23
Title: Ctrack Online Quickstart Guide Date: 18/07/2013 Version: 1.0 Fleetstar Online A Guide to Winter Maintenance Reporting v1.1 Ctrack Online User Guide

Title: Ctrack Online Quickstart Guide Date: 18/07/2013 Version: 1.0
Fleetstar Online
A Guide to Winter Maintenance
Reporting v1.1
Ctrack Online User Guide

Ctrack Online User Guide
Title: Ctrack Online User Guide Corporate Date: 29/08/2013 Version: 1.0 1 of 23
Table of Contents 1. Ctrack Online Introduction .............................................................................................................. 2 2. How to access Ctrack Online ........................................................................................................... 2
2.1. Logging onto Ctrack Online ............................................................................................................... 2 2.2. How do I log out of Ctrack Online ..................................................................................................... 3 2.3. Changing your password .................................................................................................................. 3
3. The Ctrack Online Workspace.......................................................................................................... 4 3.1. About the Workspace ....................................................................................................................... 4 3.2. The Workspace explained ................................................................................................................. 4 3.3. Component Descriptions .................................................................................................................. 4 3.4. Workspace display views .................................................................................................................. 5
4. Customising the Workspace ............................................................................................................ 7 4.1. Setting a default map view ............................................................................................................... 7 4.2. Moving or deleting columns in the list view ..................................................................................... 7
4.2.1. Moving Columns ....................................................................................................................... 7
4.2.2. Deleting Columns ...................................................................................................................... 7
4.3. Settings ............................................................................................................................................. 8 5. Displaying vehicles on the map ....................................................................................................... 9
5.1. Displaying all vehicles ....................................................................................................................... 9 5.2. Displaying an individual vehicle ...................................................................................................... 10 5.3. Changing the vehicle flag ................................................................................................................ 10 5.4. Showing vehicle information on the map ....................................................................................... 11
6. Displaying vehicle journeys ........................................................................................................... 11 6.1. Vehicle Trips ................................................................................................................................... 11 6.2. Vehicle Replay ................................................................................................................................ 12
7. Finding the nearest vehicle or driver ............................................................................................. 13 7.1. Ctrack Search .................................................................................................................................. 13 7.2. Finding nearest vehicle or driver .................................................................................................... 14
8. Points of Interest & Geo Zones ...................................................................................................... 16 8.1. Creating a Point of Interest ............................................................................................................. 16 8.2. Creating a Geo Zone ....................................................................................................................... 17
9. Contacts ....................................................................................................................................... 19 9.1. Creating a Contact .......................................................................................................................... 19
10. Reports ..................................................................................................................................... 19 10.1. Creating a report ........................................................................................................................ 19 10.2. Scheduling a report..................................................................................................................... 21
Ctrack Online User Guide
Title: Ctrack Online User Guide Corporate Date: 29/08/2013 Version: 1.0 2 of 23
1. Ctrack Online Introduction
Welcome to your Ctrack Online user guide. This guide will take you through how Ctrack Online works and will show you how to use all the valuable functionality within it Throughout this guide there will be hints and tips to aid you
Ctrack Online is a web based application and will work with Internet Explorer v7.0 or later, Mozilla Firefox v3.6 or later, Google Chrome or Safari
2. How to access Ctrack Online
2.1. Logging onto Ctrack Online
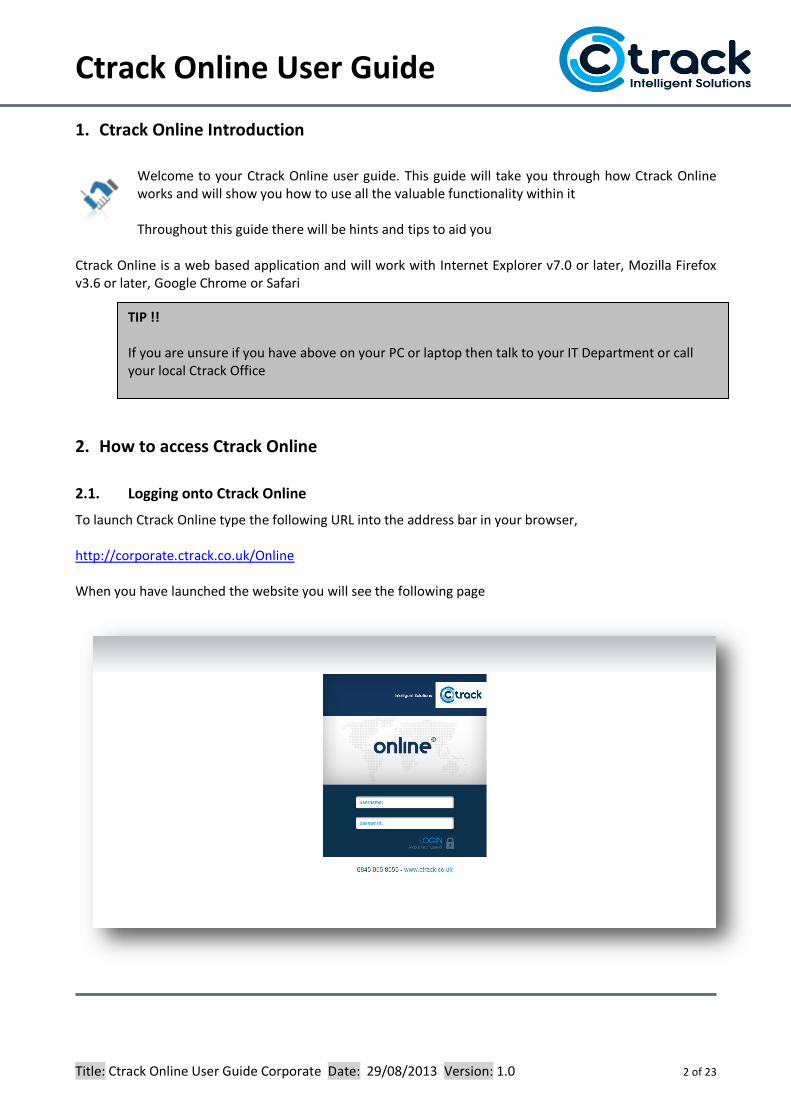
To launch Ctrack Online type the following URL into the address bar in your browser, http://corporate.ctrack.co.uk/Online When you have launched the website you will see the following page
TIP !! If you are unsure if you have above on your PC or laptop then talk to your IT Department or call your local Ctrack Office

Ctrack Online User Guide
Title: Ctrack Online User Guide Corporate Date: 29/08/2013 Version: 1.0 3 of 23
To log onto Ctrack Online you need to enter your Username and Password in the fields shown below and click on Login or press your Enter Key Please note that when you login to Ctrack Online for the first time you will be prompted to change your password to something more meaningful to you
Well done! you have signed onto Ctrack Online and are now ready to start learning how to use the system
2.2. How do I log out of Ctrack Online
To log out click on Logout on the Menu Bar
2.3. Changing your password
If at any time you wish to change your password hover over Security on the Map Toolbar and click on Change Password
In the window appears type in your old password in the top box, your new password in the middle box then confirm your new password by typing it again in the bottom box Your password has now been changed

Ctrack Online User Guide
Title: Ctrack Online User Guide Corporate Date: 29/08/2013 Version: 1.0 4 of 23
3. The Ctrack Online Workspace
3.1. About the Workspace
Ctrack Online has been designed so that you can access any information you require from a single workspace. Due to the flexibility of Ctrack Online this workspace can be customised so that it is personal to you and displays the information that you require in the format you wish to see it
3.2. The Workspace explained
As you can see the workspace is made up of various different components Their main purpose is explained here and full details on their usage is explained further into this guide
3.3. Component Descriptions
Menu Bar This allows users to access the application features, some of which are only available from the Menu Bar Map Toolbar This lets the user choose which objects to display in the map, set map defaults, clear objects from the map and reset the map amongst other things
Map Toolbar Menu Bar Ctrack Search Business
Group Filter
Map Window
List Toolbar
List View

Ctrack Online User Guide
Title: Ctrack Online User Guide Corporate Date: 29/08/2013 Version: 1.0 5 of 23
Ctrack Search This allows the user to search for items both inside and outside of Ctrack Online e.g. vehicles or drivers within Ctrack Online or postcodes, addresses etc. Business Group Filter This allows the user to select Business Groups which they have access to Map Window The map is primarily used to display vehicles and their movements. However, there are a multitude of other options available by right clicking on the map List Toolbar This allows the user to interact with items in the object list. The options displayed are dependent on the selections made in the object list List View This allows the user to be select the items to be displayed in the lists e.g. vehicles, drivers, points of interest
3.4. Workspace display views
There are three main displays available, these being Split View – Both the map and list view are displayed

Ctrack Online User Guide
Title: Ctrack Online User Guide Corporate Date: 29/08/2013 Version: 1.0 6 of 23
List View – Only the list is displayed
Map View – Only the map is displayed
The three views are selected by clicking on the appropriate option on the map toolbar Which options are displayed is dependent upon the view you have selected

Ctrack Online User Guide
Title: Ctrack Online User Guide Corporate Date: 29/08/2013 Version: 1.0 7 of 23
4. Customising the Workspace
As previously mentioned the workspace can be customised to your own personal preferences. In this way you can have it look exactly as you want it to look so that the information you need is easily accessible You can set default map views, change the colour of the workspace, change the order of the columns in the List View or even remove them completely During this section we will work through how you can do all of these things
4.1. Setting a default map view
One of the first things we recommend you do is to set yourself a default map view. This will save you having to manipulate the map to the view you want each time you login To set the default map view manipulate the map to the view you want and then click on the ‘Set as map defaults’ button as shown opposite Once you have set your default map view you can return to it at any time by clicking on the ‘Reset map’ button
4.2. Moving or deleting columns in the List View
When you first use Online the list view will not have the columns in the order you want them so we recommend you put them in order which makes sense to you
4.2.1. Moving Columns
To move a column, position the cursor on the required column in the List view. When the cursor changes to a crosshair you will see a message box displayed as below
4.2.2. Deleting Columns
To Move the column hold down the left mouse button and drag the column to the required position. When the 2 black arrows appear you can release the left mouse button
To delete columns right click in any of the column headings and from the menu list hover over ‘Columns’ From the box that is now shown you can untick the column titles you do not wish to see
IMPORTANT! After making any changes to the columns in the list view please remember to click on ‘Save settings’ on the List View toolbar otherwise you will lose all your changes

Ctrack Online User Guide
Title: Ctrack Online User Guide Corporate Date: 29/08/2013 Version: 1.0 8 of 23
4.3. Settings
Option: Workspace
Explanation
Country
Set to United Kingdom
Timezone
Set to GMT (Greenwich Mean Time)
Map type
Choose between available map displays
Coordinate display
Choose how you want map coordinates to display when shown
Workspace layout
Choose the default layout (Map, List or Split)
Measurement unit
Choose Metric or Imperial
Default business group
If you have access to more than one choose the default business group to display
Enable skillsets Tick the checkbox if you want to be able to filter or group your vehicles and/or drivers by skillsets
Enable tasks
Tick the checkbox if your vehicle have cCom units fitted so that jobs can be sent
Start with KPA dashboard
Tick the checkbox if you wish this to launch when you login to Ctrack Online
Enable alarm notification
Tick the checkbox if you wish to be notified of alarms e.g. speeding, harsh events
Enable idle mode Tick the checkbox if you want Internet Explorer to suspend the connection to Ctrack Online when you are using another application
Enable auto logout Untick the checkbox if you do not want the system to logout after not being used for 20 minutes
Enable OSGB36 (UK OS grid mapping)
Tick the checkbox if you want to OS grid to display on the map
Alarm notification frequency
Choose the interval of the alarm notification pop-up (if alarm notification enabled)
Unread messages notification frequency
Choose the interval of the messages notification pop-up
Skin
Choose your colour scheme
From this option you can further customise the way your Online screen will look. You can choose your default workspace view from the 3 options we looked at earlier, change the skin colour and lots of other things as well. All the options are explained below To access Settings hover the mouse over Setup and click on Settings

Ctrack Online User Guide
Title: Ctrack Online User Guide Corporate Date: 29/08/2013 Version: 1.0 9 of 23
Option: Map
Explanation
Map info display Choose what information is displayed on the vehicle flag in the map (standard, detail, skillset)
Default zoom level This shows the zoom level at start up for the map and is defined by the default map view you set
Default Latitude This shows default Latitude at start up for the map and is defined by the default map view you set
Default Longitude This shows default Longitude at start up for the map and is defined by the default map view you set
Show all vehicles on map Tick the checkbox if you want your vehicles to be displayed on the map when you login
Show all POIs on map
Tick the checkbox if you want your POIs to be displayed on the map when you login
Show all tasks on map Tick the checkbox if you vehicles have cCom units fitted and you want to display all tasks on the map when you login
Show OSGB36 (UK OS grid) on map
Tick the checkbox if you want to OS grid to display on the map
When you have made your changes please remember to click on Save in the top left corner of the screen. You will then see a message asking you if you wish to reload the workspace now. Click Yes to see your changes now or No if you want them to be applied next time you login
5. Displaying vehicles on the map
5.1. Displaying all vehicles
To show all of the vehicles on the map at the same time click on Vehicles on the map toolbar If a blue, yellow or red circle is shown this indicates there are multiple vehicles in the area. If you click on the circle it will zoom the map in to show you the vehicles To remove the vehicles from the map click again on Vehicles on the map tool bar
IMPORTANT! Please remember that when you click on Vehicles on the map toolbar it will display the vehicles shown in the list view. If the vehicles you require are not shown on the map then check that you have the correct business group selected by looking in the Business Group Filter in the top right hand corner of the screen

Ctrack Online User Guide
Title: Ctrack Online User Guide Corporate Date: 29/08/2013 Version: 1.0 10 of 23
5.2. Displaying an individual vehicle
There are various ways to show and individual vehicle on the map but the easiest is to click on the status symbol to the left of the vehicle ID. This will then zoom the map in to its highest level. It’s sometimes useful to then show the map in satellite image to get a better idea of where the vehicle is
If you now wish to remove the vehicle from the map then click on Reset map on the map toolbar Don’t click on Vehicles as this will then put all the vehicles on the map
5.3. Changing the vehicle flag
As a new user your default icon for a vehicle when you show it on the map is just the status icon. However if you would like to see more information on the map you can change this by going into Settings, scrolling the page down to the map section and ticking the Display vehicle status flags box. This then lets you open up the Status flag detail dropdown. If you can’t remember how to get into Settings then refer back to section 4.3
Another way to show an individual vehicle is to right click in the list view and choose either Zoom to or Pan to Using Pan to keeps the map at its current magnification level

Ctrack Online User Guide
Title: Ctrack Online User Guide Corporate Date: 29/08/2013 Version: 1.0 11 of 23
This is how they look Minimum Limited Normal
Once you have chosen your flag style remember to click on Save at the top of the settings page
5.4. Showing vehicle information on the map
Regardless of whether you just have the status icon for your vehicles or if you have chosen one of the flags you can still display vehicle information on the map To do this left click on the status icon on the map and the information box opposite is shown. Certain things such as Skill Sets will only be shown if these have been set up If you just have the status icon for your vehicles then by hovering the mouse cursor over it the vehicle registration number will be shown
6. Displaying vehicle journeys
6.1. Vehicle Trips
There are two ways to show on the map where a vehicle has been. The first is to use vehicle trips In the List View click on the required vehicle in the Vehicle ID column and the trips box will open To display a trip on the map double click on it

Ctrack Online User Guide
Title: Ctrack Online User Guide Corporate Date: 29/08/2013 Version: 1.0 12 of 23
The green icon shows the start of the trip and the red icon shows the end of the trip The arrows show the direction of travel and the green circles show each recorded position for the vehicle If a vehicle position is shown in red as opposite then this indicates that a road speed violation has occurred
To view the detail for an individual position left click on it and the information box shown opposite is displayed Using the vehicle trips functionality you are able to display on the map a vehicles journeys for the past 30 days However, if you wish to go back further than this then you need to use the replay functionality which is covered in the next section
6.2. Vehicle Replay
There are two ways to activate replay You can either right click on a vehicle in the list view and then click on Replay from the menu list or you can click on a vehicle in the List View then click on Replay on the list view toolbar With the Replay option you can look at vehicle journeys for the full data retention period which is 3 months If you have your own remote client then this period may be longer

Ctrack Online User Guide
Title: Ctrack Online User Guide Corporate Date: 29/08/2013 Version: 1.0 13 of 23
Once you have selected Replay for a vehicle a calendar will open up on the right hand side of the screen, from here you can choose your required date There is also a Supress trips shorter than option. This lets you exclude journeys under a specified distance which can help to remove movement within a depot or site for example There is also a Show one trip at a time option. By default this is ticked but if you untick it and then double click on each individual trip the whole journey for the specified date can be viewed on the map The Select a date period dropdown above the calendar lets you specify a custom date range for which to view all trips or there are predefined options as well
7. Finding the nearest vehicle or driver
7.1. Ctrack Search
In order to find the nearest vehicle or driver you first have to fine the location you are looking for You could just manually search the map but the easiest way is to use Ctrack Search Enter either a postcode or an address, click on the magnifying glass or press enter and your results are shown on the right of the screen
IMPORTANT! Although Ctrack Search can be used to find places it can also be used to search for anything else that exists within Online For example you can use it to search for a specific vehicle, driver, point of interest etc. When searching by postcode you can also just use a partial code e.g. PE1

Ctrack Online User Guide
Title: Ctrack Online User Guide Corporate Date: 29/08/2013 Version: 1.0 14 of 23
7.2. Finding nearest vehicle or driver
Once you used Ctrack search to find you location right lick on the result From the menu that appears click on Find nearest vehicles
The main thing to do when this box appears is to enter your required search radius in the within a Radius field Remember that the larger you make the radius the more results will be returned
After clicking on the Search button your results are shown on the right had side of the screen Each vehicle listed shows the distance from the location and the anticipated drive time based upon optimum driving conditions It will also show any drivers retuned in the search
To view a vehicle on the map right click on it and from the menu that appears click on Pan to If you wish to view multiple vehicles then tick the box to the left of the vehicle registration for all vehicles you wish to see on the map then right click on any of them and click on Pan to

Ctrack Online User Guide
Title: Ctrack Online User Guide Corporate Date: 29/08/2013 Version: 1.0 15 of 23
After clicking on Pan to the vehicles are shown the map The coloured lines indicate the recommended route to the location The shaded are shows the search radius you specified
Please remember that the time shown to travel is based upon optimum driving conditions By right clicking on the map it is possible to show traffic information. To do this click on Show traffic overlay. The key for the colours is, Green: more than 50 miles per hour Yellow: 25 to 50 miles per hour Red: less than 25 miles per hour Black: very slow stop/go traffic
IMPORTANT! If you have searched for your nearest vehicle and the ones you expected to see have not been returned in the search results it could be that you are not searching in the correct Business Group Check the Business Group Filter in the top right hand corner of the screen and if you are not in the correct Group use the drop down and select the correct one

Ctrack Online User Guide
Title: Ctrack Online User Guide Corporate Date: 29/08/2013 Version: 1.0 16 of 23
8. Points of Interest & Geo Zones
So what are Points of Interest and Geo Zones? The easiest way to describe them is that a Point of Interest is any location that you may wish to report on e.g. depot, customer premises etc. and it will apply to all vehicles. Once created the Point of Interest name will appear in reports A Geo Zone is an area where you want immediate notification that a vehicle has either entered it, left it or both and unlike a Point of Interest it can be specific to individual vehicles. With a Geo Zone an alert can be sent to people either by text or email to notify them that one of the above actions has taken place
8.1. Creating a Point of Interest
There are various ways to create a Point of Interest, you can right click on the map and choose Create POI or you can use the Ctrack Search facility to easily find your required location If you want to check the position on the map then either click on Zoom to or Pan to but if you are happy then just click on Create POI
You need to give your Point of Interest a name in the Description field From the drop down for Type & Category choose something appropriate or type in your own In the Radius field input the size, in feet, you wish your Point of Interest to be Either select a Shape or Colour or leave as the default red pin then click on Save then close You have created a Point of Interest
IMPORTANT! When creating a Point of Interest always remember to change the Radius to an appropriate size as the default value in this field is only 10 feet If you have multiple Business Groups you will need to establish where the vehicles are ‘owned’ within Online Please call Ctrack Customer Support on this issue if you are unsure

Ctrack Online User Guide
Title: Ctrack Online User Guide Corporate Date: 29/08/2013 Version: 1.0 17 of 23
To see all of the Points of Interest that have been created click on the Points of Interest tab in the List View Double clicking on a Point of Interest will display it on the map Clicking on the red cross will delete the Point of Interest Clicking on the pencil symbol on the far left will let you edit the Point of Interest
8.2. Creating a Geo Zone
As with creating a Point of Interest the first thing to do is locate the area for which you wish to create a Geo Zone. This can be done by any of the methods discussed earlier A Geo Zone can either just be rectangular in shape or you can draw the shape of the Geo Zone precisely by choosing the Create polygonal geo zone option after right clicking on the map In this example we will use the Create polygonal geo zone option as the area to be covered is just the car park and using a rectangular geo zone would mean that the road was included as well
After clicking on Create polygonal geo zone use the left mouse button to click on the map to draw the shape The lines can also be dragged by clicking on the circles and holding the mouse button down Once you have drawn your Geo Zone left click within the shaded are then click on Save

Ctrack Online User Guide
Title: Ctrack Online User Guide Corporate Date: 29/08/2013 Version: 1.0 18 of 23
In the Name filed type in the name of your Geo Zone From the Type drop down choose either Preferred: vehicle will alarm when leaving the Geo Zone No Go: vehicle will alarm when entering the Geo Zone Way Point: Vehicle will alarm upon entry and exit
If you wish to allocate the Geo Zone to vehicles this can be done now by ticking the check box for the required vehicles or it can be done at a later date through the Vehicle Edit facility To see all of the Geo Zones that have been created click on the Geo Zones tab in the List View Double clicking on a Geo Zone will display it on the map Clicking on the red cross will delete the Geo Zone Clicking on the pencil symbol on the far left will let you edit the Geo Zone
IMPORTANT! When you assign a Geo Zone to a vehicle the coordinates for it are actually stored within the unit in the vehicle There is a limit to the number of points a unit can store but this differs for different types of unit If you need to know how many points are available for storage on a vehicle then please call Ctrack Customer Support
IMPORTANT If a Geo Zone does not have a red cross to the left of it this means that it assigned to a vehicle or vehicles and therefore cannot be deleted The Geo Zone will have to be unassigned first by using the Edit facility to untick the box to the left of the vehicle registration, After this has been done the Geo Zone can be deleted

Ctrack Online User Guide
Title: Ctrack Online User Guide Corporate Date: 29/08/2013 Version: 1.0 19 of 23
9. Contacts
Although you may be a user within Online that does not mean that you may be a Contact In order for you to receive an alert for a Geo Zone, as discussed in the previous section, you need to be created as a Contact. The same also applies for emailed reports, in order to receive them you must be created as a contact
9.1. Creating a Contact
To create a Contact on the Menu bar hover over Setup then click on Contacts Once the Contacts box has opened up click on Add, the Add Contact window is now shown The fields you must fill in are, Name, Cell Number and Email. You must also select the correct Time Zone from the drop down All number must be put in with the international prefix Once all has been completed click on Save then Close
10.Reports
This section will look at how you can generate reports and how you can schedule reports to be emailed on a regular basis It does not cover the content of the reports in detail as there is other Ctrack literature which does this. If you would like more information on report content then please contact Ctrack Customer Support
10.1. Creating a report
To access report hover over Reports on the Menu Bar Hover over the appropriate report category, in this example we are using Trips & Utilisation This expands out the reports available in this category Click on the report you wish to generate, in this example we are using the Full Usage Report
Ctrack Online User Guide
Title: Ctrack Online User Guide Corporate Date: 29/08/2013 Version: 1.0 20 of 23
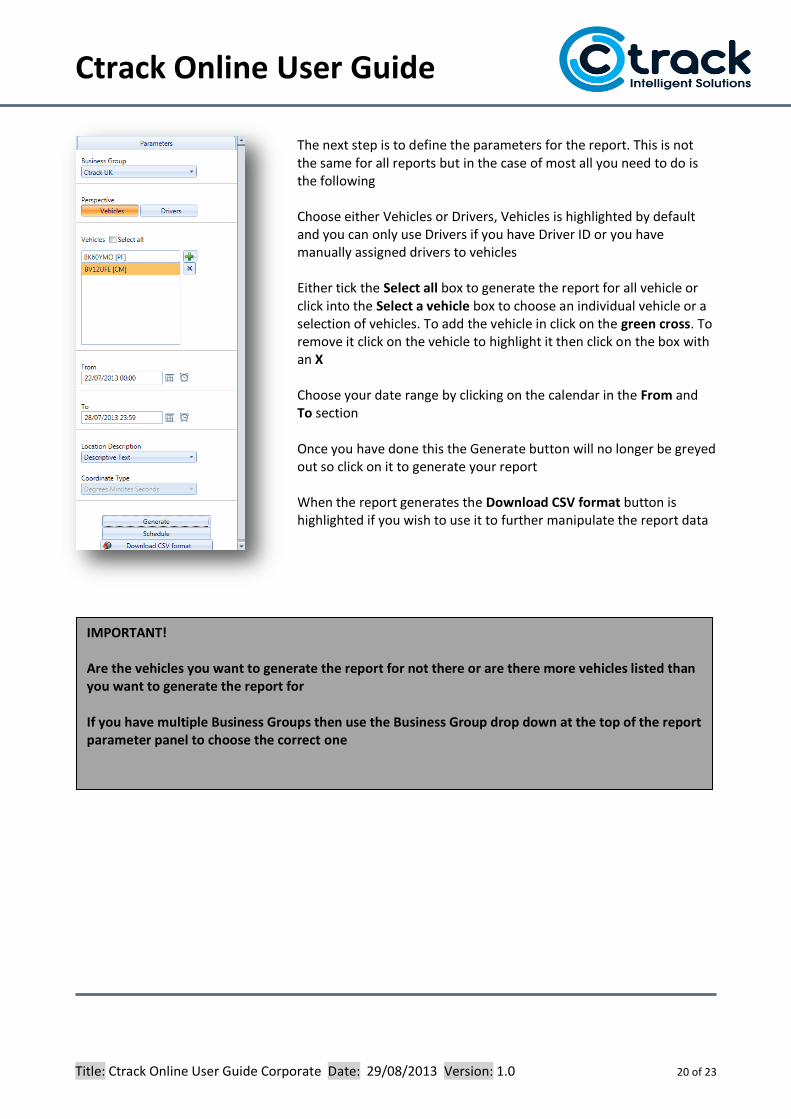
The next step is to define the parameters for the report. This is not the same for all reports but in the case of most all you need to do is the following Choose either Vehicles or Drivers, Vehicles is highlighted by default and you can only use Drivers if you have Driver ID or you have manually assigned drivers to vehicles Either tick the Select all box to generate the report for all vehicle or click into the Select a vehicle box to choose an individual vehicle or a selection of vehicles. To add the vehicle in click on the green cross. To remove it click on the vehicle to highlight it then click on the box with an X Choose your date range by clicking on the calendar in the From and To section Once you have done this the Generate button will no longer be greyed out so click on it to generate your report When the report generates the Download CSV format button is highlighted if you wish to use it to further manipulate the report data
IMPORTANT! Are the vehicles you want to generate the report for not there or are there more vehicles listed than you want to generate the report for If you have multiple Business Groups then use the Business Group drop down at the top of the report parameter panel to choose the correct one
Ctrack Online User Guide
Title: Ctrack Online User Guide Corporate Date: 29/08/2013 Version: 1.0 21 of 23
10.2. Scheduling a report
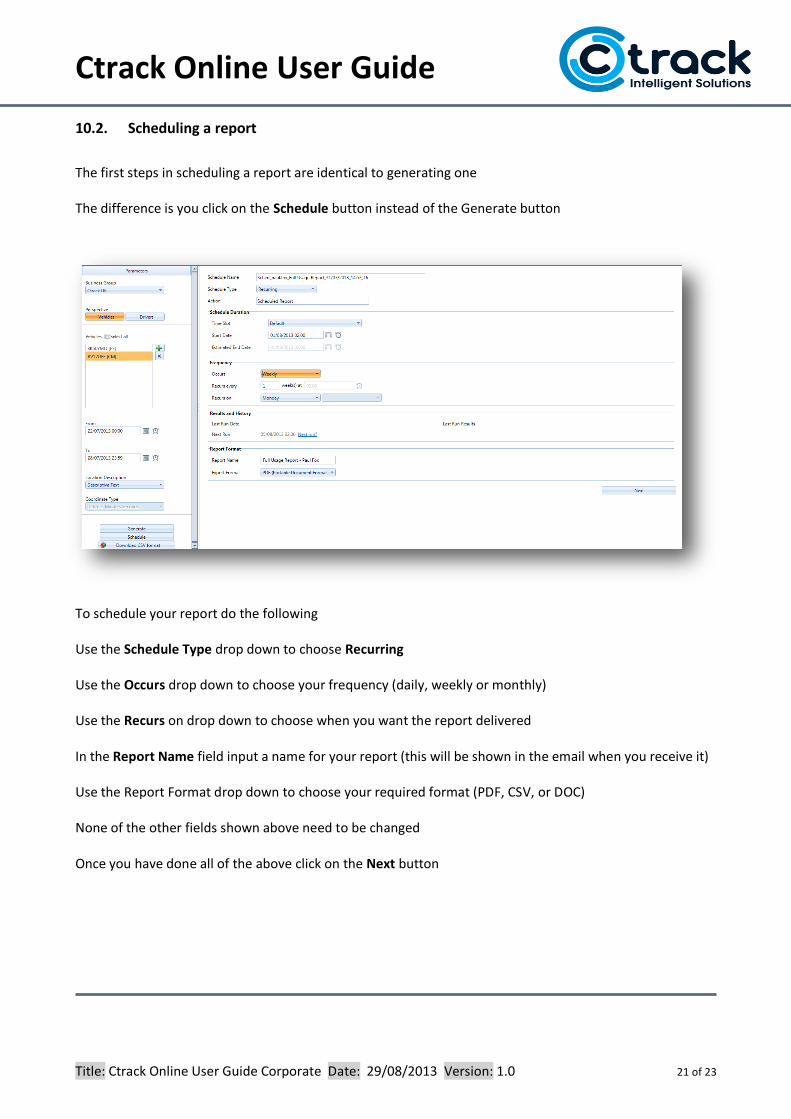
The first steps in scheduling a report are identical to generating one The difference is you click on the Schedule button instead of the Generate button
To schedule your report do the following Use the Schedule Type drop down to choose Recurring Use the Occurs drop down to choose your frequency (daily, weekly or monthly) Use the Recurs on drop down to choose when you want the report delivered In the Report Name field input a name for your report (this will be shown in the email when you receive it) Use the Report Format drop down to choose your required format (PDF, CSV, or DOC) None of the other fields shown above need to be changed Once you have done all of the above click on the Next button
Ctrack Online User Guide
Title: Ctrack Online User Guide Corporate Date: 29/08/2013 Version: 1.0 22 of 23
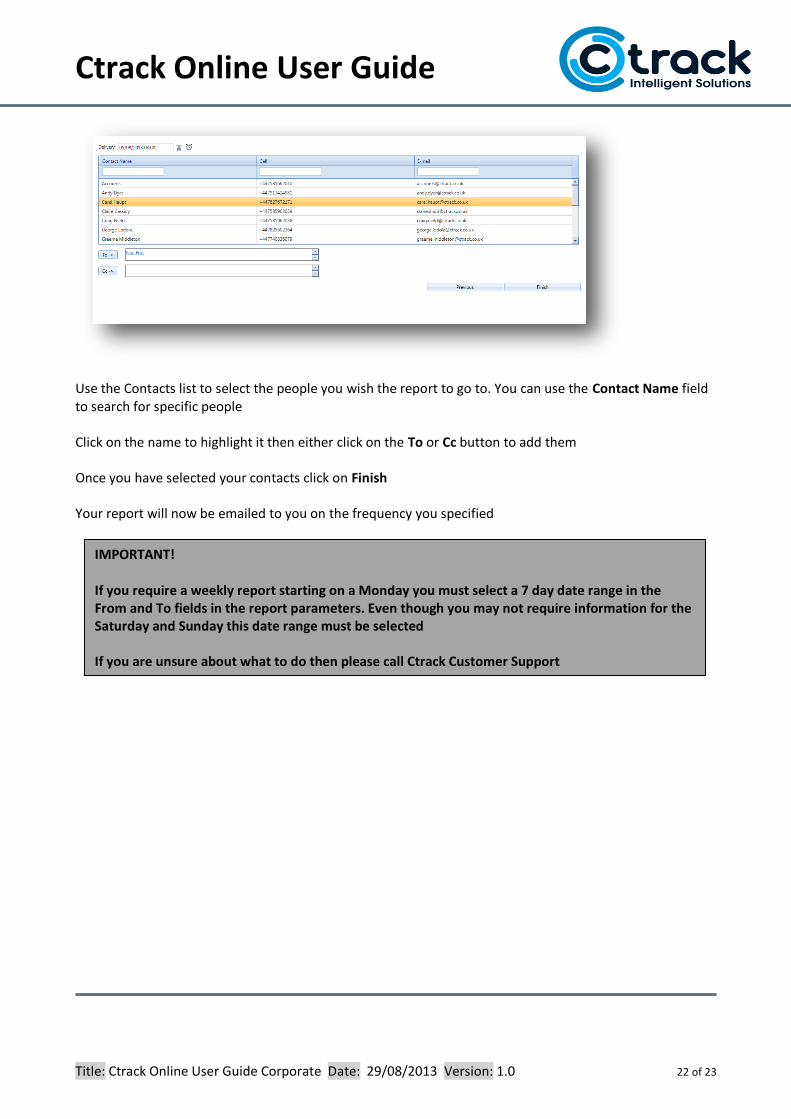
Use the Contacts list to select the people you wish the report to go to. You can use the Contact Name field to search for specific people Click on the name to highlight it then either click on the To or Cc button to add them Once you have selected your contacts click on Finish Your report will now be emailed to you on the frequency you specified
IMPORTANT! If you require a weekly report starting on a Monday you must select a 7 day date range in the From and To fields in the report parameters. Even though you may not require information for the Saturday and Sunday this date range must be selected If you are unsure about what to do then please call Ctrack Customer Support


