CUCILync Installation and Configuration Document ID: 113356 Contents Introduction Prerequisites Requirements Components Used Conventions Cisco UC Integration for Microsoft Lync Configure Network Diagram Install Active Directory Server Active Directory Domain Services Installation Wizard Create Users Inside Active Directory Create DNS Entries for Servers and Clients Certificate Authority Install Install Exchange 2010 Install Exchange Exchange Certificate Install Create Mailbox Users in Exchange LYNC SERVER 2010 INSTALL Install Lync Pre-Requisites Add Users in Lync Install Lync on Client PC Install Lync 2010 Client CUCI-LYNC configuration CUCM Configuration UC Integration for Microsoft Lync Installation Install Cisco UC Integration TM for Microsoft Lync Related Information Introduction This document provides step-by-step installations and integrations of CUCILync with Microsoft Lync 2010 and Cisco Unified Communication Manager. Note: The document covers steps that are required to install AD, Exchange and Lync in the lab and does not cover CUCM, Cisco Unity Connection. Prerequisites Requirements For staged approach to the Standard Edition Lync deployment, this is the minimum configuration required to run Lync. The initial Standard Edition topology deployment described in this document includes these environment and components: A single forest, single domain Active Directory structure. •
Transcript
CUCILync Installation and Configuration
Document ID: 113356
Contents
Introduction Prerequisites Requirements Components Used Conventions Cisco UC Integration for Microsoft Lync Configure Network Diagram Install Active Directory Server Active Directory Domain Services Installation Wizard Create Users Inside Active Directory Create DNS Entries for Servers and Clients Certificate Authority Install Install Exchange 2010 Install Exchange Exchange Certificate Install Create Mailbox Users in Exchange LYNC SERVER 2010 INSTALL Install Lync Pre−Requisites Add Users in Lync Install Lync on Client PC Install Lync 2010 Client CUCI−LYNC configuration CUCM Configuration UC Integration for Microsoft Lync Installation Install Cisco UC Integration TM for Microsoft Lync Related Information
Introduction
This document provides step−by−step installations and integrations of CUCILync with Microsoft Lync 2010and Cisco Unified Communication Manager.
Note: The document covers steps that are required to install AD, Exchange and Lync in the lab and does notcover CUCM, Cisco Unity Connection.
Prerequisites
Requirements
For staged approach to the Standard Edition Lync deployment, this is the minimum configuration required torun Lync. The initial Standard Edition topology deployment described in this document includes theseenvironment and components:
A single forest, single domain Active Directory structure.•
A single domain controller with Domain Name System (DNS) and an Enterprise Root certificationauthority (CA)
•
Exchange•
Components Used
The information in this document is based on these software and hardware versions:
Active Directory Server• Exchange Server• Lync 2010 Server• Cisco Unified Communication Manager (CUCM) 8.5• PC Client Machine•
Note: VMWare for AD, Exchange and Lync.
The information in this document was created from the devices in a specific lab environment. All of thedevices used in this document started with a cleared (default) configuration. If your network is live, make surethat you understand the potential impact of any command.
Conventions
Refer to the Cisco Technical Tips Conventions for more information on document conventions.
Cisco UC Integration for Microsoft Lync
Microsoft Lync Server 2010 communications server offers instant messaging (IM), presence, conferencing,and telephony solutions that can support enterprise−level collaboration requirements.
Cisco Unified Communication Integration (CUCI) for Microsoft Lync is a desktop integration that providesaccess to Cisco Unified Communications for Microsoft Lync. The solution extends the presence and instantmessaging (IM) capabilities of Microsoft Lync by providing access to a broad set of Cisco UnifiedCommunications capabilities, which includes softphone standards−based video, unified messaging, audio,video and web conferencing, desk−phone control, and phone presence.
Cisco UC Integration for Microsoft Lync is tightly integrated with Microsoft Lync to deliver a consistent andcompelling user experience while providing the benefits of increased employee productivity andcollaboration, reduced infrastructure complexity, and a lower total cost of ownership (TCO).
Configure
These are the pre−requisites for CUCILYNC integration.
After the installation of Pre−requisites install Active Directory (AD)1. Create Users inside Active Directory2. Activate DNS and add DNS entries for Servers and Clients3. Activate Certificate Authority (CA) Services on the same server4. After installing Pre−requisites install Exchange5. Create Mailbox6. Verify email exchange through Outlook7. After the installation of Pre−requisites install Microsoft Lync 2010 server8. Verify IM & Presence with native Lync 2010 client9.
Install Lync 2010 Clients on PC.10. Install Outlook 2010 and configure user Mailbox11.
Network Diagram
This document uses this network setup:
Install Active Directory Server
Install Active Directory Domain Services (AD DS) on a member server that runs Windows Server 2008 R2with the Active Directory Domain Services Installation Wizard (Dcpromo.exe).
The member server should be located in the forest root domain. After you install AD DS successfully, themember server becomes a domain controller.
You can install AD DS with the Windows user interface (UI). The Windows UI provides two wizards thatguide you through the installation process for AD DS. One wizard is the Add Roles Wizard, which you canaccess in Server Manager. The second wizard is the Active Directory Domain Services Installation Wizard(Dcpromo.exe). Complete these steps for installation.
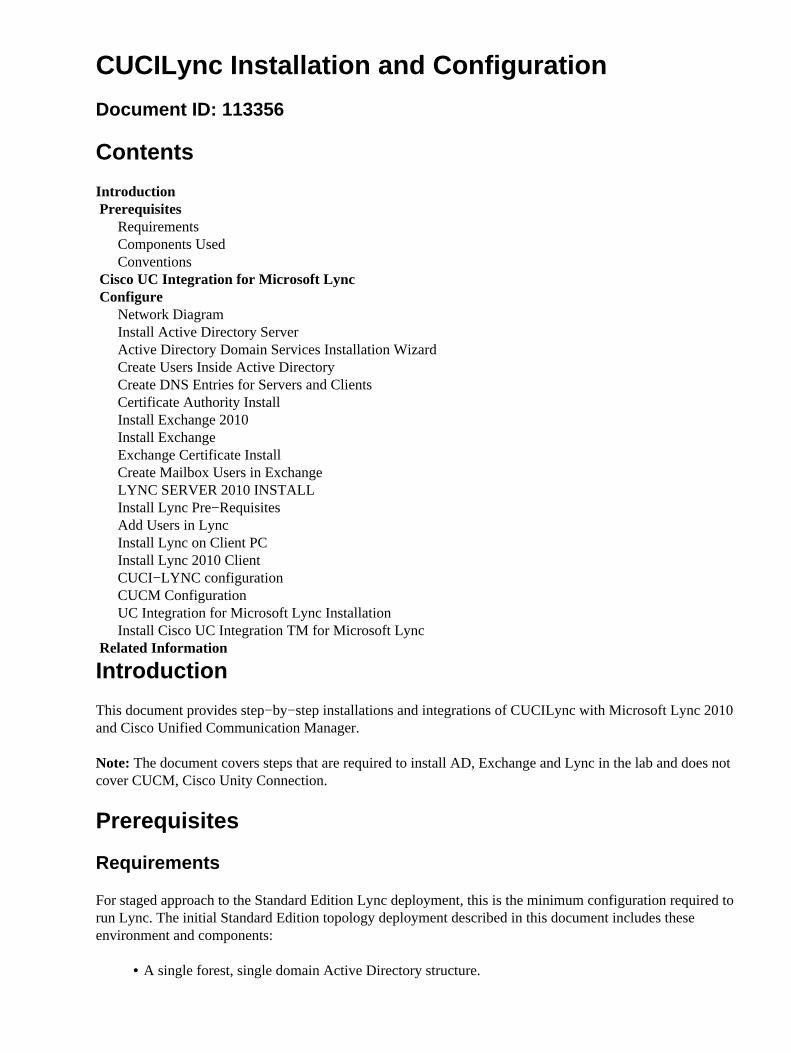
Disable IPv6 with these steps:1.
Uncheck it on the network adapter in order to disable IPv6.♦
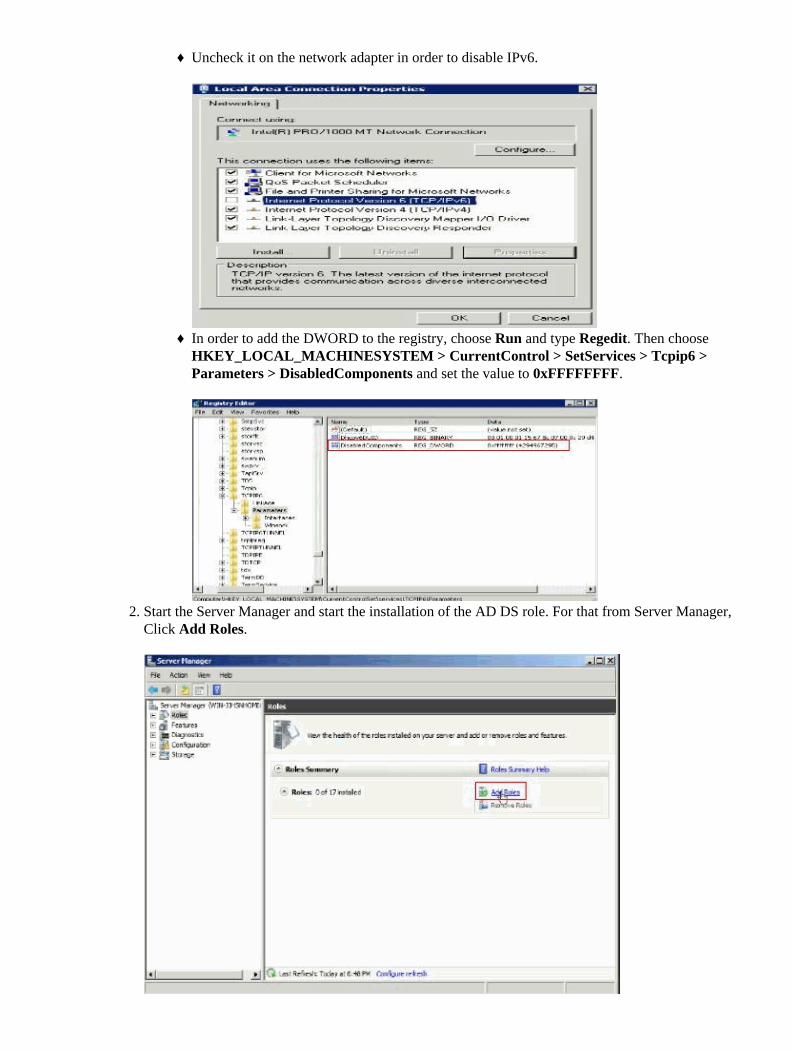
In order to add the DWORD to the registry, choose Run and type Regedit. Then chooseHKEY_LOCAL_MACHINESYSTEM > CurrentControl > SetServices > Tcpip6 >Parameters > DisabledComponents and set the value to 0xFFFFFFFF.
♦
Start the Server Manager and start the installation of the AD DS role. For that from Server Manager,Click Add Roles.
2.
On the Add Roles wizard window, click Next.3.
Choose the Active Directory Domain Services Role.4.
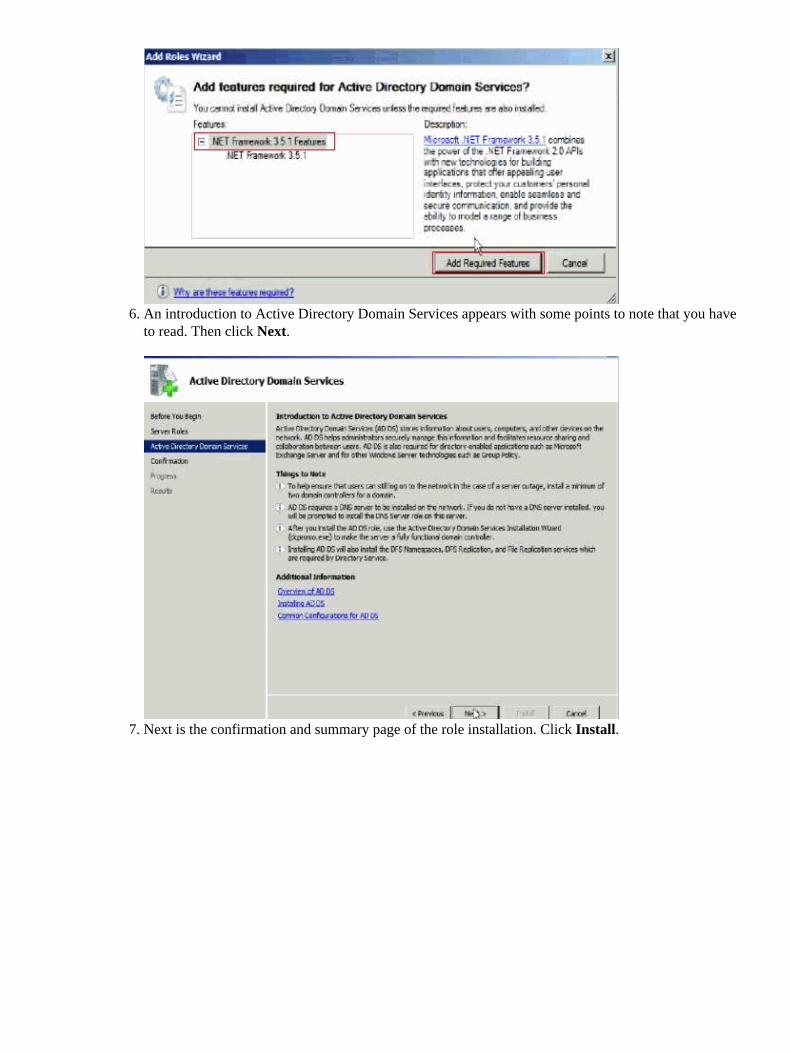
You are prompted to install the .NET framework 3.5.1 features. Choose Add Required Features andclick Next.
5.
An introduction to Active Directory Domain Services appears with some points to note that you haveto read. Then click Next.
6.
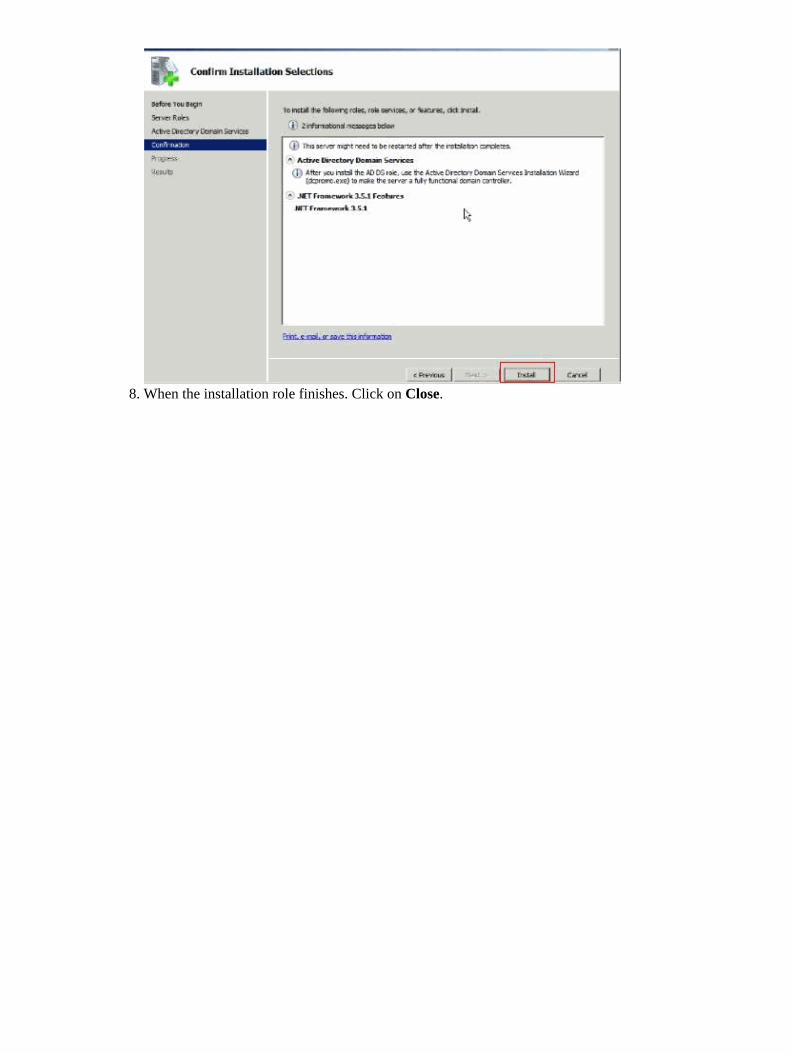
Next is the confirmation and summary page of the role installation. Click Install.7.
When the installation role finishes. Click on Close.8.
Active Directory Domain Services Installation Wizard
Complete these steps in order to install Active Directory.
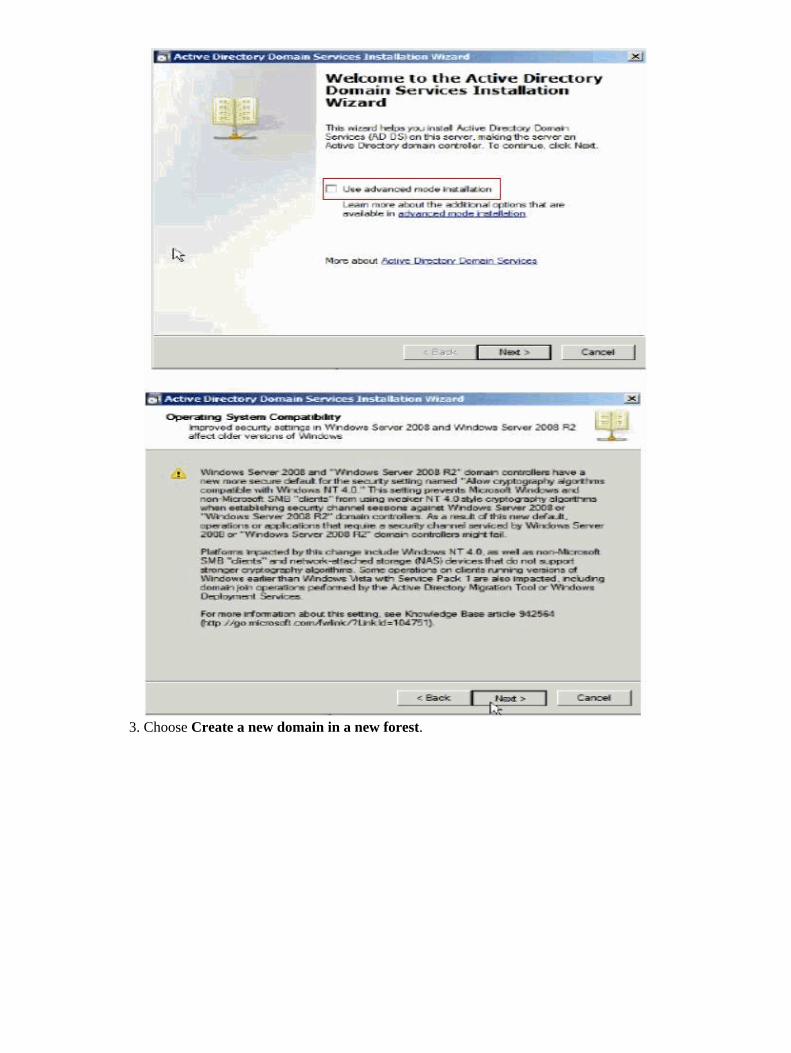
Choose Start > Run and type dcpromo.1. On the window that appears, uncheck Use advanced mode installation and click Next.2.
Choose Create a new domain in a new forest.3.
Set the FQDN of the forest root domain as sjclab.com. You can give any name here based on yourdomain name.
4.
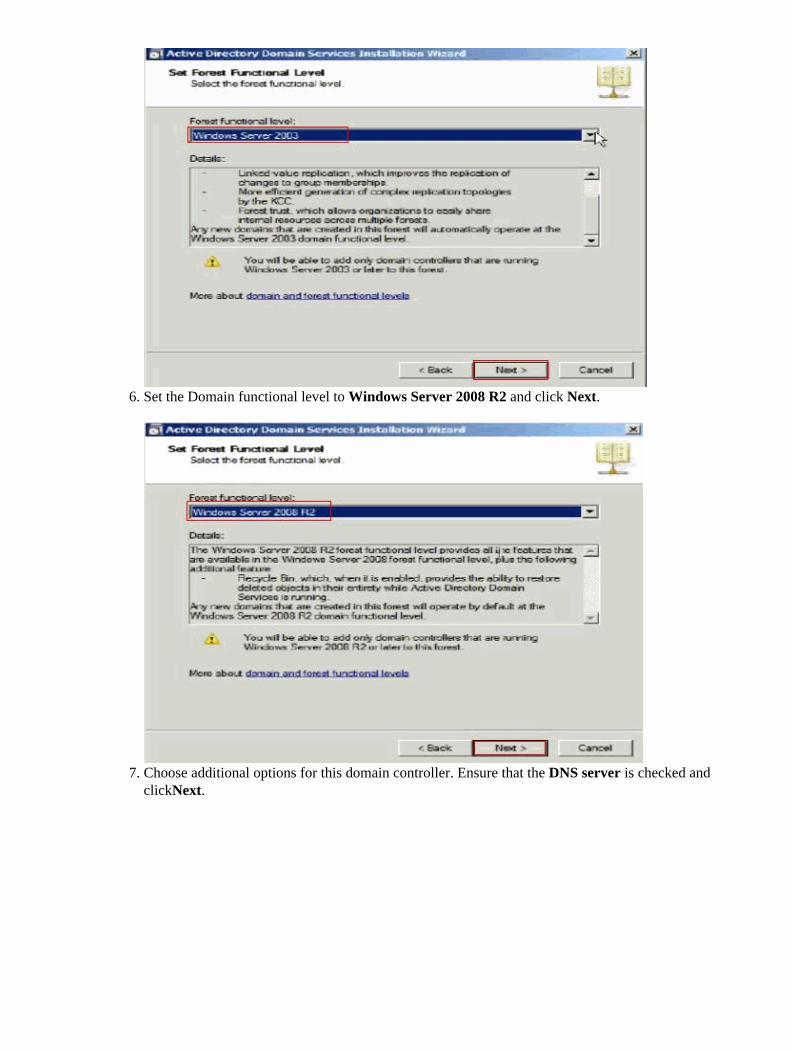
Set the Forest functional level to Windows Server 2008 and click Next.5.
Set the Domain functional level to Windows Server 2008 R2 and click Next.6.
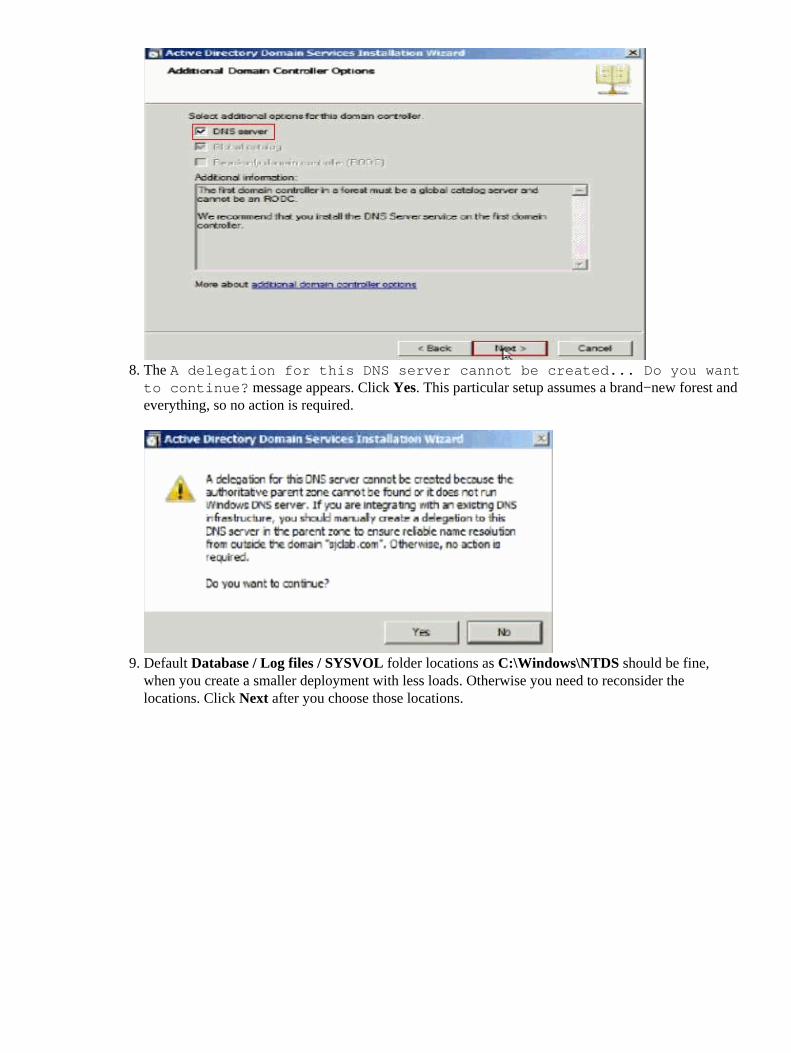
Choose additional options for this domain controller. Ensure that the DNS server is checked andclickNext.
7.
The A delegation for this DNS server cannot be created... Do you wantto continue? message appears. Click Yes. This particular setup assumes a brand−new forest andeverything, so no action is required.
8.
Default Database / Log files / SYSVOL folder locations as C:\Windows\NTDS should be fine,when you create a smaller deployment with less loads. Otherwise you need to reconsider thelocations. Click Next after you choose those locations.
9.
Enter a Directory Services Restore mode administrator password and click Next.10.
On the Summary Window, click Next.11.
The Installation continues to proceed. Click Finish when it is done.12.
Then the system restarts.13.
Create Users Inside Active Directory
Complete these steps in order to create a new user:
Choose Start > All Programs > Administrative Tools >| Active Directory Users and Computers.1. Create a new user object in the current container2.
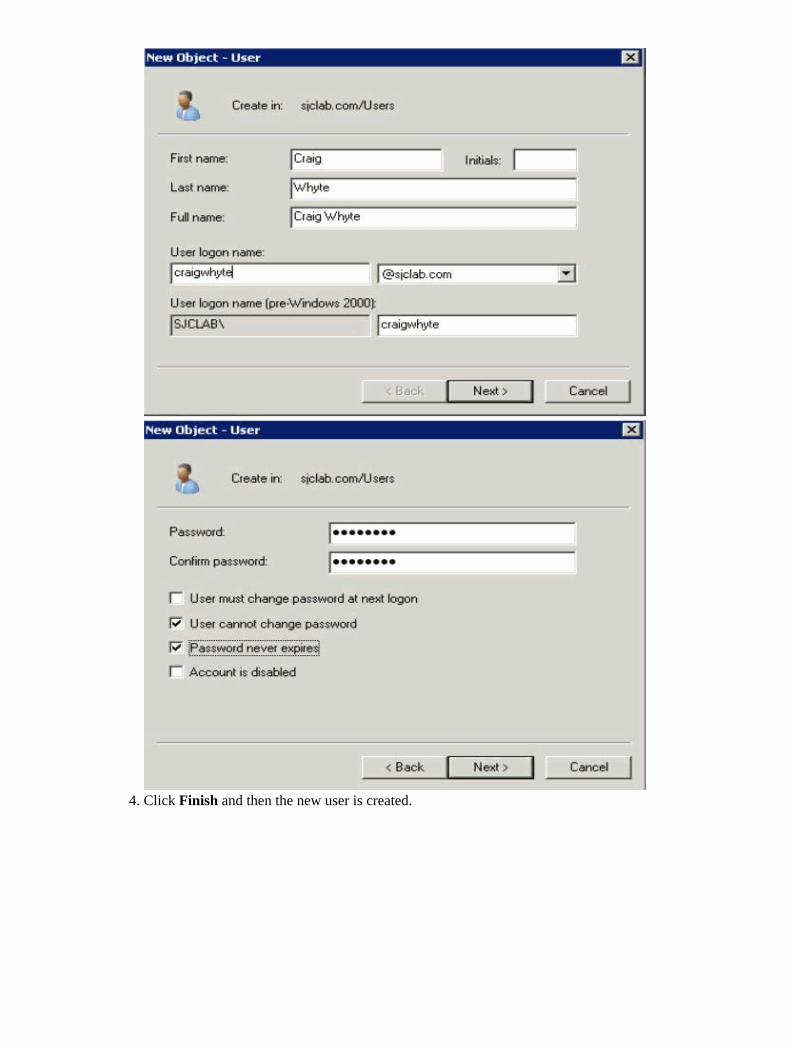
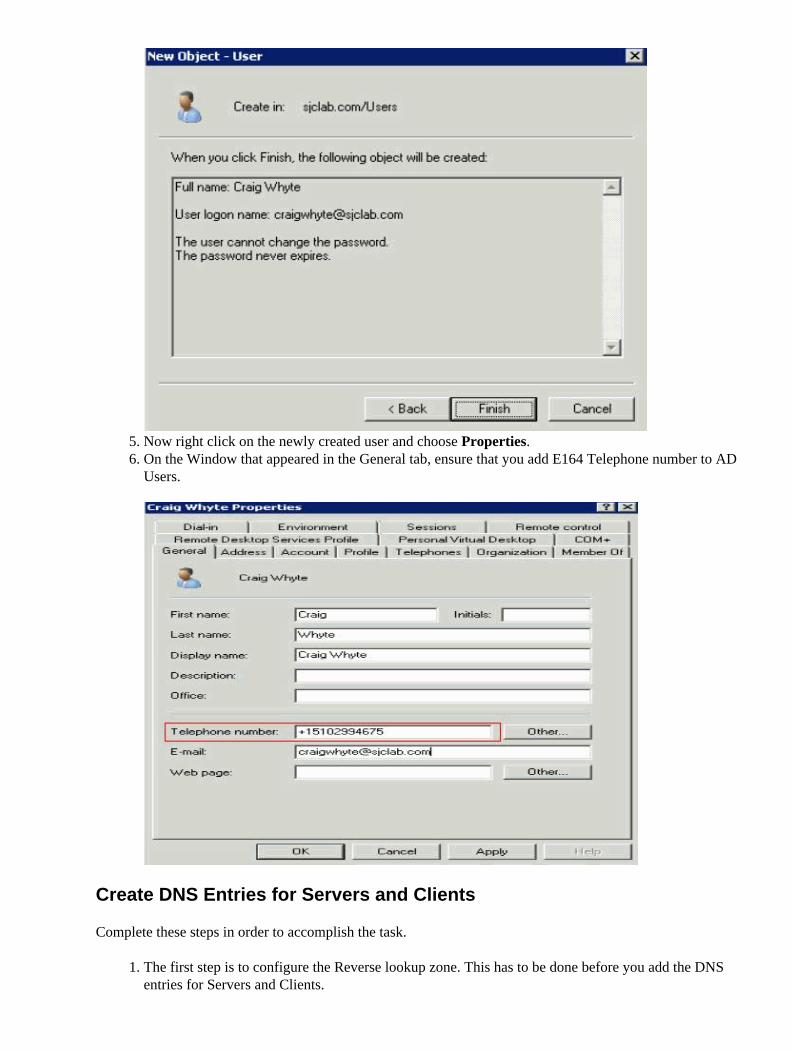
Enter the New User details and password. Click Next.3.
Click Finish and then the new user is created.4.
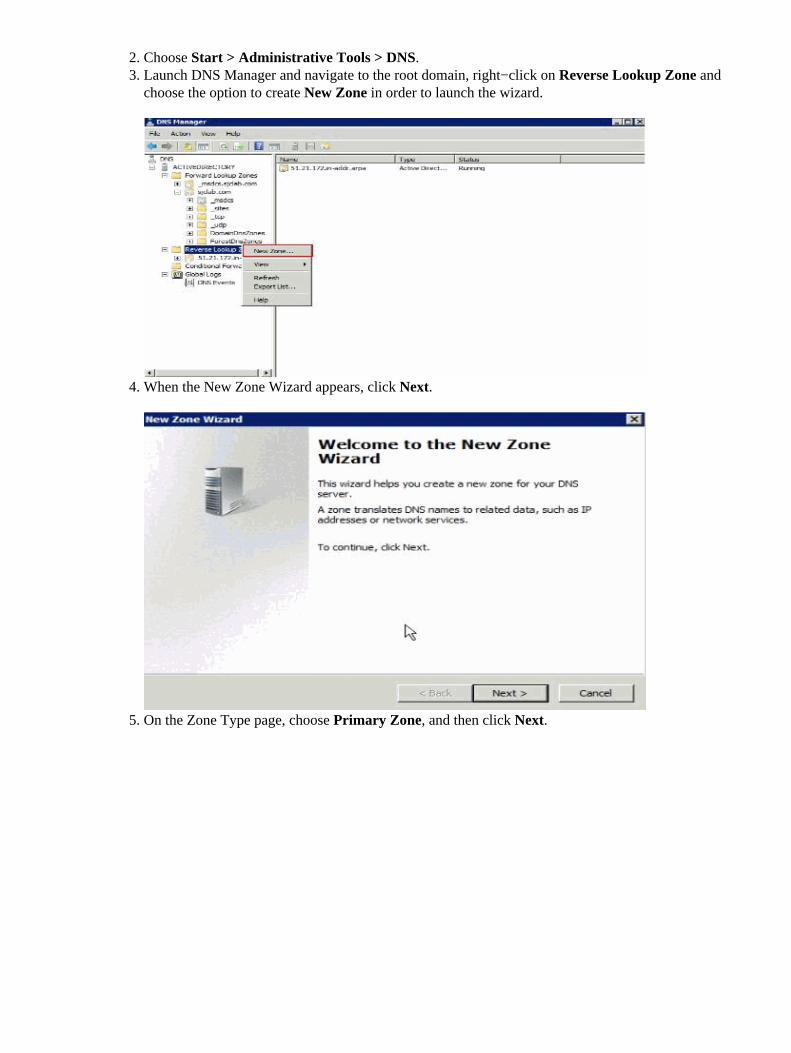
Now right click on the newly created user and choose Properties.5. On the Window that appeared in the General tab, ensure that you add E164 Telephone number to ADUsers.
6.
Create DNS Entries for Servers and Clients
Complete these steps in order to accomplish the task.
The first step is to configure the Reverse lookup zone. This has to be done before you add the DNSentries for Servers and Clients.
1.
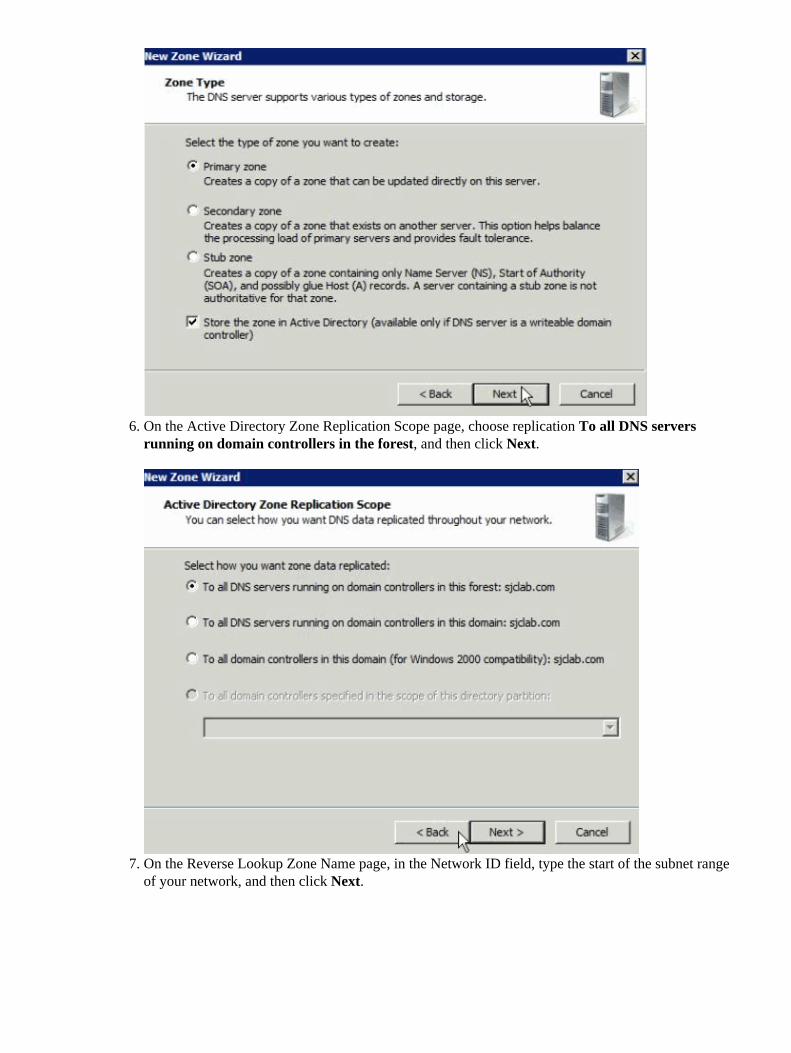
Choose Start > Administrative Tools > DNS.2. Launch DNS Manager and navigate to the root domain, right−click on Reverse Lookup Zone andchoose the option to create New Zone in order to launch the wizard.
3.
When the New Zone Wizard appears, click Next.4.
On the Zone Type page, choose Primary Zone, and then click Next.5.
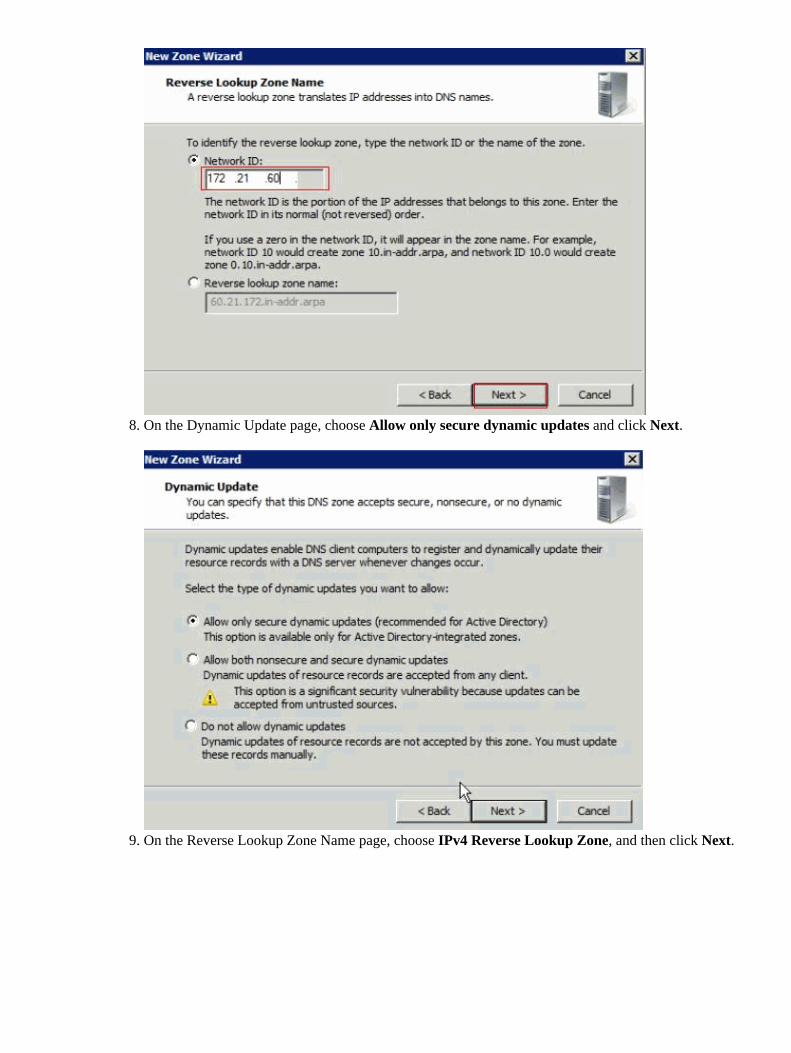
On the Active Directory Zone Replication Scope page, choose replication To all DNS serversrunning on domain controllers in the forest, and then click Next.
6.
On the Reverse Lookup Zone Name page, in the Network ID field, type the start of the subnet rangeof your network, and then click Next.
7.
On the Dynamic Update page, choose Allow only secure dynamic updates and click Next.8.
On the Reverse Lookup Zone Name page, choose IPv4 Reverse Lookup Zone, and then click Next.9.
On the Completing The New Zone Wizard page, click Finish.10.
Now add DNS entries for Exchange, Lync servers and Lync clients. (Forward and Reverse DNS)11. Launch DNS Manager and navigate to root domain under forward lookup zones.12. Right−click on domain and choose New Host (A orAAAA) in order to add the DNS entry.13.
On the New Host wizard page enter the Name, IP Address and Check Create associated pointer(PTR) record for reverse lookup entries and click Add Host.
Note: The steps from 12 to 14 have to be done for Lync Servers and Lync Clients with theirrespective name and IP Address.
14.
Certificate Authority Install
Complete these steps in order to accomplish the task.
Log on to AD as a domain administrator.1. Choose Start > Administrative Tools > Server Manager.2.
In the Roles Summary section, click Add Roles.3. On the Select Server Roles page, choose the Active Directory Certificate Services check box. Thenclick Next two times.
4.
On the Select Role Services page, choose the Certification Authority check box, and then clickNext.
5.
On the Specify Setup Type page, click Enterprise, and then click Next.6.
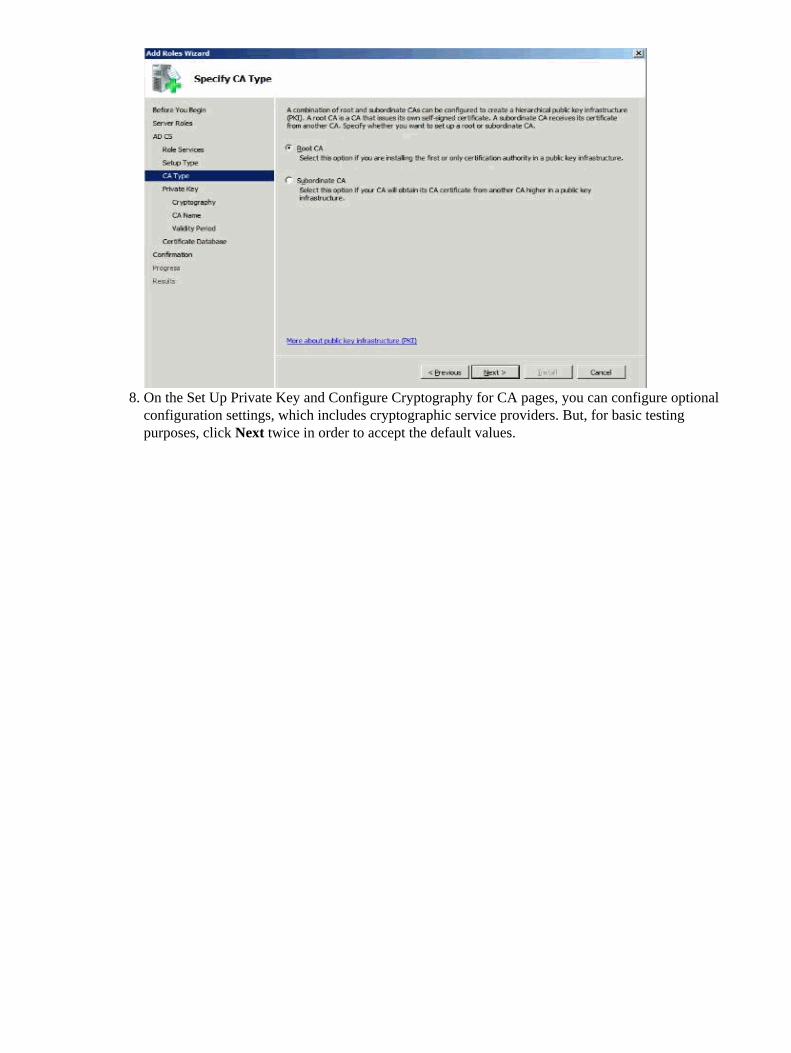
On the Specify CA Type page, click Root CA, and then click Next.7.
On the Set Up Private Key and Configure Cryptography for CA pages, you can configure optionalconfiguration settings, which includes cryptographic service providers. But, for basic testingpurposes, click Next twice in order to accept the default values.
8.
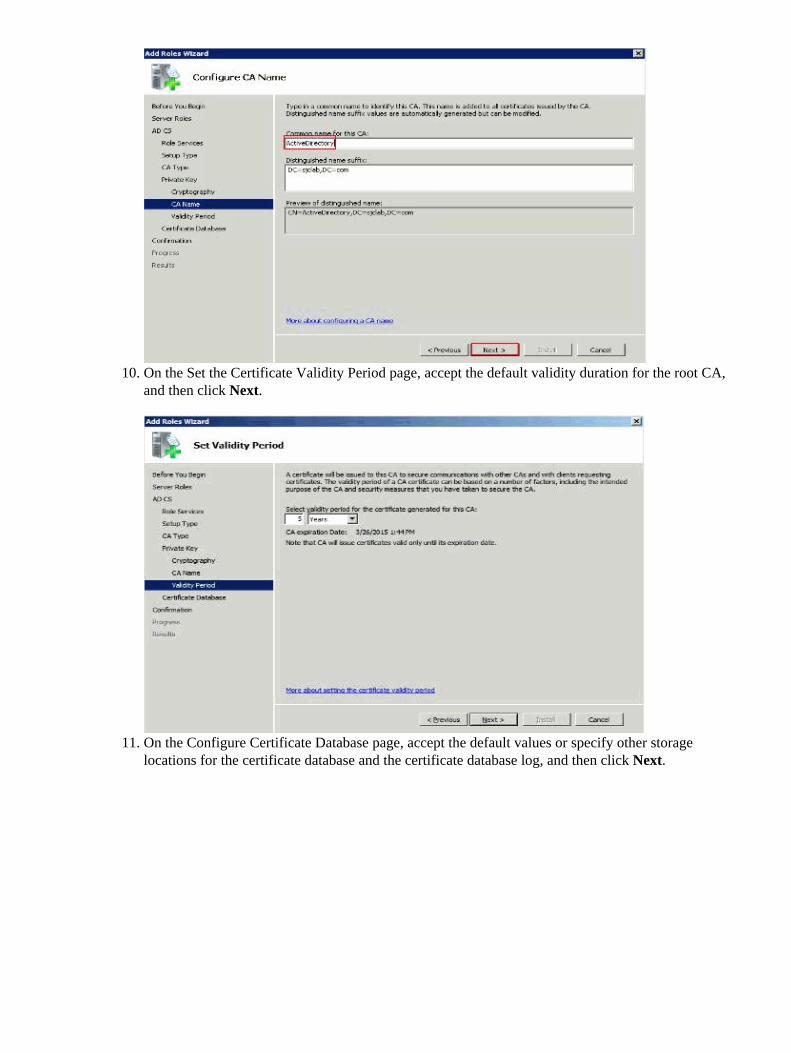
In the Common name for this CA box, type the common name for this CA, as ActiveDirectory, andthen click Next.
9.
On the Set the Certificate Validity Period page, accept the default validity duration for the root CA,and then click Next.
10.
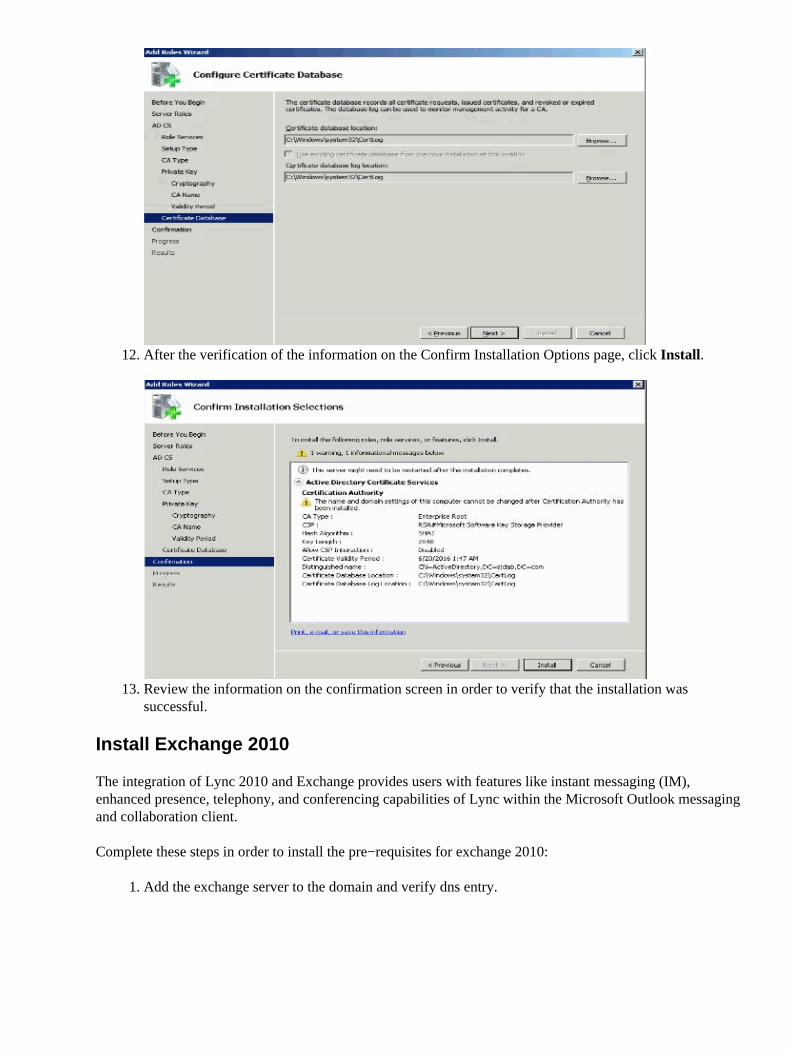
On the Configure Certificate Database page, accept the default values or specify other storagelocations for the certificate database and the certificate database log, and then click Next.
11.
After the verification of the information on the Confirm Installation Options page, click Install.12.
Review the information on the confirmation screen in order to verify that the installation wassuccessful.
13.
Install Exchange 2010
The integration of Lync 2010 and Exchange provides users with features like instant messaging (IM),enhanced presence, telephony, and conferencing capabilities of Lync within the Microsoft Outlook messagingand collaboration client.
Complete these steps in order to install the pre−requisites for exchange 2010:
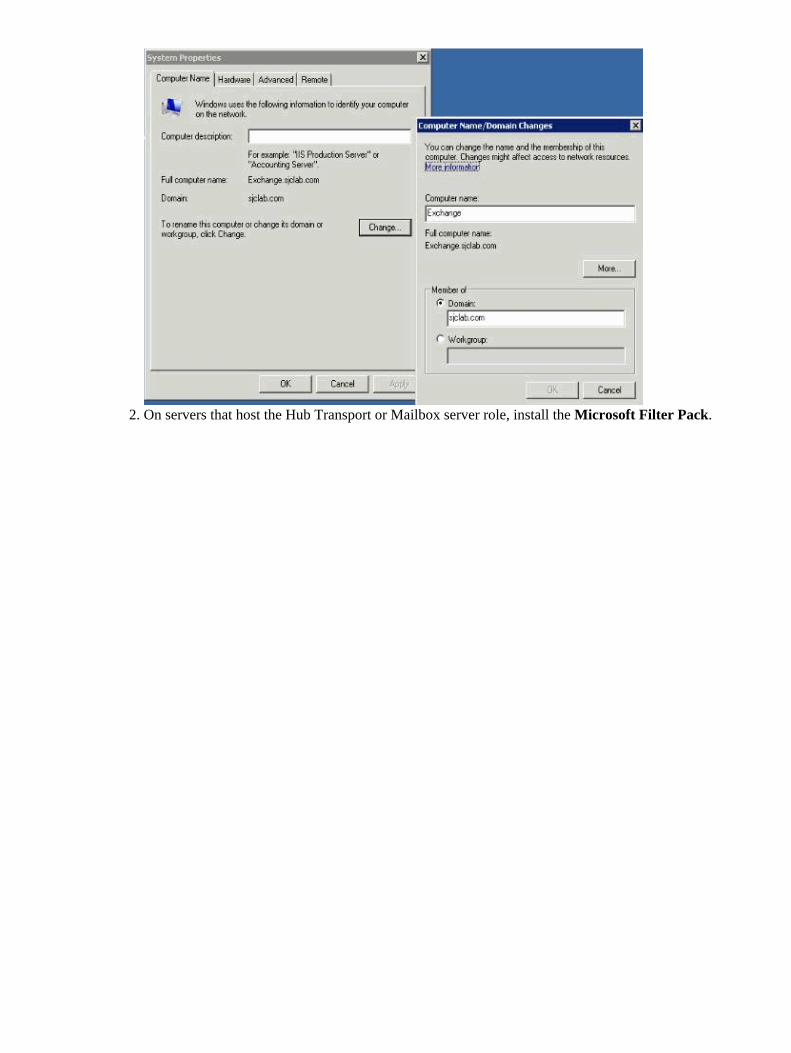
Add the exchange server to the domain and verify dns entry.1.
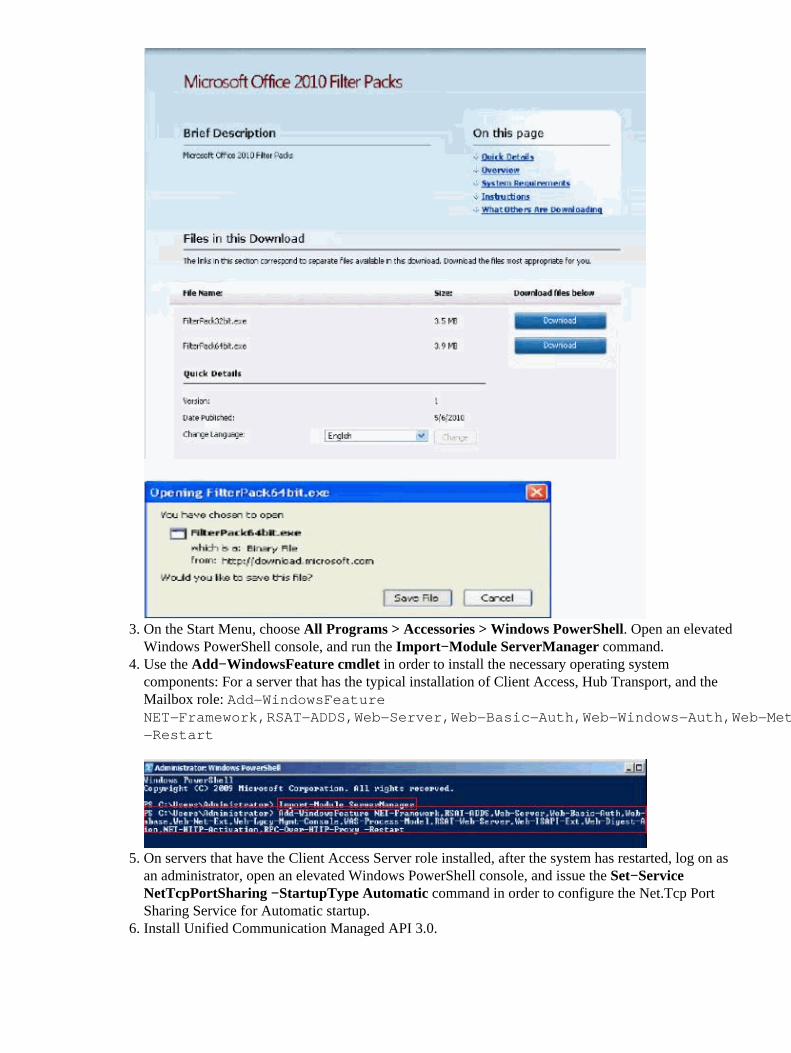
On servers that host the Hub Transport or Mailbox server role, install the Microsoft Filter Pack.2.
On the Start Menu, choose All Programs > Accessories > Windows PowerShell. Open an elevatedWindows PowerShell console, and run the Import−Module ServerManager command.
3.
Use the Add−WindowsFeature cmdlet in order to install the necessary operating systemcomponents: For a server that has the typical installation of Client Access, Hub Transport, and theMailbox role: Add−WindowsFeatureNET−Framework,RSAT−ADDS,Web−Server,Web−Basic−Auth,Web−Windows−Auth,Web−Metabase,Web−Net−Ext,Web−Lgcy−Mgmt−Console,WAS−Process−Model,RSAT−Web−Server,Web−ISAPI−Ext,Web−Digest−Auth,Web−Dyn−Compression,NET−HTTP−Activation,RPC−Over−HTTP−Proxy−Restart
4.
On servers that have the Client Access Server role installed, after the system has restarted, log on asan administrator, open an elevated Windows PowerShell console, and issue the Set−ServiceNetTcpPortSharing −StartupType Automatic command in order to configure the Net.Tcp PortSharing Service for Automatic startup.
5.
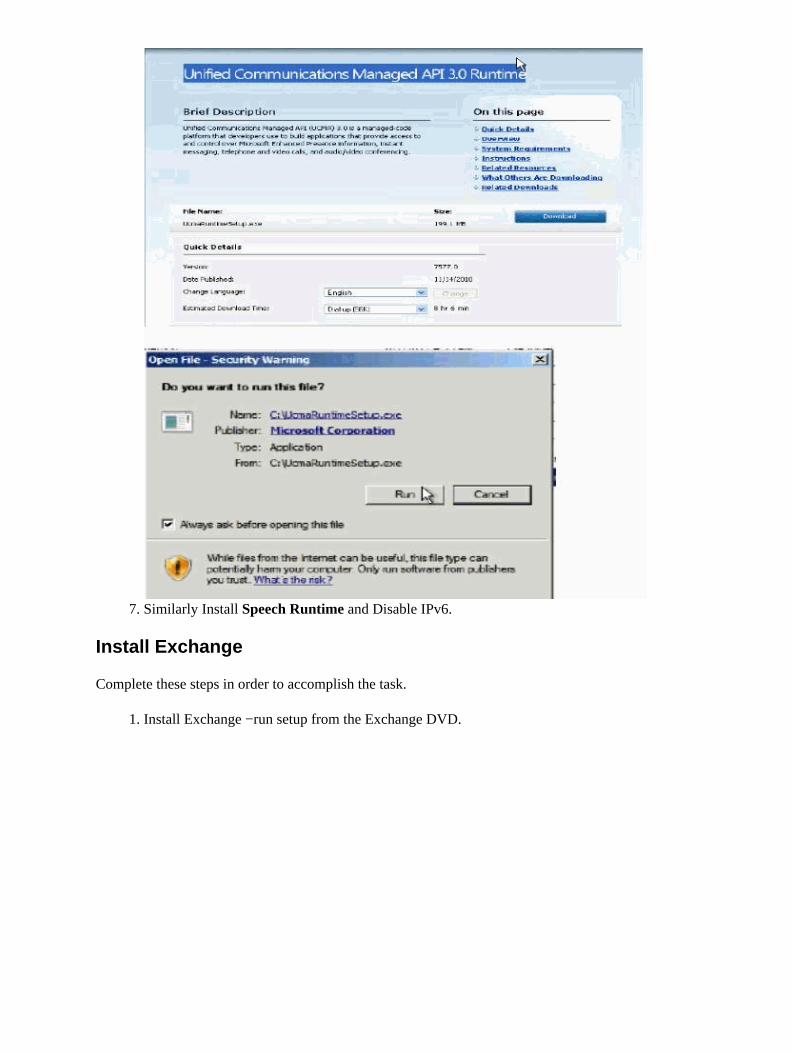
Install Unified Communication Managed API 3.0.6.
Similarly Install Speech Runtime and Disable IPv6.7.
Install Exchange
Complete these steps in order to accomplish the task.
Install Exchange −run setup from the Exchange DVD.1.
Click I accept Licensing Agreement and click Next.2. Click No for Error Reporting and click Next.3. Choose Typical Exchange for Server Installation for this simple deployment, and verify the pathfor the installation.
4.
Provide the Exchange Organization name, such as Cisco Organization.5.
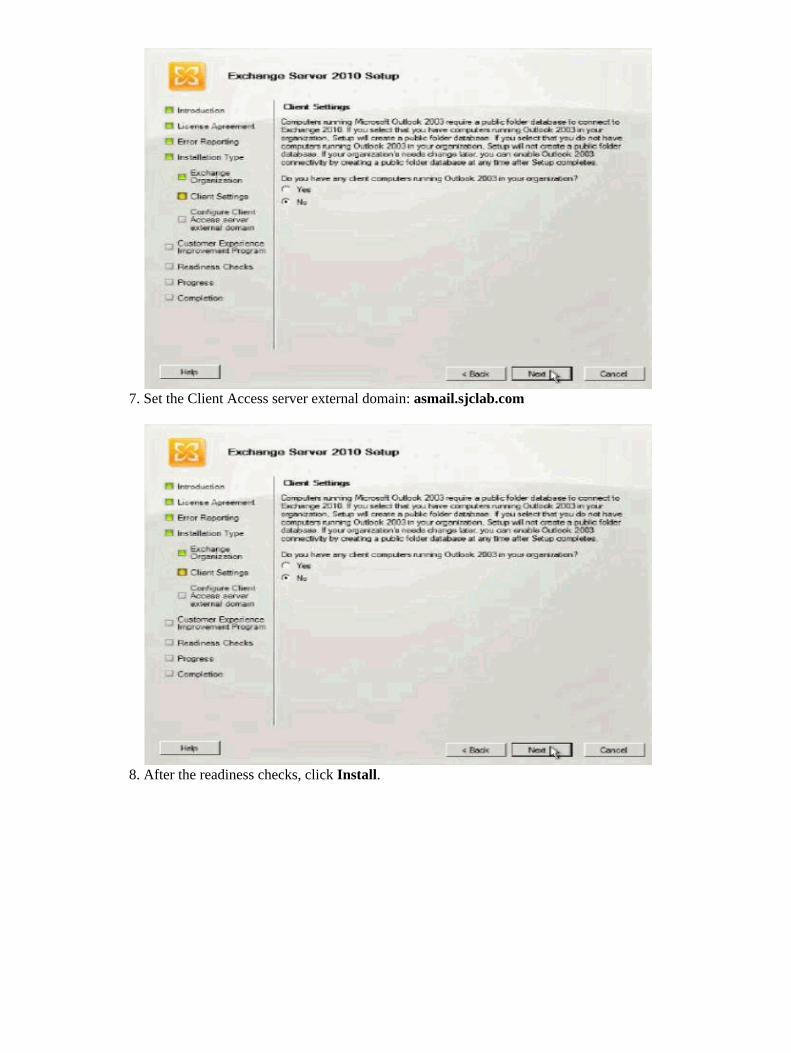
No legacy client support is needed in this case. Choose No and click Next.6.
Set the Client Access server external domain: asmail.sjclab.com7.
After the readiness checks, click Install.8.
Restart the server.9. Launch the Exchange Management Console and complete the GUI prompts to install it.10.
Exchange Certificate Install
When the Exchange Server 2010 Client Access Server role is installed, a self−signed certificate is installedautomatically, primarily for testing purposes. But, as soon as the installation is finished, a real certificateshould be acquired and installed. Exchange Server 2010 uses a Unified Messaging certificate, which holdsbesides its Subject Name other names as well, called the Subject Alternative Names (SAN).
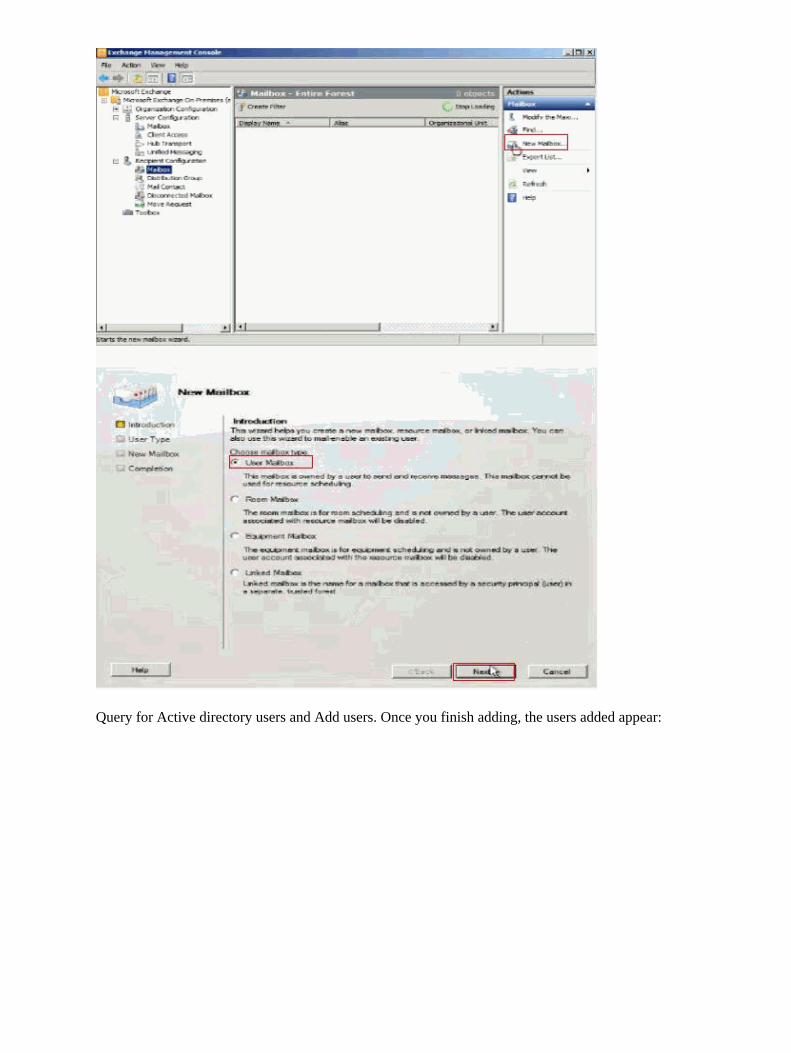
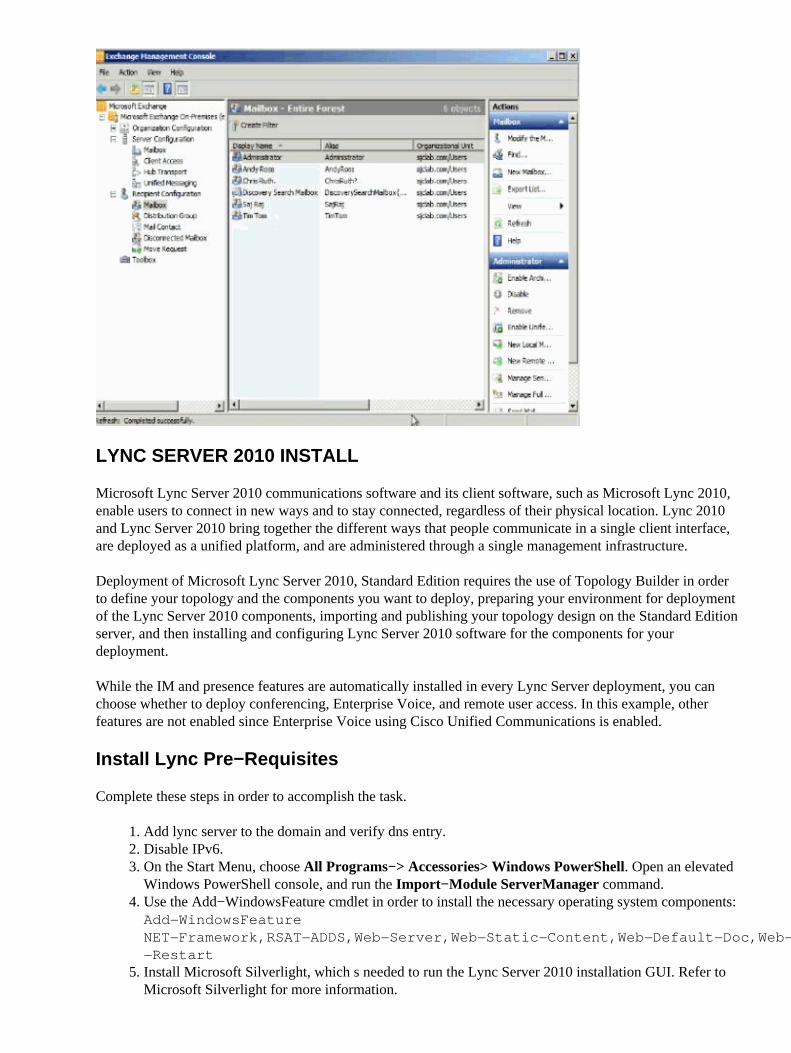
Create Mailbox Users in Exchange
Choose Recipient Configuration > Mailbox and choose New Mailbox.
Query for Active directory users and Add users. Once you finish adding, the users added appear:
LYNC SERVER 2010 INSTALL
Microsoft Lync Server 2010 communications software and its client software, such as Microsoft Lync 2010,enable users to connect in new ways and to stay connected, regardless of their physical location. Lync 2010and Lync Server 2010 bring together the different ways that people communicate in a single client interface,are deployed as a unified platform, and are administered through a single management infrastructure.
Deployment of Microsoft Lync Server 2010, Standard Edition requires the use of Topology Builder in orderto define your topology and the components you want to deploy, preparing your environment for deploymentof the Lync Server 2010 components, importing and publishing your topology design on the Standard Editionserver, and then installing and configuring Lync Server 2010 software for the components for yourdeployment.
While the IM and presence features are automatically installed in every Lync Server deployment, you canchoose whether to deploy conferencing, Enterprise Voice, and remote user access. In this example, otherfeatures are not enabled since Enterprise Voice using Cisco Unified Communications is enabled.
Install Lync Pre−Requisites
Complete these steps in order to accomplish the task.
Add lync server to the domain and verify dns entry.1. Disable IPv6.2. On the Start Menu, choose All Programs−> Accessories> Windows PowerShell. Open an elevatedWindows PowerShell console, and run the Import−Module ServerManager command.
3.
Use the Add−WindowsFeature cmdlet in order to install the necessary operating system components:Add−WindowsFeatureNET−Framework,RSAT−ADDS,Web−Server,Web−Static−Content,Web−Default−Doc,Web−Http−Errors,Web−Http−Redirect,Web−Asp−Net,Web−Net−Ext,Web−ISAPI−Ext,Web−ISAPI−Filter,Web−Http−Logging,Web−Log−Libraries,Web−Http−Tracing,Web−Windows−Auth,Web−Client−Auth,Web−Filtering,Web−Stat−Compression,Web−Mgmt−Console,Web−Scripting−Tools−Restart
4.
Install Microsoft Silverlight, which s needed to run the Lync Server 2010 installation GUI. Refer toMicrosoft Silverlight for more information.
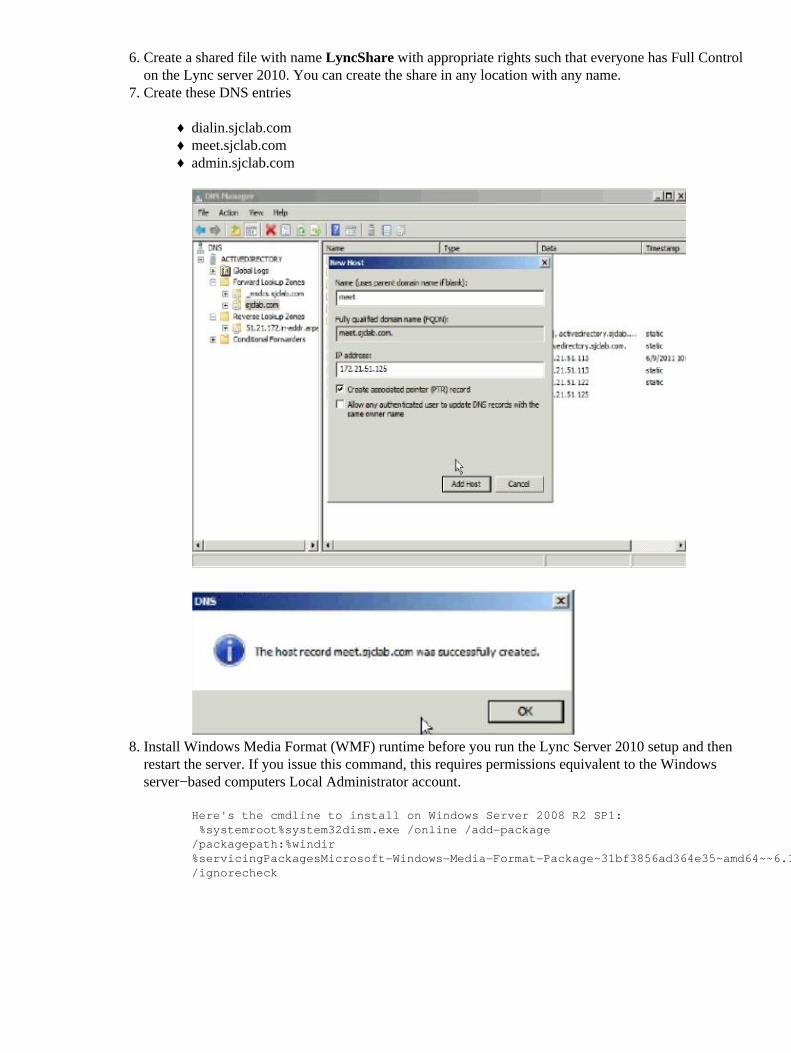
5.
Create a shared file with name LyncShare with appropriate rights such that everyone has Full Controlon the Lync server 2010. You can create the share in any location with any name.
Install Windows Media Format (WMF) runtime before you run the Lync Server 2010 setup and thenrestart the server. If you issue this command, this requires permissions equivalent to the Windowsserver−based computers Local Administrator account.
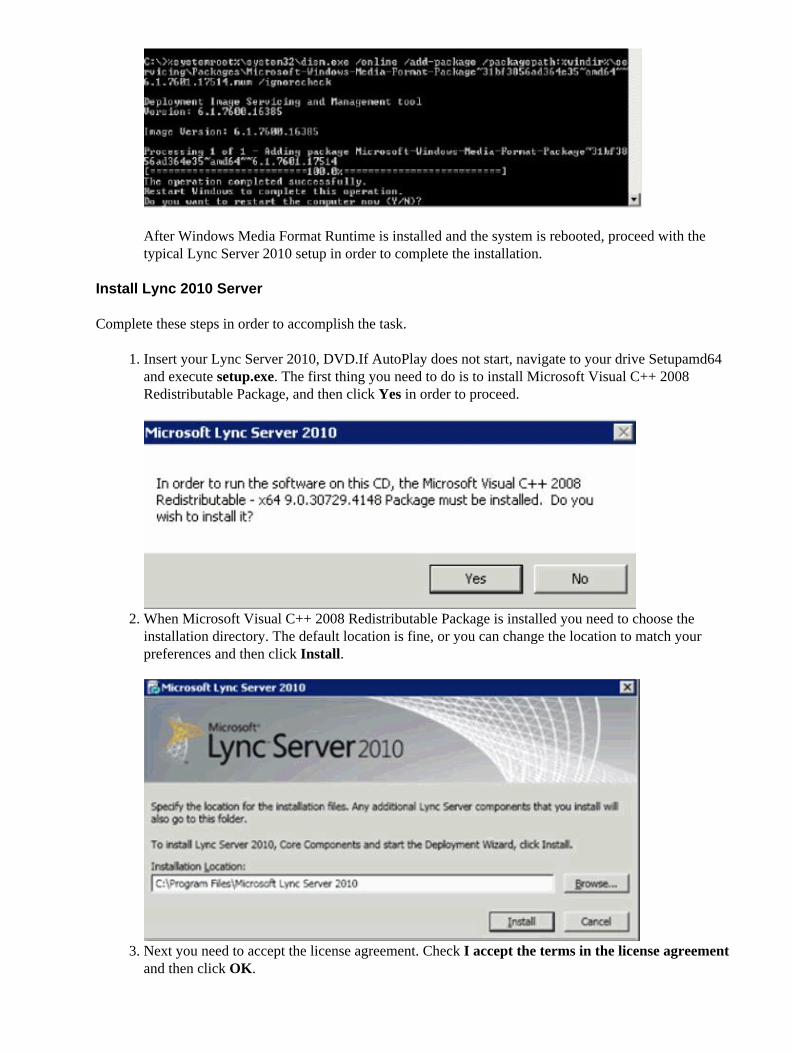
Here's the cmdline to install on Windows Server 2008 R2 SP1: %systemroot%system32dism.exe /online /add−package /packagepath:%windir%servicingPackagesMicrosoft−Windows−Media−Format−Package~31bf3856ad364e35~amd64~~6.1.7601.17514.mum /ignorecheck
8.
After Windows Media Format Runtime is installed and the system is rebooted, proceed with thetypical Lync Server 2010 setup in order to complete the installation.
Install Lync 2010 Server
Complete these steps in order to accomplish the task.
Insert your Lync Server 2010, DVD.If AutoPlay does not start, navigate to your drive Setupamd64and execute setup.exe. The first thing you need to do is to install Microsoft Visual C++ 2008Redistributable Package, and then click Yes in order to proceed.
1.
When Microsoft Visual C++ 2008 Redistributable Package is installed you need to choose theinstallation directory. The default location is fine, or you can change the location to match yourpreferences and then click Install.
2.
Next you need to accept the license agreement. Check I accept the terms in the license agreementand then click OK.
3.
Now the Deployment Wizard launches and you have these choices.
Complete these steps in this order:
Prepare Active Directorya. Prepare First Standard Edition Server.b. Install Topology Buildec. Launch Topology Builder & Publish Topologyd. Install or Update Lync Server Systeme.
4.
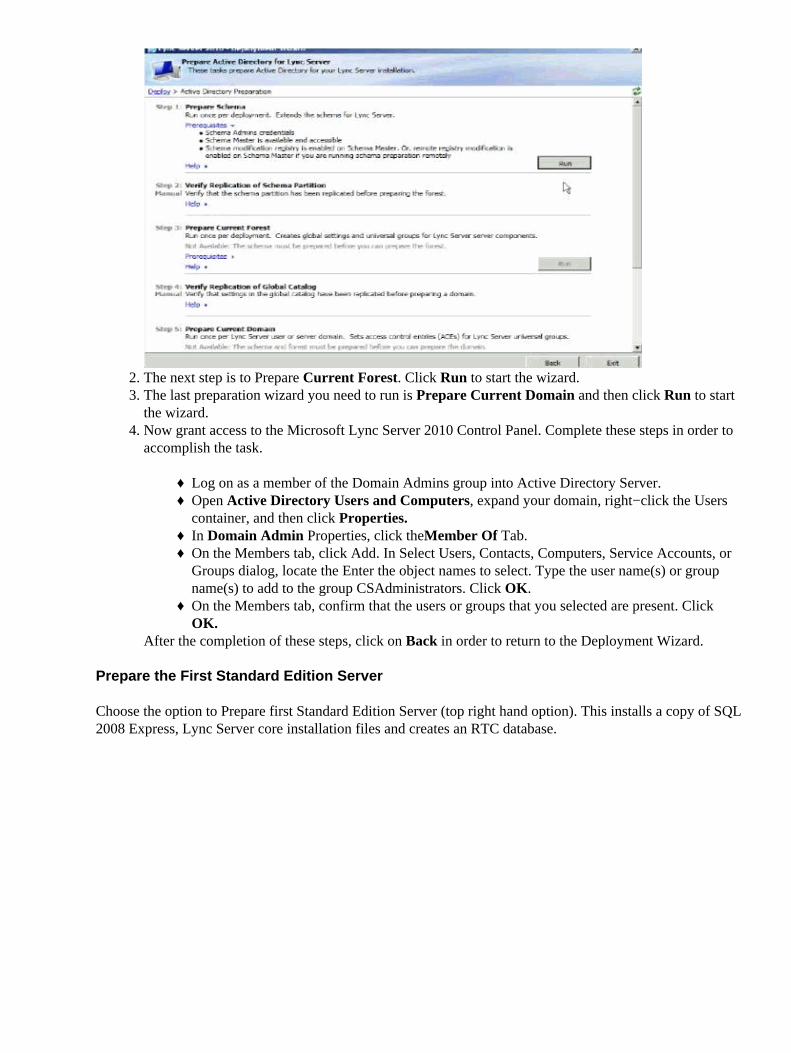
Prepare Active Directory
Complete these steps:
First step is Prepare Schema wizard. Click Run in order to start the wizard.1.
The next step is to Prepare Current Forest. Click Run to start the wizard.2. The last preparation wizard you need to run is Prepare Current Domain and then click Run to startthe wizard.
3.
Now grant access to the Microsoft Lync Server 2010 Control Panel. Complete these steps in order toaccomplish the task.
Log on as a member of the Domain Admins group into Active Directory Server.♦ Open Active Directory Users and Computers, expand your domain, right−click the Userscontainer, and then click Properties.
♦
In Domain Admin Properties, click theMember Of Tab.♦ On the Members tab, click Add. In Select Users, Contacts, Computers, Service Accounts, orGroups dialog, locate the Enter the object names to select. Type the user name(s) or groupname(s) to add to the group CSAdministrators. Click OK.
♦
On the Members tab, confirm that the users or groups that you selected are present. ClickOK.
♦
After the completion of these steps, click on Back in order to return to the Deployment Wizard.
4.
Prepare the First Standard Edition Server
Choose the option to Prepare first Standard Edition Server (top right hand option). This installs a copy of SQL2008 Express, Lync Server core installation files and creates an RTC database.
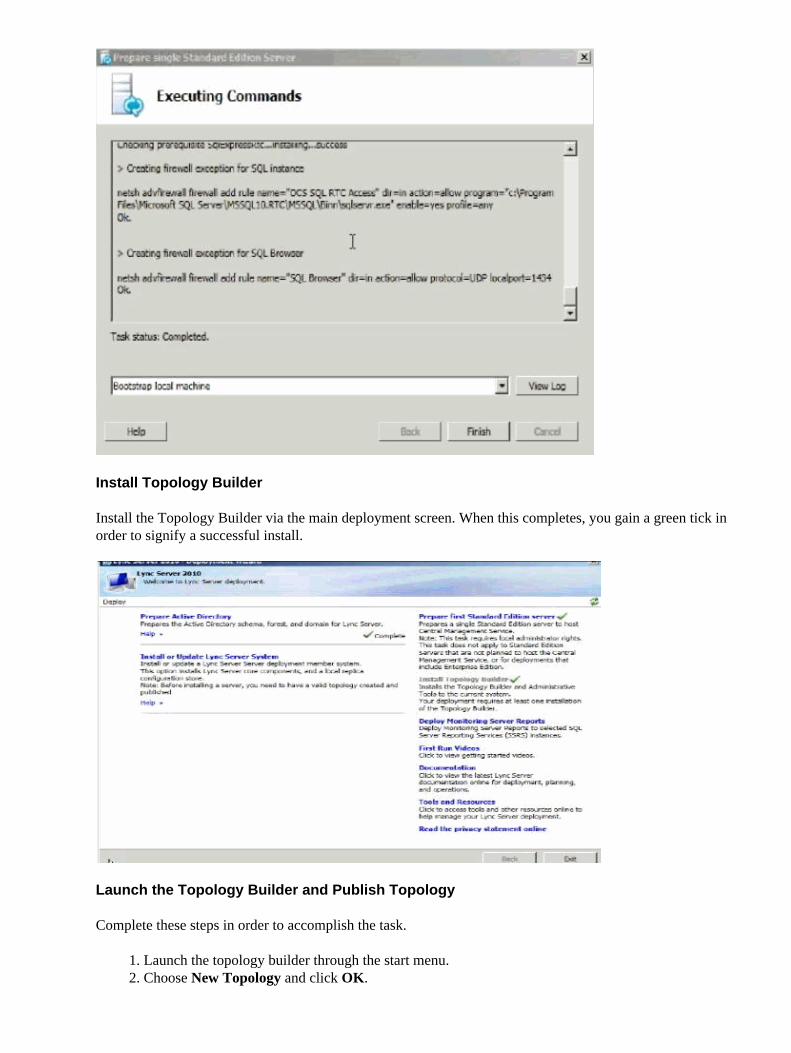
Install Topology Builder
Install the Topology Builder via the main deployment screen. When this completes, you gain a green tick inorder to signify a successful install.
Launch the Topology Builder and Publish Topology
Complete these steps in order to accomplish the task.
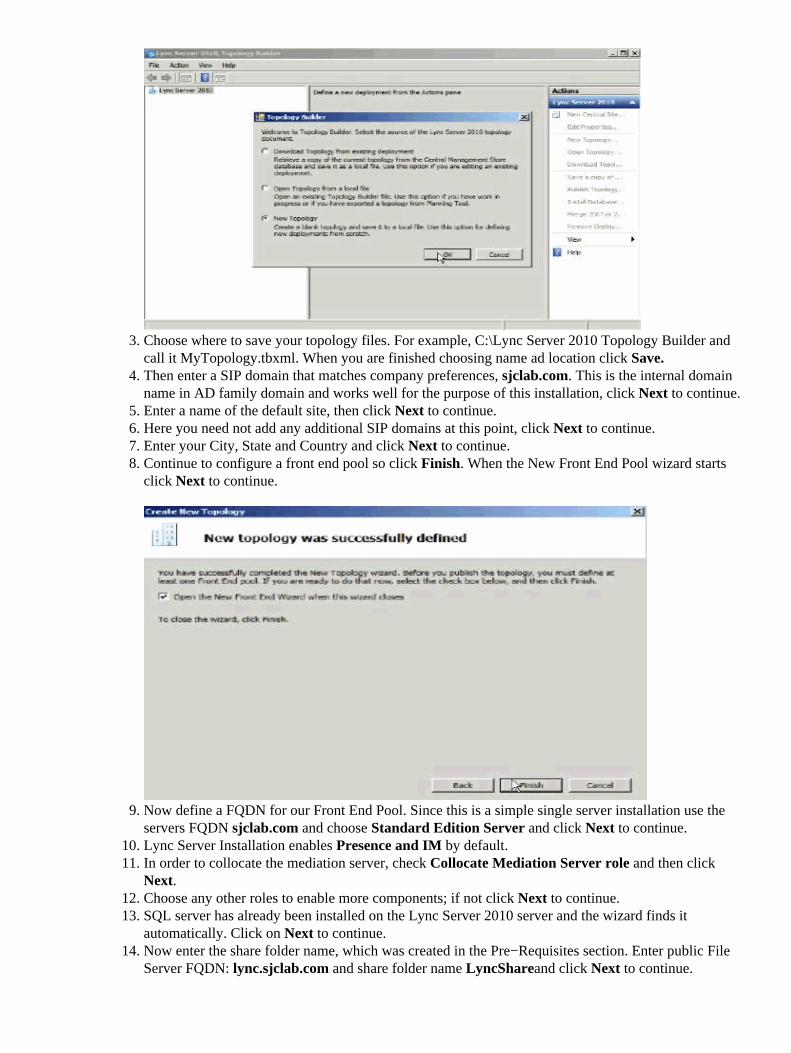
Launch the topology builder through the start menu.1. Choose New Topology and click OK.2.
Choose where to save your topology files. For example, C:\Lync Server 2010 Topology Builder andcall it MyTopology.tbxml. When you are finished choosing name ad location click Save.
3.
Then enter a SIP domain that matches company preferences, sjclab.com. This is the internal domainname in AD family domain and works well for the purpose of this installation, click Next to continue.
4.
Enter a name of the default site, then click Next to continue.5. Here you need not add any additional SIP domains at this point, click Next to continue.6. Enter your City, State and Country and click Next to continue.7. Continue to configure a front end pool so click Finish. When the New Front End Pool wizard startsclick Next to continue.
8.
Now define a FQDN for our Front End Pool. Since this is a simple single server installation use theservers FQDN sjclab.com and choose Standard Edition Server and click Next to continue.
9.
Lync Server Installation enables Presence and IM by default.10. In order to collocate the mediation server, check Collocate Mediation Server role and then clickNext.
11.
Choose any other roles to enable more components; if not click Next to continue.12. SQL server has already been installed on the Lync Server 2010 server and the wizard finds itautomatically. Click on Next to continue.
13.
Now enter the share folder name, which was created in the Pre−Requisites section. Enter public FileServer FQDN: lync.sjclab.com and share folder name LyncShareand click Next to continue.
14.
Skip adding a gateway at this moment and specify the External Base URL: lync.sjclab.com, whichcan be same as your internal or can be different. Click Finish to complete defining Front End Poolwizard.
15.
When the wizard closes you arepresented with the Topology builder. Take a moment to go throughthe configuration, then go back to the original screen and click on Edit Topology.
16.
In the left pane, choose Simple URLs, in the main pane, enter a URL in the field Administrativeaccess URL. Here this is https://admin.sjclab.com, then choose the Front end server to installCentral Management Server on. If all is well you should only have one choice here, click Ok whendone.
17.
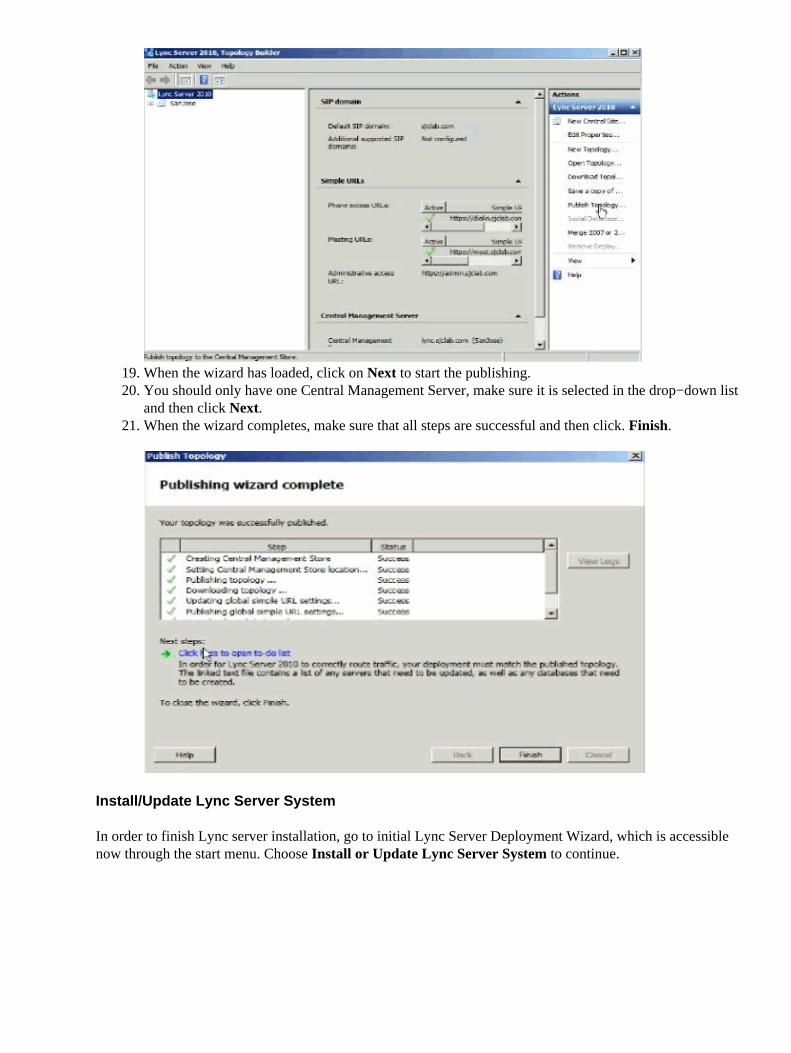
Now it is time to publish the topology that was built to the management server. Back in the topologybuilder, click on Publish Topology in the Actions Pane.
18.
When the wizard has loaded, click on Next to start the publishing.19. You should only have one Central Management Server, make sure it is selected in the drop−down listand then click Next.
20.
When the wizard completes, make sure that all steps are successful and then click. Finish.21.
Install/Update Lync Server System
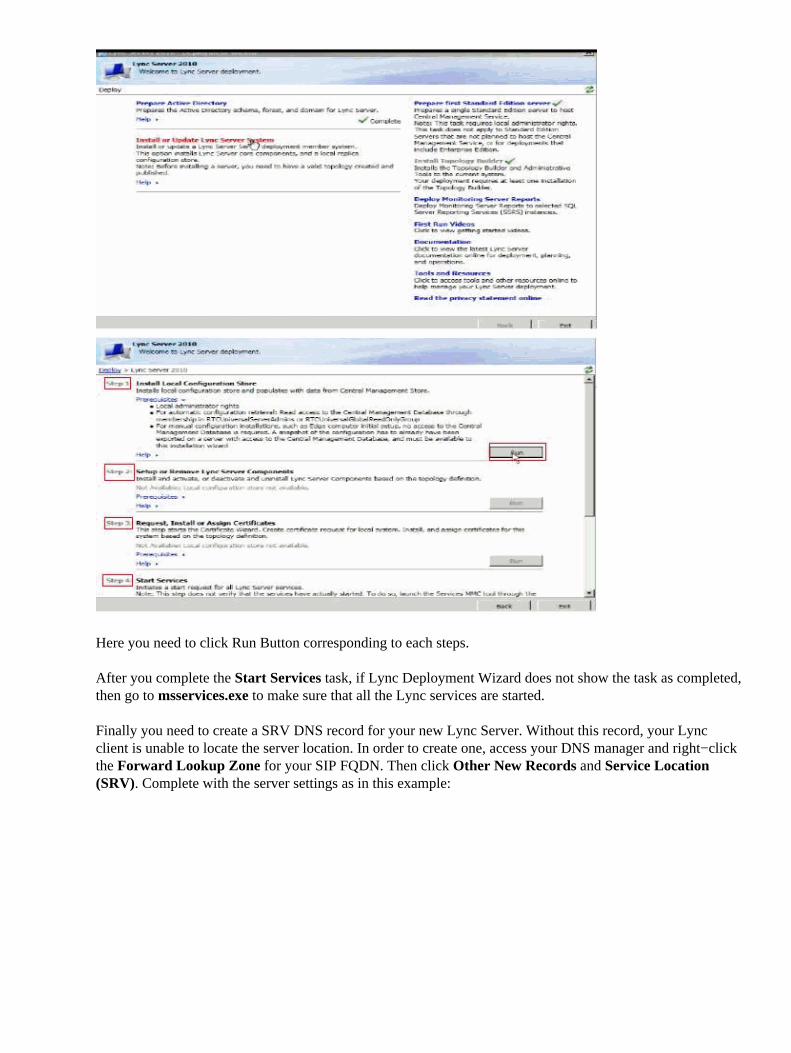
In order to finish Lync server installation, go to initial Lync Server Deployment Wizard, which is accessiblenow through the start menu. Choose Install or Update Lync Server System to continue.
Here you need to click Run Button corresponding to each steps.
After you complete the Start Services task, if Lync Deployment Wizard does not show the task as completed,then go to msservices.exe to make sure that all the Lync services are started.
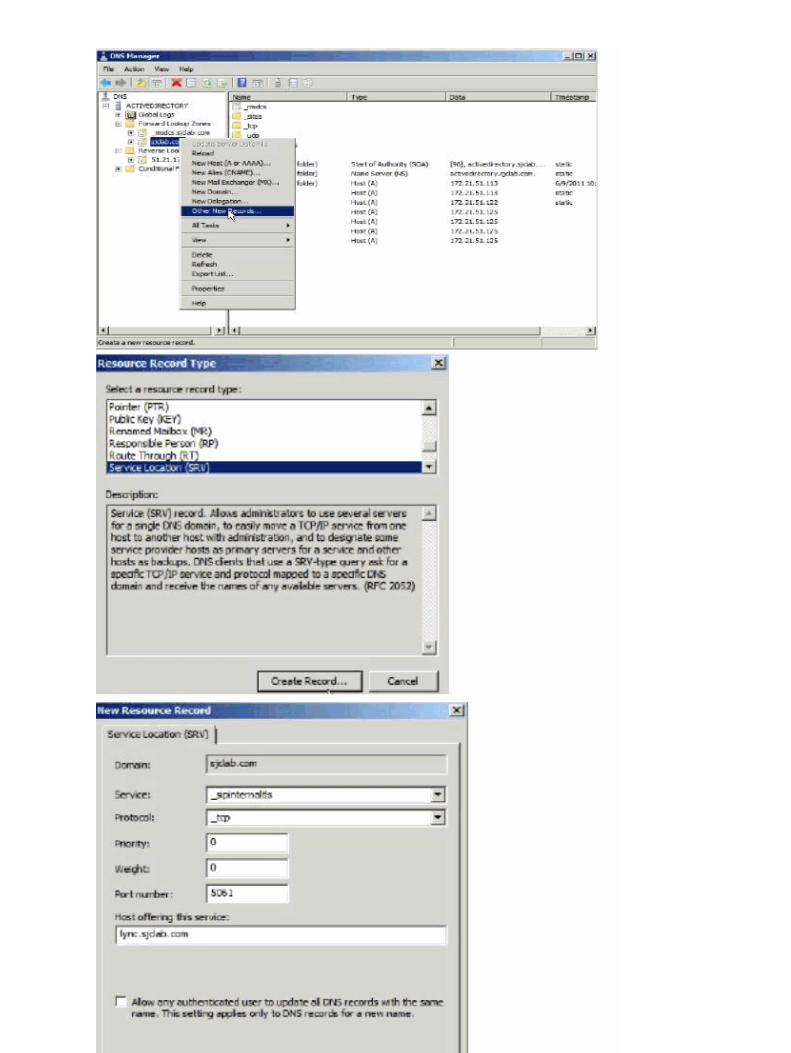
Finally you need to create a SRV DNS record for your new Lync Server. Without this record, your Lyncclient is unable to locate the server location. In order to create one, access your DNS manager and right−clickthe Forward Lookup Zone for your SIP FQDN. Then click Other New Records and Service Location(SRV). Complete with the server settings as in this example:
Add Users in Lync
Complete these steps in order to add users in Lync.
Choose Start > All Programs > Microsoft Lync Server 2010 > Lync Server Control Panel.1.
Once you login with your Lync credentials into the Lync Server Control Panel, it opens the ControlPanel window.
2.
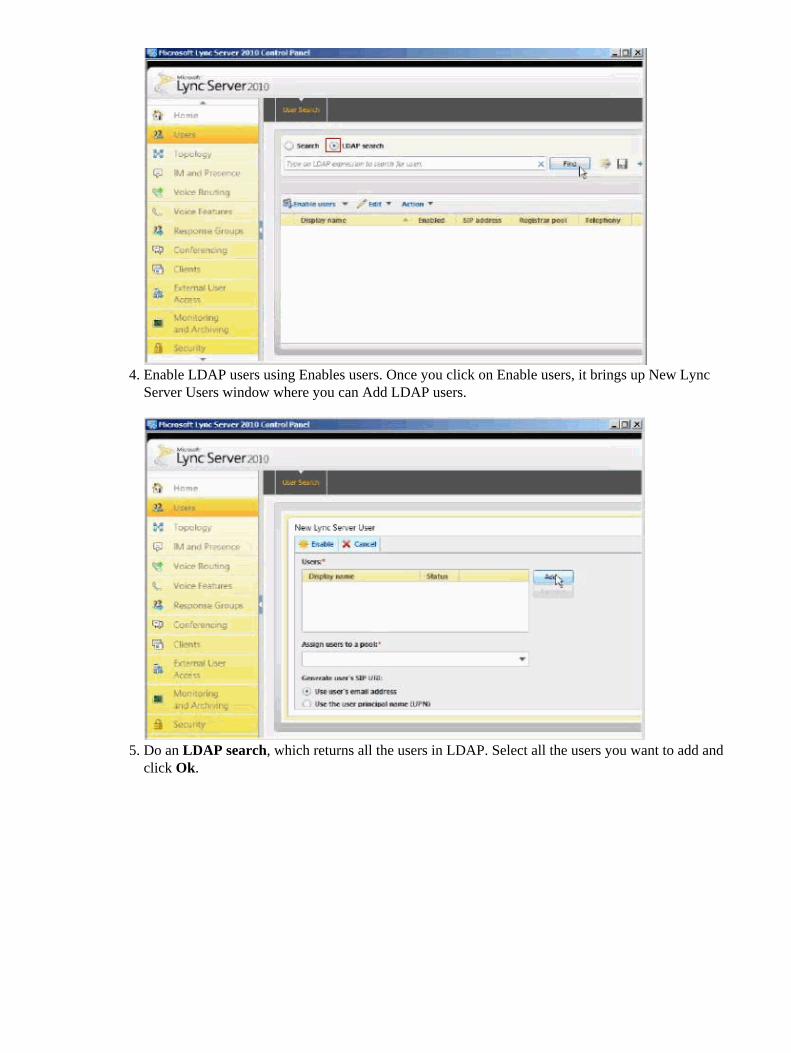
You can add users. Choose LDAP search, and click Find. Here in this example the query does notlist any users even though LDAP users are present so you can see none of those users are enabled.
3.
Enable LDAP users using Enables users. Once you click on Enable users, it brings up New LyncServer Users window where you can Add LDAP users.
4.
Do an LDAP search, which returns all the users in LDAP. Select all the users you want to add andclick Ok.
5.
Edit all the users to change Telephony settings to Audio/Video disabled (Recommended) andCommit the changes.
6.
Try to log into Client Lync with one of the above user credentials to make sure that login works fine.
Note: It is recommended not to select the following telephony options for users:
Lync 2010 delivers easy and engaging access to multiple communication modes through a single, simplifiedinterface. Users can connect and collaborate from any location that has Internet connectivity. Before proceedto install ensure the following:
Client PC needs an entry in DNS and also needs to be part of the Domain1. Ensure that root certificate on client is installed so that client trusts certificate from Lync.
Complete these steps in order to install the Root Certificate on to the client machine.
Login into CA Server from https://<CA Server>/certSrv and download the CA Certificate,with the name certnew.cer.
a.
2.
View and install the CA Root Certificate on to the client machines.b.
Certificate Import Wizard is launched.c.
Browse the certificate store where you want to place the certificates.d.
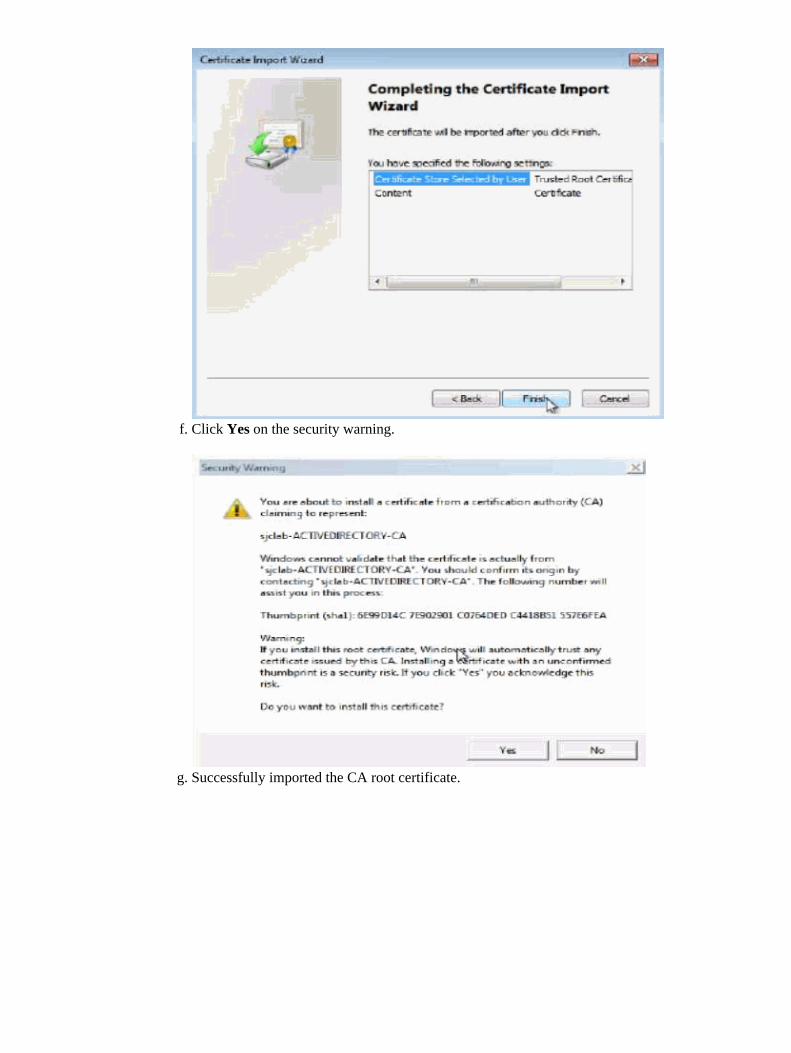
Click on Finish to complete the Certificate Import.e.
Click Yes on the security warning.f.
Successfully imported the CA root certificate.g.
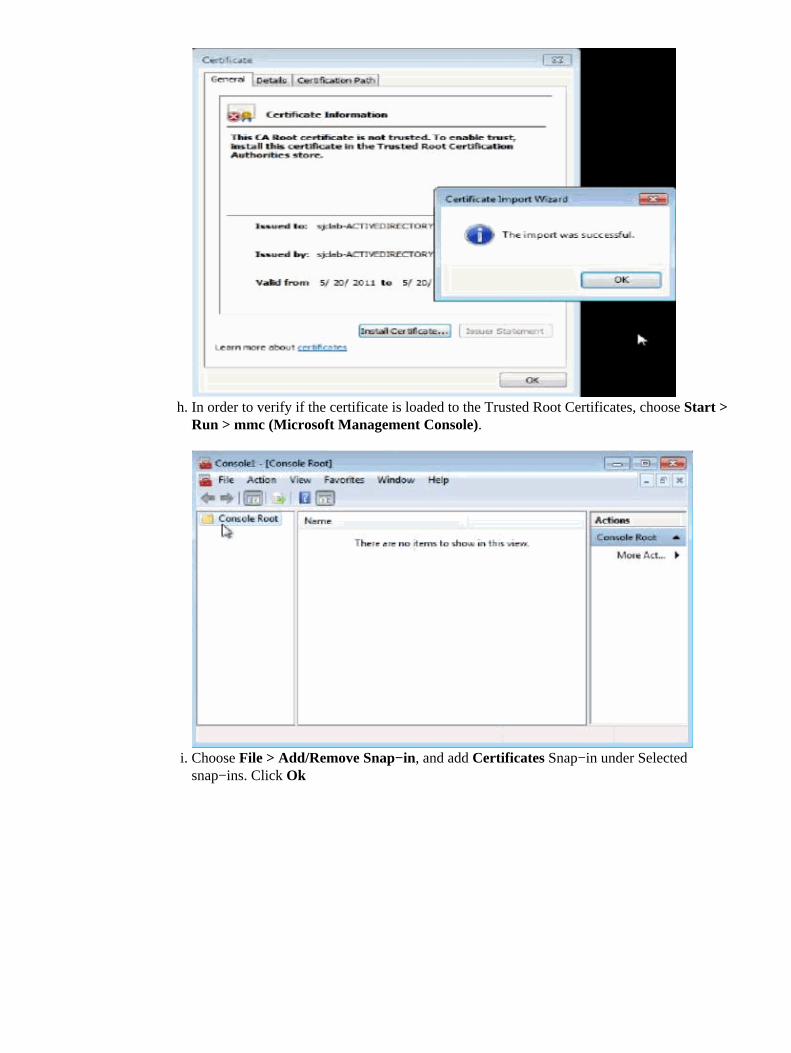
In order to verify if the certificate is loaded to the Trusted Root Certificates, choose Start >Run > mmc (Microsoft Management Console).
h.
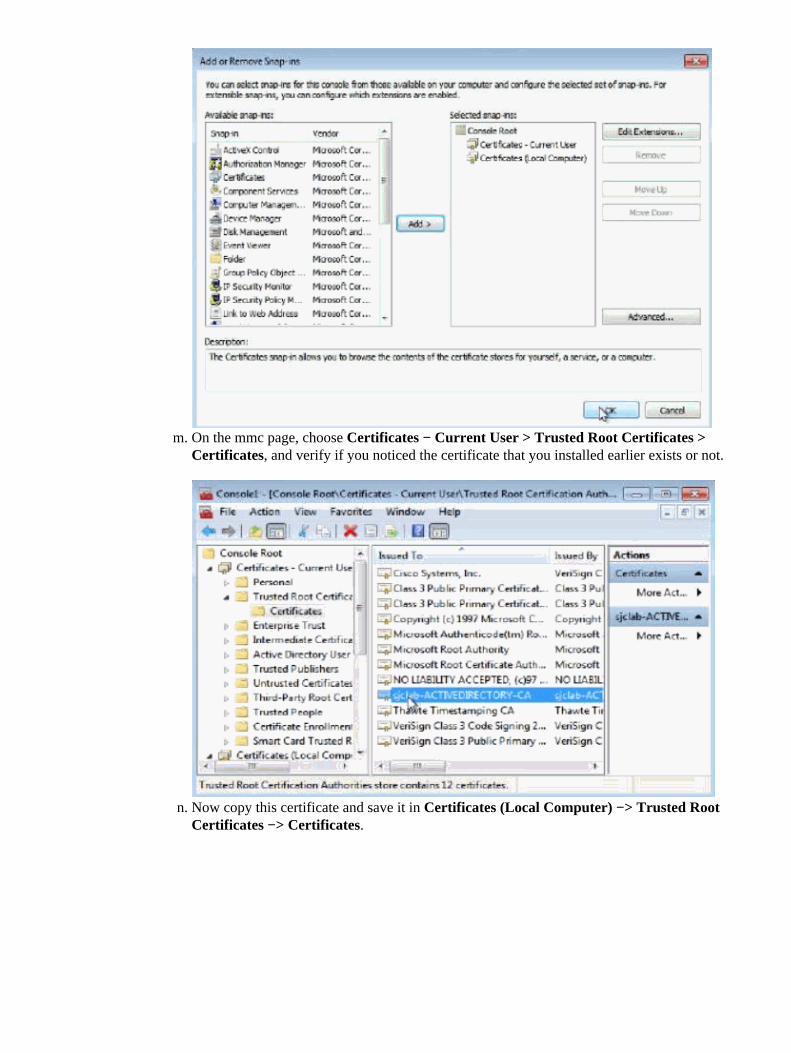
Choose File > Add/Remove Snap−in, and add Certificates Snap−in under Selectedsnap−ins. Click Ok
i.
Add My User Account Certificate snap−in: and click Finishj.
Similarly repeat step i and Add Computer account for certificates snap−in.k.
Now the Add/Remove Snap−in page looks like this.l.
On the mmc page, choose Certificates − Current User > Trusted Root Certificates >Certificates, and verify if you noticed the certificate that you installed earlier exists or not.
m.
Now copy this certificate and save it in Certificates (Local Computer) −> Trusted RootCertificates −> Certificates.
n.
Save the console changes if needed and Close MMC.o.
Install Lync 2010 Client
Complete the steps in order to install Lync 2010 client.
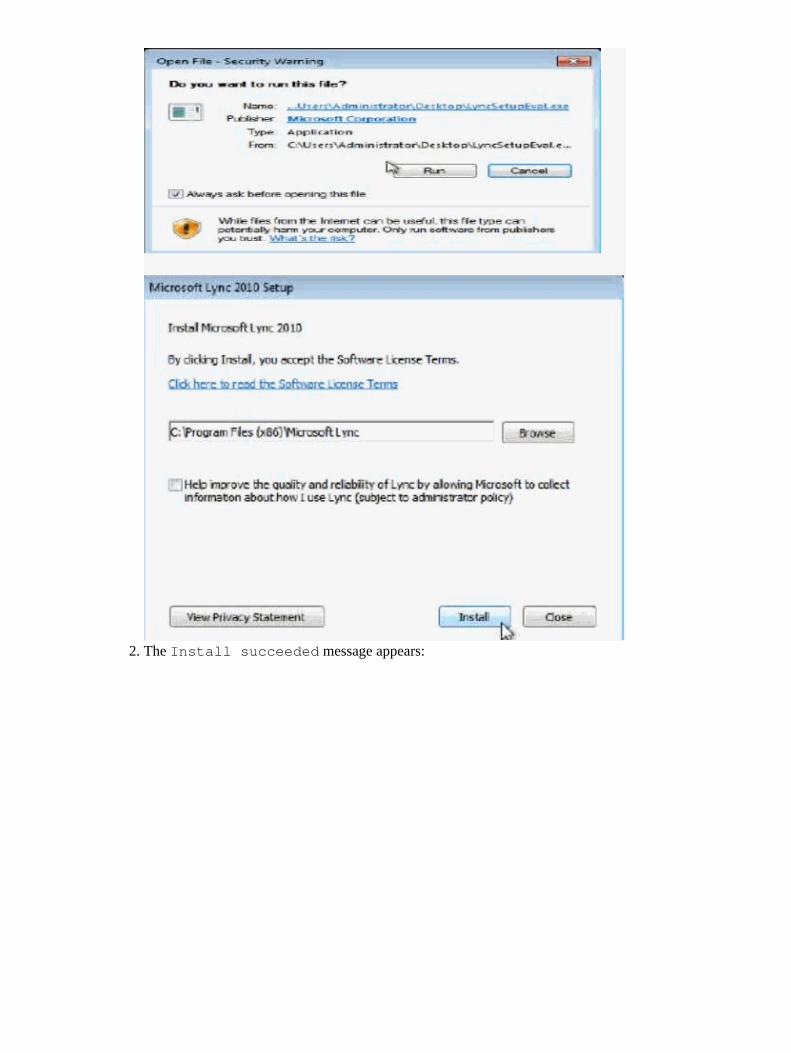
Run the LyncSetup.exe file to install Lync 2010 client on user PC.1.
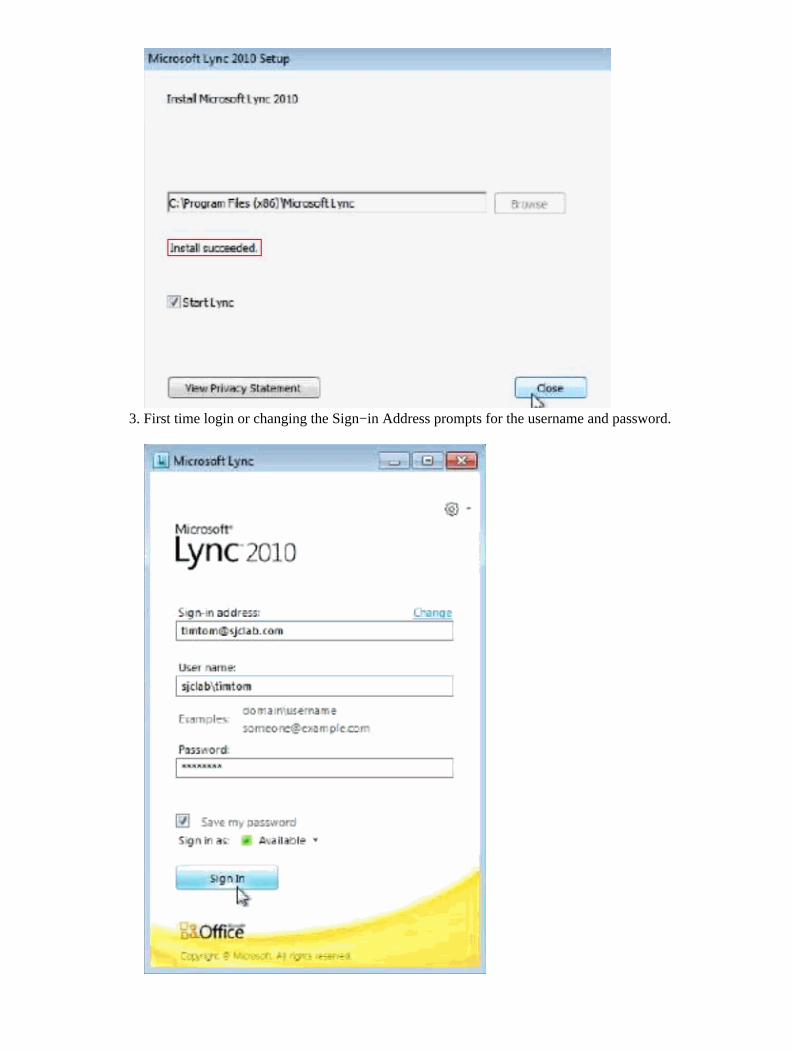
The Install succeeded message appears:2.
First time login or changing the Sign−in Address prompts for the username and password.3.
CUCI−LYNC configuration
The Cisco UC Integration for Microsoft Lync works with these applications:
Microsoft Lync• Microsoft Office Communicator•
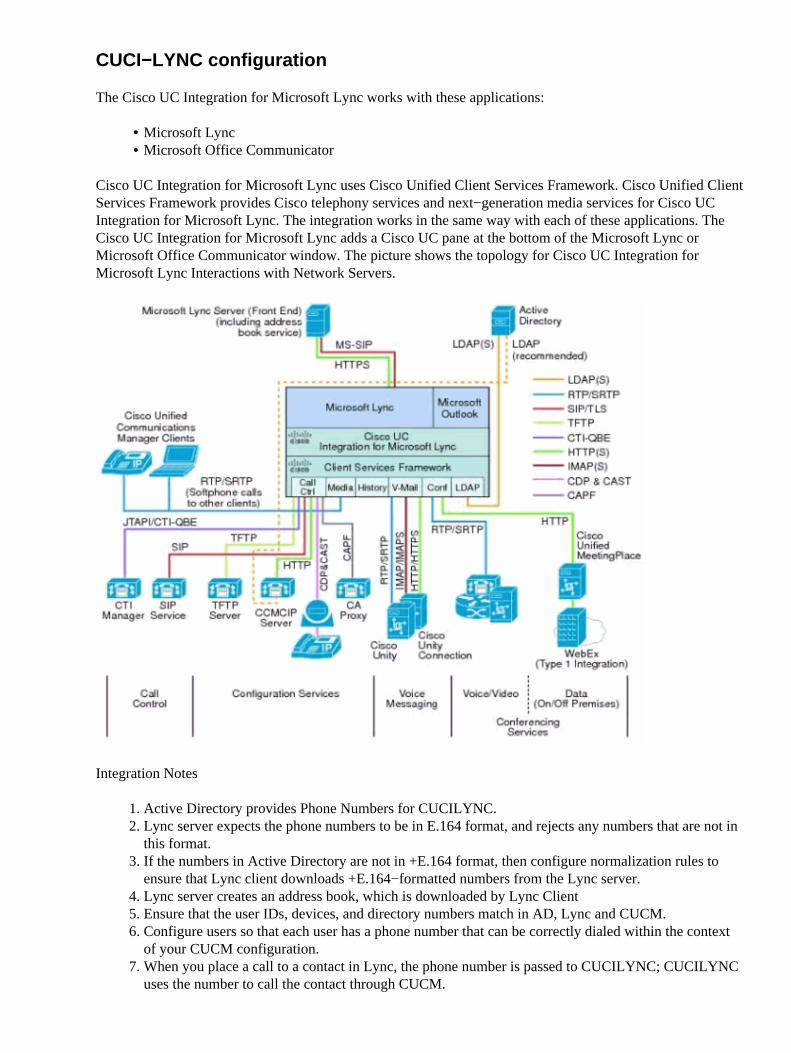
Cisco UC Integration for Microsoft Lync uses Cisco Unified Client Services Framework. Cisco Unified ClientServices Framework provides Cisco telephony services and next−generation media services for Cisco UCIntegration for Microsoft Lync. The integration works in the same way with each of these applications. TheCisco UC Integration for Microsoft Lync adds a Cisco UC pane at the bottom of the Microsoft Lync orMicrosoft Office Communicator window. The picture shows the topology for Cisco UC Integration forMicrosoft Lync Interactions with Network Servers.
Integration Notes
Active Directory provides Phone Numbers for CUCILYNC.1. Lync server expects the phone numbers to be in E.164 format, and rejects any numbers that are not inthis format.
2.
If the numbers in Active Directory are not in +E.164 format, then configure normalization rules toensure that Lync client downloads +E.164−formatted numbers from the Lync server.
3.
Lync server creates an address book, which is downloaded by Lync Client4. Ensure that the user IDs, devices, and directory numbers match in AD, Lync and CUCM.5. Configure users so that each user has a phone number that can be correctly dialed within the contextof your CUCM configuration.
6.
When you place a call to a contact in Lync, the phone number is passed to CUCILYNC; CUCILYNCuses the number to call the contact through CUCM.
7.
CUCILYNC also uses LDAP directly to search for contact information.8. When you display a CUCILYNC contact card, the full name and organization information comesfrom an LDAP search of Active Directory.
9.
When you receive a call, the LDAP connection to Active Directory is used to search for callerinformation to match the incoming number.
10.
CSF client can use either Enhanced Directory Integration (EDI) or Basic Directory Integration (BDI)mechanisms to retrieve contact information from Active Directory.
11.
EDI is recommended since it uses native Windows APIs and you might not need to do any furtherconfiguration and also provides significant advantages over BDI.
12.
CUCM Configuration
In order to accomplish this task you need to create Client Service Framework (CSF) Device in CUCM,which gets registered when the Call Control is connected to Lync 2010 and operates in Softphone mode. TheDirectory Number DN of this CSF device needs to be shared with the Actual Device of the user.
Configure CSF Device with the same Directory Number (DN) as Physical SEP Device.1.
Associate End user to the Shared Line DN from the CSF and SEP Device DN Configuration page.2.
Associate CSF Device and SEP Device to the end user Controlled Device list.3.
Configure Primary Extension on the End User page.4.
Assign End Users to User Groups.5.
When CUCILYNC is in SoftPhone Mode, you notice that the CSF Device is registered.6.
When CUCILYNC is in Deskphone Mode, CSF device is unregistered.7.
UC Integration for Microsoft Lync Installation
Configure Registry Keys for CSF Client Integration�Use the Registry file in CUCI−Lync−Admin zipfolder that you download from CCO for the configuration of the Registry Settings for the CSF ClientIntegration.
The explanation for each field is given here:
TFTPServer Address�Enter the IP address or fully qualified domain name of the primary TFTPserver in your Cisco Unified Communications system, and any other TFTP servers. If you are usingcertificates, the certificate common name must match the network identifier used to access to host,that is, the IP address or the hostname.
Note: This is where CSF Device downloads its configuration file.
•
CTI Server� Enter the IP address or fully−qualified domain name of the primary CTIManager serverin your Cisco Unified Communications system, and the secondary CTIManager server, if present. Ifyou are using certificates, the certificate common name must match the network identifier used toaccess to host, that is, the IP address or the hostname.
•
Note: Leave it blank, cause you want CUCM to determince the CTI server group.UseCUCMGroupForCti�Set this value to True if you want to use the relevant Cisco UnifiedCommunications Manager group information on the Cisco Unified Communications Manager serverto determine which CTI Servers to use instead of the CtiServer1 and CtiServer2 registry subkeynames.
Note: True: You want CUCM Group to determine the CTI Server Group.
•
CcmcipServer�Enter the IP address or fully−qualified domain name of the primary CCMCIP serverin your Cisco Unified Communications system, and the secondary CCMCIP server, if present. If youare using certificates, the certificate common name must match the network identifier used to accessto host, that is, the IP address or the hostname.
•
CcmcipServerValidation�Enter the type of security certificate validation for Client ServicesFramework to use with HTTPS to sign in to Cisco Unified Communications Manager to retrieve thedevice list. Enter one of the following values:
Client Services Framework accepts all certificates.♦ Client Services Framework accepts certificates that are defined in the keystore andself−signed certificates.
♦
Client Services Framework only accepts certificates that are defined in the keystore.♦ Note: Client Services Framework uses this certificate to verify the Cisco Unified CommunicationsManager server. When the certificate is accepted, Client Services Framework must use the credentialsof the user to sign in to Cisco Unified Communications Manager.
•
EnableNativeDirectoryProvider�Specify whether to use Enhanced or Basic Directory Integration toget contact information from Active Directory. Enter one of the following values:
Use Basic Directory Integration. This is the default value.♦ Use Enhanced Directory Integration. Data type: REG_SZ♦
•
VoicemailPilotNumber� Enter the number of the voice message service in your Cisco UnifiedCommunications system. This value only relates to when users use the desk phone to access theirvoice messages. If users are using the phone on their computer to access voicemail, the pilot numbercomes from the voicemail pilot number associated with the voicemail profile configured on the ClientServices Framework device.
•
VVM_SystemServer_X�Enter the IP address or fully−qualified hostname of the Cisco Unity orCisco Unity Connection voicemail server.
Note: X : 0 for Primary Unity or Unity Connection Server and X : 1 for Secondary Unity or UnityConnection Server
•
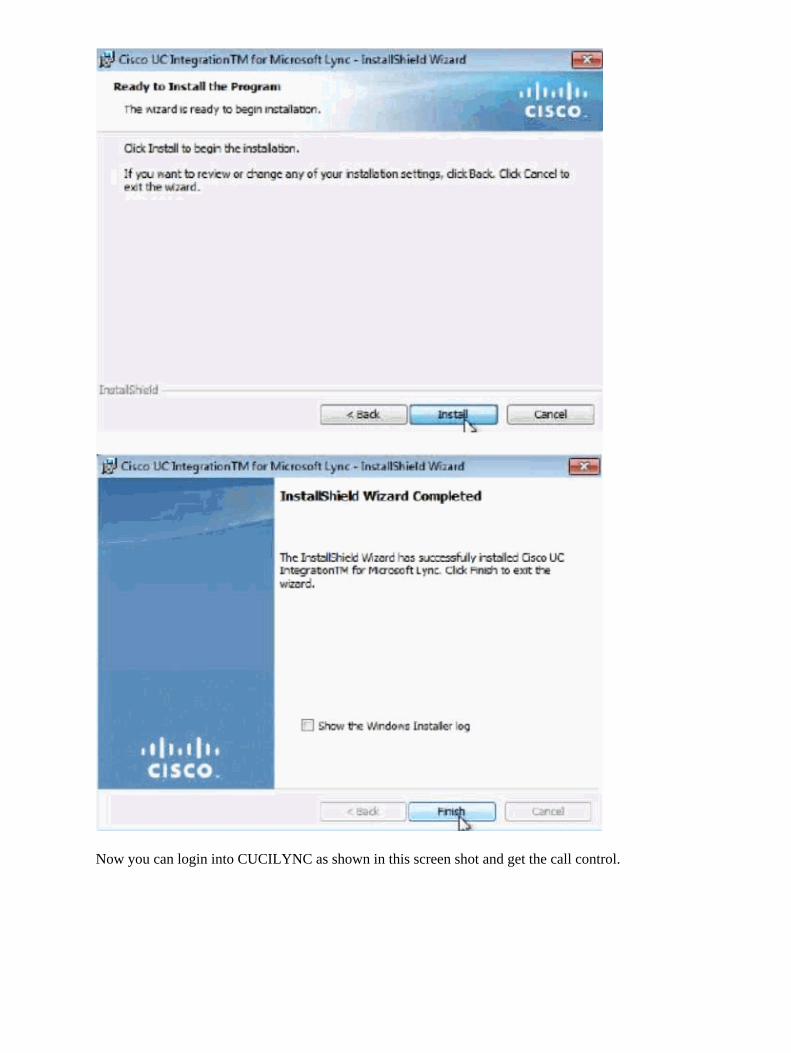
Install Cisco UC Integration TM for Microsoft Lync
Complete these steps to install CUCILYNC. Click Next on the wizard as shown in the screen shot.
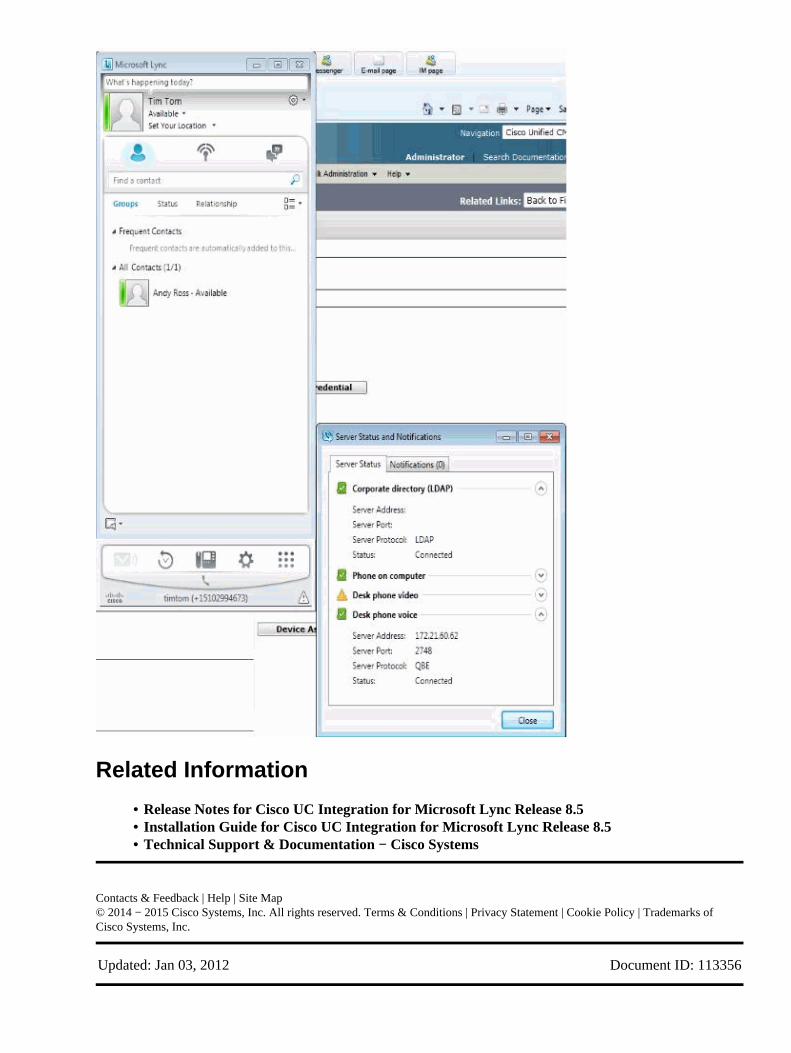
Now you can login into CUCILYNC as shown in this screen shot and get the call control.
Related Information
Release Notes for Cisco UC Integration for Microsoft Lync Release 8.5• Installation Guide for Cisco UC Integration for Microsoft Lync Release 8.5• Technical Support & Documentation − Cisco Systems•