218
Cupping Massage MASTERY Cupping for Massage Therapists Using Silicone Cups Morgan Sutherland, L.M.T.
Cupping Massage
MASTERY
Cupping for Massage Therapists
Using Silicone Cups
Morgan Sutherland, L.M.T.

Cupping Massage Mastery
Cupping for Massage Therapists Using Silicone Cups
Copyright © 2019 Morgan Sutherland, L.M.T.
All rights reserved.
No part of this book may be reproduced in any form without
permission in writing from the author. Reviewers may quote brief
passages in reviews. The information contained in this book is
current at the time of this writing. Although all attempts have been
made to verify the information provided in this publication, neither
the author nor the publisher assume any responsibility for errors,
omissions, or contrary interpretations of the subject matter herein.
This book is for educational purposes only. The views expressed
are those of the author alone and should not be taken as expert
instruction or commands. The reader is responsible for his or her
own actions.
At times links might be used to illustrate a point, technique, or best
practice. These will reference products I have found useful, but
please do your own research, make appropriate comparisons, and
form your own decisions as to which products will work best for
you. Links to products are used to illustrate points, because they
are the examples with which I am most familiar.
Photos: Copyright Morgan Sutherland
Illustrations: Online images, labeled for reuse
Cover image: Copyright Morgan Sutherland
Contents
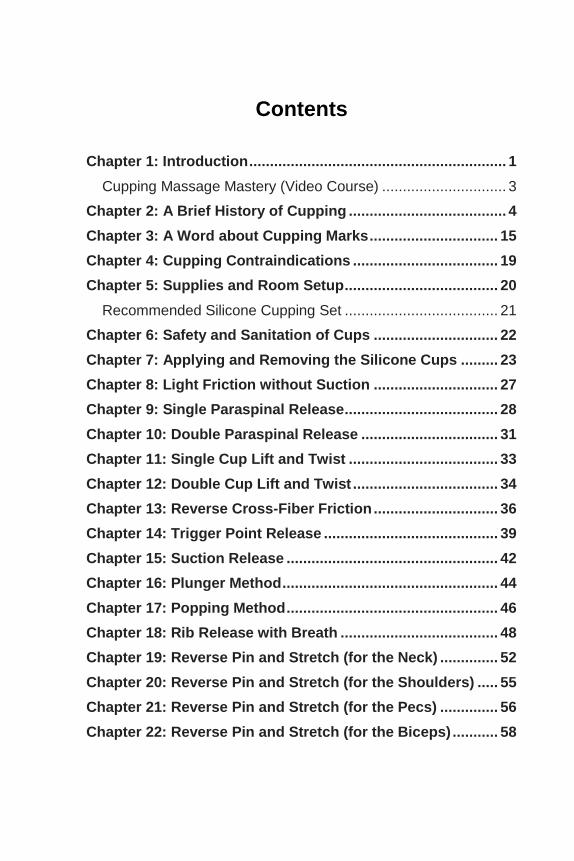
Chapter 1: Introduction .............................................................. 1
Cupping Massage Mastery (Video Course) .............................. 3
Chapter 2: A Brief History of Cupping ...................................... 4
Chapter 3: A Word about Cupping Marks ............................... 15
Chapter 4: Cupping Contraindications ................................... 19
Chapter 5: Supplies and Room Setup ..................................... 20
Recommended Silicone Cupping Set ..................................... 21
Chapter 6: Safety and Sanitation of Cups .............................. 22
Chapter 7: Applying and Removing the Silicone Cups ......... 23
Chapter 8: Light Friction without Suction .............................. 27
Chapter 9: Single Paraspinal Release ..................................... 28
Chapter 10: Double Paraspinal Release ................................. 31
Chapter 11: Single Cup Lift and Twist .................................... 33
Chapter 12: Double Cup Lift and Twist ................................... 34
Chapter 13: Reverse Cross-Fiber Friction .............................. 36
Chapter 14: Trigger Point Release .......................................... 39
Chapter 15: Suction Release ................................................... 42
Chapter 16: Plunger Method .................................................... 44
Chapter 17: Popping Method ................................................... 46
Chapter 18: Rib Release with Breath ...................................... 48
Chapter 19: Reverse Pin and Stretch (for the Neck) .............. 52
Chapter 20: Reverse Pin and Stretch (for the Shoulders) ..... 55
Chapter 21: Reverse Pin and Stretch (for the Pecs) .............. 56
Chapter 22: Reverse Pin and Stretch (for the Biceps) ........... 58
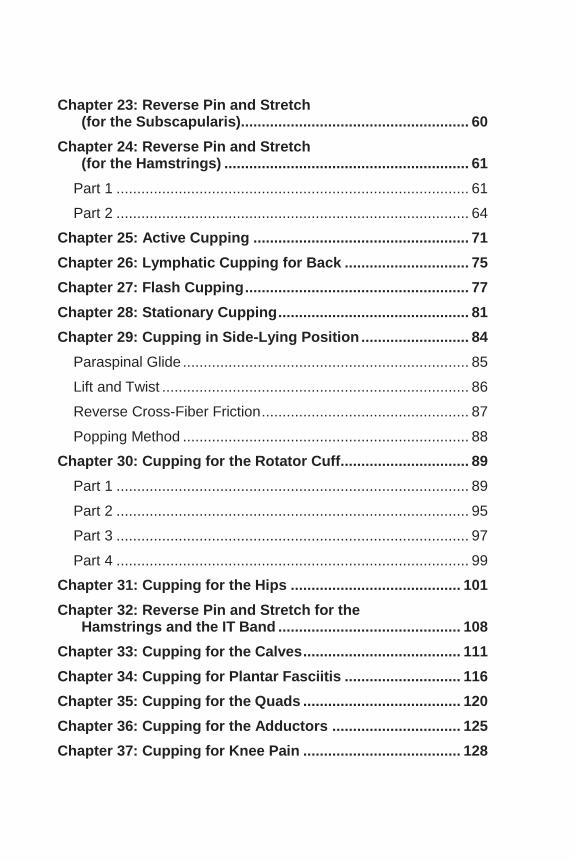
Chapter 23: Reverse Pin and Stretch (for the Subscapularis)....................................................... 60
Chapter 24: Reverse Pin and Stretch (for the Hamstrings) ........................................................... 61
Part 1 ..................................................................................... 61
Part 2 ..................................................................................... 64
Chapter 25: Active Cupping .................................................... 71
Chapter 26: Lymphatic Cupping for Back .............................. 75
Chapter 27: Flash Cupping ...................................................... 77
Chapter 28: Stationary Cupping .............................................. 81
Chapter 29: Cupping in Side-Lying Position .......................... 84
Paraspinal Glide ..................................................................... 85
Lift and Twist .......................................................................... 86
Reverse Cross-Fiber Friction .................................................. 87
Popping Method ..................................................................... 88
Chapter 30: Cupping for the Rotator Cuff............................... 89
Part 1 ..................................................................................... 89
Part 2 ..................................................................................... 95
Part 3 ..................................................................................... 97
Part 4 ..................................................................................... 99
Chapter 31: Cupping for the Hips ......................................... 101
Chapter 32: Reverse Pin and Stretch for the Hamstrings and the IT Band ............................................ 108
Chapter 33: Cupping for the Calves ...................................... 111
Chapter 34: Cupping for Plantar Fasciitis ............................ 116
Chapter 35: Cupping for the Quads ...................................... 120
Chapter 36: Cupping for the Adductors ............................... 125
Chapter 37: Cupping for Knee Pain ...................................... 128

Chapter 38: Cupping for Shin Splints ................................... 134
Chapter 39: Cupping for the Forearms ................................. 141
Golfer’s Elbow ...................................................................... 141
Carpal Tunnel ....................................................................... 145
Tennis Elbow ........................................................................ 151
Bonus Chapter: Facial Cupping ............................................ 154
Contraindications for Facial Cupping .................................... 155
Recommended Glass Facial Cupping Set ............................ 156
Caring for Your Facial Cupping Set ...................................... 157
Facial Cupping Sequence..................................................... 158
Step 1: Lymphatic Drainage ................................................. 160
Step 2: Jawline ..................................................................... 162
Step 3: Cheeks ..................................................................... 165
Step 4: Around the Mouth ..................................................... 169
Step 5: Plump the Lips ......................................................... 172
Step 6: Sides of Nose ........................................................... 174
Step 7: Around the Eyes ....................................................... 181
Step 8: Frown Lines and Forehead ....................................... 191
Step 9: Eyebrows ................................................................. 197
Step 10: Finishing Strokes .................................................... 198
Helpful Tips .......................................................................... 206
About the Author .................................................................... 209
Other Books by Morgan Sutherland, L.M.T. ......................... 211

1
Chapter 1: Introduction
Welcome to Cupping Massage Mastery, where you will learn
how to integrate the modern adaptation of cupping therapy
using silicone cups into a massage session.
Performing advanced bodywork techniques, such as
myofascial release and trigger point therapy, has never been
simpler, thanks to cupping massage.
My name is Morgan Sutherland, and I've been a certified
massage therapist since the year 2000. For the past 13
years, I've been successfully combining deep tissue
massage and cupping to treat chronic pain and sports
injuries.
My clients rave about how much cupping has enhanced the
effectiveness of my massages, so much so that they're
rebooking appointments and writing five-star reviews.
Currently I have over 450 reviews, so you can feel confident
you'll be learning from a seasoned cupping massage
therapist.
I designed this cupping course for massage therapists,
bodyworkers, and other health professionals seeking to learn
a versatile healing modality. This knowledge will allow them
to expand their current practices and work much deeper
without causing their clients pain or straining their own
bodies.
2
By the end of this book, you will be able to integrate silicone
cupping therapy into a massage session, work with a greater
range of clients and wider variety of conditions, explain
cupping marks to clients, and apply safety precautions by
knowing about contraindications.
I'll be teaching over a dozen cupping massage techniques
(such as paraspinal release and reverse pin and stretch) that
have allowed me to go deeper and get even faster results
with less pain than just deep tissue massage alone.
Follow along as you'll learn step-by-step cupping treatments
for a variety of chronic pain conditions, such as rotator cuff
strain, tennis elbow, low back pain, sciatica, in addition to a
number of sports injury protocols for the lower extremities
that keep my athletic clients performing better and injury
free.
The ideal student for this course is a massage therapist,
bodyworker, or other health professional who wants to learn
a versatile healing modality, which will allow them to do
deeper work; get excellent results without causing discomfort
to their clients; and save their hands from strain, injury, and
fatigue while still having fun and growing their practices.

3
Cupping Massage Mastery (Video Course)
Take your cupping skills to the next level with the Cupping
Massage Mastery video training.
Go to CuppingMassageMastery.com to learn more.
I look forward to seeing you inside the course.
In good health,
Morgan Sutherland, L.M.T.
Instructor, Cupping Massage Mastery
CuppingMassageMastery.com

4
Chapter 2: A Brief History of Cupping
Cupping therapy, commonly referred to as cupping, has
been around for thousands of years. It developed over time
from the original use of hollowed-out animal horns (the horn
method) to treat boils and suck the toxins out of snakebites
and skin lesions.

5
Horns slowly evolved into bamboo cups, which were
eventually replaced by glass.
Therapeutic applications evolved with the refinement of the
cup itself and with the cultures that employed cupping as a
healthcare technique.
6
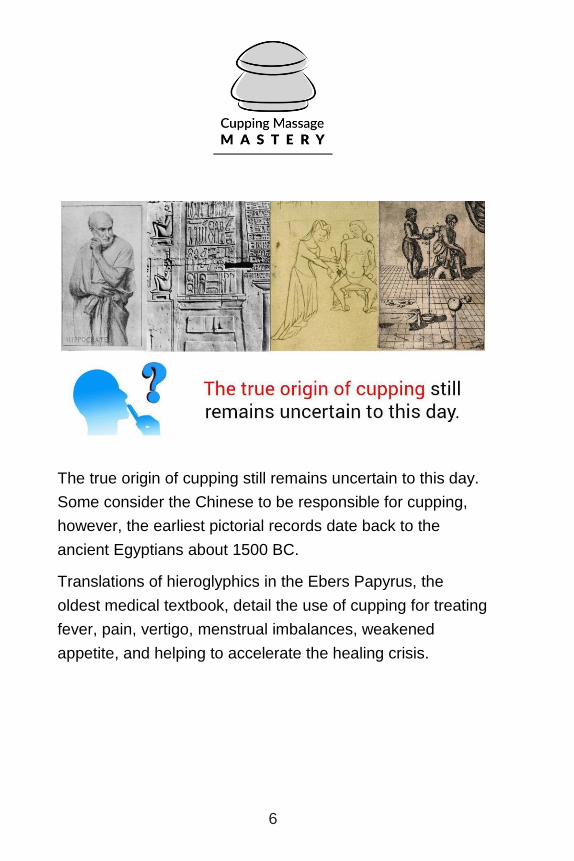
The true origin of cupping still remains uncertain to this day.
Some consider the Chinese to be responsible for cupping,
however, the earliest pictorial records date back to the
ancient Egyptians about 1500 BC.
Translations of hieroglyphics in the Ebers Papyrus, the
oldest medical textbook, detail the use of cupping for treating
fever, pain, vertigo, menstrual imbalances, weakened
appetite, and helping to accelerate the healing crisis.

7
From the Egyptians, cupping was introduced to the ancient
Greeks, where Hippocrates, the father of modern medicine
and cupping advocate, viewed cupping as a remedy for
almost every type of disease.

8
In fact, other Greek physicians used the strong suction of
cupping to restore spinal alignment by reducing dislocated
vertebrae from protruding inward.
The earliest recorded use of cupping came from the famous
alchemist and herbalist Ge Hong (281–341 BCE), who
popularized the saying, “Acupuncture and cupping, more
than half of the ills cured.”
The Chinese expanded the utilization of cupping to include
its use in surgery to divert blood flow from the surgery site.
In the 1950s, after much extensive research, a collaborative
effort between the former Soviet Union and China confirmed
the clinical efficacy of cupping therapy.
9
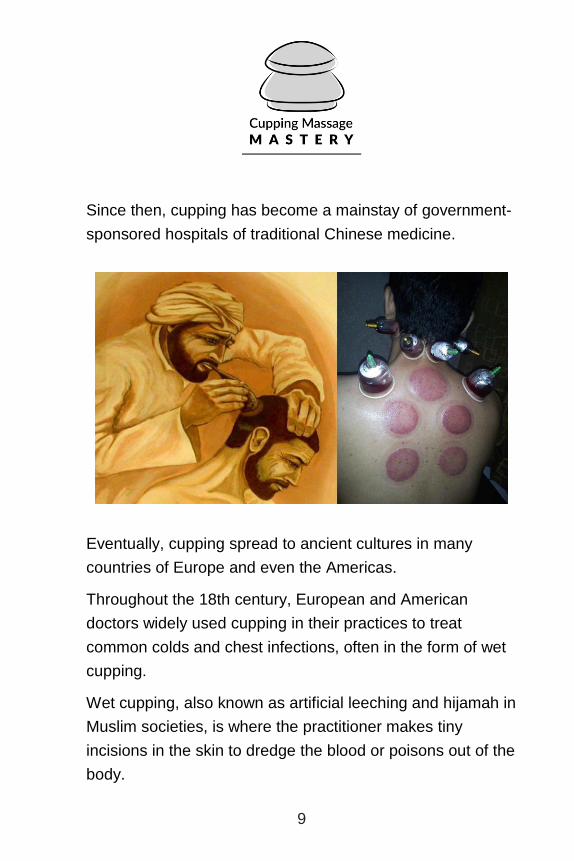
Since then, cupping has become a mainstay of government-
sponsored hospitals of traditional Chinese medicine.
Eventually, cupping spread to ancient cultures in many
countries of Europe and even the Americas.
Throughout the 18th century, European and American
doctors widely used cupping in their practices to treat
common colds and chest infections, often in the form of wet
cupping.
Wet cupping, also known as artificial leeching and hijamah in
Muslim societies, is where the practitioner makes tiny
incisions in the skin to dredge the blood or poisons out of the
body.
10
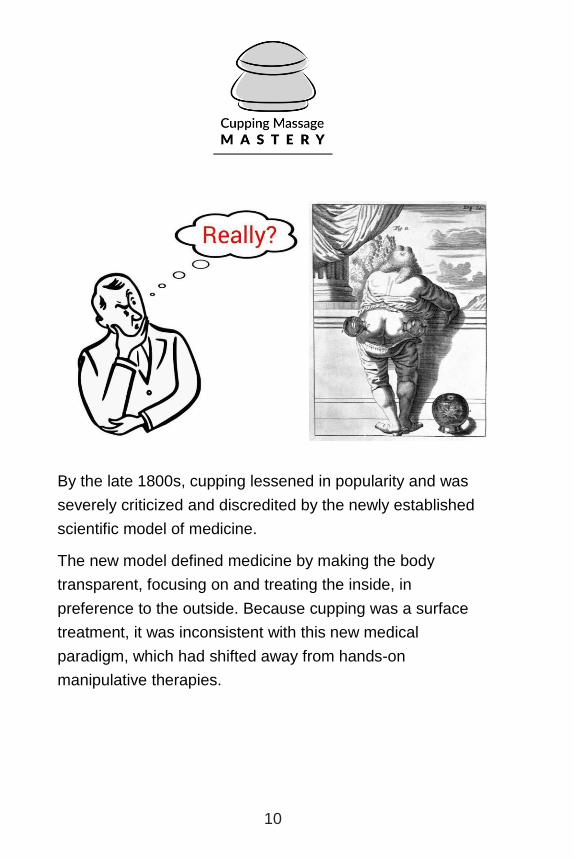
By the late 1800s, cupping lessened in popularity and was
severely criticized and discredited by the newly established
scientific model of medicine.
The new model defined medicine by making the body
transparent, focusing on and treating the inside, in
preference to the outside. Because cupping was a surface
treatment, it was inconsistent with this new medical
paradigm, which had shifted away from hands-on
manipulative therapies.

11
Decades flew by as cupping therapy gradually became
reduced to a mere curiosity of the past, collecting dust on
practitioners’ shelves.
In 2004, cupping re-emerged as a hot new celebrity trend in
the limelight of a New York film festival, where actress
Gwyneth Paltrow’s back revealed her fresh cupping marks.
Countless celebrities, such as Jennifer Aniston, Victoria
Beckham, Justin Bieber, and Kim Kardashian, followed suit
and became fast adopters of this hot new cupping trend.

12
In the 2016 Olympics, swimmer Michael Phelps’ multitude of
eye-catching purple circles made countless headlines. And
no, he was not in a bar fight!
Neither did he fall asleep on his 22 gold medals!
Michael Phelps’ trainers proudly claimed that cupping was a
favored recovery modality that helped reduce soreness and
sped up the healing of overworked muscles.
Phelps wasn’t the only Olympian who sported cupping
marks. World champion tennis star Serena Williams is also a
big believer in the benefits of cupping.

13
“It feels like an octopus, although I don’t know what an
octopus feels like . . . It looks weird, the cupping. Yeah, I
always do it, but I just did it for fun . . . so it just feels like it’s
suctioning and it just feels good.”
A 2015 systematic review and meta-analysis in the journal
PLoS One concluded that cupping could be effective in
treating the pain and disability associated with chronic neck
pain and chronic low back pain in the short term.
In 2016, Leonid Kalichman, a senior lecturer at Ben-Gurion
University of the Negev in Israel, coauthored a commentary
reviewing cupping research in the Journal of Bodywork and
Movement Therapies.
14
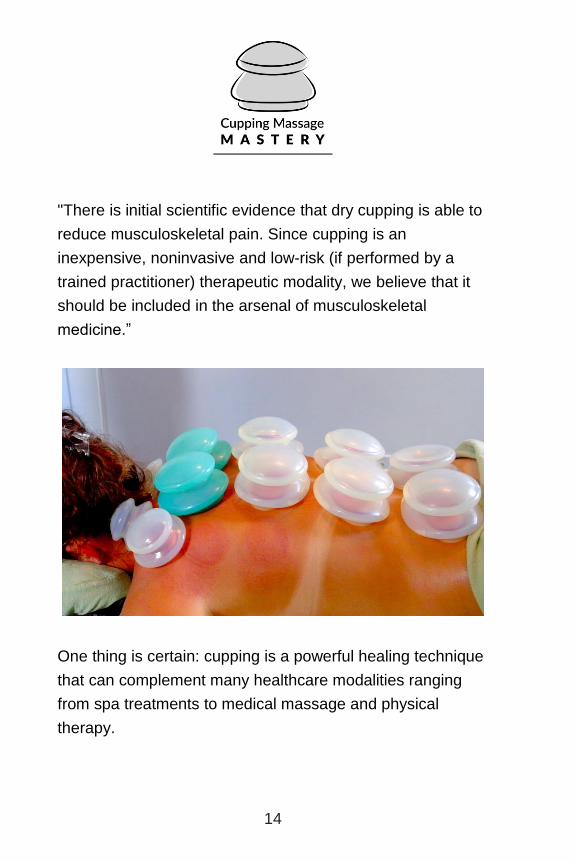
"There is initial scientific evidence that dry cupping is able to
reduce musculoskeletal pain. Since cupping is an
inexpensive, noninvasive and low-risk (if performed by a
trained practitioner) therapeutic modality, we believe that it
should be included in the arsenal of musculoskeletal
medicine.”
One thing is certain: cupping is a powerful healing technique
that can complement many healthcare modalities ranging
from spa treatments to medical massage and physical
therapy.
15
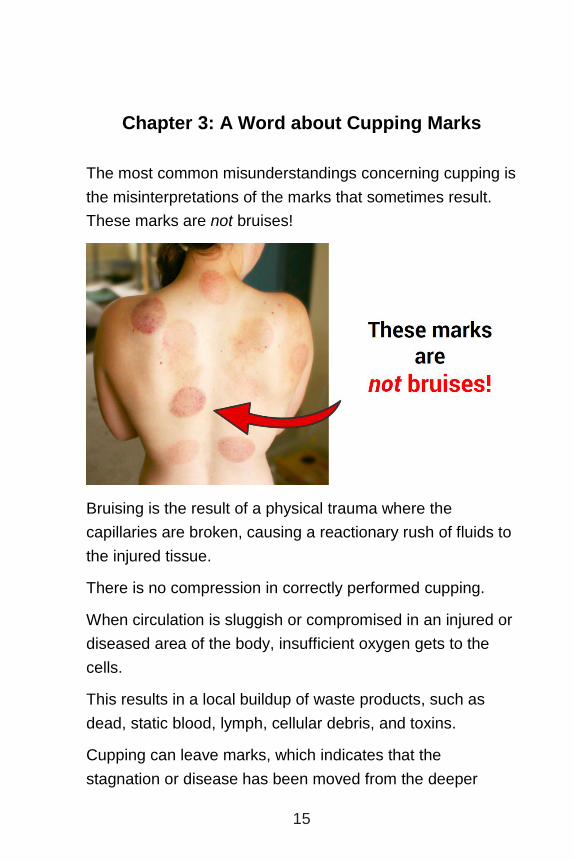
Chapter 3: A Word about Cupping Marks
The most common misunderstandings concerning cupping is
the misinterpretations of the marks that sometimes result.
These marks are not bruises!
Bruising is the result of a physical trauma where the
capillaries are broken, causing a reactionary rush of fluids to
the injured tissue.
There is no compression in correctly performed cupping.
When circulation is sluggish or compromised in an injured or
diseased area of the body, insufficient oxygen gets to the
cells.
This results in a local buildup of waste products, such as
dead, static blood, lymph, cellular debris, and toxins.
Cupping can leave marks, which indicates that the
stagnation or disease has been moved from the deeper
16
tissue layers to the surface, allowing fresh oxygenated blood
to nourish and heal the underlying areas.
Any suction device left long enough in one place will loosen
and pull these agents out and up to the skin surface.
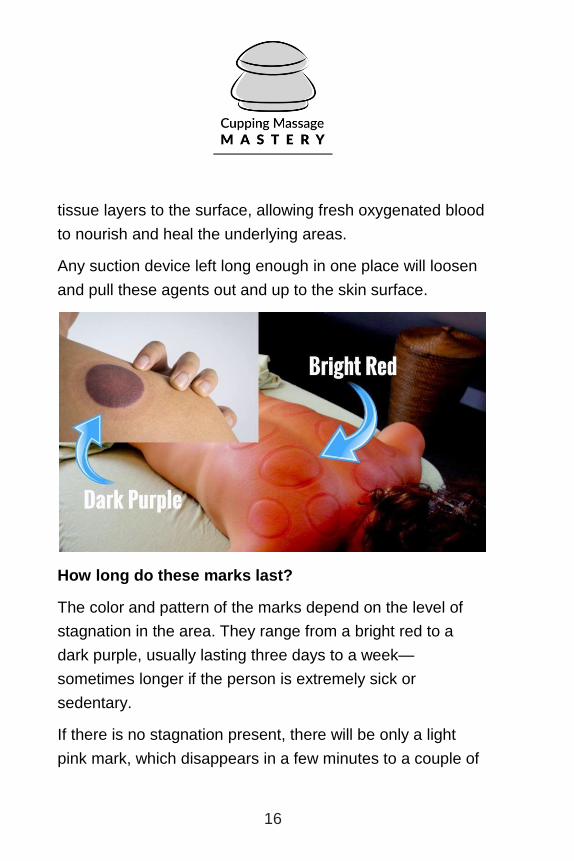
How long do these marks last?
The color and pattern of the marks depend on the level of
stagnation in the area. They range from a bright red to a
dark purple, usually lasting three days to a week—
sometimes longer if the person is extremely sick or
sedentary.
If there is no stagnation present, there will be only a light
pink mark, which disappears in a few minutes to a couple of

17
hours. Sites where there is an old trauma or injury might
require multiple cupping treatments to remove all the
stagnation.
You will find that with follow-up treatments, the marks will
become visibly lighter as the pathogens are systemically
removed from the body.
As treatments accumulate and as the stagnation gets
released, dispersed, and drained—(sometimes as quickly as
the second treatment), no discoloration is likely to occur at
all—even though each time the cupping might have been
focused on the same area, for the same duration, and with
the same amount of suction.

18
This action is clearly the result of having internal unwanted
toxins systematically purged.
According to Ilkay Zihni Chirali, author of Traditional Chinese
Medicine Cupping Therapy, the full benefits of cupping are
achieved between 5 and 10 visits. Some benefits are
immediately noticeable, but short-lived, when dealing with
musculoskeletal conditions. In this case, Chirali highly
recommends 10 sessions as one course of treatment.

19
Chapter 4: Cupping Contraindications
Please read the following contraindications before you begin
cupping your clients. Always remember, when in doubt, don’t
cup!
Avoid excessive heat, cold, or exercise for at least
four to six hours post cupping.
Do not perform cupping on broken bones,
dislocations, hernias, herniated discs, or on anyone
undergoing cancer therapies.
Do not cup over sunburned skin or skin that is
ruptured, ulcerated, or inflamed.
Avoid moving cups over the jugular or carotid artery.
Only perform cupping on pregnant clients in their
second trimester.
When cupping pregnant clients, avoid moving cups
over the abdomen or sacrum.
Avoid strong cupping or lengthy cupping on energy-
depleted clients.
Perform only light cupping on the elderly, children,
and when going over the kidneys.
Do not perform cupping on people with kidney or liver
disease, cardiomyopathy, varicose veins, or over
recent surgical incisions.
Avoid strong cupping or prolonged cupping on clients
who are on blood thinners, hemophiliacs, have high or
low blood pressure, or are diabetic.

20
Chapter 5: Supplies and Room Setup
When it comes to setting up your office, so you can easily
introduce cupping into your bodywork sessions, it’s essential
that you have the following supplies.
Four or more sets of silicone cups (recommended set
SiliconeCuppingSet.com).
A small table or counter space to place the cups.
A mat to place the cups on top of.
Massage oil or oil-based massage cream.
A small, plastic container to place the used cups into
and transport to the sink to wash.
21
A spray bottle filled with a 50/50 blend of plain
Listerine and water.
Liquid dish soap to wash and clean the cups.
A roll of paper towels to dry the cups.
Recommended Silicone Cupping Set
Go to SiliconeCuppingSet.com to see my recommended
silicone cupping set.
22
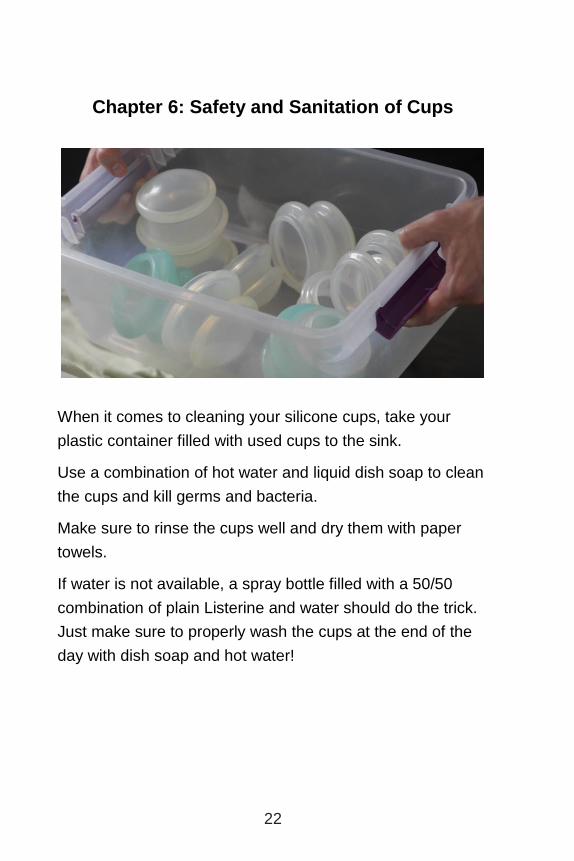
Chapter 6: Safety and Sanitation of Cups
When it comes to cleaning your silicone cups, take your
plastic container filled with used cups to the sink.
Use a combination of hot water and liquid dish soap to clean
the cups and kill germs and bacteria.
Make sure to rinse the cups well and dry them with paper
towels.
If water is not available, a spray bottle filled with a 50/50
combination of plain Listerine and water should do the trick.
Just make sure to properly wash the cups at the end of the
day with dish soap and hot water!
23
Chapter 7: Applying and Removing the
Silicone Cups
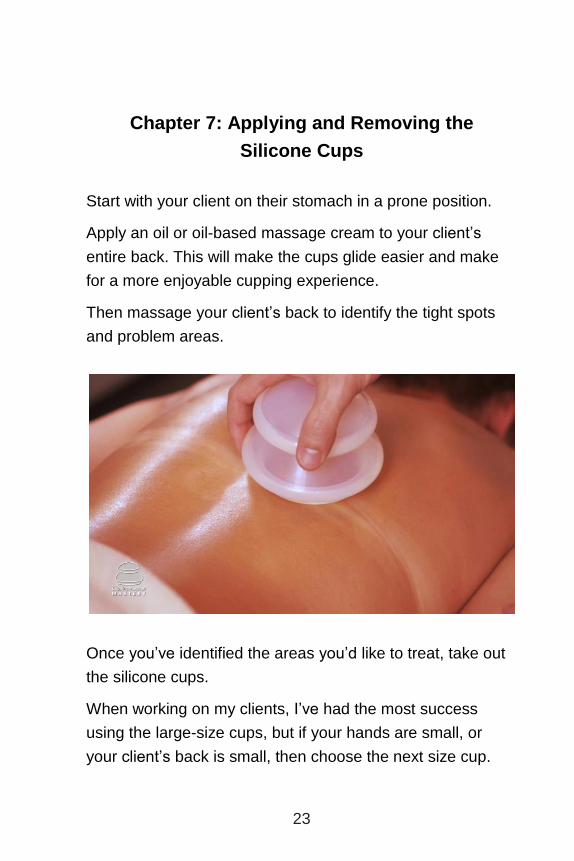
Start with your client on their stomach in a prone position.
Apply an oil or oil-based massage cream to your client’s
entire back. This will make the cups glide easier and make
for a more enjoyable cupping experience.
Then massage your client’s back to identify the tight spots
and problem areas.
Once you’ve identified the areas you’d like to treat, take out
the silicone cups.
When working on my clients, I’ve had the most success
using the large-size cups, but if your hands are small, or
your client’s back is small, then choose the next size cup.
24
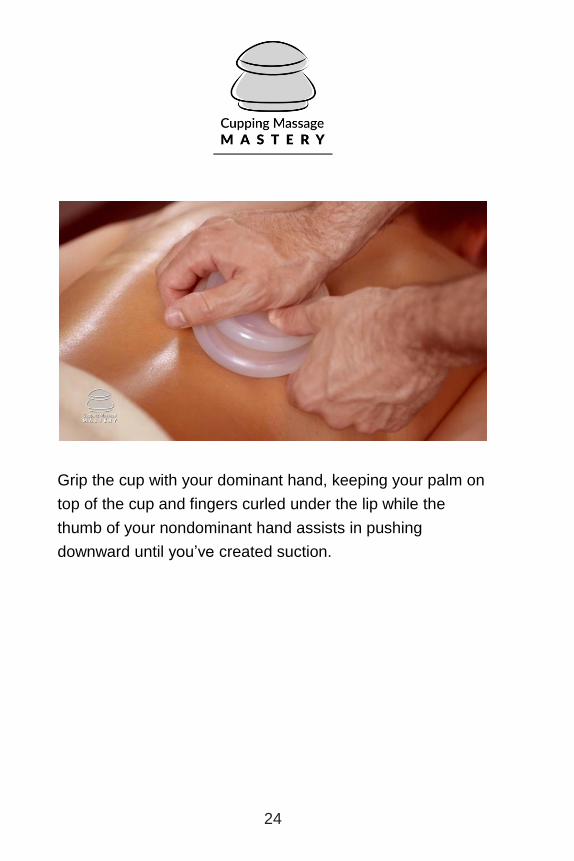
Grip the cup with your dominant hand, keeping your palm on
top of the cup and fingers curled under the lip while the
thumb of your nondominant hand assists in pushing
downward until you’ve created suction.
25
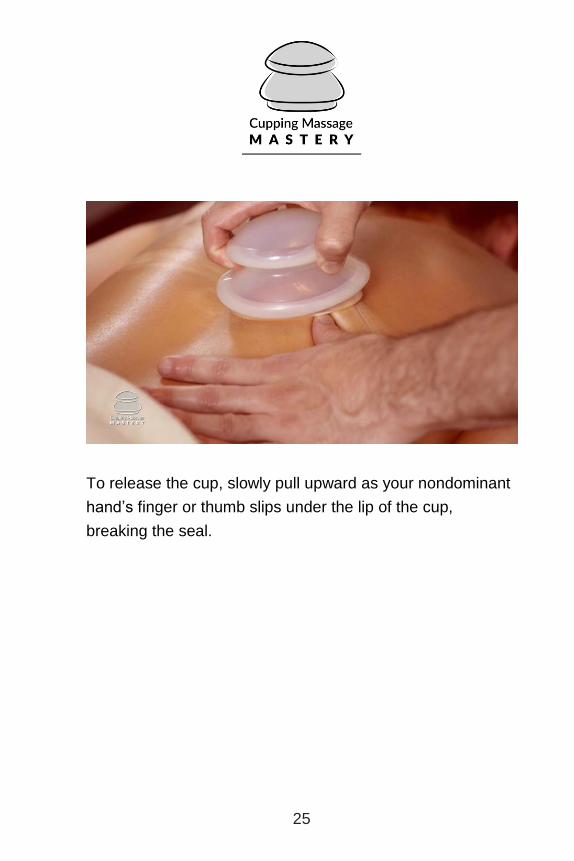
To release the cup, slowly pull upward as your nondominant
hand’s finger or thumb slips under the lip of the cup,
breaking the seal.
26
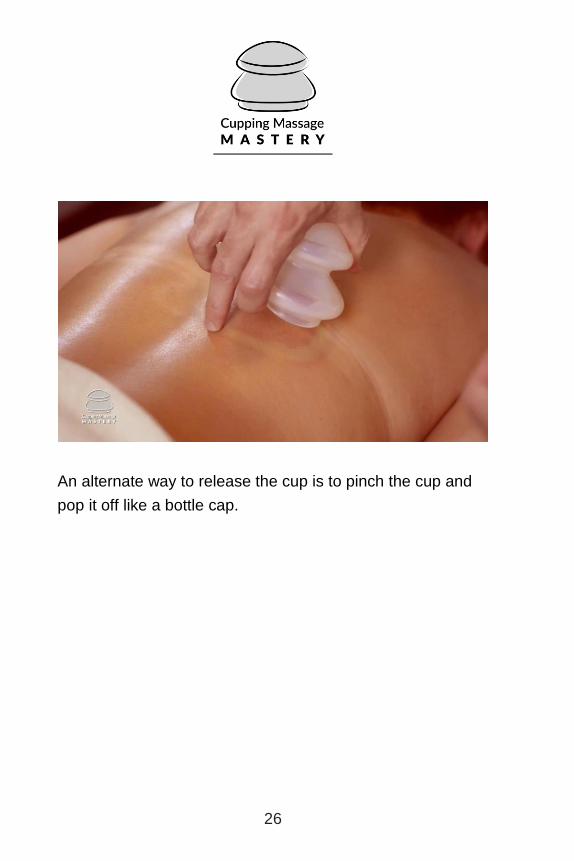
An alternate way to release the cup is to pinch the cup and
pop it off like a bottle cap.

27
Chapter 8: Light Friction without Suction
Some clients are extra sensitive to the pressure of the cups,
so doing a light frictioning first, without the suction, can help
stimulate and desensitize the skin.
After a few minutes, test the client’s sensitivity levels and
suction the cups to the area you’d like to treat. If they report
that the suction is comfortable, then you can resume the
treatment.
28
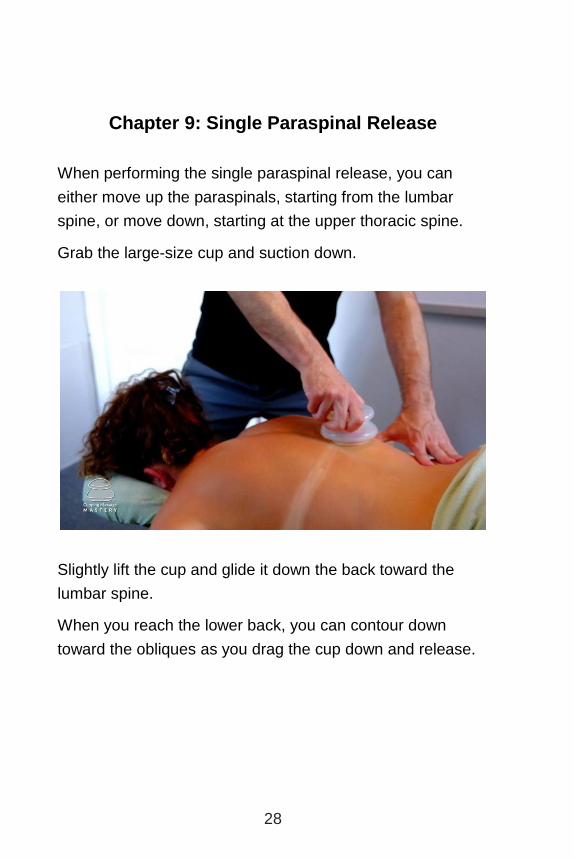
Chapter 9: Single Paraspinal Release
When performing the single paraspinal release, you can
either move up the paraspinals, starting from the lumbar
spine, or move down, starting at the upper thoracic spine.
Grab the large-size cup and suction down.
Slightly lift the cup and glide it down the back toward the
lumbar spine.
When you reach the lower back, you can contour down
toward the obliques as you drag the cup down and release.

29
Quickly re-suction and move up the paraspinals until you
reach the upper traps. Then slowly twist the cup clockwise,
counterclockwise, or both, and release it.

30
When coming up the back, circle the scapula a few times
and then release toward the armpits.
Tip: If you stand at the head of the table when moving the
cups up the paraspinals, you can simply pull the cup up the
back slightly pinching the cup if you wish to narrow the
suction space and be more specific in targeting the
paraspinals.

31
Chapter 10: Double Paraspinal Release
When doing the double paraspinal release, I like to start at
the sacroiliac joint or around the lumbar vertebra 4 or 5.
Suction the two cups down and then slowly drag them up the
back, making sure to not arch your back too much as you
lean over the table.
You’ll want to have a wider stance and make sure to bend
your knees.
When moving the cups up the back, try and make the
movement a graceful flow.

32
As you suction, pull up, turn the cups inward and then
outward, and then release. Or you can drag the cups toward
the armpits and release.
Try using a smaller-size cup if your hands are smaller. Make
sure to check in with the client and then ask how it feels.

33
Chapter 11: Single Cup Lift and Twist
When doing the single cup lift and twist method, try and
imagine you’re turning a doorknob back and forth. Suction
and lift the cup, twisting it up and down the back.

34
Chapter 12: Double Cup Lift and Twist
To do the double cup lift and twist, place two cups on either
side of the spine and then lift and quickly twist them in
opposing directions.

35
Then you can do what I call lift and twist and drag. The drag
part is created by pinching the cups, as you twist them, and
then drag them away from the midline toward the table.

36
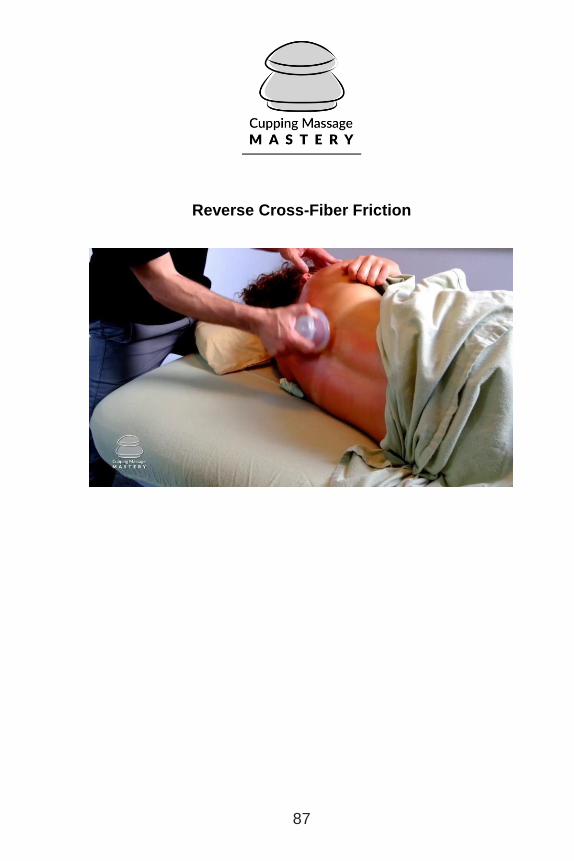
Chapter 13: Reverse Cross-Fiber Friction
Reverse cross-fiber friction is done by suctioning the cup
parallel to the spine and then slightly pinching, lifting, then
shaking the cup, as you slightly tug it away from the spine.
Then release the cup.

37
Repeat this up and down the back along the lamina groove.
When you’re gripping the cup, you can use one hand or two
hands.

38
You can also pinch, lift, and drag the cup laterally from the
client’s spine toward the table.
39
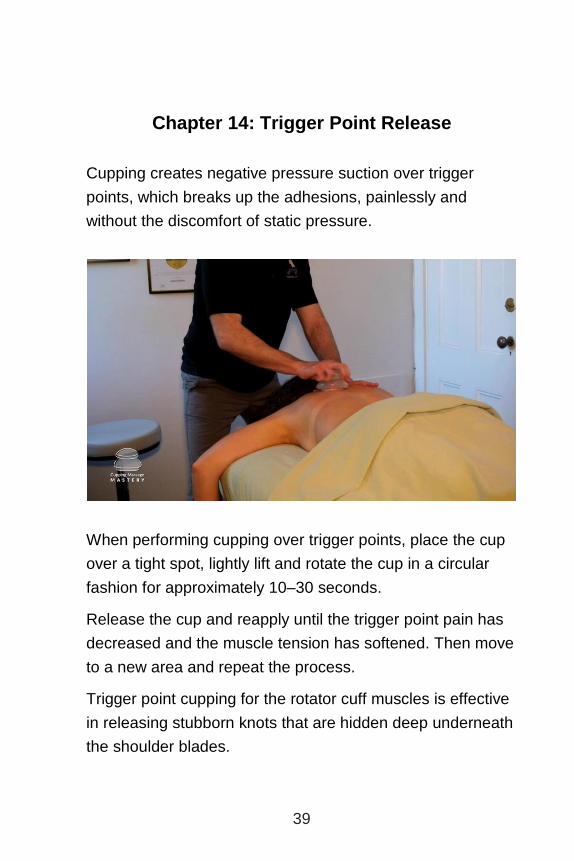
Chapter 14: Trigger Point Release
Cupping creates negative pressure suction over trigger
points, which breaks up the adhesions, painlessly and
without the discomfort of static pressure.
When performing cupping over trigger points, place the cup
over a tight spot, lightly lift and rotate the cup in a circular
fashion for approximately 10–30 seconds.
Release the cup and reapply until the trigger point pain has
decreased and the muscle tension has softened. Then move
to a new area and repeat the process.
Trigger point cupping for the rotator cuff muscles is effective
in releasing stubborn knots that are hidden deep underneath
the shoulder blades.

40
To access these muscles, gently place the client’s arm
behind their back and then place the cup over the rhomboids
and medial scapular border.
If the client cannot put their arm behind their back, position
their arm to their side and put a rolled towel under the front
of their shoulder so that the scapula pops up.
Then reposition the arm off the side of the table.
41
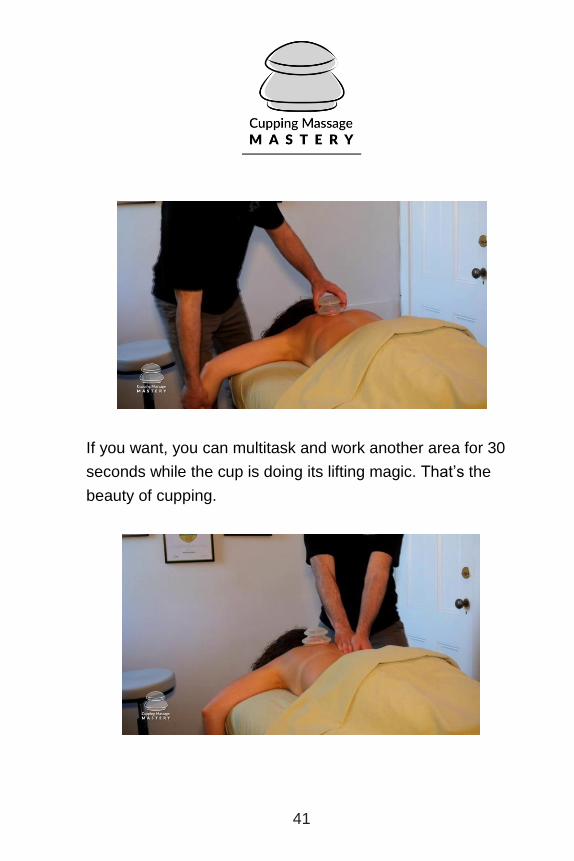
If you want, you can multitask and work another area for 30
seconds while the cup is doing its lifting magic. That’s the
beauty of cupping.
42
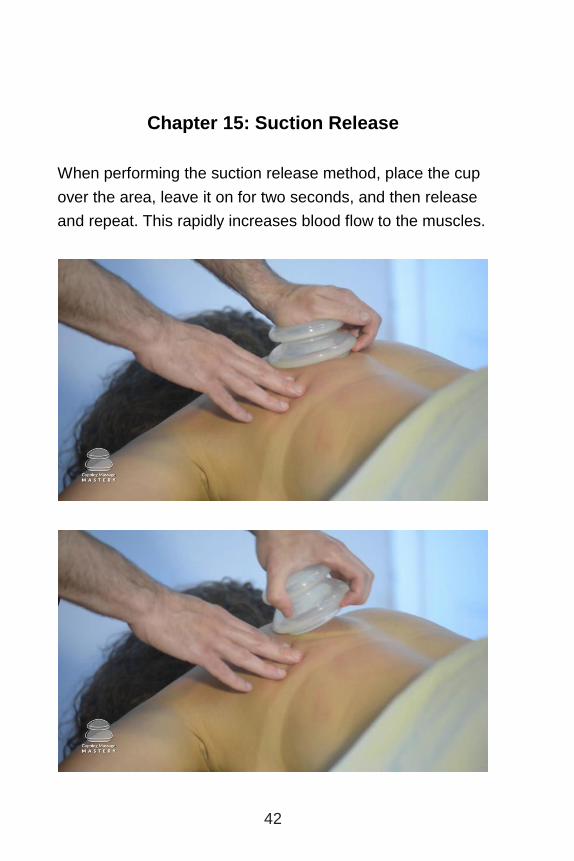
Chapter 15: Suction Release
When performing the suction release method, place the cup
over the area, leave it on for two seconds, and then release
and repeat. This rapidly increases blood flow to the muscles.
43
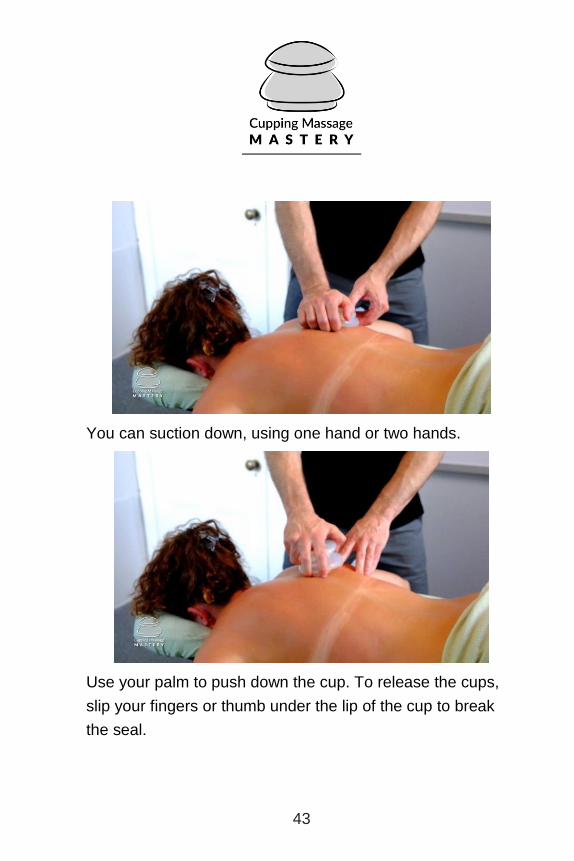
You can suction down, using one hand or two hands.
Use your palm to push down the cup. To release the cups,
slip your fingers or thumb under the lip of the cup to break
the seal.

44
Chapter 16: Plunger Method
The plunger technique is similar to the suction release
method, but without releasing the cup.
Suction and then plunge the cup up and down without
breaking the seal. (“Breaking the seal” means without
breaking the suction of the cup.)

45
Placing your other hand around the cup helps to control the
cup from popping off and allows your cupping work to be
more focused and targeted.

46
Chapter 17: Popping Method
Similar to the suction release method, with the popping
method you suction down. Instead of breaking the seal with
your fingers or thumb, you rapidly pull the cups up off the
body creating a “popping” sound.

47
While one hand is performing the popping, the other hand is
stabilizing the skin.
This method is great for chest congestion and clearing the
buildup of phlegm in the lungs.
The popping method can be done for several minutes over
the entire back along the thoracic spine, specifically around
the rotator cuff and ribs.

48
Chapter 18: Rib Release with Breath
To do a rib release with breath, begin by placing two large-
size or medium-size cups on either side of the spine around
the thoracic vertebra 2 or 3.*
*In the video clip, I actually start at T5/6, but as long as you
cover the whole thoracic vertebrae, you’re golden.
49
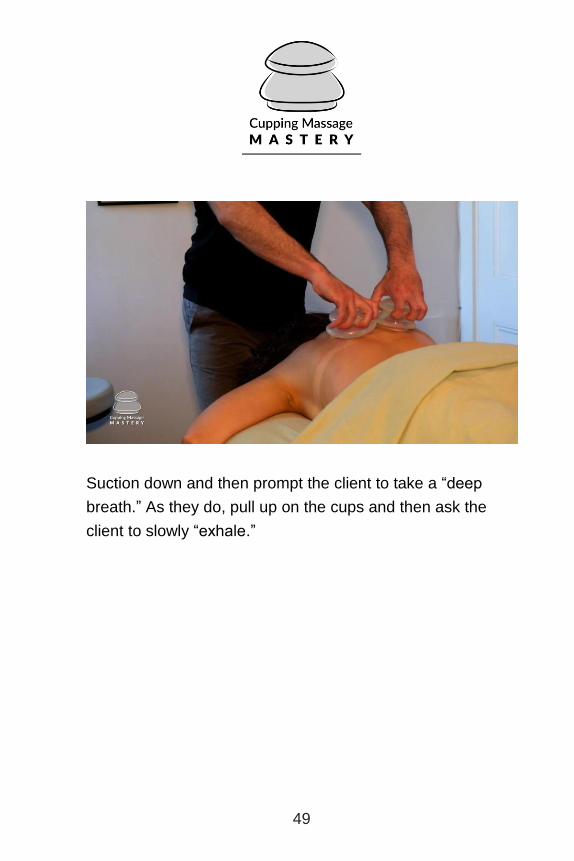
Suction down and then prompt the client to take a “deep
breath.” As they do, pull up on the cups and then ask the
client to slowly “exhale.”
50
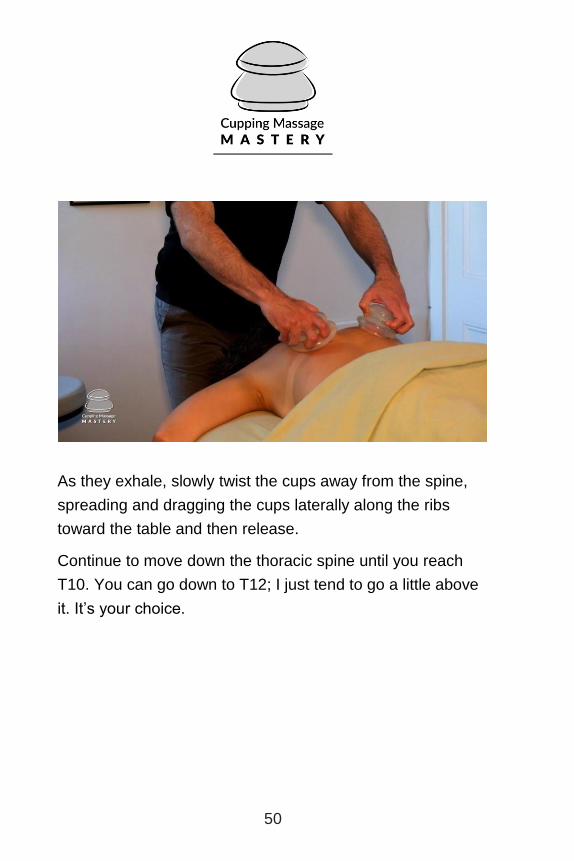
As they exhale, slowly twist the cups away from the spine,
spreading and dragging the cups laterally along the ribs
toward the table and then release.
Continue to move down the thoracic spine until you reach
T10. You can go down to T12; I just tend to go a little above
it. It’s your choice.

51
Repeat 5–10 times.

52
Chapter 19: Reverse Pin and Stretch
(for the Neck)
Reverse pin and stretch means you shorten the muscle,
place a cup over it, and then slowly stretch the muscle to its
maximum resting length.
NOTE: Because of where the camera’s set up, I’m
demonstrating this technique on the right side of my client’s
neck.
Cradle the head with your left hand, turning it slightly to the
left. Then with your right hand, suction the cup over the
upper trap/levator scapulae.
If the neck muscles are extremely tight, you can soften the
neck muscles first with your knuckles and soft fist kneading
up toward the occiput.

53
You might have to move down to a small-size cup, as the
medium-size cup might be too big.
NOTE: Keep your cups close by, if you feel like you need to
switch sizes.
With your left hand, turn the client’s head toward the cup and
then laterally flex the neck to the left.
Hold the stretch for two seconds and then release the cup.
Reapply the cup a little farther up the neck and then stretch
again for another two seconds.
You can perform this up to 10 times.
54
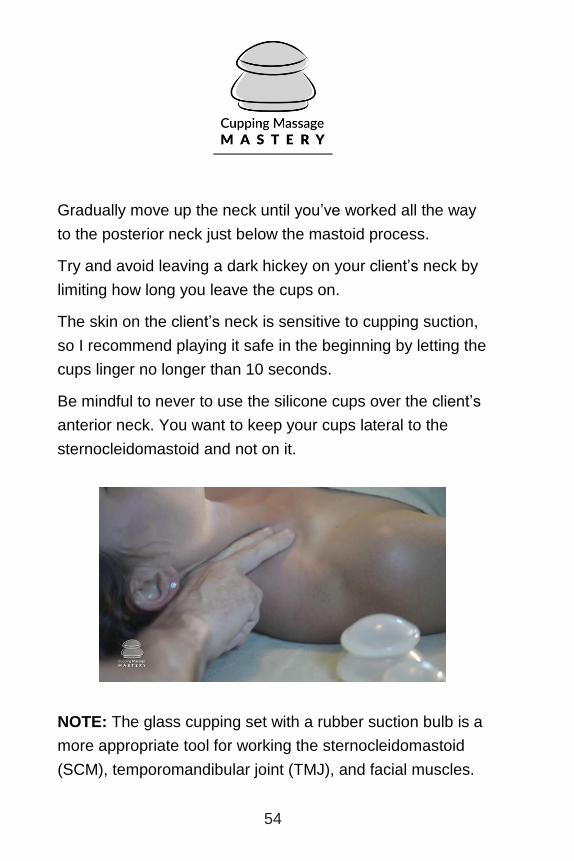
Gradually move up the neck until you’ve worked all the way
to the posterior neck just below the mastoid process.
Try and avoid leaving a dark hickey on your client’s neck by
limiting how long you leave the cups on.
The skin on the client’s neck is sensitive to cupping suction,
so I recommend playing it safe in the beginning by letting the
cups linger no longer than 10 seconds.
Be mindful to never to use the silicone cups over the client’s
anterior neck. You want to keep your cups lateral to the
sternocleidomastoid and not on it.
NOTE: The glass cupping set with a rubber suction bulb is a
more appropriate tool for working the sternocleidomastoid
(SCM), temporomandibular joint (TMJ), and facial muscles.

55
Chapter 20: Reverse Pin and Stretch
(for the Shoulders)
This image shows the reverse pin and stretch for the
shoulder while the client is in a prone position.
Start by pinning the cup (or suctioning the cup) down over
the medial border of the scapula. Then guide your client’s
arm above their head, supporting both their elbow and wrist.
Return the arm to the side of the table, release the cups, and
suction down again more lateral.
Repeat this until you’ve treated the entire posterior rotator
cuff muscle group.
Repeat on the opposite shoulder, if that’s also a problem
area.

56
Chapter 21: Reverse Pin and Stretch
(for the Pecs)
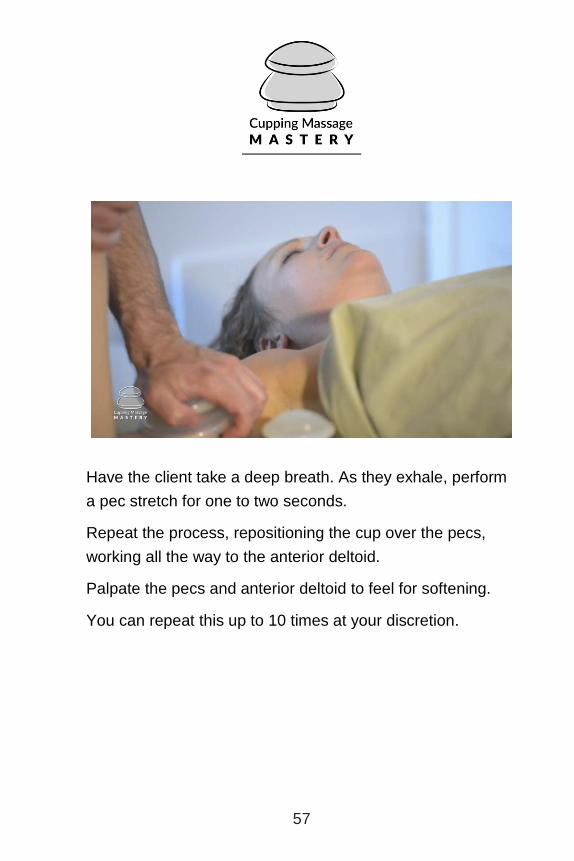
Here I’ll be demonstrating how to perform the reverse pin
and stretch for the right pectoralis major and minor while the
client is supine.
With your left hand, take hold of the client’s right wrist. Then
with your right hand, place a large-size or medium-size cup
over their pectoralis major, pectoralis minor, and anterior
deltoid.
57
Have the client take a deep breath. As they exhale, perform
a pec stretch for one to two seconds.
Repeat the process, repositioning the cup over the pecs,
working all the way to the anterior deltoid.
Palpate the pecs and anterior deltoid to feel for softening.
You can repeat this up to 10 times at your discretion.
58
Chapter 22: Reverse Pin and Stretch
(for the Biceps)
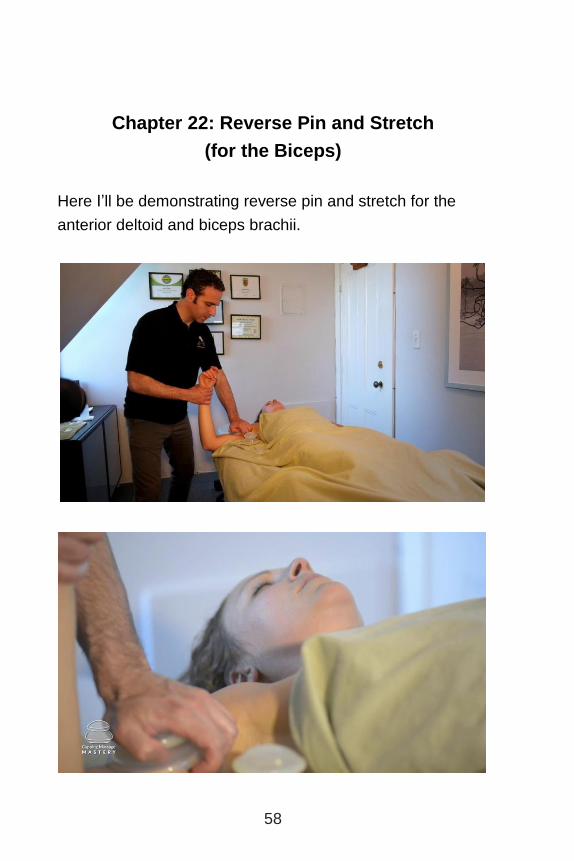
Here I’ll be demonstrating reverse pin and stretch for the
anterior deltoid and biceps brachii.
59
First, suction the client’s biceps, working proximal to distal.
Similar to the suction release method, flex their arm 90
degrees to shorten the biceps muscle. Suction down, extend
their arm, stretching the biceps, then release. Repeat this
process, until the muscles feel softer.
60
Chapter 23: Reverse Pin and Stretch
(for the Subscapularis)
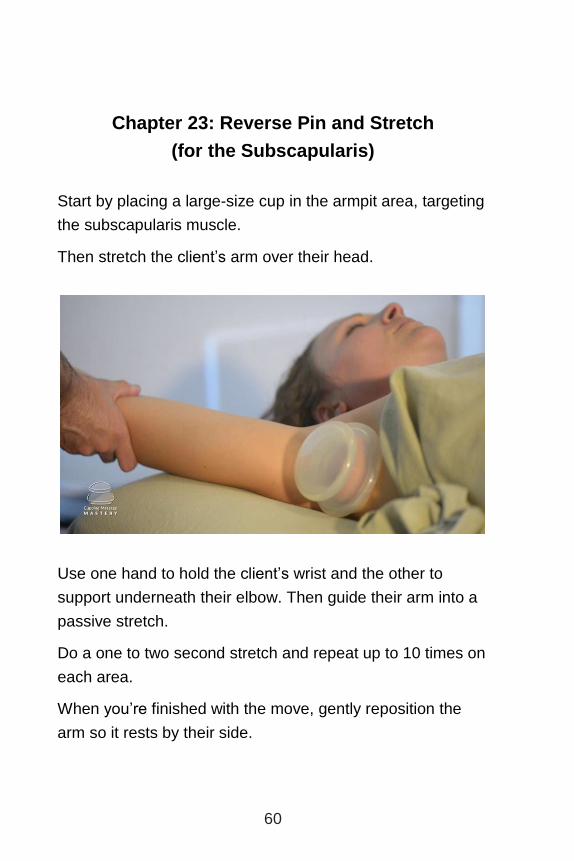
Start by placing a large-size cup in the armpit area, targeting
the subscapularis muscle.
Then stretch the client’s arm over their head.
Use one hand to hold the client’s wrist and the other to
support underneath their elbow. Then guide their arm into a
passive stretch.
Do a one to two second stretch and repeat up to 10 times on
each area.
When you’re finished with the move, gently reposition the
arm so it rests by their side.

61
Chapter 24: Reverse Pin and Stretch
(for the Hamstrings)
In this chapter, I’m going to demonstrate in two parts how to
do reverse pin and stretch for the hamstrings.
Part 1
Start with the client prone, making sure to lubricate their
entire posterior leg, as you’ll eventually be cupping their
hips, calves, and feet.

62
On the right hamstring group, with your left hand, take hold
of the client’s right foot and flex the knee.
Then, with your right hand, suction the distal part of the
client’s hamstrings and glide up, as you simultaneously
straighten their leg.
Just as you would when you massage, visually divide the
hamstrings into three parts—lateral, middle, and medial.
As you reach the proximal attachments, contour around the
hip. Repeat about 15 times—five passes on each part.

63
You can vary how you do this reverse pin and stretch move,
by pivoting your right foot and facing the client’s feet as you
pull the cup up the hamstrings, instead of facing the client’s
head and pushing the cup up.

64
Part 2
Next you’re going to move the cups across the hamstrings,
moving medial to lateral.
Grab your client’s right foot, flex their knee, and with your
other hand, suction your cup onto the proximal attachment of
their hamstrings at the ischial tuberosity.
Lift and drag the cup, medial to lateral, simultaneously,
pushing their leg across their body (called hip external
rotation).

65
Repeat five to six times until you reach right above the back
of the knee. Then repeat again, moving back up toward the
ischial tuberosity.
Remember to always check in with the client about the
pressure and make sure they are comfortable.
Next suction release their iliotibial (IT) band, as you extend
and flex their knee.

66
Now place four to five cups along their IT band, and three to
four cups on their upper hamstrings.

67
Flex and extend the knee and perform external and internal
hip rotation.

68
Do this several times.
Then release all the cups.

69
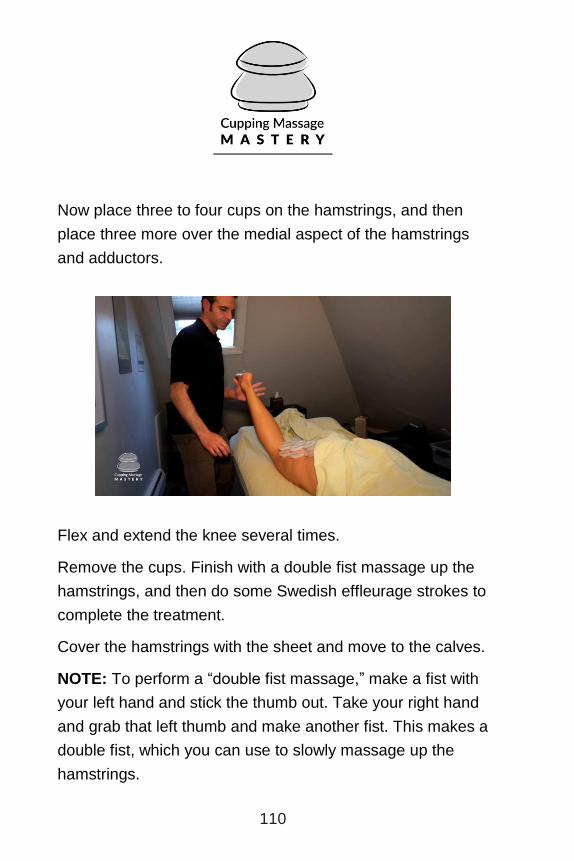
Now place three to four cups on the hamstrings and then
place three or more cups over the medial aspect of the
hamstrings and adductors.

70
Flex and extend the knee several times.
Remove the cups.

71
Chapter 25: Active Cupping
Active cupping is kind of like really fast flash cupping (see
Chapter 27), but the client actively stretches while the cups
are still on. I’ll be demonstrating it on the rotator cuff
muscles, but you can easily replicate this method on the
lower extremities.
Start with the client prone, place three to five large-size and
medium-size cups around the rotator cuff muscles and guide
the client to raise their arm above their head.

72
Then have them actively move their arm without your
assistance.
Coach your client to try and keep their arm straight when it’s
extended and then have them bring it back by their side.
After two to three active stretches, release the cups and
reposition them to “fill in the gaps” meaning the spots that
haven’t been cupped.
Place your hands over the cups, as your client actively
stretches to prevent them from popping off.
You can also perform active cupping during flash cupping.

73
Prompt the client to move their arms over their head (as if
they’re Superman or Superwoman) and then have them
return their arms to their sides and bring their shoulder
blades together. You can have them do this several times.
74
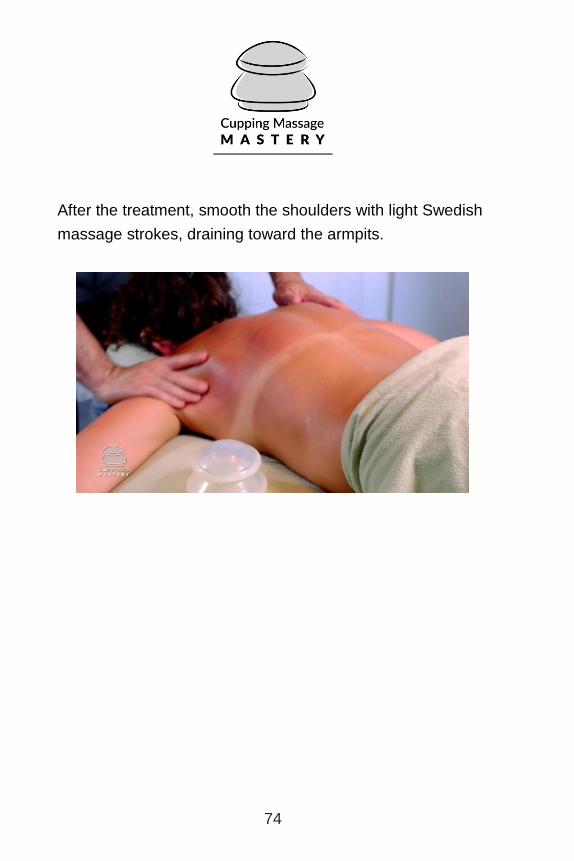
After the treatment, smooth the shoulders with light Swedish
massage strokes, draining toward the armpits.

75
Chapter 26: Lymphatic Cupping for Back
With lymphatic cupping, you’re creating light suction so that
only a little bit of skin is being drawn up into the cup.
Light moving cups stretch open the lymphatic vessels,
increasing the lymph flow and help to detoxify the body.
Your intention should be to drag the cup and release it
toward the axillary or armpit lymph nodes and the inguinal
ducts (in the pelvis).

76
Lymphatic cupping with the silicone cups can also be done
around the low back and the hips. In this case, you lightly lift,
drag, and release the cups toward the inguinal ducts or
pelvic area. Drag laterally, contouring around the hips.
You can always do a light Swedish massage in place of the
lymphatic cupping after you cup an area.

77
Chapter 27: Flash Cupping
When performing flash cupping, place about 8–12 large-size
to medium-size cups on the back in the form of a grid.
The cups are left on for 30 seconds or less and then
repeatedly applied to the skin, removed, and reapplied in the
same spots or slightly different spots to “fill in the blanks,” so
to speak.
A basic 2x4 cup grid down the back is highly effective for
releasing stiffness and soreness associated with a sedentary
lifestyle.
When doing flash cupping on the low back, you can start at
the sacroiliac (SI) joint and create a 2x4 grid up to the mid-
back region.

78
When doing flash cupping for the entire back, it’s best to use
at least 10–12 cups.
Let the cups sit for 30 seconds or less. The redness that
results is a clear sign of increased circulation.
Now it’s time to fill in the blanks and reapply the cups to the
areas that didn’t get cupped.
79
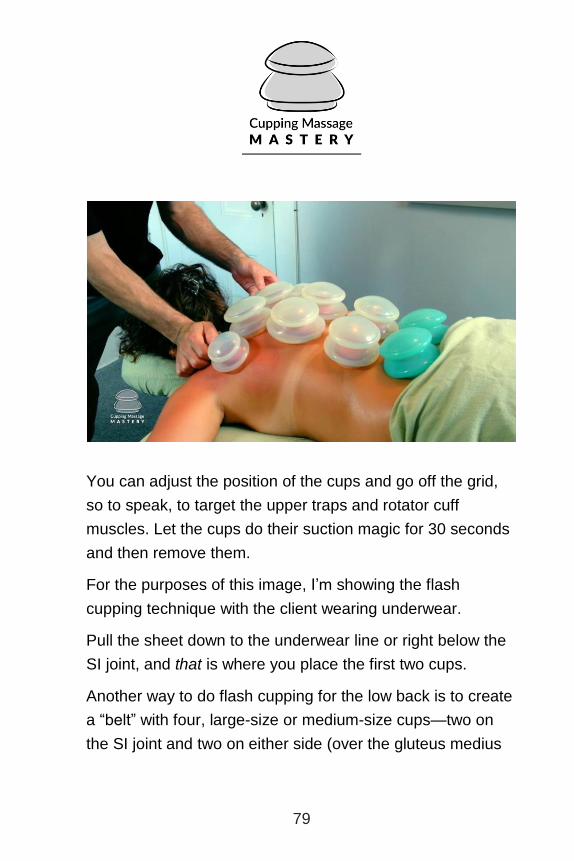
You can adjust the position of the cups and go off the grid,
so to speak, to target the upper traps and rotator cuff
muscles. Let the cups do their suction magic for 30 seconds
and then remove them.
For the purposes of this image, I’m showing the flash
cupping technique with the client wearing underwear.
Pull the sheet down to the underwear line or right below the
SI joint, and that is where you place the first two cups.
Another way to do flash cupping for the low back is to create
a “belt” with four, large-size or medium-size cups—two on
the SI joint and two on either side (over the gluteus medius

80
and gluteus minimus). Then you can add more cups up the
low back toward the mid-back.
Leave them on for 30 seconds or less and then remove the
cups. Smooth out the back with light Swedish massage
strokes or lymphatic cupping.
I keep a big plastic container nearby to put my cups in after
I’m finished using them. That way it makes it easier to
transport them to the sink to wash later.

81
Chapter 28: Stationary Cupping
When doing stationary cupping for the back, lay out a grid of
8–12 cups on the upper or lower back.
For new clients, it’s recommended to play it safe and leave
the cups on for 5–10 minutes to see how they respond.
Try not to go nuts their first session by over-cupping and
making their back look like an octopus attacked it.
While the cups are “parked” on your client’s back, you can
multitask and work on the client’s hips, legs, and feet.

82
You can leave the cups on longer for follow-up visits, but no
more than 20 minutes max.
Make sure to adjust the pressure of the cups, if they feel
painful for the client.
It’s not uncommon for stationary cupping marks to become
dark red or purple.

83
When you’re done with the stationary cupping, do a little
lymphatic cupping or light Swedish massage—toward the
armpits for the upper back and off toward the hips for the
lower back and mid-back.

84
Chapter 29: Cupping in Side-Lying Position
In this chapter, I’m going to demonstrate how to do cupping
in the side-lying position
Position your client in the side-lying position with a pillow
supporting their neck and shoulders and another pillow
between their knees.
Make sure your client’s back is well lubricated.
Have the client tuck their head and curl their back just a little.
Start with the paraspinal glide up and down their back,
followed by the lift and twist method, then the reverse cross-
fiber friction and popping method techniques.

85
Paraspinal Glide

86
Lift and Twist
87
Reverse Cross-Fiber Friction
88
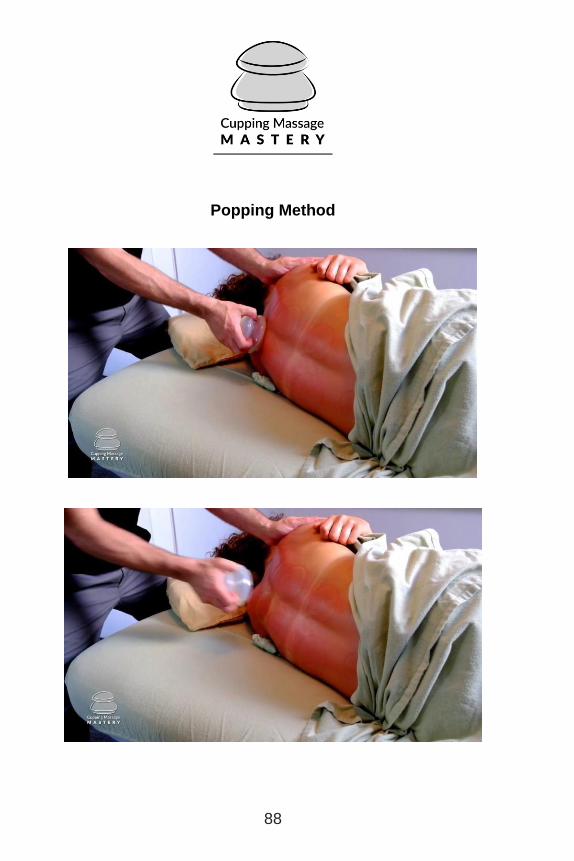
Popping Method

89
Chapter 30: Cupping for the Rotator Cuff
In this chapter, I’m going to show in four parts how to do
cupping for the rotator cuff
Part 1
Start with the client in a prone position.
Glide the cup around the posterior rotator cuff muscles and
lifting slightly, twist and drag the cup toward the armpit.
Place the client’s arm to their side and work their upper traps
and supraspinatus, gliding toward the top of the shoulder.
It’s not uncommon for the cup to get “stuck” over areas that
have fascial adhesions.

90
It’s a perfect time to do trigger point work and the plunger
method, followed by the popping method.

91
Make sure to hit the rhomboids.
92
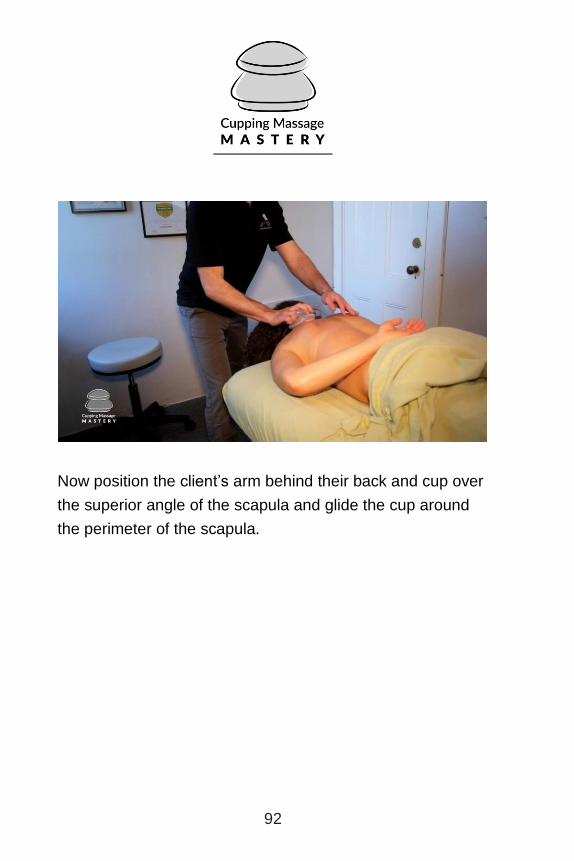
Now position the client’s arm behind their back and cup over
the superior angle of the scapula and glide the cup around
the perimeter of the scapula.

93
Next reposition the client’s arm off the table. Cup over the
trigger points and do active cupping, while the client raises
their arms over their head, like Superman or Superwoman.

94
Finish by gliding the cups over the entire scapula, draining
toward the armpit (simultaneously treating the teres minor
muscle).
For the anterior aspect of the rotator cuff, we’ll need to do
pin and stretch for pecs and subscapularis.
Cover the client and have them flip over onto their back.

95
Part 2
In Part 2 of the cupping for the rotator cuff, I’m going to
demonstrate how to do reverse pin and stretch for the right
pectoralis major and minor while the client is supine.

96
With your left hand, take hold of the client’s right wrist. Then
with your right hand, place a large-size or medium-size cup
over their pectoralis major, pectoralis minor, and anterior
deltoid.
Have the client take a deep breath, and as they exhale,
perform a pec stretch for one to two seconds. Repeat this
process, repositioning the cup over the entire pec major and
pec minor, working all the way to the anterior deltoid.
Palpate the pecs and anterior deltoid and feel for a softening
of the tissue.
You can repeat this up to 10 times.
97
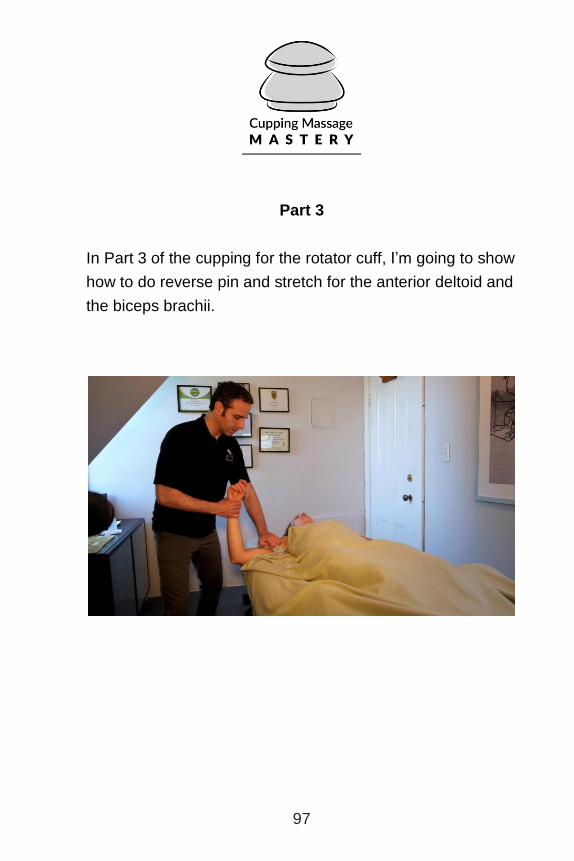
Part 3
In Part 3 of the cupping for the rotator cuff, I’m going to show
how to do reverse pin and stretch for the anterior deltoid and
the biceps brachii.

98
First, suction the client’s biceps, working proximal to distal.
Similar to the suction release method, flex their arm 90
degrees to shorten the biceps muscle, suction down, and
then extend their arm, stretching the biceps. Then release.
Repeat this process, until the muscles feel softer

99
Part 4
This is final part of the cupping for the rotator cuff. I’m going
to perform reverse pin and stretch for the subscapularis.
Start by placing a large-size cup in the armpit area, targeting
the subscapularis muscle and the upper portions of the
latissimus dorsi.
Then stretch the client’s arm over their head, keeping it level
with their ear.
100
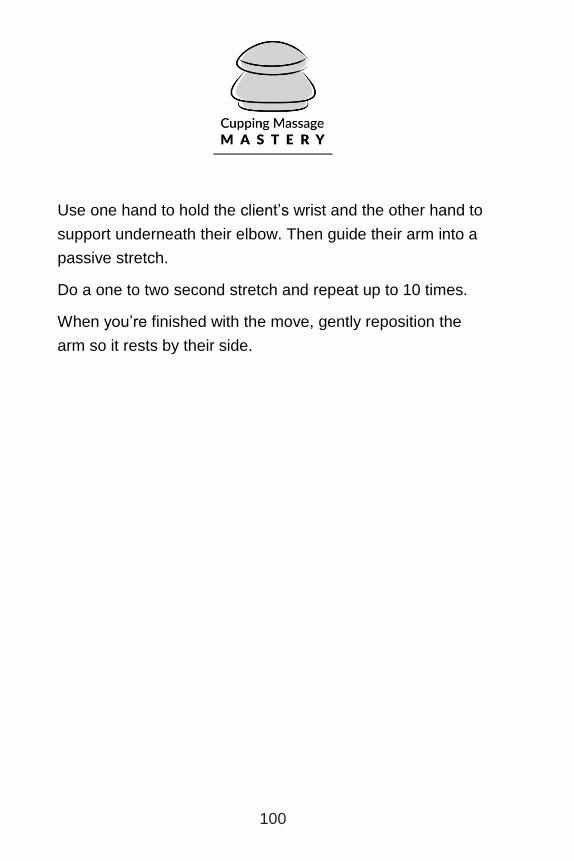
Use one hand to hold the client’s wrist and the other hand to
support underneath their elbow. Then guide their arm into a
passive stretch.
Do a one to two second stretch and repeat up to 10 times.
When you’re finished with the move, gently reposition the
arm so it rests by their side.
101
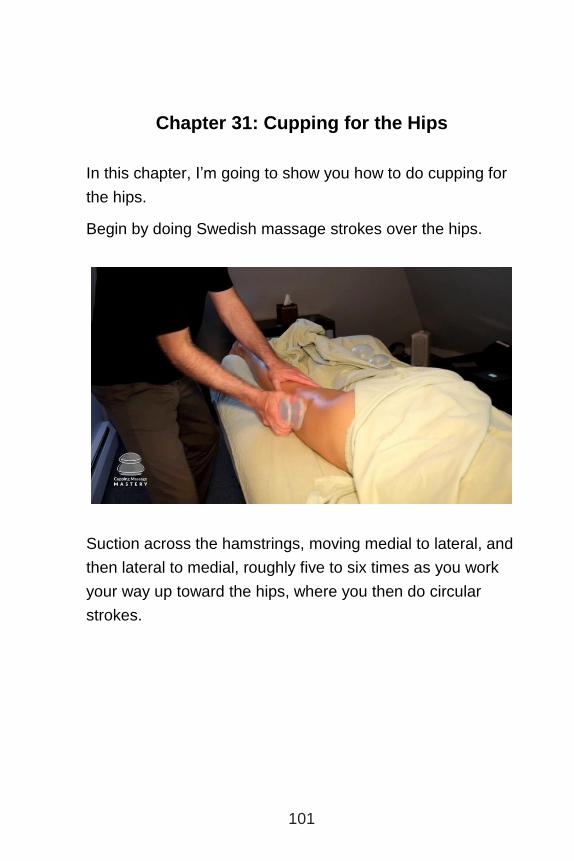
Chapter 31: Cupping for the Hips
In this chapter, I’m going to show you how to do cupping for
the hips.
Begin by doing Swedish massage strokes over the hips.
Suction across the hamstrings, moving medial to lateral, and
then lateral to medial, roughly five to six times as you work
your way up toward the hips, where you then do circular
strokes.

102
Working on the client’s right hip, I’m standing to the side of
the table using my left hand to rest on the hamstring, as my
right hand does about 10 circular strokes around the hip.
Make sure the client is properly draped and the client is well
lubricated with oil or cream, as the hips can be quite
sensitive.
Place the cup over the most medial aspect of the glutes
where it attaches to the sacral border.

103
Visualize lifting all the fascial attachments off the sacral
border. Create a 2x2 cupping grid of large-size to medium-
size cups around the lateral hip.
Your basic objective is to cover the entire gluteal area.
For the purposes of this demonstration, I’m working the
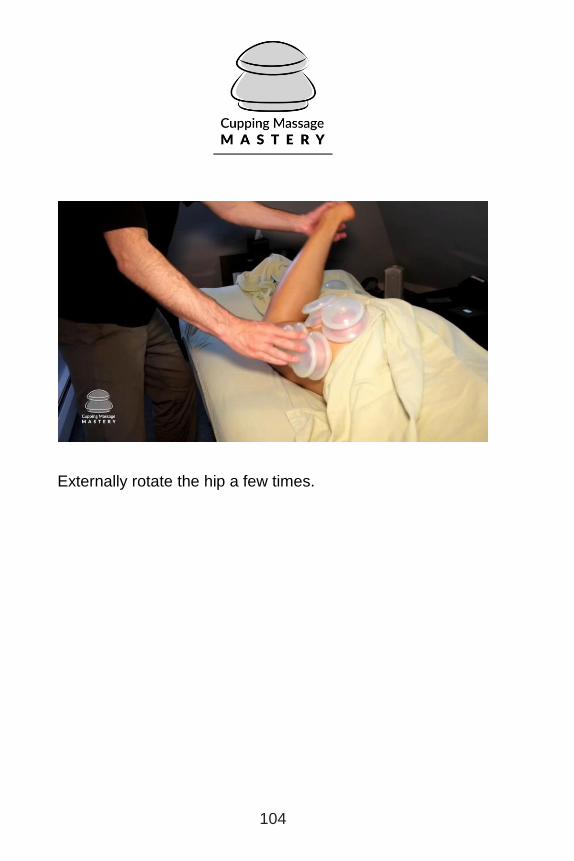
client’s right hip. With your left hand, grab the client’s right
ankle and foot and externally rotate the hip, pushing the foot
medially as you spread your hands over the cups to make
sure they don’t pop off.
104
Externally rotate the hip a few times.

105
If space allows, place a smaller-size cup at the most medial
aspects of the gluteus maximus.
Externally rotate the hip again a few times.
106
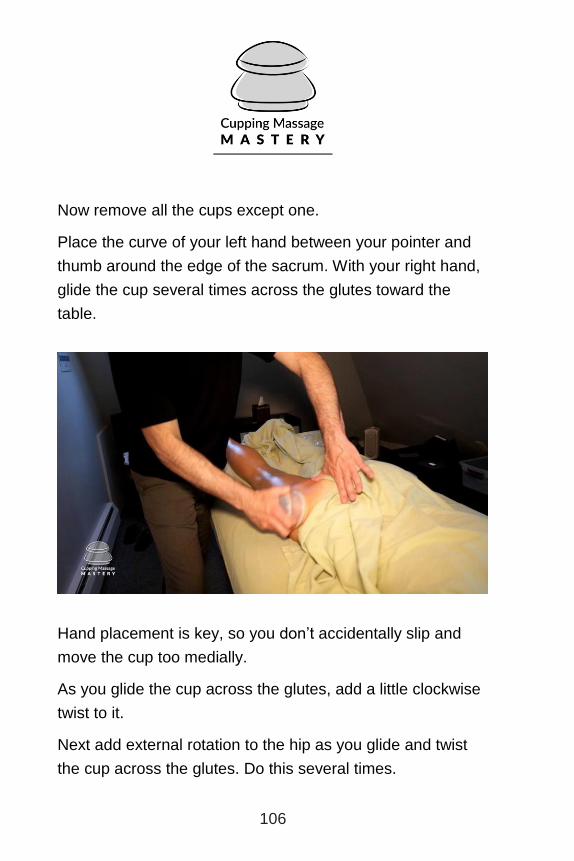
Now remove all the cups except one.
Place the curve of your left hand between your pointer and
thumb around the edge of the sacrum. With your right hand,
glide the cup several times across the glutes toward the
table.
Hand placement is key, so you don’t accidentally slip and
move the cup too medially.
As you glide the cup across the glutes, add a little clockwise
twist to it.
Next add external rotation to the hip as you glide and twist
the cup across the glutes. Do this several times.
107
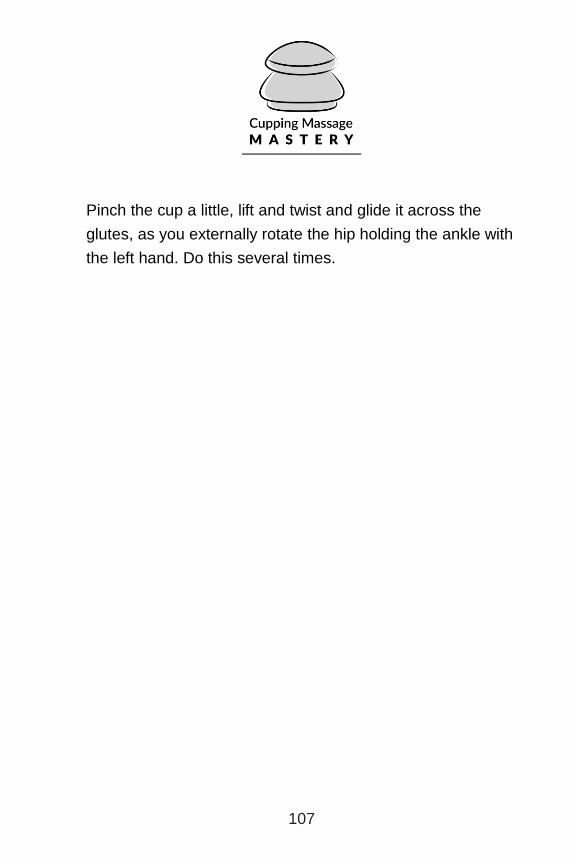
Pinch the cup a little, lift and twist and glide it across the
glutes, as you externally rotate the hip holding the ankle with
the left hand. Do this several times.

108
Chapter 32: Reverse Pin and Stretch for the
Hamstrings and the IT Band
In the last chapter, we worked the hip and now it’s time to
cup the hamstrings and the IT band.
Start with the client’s right leg flexed at the knee, holding
their ankle with your left hand. With your right hand, suction
release their IT band as you extend and flex their knee.

109
Now place four to five cups along their IT Band and three or
so cups on their upper hamstrings.
Flex and extend the knee around. Also externally and
internally rotate the hip several times.
Release all the cups.
110
Now place three to four cups on the hamstrings, and then
place three more over the medial aspect of the hamstrings
and adductors.
Flex and extend the knee several times.
Remove the cups. Finish with a double fist massage up the
hamstrings, and then do some Swedish effleurage strokes to
complete the treatment.
Cover the hamstrings with the sheet and move to the calves.
NOTE: To perform a “double fist massage,” make a fist with
your left hand and stick the thumb out. Take your right hand
and grab that left thumb and make another fist. This makes a
double fist, which you can use to slowly massage up the
hamstrings.

111
Chapter 33: Cupping for the Calves
In this chapter, I’m going to show you how do cupping for the
calves.
Create a 2x2 cupping grid starting at the lateral and medial
heads of the gastrocnemius (the calf).
Then add two more medium-size cups right below them.
You might have to drop down a cup size, based on the size
of the client’s calf.
Then add two more smaller-size cups right below those,
lateral to the Achilles tendon.
You should have a 2x4 cupping grid on the calves.
Now bring the client’s right ankle up and coach them to
“bring your foot down and flex it and then point it.”

112
Expect one of the cups to pop off and go flying, so be on
your toes, so to speak.
Lower the leg to the table and remove the cups.
Now suction two to three large-size cups down the middle of
the calves. However, the number might decrease or
increase, depending on the size of your client’s calf.
First, place three large-size cups down the middle of the calf.
Then, on either side, add two medium-size cups.
But, if this makes the bottom large-size cup in the middle
pop off, replace that cup with a medium-size cup.

113
Next add a smaller-size cup below that cup, so you’ll have
four cups in the center.
Add one more, smaller-size cup on either side.
You’ll have four down the middle of the calf and three on
either side of it. You just want to cover enough of the calf to
be effective.
Now flex the knee and bring the leg up.
The total number of cups on the calf is 10. You can be
creative when you cup, as long as you cover enough of the
calf muscle.
114
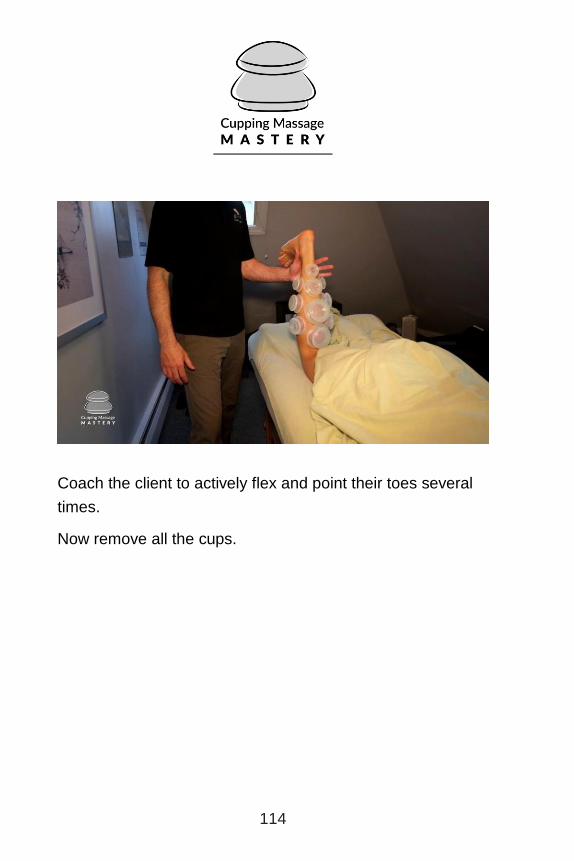
Coach the client to actively flex and point their toes several
times.
Now remove all the cups.
115
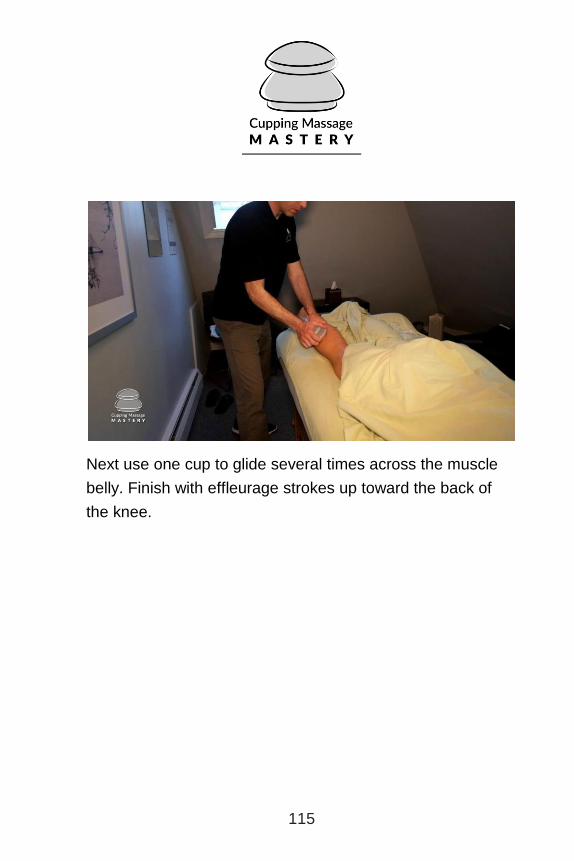
Next use one cup to glide several times across the muscle
belly. Finish with effleurage strokes up toward the back of
the knee.

116
Chapter 34: Cupping for Plantar Fasciitis
In this chapter, I’m going to show you how to perform
cupping for plantar fasciitis.
To effectively treat plantar fasciitis with cupping, you must
start with the cupping of the calves first and then do it for the
bottom of the foot. It will be helpful if you can watch the video
that corresponds to this chapter.
Depending on the texture of the foot, you might not be able
to cup the foot. If it’s too rough or dry, you’ll need to use
extra oil or cream.
With the client prone, place a large-size cup on the heel,
then another large-size or medium-size cup below that in the
middle of the foot, followed by another medium-size cup on
the ball of the foot.

117
Then place one small-size or medium-size cup on either side
of the foot between the top two cups.
Now lift the leg up and dorsiflex the foot covering the cups
with your hand, so the cups don’t pop off.

118
Then ask the client to actively dorsiflex their foot several
times while you’re still holding their leg.
119
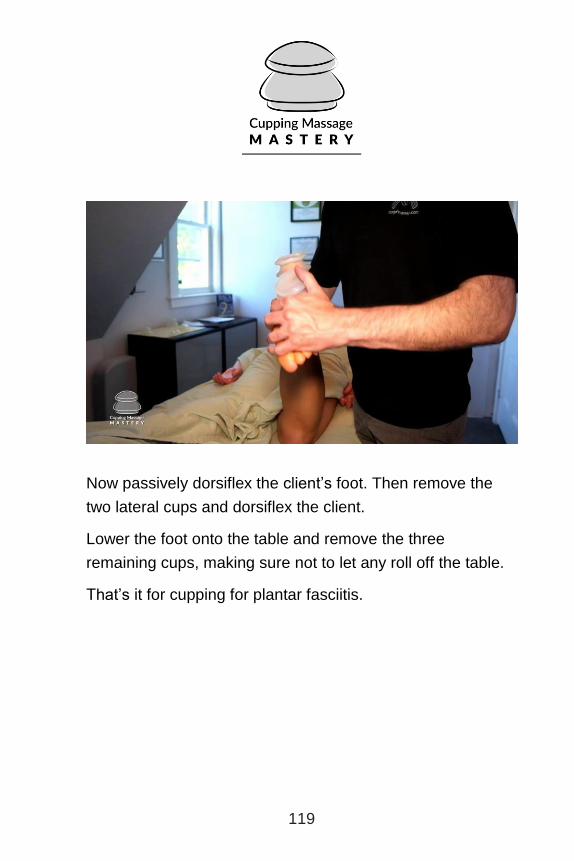
Now passively dorsiflex the client’s foot. Then remove the
two lateral cups and dorsiflex the client.
Lower the foot onto the table and remove the three
remaining cups, making sure not to let any roll off the table.
That’s it for cupping for plantar fasciitis.

120
Chapter 35: Cupping for the Quads
In this chapter, I’m going to demonstrate how to perform
cupping on the quads.
First, lubricate the quads with some quick effleurage,
petrissage, and wringing moves.
Depending on the size of your client’s quads, the number of
cups you use will vary.
Suction four, large-size cups along the quads as proximal as
you can (and within the client’s comfort zone).
Place the lower leg off the table and have the client extend
their knee.

121
Reposition the leg back on the table. Remove all four cups.

122
Take one cup and starting at the top of the quads, begin to
glide across the muscle from lateral to medial, working
across the vastus lateralis, rectus femoris, and then to the
adductors. Then glide back and forth, working your way
down to the knee and then back up again.
Then you’re going to cup distal to proximal, working up the
quads.

123
Make sure to lock your elbow into your side and then, using
the curve between your thumb and index finger, glide the
cup up the quad gradually working lateral to the IT band and
then medially.

124
Do this approximately 10 times or until you feel a softening
of the quads. Check in with your client to get feedback on
your work, as the IT band can always be a source of
tenderness.
125
Chapter 36: Cupping for the Adductors
Now that you’ve cupped the quads, we’re going to move on
to the inner thigh muscles, the adductors.
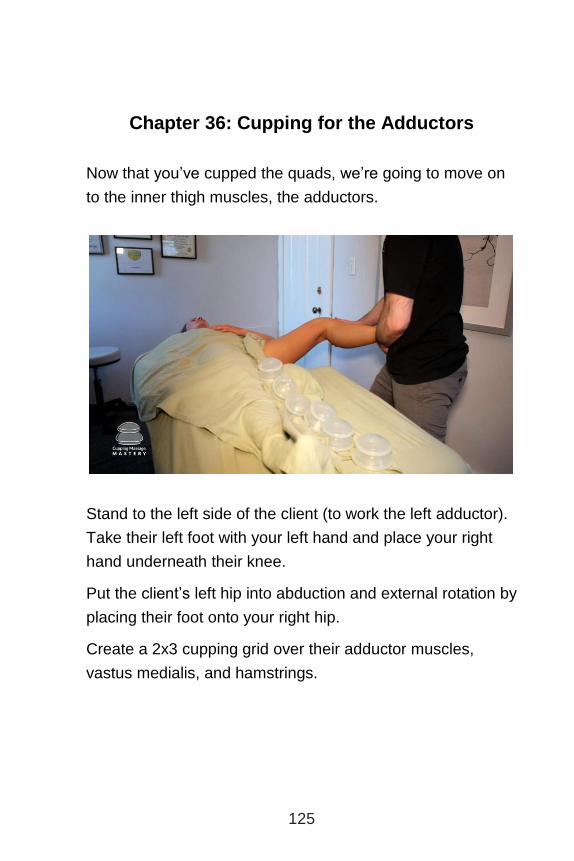
Stand to the left side of the client (to work the left adductor).
Take their left foot with your left hand and place your right
hand underneath their knee.
Put the client’s left hip into abduction and external rotation by
placing their foot onto your right hip.
Create a 2x3 cupping grid over their adductor muscles,
vastus medialis, and hamstrings.
126
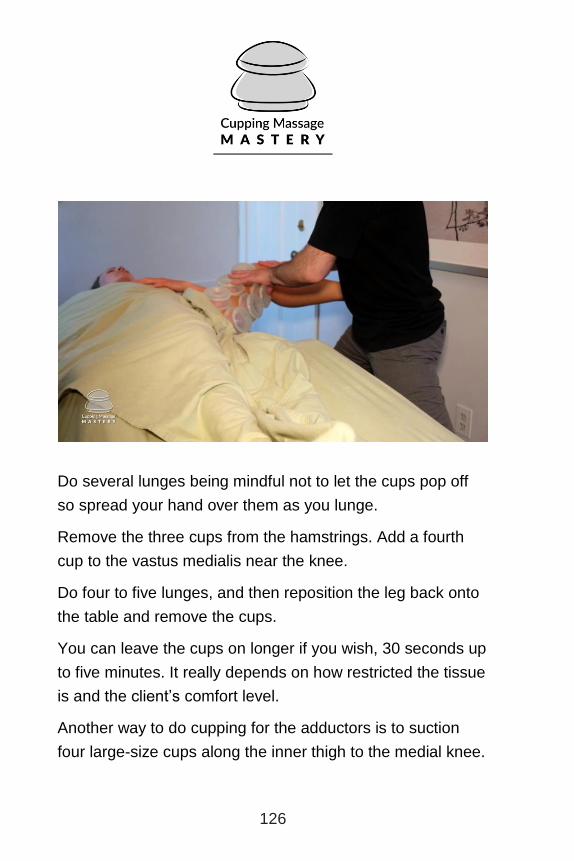
Do several lunges being mindful not to let the cups pop off
so spread your hand over them as you lunge.
Remove the three cups from the hamstrings. Add a fourth
cup to the vastus medialis near the knee.
Do four to five lunges, and then reposition the leg back onto
the table and remove the cups.
You can leave the cups on longer if you wish, 30 seconds up
to five minutes. It really depends on how restricted the tissue
is and the client’s comfort level.
Another way to do cupping for the adductors is to suction
four large-size cups along the inner thigh to the medial knee.

127
Then do seven deep lunges supporting their right calf with
your right hand and lightly resting your left hand over some
of the cups.
Finish with some soothing massage techniques, like
wringing and effleurage.
NOTE: When you first start working with a client, be mindful
that the cupping work might leave them quite sore, so
always check in and have them come in a few days later to
retreat the area.

128
Chapter 37: Cupping for Knee Pain
In this chapter, I’m going to show you how to perform
cupping for knee pain.
Demonstrating on the left knee, begin by draping “the knee.”
Grab the lower left corner of the top sheet and weave it
under the client’s left knee and wrap it around the client’s
upper thigh
Using five cups, you’re going to create what looks like five
petals of a flower.
Using the medium-size cups, place one on the patellar
tendon right above the kneecap and then suction two
more—on either side of the kneecap.
Now take two smaller-size cups and place them below the
kneecap.

129
With your left hand, take hold of the client’s left foot while
your right hand goes under the client’s left knee.
Slowly bring the leg up 90 degrees, cradling the left foot in
your left hand. Flex and extend the knee five to six times and
then have the client hold their leg up and actively extend and
flex their knee five to six times.

130
131
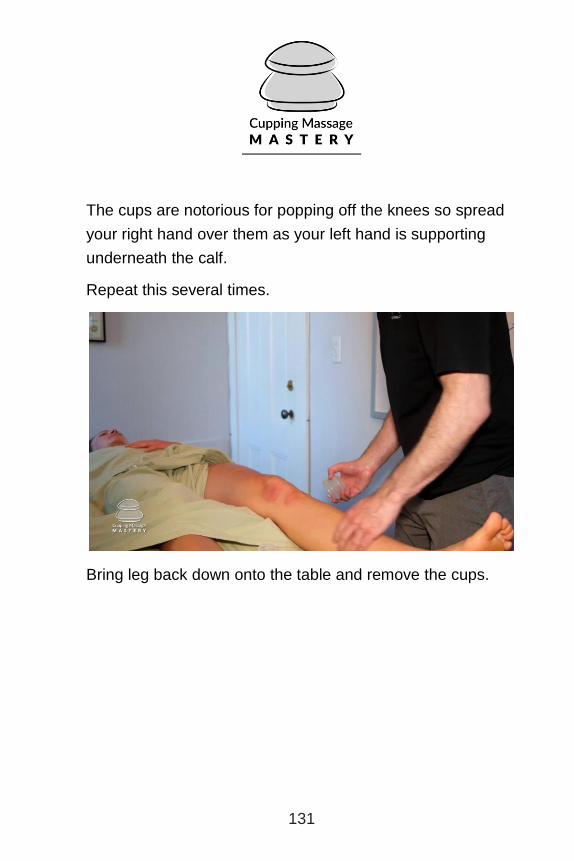
The cups are notorious for popping off the knees so spread
your right hand over them as your left hand is supporting
underneath the calf.
Repeat this several times.
Bring leg back down onto the table and remove the cups.

132
Now take one, medium-size cup and suction release around
the kneecap, gliding across it with one hand as the other
hand stabilizes the other side of the knee. Repeat this until
you feel that the tissue around the knee has softened.

133
Do a couple of spreading strokes above and below the knee,
working lateral to medial and then check the range of motion
(ROM) of the knee, getting the client’s feedback.
134
Chapter 38: Cupping for Shin Splints
In this chapter, I’m going to show you how to do cupping for
the anterior lower leg muscles, specifically targeting shin
splints.
Make sure the anterior lower leg is lubricated before
cupping.
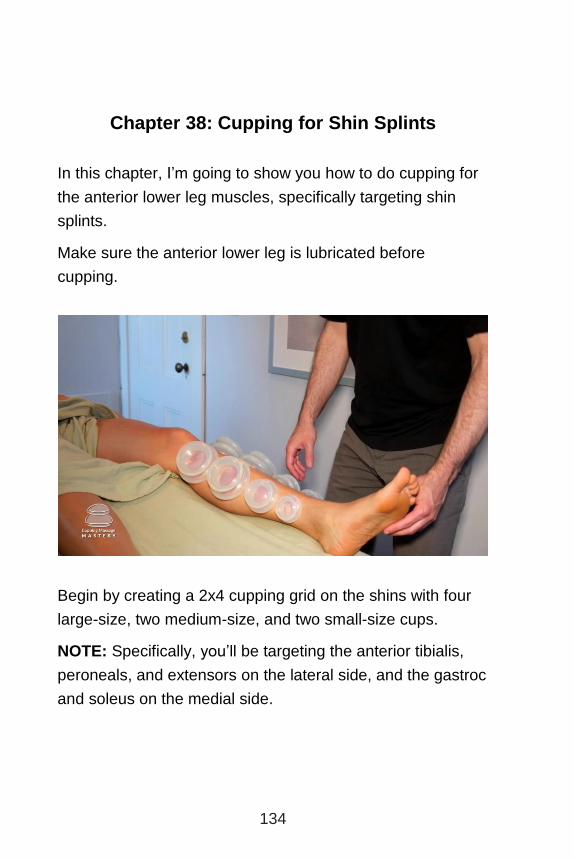
Begin by creating a 2x4 cupping grid on the shins with four
large-size, two medium-size, and two small-size cups.
NOTE: Specifically, you’ll be targeting the anterior tibialis,
peroneals, and extensors on the lateral side, and the gastroc
and soleus on the medial side.

135
Have the client actively stretch, by asking them to “bring your
toes toward your nose and then point.”
NOTE: Alternatively, you can passively dorsiflex the client’s
foot.
Be prepared for a cup to pop off.
136
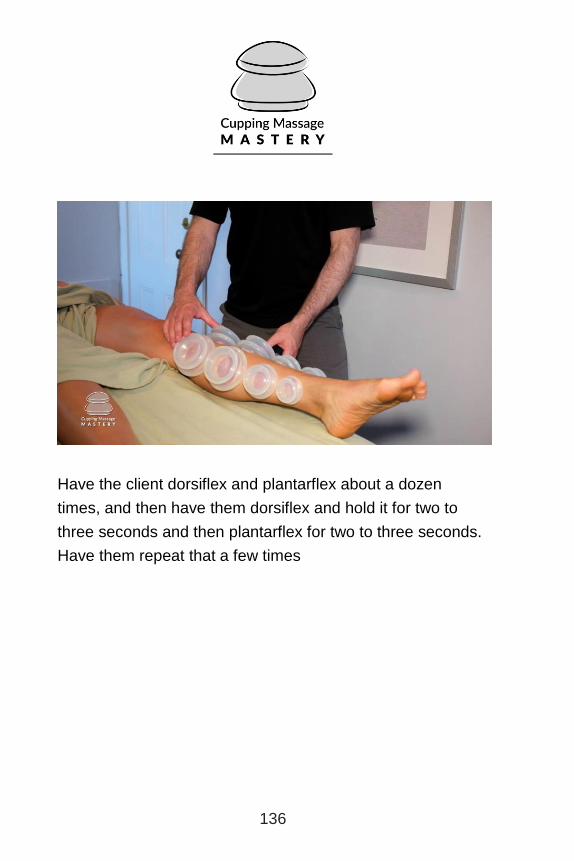
Have the client dorsiflex and plantarflex about a dozen
times, and then have them dorsiflex and hold it for two to
three seconds and then plantarflex for two to three seconds.
Have them repeat that a few times

137
Remove the cups. Notice the marks and just fill in the blanks
with more cups, creating another 2x4 cupping grid.
Have your client dorsiflex and point several more times.
138
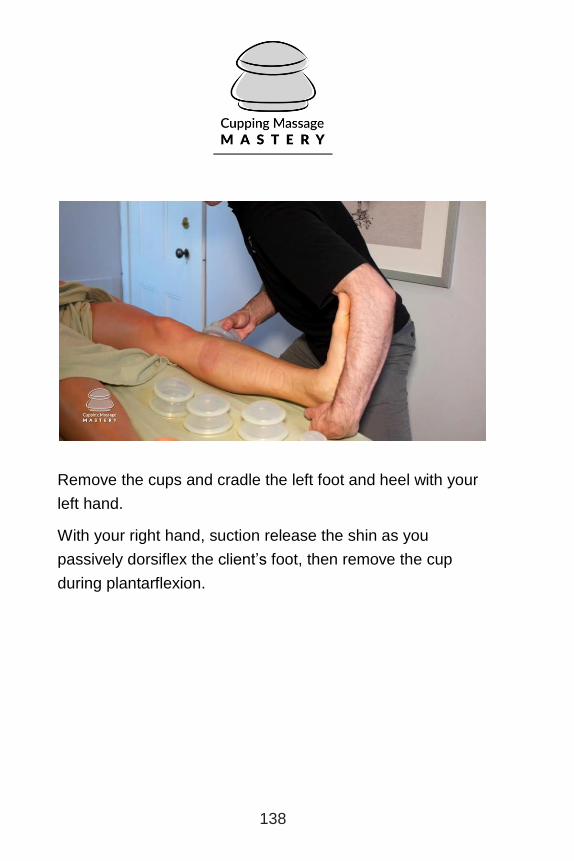
Remove the cups and cradle the left foot and heel with your
left hand.
With your right hand, suction release the shin as you
passively dorsiflex the client’s foot, then remove the cup
during plantarflexion.

139
Change to a smaller-size cup as you work more distally.
Manually massage, proximal to distal, using a myofascial
spreading movement.

140
Finish with effleurage up the shin, contouring around the
knee.
Test the ROM with the client. Have them dorsiflex and
plantarflex. Ask the client how they feel, bringing to their
attention how much freer their foot feels.

141
Chapter 39: Cupping for the Forearms
In this chapter, I’m going to demonstrate how to do cupping
to treat golfer’s elbow, carpal tunnel, and tennis elbow.
Golfer’s Elbow
We’re going to start by treating golfer’s elbow, so we’ll be
working the flexor group.
Begin by lubricating the forearm and explain to the client that
you’ll be having them flex and extend their wrist and if the
cups pop off, you’ll be sure to catch them.
Use the medium-size and smaller-size cups and suction the
entire flexor group, keeping the client’s hand supinated
(palm up).

142
I found that depending on the size and length of the client’s
forearm, one to two medium-size cups and/or one to two
smaller-size cups does the trick.
You’ll be using about three to four cups.
Once the client’s arm is cupped, have them actively flex and
extend their wrist six to eight times.
143
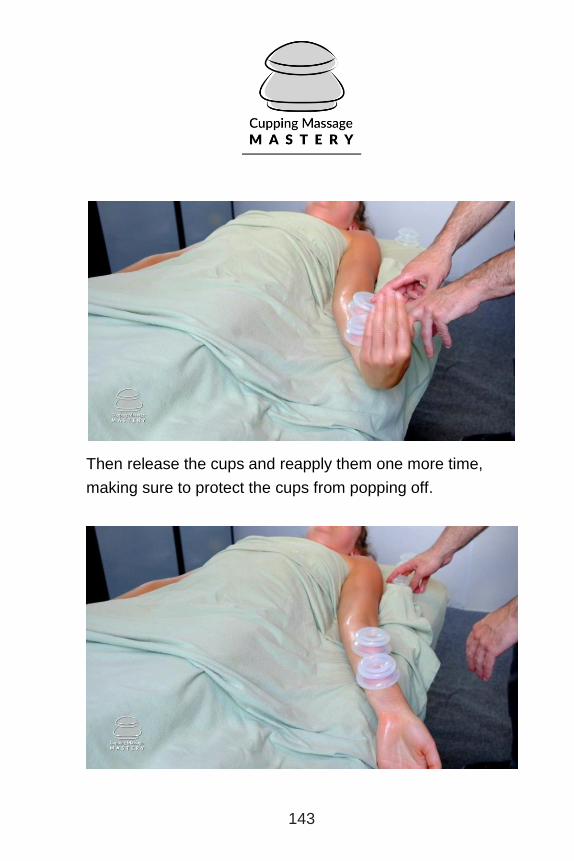
Then release the cups and reapply them one more time,
making sure to protect the cups from popping off.

144
For the third time, use two medium-size cups and place
them on the belly of the flexors. If a third smaller-size cup fits
over the retinaculum of the wrist, then leave one on there
too.
Have the client actively flex and extend seven more times
and then release.
145
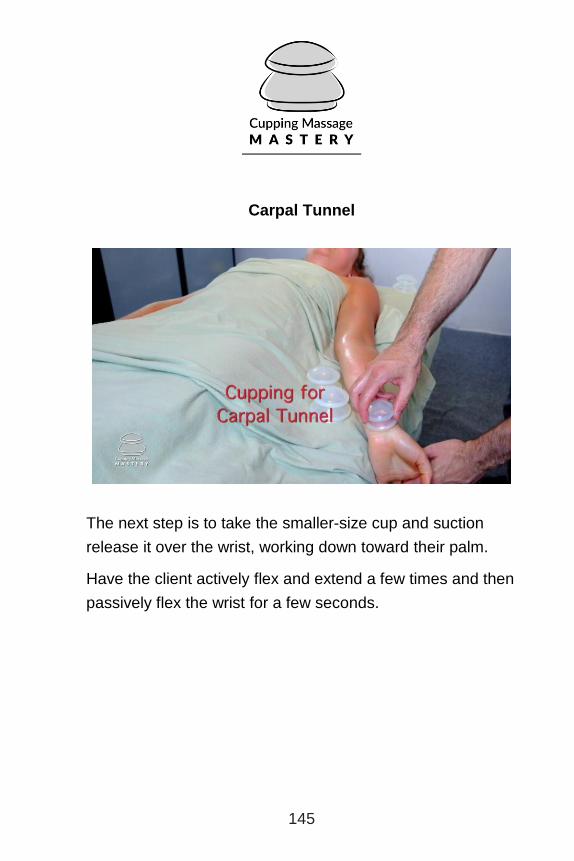
Carpal Tunnel
The next step is to take the smaller-size cup and suction
release it over the wrist, working down toward their palm.
Have the client actively flex and extend a few times and then
passively flex the wrist for a few seconds.
146
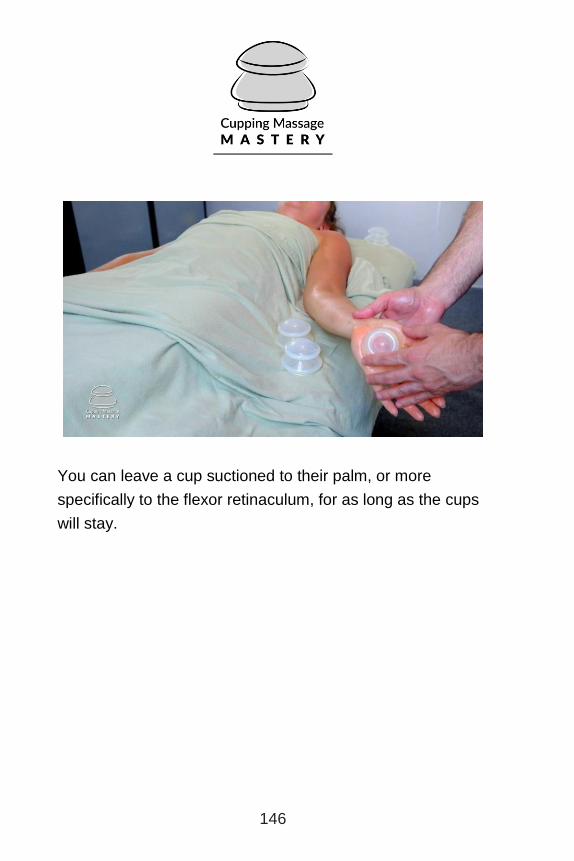
You can leave a cup suctioned to their palm, or more
specifically to the flexor retinaculum, for as long as the cups
will stay.

147
Then do a few flushing massage strokes gliding down the
flexors toward the crease of the elbow.

148
Next you’re going to cup across the muscle bellies of the
forearm flexors, moving back and forth, making sure to
stabilize the wrist with your non-cupping hand.
Move to a smaller-size cup as you approach the wrist.
149
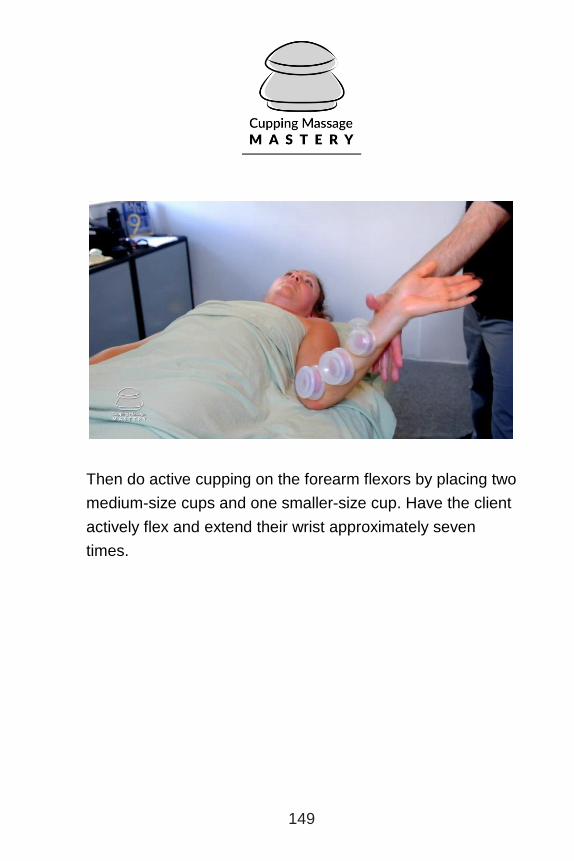
Then do active cupping on the forearm flexors by placing two
medium-size cups and one smaller-size cup. Have the client
actively flex and extend their wrist approximately seven
times.

150
Remove the cups and do flushing massage strokes toward
the elbow crease and pumping movements up the biceps,
doing a little lymphatic draining toward the armpits.

151
Tennis Elbow
Next move onto the forearm extensors. Do the same suction
release method as you did for the forearm flexors.
Place a row of three cups on the extensors, asking the client
to actively flex and extend their wrist approximately seven
times.
152
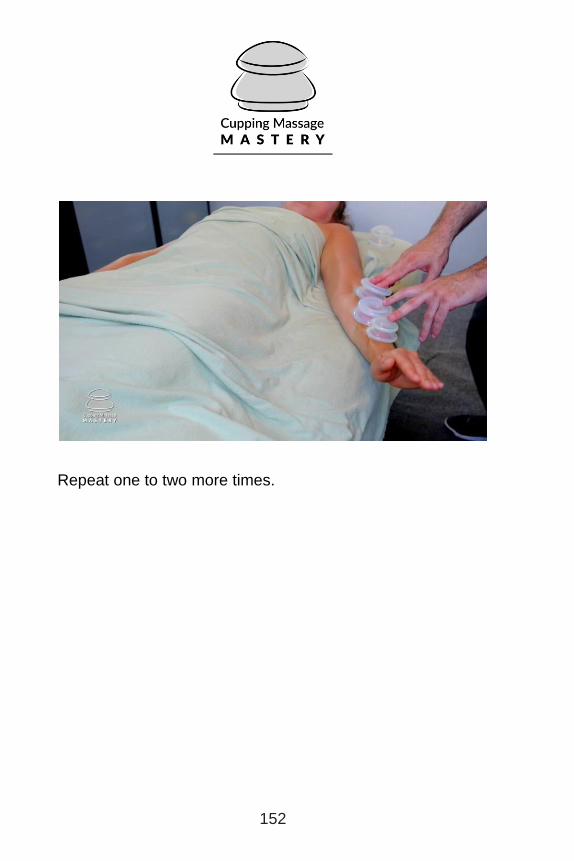
Repeat one to two more times.
153
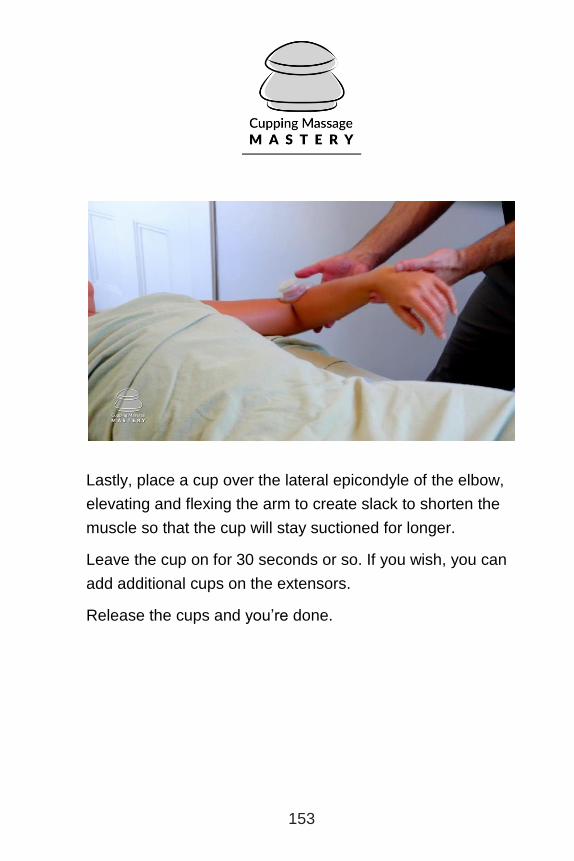
Lastly, place a cup over the lateral epicondyle of the elbow,
elevating and flexing the arm to create slack to shorten the
muscle so that the cup will stay suctioned for longer.
Leave the cup on for 30 seconds or so. If you wish, you can
add additional cups on the extensors.
Release the cups and you’re done.
154
Bonus Chapter: Facial Cupping
Cupping has been around for thousands of years. Only in
the past 10 to 15 years has it become quite the buzzword.
Countless celebrities and athletes have posted cupping
selfies on social media showing their freshly made circles.
Cupping works great on the back, shoulders, hips, and legs
for loosening tight, overworked muscles. But did you know
that it also works great on the face? Some even say that it’s
like Photoshopping a face.
Facial cupping is great for:
increasing local circulation of the skin;
helping to reduce facial edema, chronic puffiness, and
sinus problems;
helping to plump and soften expression lines,
wrinkles, and scar tissue; and
reducing tightness and tension in facial muscles
associated with temporomandibular (TMJ)
dysfunction.
Protocols for the face use small-size glass cups to vacuum
and lift the facial tissue, mimicking the pumping movements
of lymphatic drainage. It's painless and quite sedating, and
several of my clients have drifted off and begun to snore.
Others have giggled at the suctioning sound, which
resembles little fish kissing their cheeks.
155
Contraindications for Facial Cupping
Never glide across the carotid or jugular region.
Do not combine facial cupping with aggressive
exfoliation.
Do not cup open wounds or areas of inflammation on
the face.
Post cupping, clients should avoid exposure to
cold/windy weather, hot showers, baths, saunas, hot
tubs, and aggressive exercise for at least six hours.
Such exposure can produce undesirable effects.
Post cupping, clients should avoid wearing makeup
for six hours to allow the subcutaneous skin layer to
reap the benefits of the treatment.
If clients have had Botox on their face, tread lightly, so
as not to do more harm. I’ve heard some say to wait
six months before treating.
156
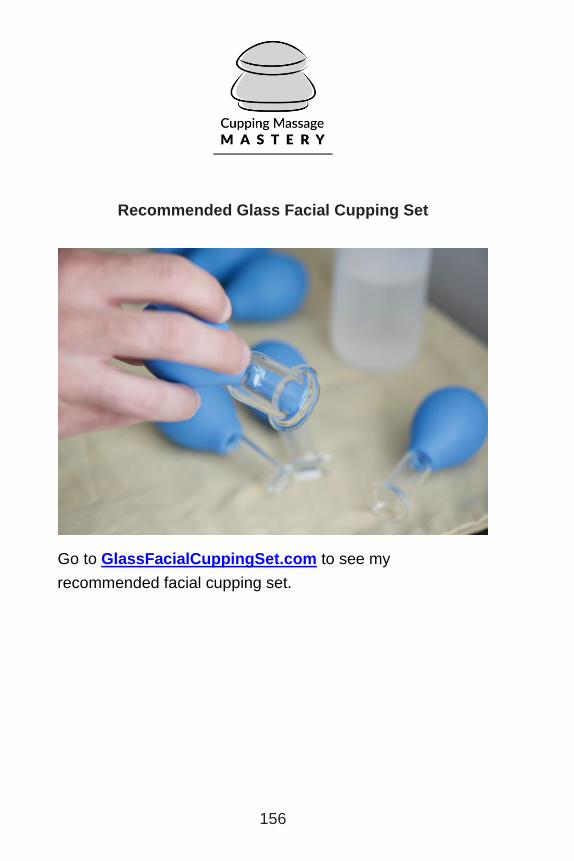
Recommended Glass Facial Cupping Set
Go to GlassFacialCuppingSet.com to see my
recommended facial cupping set.

157
Caring for Your Facial Cupping Set
After use, clean the cups with a 60:40 ratio of original
Listerine to water in a spray bottle.
At the end of the day, you can use Dr. Bronner’s
Pure-Castile Liquid Soap to wash the facial cupping
set.
Dry the glass cups as soon as you rinse them. For the
smaller cups, a cotton-tip swab can be helpful to wipe
and dry the insides.
When cleaning the cups, make sure to wash the
bulbs, but do not squeeze them. This can get water
inside the bulb and can lead to an unpleasant surprise
for the client during a facial cupping session.

158
Facial Cupping Sequence
Total time: 30 minutes.
Begin with the client in the supine position with the therapist
seated at the head of the table.
Place the four facial cups you plan to use on the same side
of the face you will be working. The photo below shows me
placing the cups to the right side of the client’s head,
because I’m going to begin the facial cupping session on the
right side of her face.
159
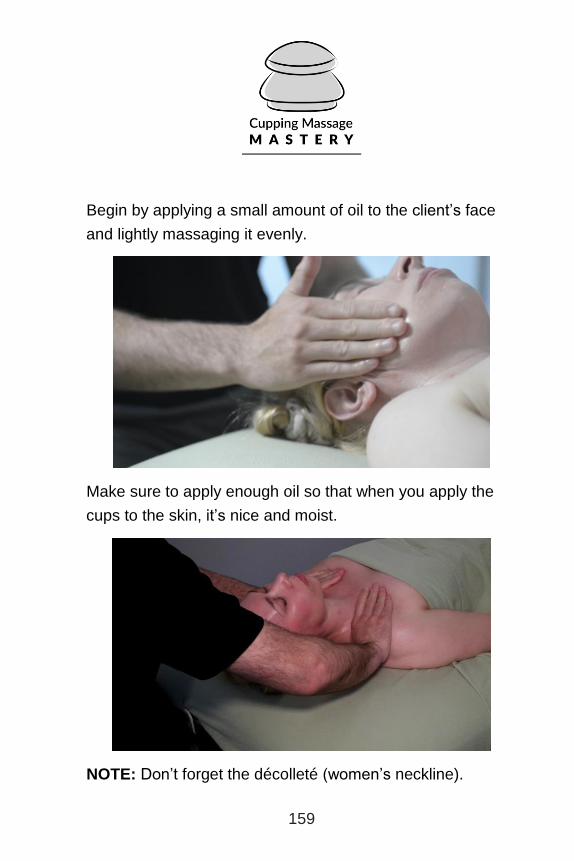
Begin by applying a small amount of oil to the client’s face
and lightly massaging it evenly.
Make sure to apply enough oil so that when you apply the
cups to the skin, it’s nice and moist.
NOTE: Don’t forget the décolleté (women’s neckline).

160
Step 1: Lymphatic Drainage
Equipment needed: large-size facial cup.
Turn the client’s face 45 degrees to the left, as you will begin
with the right side of the face.
Begin with the suction release (SR) method down the
sternocleidomastoid (SCM) on the lateral side of the neck by
pinching the bulb, which creates a suction lifting the skin.
Gently hold the suction for one to three seconds and then
release by squeezing the bulb again.
NOTE: Make sure not to glide across the carotid artery or
jugular vein when doing the SR down the SCM.

161
Do the SR method down the length of the SCM all the way to
the clavicle and SR across the subclavius muscle (which is
below the clavicles) toward the armpits, draining toward the
axillary duct.

162
Step 2: Jawline
Equipment needed: large-size or medium-size facial cup.
Starting right below the middle of the jawline, gently glide the
cup along the jawline toward the parotid region (which is
right below the ear and in front of the SCM).

163
Do three sets of 10 passes. Each pass should gradually get
higher up (superior) until the third set is directly on the
jawline itself.

164
Next, you want to drain by suction releasing from the parotid
down the SCM to the clavicle, and then across the
subclavius toward the axillary duct.

165
Step 3: Cheeks
Equipment needed: medium-size and large-size facial cups.
Suction and glide from right above the jawline toward the
temporal mandibular joint (TMJ). Do this 10 times.
166
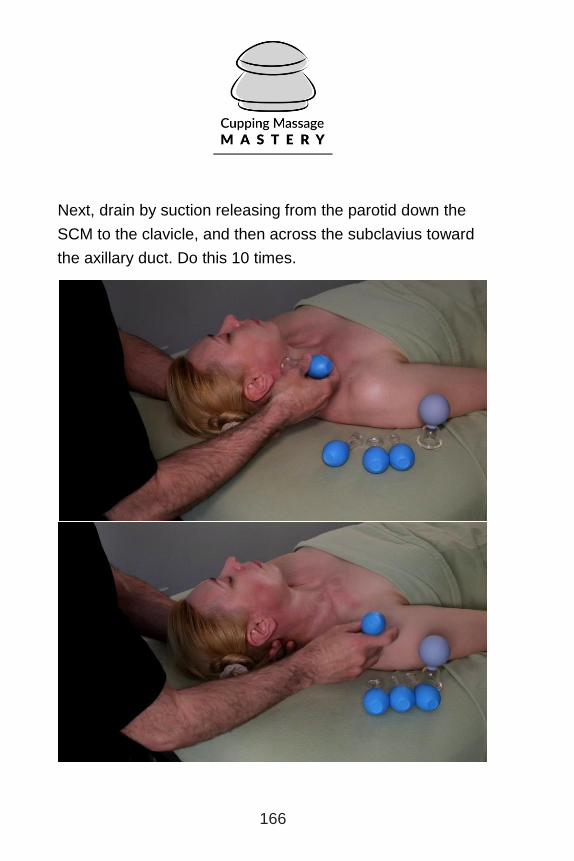
Next, drain by suction releasing from the parotid down the
SCM to the clavicle, and then across the subclavius toward
the axillary duct. Do this 10 times.

167
Suction and glide from the side of the mouth across the
cheeks to the TMJ. Do this 10 times.

168
Last, drain by suctioning down the SCM, across the
subclavius toward the axillary duct. Do this 10 times.

169
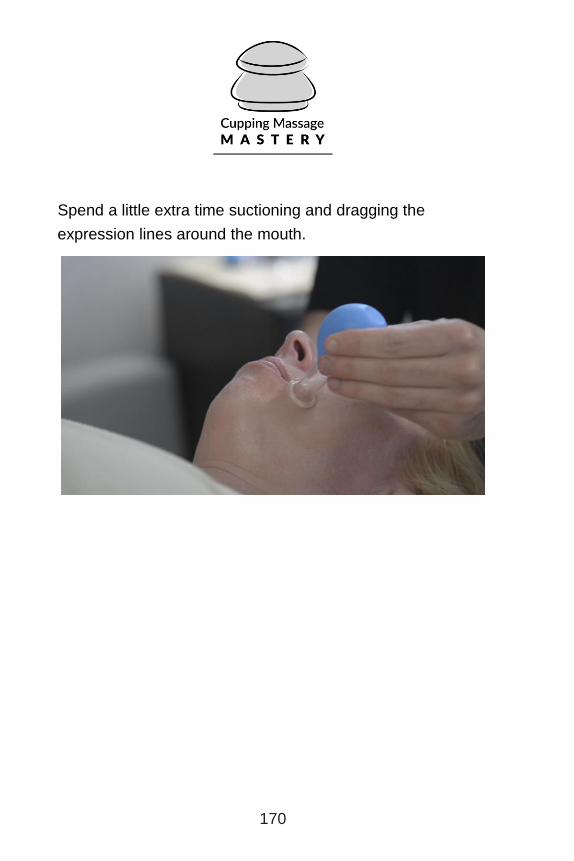
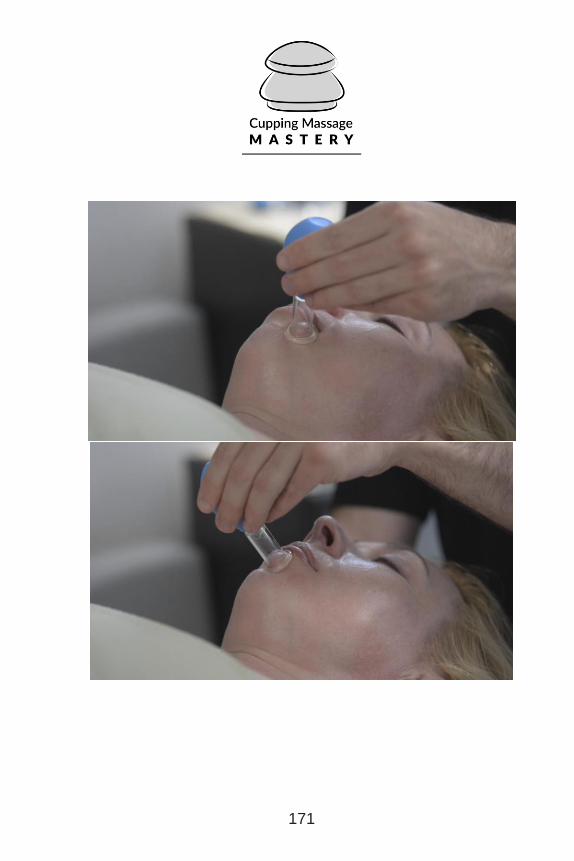
Step 4: Around the Mouth
Equipment needed: medium-size facial cup.
Switch to the medium-size facial cup. SR around the mouth.
Do one to two full circles around the mouth.
170
Spend a little extra time suctioning and dragging the
expression lines around the mouth.
171

172
Step 5: Plump the Lips
Equipment needed: large-size facial cup.
Suction the lips, lift and hold for five seconds, and then
release the lips. Divide the treatment in three sections: left,
middle, right.

173
Finish plumping the lips by draining and suctioning down the
SCM, across the subclavius toward the axillary duct. Do this
10 times.
174
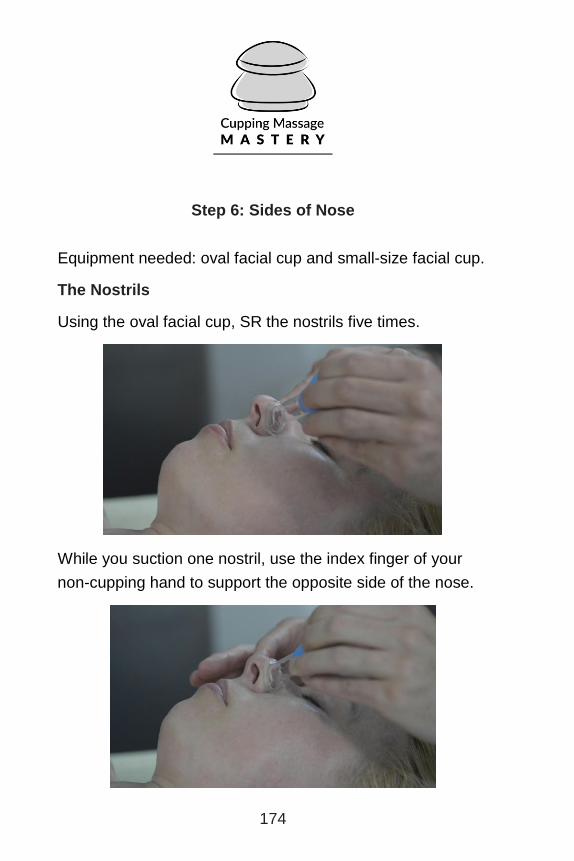
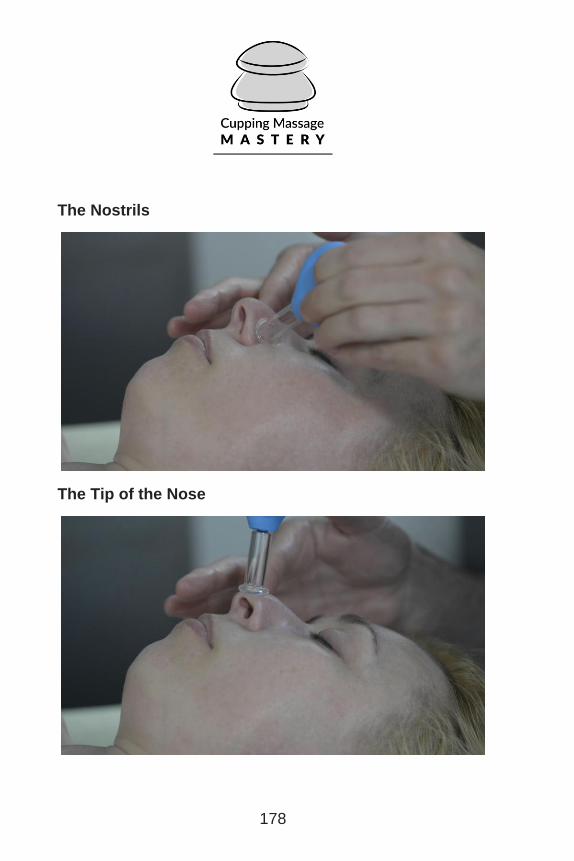
Step 6: Sides of Nose
Equipment needed: oval facial cup and small-size facial cup.
The Nostrils
Using the oval facial cup, SR the nostrils five times.
While you suction one nostril, use the index finger of your
non-cupping hand to support the opposite side of the nose.

175
The Tip of the Nose
SR the tip of the nose five times. If the oblong cup doesn’t fit
well, drop down a size to a smaller size cup.
The Bridge of the Nose
SR the bridge of the nose five times.

176
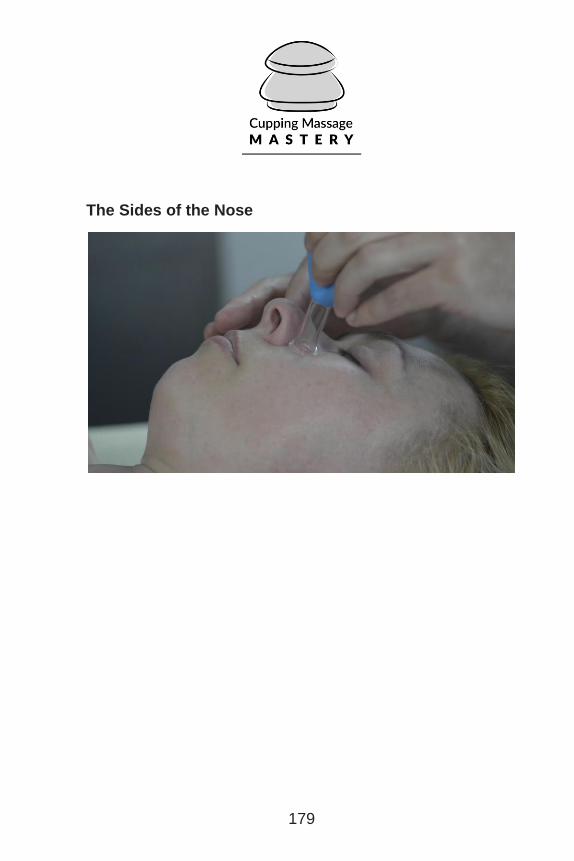
The Sides of the Nose
SR the side of the nose (the side of the face you’re working
on) five times.

177
When suctioning the side of the nose, it helps to use your
other hand’s index finger to support the opposite side of the
nose.
Drain by dragging the cup down the cheek and then switch
to the medium-size cup. SR down the SCM, across the
subclavius toward the axillary duct. Do this 10 times.
Now repeat the entire sequence using the small-size facial
cup.
178
The Nostrils
The Tip of the Nose
179
The Sides of the Nose

180
181
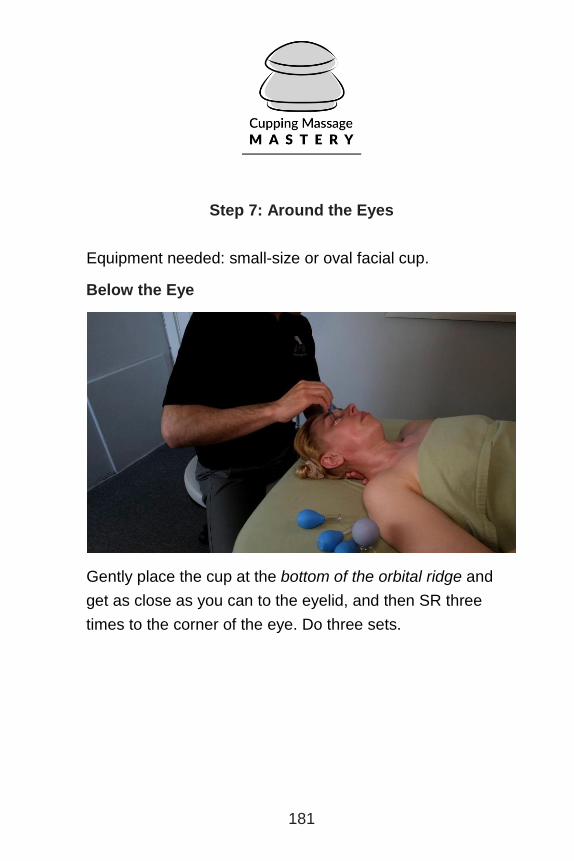
Step 7: Around the Eyes
Equipment needed: small-size or oval facial cup.
Below the Eye
Gently place the cup at the bottom of the orbital ridge and
get as close as you can to the eyelid, and then SR three
times to the corner of the eye. Do three sets.

182

183

184
Above the Eye
Now do the top of the orbital ridge and get as close as you
can to the eyelid, and then SR three times to the corner of
the eye. Do three sets.

185

186
Crow’s Feet
SR the side of the eyes (crow’s feet) three times. Use a
sweeping or flicking movement. Do three sets.
187
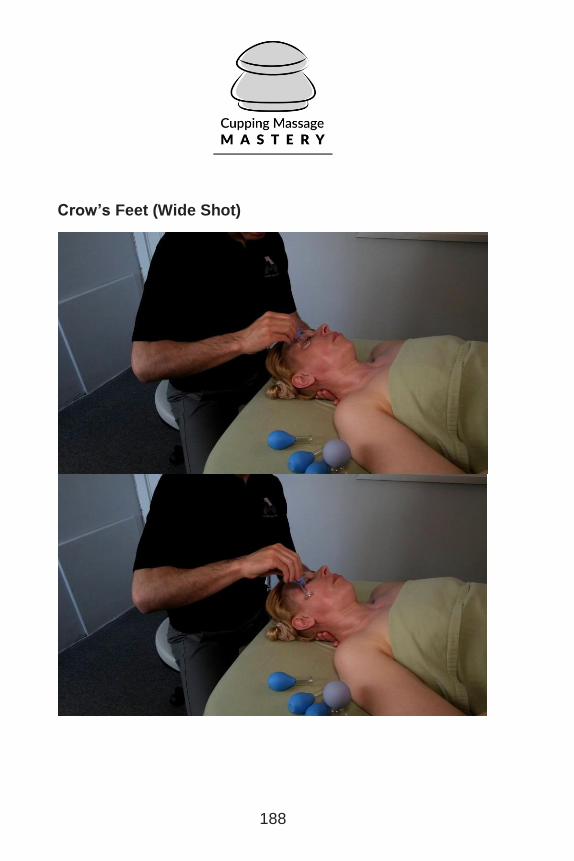
188
Crow’s Feet (Wide Shot)

189
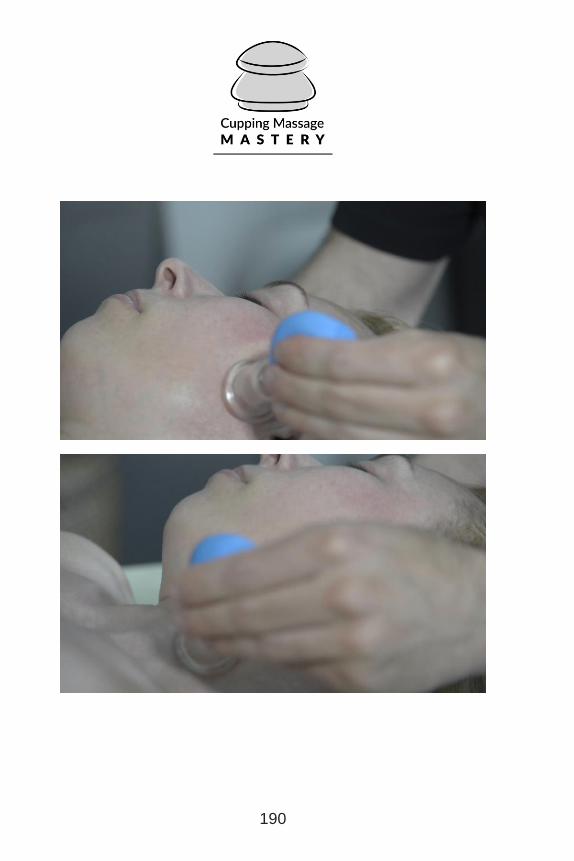
Finish and Drain
Using the large-size facial cup, suction and gently drag from
the side of the eye, across the TMJ to the parotid, and then
SR down the SCM, across the subclavius toward the axillary
duct. Do this 10 times.
190

191
Step 8: Frown Lines and Forehead
Equipment needed: large-size facial cup.
SR the frown lines between the eyebrows using the medium-
size cup. Each SR should last approximately five seconds.

192
Using the large-size oval cup, suction and glide vertically
from the eyebrows to the hairline. Do three sets of three
passes.

193

194
Now, suction and glide horizontally across the forehead
toward the temples. Do three sets of three passes covering
the entire forehead from above the eyebrows to the hairline.

195
196
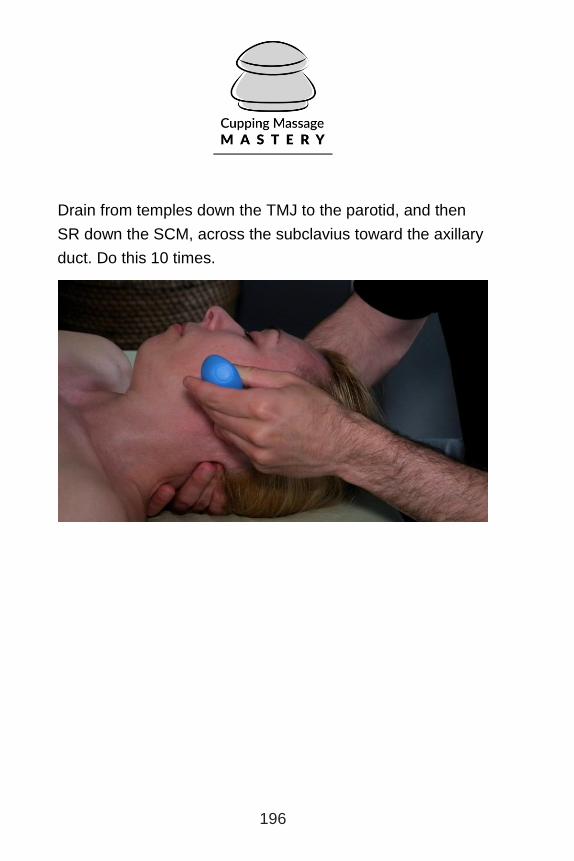
Drain from temples down the TMJ to the parotid, and then
SR down the SCM, across the subclavius toward the axillary
duct. Do this 10 times.

197
Step 9: Eyebrows
Equipment needed: small-size and medium-size facial cup.
SR directly over and above the eyebrows. Do three sets of
three passes.
Drain from the temples down the TMJ to the parotid, and
then SR down the SCM, across the subclavius toward the
axillary duct. Do this 10 times.
Now repeat the entire sequence on the other side of the
face.

198
Step 10: Finishing Strokes
After you’ve finished the facial cupping routine, perform a
gentle facial massage to end the session.
1. Spread the Forehead
Do this two times.

199
2. Trace the Cheek Line
Do this one time.

200
3. Trace the Jawline
Do this one time.

201
4. Spreading the Chest
Do this one time.

202
5. Neck Squeeze
Do this one time (or as many times as you’d like; this is a
client favorite).

203
6. Trace the Jawline (Left Side)
Do this one time.
204
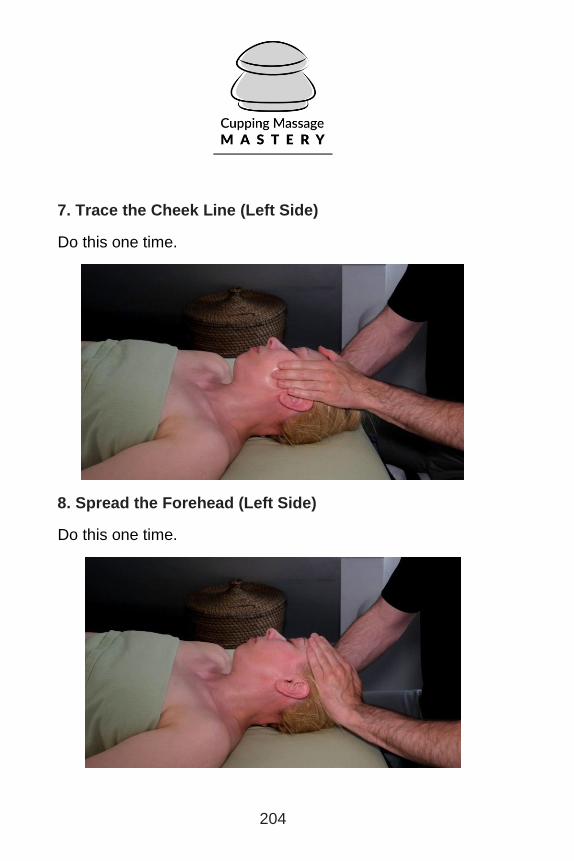
7. Trace the Cheek Line (Left Side)
Do this one time.
8. Spread the Forehead (Left Side)
Do this one time.

205
9. Spread the Pecs (Left Side)
Do this one time.
Repeat the finishing strokes on the right side.

206
Helpful Tips
Start with a clean face. Remove any makeup with a
moist towelette or other makeup remover.
Make sure to keep contact with the face with the other
hand before touching the client’s face with a cup.
Always anchor the surrounding skin when gliding
cups to prevent painful drag. Lift the cup slightly away
from the skin to increase lymphatic activity.
First-time clients: Have them sit up and examine the
difference in a portable mirror after you’ve completed
one side of the face. When they see how different the
two sides of their face look, finish the treatment on the
other side. With the client’s permission, snap a photo
with your smartphone to track before and after
images.
Use slower movements to drain more fluids. Faster
movements are more stimulating for circulation and
collagen/elastin building. Try beginning with slow,
draining movements and progressively increase the
speed over the three passes. The initial pass is slow,
the second is at a medium speed, and the third pass
is the fastest.

207
For maximum facial rejuvenation results, it’s
recommended that the client comes in for facial
cupping on a weekly basis for 6 to 12 consecutive
weeks.

208

209
About the Author
Since becoming a professional massage therapist in 2000,
Morgan Sutherland has consistently helped thousands of
clients manage their pain with a combination of deep tissue
work, cupping, and stretching. In 2002, he began a career-
long tradition of continuing study by being trained in Tuina—
the art of Chinese massage—at the world-famous Olympic
Training Center in Beijing, China.
In 2004, Morgan became a certified orthopedic massage
therapist, specializing in treating chronic pain and sports
injuries. In 2005, Morgan took his fist cupping course and
was immediately hooked. He mastered using the plastic
Kangzhu Biomagnetic Chinese Cupping set and was
amazed how easy the cups were to handle and apply.
In 2011, Morgan took more advanced cupping training and
discovered silicone cups. The silicone cups literally became
an extension of his hands, allowing him to seamlessly lift and
release clients’ muscle adhesions. Blending the silicone
cupping into his deep tissue massage practice was
effortless, and the majority of his client base raved about
how much more effective his massage sessions have
become.
When he’s not helping clients manage their pain, he’s writing
blog posts about pain relief and self-care.
Website: www.cuppingmassagemastery.com
Email: [email protected]

210

211
Other Books by Morgan Sutherland, L.M.T.
The Essential Lower Back Pain Exercise Guide: Treat Low
Back Pain at Home in Twenty-One Days or Less
21 Yoga Exercises for Lower Back Pain: Stretching Lower
Back Pain Away with Yoga
Reverse Bad Posture Exercises: Fix Neck, Back, and
Shoulder Pain in Just 15 Minutes Per Day
Best Treatment for Sciatica Pain: Relieve Sciatica
Symptoms, Piriformis Muscle Pain, and SI Joint Pain in Just
15 Minutes Per Day
Resistance Band Workouts for Bad Posture and Back Pain:
An Illustrated Resistance Band Exercise Book for Better
Posture and Back Pain Relief
DIY Low Back Pain Relief: 9 Ways to Fix Low Back Pain So
You Can Feel Like Yourself Again

212


