21
Customer Set Up in Accounts Receivable

Customer Set Up in Accounts Receivable

Customer Set Up in Accounts Receivable
Version 8.0 28-Oct-16 2 of 21
Table of Contents
1. Customers ...................................................................................................................... 3
2. Finding Customers ......................................................................................................... 6
3. Entering a brand new customer ..................................................................................... 8
4. Creating a New Site for an Existing Customer ............................................................ 17

Customer Set Up in Accounts Receivable
Version 8.0 28-Oct-16 3 of 21
1. Customers
Do you need a customer in CUFS?
It is expected that the following policy be adopted throughout the University when deciding if an invoice should be raised and hence a CUFS customer required:
If the University sells goods /services as an “over the counter” transaction, for example, within University restaurants. This income will be classed as a miscellaneous receipt and no invoice would be required.
Should the provision of the good or service be a one off supply to the general public then the payment could be collected in advance through the use of the University’s online store (WPM) and you will not need to raise an invoice or receipt in CUFS. See :
1. Introduction to WPM Online Store 2. Events and Conferences 3. Product Catalogue
You can access all three videos by going to: http://sms.cam.ac.uk/collection/1619391
If the University provides goods and services to another organisation or business then an invoice should be raised promptly within the Accounts Receivable module and consideration given to how much credit is extended to the customer.
Customers – Background
The Accounts Receivable and Projects/Grants Modules share the customer database. The University has a large and diverse customer base and it is acknowledged that departments require customer confidentiality. Therefore departments may only see details they have specified for a customer, even if they are viewing a customer which is common to a number of departments. Department specific information will be based at a customer address level. In the case of customers being used by more than one department, each department will only be able to view the address details, etc. assigned to their customer site. Only the customer header will be visible across the entire University.
Maintaining a customer database the size of the University brings with it problems in terms of data integrity. If the customer has not been created correctly it will impact the creation of transactions and the collection of income.
It is essential that there is some control over new customers to ensure that customers exist only once, even when other departments use the same one. Therefore, if after having conducted a search of CUFS you ascertained that a new customer / departmental site is needed there are two choices:
a) Use the service provided by Credit Control Team within the Finance Division of setting up the customer (preferred option).
Please see the forms section on the Finance Division website http://www.finance.admin.cam.ac.uk/staff-and-departmental-services/forms
b) Set up locally in the department by a user with the ‘AR Manager’ responsibility
(mandatory training required).

Customer Set Up in Accounts Receivable
Version 8.0 28-Oct-16 4 of 21
Are they already a Departmental Customer?
In order to raise an invoice, also known as a ‘transaction’, the Customer needs to have been set up on the system for your Department. If you try to raise an invoice to a particular customer and one of the following happens, then the customer has not been set up for use by your department:
The customer cannot be located on the List of Values; or
The customer is there but no address detail can be seen (make a note of customer account number)
Whilst searching for your customer, initially it is not case sensitive but remember the naming conventions below.
Corporate Naming
The following protocols will be adopted for corporate customers. This approach will ensure that a more reliable result is returned when using any of the system search functionality.
The following common abbreviations will be used:
Assoc for Association
Co for Company
Corp for Corporation
Inc for Incorporated
Ltd for Limited
Serv for Services
Plc for Public limited company
The following punctuation marks will be used wherever possible
& for And
() e.g. (UK)
The following punctuation marks SHOULD NOT be used.
. Full Stop
/ Back slash
“ Speech marks
: Colon
; Semi Colon
The following word should not be used in the name of the Customer: The

Customer Set Up in Accounts Receivable
Version 8.0 28-Oct-16 5 of 21
Communication contact names
For customer-related correspondence, the default salutation is Dear Sir/Madam. This default is overridden by any contact name shown against the customer. If you do not have any contact names, you must enter “Accounts Payable” in the last name field.
Individual Naming
The conventions relating to supplier/customer names should also apply to the individuals. In addition, the following protocols should be applied:
PROF, DR, MR, MRS, MS AND MISS (or any other title) may be used.
Enter last name (,) title, full first name and initials,
i.e. SMITH, MR. ROBERT M
SMITH, PROF ROBERT M
The use of the comma after the last name will enable the output documentation to reformat the name such that the title and forenames appear before the surnames e.g. MR ROBERT M SMITH.
Note: In order for the system to correctly re-arrange an individual’s name when printing a sales invoice, you must select “Standard Individual” as the customer classification type. See page 9 for further details.

Customer Set Up in Accounts Receivable
Version 8.0 28-Oct-16 6 of 21
2. Finding Customers
In the Search window that is displayed enter your search parameters into the appropriate fields. However, do not use the wildcard (%) as the first character. Ensure customer type remains as “organization” irrespective of whether you are looking for an individual.
For example:
Enter the customer’s name (in full or in part) in the Customer field with a % at the end (the search is not case sensitive).
Click Go.
Any customer containing the words you have searched will be. However if there is no match, it will show you ‘No Results Found’.
Navigate: Customers → Standard

Customer Set Up in Accounts Receivable
Version 8.0 28-Oct-16 7 of 21
Select the relevant customer from the results list and look at the accompanying display in the Accounts section at the bottom of the screen.
If the Primary Bill-To Address field is blank then the customer has been set up previously in the University but it has not been allocated to your department.
If the customer has already been set up for your department then the address will be displayed.
If there is no address, no account number and no details icon, the chances are it is an inactive supplier. To check, click on the drop down arrow for the Status field in the Accounts section. Contact the Credit Control Team within the Finance Division on 01223(7)65872 or [email protected]
The Account Number displayed is the customer number

Customer Set Up in Accounts Receivable
Version 8.0 28-Oct-16 8 of 21
3. Entering a brand new customer
An overview of creating a new customer
Check to see if the customer is already on the system
See the previous page for details.
Should ‘No Results Found’ you will need to create the customer or request central finance to create the customer for you.
If creating new customers locally click on Create.
University level
Set up the Customer organisation
Enter the Customer name in Caps lock
Populate the Classification field with either Standard corporate or Standard Individual depending on the type of customer you are creating
Populate the Address and Bill to details
Click ‘Apply’
Set up University Customer Profile
In the profile tab, select the appropriate customer category and click save
Add communication details
In the accounts tab, go to the address section at the bottom of the screen and click on details. Go to the communication tab and create a customer contact(s). Ensure if no contact details available, Accounts Payable is entered in last name field and save Add in telephone and email addresses as required.
Department Level
Specify Business Purpose details for each address
In the Business Purpose tab, click on the details icon and populate the salesperson, payment terms and customer contact details and then apply
Set up profile options for each address
Click on the profile tab and a warning message will appear prompting you are creating a new profile. You must click yes change our profile class to XX External customer form drop down menu. Another warning message will pop up prompting you are changing profile class. You must click yes.
This will default in with collector details; payment terms and will tick the send statements, send credit balance and send dunning letters options. Click save after these fields have been populated and ticked.
Complete Tax Profile for each address
Click on the Tax Profile button at the top of the screen and tick the tax applicability field. Ensure in the default controls section that rounding level and rounding rule have been populated as header and nearest respectively
Click on the add another row button and populate the operating unit, account number, tax registration number, rounding level and rule and tax classification. Then click apply.
END The customer now has been created to use.

Customer Set Up in Accounts Receivable
Version 8.0 28-Oct-16 9 of 21
Step 1: Searching for the customer
Carry out the search for your customer (as demonstrated on the previous page) and if it cannot be located you will see the “No results found” message.
Step 2: Creating the Organisation for the University
a) Click on the Create button.
b) Complete Organization Name This is the customer name. Remembering the
standard naming conventions and to enter it in caps lock (refer to page 4 and 5).
c) Classification Select either Standard Corporate or Standard
Individual from the drop down list
d) Enter the Customer Address Within the Account Site Address section.
e) Complete the Bill to Location In the Business Purposes section , using the format of XX, Space, Hyphen, Space, location (e.g. PD – Cambridge).
f) Click on Apply
Navigate: Customers → Standard

Customer Set Up in Accounts Receivable
Version 8.0 28-Oct-16 10 of 21

Customer Set Up in Accounts Receivable
Version 8.0 28-Oct-16 11 of 21
Step 3: Specify Customer Category for your University
a) Click on the Profile tab.
b) Change the Customer Category to the appropriate option. DO NOT use any research options (this is the only field that needs to be populated here)
c) Click on Save.
Add in your Department’s Customer Contacts
d) Click on the ‘Accounts’ tab. Important- do not select the Communications tab at this stage as you want to add these details so only your department can see and use them.
e) Click on the Details icon in the address section at the bottom of the page.
Customer Set Up in Accounts Receivable
Version 8.0 28-Oct-16 12 of 21
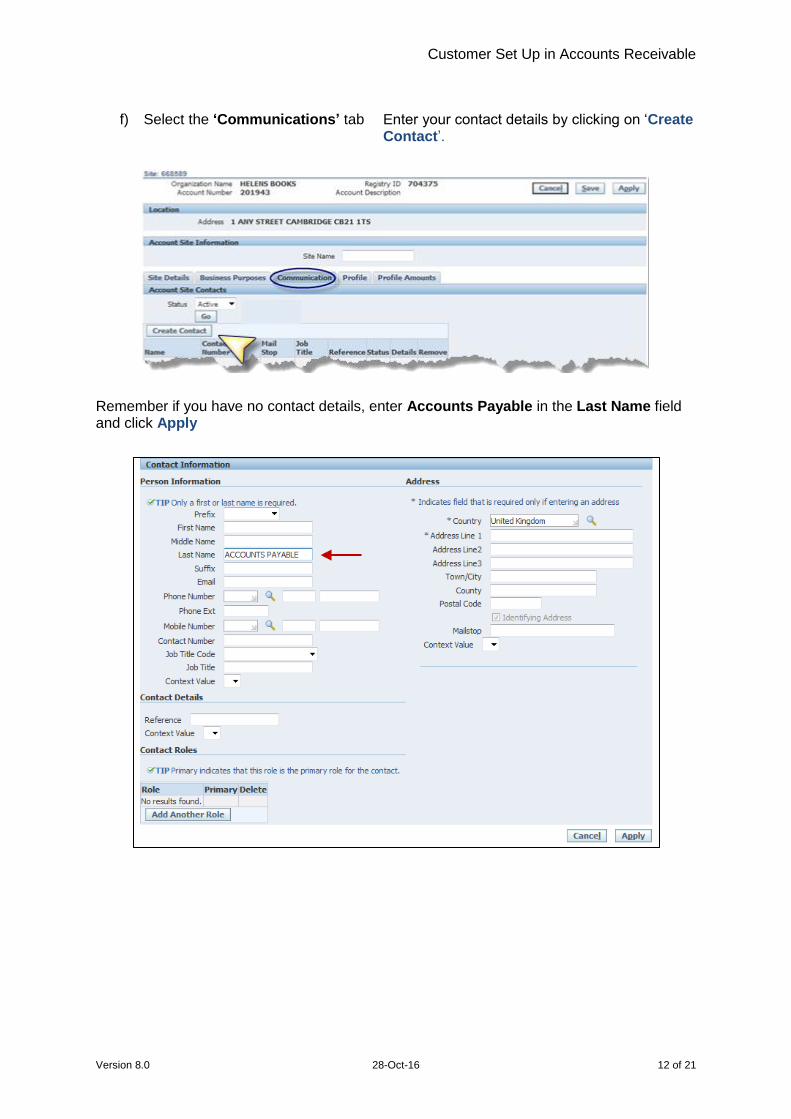
f) Select the ‘Communications’ tab Enter your contact details by clicking on ‘Create
Contact’.
Remember if you have no contact details, enter Accounts Payable in the Last Name field and click Apply

Customer Set Up in Accounts Receivable
Version 8.0 28-Oct-16 13 of 21
Specify Departmental Salesperson, Payment terms and Contact Details
g) From the Account Site Information section, click on the ‘Business Purposes’ tab
h) Then click on Details icon as shown below:
i) Scroll down to the Site Use Details Here you will populate the Salesperson, section. Payment Terms and ‘Contact’ details (Use the
magnifying glass icon and quick select buttons to assist you)
j) Click ‘Apply’. Do not populate any of the fields within the Accounting section

Customer Set Up in Accounts Receivable
Version 8.0 28-Oct-16 14 of 21
Complete Departmental Profile for Customer
k) Click on the ‘Profile’ tab A warning message will pop up to highlight you are creating a new profile. You must click ‘Yes’.
l) Change the Profile Class Change from “default” to XX External Customer (where XX is your department code).
m) Click Yes Once you have selected your profile class, you will see another warning message as shown below – click to accept.
n) Check the Collector details Should default in with your departmental name
– Do Not change this is a key driver for the Collections module.
o) Check Payment Terms The standard default is ’30 Net’ – consider
reducing if the customer is new or if you have any concerns regarding their credit worthiness.
p) Double-check The statement cycle is “Standard” and the
following items are all ticked:
Send Statement, Send Credit Balance Send Dunning Letters
q) Click ‘Save’

Customer Set Up in Accounts Receivable
Version 8.0 28-Oct-16 15 of 21
Step 4: Complete Tax Profile
a) Click on the ‘Tax Profile’ button At the top right of the Account Site Information screen
b) Tick Allow Tax Applicability
c) Ensure Rounding Level is Header
d) Ensure Rounding Rule is Nearest
e) Click on the ‘Add Another Row’’ button
Complete the Business Purpose Tax Details for this site. Using the search function (magnifying glass icon) populate the following fields.
f) Operating Unit Only one option – Cambridge University.
g) Account Number When you search the system will automatically
generate the account number for you.

Customer Set Up in Accounts Receivable
Version 8.0 28-Oct-16 16 of 21
h) Tax Registration number If an EC customer then you must enter their Tax
Registration number here so it prints out on the invoice and to support any non-charging of VAT.
i) Rounding Level – Header
j) Rounding Rule – Nearest
k) Tax classification Search and select the Tax rate that you are
most likely to use with this customer. Ignore all the “(adhoc)” items in the list. Using adhoc rates will cause problems when transactions are being interfaced and for VAT reports.
l) Click Apply until you return to the search screen. The customer is set up and ready to use (you
may wish to make a note of the account number).

Customer Set Up in Accounts Receivable
Version 8.0 28-Oct-16 17 of 21
4.Creating a New Site for an Existing Customer
If the customer was originally created in your department
If your customer changes their address it is not possible to amend the existing address line in CUFS as a clear audit trail is required.
The correct procedure is to create an additional site by creating a new address line within the same customer record. Do not create a brand new customer as this will duplicate the customer on the system!
a) Enter search criteria (e.g. customer This will retrieve the customer’s existing name) and click on Go details.
b) Click on the customer’s account This will take you to the Customers Details icon Information screen where you can create
another site for your existing customer.
Navigate: Customers → Standard

Customer Set Up in Accounts Receivable
Version 8.0 28-Oct-16 18 of 21
c) Click on the Create site button This will allow you to add the new address details of the new site.
d) Click on Create Address
e) Now populate your new address details followed by the Bill to details as shown in step 1 of creating a new customer.

Customer Set Up in Accounts Receivable
Version 8.0 28-Oct-16 19 of 21
f) Click Finish.
g) To complete the remainder of the setup, complete steps 3f-4 of creating a customer on page 12.

Customer Set Up in Accounts Receivable
Version 8.0 28-Oct-16 20 of 21
If the customer has been created by another department
You can identify if a customer has been already set up in another department in two ways:
(i) If there is no Bill-to address when you search the customer as seen below; and
(ii) If you click on the details icon and no visible address is present.
a) Click on the Details icon - DO NOT click on Create Account as this will duplicate the customer record.
b) Click on Create Site. Proceed to either step c or d.
c) If the address you are wishing to add is the same as the original department
i. Click Continue. This will display the ‘Create Account Site’ page.
ii. Complete the Business Purposes section
iii. Click on Finish

Customer Set Up in Accounts Receivable
Version 8.0 28-Oct-16 21 of 21
iv. Follow remaining steps 3f - 4 from page 12 onwards.
c) If the address you are wishing to add differs from the original department
i. Click on Create Address and follow steps 2d to 4 from page 9 onwards.


