ACTIVEMODELER AVANTAGE BPM PLATFORM GUIDE CVS Plugin CVS (Concurrent Versioning System) enables a powerful managed process repository with full version history so that process models can be shared between analysts. This is essential for process model control and the Avantage CVS plugin makes access to the CVS much simpler. Why a Repository? Have you ever worked on a project where several members of your team were making changes to the same document and passing emails to and fro with corrections to each others corrections? It is a very common scenario and one that causes a loss in productivity and generates errors. That is why there are repositories. You can think of a repository as being like a vault which contains the data of your project. It knows who is allowed to access it, who is allowed to update it and knows how many people have copies of the same data. When an updated document is put back into the repository, the previous version of the document is filed for save keeping, and a new version number is assigned to newest version of the document. CVS Plugin Page 1
Transcript
A C T I V E M O D E L E R A V A N T A G E B P M P L A T F O R M G U I D E
CVS Plugin CVS (Concurrent Versioning System) enables a powerful managed process repository with full version history so that process models can be shared between analysts. This is essential for process model control and the Avantage CVS plugin makes access to the CVS much simpler.
Why a Repository?
Have you ever worked on a project where several members of your team were making changes to the same document and passing emails to and fro with corrections to each others corrections? It is a very common scenario and one that causes a loss in productivity and generates errors.
That is why there are repositories. You can think of a repository as being like a vault which contains the data of your project. It knows who is allowed to access it, who is allowed to update it and knows how many people have copies of the same data.
When an updated document is put back into the repository, the previous version of the document is filed for save keeping, and a new version number is assigned to newest version of the document.
CVS Plugin Page 1
A C T I V E M O D E L E R A V A N T A G E B P M N P L A T F O R M G U I D E
What is the CVS plugin? Avantage uses the free CVSNT system as its versioning repository. CVSNT is the world’s most popular versioning system and we feel it is better to use and interface to this product rather than develop our own propietary versioning system. You can get more information about the product at: http://www.march-hare.com/cvspro/
In fact, you don't need to use our CVS plugin at all as you can use a CVS client such as Tortoise (see http://www.march-hare.com/cvsnt/features/clients/).
What we have done however is to make the interface to the CVS repository much easier and specific to the requirements of process modeling with Avantage. You don't have to leave the Avantage program (as you would with the Tortoise Explorer interface) and all functions have been simplified to make it easy to get the full benefit from the repository.
The diagram below shows the possible interfaces to the repository:
CVS Plugin Page 2
Avantage CVS InterfacesAvantage CVS plugin.
100% integration with Avantage workspace Simple to use, short learning curve.
Tortoise CVSWindows explorer integration
More difficult but can be used by some non-IT staff.
WinCVS clientA 'technical' stand-alone Windows client
application, more suited to IT staff.
CVS Server
Windows:CVSNT Server
Linux:Gnu CVS Server
Authentication:Each CVS client must have an OS account on the server for authenticationThe protocol used is CVS pserver.
A C T I V E M O D E L E R A V A N T A G E B P M N P L A T F O R M G U I D E
Getting startedThis chapter will explain how to use the CVS capabilities built into ActiveModeler Avantage. Instructions will be given explaining how to work on a project and then commit changes to the repository for others users to use. By continuing to work on the project alongside other users, this section will demonstrate how to commit files that other users may be simultaneously working on, and how to update files with changes that others make in them.
Starting off-lineThe CVS tutorial will start by working off-line and creating a simple project. Once the project is created, you will see how to commit this to the repository.
1. Create a new simple project using File > New Project. Use a unique name as the project name( e.g. SimpleCVSProject)
2. Create a process model file named The Model3. Create a folder named Documents4. Create two text files in Documents folder called First Document and Second
Document. Their contents should be as follows:
- First Document :“This is the contents of the first document”.
- Second Document:“This is the contents of the second document”.
The Workspace Navigator should appear as follows:
CVS Plugin Page 3
A C T I V E M O D E L E R A V A N T A G E B P M N P L A T F O R M G U I D E
The project can be worked on in this off-line mode but unless the project is committed to the repository, other users will not be able to work on the project as well.
Sharing the projectNow that a project has been created in the workspace you can make it available to other users. To do this you will need to do the following:
1. Create a CVS location identifying a shared CVS repository
2. Share the project with the CVS location and commit the changes.
Specifying a repository locationBefore it is possible to share the project with other users an available repository must first be specified.
1. Open the CVS Repository View. The top left view shows all of the CVS repositories that are currently being worked with. As can be seen, the view is empty, meaning a repository still needs to be specified.
2. In the context menu of the Repository View view choose Add new repository.
3. A CVS Repository Location wizard will appear and the location of the repository and the login information will need to be filled in. Assistance from a repository administrator may be required in order to fill in the necessary information.
CVS Plugin Page 4
A C T I V E M O D E L E R A V A N T A G E B P M N P L A T F O R M G U I D E
4. In the Host field, type the address of the host (for example "w2003").
5. In the Repository path field, type the path for the repository at the host address (for example "/cvsroot").
6. In the User field, type the user name under which to connect.
7. In the Password field, type the password.
8. Leave Use Default Port enabled.
9. By default the Validate connection is checked.
10. Click Finish when done.
Since Validate location was checked, the wizard will now attempt to validate the information by connecting to the repository. The repository connection is only used to validate the information.
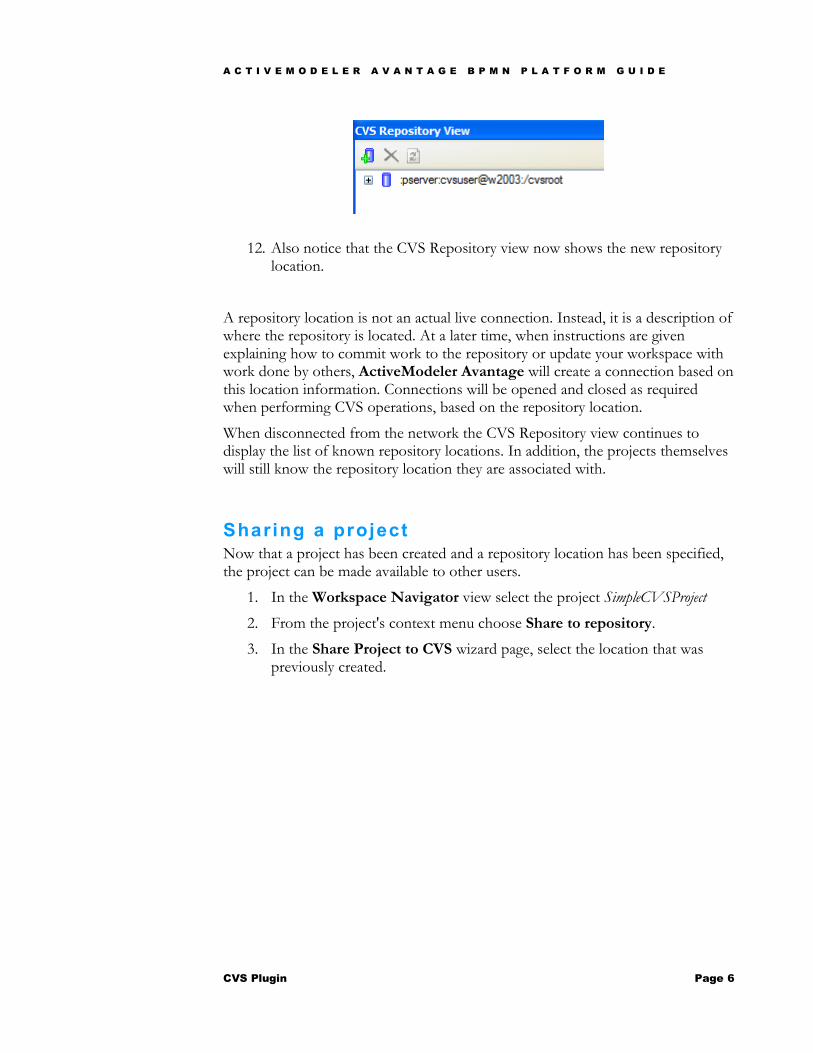
11. You will notice that the CVS Repository View now shows the new repository location.
CVS Plugin Page 5
A C T I V E M O D E L E R A V A N T A G E B P M N P L A T F O R M G U I D E
12. Also notice that the CVS Repository view now shows the new repository location.
A repository location is not an actual live connection. Instead, it is a description of where the repository is located. At a later time, when instructions are given explaining how to commit work to the repository or update your workspace with work done by others, ActiveModeler Avantage will create a connection based on this location information. Connections will be opened and closed as required when performing CVS operations, based on the repository location.
When disconnected from the network the CVS Repository view continues to display the list of known repository locations. In addition, the projects themselves will still know the repository location they are associated with.
Sharing a projectNow that a project has been created and a repository location has been specified, the project can be made available to other users.
1. In the Workspace Navigator view select the project SimpleCVSProject2. From the project's context menu choose Share to repository.
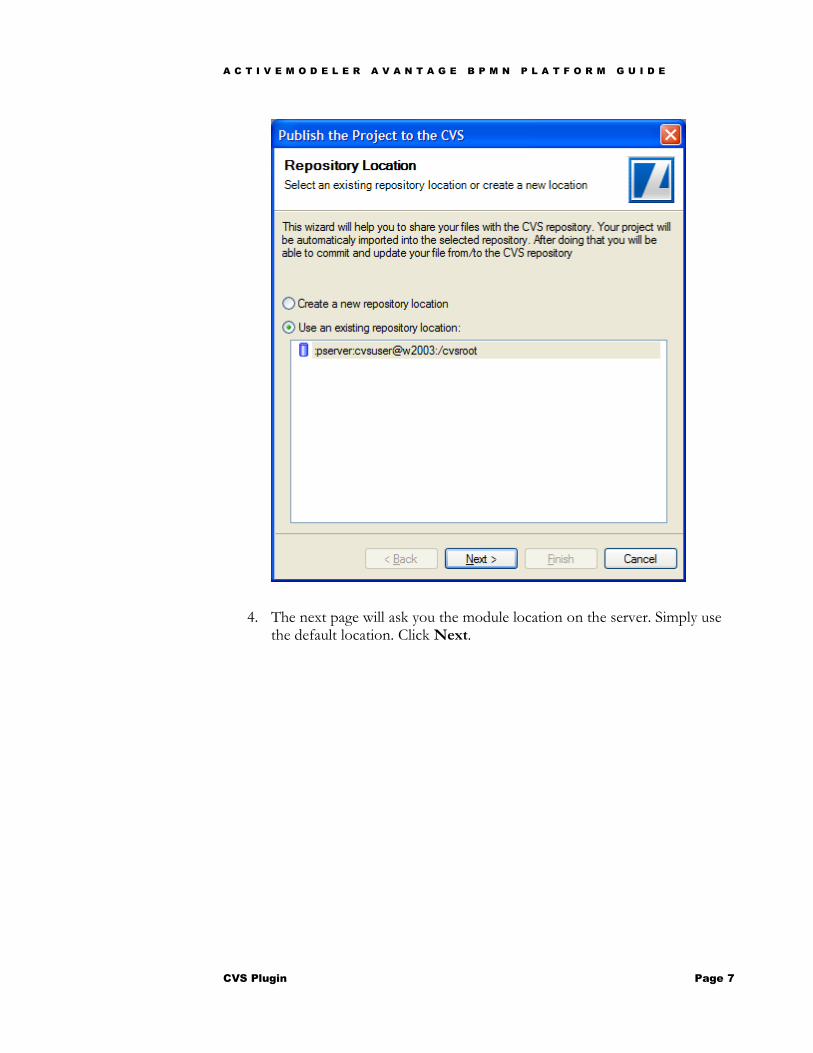
3. In the Share Project to CVS wizard page, select the location that was previously created.
CVS Plugin Page 6
A C T I V E M O D E L E R A V A N T A G E B P M N P L A T F O R M G U I D E
4. The next page will ask you the module location on the server. Simply use the default location. Click Next.
CVS Plugin Page 7
A C T I V E M O D E L E R A V A N T A G E B P M N P L A T F O R M G U I D E
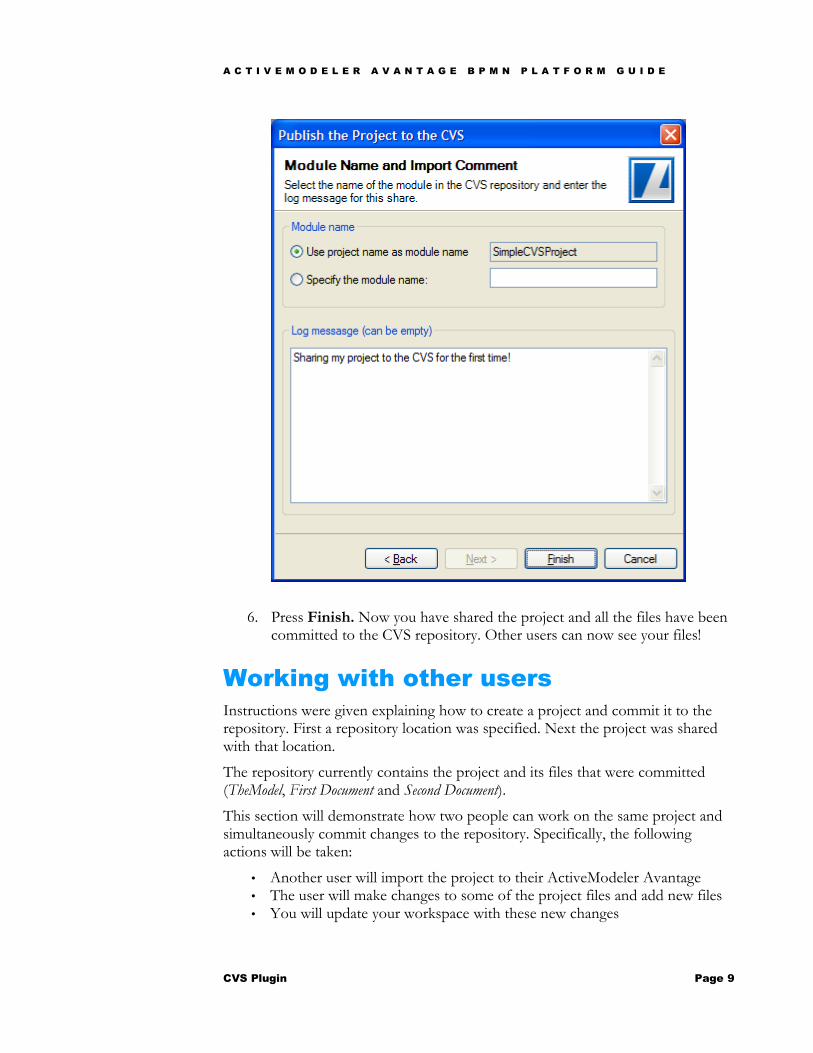
5. The next page will ask you the module name you want to create on the server and audit log message. Simply use the default name and add an log message (e.g. Sharing my project to CVS for the first time).
CVS Plugin Page 8
A C T I V E M O D E L E R A V A N T A G E B P M N P L A T F O R M G U I D E
6. Press Finish. Now you have shared the project and all the files have been committed to the CVS repository. Other users can now see your files!
Working with other usersInstructions were given explaining how to create a project and commit it to the repository. First a repository location was specified. Next the project was shared with that location.
The repository currently contains the project and its files that were committed (TheModel, First Document and Second Document). This section will demonstrate how two people can work on the same project and simultaneously commit changes to the repository. Specifically, the following actions will be taken:
• Another user will import the project to their ActiveModeler Avantage• The user will make changes to some of the project files and add new files• You will update your workspace with these new changes
CVS Plugin Page 9
A C T I V E M O D E L E R A V A N T A G E B P M N P L A T F O R M G U I D E
Checking out a projectFor another user to use the shared project the first step will be to add (check out) the project from the CVS repository into their ActiveModeler Avantage workspace:
1. Run the Add wizard from Version Control > Add existing project from repository menu
2. Create a repository location as described above
3. On the next page select the "Use an existing module from repository" radio button and wait while the repository is contacted.
4. From the list of available projects, select SimpleCVSProject and press Next.
● The last dialog will ask you a name for a location and a name for the project to be imported from CVS. Please use the default values and press
CVS Plugin Page 10
A C T I V E M O D E L E R A V A N T A G E B P M N P L A T F O R M G U I D E
Finish. A progress dialog will appear showing the progress of the check out operation.
5. Open the Workspace Navigator view and you will see that it now includes the project SimpleCVSProject. Notice that there are CVS “decorators” indicating the file revisions numbers.
CVS Plugin Page 11
A C T I V E M O D E L E R A V A N T A G E B P M N P L A T F O R M G U I D E
Commit t ing changes to the repositoryNow, having the project in ActiveModeler Avantage workspace, let's modify some files and commit the changes back to the repository.
1. Open the First DocumentAdd a new line of text::
“This is the second line in the First Document”.
Save and Close the First Document2. Expand the The Model
In the Processes node add a new diagram named Main Diagram.Add a start event, a task and an end event. Link them via a a Sequence Flow as in the image below:
Save and close Main Diagram.
3. Now, let's add a new process model file to the project by selecting the SimpleCVSProject in the Workspace Navigator and add a new process model file named Scrap Model.
4. Please choose the save all button from the toolbar to be sure that the project is saved. Now you can see that some decoration icons (a red bar in the top left) have appeared in the Workspace Navigator, attached to the items that changed since we updated from CVS:
5. To commit the changes to the SimpleCVSProject project into the CVS repository, please use the right click menu Version Control > Commit
CVS Plugin Page 12
A C T I V E M O D E L E R A V A N T A G E B P M N P L A T F O R M G U I D E
6. Please choose the default options and enter a commit audit log message (comment), then press OK. A progress dialog will appear showing the progress of the commit operation.
7. After the commit operation completes, you will see that the Workspace navigator is updated with the state and revision number of the committed files:
CVS Plugin Page 13
A C T I V E M O D E L E R A V A N T A G E B P M N P L A T F O R M G U I D E
Updating the project f rom the repositoryAs we have described, the second user has made several changes to the SimpleCVSProject 's files and committed them to the repository. In this section, the user that initially created the SimpleCVSProject will update their workspace with those changes from the repository.
1. Select the SimpleCVSProject in the ActiveModeler Avantage's Workspace Navigator view. On the right click menu, select Version Control > Update. The update dialog will be shown
2. Select the default options, and then click OK. A progress dialog will appear showing the progress of the update operation.
3. Now you can see that the SimpleCVSProject is updated into your workspace with the latest version from the CVS Repository.
ReviewHere are some of the more important but subtle issues associated with working with a repository.
• The repository contains all projects in the repository. Individual users pick which projects they are interested in and check them out into the ActiveModeler Avantage workspace. From that point on they are synchronizing(update/commit) those projects (only) with respect to the repository.
CVS Plugin Page 14
A C T I V E M O D E L E R A V A N T A G E B P M N P L A T F O R M G U I D E
• The repository represents a large in-progress collection of all known projects. From the repository's perspective, everything in it is always open for change.
• It is important to first update with changes made to the repository, retest with those changes and the soon to be committed changes and then commit the changes. By first taking the latest changes, and retesting, it helps to ensure that the changes about to be committed will actually work with the current state of the project.
• Each project is associated with a specific repository. Different projects can be associated with different repositories that may be on completely different servers
CVS Plugin Page 15
A C T I V E M O D E L E R A V A N T A G E B P M N P L A T F O R M G U I D E
Working with CVS
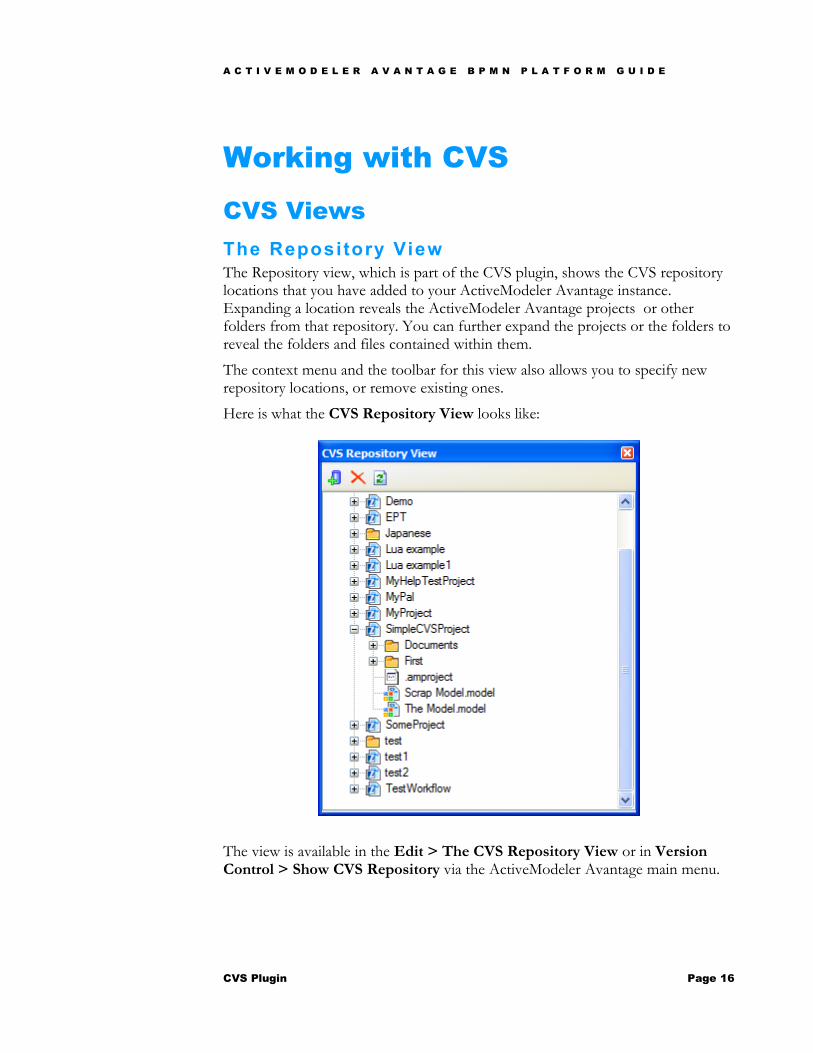
CVS ViewsThe Repository ViewThe Repository view, which is part of the CVS plugin, shows the CVS repository locations that you have added to your ActiveModeler Avantage instance. Expanding a location reveals the ActiveModeler Avantage projects or other folders from that repository. You can further expand the projects or the folders to reveal the folders and files contained within them.
The context menu and the toolbar for this view also allows you to specify new repository locations, or remove existing ones.
Here is what the CVS Repository View looks like:
The view is available in the Edit > The CVS Repository View or in Version Control > Show CVS Repository via the ActiveModeler Avantage main menu.
CVS Plugin Page 16
A C T I V E M O D E L E R A V A N T A G E B P M N P L A T F O R M G U I D E
The Console ViewThe CVS Console view, which is part of the CVS plugin, shows the output of the CVS command line client. If an error occurs during a CVS operation the console can help troubleshoot the cause of the error, because it contains all the messages used in communication with the CVS server (repository).
This is what the CVS Console view looks like:
Publish a project to a repositoryThis wizard helps you to share a project with other users to a CVS repository. It is available from the Version Control > Publish to repository main menu and the the context menu of Workspace Navigator Project > Publish to repository. Prior to running this wizard, you have to select a project from the Workspace Navigator that is not already shared with a repository.
The first page of the publish wizard allows you to choose an existing repository location you wish to share with, or create a new one. If you choose to create a new location, the new repository location dialog is shown.
CVS Plugin Page 17
A C T I V E M O D E L E R A V A N T A G E B P M N P L A T F O R M G U I D E
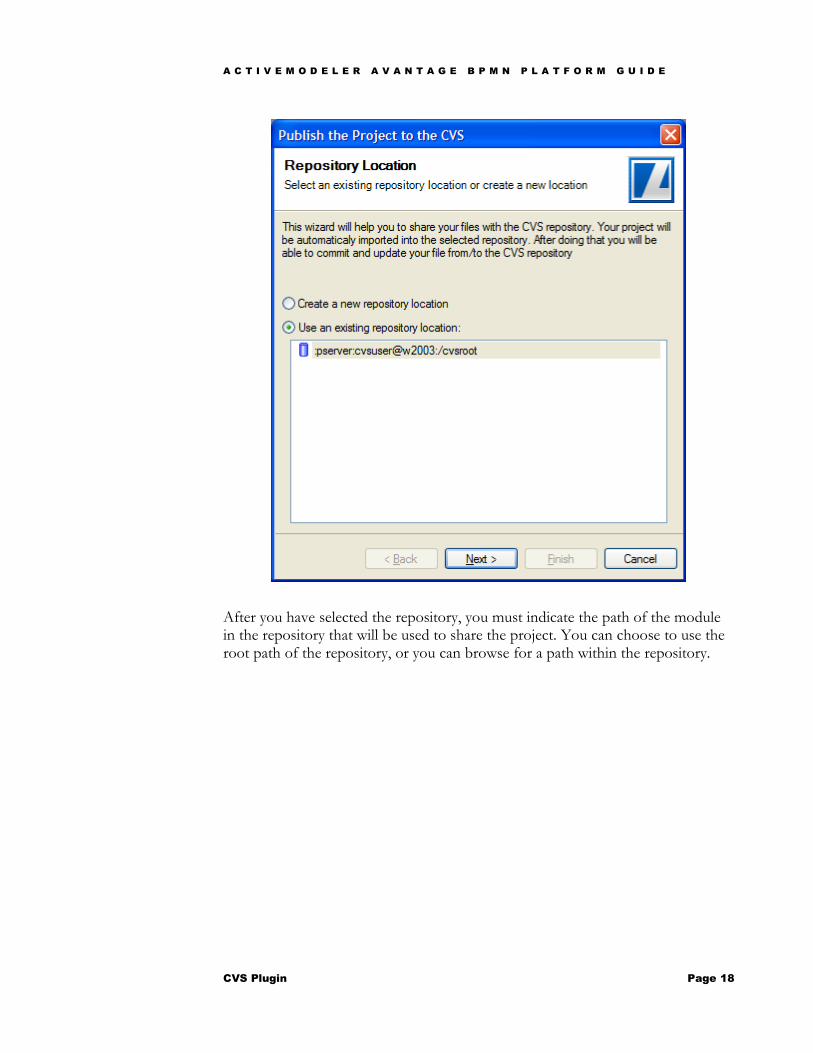
After you have selected the repository, you must indicate the path of the module in the repository that will be used to share the project. You can choose to use the root path of the repository, or you can browse for a path within the repository.
CVS Plugin Page 18
A C T I V E M O D E L E R A V A N T A G E B P M N P L A T F O R M G U I D E
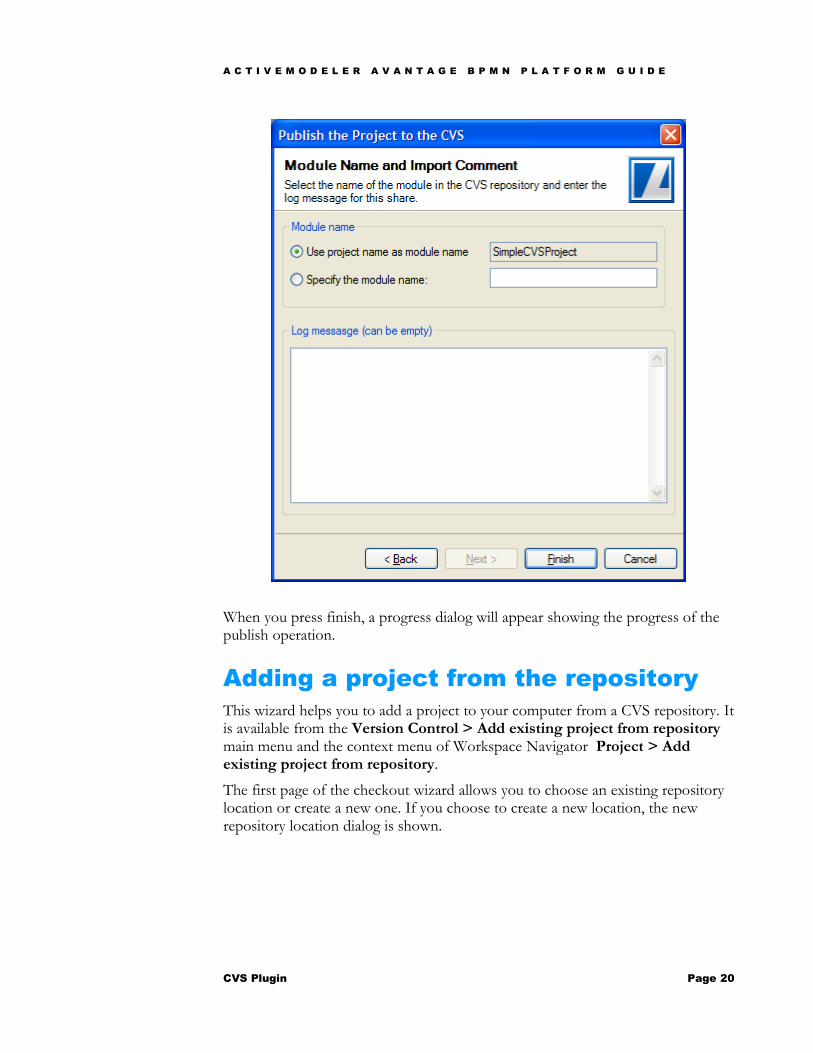
After you have the module path in the repository, you must indicate the name of the module that will be used to share the project. You can choose to use the same name as the local project or you can type another name indicating the remote module.
There is also a text box where you will be asked to add your audit log message that would be linked to the first revision of the module.
CVS Plugin Page 19
A C T I V E M O D E L E R A V A N T A G E B P M N P L A T F O R M G U I D E
When you press finish, a progress dialog will appear showing the progress of the publish operation.
Adding a project from the repositoryThis wizard helps you to add a project to your computer from a CVS repository. It is available from the Version Control > Add existing project from repository main menu and the context menu of Workspace Navigator Project > Add existing project from repository.
The first page of the checkout wizard allows you to choose an existing repository location or create a new one. If you choose to create a new location, the new repository location dialog is shown.
CVS Plugin Page 20
A C T I V E M O D E L E R A V A N T A G E B P M N P L A T F O R M G U I D E
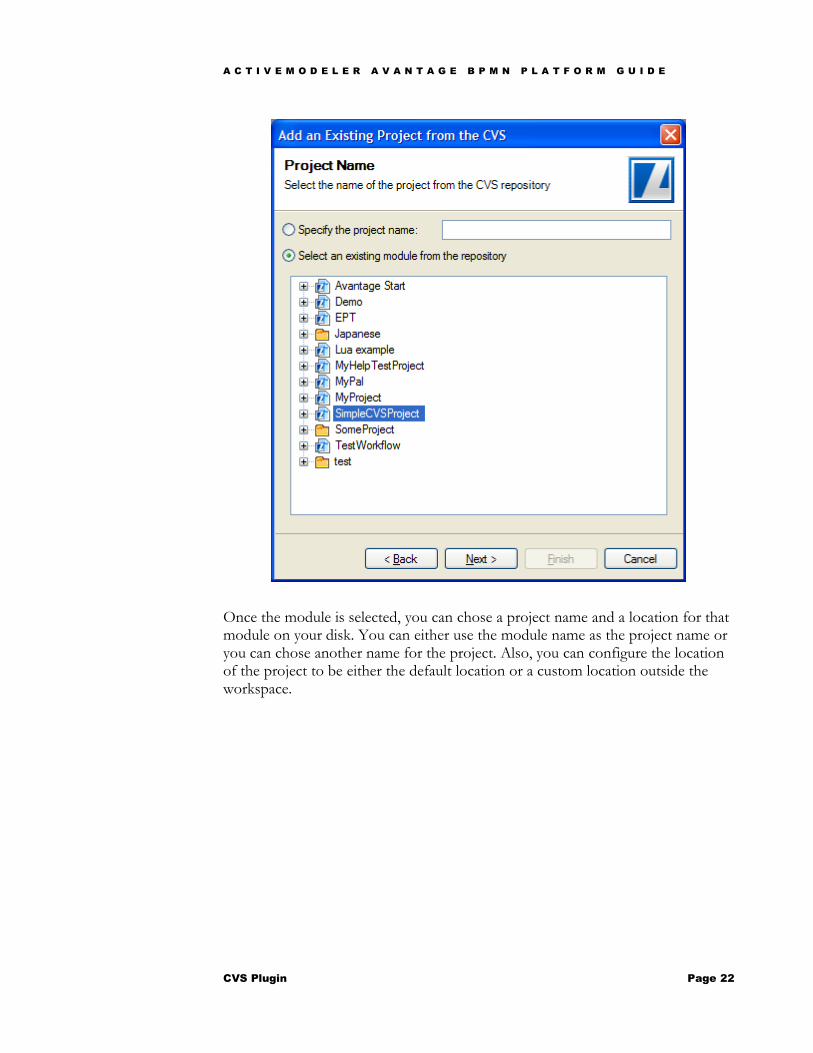
After a repository location is selected, you can now chose the module you want to check out. You can either enter a module path or select one from the list of existing modules.
CVS Plugin Page 21
A C T I V E M O D E L E R A V A N T A G E B P M N P L A T F O R M G U I D E
Once the module is selected, you can chose a project name and a location for that module on your disk. You can either use the module name as the project name or you can chose another name for the project. Also, you can configure the location of the project to be either the default location or a custom location outside the workspace.
CVS Plugin Page 22
A C T I V E M O D E L E R A V A N T A G E B P M N P L A T F O R M G U I D E
When you press finish, a progress dialog will appear showing the progress of the check out operation.
Disconnect a project from the repositoryYou can disconnect a project from CVS to disable the CVS operations that can be performed on the project and its files/folders. The disconnect command will remove the CVS information (stored in the CVS folders) associated with the project.
To disconnect a project form the CVS repository:
1. In the Workbench Navigator select the project to be disconnected.
2. Select either the context menu Disconnect Project item or main menu Version Control > Disconnect Project item.
CVS Plugin Page 23
A C T I V E M O D E L E R A V A N T A G E B P M N P L A T F O R M G U I D E
3. A message box will be shown to confirm the disconnect command. If you choose “Yes”, the project will be disconnected from the CVS.
Note that the disconnect command will not remove the project from your workspace or from your computer but will remove the link between the project and its copy from repository.
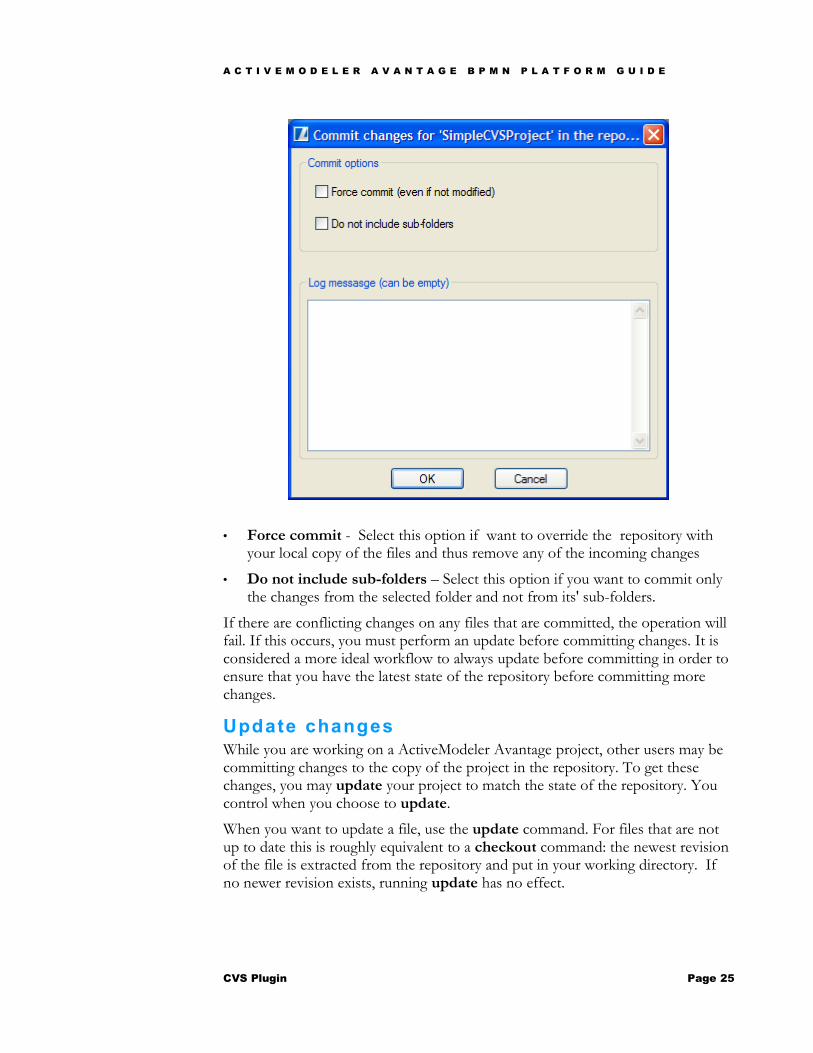
Synchronizing with the repositoryCommit changesUse commit when you want to incorporate changes from your workspace into the repository. You should commit files that you have modified to the repository so that other users can see your work. Only those changes committed will be visible to others working with the same project from the repository. By default, the commit command is careful to change in the repository only those files that you have really changed. However, you may choose to overide the repository with your copy.
The commit command can be issued from two places: the main menu Version Control> Commit, or the context menu from the Workspace Navigator Version Control > Commit. To commit changes to the repository
1. In the Workspace Navigator view, select the file, the folder or the project you want to commit, and then issue the commit command
2. In the commit dialog box, choose the options you want and then provide a commit message for your changes
CVS Plugin Page 24
A C T I V E M O D E L E R A V A N T A G E B P M N P L A T F O R M G U I D E
• Force commit - Select this option if want to override the repository with your local copy of the files and thus remove any of the incoming changes
• Do not include sub-folders – Select this option if you want to commit only the changes from the selected folder and not from its' sub-folders.
If there are conflicting changes on any files that are committed, the operation will fail. If this occurs, you must perform an update before committing changes. It is considered a more ideal workflow to always update before committing in order to ensure that you have the latest state of the repository before committing more changes.
Update changes While you are working on a ActiveModeler Avantage project, other users may be committing changes to the copy of the project in the repository. To get these changes, you may update your project to match the state of the repository. You control when you choose to update.
When you want to update a file, use the update command. For files that are not up to date this is roughly equivalent to a checkout command: the newest revision of the file is extracted from the repository and put in your working directory. If no newer revision exists, running update has no effect.
CVS Plugin Page 25
A C T I V E M O D E L E R A V A N T A G E B P M N P L A T F O R M G U I D E
The update command can be issued from two places: the main menu Version Control> Update , or the context menu from the Workspace Navigator Version Control > Update.
To update from the repository
1. In Workspace Navigator view, select the file, the folder or the project you want to update, and then issue the update command
2. In the update dialog box, choose the options you want for your update and then press OK
• Get a clean copy – Select this option when you want to override your existing copy of the file with the latest version from repository, even if your copy is not modified or the repository contains an older version of the file
• Do not include sub-folders – Select this option when you don't want the update command to recurse into the sub-folders of the selected folder. In this case the update command will apply only to the selected folder. Its' sub-folders are not included in the update
• By date – Select this option when you want to get from the repository the most recent revision before the selected date. If no matching revision is found, the command will get the most recent one.
• By revision – Select this option when you want to get from the repository the files with the specified revision. If no matching revision is found, the command will get the most recent one.
CVS Plugin Page 26
A C T I V E M O D E L E R A V A N T A G E B P M N P L A T F O R M G U I D E
• Update using last checkin time – Select this option when you want to retrieve the last version you committed to the repository.
History of a project/file in the repositoryEach time you commit a file, folder or a project to the CVS repository, a new revision is created for that file. Each revision is identified by a number (e.g. 1.1, 1.2 ... ). Along with each revision is stored the author, the date and the commit log message.
To view the history for a file, a folder or a project:
1. Select the file/folder/project in the Workspace Navigator view, and then run the history command
2. The CVS History dialog will open and show the history in the repository for the selected item
The history command can be issued from two places: the main menu Version Control> History , or the context menu from the Workspace Navigator Version Control > History.


![-ravichandran@uiowa.edu] CVS Health (CVS) September … · Through the above service, CVS helps clients in designing ... Improvement, and Modernization ... prescriptions at CVS Pharmacy](https://static.documents.pub/doc/80x56/5b5140327f8b9a056a8bdae7/-ravichandranuiowaedu-cvs-health-cvs-september-through-the-above-service.jpg)
![DIALux4[1].0- · PDF filedialux 2 plugin. 1.X. plugin , plugin. luminaire selection Plugin plugin . home page, Intenet Explorer](https://static.documents.pub/doc/80x56/5a715aac7f8b9a98538cccda/dialux410-wwwpowerengineeringblogfacomssuacirkhadamatkarkonanarticlesbarghdialux4-learningpdfpdf.jpg)


![DataManager Plugin - d36j349d8rqm96.cloudfront.net Plugin - M… · DataManager Plugin 6Version History 6 Version History 6.1Plugin Version Plugin-Version Date [dd.mm.yyyy] Notes](https://static.documents.pub/doc/80x56/5f05b5577e708231d4144e44/datamanager-plugin-plugin-m-datamanager-plugin-6version-history-6-version.jpg)


