CYCLONE COMMERCE, INC. PROPRIETARY AND CONFIDENTIAL INFORMATION. P AGE 1 OF 21 Cyclone Interchange 4.2.x to Cyclone Interchange 5.3 Upgrade Guide Version 1.3 Cyclone Commerce, Inc. 8388 E. Hartford Drive Scottsdale, AZ 85255 480.627.1800 www.CycloneCommerce.com
Transcript
C Y C L O N E C O M M E R C E , I N C . P R O P R I E T A R Y A N D C O N F I D E N T I A L I N F O R M A T I O N .
P A G E 1 O F 2 1
Cyclone Interchange 4.2.x to Cyclone Interchange 5.3
Upgrade Guide Version 1.3
Cyclone Commerce, Inc. 8388 E. Hartford Drive Scottsdale, AZ 85255
480.627.1800 www.CycloneCommerce.com
C Y C L O N E C O M M E R C E , I N C . P R O P R I E T A R Y A N D C O N F I D E N T I A L I N F O R M A T I O N .
P A G E 2 O F 2 1
Confidentiality Notice
This document contains certain information as to the methods, policies, procedures, and other confidential information proprietary to Cyclone Commerce, Inc. and may not be copied or disclosed, in whole or in part, without the prior written consent of Cyclone Commerce, Inc. This document also contains certain material proprietary to Cyclone Commerce, Inc., for which Cyclone Commerce, Inc. claims copyright protections. As the owner of the copyrights in that material, Cyclone Commerce, Inc. has the exclusive rights to do or authorize reproduction of the work, distribution of the work, and preparation of derivative works based on the work. Any such reproduction, distribution or preparation without the express written consent of Cyclone Commerce, Inc. is strictly prohibited and is a violation of law.
Copyright 2001 Cyclone Commerce, Inc. All rights reserved.
Cyclone Interchange is a trademark of Cyclone Commerce, Inc
All other trademarks are property of their respective owners.
C Y C L O N E C O M M E R C E , I N C . P R O P R I E T A R Y A N D C O N F I D E N T I A L I N F O R M A T I O N .
P A G E 3 O F 2 1
Index 1. OVERVIEW ............................................................................................................................................................3 2. PREREQUISITES...................................................................................................................................................3 3. EXPORTING PROFILES FROM CI 4.2.X..........................................................................................................3
3.1 EXPORTING CI 4.2.X PROFILES AUTOMATICALLY DURING CI 5 INSTALLATION.....................................................3 3.1.1 CI5: Configure and Test Database ...............................................................................................................3
3.2 EXPORTING CI 4.2.X PROFILES MANUALLY...........................................................................................................3 3.2.1 Exporting CI 4.2.x profiles one at a time from the Administrator ................................................................3 3.2.2 Exporting CI 4.2.x profiles in bulk from the command line..........................................................................3
4. IMPORTING CI 4.2.X PROFILES INTO CI 5....................................................................................................3 4.1 DURING THE IMPORT.............................................................................................................................................3
5.3 GLOBAL OUTBOUND COMMUNITY PROXY.............................................................................................................3 5.3.1 Consider whether one CI 5 community can replace all of your CI 4.2.x companies ....................................3
6. IMPORTING CI 4.2.X PARTNER PROFILES INTO CI 5 PARTNERS.........................................................3 6.1 DURING THE IMPORT.............................................................................................................................................3 6.2 ESTABLISH COLLABORATION SETTINGS ................................................................................................................3 6.3 CERTIFICATES.......................................................................................................................................................3
7. STEPS TO REVERT BACK FROM CI5.X TO CI 4.2.X....................................................................................3
C Y C L O N E C O M M E R C E , I N C . P R O P R I E T A R Y A N D C O N F I D E N T I A L I N F O R M A T I O N .
P A G E 4 O F 2 1
1. Overview Upgrading from CI 4.2.x to CI 5 is handled through the profile import mechanism in CI 5. This document describes how to export profiles from CI 4.2.x (either manually or through the CI 5 installation program), and import them into CI 5.
This document is intended to supplement the information in the CI 5 online help.
2. Prerequisites 1. The installation procedure should be performed on a machine which can host UNIX X-Windows
sessions. This will allow us to run the dbConfig tool in graphical mode to configure and test the database. (This isn’t absolutely required, but it makes things easier.)
2. In case of Manual import of community (Company) profile, the .p12 file containing the client’s community’s certificate needs to be available on the installation machine’s hard drive so we can import it.
3. The CIServer_ci5_settings file with all the host, user, queue, etc. names in it must be available on the installation machine’s hard drive to allow for easy cut and paste into CI5’s UI as we are creating the community.
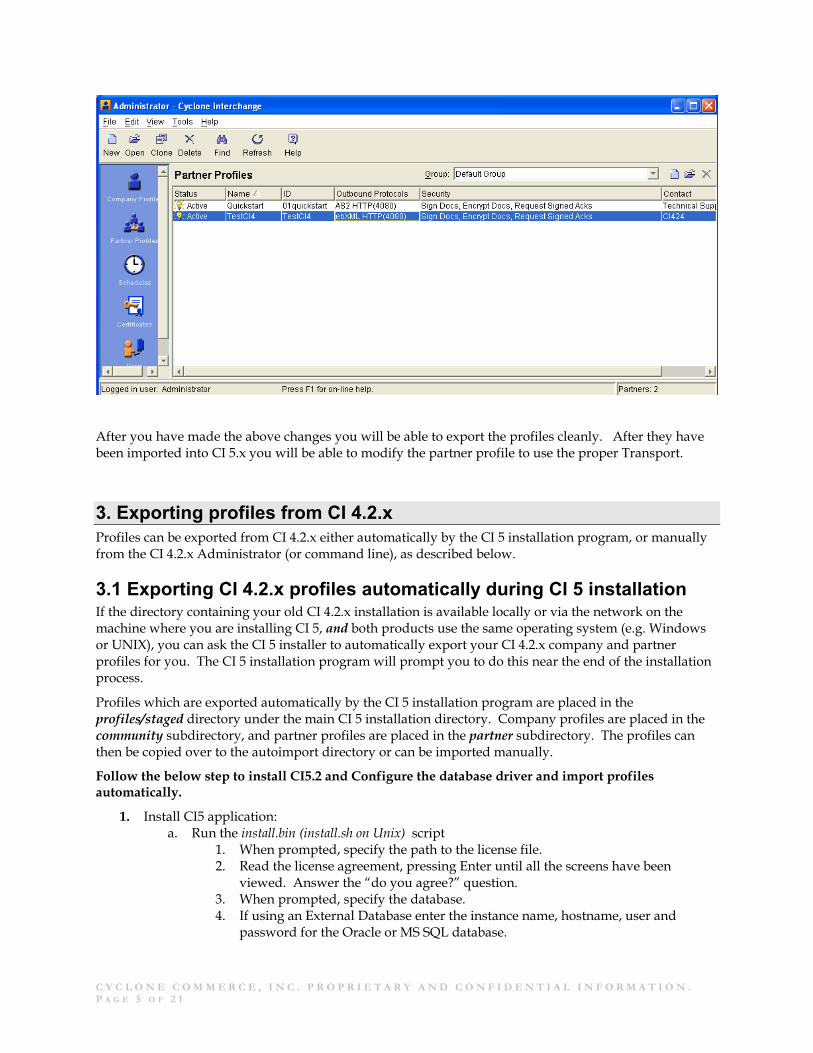
2.1 Preparing CI 4.2.x profiles for export Clean up of the CI 4.2.x profiles is optional, and not required for a successful export. If this is done it will eliminate errors when the profiles are loaded into CI 5. The following changes show the valid CI 4 protocols and how to change them to valid CI 5 protocols.
Please note: If you are using ebXML it will have to be created manually in CI 5
If you are using RosettaNet it will have to be created manually in CI 5
If you are using Secure WebMail box, it will have to be created manually as Staged HTTP.
Valid CI 4 protocol Valid CI 5 protocol
• ebXML HTTP AS2 HTTP
• ebXML HTTPS AS2 HTTPS
• ebXML POP AS1 POP
• ebXML SMTP AS1 SMTP
• RosettaNet HTTP AS2 HTTP
• RosettaNet HTTPS AS2 HTTPS
• RosettaNet POP AS1 POP
• RosettaNet SMTP AS1 SMTP
• Secure web mailbox HTTP N/A
• Secure web mailbox HTTPS N/A
In this Example the quickstart profile is correct the TestCI4 profile is incorrect.
C Y C L O N E C O M M E R C E , I N C . P R O P R I E T A R Y A N D C O N F I D E N T I A L I N F O R M A T I O N .
P A G E 5 O F 2 1
After you have made the above changes you will be able to export the profiles cleanly. After they have been imported into CI 5.x you will be able to modify the partner profile to use the proper Transport.
3. Exporting profiles from CI 4.2.x Profiles can be exported from CI 4.2.x either automatically by the CI 5 installation program, or manually from the CI 4.2.x Administrator (or command line), as described below.
3.1 Exporting CI 4.2.x profiles automatically during CI 5 installation If the directory containing your old CI 4.2.x installation is available locally or via the network on the machine where you are installing CI 5, and both products use the same operating system (e.g. Windows or UNIX), you can ask the CI 5 installer to automatically export your CI 4.2.x company and partner profiles for you. The CI 5 installation program will prompt you to do this near the end of the installation process.
Profiles which are exported automatically by the CI 5 installation program are placed in the profiles/staged directory under the main CI 5 installation directory. Company profiles are placed in the community subdirectory, and partner profiles are placed in the partner subdirectory. The profiles can then be copied over to the autoimport directory or can be imported manually.
Follow the below step to install CI5.2 and Configure the database driver and import profiles automatically.
1. Install CI5 application: a. Run the install.bin (install.sh on Unix) script
1. When prompted, specify the path to the license file. 2. Read the license agreement, pressing Enter until all the screens have been
viewed. Answer the “do you agree?” question. 3. When prompted, specify the database. 4. If using an External Database enter the instance name, hostname, user and
password for the Oracle or MS SQL database.
C Y C L O N E C O M M E R C E , I N C . P R O P R I E T A R Y A N D C O N F I D E N T I A L I N F O R M A T I O N .
P A G E 6 O F 2 1
5. When prompted, specify the directory to copy the database drivers from as /cyclone/drivers ( or to the destination directory where the driver is installed)
6. When prompted, specify the installation directory as /cyclone 7. When prompted, select “no” to the question about exporting configuration
information from a previous installation. b. Inspect installation log for errors (/cyclone/build/logs). c. Copy the MQ drivers/com.ibm.mq.jar file to /cyclone/build/corelib folder. d. Either copy the already-tweaked startServer script from the certification machine, or edit
it and make the following changes: 1. Add com.ibm.mq.jar to the classpath. 2. Change the maximum heap size for the control node and trading engine nodes
(the first -Xmx setting in the file) from 256m to 512m.
3.1.1 CI5: Configure and Test Database The current CI5 installation program does not allow setting the database port to a non-standard one during the installation process. Therefore it will be necessary to set the port after the installation by one of the following means:
• Run the graphical version of dbConfig, if X-Windows is available on the machine where the installation terminal session is being run. This is the preferred method because the graphical version has a handy “Test” button:
a. Export the display: export DISPLAY=x.x.x.x:0.0
b. Set X-Windows permissions to allow accepting incoming UI session. c. Execute /cyclone/build/bin/dbConfig. d. Change the port to 1640. e. Click on the “Test” button to test the connection. f. Exit dbConfig.
OR- • Run the command line version of /cyclone/build/bin/dbConfig to specify the port (and
everything else, unfortunately):Please note that is example is using an Oracle database (third node is ora) and the example port is 1640 dbConfig –d ora –p 1640 –h lpcyc01 –n pcyc01 –u cyc5 –pd cyc5
-OR- • Edit /cyclone/build/conf/datastoreconfig.xml manually and change the Database port to something
non-standard (this example is using port 1640). (Not ideal because the password cannot be viewed or changed since it is encrypted in the text file. But assuming the password was specified correctly during installation, this may not be an issue.)
3.2 Exporting CI 4.2.x profiles manually You can export profiles from CI 4.2.x either one at a time from the CI 4.2.x Administrator, or in bulk from the command line, as described below.
3.2.1 Exporting CI 4.2.x profiles one at a time from the Administrator
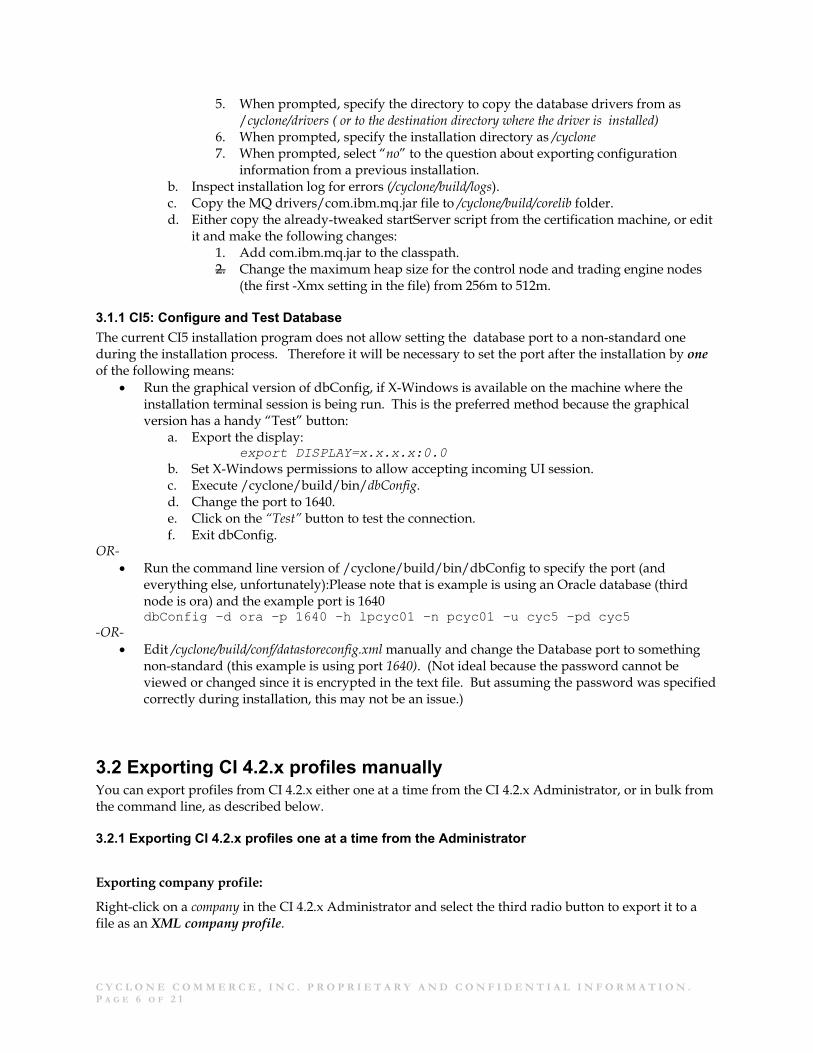
Exporting company profile:
Right-click on a company in the CI 4.2.x Administrator and select the third radio button to export it to a file as an XML company profile.
C Y C L O N E C O M M E R C E , I N C . P R O P R I E T A R Y A N D C O N F I D E N T I A L I N F O R M A T I O N .
P A G E 7 O F 2 1
Note: Make sure you select the 3rd radio button. By default, 1st radio button will be checked.
Exporting Partner Profile:
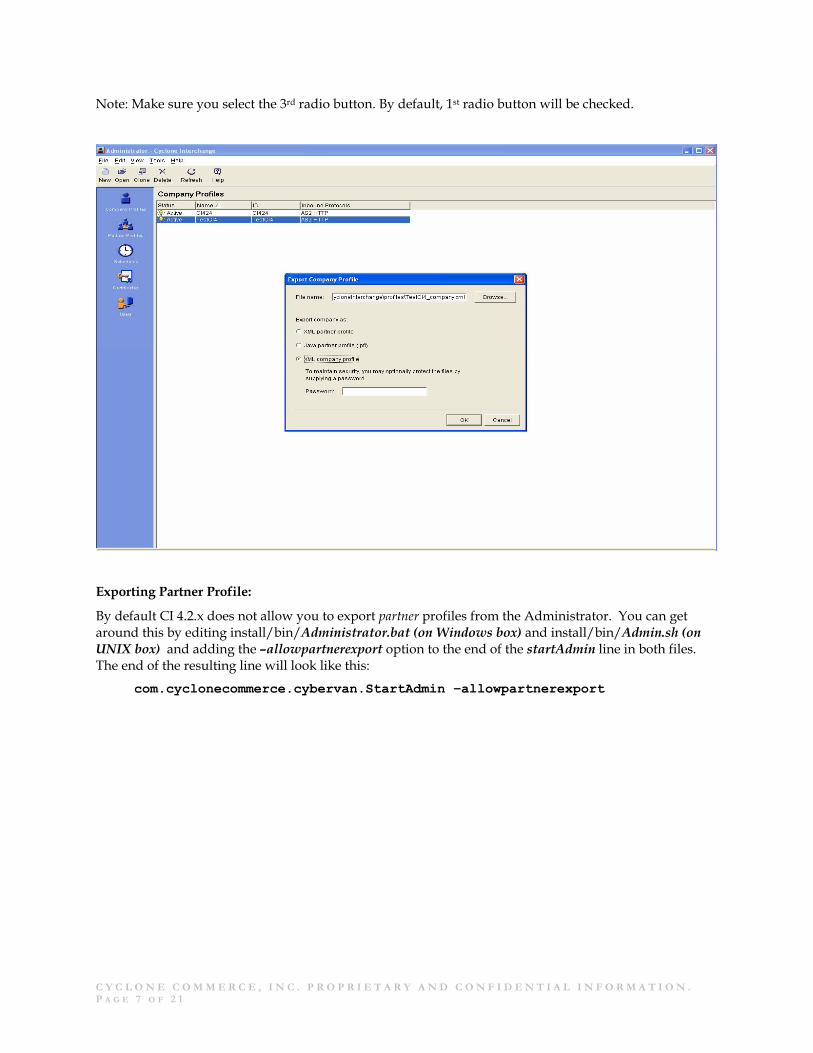
By default CI 4.2.x does not allow you to export partner profiles from the Administrator. You can get around this by editing install/bin/Administrator.bat (on Windows box) and install/bin/Admin.sh (on UNIX box) and adding the –allowpartnerexport option to the end of the startAdmin line in both files. The end of the resulting line will look like this:
C Y C L O N E C O M M E R C E , I N C . P R O P R I E T A R Y A N D C O N F I D E N T I A L I N F O R M A T I O N .
P A G E 8 O F 2 1
C Y C L O N E C O M M E R C E , I N C . P R O P R I E T A R Y A N D C O N F I D E N T I A L I N F O R M A T I O N .
P A G E 9 O F 2 1
3.2.2 Exporting CI 4.2.x profiles in bulk from the command line If you are exporting a large number of profiles (usually partner), you probably won’t want to export them one at a time from the CI 4.2.x Administrator. Fortunately there is a way to do this from the command line, though it requires creating a command file. The following excerpt from the Migrating profiles topic in the CI 5 online help describes how:
1. If you previously used the CI 5 installer to export CI 4.2.x profiles automatically, there should already be a command file called ProfileImportExport.bat (Windows) or profileimportexport.sh(UNIX) in you CI 4.2.x bin directory. If so, skip to step 7 now.
2. Locate the import utility in the CI 4.2.x bin directory. This file is named Import.bat in Windows and import.sh in UNIX.
3. Make a copy of the file and name it ProfileImportExport.bat (Windows) or profileimportexport.sh (UNIX). Leave the file in the bin directory.
4. Open the file for editing and find the following string at the end of the file: upgrade.StartImport
5. Delete the string and type the following string in its place: util.ProfileImportExport %*
6. Save and close the file.
7. Open a command window to run the utility. You need to run it twice, first to export partner profiles and then company profiles. The order does not matter. Run the utility from the bin directory.
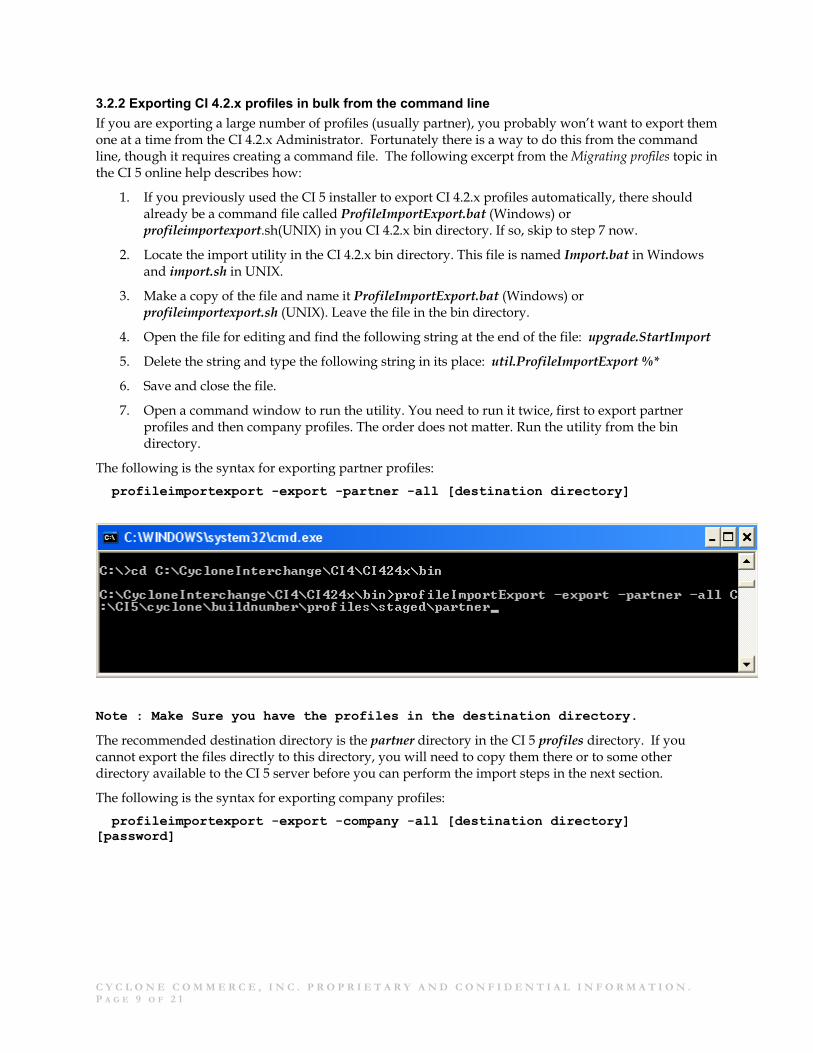
The following is the syntax for exporting partner profiles:
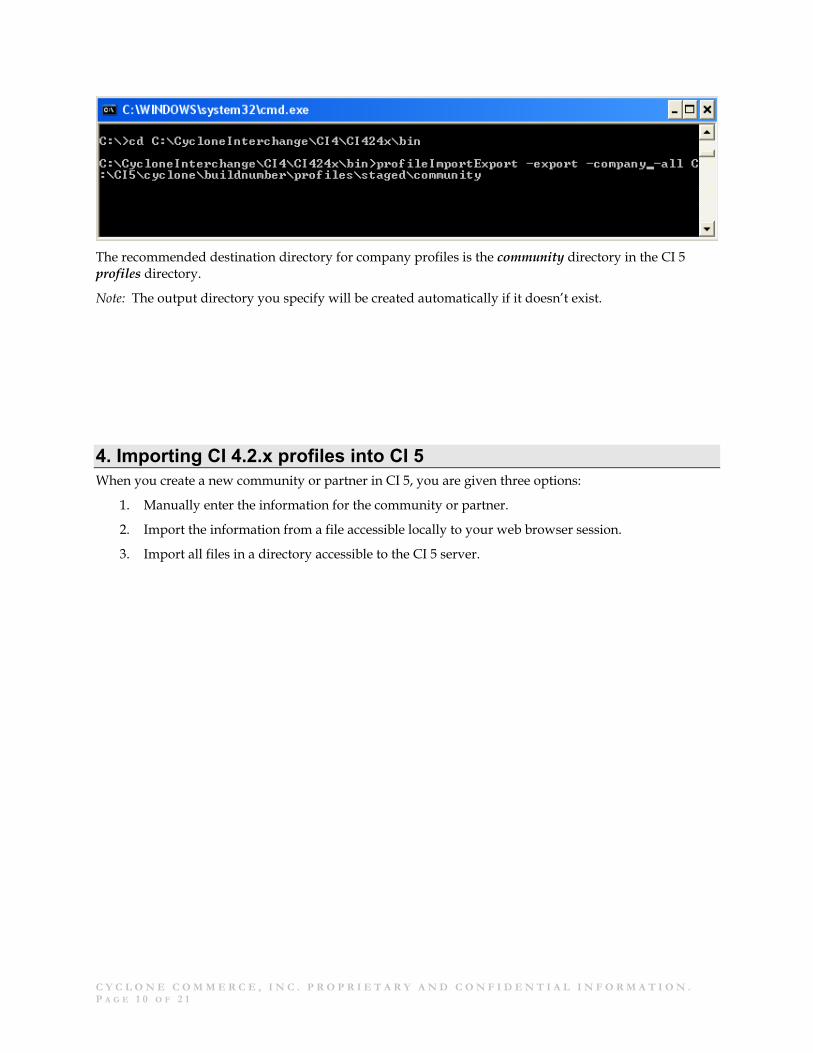
Note : Make Sure you have the profiles in the destination directory. The recommended destination directory is the partner directory in the CI 5 profiles directory. If you cannot export the files directly to this directory, you will need to copy them there or to some other directory available to the CI 5 server before you can perform the import steps in the next section. The following is the syntax for exporting company profiles:
C Y C L O N E C O M M E R C E , I N C . P R O P R I E T A R Y A N D C O N F I D E N T I A L I N F O R M A T I O N .
P A G E 1 0 O F 2 1
The recommended destination directory for company profiles is the community directory in the CI 5 profiles directory.
Note: The output directory you specify will be created automatically if it doesn’t exist.
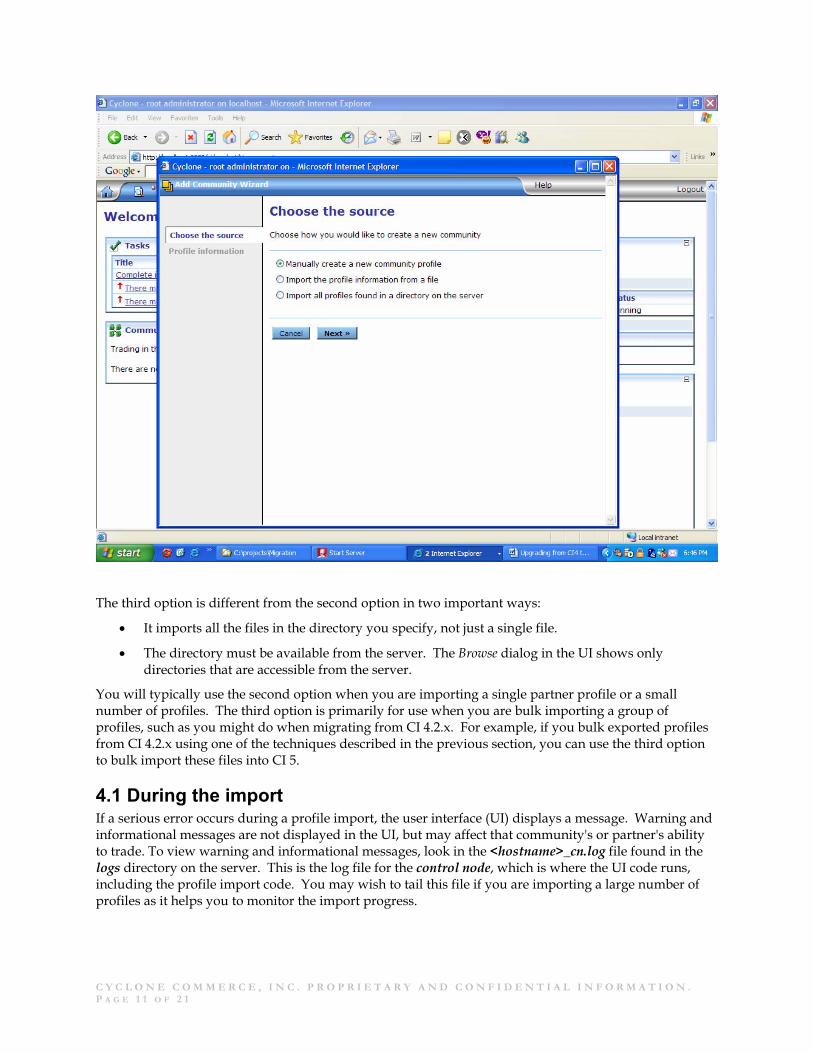
4. Importing CI 4.2.x profiles into CI 5 When you create a new community or partner in CI 5, you are given three options:
1. Manually enter the information for the community or partner.
2. Import the information from a file accessible locally to your web browser session.
3. Import all files in a directory accessible to the CI 5 server.
C Y C L O N E C O M M E R C E , I N C . P R O P R I E T A R Y A N D C O N F I D E N T I A L I N F O R M A T I O N .
P A G E 1 1 O F 2 1
The third option is different from the second option in two important ways:
• It imports all the files in the directory you specify, not just a single file.
• The directory must be available from the server. The Browse dialog in the UI shows only directories that are accessible from the server.
You will typically use the second option when you are importing a single partner profile or a small number of profiles. The third option is primarily for use when you are bulk importing a group of profiles, such as you might do when migrating from CI 4.2.x. For example, if you bulk exported profiles from CI 4.2.x using one of the techniques described in the previous section, you can use the third option to bulk import these files into CI 5.
4.1 During the import If a serious error occurs during a profile import, the user interface (UI) displays a message. Warning and informational messages are not displayed in the UI, but may affect that community's or partner's ability to trade. To view warning and informational messages, look in the <hostname>_cn.log file found in the logs directory on the server. This is the log file for the control node, which is where the UI code runs, including the profile import code. You may wish to tail this file if you are importing a large number of profiles as it helps you to monitor the import progress.
C Y C L O N E C O M M E R C E , I N C . P R O P R I E T A R Y A N D C O N F I D E N T I A L I N F O R M A T I O N .
P A G E 1 2 O F 2 1
5. Post-import community configuration After the import completes, you should check the communities and partners in the CI 5 UI to see if there are any yellow icons notifying you that additional configuration tasks are necessary.
Other things you will want to check are described in the following sections.
5.1 Trusted root certificates CI 5 does not automatically provide root third-party certificates upon installation. Therefore, you should acquire any root certificates from third-party providers that you plan to use and import them into your communities.
There are three ways to aquire the root certificates
1) go to the website of the 3rd party (example verisign or thawte), and do a search on intermediate and root certs. Download the certificates (there are a lot of steps involved with this.) Most difficult of the three ways to get the certificates.
2) Export the trusted Root certificates out of CI 4 a) sign onto the administrator. b) go to Certificate> Trusted Root Store (blue ribbon in upper right corner)> Select a certificate > select view > select Export > Select PKCS #7 (check the include all certification path) > Select Next> give it a path and filename > select Finish c) You will need to do this for all root and intermediate certificates (CI 4 comes preloaded with around 69 certs)
3) Export the trusted certificates from Internet Explorer. a) open internet Explorer b) go to tools> Internet Options> content>Certificate c) select the Intermediate tab i) Select a certificate> Export (this will bring up a wizard) > select PKCS#7 (include all certification path) > give it a path and a filename > select Finish ii) You will need to do this for all intermediate certificates that you want d) Select the Trusted Root Certification Authorities i) Select a certificate> Export (this will bring up a wizard) > select PKCS#7 (include all certification path) > give it a path and a filename > select Finish ii) You will need to do this for all intermediate certificates that you want
After you have aquired the root certs you will need to import them into your CI 5.x installation.
1) Sign onto CI 5.x 2) select the community (each community can have different trusted roots) 3) select certificates You must do each certificate separately. Verify that the certificate has not expired 4) select add a trusted Root certificate 5) import from file > browse to the certificate that you create above. You must do each certificate separately. Verify that the certificate has not expired.
5.2 Delivery exchanges CI 5 uses delivery exchanges instead of CI4.2.x's protocols/transports and system directories. When community profiles are imported, the protocols are translated into delivery exchanges, and the system directories are translated into integration delivery and integration pickup exchanges. Each of these categories requires inspection, as described in the following sections.
C Y C L O N E C O M M E R C E , I N C . P R O P R I E T A R Y A N D C O N F I D E N T I A L I N F O R M A T I O N .
P A G E 1 3 O F 2 1
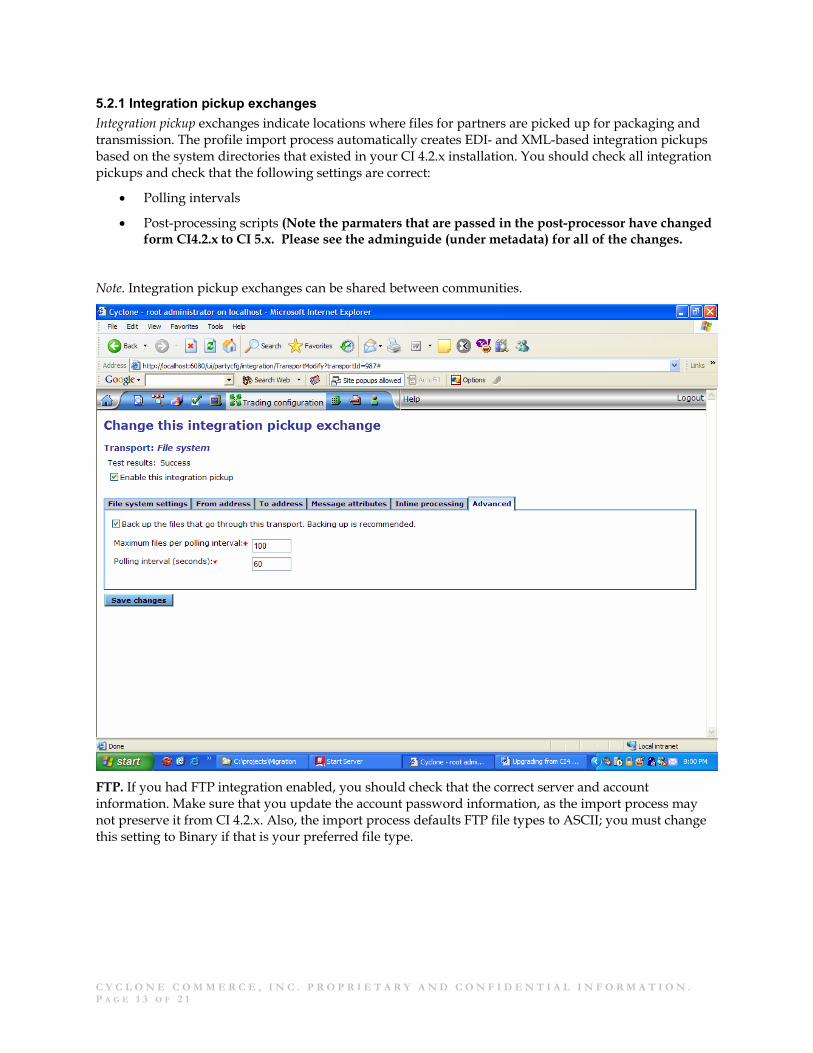
5.2.1 Integration pickup exchanges Integration pickup exchanges indicate locations where files for partners are picked up for packaging and transmission. The profile import process automatically creates EDI- and XML-based integration pickups based on the system directories that existed in your CI 4.2.x installation. You should check all integration pickups and check that the following settings are correct:
• Polling intervals
• Post-processing scripts (Note the parmaters that are passed in the post-processor have changed form CI4.2.x to CI 5.x. Please see the adminguide (under metadata) for all of the changes.
Note. Integration pickup exchanges can be shared between communities.
FTP. If you had FTP integration enabled, you should check that the correct server and account information. Make sure that you update the account password information, as the import process may not preserve it from CI 4.2.x. Also, the import process defaults FTP file types to ASCII; you must change this setting to Binary if that is your preferred file type.
C Y C L O N E C O M M E R C E , I N C . P R O P R I E T A R Y A N D C O N F I D E N T I A L I N F O R M A T I O N .
P A G E 1 4 O F 2 1
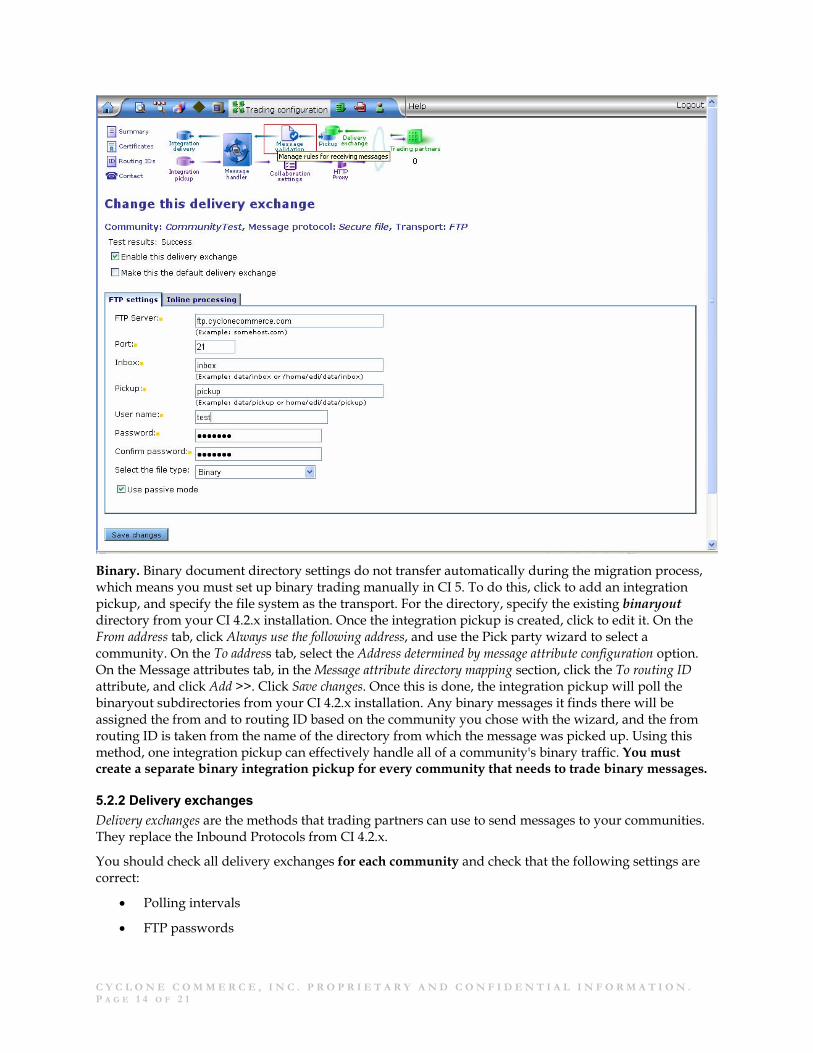
Binary. Binary document directory settings do not transfer automatically during the migration process, which means you must set up binary trading manually in CI 5. To do this, click to add an integration pickup, and specify the file system as the transport. For the directory, specify the existing binaryout directory from your CI 4.2.x installation. Once the integration pickup is created, click to edit it. On the From address tab, click Always use the following address, and use the Pick party wizard to select a community. On the To address tab, select the Address determined by message attribute configuration option. On the Message attributes tab, in the Message attribute directory mapping section, click the To routing ID attribute, and click Add >>. Click Save changes. Once this is done, the integration pickup will poll the binaryout subdirectories from your CI 4.2.x installation. Any binary messages it finds there will be assigned the from and to routing ID based on the community you chose with the wizard, and the from routing ID is taken from the name of the directory from which the message was picked up. Using this method, one integration pickup can effectively handle all of a community's binary traffic. You must create a separate binary integration pickup for every community that needs to trade binary messages.
5.2.2 Delivery exchanges Delivery exchanges are the methods that trading partners can use to send messages to your communities. They replace the Inbound Protocols from CI 4.2.x.
You should check all delivery exchanges for each community and check that the following settings are correct:
• Polling intervals
• FTP passwords
C Y C L O N E C O M M E R C E , I N C . P R O P R I E T A R Y A N D C O N F I D E N T I A L I N F O R M A T I O N .
P A G E 1 5 O F 2 1
• Post-processing scripts (Note the parmaters that are passed in the post-processor have changed form CI4.2.x to CI 5.x. Please see the adminguide (under metadata) for all of the changes.
While the above should be checked for all delivery exchanges, some protocols have specific features that should be checked, as described below.
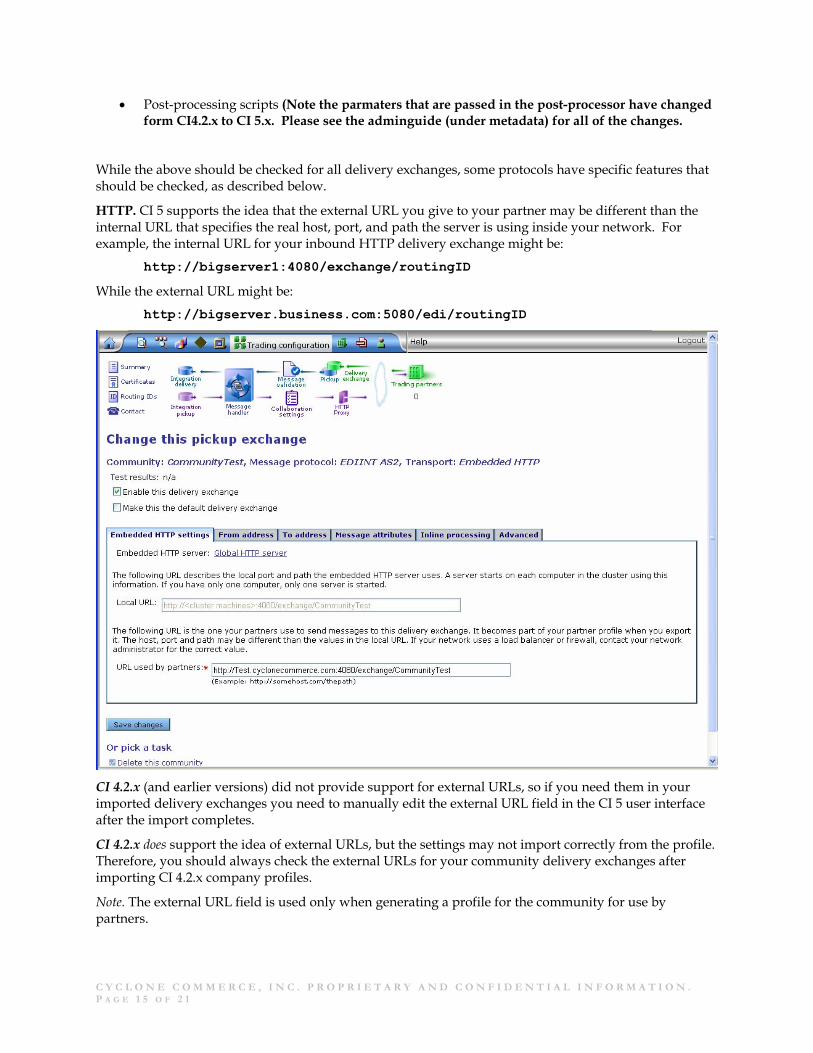
HTTP. CI 5 supports the idea that the external URL you give to your partner may be different than the internal URL that specifies the real host, port, and path the server is using inside your network. For example, the internal URL for your inbound HTTP delivery exchange might be:
http://bigserver1:4080/exchange/routingID While the external URL might be:
http://bigserver.business.com:5080/edi/routingID
CI 4.2.x (and earlier versions) did not provide support for external URLs, so if you need them in your imported delivery exchanges you need to manually edit the external URL field in the CI 5 user interface after the import completes.
CI 4.2.x does support the idea of external URLs, but the settings may not import correctly from the profile. Therefore, you should always check the external URLs for your community delivery exchanges after importing CI 4.2.x company profiles.
Note. The external URL field is used only when generating a profile for the community for use by partners.
C Y C L O N E C O M M E R C E , I N C . P R O P R I E T A R Y A N D C O N F I D E N T I A L I N F O R M A T I O N .
P A G E 1 6 O F 2 1
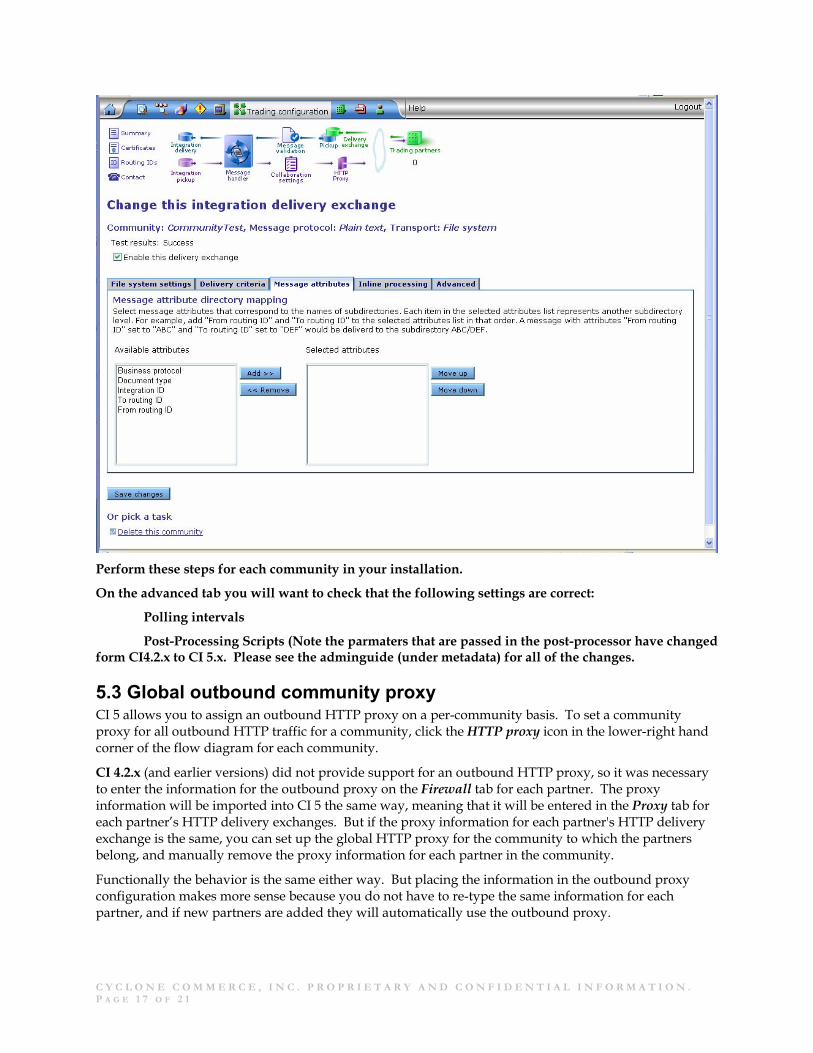
5.2.3 Integration delivery exchanges The community import process automatically creates one integration delivery exchange, where all incoming messages are delivered. This integration delivery does not correspond to your existing CI 4.2.x directory structure. Also, the import process does not automatically create separate integration delivery exchanges for EDI, XML, and Binary document types like CI 4.2.x did. You must manually edit or create these integration delivery exchanges. The following sections describe how to do this.
Go to the integration delivery exchange page from a community's summary page. Click the link to Add default integration exchanges, and navigate to the data/routingID directory of your CI 4.2.x installation. Click Finish, and CI 5.x creates integration pickup and delivery exchanges in the style of CI 4.2.x.
Go back to the integration delivery exchange page, and click to edit the binaryin integration delivery exchange. On the Message attributes tab, click To routing ID, and then click << Remove. Save the changes.
C Y C L O N E C O M M E R C E , I N C . P R O P R I E T A R Y A N D C O N F I D E N T I A L I N F O R M A T I O N .
P A G E 1 7 O F 2 1
Perform these steps for each community in your installation.
On the advanced tab you will want to check that the following settings are correct:
Polling intervals
Post-Processing Scripts (Note the parmaters that are passed in the post-processor have changed form CI4.2.x to CI 5.x. Please see the adminguide (under metadata) for all of the changes.
5.3 Global outbound community proxy CI 5 allows you to assign an outbound HTTP proxy on a per-community basis. To set a community proxy for all outbound HTTP traffic for a community, click the HTTP proxy icon in the lower-right hand corner of the flow diagram for each community.
CI 4.2.x (and earlier versions) did not provide support for an outbound HTTP proxy, so it was necessary to enter the information for the outbound proxy on the Firewall tab for each partner. The proxy information will be imported into CI 5 the same way, meaning that it will be entered in the Proxy tab for each partner’s HTTP delivery exchanges. But if the proxy information for each partner's HTTP delivery exchange is the same, you can set up the global HTTP proxy for the community to which the partners belong, and manually remove the proxy information for each partner in the community.
Functionally the behavior is the same either way. But placing the information in the outbound proxy configuration makes more sense because you do not have to re-type the same information for each partner, and if new partners are added they will automatically use the outbound proxy.
C Y C L O N E C O M M E R C E , I N C . P R O P R I E T A R Y A N D C O N F I D E N T I A L I N F O R M A T I O N .
P A G E 1 8 O F 2 1
CI 4.2.x does support the idea of a global outbound proxy. This is handled via a –D option in the StartServer.ini, StartServer.bat,ecengine.bat, ecengine.ini files, so it is not present in the exported profile information. You must manually enter the information for the outbound proxy (if any) by clicking on the HTTP proxy icon for each CI 5 community.
Note. If a partner has his own proxy information included in the profile, using the community global HTTP proxy would override it. In this instance, you should include the proxy information separately for each partner.
5.3.1 Consider whether one CI 5 community can replace all of your CI 4.2.x companies CI 5 allows you to associate multiple routing IDs with a single community. In CI 4.2.x it was necessary to create separate companies in order to use more than one routing ID. If this applies to your situation, you should consider having only one CI 5 community, and adding all the routing IDs from your multiple CI 4.2.x companies to it. If you do this, you should either avoid importing the multiple CI 4.2.x companies in the first place, or delete them if you have already imported them.
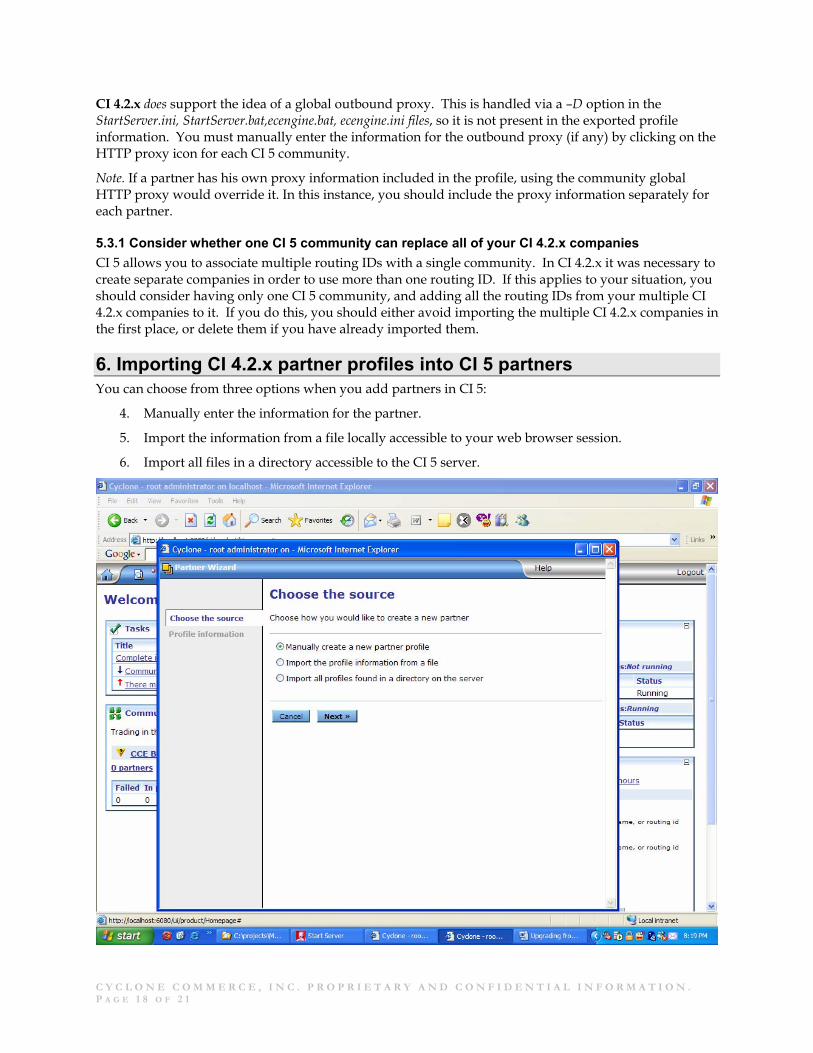
6. Importing CI 4.2.x partner profiles into CI 5 partners You can choose from three options when you add partners in CI 5:
4. Manually enter the information for the partner.
5. Import the information from a file locally accessible to your web browser session.
6. Import all files in a directory accessible to the CI 5 server.
C Y C L O N E C O M M E R C E , I N C . P R O P R I E T A R Y A N D C O N F I D E N T I A L I N F O R M A T I O N .
P A G E 1 9 O F 2 1
The third option differs from the second option in two important ways:
• It imports all the files in the directory you specify, not just a single file.
• It imports from a directory on the server. The Browse dialog in the UI shows only directories that are accessible from the server.
The second option is used when you are importing a single profile or a small number of profiles. The third option is used to bulk-import a group of profiles, such as you might do when migrating from CI 4.2.x. For example, if you bulk-exported profiles from CI 4.2.x using one of the techniques described in the previous section, you can use the third option to bulk-import these files into CI 5.
Note. You should import the company profiles into CI 5 before importing partners.
6.1 During the import If a serious error occurs during a profile import, the user interface (UI) displays a message. Warning and informational messages are not displayed in the UI, but may affect that community's or partner's ability to trade. To view warning and informational messages, look in the <hostname>_cn.log file found in the logs directory on the server. This is the log file for the control node, which is where the UI code runs, including the profile import code. You may wish to tail this file if you are importing a large number of profiles as it helps you to monitor the import progress.
6.2 Establish collaboration settings In CI 4.2.x, the security tab for each partner determined how messages sent to that partner would be encrypted and signed, and how acknowledgments would be handled. The security tab affected messages traded over all protocols to that partner. In CI 5, packaging and receipt handling are determined by collaboration settings, which offer much more flexibility than the single Security tab in CI 4.2.x. Because the differences between the two are so fundamental, none of the settings on the Security tab are carried over when you import profiles. This means that you must go through the various tabs in the collaboration settings section of the user interface and set up how you want trading to occur.
In particular, you should be aware that by default, AS2 acknowledgements are sent synchronously in CI 5, whereas CI 4.2.x’s default is to send AS2 acknowledgements asynchronously. Please refer to the online help or the administrator's guide for detailed information on using the collaboration settings section of the user interface.
6.3 Certificates Once you have partners imported into CI 5, you should verify that their certificates are ready for use.
CI 5 enables you to have more than one active certificate available for a partner. In order for the trading engine to know which certificate to use, you must specify which of the available certificates is the default certificate for encrypting messages. When you manually add a certificate to a partner, you have the option to specify whether the certificate is the default encryption certificate. However, when partner profiles are bulk-imported in to CI 5, this default certificate designation is not always set. You should view each partner's certificates page, and validate that you can see a field called Default encryption certificate is: next to a drop-down selection box. If you do not see this field, you must click to view the certificate's details, and then click Make this the encryption certificate.
Next, check the State of each certificate for each partner. The State should be Operational. If the state is Failed, this usually indicates that the root of the certificate either was not available during import, or was not trusted prior to import. To work around this, you can either re-export the certificate from CI 4.2.x, selecting the option to include all certificates in the path, if possible, or you can add the root certificate to the community as a trusted root. See the Administrator's guide for details.
C Y C L O N E C O M M E R C E , I N C . P R O P R I E T A R Y A N D C O N F I D E N T I A L I N F O R M A T I O N .
P A G E 2 0 O F 2 1
Note. If you import all root certificates that you know you will need, importing partner certificates should not fail. See Section 5.3 on how to import a third party root or intermediate certificate.
7. Steps to revert back from CI5.x to CI 4.2.x Within 5.x
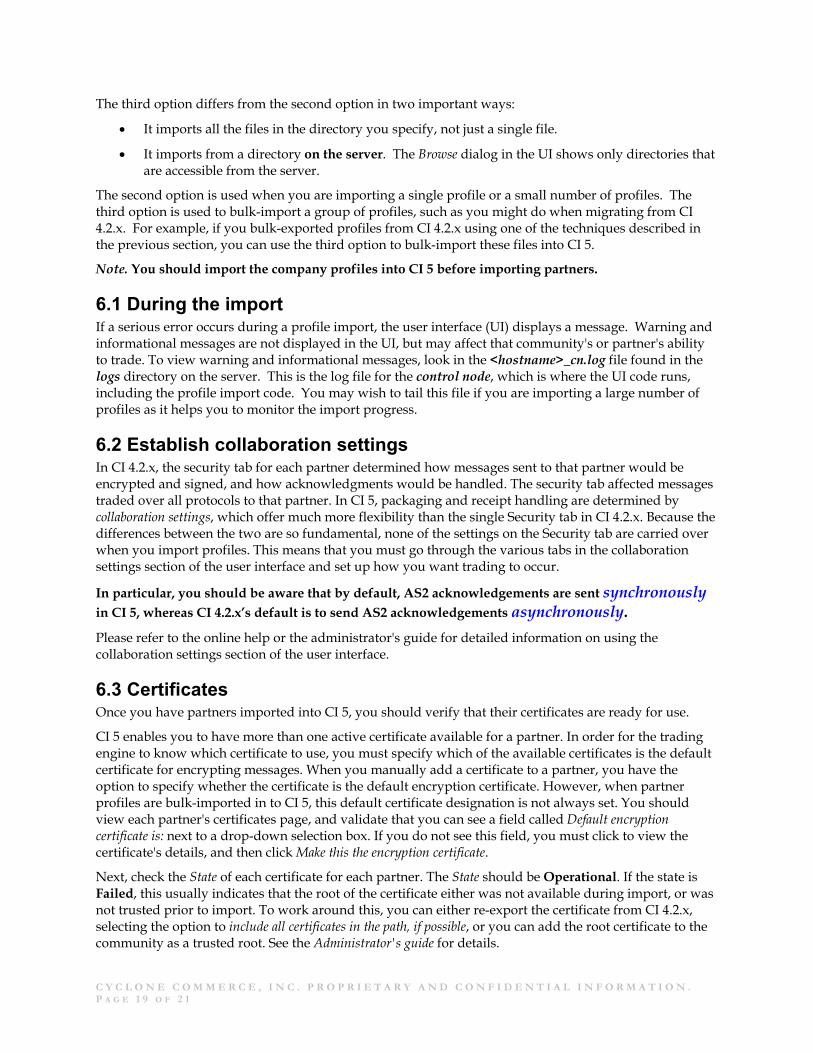
1) Disable Integration pickup within Community or Communities to keep 5.X from grabbing new documents from backend.
• From Community page (Pick a community), select Community involved. • From Summary Page for Community, select link to Integration Pickup • “Pick an integration pickup exchange” page will show listing of integration pickup exchanges. • Go into each one and disable them unchecking “Enable this integration pickup.”
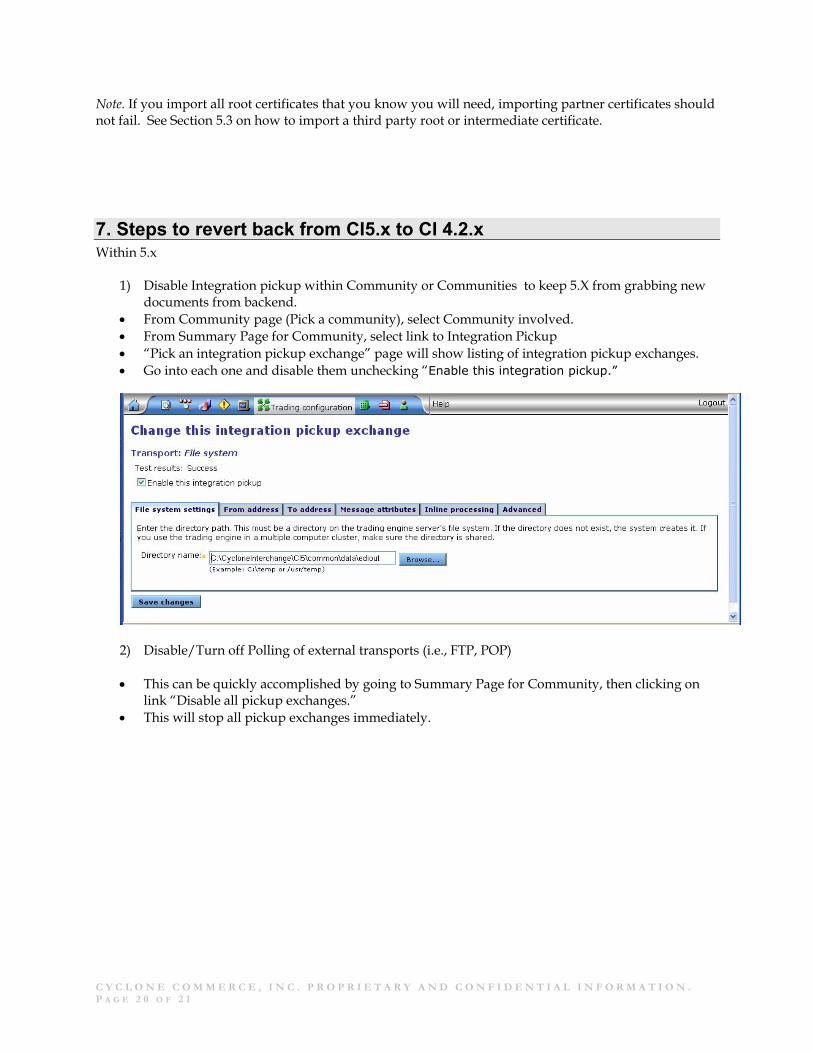
2) Disable/Turn off Polling of external transports (i.e., FTP, POP) • This can be quickly accomplished by going to Summary Page for Community, then clicking on
link “Disable all pickup exchanges.” • This will stop all pickup exchanges immediately.
C Y C L O N E C O M M E R C E , I N C . P R O P R I E T A R Y A N D C O N F I D E N T I A L I N F O R M A T I O N .
P A G E 2 1 O F 2 1
3) Turn off TE (Transaction Engine) node after current outbound packaging and transport work is
finished.
Within 5.x
1) Shutdown server. Within 4.2.x
1) Start Server. Path is /cycloneinstall directory/bin/start_server.sh on Unix Or /cycloneinstall directory/bin/startServer.bat on windows Or start the ecengine windows services if this is installed.
2) Verify 4.2.x is taking over new outbound and inbound work/documents. 9.0 Misc items that you will need to watch out for
Partner setting for requesting asynchronous MDNs are ignored during the import of the profile. This needs to be manually set up. Default on the collaboration setting is Global synchronous MDN request.
Integration pickups are not specific to a Community. In CI 4.2.x each Company had a specific set of directories that it picked up from. CI 5.x shares all intergration pick up directories among all communities
Binary polling will occur as soon as it is set up.