69
CYMA IV Accounting for Windows ® Training Guide Series Bank Reconciliation Training Guide December 2015

CYMAIV Accounting for Windows®
Training Guide Series
Bank Reconciliation Training Guide
December 2015

CYMA Systems, Inc.
2330 West University Drive, Suite 4
Tempe, AZ 85281
(800) 292-2962
Fax: (480) 303-2969
E-mail: [email protected]
www.cyma.com
Copyright 1998-2015 CYMA Systems, Inc. All rights reserved. No part of this document may be photocopied, reproduced, or translated to another language without the prior written consent of CYMA Systems, Inc.
CYMA Systems, Inc. makes no warranty of any kind with regard to this material, including, but not limited to the implied warranties of merchantability and fitness for a particular purpose. CYMA Systems, Inc. shall not be liable for errors contained herein or for incidental consequential damages in connection with the furnishing, performance or use of this material.
Warning: This manual is protected by United States Copyright law (Title 17 United States Code). Unauthorized reproduction and/or sales may result in imprisonment for up to one year and fines of up to $10,000 (17USC 506). Copyright violators may also be subject to civil liability.
The information in this document is subject to change without notice.
PASIII, PAS+, CYMAIV, GBS and GBSII are trademarks of CYMA Systems, Inc. NetWare is a registered trademark of Novell, Inc. Some of the product names mentioned herein have been used for identification purposes only and may be trademarks of their respective companies.
Crystal Reports is a registered trademark of Business Objects.
F9 is a registered trademark of Infor Software.
Pervasive.SQL is a registered trademark of Pervasive Software, Inc.
All trademarks and names are the property of their respective holders.
Revised December 2015
CYMAIV Accounting for Windows Training Guide – Bank Reconciliation
Copyright 1999-2016 CYMA Systems Inc. iii
Table of Contents Setup Overview ....................................................................................................................................................................................... 1
Setup Checklist ....................................................................................................................................................................................... 3
Journal ID Conflict! .................................................................................................................................................................................. 5
Maintain Menu ........................................................................................................................................................................................ 9
Maintain Banks for which Company? ...................................................................................................................................................... 9
Maintain Configuration .......................................................................................................................................................................... 11
Enter Menu ........................................................................................................................................................................................... 15
Enter Retrieve Data .............................................................................................................................................................................. 17
Enter Import Transaction File ................................................................................................................................................................ 21
Mark Cleared Transactions ................................................................................................................................................................... 23
Mark Cleared Transactions - General Tab ............................................................................................................................................ 27
Mark Cleared Transactions - Clear by Range Tab ............................................................................................................................... 31
Mark Cleared Transactions - Deposits and Credits Tab ....................................................................................................................... 33
Mark Cleared Transactions - Checks and Charges Tab ....................................................................................................................... 35
Enter Adjustments ................................................................................................................................................................................. 37
Process Menu ....................................................................................................................................................................................... 41
Post Adjustments to GL ........................................................................................................................................................................ 43
Process Bank Register Setup ............................................................................................................................................................... 47
Process Bank Register ......................................................................................................................................................................... 51
End of Process ...................................................................................................................................................................................... 55
End of Process - Actions Performed Tab .............................................................................................................................................. 57
End of Process - Prerequisites Tab ...................................................................................................................................................... 59
Report Menu ......................................................................................................................................................................................... 61
Report List ............................................................................................................................................................................................. 63
CYMA Systems, Inc. Contact Information ............................................................................................................................................. 65


CYMAIV Accounting for Windows Training Guide – Bank Reconciliation
Copyright 1999-2016 CYMA Systems Inc. 1
Setup Overview
Feature Overview
The Bank Reconciliation (BR) module has several features to make bank accounts simple to reconcile.
General Features
1. The Setup Checklist, a feature in all modules, guides you through Bank Reconciliation initial setup.
2. Supports multiple Accounts Payable, Accounts Receivable, and Payroll companies posting to a single General Ledger company. Retrieve data from multiple Accounts Payable, Accounts Receivable, and Payroll modules to a single General Ledger company.
3. Mark cleared transactions individually or by range of deposits and credits or checks and charges from any company, module, or bank.
4. Enter and post adjustments to GL.
Company Bank Features
1. Maintain an unlimited number of Company Bank Records from the Bank Reconciliation, Accounts Payable, Accounts Receivable, and Payroll modules. Company Bank Records are the bank records that are created within the Accounts Receivable, Accounts Payable, Payroll, and Bank Reconciliation modules on the Maintain Banks dialog box.
2. Add user-defined fields for tracking bank information.
3. Identify a GL account for each company bank record.
Bank Reconciliation Bank Control Accounts Features
1. Enter an unlimited number of Bank Control Accounts.
2. Identify a GL account for each Bank Control Account.
3. Link an unlimited number of Companies, Modules, and Company Banks to create a single Bank Control Account.


CYMAIV Accounting for Windows Training Guide – Bank Reconciliation
Copyright 1999-2016 CYMA Systems Inc. 3
Setup Checklist
The Bank Reconciliation Setup Checklist guides you through the steps necessary to set up the Bank Reconciliation module for use on a day-to-day basis.
When you access Bank Reconciliation for the first time, or if you have not yet completed the necessary steps to set up Bank Reconciliation, you will get a message dialog asking if you would like to view the checklist. Each of the items on the checklist must be completed in the order in which they are listed to accommodate any dependencies between operations or data. For example, if you have not yet completed Bank Accounts, you will not be allowed to set up Bank Control Configuration.
Each setup step can be completed by selecting the GOTO button located to the right of each item. The checklist provides a visual means of identifying the areas that have been completed by displaying a check mark to the left of each completed item. Once all of the items on the checklist have been completed you will no longer be prompted to use the checklist.
Bank Reconciliation Setup Checklist
Refer to the following field descriptions and requirements.
GL Accounts
When the GL Accounts button is clicked, the Maintain Chart of Accounts dialog box will display. See the General Ledger for complete details on setting up GL Accounts.
Bank Accounts
When the Bank Accounts button is clicked, the Maintain Banks dialog box will display. See Maintain Banks for complete details.
Bank Control Configuration
When the Bank Control Configuration button is clicked, the Maintain Configuration dialog box will display. See Maintain Configuration for complete details.

CYMAIV Accounting for Windows Training Guide – Bank Reconciliation
Copyright 1999-2016 CYMA Systems Inc. 5
Journal ID Conflict!
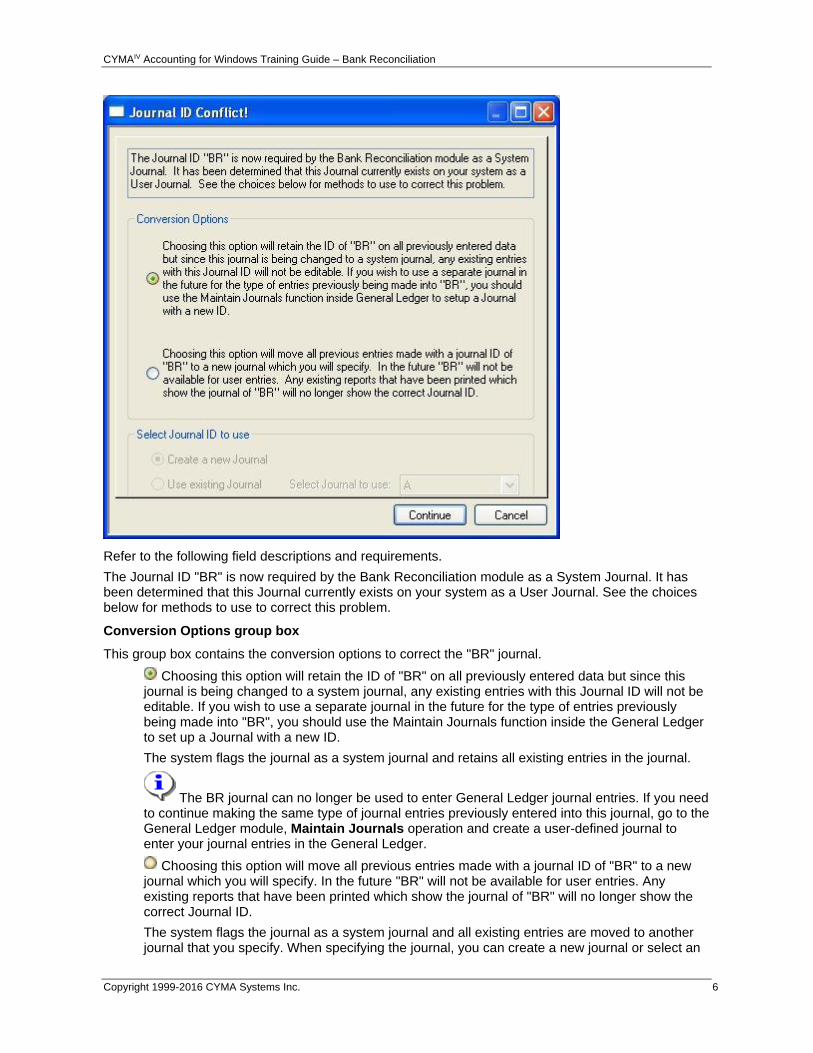
The Bank Reconciliation module requires the System journal ID "BR" for posting adjusting bank reconciliation entries to the General Ledger module. The first time the Bank Reconciliation module is selected from the menu bar Active Module drop-down list or from the File menu, Change Module option, the system verifies that a System journal with the ID of "BR" and the name "Bank Reconciliation" exists for the current company. If the journal does not exist, the system will automatically create it and this dialog box will not display. If the journal already exists on your system as a User-defined journal, the Journal ID Conflict! dialog box will display. This operation allows you to convert the existing User-defined BR journal to a system journal.
There are two options on the Journal ID Conflict! dialog box to convert the existing User-defined BR journal to a System journal:
Conversion Option 1: The system flags the journal as a system journal and retains all existing entries in the journal.
The journal can no longer be used to enter General Ledger journal entries. If you need to continue making the same type of journal entries previously entered into this journal, go to the General Ledger module, Maintain Journals operation and create a new User-defined journal to enter your journal entries in the General Ledger.
Conversion Option 2: The system flags the journal as a system journal and all existing entries are moved to another journal that you specify. When specifying the journal, you can create a new journal or select an existing user-defined journal.
When Conversion Option 2 is selected, any reports that were previously printed that referenced the "BR" journal will be incorrect.
Journal ID Conflict! dialog box
CYMAIV Accounting for Windows Training Guide – Bank Reconciliation
Copyright 1999-2016 CYMA Systems Inc. 6
Refer to the following field descriptions and requirements.
The Journal ID "BR" is now required by the Bank Reconciliation module as a System Journal. It has been determined that this Journal currently exists on your system as a User Journal. See the choices below for methods to use to correct this problem.
Conversion Options group box
This group box contains the conversion options to correct the "BR" journal.
Choosing this option will retain the ID of "BR" on all previously entered data but since this journal is being changed to a system journal, any existing entries with this Journal ID will not be editable. If you wish to use a separate journal in the future for the type of entries previously being made into "BR", you should use the Maintain Journals function inside the General Ledger to set up a Journal with a new ID.
The system flags the journal as a system journal and retains all existing entries in the journal.
The BR journal can no longer be used to enter General Ledger journal entries. If you need to continue making the same type of journal entries previously entered into this journal, go to the General Ledger module, Maintain Journals operation and create a user-defined journal to enter your journal entries in the General Ledger.
Choosing this option will move all previous entries made with a journal ID of "BR" to a new journal which you will specify. In the future "BR" will not be available for user entries. Any existing reports that have been printed which show the journal of "BR" will no longer show the correct Journal ID.
The system flags the journal as a system journal and all existing entries are moved to another journal that you specify. When specifying the journal, you can create a new journal or select an

CYMAIV Accounting for Windows Training Guide – Bank Reconciliation
Copyright 1999-2016 CYMA Systems Inc. 7
existing user-defined journal. When this radio button is selected, the options in the Select Journal ID to use group box are enabled.
Select Journal ID to use group box
This group box is only enabled when the second conversion option is selected. This allows you to select an existing user-defined journal or create a new journal. Any existing entries in the BR journal will be moved to the specified journal.
Create a new Journal
When selected and the Continue button is clicked, the Maintain Journals dialog box will display. This allows you to create the new journal for the existing entries in the BR journal.
Use existing Journal
When selected, the Select Journal to use drop-down list is enabled. This allows you select an existing journal ID for the existing entries in the BR journal.
Select Journal to use
The Select Journal to use option button is enabled when the Use existing journal option button is selected. This allows you specify the existing journal ID to use for the existing entries in the BR journal.
Journal ID Conflict! Command Buttons
Click the Continue button to proceed with your selection(s).
Click the Cancel button to close the Journal ID Conflict dialog box without making any changes.


CYMAIV Accounting for Windows Training Guide – Bank Reconciliation
Copyright 1999-2016 CYMA Systems Inc. 9
Maintain Menu
Selecting the Maintain menu from the Bank Reconciliation menu bar drops down a submenu that enables you to add or change company bank records and company configuration files.
From the Maintain menu you can select:
Maintain Banks (See System Manager Module Training Guide for more information)
Configuration
Maintain Banks for which Company?
When Banks... is selected from the Bank Reconciliation Maintain menu and there are multiple Accounts Receivable, Accounts Payable, and Payroll companies that post to the current company's General Ledger, the Maintain Banks for which Company? dialog box displays prior to the Maintain Banks dialog box. This allows you to specify the company for which you want to create, edit, or delete bank records. After you select the company and click the Continue button, the Maintain Banks dialog box will display.
Refer to the following field descriptions.
There are several companies using the Bank Reconciliation module of the current company. Each of these companies has its own set of Bank IDs. Please select a company for Maintain Banks.
This message informs you that you need to specify the company for which you want to create, edit, or delete bank records.
The drop-down list displays the companies that are set up to post to the current company's General Ledger. Select the company ID and name for which you wish to create, edit, or delete bank records. The current company is the default and can be overridden.

CYMAIV Accounting for Windows Training Guide – Bank Reconciliation
Copyright 1999-2016 CYMA Systems Inc. 10
Maintain Banks for which Company? Command Buttons
Click the Continue button to accept the selected company and access the Maintain Banks dialog box.
Click the Cancel button to close the Select Company dialog box.

CYMAIV Accounting for Windows Training Guide – Bank Reconciliation
Copyright 1999-2016 CYMA Systems Inc. 11
Maintain Configuration
When Configuration... is selected from the Bank Reconciliation Maintain menu, the Maintain Configuration dialog box displays. This allows you to create Bank Control Account records that represent bank accounts for the current company that will be reconciled in the Bank Reconciliation module.
Each Bank Control Account record links the company or companies, modules, and company bank records that will be included in the bank accounts reconciliation. Company bank records are the bank records that are created within the Accounts Receivable, Accounts Payable, Payroll, and Bank Reconciliation modules on the Maintain Banks dialog box.
When data is retrieved, check or deposit transactions from the linked company bank records are brought into the Bank Reconciliation module for the reconciliation to be performed. For example, to create a Bank Control Account record for One Bank of Arizona (01ONE) for the company Southwestern Industries (DEMO):
1. Enter the Control ID for the Bank Control Account record: 01ONE.
2. Enter the Account No for the bank account: 1221-0117.
3. Enter the Bank Name and account Description: One Bank of Arizona, Checking Account.
4. Enter the Master GL Company Bank ID from the company bank records that represents the bank account to be reconciled: 01ONE.
5. Enter the appropriate Company IDs, Module IDs, and Module Bank IDs to link to the Bank Control Account record 01ONE:
Company ID Module ID Module Bank ID
DEMO AP 01ONE
DEMO AR 01ONE
DEMO PR 01ONE
6. Click the Save button to accept the data and save the Bank Control Account record.
This is useful for companies with multiple Accounts Receivable (AR), Accounts Payable (AP), and Payroll (PR) companies posting to the same General Ledger (GL) company. You can specify any combination of companies, modules, and company bank records to include in a bank account's reconciliation. However, only companies who post to the same GL company can be included in the Bank Control Account record.
Maintain Configuration dialog box

CYMAIV Accounting for Windows Training Guide – Bank Reconciliation
Copyright 1999-2016 CYMA Systems Inc. 12
Refer to the following field descriptions and requirements.
Control ID
To create a new Bank Control Account ID, enter a control ID to represent the new bank account (up to six alphanumeric characters, blanks and special symbols are not permitted).
To edit an existing Bank Control Account record, enter the ID or use the Browser to select the ID. Once the record is displayed, click the Edit button.
Account No
Enter the bank account number (up to 15 alphanumeric characters).
Bank Name
Enter the bank name (up to 40 alphanumeric characters).
Description
Enter the bank account description (up to 40 alphanumeric characters).
Bank IDs to Include group box
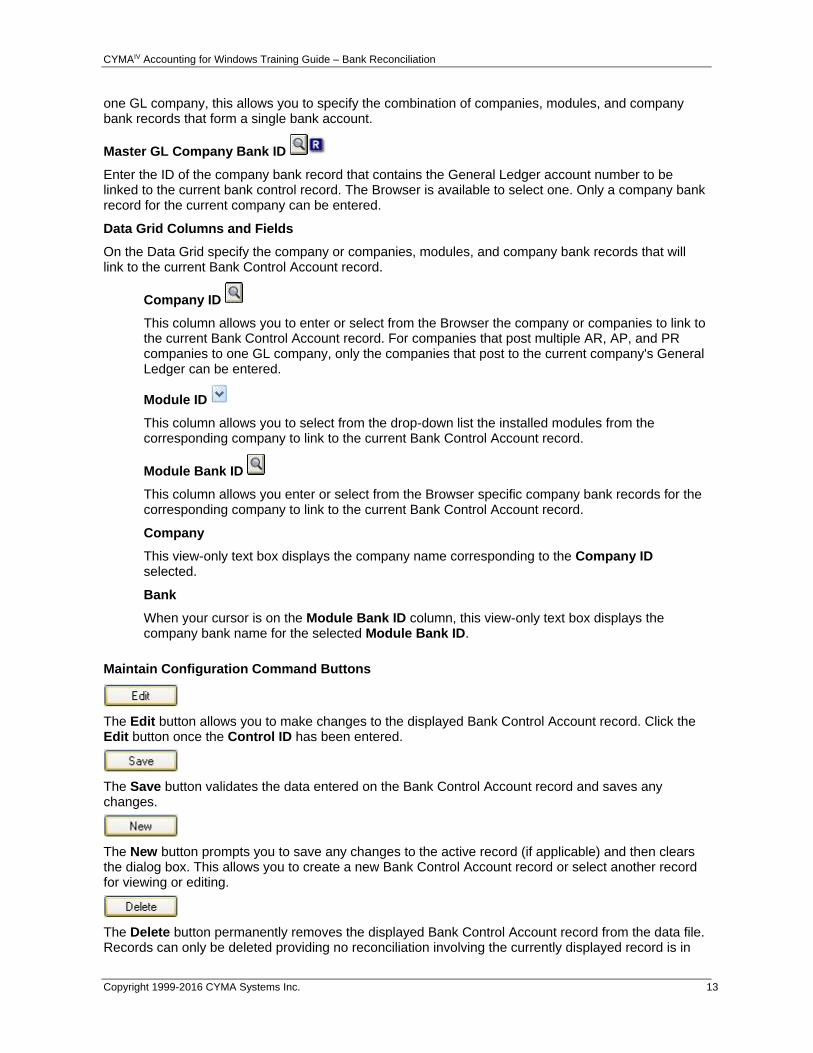
This group box allows you to specify the company, modules, and company bank records to link to the current Bank Control Account record. For companies that post multiple AR, AP, and PR companies to
CYMAIV Accounting for Windows Training Guide – Bank Reconciliation
Copyright 1999-2016 CYMA Systems Inc. 13
one GL company, this allows you to specify the combination of companies, modules, and company bank records that form a single bank account.
Master GL Company Bank ID
Enter the ID of the company bank record that contains the General Ledger account number to be linked to the current bank control record. The Browser is available to select one. Only a company bank record for the current company can be entered.
Data Grid Columns and Fields
On the Data Grid specify the company or companies, modules, and company bank records that will link to the current Bank Control Account record.
Company ID
This column allows you to enter or select from the Browser the company or companies to link to the current Bank Control Account record. For companies that post multiple AR, AP, and PR companies to one GL company, only the companies that post to the current company's General Ledger can be entered.
Module ID
This column allows you to select from the drop-down list the installed modules from the corresponding company to link to the current Bank Control Account record.
Module Bank ID
This column allows you enter or select from the Browser specific company bank records for the corresponding company to link to the current Bank Control Account record.
Company
This view-only text box displays the company name corresponding to the Company ID selected.
Bank
When your cursor is on the Module Bank ID column, this view-only text box displays the company bank name for the selected Module Bank ID.
Maintain Configuration Command Buttons
The Edit button allows you to make changes to the displayed Bank Control Account record. Click the Edit button once the Control ID has been entered.
The Save button validates the data entered on the Bank Control Account record and saves any changes.
The New button prompts you to save any changes to the active record (if applicable) and then clears the dialog box. This allows you to create a new Bank Control Account record or select another record for viewing or editing.
The Delete button permanently removes the displayed Bank Control Account record from the data file. Records can only be deleted providing no reconciliation involving the currently displayed record is in

CYMAIV Accounting for Windows Training Guide – Bank Reconciliation
Copyright 1999-2016 CYMA Systems Inc. 14
progress and no retrieved data for the currently displayed record resides in the current transaction file waiting to be cleared. If there are transactions for the Bank Control Account record, before you can delete this record, you must perform a reconciliation that will clear all open transactions.
When a record is deleted, only the Bank Control Account record is deleted. The company bank records contained in the Bank Control Account are not affected.
The Close button closes the dialog box and prompts you to save any changes (if applicable). Pressing the ESC key has the same function.

CYMAIV Accounting for Windows Training Guide – Bank Reconciliation
Copyright 1999-2016 CYMA Systems Inc. 15
Enter Menu
Selecting the Enter menu from the Bank Reconciliation menu bar drops down a submenu that enables you to select the data to retrieve for use during the reconciliation process, mark cleared transactions, and enter adjusting entries.
From the Enter menu you can select:
Retrieve Data
Import Transaction File
Mark Cleared Transactions
Enter Adjustments

CYMAIV Accounting for Windows Training Guide – Bank Reconciliation
Copyright 1999-2016 CYMA Systems Inc. 17
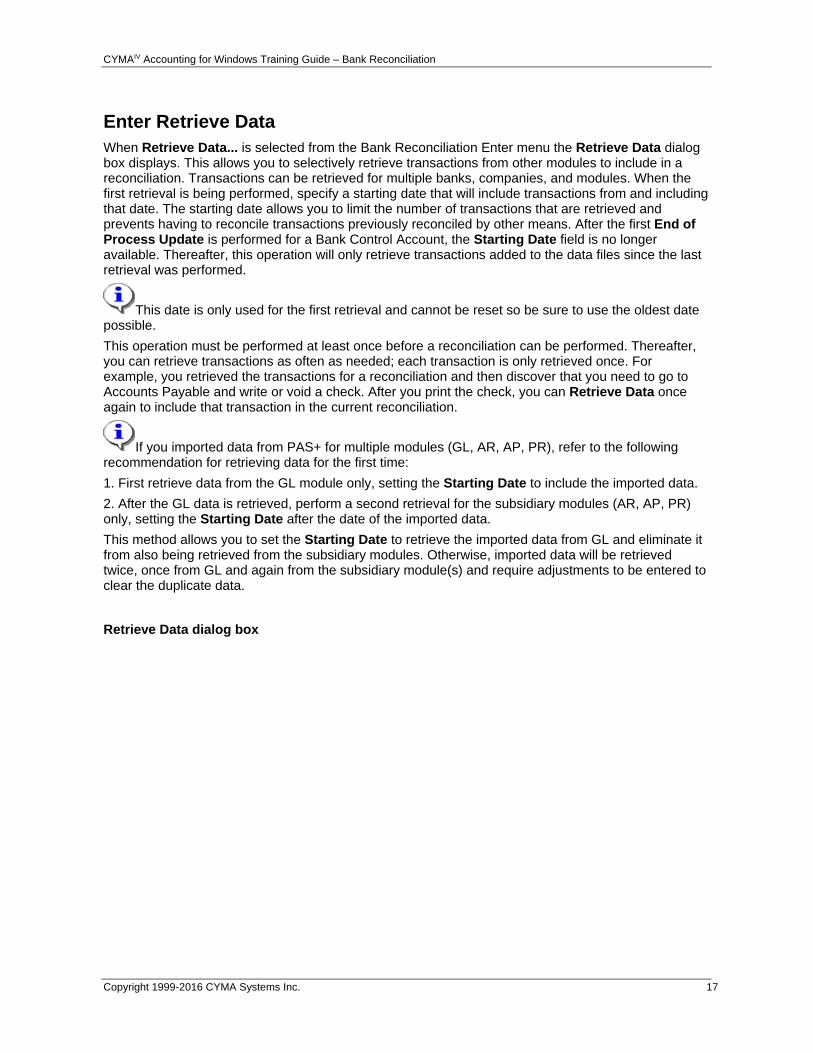
Enter Retrieve Data
When Retrieve Data... is selected from the Bank Reconciliation Enter menu the Retrieve Data dialog box displays. This allows you to selectively retrieve transactions from other modules to include in a reconciliation. Transactions can be retrieved for multiple banks, companies, and modules. When the first retrieval is being performed, specify a starting date that will include transactions from and including that date. The starting date allows you to limit the number of transactions that are retrieved and prevents having to reconcile transactions previously reconciled by other means. After the first End of Process Update is performed for a Bank Control Account, the Starting Date field is no longer available. Thereafter, this operation will only retrieve transactions added to the data files since the last retrieval was performed.
This date is only used for the first retrieval and cannot be reset so be sure to use the oldest date possible.
This operation must be performed at least once before a reconciliation can be performed. Thereafter, you can retrieve transactions as often as needed; each transaction is only retrieved once. For example, you retrieved the transactions for a reconciliation and then discover that you need to go to Accounts Payable and write or void a check. After you print the check, you can Retrieve Data once again to include that transaction in the current reconciliation.
If you imported data from PAS+ for multiple modules (GL, AR, AP, PR), refer to the following recommendation for retrieving data for the first time:
1. First retrieve data from the GL module only, setting the Starting Date to include the imported data.
2. After the GL data is retrieved, perform a second retrieval for the subsidiary modules (AR, AP, PR) only, setting the Starting Date after the date of the imported data.
This method allows you to set the Starting Date to retrieve the imported data from GL and eliminate it from also being retrieved from the subsidiary modules. Otherwise, imported data will be retrieved twice, once from GL and again from the subsidiary module(s) and require adjustments to be entered to clear the duplicate data.
Retrieve Data dialog box

CYMAIV Accounting for Windows Training Guide – Bank Reconciliation
Copyright 1999-2016 CYMA Systems Inc. 18
Refer to the following field descriptions and requirements.
Banks to Retrieve group box
This group box allows you to specify the Bank Control Account record from which to retrieve data.
All Banks
When selected, the All Banks radio button will retrieve data from all the Bank Control Account records created on the Maintain Configuration main dialog box. This radio button will be selected as the default and can be overridden.
Specific Bank
When selected, the Specific Bank radio button allows you to specify the Bank Control Account record from which to retrieve data. When this radio button is selected, the Bank Control ID text box is enabled. This allows you to enter the Bank Control Account record.
Bank Control ID
This text box is enabled when the Specific Bank radio button is selected. Enter the Bank Control Account ID to retrieve data from. The Browser is available to select the ID. When the Specific Bank radio button is selected, you can specify the type of transactions to retrieve for the selected Bank Control Account in the Type of Transactions to Retrieve group box.
Account
This view-only text box will display the corresponding Bank Control Account record's account number.
Name

CYMAIV Accounting for Windows Training Guide – Bank Reconciliation
Copyright 1999-2016 CYMA Systems Inc. 19
This view-only text box will display the corresponding Bank Control Account record's name.
Description
This view-only text box will display the corresponding Bank Control Account record's account description.
Type of Transactions to Retrieve group box
This group box allows you to specify the types of transactions to retrieve. When the All Banks radio button is selected the check boxes are enabled for all installed modules. You can select the modules and companies to retrieve data for. For each module, the drop-down list will display the company or companies associated with all the Bank Control Account records for the current company.
When the Specific Bank radio button is selected and a valid Bank Control ID is entered, the check boxes are enabled according the module IDs contained in the selected Bank Control Account record. For each enabled module, the drop-down list will display the company or companies associated with the selected Bank Control Account record.
The following check boxes are enabled if the module is installed and the current Bank Control Account record or records being used contains at least one company with the module ID.
GL Journal Entries
This check box allows you to retrieve journal entries from the current company's General Ledger. If the All Banks radio button is selected, journal entries will be retrieved from each GL account associated with the Master GL Company Bank ID in each Bank Control Account record for the current company.
If the Specific Bank radio button is selected, journal entries will be retrieved from the GL account associated with the Master GL Company Bank ID for the selected Bank Control Account record.
Journal entries must be posted in order to be retrieved.
AR Deposits
This check box allows you to retrieve Deposits and NSF transactions from the Accounts Receivable module. The drop-down list will display the corresponding company or companies that transactions can be retrieved from. The default will be All Companies and can be overridden.
All Deposits must be posted to AR before any records will be retrieved.
It is recommended that you select the Post Deposits to GL in Detail check box on the AR Maintain Configuration dialog box. This will post deposits to GL with the original deposit date. Otherwise, if deposits are posted in summary to GL, deposits are posted with the period end date. This will affect the AR ledger if the bank statement end date is before the period end date, a ledger printed with the bank statement cut off date will not include deposits.
Payroll Checks
This check box allows you to retrieve Payroll checks and voided Payroll checks from the Payroll module. The drop-down list will display the corresponding company or companies that transactions can be retrieved from. The default will be All Companies and can be overridden.

CYMAIV Accounting for Windows Training Guide – Bank Reconciliation
Copyright 1999-2016 CYMA Systems Inc. 20
Payroll checks must be printed and any manual checks entered. It is not necessary to post checks to GL prior to retrieving them.
AP Vendor Checks
This check box allows you to retrieve Vendor checks and voided Vendor checks from the Accounts Payable module. The drop-down list will display the corresponding company or companies that transactions can be retrieved from. The default will be All Companies and can be overridden.
Vendor checks must be printed and any manual checks entered. It is not necessary to post checks to GL prior to retrieving them.
After-the-Fact CD Checks
This check box allows you to retrieve Cash Disbursement checks from the General Ledger module. The drop-down list will display the corresponding company or companies that transactions can be retrieved from. The default will be All Companies and can be overridden.
First Time Options group box
When performing the first retrieval of data, transactions will be retrieved from and including the date entered. The starting date allows you to limit the number of transactions that are retrieved. This prevents having to reconcile transactions that were previously reconciled by other means. Thereafter, this operation will only retrieve transactions added to the data files since the last retrieval was performed.
Starting Date
The Starting Date text box is only enabled when the Specific Bank option button is selected. This date is only used for the first retrieval and cannot be reset so be sure to use the oldest date needed.
Retrieve Data Command Buttons
Click the Retrieve button to begin the data retrieval based on the selections entered. Once clicked, the Data Retrieval Progress dialog box will display. Once the data is retrieved, you can Mark Cleared Transactions.
Click the Clear button to clear all information on the dialog box and return the cursor to the first field on the dialog box.
Click the Close button to exit the Retrieve Data operation without retrieving any data.
CYMAIV Accounting for Windows Training Guide – Bank Reconciliation
Copyright 1999-2016 CYMA Systems Inc. 21
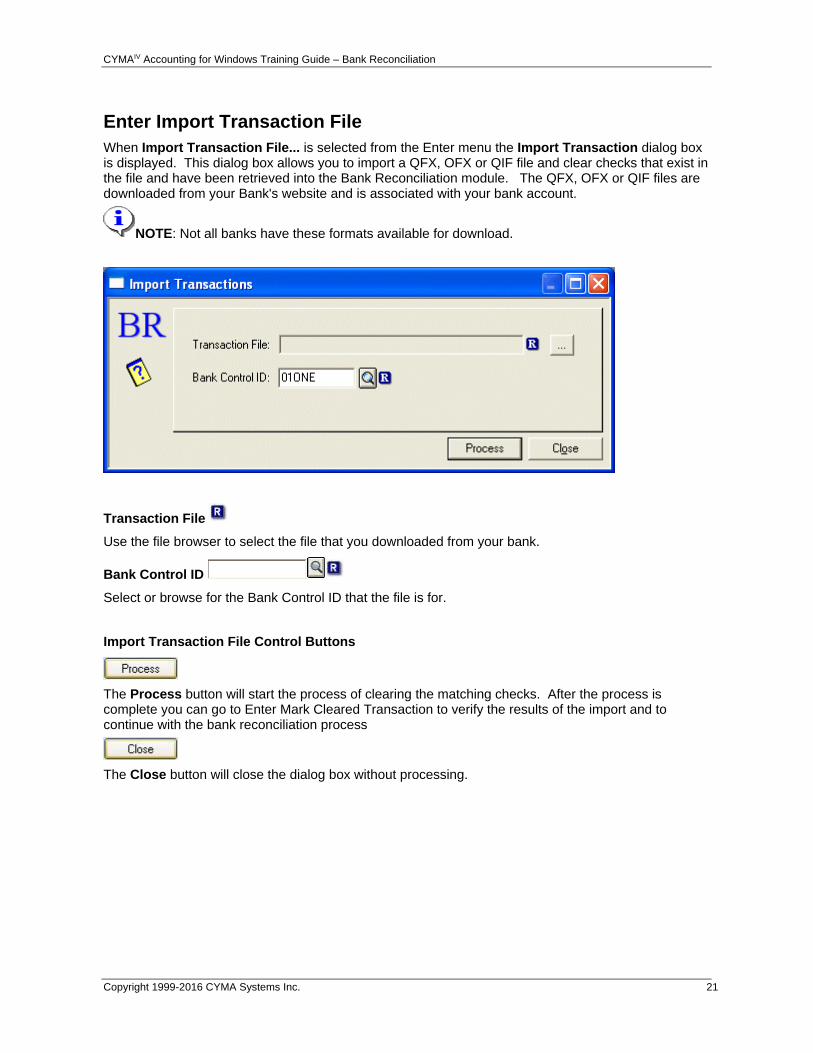
Enter Import Transaction File
When Import Transaction File... is selected from the Enter menu the Import Transaction dialog box is displayed. This dialog box allows you to import a QFX, OFX or QIF file and clear checks that exist in the file and have been retrieved into the Bank Reconciliation module. The QFX, OFX or QIF files are downloaded from your Bank's website and is associated with your bank account.
NOTE: Not all banks have these formats available for download.
Transaction File
Use the file browser to select the file that you downloaded from your bank.
Bank Control ID
Select or browse for the Bank Control ID that the file is for.
Import Transaction File Control Buttons
The Process button will start the process of clearing the matching checks. After the process is complete you can go to Enter Mark Cleared Transaction to verify the results of the import and to continue with the bank reconciliation process
The Close button will close the dialog box without processing.


CYMAIV Accounting for Windows Training Guide – Bank Reconciliation
Copyright 1999-2016 CYMA Systems Inc. 23
Mark Cleared Transactions
When Mark Cleared Transactions... is selected from the Bank Reconciliation Enter menu the Clear Transactions dialog box displays. After transactions have been retrieved, this operation allows you to "mark" transactions that have cleared the bank. The dialog box consists of the current reconciliation's summary and four tab pages, General, Clear by Range, Deposits and Credits, and Checks and Charges. The tab pages allow you to enter statement information and to select or deselect the transactions to mark as cleared. Transactions can be selected by ranges or by individual deposits and credits and individual checks and charges.
The dialog box contains the several command buttons. Not all selection buttons display on the General tab. On the other tabs they will vary in wording and function based on the active tab page. Refer to the corresponding tab page for a description and functionality of the selection buttons. The following descriptions provide an overview of the use of the other command buttons on the dialog box:
During the reconciliation, click the Save button to save any work in progress for the current Bank Control Account. This secures your selections if you have many transactions selected as cleared the bank or deselected as not cleared the bank.
After saving, click the Close button to close the Clear Transactions dialog box. You can reenter the current reconciliation by entering the appropriate Bank Control Account ID on the General tab. This allows you to enter adjustments or retrieve additional data.
Click the Clear button to clear the current reconciliation from the dialog box and select another Bank Control Account. You are prompted to save any changes to the existing reconciliation (if applicable).
After you have:
selected cleared transactions
deselected not cleared transactions
entered adjustments
and posted adjustments to GL,
Performing the End of Process Update will transfer the selected (cleared) transactions to the bank reconciliation history files. This allows you to begin a new bank reconciliation for the Bank Control Account.
Clear Transactions dialog box
Refer to the following field descriptions and requirements.
Summary group box
This group box tracks the totals for the current reconciliation.
Beginning Balance Date
If this is the first reconciliation for the current Bank Control Account record selected on the General tab, this text box is enabled and allows you to enter the beginning date of the reconciliation period. This is the same as the beginning balance date on your bank statement.
If this is not the first reconciliation for the current Bank Control Account record, then this is a view-only text box and will display the beginning date calculated from the previous reconciliation process’ Statement Ending Date.
Totals
If this is the first reconciliation for the current Bank Control Account record selected on the General tab, this text box is enabled and allows you to enter the beginning balance amount for

CYMAIV Accounting for Windows Training Guide – Bank Reconciliation
Copyright 1999-2016 CYMA Systems Inc. 24
the reconciliation period. This is the same as the beginning balance amount on your bank statement.
If this is not the first reconciliation for the current Bank Control Account record, then this is a view-only text box and will display the beginning balance amount that was carried forward from the previous reconciliation process’ Statement Ending Balance.
Deposits and Credits Cleared No. Trns / Totals
These view-only text boxes will display the total number of Deposits and Credits transactions and the total amount of the Deposits and Credits transactions that have been selected as cleared for the current reconciliation. During the reconciliation process, these text boxes are updated as Deposits and Credits transactions are selected or deselected.
Checks and Charges Cleared No. Trns / Totals
These view-only text boxes will display the total number of Checks and Charges transactions and the total amount of the Checks and Charges transactions that have been selected as cleared for the current reconciliation. During the reconciliation process, these text boxes are updated as Checks and Charges transactions are selected or deselected.
Adjustments Entered
This view-only text box will display the total of the adjusting entries that have been entered on the Enter Adjustments dialog box. Only the entries that effect the Bank Control Account record being used for the current reconciliation are included in the total. During the reconciliation process, this field is updated as adjusting entries are entered, edited, or deleted for the current Bank Control Account.
When the Save button is clicked, the above items are saved for future reference.
Ending Balance
This view-only text box will display the system-calculated ending balance for the current Bank Control Account record being reconciled. During the reconciliation process, this text box is updated as transactions are selected or deselected and as adjusting entries are entered, edited, or deleted. When the Bank Control Account record is entered on the General tab, the system calculates and displays the Ending Balance as follows:
Beginning Balance
Plus: Deposits and Credits Cleared
Minus: Checks and Charges Cleared
Plus: Adjustments Entered
Equals: Ending Balance
Difference
This view-only text box will display the difference between the system-calculated Ending Balance and the Statement Ending Balance entered on the General tab. During the reconciliation process, this text box is updated as transactions are selected or deselected and as adjusting entries are entered, edited, or deleted. When the Bank Control Account record is entered on the General tab, the system calculates and displays the Difference as follows:
Ending Balance
Minus: Statement Ending Balance
Equals: Difference
The following tab pages are contained on this dialog box:
General

CYMAIV Accounting for Windows Training Guide – Bank Reconciliation
Copyright 1999-2016 CYMA Systems Inc. 25
Clear by Range
Deposits and Credits
Checks and Charges
Mark Cleared Transactions Command Buttons
The Edit button is enabled when a valid Bank Control Account ID is entered on the General tab. Click this button to begin a reconciliation for the selected Bank Control Account record or to edit a reconciliation in progress for the selected Bank Control Account record.
The Save button saves all work in progress for the current Bank Control Account record's reconciliation without clearing the dialog box. This allows you to save as often as you like to secure the transactions that have been selected or deselected. To select another account to work with, click the Clear button.
Click the Clear button to clear the current reconciliation from the dialog box and select another Bank Control Account. You are prompted to save any changes to the existing reconciliation (if applicable).
The Close button confirms saving any changes to the active record (if applicable) and then closes the dialog box.


CYMAIV Accounting for Windows Training Guide – Bank Reconciliation
Copyright 1999-2016 CYMA Systems Inc. 27
Mark Cleared Transactions - General Tab
The General tab allows you to enter the Bank Control Account record to reconcile and the bank statement information, such as the Statement Ending Date, Statement Ending Balance, and the Reconciliation As Of date. You can also specify to display only the transactions dated on or before the Statement Ending Date and the order in which the Deposits and Credits and the Checks and Charges are sorted on their corresponding tab pages.
Mark Cleared Transactions - General tab
Refer to the following field descriptions and requirements.
Bank to Reconcile group box
Bank ID
Enter the ID of the Bank Control Account record to reconcile. The Browser is available to select it.
Statement Ending Date

CYMAIV Accounting for Windows Training Guide – Bank Reconciliation
Copyright 1999-2016 CYMA Systems Inc. 28
Enter the bank statement ending date.
Statement Ending Balance
Enter the bank statement ending balance.
Reconciliation As Of
Enter a cut-off date to specify the end of the reconciliation period. The current system login date is the default and can be overridden. This allows you to limit outstanding transactions to the date entered in this field. For example, you are reconciling the month of August. You have already retrieved transactions for August and September. By entering 08/31/98 as the Reconciliation As Of date, you limit the date of outstanding transactions to the end of August.
All reports will print outstanding transactions as of the Reconciliation As Of date entered.
Show only transactions <= the Ending Date
When this check box is selected, the Deposits and Credits and the Checks and Charges DataGrids will only display transactions dated on or before the Statement Ending Date entered. This is useful if you have retrieved transactions dated after the Statement Ending Date entered.
When selected and the Statement Ending Date is changed to an earlier date, previously selected transactions may not be visible on the Deposits and Credits and the Checks and Charges DataGrids. Also, the Summary totals may indicate that there are cleared items that are not visible on the Deposits and Credits and the Checks and Charges DataGrids. If this is the case, deselect this check box and verify the selections on the Deposits and Credits and the Checks and Charges DataGrids.
Name
After a valid ID is entered, the name of the selected Bank Control Account record displays in view-only mode.
Desc
After a valid ID is entered, the account description of the selected Bank Control Account record displays in view-only mode.
Transaction Sort Order group box
Select the order to display the Deposits and Credits and the Checks and Charges on their corresponding tab pages. The available options are:
Reference
Select the Reference option button to select the order to display by the Reference field.
Transaction Date
Select the Transaction Date option button to select the order to display by the Transaction date.
Company ID
Select the Company ID option button to select the order to display by the Company ID.
Bank ID
Select the Bank ID option button to select the order to display by the Bank ID.
Description

CYMAIV Accounting for Windows Training Guide – Bank Reconciliation
Copyright 1999-2016 CYMA Systems Inc. 29
Select the Description option button to select the order to display by the description.


CYMAIV Accounting for Windows Training Guide – Bank Reconciliation
Copyright 1999-2016 CYMA Systems Inc. 31
Mark Cleared Transactions - Clear by Range Tab
The Clear by Range tab allows you to select ranges of transactions to be marked as cleared. This provides an easy and efficient method to select large blocks of transactions as cleared without having to select each one individually. When transactions are cleared by range, they are automatically marked as cleared on their corresponding tab page.
The Company ID, Module ID, and Bank ID drop-down lists are useful if you are posting to the General Ledger from multiple companies, modules, or company bank records and there are duplicate transaction numbers. For example, companies using the same series of check numbers. The fields on this tab can be used in any combination, only the records with data that matches all of the fields that have been filled in will be selected. For example, there are duplicate check numbers for a company in the AP and PR modules. Check number 2583 has cleared in PR but has not cleared in AP. You can select PR as the Module ID and enter the starting and ending check numbers. Only the checks within the range for the PR module will be marked as cleared.
Clear by Range tab
Refer to the following field descriptions.
Range of transactions to mark cleared group box

CYMAIV Accounting for Windows Training Guide – Bank Reconciliation
Copyright 1999-2016 CYMA Systems Inc. 32
Check and Charges
Select this option button to specify that the types of transactions to mark as cleared are Checks and Charges. These transactions are listed on the Checks and Charges tab.
Deposits and Credits
Select this option button to specify that the types of transaction to mark as cleared are Deposits and Credits. These transactions are listed on the Deposits and Credits tab.
Company ID
This drop-down list box allows you to specify the ID of the company for which to mark transactions as cleared. The drop-down list will display the companies that are included in the current Bank Control Account record. All is the default and can be overridden.
Module ID
This drop-down list box allows you to specify the ID of the module for which to mark transactions as cleared. The drop-down list will display the modules that are included in the current Bank Control Account record. All is the default and can be overridden.
Bank ID
This drop-down list box allows you to specify the ID of the company bank record for which to mark transactions as cleared. The drop-down list will display the company bank records that are included in the current Bank Control Account record. All is the default and can be overridden.
Starting Number
Enter a valid starting Reference number, such as check number or deposit number, for the range of transactions to mark as cleared the bank.
Ending Number
Enter a valid ending Reference number for the range of transactions for the range of transactions to mark as cleared the bank. If this text box is left blank, the system assumes the range of transactions contains only one entry and the value for this field defaults to the same value as in the Starting Number.
Deposit numbers are padded to four places and Check numbers are padded to six places. For example, if you want to mark deposit numbers 1 to 12, enter "0001" as the Starting Number and "0012" as the Ending Number.
Clear by Range Tab Selection Buttons
The Deselect Range and Select Range buttons validate the selection criteria made to mark a range of transactions as having cleared or not cleared the bank. If all fields are valid, then based on the button selected, the appropriate records matching all the criteria selected will be marked or unmarked on their respective tabs as having cleared or not cleared the bank. Also, the appropriate fields are updated in the Summary group box.
Click the Deselect Range button to unmark all appropriate records that were previously marked for selection.
Click the Select Range button to select the appropriate records matching all the criteria selected.

CYMAIV Accounting for Windows Training Guide – Bank Reconciliation
Copyright 1999-2016 CYMA Systems Inc. 33
Mark Cleared Transactions - Deposits and Credits Tab
The Deposits and Credits tab displays the deposit and credit transactions that were retrieved and are currently outstanding for the current Bank Control Account record. The Data Grid allows you to select (mark) specific transactions as having cleared or not cleared the bank. Each time transactions are selected or deselected on the Data Grid, the appropriate fields in the Summary group box are updated.
It is recommended to select the Post Deposits to GL in Detail check box on the AR Maintain Configuration dialog box. This will post deposits to GL with the original deposit date. Otherwise, if deposits are posted in summary to GL, deposits are posted with the period end date. This will affect the AR ledger if the bank statement end date is before the period end date, a ledger printed with the bank statement cut off date will not include deposits.
Deposits and Credits tab
Refer to the following Data Grid field and column descriptions.
Data Grid Columns and Fields

CYMAIV Accounting for Windows Training Guide – Bank Reconciliation
Copyright 1999-2016 CYMA Systems Inc. 34
All columns and fields on the Data Grid are in view-only mode. To select a single transaction as cleared the bank or to deselect a single transaction as not cleared the bank, left-click the mouse on the corresponding row. Use the selection buttons (described below) to select or deselect all the transactions on the Data Grid. When a record is selected, the row is highlighted. When a record is deselected, the row is not highlighted.
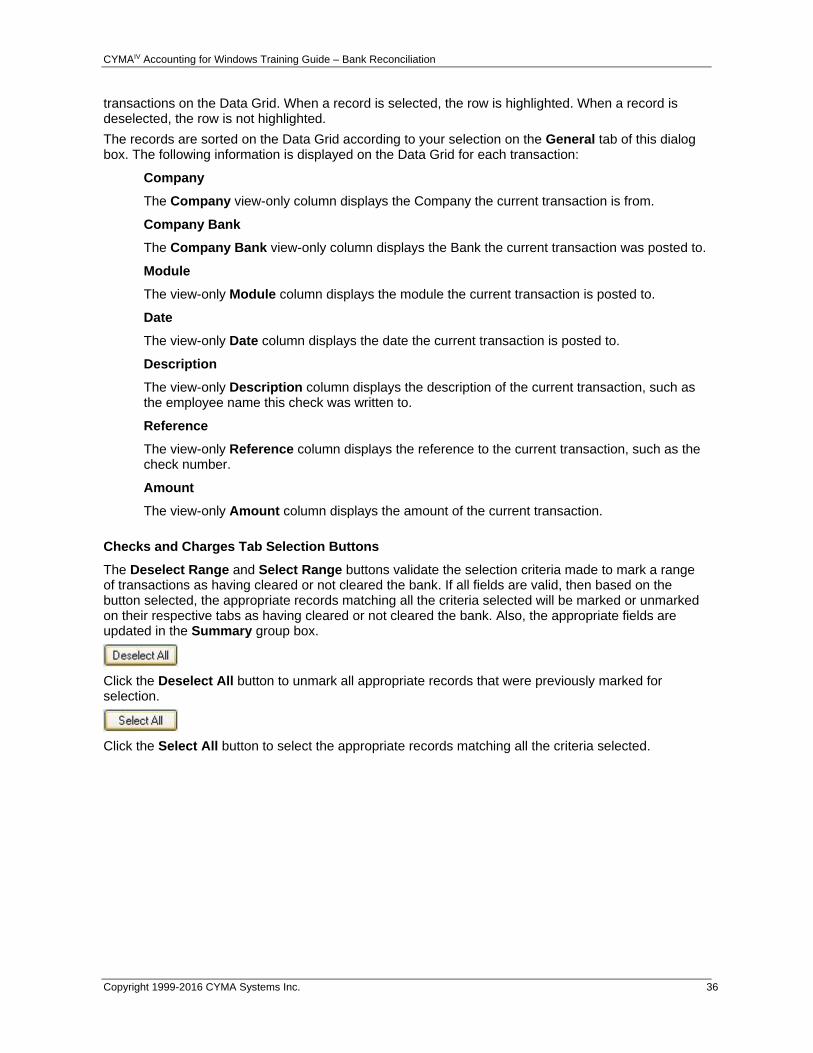
The records are sorted on the Data Grid according to your selection on the General tab of this dialog box. The following information is displayed on the Data Grid for each transaction:
If transactions were selected using the Clear by Range tab, the selected records will be displayed on the Data Grid. You can select or deselect transactions as needed.
Company
The Company view-only column displays the Company the current transaction is from.
Company Bank
The Company Bank view-only column displays the Bank the current transaction was posted to.
Module
The view-only Module column displays the module the current transaction is posted to.
Date
The view-only Date column displays the date the current transaction is posted to.
Description
The view-only Description column displays the description of the current transaction.
Reference
The view-only Reference column displays the reference to the current transaction such as the deposit number.
Amount
The view-only Amount column displays the amount of the current transaction.
Deposits and Credits Tab Selection Buttons
The Deselect Range and Select Range buttons validate the selection criteria made to mark a range of transactions as having cleared or not cleared the bank. If all fields are valid, then based on the button selected, the appropriate records matching all the criteria selected will be marked or unmarked on their respective tabs as having cleared or not cleared the bank. Also, the appropriate fields are updated in the Summary group box.
Click the Deselect All button to unmark all appropriate records that were previously marked for selection.
Click the Select All button to select the appropriate records matching all the criteria selected.

CYMAIV Accounting for Windows Training Guide – Bank Reconciliation
Copyright 1999-2016 CYMA Systems Inc. 35
Mark Cleared Transactions - Checks and Charges Tab
The Checks and Charges tab displays the check and charge transactions that were retrieved and are currently outstanding for the current Bank Control Account record. The Data Grid allows you to select (mark) specific transactions as having cleared or not cleared the bank. Each time transactions are selected or deselected on the Data Grid, the appropriate fields in the Summary group box are updated.
If transactions were selected using the Clear by Range tab, the selected records will be displayed on the Data Grid. You can select or deselect transactions as needed.
Checks and Charges tab
Refer to the following Data Grid field and column descriptions.
Data Grid Columns and Fields
All columns and fields on the Data Grid are in view-only mode. To select a single transaction as cleared the bank or to deselect a single transaction as not cleared the bank, left-click the mouse on the corresponding row. Use the selection buttons (described below) to select or deselect all the
CYMAIV Accounting for Windows Training Guide – Bank Reconciliation
Copyright 1999-2016 CYMA Systems Inc. 36
transactions on the Data Grid. When a record is selected, the row is highlighted. When a record is deselected, the row is not highlighted.
The records are sorted on the Data Grid according to your selection on the General tab of this dialog box. The following information is displayed on the Data Grid for each transaction:
Company
The Company view-only column displays the Company the current transaction is from.
Company Bank
The Company Bank view-only column displays the Bank the current transaction was posted to.
Module
The view-only Module column displays the module the current transaction is posted to.
Date
The view-only Date column displays the date the current transaction is posted to.
Description
The view-only Description column displays the description of the current transaction, such as the employee name this check was written to.
Reference
The view-only Reference column displays the reference to the current transaction, such as the check number.
Amount
The view-only Amount column displays the amount of the current transaction.
Checks and Charges Tab Selection Buttons
The Deselect Range and Select Range buttons validate the selection criteria made to mark a range of transactions as having cleared or not cleared the bank. If all fields are valid, then based on the button selected, the appropriate records matching all the criteria selected will be marked or unmarked on their respective tabs as having cleared or not cleared the bank. Also, the appropriate fields are updated in the Summary group box.
Click the Deselect All button to unmark all appropriate records that were previously marked for selection.
Click the Select All button to select the appropriate records matching all the criteria selected.
CYMAIV Accounting for Windows Training Guide – Bank Reconciliation
Copyright 1999-2016 CYMA Systems Inc. 37
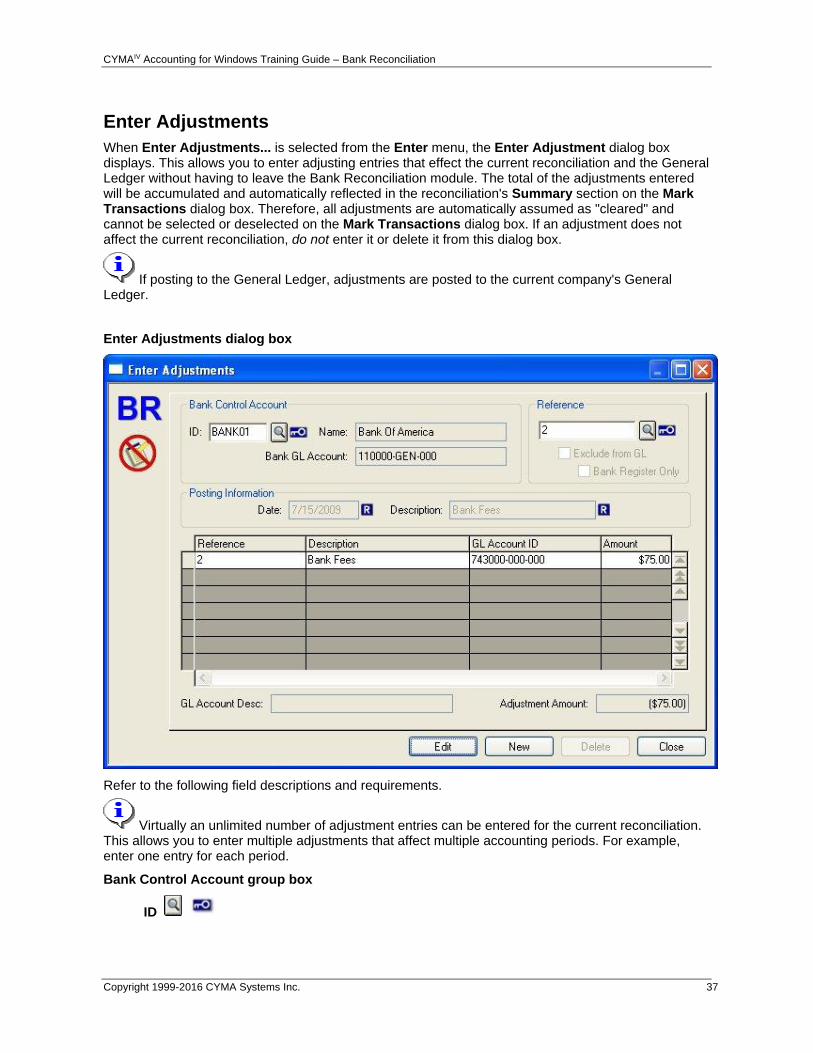
Enter Adjustments
When Enter Adjustments... is selected from the Enter menu, the Enter Adjustment dialog box displays. This allows you to enter adjusting entries that effect the current reconciliation and the General Ledger without having to leave the Bank Reconciliation module. The total of the adjustments entered will be accumulated and automatically reflected in the reconciliation's Summary section on the Mark Transactions dialog box. Therefore, all adjustments are automatically assumed as "cleared" and cannot be selected or deselected on the Mark Transactions dialog box. If an adjustment does not affect the current reconciliation, do not enter it or delete it from this dialog box.
If posting to the General Ledger, adjustments are posted to the current company's General Ledger.
Enter Adjustments dialog box
Refer to the following field descriptions and requirements.
Virtually an unlimited number of adjustment entries can be entered for the current reconciliation. This allows you to enter multiple adjustments that affect multiple accounting periods. For example, enter one entry for each period.
Bank Control Account group box
ID

CYMAIV Accounting for Windows Training Guide – Bank Reconciliation
Copyright 1999-2016 CYMA Systems Inc. 38
Enter or browse the ID of the Bank Control Account record to enter, edit, or delete adjustments for.
Name
This view-only text box will display the name of the selected Bank Control Account record.
Bank GL Account
This view-only text box will display the Bank Control Account’s GL account number. The adjustment amount will be offset to this General Ledger account.
Reference
Enter a user-defined reference code for the adjusting entries (up to 20 alphanumeric characters). This code will default as the Reference for the first Data Grid row and can be overridden.
Exclude from GL
The Exclude from GL check box is to record transactions that are needed to adjust the Bank Reconciliation but do not impact the General Ledger. The types of transactions that would normally be entered here are older transactions that were never retrieved into Bank Reconciliation, but eventually cleared the bank.
Bank Register
The Bank Register check box is to allow the user to make any adjustments to the register that should not impact a Reconciliation or be posted to the General Ledger. These transactions do not move to history and can be deleted at any time.
Posting Information group box
Date
Enter the date to assign to the adjusting entries. If the entries are being posted to the General Ledger, this date will be used for validation and posting. This must be a valid date within an open year. For the Bank Reconciliation module, all adjusting entries are considered part of the current reconciliation in progress.
Description
Enter a description to summarize the overall purpose for the adjustment (up to 30 alphanumeric characters). The description entered will default as the Description for the first Data Grid row and can be overridden.
Data Grid Columns and Fields
Enter the line items for the necessary adjustments to the selected Bank Control Account. If posting to the GL, the offset entry will automatically be made to the GL account corresponding to the selected Bank Control Account. Refer to the following column descriptions:
Reference
Enter a user-defined reference number for the current row (entry) (up to 20 alphanumeric characters). The Reference previously entered is the default for the first row and can be overridden. On each row thereafter, the Reference from the preceding Data Grid row will be the default and can be overridden.
Description
Enter a description for the current row (entry) (up to 30 alphanumeric characters). The Description previously entered is the default for the first row and can be overridden. On each row thereafter, the Description from the preceding Data Grid row will be the default and can be overridden.

CYMAIV Accounting for Windows Training Guide – Bank Reconciliation
Copyright 1999-2016 CYMA Systems Inc. 39
GL Account ID
Enter the General Ledger account number to assign to the entry on the current row. The Browser is available to select it.
Amount
Enter the amount for the entry on the current row (up to 8 numeric characters to the left of decimal and two characters to the right). If the entry is a debit amount, enter the amount as a positive number "+". For credit amounts, enter the amount as a negative number "-".
GL Account Desc
This view-only text box will display the name of the GL account for the current row on the Data Grid.
Adjustment Amount
This Adjustment Amount is view-only and will display the net amount of the entries on the Data Grid. This amount is updated as entries are added or deleted on the Data Grid. This amount is used to offset the amount for posting to GL as well as being the amount the current reconciliation is being adjusted.
The net Adjustment Amount will be the amount of the offset entry automatically made by the system.
Enter Adjustments Command Buttons
The Edit button is enabled when an existing adjustment's Reference is entered. Click this button to edit the currently displayed adjusting entries.
The Save button is enabled when a new record is created or an existing record is edited. Click this button to save the record.
The New button will clear the currently displayed record from the dialog box. You can then create a new record or select another record for viewing or editing. You are prompted to save any changes to the displayed record (if applicable).
The Delete button will delete the currently displayed record from the data files. When clicked, you are prompted with a message confirming the deletion.
The Close button will close the dialog box. You are prompted to save any changes to the displayed record (if applicable).


CYMAIV Accounting for Windows Training Guide – Bank Reconciliation
Copyright 1999-2016 CYMA Systems Inc. 41
Process Menu
Selecting the Process menu from the Bank Reconciliation menu bar drops down a submenu that enables you to post adjustments to GL and perform the end of process update.
From the Process menu you can select:
Post Adjustments to GL
Bank Register
End of Process Update


CYMAIV Accounting for Windows Training Guide – Bank Reconciliation
Copyright 1999-2016 CYMA Systems Inc. 43
Post Adjustments to GL
When Post Adjustments to GL... is selected from the Bank Reconciliation Process menu the Post Adjustments dialog box is displayed. This allows you to post adjusting entries to the General Ledger for a selected Bank Control Account. You can optionally enter an adjusting entry date range to post and select the print destination for the optional Post Bank Reconciliation Adjustments to General Ledger Proof Listing. The proof listing allows you to verify the adjustments prior to posting them.
Adjustments are posted to the General Ledger of the current company. Until all adjustments have been posted to GL, an End of Process Update cannot be performed.
Post Adjustments dialog box
Refer to the following field descriptions and requirements.
Post Adjustments for group box
This group box allows you to specify the Bank Control Account for which to post adjustments to the GL.
Bank Control ID
Enter the ID of the Bank Control Account to post adjustments for. The Browser is available to select it.

CYMAIV Accounting for Windows Training Guide – Bank Reconciliation
Copyright 1999-2016 CYMA Systems Inc. 44
Name
This view-only text box will display the name of the Bank Control Account that was entered.
GL Account
This view-only text box will display the GL account associated with the Bank Control Account that was entered.
Selections group box
This group box allows you to select the adjustments to post for the selected Bank Control Account.
All Adjustments
Select this radio button to post all adjustments that have been entered for the selected Bank Control Account. This radio button will be selected by default and can be changed.
Adjustments within Date Range
Select this radio button to enter a range of dates for the adjustments to post for the selected Bank Control Account. When selected, the From and Through text boxes are enabled.
From
When the Adjustments within Date Range option button is selected, the From text box is enabled. Enter the beginning date for the range of dates for adjustments to post for the selected Bank Control Account.
Through
When the Adjustments within Date Range option button is selected, the Through text box is enabled. Enter the ending date for the range of dates for adjustments to post for the selected Bank Control Account.
Proof Listing Destination
This group box allows you to select where the "Post Bank Reconciliation Adjustments to General Ledger Proof Listing" will print. The system default printer displays in the view-only text box.
Screen
Select this button to display the "Post Bank Reconciliation Adjustments to General Ledger Proof Listing" on your screen. Once displayed on your screen, the report may also be sent to the system default printer from your screen.
Printer
Select this button to direct the report to the printer shown in the "default printer" section of the destination group of the dialog.
File
Select this button to export the displayed report in one of several common formats.
Post Adjustments Command Buttons
Click the Post button to continue posting adjustments to GL. You are prompted with the Print a Proof Listing? message, click the Yes button to print the proof listing prior to posting the adjustments to GL. After the proof has been printed, you are prompted with the Continue and Post? message. Click the Yes button on the message to continue posting the adjustments to GL. To cancel the post to GL, click the No button on the message. When the post is complete, a message displays the number of adjustments posted to the GL.

CYMAIV Accounting for Windows Training Guide – Bank Reconciliation
Copyright 1999-2016 CYMA Systems Inc. 45
Click the Print Setup button to select a printer other than the default printer displayed or to change the orientation from Portrait to Landscape if necessary.
Click the Close button to exit the Post Adjustments to GL operation without posting any adjustments.

CYMAIV Accounting for Windows Training Guide – Bank Reconciliation
Copyright 1999-2016 CYMA Systems Inc. 47
Process Bank Register Setup
Maintain Configuration
1. Enter a Control ID to define the register. This normally would be equivalent to your bank account. Multiple banks can be set up and reconciled through the same Control ID.
2. Enter the account number for the register.
3. Enter the Bank Name.
4. Enter a description for this register.
5. Select the Master GL Company Bank ID. The GL account associated with this Bank ID will be used to retrieve GL transactions.
6. In the data grid select the Company, Module and Module Bank ID for each module to be included in the register or bank reconciliation process.
7. Click on Save.
If the Bank Reconciliation module is currently being used or will be used:
1. Follow setup instructions for Maintain Configuration. This step would already be completed if reconciliations have been done.
2. Select Process – Bank Register
3. Select the Control ID
4. Click on Process
5. Check the ending balance.
6. If the balance is incorrect
a. Go to Enter Adjustments.
b. Select the Control ID.
c. Enter a Reference to identify the adjustment
d. Check both the Exclude from GL and Bank Register Only options
e. Enter a Date for the transaction
f. Enter a Description for the transaction
g. Enter a GL account. This is a required field but will not be used.
h. Enter the amount of the adjustment. If the balance needs to be increased, enter a negative amount, if the balance needs to be decreased enter a positive amount. The amount that displays in the Adjustment Amount field is the actual amount that will affect the bank register.
i. Click on Save
7. Check the balance in Process – Bank Register
NOTE: Adjustments may need to be made based on the situations listed in Exceptions.
If the Bank Reconciliation module is not currently being used:
1. Follow setup instructions for Maintain Configuration
2. Determine the oldest dated check in AP, check in PR or deposit in AR. Including history.
3. Select Process – Bank Register
4. Select the Control ID
5. The first time selecting a Control ID a dialog will display asking for a statement ending date and a balance. Enter the date determined in Step 2 in Statement End Date and Reconciliation Date and leave the Beginning Balance at zero.
CYMAIV Accounting for Windows Training Guide – Bank Reconciliation
Copyright 1999-2016 CYMA Systems Inc. 48
6. Click on OK
7. Click on Process
8. Check the ending balance.
9. If the balance is incorrect
a. Go to Enter Adjustments.
b. Select the Control ID.
c. Enter a Reference to identify the adjustment
d. Check both the Exclude from GL and Bank Register Only options
e. Enter a Date for the transaction
f. Enter a Description for the transaction
g. Enter a GL account. This is a required field but will not be used.
h. Enter the amount of the adjustment. If the balance needs to be increased, enter a negative amount, if the balance needs to be decreased enter a positive amount. The amount that displays in the Adjustment Amount field is the actual amount that will affect the bank register.
i. Click on Save
CYMAIV Accounting for Windows Training Guide – Bank Reconciliation
Copyright 1999-2016 CYMA Systems Inc. 49
10. Check the balance in Process – Bank Register
NOTE: Adjustments may need to be made based on the situations listed in Exceptions.
Exceptions
• Only the current company data will be retrieved regardless of the companies listed for the Control ID in Maintain Configuration.
• All AR deposits will be retrieved. This includes any adjustments or transfers. An adjustment will need to be entered for the register only. It is recommended that a bank is setup and used for these types of transactions. If a bank is set up for this purpose do not add it to the Control ID.
• NSF or Void Deposits will not be retrieved. An adjustment will need to be entered just for the register. Once the corresponding deposit has been cleared and moved to history through the bank reconciliation process, the adjustment can be removed.
• CD checks will not be retrieved until they are posted to the GL.
• If bank reconciliation is not used and history is purged in GL, AR, AP or PR an adjustment will need to be made, to the bank register only, to restore the correct balance.
• Transactions that were never retrieved will display. This can occur if the first time retrieval was done, a specific date was entered. An adjustment will need to be entered.


CYMAIV Accounting for Windows Training Guide – Bank Reconciliation
Copyright 1999-2016 CYMA Systems Inc. 51
Process Bank Register
When Bank Register... is selected from the Process Menu the Bank Register dialog displays. The bank register is a dialog that will show the current balance of a selected Control ID. This process will show all saved or posted deposits from AR, printed checks from AP, printed checks from PR and saved or posted Journal Entries from GL. The register is designed to work in conjunction with the bank reconciliation to reduce the number of entries displayed. The register can be used without reconciling through the system.
Prior to using the Bank Register feature it is recommended that the setup tutorial is read. The tutorial can be found in eDesk under Module by Module Tutorials - Bank Reconciliation - Bank Register. The tutorial can also be found in the help topic Process Bank Register Setup.
Process Bank Register dialog box
Refer to the following fields and descriptions
Control ID
Enter or select a Control ID from the browser.
Bank Name
The Bank Name field will display the name of the bank associated with the selected Control ID.
Account No
The Account No field will display the account number of the bank associated with the selected Control ID.
Description
The Description field will display the description of the bank associated with the selected Control ID.

CYMAIV Accounting for Windows Training Guide – Bank Reconciliation
Copyright 1999-2016 CYMA Systems Inc. 52
Date Range Group Box
Statement Ending Date
The Statement Ending Date will show the date of the last Bank Reconciliation that was completed.
To
Enter a valid date in the To box. The date will default to the current accounting date.
The Process button will start the retrieval of entries.
Sort Order Group Box
Bank ID
Select the Bank ID option to sort the grid by the Bank ID column.
Module ID
Select the Module ID option to sort the grid by the Module ID column.
Date
Select the Date option to sort the grid by the Date column.
Reference
Select the Reference option to sort the grid by the Reference column.
Posted to GL
Select the Posted to GL option to show the transaction that have been posted to GL at the top of the grid.
Cleared
Select the Cleared option to show the transaction that have been cleared/marked at the top of the grid.
Retrieved
Select the Retrieved option to show the transaction that have been retrieved into BR at the top of the grid.
Balance Forward
The Balance Forward field will display the balance forward as of the Statement Ending Date.
Data grid columns and fields
Bank ID
The Bank ID field displays the Bank ID associated with the transaction.
Module ID
The Module ID field displays a two digit code that represents the module associated with the transaction.
Date
The Date field displays the Date of the transaction.

CYMAIV Accounting for Windows Training Guide – Bank Reconciliation
Copyright 1999-2016 CYMA Systems Inc. 53
Description
Reference
The Reference field displays the a reference code associated with the transaction. For Payroll and Accounts Payable transactions this will be the check number. For Accounts Receivable transactions this will be the deposit number. For General Ledger transactions this will be the batch number.
Posted to GL
The Posted to GL field will display "Yes" if the transaction has been posted to GL from the subsidiary module.
Retrieved
The Retrieved field will display "Yes" if the transaction has been retrieved in the Bank Reconciliation module.
Cleared
The Cleared field will display "Yes" if the transaction has been cleared/marked through the Enter Mark Cleared Transactions.
Amount
The Amount field will display the amount of the transaction.
Balance
The Balance column will show the running total.
Ending Balance
The Ending Balance field will show the total of the Beginning Balance plus all transactions included in the grid.
Process Bank Register Command Buttons
Select the Print button to print the Bank Register Report.
Select the Clear button to clear the grid and to allow you to select a different Control ID.
Select the Close button to close the dialog.

CYMAIV Accounting for Windows Training Guide – Bank Reconciliation
Copyright 1999-2016 CYMA Systems Inc. 55
End of Process
When End of Process Update... is selected from the Bank Reconciliation Process menu the End of Process dialog box displays. This operation is performed after a reconciliation is complete. The update process removes all cleared transactions from the current files and places them in the history file. The configuration records are reset in preparation for the next reconciliation process. Prior to allowing you to perform these actions, the system ensures that the account is in balance, the Reconciliation report printed, and all adjustments posted to the GL.
End of Process Command Buttons
Click the Process button to begin the update. When clicked, all transactions that are marked as cleared are moved to their respective history files and the corresponding Bank Control Account records are reset in preparation for the next reconciliation process. When the Update has completed, a message will display informing you whether the Update was successful or not.
Click the Cancel button close the dialog box without performing the End of Process Update.


CYMAIV Accounting for Windows Training Guide – Bank Reconciliation
Copyright 1999-2016 CYMA Systems Inc. 57
End of Process - Actions Performed Tab
The Actions Performed Tab allows the user to select the Bank Control Account to update. The page displays some standard information on the account selected so the user can verify they have chosen the correct account. The bottom of the page describes to the user what is about to take place.
Actions Performed tab
Refer to the following field descriptions and requirements.
Bank Control ID
Enter the ID of the Bank Control Account for which to perform an End of Process Update. The Browser is available to select it.
Only Bank Control Accounts that are in balance will be displayed in the Browser.
Bank Name
This view-only text box will display the name for the selected Bank Control Account.
Bank Account
This view-only text box will display the GL account associated with the selected Bank Control Account.
Account Description
This view-only text box will display the selected Bank Control Account's description.
GL Account

CYMAIV Accounting for Windows Training Guide – Bank Reconciliation
Copyright 1999-2016 CYMA Systems Inc. 58
This view-only text box will display GL account associated with the selected Bank Control Account.
Statement Ending Date
The Statement Ending Date text box is view only and will display the current Statement Ending Date for the Bank Control ID selected.
The End of Process update will do the following group box
This group box is informational and outlines what actions are performed by the End of Process Update.
1. Ensure that all prerequisites have been met.
If the system detects that there are prerequisites that have not been performed, a message displays and will not allow the process to continue until all prerequisites have been completed. You must view the Prerequisites tab and then exit and complete the necessary operations.
2. Reset work files for the given Bank Control ID.
During the End of Process Update the system resets the Bank Control Account record. This allows a new reconciliation to be performed.
3. Transfer adjustments and cleared transactions to history.
During the End of Process Update the system transfers all adjustments and cleared transactions to the history files.

CYMAIV Accounting for Windows Training Guide – Bank Reconciliation
Copyright 1999-2016 CYMA Systems Inc. 59
End of Process - Prerequisites Tab
The purpose of this tab page is to inform you of the required processes that must be completed before an End of Process Update can be performed. The status of the prerequisites is displayed in view-only mode. The system will not allow you to perform an Update unless the Completed? column displays a "Yes" for each prerequisite. Prerequisites that have not been met display in red as a visual reference.
Prerequisites tab
Refer to the following Prerequisite descriptions.
Is the account in balance?
The system ensures that the sum of the beginning balance, adjustments, and cleared transactions equals the ending balance. If it does not equal you must exit this dialog box and perform the necessary operations, such as retrieve and mark additional data or enter adjustments.
Has the Reconciliation Report been printed?
The system ensures that the "Reconciliation Summary" report has been printed. If it has, the date that the report was printed displays in the Date column. Otherwise, the Completed? column displays a "No" and you will not be allowed to perform the update until the "Reconciliation Summary" report is printed. Go to the Report menu and print the "Reconciliation Summary" listed in the Current Reconciliation Reports category.
Have all Adjustments been posted to GL?
The system ensures that all adjustments for the Bank Control Account being updated have been posted to the General Ledger system. If the system finds any unposted adjustments, the Completed? column displays a "No" and will not allow you to update the Bank Control Account
CYMAIV Accounting for Windows Training Guide – Bank Reconciliation
Copyright 1999-2016 CYMA Systems Inc. 60
until this process is performed. Go to the Post Adjustments to GL operation to post any adjustments.
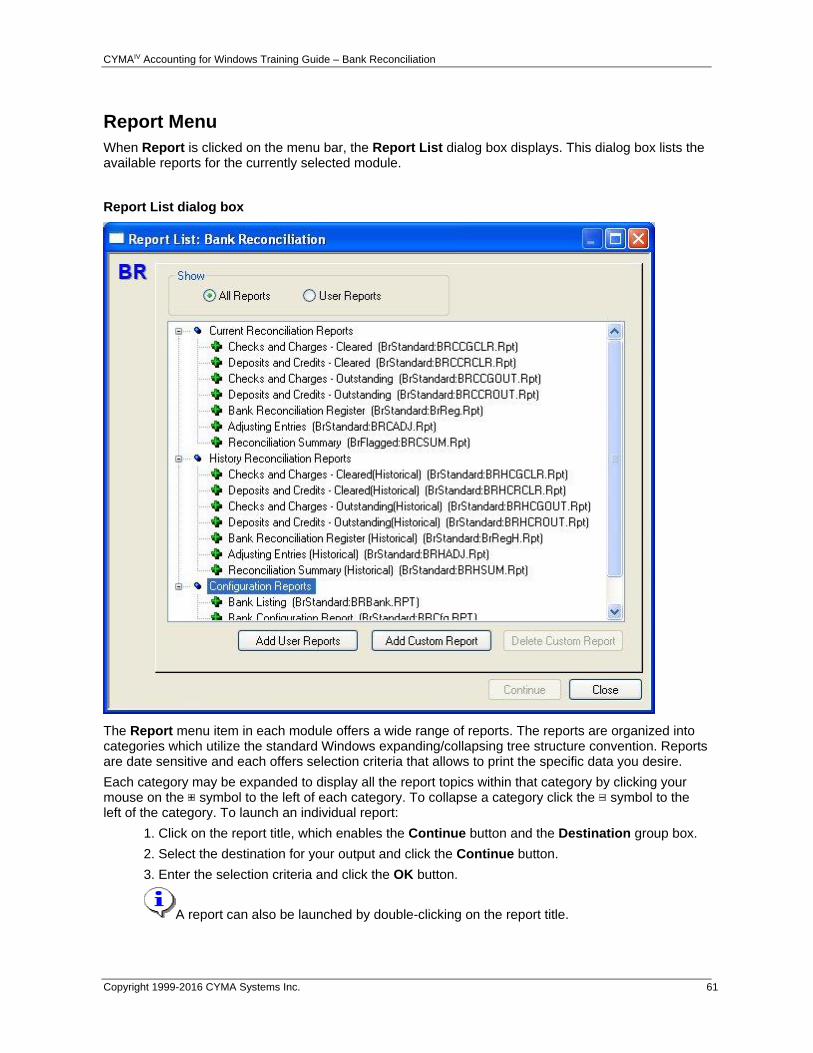
CYMAIV Accounting for Windows Training Guide – Bank Reconciliation
Copyright 1999-2016 CYMA Systems Inc. 61
Report Menu
When Report is clicked on the menu bar, the Report List dialog box displays. This dialog box lists the available reports for the currently selected module.
Report List dialog box
The Report menu item in each module offers a wide range of reports. The reports are organized into categories which utilize the standard Windows expanding/collapsing tree structure convention. Reports are date sensitive and each offers selection criteria that allows to print the specific data you desire.
Each category may be expanded to display all the report topics within that category by clicking your mouse on the symbol to the left of each category. To collapse a category click the symbol to the left of the category. To launch an individual report:
1. Click on the report title, which enables the Continue button and the Destination group box.
2. Select the destination for your output and click the Continue button.
3. Enter the selection criteria and click the OK button.
A report can also be launched by double-clicking on the report title.

CYMAIV Accounting for Windows Training Guide – Bank Reconciliation
Copyright 1999-2016 CYMA Systems Inc. 62
Reports are date sensitive and each offers selection criteria that allows to print the specific data you desire. Refer to the following descriptions for the report categories that are available in the Bank Reconciliation module.
Current Reconciliation Reports
These reports provide complete listings of information regarding current reconciliations. The "Reconciliation Summary" report must be printed prior to performing an End of Process Update for a Bank Control Account.
History Reconciliation Reports
These reports provide complete listings of information that has been transferred to the history files. These reports can be printed any time after performing an End of Process Update for a Bank Control Account.
Configuration Reports
These reports provide information regarding the setup of the Bank Reconciliation module.
Show group box
All Reports
Select the All Reports option to display all reports available within the module.
User Reports
Select the User Reports option to display the user reports selected within the module. For more information see the Report Menu User Reports topic in the System Manager Manual.
Report Menu Command Buttons
Click the Add User Reports button to display the Add User Reports dialog. From this dialog you can add/remove reports from the User Reports list.
The Add Custom Report button allows you to add customized or new custom designed Crystal Reports to the Report menu tree structure. When clicked, the Add Custom Reports dialog box will display.
The Delete Custom Report button allows you to remove customized Crystal Reports from the Report menu tree structure. This button is only enabled when a custom report is highlighted.
Click the Continue button to output the report to the selected destination.
Click the Close button to close the dialog box.
CYMAIV Accounting for Windows Training Guide – Bank Reconciliation
Copyright 1999-2016 CYMA Systems Inc. 63
Report List
Each module contains standard reports; the following is a list of the standard reports available in the Bank Reconciliation module.
Current Reconciliation Reports
Checks and Charges - Cleared
Deposits and Credits - Cleared
Checks and Charges - Outstanding
Deposits and Credits - Outstanding
Bank Reconciliation Register
Adjusting Entries
Reconciliation Summary
History Reconciliation Reports
Checks and Charges - Cleared (Historical)
Deposits and Credits - Cleared (Historical)
Checks and Charges - Outstanding (Historical)
Deposits and Credits - Outstanding (Historical)
Bank Reconciliation Register (Historical
Adjusting Entries (Historical)
Reconciliation Summary (Historical)
Configuration Reports
Bank Listing
Bank Configuration Report
Bank Reconciliation Status Report


CYMAIV Accounting for Windows Training Guide – Bank Reconciliation
Copyright 1999-2016 CYMA Systems Inc. 65
CYMA Systems, Inc. Contact Information
CYMA Systems, Inc.
2330 West University Drive, Suite 4
Tempe, AZ 85281
(800) 292-2962
Fax: (480) 303-2969
email: [email protected]
www.cyma.com
When contacting CYMA Systems, Inc. for technical support, please have the following information available:
CYMAIV Account Number (if known)
Windows Version
Network Operating System (if applicable)
CYMAIV Version


