WINTER 2005 11 CO N T ROLLED HAND FORG I N G by Jay Close Illustrations by Tom Latané, photos by Jay Close and Jane Gulden Lesson # 11- Drawing Down- Part One Definition: Reducing the cross-sectional area of a bar. Lesson: Resizing a 1/2-inch square bar into a 1/4 by 5/8-inch rec- tangular bar by hitting the bar “on the flat.” Intent: This lesson is a first practical experience in hand forging. The student's primary mission is to strive for good technique: proper fire maintenance, good heat selection and use, and relaxed and effective hammering. After familiarity with the process, the student should be comfort- able working a bar linearly, from one end to the other, with min- imal reheating of finished sections. The student will also practice correcting twist and crookedness in the bar and gain experience working to given dimensions. Tools: Basic tools are needed. Include a straight edge and a dou- ble caliper. Lacking a double caliper, two outside calipers can be substituted. Set one caliper to 1/4 inch, the other caliper to 5/8 inch. Hint: An easy way to repeatedly set your calipers accurately is to set them to an unworked bar of the target dimension. Collect an array of short bar sections that become your shop’s standards for setting caliper dimensions. Make certain your hammer face is properly ground, without sharp corners. Prepare two “winding sticks” from 1/4 by 3/4-inch bar as described below. Feeler gauges will be helpful in evaluating the work, as will a dial caliper, if available. Material: 1/2-inch square mild steel about 24 inches long. Method: The bar is heated in sections and each section resized by hammering flat on the bar face. Each section is finished before moving to the next. Corrections to the bar are carried out as needed. When half of the bar is resized, it is turned end-for-end and the resizing continued from the middle where the work left off. 1. The starting bar and the resized bar. Drawing Down- Part One 2. Properly ground hammer face Table bracket by Jay Close. Every bar was resized from larger stock.
Transcript
WINTER 2005 11
CO N T ROLLED HAND FORG I N G
by Jay Close
Illustrations by Tom Latané, photos by JayClose and Jane GuldenLesson # 11- Drawing Down- Part One
Definition: Reducing the cross-sectional area of a bar.
Lesson: Resizing a 1/2-inch square bar into a 1/4 by 5/8-inch rec-tangular bar by hitting the bar “on the flat.”
Intent: This lesson is a first practical experience in hand forging.
The student's primary mission is to strive for good technique:proper fire maintenance, good heat selection and use, and relaxedand effective hammering.
After familiarity with the process, the student should be comfort-able working a bar linearly, from one end to the other, with min-imal reheating of finished sections.
The student will also practice correcting twist and crookedness inthe bar and gain experience working to given dimensions.
Tools: Basic tools are needed. Include a straight edge and a dou-ble caliper. Lacking a double caliper, two outside calipers can besubstituted. Set one caliper to 1/4 inch, the other caliper to 5/8inch.
Hint: An easy way to repeatedly set your calipers accurately is toset them to an unworked bar of the target dimension. Collect anarray of short bar sections that become your shop’s standards forsetting caliper dimensions.
Make certain your hammer face is properly ground, withoutsharp corners.
Prepare two “winding sticks” from 1/4 by 3/4-inch bar asdescribed below. Feeler gauges will be helpful in evaluating thework, as will a dial caliper, if available.
Material: 1/2-inch square mild steel about 24 inches long.
Method: The bar is heated in sections and each section resized byhammering flat on the bar face. Each section is finished beforemoving to the next. Corrections to the bar are carried out asneeded. When half of the bar is resized, it is turned end-for-endand the resizing continued from the middle where the work leftoff.
1. The starting bar and the resized bar.
D rawing Down- Pa rt One
2. Properly ground hammer face
Table bracket by Jay Close. Every bar was resized from larger stock.
CO N T ROLLED HAND FORG I N G
12 HAMMER’S BLOW
Step One
Review the earlier discussions on hammer selection, theergonomics of forging, fire maintenance and shop safety.
Place the bar horizontally in the neutral part of the fire.
The tip of the bar will heat more quickly. Place it beyond thefire’s hot spot and let the heat of the bar radiate to the end.
To speed heating, keep the fire built up on the sides and keepthe bar covered with loose coke. You should still be able to mon-itor the heat of the bar through this coke layer.
Heat no more of the bar than you can work at any given ham-mering session, perhaps three or four inches of the bar.
At a yellow or light welding heat, get the bar to the anvil whereyour hammer is waiting. The bar will never be hotter and neverbe softer than when you first take it from the fire. DO NOTWASTE TIME GETTING TO WORK.
Hint: Set your hammer in the same place on the anvil and in thesame orientation, ready for each heat. This minimizes confusionand wasted time.
With the bar held horizontally and flat on the anvil, with the hotpart in the middle of the anvil face, hit FLAT, HARD, andRHYTHMICALLY.
Hint:: Regardless of the length of the heated section of the bar,only work on as much of the bar as you are able to completelyresize in one or two heats–probably no more than two or threeinches.
The first blow inevitably creates an offset or step in the bar onone side. Keep the bar horizontal.
Hit HARD four or five times on the top, then roll the bar 180degrees to work the surface that had been against the anvil.
Try to roll between hammer blows with no interruption of therhythm. Keep the holding hand relaxed to help you quickly andassuredly manipulate the bar.
When you flip the bar 180 degrees, the offset created by yourwork on the first face keeps the bar from sitting flat on the anvil.This is unavoidable, but your first blows on the new side willpush the metal down to contact the anvil.
Hold the bar horizontally. Resist any tendency to raise or lowerthe holding hand.
As the re-forged section lengthens you can sometimes hang theunworked section of the bar off the anvil face and still be work-ing toward the middle of the anvil. This will help you keep thebar horizontal.
Take four or five blows on the new face, then work the edges ofthe bar. Smooth them and note the effect of your hammerblows. You may need to adjust the strength of the blow becauseyou are hitting a narrower surface. On the other hand, if theseedge blows become too light, you risk the development of anI-beam cross-section to the bar. See the discussion in Part Two ofthis article under “Forging Dynamics,” in the next issue.
Work all sides of the bar. Alternate heavy flattening blows on thefaces of the bar with blows needed to refine the edges.
Develop a rhythm. For example: five hard blows on one face.roll the bar 180 degrees and hit five hard blows on the oppositeface. roll the bar 90 degrees, work the edge. roll the bar 180 degrees, work the other edge, and repeat.
Hint: The tip of the bar heats fastest and reshapes easiest. Thereis danger of over-thinning the end. Forge the tip when the bar isslightly cooler and offers more resistance.
If you reach an orange heat and are far from the target dimen-sions, put the bar back in the fire. Keep it soft.
Take a second heat on this section and continue forging.
Note: If you have been unable to complete a section of the bar bythe end of the second heat, think about why this is the case. Areyou not hitting hard enough? Perhaps you are spreading yourefforts over too much bar? Did you start at a yellow heat to max-imize softness and available time? Are you wasting time throughineffective hammering or taking too long to get to the anvil?
Intelligent analysis and self-correction are the foundations ofprogress as a blacksmith.
If you near finished dimensions at an orange heat, make a checkwith the calipers and continue working to a dull red. The bar ismuch stiffer now and resists shape change. That is fine forlighter, smoothing blows.
4. Step created by drawing part of the bar down. Bar is rotated180° and kept horizontal as drawing continues.
3. Bar placed in the fire horizontally, with the tipbeyond the hottest part of the fire
WINTER 2005 13
CO N T ROLLED HAND FORGING
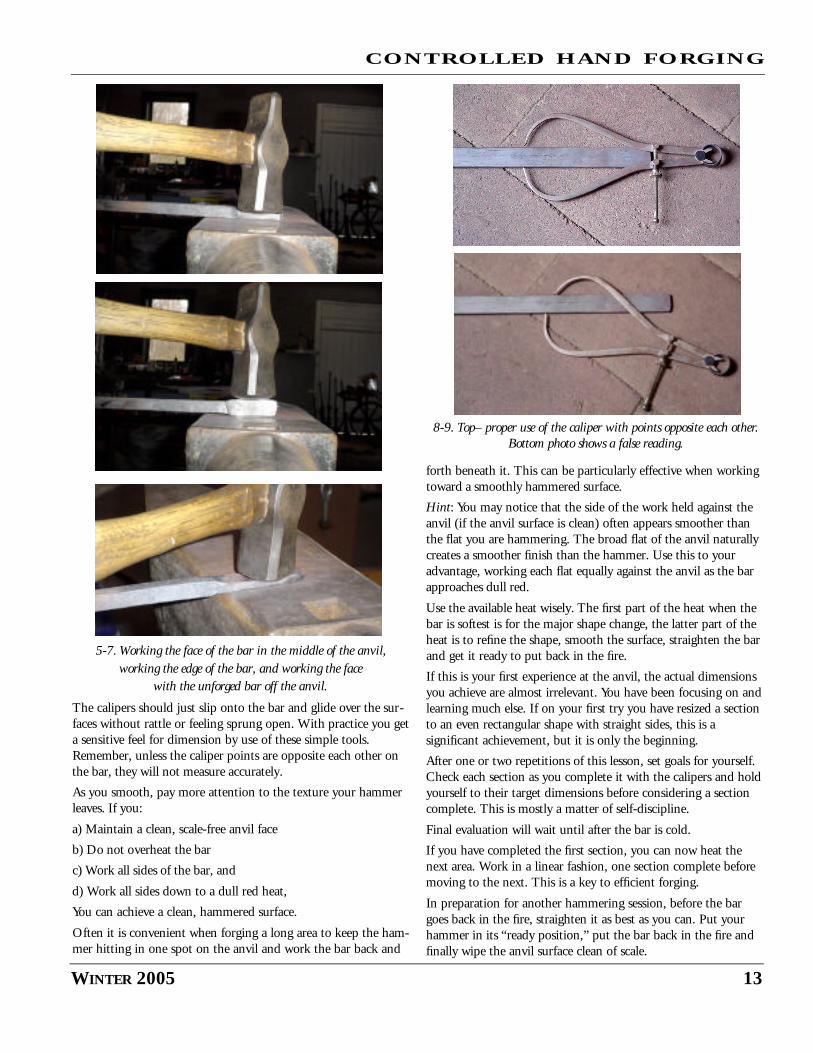
The calipers should just slip onto the bar and glide over the sur-faces without rattle or feeling sprung open. With practice you geta sensitive feel for dimension by use of these simple tools.Remember, unless the caliper points are opposite each other onthe bar, they will not measure accurately.
As you smooth, pay more attention to the texture your hammerleaves. If you:
a) Maintain a clean, scale-free anvil face
b) Do not overheat the bar
c) Work all sides of the bar, and
d) Work all sides down to a dull red heat,
You can achieve a clean, hammered surface.
Often it is convenient when forging a long area to keep the ham-mer hitting in one spot on the anvil and work the bar back and
forth beneath it. This can be particularly effective when workingtoward a smoothly hammered surface.
Hint: You may notice that the side of the work held against theanvil (if the anvil surface is clean) often appears smoother thanthe flat you are hammering. The broad flat of the anvil naturallycreates a smoother finish than the hammer. Use this to youradvantage, working each flat equally against the anvil as the barapproaches dull red.
Use the available heat wisely. The first part of the heat when thebar is softest is for the major shape change, the latter part of theheat is to refine the shape, smooth the surface, straighten the barand get it ready to put back in the fire.
If this is your first experience at the anvil, the actual dimensionsyou achieve are almost irrelevant. You have been focusing on andlearning much else. If on your first try you have resized a sectionto an even rectangular shape with straight sides, this is asignificant achievement, but it is only the beginning.
After one or two repetitions of this lesson, set goals for yourself.Check each section as you complete it with the calipers and holdyourself to their target dimensions before considering a sectioncomplete. This is mostly a matter of self-discipline.
Final evaluation will wait until after the bar is cold.
If you have completed the first section, you can now heat thenext area. Work in a linear fashion, one section complete beforemoving to the next. This is a key to efficient forging.
In preparation for another hammering session, before the bargoes back in the fire, straighten it as best as you can. Put yourhammer in its “ready position,” put the bar back in the fire andfinally wipe the anvil surface clean of scale.
5-7. Working the face of the bar in the middle of the anvil,working the edge of the bar, and working the face
with the unforged bar off the anvil.
8-9. Top– proper use of the caliper with points opposite each other.Bottom photo shows a false reading.
CO N T ROLLED HAND FORG I N G
14 HAMMER’S BLOW
Step Two
When reheating, push the finished bar section through the fireinto a cooler part of the coals. Concentrate the heat on the areayou will be working.
With another yellow or light welding heat on the bar, continueforging the next heated section. Remember your rhythm:
hit HARD on the bar face four or five times.roll the bar and hit HARD on the opposite face.forge the edge, dressing it straight. roll the bar and forge the opposite edge, and repeat as needed.
After each session at the anvil, check dimensions. If oversize,keep forging. If undersize the bar can be upset to thicken it, butthat is another technique and another lesson. For now, take noteof your mistake and resolve to do better on the next section.
Keep the bar straight as you work. It makes manipulating the barless awkward.
As you feel more comfortable with the reshaping, set some goalsas you work. Determine how much of the bar you can completeto final dimensions in one or two heats. Once you can do thatconsistently, push your limits and see if by hitting harder orfaster or using a higher heat you can get more done. Disciplineyourself; challenge yourself.
As more of the bar is reshaped, watch for twist.
Note: Twist is the result of not holding the work flat on the anvil. The holding hand (left hand for the right-handed smith)rotates, raising the edge of the bar slightly off the anvil.Whenthis slightly raised edge is struck, the bar twists. If not corrected,multiple, small repetitive errors create a major deviation fromflat. Knowing how twist develops allows you to correct it as youforge: compensate with a purposeful cant to the opposite side.
Step Three
When half (or a bit more) of the bar has been resized, the endthat you started on will be at a black heat. Further cool that endin the slack tub.
Hint:: If you find that the end you hold gets uncomfortably hotas you work, cool it periodically in the slack tub. If this problemis chronic, you are taking too long to reheat the bar, allowing
more time for heat transfer. Remember:a) Heat in the hottest, neutral part of the fire.b) Keep the fire built up around the work.c) Cover the bar with loose pieces of coke; andd) Do not let the fire grow bigger than necessary.
Flip the bar end-for-end so that you are now holding the resizedend in your hand. Continue to work down the length of the barstarting where you left off in the middle, reforging section bysection until complete.
Targets
Shape targets
The bar must be straight. Without experience it is difficult tojudge this by eye. Use the straightedge as an eye-training tool.
Put the bar in the vise with one flat up. Hold the straightedge onthe flat of the bar and peer along the contact edge backlit by astrong light source, like a window. In even the best work you willnot notice full, light-blocking contact. What you should see is aneven pattern of contact from one end of the bar to the next.
Sometimes the straightedge rocks or pivots on a high spot. If a corresponding low spot exists opposite, then you have identifieda bend in the bar.
If the straightedge pivots on one flat and at the same relativeplace on the opposite flat, you have identified a bulge in the bar.This is more of a dimensional issue than a straightness one.
Take note of the width of any gaps between the straightedge andthe bar. The eye can see light through an opening as small as athousandth of an inch. A gap that is more than 4 or 5 thou-
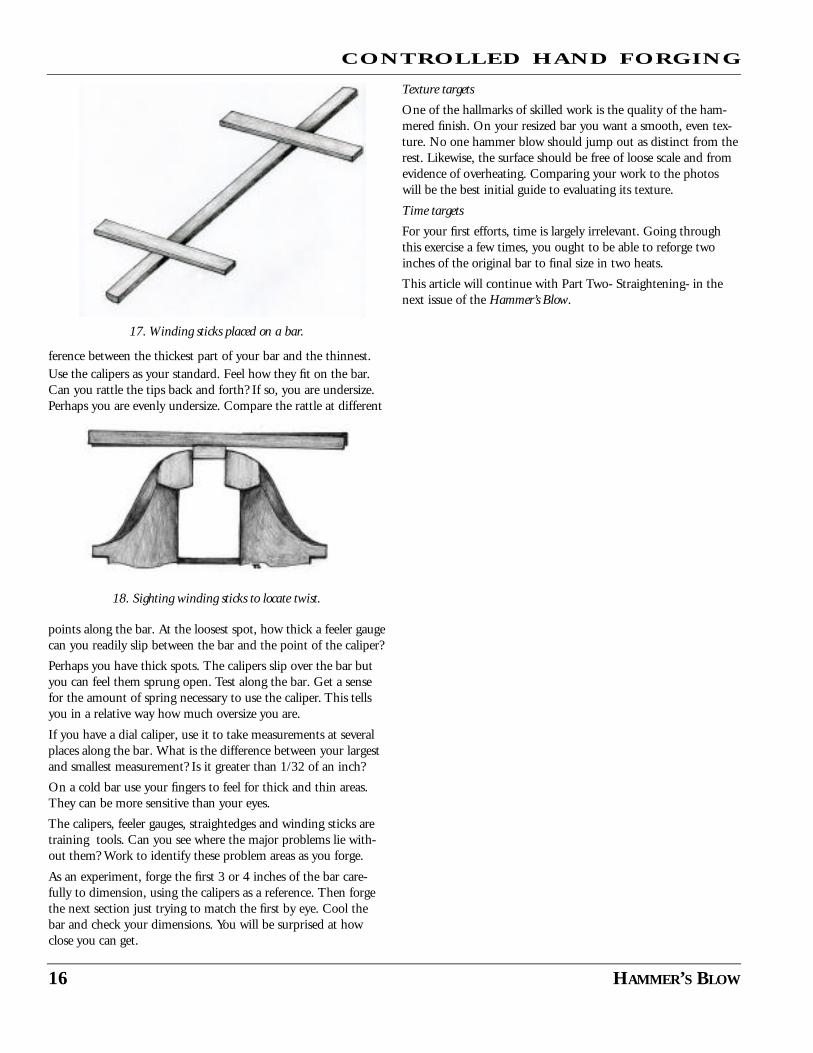
10. Development of a twist as the result of not keeping entire barflat to the anvil face.
11. Checking with a straightedge– dramatic deviation on left, closeapproximation on right.
12. Deviation from straight on left because of bend, on right becauseof narrow portion in the bar.
13. Wide and narrow portions of a bar averaged along its axis.
WINTER 2005 15
CO N T ROLLED HAND FORG I N G
sandths can appear huge. We want to keep overall dimensionaltolerance to plus or minus 1/64 of an inch. Use the feeler gaugeto check the gaps. How small a problem can your eye easily see?
If you have such a large gap, check the area with your calipers.Does the gap exist because of a bend in the bar? Or does the gapexist because the bar is too thin at that spot? The bend can becorrected easily. The thin spot will need to be upset. For now itis best to “split the difference,” thinking about straightening thebar along an imaginary axis line so the mass is equally distributedaround that axis, regardless of “thicks and thins.”
Before doing any corrections, sight down the length of the barand test your eye judgment. Can you see the problems that thestraightedge picked up? If not, keep looking, using the straight-edge to guide you. Occasionally turn the bar and look from theother end.
Hint: Changes in thickness, a twist or an uneven edge of the bar can cause the eye to see a bend where none exists. Addressingthese problems is rarely a neat, step-by-step process. You willoften work back and forth among bends, twists and dimensionalproblems.
Do not become wedded to the straightedge and feeler gauges.Use them to train your eye so that you do not rely on them anymore, but the straightedge, in particular, will never be com-pletely discarded.
Test all four flats of the reshaped bar. The bar must be free oftwist.
Bends and twists are first cousins. Some bends are localizedtwists and a twist in the bar can easily deceive the eye into “seeing” a bend. Eliminate twist before doing your final correc-tions for straightness. The goal is to learn to see twist withoutaids, but until that time make use of a pair of “winding sticks.”A couple of straight sections of bars 1/4" by 3/4" and 8 or 10inches long will suffice.
Lock the workpiece in the vise, grabbing it on the edges with theface of the bar above the vise jaws. Balance one winding stick onthe upper face at one end of the bar and the other on the otherend. Sight over these sticks. Are they parallel to each other? Ifnot, the two areas where they lie on the bar are not in the sameplane, i.e., the bar twists. Move the stick at the far end of the bara couple of inches toward you and sight the sticks again.Continue testing the whole length of the bar. Without the wind-ing sticks can you see these twisted areas? Test yourself– it is theonly way to learn.
Dimension targets
In a simple resizing exercise such as this, you should be able towork to plus or minus 1/64" in width and thickness of the bar.In other words, there could be as much as 1/32" of an inch dif-
14. Testing with the feeler gauge.
15. Sighting down the bar to locate bends and help keep it straight.
16. Major problems like this are easy to see sighting down the bar,but more subtle ones become evident too. Can you see
the 2 sharper bends in this bar?
CO N T ROLLED HAND FORG I N G
16 HAMMER’S BLOW
ference between the thickest part of your bar and the thinnest. Use the calipers as your standard. Feel how they fit on the bar.Can you rattle the tips back and forth? If so, you are undersize.Perhaps you are evenly undersize. Compare the rattle at different
points along the bar. At the loosest spot, how thick a feeler gaugecan you readily slip between the bar and the point of the caliper?
Perhaps you have thick spots. The calipers slip over the bar butyou can feel them sprung open. Test along the bar. Get a sensefor the amount of spring necessary to use the caliper. This tellsyou in a relative way how much oversize you are.
If you have a dial caliper, use it to take measurements at severalplaces along the bar. What is the difference between your largestand smallest measurement? Is it greater than 1/32 of an inch?
On a cold bar use your fingers to feel for thick and thin areas.They can be more sensitive than your eyes.
The calipers, feeler gauges, straightedges and winding sticks aretraining tools. Can you see where the major problems lie with-out them? Work to identify these problem areas as you forge.
As an experiment, forge the first 3 or 4 inches of the bar care-fully to dimension, using the calipers as a reference. Then forgethe next section just trying to match the first by eye. Cool thebar and check your dimensions. You will be surprised at howclose you can get.
Texture targets
One of the hallmarks of skilled work is the quality of the ham-mered finish. On your resized bar you want a smooth, even tex-ture. No one hammer blow should jump out as distinct from therest. Likewise, the surface should be free of loose scale and fromevidence of overheating. Comparing your work to the photoswill be the best initial guide to evaluating its texture.
Time targets
For your first efforts, time is largely irrelevant. Going throughthis exercise a few times, you ought to be able to reforge twoinches of the original bar to final size in two heats.
This article will continue with Part Two- Straightening- in thenext issue of the Hammer’s Blow.