22
D2L Brightspace – Daylight Experience Intelligent Agents Learning Technology, Training, Audiovisual, and Outreach University Information Technology Services

D2L Brightspace – Daylight Experience Intelligent Agents
Learning Technology, Training, Audiovisual, and Outreach
University Information Technology Services

Copyright © 2018 KSU Division of University Information Technology Services
This document may be downloaded, printed, or copied for educational use without further permission of the
University Information Technology Services Division (UITS), provided the content is not modified and this
statement is not removed. Any use not stated above requires the written consent of the UITS Division. The
distribution of a copy of this document via the Internet or other electronic medium without the written
permission of the KSU - UITS Division is expressly prohibited.
Published by Kennesaw State University – UITS 2018
The publisher makes no warranties as to the accuracy of the material contained in this document and
therefore is not responsible for any damages or liabilities incurred from UITS use.
D2L Brightspace is a trademark of D2L Incorporated.
Microsoft, Microsoft Office, and Word are trademarks of the Microsoft Corporation.

University Information Technology Services
D2L Brightspace® - Daylight Experience: Intelligent Agents
Table of Contents
Introduction ............................................................................................................................................................ 4
Learning Objectives ................................................................................................................................................. 4
Accessing the Intelligent Agents Tool ..................................................................................................................... 5
Agent Creation Example Scenario........................................................................................................................... 6
Creating an Intelligent Agent .................................................................................................................................. 6
Setting Custom Values .......................................................................................................................................... 13
Editing an Agent .................................................................................................................................................... 14
Running an Agent Manually .................................................................................................................................. 16
Executing a Practice Run ....................................................................................................................................... 16
Viewing Agent History........................................................................................................................................... 18
Deleting and Restoring an Intelligent Agent ......................................................................................................... 19
Deleting an Agent ............................................................................................................................................. 19
Deleting Multiple Agents .................................................................................................................................. 20
Restoring Agents ............................................................................................................................................... 20
Using Replace Strings in an Intelligent Agent ....................................................................................................... 21
Replace Strings .................................................................................................................................................. 21
Additional Help ..................................................................................................................................................... 22

Revised 5/10/2018 Page 4 of 22
Introduction
The Intelligent Agents tool (IA) sends emails to users based on preset conditions. You can run agents
automatically or manually. For each agent you will need to determine what criterion the agent is looking for,
how often it looks for that criterion, and what the email should say to those who are receiving it when the
criterion is met. The intelligent agent will contact your students (InitiatingUser) on your behalf, via email, and
make them aware that they have satisfied a criterion of your choosing that merits the contact. Using
Intelligent Agents in your course can help make learners more accountable, and engage them when they
complete tasks.
The email contains:
Org unit code and name
The name of the agent
Time and date submitted
Time and date completed
Actions taken by the agent
Errors agent encountered, such as a bounced email address
Some Example Uses of the IA tool include:
Emailing users based on their grades, login history, or activity completion.
Automating standard communications, such as welcome messages, season greetings, and
congratulations.
Important Notes/Best Practices:
Be conscious about whether you want the agent to send an email to the student, to you, or both.
Use Intelligent Agents sparingly, as too many repetitive emails can lose their effectiveness.
Switch between sending emails automatically and manually.
Be sure to name Agents accordingly, and use descriptions when possible.
Learning Objectives
After completing the instructions in this booklet, you will be able to:
Access the Intelligent Agents tool
Create an Intelligent Agent
Set Custom Values
Edit an agent
Run an agent
Execute a Practice Run
Delete and Restore an Intelligent Agent
Replace strings in an Intelligent Agent

Page 5 of 22
Accessing the Intelligent Agents Tool
The following will explain how to access the Intelligent Agents tool:
1. Click the Course Admin link.
Figure 1 - Click Course Admin
2. From the Course Administration page, under the Communication section, click Intelligent
Agents.
Figure 2 - Click Intelligent Agents
Note: You can create, edit and delete Intelligent Agents from the Agents List page
(See Figure 3).

Page 6 of 22
Agent Creation Example Scenario
When creating an Intelligent Agent, it is important to identify:
The purpose of the agent
Agent criteria
The audience of the agent.
One example of an Intelligent Agent would be if you wish to identify students who are falling behind in
a course. First, you would need to create an agent that will send an email when a student has not
logged in for a certain period of time AND achieves a failing grade on a particular grade item. The
audience for the agent is the student (InitiatingUser), and the instructor. The student is notified when
they are at risk of falling behind. The instructor is receiving the proactive notification of that particular
student who is falling behind.
Creating an Intelligent Agent
The following indicates how to create an Intelligent Agent from the Agent List to identify students who
are falling behind in a course:
1. Access the Intelligent Agents tool.
2. Click New.
Figure 3 - Click New

Page 7 of 22
3. Enter the Agent Details:
a. Enter an Agent Name (See Figure 4).
b. Enter a Description (See Figure 4).
c. Assure the checkbox beside Agent is enabled to activate the agent for use after you save
(See Figure 4).
Figure 4 - Enter Agent Details
Note: Multiple criteria can be selected for each agent.

Page 8 of 22
4. Enter Agent Criteria which includes selecting the activities to monitor. For this example, we will
be selecting Login Activity, and Creating and Attaching a Release Condition. Both of these
criteria MUST be met to qualify the agent:
a. Login Activity: Check the box beside Take action when the following login criteria are
satisfied to base agent actions on how regularly users log in to your course. For this
example, we selected “User has not logged in for at least 5 days” (See Figure 5).
b. Course Activity (Not Selected): Check the box beside Take action when the following
course activity criteria is satisfied to base agent actions on how regularly users visit
your course (See Figure 5).
c. Release Conditions: Choose the Attach Existing, or Create and Attach button to base
agent actions on selected or created release conditions. In this example, we created and
attached a release condition (See Figure 5).
Note: When using multiple Release Conditions, you have two options: you can choose to
select “All of the following conditions” must be met or “Any of the following conditions”
must be met. If you only have one release condition, leave it set to, “All of the following
conditions” (See Figure 5).
d. Newly Created Release Condition: (As created in the steps above.) “Receives less than or
equal to a 50% on the quiz: Test 1.”
Figure 5 - Enter Agent Criteria
Page 9 of 22
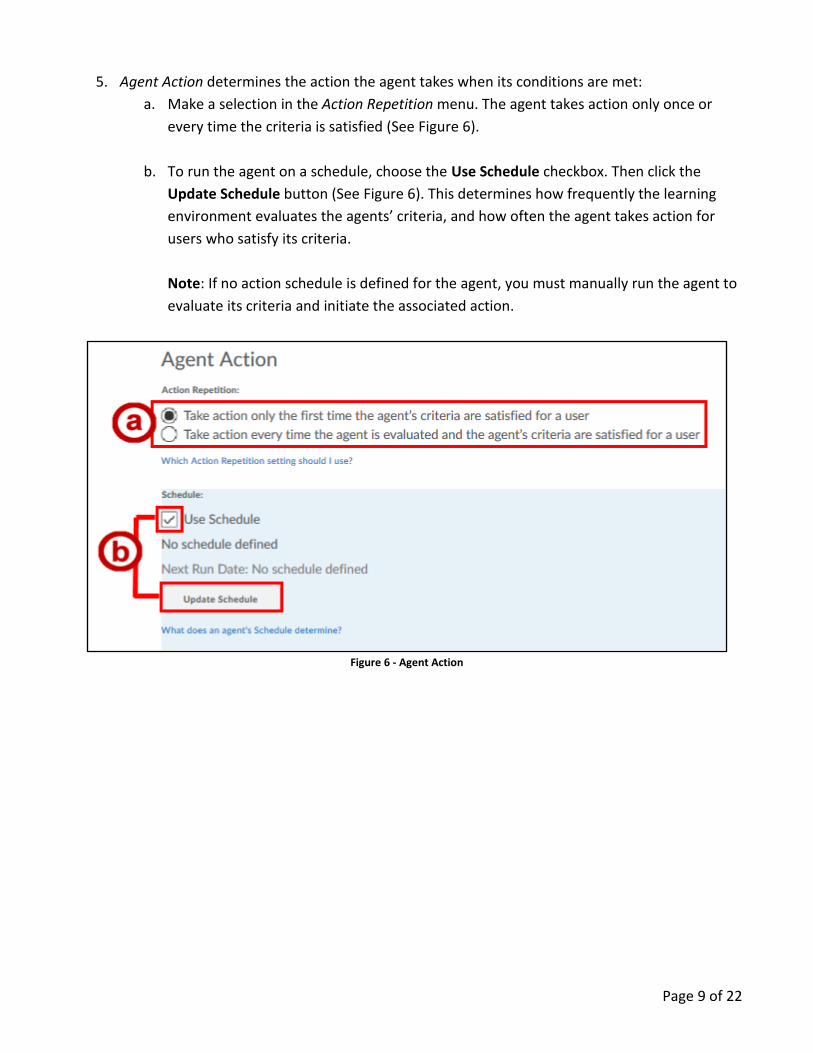
5. Agent Action determines the action the agent takes when its conditions are met:
a. Make a selection in the Action Repetition menu. The agent takes action only once or
every time the criteria is satisfied (See Figure 6).
b. To run the agent on a schedule, choose the Use Schedule checkbox. Then click the
Update Schedule button (See Figure 6). This determines how frequently the learning
environment evaluates the agents’ criteria, and how often the agent takes action for
users who satisfy its criteria.
Note: If no action schedule is defined for the agent, you must manually run the agent to
evaluate its criteria and initiate the associated action.
Figure 6 - Agent Action

Page 10 of 22
c. Update the schedule information in the Update Agent Schedule pop-up (See Figure 7).
d. Click the Update button in the Update Agent Schedule pop-up to save the schedule and
close the pop-up (See Figure 7).
Figure 7 - Update Agent Schedule
Note: The agent will only run while the course is active. Once the course is changed to inactive, the
agent will not run regardless of the schedule settings.

Page 11 of 22
6. Click the HTML or Plain text radio buttons to choose the email format (See Figure 8).
Note: If you use HTML, you can add formatting and visual interest to your message; however,
you may choose plain text as some recipients may have their email configured to reject
messages containing HTML.
7. Enter the recipients in the To, Cc, and Bcc field (See Figure 8).
Note: To use special replace strings, view Using Replace Strings in an Intelligent Agent. This
example uses {InitiatingUserFirstName}. This will send an email to the user who performs the
actions necessary to satisfy the agent’s criteria.
8. Enter a subject in the Email Subject field. Be sure to use a descriptive subject line.
Note: You can also use replace strings in both the subject and message fields, as shown here
using the {OrgUnitName} and a subject line (See Figure 8).
9. Compose your email in the Message field (See Figure 8).
10. Click Save (See Figure 8).
Note: The emails generated from the Intelligent Agents tool come from a DoNotReply account. If you
expect students to reply, be sure to include your email address as a CC, and to tell students to select
“Reply All”. If the student just replies to the agent, you will not receive it.
Note: If you do not wish to be contacted by the student based on the receipt of the agent, make sure
that your message indicates to NOT Reply to this message.

Page 12 of 22
Figure 8 - Email Format and Body

Page 13 of 22
Setting Custom Values
Instructors can now receive replies to Intelligent Agent emails directly. Students can reply directly to
the agent emails, and replies are sent to the instructor. The steps below show how to change these
settings.
1. From the Agent List, click Settings (See Figure 9).
Figure 9 - Agent Settings
2. Click the radio button to Set custom values for this course (See Figure 10).
3. Enter the email addresses in the following fields: Name that emails come from and Reply-To
address for responses (See Figure 10).
Note: You can enter your D2L email address: (kennesaw.view.usg.edu) if you wish to keep all emails
within D2L.
4. Click Save (See Figure 10).
Figure 10 - Intelligent Agent Settings

Page 14 of 22
Note: The values entered for Name that emails come from and Reply-To address for responses are not
copied during copy course components, and instructors need to update these fields post-copy.
Editing an Agent
1. Click the name of the agent you want to edit on the Agent List page (i.e. Falling Behind).
Figure 11 - Agent List Page
2. Make your changes.
Figure 12 - Change Description
Note: Changes to section are indicated by the color blue.
Page 15 of 22
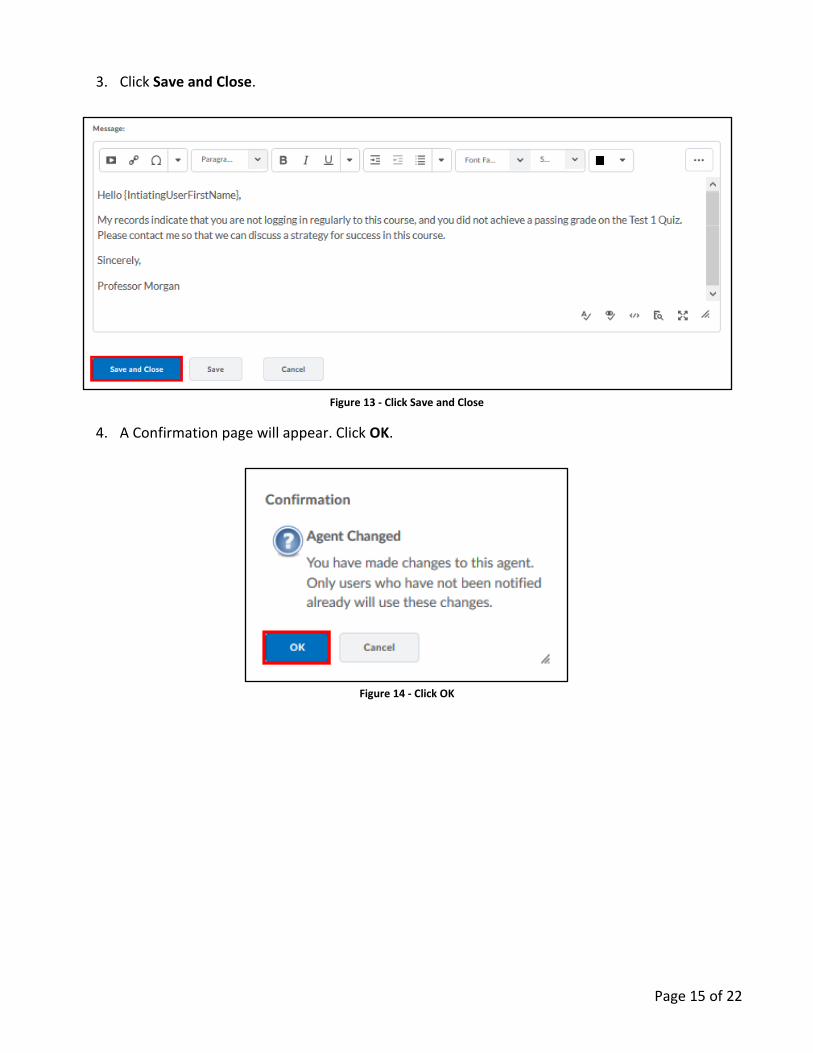
3. Click Save and Close.
Figure 13 - Click Save and Close
4. A Confirmation page will appear. Click OK.
Figure 14 - Click OK

Page 16 of 22
Running an Agent Manually
If you did not create your Intelligent Agent to run on a schedule, you can run it manually.
1. Click the drop-down icon to the right of the agent’s name on the Agent List page
(See Figure 15).
2. Click Run Now (See Figure 15).
Figure 15 - Agent List: Run Now
Executing a Practice Run
A Practice Run is another mode for running an Intelligent Agent. It runs the agent, and reports back a
list of users who met the specified criteria. Users identified in a practice run are not notified or
emailed, and does not count as an action when using the “Take action only the first time the agent’s
criteria are satisfied for a user” type of agent. The following instructions will show how to perform a
practice run.
1. Navigate to the Agent List page, and click the drop-down icon to the right of the agent’s name
(See Figure 16). 2. Select Practice Run (See Figure 16).
Figure 16 - Practice Run

Page 17 of 22
3. A Confirmation window will appear. Click the Run button.
Figure 17 - Run button
4. The Practice Run Agent Confirmation page will appear. Click Done.
Figure 18 - Practice Run Agent Confirmation

Page 18 of 22
Viewing Agent History
The history page allows users creating Intelligent Agents to see each time the agent runs, which users it
identifies, what emails have been sent, and details on any errors that occurred during the agent run.
1. From the Agent List, click the drop-down icon next to the Agent’s name (See Figure 19).
2. Click View History (See Figure 19).
Figure 19 - View History
3. The Agent’s history will appear.
Figure 20 - Agent History

Page 19 of 22
Deleting and Restoring an Intelligent Agent
Deleting an Agent
1. Select the drop-down icon next to the agent from the Agent List page (See Figure 21).
2. Click Delete (See Figure 21).
Figure 21 - Agent List: Delete
3. A confirmation page will open. Click Delete.
Figure 22 - Confirmation Page

Page 20 of 22
Deleting Multiple Agents
1. Click the checkboxes next to the agents’ names (See Figure 23).
2. Click Delete (See Figure 23).
Figure 23 - Delete Multiple Agents
Restoring Agents 1. From the Agent List, click More Actions (See Figure 24).
2. Select Restore (See Figure 24).
Figure 24 - More Actions
3. A list of agents that are available to restore will appear. Click the Restore button for the agent
you would like to restore.
Figure 25 - Restore Buttons

Page 21 of 22
Using Replace Strings in an Intelligent Agent
Before using replacement strings, consider the following:
Assure that you properly format and spell your string.
Use “name” strings sparingly.
Below is a list of replace strings. These lines of text will assist instructors with personalizing messages
and making sure that the correct students are receiving the emails.
Note: As a best practice, we recommend that you insert the course name, or org unit name, into the
subject line enabling quick identification of the course the message is related to.
Note: If you decide to export your course, Intelligent Agents can be copied course to course via Copy Components.
Replace Strings
{OrgName} The name of the organization.
{OrgUnitCode} The code for the Org Unit.
{OrgUnitName} The name of the Org Unit.
{OrgUnitStartDate} The start date specified for the Org Unit.
{OrgUnitEndDate} The end date specified for the Org Unit.
{OrgUnitId} The Id for the Org Unit.
{InitiatingUserFirstName} The first name of the initiating user.
{InitiatingUserLastName} The last name of the initiating user.
{InitiatingUserUserName} The username of the initiating user.
{InitiatingUserOrgDefinedId} The Org Defined ID of the initiating user.
{LoginPath} The address of the login path for the site.
{InitiatingUser} The user who performed the action that met the agent’s criteria.
{InitiatingUserAuditors} The auditors for the user who performed the action that met
the agent’s criteria.
{LastLoginDate} The date the initiating user las logged in.
{LastCourseAccessDate} The date the initiating user last accessed the course.

Page 22 of 22
Additional Help
For additional support, please contact the KSU Service Desk:
KSU Service Desk for Faculty & Staff
Phone: 470-578-6999
Email: [email protected]
Website: http://uits.kennesaw.edu


