382
Oracle Fusion Middleware 11g : Build Applications with ADF I Volume II • Student Guide D53979GC11 Edition 1.1 May 2009 D60500
| Date post: | 07-Jul-2018 |
| Category: |
Documents |
| Upload: | imran-shahid |
| View: | 218 times |
| Download: | 0 times |

8/18/2019 D53979GC11_sg2.pdf
http://slidepdf.com/reader/full/d53979gc11sg2pdf 1/381
Oracle Fusion Middleware 11g :
Build Applications with ADF I
Volume II • Student Guide
D53979GC11
Edition 1.1
May 2009
D60500

8/18/2019 D53979GC11_sg2.pdf
http://slidepdf.com/reader/full/d53979gc11sg2pdf 2/381
Copyright © 2009, Oracle. All rights reserved.
Disclaimer
This course provides an overview of features and enhancements planned in release
11g . It is intended solely to help you assess the business benefits of upgrading to 11g
and to plan your IT projects.
This course in any form, including its course labs and printed matter, contains
proprietary information that is the exclusive property of Oracle. This course and the
information contained herein may not be disclosed, copied, reproduced, or distributedto anyone outside Oracle without prior written consent of Oracle. This course and i ts
contents are not part of your license agreement nor can they be incorporated into any
contractual agreement with Oracle or its subsidiaries or affiliates.
This course is for informational purposes only and is intended solely to assist you in
planning for the implementation and upgrade of the product features described. It is
not a commitment to deliver any material, code, or functionality, and should not be
relied upon in making purchasing decisions. The development, release, and timing of
any features or functionality described in this document remain at the sole discretion
of Oracle.
This document contains proprietary information and is protected by copyright and
other intellectual property laws. You may copy and print this document solely for your
own use in an Oracle training course. The document may not be modified or altered in
any way. Except where your use constitutes "fair use" under copyright law, you may
not use, share, download, upload, copy, print, display, perform, reproduce, publish,license, post, transmit, or distribute this document in whole or in part without the
express authorization of Oracle.
The information contained in this document is subject to change without notice. If you
find any problems in the document, please report them in writing to: Oracle University,
500 Oracle Parkway, Redwood Shores, California 94065 USA. This document is not
warranted to be error-free.
Restricted Rights Notice
If this documentation is delivered to the United States Government or anyone using
the documentation on behalf of the United States Government, the following notice is
applicable:
U.S. GOVERNMENT RIGHTS
The U.S. Government’s rights to use, modify, reproduce, release, perform, display, ordisclose these training materials are restricted by the terms of the applicable Oracle
license agreement and/or the applicable U.S. Government contract.
Trademark Notice
Oracle is a registered trademark of Oracle Corporation and/or i ts affiliates. Other
names may be trademarks of their respective owners.
Authors
Pam Gamer
Gary Williams
Technical Contributors
and Reviewers
Glenn MaslenKen Cooper
Joe Huang
Taj-ul Islam
Duncan Mills
Kenichi Mizuta
Frank Nimphius
Dan Pillay
Blaise Ribet
Oliver Steinmeier
Editors
Steve Elwood
Jothi Lakshmi
Raj Kumar
Aju Kumar
Publisher
Jayanthy Keshavamurthy

8/18/2019 D53979GC11_sg2.pdf
http://slidepdf.com/reader/full/d53979gc11sg2pdf 3/381
iii
Contents
Preface
I Course Introduction: Oracle Fusion Middleware 11g: Build Applications with
ADF I
Course Objectives I-2
Course Agenda: Day 1 I-3
Course Agenda: Day 2 I-4
Course Agenda: Day 3 I-5
Course Agenda: Day 4 I-6
Course Agenda: Day 5 I-7
1 Introduction to Oracle Fusion and Oracle ADF
Objectives 1-2
Examining Oracle Fusion Architecture 1-3
Oracle Application Development Framework (ADF) 1-4
The Model-View-Controller Design Pattern 1-5
Implementing MVC with the ADF Framework: Business and Data Services 1-6
Implementing MVC: ADF Model 1-7
Implementing MVC: Controllers 1-8
Implementing MVC: View 1-9
Technology Choices for ADF BC Applications 1-10
Introducing JDeveloper: Oracle’s Java and Web Development Tool 1-11
Obtaining Additional Information 1-12
Summary 1-13
2 Getting Started with JDeveloper
Objectives 2-2
Describing the Benefits of Using JDeveloper 2-3
Launching JDeveloper 2-5
Defining JDK and Role 2-6
Using JDeveloper Features 2-7
Using JDeveloper’s Application Navigator 2-8
Using JDeveloper’s Database Navigator 2-10
Using JDeveloper’s Editors 2-11
Using JDeveloper’s Component Palette 2-13
Using JDeveloper’s Resource Palette 2-14
Using JDeveloper’s Structure Window 2-15

8/18/2019 D53979GC11_sg2.pdf
http://slidepdf.com/reader/full/d53979gc11sg2pdf 4/381
iv
Using JDeveloper’s Property Inspector 2-16
Using JDeveloper’s Log Window 2-17
Working with JDeveloper Windows 2-18
Setting IDE Preferences 2-19
Getting Started in JDeveloper 2-20
Creating an Application in JDeveloper 2-21
Using the Application Overview 2-23
Creating a Project in JDeveloper 2-24
Creating Database Connections 2-26
Creating a Database Connection in JDeveloper 2-27
Describing the Course Application 2-29
Presenting the Storefront User Interface 2-30
Summary 2-31
Practice 2 Overview: Using JDeveloper 2-32
3 Building a Business Model with ADF Business Components
Objectives 3-2
Describing ADF Business Components (ADF BC) 3-3
ADF BC Implementation Architecture 3-4
Types of ADF Business Components 3-5
Creating ADF Business Components 3-6
The Create Business Components from Tables Wizard: Entity Objects 3-7
The Create Business Components from Tables Wizard: Updatable View
Objects 3-8
The Create Business Components from Tables Wizard: Read-Only ViewObjects 3-9
The Create Business Components from Tables Wizard: Application Module 3-10
The Create Business Components from Tables Wizard: Diagram 3-11
Examining Created Objects 3-12
Testing the Data Model 3-13
Exposing the Application Module to the User Interface 3-14
Summary 2-31
Practice 3 Overview: Building a Business Model 3-16
4 Querying and Persisting DataObjectives 4-2
Using View Objects 4-3
Characteristics of a View Object (VO) 4-4
Creating View Objects for Queries 4-5
Testing View Objects with the Business Components Browser 4-10
Characteristics of an Entity Object (EO) 4-11

8/18/2019 D53979GC11_sg2.pdf
http://slidepdf.com/reader/full/d53979gc11sg2pdf 5/381
v
Using Entity Objects to Persist Data 4-12
Creating Entity Objects 4-13
Creating Entity Objects from Tables, Views, or Synonyms 4-15
Synchronizing an Entity Object with Changes to Its Database Table 4-16
Generating Database Tables from Entity Objects 4-17
Characteristics of Associations 4-18
Creating Associations 4-19
Association Types 4-20
Characteristics of Updatable View Objects 4-21
Creating Updatable View Objects 4-22
Creating Updatable View Objects: Attributes and Settings 4-23
Creating Updatable View Objects: Query 4-25
Creating Updatable View Objects: Additional Settings 4-27
Interaction Between Views and Entities: Retrieving Data 4-28
Interaction Between Views and Entities: Updating Data 4-29Creating a Join View Object 4-30
Including Reference Entities in Join View Objects 4-31
Creating Master–Detail Relationships with View Objects 4-32
Linking View Objects 4-33
Comparing Join View Queries with View Links 4-34
Refactoring Objects 4-35
Summary 4-36
Practice 4 Overview: Creating Entity Objects and View Objects 4-37
5 Exposing DataObjectives 5-2
Oracle ADF Application Module (AM) 5-3
Characteristics of an Application Module 5-4
Creating an Application Module 5-5
Defining the Data Model for the Application Module 5-6
Using Master–Detail View Objects in Application Modules 5-7
Determining the Size of an Application Module 5-8
Business Components Transactions 5-9
Using Nested Application Modules 5-11
Application Module Pooling 5-12
Managing Application State 5-13
The Role of ADF Model 5-14
Describing the Course Application: Database Objects 5-15
Describing the Course Application: View Objects 5-16
Describing the Course Application: Data Controls 5-18

8/18/2019 D53979GC11_sg2.pdf
http://slidepdf.com/reader/full/d53979gc11sg2pdf 6/381
vi
Summary 5-19
Practice 5 Overview: Defining Application Modules 5-20
6 Declaratively Customizing Data Services
Objectives 6-2
Using Groovy 6-3Using Groovy Syntax in ADF 6-4
Internationalizing the Data Model 6-6
Editing Business Components 6-7
Modifying the Default Behavior of Entity Objects 6-8
Defining Attribute Control Hints 6-10
Modifying the Default Behavior of Entity Objects 6-12
Synchronizing with Trigger-Assigned Values 6-13
Modifying the Default Behavior of Entity Objects 6-15
Using Alternate Key Entity Constraints 6-16
Creating Alternate Key Entity Constraints 6-17
Editing View Objects 6-19
Modifying the Default Behavior of View Objects 6-20
Defining View Object Control Hints 6-22
Modifying the Default Behavior of View Objects 6-24
Performing Calculations 6-25
Modifying the Default Behavior of View Objects 6-26
Restricting and Reordering the Columns Retrieved by a Query 6-27
Modifying the Default Behavior of View Objects 6-28
Changing the Order of Queried Rows 6-29Modifying the Default Behavior of View Objects 6-30
Restricting the Rows Retrieved by a Query 6-31
Using View Criteria (Structured WHERE Clauses) 6-32
Using Parameterized WHERE Clauses 6-34
Using Named Bind Variables 6-35
Modifying the Default Behavior of View Objects 6-36
Retaining and Reusing a View Link Accessor Row Set 6-37
Modifying the Default Behavior of View Objects 6-38
Creating View Accessors 6-39
Using a List of Values (LOV) 6-40
Defining the View Accessor for the List of Values 6-41
Defining the List of Values 6-42
Modifying Application Modules 6-43
Changing the Locking Behavior of an Application Module 6-44
Summary 6-45
Practice 6 Overview: Declaratively Modifying Business Components 6-46

8/18/2019 D53979GC11_sg2.pdf
http://slidepdf.com/reader/full/d53979gc11sg2pdf 7/381
vii
7 Programmatically Customizing Data Services
Objectives 7-2
Generating Java Classes for Adding Code 7-3
Programmatically Modifying the Default Behavior of Entity Objects 7-4
The Supporting Entity Java Classes 7-5Traversing Associations 7-7
Overriding Base Class Methods 7-8
Overriding Base Class Methods Example: Updating a Deleted Flag
Instead of Deleting Rows 7-9
Overriding Base Class Methods Example: Eagerly Assigning Values
from a Database Sequence 7-10
Programmatically Modifying the Default Behavior of View Objects 7-11
The Supporting View Object Java Classes 7-12
Examining View Object Methods 7-13
Changing View Object WHERE or ORDER BY Clause at Run Time 7-16
Using Named Bind Variables at Run Time 7-18
Programmatically Retaining and Reusing a View Link Accessor Row Set 7-19
Traversing Links 7-20
Application Module Files 7-22
Centralizing Implementation Details 7-23
Adding Service Methods to an Application Module 7-25
Coding the Service Method 7-27
Publishing the Service Method 7-28
Testing Service Methods in the Business Components Browser 7-30 Accessing a Transaction 7-31
Committing Transactions 7-33
Customizing the Post Phase 7-34
Customizing the Commit Phase 7-35
Using Entity Objects and Associations Programmatically 7-36
Finding an Entity Object by Primary Key 7-37
Updating or Removing an Existing Entity Row 7-38
Creating a New Entity Row 7-39
Using Client APIs 7-41
Creating a Test Client 7-42
Using View Objects in Client Code 7-43
Using Query Results Programmatically 7-44
Using View Criteria Programmatically 7-45
Iterating Master–Detail Hierarchy 7-47
Finding a Row and Updating a Foreign Key Value 7-48
Creating a New Row 7-49

8/18/2019 D53979GC11_sg2.pdf
http://slidepdf.com/reader/full/d53979gc11sg2pdf 8/381
viii
Summary 7-50
Practice 7 Overview: Programmatically Modifying Business Components 7-51
8 Validating User Input
Objectives 8-2
Validation Options for ADF BC Applications 8-3Triggering Validation Execution 8-4
Handling Validation Errors 8-5
Specifying the Severity of an Error Message 8-6
Using Groovy Variables in Error Messages 8-7
Storing Error Messages as Translatable Strings 8-8
Defining Validation in the Business Services 8-9
Using Declarative Validation: Built-in Rules 8-10
Defining Declarative Validation 8-11
Using Declarative Validation: Built-in Rules 8-12
Using Declarative Built-in Rules: Collection Validator 8-13
Using Declarative Built-in Rules: Unique Key Validator 8-14
Using Declarative Validation: Built-in Rules 8-15
Using Declarative Built-in Rules: Compare Validator 8-16
Using Declarative Built-in Rules: Key Exists Validator 8-17
Using Declarative Built-in Rules: Length Validator 8-18
Using Declarative Built-in Rules: List Validator 8-19
Using Declarative Built-in Rules: Range Validator 8-20
Using Declarative Built-in Rules: Regular Expression Validator 8-21
Using Declarative Validation: Built-in Rules 8-22Using Declarative Built-in Rules: Script Expression Validator 8-23
Using Declarative Custom Rules: Entity-Specific Rules (Method Validators) 8-24
Using Declarative Custom Rules: Creating an Entity-Specific Method Validator 8-25
Using Declarative Global Validation Rules 8-26
Creating the Java Class for a Global Rule 8-27
Examining the Generated Skeleton Code 8-28
Modifying the Code for the Global Rule 8-29
Assigning the Global Rule to an Object 8-31
Testing the Global Validation Rule 8-32
Using Programmatic Validation 8-33Debugging Custom Validation Code with the JDeveloper Debugger 8-34
Using a Domain to Create Custom-Validated Data Types 8-35
Creating and Using a Domain 8-36
Coding Validation in a Domain 8-37
Specifying Validation Order 8-38

8/18/2019 D53979GC11_sg2.pdf
http://slidepdf.com/reader/full/d53979gc11sg2pdf 9/381
ix
Summary 8-39
Practice 8 Overview: Implementing Validation 8-40
9 Troubleshooting ADF BC Applications
Objectives 9-2
Troubleshooting the Business Service 9-3Troubleshooting the UI 9-4
Using Logging and Diagnostics 9-5
Displaying Debug Messages to the Console 9-6
Java Logging 9-7
Core Java Logging 9-9
Using ADF Logging 9-10
Configuring ADF Logging 9-11
Creating Logging Configurations in JDeveloper 9-13
Viewing ODL Logs 9-14
Using Design-Time Code Validation 9-15
Design-Time XML Validation 9-16
Design-Time Java Code Validation 9-17
Design-Time JSPX Validation 9-18
Using Tools and Utilities 9-19
Testing Java Code with JUnit 9-20
Unit Testing with JUnit 9-21
Using JDeveloper’s Profiler 9-22
Running the Profiler 9-23
Identifying Search Paths on Windows with FileMon 9-24Troubleshooting Web Services 9-25
Troubleshooting Web Services: Sample Client 9-26
Troubleshooting Web Services: HTTP Analyzer 9-27
Using the JDeveloper Debugger 9-28
Understanding Breakpoint Types 9-29
Using Breakpoints 9-31
Declarative UI Debugging 9-32
Using the EL Evaluator 9-33
ADF Structure Pane and ADF Data Window 9-34
Object Preferences 9-35Using Oracle ADF Source Code for Debugging 9-36
Setting Up Oracle ADF Source Code for Debugging 9-37
Utilizing Quick Javadoc 9-38
Setting Breakpoints in Source Code 9-39
Using Common Oracle ADF Breakpoints 9-40
Debugging Interactions with the Model Layer 9-41

8/18/2019 D53979GC11_sg2.pdf
http://slidepdf.com/reader/full/d53979gc11sg2pdf 10/381
x
Correcting Failures to Display Data 9-42
Correcting Failures to Invoke Actions and Methods 9-45
Debugging Life Cycle Events: Task Flows 9-47
Debugging Life Cycle Events: Parameters and Methods 9-48
Debugging Life Cycle Events: Switching Between Main Page and Regions 9-49
Obtaining Help 9-50
Requesting Help 9-51
Summary 9-52
Practice 9 Overview: Troubleshooting 9-53
10 Understanding UI Technologies
Objectives 10-2
Enabling the World Wide Web with HTML and HTTP 10-3
Describing the Java Programming Language 10-4
Using Java as a Language for Web Development 10-6
What Are Servlets? 10-8
What Are JavaServer Pages (JSP)? 10-9
What Are JavaBeans? 10-10
What Is JavaServer Faces (JSF)? 10-11
JSF Key Concepts 10-13
JSF Component Model 10-14
JSF Multiple Renderers 10-15
Traditional Navigation 10-16
Defining Navigation by Using the JSF Controller 10-17
JSF Navigation: Example 10-18Using JSF Components 10-19
Using JSF Managed Beans 10-20
Overview of JSF Page Life Cycle 10-21
Formal Phases of the JSF Life Cycle 10-22
Key Characteristics of Rich User Interfaces 10-24
Adding to JSF with ADF Faces 10-25
Using the ADF Controller 10-26
ADF Life Cycle Phases 10-27
Summary 10-28
11 Binding UI Components to Data
Objectives 11-2
Creating a JSF Page 11-3
Adding UI Components to the Page 11-5
Using the Component Palette 11-6
Using the Context Menu 11-7

8/18/2019 D53979GC11_sg2.pdf
http://slidepdf.com/reader/full/d53979gc11sg2pdf 11/381
xi
Using the Data Controls Panel 11-8
Describing the ADF Model Layer 11-9
Types of Data Bindings 11-10
Using Expression Language (EL) 11-12
Expression Language and Bindings 11-13
Creating and Editing Data Bindings 11-15
Rebinding: Example 11-16
Opening a Page Definition File 11-17
Editing Bindings in a Page Definition File 11-18
Editing Bindings from a Page 11-19
Tracing Data Binding: From Database to Databound Components 11-20
Tracing Data Binding: From AM to Data Control 11-21
Tracing Data Binding: Creating Databound Components 11-22
Tracing Data Binding: From Data Control to Databound Components 11-23
Examining Data Binding Objects and Metadata Files 11-26Binding Existing Components to Data 11-28
Accessing Data Controls and Bindings Programmatically 11-29
Running and Testing the Page 11-30
Summary 11-31
Practice 11 Overview: Creating Databound Pages 11-32
12 Planning the User Interface
Objectives 12-2
Describing the Model-View-Controller (MVC) Design Pattern 12-3
Technology Choices for Fusion Applications 12-4Characteristics of ADF Task Flows 12-5
Characteristics of Unbounded ADF Task Flows 12-6
Working with Unbounded Task Flows 12-7
Characteristics of Bounded Task Flows 12-8
Comparing Unbounded and Bounded Task Flows 12-10
Bounded and Unbounded ADF Task Flows: Example 12-11
Creating an Unbounded Task Flow 12-12
Creating a Bounded Task Flow 12-13
Converting Task Flows 12-14
Using a Bounded Task Flow 12-15Using ADF Task Flow Components 12-16
Defining ADF Control Flow Rules 12-19
Example of ADF Control Flow Rules 12-20
Using the Navigation Modeler to Define Control Flow 12-21
Using the Configuration Editor to Define Control Flow 12-22
Editing the.xml File to Define Control Flow 12-23

8/18/2019 D53979GC11_sg2.pdf
http://slidepdf.com/reader/full/d53979gc11sg2pdf 12/381

8/18/2019 D53979GC11_sg2.pdf
http://slidepdf.com/reader/full/d53979gc11sg2pdf 13/381
xiii
Visualizing Data 13-37
Summary 13-39
Practice 13 Overview: Using ADF Faces Components 13-40
14 Implementing Navigation on Pages
Objectives 14-2
Using ADF Faces Navigation Components 14-3
Performing Navigation 14-4
Using Buttons and Links 14-5
Defining Access Keys 14-6
Defining Tool Tips 14-8
Using Toolbars, Toolbar Buttons, and Toolboxes 14-9
Using Menus for Navigation 14-10
Creating Menus 14-11
Creating Pop-Up Menus 14-13Creating Context Menus 14-14
Using a Navigation Pane 14-16
Using Breadcrumbs 14-17
Using Explicitly Defined Breadcrumbs 14-18
Using XML Menu Model for Dynamic Navigation Items 14-19
Creating an ADF Menu Model 14-20
Examining the ADF Menu Model 14-22
Binding the Navigation Pane to an XML Menu Model 14-23
Binding Breadcrumbs to an XML Menu Model 14-25
Defining a Sequence of Steps 14-26Creating a Train 14-28
Skipping a Train Stop 14-29
Summary 14-30
Practice 14 Overview: Using ADF Faces Navigation Components 14-31
15 Achieving the Required Layout
Objectives 15-2
Using ADF Faces Layout Components 15-3
Adding Spaces and Lines: Spacer and Separator 15-4
Stretching Components 15-5Enabling Automatic Component Stretching: Panel Splitter or Panel Stretch
Layout 15-6
Stretching a Table Column 15-7
Creating Resizable Panes: Panel Splitter 15-8
Printing Layout Panel Content: Show Printable Page Behavior Operation 15-9
Creating Collapsible Panes: Panel Splitter 15-10

8/18/2019 D53979GC11_sg2.pdf
http://slidepdf.com/reader/full/d53979gc11sg2pdf 14/381
xiv
Creating Collapsible Panes: Panel Accordion 15-11
Panel Accordion Overflow 15-12
Setting Panel Accordion Properties 15-13
Arranging Items in Columns or Grids: Panel Form Layout 15-15
Creating Stacked Tabs: Panel Tabbed with Show Detail Item 15-17
Hiding and Displaying Groups of Content: Show Detail 15-18
Arranging Items Horizontally or Vertically, with Scrollbars: Panel Group
Layout 15-20
Displaying Table Menus, Toolbars, and Status Bars: Panel Collection 15-22
Creating Titled Sections and Subsections: Panel Header 15-24
Grouping Related Components: Group 15-25
Displaying a Bulleted List: Panel List 15-26
Displaying Items in a Content Container Offset by Color: Panel Box 15-27
Arranging Content Around a Central Area: Panel Border Layout 15-28
Arranging Content Around a Central Area: Panel Stretch Layout 15-30Using ADF Faces Skins 15-31
Using Dynamic Page Layout 15-32
Using Expression Language to Conditionally Display Components 15-33
Characteristics of Partial Page Rendering (PPR) 15-34
Enabling PPR Declaratively 15-35
Native PPR: Example 15-37
Declarative PPR: Example 15-38
Enabling PPR Programmatically 15-40
Enabling Automatic PPR 15-41
Conforming to PPR Guidelines 15-42Summary 15-43
Practice 15 Overview: Using ADF Faces Layout Components 15-44
16 Ensuring Reusability
Objectives 16-2
Benefits of Reusability 16-3
Designing for Reuse 16-4
Using a Resource Catalog 16-5
Creating a Resource Catalog 16-6
Reusing Components 16-7Creating an ADF Library 16-8
Adding an ADF Library to a Project by Using the Resource Palette 16-9
Removing an ADF Library from a Project 16-10
Restricting BC Visibility in Libraries 16-11
Types of Reusable Components 16-12
Using Task Flow Templates 16-13

8/18/2019 D53979GC11_sg2.pdf
http://slidepdf.com/reader/full/d53979gc11sg2pdf 15/381
xv
Characteristics of Page Templates 16-14
Creating a Page Template 16-15
Editing a Page Template 16-17
Applying a Page Template to a Page 16-18
Characteristics of Declarative Components 16-19
Creating a Declarative Component 16-21
Using a Declarative Component on a Page 16-22
Characteristics of Page Fragments 16-23
Creating a Page Fragment 16-24
Using a Page Fragment on a Page 16-25
Characteristics of Regions 16-26
Wrapping a Task Flow as a Region 16-27
Converting a Bounded Task Flow to Use Page Fragments 16-28
Deciding Which to Use 16-29
Summary 16-30Practice 16 Overview: Implementing Reusability 16-31
17 Passing Values Between UI Elements
Objectives 17-2
Holding Values in the Data Model (Business Components) 17-3
Holding Values in Managed Beans 17-4
Using Managed Properties 17-5
Managed Properties: Examples 17-6
Using Memory-Scoped Attributes 17-7
Memory Scope Duration with a Called Task Flow 17-9Memory Scope Duration with a Region 17-10
Accessing Memory-Scoped Attribute Values 17-11
Using Memory-Scoped Attributes Without Writing Java Code 17-12
Overview of Parameters 17-13
Using Page Parameters 17-14
The Job of the Page Parameter 17-15
Using Task Flow Parameters 17-16
The Job of the Task Flow Parameter 17-18
Using Region Parameters 17-19
The Job of the Region Parameter 17-20
Developing a Page Independently of a Task Flow 17-21
Using View Activity Parameters 17-22
The Job of the View Activity Parameter 17-23
Summary: Passing a Value from a Containing Page to a Reusable Page Fragment in
Region 17-24
Passing Values to a Task Flow from a Task Flow Call Activity 17-25

8/18/2019 D53979GC11_sg2.pdf
http://slidepdf.com/reader/full/d53979gc11sg2pdf 16/381
xvi
Returning Values to a Calling Task Flow 17-27
Deciding Which Type of Parameter to Use 17-29
Summary 17-30
Practice 17 Overview: Passing Values Between Pages 17-31
18 Responding to Application EventsObjectives 18-2
Adding UI Code 18-3
Creating Managed Beans 18-4
Registering Existing Java Classes as Managed Beans 18-5
Configuring Managed Beans 18-6
Referencing Managed Beans 18-7
Describing JSF and ADF Life-Cycle Roles 18-8
Coordinating JSF and ADF Life Cycles 18-9
Specifying When to Refresh Binding Executables 18-11
Specifying Whether to Refresh Binding Executables 18-13
Describing Types of Events 18-14
Using Phase Listeners 18-15
Using Event Listeners 18-16
Responding to Action Events 18-17
Creating Action Methods 18-18
Using Action Listeners 18-19
Value Change Events 18-20
Listening for Value Change Events 18-21
Event and Listener Execution Order 18-22 ADF Faces Enhanced Event Handling 18-23
Using JavaScript in ADF Faces Applications 18-24
Other ADF Faces Server Events 18-25
Using Table Model Methods in a Selection Listener 18-27
Using Tree Model Methods in a Selection Listener 18-28
Additional AJAX Events 18-29
Characteristics of the Contextual Event Framework 18-30
Contextual Events: Overview 18-31
Using the Contextual Event Framework to Coordinate Page Regions 18-32
Using the Contextual Event Framework to Coordinate Page Regions: Step 1 18-33Using the Contextual Event Framework to Coordinate Page Regions: Step 2 18-34
Using the Contextual Event Framework to Coordinate Page Regions: Step 3 18-35
Using the Contextual Event Framework to Coordinate Page Regions: Step 4 18-36
Using the Contextual Event Framework to Coordinate Page Regions: Step 5 18-37
Using the Contextual Event Framework to Coordinate Page Regions: Step 6 18-38
Using the Contextual Event Framework to Coordinate Page Regions: Step 7 18-39

8/18/2019 D53979GC11_sg2.pdf
http://slidepdf.com/reader/full/d53979gc11sg2pdf 17/381
xvii
Using the Contextual Event Framework to Coordinate Page Regions: Step 8 18-40
Using the Contextual Event Framework to Coordinate Page Regions: Step 9 18-41
Summary 18-42
Practice 18 Overview: Responding to Events 18-43
19 Implementing Transactional CapabilitiesObjectives 19-2
Handling Transactions with ADF BC 19-3
Default ADF Model Transactions 19-4
Transactions in Task Flows 19-5
Controlling Transactions in Task Flows 19-6
Transaction Support Features of Bounded Task Flows 19-7
Specifying Task Flow Transaction Start Options 19-8
Specifying Task Flow Return Options 19-9
Enabling Transactions on a Task Flow 19-11
Sharing Data Controls 19-13
Handling Transaction Exceptions 19-15
Designating an Exception Handler Activity 19-16
Defining Response to the Back Button 19-17
Saving for Later 19-19
Enabling Explicit Save for Later 19-21
Enabling Implicit Save for Later 19-23
Restoring Savepoints 19-24
Setting Global Save for Later Properties 19-26
Summary 19-27Practice 19 Overview: Controlling Transactions 19-28
20 Implementing Security in ADF Applications
Objectives 20-2
Benefits of Securing Web Applications 20-3
Examining Security Aspects 20-4
ADF Security Framework: Overview 20-5
Configure ADF Security Wizard: Configuring ADF Security Authentication 20-6
Configure ADF Security Wizard: Choosing the Authentication Type 20-7
Using Form-Based Authentication 20-8Configure ADF Security Wizard: Choosing the Identity Store 20-9
Configure ADF Security Wizard: Choosing the Welcome Page 20-10
Configure ADF Security Wizard: Enabling ADF Authorization 20-11
Files Modified by Configure ADF Security Wizard: web.xml 20-12
Other Files Modified or Created by Configure ADF Security Wizard 20-13
Enabling Users to Access Resources 20-14

8/18/2019 D53979GC11_sg2.pdf
http://slidepdf.com/reader/full/d53979gc11sg2pdf 18/381
xviii
Defining Users and Roles in the Identity Store 20-15
Defining Security Policies 20-16
Defining Application Roles in the Policy Store 20-17
Assigning Identity Store Roles to Application Roles 20-18
Granting Permissions to Roles 20-19
Securing Groups of Pages (Bounded Task Flows) 20-20
Securing Individual Pages (Page Definitions) 20-21
ADF BC Model Authorization 20-22
Securing Row Data (Entity Objects or Attributes) 20-23
Granting Privileges on Entity Objects or Attributes 20-24
Application Authentication at Run Time 20-25
ADF Security: Implicit Authentication 20-26
ADF Security: Explicit Authentication 20-28
ADF Security: Authorization at Run Time 20-29
Programmatically Accessing ADF Security Context 20-30Using Expression Language to Extend Security Capabilities 20-31
Using Global Security Expressions 20-32
Using a Security Proxy Bean 20-33
Summary 20-34
Practice 20 Overview: Implementing ADF Security 20-35
Appendix A: Modeling the Database Schema
Objectives A-2
Modeling Database Schemas A-3
Goals of Database Modeling A-4Characteristics of the JDeveloper Database Modeler A-5
Database Modeling Tools in JDeveloper A-6
Modeling Database Objects Offline A-7
Creating a New Offline Database A-8
Creating New Schema Objects in an Offline Database A-9
Creating a Database Diagram A-10
Importing Tables to the Diagram from an Offline Database A-11
Editing Objects on the Diagram A-12
Generating Changes from the Diagram to the Database A-13
Reconciling Changes to the Database A-14Generating Changes from the Offline Database Object to the Database A-15
Importing Database Objects Without a Diagram A-16
Presenting the Storefront Schema A-17
Summary A-18
Practice Overview: Modeling the Schema for the Course Application A-19

8/18/2019 D53979GC11_sg2.pdf
http://slidepdf.com/reader/full/d53979gc11sg2pdf 19/381
xix
Appendix B: Deploying ADF Applications
Objectives B-2
Steps in the Deployment Process B-3
Configuring Deployment Options B-5
Creating Deployment Profiles B-6
Specifying Deployment Profile Options B-7
Creating a Business Components Deployment Profile B-8
Web Module Deployment B-9
Typical Web Application Deployment Example B-10
Example: Creating a WAR Deployment Profile for the UI Project B-11
Example: Creating an EAR Deployment Profile for the Application B-12
Using Deployment Descriptors B-13
Steps in the Deployment Process B-14
Preparing the Oracle WebLogic Server B-15
Installing the ADF Runtime to the WebLogic Installation B-16Creating and Configuring the WebLogic Domain B-17
Creating a JDBC Data Source B-19
Configuring the Data Control to Use the Data Source B-21
Steps in the Deployment Process B-23
Creating a Connection to an Application Server B-24
Example: Deploying the Application B-25
Steps in the Deployment Process B-26
Deploying the Application from the WebLogic Administration Server Console B-27
Steps in the Deployment Process B-28
Using Ant to Automate the Deployment Process B-29Creating an Ant Buildfile in JDeveloper B-30
Defining Ant Deployment Tasks B-31
Adding Elements to the Buildfile B-32
Running Ant on Buildfile Targets B-33
Creating an External Ant Tool B-35
Implementing Security in Deployed Applications B-36
Deployment Testing During Development B-38
Deployment Testing for Production B-39
Summary B-40
Practice Overview: Deploying the Web Application B-41
Appendix C: Practices and Solutions

8/18/2019 D53979GC11_sg2.pdf
http://slidepdf.com/reader/full/d53979gc11sg2pdf 20/381

8/18/2019 D53979GC11_sg2.pdf
http://slidepdf.com/reader/full/d53979gc11sg2pdf 21/381
Preface

8/18/2019 D53979GC11_sg2.pdf
http://slidepdf.com/reader/full/d53979gc11sg2pdf 22/381

8/18/2019 D53979GC11_sg2.pdf
http://slidepdf.com/reader/full/d53979gc11sg2pdf 23/381
Preface - 3
Profile
Before You Begin This Course
Before you begin this course, you should have:
Experience with the basic Java language
A basic understanding of XML
Some experience with Oracle JDeveloper How This Course Is Organized
Oracle Fusion Middleware 11g: Build Applications with ADF is an instructor-led
course featuring lectures and hands-on exercises. Online demonstrations and written
practice sessions reinforce the concepts and skills that are introduced.

8/18/2019 D53979GC11_sg2.pdf
http://slidepdf.com/reader/full/d53979gc11sg2pdf 24/381
Preface - 4
Related Publications
Oracle Publications
Title Part Number
Oracle® Fusion Middleware Fusion Developer's
Guide for Oracle Application Development
Framework 11 g Release 1 (11.1.1) B31974-01
Oracle® Fusion Middleware Web User Interface
Developer's Guide for Oracle Application
Development Framework 11 g Release 1 (11.1.1) B31973-01
Additional Publications
• System release bulletins
• Installation and user’s guides
• read.me files
• International Oracle User’s Group (IOUG) articles
• Oracle Magazine

8/18/2019 D53979GC11_sg2.pdf
http://slidepdf.com/reader/full/d53979gc11sg2pdf 25/381
Preface - 5
Typographic Conventions
The following two lists explain Oracle University typographical conventions for
words that appear within regular text or within code samples.
1. Typographic Conventions for Words Within Regular Text
Convention Object or Term ExampleCourier New User input; Use the SELECT command to view
commands; information stored in the LAST_NAME
column, table, and column of the EMPLOYEES table.
schema names;functions; Enter 300.
PL/SQL objects; paths Log in as scott
Initial cap Triggers; Assign a When-Validate-Item trigger to
user interface object the ORD block.
names, such as
button names Click the Cancel button.
Italic Titles of For more information on the subject see
courses and Oracle SQL Reference
manuals; Manual
emphasized
words or phrases; Do not save changes to the database.
placeholders orvariables Enter hostname, where
hostname is the host on which the
password is to be changed.
Quotation marks Lesson or module This subject is covered in Lesson 3,
titles referenced “Working with Objects.”
within a course

8/18/2019 D53979GC11_sg2.pdf
http://slidepdf.com/reader/full/d53979gc11sg2pdf 26/381
Preface - 6
Typographic Conventions (continued)
2. Typographic Conventions for Words Within Code Samples
Convention Object or Term Example
Uppercase Commands, SELECT employee_id
functions FROM employees;
Lowercase, Syntax variables CREATE ROLE role;
italic
Initial cap Forms triggers Form module: ORD
Trigger level: S_ITEM.QUANTITY
item
Trigger name: When-Validate-Item
. . .
Lowercase Column names, . . .
table names, OG_ACTIVATE_LAYERfilenames, (OG_GET_LAYER ('prod_pie_layer'))
PL/SQL objects . . .
SELECT last_name
FROM employees;
Bold Text that must CREATE USER scott
be entered by a IDENTIFIED BY tiger;
user

8/18/2019 D53979GC11_sg2.pdf
http://slidepdf.com/reader/full/d53979gc11sg2pdf 27/381
Copyright © 2009, Oracle. All rights reserved.
Binding UI Components to Data

8/18/2019 D53979GC11_sg2.pdf
http://slidepdf.com/reader/full/d53979gc11sg2pdf 28/381Oracle Fusion Middleware 11g : Build Applications with ADF I 11 - 2
Copyright © 2009, Oracle. All rights reserved.
Objectives
After completing this lesson, you should be able to do the
following:
• Create a JSF page
• Add ADF Faces UI components to a page
• Include databound components on a page
• Create and edit data bindings
Lesson AimThis lesson describes how to use ADF Faces to create a simple page that includes databound
components. ADF Model and data binding are described in detail.

8/18/2019 D53979GC11_sg2.pdf
http://slidepdf.com/reader/full/d53979gc11sg2pdf 29/381Oracle Fusion Middleware 11g : Build Applications with ADF I 11 - 3
Copyright © 2009, Oracle. All rights reserved.
Creating a JSF Page
<?xml version='1.0' encoding='UTF-8'?>
<jsp:root xmlns:jsp="http://java.sun.com/JSP/Page" version="2.0"
xmlns:h="http://java.sun.com/jsf/html"
xmlns:f="http://java.sun.com/jsf/core"
xmlns:af="http://xmlns.oracle.com/adf/faces/rich">
<jsp:directive.page contentType="text/html;charset=UTF8"/>
<f:view>
<af:document>
<af:form/>
</af:document>
</f:view>
</jsp:root>
Use New Gallery
OR task flow
diagram.
Creating a JSF PageTo create a JSF JSP, you can invoke the New Gallery as shown in the slide. If you have
generated task flows during the planning stages, instead of using the New Gallery you can
double-click a view icon in the task flow diagram to create the actual JSP file, or right-click the
icon and select Create Page.
Oracle recommends that when creating an ADF application, you create an XML-based JSPdocument, which uses the extension .jspx, rather than creating a .jsp file. Using an XML-
based document provides the following benefits:
• Treats your page as a well-formed tree of UI component tags
• Discourages you from mixing Java code and component tags
• Enables you to easily parse the page to create documentation or audit reports
• Enables the page to be used as metadata
All JSF pages that use ADF Faces components must have af:document enclosed within
f:view, as shown in the following code snippet (elements beginning with “af:” are ADF
Faces elements, whereas those that begin with “f:” are JSF elements):<f:view>
<af:document/></f:view>

8/18/2019 D53979GC11_sg2.pdf
http://slidepdf.com/reader/full/d53979gc11sg2pdf 30/381Oracle Fusion Middleware 11g : Build Applications with ADF I 11 - 4
Creating a JSF Page (continued)
By default, when you create a JSF page in a project that uses ADF Faces technology, JDeveloperautomatically inserts the af:document tags for you. All other components that make up the
page then go in between <af:document> and </af:document>. The af:document
component renders nothing itself, but the contents within it are rendered, where appropriate.
At run time, the af:document component creates the root elements for the client page. For
example in HTML output, the standard root elements of an HTML page are generated: <html>,<head>, and <body>.
Typically you would use af:form within af:document to contain your page contents, so
JDeveloper creates that tag for you also, as shown in the example in the slide of the XML code
for a page when it is first created.
After your page files are created, you can add databound UI components.

8/18/2019 D53979GC11_sg2.pdf
http://slidepdf.com/reader/full/d53979gc11sg2pdf 31/381Oracle Fusion Middleware 11g : Build Applications with ADF I 11 - 5
Copyright © 2009, Oracle. All rights reserved.
Adding UI Components to the Page
You can create components on a page by:
• Dragging a component from the Component Palette
• Using the context menu in editor or Structure window
• Dragging a data element from the Data Controls panel
Adding UI Components to the PageYou can add databound components to a page by using either the Component Palette or the Data
Controls panel. You also can right-click the Structure window or the Design view in the editor
and choose from the context menu to insert a component.

8/18/2019 D53979GC11_sg2.pdf
http://slidepdf.com/reader/full/d53979gc11sg2pdf 32/381Oracle Fusion Middleware 11g : Build Applications with ADF I 11 - 6
Copyright © 2009, Oracle. All rights reserved.
Using the Component Palette
Drag the component from the Component Palette:
Component category
pop-up list
Using the Component PaletteJDeveloper provides the Component Palette that enables you to easily add components by
dragging them to the page in the visual editor or to the Structure panel. You can choose a
component category from the pop-up list at the top. By default, the following categories are
available: ADF Data Visualization (graph components), ADF Faces, CSS (stylesheets), HTML,
JSF, JSP, and JSTL (JSP Standard Tag Library).
For ADF Faces, the following types of components are provided:
• Common components: The building blocks of a JSF page with properties and behaviors
• Layout components: Containers to lay out components on a page and define the resize
behavior
• Operations: Specification of client-side behavior or user interaction
When you create components by dragging them from the Component Palette, you can use
Expression Language (EL) to bind them to data. You learn more about data binding and EL later
in this lesson.

8/18/2019 D53979GC11_sg2.pdf
http://slidepdf.com/reader/full/d53979gc11sg2pdf 33/381Oracle Fusion Middleware 11g : Build Applications with ADF I 11 - 7
Copyright © 2009, Oracle. All rights reserved.
Using the Context Menu
Context menu of
Structure
window
Context menu of
editor
Using the Context MenuIn both the Structure window and in the design view of the editor, you can right-click and
choose from the context menu to:
• Insert another UI component inside, before, or after the current one
• Surround the selected component with another
If inserting inside, you are able to choose from components that are valid for that location or
browse for others. If inserting before or after or surrounding with, you are presented with a list
of component categories from which to choose. You can browse for others, or if you select a
category, you can then choose from all components of that category.

8/18/2019 D53979GC11_sg2.pdf
http://slidepdf.com/reader/full/d53979gc11sg2pdf 34/381Oracle Fusion Middleware 11g : Build Applications with ADF I 11 - 8
Copyright © 2009, Oracle. All rights reserved.
Using the Data Controls Panel
The Data Controls panel:
• Is a visual representation of your
business service that contains: – Methods
– Parameters and
results
– Attributes
– Collections
– Built-in operations
• Provides automatic data binding forany business service; for example,
there automatically is a data control
for every ADF BC application
module
Using the Data Controls PanelThe Data Controls panel shows all the data controls that have been created for the application’s
business services and exposes all the data objects, data collections, methods, and operations that
are available for binding to UI components. A different icon is used for each type of data control
object. Each root node in the Data Controls panel represents a specific data control. Under each
data control is a hierarchical list of objects, collections, methods, and operations. How this
hierarchy appears on the Data Controls panel depends on the type of business service
represented by the data control and how it was defined.
When you use technologies other than ADF Business Components (ADF BC) for the business
model, then you must explicitly create data controls for the business service. However, ADF BC
automatically creates a data control for each application module in an application.
The Data Controls panel enables you to easily create databound components on a page. When
you drag a data element to a page, you are given a choice of the type of component to use to
contain the data element, based on whatever is appropriate for that particular element.
Dragging a collection, such as a view object, to the page gives you the choice of creating the
component as an ADF form, table, graph, single selection, tree, navigation component, or
geographic map. When you select a category, you are presented with additional choices. After
you select a component, JDeveloper automatically creates the various code and objects needed
to bind the component to the data control that you selected.

8/18/2019 D53979GC11_sg2.pdf
http://slidepdf.com/reader/full/d53979gc11sg2pdf 35/381Oracle Fusion Middleware 11g : Build Applications with ADF I 11 - 9
Copyright © 2009, Oracle. All rights reserved.
Describing the ADF Model Layer
• Data controls describe
the public interface of a
business service.
• Bindings connect UI
components to data or
actions.
• Data controls and
bindings are definedby using XML metadata.
Business serviceBusiness service
BindingsBindings BindingsBindings
Data ControlData Control
Model Layer ComponentsOracle ADF data controls provide an abstraction of the business service’s data model. The ADF
data controls provide a consistent mechanism for clients and Web application controllers to
access data and actions defined by diverse data-provider technologies.
The Oracle ADF Model layer implements the two concepts in the JSR-227 specification that
enable decoupling the user interface technology from the business service implementation:
• Data controls: The ADF data controls provide an abstraction of an application’s business
services, giving the ADF binding layer access to the service data. Data controls define the
data model returned by the business service. You can bind UI components to data controls
to populate a page with data from your data model at run time.
• Declarative data binding: The UI components created by the Data Controls panel use
declarative data binding, which means that the data binding expressions are automatically
configured, and that in most cases, you do not have to write any additional code. When you
use the Data Controls panel to create a UI component, JDeveloper automatically creates
the various code and objects needed to bind the component to the data control you
selected.

8/18/2019 D53979GC11_sg2.pdf
http://slidepdf.com/reader/full/d53979gc11sg2pdf 36/381Oracle Fusion Middleware 11g : Build Applications with ADF I 11 - 10
Copyright © 2009, Oracle. All rights reserved.
Types of Data Bindings
• Iterator Binding: Keeps track of the current row in a data
collection
– Iterator
– Method iterator
• Value Binding: Connects UI components to attributes in a
data collection; examples: attribute binding, tree binding,
list binding, table binding
• Action Binding: Invokes a method or operation
– Accessor iterator
– Variable iterator
Types of BindingsOracle ADF provides several types of binding objects to support the attributes and operations
exposed by the Oracle ADF data controls for a particular business object.:
• Iterator binding, one per accessor attribute that your page or panel displays. Iterates over
the business objects of the data collection and maintains the row currency and state. The
slide shows an iterator binding as depicted in a page definition file (more on this shortly.)
Value bindings, one for each databound UI component. It provides access to data.
• Action binding, specifically defined for command components. It provides access to
operations or methods defined by the business object.
Iterators are usually created for you so that you don’t have to create them explicitly. One
exception is that when creating a list binding, you often have to create a new iterator for the
displayed items. This is done from the list binding editor, as described later in this lesson. There
are four types of iterator bindings:
• Iterator: Iterates over a collection. When you drop a VO from the Data Controls panel
onto a page, an iterator is created automatically, as depicted in the slide.
• Method iterator: Iterates over the results returned by a method
Note: The screenshot in the slide is from a page definition file, which you learn about shortly.

8/18/2019 D53979GC11_sg2.pdf
http://slidepdf.com/reader/full/d53979gc11sg2pdf 37/381Oracle Fusion Middleware 11g : Build Applications with ADF I 11 - 11
Types of Bindings (continued)
• Accessor iterator: In a master-detail relationship, iterates over detail objects returned by
accessors; created automatically if an accessor return from the Data Controls panel is
dropped on the page. Accessor iterators are always related to a master iterator, which is the
method iterator for the parent object. The accessor iterator returns the detail objects related
to the current object in the master (or method) iterator.
• Variable iterator: Iterates over local variables and method parameters created within the
binding container. These variables and parameters are local to the binding container and
exist only while the binding container object exists. When you use a Data Control method
or operation that requires a parameter that is to be collected from the page, JDeveloper
automatically defines a variable for the parameter in the page definition file. Attribute
bindings can reference the binding container variables.
Value bindings are of different types depending on data, such as in the following examples:
• A page has a drop-down list of department names. The combo box uses a list binding to
display department names and update department numbers.
• A form shows the employee’s last name as a text field. The text field uses an attribute
binding to bind to the LastName attribute.Action bindings, which are for a command component such as a button, provide access to
methods or operations defined by the business object. For example, a Next button on a form
navigates to the next record. The Next button uses an action binding to bind to the Next
operation.

8/18/2019 D53979GC11_sg2.pdf
http://slidepdf.com/reader/full/d53979gc11sg2pdf 38/381Oracle Fusion Middleware 11g : Build Applications with ADF I 11 - 12
Copyright © 2009, Oracle. All rights reserved.
Using Expression Language (EL)
Use Expression Builder
to declaratively create EL
expressions.
Using Expression LanguageYou can use a simple expression language (EL) to work with information. EL is part of JSP
Standard Tag Library (JSTL), and it defines a standard syntax for accessing dynamic values
without using Java scriptlets in JSPs. The standard syntax is #{object.attribute} for a
JSF expression, or ${expression} for a standard JSTL expression. Binding expressions can
use either a $ or # prefix, but EL expressions in JSF pages can use only the # prefix.
At run time, a generic expression evaluator returns value of expressions, automating access to
the individual objects and their properties without requiring code. You use EL expressions
throughout an ADF Faces application to bind attributes to object values determined at run time.
The value of certain UI components (such as an input text component) are determined at runtime by the value attribute. Though a component can have static text as its value, typically the
value attribute contains an EL expression that the run-time infrastructure evaluates to
determine what data to display. Because any attribute of a component (and not just the value
attribute) can be assigned a value by using an EL expression, it is easy to build dynamic, data-
driven user interfaces.
You can create EL expressions declaratively by using the JDeveloper Expression Builder. You
can access the builder from the Property Inspector by selecting Expression Builder from the
drop-down list of an attribute.

8/18/2019 D53979GC11_sg2.pdf
http://slidepdf.com/reader/full/d53979gc11sg2pdf 39/381Oracle Fusion Middleware 11g : Build Applications with ADF I 11 - 13
Copyright © 2009, Oracle. All rights reserved.
Expression Language and Bindings
• Data binding expressions are written using EL.• They are evaluated at run time to determine what data to
display.
• ADF EL expressions typically have the form:#{bindingVariable.BindingObject.propertyName}
– Example of an inputText component in a JSF page:
<af:inputTextvalue="#{bindings.Ename.inputValue}”
label="#{bindings.Ename.label}”
required="#{bindings.Ename.mandatory}">
Expression Language and BindingsWhen you use the Data Controls panel to create a component, the ADF data binding expressions
are created for you. The expressions are added to every component attribute that displays data
from or references properties of a binding object.
Each expression references the appropriate binding objects defined in the page definition file,
the file that contains data bindings for a page. You can edit these binding expressions or create
your own, as long as you adhere to the basic ADF binding expression syntax. ADF data binding
expressions can be added to any component attribute that you want to populate with data from a
binding object.
In JSF pages, a typical ADF data binding EL expression uses the following syntax to referenceany of the different types of binding objects in the binding container:
#{bindings.BindingObject. propertyName}
where:• bindings is a variable that identifies that the binding object being referenced by the
expression is located in the binding container of the current page. All ADF data binding ELexpressions must start with the bindings variable.

8/18/2019 D53979GC11_sg2.pdf
http://slidepdf.com/reader/full/d53979gc11sg2pdf 40/381Oracle Fusion Middleware 11g : Build Applications with ADF I 11 - 14
Expression Language and Bindings (continued)
• BindingObject is the ID (or, in the case of attributes, the name) of the binding object
as it is defined in the page definition file. The binding objectID or name is unique to that
page definition file. An EL expression can reference any binding object in the page
definition file, including parameters, executables, or value bindings.• propertyName is a variable that determines the default display characteristics of each
databound UI component and sets properties for the binding object at run time. There are
different binding properties for each type of binding object.
The JDeveloper Expression Builder is a dialog box that helps you build EL expressions by
providing lists of binding objects defined in the page definition files, as well as other valid
objects to which a UI component may be bound. It is particularly useful when creating or editing
ADF databound expressions because it provides a hierarchical list of ADF binding objects and
their most commonly used properties. For information about these objects and properties, see the
Oracle Fusion Middleware Fusion Developer’s Guide for Application Development Framework
11g , which is available on OTN.
The example in the slide shows an ADF Faces inputText component (a text field with label)
that displays the employee name. The attributes of the text field are all set using EL expressions;the dot-separated expressions in the example all start with bindings, the binding variable that
represents the binding context of the current page. This is explained further in later slides.
The attributes are evaluated as follows:• value="#{bindings.Ename.inputValue}" : The value of the inputText
component is set to the value of the Ename attribute.
• label="#{bindings.Ename.label}" : The label is set to the label property of
the Ename attribute. If you have assigned a custom label to Ename, then the label property is your custom label; otherwise the label property is the same as the attribute
name.• required="#{bindings.Ename.mandatory}" : required is a boolean
attribute that determines whether a value must be entered in the field. In this caserequired evaluates to the mandatory property of the Ename attribute. If Ename is a
mandatory attribute, then the inputText requires a value and is displayed with a
required indicator (*) next to the field.

8/18/2019 D53979GC11_sg2.pdf
http://slidepdf.com/reader/full/d53979gc11sg2pdf 41/381Oracle Fusion Middleware 11g : Build Applications with ADF I 11 - 15
Copyright © 2009, Oracle. All rights reserved.
Creating and Editing Data Bindings
Data Bindings:• Are created automatically when you drag them from the
Data Controls panel to a page or panel
• Can also be created and edited in the editor, the Property
Palette, or the Structure window
Price:
7Quantity:
$3.49
Creating and Editing Data BindingsYou can create or edit a data binding in one of the following ways:
• When you drag a component from the Data Controls panel to a page or panel, a binding is
created automatically.
• You can select the component in the editor and edit the binding in the Property Inspector.
This enables you to use Expression Builder to define an EL expression.
• With the component selected in the editor, you can right-click the component in the editor
or the Structure window and select Rebind to Another ADF Control. If there is no existing
binding, you can select Bind to ADF Control. This is explained further in the next slide.
• You can view and edit bindings contained in the page definition file by clicking the
Bindings tab at the bottom of the editor, then selecting a binding and clicking Edit (the pencil icon.)
• You can also open the page definition file and create or edit a binding in the Structure
window or in the Overview tab. This is explained further in a few slides.

8/18/2019 D53979GC11_sg2.pdf
http://slidepdf.com/reader/full/d53979gc11sg2pdf 42/381Oracle Fusion Middleware 11g : Build Applications with ADF I 11 - 16
Copyright © 2009, Oracle. All rights reserved.
Rebinding: Example
In the visual editor or its Structure window, perform the
following steps:1. Right-click the component.
2. Select Rebind to Another ADF Control.
3. Select a different control to bind to.
Rebinding: ExampleIf you want to use a different data control element for the binding, right-click the component in
either the visual editor or its Structure window and select Rebind to Another ADF Control from
the context menu.
The example in the slide shows how you rebind an existing data control binding and choose a
different data control to bind to the component.

8/18/2019 D53979GC11_sg2.pdf
http://slidepdf.com/reader/full/d53979gc11sg2pdf 43/381Oracle Fusion Middleware 11g : Build Applications with ADF I 11 - 17
Copyright © 2009, Oracle. All rights reserved.
The page definition file <pagename>PageDef.xml (for
example, browseOrdersPageDef.xml):
• Is created automatically when you add
a databound component to a page
• Contains all the binding definitions
for a page
To open a page definition, perform the
following steps:
1. Right-click the page in the editor or
Application Navigator.
2. Select Go to Page Definition.
Opening a Page Definition File
Opening a Page Definition FileInformation on data bindings is not held in the page itself, but in a separate metadata file,<pagename>PageDef.xml. This file is created automatically when you first add a data
binding to a page, and each time you add databound components to the page, JDeveloper adds
appropriate declarative binding entries into this page definition file.
The page definition file is used at run time to instantiate the page’s bindings, which are held in a
map called the binding container, accessible during each page request using the EL expression#{bindings}. This expression always evaluates to the binding container for the current page.
The binding container provides access to the bindings within the page, so there is one page
definition file for each databound Web page.
To edit a page definition file, open it in the visual editor or code editor by right-clicking
anywhere in the page or page fragment and selecting Go to Page Definition from the context
menu. You can also view the page definition file bindings by clicking the Bindings tab whileediting the .jsp or .jspx page.
In the Applications Navigator, the page definition file is under the Application Sources node.

8/18/2019 D53979GC11_sg2.pdf
http://slidepdf.com/reader/full/d53979gc11sg2pdf 44/381Oracle Fusion Middleware 11g : Build Applications with ADF I 11 - 18
Copyright © 2009, Oracle. All rights reserved.
Editing Bindings in a Page Definition File
1
2 3 4
Editing Bindings in a Page Definition FileThe elements of the page definition file are displayed in the editor. There are four types of
elements:
1. Parameters: Page parameters, evaluated at the beginning of the request; this is where you
would put any parameters that are passed in when the page is requested, and then used as
parameters by methods invoked in the page. Page parameters are explained more fully in
the lesson titled “Passing Values Between UI Elements.”
2. Bindings: Value and action bindings in the page
3. Executables: All iterator bindings used in the page and any method actions that need to be
invoked when the page is loaded; at run time, the bindings in the executables element are
executed in the order in which they appear in the page definition file.4. Data Controls: The data source or sources for the page
As you select different bindings in the visual editor, arrows link the selected binding with its
iterator and its data control element. You can add, remove, or edit bindings and executables.
You can also view the Source or History by selecting those tabs at the bottom of the editor.

8/18/2019 D53979GC11_sg2.pdf
http://slidepdf.com/reader/full/d53979gc11sg2pdf 45/381Oracle Fusion Middleware 11g : Build Applications with ADF I 11 - 19
Copyright © 2009, Oracle. All rights reserved.
Editing Bindings from a Page
Editing Bindings from a PageWhen you have a page open in the visual editor, the Bindings tab displays the bindings from its
page definition file. Edits that you make on this tab are to the page definition file, not the page;
that is, you are editing only the data bindings. Parameters that are available in the page
definition file are not displayed on the Bindings tab for the page. On the Bindings tab of the
page there is a link that you can click to open the page definition file editor.

8/18/2019 D53979GC11_sg2.pdf
http://slidepdf.com/reader/full/d53979gc11sg2pdf 46/381Oracle Fusion Middleware 11g : Build Applications with ADF I 11 - 20
Copyright © 2009, Oracle. All rights reserved.
Tracing Data Binding:
From Database to Databound Components
Database table ADF BC
Entity Object
ADF BC
View Object
ADF BC
Application
Module
ADF Model
Data ControlBinding Container Databound components on a JSP
Tracing Data Binding: From Database to Databound ComponentsIt is easy for you as a developer to create databound components, but it is helpful for you to also
understand what goes on behind the scenes to enable this simplicity.
This slide illustrates the source of data that appears on the page. Its ultimate source in an ADF
BC application is a table in the database. An ADF BC entity object represents that table, and a
developer creates an ADF BC view object to present a specific view of the EO data that is
required by an application. The developer exposes the VO to an application in an ADF BC
application module. When you create an AM, JDeveloper automatically creates a data control
for it. You then bind data on a page to elements in the data control, thus enabling access to the
back-end ADF BC entity object, and through that to the database table.
The next several slides examine the concept of data binding in more detail, expounding upon the
bottom portion of the above slide.

8/18/2019 D53979GC11_sg2.pdf
http://slidepdf.com/reader/full/d53979gc11sg2pdf 47/381Oracle Fusion Middleware 11g : Build Applications with ADF I 11 - 21
Copyright © 2009, Oracle. All rights reserved.
Tracing Data Binding:
From AM to Data Control
JDeveloper creates data
controls for each ADF
BC application module.
Tracing Data Binding: From AM to Data ControlThe data control is what ties the back-end data model to the front-end UI.

8/18/2019 D53979GC11_sg2.pdf
http://slidepdf.com/reader/full/d53979gc11sg2pdf 48/381Oracle Fusion Middleware 11g : Build Applications with ADF I 11 - 22
Copyright © 2009, Oracle. All rights reserved.
Tracing Data Binding:
Creating Databound Components
Example: Drag OrderVO1 to a page and
create as an ADF Form with navigation.
Data Control
Page
Tracing Data Binding: Creating Databound ComponentsWhen you drag a data control to a page, components thus created are automatically bound to
data.
In the slide, the components on the page are bound to the OrderAM data control. They call
operations in OrderAM and display data from attributes in OrderAM. Next, we step through the
bindings that the page uses.

8/18/2019 D53979GC11_sg2.pdf
http://slidepdf.com/reader/full/d53979gc11sg2pdf 49/381Oracle Fusion Middleware 11g : Build Applications with ADF I 11 - 23
Copyright © 2009, Oracle. All rights reserved.
Tracing Data Binding:
From Data Control to Databound ComponentsData Control
Page
Binding
container
The OrderId field is bound to the OrderIdattribute, using an attribute (value) binding.
The iterator binding ensures that the current
row is displayed.
Tracing Data Binding: From Data Control to Databound ComponentsThe attribute binding actually binds to the iterator binding, which then binds to the OrderVO1
object. This is necessary to make sure that the page is displaying the OrderId from the current
row (remember that the iterator binding keeps track of the current row).
The EL expression used in the data binding for the value of the input text component is:
#{bindings.OrderId.inputValue}.
The EL expression used in the data binding for the label of the input text component is:#{bindings.OrderId.label}.
The XML in the page definition file is as follows:
<attributeValues IterBinding=“OrderVO1Iterator" id="OrderId"><AttrNames>
<Item Value="OrderId"/>
</AttrNames>
</attributeValues>

8/18/2019 D53979GC11_sg2.pdf
http://slidepdf.com/reader/full/d53979gc11sg2pdf 50/381Oracle Fusion Middleware 11g : Build Applications with ADF I 11 - 24
Copyright © 2009, Oracle. All rights reserved.
Tracing Data Binding:
From Data Control to Databound ComponentsData Control
Page
Binding
container
The OrderShippedDate field is bound to theOrderShippedDate attribute, also using
an attribute binding.
Tracing Data Binding: From Data Control to Databound Components (continued) Note that an attribute binding is used for any field that displays text, whether it’s a read-only
value or an editable text field. The EL expression and XML for the OrderShippedDate are
similar to the usage for OrderId.

8/18/2019 D53979GC11_sg2.pdf
http://slidepdf.com/reader/full/d53979gc11sg2pdf 51/381Oracle Fusion Middleware 11g : Build Applications with ADF I 11 - 25
Copyright © 2009, Oracle. All rights reserved.
Tracing Data Binding:
From Data Control to Databound Components
The Next button uses an action binding tocall the Next operation, which increments
the current row in the iterator binding.
Data Control
Page
Binding
container
Tracing Data Binding: From Data Control to Databound Components (continued)Next is a built-in operation that is available for all collections.
The Previous button uses an operation binding to call the Previous built-in operation. The
Previous button is disabled when the page is showing the first row; similarly the Next button isdisabled when the page is showing the last row. This is controlled by the button’s disabled
attribute:<af:commandButton actionListener="#{bindings.Next.execute}"
text="Next"disabled="#{!bindings.Next.enabled}"/>
The disabled attribute is set by a conditional expression: if the Next operation is not enabled
then the button is disabled; and in the underlying ADF code the Next operation is enabled only
if there are more rows of data to step through.

8/18/2019 D53979GC11_sg2.pdf
http://slidepdf.com/reader/full/d53979gc11sg2pdf 52/381Oracle Fusion Middleware 11g : Build Applications with ADF I 11 - 26
Copyright © 2009, Oracle. All rights reserved.
Examining Data Binding Objects
and Metadata Files
Binding Context
Binding
Container
Data
Control
Page
definition
file
*PageDef.xml
Binding
context
definition file
DataBindings.cpx
Structure
definition
file
*.xml
DataControls.dcx
Data
Controls
definitionfile
Data Binding Objects and Metadata FilesAll of the bindings used by a particular page or form are grouped in a binding container. In
general there is one binding container per page or form.
The binding context is the handle through which the client accesses the data binding layer. TheDataBindings.cpx file maps each page to its page definition file and the data controls it
uses. It lists all of the data controls that are in use.
The page definition file is created automatically the first time you create a binding in a page.
Alternatively, if you select “Go to Page Definition” for a page that does not currently have a
page definition, you are prompted to create the page definition file. Page definition files are
named pagenamePageDef.xml. If you rename a page definition file you must also changethe name of the file in DataBindings.cpx. Use the Refactor Rename operation to
perform a consistent rename.
Each binding context, binding container, and data control has its own metadata file. A metadata
file is a .xml file that contains all the application-specific information that the ADF model run
time needs.
Note that ADF BC is different from other data controls in that it does not have a Data Controls
definition file, because each application module automatically becomes a data control.

8/18/2019 D53979GC11_sg2.pdf
http://slidepdf.com/reader/full/d53979gc11sg2pdf 53/381Oracle Fusion Middleware 11g : Build Applications with ADF I 11 - 27
Data Binding Objects and Metadata Files (continued)
One additional metadata file is META-INF/adfm.xml. This file is the registry for the data
controls and is only used at design time. The Data Controls panel uses the file to locate theDataControls.dcx file that appears in the data model project when data controls are
created manually (this does not apply to ADF BC data controls, which are created
automatically.) The adfm.xml file is deployed with the rest of the application but is ignored at
run time.

8/18/2019 D53979GC11_sg2.pdf
http://slidepdf.com/reader/full/d53979gc11sg2pdf 54/381Oracle Fusion Middleware 11g : Build Applications with ADF I 11 - 28
Copyright © 2009, Oracle. All rights reserved.
Binding Existing Components to Data
You can add data binding to existing components:1. Right-click the component and select Bind to ADF Control.
2. Select a data control object from the Bind to ADF Control
dialog box.
1 2
Binding Existing Components to DataIn the example, you have an existing button on the page, and when it is clicked you want
navigation to occur, so that the user can view more than just the first record that is returned by a
query. The easiest way to do this is to perform the following steps:
1. Right-click the button and select Bind to ADF Control.
2. In the Bind to ADF Control dialog box, perform the following steps:
- Expand the view object instance to which the form is bound.
- Expand the Operations node under that view.
- Select the Next operation and click OK.
Alternatively, you can edit the appropriate property in the Property Inspector (such as Label or
Value for a text item and ActionListener for a button.) You could type in the expression directly,
but for some properties you can click the arrow to the right of the property and select Expression
Builder from the context menu. You can then expand the ADF Bindings > bindings nodes to
have access to most of the available bindings.

8/18/2019 D53979GC11_sg2.pdf
http://slidepdf.com/reader/full/d53979gc11sg2pdf 55/381Oracle Fusion Middleware 11g : Build Applications with ADF I 11 - 29
Copyright © 2009, Oracle. All rights reserved.
Accessing Data Controls and Bindings
Programmatically
• Use methods in DCBindingContainer.
– Example of accessing an ADF BC application module:
–
– Example of getting an attribute from an iterator binding:
DCBindingContainer bc = getBindingContainer();MyAppModule myAM = (MyAppModule)bc.findDataControl("MyAppModuleDataControl").getDataProvider();//Now use myAM to call app module methods.
DCBindingContainer bc = getBindingContainer();
String empname = (String)bc.findIteratorBinding("empIter").getCurrentRow().getAttribute("EmpName");
BindingContainer bc =BindingContext.getCurrent().getCurrentBindingsEntry();
• Access binding container with convenience API:
Accessing Data Controls ProgrammaticallyYou may need to add code to your JSF managed bean or ADF Controller action to access data or
methods from your data source. In general it is a better practice to write methods on your data
source and expose them in the Data Controls panel, but sometimes that might not be possible.
The first example in the slide shows code that accesses the data control to get a handle to its
application module.
The second example in the slide shows some sample code that gets an attribute value from an
iterator binding. You might need to do this, for example, from a backing bean.
One of the more common requirements in backing bean code is to access the current ADF
binding container. A convenience API in JDeveloper enables you to access the binding containeras in the code shown in the third example in the slide.

8/18/2019 D53979GC11_sg2.pdf
http://slidepdf.com/reader/full/d53979gc11sg2pdf 56/381Oracle Fusion Middleware 11g : Build Applications with ADF I 11 - 30
Copyright © 2009, Oracle. All rights reserved.
Running and Testing the Page
1. Run the page.
2. Test the functionality.
21
Running and Testing the PageTo test the page, run it either from the task flow diagram or from the page itself. To run the
page, right-click it in the editor and select Run. To run as part of task flow, right-click the view
in the task flow and select Run.
To make testing quicker, you can retest the page without rerunning it if the page definition (data binding information) has not changed. To do so, remove the parameters (everything from ? to
the end) from the URL in the browser and reload the page. You can also retest it by clicking the
link that displays in the log window. Make sure to recompile and save any changes before
retesting.
Then test the functionality. The example in the slide depicts a default ADF Search Form. To testthe functionality, you must click Find to put the form into Find mode. Enter one or more query
criteria, and then click Execute to retrieve the queried data.
You may notice that additional components are needed to improve functionality. In the example
in the slide, there is no way to see more than one record, so you would need to add navigation
buttons to the form.

8/18/2019 D53979GC11_sg2.pdf
http://slidepdf.com/reader/full/d53979gc11sg2pdf 57/381Oracle Fusion Middleware 11g : Build Applications with ADF I 11 - 31
Copyright © 2009, Oracle. All rights reserved.
Summary
In this lesson, you should have learned how to:
• Create a JSF page
• Add ADF Faces UI components to a page
• Include databound components on a page
• Create and edit data bindings

8/18/2019 D53979GC11_sg2.pdf
http://slidepdf.com/reader/full/d53979gc11sg2pdf 58/381Oracle Fusion Middleware 11g : Build Applications with ADF I 11 - 32
Copyright © 2009, Oracle. All rights reserved.
Practice 11 Overview:
Creating Databound Pages
This practice covers the following topics:
• Creating simple JSF pages
• Creating and editing data bindings
• Examining metadata files
• Changing the file name of a JSP
• Editing metadata files to maintain data binding
Practice 11 Overview: Creating Databound PagesIn this set of practices, you create a databound JSF page. You then examine the data bindings
and manipulate the data binding files.

8/18/2019 D53979GC11_sg2.pdf
http://slidepdf.com/reader/full/d53979gc11sg2pdf 59/381
Copyright © 2009, Oracle. All rights reserved.
Planning the User Interface

8/18/2019 D53979GC11_sg2.pdf
http://slidepdf.com/reader/full/d53979gc11sg2pdf 60/381Oracle Fusion Middleware 11g : Build Applications with ADF I 12 - 2
Copyright © 2009, Oracle. All rights reserved.
Objectives
After completing this lesson, you should be able to do the
following:
• Describe the Model-View-Controller design pattern
• Explain the role of the ADF Controller
• Differentiate between bounded and unbounded task flows
• Create task flows
• Define control flows
• Define global navigation• Create routers for conditional navigation
• Call methods and other task flows
• Convert task flows
• Use validation in the user interface
Lesson AimThe user interface of a Web application usually comprises multiple pages. In this lesson, you
learn how to use the ADF Controller to manage page navigation and task flow.

8/18/2019 D53979GC11_sg2.pdf
http://slidepdf.com/reader/full/d53979gc11sg2pdf 61/381Oracle Fusion Middleware 11g : Build Applications with ADF I 12 - 3
Copyright © 2009, Oracle. All rights reserved.
Describing the Model-View-Controller (MVC)
Design Pattern
Business Services
Rich Clients Web and Mobile
Model
Controller
BusinessServices
Model
Controller
View
The Model-View-Controller Design PatternA good practice when developing applications is to employ design patterns. Design patterns are
a convenient way of reusing object-oriented concepts between applications and developers. The
idea behind design patterns is simple: document and catalog common behavior patterns between
objects. Developers can then make use of these patterns rather than re-create them. One of the
frequently used design patterns is the Model-View-Controller (MVC) pattern.
In the MVC pattern, the user input, the business logic, and the visual feedback to the user are
explicitly separated and handled by three types of objects. Each of these objects is specialized
for a particular role in the application:
• The model manages the data of the application domain, responds to requests for
information about its state (usually from the view), and responds to instructions to change
state (usually from the controller).
• The view manages the presentation of the application output to the user.
• The controller interprets the mouse and keyboard inputs from the user, commanding the
model and/or the view to change as appropriate.

8/18/2019 D53979GC11_sg2.pdf
http://slidepdf.com/reader/full/d53979gc11sg2pdf 62/381Oracle Fusion Middleware 11g : Build Applications with ADF I 12 - 4
Copyright © 2009, Oracle. All rights reserved.
Technology Choices for Fusion Applications
BusinessServices
DataServices
Model
Controller
View
ADF Bindings
JSF
Desktop Browser-based
Struts JSF/ADF Task Flow
ADF Swing JSP
TopLink
EJB BAM ADFbc PortletsBI EssbaseBPEL WebServices
Java
ADF Faces
XML Data Legacy DataRelational Data Packaged Apps
Office
Implementing MVC with the ADF FrameworkDevelopers often use architectural frameworks to build applications that perform in a standard
way. ADF is such a framework, and it implements the MVC design pattern as follows:
• Data Services: Can be any data source
• Business Services: The back-end data model that interacts with the data source. It may be
a set of Java classes or Web services, or can be Enterprise JavaBeans (EJBs), TopLink, or
ADF Business Components. This course teaches you to use ADF Business Components as
a back-end data model.
• Model: ADF data binding utilizes a data binding and data access facility for Java EE that
provides a standard for interactions between UI components and methods available on the
business services. With this standard data binding, any Java UI rendering technology candeclaratively bind to any business service.
• View: The user interface can be a rich client with ADF Swing components, or as in this
course, can use Java ServerFaces and ADF Faces components.
• Controller: Page flow and UI input processing can be implemented in Struts, JSF, or ADF
Controller. This course uses the ADF Controller.
The earlier lessons in this course deal mainly with how to build back-end business services. The
remainder of this course explains how to build the front-end user interface (view) and flow
control (controller), and how to bind UI components to business services (model).

8/18/2019 D53979GC11_sg2.pdf
http://slidepdf.com/reader/full/d53979gc11sg2pdf 63/381Oracle Fusion Middleware 11g : Build Applications with ADF I 12 - 5
Copyright © 2009, Oracle. All rights reserved.
Characteristics of ADF Task Flows
ADF task flows are logical units of page flows that:
• Offer advantages over JSF page flows:
– Application can be broken into series of tasks
– Can contain nodes other than pages
– Can navigate between activities other than pages
– Reusable
– Shared memory scope
• Can be either unbounded or bounded
Characteristics of ADF Task FlowsIn the lesson titled “Understanding UI Technologies,” you learned that the ADF Controller
enhances the JSF navigation model by providing the concept of task flows.
ADF task flows provide a modular approach for defining control flow in an application. Instead
of representing an application as a single large JSF page flow, you can break it up into a
collection of reusable task flows. In each task flow, you identify application activities, the work
units that must be performed in order for the application to complete. An activity represents a
piece of work that can be performed when running the task flow.
The ADF task flow offers the following advantages over standard JSF page flows:
• The application can be broken into a series of tasks, instead of having to represent theapplication in a single page flow.
• You can use activities other than pages in a task flow.
• You can navigate between activities, not just pages.
• Task flows are modular and reusable within an application or in different applications.
• Shared memory scope enables data to be passed between activities within the task flow.
The ADF controller supports two types of task flows:
• Unbounded task flows
• ADF bounded task flows

8/18/2019 D53979GC11_sg2.pdf
http://slidepdf.com/reader/full/d53979gc11sg2pdf 64/381Oracle Fusion Middleware 11g : Build Applications with ADF I 12 - 6
Copyright © 2009, Oracle. All rights reserved.
Characteristics of Unbounded ADF Task Flows
Unbounded ADF task flows often serve as the entry point to an
application, and have the following characteristics:
• First entry on task flow stack—the outermost task flow
• No well-defined boundary or single point of entry: use an
unbounded task flow if your application has multiple points
of entry
• Can be used to define the “top level” flow of an application
• Bookmarkable pages
Characteristics of Unbounded ADF Task FlowsAlthough there can be many bounded task flows in an application, there can be only oneunbounded task flow, which is assembled at run time by combining one or more adfc-config.xml files. The set of files that is combined to produce the ADF unbounded task flow
is referred to as the application’s bootstrap ADFc configuration files.
The ADF unbounded task flow represents the outermost task flow of an ADF application. The
application’s entry point can be a view within the ADF unbounded task flow.
As a user navigates within an application, a task flow stack is maintained to keep track of the
calls from task flow to task flow. An ADF unbounded task flow always logically exists as the
first entry on the task flow stack, but would simply be empty if no unbounded task flow isdefined.
An unbounded task flow does not contain the well-defined boundary or single entry point of a
bounded task flow. You should use an unbounded task flow if your application has multiple
points of entry. For example, an end user might enter an application through two different Home
pages.

8/18/2019 D53979GC11_sg2.pdf
http://slidepdf.com/reader/full/d53979gc11sg2pdf 65/381Oracle Fusion Middleware 11g : Build Applications with ADF I 12 - 7
Copyright © 2009, Oracle. All rights reserved.
Working with Unbounded Task Flows
• Unbounded task flow source file isadfc-config.xml
.
• Editor contains four tabs to show different views:
– Diagram
– Source
– Overview
– History
• You can easily test task flow functionality in the unbounded
task flow, and convert to bounded when functioning
correctly.
Working with Unbounded Task FlowsBy default, adfc-config.xml is the XML configuration file for an ADF unbounded task
flow. You can double-click this file in the Application Navigator to open it in the editor.
There are four tabs at the bottom of the editor that enable you to see different views of the
source file for the task flow, all of which remain coordinated as you edit them:
• Diagram: A visual view that enables you to drag source elements, components, or diagram
notations from the Component Palette to define the task flow
• Source: The XML source code, which you can edit directly
• Overview: Contains different panels that enable you to configure the task flow
• History: A history of changes
A common way of working is to initially create pages and navigation in the unbounded task
flow, because that enables you to easily test them in one location. When they are functioning
correctly, you can convert portions of the unbounded task flow to a bounded task flow if needed.
A typical application is a combination of an unbounded and one or more bounded task flows.
Every Fusion Web application contains an unbounded task flow, even if the unbounded task
flow is empty. The application can call bounded task flows from activities in the unbounded one.

8/18/2019 D53979GC11_sg2.pdf
http://slidepdf.com/reader/full/d53979gc11sg2pdf 66/381Oracle Fusion Middleware 11g : Build Applications with ADF I 12 - 8
Copyright © 2009, Oracle. All rights reserved.
Characteristics of Bounded Task Flows
Bounded task flows:• Are modular blocks of task flow functionality for reuse, with
the following characteristics:
– Single point of entry
– Well-defined boundary
– pageFlow Memory scope
– Declarative transactionmanagement
– Declarative Back button support
• Consist of:
– Activities
— View
— Router
– Control flows between activities
– Ability to accept input parametersand to return values
– On-demand metadata loading
– Fragment reuse through task flowtemplates
– Addressable
Characteristics of Bounded Task FlowsAlthough there can be only one unbounded task flow in an application, there can be many
bounded task flows. You can think of a bounded task flow as a process because it defines a
modular block of task flow functionality for reuse. It is the only type of task flow that can be
used as a region on a page.
Bounded task flows have the following characteristics:
• Single entry point and zero or more well-defined exit points
• Well-defined boundary with a transaction beginning and end. It consists of its own set of
private control flow rules, activities and managed beans.• Memory scope (pageFlow scope)variables for passing data between activities within
the ADF bounded task flow, with a lifespan that is longer than request, but shorter than
session scope
• Declarative support for transaction management
- Ability to begin a new transaction upon ADF bounded task flow entry
- Ability to commit or roll back upon ADF bounded task flow exit

8/18/2019 D53979GC11_sg2.pdf
http://slidepdf.com/reader/full/d53979gc11sg2pdf 67/381Oracle Fusion Middleware 11g : Build Applications with ADF I 12 - 9
Characteristics of Bounded Task Flows (continued)
• Declarative support for Back button navigation
• Ability to pass input parameters from the ADF bounded task flow caller to store within thepageFlow scope
• Ability to return values back to ADF bounded task flow caller upon exit
• Metadata only loaded on-demand
• ADF bounded task flow fragment reuse through task flow templates• Addressable, in that when you invoke an ADF bounded task flow, you must specify an
identifier and the name of the XML document that contains the identifier
Bounded task flows consist of a group of activities and control flows between the activities that
enable a user to complete a task. There are different types of task flow activities, including the
following:
• View activity: Displays a page or page fragment. For Fusion applications, all pages are
contained in the unbounded task flow, so any view activities in bounded task flows should
be page fragments.
• Router activity: Evaluates a declarative expression to produce a control flow outcome
• Method call activity: Invokes application logic (Java method) from within task flow
• Task flow call activity: Calls an ADF bounded task flow
• Task flow return activity: Defines an exit point of the task flow
• Save point restore activity: Restores an application that supports save for later
functionality. This is explained in the lesson titled “Implementing Transactional
Capabilities.”
• URL view activity: Redirects the view port to any URL addressable resource

8/18/2019 D53979GC11_sg2.pdf
http://slidepdf.com/reader/full/d53979gc11sg2pdf 68/381Oracle Fusion Middleware 11g : Build Applications with ADF I 12 - 10
Copyright © 2009, Oracle. All rights reserved.
Comparing Unbounded
and Bounded Task Flows
Not bookmarkableCan be bookmarked
Must be called to be invokedCannot be called
Declarative transaction
management, save for later
Cannot manage transactions or save for later
Can be secured separately from pagesNot securable on its own; uses page security
Can accept parameters and return valuesDoes not accept parameters
Cannot be used as a region on a page
No well-defined boundary or single point of entry
First entry on task flow stack
Unbounded:
Added to task flow stack when called
Use as region on page with page fragments
Single point of entry, with zero or more exit
points
Bounded:
Comparison of Unbounded and Bounded Task FlowsUnbounded task flow: A set of activities, control flow rules, and managed beans interacting to
allow a user to complete a task. An unbounded task flow consists of all activities and control
flows in an application that are not included within any bounded task flow.
Bounded task flow: A specialized form of task flow, having a single entry point and one or
more exit points. It contains its own set of private control flow rules, activities and managed
beans. An ADF bounded task flow allows reuse, parameters, transaction management and
reentry. It can have zero to many exit points.

8/18/2019 D53979GC11_sg2.pdf
http://slidepdf.com/reader/full/d53979gc11sg2pdf 69/381Oracle Fusion Middleware 11g : Build Applications with ADF I 12 - 11
Copyright © 2009, Oracle. All rights reserved.
Bounded and Unbounded
ADF Task Flows: Example
The unbounded task
flow for a shoppingapplication
The bounded CheckoutFlow
task flow
Bounded and Unbounded ADF Task Flows: ExampleThe example in the slide shows:
• An unbounded task flow that consists of two pages; there is no entry or exit point in this
task flow. It defines the “top level” flow.
• The CheckoutFlow bounded task flow, which is a train with a single entry and two exit
points. It also includes a global control flow rule.
A typical application is a combination of an unbounded and one or more bounded task flows.
The application can then call bounded task flows from activities within the unbounded task flow.
You can include bounded task flows in a top-level (unbounded) task flow diagram. This has
various advantages over putting everything in one diagram:
• It breaks the diagram into modules and makes it more readable.
• The individual modules (bounded task flows) make it easier for multiple developers to
work on pieces of the application.
• Bounded task flows can be reused by other application developers.

8/18/2019 D53979GC11_sg2.pdf
http://slidepdf.com/reader/full/d53979gc11sg2pdf 70/381Oracle Fusion Middleware 11g : Build Applications with ADF I 12 - 12
Copyright © 2009, Oracle. All rights reserved.
Creating an Unbounded Task Flow
You can create an unbounded task flow by:
• Adding task flow components to adfc-config.xml
• Using the New Gallery
• Converting a bounded task flow
Creating an Unbounded Task FlowDepending on standards in use at your organization, you may never need to create a newunbounded task flow. You may place all unbounded task flow components in the adfc-config.xml file and use that single unbounded task flow for the application.
If you do need to create a new unbounded task flow, you can use the New Gallery (Web Tier >
JSF > ADF Task Flow.) In the Create ADF Task Flow dialog box, you perform the following:
• Give the task flow a name and location.
• Deselect the Create as Bounded Task Flow check box. Note that when you do this, thedefault name, if you have not already changed it, changes to a variation of adfc-config.xml.
A third option, discussed shortly, is converting a bounded task flow to an unbounded one.

8/18/2019 D53979GC11_sg2.pdf
http://slidepdf.com/reader/full/d53979gc11sg2pdf 71/381Oracle Fusion Middleware 11g : Build Applications with ADF I 12 - 13
Copyright © 2009, Oracle. All rights reserved.
Creating a Bounded Task Flow
You can create a bounded task flow by doing one of the
following:1. Using the New Gallery
OR
2. Extracting part of an
existing task flow
2
1
Creating a Bounded Task FlowTo create a new task flow that is bounded, you can invoke the New Gallery and select Web Tier
> JSF > ADF Task Flow. In the Create ADF Task Flow dialog box, you perform the following:
• Give the task flow a name, location, and unique ID.
• Select the Create as Bounded Task Flow check box.
• Indicate whether to create it with page fragments. If you want to use page fragments
(discussed in the lesson titled “Ensuring Reusability”) you need to be aware that you
cannot run a page fragment by itself. You may initially create the bounded task flow with
pages and convert it to page fragments after testing of the task flow is complete.
• Indicate whether to create the task flow as a train, which is a progression of related pages
guiding the end user through a series of steps. Each step in a train contains a UI componentshowing the user’s progress and enabling them to return to earlier steps.
• Indicate whether to use a template and whether to update the task flow when the template
changes.
Another way to create a bounded task flow is to extract part of an existing task flow into its own
bounded task flow. To do this, click the task flow diagram and drag out an area to surround the
activities that you want to include in the separate task flow. Then right-click one of the activities
and select Extract Task Flow from the context menu.

8/18/2019 D53979GC11_sg2.pdf
http://slidepdf.com/reader/full/d53979gc11sg2pdf 72/381Oracle Fusion Middleware 11g : Build Applications with ADF I 12 - 14
Copyright © 2009, Oracle. All rights reserved.
Converting Task Flows
You can convert task flows:
• Unbounded to bounded • Bounded to unbounded
Converting Task FlowsJDeveloper makes it easy to convert unbounded task flows to bounded ones, and vice versa. You
right-click in the task flow diagram and select the Convert to <Bounded/Unbounded> Task Flow
option.
When you convert an unbounded task flow to a bounded one, you must identify the default
activity for the bounded task flow. When you convert a bounded task flow, if it uses page
fragments (discussed in the lesson titled “Ensuring Reusability”), then the fragments are
converted to pages.

8/18/2019 D53979GC11_sg2.pdf
http://slidepdf.com/reader/full/d53979gc11sg2pdf 73/381Oracle Fusion Middleware 11g : Build Applications with ADF I 12 - 15
Copyright © 2009, Oracle. All rights reserved.
Using a Bounded Task Flow
Using a bounded task
flow in a region on a
page
Using a Bounded Task FlowA bounded task flow can be incorporated in an application in various ways:
• As a set of pages and other activities in a larger application flow
• As a region, providing navigation between page fragments in a single containing page
• Within a modal dialog box, launched from a page
You can declaratively manage the transaction of a task flow by specifying whether a bounded
task flow starts a new transaction or inherits an existing transaction.
You learn more about regions, page fragments, and transaction control in later lessons.

8/18/2019 D53979GC11_sg2.pdf
http://slidepdf.com/reader/full/d53979gc11sg2pdf 74/381Oracle Fusion Middleware 11g : Build Applications with ADF I 12 - 16
Copyright © 2009, Oracle. All rights reserved.
Using ADF Task Flow Components
2 31
Using ADF Task Flow ComponentsADF task flow components are divided into three categories in the Component Palette. You can
access them by expanding the corresponding categories:
1. Source Elements (you would not normally use most of these, because it is easier to create
them by dragging component elements or by setting properties):
- ADF Task Flow
- bookmark: Identifies a view activity as bookmarkable, so that a user can create a
bookmark for it, saving the URL for the page as a bookmark
- control-flow-case: Defines a possible control flow originating from the view
- control-flow-rule: Identifies how control passes from one activity to the next
- data-control-scope: Enables sharing data control instances between task flows- default-activity: The starting activity of a bounded task flow
- description: Provides a long description of the task flow that is displayed during
design time
- display-name: Provides a short description of the task flow that is displayed during
design time
- exception-handler: Identifies the activity as the exception handler for the task flow
- finalizer: Specifies code to be invoked when exiting a bounded task flow through a
return activity or an exception

8/18/2019 D53979GC11_sg2.pdf
http://slidepdf.com/reader/full/d53979gc11sg2pdf 75/381Oracle Fusion Middleware 11g : Build Applications with ADF I 12 - 17
Using ADF Task Flow Components (continued)
- from-action: Limits the application of a control flow rule to outcomes from the
specified action method
- from-activity-id: Identifies the activity where a control flow rule originates
- from-outcome: Specifies an outcome value on a control flow case that is matched
against a value specified in the action attribute of a UI component.
- icon: Specifies the path and file name for an icon to be displayed for the activityduring design time
- initializer: Specifies code to be invoked immediately when entering an ADF
bounded task flow
- input-parameter: Specifies the name of an input parameter on the bounded task
flow
- input-parameter-definition: Specifies the values for an input parameter on the
bounded task flow
- large-icon: Specifies the path and file name for a large icon to be displayed for the
activity during design time
- list-entries: Defines the values in a list- managed-bean: Registers a bean to be managed by the configuration of the task flow
- managed-bean-name: Specifies the logical name of a managed bean
- managed-bean-scope: Specifies the memory scope in which a managed bean is
stored
- managed-property: Specifies a managed bean property
- map-entries: Defines the values in a map
- map-entry: Defines a key-value pair that comprises an entry in a map
- method-call: Specifies a call to a Method Call activity to invoke application logic
- outcome: Specifies a value to be returned by the router activity if its corresponding
expression evaluates to true- return-value: Specifies how values are passed back from a called task flow
definition to the calling bounded or unbounded task flow
- return-value-definition: Specifies where a calling task flow can obtain return values
when a called task flow definition is exited
- router: Specifies an activity to evaluate declarative case logic at run time and route
control based on logic specified in an EL expression
- save-point-restore: Used to restore a previous persistent save point in an application,
supporting save for later functionality
- security: Specifies a permission for an ADF bounded task flow
- small-icon: Specifies a small icon to be displayed for an activity or ADF task flow at
design time
- task-flow-call: Used to call an ADF bounded task flow
- task-flow-definition: Specifies properties for a task flow definition
- task-flow-reentry: Used to set the default behavior when an ADF bounded task flow
is reentered via browser Back button navigation
- task-flow-return: Indicates the return from a called bounded task flow
- task-flow-template: Indicates that the task flow is to be used as a template

8/18/2019 D53979GC11_sg2.pdf
http://slidepdf.com/reader/full/d53979gc11sg2pdf 76/381Oracle Fusion Middleware 11g : Build Applications with ADF I 12 - 18
Using ADF Task Flow Components (continued)
- template-reference: Identifies the ADF task flow template on which a bounded task
flow or another task flow template is based
- to-activity-id: Specifies the activity to navigate to as a result of a control flow case
- train-stop: Specifies that the activity is one of a sequence of defined steps
- transaction: Specifies whether a called ADF bounded task flow should join an
existing transaction, create a new one, or create a new one only if there is no existing
transaction
- url-view: Used to redirect the root view port (for example, a browser page) to any
URL addressable resource
- view: Used to display a JSF page or page fragment (page fragments are explained in
the lesson titled “Ensuring Reusability”)
2. Components:
- Activities:
- Method Call: Invokes a Java method from within a task flow
- Router: Performs conditional routing depending on the outcome of an expression
- Save Point Restore: Enables restoration of a previous persistent save point in an
application that supports save for later functionality (This functionality is described in the
lesson titled “Implementing Transactional Capabilities.”)
- Task Flow Call: Invokes another task flow
- URL View: Redirects the root view port, such as a browser page, to any URL-
addressable resource
- View: Displays a page or page fragment (Page fragments are explained in the lesson
titled “Ensuring Reusability.”)
- Control Flow:
- Control flow case: Identifies how control passes from one activity to another
- Wildcard control flow rule: Global navigation rule
3. Diagram Annotations:- Note: Adds a note to the task flow diagram.
- Note Attachment: Attaches an exiting note to an activity or control flow case in the
diagram
To get more complete descriptions of any of these elements, right-click the component in the
Component Palette and select Help from the context menu.

8/18/2019 D53979GC11_sg2.pdf
http://slidepdf.com/reader/full/d53979gc11sg2pdf 77/381Oracle Fusion Middleware 11g : Build Applications with ADF I 12 - 19
Copyright © 2009, Oracle. All rights reserved.
Defining ADF Control Flow Rules
ADF control flow rules:• Define flow through activities, such as views (pages)
• Are stored in task flow configuration files
• Can be defined by using:
– The visual editor (Navigation Modeler)
– The .xml console (Configuration Editor)
– The .xml file directly
– The Structure window• Are invoked by:
– Command components (button, link)
– Tabs or breadcrumbs
– Trains
Defining ADF Control Flow RulesThe overall navigation through a JSF application uses a set of rules for choosing the next page to
display when, for example, the user clicks a button or link. To define the navigation for your
application, you need to define the control flow rules themselves, then include on the pages the
controls that a user can interact with to navigate to another place in the application at run time.
ADF Faces components that can be used to implement navigation features on pages include:
• Buttons and links, which users click to navigate to another place in the application
• Components such as tabs and breadcrumbs
• Train components for walking users through sequential steps of a process
Control flow rule definitions are stored in configuration files (adfc-config.xml or a similar.xml file). You can define the rules directly in the .xml configuration file, or you can use the
Navigation Modeler and the Configuration Editor, which offer the following advantages:
• Provide a GUI environment for modeling and editing the navigation between pages
• Enable you to map out your application navigation using a visual diagram
• Update the configuration file for you automatically
Use the Navigation Modeler to initially create control flow rules; use the Configuration Editor to
create global or pattern-based rules for multiple pages, create default navigation cases, and edit
control flow rules. These tools, along with the Structure window, are explained further in
subsequent slides.

8/18/2019 D53979GC11_sg2.pdf
http://slidepdf.com/reader/full/d53979gc11sg2pdf 78/381Oracle Fusion Middleware 11g : Build Applications with ADF I 12 - 20
Copyright © 2009, Oracle. All rights reserved.
Example of ADF Control Flow Rules
<af:commandButton
text="Show Items"
action="showDetail"/>
<af:commandButton
text= "Return to Orders"
action="showOrders"/>
browseOrders Page:
orderDetail Page:
Example of ADF Control Flow RulesAn example of an ADF unbounded task flow showing simple navigation:
<control-flow-rule><from-activity-id>browseOrders</from-activity-id><control-flow-case>
<from-outcome>showDetail</from-outcome><to-activity-id>orderDetail</to-activity-id>
</control-flow-case></control-flow-rule><control-flow-rule><from-activity-id>orderDetail</from-activity-id><control-flow-case>
<from-outcome>showOrders</from-outcome><to-activity-id>browseOrders</to-activity-id>
</control-flow-case></control-flow-rule>
A button on each page fragment invokes the appropriate action. For example, the Show Items
button on the browseOrders page fragment is defined as follows:
<af:commandButton text="Show Items" action="showDetail"/>

8/18/2019 D53979GC11_sg2.pdf
http://slidepdf.com/reader/full/d53979gc11sg2pdf 79/381Oracle Fusion Middleware 11g : Build Applications with ADF I 12 - 21
Copyright © 2009, Oracle. All rights reserved.
Using the Navigation Modeler
to Define Control Flow
2
1
43
Using the Navigation Modeler to Define Control FlowTo define a control flow rule by using the Navigation Modeler, perform the following steps:
1. Select Control Flow Case in the Component Palette (grouped under Components > Control
Flow).
2. Click the source activity (browseOrders in the example in the slide).
3. Click the destination activity (orderDetail in the example).
4. Enter a name for the control flow case.

8/18/2019 D53979GC11_sg2.pdf
http://slidepdf.com/reader/full/d53979gc11sg2pdf 80/381Oracle Fusion Middleware 11g : Build Applications with ADF I 12 - 22
Copyright © 2009, Oracle. All rights reserved.
Using the Configuration Editor
to Define Control Flow
Use from-actionto define dynamic
control flow.
Using the Configuration Editor to Define Control FlowThis console provides a visual way to edit all elements of the .xml configuration file, as
opposed to just a navigation model. It is especially useful for creating global or pattern-based
rules for multiple pages, creating default navigation cases, and editing control flow rules. From
this console, you can edit or remove existing control flow cases or create new ones.
Defining Dynamic Control Flow
If you want the outcome of a control flow to be determined dynamically, you can bind it to amethod on a managed bean by setting its from-action in the Property Inspector to an
expression that evaluates to a managed bean method. The managed bean can execute some
application logic and, depending on the results, return an outcome. The returned outcomedetermines the control flow case that is implemented.
A from-action is an EL expression (such as
#{backing_OrderCreate.cancelButton_action}) that binds to the managed bean
method that should be executed to determine the from-outcome. You learn about EL
expressions in the lesson titled “Adding Functionality to Pages.”

8/18/2019 D53979GC11_sg2.pdf
http://slidepdf.com/reader/full/d53979gc11sg2pdf 81/381Oracle Fusion Middleware 11g : Build Applications with ADF I 12 - 23
Copyright © 2009, Oracle. All rights reserved.
Editing the.xml File to Define Control Flow
...<control-flow-rule>
<from-activity-id>browseOrders</from-activity-id>
<control-flow-case>
<from-outcome>showDetail</from-outcome>
<to-activity-id>orderDetail</to-activity-id>
</control-flow-case>
</control-flow-rule>
<control-flow-rule>
<from-activity-id>orderDetail</from-activity-id>
<control-flow-case><from-outcome>showOrders</from-outcome>
<to-activity-id>browseOrders</to-activity-id>
</control-flow-case>
</control-flow-rule>
...
Source code editor shows errors:
Editing the .xml File to Define Control FlowYou can click the Source tab in the editor to see the XML source. You also can edit the source
there.
Errors in XML syntax are underlined with a red squiggly line, and there is also a red box in the
right margin. You can see a description of the error when you hold the cursor over the box or
over the code that contains the error.
You would probably want to edit the XML directly only in certain cases. For example, you may
find that cutting, pasting, and editing blocks of code is easier for you than drawing and labeling
elements on the diagram.

8/18/2019 D53979GC11_sg2.pdf
http://slidepdf.com/reader/full/d53979gc11sg2pdf 82/381Oracle Fusion Middleware 11g : Build Applications with ADF I 12 - 24
Copyright © 2009, Oracle. All rights reserved.
Using the Structure Window
to Modify a Task Flow
Freeze /
Unfreeze
View
New
View
Using the Structure WindowThe Structure window offers a structural view of the data in the document currently selected in
the active window of those windows that participate in providing structure: the diagrams, the
navigators, the editors and viewers, and the Property Inspector.
The windows that participate in providing structure also follow selections made in the Structure
window. Double-clicking the node for a method in the Structure window, for instance, makes the
source editor the active view and takes you directly to the definition for that method.
You can open multiple instances of the Structure window, freezing the contents of any number
of them, to compare the structures of different files. You can also switch structure views without
changing editors.It is sometimes easier to select elements in the Structure window and either delete them or drag
other elements to them from the Component Palette. So you can use the Structure window not
only to view the structure of a document, but to modify it also. For example, the slide shows
dragging a control-flow-case tag from the Component Palette to the Structure window to create a
new control flow. You can also right-click an element in the Structure window and from the
context menu choose to surround it with another element or insert another element inside, before
or after it.

8/18/2019 D53979GC11_sg2.pdf
http://slidepdf.com/reader/full/d53979gc11sg2pdf 83/381Oracle Fusion Middleware 11g : Build Applications with ADF I 12 - 25
Copyright © 2009, Oracle. All rights reserved.
Using Wildcards to Define Global Navigation
To define a global (for all pages) control flow rule, drag a
wildcard control flow rule to the page:
Using Wildcards to Define Global NavigationMost control flow rules specify navigation from one activity to another. However, you can alsodefine global rules that affect all pages by setting the <from-activity-id> element to an
asterisk, so that the rule can be called from any page. You can create a global rule by dragging a
wildcard control flow rule element from the Component Palette, and then define the flow
outcomes for the wildcard rule.
The example in the slide shows a wildcard control flow rule that has from-outcome elements to
navigate to every page in the task flow. Because of this wildcard rule, any page in the task flow
can navigate to any other page. The source XML looks like this:<control-flow-rule>
<from-activity-id>*</from-activity-id><control-flow-case><from-outcome>shop</from-outcome><to-activity-id>ProductCatalog</to-activity-id>
</control-flow-case><control-flow-case><from-outcome>search</from-outcome><to-activity-id>ProductSearch</to-activity-id>
</control-flow-case>

8/18/2019 D53979GC11_sg2.pdf
http://slidepdf.com/reader/full/d53979gc11sg2pdf 84/381Oracle Fusion Middleware 11g : Build Applications with ADF I 12 - 26
Using Wildcards to Define Global Navigation (continued)
<control-flow-case><from-outcome>details</from-outcome><to-activity-id>ProductDetails</to-activity-id>
</control-flow-case><control-flow-case><from-outcome>cart</from-outcome><to-activity-id>DisplayShoppingCart</to-activity-id>
</control-flow-case><control-flow-case><from-outcome>add</from-outcome><to-activity-id>AddShoppingCart</to-activity-id>
</control-flow-case><control-flow-case><from-outcome>checkout</from-outcome><to-activity-id>CheckoutFlow</to-activity-id>
</control-flow-case>
</control-flow-rule>

8/18/2019 D53979GC11_sg2.pdf
http://slidepdf.com/reader/full/d53979gc11sg2pdf 85/381Oracle Fusion Middleware 11g : Build Applications with ADF I 12 - 27
Copyright © 2009, Oracle. All rights reserved.
Using Routers for Conditional Navigation
Router activities:• Use expressions
that evaluate to
true or false
• Define
from-outcomes
based on the
value of the expression
Using Routers for Conditional NavigationYou can use the router activity in a task flow to declaratively route control to activities based on
logic specified in an EL expression. As shown in the example in the slide, a router has multiple
control flows leading from it to different activities.
Each control flow can correspond to a different router case. Each router case contains the
following elements, which are used to choose the activity to which control is next routed.• Expression: An EL expression evaluating to either true or false, for example,
#{user.choice=="shop"}• Outcome: A value returned by the router activity if the EL expression evaluates to true,
for example, order. If the outcome matches a from-outcome on a control flow case,
control passes to the activity that the control flow case points to.
For example, suppose you want to base control flow on the content of an input text field on a
Start page. You could add an conditional expression for each router case. For each expression,you would specify an expected outcome, which in the example in the slide is order. If the
expression evaluates to true, control passes to the shopping-cart-action-flowactivity, based on the control flow case from-outcome. If the expression evaluates to false,
then the from-outcome is show. Control passes to a page corresponding to the cart-details activity.

8/18/2019 D53979GC11_sg2.pdf
http://slidepdf.com/reader/full/d53979gc11sg2pdf 86/381Oracle Fusion Middleware 11g : Build Applications with ADF I 12 - 28
Copyright © 2009, Oracle. All rights reserved.
Defining Router Activities
2
1
3
4
Defining Router ActivitiesTo define a control flow using the router activity, perform the following steps:
1. In the Component Palette, drag the router activity to the task flow diagram.
2. In the Property Inspector, enter an id. The id is an identifier that is used to reference the
router activity within the metadata, for example, chooseAction.
3. In the Property Inspector, enter a default outcome. This outcome is returned if none of thecases for the router activity evaluates to true, or if no cases are specified. The default
outcome should specify a case already defined for the router. If no case is specified for the
default outcome, an error occurs if the default outcome is returned.
4. In the case section of the Property Inspector, specify values for each of the router’s cases.
A case is a condition that, when evaluated to true, returns an outcome. For each case,you must enter:
- expression: An EL expression evaluating to true or false. The expression can
reference an input text field in the Start activity.
- outcome: Returned by the router activity when its corresponding expressionevaluates to true. You must account for each outcome with a matching control flow
case or a wildcard control flow rule in your task flow diagram.

8/18/2019 D53979GC11_sg2.pdf
http://slidepdf.com/reader/full/d53979gc11sg2pdf 87/381Oracle Fusion Middleware 11g : Build Applications with ADF I 12 - 29
Copyright © 2009, Oracle. All rights reserved.
Calling Methods and Other Task Flows
Task flow call
Method call
Calling Methods and Other Task FlowsIn addition to view and router activities, you can call methods and task flows from within a task
flow by using method call and task flow call activities. You can pass parameters to the called
activities, and control returns to the calling task flow when the called activity is completed.
The example in the slide shows part of a ShoppingFlow bounded task flow. It contains a task
flow call activity that calls another bounded task flow, CheckoutFlow. It also contains a
method call activity, commit, which calls a managed bean method to commit the transaction.
The slide shows the Common panel of the Property Inspector. Note that both the task flow and
the method call Property Inspectors also have a Parameters panel; you use this to define
parameters to pass to the task flow or method.

8/18/2019 D53979GC11_sg2.pdf
http://slidepdf.com/reader/full/d53979gc11sg2pdf 88/381Oracle Fusion Middleware 11g : Build Applications with ADF I 12 - 30
Copyright © 2009, Oracle. All rights reserved.
Defining a Task Flow Return Activity
When you return from a called task flow, the task flow return
activity specifies the outcome that is returned to the caller.
Calling task flow Task flow return activity
of called task flow
Defining a Task Flow Return ActivityWhen you define a task flow return activity, you need to specify the outcome that is returned to
the calling task flow. You can have only one outcome per task flow return. The calling flow
should have a control flow rule that corresponds to the outcome that you name in the task flow
return activity.
The example in the slide shows the task flow that calls the shopping cart flow. The shopping cart
flow has a return activity, depicted on the right side of the slide, whose outcome is defined ascheckout. The calling task flow has a control flow rule named checkout, so when the
called shopping cart flow is exited via the Checkout task flow return activity, navigation in the
calling task flow proceeds to the CheckoutFlow.

8/18/2019 D53979GC11_sg2.pdf
http://slidepdf.com/reader/full/d53979gc11sg2pdf 89/381Oracle Fusion Middleware 11g : Build Applications with ADF I 12 - 31
Copyright © 2009, Oracle. All rights reserved.
Making View Activities Bookmarkable
(or Redirecting)
• Saving a view activity as a bookmark is available only in
unbounded task flows.
• You can:
– Designate in Property Inspector at
design time
– Designate at run time with theViewBookmarkable() method
– Optionally specify:— URL parameters
— Method to invoke before view is rendered
– Use the redirect option for a view activity
instead of making it bookmarkable
Making View Activities BookmarkableYou can enable users to easily return to a view activity in an unbounded task flow by
designating the activity as bookmarkable. On the Bookmark tab of the Property Inspector, you
can set the bookmark property to true. You can optionally add parameters in the URL
Parameters section and can add an optional method binding in the converter field for a
parameter’s value. You can also optionally specify a method in the method field that the ADF
Controller should invoke before rendering the view. You could use this method to retrieve
additional information based on the parameter values.
Instead of making the view activity bookmarkable, you may choose to use the redirectoption to create a new browser URL for the view activity. You do this by setting the redirect property to true on the Common panel of the Property Inspector for the view activity.

8/18/2019 D53979GC11_sg2.pdf
http://slidepdf.com/reader/full/d53979gc11sg2pdf 90/381Oracle Fusion Middleware 11g : Build Applications with ADF I 12 - 32
Copyright © 2009, Oracle. All rights reserved.
Adding UI Code
Managed beans:
• Configured in adfc-config.xml or other task flow .xmlfile
• Plain Old Java Objects (POJOs), Lists and Maps
• Have no-argument constructor
• Lazy initialization by JavaServer Faces framework “as
needed”
Adding UI CodeYou can add UI code to the task flow by using managed beans. You learn how to code and
register managed beans in the lesson titled “Responding to Application Events.” However, a
brief mention of managed beans is included in this lesson on task flows because managed beans
are specific to task flows and are configured in the task flow’s XML file.
Managed beans are Java classes with a no-argument constructor that you register with theapplication in task flow .xml files. When the JSF application starts up, it parses these files and
makes the beans available to be referenced in EL expressions or Java code, enabling access to
the beans’ properties and methods.
Whenever a managed bean is referenced for the first time and it does not already exist, theManaged Bean Creation Facility instantiates the bean by calling the default constructor method
on the bean. If any properties are also declared, they are populated with the declared default
values.

8/18/2019 D53979GC11_sg2.pdf
http://slidepdf.com/reader/full/d53979gc11sg2pdf 91/381Oracle Fusion Middleware 11g : Build Applications with ADF I 12 - 33
Copyright © 2009, Oracle. All rights reserved.
Incorporating Validation into the User Interface
• ADF Faces provides the following types of validation:
– UI component attributes
– Default ADF Faces validators
– Custom ADF Faces validators
• Use ADF Faces validation to provide immediate feedback
to users, instead of waiting for commit.
• You should always define equivalent validation at the
business component level.
Incorporating Validation into the User InterfaceADF Faces provides the following types of validation:
• UI component attributes: ADF Faces input components have attributes that can be used
to validate data. For example you can set the required attribute on a component to
specify whether a value must be entered. When set to true, the component must have a
value.
• Default ADF Faces validators: The standard validators supplied by ADF Faces and the
JSF reference implementation provide common validation checks, such as validating date
ranges, and validating the length of entered data.
• Custom ADF Faces validators: You can create your own validators and then select them
to be used in conjunction with UI components.
You can use UI validation to provide immediate feedback and meaningful error messages to
users. However, UI validation should always have equivalent validation at the business services
layer, so that the same validation is applied when the model is exposed in other ways.

8/18/2019 D53979GC11_sg2.pdf
http://slidepdf.com/reader/full/d53979gc11sg2pdf 92/381Oracle Fusion Middleware 11g : Build Applications with ADF I 12 - 34
Copyright © 2009, Oracle. All rights reserved.
Describing the Course Application:
UI Functionality
1
2
3
4
5
Describing the Course Application: UI FunctionalityThe user interface consists of the following main functions:
1. A category tree, where users can click a category to display either subcategories (if the
clicked category is a root category) or related products
2. A product search, where users enter query criteria and search for matching products
3. A product detail page, where users can add the product to the cart
4. A shopping cart, where users can update quantities of items ordered, delete items from
their cart, or display details about a selected item
5. A checkout process, where users complete a multistep process to complete their order
There is also another tab that enables users to browse, update, delete, or create suppliers (not
pictured).

8/18/2019 D53979GC11_sg2.pdf
http://slidepdf.com/reader/full/d53979gc11sg2pdf 93/381Oracle Fusion Middleware 11g : Build Applications with ADF I 12 - 35
Copyright © 2009, Oracle. All rights reserved.
Summary
In this lesson, you should have learned how to:
• Describe the Model-View-Controller design pattern
• Explain the role of the ADF Controller
• Differentiate between bounded and unbounded task flows
• Create task flows
• Define control flows
• Define global navigation
• Create routers for conditional navigation
• Call methods and other task flows
• Convert task flows
• Use validation in the user interface

8/18/2019 D53979GC11_sg2.pdf
http://slidepdf.com/reader/full/d53979gc11sg2pdf 94/381Oracle Fusion Middleware 11g : Build Applications with ADF I 12 - 36
Copyright © 2009, Oracle. All rights reserved.
Practice 12 Overview:
Defining Task Flows
This practice covers the following topics:
• Building an unbounded task flow
• Creating a bounded task flow
• Defining control flow rules
• Adding routers, wildcards, and task flow calls
• Converting an unbounded task flow to a bounded task flow
Practice 12 Overview: Defining Task FlowsIn the practices for this lesson, you create both unbounded and bounded task flows, along with
various types of activities and control flows for each. You also extract part of an unbounded task
flow into its own flow, and convert an unbounded task flow to a bounded one.

8/18/2019 D53979GC11_sg2.pdf
http://slidepdf.com/reader/full/d53979gc11sg2pdf 95/381
Copyright © 2009, Oracle. All rights reserved.
Adding Functionality to Pages

8/18/2019 D53979GC11_sg2.pdf
http://slidepdf.com/reader/full/d53979gc11sg2pdf 96/381Oracle Fusion Middleware 11g : Build Applications with ADF I 13 - 2
Copyright © 2009, Oracle. All rights reserved.
Objectives
After completing this lesson, you should be able to do the
following:
• Internationalize the user interface
• Use component facets
• Enable users to:
– Select a value from a list
– Select a date from a calendar
• Display tabular data in tables• Display hierarchical data in trees
• Display text or media with icons and images
• Define search forms and display results
• Display data graphically
Lesson AimThis lesson teaches you to use advanced ADF Faces components to add functionality to Web
pages.

8/18/2019 D53979GC11_sg2.pdf
http://slidepdf.com/reader/full/d53979gc11sg2pdf 97/381Oracle Fusion Middleware 11g : Build Applications with ADF I 13 - 3
Copyright © 2009, Oracle. All rights reserved.
Internationalization
• Internationalization is the support for multiple locales.
• Localization is the process in which support for a specific
locale is added.
• ADF Faces components provide automatic translation (into
28 languages).
InternationalizationIf you want your application to be viewed by users in more than one country, you can configure
it to different locales so that it displays the correct language for the language setting of a user’s
browser. For example, if you know your application will be viewed in Germany, you can
localize your application so that when a user’s browser is set to use the German language, text
strings in the application will appear in German.
ADF Faces components provide automatic translation. The resource bundles used for the
components’ skin (which determines the look and feel as well as the text within it) are translated
into 28 languages. If a user sets the browser to use the German language, any text contained
within the components is automatically displayed in German.

8/18/2019 D53979GC11_sg2.pdf
http://slidepdf.com/reader/full/d53979gc11sg2pdf 98/381Oracle Fusion Middleware 11g : Build Applications with ADF I 13 - 4
Copyright © 2009, Oracle. All rights reserved.
Resource Bundles
• Resource bundles contain locale-specific strings used in
an application.• Translation strings can include parameters.
• You do not need to load the base resource bundle on each
page of your application.
str.browserTitle=StoreFront Beispielanwendungstr.about=Über dieses Beispielstr.copyright=\u00a9 Oracle Corp, 2007str.contact=Kontakt
UIResources_de.properties
str.browserTitle=StoreFront Sample Applicationstr.about=About this samplestr.copyright=\u00a9 Oracle Corp, 2007str.contact=Contact Us
UIResources.properties
Resource BundlesResource bundles contain the actual text that you have added to the application. You need to
create a version of the resource bundle for each locale where your application will be used, and
add a <locale-config> element to define default and support locales in the application’s
faces-config.xml file. You also need to add a <resource-bundle> element to your
application’s faces-config.xml file to make the resource bundles available to all the pages
in your application without using a <f:loadBundle> tag in every page. (With JSF1.2, you
don’t need to load the base resource bundle on each page of your application with the<f:loadBundle> tag).
After you have configured and registered a resource bundle, the Expression Language editor will
display the key from the bundle, making it easier to reference the bundle in application pages.
The first example in the slide shows part of the UIResources.properties file, which
displays some of the English-language entries for static text in the StoreFront application. Thesecond example shows the same file named UIResources_de.properties, but with the
browser set to use the German language.

8/18/2019 D53979GC11_sg2.pdf
http://slidepdf.com/reader/full/d53979gc11sg2pdf 99/381Oracle Fusion Middleware 11g : Build Applications with ADF I 13 - 5
Copyright © 2009, Oracle. All rights reserved.
Steps to Internationalize an Application
1. Create a base resource bundle containing all text strings
that are not part of the components themselves.
2. Create a localized resource bundle for each locale
supported by the application.
3. Register the locales with the application.
4. Use the resource bundle on your page.
CANCEL=CancelCANCEL=Annullieren
Part of
the
component
Steps to Internationalize an ApplicationTo internationalize your application, you need to do the following:
1. Create a base resource bundle that contains all the text strings that are not part of the
components themselves. This is a text file with a .properties extension that contains
key/value pairs: the key is the name of the text resource and the value is the translation.For example: CANCEL=CancelThis bundle should be in the default language of the application.
2. Create a localized version of the bundle for each locale supported by the application. You
can copy the resource bundle file to another file and append the file name with anunderscore and the language code, such as _de for German. For example, if the resource
bundle file name is StorefrontUIBundle.properties, you would name theGerman resource bundle StorefrontUIBundle_de.properties. Then translate
the values in the file. For example: CANCEL=Annullieren3. Register the locales with the application. You do this on the Application page of the
faces-config.xml. (Click the Overview tab at the foot of the faces-config.xmlfile, and then select Application from the list at the top left. You can specify a defaultlocale and add supported locales in the Locale Config area.)

8/18/2019 D53979GC11_sg2.pdf
http://slidepdf.com/reader/full/d53979gc11sg2pdf 100/381Oracle Fusion Middleware 11g : Build Applications with ADF I 13 - 6
Steps to Internationalize an Application (continued)
4. Use the bundle on your page.
a. Note that you need to set your page encoding to be a superset of all supported
languages. By default JDeveloper sets the page encoding to windows-1252. To set
the default to a different page encoding, perform the following steps:
1. Select Tools > Preferences.
2. Select Environment from the list at the left, if it is not already selected.
3. Set Encoding to the preferred default.
b. Bind all attributes that represent strings of static text on the page to the appropriatekey in the resource bundle, using the variable defined in the faces-config.xmlfile for the <resource-bundle> element.

8/18/2019 D53979GC11_sg2.pdf
http://slidepdf.com/reader/full/d53979gc11sg2pdf 101/381Oracle Fusion Middleware 11g : Build Applications with ADF I 13 - 7
Copyright © 2009, Oracle. All rights reserved.
Automatically Creating a Resource Bundle
Set project to create a resource bundle automatically:
Automatically Creating a Resource BundleYou can set project properties to create a resource bundle automatically, either one per project,
or one per file. There are three settings that help enforce the use of text resources by developers:
• Automatically Synchronize Bundle: Automatically creates text resources in the page's
resource bundle when editing UI components in the visual editor
• Warn About Hard-coded Translatable Strings: Displays a message when a UI
component that is being edited in the visual editor has an associated translatable string
• Always Prompt for Description: Displays a message prompting a text resource when
editing UI components in the visual editor

8/18/2019 D53979GC11_sg2.pdf
http://slidepdf.com/reader/full/d53979gc11sg2pdf 102/381Oracle Fusion Middleware 11g : Build Applications with ADF I 13 - 8
Copyright © 2009, Oracle. All rights reserved.
Automatically Creating a Text Resource
1
2
3
4
Automatically Creating a Text ResourceYou do not need to manually edit the resource bundle file to create a text resource (name–value
pair). The JDeveloper IDE provides a simpler way to do this.
1. In the Property Inspector, click the arrow to the right of the text attribute for which you
want to enter a text resource and choose Select Text Resource. The first time you do this,
the appropriate resource bundle file is created if it does not already exist.
2. In the Select Text Resource dialog box, you can either select an existing text resource or
create a new one: enter a Display Value (the text that should be displayed in the UI and
that is translatable), a key (defaults based on the Display Value, but you can change it), and
a Description (how the text resource is to be used). Then click Save and Select (or Select
when choosing an existing text resource).3. The UI reflects the string, whereas the property shows the EL expression that refers to the
text resource.
4. The text resource is added to the resource bundle.

8/18/2019 D53979GC11_sg2.pdf
http://slidepdf.com/reader/full/d53979gc11sg2pdf 103/381Oracle Fusion Middleware 11g : Build Applications with ADF I 13 - 9
Copyright © 2009, Oracle. All rights reserved.
Using Component Facets
Facets are:• Placeholders for subcomponents
• Similar to detail elements
• Used to specify subordinate elements such as toolbars,
headers, or footers
• Displayed with the component
Using FacetsWhen you begin to use components, you see in the Structure window that many of them contain
something called facets. A facet is a placeholder where a developer can add content.
For example, the af:showDetailItem component has a facet called toolbar. As the
name suggests, the facet is intended as a placeholder for a toolbar, although you could place any
content there.
In the example in the slide, the application developer has added a toolbar component with a
toolbarButton to the toolbar facet of showDetailItem and set the button’s text property value to “I’m a button on the toolbar facet!” At run time, that text is displayed at the
place designated for the toolbar facet on the showDetailItem component.It is important to note that a facet can have only one direct child. If the developer adds more buttons to the toolbar facet, they must be added to the direct child of the facet, which is the
toolbar component.

8/18/2019 D53979GC11_sg2.pdf
http://slidepdf.com/reader/full/d53979gc11sg2pdf 104/381Oracle Fusion Middleware 11g : Build Applications with ADF I 13 - 10
Copyright © 2009, Oracle. All rights reserved.
Using ADF Faces Rich Client Components
This lesson discusses the following types of components:
• Input components
– List components
– Dates
• Table and tree components
• Output components
• Query components
• Data visualization components
Using ADF Faces Rich Client ComponentsYou have already learned how to use a few basic ADF Faces components on a page. There are
over a hundred components from which to choose, many of which are discussed in this and later
lessons. You can obtain a demo of all the components at
http://www.oracle.com/technology/products/adf/adffaces/11/doc/demo/adf_faces_rc_demo.html.
These components may be categorized as follows:
• Input components: For accepting user input
• Table and tree components: For displaying structured data
• Output components: For displaying text, icons, and images, and for playing audio and
video clips on application pages
• Query components: For constructing search forms
• Data visualization components: For utilizing graphical and tabular capabilities for
analyzing data
• Navigation components: For implementing navigation features on pages (described in the
lesson titled “Implementing Navigation on Pages”)
• Layout components: Is described in the lesson titled “Achieving the Required Layout”

8/18/2019 D53979GC11_sg2.pdf
http://slidepdf.com/reader/full/d53979gc11sg2pdf 105/381Oracle Fusion Middleware 11g : Build Applications with ADF I 13 - 11
Copyright © 2009, Oracle. All rights reserved.
Using ADF Faces Input Components
Using ADF Faces Input ComponentsInput components accept user input in a variety of formats. The most common formats are text,
numbers, date, and selection lists. The entered values or selections may be validated and
converted before they are processed further. These values may be data that will eventually be
committed to a database or search criteria values in a search form that will be used to construct a
query statement.
ADF Faces input components provide a variety of UI devices for entering data, such as:• The basic input component for text is inputText.
• Numbers: They can be entered by using a number slider (inputNumberSlider), or a
number spinbox (inputNumberSpinbox), or for entering the endpoints of a range of
numbers, a horizontal or a vertical range slider (inputRangeSlider).
• Dates: Users can select the date from a calendar (chooseDate), and can have the date
entered into an input field (inputDate).
• Colors: Users can select the color from a color chooser (chooseColor), and can have
the color name entered into an input field (inputColor).
All input components (except af:selectItem) have a changed attribute that when set to
true (the default is false) would enable a change indicator icon to be displayed upon
changes in the Value field. This feature is an easy way to enable users to see which input values
have changed.

8/18/2019 D53979GC11_sg2.pdf
http://slidepdf.com/reader/full/d53979gc11sg2pdf 106/381Oracle Fusion Middleware 11g : Build Applications with ADF I 13 - 12
Using ADF Faces Input Components (continued)
• Selecting one or more values from lists: The selection features you can use include:- Select a value by using a check box (selectBooleanCheckbox ) or selecting a
option button (selectOneRadio or selectBooleanRadio).
- Select a single value from a list or menu (inputListOfValues or
selectOneChoice).
- Select from a list that includes a search and select dialog box(inputComboboxListOfValues).
- Select multiple values from a list or menu (selectManyCheckbox,
selectManyChoice, or selectManyListbox).
- Select multiple values from a list of values by shuttling values between two lists,adding and removing values from the target list (selectManyShuttle or
selectOrderShuttle).
• The ADF Faces Rich Text Editor component provides users with the ability to edit rich
text. Text formatting features supported include:
- Text and background colors
- Font name, size, and weight- Text decoration such as underline and strikethrough
- Ordered and unordered lists
- Text justification (left, right, center, or full)
- Undo and redo
- Link and unlink
- Clear styling
- Undo and redo
- Subscript and superscript• You can provide features for users to upload files (inputFile).
Input components are usually contained within a form or subform component. A form is a
component that serves as a container for other components. When you add input components,
you need to embed those components within a form structure. For example, if you add an
af:inputNumberSlider to a page, it must be enclosed or be a child component within an
af:form.
Within a form you can also add an af:subform, which represents a portion of the page that
can be independently submitted. The contents of a subform are validated (or otherwise
processed) only if a component inside the subform is responsible for submitting the page. This
allows for comparatively fine-grained control of which components will be validated and pushed
into the model without the compromises of using entirely separate form elements.Oracle recommends the use of a single <af:form> per page, along with using
<af:subform> instead of multiple forms. Multiple forms require multiple copies of page
state, and user edits in forms that aren’t submitted are always lost. When a page using subforms
is submitted, page state is only written once, and all user edits are preserved.
You can include a button to reset the content of all input items to their default values(af:esetButton).
To see descriptions of how to use these input components, you can hold the cursor over the
name of the component in the Component Palette.

8/18/2019 D53979GC11_sg2.pdf
http://slidepdf.com/reader/full/d53979gc11sg2pdf 107/381Oracle Fusion Middleware 11g : Build Applications with ADF I 13 - 13
Copyright © 2009, Oracle. All rights reserved.
Defining a List
You can define a list:
• At the model layer
• In the UI
Defining a ListYou can define a list in one of two ways:
• At the model layer: You can define Lists of Values (LOVs) on view object attributes
declaratively, including the ability to:
- Configure the display style (including both inline drop-down lists for shorter lists and
pop-up windows for longer lists)
- Filter the choices in the list based on user input
- Autofill the attribute value if user input identifies a unique match
- Automatically use other attribute values in the current row to parameterize
“cascading” lists
• In the UI, by binding a selection component to model data
When you define lists at the model layer, they appear in a consistent manner regardless of the
type of UI that you use. In addition, you can test them with the Business Components browser.
Because defining lists at the model layer is a best practice, that is the method discussed in this
lesson.

8/18/2019 D53979GC11_sg2.pdf
http://slidepdf.com/reader/full/d53979gc11sg2pdf 108/381Oracle Fusion Middleware 11g : Build Applications with ADF I 13 - 14
Copyright © 2009, Oracle. All rights reserved.
Defining Lists at the Model Layer
21
Defining Lists at the Model Layer For a consistent UI, it is preferable to specify and define lists in the model layer. You can do this
by performing the following steps:
1. Define a view accessor on the entity object to reference the data that composes the list.
(This is the same view accessor that would also be used by a Key Exists validator or a List
validator.)
2. For the view object attribute where you want to use the list for input, define List of Values
properties:
- Select the attribute on the Attribute tab of the view object.
- In the List of Values section of the Attribute tab, click Add.
- Under List Data Source, select the view accessor to use and the attribute whose valueis to be returned to this attribute.
- Under List Return Values, optionally add any other attribute values that you want to
return to the base view object.
- Click Edit List UI Hints to specify the list type and display options.
Changing the type of list defined in the model does not automatically change any list
components that already exist on pages. To change the type of list used for an existing
component on a page, you need to delete the component, change the list type that is defined in
the model, and drag the data element to the page again.

8/18/2019 D53979GC11_sg2.pdf
http://slidepdf.com/reader/full/d53979gc11sg2pdf 109/381Oracle Fusion Middleware 11g : Build Applications with ADF I 13 - 15
Copyright © 2009, Oracle. All rights reserved.
Selecting a Value from a List
Input select components:• Item: af:selectItem
• List of values: af:inputListOfValues,
af:selectOneListBox, af:selectManyListbox
• Combo Box: af:inputComboboxListOfValues
• Check Box: af:selectBooleanCheckbox,
af:selectManyCheckbox
• Menu: af:selectOneChoice, af:selectManyChoice
• Radio group: af:selectBooleanRadio
• Radio item: af:selectOneRadio
• Shuttles: af:selectManyShuttle,
af:selectOrderShuttle
Selecting a Value from a ListFor input fields where the set of allowable values is held in a managed bean or in your
application model, you can allow users to select the value they want from a provided list of
values. ADF Faces provides several selection components:
• The af:selectItem component represents a single item that the user may select from a
list, choice, option buttons, or shuttle ADF control.• The af:inputListOfValues component provides users with a search dialog box
from which they can select a value to enter. This component enables a user to select from a
large list of values to populate the LOV field (and possibly other fields) on a page. It is
typically used in situations where the list of values is too large to display in a drop-down
list. In addition to rendering an af:inputText component, theaf:inputListOfValues component also renders a Search icon. Clicking the icon
launches a Search and Select dialog box that enables the user to find an option that goes
into the LOV field on the base page.• The af:inputComboboxListOfValues component gives the user two different
ways to select an item to input: from a drop-down list, or by searching a list.

8/18/2019 D53979GC11_sg2.pdf
http://slidepdf.com/reader/full/d53979gc11sg2pdf 110/381Oracle Fusion Middleware 11g : Build Applications with ADF I 13 - 16
Copyright © 2009, Oracle. All rights reserved.
Selecting a Date
Date attributes are automatically created as af:inputDate
components:
<af:inputDate value="#{bindings.OrderDate.inputValue}"
label="#{bindings.OrderDate.label}"
required="#{bindings.OrderDate.mandatory}">
<af:convertDateTime pattern="#{bindings.OrderDate.format}"/>
</af:inputDate>
Selecting a DateAs with other components, you can create a calendar component by dragging from the
Component Palette or the Data Controls panel. However, when a default component is created
for a date attribute, it is automatically created as an af:inputDate component. This
component presents a text input field for entering dates and a button for picking dates from a
calendar. The default date format is the short date format appropriate for the current locale. Forexample, in U.S. English, the format is mm/dd/yy. However, you can override the format using
af:convertDateTime.
When you use the af:inputDate component, an af:convertDateTime subcomponent
is included. This subcomponent converts a String into java.util.Date, and vice versa,
based on the pattern and style set. For Oracle Fusion Applications development, when a dateattribute is dropped onto the UI, the <af:convertDateTime> attributes are automatically
set so that the date is formatted according to the user’s language preference.
You can set the following attributes on the af:inputDate component, either
programmatically or by using the Property Inspector: label: Specify a label for the component.
• chooseId: Specify the ID of the af: chooseDate component, which can be used to
pick the Date value for this af:inputDate.

8/18/2019 D53979GC11_sg2.pdf
http://slidepdf.com/reader/full/d53979gc11sg2pdf 111/381Oracle Fusion Middleware 11g : Build Applications with ADF I 13 - 17
Selecting a Date (continued)
• value: Specify the initial value of the component.
• minValue: Specify the minimum value allowed for the date value. When set to a fixed
value on a tag, this is parsed as an ISO 8601 date. ISO 8601 dates are of the formatyyyy-MM-dd (for example: 2002-02-15). All other uses require java.util.Dateobjects.
• maxValue: Specify the maximum value allowed for the date value. When set to a fixedvalue on a tag, this is parsed as an ISO 8601 date. ISO 8601 dates are of the formatyyyy-MM-dd (for example: 2002-02-15). All other uses require java.util.Dateobjects.
• disableDays Specify a binding to an implementation of the
org.apache.myfaces.trinidad.model.DateListProvider interface. The
getDateList method should generate a List of individual java.util.Dateobjects, which should be rendered as disabled. The dates must be in the context of the
given base calendar. Note: This binding requires periodic round-trips. If you just want to
disable certain weekdays (for example, Saturday and Sunday), use the
disabledDaysOfWeek attribute.• disableDaysOfWeek: Specify a space-delimited list of weekdays that should be
rendered as disabled in every week. The list should consist of one or more of the following
abbreviations: sun, mon, tue, wed, thu, fri, sat. By default all days are enabled.
• disableMonths: Specify a space-delimited list of months that should be rendered as
disabled in every year. The list should consist of one or more of the followingabbreviations: jan, feb, mar, apr, may, jun, jul, aug, sep, oct, nov, dec. By
default all months are enabled.
Note: ADF Faces pop-up components, such as dialogs, pop-up windows (af:popup), LOVs,
and calendar components, are not normal browser windows, but rather DHTML overlays thatcurrent pop-up blocker technology does not detect. They are, therefore, not affected by pop-up
blockers.

8/18/2019 D53979GC11_sg2.pdf
http://slidepdf.com/reader/full/d53979gc11sg2pdf 112/381Oracle Fusion Middleware 11g : Build Applications with ADF I 13 - 18
Copyright © 2009, Oracle. All rights reserved.
Using ADF Faces Table and Tree Components
Using ADF Faces Table and Tree ComponentsYou can easily add a databound table to a page by using the af:table component to display
structured data as a formatted table. This is done for you automatically when you drag a view
object instance from the Data Controls panel and choose to create it as an ADF table.
There are two additional types of components for displaying rows of data:• af:tree: Used to display hierarchical data; the nested levels of data are indented, and the
user can expand and collapse the nodes• af:treeTable: Combines the features of a table and a tree to present hierarchical data
with indenting in the same way as the af:tree component, but within a table, offering
the column heading, column banding and other features of a table. Table components
include a variety of features for presenting tables, such as grid lines, banding, and grouping
of columns with headers spanning several columns.

8/18/2019 D53979GC11_sg2.pdf
http://slidepdf.com/reader/full/d53979gc11sg2pdf 113/381Oracle Fusion Middleware 11g : Build Applications with ADF I 13 - 19
Copyright © 2009, Oracle. All rights reserved.
Using Tables
• ADF Faces table component adds to JSF table by
providing:Column sorting
and reordering
Data filtering
Row selection
(single or
multiple rows)
• There are many formatting options for ADF tables.
Using TablesThe ADF Faces table component af:table is similar to the standard JSF component but
provides additional features, including the ability to sort columns by clicking the column header,
filtering data, reordering columns, and selecting a single row or multiple rows.
Table attributes enable you to specify the look and feel of the table, whether users will be able to
select rows, or reorder columns, as well as identifying the data to be displayed.
The immediate children of a table component must all be column components, af:column.
Each visible column component is displayed as a separate column in the table. For sets of
columns that are related in some way, you can group them into column groups, with one heading
spanning several columns.Attributes of each column specify details of the column such as the alignment of values, whether
values are allowed to wrap within cells, and whether the column can be sorted, and if so, on
which property it is to be sorted. To specify the headers and footers for columns, header and
footer facets are available.
Within a column, both ADF Faces and standard JSF tags can be used for displaying the data.

8/18/2019 D53979GC11_sg2.pdf
http://slidepdf.com/reader/full/d53979gc11sg2pdf 114/381Oracle Fusion Middleware 11g : Build Applications with ADF I 13 - 20
Copyright © 2009, Oracle. All rights reserved.
Rendering (Stamping) the Table Data
Each child component of a column is stamped once per row, sono embedded stamped components:
<af:table var="row" value="#{myBean.allEmployees}"><af:column><af:outputText value="#{row.firstname}"/>
</af:column><af:column><af:outputText value="#{row.lastname}"/>
</af:column><af:table var="row" value="#{myBean.EmployeeManager}"><af:column>
<af:outputText value="#{row.firstname}"/></af:column><af:column><af:outputText value="#{row.lastname}"/>
</af:column></af:table>
</af:table>
Rendering (Stamping) the Table DataThe immediate children of an af:table component must all be af:column components.
Each visible af:column component creates a separate column in the table.
The child components of each column display the data for each row in that column. The column
does not create child components per row; instead, each child is repeatedly rendered (stamped)
once per row.
Because of this stamping behavior, some components many not work inside the table. Any
component that is pure output, with no behavior, will work without problems. ADF Faces input
components work properly. Components that themselves support stamping are not supported,
such as tables within a table.As each row is stamped, the data for the current row is copied into a property that can beaddressed using an EL expression. You specify the name to use for this property in the var property on the table. After the table has completed rendering, this property is removed or
reverted back to its previous value.
In the example in the slide, the data for each row is referenced by using the variable row, which
identifies the data to be displayed in the table. Each column displays the data for each row as
defined by a particular attribute.

8/18/2019 D53979GC11_sg2.pdf
http://slidepdf.com/reader/full/d53979gc11sg2pdf 115/381Oracle Fusion Middleware 11g : Build Applications with ADF I 13 - 21
Copyright © 2009, Oracle. All rights reserved.
Setting Table Attributes
start,end,left,
right, center
true or false
number or %
Align
nowrap
width, height
Align, wrap,
width, heightColumn
formatting
To group columns, nest af:column tags, using the
outer af:column tag as the group, and the inner tagsas the columns within the group.
Common label for
group of columns
Column groups
Column or row
headers
Banding
(table attribute)
Grid Lines
(table attribute)
Type
true or falseverticalGridVisible
horizontalGridVisible
Lines separating
cells
text to display in
header
true or false
header facet or headerText
attribute
rowHeader column attribute
Labels for
columns or rows
rowBandingIntervalcolumnBandingInterval
Attribute(s)
number of rows or
columns you want to
be in each band
Alternating
background
colors
Setting(s)Description
Setting Table AttributesThere are many attributes of the af:table component, a few of which are shown in the slide
and in the following examples:
• Grid lines:
<af:table verticalGridVisible="false" ...>• Banding:
<af:table columnBandingInterval="1" ...>• Column headers (one set with header facet and one set with the headerText
attribute):<af:table>
<af:column>...<f:facet name="header"><af:outputText value="First name"/>
</f:facet>. . .
</af:column><af:column headerText="Last name">
. . .</af:column>
</af:table>

8/18/2019 D53979GC11_sg2.pdf
http://slidepdf.com/reader/full/d53979gc11sg2pdf 116/381Oracle Fusion Middleware 11g : Build Applications with ADF I 13 - 22
Setting Table Attributes (continued)
• Row headers: The first column of a table can be rendered as a column of headers for the
table rows. To use row headers, include the data for the row header text as the first columnof the table and set the rowHeader attribute of the column to true.
• Column groups (shows two name columns grouped into a Name column group. The
individual columns retain their own column headers First and Last ):
<af:table var="row"><af:column headerText="Name">
<af:column headerText="First"><af:outputText value="#{row.col1}"/>
</af:column><af:column headerText="Last"><af:outputText value="#{row.col2}"/>
</af:column></af:column>
</af:table>

8/18/2019 D53979GC11_sg2.pdf
http://slidepdf.com/reader/full/d53979gc11sg2pdf 117/381Oracle Fusion Middleware 11g : Build Applications with ADF I 13 - 23
Copyright © 2009, Oracle. All rights reserved.
Using Trees
Using TreesThe ADF Faces tree component af:tree displays hierarchical data, such as organization
charts or hierarchical directory structures. In data of these types, there may be a series of top-
level nodes, and each element in the structure may expand to contain other elements. In the
shopping example shown in the slide, each element, that is, each category, in the hierarchy may
have any number of child elements (products). In addition, several parent elements may share
the same child elements.
The af:tree component supports multiple root elements. It displays the data in a form that
represents the structure, with each element indented to the appropriate level to indicate its level
in the hierarchy, and connected to its parent. Users can expand and collapse portions of the
hierarchy.

8/18/2019 D53979GC11_sg2.pdf
http://slidepdf.com/reader/full/d53979gc11sg2pdf 118/381Oracle Fusion Middleware 11g : Build Applications with ADF I 13 - 24
Copyright © 2009, Oracle. All rights reserved.
Using Tree Tables
Tree tables:• Display hierarchical data
in a table
• Combine features of
trees and tables
Using Tree TablesThe ADF Faces tree table component af:treeTable displays hierarchical data in the form of
a table. The display is more elaborate than the display of an af:tree component. The
af:treeTable component can display columns of data for each tree node in the hierarchy.
The component includes mechanisms for focusing in on subtrees within the main tree, as well as
expanding and collapsing elements in the hierarchy.
The immediate children of an af:treeTable component must be af:column components,
in the same way as for af:table components. The af:treeTable component has a
nodeStamp facet, which renders the object name column. This is the column that contains the
primary identifier of an element in the hierarchy. For example, in a hierarchy of products, the
object name column might be the category name or the product name.
The af:treeTable component supports the same vertical and horizontal grid lines and
banding as the table component.

8/18/2019 D53979GC11_sg2.pdf
http://slidepdf.com/reader/full/d53979gc11sg2pdf 119/381Oracle Fusion Middleware 11g : Build Applications with ADF I 13 - 25
Using Tree Tables (continued)
Both the af:tree and af:treeTable components render icons that the user can click to
expand or collapse a subtree. When the user clicks one of these icons, the component generates aRowDisclosureEvent (you learn more about events in the lesson titled “Responding to
Application Events”). The event has two RowKeySet objects: RemovedSet for all the
collapsed nodes and AddedSet for all the expanded nodes. The component expands the
subtrees under all nodes in the added set and collapses the subtrees under all nodes in theremoved set.
You can register custom RowDisclosureListener instances, which can do post
processing, on the tree component.
The af:tree and af:treeTable components use an instance of the
oracle.adf.view.rich.model.RowKeySet class to keep track of which elements are
expanded. This instance is stored as the disclosedRowKeys attribute on the component.
You can use this instance to control the expand or collapse state of an element in the hierarchy
programmatically. Any element contained by the RowKeySet instance is expanded, and all
other elements are collapsed. The addAll() method adds all elements to the set, and theremoveAll() method removes all the elements from the set.

8/18/2019 D53979GC11_sg2.pdf
http://slidepdf.com/reader/full/d53979gc11sg2pdf 120/381Oracle Fusion Middleware 11g : Build Applications with ADF I 13 - 26
Copyright © 2009, Oracle. All rights reserved.
Providing Data for Trees
<af:treevalue="#{bindings.RootCategory1.treeModel}"var="node">
<f:facet name="nodeStamp">
<af:outputText value="#{node}"/>
</f:facet>
</af:tree>
Providing Data for TreesThe ADF Faces tree component uses a stamping strategy similar to the ADF Faces tablecomponent. The nodeStamp facet of the tree is used to display the data for each element in the
tree. The tree does not create components for each element; instead, the nodeStamp is
repeatedly rendered (stamped) once for each element. Because of this stamping behavior, only
certain types of components are supported as children inside an ADF Faces tree. All components
that have no behavior are supported, as are most components that implement the ValueHolder or
ActionSource interfaces.
Each time the nodeStamp is stamped, the data for the current element is copied into a property
that can be addressed using an EL expression. You specify the name to use for this property inthe var property on the tree. After the table has completed rendering, this property is removed
or reverted back to its previous value.
In the example in the slide, the data for each element is referenced using the variable node,which identifies the data to be displayed in the tree. The nodeStamp facet displays the data for
each element by getting further properties from the node variable.

8/18/2019 D53979GC11_sg2.pdf
http://slidepdf.com/reader/full/d53979gc11sg2pdf 121/381Oracle Fusion Middleware 11g : Build Applications with ADF I 13 - 27
Copyright © 2009, Oracle. All rights reserved.
Providing Data for Trees
A tree binding rule for the root tree node, with an additionallevel for the child collection, provides the hierarchical data.
Providing Data for Trees (continued)To build a hierarchical tree view in ADF Faces with ADF Business Components, you need to
create related view objects that build the basis for the tree binding rules. The data for this
particular tree comes from the RootCategory1 view object instance; this VO queries for root
categories (those with no parent category.) Subnodes of the tree display the subcategories from
the instance of the SubCategoryVO view object, which is linked to the RootCategoryVO with aview link. In this way, a typical SQL hierarchical query with a start with…connect byprior clause is constructed to use as the tree data. The query starts with categories whose
parent category id is null, and connects category id to parent category id.

8/18/2019 D53979GC11_sg2.pdf
http://slidepdf.com/reader/full/d53979gc11sg2pdf 122/381Oracle Fusion Middleware 11g : Build Applications with ADF I 13 - 28
Copyright © 2009, Oracle. All rights reserved.
Using ADF Faces Output Components
With output components, you can:
• Display messages, text, icons, andimages
• Play audio and video files
<af:messages/>
<af:outputText value="Error icon:"/>
<af:icon name="error"shortDesc="Error Icon"/>
<af:outputText value="Info icon:"/>
<af:icon name="info"/>
<af:outputText value="Media component: "/>
<af:media source="/Brian.wma"standbyText="One moment please"/>
Source:
Design time:
Run time:
Using ADF Faces Output ComponentsADF Faces provides components for displaying text, icons, and images, and for playing audio
and video clips on application pages.
You can output error or warning messages with the af:message or af:messagescomponent.
Read-only text, either specified explicitly or from a resource bundle or bean, is displayed usingthe af:outputText and af:outputFormatted components. As implied by the names of
the components, you can specify a certain amount of formatting for text displayed using theaf:outputFormatted component. For styling output text, setting the whole of the text to
some style, you use the styling features available with both components.Each skin used for the presentation of an application provides icons representing standardfunctions such as an error or a warnings, which you can display using the af:icon component
with the name of the type of icon (required, warning, info, error, or logo).
Many other ADF Faces components can have icons associated with them, such as a menu where
each of the menu items can have an associated icon. You identify the image to use for each oneas the value of an icon attribute for the component itself.
To play back an audio clip or a video clip, you use the af:media component. These
components have attributes for you to define how the item is presented in the page.

8/18/2019 D53979GC11_sg2.pdf
http://slidepdf.com/reader/full/d53979gc11sg2pdf 123/381Oracle Fusion Middleware 11g : Build Applications with ADF I 13 - 29
Copyright © 2009, Oracle. All rights reserved.
Using ADF Faces Query Components
Using ADF Faces Query ComponentsADF supports two types of search forms:
• The query search form, created using the af:query component, is a full-featured search
form. An af:query component includes an af:queryCriteria component, which
represents the search panel or form. It can be used to render the criteria fields without the
toolbar at the top and the button bar at the bottom. The query control enables a user to
perform the following tasks:
- Manage existing searches.
- Perform operations including creating a search, deleting a search, updating a search,
duplicating a search, and resetting a search.
- Execute a query based on values defined for the current search.- Adjust the current search, for example, by adding or deleting search fields, changing
the search mode. The quick query search form, created using the af:quickQuerycomponent, is a simplified form that has only one search criterion.
• The quick query control enables a user to perform a quick search for a textual stringacross one or more criteria items. The af:quickQuery component is usually used in
conjunction with a table or a tree table component to display the query results.

8/18/2019 D53979GC11_sg2.pdf
http://slidepdf.com/reader/full/d53979gc11sg2pdf 124/381Oracle Fusion Middleware 11g : Build Applications with ADF I 13 - 30
Copyright © 2009, Oracle. All rights reserved.
Using the af:query Component
Advanced mode query with dynamically added search criterion
Using the af:query ComponentThe af:query component is used for transactional searches, providing a comprehensive set of
search criteria and controls. The query component is a full-featured component that can support
multiple search criteria, dynamically adding and deleting criteria, selectable search operators,
match all/any selections, seeded or saved searches, basic and advanced modes, and
personalization of searches.
It has the following two modes that the user can toggle by clicking a button that appears if theModeChangeVisible property of the query component is set to true:
• Basic mode query form features include:
- Drop-down list of selectable search criteria operators
- Custom list of operators
- Custom operators- Selectable where clause conjunction of either and or or (match all or match any)
- Saved searches and seeded searches
- Personalizing saved searches
• Advanced mode query form features include the ability for a user to dynamically add
search criteria by selecting from a list of searchable attributes. The user can subsequently
delete any criteria that were added.

8/18/2019 D53979GC11_sg2.pdf
http://slidepdf.com/reader/full/d53979gc11sg2pdf 125/381Oracle Fusion Middleware 11g : Build Applications with ADF I 13 - 31
Using the af:query Component (continued)
When you drop an af:query component onto a JSF page, the component provides a search
panel that includes one or more input fields for entering search criteria values. The user canselect from the drop-down list of operators to create a SQL Query WHERE clause for the search.
You can configure an input field to be a list of values (LOV), a number spinner, a date picker, or
other control.
A Match All/Match Any radio group further modifies the query. A Match All selection isessentially an AND function. The query returns only rows that match all of the selected criteria.
A Match Any selection is an OR function, where the query returns all rows that match any one of
the criteria.
After users enter all the search criteria values (including null values) and select the Match
All/Any option button, they can click the Search button to initiate the query. The query results
can be displayed in any output component. Typically, the output component is a table or treetable, but you can associate other display components such as af:form, af:outputText,
and graphics to display the results component.
If you enable the Basic/Advanced button, the user can toggle between the two modes. Each
mode displays only the search criteria that were defined for that mode. You can define a search
criteria field to appear only for basic, only for advanced, or for both modes.
In advanced mode, the control panel also includes an Add More button that exposes a pop-up list
of searchable attributes. When the user selects any of these attributes, a dynamically generated
search criteria input field and drop-down operator appears. All search criteria input fields are
positioned in the order in which the attributes are defined in the data source. Any newly created
search criteria fields will also follow this rule. For example, if the attributes in the underlying
data source are ordered A, B, C, D, E, and the default search fields are A, C, and E. If the user
adds D, the search fields appear in the order A, C, D, E.
This newly created search criteria field also has a delete icon next to it. The user cansubsequently click this icon to delete the added field. The originally defined search criteria fields
do not have a delete icon and, therefore, the user cannot delete them.
Note: Certain properties set on the view criteria in the ADF BC layer affect the run-time
behavior of the query, such as the following:
• Required property of view criteria row: Determines whether a view criteria item is a
required or optional part of the attribute value comparison in the generated WHERE clause;
default is optional, meaning that no exception is generated for null values. If set to
required, an exception is thrown when no value is supplied; if set to Selectively
Required, the view criteria item is ignored at run time if no value is supplied andanother criteria item at the same level has a value; otherwise, an exception is thrown.
• mode property of view criteria: Determines the initial mode, Basic or Advanced.

8/18/2019 D53979GC11_sg2.pdf
http://slidepdf.com/reader/full/d53979gc11sg2pdf 126/381Oracle Fusion Middleware 11g : Build Applications with ADF I 13 - 32
Copyright © 2009, Oracle. All rights reserved.
Using the af:quickQuery Component
A quick query:• Has a selectable list of attributes to search on
• Has a single search criterion input field
• Can have a link to more advanced search capabilities, with
switching implemented in managed bean
Quick query component in horizontal layout
Using the af:quickQuery ComponentThe quick query component has a single search criteria input field. The user can select which
attribute to search by selecting from a drop-down list. The available searchable attributes are
drawn from the model or from a managed bean. The user can search against the selected
attribute or against all attributes. The search criteria field type will automatically match theattribute type. For example, if the selected search field is of type VARCHAR, then an Input Text
component is rendered.
Quick query components may be used as the starting point of a more complex transactional
search that uses a query component. For example, the user may perform a quick query search on
one attribute, and if successful, may want to continue to a more complex search. The quickquery component supports this by having a built-in advanced link that is a af:commandLinkcomponent. You can create a managed bean to enable the user to switch from a quick query to a
query component.
Under the af:quickQuery tag, are several attributes that define the quick query properties.
The attributes of interest include:• The id attribute, which uniquely identifies the quick query. This value should be set to
match the results table or component's partialTriggers value.

8/18/2019 D53979GC11_sg2.pdf
http://slidepdf.com/reader/full/d53979gc11sg2pdf 127/381Oracle Fusion Middleware 11g : Build Applications with ADF I 13 - 33
Using the af:quickQuery Component (continued)
• The Layout attribute, which specifies the quick query layout to be either horizontal or
vertical.• The Label attribute, which specifies the name to be displayed at the top of the search
panel. It is usually an af:outputText component.
The af:quickQuery tag supports the following three facets:
• The criteriaItems facet specifies the component that displays the search attributes ofthe search object. This component is usually a af:selectOneChoice, but other
components can be specified. You are responsible for connecting the quick query
component with the model and implementing the queryListener in the model.
• The criterionValue facet specifies the component that displays or accepts the value
of the search attribute of the search object. This component is usually an input component,such as af:inputText, but other components can be specified. You are responsible for
connecting the quick query component with the model and implementing the
queryListener in the model.
• The end facet, where you can add a command component to enable users to change from
a quick query to a query (advanced mode)The example shown in the slide has the following source code:
<af:quickQuery id="personsViewCriteriaOneQueryId" label="Search"value="#{bindings.PersonsViewCriteriaOneQuery.queryDescriptor}"queryListener="#{bindings.PersonsViewCriteriaOneQuery.quickSearch}"layout="vertical"><f:facet name="criteriaItems"><af:selectOneChoice label="criteriaItems" simple="true"shortDesc="value"value="#{bindings.PersonsViewCriteriaOneQuery.selectedItem.value}"><f:selectItems
value="#{bindings.PersonsViewCriteriaOneQuery.searchableItems}"/></af:selectOneChoice>
</f:facet><f:facet name="criterionValue"><af:inputText label="criterionValue" simple="true" shortDesc="value"
value="#{bindings.PersonsViewCriteriaOneQuery.selectedItem.criterionValue}"/></f:facet><f:facet name="end"><af:commandLink text="Advanced" rendered=“true"/>
</f:facet></af:quickQuery>

8/18/2019 D53979GC11_sg2.pdf
http://slidepdf.com/reader/full/d53979gc11sg2pdf 128/381Oracle Fusion Middleware 11g : Build Applications with ADF I 13 - 34
Copyright © 2009, Oracle. All rights reserved.
Creating a Query Search Form
Drag a named criteria from the Data Controls panel:
Creating a Query Search FormYou create a query search form by dropping a named view criteria item from the Data Control
panel onto a page. Named criteria represent the view criteria that have been defined for the data
collection in the model. When you drop a named view criteria onto a page, that view criteria is
the basis for the initial search form. All other view criteria defined against that data collection
appear in the Saved Search drop-down list. Users can then select any of the view criteria search
forms, and also any saved searches.
You have a choice of dropping only a search panel, dropping a search with a results table, or
dropping a search with a tree table. If you choose to drop the search panel with a table, you can
select the filtering option to create a filtered table.
Normally, you would drop a query search panel with the results table or tree. JDeveloper
automatically wires up the results table or tree with the query panel. If you drop the query search
panel without the results table or tree, you can designate a component that is based on the
query’s data collection as a results component. In the Property Inspector for the query panel,
copy the value of the ResultsComponentId field, and then paste that value into the Id field for
the component that you want to designate as a results component.

8/18/2019 D53979GC11_sg2.pdf
http://slidepdf.com/reader/full/d53979gc11sg2pdf 129/381Oracle Fusion Middleware 11g : Build Applications with ADF I 13 - 35
Copyright © 2009, Oracle. All rights reserved.
Modifying Query Behavior
On the model’s view criteria: On the query in the UI:
You can set properties that affect query behavior:
Modifying Query Behavior When you define the view criteria in a view object, you specify the attributes and conjunctions
that form the query statement and serve as a basis for the query search form. You can also
specify some of the default properties of the search form after it has been dropped onto the page.
These properties include setting the basic/advanced mode, automatic query execution, and
search criteria field rendering.
After the query search form is created, you can set other properties such as setting the id of the
results table or component. For example, to hide the Basic/Advanced toggle button, you can setthe ModeChangeVisible field to false.
Additionally, you can add a Cancel button to the footer facet of the query search form and use itto call code in the business or model layer that would cancel a long-running query.

8/18/2019 D53979GC11_sg2.pdf
http://slidepdf.com/reader/full/d53979gc11sg2pdf 130/381Oracle Fusion Middleware 11g : Build Applications with ADF I 13 - 36
Copyright © 2009, Oracle. All rights reserved.
Using ADF Data Visualization Components
Common features:• Design time creation by
using:
– Data Controls panel
– JSF visual editor
– Property Inspector
– Component Palette
• Live data preview at
design time
• Support for data binding
Characteristics of ADF Data Visualization ComponentsADF Data Visualization components are a set of rich interactive ADF Faces components that
provide significant graphical and tabular capabilities for analyzing data. ADF Data Visualization
components have the following characteristics in common:
• You create them at design time by using the Data Controls panel, the visual editor, the
Property Inspector, and the Component Palette.
• Design time provides a live data preview.
• You can bind data to standard rowset data controls, as well as hierarchical, BAM, and BI
data controls.
To see a demo of these components, go to
http://www.oracle.com/technology/products/jdev/viewlets/11/index.html and select Data
Visualization and Graphs for JSF.

8/18/2019 D53979GC11_sg2.pdf
http://slidepdf.com/reader/full/d53979gc11sg2pdf 131/381Oracle Fusion Middleware 11g : Build Applications with ADF I 13 - 37
Copyright © 2009, Oracle. All rights reserved.
Visualizing Data
The following types of data visualization components are available:
Graph
Gauge
Geographic
mapPivot tableGantt chart
Visualizing DataThe following list identifies the data visualization components:
• Graph: Supports more than 50 types of graphs, including bar, pie, line, scatter, and stock
graphs, enabling you to evaluate data points on multiple axes in a variety of ways. Part of
JDeveloper since 10 g , Graph is now a JSF component with many new features added:
- There are several new graph types, including funnel, floating bar, and fit to curve.
- Graphs can render in Flash or in Scalable Vector Graphics (SVG), an XML-based
language for drawing two-dimensional graphics.
- Interactivity features include zooming and scrolling, time selector window, line and
legend highlighting and fading, and dynamic reference lines and areas
- The JSF graph tag is improved, with simplified tags for 17 commonly used graphtypes.
• Gauge: A new data visualization component in JDeveloper 11 g that focuses on
identification of problems in data. Supported gauge types are:
- Dial: Standard and Threshold
- Status Meter: Standard and Threshold
- LED

8/18/2019 D53979GC11_sg2.pdf
http://slidepdf.com/reader/full/d53979gc11sg2pdf 132/381Oracle Fusion Middleware 11g : Build Applications with ADF I 13 - 38
Visualizing Data (continued)
• Geographic map: A new data visualization component in JDeveloper 11 g that provides
functionality of Oracle Spatial within the ADF framework. It enables you to represent
business data on a geographic map, and supports superimposing multiple layers of
information on a single map. Available map types are:
- Thematic
- Pie
- Bar
- Point
• Pivot table: A new data visualization component in JDeveloper 11 g that supports multiple
layers of data labels on a row or a column edge and automatic calculation of subtotals and
totals. It enables you to switch data labels from one edge to another to obtain different
views of your data. Supported features include:
- Horizontal and vertical scrolling
- Header and cell formatting
- Drag and drop pivoting
- Automatic totals and subtotals against ADF BC Data Control- Drilling against BI Data Control
• Gantt chart: A new data visualization component in JDeveloper 11 g that provides the
ability to track tasks and resources on a time axis. Its purpose is to assist in project
planning. The following Gantt Chart types are supported:
- Project Gantt: Focuses on project management
- Scheduling Gantt: Focuses on resource management

8/18/2019 D53979GC11_sg2.pdf
http://slidepdf.com/reader/full/d53979gc11sg2pdf 133/381Oracle Fusion Middleware 11g : Build Applications with ADF I 13 - 39
Copyright © 2009, Oracle. All rights reserved.
Summary
In this lesson, you should have learned how to:
• Internationalize the user interface
• Use component facets
• Enable users to:
– Select a value from a list
– Select a date from a calendar
• Display tabular data in tables
• Display hierarchical data in trees
• Display text or media with icons and images
• Define search forms and display results
• Display data graphically

8/18/2019 D53979GC11_sg2.pdf
http://slidepdf.com/reader/full/d53979gc11sg2pdf 134/381Oracle Fusion Middleware 11g : Build Applications with ADF I 13 - 40
Copyright © 2009, Oracle. All rights reserved.
Practice 13 Overview:
Using ADF Faces Components
This practice covers the following topics:
• Using a tree component
• Creating a search page
• Defining LOVs
Practice 13 Overview: Using ADF Faces ComponentsIn the practices for this lesson, you begin to add functionality to pages by using ADF Faces
components. You create search and detail pages and another page that displays a hierarchical
tree of categories and subcategories. You also create several pages that display input
components as a list of values.

8/18/2019 D53979GC11_sg2.pdf
http://slidepdf.com/reader/full/d53979gc11sg2pdf 135/381
Copyright © 2009, Oracle. All rights reserved.
Implementing Navigation on Pages

8/18/2019 D53979GC11_sg2.pdf
http://slidepdf.com/reader/full/d53979gc11sg2pdf 136/381Oracle Fusion Middleware 11g : Build Applications with ADF I 14 - 2
Copyright © 2009, Oracle. All rights reserved.
Objectives
After completing this lesson, you should be able to do the
following:
• Implement command buttons and links
• Create menus
– Menu bar
– Pop-up
– Context
• Use an ADF menu model
• Define navigation panes
• Use breadcrumbs
• Define trains
Lesson AimADF Faces contains several components to enhance and implement navigation on pages. This
lesson teaches you how to implement such navigation by using ADF Faces navigation
components.

8/18/2019 D53979GC11_sg2.pdf
http://slidepdf.com/reader/full/d53979gc11sg2pdf 137/381Oracle Fusion Middleware 11g : Build Applications with ADF I 14 - 3
Copyright © 2009, Oracle. All rights reserved.
Using ADF Faces Navigation Components
Using ADF Faces Navigation Components Navigation components in ADF Faces include:
• Button and link components for navigating to another location with or without server-side
actions
• Components that render items such as tabs and breadcrumbs for navigating hierarchical
pages
• Train components for navigating a multistep process

8/18/2019 D53979GC11_sg2.pdf
http://slidepdf.com/reader/full/d53979gc11sg2pdf 138/381Oracle Fusion Middleware 11g : Build Applications with ADF I 14 - 4
Copyright © 2009, Oracle. All rights reserved.
Performing Navigation
• Control flow rules are defined in the task flow.
• A component fires an action event to generate a Stringoutcome corresponding to the control casefrom-outcome.
• Event listener responds by executing navigation.
Performing NavigationLike any JSF application, an application that uses ADF Faces components contains a set of rules
for choosing the next page to display when, for example, a button or link is clicked. You define
the rules in an ADF Faces application by adding control flow rules and cases to task flows.
JSF uses an outcome String to select the control flow rule to use to perform a page
navigation. ADF Faces navigation components generate an action event when users activate thecomponent. The JSF navigation handler and default ActionListener mechanism use the
logical outcome String on the activated component to find a match in the set of control flow
rules. When JSF locates a match, the corresponding page is selected and rendered.
The example in the slide shows two pages in an ADF task flow:• The BrowseOrders page has a control-flow-case whose control flow from-outcome is
named showItems, defining that navigation should go to the OrderItems page.• The OrderItems page has a control-flow-case whose control flow from-outcome is
named goOrders, defining that navigation should return to the BrowseOrders page.
There are two command buttons on the pages:
• The BrowseOrders page has a command button whose action is set to showItems.
• The OrderItems page has a command button whose action is set to goOrders.

8/18/2019 D53979GC11_sg2.pdf
http://slidepdf.com/reader/full/d53979gc11sg2pdf 139/381Oracle Fusion Middleware 11g : Build Applications with ADF I 14 - 5
Copyright © 2009, Oracle. All rights reserved.
Using Buttons and Links
• Command components:
– Include af:commandButton and af:commandLink
– Submit requests and fire action events when activated
– Typically used for internal navigation
• Go components:
– Include af:goButton and af:goLink
– Navigate directly without server-side actions
– Are typically used for external navigation
– Do not use control flow rules
• Command and go components have the
same appearance.
Using Buttons and LinksButtons and links have an Action property that is a String, or a method that returns a String. This
String should correspond to one of the outcomes defined in the task flow, so that it can be used
for navigation.

8/18/2019 D53979GC11_sg2.pdf
http://slidepdf.com/reader/full/d53979gc11sg2pdf 140/381

8/18/2019 D53979GC11_sg2.pdf
http://slidepdf.com/reader/full/d53979gc11sg2pdf 141/381Oracle Fusion Middleware 11g : Build Applications with ADF I 14 - 7
Defining Access Keys (continued)
Reusing Access Keys
You can bind the same access key to several components. If the same access key appears in
multiple locations in the same page, the rendering agent cycles among the components accessed
by the same key. That is, each time the access key is pressed, focus moves from component to
component. When the last component is reached, focus returns to the first component.
Depending on the browser, if the same access key is assigned to two or more Go components on
a page, the browser may activate the first component instead of cycling through the components
that are accessed by the same key.
Note: If you assign an access key that is already defined as a menu shortcut in the browser, the
ADF Faces component access key takes precedence.

8/18/2019 D53979GC11_sg2.pdf
http://slidepdf.com/reader/full/d53979gc11sg2pdf 142/381Oracle Fusion Middleware 11g : Build Applications with ADF I 14 - 8
Copyright © 2009, Oracle. All rights reserved.
Defining Tool Tips
• Use the shortDesc attribute:
• Can also be defined as a UI Control Hint on EO or VO in
the model
<af:commandButton text="commandButton 1"
shortDesc="This is a command button"/>
Defining Tool TipsYou can define tool tips in two ways:
• In the component’s Property Inspector, you can set the ShortDesc property to define a tool
tip for the component.
• In the data model, you can define the tool tip text on the Control Hints tab of the attribute
editor that is effective whenever that attribute is displayed in the UI.

8/18/2019 D53979GC11_sg2.pdf
http://slidepdf.com/reader/full/d53979gc11sg2pdf 143/381Oracle Fusion Middleware 11g : Build Applications with ADF I 14 - 9
Copyright © 2009, Oracle. All rights reserved.
Using Toolbars, Toolbar Buttons, and Toolboxes
• Toolbars contain other components.
• Toolbar buttons have special properties (if you use toolbar
buttons, always put them on a toolbar).
• Toolboxes contain multiple toolbars.
• You can stretch one component on a toolbar.
• Overflow buttons are automatic.
Stretched component Overflow icon
Toolbox
Toolbar
Using Toolbars, Toolbar Buttons, and ToolboxesAlong with menus, you can create toolbars in your application that contain toolbar buttons used
to initiate some operation in the application. The buttons can display text, an icon, or a
combination of both. You can use the group component to group related toolbar buttons.
Toolbars can also contain other UI components, such as drop-down lists, command buttons, and
command links. However, toolbar buttons provide additional functionality:• The af:commandToolbarButton component has a popup facet that enables you to
provide pop-up menus from a toolbar button.• The flex property of a component can be set to an integer that indicates the ratio of this
component to other flexible components within the same container.
You can use more than one toolbar component by enclosing them in a toolbox component (in the
Layout group of the Component Palette). Doing so stacks the toolbars so that the first toolbar on
the page displays on the top, and the last toolbar displays on the bottom. When you use morethan one toolbar, you can set the flex attribute on the toolbars to determine which toolbar
should be the longest. If you want toolbars to be displayed next to each other (rather than
stacked), you can enclose them in a group component.
Within a toolbar, you can set one component to stretch so that the toolbar will always equal that
of its parent container. When a window is resized such that all the components within the toolbar
can no longer be displayed, the toolbar displays an overflow icon.

8/18/2019 D53979GC11_sg2.pdf
http://slidepdf.com/reader/full/d53979gc11sg2pdf 144/381Oracle Fusion Middleware 11g : Build Applications with ADF I 14 - 10
Copyright © 2009, Oracle. All rights reserved.
Using Menus for Navigation
• You can group menu bars and toolbars in a toolbox.
• Menu bars contain menus, which provide the top-level
menu.
• Menu items:
– Provide the vertical (drop-down) selections
– Like toolbar buttons, can:
— Display differently when selected
— Perform navigation
Using Menus for NavigationADF Faces provides menu bars and toolbars that you can add to a page. Menu items and toolbar
buttons enable users to perform some change on a selected object or to navigate somewhere else
in the application. A toolbox can be used to group menus and multiple toolbars together. The
example in the slide contains both a menu bar and a toolbar.
Both menu items and toolbar buttons have the capability to display differently when selected.
Additionally, they can both navigate to other pages in the application, and perform any logic
needed for navigation in the same way that other command components do.
You use the menuBar component to render a bar that contains the menu bar items, such as File
in the example. Each item on a menu bar item is rendered by a menu component, which holds avertical menu. Each vertical menu consists of a list of commandMenuItem components that
can invoke some operation on the application. You can nest menu components inside menu
components to create submenus.

8/18/2019 D53979GC11_sg2.pdf
http://slidepdf.com/reader/full/d53979gc11sg2pdf 145/381Oracle Fusion Middleware 11g : Build Applications with ADF I 14 - 11
Copyright © 2009, Oracle. All rights reserved.
Creating Menus
Creating MenusTo create and use menus in a menu bar, perform the following steps:
1. Drag a Panel Menu Bar from the Component Palette to the JSF page.
2. Drag the desired number of Menu components into the menu bar.
3. Drag a Menu Item from the Component Palette; you can drag to a menu or directly into the
Panel Menu Bar, which renders similar to a button onto the menu bar.
4. Within each menu component, drag and drop Menu Item components from the ComponentPalette to insert a series of af:commandMenuItem components to define the items in
the vertical menu.
5. Set properties of menu components in the Property Inspector. In addition to setting text and
access key as described previously, you can set the following properties:- Accelerator: The keystroke to activate this menu item’s command when the item is
selected. ADF Faces converts the keystroke and displays a text version of the
keystroke (for example, Ctrl + O) next to the menu item label.
- Icon: Enter the URI of the image file you want to display before the menu item label.- Disabled: Set to true to disable this menu item.
- Type: Check, radio, antonym

8/18/2019 D53979GC11_sg2.pdf
http://slidepdf.com/reader/full/d53979gc11sg2pdf 146/381

8/18/2019 D53979GC11_sg2.pdf
http://slidepdf.com/reader/full/d53979gc11sg2pdf 147/381Oracle Fusion Middleware 11g : Build Applications with ADF I 14 - 13
Copyright © 2009, Oracle. All rights reserved.
Creating Pop-Up Menus
Creating Pop-Up MenusYou can also have the menu launch in a pop-up that displays vertically. To create a pop-up
menu, perform the following steps:
1. Drag the ToolbarButton component to a toolbar in the JSF page and set the text attribute to
display the name of the button. Use the icon attribute to set the image to use on the button.
2. In the Structure window, expand the ToolbarButton facets and drag a Menu component to
the pop-up facet.
3. Drag to the Menu component as many Menu Item components as needed to define the
items in the vertical menu. Set properties on the Menu Items as needed.

8/18/2019 D53979GC11_sg2.pdf
http://slidepdf.com/reader/full/d53979gc11sg2pdf 148/381Oracle Fusion Middleware 11g : Build Applications with ADF I 14 - 14
Copyright © 2009, Oracle. All rights reserved.
Creating Context Menus
To create a context menu, use the af:showPopupBehavioroperation.
Creating Context MenusADF Faces client behavior tags provide declarative solutions to common client operations that
you would otherwise have to write yourself using JavaScript, and register on components as
client listeners. In this release, ADF Faces supports the client behavior
af:showPopupBehavior to use in place of a client listener. You perform the following
steps to use af:showPopupBehavior to create a context menu for a component:
1. Create a pop-up menu with af:popup, af:menu, and af:commandMenuItemcomponents.
2. Give the pop-up menu an ID.
3. Create a component to use the context menu.
4. Drag the af:showPopupBehavior operation to the component and set properties:- popupId: Specify the ID of the af:popup component whose contents you want to
- display in a pop-up.
- alignId: Specify the ID of the component to align the pop-up contents with.
- align: Specify an alignment position that is relative to the component identified by
alignId.
- triggerType: Specify the event type to use to trigger the pop-up. Default is
action, because typically, you would associate af:showPopupBehavior with
a command component. When the command component is clicked, an action event is

8/18/2019 D53979GC11_sg2.pdf
http://slidepdf.com/reader/full/d53979gc11sg2pdf 149/381Oracle Fusion Middleware 11g : Build Applications with ADF I 14 - 15
Creating Context Menus (continued)
fired, which triggers the pop-up to display. If you associate af:showPopupBehaviorwith some other noncommand component, such as af:outputText, set
triggerType on af:showPopupBehavior to contextMenu, which displays a
pop-up context menu. The slide shows a sample code that displays a pop-up menu whenusers right-click the text rendered by af:outputText. The slide also shows the sample
context menu generated at run time.Note: You can use the same general steps to display a pop-up window that contains any
components, not just one that contains a menu.

8/18/2019 D53979GC11_sg2.pdf
http://slidepdf.com/reader/full/d53979gc11sg2pdf 150/381Oracle Fusion Middleware 11g : Build Applications with ADF I 14 - 16
Copyright © 2009, Oracle. All rights reserved.
Using a Navigation Pane
• You can either:
– Define navigation levels
explicitly
Or
– Bind to XML Menu Model
<af:navigationPane hint="bar" id="barExample">
<af:commandNavigationItem text="Bar Item 1" partialSubmit="true"actionListener="#{demoCommandNavigationItem.navigationItemAction}"/><af:commandNavigationItem text="Bar Item 2" partialSubmit="true" selected="true"actionListener="#{demoCommandNavigationItem.navigationItemAction}"/>
<af:commandNavigationItem text="Bar Item 3" partialSubmit="true"actionListener="#{demoCommandNavigationItem.navigationItemAction}"/>
<af:commandNavigationItem text="Disabled Item" partialSubmit="true" disabled="true"actionListener="#{demoCommandNavigationItem.navigationItemAction}"/>
<af:commandNavigationItem text="Component Guide" immediate="true" action="guide"/></af:navigationPane>
Using a Navigation PaneThe af:navigationPane component is a layout component that creates a series of
navigation items representing one level in a navigation hierarchy. You can create this hierarchy
manually, or you can bind the navigation pane to the XML Menu Model. You create one
navigation pane for each level of the hierarchy.
To set up a hierarchy manually, you define one global navigation rule that can access each page
in the hierarchy. Then create a navigation pane for each level of the hierarchy, setting the Hint
attribute as described below. Drag navigation items to each navigation pane for the pages that
should display at its level of the hierarchy. For each navigation item, set the Action to a String
outcome corresponding to one of the outcomes in the global navigation rule.
Depending on the Hint attribute of the navigation pane, the navigation items can be rendered as:
• Bar: Displays the navigation items separated by a bar
• Buttons
• Choice: Displays navigation items in a pop-up list when the associated icon is clicked (you
must include a value for the navigation pane’s icon attribute)
• List: Bulleted list
• Tabs
You would need to add the navigation panes to each page that should display them, or use a page
fragment or page template, discussed in the lesson titled “Ensuring Reusability.”

8/18/2019 D53979GC11_sg2.pdf
http://slidepdf.com/reader/full/d53979gc11sg2pdf 151/381Oracle Fusion Middleware 11g : Build Applications with ADF I 14 - 17
Copyright © 2009, Oracle. All rights reserved.
Using Breadcrumbs
• Breadcrumbs: af:breadCrumbs
• Links: af:commandNavigationItem
• You can:
– Define breadcrumbs explicitly
– Bind to XML Menu Model
Using BreadcrumbsThe af:breadCrumbs component enables you to display a path of links for navigation. You
can explicitly define the links by using one af:commandNavigationItem component for
each. Alternatively, you can define the links dynamically by using the XML Menu Model.
You would need to add the breadcrumbs to each page that should display them, or use a page
fragment or page template, discussed in the lesson titled “Ensuring Reusability.”

8/18/2019 D53979GC11_sg2.pdf
http://slidepdf.com/reader/full/d53979gc11sg2pdf 152/381Oracle Fusion Middleware 11g : Build Applications with ADF I 14 - 18
Copyright © 2009, Oracle. All rights reserved.
Using Explicitly Defined Breadcrumbs
• Use static values:
• Can also use EL for dynamic values
<af:breadCrumbs><af:commandNavigationItem text=“Store”/><af:commandNavigationItem text=“Media”/><af:commandNavigationItem text=“Music”/>
</af:breadCrumbs>
Using Explicitly Defined BreadcrumbsTo provide a simple navigation hierarchy where you define the navigation items for the breadcrumbs, you can add the af:breadCrumbs component to each page, with one or more
af:commandNavigationItem components that you explicitly set. The value of the
af:commandNavigationItem component’s attributes may be set to a page or to an EL
expression.
For example, in a shopping application you may want to enable the user to follow breadcrumbs
to display categories and subcategories of products, rather than pages, as shown in the example
in the slide. Instead of static values, you can use parameters and action listeners to make these
breadcrumbs dynamic, displaying the names of the categories and subcategories by using EL
expressions that evaluate to changing parameter values.

8/18/2019 D53979GC11_sg2.pdf
http://slidepdf.com/reader/full/d53979gc11sg2pdf 153/381Oracle Fusion Middleware 11g : Build Applications with ADF I 14 - 19
Copyright © 2009, Oracle. All rights reserved.
Using XML Menu Model for Dynamic Navigation
Items
XML Menu Model:
• Represents navigation for a page hierarchy in XML format
• Contains the following elements:
– menu
– groupNode
– itemNode
– sharedNode
Health
Home
Employee DataBenefits
PaidTime Off
Insurance
Dental
Using XML Menu Model for Dynamic BreadcrumbsFor a very simple page hierarchy, you can manually create navigational components, such as
breadcrumbs or navigation panes, and add navigation items for each. However, this becomes
very cumbersome when a navigational hierarchy encompasses several pages. An ADF menu
model enables you to create complex navigational hierarchies without all the tedious manual
coding.
You can organize related JSF pages in a treelike hierarchy that users can navigate to drill down
or up to another level of the hierarchy by using navigation items in navigation panes or
breadcrumbs. The XML Menu Model represents navigation for a page hierarchy in XML format.The hierarchy is described within the menu element. The hierarchy is composed of nodes, each
of which can correspond to a page. The menu element can contain the following types of nodes:
• groupNode: Contains one or more child nodes to navigate to indirectly; must reference
the ID of at least one of its child nodes, which can be an item node or another group node• itemNode: A node that performs navigation upon selection
• sharedNode: References another XML menu; used to link or include various menus
For more information and examples of creating an XML Menu hierarchy, see the Web User
Interface Developer’s Guide for ADF and the Fusion Developer’s Guide for ADF .

8/18/2019 D53979GC11_sg2.pdf
http://slidepdf.com/reader/full/d53979gc11sg2pdf 154/381Oracle Fusion Middleware 11g : Build Applications with ADF I 14 - 20
Copyright © 2009, Oracle. All rights reserved.
Creating an ADF Menu Model
• Create the page hierarchy in one or more unbounded task
flows.
• In the Application Navigator, right-click each task flow and
select Create ADF Menu Model.
Health
Home
Employee DataBenefits
Paid
Time Off Insurance
Dental
Level 0 (root_menu)
Level 1 (home_menu)
Level 2 (benefits_menu)
Level 3
(insurance_menu)
Creating an ADF Menu ModelYou can use ADF Controller features in conjunction with XML Menu Model to build the page
hierarchy. JDeveloper creates the nodes in the metadata file for your page hierarchy
automatically, and also creates the links.
To create a page hierarchy, you first divide the nodes into menus, similar to the example shown
in the slide. The example shows the top-level menu as containing the Home page, which is
represented as an item node. It contains a navigation pane with two tabs: one that links to
Employee Data (an item node), and one that links to Benefits (a shared node).
The Benefits menu adds two links to Insurance (shared node) and Paid Time Off (item node).
The Insurance menu adds two links to the Health and Dental item nodes.To create a page hierarchy, perform the following steps:
1. Create an unbounded task flow for each menu in the page hierarchy. You could put the pages all in adfc-config.xml, but for reuse you may opt to create multiple menus.
The example contains two menus: Home, Benefits, and Insurance. So in the example, thedeveloper would create three unbounded task flows: adfc-config-home.xml,
adfc-config-benefits.xml, and adfc-config-insurance.xml (it is
helpful to prefix unbounded task flow names with adfc or adfc-config to easily
identify them as unbounded task flows.) The default task flow, adfc-config.xml,
serves as the root menu.

8/18/2019 D53979GC11_sg2.pdf
http://slidepdf.com/reader/full/d53979gc11sg2pdf 155/381Oracle Fusion Middleware 11g : Build Applications with ADF I 14 - 21
Creating an ADF Menu Model (continued)
2. Add view activities to each unbounded task flow that correspond to each menu node for
which you want to create a page.
For example, the Benefits menu contains:
A group node, Benefits, for grouping the subnodes
A shared node that points to the Insurance menu
An item node, PaidTimeOff, that corresponds to a pageTherefore, in the adfc-config-benefits task flow you would add one view activity
(for paid time off). Do not create views for nodes that do not have a page in this task flow.
3. Create the pages for your menu hierarchy: one page for each node in the hierarchy.
Alternatively, you could create the pages first and then drag them to the appropriate view
activities in the task flows, or drag them to create the view activities.
4. In the Application Navigator, right-click each unbounded task flow and select Create ADF
Menu. Create in a bottom-up manner, that is, create the submenus first, and then the parent
menus. In the Create ADF Menu Model dialog box, give each menu a descriptive file
name. You can use the root_menu default file name for the root adfc-config.xml
file’s menu. When you create an ADF menu for a task flow, a global navigation rule isadded to the task flow to access any views in that task flow.
5. In the Application Navigator, select the menu XML file that was just created. In the
Structure window, you see that all views in the unbounded task flow have corresponding
item nodes in the menu XML file. Create the node hierarchy by:
- Creating group nodes for those groups that do not have a view activity: Right-click
the menu node and select “Insert inside menu” > groupNode. Give the group node a
descriptive name (such as groupNode_Benefits), set idref to the ID of one of the
node’s children (such as itemNode_PaidTimeOff), and set the label that will display
on navigation items (for example, Benefits).
- Converting to group nodes any nodes that you want to use as a group node, but that
do have a view activity and so already exist in the menu. Right-click the node and
select Convert > groupNode. Change the ID if desired (for example, from
itemNode_<name> to groupNode_<name>), and set the idref and label as in the step
just above.
- Creating shared nodes to reference other menus to access from this one. Right-click
the menu node and select “Insert inside menu” > sharedNode. Set the ref property tothe EL expression for the referenced menu, such as #{insurance_menu}.
- Dragging each child to its parent. In the example of the Benefits menu, you would
have created a shared node that references the insurance menu and a group node
named groupNode_Benefits and labeled Benefits. You would drag the shared node
and itemNode_PaidTimeOff to the group node.
- Checking the labels of all group and item nodes—the label is what is displayed in the
navigation item on a page
Note that the shared node of one menu may be a group node or an item node in the referenced
submenu. For example, in the Home menu, Benefits is represented as a shared node that
references #{benefits_menu}. In the Benefits menu, Benefits is the label for a group node that
groups the PaidTimeOff item node and another shared node that references the insurance menu.

8/18/2019 D53979GC11_sg2.pdf
http://slidepdf.com/reader/full/d53979gc11sg2pdf 156/381

8/18/2019 D53979GC11_sg2.pdf
http://slidepdf.com/reader/full/d53979gc11sg2pdf 157/381Oracle Fusion Middleware 11g : Build Applications with ADF I 14 - 23
Copyright © 2009, Oracle. All rights reserved.
Binding the Navigation Pane to an
XML Menu Model
Health
Home
Employee DataBenefits
Paid Time Off Insurance
Dental
0 – tabs
1 – buttons
2 – bar
3 – list
Levels and Hints
Binding the Navigation PaneTo display dynamic navigation controls similar to the one shown on the page at the right of the
slide, you need to add a navigation pane for each level of the menu hierarchy. The navigation
panes are identical except for the Level and Hint properties, so you can copy and paste them and
change only those two properties. Set the following properties on the navigation panes:
• Hint: Typical usage is buttons for level 0, tabs for level 1, and bar for level 2. The example
in the slide shows a fourth level, level 3, which has Hint set to list.
• Level: Top level is zero.• Value: Set to the EL expression for the root menu, such as #{root_menu}• Var (on the Data tab): Set to a name, such as menuInfo, that you refer to in the
navigation item (added below) to get the needed data from the menu model
Now, add to the nodeStamp facet of the navigation pane a single navigation item. At run time,
this stamps out the appropriate number of navigation items for the level of menu that is being
displayed. The navigation items for all of the navigation panes should be identical, so you can
copy and paste them. Set the following properties on the navigation item:• Rendered: #{<varvalue>.rendered} – for example, if the Var property on the
navigation pane is set to menuInfo, then set Rendered to #{menuInfo.rendered}.
• Text: #{menuInfo.label}• Icon: #{menuInfo.icon}

8/18/2019 D53979GC11_sg2.pdf
http://slidepdf.com/reader/full/d53979gc11sg2pdf 158/381Oracle Fusion Middleware 11g : Build Applications with ADF I 14 - 24
Binding the Navigation Pane (continued)
• Destination: #{menuInfo.destination}• Action: #{menuInfo.doAction}• Visible: #{menuInfo.visible}
After you have defined the navigation panes on one page, you can copy and paste them to all
pages in the hierarchy. Alternatively, you can use a page fragment or a page template, as discussed
in the lesson titled “Ensuring Reusability.”

8/18/2019 D53979GC11_sg2.pdf
http://slidepdf.com/reader/full/d53979gc11sg2pdf 159/381Oracle Fusion Middleware 11g : Build Applications with ADF I 14 - 25
Copyright © 2009, Oracle. All rights reserved.
Binding Breadcrumbs to an XML Menu Model
To link breadcrumbs to the menu model:
• Set Var and Value properties on the breadcrumbs
component
• Add a navigation item to the nodeStamp facet and set its
properties just as for navigation pane’s item
• Copy the breadcrumbs component to each page
Health
Home
Employee DataBenefits
Paid
Time Off Insurance
Dental
Binding Breadcrumbs to an XML Menu ModelIn the example page hierarchy that we have discussed, to view Health information, the user
would start drilling from the Home page and choose Benefits, then choose Insurance page where
two choices are presented, one of which is Health. The path of links starting from Home and
ending at Health is known as the focus path in the tree, and can be represented on a page as
breadcrumbs.
Using an XML Menu Model to display dynamic breadcrumbs is similar to the way you use the
navigation pane. On any page, to show the user’s current position in relation to the entire pagehierarchy, you can use the af:breadCrumbs component with one
af:commandNavigationItem component as a nodeStamp, to provide a path of links
from the current page back to the root page (that is, the current nodes in the focus path). You can bind the value attribute of the af:breadCrumbs component to an XML menu model, and
use one af:commandNavigationItem in the nodeStamp facet of af:breadCrumbsto stamp out the items for a page.
Set the Value and Var properties on the breadCrumbs component the same way as for the
navigation pane—you can even use the same values for these properties. Then set the navigation
item properties as for the navigation item in the navigation pane.
Note: You also can bind a tree to an XML menu model and use it on pages for navigation.

8/18/2019 D53979GC11_sg2.pdf
http://slidepdf.com/reader/full/d53979gc11sg2pdf 160/381Oracle Fusion Middleware 11g : Build Applications with ADF I 14 - 26
Copyright © 2009, Oracle. All rights reserved.
Defining a Sequence of Steps
A train is a specialized type of task flow with linear steps:
Navigation items rendered by af:train
Navigation buttons renderedby af:trainButtonBar
}
Creating the task flow for
a train
Using a Train ComponentIf you have a set of pages that users should visit in a particular order, consider using theaf:train component on each page to display a series of navigation items to guide users
through the multistep process. Not only does a train display the number of steps in a multistep
process, it also indicates the location of the current step in relation to the entire process.
Suppose you have eight steps in a multistep process, such as creating a new item in an inventorysystem. When configured properly, the af:train component would render all eight steps on a
page, with each step represented as a train stop, and with all the stops connected by lines. Each
train stop has an image (for example, a square block) with a label underneath the image. The
slide shows an example of how this train could look on a page.
Each train stop corresponds to one step or one page in your multistep process. Users navigate the
train stops by clicking an image or label, which causes a new page to display. Typically, train
stops must be visited in sequence, that is, a user cannot jump to step 3 if the user has not visited
step 2.
As shown in the slide, a train is actually a specialized type of task flow with linear steps.
Note: Internationalization of the text displayed for a train stop is currently not supported.
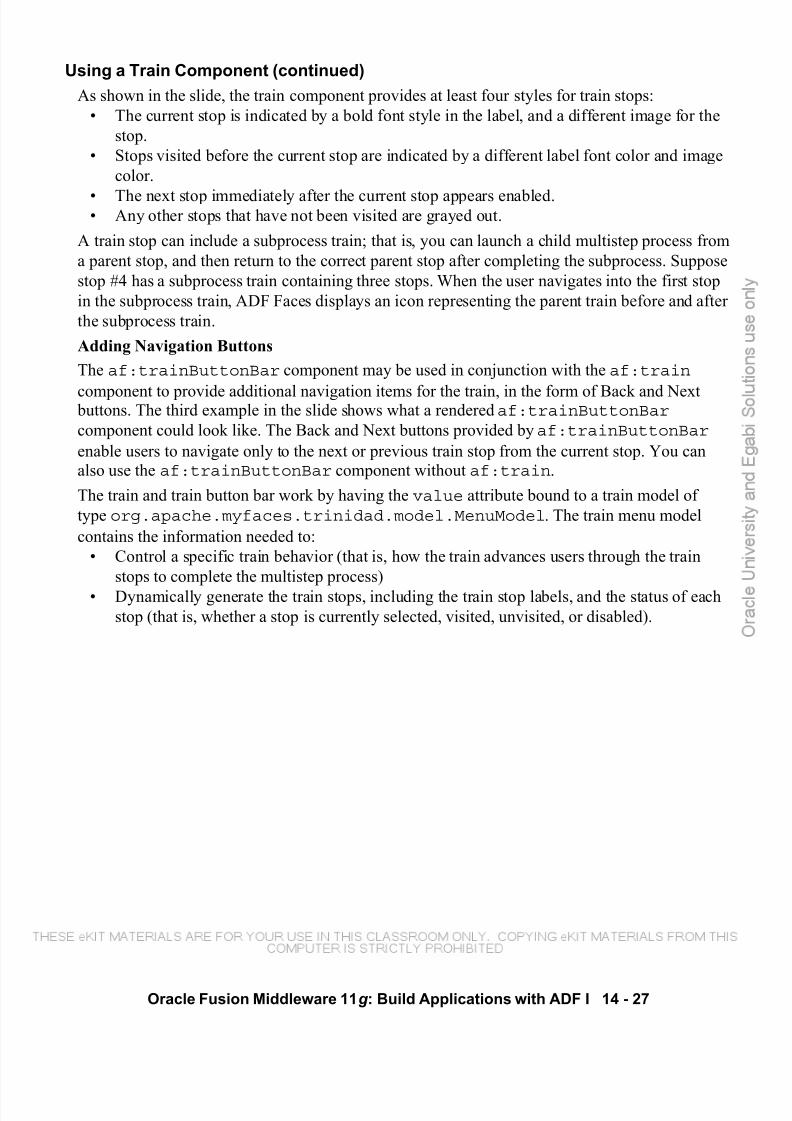
8/18/2019 D53979GC11_sg2.pdf
http://slidepdf.com/reader/full/d53979gc11sg2pdf 161/381Oracle Fusion Middleware 11g : Build Applications with ADF I 14 - 27
Using a Train Component (continued)
As shown in the slide, the train component provides at least four styles for train stops:
• The current stop is indicated by a bold font style in the label, and a different image for the
stop.
• Stops visited before the current stop are indicated by a different label font color and image
color.
• The next stop immediately after the current stop appears enabled.• Any other stops that have not been visited are grayed out.
A train stop can include a subprocess train; that is, you can launch a child multistep process from
a parent stop, and then return to the correct parent stop after completing the subprocess. Suppose
stop #4 has a subprocess train containing three stops. When the user navigates into the first stop
in the subprocess train, ADF Faces displays an icon representing the parent train before and after
the subprocess train.
Adding Navigation Buttons
The af:trainButtonBar component may be used in conjunction with the af:train
component to provide additional navigation items for the train, in the form of Back and Next buttons. The third example in the slide shows what a rendered af:trainButtonBarcomponent could look like. The Back and Next buttons provided by af:trainButtonBarenable users to navigate only to the next or previous train stop from the current stop. You can
also use the af:trainButtonBar component without af:train.
The train and train button bar work by having the value attribute bound to a train model of
type org.apache.myfaces.trinidad.model.MenuModel. The train menu model
contains the information needed to:
• Control a specific train behavior (that is, how the train advances users through the train
stops to complete the multistep process)
• Dynamically generate the train stops, including the train stop labels, and the status of each
stop (that is, whether a stop is currently selected, visited, unvisited, or disabled).

8/18/2019 D53979GC11_sg2.pdf
http://slidepdf.com/reader/full/d53979gc11sg2pdf 162/381Oracle Fusion Middleware 11g : Build Applications with ADF I 14 - 28
Copyright © 2009, Oracle. All rights reserved.
Creating a Train
<af:train value="#{controllerContext.currentViewPort.taskFlowContext.trainModel}"/>
<af:trainButtonBarvalue="#{controllerContext.currentViewPort.taskFlowContext.trainModel}"/>
<af:outputText value="Train Stop 1"/>
Creating a TrainTo create a train, perform the following steps:
1. Create a bounded task flow, being sure to select the Create Train check box.
2. Drag View components to the task flow; these become train stops. You can add other
components to the task flow as needed, but flow between train stops is defined
automatically.
3. Double-click each view to create the page, and drag a Train component to the page. By
default it binds to the train model of the task flow.
- Drag a train button bar to the page, which also by default binds to the task flow’s
train model.
- Add whatever content you want to appear on the page.
The bottom part of the slide shows a series of pages that were created by following the steps
above, adding an output text component to each page that shows the current train stop. The
running pages are also shown.
A train component has a nodeStamp facet, which accepts an
af:commandNavigationItem component to act as a stamp for the train component,
stamping out each train stop in the train model. When you bind the train to the task flow’s train
model, you do not explicitly define these navigation item components; they are implicit.

8/18/2019 D53979GC11_sg2.pdf
http://slidepdf.com/reader/full/d53979gc11sg2pdf 163/381Oracle Fusion Middleware 11g : Build Applications with ADF I 14 - 29
Copyright © 2009, Oracle. All rights reserved.
Skipping a Train Stop
To skip a train stop, perform the following steps:• Set the skip property of train stop to true.
• Typically set to expression that evaluates to true or
false, such as managed bean method or property.
• If true, users cannot navigate to that train stop.
Skipping a Train StopYou can set a train stop to be skipped by setting the skip property to true. You would
typically set this property to an EL expression that evaluates to true or false to conditionally
skip the train stop.
The example in the slide shows the Property Inspector for a view in the task flow of the train.The skip property is set to a managed bean method that is coded to perform some evaluation
and conditionally return either true or false.
At run time, the user cannot navigate to a skipped train stop.

8/18/2019 D53979GC11_sg2.pdf
http://slidepdf.com/reader/full/d53979gc11sg2pdf 164/381Oracle Fusion Middleware 11g : Build Applications with ADF I 14 - 30
Copyright © 2009, Oracle. All rights reserved.
Summary
In this lesson, you should have learned how to:
• Implement command buttons and links
• Create menus
– Menu bar
– Pop-up
– Context
• Use an ADF menu model
• Define navigation panes
• Use breadcrumbs
• Define trains
8/18/2019 D53979GC11_sg2.pdf
http://slidepdf.com/reader/full/d53979gc11sg2pdf 165/381Oracle Fusion Middleware 11g : Build Applications with ADF I 14 - 31
Copyright © 2009, Oracle. All rights reserved.
Practice 14 Overview:
Using ADF Faces Navigation Components
This practice covers the following topics:
• Creating buttons and links to implement navigation
• Adding breadcrumbs
• Defining a train
Practice 14 Overview: Using ADF Faces Navigation ComponentsIn this set of practices, you implement navigation on pages by creating buttons, links,
breadcrumbs, and a train.

8/18/2019 D53979GC11_sg2.pdf
http://slidepdf.com/reader/full/d53979gc11sg2pdf 166/381

8/18/2019 D53979GC11_sg2.pdf
http://slidepdf.com/reader/full/d53979gc11sg2pdf 167/381
Copyright © 2009, Oracle. All rights reserved.
Achieving the Required Layout

8/18/2019 D53979GC11_sg2.pdf
http://slidepdf.com/reader/full/d53979gc11sg2pdf 168/381Oracle Fusion Middleware 11g : Build Applications with ADF I 15 - 2
Copyright © 2009, Oracle. All rights reserved.
Objectives
After completing this lesson, you should be able to do the
following:
• Use complex layout components
• Explain how to use ADF Faces skins
• Use dynamic page layout
Lesson AimOne of the goals in Web development is to design attractive and usable pages. This lesson
describes how to use complex layout components and styles to achieve a desired appearance.
Students also learn to use dynamic page layout techniques.

8/18/2019 D53979GC11_sg2.pdf
http://slidepdf.com/reader/full/d53979gc11sg2pdf 169/381Oracle Fusion Middleware 11g : Build Applications with ADF I 15 - 3
Copyright © 2009, Oracle. All rights reserved.
Using ADF Faces Layout Components
• af:spacer
• af:separator
• af:panelSplitter
• af:panelStretchLayout
• af:panelAccordion
• af:panelFormLayout
• af:panelTabbed
• af:showDetail
You can use the following components to achieve the desired
layout:• af:panelGroupLayout
• af:panelCollection
• af:panelHeader
• af:showDetailHeader
• af:group
• af:panelList
• af:panelBox
• af:panelBorderLayout
Using ADF Faces Complex Layout ComponentsADF Faces layout components include the following: spacer, separator: Add blank space and divider lines.
• panelSplitter, panelStretchLayout: Enable automatic component stretching
in your pages.• panelSplitter, panelAccordion: Create collapsible panes.
• panelFormLayout: Arrange items in columns or grids.
• panelTabbed: Create stacked tabs.
• showDetail: Hide and display groups of content.
• panelGroupLayout: Enable automatic scroll bars in your pages, and arrange items
horizontally or vertically.• panelCollection: Add menus, toolbars, and status bars to data aggregation
components such as tables, trees, and tree tables.• panelHeader, showDetailHeader: Create titled sections and subsections.
• group: Group semantically related components.
• panelList, panelBox: Create styled lists and content boxes.
• panelBorderLayout, panelStretchLayout: Place items in fixed, peripheral
areas around a central area.
The following slides show how to use these components for various layout tasks. OTN also has
the ADF Faces Rich Client Demos that show how to use layout components.

8/18/2019 D53979GC11_sg2.pdf
http://slidepdf.com/reader/full/d53979gc11sg2pdf 170/381Oracle Fusion Middleware 11g : Build Applications with ADF I 15 - 4
Copyright © 2009, Oracle. All rights reserved.
Adding Spaces and Lines:
Spacer and Separator
<af:form>
<af:spacer width="10"/>
<af:outputText value="outputText1"/>
<af:spacer width="10"/>
<af:outputText value="outputText2"/>
<p><af:spacer height="10"/></p><af:separator/>
<p><af:spacer height="10"/></p>
<af:spacer width="10"/>
<af:outputText value="outputText3"/>
<af:spacer width="10"/>
<af:outputText value="outputText4"/>
</af:form>
Output text on a page
With spacers and separator No spacers
Adding Spaces and LinesYou can use the af:spacer component to incorporate some blank space in your pages
between components, so that the page appears less cluttered than it would if all the components
were right next to each other. You can include either or both vertical and horizontal space in a
page by using the following attributes:• height: The amount of vertical space to include in the page; use with width not set to
create vertical spacer, surrounded with a paragraph tag so that it appears on its own line• width: The amount of horizontal space to include between components; use with height
not set to create horizontal spacer
The af:separator component creates a horizontal line on the page.

8/18/2019 D53979GC11_sg2.pdf
http://slidepdf.com/reader/full/d53979gc11sg2pdf 171/381Oracle Fusion Middleware 11g : Build Applications with ADF I 15 - 5
Copyright © 2009, Oracle. All rights reserved.
Stretching Components
Enable stretching so that a component fills the designated area,
such as browser window:
Stretching ComponentsBy default, the maximized attribute on af:document is set to true. Upon rendering
content, any outer margin, border, and padding are removed, and the body is stretched to fill the
entire browser window.
However, this does not mean that setting maximized to true is sufficient when you want
your page contents to fill a browser window. When the user resizes the browser window, theaf:document component does not reposition and resize its children components accordingly.
If you want a component to fill an area, such as the browser or a designated part of another
component, then you must enable stretching for that component. If a stretchable component is a
root component (shown at the first level of a component hierarchy in the Application Navigator),then it stretches automatically.

8/18/2019 D53979GC11_sg2.pdf
http://slidepdf.com/reader/full/d53979gc11sg2pdf 172/381Oracle Fusion Middleware 11g : Build Applications with ADF I 15 - 6
Copyright © 2009, Oracle. All rights reserved.
Enabling Automatic Component Stretching:
Panel Splitter or Panel Stretch Layout
Table on page:
Same table within
stretched Panel StretchLayout component:
Enabling Automatic Component StretchingSome ADF Faces components, however, do reposition and resize their children when the browser size changes. Such components include af:panelSplitter and
af:panelStretchLayout, which automatically use client-side geometry management to
control the stretching of their child components. You don’t have to write any code to enable thestretching; simply use either af:panelSplitter or af:panelStretchLayout to
contain your page contents.
Although a geometry management component stretches its children, the component itself does
not stretch automatically. So unless the geometry management component is the root component
for your page contents, you must set a property to tell it to fill up the section of the window
where it is displayed.
To stretch and position your outermost layout panel component, you can set the maximized property of af:document to true (the default). If the root component is stretchable, it then
stretches, both vertically and horizontally, to fit the browser viewport.
To horizontally stretch any component that does not stretch automatically, set its Width property
to 100%. You should not, however, set the Height property to 100%. If you want to stretch a
component vertically, you should place it in a stretched component that automatically stretches
its children.

8/18/2019 D53979GC11_sg2.pdf
http://slidepdf.com/reader/full/d53979gc11sg2pdf 173/381Oracle Fusion Middleware 11g : Build Applications with ADF I 15 - 7
Copyright © 2009, Oracle. All rights reserved.
Stretching a Table Column
Table with no stretched columns:
Table with last column stretched :
Stretching a Table ColumnCertain components have attributes that relate to stretching their subcomponents. One of these is
the ADF table.
You can stretch a table column to fill up the available space. On the Appearance tab of the
table’s Property Inspector, you can set the ColumnStretching property to one of the following
values:• none (default): Gives optimal performance
• blank: Inserts an empty blank column that is stretched; use this so that the row’s
background colors will span the entire width of the table• last: Stretches the last column to fill up any unused space inside the viewport
• column:<id>: Stretches a specified column; use the ID of the column that you want to
stretch (requires that you explicitly set the column’s ID property—the drop-down list for
the property displays all columns whose ID has been set)

8/18/2019 D53979GC11_sg2.pdf
http://slidepdf.com/reader/full/d53979gc11sg2pdf 174/381Oracle Fusion Middleware 11g : Build Applications with ADF I 15 - 8
Copyright © 2009, Oracle. All rights reserved.
Creating Resizable Panes: Panel Splitter
af:panelSplitter
Horizontalorientation: Verticalorientation:Nested:
Creating Resizable PanesWhen you have groups of unique content to present to users, consider using multiple panes
separated by adjustable splitters. When viewing the page in a client browser, users can change
the size of panes by dragging a splitter, and also choose to collapse or restore panes. When a
pane is collapsed, its contents are hidden; when a pane is restored, the contents are displayed.
The af:panelSplitter component enables you to organize contents into two panes
separated by an adjustable splitter. Clicking the arrow button on a splitter collapses a pane (andits contents) in the direction of the arrow. The value of the orientation attribute determines
whether the panes are horizontal (default) or vertical. The pane contents are specified in thefacets first and second. The slide shows a page divided into two horizontal panes (placed
left to right), and another page divided into two vertical panes (placed top to bottom). It alsoshows a nested panelSplitter, created by a horizontal panelSplitter into the first
facet of a vertical panelSplitter.
The af:panelSplitter component uses geometry management to stretch its children
components at run time. This means when the user collapses one pane, the contents in the other pane are explicitly resized to fill up available space. If af:panelSplitter is the root
component for your page contents, stretching occurs automatically.

8/18/2019 D53979GC11_sg2.pdf
http://slidepdf.com/reader/full/d53979gc11sg2pdf 175/381Oracle Fusion Middleware 11g : Build Applications with ADF I 15 - 9
Copyright © 2009, Oracle. All rights reserved.
Printing Layout Panel Content:
Show Printable Page Behavior Operation
<af:commandButton text="Printable Page">
<af:showPrintablePageBehavior/>
</af:commandButton>
Printing Layout Panel ContentThe af:showPrintablePageBehavior operation creates a printable page that the user
can print by using the browser’s Print button. To allow printing, place theaf:showPrintablePageBehavior component (an Operations component) within the
page. The showPrintablePageBehavior tag is an operation, so you can drag it from the
Operations components section of the Component Palette to a button or other component that
executes an operation.
If the page contains a layout component with panes, such as a panel splitter, place the button thatcontains the af:showPrintablePageBehavior component in the facet whose pane
contents you want users to be able to print. For example, in a panel splitter, if the second facet isthe main content area of the af:panelSplitter component, then insert the button that
contains the af:showPrintablePageBehavior component into that facet. If you insert
af:showPrintablePageBehavior anywhere outside of af:panelSplitter, the
printed result may not contain all of the main content area.
Therefore, it is important to place the print operation within the af:panelSplitter facet
whose pane contents users would normally want to print. If both facets need printing support,then insert one af:showPrintablePageBehavior component into each facet. To print
contents of both panes, the user then has to execute the print command one pane at a time.

8/18/2019 D53979GC11_sg2.pdf
http://slidepdf.com/reader/full/d53979gc11sg2pdf 176/381Oracle Fusion Middleware 11g : Build Applications with ADF I 15 - 10
Copyright © 2009, Oracle. All rights reserved.
Creating Collapsible Panes:
Panel Splitter
Attributes:
Both panes displayed, withsplitterPosition governing size
of 1st pane and splitter arrow pointed
toward 1st pane
falsefalse
false
true
true
collapsed
First pane hidden; second pane
stretches
false
Both panes displayed, withsplitterPosition governing size
of 2nd
pane and splitter arrow pointedtoward 2nd pane
true
Second pane hidden; first pane
stretches
Behavior
true
positionedFromEnd
Creating Collapsible Panes with the Panel Splitter ComponentAnother feature of the panel splitter component is that users can collapse or restore its panes.
When a pane is collapsed, the pane contents are hidden; when a pane is restored, the contents are
displayed. The collapsed attribute on af:panelSplitter determines whether the
splitter is in a collapsed (hidden) state. By default, the collapsed attribute is false, which
means both panes are displayed. When the user clicks the arrow button on the splitter, collapsedis set to true and one of the panes is hidden.
ADF Faces uses the collapsed and positionedFromEnd attributes to determine which
pane (that is, the first or second pane) to hide (collapse) when the user clicks the arrow button onthe splitter. When collapsed is true and positionedFromEnd is false, the first pane
is hidden and the second pane stretches to fill up the available space. When collapsed is
true and positionedFromEnd is true, the second pane is hidden instead. Visually, the
user can know which pane will be collapsed by looking at the direction of the arrow on the
button; when the user clicks the arrow button on the splitter, the pane collapses in the direction
of the arrow. The splitterPosition and collapsed attributes are persistable; that is,
when the user moves the splitter or collapses a pane, ADF Faces can implicitly persist the
attribute value changes for the component.

8/18/2019 D53979GC11_sg2.pdf
http://slidepdf.com/reader/full/d53979gc11sg2pdf 177/381Oracle Fusion Middleware 11g : Build Applications with ADF I 15 - 11
Copyright © 2009, Oracle. All rights reserved.
Creating Collapsible Panes:
Panel Accordion
<af:panelAccordion>
<af:showDetailItem text="This is a pane"/>
<af:showDetailItem text="This is another pane"/>
</af:panelAccordion>
With default settings Characteristics of Panel
Accordion component:• Does not automatically
stretch it children
• Panes cannot be resized
at run time—only expand
or contract
• Panes defined byshowDetailItem
Creating Collapsible Panes with the Panel Accordion ComponentAnother component that enables you to create collapsible panes is panel accordion. A series ofaf:showDetailItem components inside af:panelAccordion make up the accordion
panes, with one af:showDetailItem component corresponding to one pane. The pane
contents are the children components inside each af:showDetailItem.
You can use more than one af:panelAccordion component in a page, typically in different
areas of the page, or nested. After adding the af:panelAccordion component, insert a
series of af:showDetailItem components to provide the panes, using one
af:showDetailItem for one pane. Then insert components into each
af:showDetailItem to provide the pane contents.
Note: The af:showDetailItem component has a StretchChildren property that you can set
to stretch the first child of the af:showDetailItem component, if the child is a stretchable
component.

8/18/2019 D53979GC11_sg2.pdf
http://slidepdf.com/reader/full/d53979gc11sg2pdf 178/381Oracle Fusion Middleware 11g : Build Applications with ADF I 15 - 12
Copyright © 2009, Oracle. All rights reserved.
Panel Accordion Overflow
Automatic overflow
icons to display
content out of view
Panel Accordion OverflowAt run time, when the available browser space is less than the space needed to display expanded
pane contents, ADF Faces automatically displays overflow icons that enable users to select and
navigate to those panes that are out of view. The slide shows overflow icons at the upper-left
(first example) portion and at the lower-right (second example) portion. When the user clicks the
overflow icon, ADF Faces displays the overflow pop-up menu, as shown in the slide, for the user
to select and navigate to a pane that is out of view.

8/18/2019 D53979GC11_sg2.pdf
http://slidepdf.com/reader/full/d53979gc11sg2pdf 179/381Oracle Fusion Middleware 11g : Build Applications with ADF I 15 - 13
Copyright © 2009, Oracle. All rights reserved.
<af:showDetailItemtext="Browse Products"
inlineStyle="width:100%;height:100%;" flex=“1">
<af:showDetailItemtext="Selected Product"
inlineStyle="width:100%;height:100%;" flex="2">
Setting Panel Accordion Properties
With discloseMany="true"discloseNone="true"
Setting Panel Accordion PropertiesThe following properties govern behavior of the panel accordion at run time:• discloseNone: Allows all panes to be collapsed at once (default is false)
• discloseMany: Allows multiple panes to be expanded at once (default is false)
The following properties of showDetailItem affect the behavior of the accordion panes:
• flex: Specifies a nonnegative integer that determines how much space is distributed
among the af:showDetailItem components of one af:panelAccordion. By
default, flex is 0 (zero), that is, the pane contents of each af:showDetailItem are
inflexible. To enable flexible contents in a pane, specify a flex number larger than 0.
• inflexibleHeight: Specifies the number of pixels a pane will use. Default is 100 pixels. This means if a pane has a flex value of 0 (zero), ADF Faces will use 100 pixels
for that pane, and then distribute the remaining space among the non-zero panes. If thecontents of a pane cannot fit within the af:panelAccordion container given the
specified inflexibleHeight value, ADF Faces automatically pushes out nearby
contents into overflow menus, as described previously.
Because neither of the above components automatically stretches its children, you may need toset the width and height of any children of showDetailItem to 100%.

8/18/2019 D53979GC11_sg2.pdf
http://slidepdf.com/reader/full/d53979gc11sg2pdf 180/381Oracle Fusion Middleware 11g : Build Applications with ADF I 15 - 14
Setting Panel Accordion Properties (continued)
The discloseMany attribute governs how many panes can be visible at once.
• Set to true if you want users to be able to expand and see the contents of more than one
pane at the same time.• By default, discloseMany is false. This means only one pane can be expanded at
any one time. For example, suppose there is one expanded pane A and one collapsed pane
B when the page first loads. If the user expands pane B, pane A will be collapsed, as onlyone pane can be expanded at any time.
The discloseNone attribute governs whether users can collapse all panes.
• Set the discloseNone attribute to true to enable users to collapse all panes.
• By default, discloseNone is false. This means one pane must remain expanded at any
time.
You can add toolbars and toolbar buttons in the pane headers. To add toolbar buttons to a pane,insert the af:toolbar component into the toolbar facet of the af:showDetailItemcomponent that defines that pane. Then insert the desired number of
af:commandToolbarButton components into the af:toolbar component. Althoughthe toolbar facet is on af:showDetailItem, it is the parent component
af:panelAccordion that renders the toolbar and its buttons.
To allow users to print the contents of a single pane, place theaf:showPrintablePageBehavior component (wrapped in af:commandButton)
within the af:showDetailItem whose pane contents you want users to be able to print.

8/18/2019 D53979GC11_sg2.pdf
http://slidepdf.com/reader/full/d53979gc11sg2pdf 181/381Oracle Fusion Middleware 11g : Build Applications with ADF I 15 - 15
Copyright © 2009, Oracle. All rights reserved.
Arranging Items in Columns or Grids:
Panel Form Layout
Use af:panelFormLayout with labels above or below the
text:
Use rows and maxColumns attributes to arrange items in theform:
Arranging Items in Columns or GridsThe af:panelFormLayout component enables you to lay out multiple form input
components such as input fields and selection list fields in one or more columns. They can be
arranged one of two ways:
• With the field labels right-aligned and the fields left-aligned, as shown in the first example
in the slide
• With the labels above the fields, as shown in the second example. To place the labelsabove the fields, set the labelAlignment attribute on af:panelFormLayout to
top.
When you nest an af:panelFormLayout component inside another, by default the label
alignment in the nested layout is top.
The following attributes determine the number of rows and columns to display the children
components:• rows: The number of rows after which a new column will start. The default is
2,147,483,647 (Integer.MAX_VALUE), which means all visible, rendered children
components display in a single column. When rows is a nondefault value, the number of
columns is dependent on the number of rendered children. For example, if rows is set to 6and there are 7 to 12 rendered children, the list is displayed in two columns.

8/18/2019 D53979GC11_sg2.pdf
http://slidepdf.com/reader/full/d53979gc11sg2pdf 182/381Oracle Fusion Middleware 11g : Build Applications with ADF I 15 - 16
Arranging Items in Columns or Grids (continued)
• maxColumns: The maximum number of columns to display the children components.
The default is 3 (2 on PDAs). For nested panel form layout components, the inner
component’s maxColumns value is always 1.
The row-column split is based solely on the number of rendered children and not on their size. If
the number of rendered children does not fit in the number of rows and columns specified,
ADF Faces automatically increases the number of rows to accommodate the number of children.
To add content below the children input components, insert the desired component into the
footer facet of af:panelFormLayout. Facets accept only one child. If you have to insert
more than one footer child, use af:panelGroupLayout or af:group to wrap the
footer children.

8/18/2019 D53979GC11_sg2.pdf
http://slidepdf.com/reader/full/d53979gc11sg2pdf 183/381Oracle Fusion Middleware 11g : Build Applications with ADF I 15 - 17
Copyright © 2009, Oracle. All rights reserved.
Creating Stacked Tabs:
Panel Tabbed with Show Detail Item
Use af:panelTabbed; use af:showDetailItem for each
tab:
<af:panelTabbed position="both"><af:showDetailItem text=“Categories"><!– Root categories table here -->
</af:showDetailItem><af:showDetailItem text=“Subcategories"><!– Subcategories table here -->
</af:showDetailItem><af:showDetailItem text=“Products"><!– Products table here -->
</af:showDetailItem></af:panelTabbed>
Creating Stacked TabsUsing af:panelTabbed to create tabbed panes is similar to using af:panelAccordionto create accordion panes. After adding an af:panelTabbed component, insert a series of
af:showDetailItem components to provide the tabbed pane contents for display.
To display and hide contents using PanelTabbed, perform the following steps:1. Add the af:panelTabbed component to the JSF page.
2. Set the position attribute to below if you want the tabs to be rendered below the
contents in the display area.By default, position is above. This means the tabs are rendered above the contents in
the display area. The other acceptable value is both, where tabs are rendered above and
below the display area.3. To add a tabbed pane, insert the af:showDetailItem component inside
af:panelTabbed. You can add as many tabbed panes as you want.
4. To add contents for display in a pane, insert the desired children components into each
af:showDetailItem component.
The example in the slide shows three tabs, positioned at both top and bottom. Each tab is defined
by a show detail item component, each of which contains a table as content for the tab.

8/18/2019 D53979GC11_sg2.pdf
http://slidepdf.com/reader/full/d53979gc11sg2pdf 184/381Oracle Fusion Middleware 11g : Build Applications with ADF I 15 - 18
Copyright © 2009, Oracle. All rights reserved.
<af:showDetail><af:panelGroupLayout layout="vertical">
<af:outputText value="Indexed Child 1"/>
<af:outputText value="Indexed Child 2"/>
</af:panelGroupLayout>
</af:showDetail>
Hiding and Displaying Groups of Content:
Show Detail
Hiding and Displaying Groups of ContentYou can use the af:showDetail component to display and hide groups of content. Its child
components can be displayed or hidden at run time.
To display or hide contents using af:showDetail, perform the following steps:
1. Add the af:showDetail component to the JSF page and set its properties:
- disclosed: Set to true if you want the component to show its children.
- disclosedText: Set to the label you want to display next to the toggle icon when
the contents are disclosed (shown). By default, the label is “Hide.”
- undisclosedText: Set to the label you want to display next to the toggle icon
when the contents are undisclosed (hidden). The default label is “Show.”
Note: If you specify a value for either disclosedText or for undisclosedText,
but not for both, then that value is used for both the disclosed state and undisclosed
state. Instead of using text specified in disclosedText and undisclosedText,
you could use the prompt facet to add a component that will render next to the toggle
icon.
2. Insert the children components for display into af:showDetail. You can wrap the
children in, for example, af:panelGroupLayout, to achieve the desired layout.

8/18/2019 D53979GC11_sg2.pdf
http://slidepdf.com/reader/full/d53979gc11sg2pdf 185/381Oracle Fusion Middleware 11g : Build Applications with ADF I 15 - 19
Hiding and Displaying Groups of Content (continued)
An org.apache.myfaces.trinidad.event.DiscloserEvent is raised when the user
clicks the toggle icon,. You can perform special handling of this event by binding the
component’s disclosureListener attribute to a DisclosureListener method in a
backing bean. The DisclosureListener method must be a public method with a single
DisclosureEvent event object and a void return type, as shown in the following example:
public void some_disclosureListener(DisclosureEventdisclosureEvent) {// Add event handling code here
}
By default, DisclosureEvent events are usually delivered in the Invoke Application phase,
unless the component’s immediate attribute is set to true. When immediate is true, the
event is delivered in the earliest possible phase, usually the Apply Request Values phase.
On the client-side component, the AdfDisclosureEvent is fired. The event root for the client
AdfDisclosureEvent is set to the event source component; only the event for the pane whose
disclosed attribute istrue
gets sent to the server.
You learn more about events in the lesson titled “Responding to Application Events.”

8/18/2019 D53979GC11_sg2.pdf
http://slidepdf.com/reader/full/d53979gc11sg2pdf 186/381Oracle Fusion Middleware 11g : Build Applications with ADF I 15 - 20
Copyright © 2009, Oracle. All rights reserved.
Arranging Items Horizontally or Vertically, with
Scrollbars: Panel Group Layout
Panel group layout arrangements Panel group layout inside stretchedpanel splitter does not stretch its children
Arranging Items Horizontally or Vertically, with ScrollbarsThe af:panelGroupLayout component enables you to arrange a series of children
components vertically or horizontally without wrapping, or consecutively with wrapping, asshown in the first example in the slide. The layout attribute value determines the arrangement
of the children.
In all arrangements, each pair of adjacent children components can be separated by a line orwhite space using the separator facet on af:panelGroupLayout.
When using the horizontal layout, the children can also be vertically or horizontally aligned. For
example, you could make a short component beside a tall component align at the middle, as
shown in the second layout in the slide.Unlike af:panelSplitter or af:panelStretchLayout, the
af:panelGroupLayout component does not stretch its children. You can use
af:panelGroupLayout in situations where you’re already using af:panelSplitter or
af:panelStretchLayout as the root component for the page, and you have a large
number of children components to flow normally but are not to be stretched, as in the second
example in the slide.

8/18/2019 D53979GC11_sg2.pdf
http://slidepdf.com/reader/full/d53979gc11sg2pdf 187/381Oracle Fusion Middleware 11g : Build Applications with ADF I 15 - 21
Arranging Items Horizontally or Vertically, with Scrollbars (continued)
To provide scrollbars when flowing the children components, wrap the children in theaf:panelGroupLayout component with its layout attribute set to scroll, and then
place the af:panelGroupLayout component inside the af:panelSplitter or
af:panelStretchLayout facet. The second example in the slide shows a panel splitter
that is stretched. It contains a panel group layout with its layout attribute set to scroll.
Although the child table is not stretched, it does display scrollbars to enable users to see all of itscontent.
When layout is set to scroll on af:panelGroupLayout, ADF Faces automatically
provides a scrollbar at run time when the contents contained by the af:panelGroupLayoutcomponent are larger than the af:panelGroupLayout itself. You don’t have to write any
code to enable the scrollbars, or set any inline styles to control the overflow.
For example, when you use layout components such as af:showDetail that enable users to
expand and collapse children contents, you don’t have to write code to show the scrollbars when
the contents expand, and to hide the scrollbars when the contents collapse. Simply wrap the
af:showDetail component inside an af:panelGroupLayout component, and set thelayout attribute to scroll. To get the layout you desire for the af:showDetail children,
you can use nested af:panelGroupLayout components.

8/18/2019 D53979GC11_sg2.pdf
http://slidepdf.com/reader/full/d53979gc11sg2pdf 188/381Oracle Fusion Middleware 11g : Build Applications with ADF I 15 - 22
Copyright © 2009, Oracle. All rights reserved.
Displaying Table Menus, Toolbars, and Status
Bars: Panel Collection
Use panelCollection for table with menus and toolbars:
Displaying Table Menus, Toolbars, and Status BarsYou can use the af:panelCollection component to add menus, toolbars, and status bars
to data aggregation components such as tables, trees, and tree tables. You would create theaf:panelCollection component, then add the table, tree, or tree table component as a
direct child of the panelCollection.
The af:panelCollection tag contains a menu facet for af:menu, a toolbar facet for
af:toolbar, a secondaryToolbar facet for another af:toolbar, and a statusbarfacet. The table, tree, or tree table is added after the last facet.
The default top level menu and toolbar items depends on the child component being used:
• Tables and trees: Default top level menu is View.• Tables and tree table: Default toolbar menu is Detach.
• Tree and tree table (when the pathStamp is used): The toolbar buttons Go Up, GoTo Top, and Show as Top also appear.

8/18/2019 D53979GC11_sg2.pdf
http://slidepdf.com/reader/full/d53979gc11sg2pdf 189/381Oracle Fusion Middleware 11g : Build Applications with ADF I 15 - 23
Displaying Table Menus, Toolbars, and Status Bars (continued)
The example shown in the slide has the following source code:<af:panelCollection binding="#{editor.component}"><f:facet name="menus"><af:menu text="Actions"><af:commandMenuItem text="Add..." /><af:commandMenuItem text="Create.." />
<af:commandMenuItem text="Update..." disabled="true"/><af:commandMenuItem text="Copy"/><af:commandMenuItem text="Delete"/><af:commandMenuItem text="Remove" accelerator="control A"/><af:commandMenuItem text="Preferences"/>
</af:menu></f:facet><f:facet name="toolbar"><af:toolbar><af:commandToolbarButton shortDesc="Create" icon="/new_ena.png"></af:commandToolbarButton><af:commandToolbarButton shortDesc="Update" icon="/update_ena.png">
</af:commandToolbarButton><af:commandToolbarButton shortDesc="Delete" icon="/delete_ena.png"></af:commandToolbarButton>
</af:toolbar></f:facet><f:facet name="secondaryToolbar"> </f:facet><f:facet name="statusbar"><af:toolbar><af:outputText id="statusText" ... value="Custom Statusbar Message"/>
</af:toolbar></f:facet><af:table rowSelection="multiple" columnSelection="multiple" ...<af:column ...
</af:column>
The panelCollection component is a naming container. If you want to add its contained
component, such as a table, as partialTriggers (described later in this lesson), you must
use its fully qualified name. For example, if you have a panelCollection with
id=entriesCollection and a contained table with id=deptTable, and you want to
update a panelForm on the selection change of the table, you would declare the
panelForm's partialTriggers as:
<panelForm partialTriggers="entriesCollection:deptTable">

8/18/2019 D53979GC11_sg2.pdf
http://slidepdf.com/reader/full/d53979gc11sg2pdf 190/381Oracle Fusion Middleware 11g : Build Applications with ADF I 15 - 24
Copyright © 2009, Oracle. All rights reserved.
Creating Titled Sections and Subsections:
Panel Header
Panel header
component with
sections and
subsections:
af:panelHeader
Show detail header component with sections that expand orcollapse:af:showDetailHeader
Creating Titled Sections and SubsectionsYou may want to divide a page into sections and subsections, starting each section or subsection
with a header. The af:panelHeader component enables you create sections and subsections
with a label and an icon at the top of each section or subsection header, as shown in the first
example in the slide.
To enable users to toggle the display of contents under each section or subsection header, use the
af:showDetailHeader component instead. This is similar to the af:panelHeader
component, except that it renders a toggle icon that enables users to hide or display the section
or subsection contents. The second example in the slide shows a top section with its contents
displayed, and a subsection with its contents hidden. Partial Page Rendering (PPR), which you
learn about later in this lesson, is automatically used to refresh a section of the page when the
user selects to hide or show contents under the header.
The disclosed attribute on af:showDetailHeader specifies whether to show or hide the
contents under its header. The default is false, meaning the contents are hidden.

8/18/2019 D53979GC11_sg2.pdf
http://slidepdf.com/reader/full/d53979gc11sg2pdf 191/381Oracle Fusion Middleware 11g : Build Applications with ADF I 15 - 25
Copyright © 2009, Oracle. All rights reserved.
Grouping Related Components: Group
Use af:group to:
• Add multiple components to a facet• Group related
child components
<af:panelFormLayout><af:inputDate label="Pick a date"/><!-- first group --><af:group><af:selectManyCheckbox label=
"Select all that apply"><af:selectItem label="Coffee" value="1"/>//other select items
</af:selectManyCheckbox><af:inputText label="Special instructions"rows="3"/>
</af:group>
<!-- Second group --><af:group><af:inputFile label="File to upload"/><af:inputText label="Enter passcode"/>
</af:group><af:inputText label="Comments" rows="3"/><af:spacer width="10" height="15"/><f:facet name="footer"/>
</af:panelFormLayout>
Grouping Semantically Related ComponentsThe af:group component aggregates or groups together children components that are related
semantically. The af:group component does not provide any layout for its children. Used on
its own, the af:group component does not render anything; only the children components
inside af:group render at run time.
You can use any number of af:group components to group related components together. For
example, you might want to group some of the input fields in a form layout created byaf:panelFormLayout, as shown in the example in the slide that groups two sets of children
components inside af:panelFormLayout.
When the af:group component is used as a child in a parent component that does providespecial rendering for af:group children, then visible separators, such as bars or dotted lines,
display around the children of each af:group. For example, af:panelFormLayout and
af:toolbar support special rendering for af:group children. The example in the slide
shows how at run time the af:panelFormLayout component renders dotted separator lines
before and after the first and second af:group of children components. Children inside
af:group are never split across a column on a form.
The af:group component is especially useful when you need to group components under a
facet, because a facet may have only one child.

8/18/2019 D53979GC11_sg2.pdf
http://slidepdf.com/reader/full/d53979gc11sg2pdf 192/381Oracle Fusion Middleware 11g : Build Applications with ADF I 15 - 26
Copyright © 2009, Oracle. All rights reserved.
Displaying a Bulleted List: Panel List
• Use af:panelList to display a bulleted list in one or more
columns.• To create columns, nest inside af:panelFormLayout and set
the rows property:
• Create a list hierachy with nestedaf:panelList components:
• Specify bullet style
by settinglist-style-type to:
– disc
– square
– circle
– decimal
– lower-alpha
– upper-alpha
Displaying a Bulleted ListYou can use af:panelList to display a bulleted list in one or more columns. Use one
af:panelList component to create each list of items. By default, all rendered child
components of af:panelList are displayed in a single column. You can surround the child
components in a Panel Form Layout component to split the list into two or more columns.
To create a styled list of items, perform the following steps:
1. Add the Panel List component to the JSF page.
2. Insert the desired number of child components (to display as bulleted items).
3. To style the child components, set the ListStyle attribute to a valid CSS 2.1 list style
value, such as one of the following:- list-style-type:disc- list-style-type:square- list-style-type:circle
For example, entering list-style-type:disc into the ListStyle property
corresponds to a disc bullet.
You can nest af:panelList components to create a list hierarchy that has outer items and
inner items, where the inner items belonging to an outer item are indented under the outer item.You can use an af:panelGroupLayout component to wrap the components that make up
each group of outer item and its inner items.
- list-style-type:decimal- list-style-type:lower-alpha- list-style-type:upper-alpha

8/18/2019 D53979GC11_sg2.pdf
http://slidepdf.com/reader/full/d53979gc11sg2pdf 193/381Oracle Fusion Middleware 11g : Build Applications with ADF I 15 - 27
Copyright © 2009, Oracle. All rights reserved.
Displaying Items in a Content Container
Offset by Color: Panel Box
Use af:panelBox to display items in a content container
offset by color.
Displaying Items in a Content Container Offset by Color You can display content in a container that can have a colored background. The af:panelBoxcomponent enables you create a container that has a header, which can contain a title with an
optional icon. Under the header is the box for your contents, as shown in the slide.
To use a colored content container for your contents, perform the following steps:
1. Add the Panel Box component to the JSF page.
2. Set attributes as needed:- Background: Set to light (default), medium, dark, or transparent.
- Text: Set to the text string to display as the title in the header of the container.
- Icon: Set to the URI of the icon image you want to display before the header text.
Note: If both the Text and Icon attributes are not set, ADF Faces does not display
the header portion of the content container.- TitleHalign: Set the horizontal alignment of the title to one of the following
values: center, start, end, left, or right.
- InlineStyle: Set the width of the container box to the exact pixel size or a
percent.- ContentStyle: Change style of contents inside the container; for example, set to
background-color:Lime to change the color of the box to lime green.
Note: Color should never be used to convey information because of accessibility issues.

8/18/2019 D53979GC11_sg2.pdf
http://slidepdf.com/reader/full/d53979gc11sg2pdf 194/381Oracle Fusion Middleware 11g : Build Applications with ADF I 15 - 28
Copyright © 2009, Oracle. All rights reserved.
Arranging Content Around a Central Area:
Panel Border Layout
Panel Border Layout: Predefined named areas around a
central area where direct child content is displayed.
Arranging Items Around a Central AreaThe af:panelBorderLayout component is a layout element for arranging components in
predefined, named areas around a central area. The central area is where direct childrencomponents of af:panelBorderLayout render consecutively. In addition to the central
area, the af:panelBorderLayout component supports the following named areas, each of
which is defined by a facet bearing the name for the area:• top: Renders children above the central area
• bottom: Renders children below the central area
• left: Renders children on the left of the central area between top and bottom facet
children
• innerLeft: Renders children to the right of the left facet• innerTop: Renders children to the right of the innerLeft facet and below the top• right: Renders children on the right of the central area between top and bottom facets
• innerRight: Renders children to the left of the right and below the top facet
• bottom: Renders children below central area
• innerBottom: Renders children between the bottom facet and the central area

8/18/2019 D53979GC11_sg2.pdf
http://slidepdf.com/reader/full/d53979gc11sg2pdf 195/381Oracle Fusion Middleware 11g : Build Applications with ADF I 15 - 29
Arranging Items Around a Central Area (continued)
• right: Renders children on the right of the center area between top and bottom facet
children. If the reading direction is left to right, right has precedence over end if both
right and end facets are used. If the reading direction is right to left, right also has
precedence over start if both right and start facets are used.
• innerTop: Renders children above the center area but below the top facet children
• innerBottom: Renders children below the center area but above the bottom facet
children• innerLeft: Similar to left, but renders between innerTop and innerBottom,
and between left and the center area
• innerRight: Similar to right, but renders between innerTop and innerBottom,
and between right and the center area
• innerStart: Similar to innerLeft, if the reading direction is left to right and similar
to innerRight, if the reading direction is right to left
• innerEnd: Similar to innerRight, if the reading direction is left-to-right and similar
to innerLeft, if the reading direction is right-to-left
Note: For BiDi support (right to left layout), Oracle Applications developers should notuse the left and right areas of af:panelBorderLayout. Start and end should be used
instead of left and right.
To add items in predefined areas using PanelBorderLayout, perform the following steps :
1. Add the Panel Border Layout component to the JSF page.
2. To place content in the center area, insert the desired components inside
af:panelBorderLayout.
3. The children components are displayed consecutively in the order in which you inserted
the desired components. If you want some other type of layout for the children, wrap the
components inside af:panelGroupLayout.
4. To place content in one of the named areas around the center area, do one of the following:- If the facet is visible (for example, start or end), insert the desired components
into the facet, grouping multiple components because a facet can take only one child.- If the facet is not visible, right-click af:panelBorderLayout, select Facets -
Panel Border Layout from the context menu, and choose a facet name from the list.
Visible facets are indicated by a check mark in front of the facet name. Insert the
desired components into the visible facet.

8/18/2019 D53979GC11_sg2.pdf
http://slidepdf.com/reader/full/d53979gc11sg2pdf 196/381Oracle Fusion Middleware 11g : Build Applications with ADF I 15 - 30
Copyright © 2009, Oracle. All rights reserved.
Arranging Content Around a Central Area:
Panel Stretch Layout
The panel stretch layout component:
• Can arrange content around a central area
• Does not render anything by itself
• Has fewer facets than panel border, with no direct children
The panel stretch layout component at design time
Arranging Content Around a Central Area: Panel Stretch LayoutAs previously mentioned, the panel stretch layout component can automatically stretch its
children when it is stretched. However, it does not have any elements that render by themselves.
It does have several facets to which you can add content to arrange such content around a central
area. The center facet is the central area, and you can display content above, below, to the
left, or to the right of it in the top, bottom, start, and end facets.
Although the panel stretch layout component is similar to the panel border layout, it differs in
that:
• Fewer facets restrict you to a less flexible arrangement of content.
• You cannot add direct children. All content must be added to a facet.

8/18/2019 D53979GC11_sg2.pdf
http://slidepdf.com/reader/full/d53979gc11sg2pdf 197/381Oracle Fusion Middleware 11g : Build Applications with ADF I 15 - 31
Copyright © 2009, Oracle. All rights reserved.
Using ADF Faces Skins
• ADF Faces skins:
– Provide a global style sheet for an application
– Use a CSS file to set styles
– Use a resource bundle for text
• Included skins:
– Oracle
– Minimal
– Simple
Using ADF Faces SkinsYou can change the appearance or look and feel of an application without having to rewrite the
user interface. A skin in ADF Faces is a global style sheet that only needs to be set in one place
for the entire application. Every component automatically uses the styles as described by the
skin. Any changes to the skin are picked up at run time, so no change to code is needed. Skins
are based on the Cascading Style Sheet specification, using CSS 3.0 syntax.
In addition to using a CSS file to determine the styles, skins also use a resource bundle to
determine the text. For example, the words “Previous” and “Next” in the navigation bar of the
ADF Faces table component are determined by using the skin’s resource bundle. All the
included skins use the same resource bundle.
ADF Faces provides three main skins that are provided for you to use in your applications:
• Oracle (oracle): The default skin that conforms to Oracle’s UI standards (Browser Look
and Feel - BLAF) for applications
• Minimal (minimal): Provides some formatting
• Simple (simple): Contains almost no special formatting

8/18/2019 D53979GC11_sg2.pdf
http://slidepdf.com/reader/full/d53979gc11sg2pdf 198/381Oracle Fusion Middleware 11g : Build Applications with ADF I 15 - 32
Copyright © 2009, Oracle. All rights reserved.
Using Dynamic Page Layout
Dynamic page layout is made possible by using:
• Expression Language (EL)
• Partial Page Rendering (PPR)

8/18/2019 D53979GC11_sg2.pdf
http://slidepdf.com/reader/full/d53979gc11sg2pdf 199/381Oracle Fusion Middleware 11g : Build Applications with ADF I 15 - 33
Copyright © 2009, Oracle. All rights reserved.
<af:selectOneChoicevalue="#{bindings.CardTypeCode.inputValue}"label="#{bindings.CardTypeCode.label}"partialTriggers="PaymentType"rendered="#{bindings.PaymentTypeCode.inputValue == 'CC'}"><f:selectItems value="#{bindings.CardTypeCode.items}"/>
</af:selectOneChoice>
Using Expression Language to Conditionally
Display Components
• You can use EL for any of a component’s attributes.
• Example of setting attributes with EL:
Using Expression Language (EL)In JSF, you use a simple expression language (EL) to work with the information you want to
present. At run time, a generic expression evaluator returns the value of expressions, automating
access to the individual objects and their properties without requiring code. Because any
attribute of a component can be assigned a value by using an EL expression, it’s easy to build
dynamic, data-driven user interfaces.
Here are some examples of how to use EL:
• For the component’s value: At run time, the value of a JSF UI component is determined byits value attribute. Although a component can have static text as its value, typically the
value attribute contains an EL expression that the run-time infrastructure evaluates to
determine what data to display.
• To hide a component when a set of objects you need to display is empty: Use a Boolean-valued expression such as #{not empty ProductList.selectedProducts} in
the UI component’s rendered attribute. If the list of selected products in the object
named ProductsList is empty, the rendered attribute evaluates to false and the
component disappears from the page.
For more information about expression language, see:
http://java.sun.com/j2ee/1.4/docs/tutorial/doc/JSPIntro7.html
http://www.oracle.com/technology/sample_code/tutorials/jsp20/simpleel.html

8/18/2019 D53979GC11_sg2.pdf
http://slidepdf.com/reader/full/d53979gc11sg2pdf 200/381Oracle Fusion Middleware 11g : Build Applications with ADF I 15 - 34
Copyright © 2009, Oracle. All rights reserved.
Characteristics of Partial Page Rendering (PPR)
PPR:
• Is enabled by ADF Faces
• Enables redrawing only a portion of a page
• Requires server round-trip:
– Rerenders only a portion of the server-side component tree
– Downloads only the appropriate fragment of HTML
• Is currently certified on IE 7.0+ and Firefox 2.0.0.2 +
• Is supported (but not certified) on Firefox 3.0 and Safari
3.1.2
• Implements certain ADF Faces patterns
– Single component refresh
– Cross-component refresh
• Can be enabled declaratively or programmatically
Partial Page RenderingUnlike standard JSF events, ADF Faces events support Ajax-style partial postbacks to enable
Partial Page Rendering (PPR), which enables refreshing portions of page content that have
minimal processing without the need to redraw the entire page. In ADF Faces components, this
is implemented by a hidden IFrame, which is automatically added to a Web page when one of
the following ADF Faces elements is used: af:document, afh:body or
af:panelPartialRoot.
PPR is currently supported on the following browsers:
• Internet Explorer 7.0 and above on Windows
• Firefox 2.0.0.2 and above
Two main Ajax patterns are implemented with PPR:
• Single component refresh: Implemented natively; for example, the ADF Faces table
component comes with built-in functionality that enables you to scroll through the table,
sort the table by clicking a column header, mark a line or several lines for selection, and
expand specific rows in the table—all through declarative property settings with no coding
needed.
• Cross-component refresh: Implemented declaratively or programmatically by the
application developer by defining ADF Faces UI components to act either as a trigger for a
partial update or as a partial listener to be updated.

8/18/2019 D53979GC11_sg2.pdf
http://slidepdf.com/reader/full/d53979gc11sg2pdf 201/381Oracle Fusion Middleware 11g : Build Applications with ADF I 15 - 35
Copyright © 2009, Oracle. All rights reserved.
Target component:
(must specify triggering
component)
Enabling PPR Declaratively
Triggering component:
(must have unique ID andcause a Submit)
Enabling PPR DeclarativelyFor a component to trigger another component to refresh, the trigger component must have a
unique ID, which is a valid XML name, and must cause a submit when an appropriate action
takes place. For a component to be refreshed as triggered by another component, it must declare
which other components are the triggers.
The following are three main component attributes used in PPR:• autoSubmit: When set to true, and an appropriate action takes place (such as a value
change), the component automatically submits the enclosing form. For PPR, you may use
this in conjunction with a listener attribute bound to a method that performs some logic
when an event that is based on the submit is launched.• partialSubmit: When set to true, the page partially submits when the button or link
is clicked. You might use this in conjunction with an actionListener method that
performs some logic when the button or link is clicked.
• partialTriggers: Use this attribute to list the IDs of components whose change
events are to trigger this component to be refreshed. Use a space between multiple IDs.
When any of those triggering components is submitted or updated (for example, through anautoSubmit), this component is also updated. All rendered components support the
partialTriggers attribute.

8/18/2019 D53979GC11_sg2.pdf
http://slidepdf.com/reader/full/d53979gc11sg2pdf 202/381Oracle Fusion Middleware 11g : Build Applications with ADF I 15 - 36
Enabling PPR Declaratively (continued)
To enable a component to partially refresh another component, perform the following steps:
1. On the trigger component:- Set the id attribute to a unique value.
- If it is an input component in a form, set the autoSubmit attribute of the
component to true. Otherwise, set the partialSubmit attribute of the
component to true.2. On the target component that you want to partially refresh when the trigger command
component is activated, set the partialTriggers attribute to the ID of the trigger
component. If the component refresh is to be triggered by more than one other component,
list their IDs separated by spaces. It is recommended that you use the partial trigger editor
for choosing the ID values. If the target component is inside a *container* component, the
partialTrigger value might contain that *container* ID as well—which the partial trigger
editor would automatically pick up.
At run time, when the triggering component fires a partial event, the output component, which is
listening for partial events from the triggering component, refreshes its values using PPR.
Example:
<af:commandButton text="Toggle" id="commandButton1“ partialSubmit="true"actionListener="#{backing_page.commandButton1_actionListener}"/><af:outputText value="Hello World" binding="#{backing_page.outputText1}"
id="outputText1" partialTriggers="commandButton1"/>
Setting partialSubmit to true (the default value is false) on af:commandButtoncauses ADF Faces to perform the action through a partial page submit when the button is clicked
(action listeners and events, as used in the example, are discussed the lesson titled “Respondingto Application Events”). The partialTriggers attribute on af:outputText tells the
component to listen for any event triggered by the af:commandButton; when an event istriggered, the af:outputText component automatically refreshes itself. ADF Faces does not
rerender the entire page, but only those components (for example, af:outputText) that are
listening for events fired by trigger components (for example, af:commandButton) are
rerendered.
Note that only the following ADF Faces command components use full page rendering for theiraction events by default (that is, partialSubmit is false by default):
• af:commandButton• af:commandLink• af:commandNavigationItem
In contrast, the following command components always use PPR for their action events (that is,partialSubmit is true by default), unless explicitly set otherwise:
• af:commandMenuItem• af:commandToolbarButton
Like action events, value change events in ADF Faces components can also use PPR. ADFFaces input and select components (such as af:inputText and af:selectOneChoice)
automatically trigger partial page requests when their autoSubmit attribute is set to true.

8/18/2019 D53979GC11_sg2.pdf
http://slidepdf.com/reader/full/d53979gc11sg2pdf 203/381Oracle Fusion Middleware 11g : Build Applications with ADF I 15 - 37
Copyright © 2009, Oracle. All rights reserved.
Native PPR: Example
Native PPR: ExampleAs an example, the slide shows a page with two af:showDetailItem components in a
tabbed panel near the bottom of the display, one for Product Details and one for Stock Levels.
When the user selects one of the tabs, the page renders only that portion of the page, not the
whole page. This behavior is built into the components; you do not need to add any code.

8/18/2019 D53979GC11_sg2.pdf
http://slidepdf.com/reader/full/d53979gc11sg2pdf 204/381Oracle Fusion Middleware 11g : Build Applications with ADF I 15 - 38
Copyright © 2009, Oracle. All rights reserved.
Declarative PPR: Example
<af:commandToolbarButtonid="updateToolbarButton"text="Update Shopping Cart"/>
<af:commandToolbarButtonid="deleteToolbarButton"text="Delete“/>
<af:commandMenuItemid=" menuDelete" partialSubmit="true"text="Delete"/>
<af:table//bindings
partialTriggers="deleteToolbarButton menuDelete updateToolbarButton">
//list of columns
</af:table>
Declarative PPR: ExampleThe example in the slide is the View Cart page of the course application, which contains the
following code:
<af:panelCollection id="tableCollection"><f:facet name="toolbar"><af:toolbar><af:commandToolbarButton
actionListener="#{FODShoppingCartBean.onDeleteRow}"text="Delete"disabled="#{!bindings.Delete.enabled}"id="deleteToolbarButton">
<af:setActionListener from="#{'Modified'}"to="#{requestScope.cartStatus}"/>
</af:commandToolbarButton><af:commandToolbarButton id="updateToolbarButton" text="Update Shopping
Cart"/></af:toolbar>
</f:facet>

8/18/2019 D53979GC11_sg2.pdf
http://slidepdf.com/reader/full/d53979gc11sg2pdf 205/381Oracle Fusion Middleware 11g : Build Applications with ADF I 15 - 39
Declarative PPR: Example (continued)
<af:table value="#{bindings.ShoppingCartItem1.collectionModel}"var="row" rows="#{bindings.ShoppingCartItem1.rangeSize}"first="#{bindings.ShoppingCartItem1.rangeStart}"emptyText="#{bindings.ShoppingCartItem1.viewable ? 'No rows yet.' :
'Access Denied.'}"fetchSize="#{bindings.ShoppingCartItem1.rangeSize}“
selectedRowKeys="#{bindings.ShoppingCartItem1.collectionModel.selectedRow}"selectionListener="#{bindings.ShoppingCartItem1.collectionModel.makeCurrent}"rowSelection="single" id="table1" inlineStyle="width:100%"contextMenuId="tablePopup"partialTriggers="deleteToolbarButton menuDelete updateToolbarButton">
//list of columns//...//...
</af:table><af:popup id="tablePopup">
<af:menu text="menu 1" id="tablePopupMenu"><af:commandMenuItem text="Delete"
actionListener="#{FODShoppingCartBean.onDeleteRow}"id=" menuDelete" partialSubmit="true"><af:setActionListener from="#{'Modified'}"
to="#{requestScope.cartStatus}"/></af:commandMenuItem>
</af:menu></af:popup>
</af:panelCollection>
This example illustrates setting partialTriggers on a table to the IDs of three components.
You can see that it is not necessary to explicitly set partialSubmit on the toolbar buttons, because it is set to true by default on this type of component. However, partialSubmithas been explicitly set to true on the command menu item, even though it was not necessary to
explicitly do so because it is also set to true by default on this type of component.

8/18/2019 D53979GC11_sg2.pdf
http://slidepdf.com/reader/full/d53979gc11sg2pdf 206/381Oracle Fusion Middleware 11g : Build Applications with ADF I 15 - 40
Copyright © 2009, Oracle. All rights reserved.
Enabling PPR Programmatically
Why?• Need logic to determine if component should refresh
• Refresh should occur on only one of several events that a
triggering component may fire (for example, on row
selection in table, use a selection listener)
How? Use the addPartialTarget method.
Enabling PPR ProgrammaticallyIf you need to execute some logic to determine whether a component should be refreshed, you
cannot handle the refresh using partial triggers, but need to use a different technique.
Also, if you need to refresh a component only when a certain event occurs (such as when the
selection changes), and not when other events are triggered, using partial triggers may not be the
most efficient method to use, because when you use partial triggers the component is refreshed
for all events that are fired by those trigger components. For example, a table supports multiple
events, such as sorting and selecting events. Similarly, for components that display the results of
complicated queries, if you want to refresh the component only when the selection changes, a
more efficient way than using partial triggers is to use a selection listener.
The addPartialTarget() method enables you to add a component as a partial target for an
event, so that when that event is triggered, the partial target component is refreshed. With this
technique, you can associate the component you want to have refreshed with the event that is to
trigger the refresh.
The following example, part of a managed bean, adds a UI component as a partial target :
public void doPartialRefresh(UIComponent uc){ AdfFacesContext adfctx = AdfFacesContext.getCurrentInstance();adfctx.addPartialTarget(uc);}

8/18/2019 D53979GC11_sg2.pdf
http://slidepdf.com/reader/full/d53979gc11sg2pdf 207/381Oracle Fusion Middleware 11g : Build Applications with ADF I 15 - 41
Copyright © 2009, Oracle. All rights reserved.
Enabling Automatic PPR
To enable automatic PPR:
• Select a binding in the
page definition file
• Set ChangeEventPolicyto ppr
Enabling Automatic PPRConfiguring PPR manually can be tedious and error-prone, especially when back-end business
logic is added to the mix. The complexity rises further when page developers use back-end
components that are developed by another team, because they may not be aware of how the
back-end logic changes values.
To resolve this difficulty, you can enable automatic partial page refresh on the bindings of any
page. This causes components whose values change as a result of back-end business logic to be
automatically repainted. At run time, the binding layer is notified of value changes, and
appropriate components are added to the PPR targets list.
This feature enables you to avoid much of the manual PPR configuration, so that you can focuson building the UI or business logic.

8/18/2019 D53979GC11_sg2.pdf
http://slidepdf.com/reader/full/d53979gc11sg2pdf 208/381Oracle Fusion Middleware 11g : Build Applications with ADF I 15 - 42
Copyright © 2009, Oracle. All rights reserved.
Conforming to PPR Guidelines
• Purposes of PPR: – Improve application performance
– Improve the user experience
• Guidelines for using PPR:http://www.oracle.com/technology/tech/blaf/specs/ppr.html
• PPR should not be used:
– When navigating to another page
– When response times may be long
– When multiple sections of the page need to be redrawn
• PPR may cause accessibility issues.
Conforming to PPR GuidelinesWhen PPR is implemented correctly, it improves application performance as follows:
• Rendering performance is improved by generating only a subset of the page.
• Network traffic is reduced by sending only a subset of the page’s contents to the browser.
• User perception of performance is improved because of not spending time looking at a
blank page.
When performance improvement is not possible with PPR, it should not be implemented, thus
avoiding unnecessary code bloat.
PPR should not be invoked in the following contexts:
• When navigating to another page, because some page elements, such as page titles, do notchange during PPR
• When response times may be long (user is blocked during a partial page submit), such as:
- Database queries or database maintenance operations
- Processes that demand significant middle-tier processing
• When multiple sections of the page need to be redrawn, such as:
- Action or choices that affect more than half the content of the page
- Inline messaging, which features a message box at the top of the page, and may insert
inline messages below multiple fields

8/18/2019 D53979GC11_sg2.pdf
http://slidepdf.com/reader/full/d53979gc11sg2pdf 209/381Oracle Fusion Middleware 11g : Build Applications with ADF I 15 - 43
Copyright © 2009, Oracle. All rights reserved.
Summary
In this lesson, you should have learned to:
• Use complex layout components
• Explain how to use ADF Faces skins
• Use dynamic page layout

8/18/2019 D53979GC11_sg2.pdf
http://slidepdf.com/reader/full/d53979gc11sg2pdf 210/381Oracle Fusion Middleware 11g : Build Applications with ADF I 15 - 44
Copyright © 2009, Oracle. All rights reserved.
Practice 15 Overview:
Using ADF Faces Layout Components
This practice covers the following topics:
• Modifying the layout of pages
• Defining partial page rendering
Practice 15 Overview: Using ADF Faces Layout ComponentsIn this set of practices, you use layout components and techniques to enhance the appearance of
the application, and you implement partial page rendering to coordinate products with a selected
subcategory.

8/18/2019 D53979GC11_sg2.pdf
http://slidepdf.com/reader/full/d53979gc11sg2pdf 211/381
Copyright © 2009, Oracle. All rights reserved.
Ensuring Reusability

8/18/2019 D53979GC11_sg2.pdf
http://slidepdf.com/reader/full/d53979gc11sg2pdf 212/381Oracle Fusion Middleware 11g : Build Applications with ADF I 16 - 2
Copyright © 2009, Oracle. All rights reserved.
Objectives
After completing this lesson, you should be able to do the
following:
• Explain the benefits of reusing components
• Create and use a resource catalog
• Create and use ADF libraries
• Define and use a task flow template
• Create and use a page template
• Create a declarative component and use it on a page
• Create a page fragment and use it in a bounded task flow
• Use a bounded task flow as a region
Lesson AimThis lesson teaches you to create and use components that are reusable: page templates, page
fragments, declarative components, and bounded task flows in regions. It also introduces the
concepts of the Resource Catalog and ADF libraries to package components and make them
available for reuse.

8/18/2019 D53979GC11_sg2.pdf
http://slidepdf.com/reader/full/d53979gc11sg2pdf 213/381Oracle Fusion Middleware 11g : Build Applications with ADF I 16 - 3
Copyright © 2009, Oracle. All rights reserved.
Benefits of Reusability
Designing code to be reused has the following benefits:
• Increased developer productivity
• Fewer bugs—debug once
• Consistency
– In functionality
– In look and feel
• Easier maintainability
• Rapid adaptability
Benefits of ReusabilityDuplicating code or content is one of the worst practices. It can be an easy solution sometimes,
but changing the application becomes a lot more difficult, which means that in the long term,
you can’t adapt to new user requirements or fix problems quickly. Ideally, an application
shouldn't contain multiple versions of the same code and the Web content shouldn’t be copied
and pasted.
Code reuse can increase developer productivity and application maintainability. Instead of
reinventing the wheel, you should always look for well-designed frameworks and customizable
components. Application-specific code can also be reused across modules and even across
related projects. This latter type of reusability allows you to make rapid changes, exploit new
features globally, and spend less time testing and debugging.
These things might sound like good advice for programmers, but Web developers should pay
attention to them too. Oracle ADF Faces provides built-in components along with support for
creating additional reusable components. Very often, however, the bits of HTML and JSP
markup are copied from one Web page and pasted into other pages, which means that multiplied
markup has to be modified everywhere when the Web content changes. In addition, the look of
an application becomes inconsistent if some of the pages aren’t updated. This doesn’t happen if
the UI parts are reused across pages so that any change requires editing in exactly one place.

8/18/2019 D53979GC11_sg2.pdf
http://slidepdf.com/reader/full/d53979gc11sg2pdf 214/381Oracle Fusion Middleware 11g : Build Applications with ADF I 16 - 4
Copyright © 2009, Oracle. All rights reserved.
Designing for Reuse
• Guidelines:
– Use naming conventions.
— Avoid naming conflicts.
— Facilitate identifying component functionality.
– Standardize storage by agreeing on:
— Type of repository needed
— Storage and organization
— Access methods
• Make components available for reuse by using:
– Resource catalog
– ADF library
Designing for ReuseCreating and consuming reusable components should be included in the early design and
architectural phases of software projects. You and your development team should consider
which components are candidates for reuse, not only in the current applications but also for
future applications and for applications being developed in other departments.
When you create reusable components, you should try to create unique and relevant names for
the application, project, application module, task flow, or any other relevant file or component.
Do not accept the JDeveloper Wizard’s default names, but try to have unique names to avoid
name conflicts with other projects or components in the application. You should also consider
creating standardized naming conventions so both creators and consumers of ADF Library JARs
can readily identify the component functionality.
You and your team should decide on the type of repository needed to store the library JARs,
where to store them and how to access them. You should consider how to organize and group the
library JARs in a structure that fits your organizational needs.

8/18/2019 D53979GC11_sg2.pdf
http://slidepdf.com/reader/full/d53979gc11sg2pdf 215/381Oracle Fusion Middleware 11g : Build Applications with ADF I 16 - 5
Copyright © 2009, Oracle. All rights reserved.
Using a Resource Catalog
A resource catalog:
• Enables application developers to find and incorporate
shared resources, such as libraries containing ADF BC
Model Objects, validators, message bundles, and so on,
that were created by other members of the team
• Provides a federated view of the resources from one or
more otherwise unrelated repositories in a unified search
and browse UI
• Enables you to store libraries comprising a commonrepository that can be used by the developers building any
client application
• Ensures that all application developers use the same
business model without any discrepancies
Using a Resource CatalogThe Resource Catalog is your window into the many disparate resources your application may
need to consume. It enables you to define connections to the resource providers, and to drag
those resources into your application as needed. The resource catalog provides a search tool to
search all the defined repositories in a single action. Connections can be created for the
following types of resource repositories:
• Application server
• Database
• File system
• UDDI Registry
• URL adapter • WebDAV
• BAM/Fabric
• BI Presentation server
• BPEL
• MDS connection
• Portlet producers
• Virtual Content Repository (VCR)
• WSDL adapter

8/18/2019 D53979GC11_sg2.pdf
http://slidepdf.com/reader/full/d53979gc11sg2pdf 216/381Oracle Fusion Middleware 11g : Build Applications with ADF I 16 - 6
Copyright © 2009, Oracle. All rights reserved.
Creating a Resource Catalog
Creating a catalog:
Adding resources to
a catalog:
Creating a Resource CatalogThe Resource Palette is the mechanism for managing resource catalogs and connections. You
can open the Resource Palette by selecting View > Resource Palette from the menu. From the
Resource Palette you can create new catalogs or connections or import existing ones from an
archive. You can also search for a resource.
You can create a new folder in a catalog by right-clicking the catalog and selecting New Folder.
You also can apply a filter to selectively show or hide groups of resources, or you can export the
catalog or connection to an archive. When you create a catalog, only you have permission to
view or edit it. You can share the catalog by granting access to other users.
To add resources to a catalog, you first create a connection to those resources in the Connections panel of the Resource Palette. Then you can right-click the resource and select Add to Catalog.
A pop-up list enables you to choose from the existing catalogs, or you can create a new one by
clicking Show Hierarchy and then New Catalog.

8/18/2019 D53979GC11_sg2.pdf
http://slidepdf.com/reader/full/d53979gc11sg2pdf 217/381Oracle Fusion Middleware 11g : Build Applications with ADF I 16 - 7
Copyright © 2009, Oracle. All rights reserved.
Reusing Components
ADF Library enables you to reuse components:
• Package them into ADF Library JAR files.
• Add them to a resource catalog.
• Add the library to a project to use its
components.
Reusing ComponentsIn the course of application development, certain components are often used more than once.
Whether the reuse happens within the same application, or across different applications, it is
often advantageous to package these reusable components into a library that can be shared
between different developers, across different teams, and even across departments within an
organization.
ADF Library provides a convenient and practical way to create, deploy, and reuse high-level
components. You should design your application with component reusability in mind. If you
created components that can be reused, you can package them into JAR files and add them to a
resource catalog. If you need a component, you may look into the resource catalog for that
component and then add the library into your project or application.
For example, you can create an application module for a domain and package it up to be used as
the model project in several different applications. Or, if your application consumes
components, you may be able to load a page template component from a repository of ADF
Library JARs to create common look-and-feel pages. Then you can put your page flow together
by stringing several task flows components pulled from the library.

8/18/2019 D53979GC11_sg2.pdf
http://slidepdf.com/reader/full/d53979gc11sg2pdf 218/381Oracle Fusion Middleware 11g : Build Applications with ADF I 16 - 8
Copyright © 2009, Oracle. All rights reserved.
Creating an ADF Library
1
23
4
Creating an ADF LibraryA project corresponds to one ADF Library JAR. If you create multiple projects and want to
reuse components from each of the projects, you may need to create an ADF Library JAR for
each project. In other situations, you may be able to involve multiple components under one
project to create a single ADF Library JAR. For example, you may be able to create business
components, application module, task flow, and page template all under one project and create
one ADF Library JAR.
To package and deploy a project into the ADF Library JAR, perform the following steps:
1. In the left pane of the Project Properties window for the project that contains the
component you want to make reusable, select Deployment and then click New.
2. In the Create Deployment Profile dialog box, select ADF Library JAR file for Archive
Type drop-down list and enter a name for the deployment profile. Click OK.
3. Edit the profile you just created. In the ADF Library JAR Deployment Profile Properties
dialog box, verify the default directory path or enter a new path to store your ADF Library
JAR file. Click OK, and then click OK again.
4. In the Application Navigator, right-click the project and select the followng: from the
context menu Deploy > deployment > to ADF Library, where deployment is the name of
the deployment profile

8/18/2019 D53979GC11_sg2.pdf
http://slidepdf.com/reader/full/d53979gc11sg2pdf 219/381Oracle Fusion Middleware 11g : Build Applications with ADF I 16 - 9
Copyright © 2009, Oracle. All rights reserved.
1
Adding an ADF Library to a Project
by Using the Resource Palette
2
3
4
Adding an ADF Library to a Project by Using the Resource PaletteUsing the JDeveloper Resource Palette is the easiest and most efficient way to add library
resources to a project. To add the component to the project using the Resource Palette, perform
the following steps:
1. Select Resource Palette from the View menu.
2. In the Resource Palette window, click New and select Connection > File System from the
context menu.
3. In the Create File System Connection dialog box, enter a name for the Connection ID and
then enter the path of the JAR. Click Test Connection and then click OK if the connection
is successful.
4. The new ADF Library JAR appears under the connection name in the Resource Palette.Right-click the JAR or any component within the JAR subdirectory and select Add to
Active Project. The JAR is added to the class path and all its supported components are
added to the current project.
You cannot choose to add only one component in a multicomponent ADF Library JAR, but for
application modules and data controls, you have the option to drag the application module or
data control from the Resource Palette into the Data Control Panel.
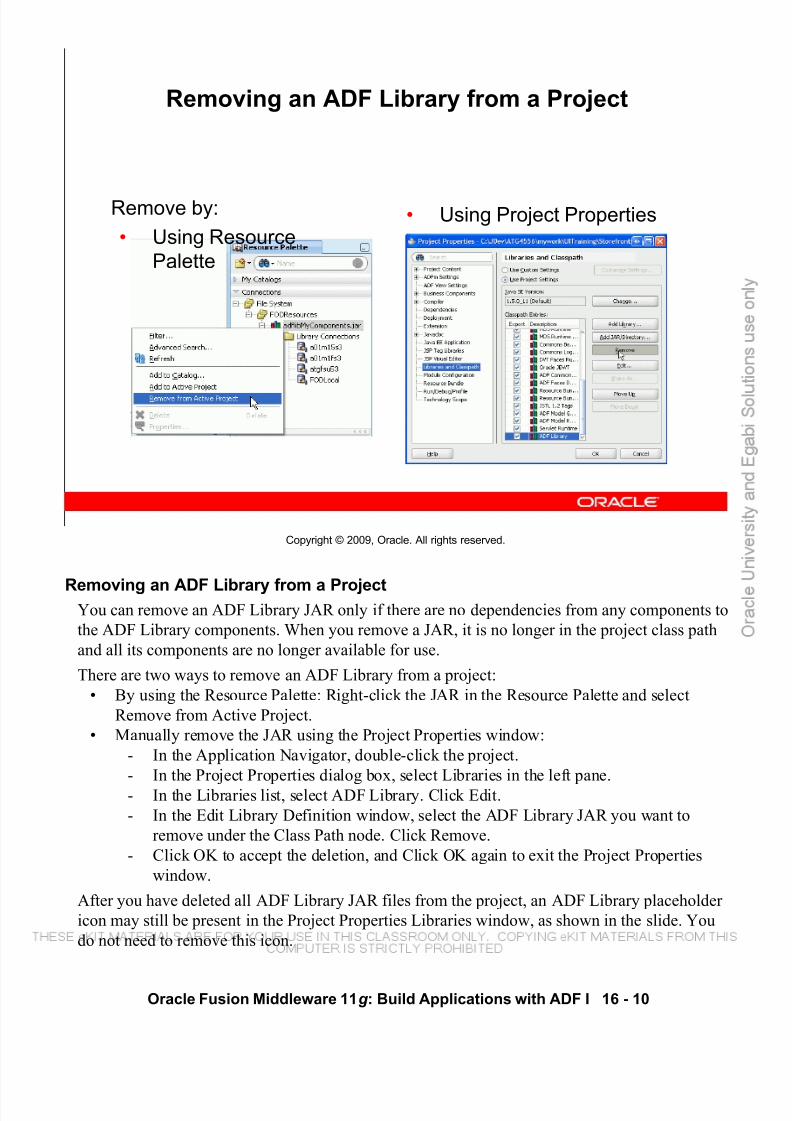
8/18/2019 D53979GC11_sg2.pdf
http://slidepdf.com/reader/full/d53979gc11sg2pdf 220/381Oracle Fusion Middleware 11g : Build Applications with ADF I 16 - 10
Copyright © 2009, Oracle. All rights reserved.
Removing an ADF Library from a Project
Remove by:
• Using Resource
Palette
• Using Project Properties
Removing an ADF Library from a ProjectYou can remove an ADF Library JAR only if there are no dependencies from any components to
the ADF Library components. When you remove a JAR, it is no longer in the project class path
and all its components are no longer available for use.
There are two ways to remove an ADF Library from a project:
• By using the Resource Palette: Right-click the JAR in the Resource Palette and select
Remove from Active Project.
• Manually remove the JAR using the Project Properties window:
- In the Application Navigator, double-click the project.
- In the Project Properties dialog box, select Libraries in the left pane.
- In the Libraries list, select ADF Library. Click Edit.
- In the Edit Library Definition window, select the ADF Library JAR you want to
remove under the Class Path node. Click Remove.
- Click OK to accept the deletion, and Click OK again to exit the Project Properties
window.
After you have deleted all ADF Library JAR files from the project, an ADF Library placeholder
icon may still be present in the Project Properties Libraries window, as shown in the slide. You
do not need to remove this icon.

8/18/2019 D53979GC11_sg2.pdf
http://slidepdf.com/reader/full/d53979gc11sg2pdf 221/381Oracle Fusion Middleware 11g : Build Applications with ADF I 16 - 11
Copyright © 2009, Oracle. All rights reserved.
Restricting BC Visibility in Libraries
Set Library Private property for a business component to true
if you don’t want consumers to see the object in the library JAR.
Restricting BC Visibility in LibrariesWhen deploying a library for reuse, there may be some business components that are not
intended for reuse, but must be included in the library because other components depend upon
them. For example:
• The library developer wants consuming projects to access components in the library only
through services exposed on the application module. All components in the library are
private and may not be reused.
• The library developer wants consuming projects to access an entity object only by using or
extending view objects in the library; the entity object contains attributes that should not be
exposed in any view object. In this case the entity object is private and the view objects are
public.
You can mark an ADF BC object as public (the default) or private. Setting Library Private to
true keeps the object from appearing to the consumer who is browsing the library JAR.
To mark a BC object as private, perform the following steps:
1. Open the object in the editor.2. In the Property Inspector, click the Type tab and set Library Private to true.
When an object is marked as private, it is not visible in the Resource Catalog or in the
Application Navigator of the consuming project.

8/18/2019 D53979GC11_sg2.pdf
http://slidepdf.com/reader/full/d53979gc11sg2pdf 222/381Oracle Fusion Middleware 11g : Build Applications with ADF I 16 - 12
Copyright © 2009, Oracle. All rights reserved.
Types of Reusable Components
ADF supports reusing the following types of components:
• Data controls
• Application modules
• Business components
• Task flows
• Task flow templates
• Page templates• Declarative components
Types of Reusable ComponentsThe following reusable components are supported by ADF:
• Data Control: Any data control can be packaged into an ADF Library JAR.
• Application Module: When you package an application module data control, you also
package the business components associated with that application module.
• Business Components: Business components are the entity objects, view objects, and
associations used in the business layer; you can package them by themselves or together
with an application module.
• Task Flows and Task Flow templates: Task flows can be packaged into an ADF Library
JAR for reuse. ADF bounded task flows built using pages can be dropped onto pages,
creating a link to call the bounded task flow. If an ADF task flow template was created inthe same project as the task flow, the ADF task flow template is included in the ADF
Library JAR and is reusable.
• Page Templates: You can package a page template and its artifacts into an ADF Library
JAR. If the template uses image files and they are included in a directory within your
project, these files are also available for the template during reuse.
• Declarative Components: You can create declarative components and package them for
reuse. The tag libraries associated with the component are included and loaded into the
consuming project.

8/18/2019 D53979GC11_sg2.pdf
http://slidepdf.com/reader/full/d53979gc11sg2pdf 223/381Oracle Fusion Middleware 11g : Build Applications with ADF I 16 - 13
Copyright © 2009, Oracle. All rights reserved.
Using Task Flow Templates
Using Task Flow TemplatesTask flow templates provide the ability to capture common task flows and behavior for reuse
across many different bounded task flows. Two reuse mechanisms are provided: by copy and by
reference. Exception handling is an area where developers may make use of task flow templates.
Task flow templates define reusable skeletons for task flow definitions to extend and, therefore,
cannot be run on their own. To run a task flow template within JDeveloper, you must create a
task flow definition that extends it and run that task flow instead.
You create a task flow template from the New Gallery by selecting Web Tier > JSF > ADF Task
Flow Template.

8/18/2019 D53979GC11_sg2.pdf
http://slidepdf.com/reader/full/d53979gc11sg2pdf 224/381Oracle Fusion Middleware 11g : Build Applications with ADF I 16 - 14
Copyright © 2009, Oracle. All rights reserved.
Characteristics of Page Templates
Page templates:
• Are reusable
• Enable consistent look across pages or page fragments
• Are built from standard ADF components
• Cannot be nested
• Use partial page refresh when navigating between pagesthat use the same template
• Use three types of files: – Page-specific definition file (.jspx)
– Definition file for all templates: pagetemplate-metadata.xml
– Application or library file (.cpx)
Characteristics of Page TemplatesA page template provides a reusable page definition that enforces consistent branding and page
layout across the application. It enables developers to change the branding and page layout for
all the pages or page fragments that use the page template by changing only the page template
definition. Templates can contain attributes and ADF bindings.
Page templates use standard ADF components; so all skins are automatically applied. They
cannot be nested, or based on another page template. Pages that use the same page template take
advantage of partial page refresh—just the content that is specific to a page changes without the
need to refresh the template.
There are two sets of page template definition files:• For each page template there is:- A JSP xml file (.jspx): Defines the rendered UI in terms of other JSF components,
facet references, and EL expressions resolved against the page template’s UIattributes and model
- An optional model-specific file; for example, an ADF page definition (.pdm) file
• Across all page templates there is:- A pagetemplate-metadata.xml file: Contains the paths of all the page
template definitions in the project; located in the META-INF directory of the project
- An application or library .cpx file: Contains any application and library-wide model
information

8/18/2019 D53979GC11_sg2.pdf
http://slidepdf.com/reader/full/d53979gc11sg2pdf 225/381Oracle Fusion Middleware 11g : Build Applications with ADF I 16 - 15
Copyright © 2009, Oracle. All rights reserved.
Creating a Page Template
Creating a Page TemplateYou can create a JSF page template from the New Gallery by selecting Web Tier > JSF > JSF
Page Template. You give it a file name, and optionally a different page template name. You can
optionally select to create an associated page definition file as well.
The Create JSF Page Template dialog box also enables you to create:
• Facet definitions: Placeholders for content to be provided by page developers
• Attributes: Attributes that can be referenced from the template; abstraction between data
provided on the page and that used by the page
• Model parameters: Parameters in the page definition file that are passed differently from
attributes
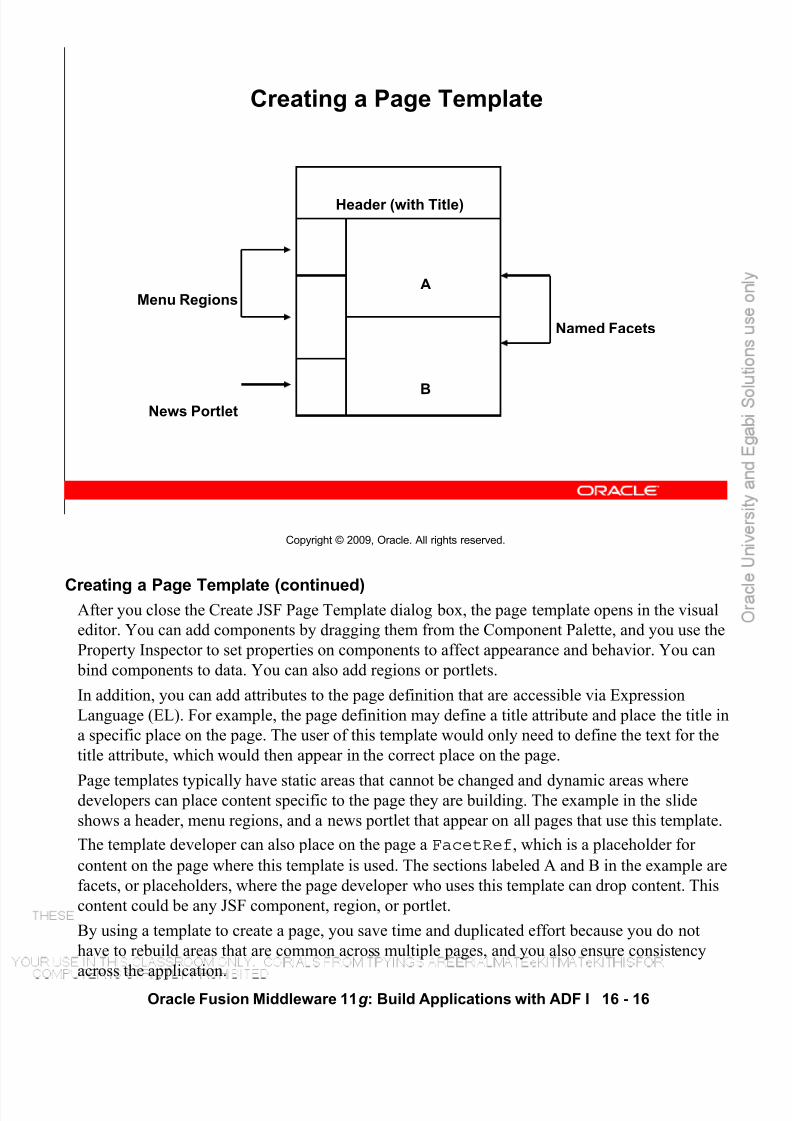
8/18/2019 D53979GC11_sg2.pdf
http://slidepdf.com/reader/full/d53979gc11sg2pdf 226/381Oracle Fusion Middleware 11g : Build Applications with ADF I 16 - 16
Copyright © 2009, Oracle. All rights reserved.
Creating a Page Template
Header (with Title)
A
B
Menu Regions
News Portlet
Named Facets
Creating a Page Template (continued)After you close the Create JSF Page Template dialog box, the page template opens in the visual
editor. You can add components by dragging them from the Component Palette, and you use the
Property Inspector to set properties on components to affect appearance and behavior. You can
bind components to data. You can also add regions or portlets.
In addition, you can add attributes to the page definition that are accessible via Expression
Language (EL). For example, the page definition may define a title attribute and place the title in
a specific place on the page. The user of this template would only need to define the text for the
title attribute, which would then appear in the correct place on the page.
Page templates typically have static areas that cannot be changed and dynamic areas wheredevelopers can place content specific to the page they are building. The example in the slide
shows a header, menu regions, and a news portlet that appear on all pages that use this template.
The template developer can also place on the page a FacetRef, which is a placeholder for
content on the page where this template is used. The sections labeled A and B in the example are
facets, or placeholders, where the page developer who uses this template can drop content. This
content could be any JSF component, region, or portlet.
By using a template to create a page, you save time and duplicated effort because you do not
have to rebuild areas that are common across multiple pages, and you also ensure consistency
across the application.

8/18/2019 D53979GC11_sg2.pdf
http://slidepdf.com/reader/full/d53979gc11sg2pdf 227/381Oracle Fusion Middleware 11g : Build Applications with ADF I 16 - 17
Copyright © 2009, Oracle. All rights reserved.
Editing a Page Template
Header (with Title)
A
B
Header (with Title)
A
B
Footer
Modified TemplateOriginal Template
Must continue
to use the
same named
facets
Editing a Page TemplateA big advantage of page templates is that when you edit the template, any page that uses the
template picks up the changes automatically. However, it is required that you maintain the
named FacetRefs in the template to avoid breaking pages that use the template. The modified
template shown in the slide continues to use facets A and B after modification, so pages built
using that template would still work.

8/18/2019 D53979GC11_sg2.pdf
http://slidepdf.com/reader/full/d53979gc11sg2pdf 228/381Oracle Fusion Middleware 11g : Build Applications with ADF I 16 - 18
Copyright © 2009, Oracle. All rights reserved.
Applying a Page Template to a Page
Applying a Page Template to a PageWhen you create a JSF JSP in JDeveloper, the wizard gives you the choice to use a page
template. If you select to do so, you are presented with a list of known page templates from
which to choose. When you select a template, the wizard presents attributes that are defined in
the template so that you can set initial values, such as title in the example presented previously.
Then the template-based page opens in the visual editor, and you can drop components, regions,
or portlets into one of the named facets on the page. You cannot modify the template itself from
this page.
Pages that are created by using page templates are accessed, packaged, versioned, bookmarked,
and consumed as is any other stand-alone page.
You can also apply a page template to a page fragment. Page fragments are discussed later in
this lesson.
Note: A page template does not necessarily need to be used to construct a single page or page
fragment. It can also be used as reusable sections of the page. However, there is no design-time
support for this, and doing so is outside the scope of this course.
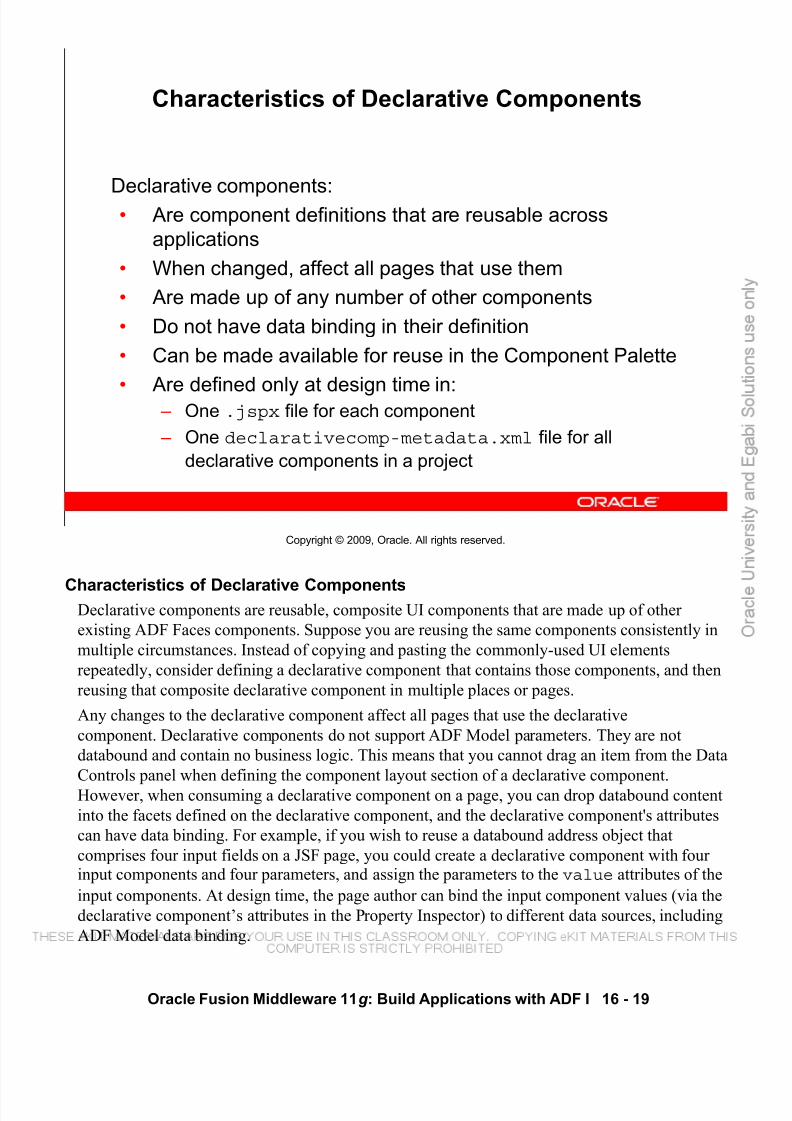
8/18/2019 D53979GC11_sg2.pdf
http://slidepdf.com/reader/full/d53979gc11sg2pdf 229/381Oracle Fusion Middleware 11g : Build Applications with ADF I 16 - 19
Copyright © 2009, Oracle. All rights reserved.
Characteristics of Declarative Components
Declarative components:• Are component definitions that are reusable across
applications
• When changed, affect all pages that use them
• Are made up of any number of other components
• Do not have data binding in their definition
• Can be made available for reuse in the Component Palette
• Are defined only at design time in: – One .jspx file for each component
– One declarativecomp-metadata.xml file for all
declarative components in a project
Characteristics of Declarative ComponentsDeclarative components are reusable, composite UI components that are made up of other
existing ADF Faces components. Suppose you are reusing the same components consistently in
multiple circumstances. Instead of copying and pasting the commonly-used UI elements
repeatedly, consider defining a declarative component that contains those components, and then
reusing that composite declarative component in multiple places or pages.
Any changes to the declarative component affect all pages that use the declarative
component. Declarative components do not support ADF Model parameters. They are not
databound and contain no business logic. This means that you cannot drag an item from the Data
Controls panel when defining the component layout section of a declarative component.
However, when consuming a declarative component on a page, you can drop databound content
into the facets defined on the declarative component, and the declarative component's attributes
can have data binding. For example, if you wish to reuse a databound address object that
comprises four input fields on a JSF page, you could create a declarative component with fourinput components and four parameters, and assign the parameters to the value attributes of the
input components. At design time, the page author can bind the input component values (via the
declarative component’s attributes in the Property Inspector) to different data sources, including
ADF Model data binding.

8/18/2019 D53979GC11_sg2.pdf
http://slidepdf.com/reader/full/d53979gc11sg2pdf 230/381Oracle Fusion Middleware 11g : Build Applications with ADF I 16 - 20
Characteristics of Declarative Components (continued)
Declarative components are composed of other components. For example, you could design a
declarative component to include a facet (placeholder) for the product image component and
facets for two text components to display a product description and product cost. You can also
hide attributes, such as labels, of a declarative component, so that they cannot be changed by
other developers who use the component.
A declarative component cannot be changed or customized at run time. It must be defined atdesign time, and uses the following definition files:
• A JSP xml file (.jspx) that defines the rendered UI in terms of other JSF components,
Facet references, and EL expressions resolved against the declarative component’s UI
attributes; there is one such file for each declarative component• A declarativecomp-metadata.xml file that contains the declarative
components’ file paths in the project; this file, located in the META-INF directory of the
project, is shared across all declarative component definitions in an application or library

8/18/2019 D53979GC11_sg2.pdf
http://slidepdf.com/reader/full/d53979gc11sg2pdf 231/381Oracle Fusion Middleware 11g : Build Applications with ADF I 16 - 21
Copyright © 2009, Oracle. All rights reserved.
Creating a Declarative Component
The JSF DeclarativeComponent dialog box:
• Is invoked with New >
Web Tier > JSF > JSF
Declarative Component
• Creates the<af:componentDef>
tag in .jspx file
• Creates metadata
Creating a Declarative ComponentWhen you invoke the Create JSF Declarative Component dialog box, you can specify the name
of the component, its file name and path, and the package in which to place it. You must add a
tag library, and you can define facets, attributes, and methods for the component. When you
click OK, the .jspx file opens in the editor. You can drag components to the editor to create
the component.
JDeveloper creates an <af:componentDef> tag in the declarative component definition
JSPX fragment; this tag acts as the root of the tag hierarchy. This tag describes the entire
declarative component in two sections:• af:xmlContent section: Defines the declarative component metadata in facet and
attribute elements
• Component layout section: Anything outside of af:xmlContent.
- Defines the actual UI components that make up the composite declarative component
- Requires that only one child is defined for the layout, so you can use one of the panel
layouts to contain multiple elements- Uses af:facetRef tags to reference named facets, and EL expressions containing
named attributes to enable page authors to set their own property values for the
declarative component

8/18/2019 D53979GC11_sg2.pdf
http://slidepdf.com/reader/full/d53979gc11sg2pdf 232/381Oracle Fusion Middleware 11g : Build Applications with ADF I 16 - 22
Copyright © 2009, Oracle. All rights reserved.
Using a Declarative Component
on a Page
To use a declarative component on a page:
• Deploy the component’s project as an ADF library JAR file
• Add the ADF library to your current project.
• Select the ADF library from the Component Palette drop-
down list.
• Select the declarative component and drag it to your page,
providing values for any attributes.
Using a Declarative Component on a PageTo use a declarative component on a page, you first have to ensure that the component appears
in the Component Palette. You then can drag the component to a page just as you would any
other component.
To use a declarative component in another project, you first must deploy the components’
project as an ADF library JAR file and then add it to your current project as described previously
– but add it as a JSP tag library. After it is added to your project, the library appears in the drop
down list in the Component Palette, and any declarative components defined in that library can
be dragged to a JSF JSP.
You can use the Property Palette to provide values for the attributes that you defined. If youmarked any of the attributes as required, when you drag the component to the page a dialog box
appears to enable you to enter attribute values.

8/18/2019 D53979GC11_sg2.pdf
http://slidepdf.com/reader/full/d53979gc11sg2pdf 233/381Oracle Fusion Middleware 11g : Build Applications with ADF I 16 - 23
Copyright © 2009, Oracle. All rights reserved.
Characteristics of Page Fragments
Page fragments:
• Are built like regular pages
• Have page definition files like regular pages do
• Are not defined as a full Web page
• Can be displayed within a page that contains other content
• Cannot contain af:document or f:view tags
• Cannot be run on their own
Characteristics of Page FragmentsAs you build Web pages for an application, some pages may quickly become large and
unmanageable. One possible way to simplify the process of building and maintaining complex
pages is to use page fragments.
Large, complex pages broken down into several smaller page fragments are easier to maintain.
Depending on how you design a page, the page fragments created for an entire page may also be
reused in other pages. For example, suppose different parts of several pages use the same
components, then you might find it beneficial to create page fragments containing those
components, and reuse those page fragments in several pages or in several places on the same
page. Deciding on how many page fragments to create for one or more complex pages depends
on your application, the degree to which you want to reuse portions of a page between multiple
pages, and the need to simplify complex pages.
Page fragments are created and used much like pages, except that page fragments are not defined
as a full Web page. This enables page fragments to be used as a smaller part of a larger page. To
utilize the capability of page fragments to be used as part of a page, it is likely that most pages
for Fusion applications will be built as page fragments.
A page fragment does not contain f:view or af:document; its contents are simply enclosed
within jsp:root. You cannot run page fragments like you can run complete JSF pages.

8/18/2019 D53979GC11_sg2.pdf
http://slidepdf.com/reader/full/d53979gc11sg2pdf 234/381Oracle Fusion Middleware 11g : Build Applications with ADF I 16 - 24
Copyright © 2009, Oracle. All rights reserved.
Creating a Page Fragment
You can create a page fragment by:1. Using the New Gallery
OR
2. Double-clicking a view in a bounded task flow that uses
page fragments
1 2
Creating a Page FragmentTo create a page fragment, perform the following steps:
1. In the Application Navigator, select the project where you want to create and store page
fragments. Then use the JSF Page Fragment item in New Gallery to open the Create JSF
Page Fragment Wizard.2. Enter a name for the page fragment file. By default, JDeveloper uses .jsff for the source
file extension. You cannot overwrite the file extension in the wizard.
3. Accept the default directory for the page fragment, or choose a new location. By default,JDeveloper saves page fragments in the project’s /public_html in the file system. For
example, you could change the default directory to /public_html/fragments.
4. If you want to create a page fragment based on a page template, select a template namefrom the drop-down list.
Another way to create a page fragment is to drag a view to a bounded task flow that uses page
fragments, and then double-click that view to create the page fragment.
When finished, JDeveloper displays the page fragment file in the visual editor. You can drag
components from the Component Palette onto the page fragment. You can use any ADF Facesor standard JSF component, but must not enclose the contents in f:view or af:document.

8/18/2019 D53979GC11_sg2.pdf
http://slidepdf.com/reader/full/d53979gc11sg2pdf 235/381Oracle Fusion Middleware 11g : Build Applications with ADF I 16 - 25
Copyright © 2009, Oracle. All rights reserved.
Using a Page Fragment on a Page
• You can use a page fragment on a page by: – Inserting the jsp:include tag:
— The included page fragment uses the binding context of the
consuming page.
— Page definition file for page fragment is not loaded (doesn’t use
bindings).
– Inserting a bounded task flow with page fragments as a
region in your page; the page fragment can have its own
binding context
• Modifying the page fragment affects all pages that use it(but check the overall layout of consuming pages).
Using a Page Fragment on a PageWhen you build a JSF page using page fragments, the page can use one or more page fragments
that define different portions of the page. The same page fragment can be used more than once
on a page, and in multiple pages.
To consume a page fragment on a JSF page, at the part of the page that will use the pagefragment contents, insert the jsp:include tag to include the desired page fragment file, as in
the following example:<jsp:include page="/fragment_page.jsff"/>
Another way to use a page fragment is as part of a bounded task flow that you add to a page as a
region; this is described shortly.When you modify a page fragment, the pages that consume the page fragment automatically
display the modifications. With pages built from page fragments, when you make layout
changes, you should check that the overall layout of pages that consume the page fragments still
meet requirements.
If the consuming page uses Oracle ADF Model data binding, a page fragment used with
jsp:include uses the binding container of the consuming page, so its page definition file is
not loaded. Only page fragments created as part of ADF bounded task flows can have their own
binding context.

8/18/2019 D53979GC11_sg2.pdf
http://slidepdf.com/reader/full/d53979gc11sg2pdf 236/381Oracle Fusion Middleware 11g : Build Applications with ADF I 16 - 26
Copyright © 2009, Oracle. All rights reserved.
Characteristics of Regions
An ADF region:
• Represents a task flow as part of a page
• Is similar to a portlet, but for local functionality
• Can share information and transaction boundaries with
other page content
Characteristics of RegionsA region is a powerful new feature in Fusion that can be used within a page or page fragment. A
region is a JSF component that represents a task flow as a smaller part of a larger page. You can
use a region to wrap a task flow for display on a page that has other content.
A region is similar to a portlet in functionality and user behavior, but regions are used when the
functionality is in a local context, whereas portlets are used when exposing the functionality for
external usage. Because a region runs locally in the local context, it can share information and
transaction boundaries with the rest of the items on the page, and it doesn’t have the overhead
that a remote portlet does. Any task flow can also be wrapped as a portlet for external usage, but
should be used as a region for internal use cases.
Building well-defined, parameterized task flows that can be used as regions on pages is a good
way to provide reusable and highly maintainable segments of functionality across your
application. You learn about passing parameter between regions in the lesson titled “Passing
Values Between UI Elements.”

8/18/2019 D53979GC11_sg2.pdf
http://slidepdf.com/reader/full/d53979gc11sg2pdf 237/381Oracle Fusion Middleware 11g : Build Applications with ADF I 16 - 27
Copyright © 2009, Oracle. All rights reserved.
Wrapping a Task Flow as a Region
Drag bounded task flow to page as a region:
Default activity is displayed
at design and run time:
Wrapping a Task Flow as a RegionYou can drag to your page a bounded task flow that includes page fragments and create it as a
region on the page. The default activity of the task flow appears in the editor and in the page
when it is first run.
At run time, you can use page navigation (described in the lesson titled “Implementing
Navigation on Pages”) to navigate through the task flow. As you do this, the region refreshes
without redrawing the entire page (partial page refresh).

8/18/2019 D53979GC11_sg2.pdf
http://slidepdf.com/reader/full/d53979gc11sg2pdf 238/381Oracle Fusion Middleware 11g : Build Applications with ADF I 16 - 28
Copyright © 2009, Oracle. All rights reserved.
Converting a Bounded Task Flow to Use Page
Fragments
To use a bounded task flow containing pages as a region,
convert to a task flow with page fragments.
Converting a Bounded Task Flow to Use Page FragmentsWhen you are initially developing a bounded task flow, you may use view activities thatcorrespond to pages (.jspx). However, to use a task flow as a region, the view activities cannot
be full pages, so you can convert the task flow to one that uses page fragments. You have to only
right-click a blank space on the task flow diagram and select Convert to Task Flow with Page
Fragments.
This converts all pages associated with view activities in the bounded task flow to page
fragments. You can optionally save old pages by selecting the Keep Page? check box. New pagefragment names default to the names of the old pages. For example, MyPage.jspx becomes
MyPage.jsff.

8/18/2019 D53979GC11_sg2.pdf
http://slidepdf.com/reader/full/d53979gc11sg2pdf 239/381Oracle Fusion Middleware 11g : Build Applications with ADF I 16 - 29
Copyright © 2009, Oracle. All rights reserved.
Deciding Which to Use
• You can use a page template when you want: – Similar page layout to be used on multiple pages
– Similar look on multiple pages
• You can use a declarative component when you want to:
– Use a similar grouping of components on multiple pages or
applications
– Select the component from the Component Palette
• You can use a bounded task flow when you want to:
– Reuse a set of activities and control flows
– Use multiple page fragments in a region on a page
– Create a portlet from a set of activities and control flows
Deciding Which to UseAt first you may be confused about the differences between page templates, declarative
components, and bounded task flows and when you would want to use each.
You could use a page template when multiple pages have similar layout. For example, you may
want to display several data elements with a master at top and detail at the bottom in a panel
splitter. You may also want several pages to have a similar look and feel, such as branding,
header, footer, or toolbars.
A declarative component is a composite of existing components that you define and reuse from
the Component Palette. If you often find yourself constructing groupings of components that are
the same, you can define a declarative component, so that all you need to do is drag it from theComponent Palette to reuse it in multiple pages or applications. For example, you could define
an address component that could be used whenever you display an address of any type in any
application. That declarative component can be bound to different data, just like any component.
Bounded task flows are useful any time you have a set of activities and control flows that needs
to be reused, such as a shopping cart or checkout in a shopping application, or creating an
account in a banking application. You can call the bounded task flow. When constructed with
page fragments, a bounded task flow can be used in a region on a page, so that the activities are
displayed in the region without refreshing the entire page. You can create a portlet from a task
flow as well.

8/18/2019 D53979GC11_sg2.pdf
http://slidepdf.com/reader/full/d53979gc11sg2pdf 240/381Oracle Fusion Middleware 11g : Build Applications with ADF I 16 - 30
Copyright © 2009, Oracle. All rights reserved.
Summary
In this lesson, you should have learned how to:
• Explain the benefits of reusing components
• Create and use a resource catalog
• Create and use ADF libraries
• Define and use a task flow template
• Create and use a page template
• Create a declarative component and use it on a page• Create a page fragment and use it in a bounded task flow
• Use a bounded task flow as a region

8/18/2019 D53979GC11_sg2.pdf
http://slidepdf.com/reader/full/d53979gc11sg2pdf 241/381Oracle Fusion Middleware 11g : Build Applications with ADF I 16 - 31
Copyright © 2009, Oracle. All rights reserved.
Practice 16 Overview:
Implementing Reusability
This practice covers the following topics:
• Converting bounded task flows to use page fragments
• Creating a page template for the main page and for the
checkout flow
• Using bounded task flows in regions on the main page
Practice 16 Overview: Implementing ReusabilityIn this set of practices, you first convert all of the bounded task flows to use page fragments.
You create page templates and apply them to the existing checkout pages and to a new main
page. You then use the bounded task flows as regions on the main page.

8/18/2019 D53979GC11_sg2.pdf
http://slidepdf.com/reader/full/d53979gc11sg2pdf 242/381

8/18/2019 D53979GC11_sg2.pdf
http://slidepdf.com/reader/full/d53979gc11sg2pdf 243/381

8/18/2019 D53979GC11_sg2.pdf
http://slidepdf.com/reader/full/d53979gc11sg2pdf 244/381Oracle Fusion Middleware 11g : Build Applications with ADF I 17 - 2
Copyright © 2009, Oracle. All rights reserved.
Objectives
After completing this lesson, you should be able to do the
following:
• Define the data model to reduce the need to pass values
• Use a managed bean to hold values
• Store values in memory-scoped attributes
• Use parameters to pass values
Lesson AimThis lesson explains how to pass parameters and values between UI elements such as pages,
regions, and bounded task flows.

8/18/2019 D53979GC11_sg2.pdf
http://slidepdf.com/reader/full/d53979gc11sg2pdf 245/381Oracle Fusion Middleware 11g : Build Applications with ADF I 17 - 3
Copyright © 2009, Oracle. All rights reserved.
Holding Values in the Data Model
(Business Components)
• Define transient attributes to hold values.
• Row concurrency can coordinate multiple pages without
parameter passing.
• Defining view links in the data model:
– Coordinates master and detail pages
– Re-executes queries as needed
– Reduces the need to pass parameters between UI pages
and regions
Holding Values in the Data ModelProperly constructing a data model in ADF Business Components eliminates some of the need to
pass parameters between pages and regions. For example:
• You can define transient attributes in business components to retain values.
• ADF BC maintains the state of the currently selected row, so a query form that displays
results on a different page doesn’t have to pass a parameter to that page, but relies on row
concurrency.
• When you define view links between related view objects, you can rely on row
concurrency to coordinate pages that contain master and detail results, without explicitly
coding parameter passing or re-executing of queries.
Development of the user interface is therefore made much easier if you take time to define the
data model to consider related data that may need to be displayed.

8/18/2019 D53979GC11_sg2.pdf
http://slidepdf.com/reader/full/d53979gc11sg2pdf 246/381Oracle Fusion Middleware 11g : Build Applications with ADF I 17 - 4
Copyright © 2009, Oracle. All rights reserved.
Holding Values in Managed Beans
• Managed beans are optional and can be used to:
– Hold values
– Store state
• How?
– Managed properties
– Scoped managed bean attributes
Holding Values in Managed BeansManaged beans enable you to hold values, either in properties of the managed bean or in scoped
managed bean attributes. You learn more about configuring and coding managed beans in the
lesson titled “Responding to Application Events.”
You can pass values between pages by using managed beans to hold the values. The JSF run
time manages instantiating these beans on demand when any EL expression references them for
the first time. When displaying a value, the JSF run time evaluates the EL expression and pulls
the value from the managed bean to populate the component with data when the page is
displayed. If the user updates data in the UI component, the JSF run time pushes the value back
into the corresponding managed bean based on the same EL expression.

8/18/2019 D53979GC11_sg2.pdf
http://slidepdf.com/reader/full/d53979gc11sg2pdf 247/381Oracle Fusion Middleware 11g : Build Applications with ADF I 17 - 5
Copyright © 2009, Oracle. All rights reserved.
Using Managed Properties
• Managed bean attributes that are exposed through getter
and setter methods
• Configured in the .xml file of the task flow
• Possible values:
– null
– Literal string
– Lists and Maps
– Value binding expression (EL)
Using Managed PropertiesManaged properties are bean attributes that are exposed through setter and getter methods for
write and read access. All attributes not explicitly set as managed properties retain the default
values upon bean instantiation.
The <managed-property> element represents an individual property of a managed bean. A
managed property calls the equivalent setter method of the bean on bean initialization
The <managed-property> element is nested within the <managed-bean> element.
Managed properties must have a name and a value. Optionally they can have a property class, a
description, a display name and an icon. The last three elements are for tools to display the
property and have no meaning for the JSF application at run time.The property class doesn’t need to be mentioned for simple types, as JSF will figure this out.
Although null is among the possible values for a managed property, it is allowed only if the
property is an object. This means that null cannot be used for types of int, boolean, and so
on.
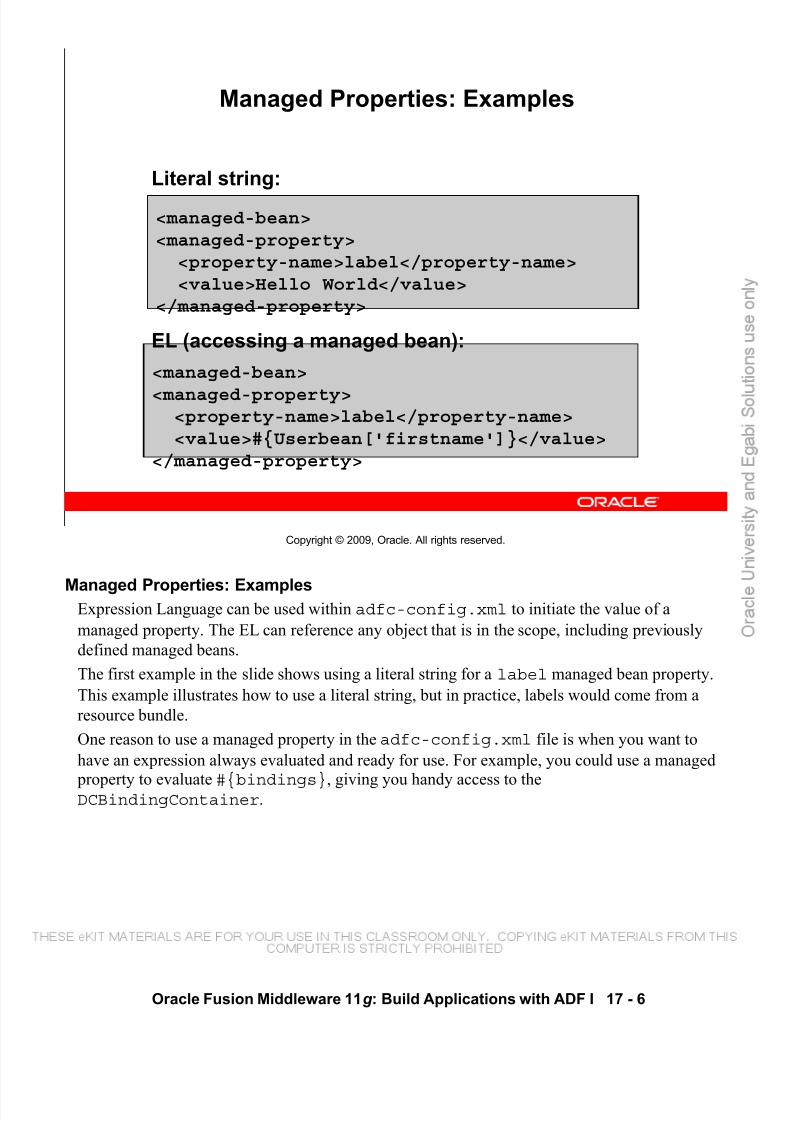
8/18/2019 D53979GC11_sg2.pdf
http://slidepdf.com/reader/full/d53979gc11sg2pdf 248/381Oracle Fusion Middleware 11g : Build Applications with ADF I 17 - 6
Copyright © 2009, Oracle. All rights reserved.
Managed Properties: Examples
Literal string:
<managed-bean><managed-property>
<property-name>label</property-name><value>Hello World</value>
</managed-property>
<managed-bean>
<managed-property><property-name>label</property-name><value>#{Userbean['firstname']}</value>
</managed-property>
EL (accessing a managed bean):
Managed Properties: ExamplesExpression Language can be used within adfc-config.xml to initiate the value of a
managed property. The EL can reference any object that is in the scope, including previously
defined managed beans.
The first example in the slide shows using a literal string for a label managed bean property.
This example illustrates how to use a literal string, but in practice, labels would come from a
resource bundle.
One reason to use a managed property in the adfc-config.xml file is when you want to
have an expression always evaluated and ready for use. For example, you could use a managed
property to evaluate #{bindings}, giving you handy access to theDCBindingContainer.

8/18/2019 D53979GC11_sg2.pdf
http://slidepdf.com/reader/full/d53979gc11sg2pdf 249/381Oracle Fusion Middleware 11g : Build Applications with ADF I 17 - 7
Copyright © 2009, Oracle. All rights reserved.
Using Memory-Scoped Attributes
• JSF scopes:
– application
– session
– request
– none
• Why use scopes?
– Save state of model
– Enables passing values to other pages or phases in same scope
• pageFlow scope:
– Retains values for current process (page flow) only
– Independent of other processes, unless using LaunchEvent
– Can be accessed via EL or Java
– Can be explicitly cleared
• Additional ADF Faces scopes:
– view (ADF Faces)
– pageFlow (ADF Faces)
– backingBean (only for page fragments or
declarative components)
Using Memory-Scoped AttributesScopes in JSF enable you to save the state of the model for holding and passing information to
another page or to another life-cycle phase. You can set a scope on managed beans, and you also
can store values in memory-scoped attributes without explicitly defining a managed bean.
JSF memory scopes include: application: The object is available for the duration of the Web application. This is
helpful for global beans such as LDAP directories.• session: The object is available to the client throughout the client’s session.
• request: The object is available from the time it is instantiated until a response is sent
back to the client. This is usually the life of the current page.• none: The object is instantiated each time it is referenced. The object is usable only
within EL references in the task flow’s .xml file itself.
ADF Faces provides additional scopes:• view: Stores objects used by a single page and retains the objects as long as the user
continues to interact with the page, and then automatically releases them when the user
leaves the page• pageFlow: Makes it easier to pass values from one page to another within a task flow.
This scope means that the bean is available for a set of pages in the current task flow.

8/18/2019 D53979GC11_sg2.pdf
http://slidepdf.com/reader/full/d53979gc11sg2pdf 250/381Oracle Fusion Middleware 11g : Build Applications with ADF I 17 - 8
Using Memory-Scoped Attributes (continued)
• backingBean: Used for managed beans for page fragments and declarative components
only, the object is available for the duration between an HTTP request until a response is
sent back to the client. This is needed because there may be more than one page fragment
or declarative component on a page and to avoid collisions, any values must be kept in
separate scope instances. Therefore, any managed bean for a page fragment or declarativecomponent must use the backingBean scope.
Using Page Flow Scope
For efficient memory usage, you should store values in the scope with the shortest duration that
fits your needs. For example, to make a value accessible anywhere within a task flow, you would
use page flow scope. Each ADF task flow can specify a page flow scope that is independent of
the memory scope for all other task flows.
When one task flow calls another, the calling task flow cannot access the called task flow’s page
flow scope, so you can use page flow scope to pass data values only between activities within a
task flow. Application and session scopes are also allowed within task flow definition files, but
in most cases are not recommended because they may keep objects in memory longer than
needed.
You can bind values to pageFlowScope managed bean properties before control is passed to
a called ADF bounded task flow. Values added as pageFlowScope continue to be available
as the user navigates from one page to another within a task flow. This is true even if you use
<redirect/>. These values are visible only in the current page flow or process. If the user
opens a new window and starts navigating, that series of windows has its own process; values
stored in each window remain independent. Clicking the browser’s Back button resetspageFlowScope to its original state.
Clearing pageFlowScope
This scope never clears itself. You can manually force pageFlowscope to clear, as shown in
this example:
RequestContext afContext = RequestContext.getCurrentInstance();
afContext.getPageFlowScope().clear();

8/18/2019 D53979GC11_sg2.pdf
http://slidepdf.com/reader/full/d53979gc11sg2pdf 251/381Oracle Fusion Middleware 11g : Build Applications with ADF I 17 - 9
Copyright © 2009, Oracle. All rights reserved.
Request Scope
Page Flow Scope
View Scope
Session Scope
Application Scope
View A Router Method
Taskflow Flow
Call
PFS1 PFS2 PFS1
RS1 RS2 RS3 RS4
VS1 VS2 VS3 VS4
S1
A1
View B View C
Taskflow Flow
Call
Method
Call
Router View
R
Region Return
Icon
Legend:
D
Declarative
Component
Memory Scope Duration with a Called Task Flow
Memory Scope Duration with a Called Task FlowAs stated previously, you should store values in the scope with the shortest duration that fits
your needs, so it is important to know the duration of memory scopes in an application.
The parent task flow depicted on the slide contains three view activities, a router, a method call,
and a task flow call. The called bounded task flow has two view activities, a method call, and a
task flow return.
The request scope line shows that the duration of a request scope is from the time a request is
issued in a view activity until another view activity creates a request. Routers and method calls
do not have a request scope of their own, so values set in RS1 above are available to the router
and the method call. If the called task flow had no view activities, RS1 would span the task flowalso. However, each of the called task flow’s two view activities creates a request, ending the
previous request scope and starting a new one. View scope is similar, except that it begins when
a view is rendered and ends when a new view is rendered.
As mentioned earlier, page flow scope attributes are accessible anywhere within a task flow.
The called task flow has its own page flow scope, PFS2, that is separate from the parent’s PFS1,
and the called task flow cannot access PFS1, so parameters, which are discussed in this lesson,
are needed to pass information from the parent to the called task flow.
Session scope lasts throughout the user session, while application scope lasts beyond the user
session and can share values among all instances of an application.

8/18/2019 D53979GC11_sg2.pdf
http://slidepdf.com/reader/full/d53979gc11sg2pdf 252/381Oracle Fusion Middleware 11g : Build Applications with ADF I 17 - 10
Copyright © 2009, Oracle. All rights reserved.
Request Scope
Page Flow Scope
View Scope
Session Scope
Application Scope
View B
PFS1
RS1 RS2 RS3 RS4
VS1
VS3 VS4
S1
A1
Backing Bean
Scope
Region
R
D1
D2
PFS2
BBS1
BBS2
View A Router View C
Memory Scope Duration with a Region
VS2
VS5
Memory Scope Duration with a RegionThis example is similar to the previous one, except that the bounded task flow is contained in a
region on the page that is represented as a view activity within the main task flow. It shows the
following differences from the previous slide:
• Backing bean scope is available for the declarative components, and lasts as long as the
component is in focus. Each component notifies the controller when it starts and ends
being in focus. There is a separate backing bean scope for each declarative component.
• Page flow scope works differently in this example, because the second task flow is in a
region on a view within the main task flow. So the duration of the page flow scope of the
main task flow is throughout its entire flow, including the region that contains the other
task flow. The bounded task flow represented as a region has its own page flow scope aswell. Each task flow’s scope is independent of and cannot access objects in the other task
flow’s scope.
• The view scope for the page fragments in the bounded task flow (in the region on the page
represented by view activity B) is separate from the view scope for the containing page.
The views in the region cannot access the view scope of the containing page, and the
containing page cannot access the view scopes of the page fragments in the region.

8/18/2019 D53979GC11_sg2.pdf
http://slidepdf.com/reader/full/d53979gc11sg2pdf 253/381Oracle Fusion Middleware 11g : Build Applications with ADF I 17 - 11
Copyright © 2009, Oracle. All rights reserved.
Accessing Memory-Scoped Attribute Values
You can access pageFlowScope attributes by using:
• EL:
<af:commandButtontext="#{pageFlowScope.buttonBean.label}"
action="#{pageFlowScope.buttonBean.action}"/>
• Java:
import java.util.Map;import
org.apache.myfaces.trinidad.context.RequestContext;. . .Map pageFlowScope =RequestContext.getCurrentInstance().getPageFlowScope();
Object myObject = pageFlowScope.get("myObjectName");
Accessing Memory-Scoped Attribute ValuesYou can access memory-scoped attributes in one of the following ways:
• By using EL: You can access objects stored in memory scopes through EL expressions.
The object names must use the name of the scope as a prefix, because EL expressions do
not automatically look into any memory scopes.
The first example in the slide shows how to have a button’s label provided by apageFlowScope managed bean, and to have a method on the bean called when the
button is selected. (This example is just for illustrative purposes; in practice, you would use
resource bundles for the text of labels.)• By using Java: The pageFlowScope is a java.util.Map that may be accessed
from Java code. To get a reference to pageFlowScope, use thegetPageFlowScope() method provided by Trinidad in
org.apache.myfaces.trinidad.context.RequestContext. The second
example in the slide retrieves an object from pageFlowScope.

8/18/2019 D53979GC11_sg2.pdf
http://slidepdf.com/reader/full/d53979gc11sg2pdf 254/381Oracle Fusion Middleware 11g : Build Applications with ADF I 17 - 12
Copyright © 2009, Oracle. All rights reserved.
Using Memory-Scoped Attributes
Without Writing Java Code
<af:table
value="#{myManagedBean.allEmployees}"var="emp" rowSelection="single"><af:column headerText="Name"><af:outputText value="#{emp.name}"/></af:column><af:columnheaderText="Department Number"><af:outputTextvalue="#{emp.deptno}"/>
</af:column><af:column headertext="Select"><af:commandButtontext="Show more details"action="showEmpDetail"><af:setActionListener
from="#{emp}"to="#{pageFlowScope.empDetail}"/>
</af:commandButton></af:column></af:table>
<h:panelGrid columns="2"><af:outputText value="Firstname:"/><af:inputText
value="#{pageFlowScope.empDetail.name}"/><af:outputText value="Email:"/>
<af:inputTextvalue="#{pageFlowScope.empDetail.email}"/><af:outputText value="Hiredate:"/><af:inputText
value="#{pageFlowScope.empDetail.hiredate}"/><af:outputText value="Salary:"/><af:inputText
value="#{pageFlowScope.empDetail.salary}"/></h:panelGrid>
3
4
1
2
The Master page stores an employee
row in pageFlowScope attributeempDetail.
The Detail page retrieves employeedata from pageFlowScope attribute
empDetail.
Using Memory-Scoped Attributes Without Writing Java CodeThe af:setActionListener tag provides a declarative way to cause an action source (for
example, af:commandButton) to set a value before navigation. You can use memory-scoped
attributes with af:setActionListener to pass values from one page to another, without
writing any Java code in a backing bean.
Suppose you have a master page with a single-selection table showing employees, as shown in
the first example in the slide:
1. The EL variable name emp is used to represent one row (employee) in the table.
2. The action attribute value of af:commandButton is a static string outcome
showEmpDetail.
3. The af:setActionListener tag, which has two attributes from and to, takes the from
value and stores it with the to value.
When the user clicks the command button on a row, the action listener executes, and the
value of #{emp} is retrieved. The retrieved row object is stored as the empDetail
property of pageFlowScope with the #{pageFlowScope.empDetail} EL
expression—you don’t need to write any Java code in a backing bean. Then the action
event executes with the static outcome, and the user is navigated to a detail page:
4. On the detail page, you refer to the pageFlowScope.empDetail objects to display more
data for the current employee, as shown in the second example in the slide.

8/18/2019 D53979GC11_sg2.pdf
http://slidepdf.com/reader/full/d53979gc11sg2pdf 255/381Oracle Fusion Middleware 11g : Build Applications with ADF I 17 - 13
Copyright © 2009, Oracle. All rights reserved.
Overview of Parameters
• You can use:
– Page parameters
– Region parameters
– Task flow parameters
– View activity parameters
– Task flow call activity parameters
• You set parameter values by using expressions (not by
just typing in a value.)• The goal is increased reusability of pages and task flows.
Stored in binding
container; define in
page definition file
Stored in task flow.xml file; define in
Property Inspector
Using ParametersThere are several types of parameters that you can use to pass information to different parts of
the application. Subsequent slides discuss page parameters, region parameters, task flow
parameters, view activity parameters, and task flow call activity parameters.
The examples discussed in the next few pages show how to use the first four types of parameters
to pass a value from a containing page to a task flow represented as a region on that page. You
actually can accomplish this task without using all four types of parameters. However, using
more types of parameters enables you to make your pages and task flows more reusable, as
shown in the examples.
After presenting this example, the remainder of the lesson discusses how to pass values to acalled task flow and return values to the calling task flow.

8/18/2019 D53979GC11_sg2.pdf
http://slidepdf.com/reader/full/d53979gc11sg2pdf 256/381Oracle Fusion Middleware 11g : Build Applications with ADF I 17 - 14
Copyright © 2009, Oracle. All rights reserved.
Using Page Parameters
Page parameters are:
• Output parameters to pass a value from a page
• Stored in the binding container for the page
• Defined in the Structure window or Property Inspector for a
page definition file:
#{bindings.nameToPass}
Using Page ParametersYou define page parameters in the page definition of the page. The example in the slide showssetting a page parameter to a String value by using expression language, because the value of
the parameter must be an expression.
You could also set the page parameter to a value contained in a managed bean, in the binding
container, or in a memory-scoped attribute. For example:
<parameters>
<parameter id="myDeptId" value="#{DepartmentBean.deptId}"/>
<parameter id= "fname" value="#{bindings.FirstName.InputValue}"/>
<parameter id= "lname" value="#{pageFlowScope.lastName}"/></parameters>
You can access the parameter value in EL as #{bindings.<param name>}.
You can use page parameters to, for example, pass values into a page template, enabling use of
the same template for a variety of different pages. Another example of using a page parameter is
to set a value in a containing page to pass to a region (task flow) on the page.

8/18/2019 D53979GC11_sg2.pdf
http://slidepdf.com/reader/full/d53979gc11sg2pdf 257/381Oracle Fusion Middleware 11g : Build Applications with ADF I 17 - 15
Copyright © 2009, Oracle. All rights reserved.
The Job of the Page Parameter
#{pageFlowScope.pname}Page
fragment in
task flow
#{'Pam'}
Parameter value
Receive a value and store
it in binding container.
nameToPassoutputContaining
page
parameter
Parameter functionParameter nameParametertype
Receives a value and stores it in a parameter in the binding
container:
?
The Job of the Page Parameter It is often necessary to pass values between pages. In this example, there is a bounded task flow
that is represented as a region on a page. The task flow contains a view activity that represents a
page fragment, and the requirement is to pass a value from the containing page to that page
fragment.
As depicted in the table in the slide, the parameter of a containing page takes a value that is
assigned to it and stores it in a parameter in the binding container. Subsequent slides build this
table to show the functions of different types of parameters.

8/18/2019 D53979GC11_sg2.pdf
http://slidepdf.com/reader/full/d53979gc11sg2pdf 258/381Oracle Fusion Middleware 11g : Build Applications with ADF I 17 - 16
Copyright © 2009, Oracle. All rights reserved.
Using Task Flow Parameters
Task flow parameters are:
• Input parameters to pass a value into a task flow
• Defined in the .xml file for the task flow (you can use the
the Property Inspector for the task flow):
Using Task Flow ParametersBuilding well-defined, parameterized task flows that can be used as regions on pages is a good
way to provide reusable and highly maintainable segments of functionality across your
application.
Parameters and page events are how different regions and portlets on a single page can
communicate with each other and pass context to each other without being hard-wired together,
or even knowing if the other one is present on the page. For example, a region that shows a
graph of types of goods sold for a particular country could take a parameter into the region that
specifies the country. That same region could also take in a parameter that specifies whether or
not it should display the results as a graph or as a pie chart. Using parameters enables that same
region to be reused in a variety of different situations.
You define task flow parameters in the task flow’s .xml file. You can define a task flow
parameter declaratively, as shown in the slide. The slide shows an example of an input parameter with name pname, value #{pageFlowScope.pname}. The parameter works as
follows:1. When the parameter pname is passed into the task flow, its value is stored in the page-
flow-scoped attribute pname.
2. Inside the task flow, activities and pages can get the value of the page-flow-scoped
attribute by using the EL expression #{pageFlowScope.pname}.

8/18/2019 D53979GC11_sg2.pdf
http://slidepdf.com/reader/full/d53979gc11sg2pdf 259/381Oracle Fusion Middleware 11g : Build Applications with ADF I 17 - 17
Using Task Flow Parameters (continued)
In the lesson titled “Responding to Application Events,” you learn how to set up contextual
events to communicate between regions. You can use page parameters and task flow parameters
in conjunction with events to coordinate regions.

8/18/2019 D53979GC11_sg2.pdf
http://slidepdf.com/reader/full/d53979gc11sg2pdf 260/381Oracle Fusion Middleware 11g : Build Applications with ADF I 17 - 18
Copyright © 2009, Oracle. All rights reserved.
The Job of the Task Flow Parameter
#{pageFlowScope.pname}Page
fragment in
task flow
#{pageFlowScope.pname}
#{'Pam'}
Parameter value
Store parameter value in
memory-scoped attribute.
pnameinputBounded
task flow
parameter
Receive a value and store
it in binding container.
nameToPassoutputContaining
page
parameter
Parameter functionParameter nameParameter
type
?
Stores input value into page-flow-scoped attribute:
The Job of the Task Flow Parameter As previously stated and as depicted in the table above, the bounded task flow parameter
receives an input value and stores it in a memory-scoped attribute. The example shows storing it
in pageFlowScope, so that the value of that attribute can then be used anywhere in the task
flow, such as on a page fragment within the task flow.
But where does that input value come from? A task flow is independent of the page that contains
it. It cannot receive a value directly from a page parameter of the containing page, so another
mechanism is needed. In the example, there needs to be a way to pass the value in the
nameToPass page output parameter into the pname task flow input parameter.

8/18/2019 D53979GC11_sg2.pdf
http://slidepdf.com/reader/full/d53979gc11sg2pdf 261/381Oracle Fusion Middleware 11g : Build Applications with ADF I 17 - 19
Copyright © 2009, Oracle. All rights reserved.
Using Region Parameters
Region parameters are:
• Input parameters to pass a value into a region on a page
• Stored in the binding container for the page
• Defined in the Structure window or Property Inspector for a
page definition file:
Using Region ParametersTo pass a parameter from a containing page to a task flow, you need a region parameter, which
you define as follows:
1. You first need to define a page parameter and a task flow parameter as in the previous
slides.
2. Then you need a way to pass the page parameter’s value to the input parameter of the task
flow. You do this by defining a region parameter in the page definition file of the
containing page, either in the Structure window or, with the region selected in the
Executables section, in the Property Inspector.
3. Then set the parameter’s value to the EL value of the page parameter.
A simpler way to define a region parameter is when you create the region. If the task flow has
input parameters defined on it, then when you drag a task flow to a page to create a region, you
must define region parameters for the task flow parameters.
After you have defined the region parameters, you can access the value within a page on thecontained region by using the expression #{pageFlowScope.<input parametername>}, such as in the following example in the task flow’s default page:
<af:outputLabel value="Hello, "/>
<af:outputText value="#{pageFlowScope.pname}"/>

8/18/2019 D53979GC11_sg2.pdf
http://slidepdf.com/reader/full/d53979gc11sg2pdf 262/381Oracle Fusion Middleware 11g : Build Applications with ADF I 17 - 20
Copyright © 2009, Oracle. All rights reserved.
The Job of the Region Parameter
#{pageFlowScope.pname}Page
fragment in
task flow
#{pageFlowScope.pname}
#{bindings.nameToPass}
#{'Pam'}
Parameter value
Store parameter value in
memory-scoped attribute.
pnameinputBounded
task flow
parameter
Store binding value as
parameter for input to a
region.
pnameoutputRegion
parameter
Receive a value and store
it in binding container.
nameToPassoutputContaining
page
parameter
Parameter functionParameter nameParameter
type
Passes the value from the page to its task flow:
The Job of the Region Parameter The region parameter acts as a bridge from the page parameter to the task flow. It takes the value
stored in the page parameter and stores it in an output parameter, which should have the same
name as the input parameter of the task flow. Now the task flow is able to receive that value and
store it in the page-flow-scoped attribute that can be used anywhere within that task flow.

8/18/2019 D53979GC11_sg2.pdf
http://slidepdf.com/reader/full/d53979gc11sg2pdf 263/381Oracle Fusion Middleware 11g : Build Applications with ADF I 17 - 21
Copyright © 2009, Oracle. All rights reserved.
Developing a Page Independently of a Task Flow
#{pageFlowScope.ename}Page
fragment in
task flow
#{pageFlowScope.pname}
#{bindings.nameToPass}
#{'Pam'}
Parameter value
Store parameter value in
memory-scoped attribute.
pnameinputBounded
task flow
parameter
Store binding value as
parameter for input to a
region.
pnameoutputRegion
parameter
Receive a value and store
it in binding container.
nameToPassoutputContaining
page
parameter
Parameter functionParameter nameParameter
type
Page not aware of the task flow’s page-flow-scoped attribute:
?
Developing a Page Independently of a Task FlowTo make a page (or page fragment) reusable in different task flows, it should be independent of
the task flow. The page-flow-scoped attributes that are referenced on the page may not be named
the same as the task flow’s page-flow-scoped attributes. So pages that are developed
independently and used in different task flows need another mechanism to be able to use the
values that are stored in page-flow-scoped attributes for a particular task flow.

8/18/2019 D53979GC11_sg2.pdf
http://slidepdf.com/reader/full/d53979gc11sg2pdf 264/381Oracle Fusion Middleware 11g : Build Applications with ADF I 17 - 22
Copyright © 2009, Oracle. All rights reserved.
Using View Activity Parameters
Use view activity parameters to pass values from a task flow to
one of its pages:
Passing Parameters from a Task Flow to One of Its PagesInstead of using task flow parameters directly in the pages that are in the task flow, you can
make pages more reusable by using view activity input page parameters to map the task flow’s
memory-scoped attributes to those expected by the page.
To define a view activity parameter, perform the following steps:
1. Select the view activity in the task flow diagram and in the Property Inspector, select the
Page Parameters panel.
2. In the Input Page Parameter section, click Add.
3. Enter a from-value as an EL expression to specify where the parameter value is being
passed from, such as #{pageFlowScope.pname}. If the value is coming from the task
flow input parameter, it should match the value specified for the task flow input parameter.4. Enter a to-value as an EL expression to specify where the page associated with the
view activity can retrieve the value of the input page parameter, such as
#{pageFlowScope.ename}.
This enables you to use a page in multiple task flows as the page for different views activities.
The view activity acts as the mechanism for passing parameters from its task flow to its page.

8/18/2019 D53979GC11_sg2.pdf
http://slidepdf.com/reader/full/d53979gc11sg2pdf 265/381Oracle Fusion Middleware 11g : Build Applications with ADF I 17 - 23
Copyright © 2009, Oracle. All rights reserved.
The Job of the View Activity Parameter
Move value from memory-scoped attribute into the
memory-scoped attribute
expected by the reusable
page.
#{pageFlowScope.pname}
#{pageFlowScope.ename}
#{pageFlowScope.ename}Page
fragment in
task flow
internalView activityparameter
#{pageFlowScope.pname}
#{bindings.nameToPass}
#{'Pam'}
Parameter value
Store parameter value in
memory-scoped attribute.
pnameinputBounded
task flow
parameter
Store binding value as
parameter for input to a
region.
pnameoutputRegion
parameter
Receive a value and store
it in binding container.
nameToPassoutputContaining
page
parameter
Parameter functionParameter nameParameter
type
Populates the page-flow-scoped attribute expected by the page:
The Job of the View Activity Parameter The view activity parameter simply takes the value that is stored in one memory-scoped attribute
for the task flow and stores it in another—the memory-scoped attribute that is used by the page.
In this way, you can integrate independently-developed pages into multiple task flows without
changing either the task flow or the page.

8/18/2019 D53979GC11_sg2.pdf
http://slidepdf.com/reader/full/d53979gc11sg2pdf 266/381Oracle Fusion Middleware 11g : Build Applications with ADF I 17 - 24
Copyright © 2009, Oracle. All rights reserved.
Page Fragment
View activity
parameter
Task flow
parameter
Region
parameter
Page parameter Containing Page
Region
Task Flow
View Activity
Summary: Passing a Value from a Containing Page
to a Reusable Page Fragment in a Region
Define in
page def
file
Define in
task flow.xml file
Summary: Passing a Value from a Page to a Reusable Page Fragment in a RegionThe more types of parameters you use, the more reusable your components are. The page
fragment in this diagram is represented as a view activity in a task flow used as a region on a
containing page, like the example that was just discussed. Because parameters are used at each
level, the page can be developed independently of all other components without regard to the
names of memory-scoped attributes that are used on the page:
• The containing page uses a page parameter to pass its value to the region.
• The region uses a region parameter to pass the value on to the task flow, so the task flow
can be developed independently of the page and reused in multiple pages.
• The task flow uses a task flow parameter to pass the value to its view activity.
• The view activity uses a view activity parameter to store the value in the memory-scopedattribute that is used by the page fragment.
All of these parameters could be named differently, as long as the output parameter of one level
has the same name as the input parameter of the next level. For example, the region’s output
parameter would have the same name as the task flow’s input parameter.
Page and region parameters are stored in the page’s binding container, so you define them in the
page definition file for the page. Task flow and view activity parameters are defined on the
.xml file for the bounded task flow.

8/18/2019 D53979GC11_sg2.pdf
http://slidepdf.com/reader/full/d53979gc11sg2pdf 267/381

8/18/2019 D53979GC11_sg2.pdf
http://slidepdf.com/reader/full/d53979gc11sg2pdf 268/381Oracle Fusion Middleware 11g : Build Applications with ADF I 17 - 26
Passing Values to a Task Flow from a Task Flow Call Activity (continued)
By default, input parameters are passed by reference, although you can select the pass-by-value
check box in the Property Inspector for the task flow call activity to pass by value. Mixing the
two, however, can lead to unexpected behavior in cases where parameters reference each other.
Task flow call activity input parameters can be passed by reference only if managed bean
objects are passed, not individual values, so the pass-by-value check box applies only to
managed bean objects and is used to override the default setting of passing by reference.Individual values are only passed by value.
If you call a bounded task flow using a URL rather than a task flow call activity, you pass
parameters and values on the URL itself.
To specify input parameters on the task flow call activity, perform the following steps:
1. Select the task flow call activity in the task flow diagram.
2. In the Property Inspector, click Parameters and expand the Input Parameters section:
- Click Add and enter a name for the parameter, for example.- Enter a parameter value, for example,
#{pageFlowScope.callingTaskflowParm}. The value specifies where the
parameter value will be taken from within the calling task flow.
- Optionally select the pass-by-value check box (by default, parameters are passed by
reference to the called bounded task flow). Task flow call activity input parameters
can be passed by value only if managed bean objects are passed, not individual
values.
After you have specified an input parameter for the task flow call activity, you can specify a
input parameter definition for the called ADF bounded task flow as explained previously.

8/18/2019 D53979GC11_sg2.pdf
http://slidepdf.com/reader/full/d53979gc11sg2pdf 269/381Oracle Fusion Middleware 11g : Build Applications with ADF I 17 - 27
Copyright © 2009, Oracle. All rights reserved.
Returning Values to a Calling Task Flow
• To return a value, you must specify: – Return value definitions on the called task flow
– Return values on the task flow call activity in the calling task
flow
• Names must match.
Returning Values to a Calling Task FlowA task flow return activity causes the ADF bounded task flow to return to the task flow that
called it. The called bounded task flow can pass return values back to the calling task flow.
To return a value, you must specify:
• Return value definitions on the called bounded task flow. These specify where the return
value is to be taken from upon exit of the called bounded task flow.
• Return values on the task flow call activity in the calling task flow. These specify where
the calling task flow can find return values.
The caller of the bounded task flow can choose to ignore return value definition values by not
identifying any task flow call activity return values back to the caller.Return values on the task flow call activity are passed back by reference. Nothing inside the
ADF bounded task flow still references them, so there is no need to pass by value and make a
copy.

8/18/2019 D53979GC11_sg2.pdf
http://slidepdf.com/reader/full/d53979gc11sg2pdf 270/381Oracle Fusion Middleware 11g : Build Applications with ADF I 17 - 28
Returning Values to a Calling Task Flow (continued)
To specify a return value for a called ADF bounded task flow, perform the following steps:
1. In the task flow editor, open the called ADF bounded task flow.
2. On the Overview tab, select the Parameters panel and click Add in the Return Value
Definitions section to add the return value:- In the name field, enter a name to identify the return value, for example, Return1.
- In the value field, enter an EL expression that specifies where the return value is to be taken from upon exit of the called bounded task flow, for example,
#{pageFlowScope.ReturnValueDefinition}.
To specify a return value for the calling task flow, perform the following steps:
1. In the task flow editor, open the calling ADF task flow and in the task flow diagram, select
the task flow call activity.
2. In the Property Inspector, select the Parameters panel and click Add in the Return Values
section.- In the name field, enter a name to identify the return value, for example, Return1.
The name of the return value must match the name of the return value definition on
the called task flow definition.
- In the value field, enter an EL expression that specifies where the calling task flowcan find return values, for example, #{pageFlowScope.ReturnValue}.
Tip: If you drop the bounded task flow that you intend to call on the task flow call activity, the
name field is already specified. Therefore, the name field for the return value automatically
matches the name of the return value definition on the called task flow definition.

8/18/2019 D53979GC11_sg2.pdf
http://slidepdf.com/reader/full/d53979gc11sg2pdf 271/381Oracle Fusion Middleware 11g : Build Applications with ADF I 17 - 29
Copyright © 2009, Oracle. All rights reserved.
Deciding Which Type of Parameter to Use
• Parameters are designed to:
– Improve reusability
– Encapsulate functionality
• You can use more than one type of parameter to achieve
these goals.
Deciding Which Type of Parameter to UseAs you have seen in this lesson, the use of one type of parameter does not preclude the use of
another, because they all have different functions. Defining parameters is all about providing
reusability. Defining parameters on a task flow improves reusability of that task flow. Defining
parameters on a page or page fragment improves its reusability. Parameters also make an object
much more encapsulated (self-contained).
For example, if you have a bounded task flow that updates customers, you could have it take inas a parameter the CustomerId. The task flow can then make sure that the correct customer is
queried up to edit—and there is no reliance on the consumer of that bounded task flow setting
the current row in a view object in some application module that this bounded task flow uses.
This ensures that the interface between consumer and producer is much better documented and
separated from the internal implementation.
If you want to make the page a more reusable component, you may provide a parameter on the
page for exactly the same reasons.

8/18/2019 D53979GC11_sg2.pdf
http://slidepdf.com/reader/full/d53979gc11sg2pdf 272/381Oracle Fusion Middleware 11g : Build Applications with ADF I 17 - 30
Copyright © 2009, Oracle. All rights reserved.
Summary
In this lesson, you should have learned how to:
• Define the data model to reduce the need to pass values
• Use a managed bean to hold values
• Store values in memory-scoped attributes
• Use parameters to pass values

8/18/2019 D53979GC11_sg2.pdf
http://slidepdf.com/reader/full/d53979gc11sg2pdf 273/381Oracle Fusion Middleware 11g : Build Applications with ADF I 17 - 31
Copyright © 2009, Oracle. All rights reserved.
Practice 17 Overview:
Passing Values Between Pages
This practice covers the following topics:
• Conditionally displaying tables based on parameters
• Changing a panel header title based on parameters
Practice 17 Overview: Passing Values Between PagesIn this practice, you modify the ProductCatalog page to display only one of its three tables,
depending on the value of parameters passed to the page. You place all of the tables under a
single panel header whose title depends on the input parameters for the page.

8/18/2019 D53979GC11_sg2.pdf
http://slidepdf.com/reader/full/d53979gc11sg2pdf 274/381

8/18/2019 D53979GC11_sg2.pdf
http://slidepdf.com/reader/full/d53979gc11sg2pdf 275/381
Copyright © 2009, Oracle. All rights reserved.
Responding to Application Events

8/18/2019 D53979GC11_sg2.pdf
http://slidepdf.com/reader/full/d53979gc11sg2pdf 276/381Oracle Fusion Middleware 11g : Build Applications with ADF I 18 - 2
Copyright © 2009, Oracle. All rights reserved.
Objectives
After completing this lesson, you should be able to do the
following:
• Configure and use managed beans to contain code torespond to events
• Describe the different types of events
• Use phase listeners
• Create event listeners
• Define action listeners
• Create value change listeners
• Describe ADF Faces enhanced event handling• List other types of server events used by ADF Faces
components
• Explain how ADF components use AJAX events
• Use contextual events to coordinate regions
Lesson AimWeb applications are often required to respond to a user interaction or other events. This lesson
covers events for UI components. ADF enables you to define actions that take place when
certain events occur, such as when a page loads or when the user clicks a button. Events may
trigger a change in the user interface, invoke back-end application code, or both.

8/18/2019 D53979GC11_sg2.pdf
http://slidepdf.com/reader/full/d53979gc11sg2pdf 277/381Oracle Fusion Middleware 11g : Build Applications with ADF I 18 - 3
Copyright © 2009, Oracle. All rights reserved.
Adding UI Code
Managed beans:
• Configured in adfc-config.xml or other task flow .xmlfile
• Plain Old Java Objects (POJOs), Lists and Maps
• Have no-argument constructor
• Lazy initialization by JavaServer Faces framework “as
needed”
Adding UI CodeYou can add UI code to the task flow by using managed beans.
Managed beans are Java classes with a no-argument constructor that you register with theapplication in task flow .xml files. When the JSF application starts up, it parses these files and
makes the beans available to be referenced in EL expressions (you learn about these in the
lesson titled “Implementing Transactional Capabilities”) or Java code, enabling access to the
beans’ properties and methods.
Whenever a managed bean is referenced for the first time and it does not already exist, the
Managed Bean Creation Facility instantiates the bean by calling the default constructor method
on the bean. If any properties are also declared, they are populated with the declared defaultvalues.

8/18/2019 D53979GC11_sg2.pdf
http://slidepdf.com/reader/full/d53979gc11sg2pdf 278/381Oracle Fusion Middleware 11g : Build Applications with ADF I 18 - 4
Copyright © 2009, Oracle. All rights reserved.
Creating Managed Beans
1. Right-click command button.2. Browse for existing Java
class or create new class.
3. Search class.
4. Select class.
5. Create method.
6. Bean automatically gets configuredin adfc-config.xml file (see next slide).
Creating Managed BeansYou can create managed beans as Java classes in a project before configuring them as a
managed bean, or you can create them when binding a command button by performing the
following:
1. Right-click the command button and select Create Method Binding for Action to launch
the binding editor.
2. Choose to create a new class as a managed bean or to reuse an existing class.
3. To reuse an existing class, choose a bean or search the class path.
4. If searching the class path, select the Java class you want to become a managed bean and
click OK.
5. Click OK to create the managed bean.6. The class is configured as a managed bean and the new method is created and bound to the
command button (see next slide).
This creates the class and registers it as a managed bean in the adfc-config.xml file.

8/18/2019 D53979GC11_sg2.pdf
http://slidepdf.com/reader/full/d53979gc11sg2pdf 279/381Oracle Fusion Middleware 11g : Build Applications with ADF I 18 - 5
Copyright © 2009, Oracle. All rights reserved.
Registering Existing Java Classes
as Managed Beans
Use Overview tab of task flow.
Registering Existing Java Classes as Managed BeansTo register an existing class as a managed bean, open the task flow in the editor, click the
Overview tab, select the Managed Beans panel, and click Create. Enter values for the managed
bean attributes in the Property Inspector, browsing to locate the existing class.

8/18/2019 D53979GC11_sg2.pdf
http://slidepdf.com/reader/full/d53979gc11sg2pdf 280/381Oracle Fusion Middleware 11g : Build Applications with ADF I 18 - 6
Copyright © 2009, Oracle. All rights reserved.
Configuring Managed Beans
Entry in adfc-config.xml:
Skeleton for new managed
bean (add your own code):
<managed-bean><managed-bean-name> DepartmentBean </managed-bean-name><managed-bean-class> sample.DepartmentsManagedBean
</managed-bean-class><managed-bean-scope> request </managed-bean-scope>
</managed-bean>
Managed Beans in adfc-config.xmlManaged beans can be defined in ADF Controller source files only (adfc-config.xml or
bootstrap source files, and task flow definition files). They are not allowed in the faces-config.xml file. Managed beans are defined in the .xml files by using the <managed-bean> tag. Attributes of the managed bean, as shown in the example in the slide, are as follows:
<managed-bean-name>: Specifies the name that is used to refer to the managed bean
throughout the application• <managed-bean-class>: Contains the fully qualified class name for the JavaBean
• <managed-bean-scope>: Defines the scope of the JavaBean. The possible values for
this element are application, session, request, pageFlow, view,
backingBean, or none (these are described in the lesson titled “Passing ValuesBetween UI Elements”). If the value of the managed-bean-scope element is
something other than none, the JavaBean created is stored in the corresponding object.
For example, if the value is request, the JavaBean is stored in the request object of a
given user.
If you have created a new Java class for your bean, JDeveloper creates skeleton code to which
you need to add your own code.

8/18/2019 D53979GC11_sg2.pdf
http://slidepdf.com/reader/full/d53979gc11sg2pdf 281/381Oracle Fusion Middleware 11g : Build Applications with ADF I 18 - 7
Copyright © 2009, Oracle. All rights reserved.
Referencing Managed Beans
Use in Expression Language on JSF Page:
Use in Java code:
<af:inputTextvalue="#{DepartmentBean.firstName}"/>
FacesContext facesContext =FacesContext.getCurrentInstance();
ELContext elContext = facesContext.getELContext();ExpressionFactory expressionFactory =
facesContext.getApplication().getExpressionFactory(); ValueExpression exp =expressionFactory.createValueExpression(elContext,"#{DepartmentBean}", DepartmentsManagedBean.class);
DepartmentsManagedBean dept =
(DepartmentsManagedBean)exp.getValue(elContext);
Referencing Managed BeansYou can reference managed beans by using either Expression Language (EL) or Java, as shown
in the examples in the slide. Expression language is described in the lesson titled “Implementing
Transactional Capabilities.”
What the Java code in the slide does is to assign the value of a managed bean (whose name is
expressed in EL) to a User object. It uses the following classes and methods:• FacesContext is a class that contains all of the per-request state information related to
the processing of a single JSF request, and the rendering of the corresponding response. It
is passed to, and potentially modified by, each phase of the request processing life cycle
(you learn about life-cycle phases in the next few slides.)• ELContext is a class that is used to evaluate an expression.
• ExpressionFactory is a class that parses a String into a value expression (as in the
code in the slide) or a method expression for later evaluation.• The createValueExpression() method parses expressions that evaluate to values.
The expression must be first parsed, and then evaluated.• The ValueExpression class encapsulates a parsed expression, and its getValue()
method evaluates the expression relative to the provided context, and returns the resulting
value.

8/18/2019 D53979GC11_sg2.pdf
http://slidepdf.com/reader/full/d53979gc11sg2pdf 282/381Oracle Fusion Middleware 11g : Build Applications with ADF I 18 - 8
Copyright © 2009, Oracle. All rights reserved.
Describing JSF and ADF Life-Cycle Roles
• The JSF life cycle handles presentation:
– Submission of values on the page
– Validation for components
– Navigation
– Displaying the components on the resulting page
– Saving and restoring state
• The ADF life cycle handles data:
– Preparing and updating the data model
– Validating the data at the model layer
– Executing methods on the business layer
Coordinating JSF and ADF Life CyclesWhen a page is submitted and a new page requested, the application invokes both the JSF
request life cycle and the ADF page life cycle.
The JSF life cycle handles the submission of values on the page, validation for components,
navigation, and displaying the components on the resulting page and saving and restoring state.
The JSF life-cycle phases use a UI component tree to manage the display of the faces
components. This tree is a run-time representation of a JSF page: each UI component tag in a
page corresponds to a UI component instance in the tree. The FacesServlet object manages
the request processing life cycle in JSF applications. FacesServlet creates an object called
FacesContext, which contains the information necessary for request processing, and invokes
an object that executes the life cycle.
The ADF life cycle handles preparing and updating the data model, validating the data at the
model layer, and executing methods on the business layer. The ADF life cycle uses the binding
container to make data available for easy referencing by the page during the current page
request.

8/18/2019 D53979GC11_sg2.pdf
http://slidepdf.com/reader/full/d53979gc11sg2pdf 283/381Oracle Fusion Middleware 11g : Build Applications with ADF I 18 - 9
Copyright © 2009, Oracle. All rights reserved.
Coordinating JSF and ADF Life Cycles
Coordinating JSF and ADF Life Cycles (continued)You learned about the JSF life-cycle phases in the lesson titled “Understanding UI
Technologies.” The ADF life cycle also contains phases that are defined simply to notify ADF
life-cycle listeners before and after the corresponding JSF phase is executed (that is, there is no
implementation for these phases), shown in the slide as ADF phases beginning with “JSF.” This
enables you to create custom listeners and register them with any phase of both the JSF and ADF
life cycles, so that you can customize the ADF page life cycle if needed.
Combining what you learned previously about the JSF life cycle with the ADF life cycle, a page
goes through the following phases:• Restore View: The URL for the requested page is passed to the bindingContext,
which finds the page definition file that matches the URL. The component tree of the
requested page is either newly built or restored. All the component tags, event handlers,converters, and validators on the submitted page have access to the FacesContextinstance. If it’s a new empty tree (that is, there is no data from the submitted page), the
page life cycle proceeds directly to the Render Response phase.
• Initialize Context: Uses the page definition file to create the binding context; initializesthe LifecycleContext class with values for request, binding container, and life cycle.
• Prepare Model: Prepares and evaluates any page or task flow parameters, refreshes
applicable executables

8/18/2019 D53979GC11_sg2.pdf
http://slidepdf.com/reader/full/d53979gc11sg2pdf 284/381Oracle Fusion Middleware 11g : Build Applications with ADF I 18 - 10
Coordinating JSF and ADF Life Cycles (continued)
• Apply Request Values: Values provided in components that hold a value (such as input
fields) have their values applied to their counterparts in the view tree. All events such asValueChangeEvents (VCE) or ActionEvents (AE) are queued. If a component
has its immediate attribute set to true, then validation, conversion, and events
associated with the component are processed during this phase.
• Process Validation: Conversion and validation logic is executed for each component. This
means both built-in validation/data conversion and custom validation/conversion are added
onto the components. If a validation error is reported, an exception is thrown. The life
cycle halts and the response is rendered with validation error messages. At the end of this
phase, new component values are set, any validation or conversion error messages andevents are queued on FacesContext, and any value change events are delivered.
• Update Model: The component’s validated local values are moved to the model and the
local copies are discarded. If you are using a backing bean for a JSF page to manage your
UI components, any managed bean properties that are value-bound to a UI componentusing the value attribute are updated with the value of the component.
• Validate Model Updates: The updated model is now validated against any validationroutines set on the model. Exceptions are caught by the binding container and cached.
• Invoke Application: Any action bindings for command components or events are
invoked. Navigation is handled here depending on the outcome of the action method (if
any).
• Metadata Commit: Run-time metadata changes to the model are committed, which stores
any run-time changes made to the application using the Metadata Service (MDS).
• Prepare Render: The binding container is refreshed to allow for any changes that may
have occurred in the Apply Request Values or Validation phases. Any iterators thatcorrespond to read-only components (such as an outputText component) are refreshed.
The prepareRender event and the afterJSFRenderResponse event are sent toall registered listeners.Note: Instead of displaying prepareRender as a valid phase for a selection, JDeveloper
displays renderModel, which represents the refresh(RENDER_MODEL) method
called on the binding container.
• Render Response: The components in the tree are rendered as the Java EE Web container
traverses the tags in the page. State information is saved for subsequent requests and the
Restore View phase.

8/18/2019 D53979GC11_sg2.pdf
http://slidepdf.com/reader/full/d53979gc11sg2pdf 285/381Oracle Fusion Middleware 11g : Build Applications with ADF I 18 - 11
Copyright © 2009, Oracle. All rights reserved.
Specifying When to Refresh Binding Executables
• Refreshing iterator reconnects it with RowSetIteratorobject.
• Refreshing invoke action binding invokes the action.
• You can set the Refresh property to determine when to
refresh.
Refreshing Binding ExecutablesRefreshing Iterator Bindings
For scalability reasons, at run time the iterator bindings in the binding container release any
reference they have to a row set iterator at the end of each request. During the next request, the
iterator bindings are refreshed to again point at a “live” row set iterator that is tracking the
current row of some data collection. The act of refreshing an ADF iterator binding during the
ADF page life cycle is the operation of accessing the row set iterator to reunite the binding to the
row set iterator to which it is bound.
Refreshing Invoke Action Bindings
Refreshing an invoke action binding invokes the action.Determining When to Refresh
You can use the Refresh property on iterator bindings and invoke action executables in your
page definition file to control when each is evaluated during the ADF page life cycle. The valid
values for the Refresh property are as follows:
• deferred (the default): Enforces execution whenever demanded the first time, such as
when a binding value is referenced in an EL expression. After it is called, it does not
reexecute unless the binding itself or any parameter values for the binding have changed.• prepareModel: Refreshes just during the Prepare Model phase

8/18/2019 D53979GC11_sg2.pdf
http://slidepdf.com/reader/full/d53979gc11sg2pdf 286/381Oracle Fusion Middleware 11g : Build Applications with ADF I 18 - 12
Refreshing Binding Executables (continued)
• renderModel: Refreshes just during the Prepare Render phase
Note: The key distinction between the Prepare Model phase and the Prepare Render phase
is that one comes before JSF’s Invoke Application phase, and one after. Because JSF’s
Invoke Application phase is when action listeners fire, if you need your iterator to refresh
after these action listeners have performed their processing, you’ll want to set theRefresh property to renderModel.
• ifNeeded: Refreshes the iterator only if it has not been refreshed, based on the refresh
condition or if no condition is specified, during the Prepare Model phase• prepareModelIfNeeded: Same as ifNeeded, during the Prepare Model phase
• renderModelIfNeeded: Same as ifNeeded, during the Render Model phase
• RefreshAfter: Specify that one executable refreshes after another (you also then need
to set the RefreshAfter property in addition to the Refresh property); used to handle
dependencies between executables.• never (valid for iterator bindings only): Refreshes only when your own code calls
getRowSetIterator() on the iterator binding
• always (valid for iterator bindings only): Iterator always refreshed during both thePrepare Model and Prepare Render phases
Note: Refreshing an iterator binding does not forcibly reexecute its query each time. The first
time the view object instance’s row set iterator is accessed during a particular user’s unit of
work, this implicitly executes the view object’s query if it was not already executed. Subsequent
refreshing of the iterator binding related to that view object instance on page requests that are
part of the same logical unit of work only accesses the row set iterator again, but does not
forcibly reexecute the query. When you want to reexecute the query to refresh its data, use theExecute or ExecuteWithParams built-in operation, or programmatically call the
executeQuery() method on the iterator binding.

8/18/2019 D53979GC11_sg2.pdf
http://slidepdf.com/reader/full/d53979gc11sg2pdf 287/381Oracle Fusion Middleware 11g : Build Applications with ADF I 18 - 13
Copyright © 2009, Oracle. All rights reserved.
Specifying Whether to Refresh Binding
Executables
• Set RefreshCondition to an EL expression evaluating
to true (default) or false.
• Example: A search page that initially shows no data has
iterator binding with settings:
– RefreshCondition="#{!adfFacesContext.isInitialRender}"(false when page is first rendered)
– Refresh="renderModel"
Specifying Whether to Refresh Binding ExecutablesThe Refresh property determines the phase in which to invoke the executable, whereas the
RefreshCondition property determines whether to refresh the binding. Before refreshing
any bindings, the ADF run-time evaluates the RefreshCondition attribute of the
executables, which specifies the conditions under which the executable should be refreshed. Youcan specify the RefreshCondition value using a Boolean EL expression (default is true).
If an iterator binding is not refreshed during the life cycle, it is not pointing to any row set
iterator for that request. This results in the value bindings related to that iterator binding not
having any data to display. This can be a desirable result when, for example, you want a page,
such as a search page, to initially show no data. To achieve this, you can use the expression
#{adfFacesContext.isInitialRender}, which evaluates to true when a page is
first rendered. So that data does not display when the page is first rendered, use aRefreshCondition of: #{!adfFacesContext.isInitialRender}.
You should set the Refresh attribute of an executable to renderModel when the
RefreshCondition is dependent on the model. So if you want to use the
#{adfFacesContext.isInitialRender} expression in a RefreshCondition of
an executable, you must set the Refresh property to either renderModel or
renderModelIfNeeded, so that the executable refreshes during the Prepare Render phase.

8/18/2019 D53979GC11_sg2.pdf
http://slidepdf.com/reader/full/d53979gc11sg2pdf 288/381Oracle Fusion Middleware 11g : Build Applications with ADF I 18 - 14
Copyright © 2009, Oracle. All rights reserved.
Describing Types of Events
JSF supports:
• Phase events
– Execute as part of the JSF and ADF life cycle
– Can be used to augment standard behavior
• Action events
– Occur when a command component is activated, such as
when a user clicks a button or a link
– Return a control flow outcome
• Value change events
– Occur when the local value of a input component changes,
such as when a user selects a check box
– Are used for managing UI elements
Types of JSF EventsIn traditional JSF applications, event handling typically takes place on the server. JSF event
handling is based on the JavaBeans event model, where event classes and event listener
interfaces are used by the JSF application to handle events generated by components. For a JSF
application to be able to respond to user events, you typically register event listeners on the
components that would generate events. The following types of events are supported:
• A phase event or listener is executed as part of the standard JSF life cycle. You can add to
the standard behavior by implementing your own phase listener.
• An action event occurs when a command component is activated. For example, when a
user clicks a button or a link, the form containing the component is submitted, and the
component creates an event object that stores information about the event and identifiesthe component that generated the event. The event is also added to an event queue. At the
appropriate time in the JSF life cycle, JSF tells the component to broadcast the event to the
appropriate registered listener, which invokes the listener method that processes the event.
Events may trigger a change in the user interface or invoke back-end application code, or
both. The return value of an action event is usually used for navigation.
• A value change event occurs when the local value of an input component changes; it fires
only after component value validation and form submission.

8/18/2019 D53979GC11_sg2.pdf
http://slidepdf.com/reader/full/d53979gc11sg2pdf 289/381Oracle Fusion Middleware 11g : Build Applications with ADF I 18 - 15
Copyright © 2009, Oracle. All rights reserved.
JSF life cycle
Using Phase Listeners
Restore/Create
Component Tree
(View)
Render Response
Apply
Request
Values
UpdateModel
InvokeApplication
Process
Events,
ValidationInitial
Request
Postback
Using Phase ListenersIt is possible to create event listeners, called phase listeners, that are triggered at different stages
of the JSF life cycle. This enables you to code processing that should occur, for example, prior
to the rendering of a page.
Using a phase listener, you can listen for phase events for any of the ADF life-cycle phases, and
execute your own code before and after the events. The basic steps for implementing your own
phase listener in an ADF application are as follows:1. Create a class that implements the javax.faces.event.PhaseListener interface.
2. Add your own functionality in the beforePhase() and afterPhase() methods of
your class.3. Use the Overview tab to register your listener with your faces-config.xml file.
You can accomplish similar functionality, but for a single page, by using a page phase listener
that implements theoracle.adf.controller.v2.lifecycle.PagePhaseListener interface.

8/18/2019 D53979GC11_sg2.pdf
http://slidepdf.com/reader/full/d53979gc11sg2pdf 290/381Oracle Fusion Middleware 11g : Build Applications with ADF I 18 - 16
Copyright © 2009, Oracle. All rights reserved.
Using Event Listeners
I’ve been clicked!
Does anyone care? Yes – I’m listening!
Now I’ll get to work…
Event Source
Event Object
Event Listener
Using Event ListenersComponents can generate events, which are occurrences that take place as users interact with an
application, such as when they click a button or change a value. There are also events, such as
gaining or losing focus, that are not the result of user interactions.
If there is a listener for the event, the event communicates some information about what
happened, so that the listener can respond. An event, then, is a component’s way of letting a
listener know that something happened.
An event listener is a class that implements one of the listener interfaces and contains code to
respond to the event. A component has mechanisms to register and deregister event listeners for
the types of events that are generated by the component.

8/18/2019 D53979GC11_sg2.pdf
http://slidepdf.com/reader/full/d53979gc11sg2pdf 291/381Oracle Fusion Middleware 11g : Build Applications with ADF I 18 - 17
Copyright © 2009, Oracle. All rights reserved.
Responding to Action Events
• Command components raise action events.
• Code to respond to the action event can be in the backing
bean or external class.
• Stub code is generated by JDeveloper on demand.
• The action is registered in the page source.
• Action events are called in the Invoke Application phase of
the life cycle.
• Action methods are the last to execute after other listeners,such as valueChange events.
Responding to Action EventsAction events are events that are associated with command components (such ascommandButton, commandLink, or commandMenuItem).
An action event enables you to define an action method that returns an outcome to be used fornavigation. Instead of entering a control flow outcome directly in the action property of a
command component, you refer to a bean method that returns a string that corresponds to the
control flow outcome. An example is shown in the next slide.
Action method code can be either in the page-backing bean or in a separate class. The benefit of
having the code in the backing bean is that the code that is associated with a specific page is all
local to the page (single source). However, the benefit of a separate class is reusability. Forexample, if you have standard code that should be executed regardless of the page, then the
separate class approach makes more sense. If you use the backing bean approach, JDeveloper
creates a method stub for you; all you have to do is add your custom code. JDeveloper also
registers the action in the page source.
When the page is submitted, the action method is added to the queue of application events to be
executed. Action methods are the last to fire in the application phase of the life cycle. For this
reason they are generally used to determine navigation.

8/18/2019 D53979GC11_sg2.pdf
http://slidepdf.com/reader/full/d53979gc11sg2pdf 292/381Oracle Fusion Middleware 11g : Build Applications with ADF I 18 - 18
Copyright © 2009, Oracle. All rights reserved.
Creating Action Methods
• To create an action method:
1. Invoke the action binding
editor.
2. Choose existing bean and
method, or create new.
• JDeveloper:
– If the bean does not exist, creates Java class and registers
as a managed bean
– If the method does not exist, creates a method stub in themanaged bean class
– Adds the method to the action property of component
• Add your own code.
• Action methods return a String outcome.
Creating Action MethodsYou can create an action in JDeveloper by:
1. Invoking the action-binding editor by either double-clicking the component in the editor or
by right-clicking it in the Structure window and selecting Create Method Binding for
Action.
2. In the action-binding editor, you can accept the proposed method name or change it to a
name of your choice. You can select to create a new bean and method if desired.
You then add whatever code you need to the action method. Remember that action methods can
be used for controlling the UI, modifying values, or navigation; however, action methods returna String outcome.
For example, the myBean.selectWhere method depicted in the slide could have code
similar to the following:public String selectWhere() {if <some condition> {return (“cart”); /* navigate to shopping cart */
}else {return(“prod”); /* navigate to Product page */
}}

8/18/2019 D53979GC11_sg2.pdf
http://slidepdf.com/reader/full/d53979gc11sg2pdf 293/381Oracle Fusion Middleware 11g : Build Applications with ADF I 18 - 19
Copyright © 2009, Oracle. All rights reserved.
Using Action Listeners
Action listeners:
• Contain code to respond
to an action
• Do not return a value
• Execute after value
change listeners
Action methods:
• Are used for navigation
• Return a String outcome
• Execute last
Action listeners differ from action methods:
However, both can beinitiated by the same
action, such as a
button click.
Using Action ListenersCommand components, such as buttons and links, generate actions when clicked. Action
listeners are event listeners that define code to execute in response to that action. Action
listeners contain code that processes the action event object passed to it by the command
component.

8/18/2019 D53979GC11_sg2.pdf
http://slidepdf.com/reader/full/d53979gc11sg2pdf 294/381Oracle Fusion Middleware 11g : Build Applications with ADF I 18 - 20
Copyright © 2009, Oracle. All rights reserved.
Value Change Events
• Input components raise value change events.
• Code for the value change listener can be in the backing
bean or external class.
• Stub code is generated by JDeveloper.
• The value change event is registered in the page source.
• Value change events are processed in the Invoke
Application phase of the life cycle.
• Value change events fire before action events.
Value Change EventsValue change events are attached to input and select components. When there is a change to the
value of a component, a value change event is added to the queue of application events to be
executed. Just like action events, the code can be either in the backing bean or in a separate
class. JDeveloper creates the method stub in the backing bean and registers the listener in the page source by using the valueChangeListener property of the component tag.
The registered value change listener is added to the queue of listeners to be processed before any
action events. Action events, which are linked to navigation, are executed last.

8/18/2019 D53979GC11_sg2.pdf
http://slidepdf.com/reader/full/d53979gc11sg2pdf 295/381Oracle Fusion Middleware 11g : Build Applications with ADF I 18 - 21
Copyright © 2009, Oracle. All rights reserved.
Listening for Value Change Events
• Select the input component in the visual editor.
• Edit the valueChangeListener property and select a bean
and method, or create a new one.
• JDeveloper:
– Creates the method in the managed bean if it doesn’t already
exist
– Adds the method to the valueChangeListener property in
the page source• Add your code.
Listening for Value Change EventsYou create value change events by entering the name of the method in thevalueChangeListener property of the component. If you are creating a new method,
JDeveloper adds the method stub to the Java class. You then add your custom code.

8/18/2019 D53979GC11_sg2.pdf
http://slidepdf.com/reader/full/d53979gc11sg2pdf 296/381

8/18/2019 D53979GC11_sg2.pdf
http://slidepdf.com/reader/full/d53979gc11sg2pdf 297/381Oracle Fusion Middleware 11g : Build Applications with ADF I 18 - 23
Copyright © 2009, Oracle. All rights reserved.
ADF Faces Enhanced Event Handling
ADF Faces adds to JSF event handling by providing:
• Partial page rendering (PPR)
• JavaScript
ADF Faces Enhanced Event HandlingLike standard JSF components, ADF Faces command components deliver ActionEvent events
when the components are activated, and ADF Faces input and select components deliver
ValueChangeEvent events when the component local values change. Though ADF Faces
adheres to standard JSF event handling techniques, it also enhances event handling. Unlike
standard JSF events, ADF Faces events support AJAX-style partial postbacks to enable partial
page rendering (PPR). Instead of full page rendering, ADF Faces events and components can
trigger partial page rendering, that is, only portions of a page refresh upon request.

8/18/2019 D53979GC11_sg2.pdf
http://slidepdf.com/reader/full/d53979gc11sg2pdf 298/381Oracle Fusion Middleware 11g : Build Applications with ADF I 18 - 24
Copyright © 2009, Oracle. All rights reserved.
Using JavaScript in ADF Faces Applications
You can use JavaScript:
• To create custom components
• To respond to events
• In individual pages or bundled in a library
Using JavaScript in ADF Faces ApplicationsADF Rich Client uses JavaScript on the client side. The framework itself provides most of the
functionality needed. However, sometimes there is a need to write some custom JavaScript code
and have your pages access that code. You can use JavaScript in custom components or to
respond to events.
To enhance performance, you should bundle all JavaScript code into one JavaScript file and
deliver it to the client. The easiest approach is to use the MyFaces Trinidad tag<trh:script source=" "/>.
For more information about using JavaScript, see the Web User Interface Developer’s Guide for
ADF .

8/18/2019 D53979GC11_sg2.pdf
http://slidepdf.com/reader/full/d53979gc11sg2pdf 299/381Oracle Fusion Middleware 11g : Build Applications with ADF I 18 - 25
Copyright © 2009, Oracle. All rights reserved.
Other ADF Faces Server Events
Property Inspector of ADF Faces components displays
appropriate event listeners:
Other ADF Faces Server EventsIn addition to server-side action and value change events, ADF Faces components also fire other
kinds of server events. ADF Faces server events, and the components that generate them, include
the following:
• ActionEvent: All command components
• DialogEvent: dialog• DisclosureEvent: showDetail, showDetailHeader, showDetailItem• FocusEvent (generated when focusing in on a specific subtree, which is not the same as
a client-side keyboard focus event ): tree, treeTable• LaunchEvent: All command components
• LaunchPopupEvent: inputListOfValues, inputComboboxListOfValues• PollEvent: poll• QueryEvent: query, quickQuery, table• QueryOperationEvent: query, queryCriteria, quickQuery• RangeChangeEvent: table• RegionNavigationEvent: region

8/18/2019 D53979GC11_sg2.pdf
http://slidepdf.com/reader/full/d53979gc11sg2pdf 300/381Oracle Fusion Middleware 11g : Build Applications with ADF I 18 - 26
Other ADF Faces Server Events (continued)
• ReturnEvent: All command components
• ReturnPopupDataEvent: inputListOfValues,
inputComboboxListOfValues• ReturnPopupEvent: inputListOfValues, inputComboboxListOfValues• RowDisclosureEvent: tree, treeTable• SelectionEvent: tree, treeTable, table• SortEvent: treeTable, table• ValueChangeEvent: All input and select components (components that implement
EditableValueHolder)
All server events have associated event listeners. For example, to process a LaunchEventevent, you would create a LaunchListener event listener implementation. All server event
listener implementations must override a processEvent() method, where Event is the
event type. For example, LaunchListener accepts an instance of LaunchEvent as the
single argument; in your implementation you must override the event processing method, as
shown in the method signature here:
public void processLaunch (LaunchEvent evt) {// your code here
}
Instead of creating an event listener implementation, you can create an event listener method in
a backing bean. Any event listener method must be a public method that accepts the event as theonly parameter and returns void.
As you can see by the examples in the slide, the Property Inspector in JDeveloper exposes the
proper listeners for the type of ADF Faces component being used.
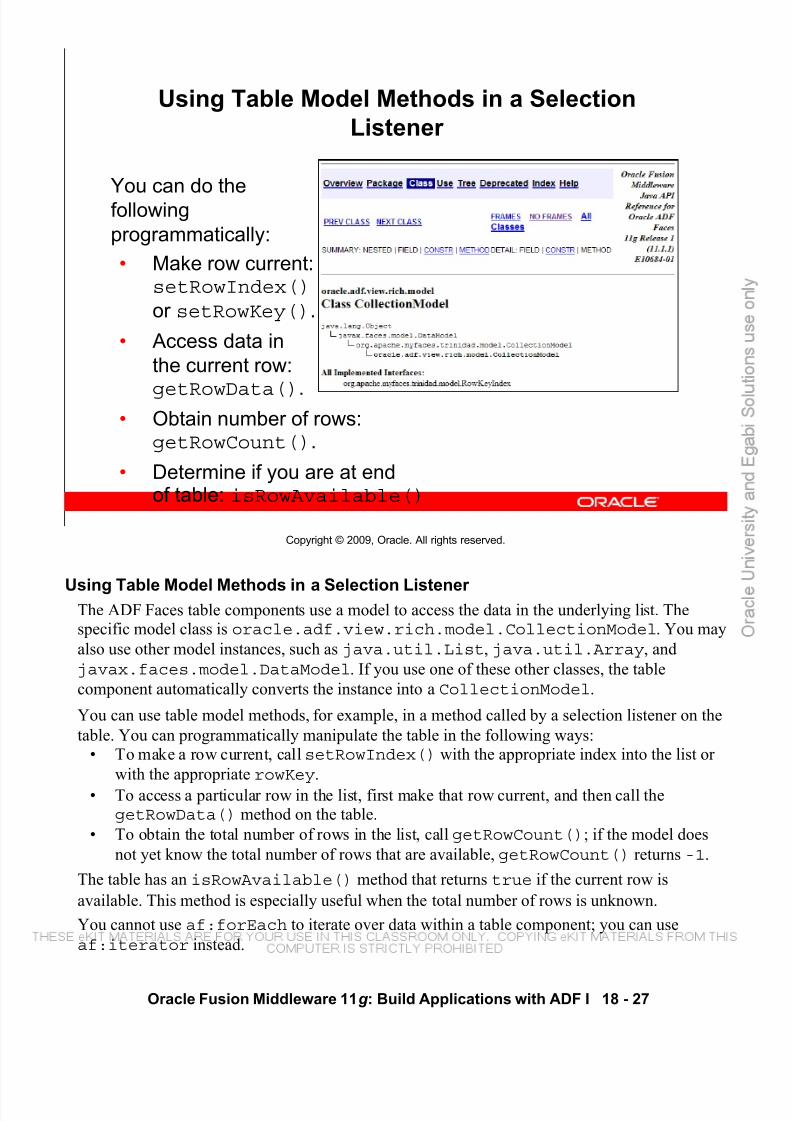
8/18/2019 D53979GC11_sg2.pdf
http://slidepdf.com/reader/full/d53979gc11sg2pdf 301/381Oracle Fusion Middleware 11g : Build Applications with ADF I 18 - 27
Copyright © 2009, Oracle. All rights reserved.
Using Table Model Methods in a Selection
Listener
You can do thefollowing
programmatically:
• Make row current:setRowIndex()or setRowKey().
• Access data in
the current row:
getRowData().• Obtain number of rows:
getRowCount().
• Determine if you are at endof table: isRowAvailable()
Using Table Model Methods in a Selection Listener The ADF Faces table components use a model to access the data in the underlying list. Thespecific model class is oracle.adf.view.rich.model.CollectionModel. You may
also use other model instances, such as java.util.List, java.util.Array, and
javax.faces.model.DataModel. If you use one of these other classes, the table
component automatically converts the instance into a CollectionModel.
You can use table model methods, for example, in a method called by a selection listener on the
table. You can programmatically manipulate the table in the following ways:• To make a row current, call setRowIndex() with the appropriate index into the list or
with the appropriate rowKey.
• To access a particular row in the list, first make that row current, and then call thegetRowData() method on the table.
• To obtain the total number of rows in the list, call getRowCount(); if the model does
not yet know the total number of rows that are available, getRowCount() returns -1.
The table has an isRowAvailable() method that returns true if the current row is
available. This method is especially useful when the total number of rows is unknown.
You cannot use af:forEach to iterate over data within a table component; you can use
af:iterator instead.

8/18/2019 D53979GC11_sg2.pdf
http://slidepdf.com/reader/full/d53979gc11sg2pdf 302/381Oracle Fusion Middleware 11g : Build Applications with ADF I 18 - 28
Copyright © 2009, Oracle. All rights reserved.
Using Tree Model Methods in a Selection Listener
You can do thefollowing
programmatically:
• Determine if a row
has children:isContainer()
• Access children of
current row:
enterContainer()• Revert to parent
collection:exitContainer()
Using Tree Model Methods in a Selection Listener The ADF Faces tree components use a model to access the data in the underlying hierarchy. Thespecific model class is oracle.adf.view.rich.model.TreeModel, which extends
CollectionModel. You can use code from this class in a managed bean method and call it
from a tree’s selection listener.
The TreeModel is a collection of rows. It has an isContainer() method that returns
true if the current row contains child rows. To access the children of the current row, call the
enterContainer() method. Calling this method results in the TreeModel instance
changing to become a collection of the child rows. To revert back up to the parent collection,call the exitContainer() method.
The oracle.adf.view.faces.model.ChildPropertyTreeModel class can be
useful when constructing a TreeModel.

8/18/2019 D53979GC11_sg2.pdf
http://slidepdf.com/reader/full/d53979gc11sg2pdf 303/381Oracle Fusion Middleware 11g : Build Applications with ADF I 18 - 29
Copyright © 2009, Oracle. All rights reserved.
Additional AJAX Events
Additional event types include AJAX events:
Additional Event TypesAjax (Asynchronous JavaScript and XML) combined with the component-based approach of
JavaServer Faces (JSF) is the technology behind ADF Faces’ highly interactive components.
ADF Rich Client components automatically provide various AJAX-like interactions, such as
sorting on table components.

8/18/2019 D53979GC11_sg2.pdf
http://slidepdf.com/reader/full/d53979gc11sg2pdf 304/381Oracle Fusion Middleware 11g : Build Applications with ADF I 18 - 30
Copyright © 2009, Oracle. All rights reserved.
Characteristics of the Contextual Event
Framework
• Contextual events:
– Provide a way to coordinate regions
– Can be invoked and consumed only by method action of adata control
• Producer and consumer may be the same or different data
controls.
Containing
Page
Characteristics of the Contextual Event FrameworkWhen a page contains multiple regions that need to work together to display relevant
information to the user, the need to communicate between regions becomes very important. This
communication can be handled through an event framework called the Contextual Event
Framework. This framework provides the page with the ability to map events to be produced and
consumed by the page’s various regions, along with the information to be passed to the
consumer regions.
In a typical scenario a consumer would need to register with the producer to get event
notification. However, the contextual event framework in ADF enables the producer and
consumer to be tied through an event routing mechanism. The producer publishes the contextual
event it is going to raise. The page listens for the event and then routes it to the consumer.
The Contextual Event Framework includes the following characteristics:
• A contextual event can go across data controls.
• A contextual event can be raised or consumed only with a method action binding that must
be only data control methods, not managed bean methods.
• Event payload can either be primitive or any serializable object.

8/18/2019 D53979GC11_sg2.pdf
http://slidepdf.com/reader/full/d53979gc11sg2pdf 305/381Oracle Fusion Middleware 11g : Build Applications with ADF I 18 - 31
Copyright © 2009, Oracle. All rights reserved.
Contextual Events: Overview
Producer
regionConsumer
region
Containing page
Payload
method
Consumer
method
Event
map
Contextual Events: ExampleAs an example of using the contextual events framework, consider a containing page that
contains two regions representing two task flows. The task flows in the separate regions have no
knowledge of one another, as if there is a wall between them. Only the containing page has
knowledge of both regions, so it is the containing page that must coordinate the interaction
between them.
The goal of creating a contextual event in this example is to accomplish the following:
• Pass information from the first region to the second region.
• React in the second region based on the information that is passed.
When an action, such as a button click, occurs in the first region, the event is initiated. There is amethod defined that constructs the payload for the event, that is, the information that is being
passed to the other region. There is another method on the target, or consumer region, that
specifies how that region should respond. The job of the containing page is to map the event:
specify which is the payload method, which is the handler method, and so on.

8/18/2019 D53979GC11_sg2.pdf
http://slidepdf.com/reader/full/d53979gc11sg2pdf 306/381Oracle Fusion Middleware 11g : Build Applications with ADF I 18 - 32
Copyright © 2009, Oracle. All rights reserved.
Using the Contextual Event Framework to
Coordinate Page Regions
Containing
PageConsumerProducer
Payload
Method
Handler
Method
Producer
PageDef
Consumer
PageDef
Containing
PageDef
1
2
34
5
Using Contextual EventsThere are several pieces that define a contextual event:
1. A container page that contains the regions to be coordinated
2. A producer that invokes a method to raise the event and provide a payload (information
needed by the event)
3. A consumer that is the target of the event
4. A handler method that is bound either to the consumer page fragment or to the page
containing the regions
5. An event mapping on the container page definition that specifies:
- The producer region and payload method
- The event name- The consumer and event handler
- The parameter (payload) to pass to the event
The steps required to set up a contextual event are described in the next few slides.

8/18/2019 D53979GC11_sg2.pdf
http://slidepdf.com/reader/full/d53979gc11sg2pdf 307/381Oracle Fusion Middleware 11g : Build Applications with ADF I 18 - 33
Copyright © 2009, Oracle. All rights reserved.
Using the Contextual Event Framework to
Coordinate Page Regions: Step 1
Containing
PageConsumerProducer
Define a page
that containstwo regions.
Using Contextual Events: Step 1Although they do not need to be performed exactly in order, defining a contextual event requires
several steps as explained in this and the following slides:
1. Create the container, producer, and consumer:
If you have two regions on a containing page that you want to coordinate by using
contextual events, you first need to decide which is the producer and which is the
consumer. For example, you may want the data in the consumer region to display
differently depending on what is clicked in the producer region, such as displaying
products or categories when the user clicks a subcategory or a root category in a category
tree (this is the example that is used in the course application).

8/18/2019 D53979GC11_sg2.pdf
http://slidepdf.com/reader/full/d53979gc11sg2pdf 308/381Oracle Fusion Middleware 11g : Build Applications with ADF I 18 - 34
Copyright © 2009, Oracle. All rights reserved.
Using the Contextual Event Framework to
Coordinate Page Regions: Step 2
Containing
PageConsumerProducer
Payload
Method
Construct
an event
payload.
Using Contextual Events: Step 22. Create the method that constructs the payload and expose it as a data control:
After you have designated the producer and the consumer, you can determine what data, or
payload, the consumer of the event requires to refresh its region appropriately. This can be
as simple as passing a foreign key value, but some complex business logic may be required
to produce the data needed by the consumer region. In any case, you need to create a
method to construct the event payload. This can be in a separate Java class, or it can be a
service method in the application module. The method must always return the event
payload.
No matter how you create the method, you must expose it as a data control. If it is in a
separate Java class, you can simply drag it to the Data Control Palette. If it is anapplication module method, you must expose it to the client interface.

8/18/2019 D53979GC11_sg2.pdf
http://slidepdf.com/reader/full/d53979gc11sg2pdf 309/381Oracle Fusion Middleware 11g : Build Applications with ADF I 18 - 35
Copyright © 2009, Oracle. All rights reserved.
Using the Contextual Event Framework to
Coordinate Page Regions: Step 3
Containing
PageConsumerProducer
Payload
Method
Invoke the
payload method.
Using Contextual Events: Step 33. Invoke the payload method:
You need to call the method that you just created, so you can create a command
component (button or link) on the producer region’s page and drag the method to that
component from the Data Control Palette.

8/18/2019 D53979GC11_sg2.pdf
http://slidepdf.com/reader/full/d53979gc11sg2pdf 310/381Oracle Fusion Middleware 11g : Build Applications with ADF I 18 - 36
Copyright © 2009, Oracle. All rights reserved.
Using the Contextual Event Framework to
Coordinate Page Regions: Step 4
Containing
PageConsumerProducer
Payload
Method
Producer
PageDef Supply a value
for the payload
method argument.
Using Contextual Events: Step 44. Supply values for the payload method arguments, if any:
The previous step creates a method action binding in the producer page definition. In that
page definition file, you may need to supply a value for any arguments that are passed to
the method. In the Structure window, select the method argument and set its value in the
Property Inspector. You can use EL to pass a value from the data that is on the page.

8/18/2019 D53979GC11_sg2.pdf
http://slidepdf.com/reader/full/d53979gc11sg2pdf 311/381Oracle Fusion Middleware 11g : Build Applications with ADF I 18 - 37
Copyright © 2009, Oracle. All rights reserved.
Using the Contextual Event Framework to
Coordinate Page Regions: Step 5
Containing
PageConsumerProducer
Payload
Method
Producer
PageDef Raise an event
when the
payload method
is invoked.
Using Contextual Events: Step 55. Raise the event when the payload method is invoked:
You need to specify that an event be raised when the payload method is invoked. In the
Structure window for the page definition for the producer page fragment, insert
<events> inside the method binding, and insert <event> inside <events>. Specify
the event name to be raised as any meaningful name.
Note: One method action can raise one or more events.

8/18/2019 D53979GC11_sg2.pdf
http://slidepdf.com/reader/full/d53979gc11sg2pdf 312/381Oracle Fusion Middleware 11g : Build Applications with ADF I 18 - 38
Copyright © 2009, Oracle. All rights reserved.
Using the Contextual Event Framework to
Coordinate Page Regions: Step 6
Containing
PageConsumerProducer
Payload
Method
Handler
Method
Producer
PageDef
Create an
event handler.
Using Contextual Events: Step 66. Create an event handler method and expose as a data control:
You also need to create an event handler that specifies what happens in the consumer
region after the event is raised. Does it need to requery, using the payload data, or does it
simply need to refresh the region? Again, this event handler method, which can be defined
in a separate class or as an application module service method, must be exposed as a data
control. The handler method expects event parameters or the event payload itself.

8/18/2019 D53979GC11_sg2.pdf
http://slidepdf.com/reader/full/d53979gc11sg2pdf 313/381

8/18/2019 D53979GC11_sg2.pdf
http://slidepdf.com/reader/full/d53979gc11sg2pdf 314/381Oracle Fusion Middleware 11g : Build Applications with ADF I 18 - 40
Copyright © 2009, Oracle. All rights reserved.
Using the Contextual Event Framework to
Coordinate Page Regions: Step 8
Containing
PageConsumerProducer
Payload
Method
Handler
Method
Producer
PageDef
Consumer
PageDef
Containing
PageDef
Map the event.
Using Contextual Events: Step 88. Map the event:
Event mapping means that you tell the containing page how to route the event. You do this
on the page that contains the regions to be coordinated. In the Structure window for its
page definition, right-click the root node and select Edit Event Map. The Event Map editor
has an upper portion where you specify the mapping:
- Select the Producer (the method on the producer page fragment that constructs the
payload for the event.) This should populate the Event Name for you, because in the
page definition file for the producer page fragment, you have already specified the
event to be raised when the method is invoked.
- Select the consumer, which is the method to be invoked to handle the event.- Click the ellipsis button beside Parameters to supply the payload for the event. The
Edit Consumer Params dialog box enables you to name the parameter and to use ELto specify the payload, which must be ${payLoad}. You can click the ellipsis in
the Param Value column to use Expression Builder to choose this value from Payload
Data.
- After you have defined the mapping, click Add New to add it to the Event Entries
Summary.

8/18/2019 D53979GC11_sg2.pdf
http://slidepdf.com/reader/full/d53979gc11sg2pdf 315/381Oracle Fusion Middleware 11g : Build Applications with ADF I 18 - 41
Copyright © 2009, Oracle. All rights reserved.
Using the Contextual Event Framework to
Coordinate Page Regions: Step 9
Containing
PageConsumerProducer
Payload
Method
Handler
Method
Producer
PageDef
Consumer
PageDef
Containing
PageDef
Specify producer
region refreshing.
Specify consumer
region refreshing .
Using Contextual Events: Step 99. Specify region refreshing:
You also need to define how the regions will be refreshed:
- Producer region: Typically you do not want to refresh the producer region, so for the
button that invokes the event, set the PartialSubmit property to true.
- Consumer region: If you are performing an action in the handler method that
refreshes the page (such as requerying), then you do not need to worry about
refreshing the consumer page fragment or region. The event consumer processes the payload and updates its model accordingly. Otherwise, you need to set refreshand refreshCondition appropriately for the consumer region on the page
definition for the containing page.
At run time, when the user clicks the button or link in the producer task flow, a PPR action
submit in the event producer region invokes a method action in the event producer task flow.
When the method action in the event producer task flow is invoked, it raises an ADFm
event. The ADFm event is consumed by a method action inside the consumer task flow
according to the event mapping defined in the containing page’s page definition. The event
consumer processes the payload and updates its model accordingly.

8/18/2019 D53979GC11_sg2.pdf
http://slidepdf.com/reader/full/d53979gc11sg2pdf 316/381Oracle Fusion Middleware 11g : Build Applications with ADF I 18 - 42
Copyright © 2009, Oracle. All rights reserved.
Summary
In this lesson, you should have learned how to:
• Configure and use managed beans to contain code to
respond to events
• Describe the different types of events
• Use phase listeners
• Create event listeners
• Define action listeners
• Create value change listeners
• Describe ADF Faces enhanced event handling
• List other types of server events used by ADF Faces
components
• Explain how ADF components use AJAX events
• Use contextual events to coordinate regions

8/18/2019 D53979GC11_sg2.pdf
http://slidepdf.com/reader/full/d53979gc11sg2pdf 317/381Oracle Fusion Middleware 11g : Build Applications with ADF I 18 - 43
Copyright © 2009, Oracle. All rights reserved.
Practice 18 Overview:
Responding to Events
This practice covers the following topics:
• Defining task flow parameters
• Using a contextual event to coordinate user selection in a
tree in one region with the display in another region
• Using phase listeners
Practice 18 Overview: Responding to EventsIn this practice, you create task flow parameters that enable a page to accept values from outside
the task flow. You define a contextual event to coordinate two regions, and you optionally write
phase listeners to display JSF life-cycle phases when a user navigates to a new page.

8/18/2019 D53979GC11_sg2.pdf
http://slidepdf.com/reader/full/d53979gc11sg2pdf 318/381

8/18/2019 D53979GC11_sg2.pdf
http://slidepdf.com/reader/full/d53979gc11sg2pdf 319/381
Copyright © 2009, Oracle. All rights reserved.
Implementing Transactional Capabilities

8/18/2019 D53979GC11_sg2.pdf
http://slidepdf.com/reader/full/d53979gc11sg2pdf 320/381Oracle Fusion Middleware 11g : Build Applications with ADF I 19 - 2
Copyright © 2009, Oracle. All rights reserved.
Objectives
After completing this lesson, you should be able to do the
following:
• Explain ADF BC transaction handling
• Implement task flow transaction control
• Handle transaction exceptions
• Define response to the browser’s Back button
• Enable save for later functionality
Lesson AimThis lesson describes how to build the pages to support a multipage transaction. You add
transaction capability to the checkout flow and also define pages to insert, update, and delete
suppliers.

8/18/2019 D53979GC11_sg2.pdf
http://slidepdf.com/reader/full/d53979gc11sg2pdf 321/381Oracle Fusion Middleware 11g : Build Applications with ADF I 19 - 3
Copyright © 2009, Oracle. All rights reserved.
Handling Transactions with ADF BC
• Application modules handle transaction and concurrency
support.
• No coding is required unless you want to customize the
default behavior.
• For nested application modules, the outermost application
module provides the transaction context for the others.
Business Components TransactionsA transaction is a persisted collection of work that can be committed or rolled back together as a
group.
The Business Components framework handles all transactions at the application module level.
The application module provides a transaction context, with a single database connection. When
you commit a change, the commit applies to all view objects in the application module. For
nested application modules, the outermost or root application module provides the transaction
context for all nested application modules.

8/18/2019 D53979GC11_sg2.pdf
http://slidepdf.com/reader/full/d53979gc11sg2pdf 322/381Oracle Fusion Middleware 11g : Build Applications with ADF I 19 - 4
Copyright © 2009, Oracle. All rights reserved.
Default ADF Model Transactions
Database table ADF BC
Entity Object
ADF BC
View Object
ADF BC
Application Module
ADF Model
Data ControlBinding Container Databound components on a JSP
Default ADF Model TransactionsThe default behavior when an ADF model change is committed is to issue the commit directly tothe Transaction object of the current associated ADF BC application module instance to
handle the transaction.

8/18/2019 D53979GC11_sg2.pdf
http://slidepdf.com/reader/full/d53979gc11sg2pdf 323/381Oracle Fusion Middleware 11g : Build Applications with ADF I 19 - 5
Copyright © 2009, Oracle. All rights reserved.
Transactions in Task Flows
Transactions in Task FlowsWhen you issue a commit within a bounded task flow, the entire task flow is committed as a
unit. If changes have been made on multiple pages within the task flow, they are all committed.
If you have multiple pages that are based on different application modules, allowing the
application modules to control the transactions means that the changes on each page get
committed separately. A commit failure on one of the application modules does not prevent theother changes from being committed, because the Transaction object of each application
module is separate from the others.

8/18/2019 D53979GC11_sg2.pdf
http://slidepdf.com/reader/full/d53979gc11sg2pdf 324/381Oracle Fusion Middleware 11g : Build Applications with ADF I 19 - 6
Copyright © 2009, Oracle. All rights reserved.
Controlling Transactions in Task Flows
Controlling Transactions in Task FlowsYou can use an ADF bounded task flow to represent a transactional unit of work and to
declaratively manage transaction boundaries.
When you allow the bounded task flow to control the transaction, any application modules
involved are treated as nested application modules. The task flow interacts with the
Transaction object of a “dummy” application module, which provides the transaction
context for all the nested AMs. If the commit on one of the nested AMs should fail, then the
entire transaction fails.

8/18/2019 D53979GC11_sg2.pdf
http://slidepdf.com/reader/full/d53979gc11sg2pdf 325/381Oracle Fusion Middleware 11g : Build Applications with ADF I 19 - 7
Copyright © 2009, Oracle. All rights reserved.
DeclarativeCommit
/ Rollback
Back Button
SupportTransaction:
Inherit with savepointor New Save for later
Transaction Support Features
of Bounded Task Flows
Transaction Support in Bounded Task Flows• Transaction options on the called task flow definition specify whether a called ADF
bounded task flow should join an existing transaction, create a new one, or create a new
one only if there is no existing transaction.
• Savepoints: ADF creates a savepoint when a task flow is entered with an existing
transaction. The savepoint is a snapshot of the model state at the time the task flow was
entered. The savepoint enables the model state to be restored to what it was at the time the
task flow was entered.
• If the called ADF bounded task flow is able to start a new transaction (based on the
transaction option that you select), you can specify whether the transaction is committed or
rolled back when the task flow returns to its caller.• In a called task flow definition, you can specify two different return task flow activities
that result in either committing or rolling back a transaction in the called ADF bounded
task flow.
• You can enable users to save the state of the UI and model at any point and come back to it
later.
• You can specify how a page should behave when users navigate to it by using the Back
button.

8/18/2019 D53979GC11_sg2.pdf
http://slidepdf.com/reader/full/d53979gc11sg2pdf 326/381Oracle Fusion Middleware 11g : Build Applications with ADF I 19 - 8
Copyright © 2009, Oracle. All rights reserved.
Specifying Task Flow Transaction Start Options
Defining task flow transaction options:
In Property Inspector
In Structure window
Specifying Task Flow Transaction Start OptionsTransaction start options on the called task flow definition specify whether a called ADF
bounded task flow should:
• Join an existing transaction (requires-existing-transaction)• Create a new transaction (new-transaction)• Create a new one only if there is no existing transaction (requires-transaction)
If no transaction option is specified, a transaction is not started on entry of the called ADF
bounded task flow. A run-time exception is thrown if the ADF bounded task flow attempts to
access transactional services.

8/18/2019 D53979GC11_sg2.pdf
http://slidepdf.com/reader/full/d53979gc11sg2pdf 327/381Oracle Fusion Middleware 11g : Build Applications with ADF I 19 - 9
Copyright © 2009, Oracle. All rights reserved.
Specifying Task Flow Return Options
Commit or rollback must be specified for
some transactions:
You specify commit or rollback on transaction
return activities:
Specifying Task Flow Return OptionsIf the called ADF bounded task flow is able to start a new transaction (based on the transaction
option that you selected), you can specify whether the transaction should be committed or rolled
back when the task flow returns its caller. The table at the top of the slide shows the
requirements to specify commit or rollback for each transaction option.
The commit and rollback options are set on the task flow return activity that returns control back
to the calling task flow. You use the Property Inspector in the End Transaction property on the
Behavior tab. The same task flow that starts a transaction must also resolve the transaction.
In a called task flow definition, you can specify two different return task flow activities that
result in either committing or rolling back a transaction in the called ADF bounded task flow.Each of the task flow return activities passes control back to the same calling task flow. Thedifference is that one task flow return activity specifies the commit option, whereas the other
specifies the rollback option.
In the example in the slide, if transaction processing successfully completes, the submitcontrol flow rule passes to the PlaceOrder task flow return activity, which specifies options
to commit the transaction. If the transaction is cancelled before completion, the cancel control
flow rule passes control to the CancelOrder task flow activity, which specifies options to roll
back the transaction.

8/18/2019 D53979GC11_sg2.pdf
http://slidepdf.com/reader/full/d53979gc11sg2pdf 328/381Oracle Fusion Middleware 11g : Build Applications with ADF I 19 - 10
Specifying Task Flow Return Options (continued)
Only task flows that begin a transaction can commit or roll back the transaction. Also, a taskflow that always begins a transaction (the new-transaction option) must specify resolution
of the transaction (either commit or rollback) on all of its task flow return activities’ outcomes. It
is invalid for the task flow to return without resolving a transaction it started.
If you want changes made within the called ADF bounded task flow to be discarded when it is
exited, you can specify the restore-save-point option on the task flow return activity. If restore-save-point is true when the task flow is exited, the ADF controller rolls back to the previous
ADF Model savepoint that was created when the ADF bounded task flow was entered. The
restore-save-point option applies only to cases when an ADF bounded task flow is entered by
joining an existing transaction (either the requires-existing-transaction or requires-transaction
option is also specified) and a savepoint is created upon entry.

8/18/2019 D53979GC11_sg2.pdf
http://slidepdf.com/reader/full/d53979gc11sg2pdf 329/381Oracle Fusion Middleware 11g : Build Applications with ADF I 19 - 11
Copyright © 2009, Oracle. All rights reserved.
Enabling Transactions on a Task Flow
1 2 3
4 5 6
78
Enabling Transactions on a Task FlowBefore you begin, you should have two task flows. One calls the second ADF bounded task flow
using a task flow call activity.
To enable an ADF bounded task flow to run as a transaction, in the called ADF bounded task
flow, you specify a transaction option that defines whether or not a new transaction will be
created when it is called. You also define a task flow return activity that specifies an outcome
upon return to the caller. To accomplish this, perform the following steps (1–4 specify
transaction start options, whereas 5–8 are transaction return options):
Transaction Start Options
1. In the Application Navigator, double-click the called ADF task flow to open it in theeditor.
2. In the Overview tab for the called ADF bounded task flow, click Behavior and expand the
Transaction section.
3. Choose one of the following from the transaction drop-down list (if you do not choose any
item, the called ADF bounded task flow does not participate in any transaction
management):- requires-existing-transaction: When called, the ADF bounded task
flow participates in an existing transaction already in progress.

8/18/2019 D53979GC11_sg2.pdf
http://slidepdf.com/reader/full/d53979gc11sg2pdf 330/381Oracle Fusion Middleware 11g : Build Applications with ADF I 19 - 12
Enabling Transactions on a Task Flow (continued)
- requires-transaction: When called, the ADF bounded task flow either
participates in an existing transaction if one exists, or starts a new transaction upon
entry of the ADF bounded task flow if one doesn’t exist.- new-transaction: A new transaction is always started when the ADF bounded
task flow is entered, regardless of whether or not a transaction is in progress. The
new transaction is completed when the ADF bounded task flow exits.4. If you choose requires-existing-transaction or requires-
transaction, you can optionally select true in the No Save Point drop-down list. If
you select true, an ADF Model savepoint is not created on task flow entry. An ADF
Model savepoint is a saved snapshot of the ADF Model state. Selecting true means that
the overhead associated with a savepoint is not created for the transaction.
Note: You can also specify transaction start options on the Behavior panel of the Property
Inspector.
Transaction Return Options
5. In the editor, select the task flow return activity in the called ADF bounded task flow.
6. In the Property Inspector, click Behavior.7. If the called task flow definition supports creation of a new transaction (task flow
definition specifies requires-transaction or new-transaction options),
select one of the following in the End Transaction drop-down list:- commit: Commits the existing transaction to the database
- rollback: Rolls back a new transaction to its initial state on task flow entry. This
has the same effect as canceling the transaction.8. In the restore-save-point drop-down list, select true if you want changes that the user
made within the called ADF bounded task flow to be discarded when it is exited. The
savepoint that was created upon task flow entry will be restored.

8/18/2019 D53979GC11_sg2.pdf
http://slidepdf.com/reader/full/d53979gc11sg2pdf 331/381Oracle Fusion Middleware 11g : Build Applications with ADF I 19 - 13
Copyright © 2009, Oracle. All rights reserved.
Sharing Data Controls
Data control scopes:
• Shared (default): Called flow shares data control instances
with calling flow
• Isolated: Called flow has unique instance of data controls
<data-control-scope>
<shared/>
</data-control-scope>
Sharing Data ControlsThe ADF Model layer provides a scoping mechanism for data controls called aDataControlFrame. At any given time there is one current
DataControlFrame. Whenever a data control is referenced, for example by the EL
expression #{bindings.foo}, the ADF Model layer goes to the current
DataControlFrame to find the data control.
By default, the called task flow shares all data control instances with its caller (shared datacontrol scope.) You can change that by setting the task flow’s data control scope to isolated.
With this setting, a DataControlFrame is created for each task flow that is entered, with the
result that each task flow has its own unique instance of any data controls it uses—it is isolated
from its caller and does not share any data control instances.
The model layer uses the DataControlFrame to manage the transaction that the data
controls within the frame participate in. The behavior of various task flow transactional settings
is dependent on the data control scope, as shown in the following table:

8/18/2019 D53979GC11_sg2.pdf
http://slidepdf.com/reader/full/d53979gc11sg2pdf 332/381Oracle Fusion Middleware 11g : Build Applications with ADF I 19 - 14
Sharing Data Controls (continued)
Interaction of transaction and data-controls-scope option settings
Setting Shared Isolated
Requires Transaction Begins a new transaction if Always begins a new
one is not already open transaction
Requires New Transaction Begins a new transaction if Always begins a new
one is not open and throws transaction
an exception if one is already
open
Requires Existing Transaction Throws an exception if a Invalid: This option
transaction is not already open cannot be selected at
design time.
None N/A A newDataControlFrame
is created without an
open transaction.
Synchronizing with the Model
By default, a transaction is not committed until the task flow is exited, because that is when the
DataControlFrame is committed. If you attempt to commit in the middle of the task flow,
the state of the UI gets out of synchronization with the state of the model. However, you canenable a midtask flow commit by manually committing the DataControlFrame, as in the
following example:
static public void saveAndContinue() {
Map sessionMap =
FacesContext.getCurrentInstance().getExternalContext().getSessionMap();
BindingContext context =
(BindingContext)sessionMap.get(BindingContext.CONTEXT_ID);
String currentFrameName = context.getCurrentDataControlFrame();
DataControlFrame dcFrame = context.findDataControlFrame(currentFrameName);
dcFrame.commit();
dcFrame.beginTransaction(null);}
FacesContext contains the information necessary for request processing, and invokes an
object that executes the life cycle. BindingContext is a container object that defines a
hierarchy of data controls and data binding objects derived from the Oracle ADF Model Layer.
It is the handle through which the client accesses the data binding layer, and is represented bythe bindings variable in EL data binding expressions.

8/18/2019 D53979GC11_sg2.pdf
http://slidepdf.com/reader/full/d53979gc11sg2pdf 333/381Oracle Fusion Middleware 11g : Build Applications with ADF I 19 - 15
Copyright © 2009, Oracle. All rights reserved.
Handling Transaction Exceptions
• You should designate an exception handling activity on
transactional task flows.
• Can be any activity type, such as:
– View: To display a message
– Router: To call a method depending on the type of exception
Handling Transaction ExceptionsDuring execution of an ADF task flow, exceptions can occur that may require some kind of
exception handling, such as when a method call activity throws an exception or when a user is
not authorized to execute the activity.
To handle exceptions thrown from an activity or caused by some other type of ADF controller
error, you can create an exception handler for an ADF bounded or unbounded task flow. When
an exception is raised within the task flow, control flow passes to the designated exception
handling activity. The exception handler activity can be any supported activity type, for
example, a view that displays an error message, or a router activity that passes control flow to a
method, based on an expression that evaluates the type of exception.
As a best practice, any ADF bounded task flow representing a managed transaction should
designate an exception handling activity. When running an ADF bounded task flow managed
transaction, the ADF controller attempts to commit the transaction when it reaches a task flow
return activity identified in metadata for a commit. If the commit throws an exception, control is
passed to the ADF bounded task flow’s exception handling activity. This provides the end user
with a chance to correct any data and then reattempt to commit it. You can use the exception
handling activity to display a warning message on a page that tells the user to correct the data
and attempt to commit it again.

8/18/2019 D53979GC11_sg2.pdf
http://slidepdf.com/reader/full/d53979gc11sg2pdf 334/381Oracle Fusion Middleware 11g : Build Applications with ADF I 19 - 16
Copyright © 2009, Oracle. All rights reserved.
Designating an Exception Handler Activity
<exception-handler>ShowError</exception-handler>
...
...
<view id="ShowError"></view>
Designating an Exception Handler ActivityTo designate an activity as an exception handler for a task flow, perform the following steps:
1. Right-click the activity in the task flow diagram, then choose Mark Activity > Exception
Handler. A red exclamation point is superimposed on the activity in the task flow to
indicate that it is an exception handler.
2. To unmark the activity, right-click the activity in the task flow diagram, then choose
Unmark Activity > Exception Handler. If you mark an activity as an exception handler in a
task flow that already has a designated exception handler, the old handler is unmarked.
After you designate that an activity is the exception handling activity for a task flow, the taskflow metadata updates with an <exception-handler> element that specifies the ID of the
activity, as shown in the slide.

8/18/2019 D53979GC11_sg2.pdf
http://slidepdf.com/reader/full/d53979gc11sg2pdf 335/381Oracle Fusion Middleware 11g : Build Applications with ADF I 19 - 17
Copyright © 2009, Oracle. All rights reserved.
Defining Response to the Back Button
The task-flow-reentry property determines if user
can return to an exited task flow by clicking the
browser’s Back button:
• reentry-allowed: OK
• reentry-not-allowed: Throws exception
• reentry-outcome-dependent: Depends on
outcome from exited task flow
Return
to exited
task flow?
Defining Response to the Back ButtonTo deal with cases in which the end user clicks the Back button to navigate back into an ADF bounded task flow that was already exited, you can specify the following task-flow-reentry options for the task flow definition that specify whether a page in the ADF bounded
task flow can be reentered: reentry-allowed: Reentry is allowed on any view activity within the ADF bounded
task flow.• reentry-not-allowed: Reentry of the ADF bounded task flow is not allowed. An
end user can still click the browser Back button and return to a page within the bounded
task flow. However, if the user does anything on the page such as clicking a button, an
exception (for example, InvalidTaskFlowReentry) is thrown indicating the bounded task flow was reentered improperly. The actual reentry condition is identified
upon the submit of the reentered page.• reentry-outcome-dependent: Reentry of an ADF bounded task flow using the
browser Back button is dependent on the outcome that was received when the same ADF
bounded task flow was previously exited via task flow return activities. For example, a task
flow representing a shopping cart can be reentered if the user exited by canceling an order,
but not if the user exited by completing the order. Upon reentry, ADF bounded task flow
input parameters are evaluated using the current state of the application, not the application
state existing at the time of the original ADF bounded task flow entry.

8/18/2019 D53979GC11_sg2.pdf
http://slidepdf.com/reader/full/d53979gc11sg2pdf 336/381Oracle Fusion Middleware 11g : Build Applications with ADF I 19 - 18
Defining Response to the Back Button (continued)
If the task-flow-reentry property of the task flow is set to reentry-outcome-dependent, then a property of the task flow return activity determines whether the user can
use the Back button to navigate back to the called task flow. On the Behavior tab of the task
flow return’s Property Inspector, you can set the Reentry property to reentry-allowed or
reentry-not-allowed. This enables you to specify a different response to the Back button
depending on the outcome that is returned to the calling task flow.
When an end user reenters an ADF bounded task flow by using the browser Back button and
reentry is allowed, the value of a managed bean on the reentered task flow is set back to its
original value—the same value that it was before the end user left the original task flow.
This results in the managed bean value resetting back to its original value before a view activity
in the reentered task flow is rendered. Any changes that occurred before reentry are lost. Tochange this behavior, specify the <redirect> element on the view activity in the reentered
bounded task flow. When the end user reenters the bounded task flow using the Back button, the
managed bean has the new value from the parent task flow, not the original value from the child
task flow that is reentered.

8/18/2019 D53979GC11_sg2.pdf
http://slidepdf.com/reader/full/d53979gc11sg2pdf 337/381Oracle Fusion Middleware 11g : Build Applications with ADF I 19 - 19
Copyright © 2009, Oracle. All rights reserved.
Saving for Later
Quitting time Next morning
I’ll work some
tomorrow.
Great—right
where I
left off!
Saving for Later In some applications, an end user may need to stop without completing a task, for example,
when additional information is needed to answer questions. As the developer of the application,
you may want to retain the current state of the task if a user leaves a page without finalizing it.
You can also enable the user to complete the rest of the task at a future point, with former
unsaved values restored to the page. The ability to save current application state is called save
for later.
There are two general categories of saving for later:
• Explicit: For example, a page contains a button that the user can click to save all the data
entered so far on the page. Explicit save for later is available for both ADF unbounded and
bounded task flows. For example, a user may click a button to save, but not submit, a
partial expense report, and then may cancel out of the application. Later the user can
invoke a list of saved expense reports and select the one to continue working on.
• Implicit: For example, a user accidentally closes a browser window without saving data
entered on a page, a user logs out without saving the data, or the session times out. Implicit
save for later can originate only from a bounded task flow.
Save for later saves the data without enforcing validation rules or submitting it. The end user can
resume working on the application later with the same data that was saved at the point when the
save for later was performed.

8/18/2019 D53979GC11_sg2.pdf
http://slidepdf.com/reader/full/d53979gc11sg2pdf 338/381Oracle Fusion Middleware 11g : Build Applications with ADF I 19 - 20
Saving for Later (continued)
Save for later is implemented by using a save-point-id that captures a snapshot of the ADF
application at a specific point in time. This includes everything from the time the savepoint is
created in the originating task flow up the call stack. Application state information is also saved,
including:
• UI state, including table sort order and selected tabs, check boxes, table rows, and so on
• Managed beans: Saves the state information that is saved in memory scopes, except for
request scope and application scope
• Navigation state: Task flow call stack, which tracks where the user is in the application and
the navigational path for getting there, and also the starting point of any data transactions
• Model state: Any data model updates made since beginning the current bounded task flow,
subject to limits imposed by the model layer on the saved state lifetime
The same save-point-id can be used when the same user repeatedly performs a save for
later on the same instance of a task flow within the same browser window within the samesession. If a user performs a save for later following every page of a task flow, only one save-point-id is created and is overlaid each time.
An example of when you might use an explicit save for later is an expense report application. Auser may click a button to save, but not submit, the partial expense report, and then may cancel
out of the application. Later the user can invoke a list of saved expense reports and select the one
to continue working on.

8/18/2019 D53979GC11_sg2.pdf
http://slidepdf.com/reader/full/d53979gc11sg2pdf 339/381Oracle Fusion Middleware 11g : Build Applications with ADF I 19 - 21
Copyright © 2009, Oracle. All rights reserved.
Enabling Explicit Save for Later
Save for later task flow
Contains
button that
performs save
for later
CallscreateSavePoint
to add a
save-point-id
Contains field for
user to entersave-point-id
to pass to restore
activity
Restores
application state
and data to what
was captured insave-point-id
Enabling Explicit Save for Later To enable explicit save for later, you must incorporate a call to the createSavePoint()API to create a savepoint. The save-point-id saves data and state information about a
region, view port, or portlet. Later, you use the Save Point Restore activity to restore application
state and data associated with a save-point-id.
A save-point-id is stored in a database table or Java object cache, depending on the value youhave specified for the savepoint-manager configuration option (discussed later in this
lesson.) When save-point-id is restored, it is deleted from the database or Java object
cache.
To add save for later capability to a task flow, perform the following steps:1. Drag a method call activity from the ADF Task Flow page of the Component Palette to the
diagram for the ADF bounded task flow.
2. In the diagram, select the Method Call activity.
3. In the Common page of the Property Inspector, enter an ID for the method, for example,
callCreateSavePoint.
4. In the method field, enter an EL expression for the savepoint method, for example,#{controllerContext.currentViewPort.createSavePoint}.
If you created your own method to call createSavePoint, enter that method name
instead (see the example that follows this list of steps).

8/18/2019 D53979GC11_sg2.pdf
http://slidepdf.com/reader/full/d53979gc11sg2pdf 340/381Oracle Fusion Middleware 11g : Build Applications with ADF I 19 - 22
Enabling Explicit Save for Later (continued)
5. After adding the method call activity to the diagram, connect it to the other existing
activities in the diagram using control flows.6. You can optionally set properties in the adfc-config.xml file, such as the savepoint
default expiration time and where savepoints are stored. This is described later in this
lesson.
You can access the createSavePoint() method under the currentViewPort nodeunder ADF Controller Objects. Instead of calling this method directly, you may want to createyour own method that calls createSavePoint(), as shown in the following example (if you
do this, you can update the save-point-id with any attributes you create on your method):
package viewcontroller;import java.io.Serializable;import oracle.adf.controller.ControllerContext;import oracle.adf.controller.ViewPortContext;public class SaveForLater implements Serializable {
public SaveForLater() {}
public String saveTaskFlow() {ControllerContext cc = ControllerContext.getInstance();if (cc != null) {
ViewPortContext vpc = cc.getCurrentViewPort();if (vpc != null) {
String id = vpc.createSavePoint();return id; }}}}
You can override global settings for individual savepoints for the amount of time that a
savepoint remains in effect by calling the setSavePointTimeToLive() method. You caninclude this in the same method that you use to create the savepoint. The method signature is:void setSavePointTimeToLive(long timeInSeconds)

8/18/2019 D53979GC11_sg2.pdf
http://slidepdf.com/reader/full/d53979gc11sg2pdf 341/381Oracle Fusion Middleware 11g : Build Applications with ADF I 19 - 23
Copyright © 2009, Oracle. All rights reserved.
Enabling Implicit Save for Later
To enable implicit save for later:
• Change a setting in adfc-config.xml
• Mark the task flow as critical
You can use the task flow editor or the Property Inspector to mark the
task flow as critical.
Enabling Implicit Save for Later Implicit savepoints are generated only if a critical task flow is present in any of the page flow
stacks for any view port under the current root view port. An implicit savepoint is not generated
if the request is a request for an ADF Controller resource, such as:
• Task flow call activity
• Task flow return activity
• Save Point Restore activity
• A dialog
Implicit savepoints are deleted when the task flow at the bottom of the stack completes or a new
implicit savepoint is generated, whichever comes earlier.
If you want an implicit save for later to occur when the session times out, the user logs out
without saving the data, or the user closes the only browser window, you can select the Critical
check box on the Behavior panel of the Overview tab for the task flow definition, or set Criticalto true on the Behavior panel of the Property Inspector. You must also set an attribute in the
adfc-config.xml file, as described later in this lesson.
If multiple windows are open when the implicit savepoint is created, a different save-point-id is created for each browser window. This includes everything from the root view port of the
browser window and down. To return a list of implicitly saved savepoints, you can usecontrollerContext.savePointManager.listSavePointIds.

8/18/2019 D53979GC11_sg2.pdf
http://slidepdf.com/reader/full/d53979gc11sg2pdf 342/381Oracle Fusion Middleware 11g : Build Applications with ADF I 19 - 24
Copyright © 2009, Oracle. All rights reserved.
Restoring Savepoints
A Save Point Restore activity:
• Restores the state of
the application
• Deletes the savepoint
from its persistence store
• Optionally performs additional logic with a Save Point
Restore Finalizer
• Is required in applications that are responsible for restoringsave-point-id (not necessarily the same application
that was saved for later)
Restoring SavepointsRestoring a save-point-id returns the end user back to the part of the application where the
ID was created and restores the application state. Use the Save Point Restore activity to restore a
previously persistent savepoint for an application.
When a savepoint is restored, the ADF controller terminates the saved application and restarts
the application that was executing when the end user performed a save. The end user’s originallocation in the application is displayed. After the save-point-id is restored, it is deleted
from its method of persistence (database or Java object cache).
A Save Point Restore activity is not required within every individual application supporting save
for later capabilities. It is only required within the applications responsible for restoring the previously persistent save-point-id. For example, a Save Point Restore activity would not
be required within a Create Expense Report application, but would be within the application
used to select previously saved Expense Reports for further updates.

8/18/2019 D53979GC11_sg2.pdf
http://slidepdf.com/reader/full/d53979gc11sg2pdf 343/381Oracle Fusion Middleware 11g : Build Applications with ADF I 19 - 25
Restoring Savepoints (continued)
Save Point Restore Finalizers
When used in conjunction with a Save Point Restore activity, a Save Point Restore Finalizer
contains application-specific logic that may need to be performed to restore the application’s
state. The Save Point Restore Finalizer is a method that is invoked after the ADF bounded task
flow’s state has been restored. This method performs any necessary application logic to ensure
that the application's state is correct before proceeding with the restore. For example, you mightuse a Save Point Restore Finalizer to restore logic for time validations.
During the restore process, each bounded task flow on the call stack being restored gets a chance
to verify that its restored state is valid and to perform any restore-specific logic it might need.
To add a Save Point Restore Finalizer method to an ADF bounded task flow, perform the
following steps:
1. In the editor, open the ADF bounded task flow on which you want to execute a Save Point
Restore Finalizer method. This is the ADF bounded task flow being restored, not the task
flow executing the Save Point Restore activity.
2. In the editor, click the Overview tab and click Common.
3. Click the button next to the Finalizer.
4. In the dialog box, specify a custom Save Point Restore Finalizer method on a managed
bean, for example: #{pageFlowScope.taskflowBean.finalizerMethod}

8/18/2019 D53979GC11_sg2.pdf
http://slidepdf.com/reader/full/d53979gc11sg2pdf 344/381Oracle Fusion Middleware 11g : Build Applications with ADF I 19 - 26
Copyright © 2009, Oracle. All rights reserved.
Setting Global Save for Later Properties
Set properties in the adfc-config.xml file:
• savepoint-expiration
• savepoint-manager
• savepoint-datasource
• enable-implicit-savepoints
Setting Global Save for Later PropertiesIn the adfc-config.xml file, you can set the following properties that govern save for later
behavior:• savepoint-expiration: Number of seconds that, by default, savepoints in an
application are retained; default is 86400 (24 hours); can override for individual
savepoints by setting time-to-live on the savepoint
• savepoint-manager: Type of savepoint persistence; default is DATABASE, but can
alternatively be set to JOC (Java object cache)
• savepoint-datasource: JNDI name of the data source, such as
jdbc/MyConnectionDS (typically is the name of the database connection appended
with DS)• enable-implicit-savepoints: Set to true to enable implicit save for later

8/18/2019 D53979GC11_sg2.pdf
http://slidepdf.com/reader/full/d53979gc11sg2pdf 345/381Oracle Fusion Middleware 11g : Build Applications with ADF I 19 - 27
Copyright © 2009, Oracle. All rights reserved.
Summary
In this lesson, you should have learned how to:
• Explain ADF BC transaction handling
• Implement task flow transaction control
• Handle transaction exceptions
• Define response to the browser’s Back button
• Enable save for later functionality

8/18/2019 D53979GC11_sg2.pdf
http://slidepdf.com/reader/full/d53979gc11sg2pdf 346/381Oracle Fusion Middleware 11g : Build Applications with ADF I 19 - 28
Copyright © 2009, Oracle. All rights reserved.
Practice 19 Overview:
Controlling Transactions
This practice covers the following topics:
• Implementing commit functionality in the shopping cart
• Adding transaction control to the checkout flow
• Adding the ability to insert, update, and delete suppliers
Practice 19 Overview: Controlling TransactionsIn this practice, you complete the application by adding transaction management. So far, the
application navigates to all the pages and displays data, but the commit functions are missing.
You add commit functionality to the shopping cart, and you add transaction management to the
checkout process. You also add the ability to update, delete, and add suppliers.

8/18/2019 D53979GC11_sg2.pdf
http://slidepdf.com/reader/full/d53979gc11sg2pdf 347/381

8/18/2019 D53979GC11_sg2.pdf
http://slidepdf.com/reader/full/d53979gc11sg2pdf 348/381Oracle Fusion Middleware 11g : Build Applications with ADF I 20 - 2
Copyright © 2009, Oracle. All rights reserved.
Objectives
After completing this lesson, you should be able to:
• Explain the need to secure Web applications
• Describe security aspects of a Web application
• Implement ADF security:
– Authentication
– Authorization:
— In the data model
— In the UI for task flows and pages
• Access security information programmatically
• Use Expression Language to extend security capabilities
Lesson AimThis lesson describes the methods and techniques available for applying security principles to Web
applications. Students define security at the server level and then apply those rules to the application.

8/18/2019 D53979GC11_sg2.pdf
http://slidepdf.com/reader/full/d53979gc11sg2pdf 349/381Oracle Fusion Middleware 11g : Build Applications with ADF I 20 - 3
Copyright © 2009, Oracle. All rights reserved.
Benefits of Securing Web Applications
• Web applications often connect with a single database
user account. Therefore, separate application users
accounts must be utilized.
• Identity can be used to:
– Ensure that only authenticated users can access the
application
– Restrict access to parts of the application
– Customize the UI (such as pick lists) – Provide the user name for auditing
– Set up a virtual private database (VPD)
Benefits of Securing Web ApplicationsOne of the big problems of Web applications is the notion of identity when authentication is not done
by the database that is providing the data. The identity of the end user is often needed for a variety of
purposes as shown above.

8/18/2019 D53979GC11_sg2.pdf
http://slidepdf.com/reader/full/d53979gc11sg2pdf 350/381Oracle Fusion Middleware 11g : Build Applications with ADF I 20 - 4
Copyright © 2009, Oracle. All rights reserved.
Examining Security Aspects
Authentication: Is this user allowed to
access this application?
Authorization: Is this user’s role
allowed to access this resource?
Application
Resource 2Resource 1 Resource 3
Resource 4 Resource 5 Resource 6
Authentication and AuthorizationThere are two aspects of security for Web applications. You should implement both authentication
and authorization in the environment where the application runs:
• Authentication determines which users can access the application. Java Authentication and
Authorization Service (JAAS) is a package that enables services to authenticate and enforce
user-access controls. JAAS is a standard security Application Programming Interface (API) that
is added to the Java language through the Java Community Process and enables applications to
authenticate users and enforce authorization. JAZN (Java AuthoriZatioN) is Oracle’simplementation of JAAS. JAAS authentication is defined in the jazn-data.xmlconfiguration file, which is referenced by the jazn.xml file. In the jazn-data.xml file,
you can specify user IDs and passwords, create roles, and assign roles to users. You can also setapplication-specific roles that map to roles that you defined for JAAS.
• Authorization determines what functions users are allowed to perform after they enter the
application. You can control this by granting certain functionality to the roles that are defined
for the application. You specify which objects, pages, and task flows are available to each role.

8/18/2019 D53979GC11_sg2.pdf
http://slidepdf.com/reader/full/d53979gc11sg2pdf 351/381Oracle Fusion Middleware 11g : Build Applications with ADF I 20 - 5
Copyright © 2009, Oracle. All rights reserved.
ADF Security Framework: Overview
• The ADF security framework provides:
– Standard features required to secure ADF applications
– More granular declarative security
– Hierarchical roles with permission inheritance
– Utility methods for use in EL expressions
– Different access defined for different roles at same URL
• Uses JAAS enforced by ADF binding servlet filter
• Can authenticate users against a resource provider:
– LDAP
– OID
– XML-based
ADF Security Framework: OverviewThe goal of the Oracle ADF security framework is to provide a standard set of security features that
typical ADF applications require, so that the individual applications need not contain their own
mechanisms.
JAAS requires custom code at the application level that makes implementing authorization more
difficult. Oracle ADF Security simplifies the implementation of a JAAS authorization model by
exposing it in a declarative way on various Fusion Web application resources that JDeveloper
supports.
Java EE security roles are flat, but ADF security provides simplified permission assignment by using
hierarchical roles, allowing for inheritance of permissions.
You can use the ADF Security utility methods in EL to determine whether the user is allowed to
perform a known operation, such as accessing a particular task flow or data value.
Within the Oracle ADF framework, JAAS-based security is enforced by the ADF binding servlet
filter and the ADF Model Layer of the application. The filter is configured to protect ADF resources
and requires the current user to have sufficient access right grants to view the ADF resource, thus
providing a much more granular approach to security.

8/18/2019 D53979GC11_sg2.pdf
http://slidepdf.com/reader/full/d53979gc11sg2pdf 352/381Oracle Fusion Middleware 11g : Build Applications with ADF I 20 - 6
Copyright © 2009, Oracle. All rights reserved.
Configure ADF Security Wizard:
Configuring ADF Security Authentication
Tools > Configure ADF Security
Configuring ADF Security AuthenticationThe Configure ADF Security Wizard enables you to configure ADF Authentication and
Authorization, or to configure only ADF Authentication. A third option enables you to remove all
ADF security.
To invoke the wizard, select in the Application Navigator the user interface project that contains the
pages you want to protect, and then select Tools > Configure ADF Security from the menu.
The first page of the wizard enables you to choose which type of security to configure. When you
choose only ADF Authentication, you enable the ADF authentication servlet to support dynamic
authentication, but you are not implementing the fine-grained authorization of resources available
with ADF authorization.
When you select only ADF Authentication, the servlet requires the user to log in the first time a page
in the application is accessed. The servlet also redirects the user to the requested page when the user
has sufficient access rights as defined by security constraints. In this case, the developer is
responsible for defining security constraints for Web pages; otherwise, all pages are accessible by the
authenticated user.

8/18/2019 D53979GC11_sg2.pdf
http://slidepdf.com/reader/full/d53979gc11sg2pdf 353/381Oracle Fusion Middleware 11g : Build Applications with ADF I 20 - 7
Copyright © 2009, Oracle. All rights reserved.
Configure ADF Security Wizard:
Choosing the Authentication Type
Most commonly used:
• HTTP basic authentication:
– It uses browser login dialog box.
– Cached credentials prevent logout.
• Form-based authentication: Developer-designed login
page
Choosing the Authentication TypeThe second page of the Configure ADF Security Wizard enables you to choose the type of
authentication that the application should use. The choices are:
• HTTP Basic Authentication: Browser authentication is used; the user name and password are
not encrypted. This is useful for testing authentication without the need for a custom login
page.
• HTTP Digest Authentication: Browser authentication is used; the user name and password are
encrypted, so it is more secure than basic authentication.
• HTTPS Client Authentication (Public Key Certificate): This strong authentication
mechanism uses a certificate and transmits over SSL.
• Form-Based Authentication: The developer can specify a login page and a page to displaywhen login fails. If you specify a page that uses ADF Faces components, you must usefaces/ in the path, such as faces/login.html. If you select the Generate Default Pages
check box, JDeveloper generates a login page and an error page for you.

8/18/2019 D53979GC11_sg2.pdf
http://slidepdf.com/reader/full/d53979gc11sg2pdf 354/381Oracle Fusion Middleware 11g : Build Applications with ADF I 20 - 8
Copyright © 2009, Oracle. All rights reserved.
Using Form-Based Authentication
You implement authentication in the UI by:
• Configuring the login in web.xml (done by Configure ADF
Security Wizard)
• Setting up a login page to accept user credentials with the
following elements:
– A form attribute: action="jsecurity_check"
– An input text item: name="j_username"
– An input password: name="j_password"
• Presenting the login page in HTTPS mode
Using Form-Based AuthenticationIn the Java EE deployment descriptor file, web.xml, you set up an application-specific login
configuration to specify the type of authentication to perform, such as form-based to display a login
form. For a login page to be successful, the form must contain the following tags:<form action="j_security_check" method="post" ><input type="text" name="j_username"><input type="password" name="j_password">
</form>
This type of login page is automatically created if you choose to use form-based authentication and
generate a login page when you implement ADF security. If you define a custom login page, it
should be a plain HTML or JSP page that does not use ADF Faces or JSF.
The form submission from the browser is in clear text unless the login page is secured using HTTPS.

8/18/2019 D53979GC11_sg2.pdf
http://slidepdf.com/reader/full/d53979gc11sg2pdf 355/381Oracle Fusion Middleware 11g : Build Applications with ADF I 20 - 9
Copyright © 2009, Oracle. All rights reserved.
Configure ADF Security Wizard:
Choosing the Identity Store
Choices:
• Application XML:
– Used for small-scale applications or testing
– Uses the Oracle Platform Security for Java's file-based
repository
– Configured in JDeveloper—user and role information storedin jazn-data.xml
• LDAP: – Identity store configured outside of JDeveloper
– Scalable and secure
– Integrates with Oracle Single Sign On
Choosing the Identity StoreThe next page of the Configure ADF Security Wizard enables you to choose the type of repository to
store the user and role information for authentication purposes. You can choose either an XML file or
a directory service:
• Application XML: You configure user and role information within JDeveloper by using theeditor for the jazn-data.xml file.
• LDAP: You configure the identity store outside of JDeveloper. If you choose this option, the
next page of the wizard enables you to specify connection information for the LDAP identity
store.
The Oracle Identity Management and Single Sign-On (SSO) Infrastructure is the primary enterprise
identity management solution of choice with which to associate ADF applications. However, theADF security framework must not be dependent on or require the Oracle Identity Management
infrastructure. In the absence of Oracle Identity Management, user management and authenticationcan be performed against the system-jazn-data.xml user repository, mostly for small-scale
applications or for development and testing purposes. This provides a lightweight developer-focused
environment that integrates seamlessly with the ADF Security Framework.

8/18/2019 D53979GC11_sg2.pdf
http://slidepdf.com/reader/full/d53979gc11sg2pdf 356/381Oracle Fusion Middleware 11g : Build Applications with ADF I 20 - 10
Copyright © 2009, Oracle. All rights reserved.
Configure ADF Security Wizard:
Choosing the Welcome Page
• Specify page where user should go upon
authentication
• Ignored if page specified on URL
• If no page specified, user returns to the login page
Choosing the Welcome PageThe final step in the wizard is to optionally redirect the user to a welcome page upon successful
authentication. The application uses the specified Web page only when a destination page is not
specified as a parameter to the ADF authentication servlet. If you do not specify a redirect Web page,
the servlet directs the user back to the page from which login was initiated.

8/18/2019 D53979GC11_sg2.pdf
http://slidepdf.com/reader/full/d53979gc11sg2pdf 357/381Oracle Fusion Middleware 11g : Build Applications with ADF I 20 - 11
Copyright © 2009, Oracle. All rights reserved.
Configure ADF Security Wizard:
Enabling ADF Authorization
• Choose the ADF
Authentication and
Authorization option.
• Select an option for testing.
• To change existing
authorizations,
use overview
editor forjazn-data.xml.
Enabling ADF AuthorizationTo use the Configure ADF Security Wizard to configure authorization (in addition to authentication)
you can select the ADF Authentication and Authorization option on the first page. Then you are
presented with an additional wizard page where you specify whether to automatically grant viewaccess on bounded task flows and pages to a special test-all role. This enables you to test your
application before creating ADF policy grants because the built-in role anonymous-role is a
member of this role. No login is required to access pages that are granted to the test-all role.
You can choose one of the following options for automatic grants:
• No automatic grants: You must explicitly grant access to bounded task flows and pages.• Existing objects only: View access is granted to the test-all role for existing bounded task
flows and pages, but not to new ones.• All objects: View access is granted to the test-all role for both new and existing bounded
task flows and pages.
You can rerun the Configure ADF Security Wizard during different stages of applicationdevelopment to enable or disable automatic grants to the test-all application role as desired. If
you decide to disable automatic grants, you need to remove the ADF security policies using theoverview editor for ADF security policies that you display by double-clicking the jazn-data.xml file in the Application Resources window. The editor displays a check box "Show task
flows/web pages with test-all grants only" to enable you to easily locate the test-all
application role grants. Click Remove Role (red X) to remove the grants made for testing purposes.

8/18/2019 D53979GC11_sg2.pdf
http://slidepdf.com/reader/full/d53979gc11sg2pdf 358/381Oracle Fusion Middleware 11g : Build Applications with ADF I 20 - 12
Copyright © 2009, Oracle. All rights reserved.
Files Modified by Configure ADF Security Wizard: web.xml
web.xml modifications:
• ADF authentication servlet definition
and mapping
• Security constraint
• Login configuration
Files Modified by Configure ADF Security Wizard: web.xmlThe web.xml file contains configuration and deployment information for a Web application. When
you define ADF authentication, the Configure ADF Security Wizard modifies the web.xml file as
follows:
• Defines the authentication servlet
• Provides the servlet mapping for enforcing security
• Defines a security constraint on authentication Web resource (you may use this page to add
further security constraints)
• Defines the login configuration
• Specifies required security roles (you may use this page to add further roles)
The web.xml file is in the /public_html/WEB-INF subdirectory of the UI project.
Because every user of the application is required to be able to log on, the security constraint defined
against the ADF authentication servlet should allow all users to access this Web resource. As such,
the security role associated with the constraint should encompass all users. To simplify this task, thevalid-users role is provided.
Note: You must not delete the adfAuthentication constraint from the web.xml file. Deleting
it would prevent users from logging on to the application in the manner supported by ADF. Any
other static security constraints would continue to work and invoke a login if required.

8/18/2019 D53979GC11_sg2.pdf
http://slidepdf.com/reader/full/d53979gc11sg2pdf 359/381Oracle Fusion Middleware 11g : Build Applications with ADF I 20 - 13
Copyright © 2009, Oracle. All rights reserved.
Other Files Modified or Createdby Configure ADF Security Wizard
adf-config.xml
jps-config.xml
jazn-data.xml
Based Authenticationuthentication
<jazn-realm default="jazn.com">
<realm>
<name>jazn.com</name></realm>
</jazn-realm>
<policy-store>
...
...
</policy-store>
<jazn-realm default="jazn.com">
<realm>
<name>jazn.com</name></realm>
</jazn-realm>
<policy-store>
...
...
</policy-store>
Modified
Created
<CredentialStoreContext credentialStoreClass=
"oracle.adf.share.security.providers.jazn.JAZNCredentialStore"
credentialStoreDefaultUser="anonymous"
credentialStoreLocation="./credential-jazn-data.xml"/>
<sec:JaasSecurityContext initialContextFactoryClass=
"oracle.adf.share.security.JAASInitialContextFactory"
jaasProviderClass=
"oracle.adf.share.security.providers.jps.JpsSecurityContext"
authorizationEnforce="true"
authenticationRequire="true"/>
<CredentialStoreContext credentialStoreClass=
"oracle.adf.share.security.providers.jazn.JAZNCredentialStore"
credentialStoreDefaultUser="anonymous"
credentialStoreLocation="./credential-jazn-data.xml"/><sec:JaasSecurityContext initialContextFactoryClass=
"oracle.adf.share.security.JAASInitialContextFactory"
jaasProviderClass=
"oracle.adf.share.security.providers.jps.JpsSecurityContext"
authorizationEnforce="true"
authenticationRequire="true"/><serviceProviders>
<serviceProvider
class="oracle.security.jps.internal..."...
</serviceProvider>
...
<serviceInstances>
<serviceInstance
provider="credstore.provider"
...</serviceInstance>
...
<jpsContexts default="Storefront-12">
<jpsContext name="anonymous">
<serviceInstanceRef ref="credstore"/>
...
</jpsContext>
</jpsContexts>
<serviceProviders>
<serviceProvider
class="oracle.security.jps.internal..."...
</serviceProvider>
...
<serviceInstances>
<serviceInstance
provider="credstore.provider"
...</serviceInstance>
...
<jpsContexts default="Storefront-12">
<jpsContext name="anonymous">
<serviceInstanceRef ref="credstore"/>
...
</jpsContext>
</jpsContexts>
Other Files Modified or Created by Configure ADF Security WizardThe Configure ADF Security Wizard performs the following additional file creations or
modifications:
• Default realm name for optional lightweight
XML application-specific identity store
• Policy store
/src/META-INF
relative to Web
application
jazn-data.xml
• Credential store context
• JAAS security context
/adf/META-INF
relative to Web
application
adf-config.xml
/src/META-INF
relative to Webapplication
Location
• Oracle Platform Security context for optional
credential store• Oracle Platform Security context for optional
policy store
• Oracle Platform Security context for optionalanonymous user
jps-
config.xml(JPS stands for
Java Platform
Security.)
Configuration PerformedFile

8/18/2019 D53979GC11_sg2.pdf
http://slidepdf.com/reader/full/d53979gc11sg2pdf 360/381Oracle Fusion Middleware 11g : Build Applications with ADF I 20 - 14
Copyright © 2009, Oracle. All rights reserved.
Enabling Users to Access Resources
To give users access:
• Define a security realm in the identity store:
– Create users.
– Create roles.
– Assign users to roles.
• Define an application policy in the policy store
– Create application roles.
– Map the identity roles to the application roles.
– Grant the application roles access to resources.
Enabling Users to Access ResourcesTo grant users access to resources, you first set up users and roles in the identity store as part of a
security realm. You then define application roles in the policy store and assign identity store roles to
the application roles.
Permissions to use resources are granted to roles, rather than to users directly.
The next few slides elaborate on these concepts.

8/18/2019 D53979GC11_sg2.pdf
http://slidepdf.com/reader/full/d53979gc11sg2pdf 361/381Oracle Fusion Middleware 11g : Build Applications with ADF I 20 - 15
Copyright © 2009, Oracle. All rights reserved.
Defining Users and Roles in the Identity Store
Adding user credentials
to the default realm
Opening the Properties editor
Adding a user to
a role in the
identity store
Defining a Realm
Defining Users and Roles in the Identity StoreIn ADF security, a realm is a set of users and roles in an identity store. You create the users and roles,
and then you assign the users to roles.
You can use the same realm for many different applications. Within a realm, applications participate
in browser-based single sign-on, so that being authenticated in one application in a realm means that
you do not have to be authenticated again in another application in the same realm, as long as you do
not close the browser between requests.
A default realm is a policy space that is used whenever no realm is explicitly mentioned during the
user login process. The default realm is jazn.com, but you can create additional realms as needed.
The identity store can be file-based or LDAP-based, with grants stored in an LDAPv3-compliantdirectory, such as Oracle Internet Directory. You may want to seed the identity store with a
temporary set of users to mirror the actual users’ experience in your production environment.
To add test users, perform the following steps:1. Right-click jazn-data.xml and select Properties.
2. In the Edit JPS Identity & Policy Store dialog box, expand the jazn.com realm and select the
Users node, and click Add to add logon name and credentials. (If there is no jazn.com node,
you can add it, or create an additional realm.)
Note: By default, the anonymous-role built-in role is a member of the test-all role, so any
resources granted to test-all do not require a login.

8/18/2019 D53979GC11_sg2.pdf
http://slidepdf.com/reader/full/d53979gc11sg2pdf 362/381Oracle Fusion Middleware 11g : Build Applications with ADF I 20 - 16
Copyright © 2009, Oracle. All rights reserved.
Defining Security Policies
• A security policy is a set of grants made to roles.
• To define a security policy:
– Create application roles
– Assign identity store roles to application roles
– Grant permissions to roles
Defining Security PoliciesWhen you enforce ADF authorization, all ADF resources are secure by default. To make these
resources available to authenticated users, you must configure a policy store that consists of grants
made to specific application roles, and you must assign to those roles the roles that you created in the
identity store. Subsequent slides elaborate on these actions.
When you first configure ADF authorization, you are not required to have a policy store in place. Thetest-all role enables you to run and test your application before creating the policy store.
However, eventually you need to customize the rights for members of actual application roles to
access ADF resources.
Oracle ADF Security enables you to define an access policy for a variety of application resources.
For example, you can control access to a particular task flow based on the access right grants that you
make in the policy store for the ADF task flow.

8/18/2019 D53979GC11_sg2.pdf
http://slidepdf.com/reader/full/d53979gc11sg2pdf 363/381Oracle Fusion Middleware 11g : Build Applications with ADF I 20 - 17
Copyright © 2009, Oracle. All rights reserved.
Defining Application Roles in the Policy Store
Policy store is injazn-data.xml.
Defining Application Roles in the Policy StoreBecause Web application security is a role-based access control mechanism with permissions granted
to application roles, you must define a set of roles in the policy store that are specific to your
application. You eventually map the application roles of your policy store to enterprise roles defined
in the deployment environment. This enables a user who is a member of a given enterprise role to
access resources that are accessible from the associated application role. Enterprise roles are defined
in the identity store of the security provider and are controlled only at an administrator level. This
provides a level of abstraction to the enterprise roles and enables development to proceed against
functional roles.
During development, the policy store is file-based, with access right grants stored in the jazn-
data.xml file in <app-role> elements under <policy-store>. To add a role to the policystore, perform the following steps:
1. Right-click jazn-data.xml and select Properties.
2. In the Edit JPS Identity and Policy Store dialog box:
a. Create the policy store if one does not yet exist: Select Application Policy Store and click
New. Enter a Display Name and click OK.
b. Expand the policy store and select Application Roles.
c. Click Add, and in the Add Application Role dialog box, enter a name and click OK.

8/18/2019 D53979GC11_sg2.pdf
http://slidepdf.com/reader/full/d53979gc11sg2pdf 364/381Oracle Fusion Middleware 11g : Build Applications with ADF I 20 - 18
Copyright © 2009, Oracle. All rights reserved.
Assigning Identity Store Roles
to Application Roles
Mapping an identity role
to an application role
Users
Rolesclerk manager
app_clerk app_manager
Assigning Roles to Users Now that you have defined a realm with users and roles and have also defined application roles, the
next step is to map the application roles to the roles in the identity store realm.
In the Properties editor for jazn-data.xml, select the Application Roles node for your
application in the tree at the left. Then select the role in the Application Roles panel, and select the
Member Roles tab. Shuttle from Available to Selected the roles to whom that application role should
be assigned.

8/18/2019 D53979GC11_sg2.pdf
http://slidepdf.com/reader/full/d53979gc11sg2pdf 365/381Oracle Fusion Middleware 11g : Build Applications with ADF I 20 - 19
Copyright © 2009, Oracle. All rights reserved.
Granting Permissions to Roles
You can associate roles to grants on resources:
Entity objects or
attributes
Page definitions *
Bounded task flows
Grants Issued On:
Rows
Individual pages
Groups of pages
Authorization Point
jazn-data.xml editor
EO security and authorization
editors
jazn-data.xml editor
Defined In:
* To secure page with no
data, create an empty
page definition file.
Granting Permissions to RolesYou eventually associate each application role with a specific set of grants to ADF resources. The
security policy names the application role as the principal of the grant, rather than specific users.
Oracle ADF Security defines the following authorization points for your application’s access
policies:
• Groups of Web pages with grants issued on ADF task flows; the pages that the task flow
defines are all securable with grants.
• Individual Web pages with grants issued on ADF page definitions; useful for any Web page
that is not contained in an ADF task flow. A page definition is created automatically for Web
pages with components that are bound to data. If you want to secure a Web page that does not
display databound components, you can create an empty page definition file for it.• Specific row-level data accessed through the Business Components data model project, with
grants issued on entity objects or their attributes.
For the view–controller project, you use the overview editor for ADF security policies to secure ADF
resources, including ADF task flows and ADF page definitions. To open the overview editor, double-click jazn-data.xml in the Application Resources panel in JDeveloper. This editor is available
only if you have ADF Security configured.

8/18/2019 D53979GC11_sg2.pdf
http://slidepdf.com/reader/full/d53979gc11sg2pdf 366/381Oracle Fusion Middleware 11g : Build Applications with ADF I 20 - 20
Copyright © 2009, Oracle. All rights reserved.
Securing Groups of Pages
(Bounded Task Flows)
• Prevent unauthorized access to secured task flows.• Provide developers with ability to:
– Secure a bounded task flow as a logical entity
– Write security-aware bounded task flows and pages
Granting Permissions on Task FlowsADF unbounded task flows are not securable on their own, although the individual pages are
securable. Bounded task flows are secured by default when ADF Security is enabled. ADF enablesyou to grant the view permission on bounded task flows; users who belong to a role with the view
permission can read and execute a bounded task flow and view its pages.
Objects within a task flow inherit the containing object’s security unless overridden on the local
object. Page-level security resides with the page, and is not held in the view activity metadata. This
ensures that there is only one place to access security information for that page, regardless of how
many task flows reference it.
Securing task flows can provide for simpler security administration by allowing security to be
controlled in terms of a unit of application functionality, rather than having to deal with all the
individual pages that may arise in the implementation of that application function.
The controller calls the security module on each request to ensure that the required access has been
granted. The controller will not attempt to cache or retain any authorization information.
Authorization failure results in navigation to the designated exception activity. The exception thrownis ADFSecurityRuntimeException.
You can use Expression Language (EL) to check whether the user is authorized to access a task flow.
When a user is required to log in to view a page, you can use EL within the page to check whether a
user is authorized to view specific components.

8/18/2019 D53979GC11_sg2.pdf
http://slidepdf.com/reader/full/d53979gc11sg2pdf 367/381Oracle Fusion Middleware 11g : Build Applications with ADF I 20 - 21
Copyright © 2009, Oracle. All rights reserved.
Securing Individual Pages
(Page Definitions)
• Determines whether user is allowed to navigate to (view) a
page
• Not needed on pages in secured task flows
Granting Permissions on Individual PagesThe permissions you can grant for an ADF page definition can control if the authenticated user can
view the page. Later JDeveloper releases enable you to specify additional permissions.
Page definitions are secure by default when ADF Security is enabled. However, page-level security is
not checked within bounded task flows. If a developer intends to have a higher-security page within a
bounded task flow, the developer must include that page in a nested task flow.
To define security for a page, perform the following steps:1. Open jazn-data.xml and select the Web Pages tab in the overview editor. This displays all
pages for which there are page definition files.
2. In the Web Page Definition column, select the page.
3. In the Granted to Roles column, click Add and select the previously defined application role.
4. In the Actions column, select the action you want to grant to the role.

8/18/2019 D53979GC11_sg2.pdf
http://slidepdf.com/reader/full/d53979gc11sg2pdf 368/381Oracle Fusion Middleware 11g : Build Applications with ADF I 20 - 22
Copyright © 2009, Oracle. All rights reserved.
ADF BC Model Authorization
Purpose is to:
• Prevent unauthorized access to entity objects or attributes
• Enable developers to:
– Secure access to an entire entity object or only certain
attributes
– Specify the actions that members of a role can perform on
entity objects or attributes
ADF BC Model AuthorizationOracle ADF entity objects in the model project are security-aware, meaning predefined resource-
specific permissions exist that a developer can grant. Additionally, you can secure just the individual
attributes of entity objects.

8/18/2019 D53979GC11_sg2.pdf
http://slidepdf.com/reader/full/d53979gc11sg2pdf 369/381Oracle Fusion Middleware 11g : Build Applications with ADF I 20 - 23
Copyright © 2009, Oracle. All rights reserved.
Securing Row Data
(Entity Objects or Attributes)
Update specific
attribute.
Updateupdate Attribute of EO
Entity object
ADF Business
Component
View rows of result set.Readread
Update any attribute.Updateupdate
Delete
Expected Mapped
Action
Delete a row from the
bound collection.
removeCurrentRow
Implementation
Securable
Operation
You can enable security on:• Entire
entity
objects:
• Individual
attributes:
Securing Row Data (Entity Objects or Attributes)Entity objects that you secure restrict users from updating data on any Web page that renders a UI
component bound by an ADF binding to the data accessed by the secured entity object. Additionally,
when you secure an entity object, you effectively secure any view object in the data model project
that relies on that entity object. As such, entity objects that you secure define an even broader access
policy that applies to all UI components bound to this set of view objects.
To enforce row-level security checks on entity objects or their attributes, perform the following steps:
1. Invoke the editor for the entity object.
2. Select either General (for the entire entity object) or Attributes in the tree at the left.
3. If you selected Attributes, select the attribute on which to define security.
4. In the Security section of the page, select the check boxes for the operations on which to enablesecurity.
Alternatively, you can right-click the Entity Object in the Application Navigator and select Edit
Security.

8/18/2019 D53979GC11_sg2.pdf
http://slidepdf.com/reader/full/d53979gc11sg2pdf 370/381Oracle Fusion Middleware 11g : Build Applications with ADF I 20 - 24
Copyright © 2009, Oracle. All rights reserved.
Granting Privileges on Entity Objects or
Attributes
• In Structure window, right-click
entity object or attribute and
select Edit Authorization.
• Select privileges to grant to
application roles.
Granting Privileges on Entity Objects or AttributesAfter you have enabled security for an entity object or attribute, you can assign privileges for
updating on entity objects and attributes, and for reading and deleting on entity objects. You can also
add, remove, or edit application roles from the Edit Authorization dialog box.
You invoke the Edit Authorization dialog box from the context menu of the entity object in the
Structure window. The dialog box displays all application roles; you check the appropriate
permissions to grant to each role.

8/18/2019 D53979GC11_sg2.pdf
http://slidepdf.com/reader/full/d53979gc11sg2pdf 371/381Oracle Fusion Middleware 11g : Build Applications with ADF I 20 - 25
Copyright © 2009, Oracle. All rights reserved.
Application Authentication at Run Time
Two types:
• Implicit: Based on JAAS permissions for anonymous-
role role
• Explicit: Based on security constraint on authentication
servlet that you can define by using the Configure ADF
Security Wizard
ADF Security: Configuring Application AuthenticationApplication authentication can be one of two types:
• Implicit: The adfBindings servlet filter checks to see if page is viewable based on JAAS
permission that you have assigned for the anonymous-role role, which can access any page
on which no web.xml security constraint is defined for the anonymous-role role, and the
view privilege has been granted.• Explicit: A login link is directed to the adfAuthentication servlet, which is secured
through a Java EE security constraint. In an explicit authentication scenario, a public page has a
login link, which when clicked, triggers an authentication challenge to log in the user. The
login link may optionally specify some other target page that should be displayed (assuming the
authenticated user has access) after the successful authentication. On the first access to a page,if there is no Subject defined, then one is created containing the anonymous user principal
and the anonymous-role role principal. With this role principal, the user can access any
page on which no web.xml security constraint is defined for the anonymous-role role
principal and for which the view privilege has been granted.

8/18/2019 D53979GC11_sg2.pdf
http://slidepdf.com/reader/full/d53979gc11sg2pdf 372/381Oracle Fusion Middleware 11g : Build Applications with ADF I 20 - 26
Copyright © 2009, Oracle. All rights reserved.
No
Session
ADF Security: Implicit AuthenticationJ2EE Container
Enterprise
Identity
Management
ADF
Security
Filter
Public.jsp
MyPage.jspx
*.jsp
*.jspx
“anonymous” (User Principal)“anonymous-role” (Role Principal)
Added to the Subject
P2
/app/Public.jspx
P1
submit=j_security_check()
User: Bob
Implicit Authentication
J2EE Security
JAAS Security
adfAuthentication
Servlet
P3
Container Authentication
Logic BOB
4
Redirect to success
URL=/app/MyPage.jspx
as per #1
5
Authentication servlet
protected by J2EE
Security Constraint,
Triggers Container
login process
3
/app/MyPage.jspx
16
/adfAuthentication?success_url=/app/MyPage.jspx 2
ADF Security: Implicit AuthenticationIn an implicit authentication scenario, authentication is triggered automatically if the user is not yetauthenticated and the user tries to access a page that is not granted to the anonymous-role role.
After successfully logging in, another check is done to verify if the authenticated user has view
access to the requested page.
When an unauthenticated user tries to access a page, the adfBindings servlet filter intercepts the
request and checks to see if the page is defined as viewable by the anonymous-role role. If the
requested page is public:
P1: If this is the first access to a page within the application and if there is no subject currently
defined.
P2: The security layer creates a subject containing the anonymous user principal and theanonymous-role role principal.
P3: The user is then allowed access to the public page.
For a request to a secured page:1. The user requests the secured mypage.jspx.
2. The adfBindings servlet filter redirects the request to the Oracle ADF authentication
servlet, passing in the URL to the requested page as the success URL.

8/18/2019 D53979GC11_sg2.pdf
http://slidepdf.com/reader/full/d53979gc11sg2pdf 373/381Oracle Fusion Middleware 11g : Build Applications with ADF I 20 - 27
ADF Security: Implicit Authentication (continued)
3. Because the adfAuthentication servlet has a J2EE security constraint on it, calling the
adfAuthentication Servlet results in the J2EE container invoking the configured login
mechanism.
4. Based on the container’s login configuration, the user is prompted to authenticate. The example
shown in the slide uses a form-based login, so the appropriate login form is displayed. The user
enters credentials and posts the form back to the container's j_security_check() method,so that the Java EE container can authenticate the user.
5. Upon successful authentication, the container redirects the user back to theadfAuthentication servlet.
6. The adfAuthentication servlet forwards the user to the requested page. If ADF Security
is enforced, that resource appears if the user has access privileges.
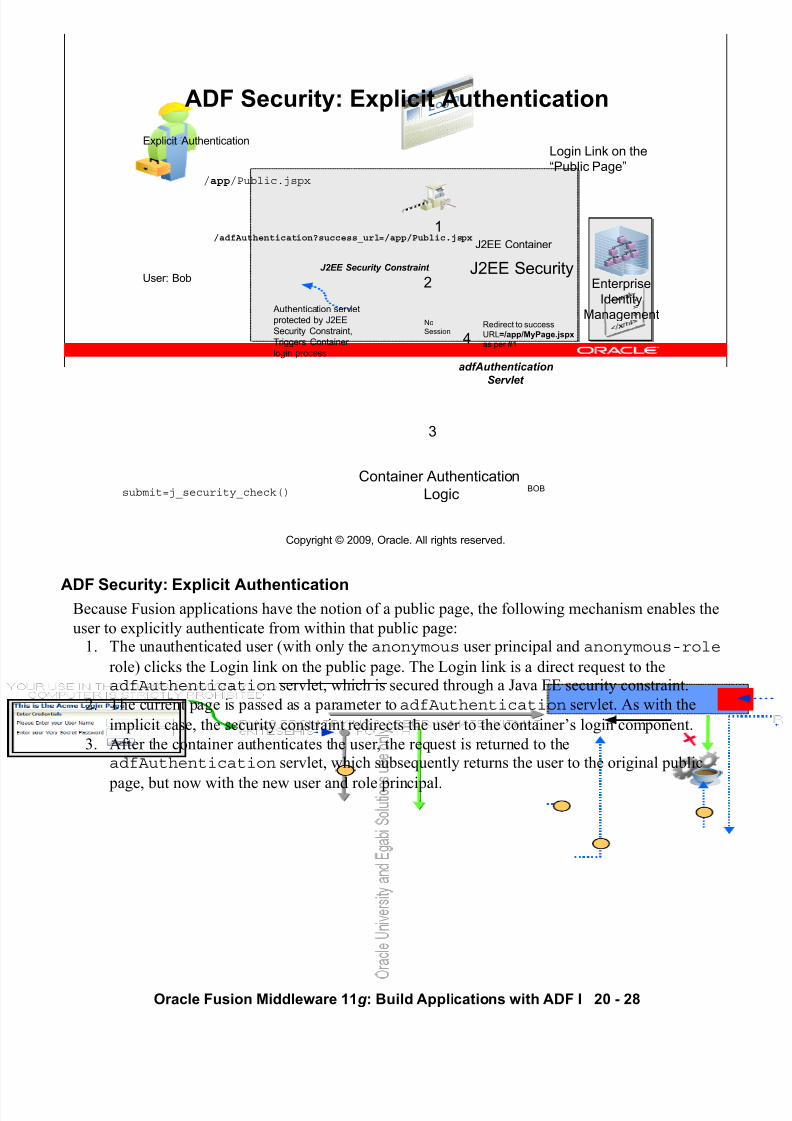
8/18/2019 D53979GC11_sg2.pdf
http://slidepdf.com/reader/full/d53979gc11sg2pdf 374/381Oracle Fusion Middleware 11g : Build Applications with ADF I 20 - 28
Copyright © 2009, Oracle. All rights reserved.
ADF Security: Explicit Authentication
Enterprise
Identity
Management
User: Bob
Explicit Authentication
adfAuthentication
Servlet
Redirect to success
URL=/app/MyPage.jspxas per #14
Authentication servlet
protected by J2EE
Security Constraint,
Triggers Container
login process
2
J2EE Container
Login Link on the
“Public Page”/app/Public.jspx
J2EE Security
No
Session
submit=j_security_check()
3
Container Authentication
LogicBOB
J2EE Security Constraint
/adfAuthentication?success_url=/app/Public.jspx1
ADF Security: Explicit AuthenticationBecause Fusion applications have the notion of a public page, the following mechanism enables the
user to explicitly authenticate from within that public page:1. The unauthenticated user (with only the anonymous user principal and anonymous-role
role) clicks the Login link on the public page. The Login link is a direct request to theadfAuthentication servlet, which is secured through a Java EE security constraint.
2. The current page is passed as a parameter to adfAuthentication servlet. As with the
implicit case, the security constraint redirects the user to the container’s login component.
3. After the container authenticates the user, the request is returned to theadfAuthentication servlet, which subsequently returns the user to the original public
page, but now with the new user and role principal.

8/18/2019 D53979GC11_sg2.pdf
http://slidepdf.com/reader/full/d53979gc11sg2pdf 375/381Oracle Fusion Middleware 11g : Build Applications with ADF I 20 - 29
Copyright © 2009, Oracle. All rights reserved.
ADF Security: Authorization at Run Time
Administrator
Clerks
HR
Sales
Dev
ADF Security performs
authorization check
*.jsp
*.jspx
“View”Privilege is
granted to a Role
of which Bob is a
member.
SecPage.jspx
Policy Store
MyPage.jspx
Public.jsp
Bob has No
“View”Privilege Defined
on the Page.
PageDefs
or
JAAS AuthZrequest
JAAS AuthZ
request
Staff
<grant><principal>
<type>role</type><name>Staff</name>
</principal>
<permission>
<name>MyPage</name>
<actions>view </actions></permission>
</grant>
“View” Privilege
granted to the
“anyone”Role.
J2EE Container
PageDefs used as
Security Def end
points
/app/MyPage.jspx
/app/Public.jsp
• Bob is a member of the“Staff” role in the policy
store.
• Unlike J2EE Container
Security, authorization
is not “path” based.
/app/SecPage.jsp
User: Bob
ADF
Security
Filter
ADF Security: Authorization at Run TimeThe security implementation within a Fusion application is based around JAAS policies, which are
held in a policy store (independent of the application) and accessed at run time. The policy
determines if the user has access to the defined Web resource and what granular permissions
(actions) have been granted to the user.
In this case, the user Bob is a member of the enterprise role Staff in the identity management
solution.
Assuming that Bob is already logged in and successfully authenticated, when he tries to accessmypage.jspx, the Oracle ADF Security enforcement logic intercepts the request and checks the
page definition of that page to see if permission is required. In the example in the slide, the View privilege on the requested page has been granted to the Staff role, so for Bob the mypage.jspx
appears.
However, when Bob later tries to access SecPage.jspx, permission is required and Bob does not
belong to a role that has access to the resource, so a security error appears.

8/18/2019 D53979GC11_sg2.pdf
http://slidepdf.com/reader/full/d53979gc11sg2pdf 376/381Oracle Fusion Middleware 11g : Build Applications with ADF I 20 - 30
Copyright © 2009, Oracle. All rights reserved.
Programmatically Accessing
ADF Security Context
Is ADF security turned on?
Is the user logged on?
Who is the user?
Is the user in a specified role?
if (ADFContext.getCurrent().getSecurityContext().isAuthorizationEnabled() )
{ … }
public boolean isAuthenticated() {
return ADFContext.getCurrent().getSecurityContext().isAuthenticated(); }
public String getCurrentUser() {
return ADFContext.getCurrent().getSecurityContext().getUserName(); }
public boolean isUserInRole(String role) {
return ADFContext.getCurrent().getSecurityContext().isUserInRole(role); }
Programmatically Accessing ADF Security ContextYou can use methods of the ADF Security context to obtain information about users and roles.
Because the enforcement of Oracle ADF Security can be turned on and off at the container level
independent from the application, you should determine if Oracle ADF Security is enabled beforemaking permission checks. You can evaluate the isAuthorizationEnabled() method to
achieve this.
It is not possible to check if the user principal is null to determine if the user has logged on or not, because it is either anonymous for unauthenticated users or the actual user name for authenticated
users. You can use the isAuthenticated() method to determine if the user has authenticated.
You can determine the current user name (either anonymous for unauthenticated users or the actualuser name for authenticated users) with the getUserName() method.
You can use the isUserInRole() method to determine if the user is a member of a specified
role.
It is a good idea to make user and role information available throughout the application by using
session-scoped beans.

8/18/2019 D53979GC11_sg2.pdf
http://slidepdf.com/reader/full/d53979gc11sg2pdf 377/381Oracle Fusion Middleware 11g : Build Applications with ADF I 20 - 31
Copyright © 2009, Oracle. All rights reserved.
Using Expression Language
to Extend Security Capabilities
You can integrate expression language in three ways:
• Using built-in global security expressions:
• Using a security proxy bean:
<af:commandLink action="accounts"rendered="#{userInfo.admin}"text="Manage Accounts"/>
See next slide for source
of this expression.
<af:commandLink action="accounts"rendered="#{securityContext.userInRole['admin']}"text="Manage Accounts"/>
Using Expression Language to Extend Security CapabilitiesYou can use expressions to resolve properties such as Rendered, ReadOnly, and Disabled at
run time. The built-in global security expressions, shown in the first example on the slide, enable
such access. Alternatively, you could write your own beans, as in the second example.

8/18/2019 D53979GC11_sg2.pdf
http://slidepdf.com/reader/full/d53979gc11sg2pdf 378/381Oracle Fusion Middleware 11g : Build Applications with ADF I 20 - 32
Copyright © 2009, Oracle. All rights reserved.
Using Global Security Expressions
Does the user have view
permission on the target region?
#{securityContext.regionViewable['target']}
Expression Purpose
#{securityContext.userName} User name of the authenticateduser
#{securityContext.userInRole['role list']}
Is the user in any of these roles?
#{securityContext.userInAllRoles['role list']}
Is the user in all of these roles?
#{securityContext.userGrantedPermission['permission']}
Does the user have this
permission granted?
#{securityContext.taskflowViewable['target']} Does the user have viewpermission on the target task
flow?
Using Global Security ExpressionsGlobal security expressions are available without installing any extensions. You can use them on any
page, even if the page does not have a page definition file.

8/18/2019 D53979GC11_sg2.pdf
http://slidepdf.com/reader/full/d53979gc11sg2pdf 379/381Oracle Fusion Middleware 11g : Build Applications with ADF I 20 - 33
Copyright © 2009, Oracle. All rights reserved.
A managed bean can expose a Boolean property that the UI
expressions can consume.
Example: UserInfo bean:
Example: UI expression:
Checking for multiple roles is a problem; you could end up
writing many convenience methods.
#{userInfo.admin}
Using a Security Proxy Bean
public boolean isAdmin() {return (ADFContext.getCurrent().getSecurityContext().isUserInRole("admin"));
}
Using a Security Proxy BeanA security proxy bean is a Java class that is usually stored in the session as a managed bean. This
bean exposes security information in a form that Expression Language can process, usually as amethod called is<something>, which translates to a simple expression as in the example shown
in the slide.
However, when you need to check for multiple combinations, the Expression Language becomes
complex or you need many convenience methods. Additionally, you need to generate accessors for
each role.

8/18/2019 D53979GC11_sg2.pdf
http://slidepdf.com/reader/full/d53979gc11sg2pdf 380/381Oracle Fusion Middleware 11g : Build Applications with ADF I 20 - 34
Copyright © 2009, Oracle. All rights reserved.
Summary
In this lesson, you should have learned how to:
• Explain the need to secure Web applications
• Describe security aspects of a Web application
• Implement ADF security:
– Authentication
– Authorization:
— In the data model
— In the UI for task flows and pages
• Access security information programmatically
• Use Expression Language to extend security capabilities

8/18/2019 D53979GC11_sg2.pdf
http://slidepdf.com/reader/full/d53979gc11sg2pdf 381/381
Copyright © 2009, Oracle. All rights reserved.
Practice 20 Overview:
Implementing ADF Security
This practice covers the following topics:
• Configuring the application to use ADF Security
• Defining users, roles, and application roles
• Implementing entity object security
• Accessing security context programmatically
Practice 20 Overview: Implementing ADF SecurityIn the practices for this lesson, you set up the application to use security. You create users and roles
in an identity store, and you assign permissions to roles. You also create login and error pages. You
then use ADF security to manage access to pages, task flows, and entity objects, and you
programmatically access the security context by using global security expressions and a security
proxy bean.


