26
Department of Accounting and General Services Data Mart User Manual Information and Communication Services Division eWorld Enterprise Solutions Inc. September 11, 2013

Department of Accounting and General Services
Data Mart User Manual Information and Communication Services Division
eWorld Enterprise Solutions Inc. September 11, 2013

Data Mart User Manual
Page 1 of 26
Table of Contents
1 Overview ..................................................................................................................... 3
2 Accounts and Data Mart Access ................................................................................. 3
2.1 Access Levels for Data Mart ................................................................................. 3
2.2 Data Mart Account and Security .......................................................................... 4
2.2.1 Password Rules and Restrictions .................................................................. 4
2.2.2 Changing Passwords ..................................................................................... 5
2.2.3 Single Account Usage .................................................................................... 5
2.2.4 Account Timeout ........................................................................................... 6
3 General Usage ............................................................................................................. 6
3.1 Header .................................................................................................................. 6
3.2 Footer ................................................................................................................... 6
3.3 Query Options ...................................................................................................... 7
3.3.1 Basic Usage ................................................................................................... 7
3.3.2 Department ................................................................................................... 7
3.3.3 Division .......................................................................................................... 7
3.3.4 Program ID .................................................................................................... 7
3.3.5 Appropriation Account ................................................................................. 7
3.3.6 Means of Finance (MOF) ............................................................................... 8
3.3.7 AS OF ............................................................................................................. 8
3.3.8 Multi Selection .............................................................................................. 8
3.4 Submit .................................................................................................................. 8
3.5 Download ............................................................................................................. 8
4 Payroll Menu ............................................................................................................... 9
Data Mart User Manual
Page 2 of 26
4.1 Retroactive Payment Calculator .......................................................................... 9
4.2 Salary Overpayment Calculator ......................................................................... 10
4.3 Payment History ................................................................................................. 10
4.4 Overtime Reporting ............................................................................................ 11
4.5 Custom Query..................................................................................................... 11
5 FAMIS Menu .............................................................................................................. 12
5.1 Account Summary .............................................................................................. 13
5.1.1 Contracts Balance Details ........................................................................... 15
5.1.2 Claims (Purchase Orders) Balance Details .................................................. 15
5.1.3 Revenue Details .......................................................................................... 15
5.1.4 Expenditure Details ..................................................................................... 15
5.2 YTD Quarterly Information ................................................................................. 15
5.3 YTD Revenue/Expenditure/Encumbrance Balance ............................................ 18
5.4 Expenditure/Encumbrance by Object Code ....................................................... 19
5.5 Revenue/Expenditure Transaction by Date ....................................................... 19
5.6 Inquire by Vendor Number ................................................................................ 20
5.7 Inquire by Contract or Claim Number ................................................................ 20
5.8 Standard Downloads .......................................................................................... 21
6 Reports Menu ........................................................................................................... 22
6.1 Encrypted PDFs................................................................................................... 23

Data Mart User Manual
Page 3 of 26
1 Overview
The Data Mart system is designed to provide financial information to State Department
heads, division administrators, program managers, branch supervisors, project
managers, and departmental accounting staff. Data Mart delivers financial data through
a customized browser based user interface.
FAMIS data is downloaded into the Data Mart daily allowing users to access the most
up-to-date financial information accessible from FAMIS. Access to Data Mart is through
the web browser and users must be connected via the State’s NGN network to view it.
Data Mart contains download functions that allows departments to do departmental
data analysis and reporting on financial data.
The Data Mart is a read-only database and does not allow any users to update the data.
Payroll data is updated two days before each pay date and FAMIS data is updated daily.
2 Accounts and Data Mart Access
2.1 Access Levels for Data Mart Access to Data Mart will be provided by the system administrator for your department.
A user ID and password will be created by the Data Mart system administrator and given
to you. The ID will provide you access to only data and functions within the Data Mart
system that you are authorized to view. A user group will be assigned and will define
your role in Data Mart. You will be assigned a user group and have one or more sub user
groups also assigned.
The user groups are as follows:
Super User – The user has access to and can view FAMIS data for all
departments.
Dept User – The user has access to and can view FAMIS data only for their
department.
Div User – The user has access to and can view FAMIS data for the Division
assigned to them by the system administrator.
Program User – The user has access to and can view FAMIS data for the Program
IDs assigned to them by the system administrator.

Data Mart User Manual
Page 4 of 26
The sub user groups or “Other User Groups” are as follows:
None
Admin-Super-User – The user is assigned to the Super Admin group and can
view, create, edit, deactivate and delete any Data Mart users.
Admin-Dept – The user belongs to a specific department and is in that
department’s Department Admin group. The user can view, create, edit,
deactivate, and delete all Data Mart users within their department only.
Low Resolution – The user has their computer set to a resolution lower than
1024x768.
PDF Enabled – The user can access PDF reports for their department only.
2.2 Data Mart Account and Security The Data Mart application can be accessed at http://famisdatamart.hawaii.gov.
An administrator will issue a user name and password for the initial login to the
application. Upon logging into the application for the first time with the generated
password the system will force you to change your password.
2.2.1 Password Rules and Restrictions The system requires complex passwords. The following rules that are enforced when
creating or changing a password are:
Passwords must be at least 8 characters long
Must contain at least one uppercase letter (A-Z)
Must contain at least one lowercase letter (a-z)

Data Mart User Manual
Page 5 of 26
Must contain at least one numeric character (0-9)
Must contain at least one symbol (!@#$%^&*()_+~-=\`{}[]:”;’<>?,./)
Passwords cannot contain the user name anywhere in them
The last 6 passwords cannot be repeated
Passwords will expire after 90 days. After 90 days you will be forced to change your
password before doing anything else in Data Mart.
There is a lockout period when an account is accessed with an incorrect password. After
5 failed attempts a 20 minute lockout period will be enforced. If an administrator resets
your password during this lockout period the lockout period will be lifted and you may
login with the newly issued temporary password.
All temporary passwords issued by a system administrator expire in 7 days. If the
temporary password is not used within the 7 day period you will have to ask the
administrator to generate a new temporary password.
NOTE: The above applies to any time an administrator resets a user’s password in
addition to when they create a new account.
2.2.2 Changing Passwords Your password can be reset at any time, not just when prompted to do so. The
dropdown menu in the upper right has an option to “Change Password”. There you can
enter your current password and set your new one.
2.2.3 Single Account Usage Data Mart does not allow an account to be logged on more than once at any given time.
To prevent this from happening be sure click the “Logout” menu option from the
Data Mart User Manual
Page 6 of 26
dropdown in the upper right corner of the screen. If you try to login with the same
account more than once an error will be shown on the login screen.
If you are unable to properly logout (i.e. already closed the window for the other
session) you will need to contact a Data Mart administrator to reset your account before
you will be able to login again.
2.2.4 Account Timeout The Data Mart application has a 15 minute timeout period. If the application is left idle it
will log you out after 15 minutes and return you to the login screen.
3 General Usage
3.1 Header The header contains menus to navigate through the different parts of the application.
The dropdown menus available will vary depending on what roles your account has
been assigned. On the right-side of the header is a dropdown menu that contains user
account related items.
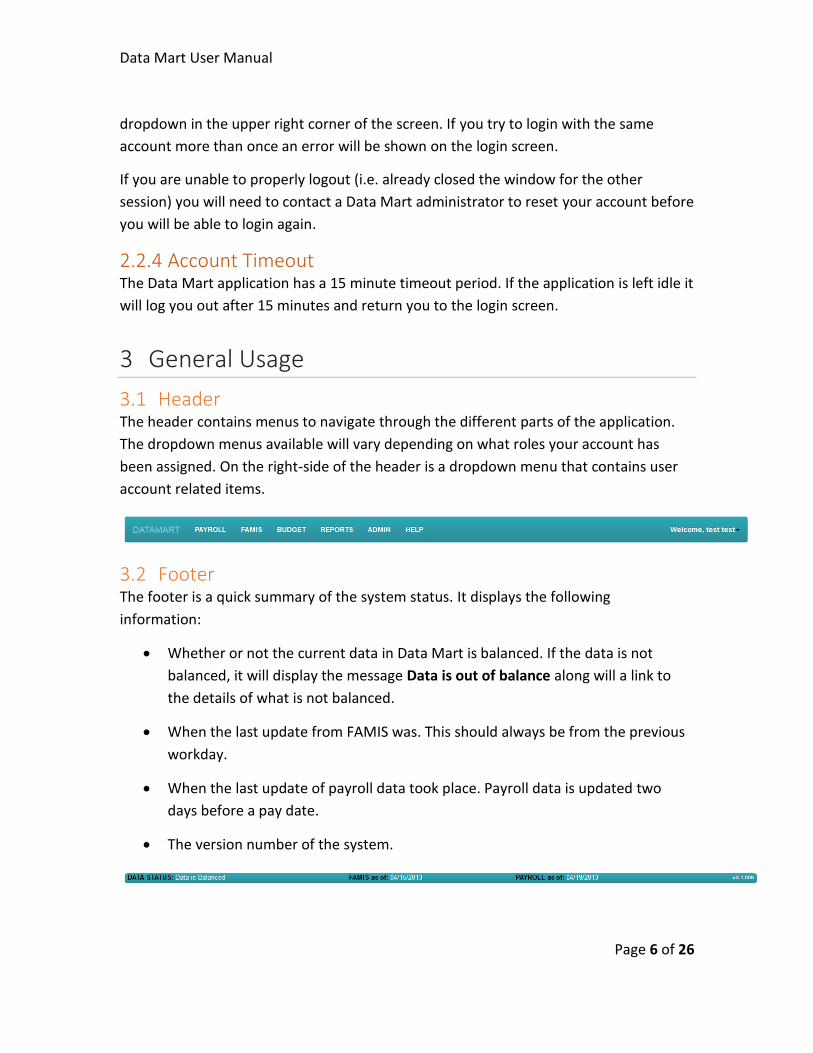
3.2 Footer The footer is a quick summary of the system status. It displays the following
information:
Whether or not the current data in Data Mart is balanced. If the data is not
balanced, it will display the message Data is out of balance along will a link to
the details of what is not balanced.
When the last update from FAMIS was. This should always be from the previous
workday.
When the last update of payroll data took place. Payroll data is updated two
days before a pay date.
The version number of the system.

Data Mart User Manual
Page 7 of 26
3.3 Query Options All of the Data Mart screens start off with a group of dropdown menus. These contain
options that can be selected to specify what records should be shown. Each screen may
contain different options but they work the same.
3.3.1 Basic Usage Most dropdowns default to -ALL-, which means all values in the dropdown will
be used.
Values must be changed from left to right. Changing the value of a dropdown
menu will cause the menus to the right of it to be regenerated with the
appropriate options.
Fields with an asterisk (*) next to them are required. The Submit button will not
enable until all required fields have a valid value.
3.3.2 Department The department field defaults to the department or governmental agency that your
account is assigned to. If you are a department user or a program user only a single
department will be shown, your own.
If your account has super user rights all departments will be shown. Selecting -ALL- will
use all departments available.
3.3.3 Division Divisions can be selected after a department is selected. Only divisions within the
selected department will be shown. If the department chosen does not use divisions,
the -ALL- option should be selected.
3.3.4 Program ID The program IDs shown are based on the selected department and division. If -ALL- is
selected for division -ALL- or -BLANK- option should be selected for program ID.
3.3.5 Appropriation Account Appropriation account numbers are established in FAMIS. The appropriation account
listed is a combination of 3 fields from FAMIS: Fund Type, Fiscal Year, and Appropriation

Data Mart User Manual
Page 8 of 26
Account Number. It is possible for a single program ID to have more than one
appropriation account.
3.3.6 Means of Finance (MOF) This is the source of funding used in the budget.
3.3.7 AS OF There are 3 time periods options that can be selected when doing a query. They are:
YTD – For year to date balances as of the current month. This is the default
selection.
PM – For year to date balances as of the prior month.
PY – For the balance for the prior fiscal year.
3.3.8 Multi Selection Some of the dropdowns contain an option called -MULTI-. If this is selected you will be
taken to a screen to select a custom set of the options in the dropdown. Once this is
done you will be taken back to the screen you were on and a little button that says
“Multi” will appear under the dropdown. You can use this button to edit the selected
options or use the dropdown normally to clear any selection done using the -MULTI-
option.
3.4 Submit All screens will have a submit button. This submits the selected options and initiates the
request for the data. If the submit button is not enabled check that all required fields
are properly filled in.
3.5 Download After data is returned from a submitted request a download button will be enabled. This
will download a CSV (comma separated value) file that can be viewed in Excel. Note that
for some screens more data than what is seen will be exported to the CSV file (i.e.

Data Mart User Manual
Page 9 of 26
Account Summary will contain the data for all the accounts that make up the totals).
This is intentional.
4 Payroll Menu
The payroll menu has the following menu items:
Retroactive Payment Calculator
Displays and calculates an employee’s pay for a period of time.
Salary Overpayment Calculator
Displays and calculates the employee’s net pay after deduction.
Payment History
Displays and breakdown an employee’s pay by pay type over a period of time. Or
if no employee is selected displays the breakdown of all pay types for all
employees.
Overtime Reporting
Displays overtime reported by employees.
Custom Query
Displays a custom payroll report based on selected filters and display columns.
4.1 Retroactive Payment Calculator Provides information about an employee’s pay over a period of time. Data is shown for
each pay period in the pay date range that is selected. This report requires a social
security number. You many type in the employee’s full SSN or you can use the SSN
Lookup function. If you click SSN Lookup, a screen will be shown to search by SSN or by
last name. These do not need to match exactly. When a SSN is selected it will appear
back on the screen that the Retroactive Payment Calculator screen. Results can be
downloaded as a CSV file.

Data Mart User Manual
Page 10 of 26
4.2 Salary Overpayment Calculator Shows information on an employee’s pay and the breakdown of deductions from their
salary. The data shown is for all the pay periods between the selected to and from pay
dates. This report requires a social security number. You many type in the employee’s
full SSN or you can use the SSN Lookup function. If you click SSN Lookup, a screen will be
shown to search by SSN or by last name. These do not need to match exactly. When a
SSN is selected it will appear back on the screen that the Salary Overpayment Calculator
screen. Results can be downloaded as a CSV file.
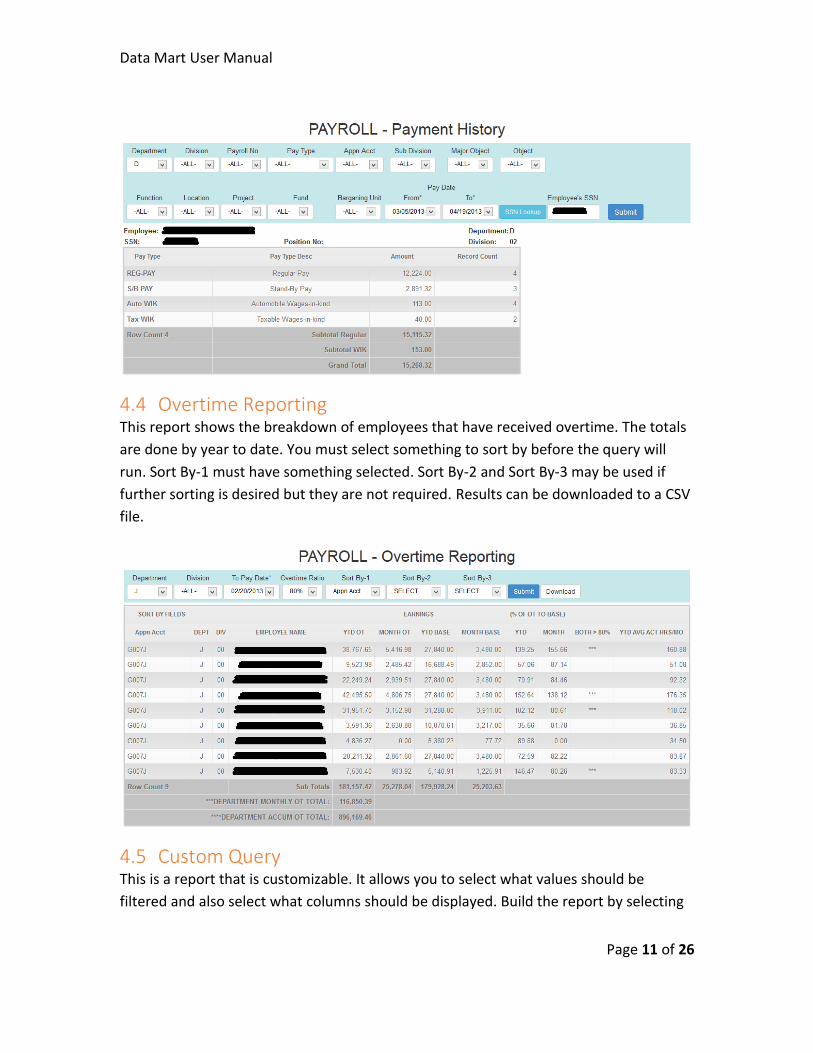
4.3 Payment History Payment history lists the breakdown of how much each pay type was paid out over a
selected time period. If an SSN is entered it will only show the pay types for the
associated employee. The SSN can be manually entered or the SSN Lookup function may
be used. The query can further be limited by using the dropdowns.
Data Mart User Manual
Page 11 of 26
4.4 Overtime Reporting This report shows the breakdown of employees that have received overtime. The totals
are done by year to date. You must select something to sort by before the query will
run. Sort By-1 must have something selected. Sort By-2 and Sort By-3 may be used if
further sorting is desired but they are not required. Results can be downloaded to a CSV
file.
4.5 Custom Query This is a report that is customizable. It allows you to select what values should be
filtered and also select what columns should be displayed. Build the report by selecting

Data Mart User Manual
Page 12 of 26
the column names from the left side and click the Submit button when done. Results
can be downloaded as a CSV file.
5 FAMIS Menu
The FAMIS menu has the following menu items:
Account Summary
Displays the status of an appropriation account or group of accounts.
YTD Quarterly Information
Reflects the status of currently operating appropriated accounts by quarters.
YTD Revenue Exp/Encu – By Optional Fields
Provides totals for revenues, expenditures and encumbrances by source or
object which can be summarized by cost center, project, project phase, or
activity.
Expenditure/Encumbrance – By Object Code
Provides totals for expenditure and encumbrances by object code for an
appropriation account or group of accounts.
Rev/Exp Trans – By Date
Provides detailed revenue or expenditure transactions for a fiscal month or a
range of fiscal months.

Data Mart User Manual
Page 13 of 26
Inquire By Vendor No.
Provides a list of all outstanding contract or claim encumbrances for a particular
vendor.
Inquire By Contract or Claims No.
Provides information for a specific contract or claims encumbrance.
Standard Downloads
File downloads for Account Summary, Contracts, Claims, Revenue and
Expenditure detailed records.
5.1 Account Summary The account summary is shows the status of one or more appropriation accounts at
once.
The following table provides the list of data fields displayed along with a brief
description.
Field Name Brief Description
Account Title A description of an individual appropriation account. If you selected
more than one appropriation account this field will display
THIS_IS_A_SUMMATION_THEREFORE_NO_TITLE.
Appn Type Appropriation type. This single character field is used to group the
appropriation accounts into various operating and capital fund types. If
more than one appropriation or fund account is being reviewed the

Data Mart User Manual
Page 14 of 26
field will display
SUMMATION_NO_TYPE.
Appropriation Represents the original appropriation amount if the account is a current
fiscal year account. If the account is for a prior fiscal year, the amount
shown represents the unexpended appropriation amount carried
forward.
Transfer Represents the appropriation amount transferred in or out of the
account during the current fiscal year.
Allotment Represents the sum of all quarterly allotments, other allotments,
continuing allotments, plus or minus allotment transfers, less allotment
reversion.
Appropriation
Balance
Represents the amount of appropriation that is available for allotment.
Allotment 10
Balance
Represents the amount of allotment that is available in the fiscal period
for personnel services expenditures.
Allotment 20
Balance
Represents the amount of allotment that is available in the fiscal period
for other current expenditures.
Contracts
Balance and
Details
Represents the amount of contract encumbrances still outstanding as of
the fiscal period.
Claims (POs)
Balance and
Details
Represents the amount of claims encumbrances still outstanding as of
the fiscal period. Press the Details button to drilldown to the Claims
Listing By Claim Number. This is a list of the individual outstanding
claims for the selection values.
Beginning
Cash
Represents the cash balance at the beginning of the fiscal year.
Revenue and
Details
Represents the revenues recorded as of the fiscal period. Press the
Details button to drilldown to the Revenue Listing By Source Code. This
is a list of the revenue totals for the selection values by source code.
Cash Transfer Represents the amount of cash that was transferred in or out as of the
Data Mart User Manual
Page 15 of 26
fiscal period.
Expenditures
and Details
Represents the amount of expenditures recorded as of the fiscal period.
Press the Details button to drilldown to the Expenditures Listing By
Object Code. This is a list of the expenditure totals for the selection
values by object code.
Ending Cash Represents the cash balance as of the fiscal period.
5.1.1 Contracts Balance Details To view the contracts listing that makes up the Contracts Balance, click on the Details
button next to List Contacts. The Contact Listing by Contract Number screen will load
showing the contract balance details. Click the Back button to return to the Account
Summary screen. Click on the Download button to download the data as a CSV file.
5.1.2 Claims (Purchase Orders) Balance Details To view the claims that make up the Claims (POs) Balance, click on the Details button
next to List Claims (POs). The Claims Listing by Claims No. will load showing the details of
the claims balance. Click the Back button to return to the Account Summary screen.
Click on the Download button to download the data as a CVS file.
5.1.3 Revenue Details To view the revenue listing that makes up the Revenues total, click the Details button
next to By Source Code. The Revenue Listing by Source Code screen will load showing
the receipts and revenues by source code. Click the Back button to return to the
Account Summary screen. Click the Download button to download the data as a CSV.
5.1.4 Expenditure Details To view the expenditure listing that makes up the Expenditure total, click on the Details next to By Object Code. The Expenditure Listing by Object Code screen will load showing the expenditure data by object code. Click the Back button to return to the Account Summary screen. Click the Download button to download the data as a CSV.
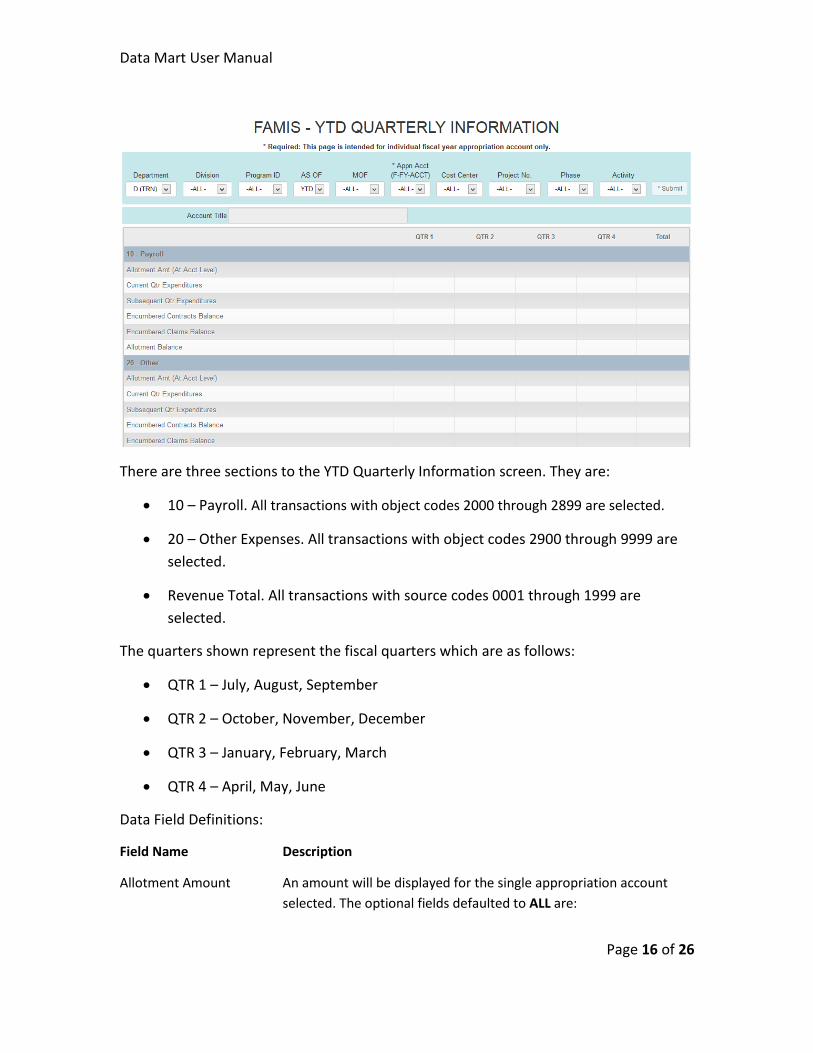
5.2 YTD Quarterly Information This screen is intended to reflect quarterly allotments, expenditures, encumbrances and
revenues. This information is intended for the current fiscal year appropriation accounts
and will only show information for a single appropriation.
Data Mart User Manual
Page 16 of 26
There are three sections to the YTD Quarterly Information screen. They are:
10 – Payroll. All transactions with object codes 2000 through 2899 are selected.
20 – Other Expenses. All transactions with object codes 2900 through 9999 are
selected.
Revenue Total. All transactions with source codes 0001 through 1999 are
selected.
The quarters shown represent the fiscal quarters which are as follows:
QTR 1 – July, August, September
QTR 2 – October, November, December
QTR 3 – January, February, March
QTR 4 – April, May, June
Data Field Definitions:
Field Name Description
Allotment Amount An amount will be displayed for the single appropriation account
selected. The optional fields defaulted to ALL are:

Data Mart User Manual
Page 17 of 26
Division Program ID Means of Financing (MOF) Cost Center Project No. Phase Activity
The allotment amount is not displayed when values are selected for
these fields.
*Note: When these optional fields are selected, the Allotment
Amount will not be displayed. Only expenditures or claims related to
the optional fields will be displayed.
Current Quarter
Expenditures
This is the total of direct expenditures and expenditures for
encumbrances that were recorded in the same fiscal quarter.
Subsequent Quarter
Expenditures
This is the total expenditures for encumbrances recorded in this
quarter but paid for in a subsequent quarter of the same fiscal year.
Encumbered Contacts
Balance
This is the outstanding balance of contracts encumbered in the fiscal quarter.
Encumbered Claims
Balance
This is the outstanding balance of claims (purchase orders)
encumbered in the fiscal quarter.
Allotment Balance If displayed, the Allotment Balance is calculated as follows: Allotment Amount - Current Quarter Expenditures - Subsequent Quarter Expenditures - Encumbered Contracts Balance - Encumbered Claims Balance ---------------------------------------------------- = Allotment Balance Note: The allotment amounts do not include reversions

Data Mart User Manual
Page 18 of 26
5.3 YTD Revenue/Expenditure/Encumbrance Balance
Totals by object code for all revenues, expenditures and encumbrances are reflected on
this screen. The Source code identifies the source of the revenue and the object code
identifies the type of expenditure. Source codes 0001-1999 are used to identify revenue
sources and object codes 2000- 9999 are used to identify expenditure types.
On this screen, besides the standard selection criteria, users can also drill down further by selecting cost center, project, phase or activity. The records are grouped and sorted by object code. The *Cross Tab By is a required selection. The valid selections are: • Cost center • Project No. • Phase • Activity For example, if cost center is selected as the *Cross Tab By, there will be a break down by columns for the different cost centers across the screen. The TOTALS column is displayed first but there may be many cost centers displayed horizontally that total up to the TOTAL’s column. Use the scroll bar at the bottom of the browser screen to see any remaining cost centers. Expenditure, Revenue or Encumbrance entries without associated cost center, project, phase, and activity number will be reported as a “Blank” column entry.

Data Mart User Manual
Page 19 of 26
5.4 Expenditure/Encumbrance by Object Code This screen provides a breakdown expenditures and encumbrances by object code. It
also displays the total of the expenditures and encumbrances for each object code.
5.5 Revenue/Expenditure Transaction by Date This screen shows all revenue and expenditure transactions for a given time period. If
you are querying by a specific vendor, this query has a vendor lookup function. If you
click Vendor Lookup a screen will be shown to search by vendor name or vendor
number. These do not need to match exactly. When a vendor is selected its number will
appear back on the Revenue/Expenditure Transaction by Date screen. Alternatively, if
the vendor number is known it can be entered directly into the Vendor No. field.
Data Mart User Manual
Page 20 of 26
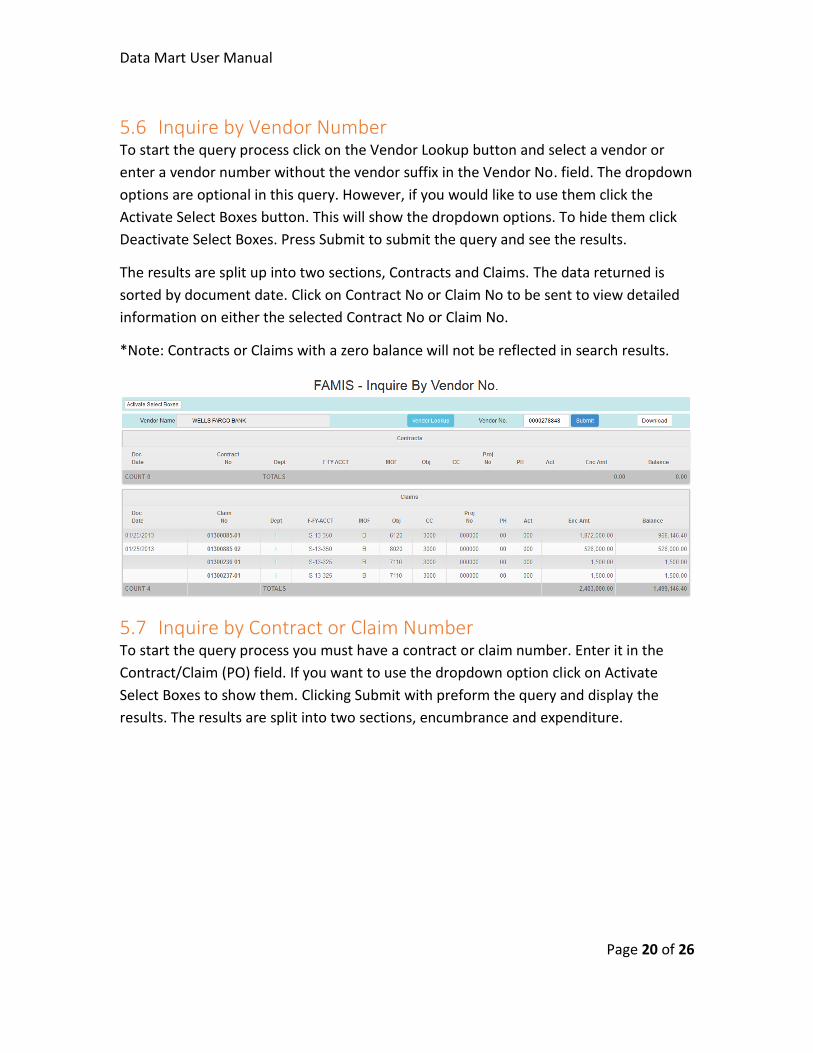
5.6 Inquire by Vendor Number To start the query process click on the Vendor Lookup button and select a vendor or
enter a vendor number without the vendor suffix in the Vendor No. field. The dropdown
options are optional in this query. However, if you would like to use them click the
Activate Select Boxes button. This will show the dropdown options. To hide them click
Deactivate Select Boxes. Press Submit to submit the query and see the results.
The results are split up into two sections, Contracts and Claims. The data returned is
sorted by document date. Click on Contract No or Claim No to be sent to view detailed
information on either the selected Contract No or Claim No.
*Note: Contracts or Claims with a zero balance will not be reflected in search results.
5.7 Inquire by Contract or Claim Number To start the query process you must have a contract or claim number. Enter it in the
Contract/Claim (PO) field. If you want to use the dropdown option click on Activate
Select Boxes to show them. Clicking Submit with preform the query and display the
results. The results are split into two sections, encumbrance and expenditure.

Data Mart User Manual
Page 21 of 26
5.8 Standard Downloads The Standard Downloads screen does not display any financial data. It is used to download detailed records based on the criteria selected. After clicking on one of the following buttons: Account Summary, Contracts, Claims, Revenue or Expenditure, you will be prompted to open or save the results as a CSV file. This screen is best suited for situations where there is a need to manipulate and analyze the data or when other screens cannot provide the required detailed records.
When selecting the Account Summary, Contracts, and Claims buttons, you must select an AS OF value of PM, PY or YTD to receive data on a query, the FROM/TO fiscal month and fiscal year will not be applicable. If you select the FROM/TO fiscal month and fiscal year, the Revenue and Expenditure buttons will be activated. Note: Due to the large number of revenue and expenditure detail transactions contained in the Data Mart, it is strongly recommended to minimize the date range that is entered. Account Summary Contracts of Claims Revenue Expenditure Department Division
Department Division
Department Division
Department Division

Data Mart User Manual
Page 22 of 26
Program ID Law - Act Section- Citation Lapse Date Means of Financing (MOF) Appropriation Type Appropriation Account Account Title Appropriation Amt Transfer Allot Amt Appropriation Balance Allot 10 Bal Allot 20 Bal Contracts Balance Claims (PO) Balance Beginning Cash Revenues Cash Transfer Expenditures Ending Cash Estimated Revenues Lapse Reversion Period
Program ID Means of Financing (MOF) Appropriation Type Appropriation Acct Contract No/Sfx or Claim No/Sfx Doc Date Vendor No Vendor Name Object Code Cost Center Project No Phase Activity Encumbrance Amount Expenditure Amount Encumbrance Balance Original Encumbrance Adjustment Liquidation Direct Exp (Contracts only) Retainage Encumbrance Fiscal Year/ Month Create Date Period (1) Description (Contracts only) (2) Description
Program ID Means of Financing (MOF) Appropriation Type Transaction Code Appropriation Acct Source Code Cost Center Project No Phase Activity Amount Doc Type Comptroller No. Department No Doc No Optional Data Fiscal Year/Month Processing Date Transaction ID
Program ID Means of Financing (MOF) Appropriation Type Transaction Code Appropriation Acct Object Code Cost Center Project No Phase Activity Expenditure Amt Enc No/Sfx (Contract No/Sfx or Claim No/Sfx) Vendor No Vendor Name Invoice No Invoice Date Aging Date Check Date Check No Doc Type Comp No Dept No Doc No Optional Data 1099 Indicator FY/FM Enc FM Processing Date Transaction ID
6 Reports Menu
The reports menu has the following menu items:
MBP-405 – Detail of Transactions Posted
The online version of the MBP-405 report.

Data Mart User Manual
Page 23 of 26
FAMIS PDF Reports
FAMIS reports in PDF reports.
Central Accounting PDF Reports
Central accounting reports in PDF format.
Payroll PDF Reports
Payroll reports in PDF format.
6.1 Encrypted PDFs PDFs that contain sensitive information will be encrypted with your Datamart password.
Upon trying to download or view an encrypted PDF a prompt will ask for your password.
If the password succeeds a download box will appear for you to save or open the PDF.
If you try to open an encrypted PDF Adobe Reader will prompt you for a password. Use
your Datamart password that you used to download the PDF.

Data Mart User Manual
Page 24 of 26
6.2 Online MBP 405 The online version of the MBP 405 requires either a processing date or a fiscal year
range to be selected. Results can be downloaded as a CSV file.

Data Mart User Manual
Page 25 of 26
6.3 PDF Reports The PDF report screens will all display a list of PDF files available for the search criteria
that is entered. Clicking on a PDF will bring up a download box or if the PDF is encrypted
a password prompt will appear first. For more information on encrypted PDFs see
Section 6.1.
The FAMIS reports require the report number and a year and month date.
Central accounting and payroll reports require either the report name or a date to be
selected.


