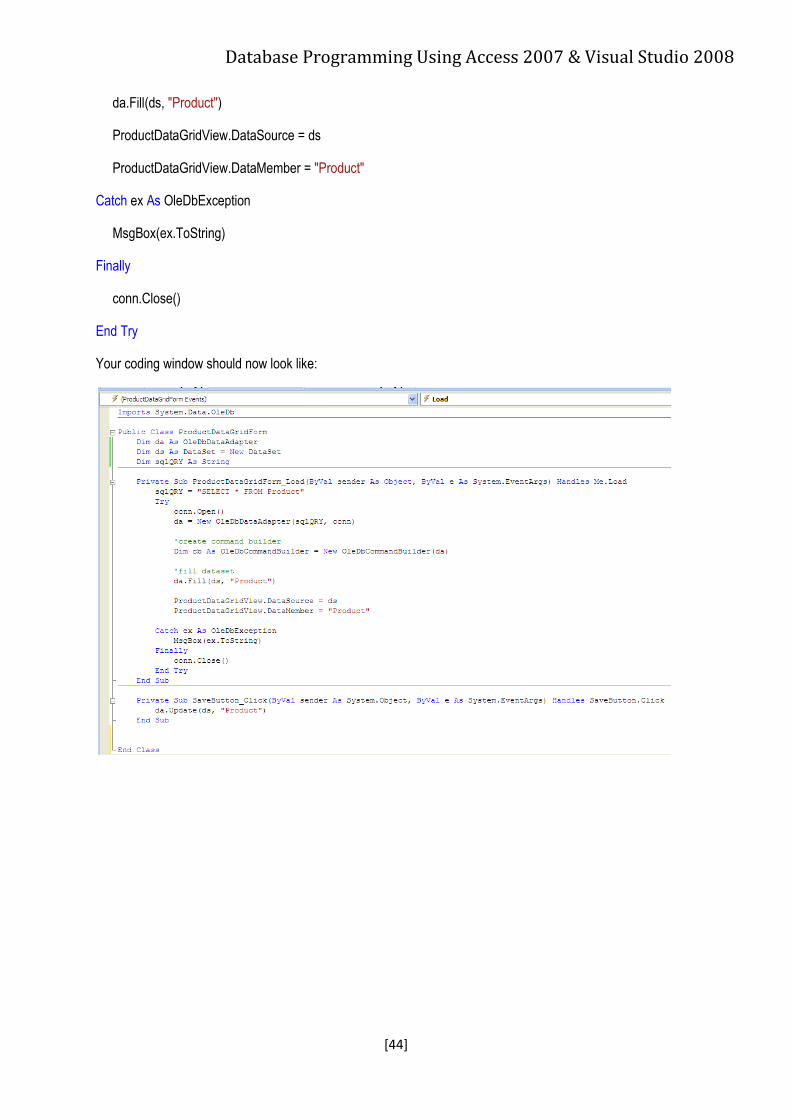
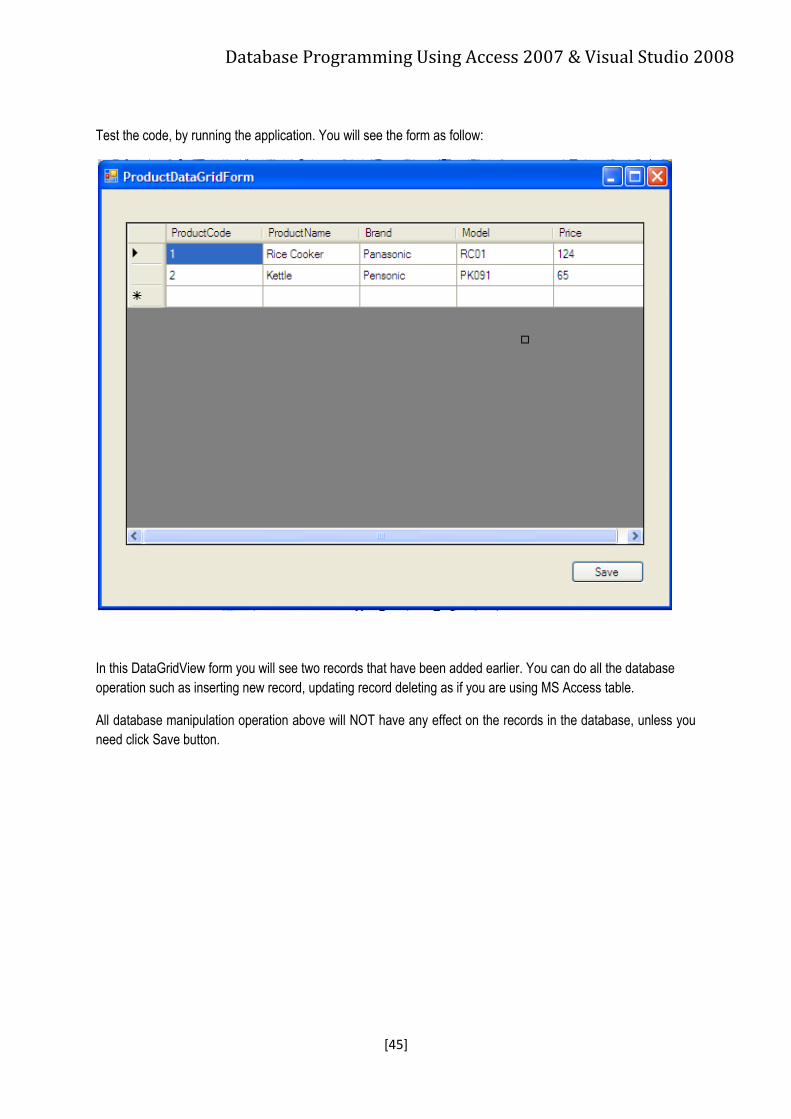
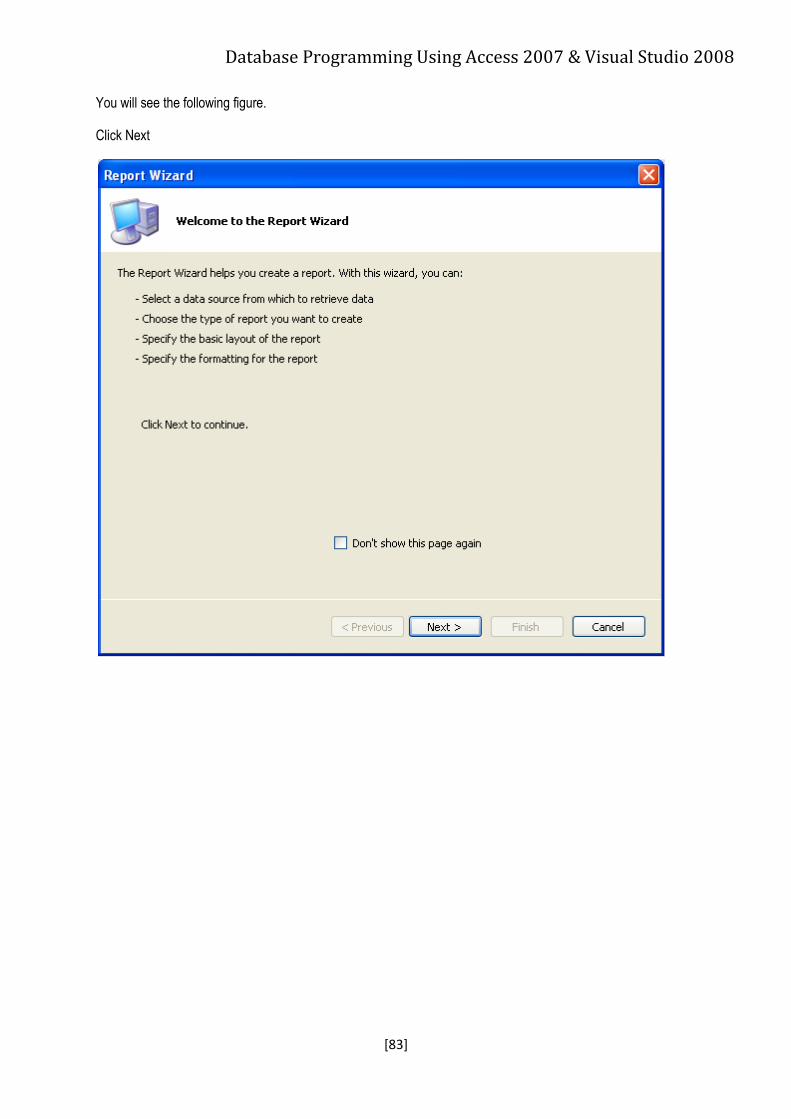
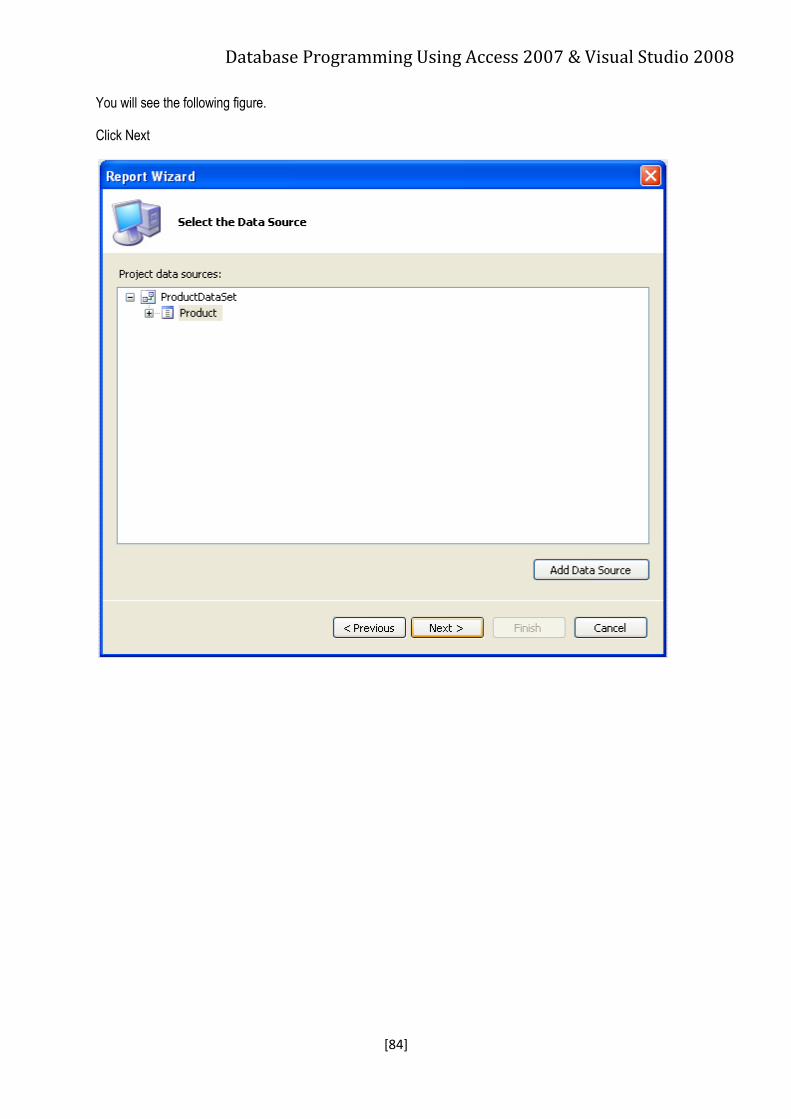
5.3 Creating Microsoft Report Viewer .................................................................................................... 90
Database Programming Using Access 2007 & Visual Studio 2008
[2]
CHAPTER 1:
INTRODUCTION TO
DATABASE AND
MICROSOFT ACCESS
2007
After you have completed this
chapter, you should be able to :
Define the basic
definition of database
and relational
database elements
Explain three types of
relationship in
relational database
and know how to
create relationship
within a database
Explain the basics of
database
management
software (DBMS)
Database Programming Using Access 2007 & Visual Studio 2008
[3]
1.0 INTRODUCTION TO DATABASE & MICROSOFT ACCESS 2007
atabase is an integrated collection of related files, records and data. It also can be defined as an
organized collection of data in an integrated place where it can be accessed and managed
systematically and can be accessed by multiple users at the same time. Database is a unique
concept on how to manage data structures in an organized and integrated fashion.
One of the most popular databases handling method today is relational database system. Relational
database handles all data in a tabular form. All information is being kept in a table that consist of columns
and rows.
Below are the important elements of a relational database model:
1.1 Relational Database Elements
a. Table
Table is considered as the main building block of a database. It is a set of data elements which
is organized in columns and rows. Each column represents an attribute which is called field.
Examples of tables are Student, Employee, Sales, Purchase and Subject.
b. Field
Column in table is also called as field. Each field has a distinct name and is used to store
different element of a data. Each field will have different type of data format. Examples of field
are Student_Name, Student_Matric, Student_Address, Employee_Status, Sales_Date and
many others.
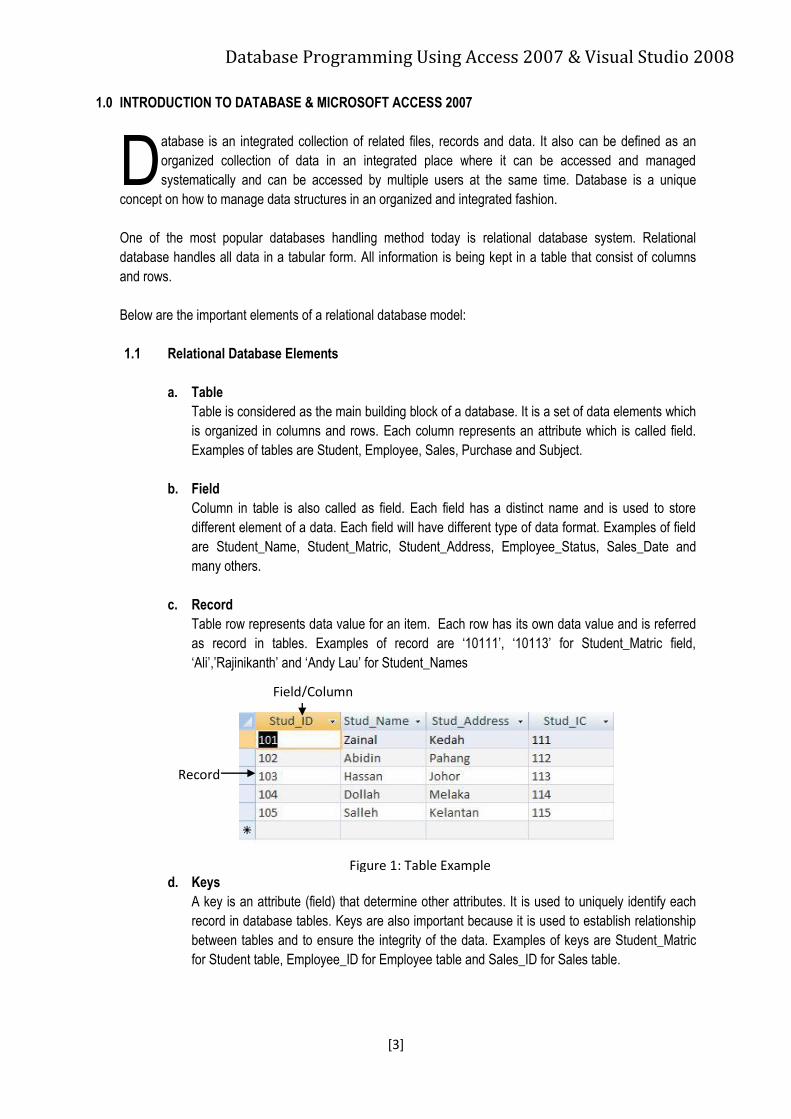
c. Record
Table row represents data value for an item. Each row has its own data value and is referred
as record in tables. Examples of record are ‘10111’, ‘10113’ for Student_Matric field,
‘Ali’,’Rajinikanth’ and ‘Andy Lau’ for Student_Names
d. Keys
A key is an attribute (field) that determine other attributes. It is used to uniquely identify each
record in database tables. Keys are also important because it is used to establish relationship
between tables and to ensure the integrity of the data. Examples of keys are Student_Matric
for Student table, Employee_ID for Employee table and Sales_ID for Sales table.
D
Record
Field/Column
Figure 1: Table Example
Database Programming Using Access 2007 & Visual Studio 2008
[4]
Keys can be divided to primary key, foreign key, superkey, candidate key and secondary keys,
however, in this topic the discussion will only be limited to primary key and foreign key only.
Primary key is the main key in table to uniquely identify each record. Normally it comprises of
single field, but there are cases which primary key comprises of more than two fields.
Foreign key is the key used in defining relationship between tables. It is the primary key from
the referenced master table. The value between the two related fields must match each other.
A table can have many foreign key, depending on the table which it related to.
In the example above, Department_Code and Manager_ID is the primary key in the table
Department and table Manager. While in the table Manager, Department_Code act as the
foreign key. The concept of relationship between entities and tables will be explained in detail
in the topic Relationship within a Database.
Figure 2: Primary and Foreign Key Example
Database Programming Using Access 2007 & Visual Studio 2008
[5]
1.2 Relationship within a Database
a. 1 : 1 (One To One)
1: 1 relationship rarely happens in database design. It happens when one entity is related with
only one other entity and the other way round. In this relationship only one occurrence of the
related record in the related tables happens.
Example of 1:1 relationship is the relation between Employee and Authentication. One
employee can own one authentication id only and one id can be owned by only one employee.
b. 1 : M (One To Many)
1:M relationship is the common relation that happen in relational database. This type of relation
happens when one record in the master table is related with many records in the child table. It
is linked by using foreign key in the child table. Note that the foreign key is the primary key
from the master table.
Example of 1: M relationship is the relationship between book and shelf. One book can be
located in only one shelf while one shelf can locate many books. Another example is between
Voucher and Cheque. One voucher can produce many cheques while one cheque can be
produced by only one voucher.
Figure 4: One To Many Relationship
Figure 3: One To One Relationship
Database Programming Using Access 2007 & Visual Studio 2008
[6]
c. M : M (Many To Many)
M:M relationship refers to relation when many records also related with many records in the
related table. In the case of M:M relationship which can be implemented directly, an
intermediate entity has to be created. This intermediate entity will consist of primary key from
both of the related table and also other fields which are required in the relationship.
Example of many to many relationship is Student and Subject. One student can take many
subjects and in the same time one subject can be taken by many students. In this case,
intermediate entity has to be created. The name of the intermediate entity can be the
combination of the two tables or other names which are appropriate.
1.3 Database Management System (DBMS)
DBMS is a complex software programs that can be used to organize and manage a database. It
acts as middleware between users and database. The main function of DBMS are to create
database and its elements such as tables and index, define relationship between tables, perform
data retrieval and data query using query language, administer its users and security and produce
reports.
There are a lot of DBMS vendors in the market such as MySQL (open source), Oracle (Sun),
SQLServer (Microsoft), PostgreSQL (open source), DB2 (IBM) Informix (IBM) and many more.
Each type of DBMS has their own specialty and specific purposes, for example, IBM Informix is
Figure 5: Many To Many Relationship
Data Query
Relational
Database
Structure
End Users
End Users
DBMS (Database
Management System) End User Data Request
Figure 2: DBMS relates end user and database structure
Database Programming Using Access 2007 & Visual Studio 2008
[7]
meant to focus on online transaction processing while MySQL is an open source database software
for middle size application.
One of the popular DBMS for students and small medium size organization that use Windows
platform is Access from Microsoft Corporation. Access is one of the software included in the
Microsoft Office suite and is highly used around the world because of its simplicity and friendly user
interface. In this book, Microsoft Access 2007 will be used as the main database.
1.4 Introduction to Access 2007
Microsoft Access is an application used to create small and midsize computer desktop databases
for Microsoft Windows family of operating systems. Starting with version 1.0 in 1992, Access DBMS
continue to expand with lots of new and exciting functionalities to manage database from time to
time. Figure below shows the evolution of Access from 1992 until now. The latest version of Access
comes in Microsoft Office 2007 suite and is also known as Access 2007.
The new version of Access 2007 uses different extension which is .accdb compared to prior version
which use .mdb. The new format enables Access to handles multi value and attachment in fields.
Access 2007 offers a totally different environment compared to previous version but it still maintains the
basic features of Access which are creating tables, queries, forms and reports by using design mode or
wizard. Advanced users can use and VBA (Visual Basic for Application) to enhance the Access
application.
Database Programming Using Access 2007 & Visual Studio 2008
[8]
Besides the core function, there are lot more functionalities such as user administration, maintaining
securities, switchboard and many more. One of the major upgrade in Access 2007 is its interface where
it uses the ribbon concepts that contains iconic like toolbar to create database elements. Each icon has
its own functionalities.
In this module, you are going to create an Access 2007 file to store your data while Visual Basic 2008
will serve as the interface of your database system. The discussion of Access will only be limited to the
creation of tables because queries, form and report will be created by using Visual Basic 2008 and
crystal report.
1.4.1 Create New Database File.
1. Start Microsoft Access 2007
2. Click New Blank Database icon
3. Enter Sales as the file name to replace the default name (Database1).
4. Select the directory where you want to save your file by clicking the folder icon.
(The default directory is My Document folder) and click Create button.
Database Programming Using Access 2007 & Visual Studio 2008
[9]
1.4.2 Creating Tables
Table is the most important components of any relational database. Data in database
is stored in tables in a form of columns and row. Table column represents the data
characteristics which is known as field while table rows represents data item and is
known as record.
To create a table, click table on the create tab. You can choose either to use the
normal table view or use table templates or straight away use table design which will
open the classic design mode.
When table had been created, it will appear in datasheet view. In this mode, you can
add delete or update fields, modify the formatting, set null properties, create a lookup
column and update the table name.
Database Programming Using Access 2007 & Visual Studio 2008
[10]
Instead of using datasheet view, classic design view can also be used to modify the
table structure.
Design view in 2007 still maintains the classic view of design mode which allows user
to create the fields in rows. When adding fields to the table structure, few things has
to be considered and carefully set up. The first one is the data type. Choose suitable
data type for each field based on its usage. Table below shows the important data
types in Access and its description.
Data Type Description Example
Text Text character up to 255 character Names
Memo Up to 65300 alphanumeric characters
Address, notes
Number Numeric value Matrix number, Quantity
Date/Time Date and time Sales date
Currency Currency value Sales price
Auto Number Unique auto generated sequence numbers
Transaction number
Attachment Any binary file such as images and office file
Digital images
As stated earlier, this module will only discuss the creation of tables in Access; other
Access features will not be discussed. This is because query, form and report handling will
be done through Microsoft Visual Basic 2008.
Database Programming Using Access 2007 & Visual Studio 2008
[11]
Chapter Exercises
Create the following tables in Sales database:
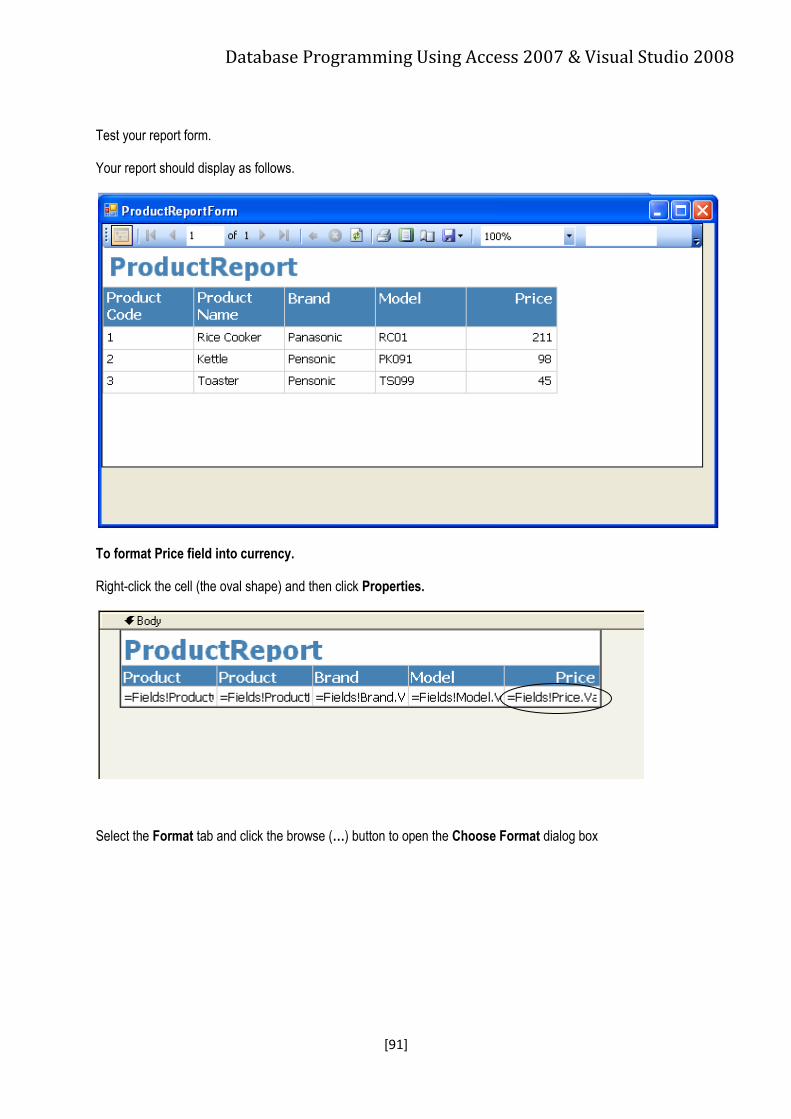
1. Table Name: Product
Field Name Data Type
ProductCode Text
ProductName Text
Brand Text
Model Text
Price Number
2. Table Name: Customer
Field Name Data Type
CustID Text CustName Text
Address Text
Phone Text
Email Text
3. Table Name: SalesOrder
Field Name Data Type
SONo Text
OrderDate Date/Time
CustID Text
ProductCode Text
Quantity Number
Database Programming Using Access 2007 & Visual Studio 2008
[12]
Chapter Summary
Database Programming Using Access 2007 & Visual Studio 2008
[13]
CHAPTER 2 :
STRUCTURED QUERY
LANGUAGE
After you have completed this
chapter, you should be able to :
Define the basic of SQL
Differentiate between
SQL and other
programming languages
Apply the basic command
of SQL data definition,
data manipulation and
data query language.
Database Programming Using Access 2007 & Visual Studio 2008
[14]
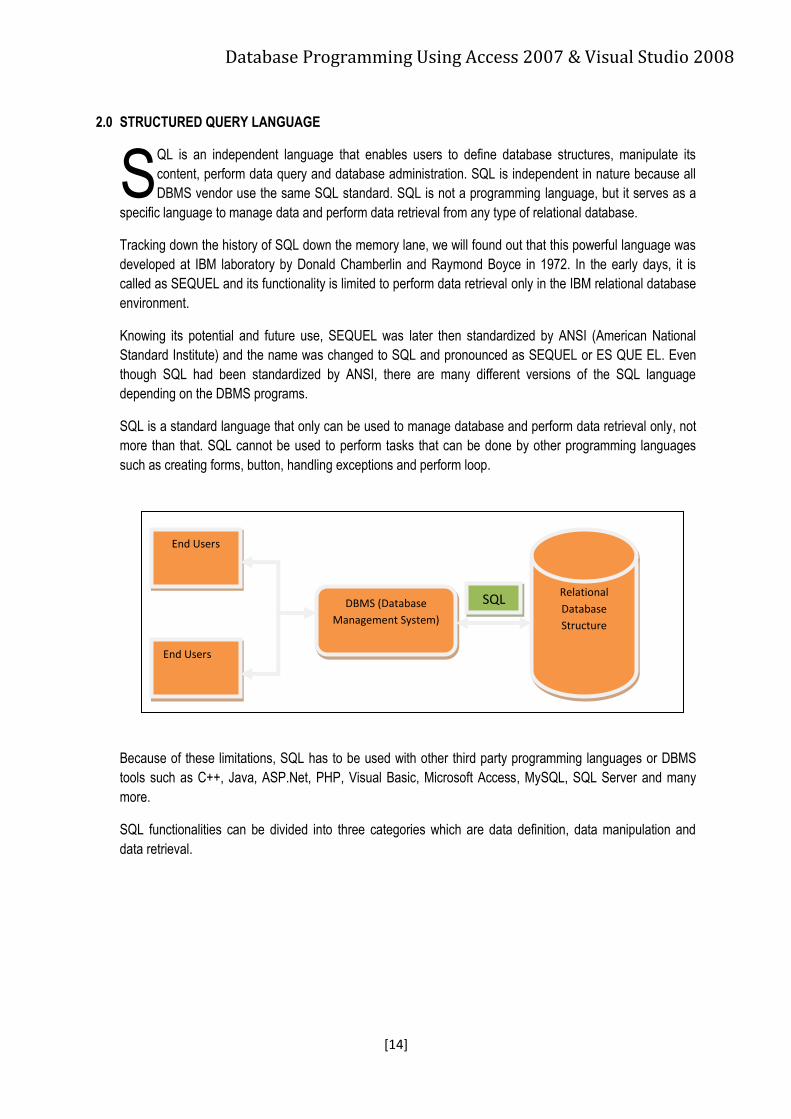
2.0 STRUCTURED QUERY LANGUAGE
QL is an independent language that enables users to define database structures, manipulate its
content, perform data query and database administration. SQL is independent in nature because all
DBMS vendor use the same SQL standard. SQL is not a programming language, but it serves as a
specific language to manage data and perform data retrieval from any type of relational database.
Tracking down the history of SQL down the memory lane, we will found out that this powerful language was
developed at IBM laboratory by Donald Chamberlin and Raymond Boyce in 1972. In the early days, it is
called as SEQUEL and its functionality is limited to perform data retrieval only in the IBM relational database
environment.
Knowing its potential and future use, SEQUEL was later then standardized by ANSI (American National
Standard Institute) and the name was changed to SQL and pronounced as SEQUEL or ES QUE EL. Even
though SQL had been standardized by ANSI, there are many different versions of the SQL language
depending on the DBMS programs.
SQL is a standard language that only can be used to manage database and perform data retrieval only, not
more than that. SQL cannot be used to perform tasks that can be done by other programming languages
such as creating forms, button, handling exceptions and perform loop.
Because of these limitations, SQL has to be used with other third party programming languages or DBMS
tools such as C++, Java, ASP.Net, PHP, Visual Basic, Microsoft Access, MySQL, SQL Server and many
more.
SQL functionalities can be divided into three categories which are data definition, data manipulation and
data retrieval.
S
Relational
Database
Structure
End Users
End Users
DBMS (Database
Management System)
SQL
Database Programming Using Access 2007 & Visual Studio 2008
[15]
2.1 SQL Data Types
Data types for SQL refer to the length and type of the field which is going to be created. SQL data
types are declared together with the database table structure. Below is the common data type that
is used in declaring table structure.
GROUP DATA TYPE USAGE
CHARACTER NUMBER (Long, Decimal) Numbers with specific length and decimal places
INTEGER Numbers without decimal places
NUMBER CHAR (Long) Fixed sized character up to 255 characters.
VARCHAR (Long) Varying size character
DATE DATE Dates in any format
TIME Time in any format
However, this data type is only common when standard SQL is used. Different vendors such as
Access and MySQL provide much more option such as CURRENCY, AUTONUMBER and many
more.
2.2 SQL as Data Definition Language
SQL can be used as a language to define a database. This includes the creation of database, the
creation of database objects such as tables, indexes and views and also performing administration
function on a database such as handling user access, table maintenance and setting up the
primary key for tables.
The basics of data definition language can be divided into three segments which are:
2.2.1 CREATE
Creates database components such as tables, indexes (search key), primary key and
views and also is used to create the database schema.
Examples:
CREATE TABLE Product
[field name] [data type] [constraint]
P_Code INTEGER NOT NULL UNIQUE,
P_Name VARCHAR (50) NOT NULL,
P_Price NUMBER (7,2) NOT NULL
This statement will create the following table structure
Database Programming Using Access 2007 & Visual Studio 2008
[16]
2.2.2 ALTER
Modify existing database components structure such as add new field in table.
Examples:
ALTER TABLE Product
ADD P_Type CHAR(10) NOT NULL ,
ALTER TABLE Product
DROP COLUMN P_Type
2.2.3 DROP
Delete existing database components and is rarely used. This command is normally
used to delete users or table in database.
Examples:
DROP TABLE Product
In this book, data definition language will not be used together with Visual Basic 2008. This is
because most functions of DDL can be done effectively by using Access 2007 interface such as
table creation, altering and deleting tables.
Database Programming Using Access 2007 & Visual Studio 2008
[17]
2.3 SQL as Data Manipulation Language
SQL data manipulation commands deals with the manipulation of data in database tables. Data
manipulation commands in SQL involve three important tasks which are:
2.3.1 Data Insertion
Data insertion command is used to insert new row (records) in a table by using the
INSERT INTO statements. INSERT INTO statements can be written in two options,
the first option is by specifically addressing the field names and the value that will be
inserted in the columns.
Examples:
[table] [table fields] [values]
INSERT INTO Product (P_Code, P_Name) VALUES (‘001’, ‘Pen’)
The second option of writing INSERT INTO statement doesn’t specify the specific
field to be inserted; only their values will be specified. This option is suitable when all
table fields are going to be given a value.
INSERT INTO Product VALUES (‘001’, ‘Pen’, ‘RM1’)
2.3.2 Data Update
Data update command is used to update existing records in table by using the
UPDATE SET statement.
Examples:
UPDATE Product SET P_Name = ‘Pencil’
UPDATE statement must be used together with the WHERE statement, otherwise, all
records in a table will be updated, in these case, all P_Name records in the table will
be changed to ‘Pencil’. The WHERE statement is a special syntax in SQL that is used
to filter records.
UPDATE Product SET P_Name = ‘Pencil’ WHERE P_Code = ‘001’
The above UPDATE statement will only changed the record where P_Code is equal
to ‘001’ only.
Database Programming Using Access 2007 & Visual Studio 2008
[18]
2.3.3 Data Delete
Data deletion command is used to delete existing records in table by using the
DELETE statement.
Examples:
DELETE FROM Product
DELETE statement must be used together with the WHERE statement, otherwise, all
records in the table Product will be deleted and this operation cannot be undo.
DELETE FROM Product WHERE P_Code = ‘001’
Database Programming Using Access 2007 & Visual Studio 2008
[19]
2.4 SQL as Data Query Language
Querying is considered as the most important and common function of SQL. The basic of querying
in SQL use SELECT statement to perform data retrieval from database tables. The results of
SELECT statement is stored in a temporary data reader such as record set (VB 2008) or result set
which also have the same structure in a form of rows and columns.
SQL SELECT statement can be used in a variety of ways and can be combined with multiple
functionalities. That’s why SELECT statement is considered as the most powerful statement in SQL
language.
2.4.1 Basic SELECT
Below is the ‘Product’ table
In order to select P_Code and P_Name from the table above, the SELECT statement
will look like :
SELECT P_Code, P_Name FROM Product
The results will be:
To retrieve all columns, use SELECT with *
SELECT * FROM Product
All columns will be selected.
Database Programming Using Access 2007 & Visual Studio 2008
[20]
2.4.2 SELECT with WHERE
As mentioned before, WHERE statement is used to filter results or in SQL statement.
WHERE statement can be used together with UPDATE, DELETE and SELECT
statement as demonstrated in the UPDATE and DELETE examples.
SELECT statement below will retrieve data where the product type is equal to ‘Pencil’.
SELECT P_Code, P_Name FROM Product WHERE P_Type = ‘Pencil’
Below is the list of operations that can be used with WHERE
Operator Descriptions Examples
= Equal SELECT * FROM Product WHERE P_Type= ‘Pencil’
>,< Greater/smaller than SELECT P_Price FROM Product WHERE P_Price > RM 1
<> Not equal to SELECT * FROM Product WHERE P_Type <> ‘Pencil’
>=,<= Greater/smaller than or equal SELECT P_Price FROM Product WHERE P_Price > RM 1
LIKE Pattern search SELECT * FROM Product WHERE P_Type LIKE ‘Pen%’ *The result will display the list of records which the product type starts with Pen.... This means Pen and Pencil will be listed in the result set. *The % can also be used in front of the character for example %cil. In this case, the result will list product type which ends with the character ‘cil’.
BETWEEN Range search SELECT * FROM Product WHERE P_Price BETWEEN RM1 and RM1.50 *The result of the statement will display the result where product price in within the range of RM1 to RM 1.50 *BETWEEN can also be used to find range between characters, date and numbers.
Database Programming Using Access 2007 & Visual Studio 2008
[21]
WHERE statement can also be used with AND and OR conditions.
SELECT P_Code, P_Name FROM Product WHERE P_Type = ‘Pencil’ OR P_Type =
‘Pen’
The statement above will display the product code and name where the type is either
‘Pen’ or ‘Pencil’.
SELECT P_Code, P_Name FROM Product WHERE P_Type = ‘Pencil’ AND P_Price
= RM 1.00
The statement above will display the record which the type is equal to Pencil and the
price is equal to RM 1.00.
2.4.3 SELECT with ORDER BY
Although simple in nature, ORDER BY is one of the most useful functions of SQL.
ORDER BY can be used to sort records in ascending or descending mode. ORDER
BY statement located at the end of SELECT statement.
SELECT * FROM Product ORDER BY P_Code Asc
ASC stands for ascending order by DESC stands for descending order.
Database Programming Using Access 2007 & Visual Studio 2008
[22]
2.4.4 SELECT with FUNCTIONS
SQL has many useful functions that can be used either to perform calculations, string
operations or formatting. Below is the list of some useful SQL functions that can be
used together with SELECT statement.
Functions Descriptions Examples
AVG Calculate average SELECT AVG (P_Price) AS AvgPrice FROM Product
SUM Accumulate sum SELECT SUM (P_Price) AS SumPrice FROM Product
COUNT Count number of records SELECT COUNT (*) AS RecCount FROM Product
MAX Find maximum value SELECT MAX (P_Price) AS MaxPrice FROM Product
MIN Find minimum value SELECT MIN (P_Price) AS MinPrice FROM Product
FIRST Search for first value SELECT FIRST (P_Code) AS FirstCode FROM Product
LAST Search for last value SELECT LAST (P_Code) AS LastCode FROM Product
2.4.5 SELECT with GROUP BY
The GROUP BY statement is very useful in grouping the result set in one or more
columns. GROUP BY statement is normally used with aggregate functions.
P_Id PurchaseDate PurchasePrice Customer
1 2008/11/12 1000 Hisham
2 2008/10/23 1600 Hadzrami
3 2008/09/02 700 Hisham
4 2008/09/03 300 Hisham
5 2008/08/30 2000 Raudah
6 2008/10/04 100 Hadzrami
GROUP BY statement can be used in the above situation to group the result for example to find the total purchase of each customer.
SELECT Customer,SUM(PurchasePrice) FROM Purchases GROUP BY Customer
The result-set after the SQL statement had been executed will look like this:
Customer SUM(PurchasePrice)
Hisham 2000
Hadzrami 1700
Raudah 2000
Database Programming Using Access 2007 & Visual Studio 2008
[23]
Chapter Exercise :
The contents of Product table are as follows:
Product
Code Name Model Siz
e QtyOnHand
Reorder
Qty
Pric
e Vendor
2407WF
P
Ell 24" 2407WFP TFT LCD Monitor Ell 24 6 2 249
9
ABC S/B
AL2216
W
Acer 22" AL2216W LCD Monitor Acer 22 3 2 129
9
M Ent
BFP73
G
BenQ 17" FP73G+ TFT LCD Monitor BenQ 17 2 2 599 M Ent
BFP92
W
BenQ 19" FP92W TFT LCD Monitor BenQ 19 5 2 639 M Ent
Database Programming Using Access 2007 & Visual Studio 2008
[24]
REQUIRED:
(a) Write the SQL code to display the 17” (inches) monitors that have reached or exceeded the
reorder quantity as shown in Query1 table below.
Query1
Name Model Price
BenQ 17" FP73G+ TFT LCD
Monitor
BenQ 599
LG 17" L1752S TFT LCD
Monitor
LG 575
(b) Write the SQL code to display the monitors which price is above RM1000 as shown in Query2
table below.
Query2
Name Model Price
Acer 22" AL2216W LCD Monitor Acer 1299
Ell 24" 2407WFP TFT LCD Monitor Ell 2499
(c) Write the SQL code to change the reorder quantity from 2 units to 3 units for all models.
(d) Write the SQL code to delete a record for monitor with the product code L1952S.
(e) Write the SQL code to insert the following data.
Code Name Model Siz
e QtyOnHand
Reorder
Qty
Pric
e Vendor
1999E Dell Studio Laptop Dell 14 7 3 249
9
MHS/AM
Database Programming Using Access 2007 & Visual Studio 2008
[25]
Chapter Summary
Database Programming Using Access 2007 & Visual Studio 2008
[26]
CHAPTER 3:
DATABASE
PROGRAMMING USING
OLEDB TECHNIQUE
After you have completed this
chapter, you should be able to:
Establish database
connection between
Visual Basic and Access
Perform database
manipulation and query
using VB and SQL
statement.
Use components such as
Data Grid and List View
to perform database
manipulation.
Database Programming Using Access 2007 & Visual Studio 2008
[27]
3.0 DATABASE PROGRAMMING USING OLEDB TECHNIQUE
3.1 Database Connectivity
In this part, we will learn about the objects that we can use to open and read data from a database. We
will be using MS Access 2007 as our database.
The Connection Object
We need to establish connection to a database before your application can manipulate the database
such data insertion, deleting, updating or searching. So we need a Connection Object to enable us to
connect to a database.
There are a number of different connection objects, and it depends largely on the type of database
you're connecting to. For our application, we will be using MS Access 2007 database, so we will need
something called the OLE DB connection object.
OLE stands for Object Linking and Embedding that allow you to connect to data sources in general, and
not just databases. You can use it, for example, to connect to text files, SQL Server, email, etc.
There are a number of different OLE DB objects (called data providers), because we are using Access
2007, so we will use "Microsoft.ACE.OLEDB.12.0". (Note: If you’re using MS Access 2003 version you
have to use Microsoft.Jet.OLEDB.4.0 data provider).
Database Programming Using Access 2007 & Visual Studio 2008
[28]
Establishing Database Connection
Let us begin our lesson on how to create connection to a database.
Create a new project and renamed it as OleDBExample.
Click File Save All, to save your project.
Browse the location you want to store your project.
Explanation: In this example, the project is saved inside My Documents folder. You can change the
location/directory where you want to save your project.)
Database Programming Using Access 2007 & Visual Studio 2008
[29]
Open your Windows Explorer and look for OleDBExample folder.
Double click the folder and you will see your folder as follows.
Now, we’re going to create/add Data folder inside bin folder.
Double click the bin folder, add a new folder and rename it as Data.
The next step is to copy your database file that you have created in the previous section into the Data
folder.
Find the Sales.accdb file in My Documents folder, right-click, cut the file and paste it inside the Data
folder.
You should be able to see Sales.accdb inside the Data folder.
Database Programming Using Access 2007 & Visual Studio 2008
[30]
Interface Design
Back to our Project, place a button on your form and set the Name and Text properties to LoadButton
and Load accordingly.
Double click your button to open up the code window. Add the following codes:
Const cnString As String = "PROVIDER=Microsoft.ACE.OLEDB.12.0;Data Source = ..\Data\Sales.accdb"
Dim con As OleDb.OleDbConnection
con = New OleDbConnection(cnString)
con.Open()
MsgBox("A Connection to the Database is now open")
con.Close()
MsgBox("The Connection to the Database is now Closed")
Note: If you are using Access 2003, replace the first line with the following code:
Const cnString As String = "PROVIDER=Microsoft.Jet.OLEDB.4.0;Data Source = ..\Data\Sales.accdb"
Database Programming Using Access 2007 & Visual Studio 2008
[31]
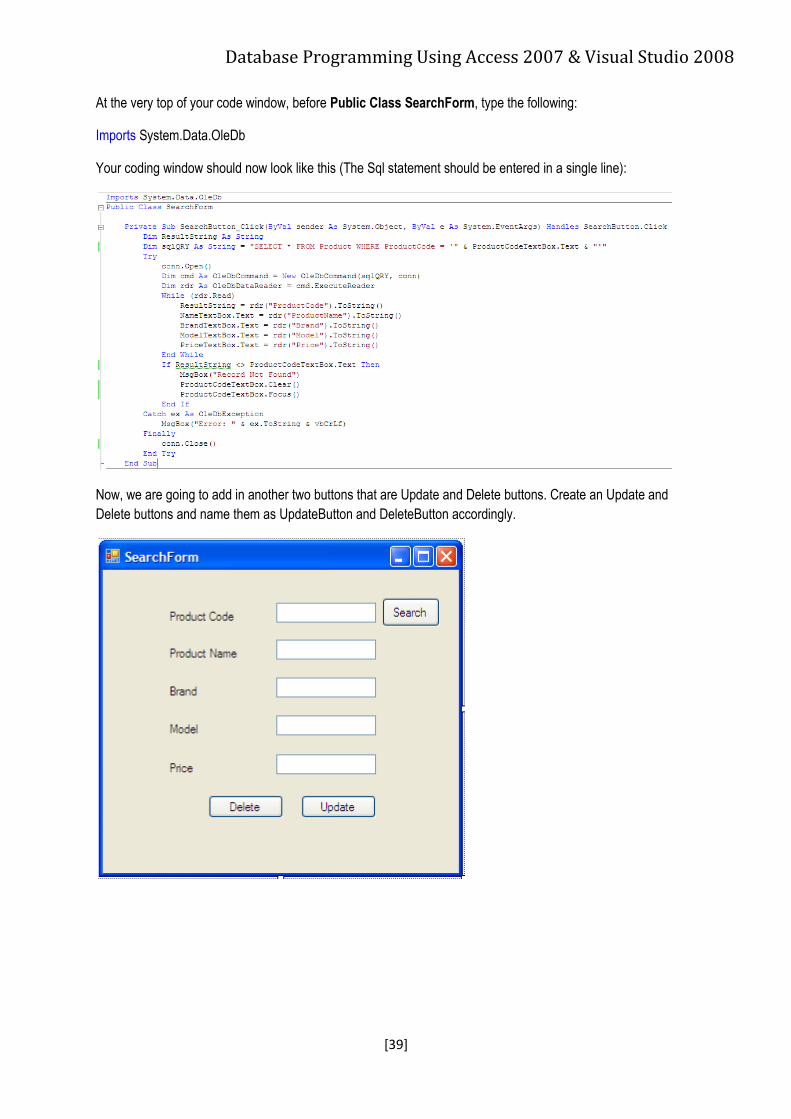
At the very top of your code window, before Public Class Form 1, type the following:
Imports System.Data.OleDb
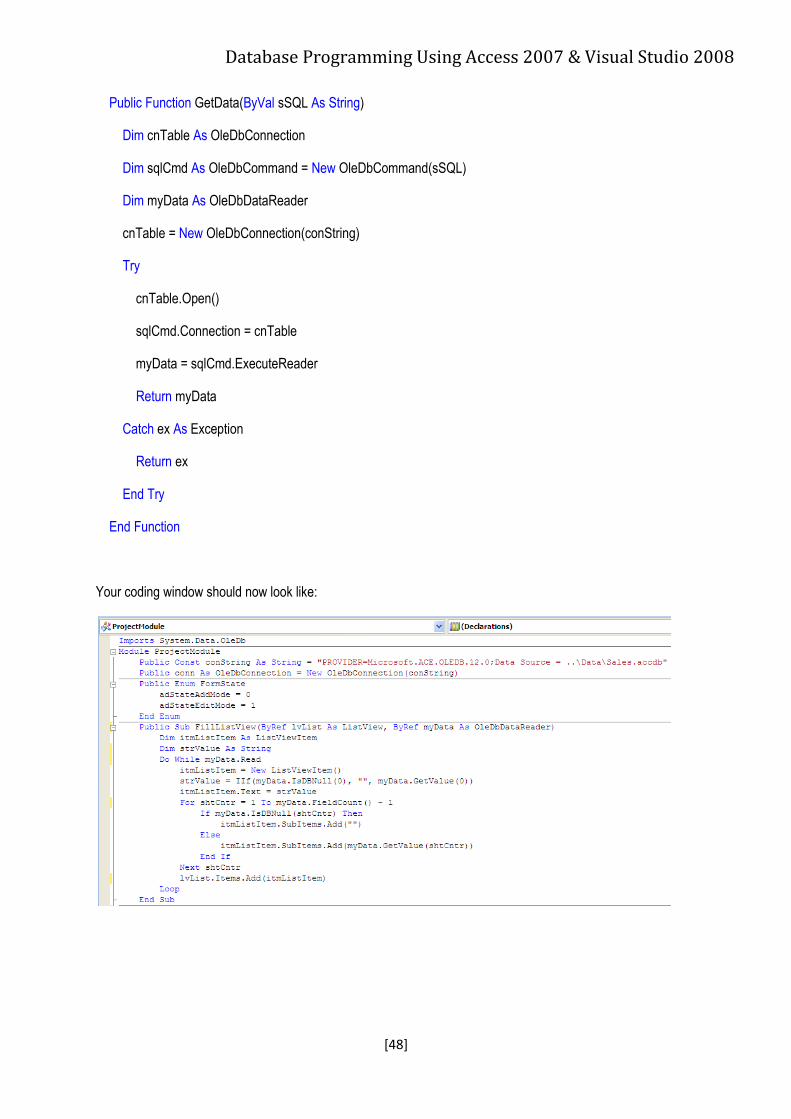
Your coding window should now look like this:
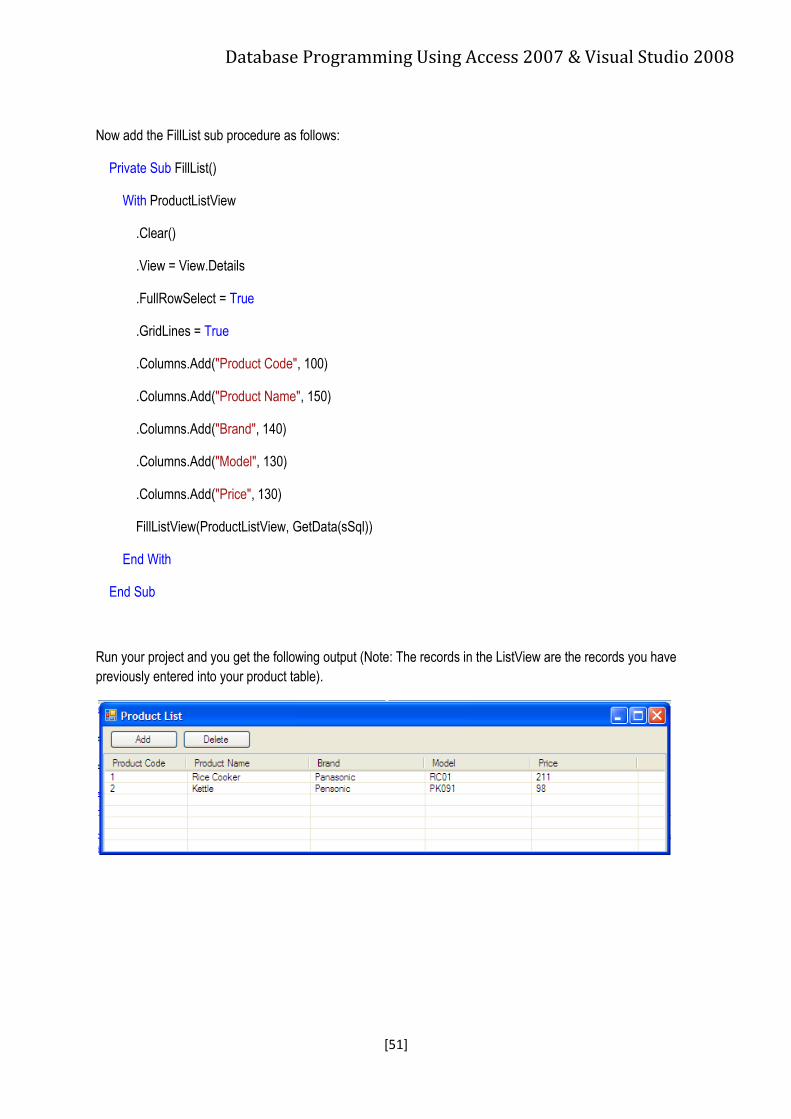
Test out your code by running your program.
Click Load button and the following message boxes should display to show the connection to the database is
open. Click OK and you will see the second message box.
Troubleshooting: If the message box does not appear, make sure your Data Source path is correct. The
database file (Sales.accdb) should be located inside Data folder, Data folder should be located inside bin folder
and bin folder should be located inside OleDBExample folder as follows.
Database Programming Using Access 2007 & Visual Studio 2008
[32]
Explanation:
If we look at the code below, we will notice that there are two things stated in the Connection Object: the
technology to do the connecting to our database; and the location of the database. The technology is called the
Provider; and you use "Data Source" to specify where your database is.
Notice the two parts, separated by a semi-colon:
1st Part: PROVIDER= Microsoft.ACE.OLEDB.12.0 2nd Part: Data Source = ..\Data\Sales.accdb
The first part specifies which provider technology we want to use to do the connecting which is ACE (For Access 2003, the provider technology is Jet). The second part, typed after a semi-colon, points to where the database is. In the above code, the database is in the Data folder which is inside bin folder and inside OleDBExample (your project) folder. The name of the Access file we want to connect to is called Sales.accdb.
Database Programming Using Access 2007 & Visual Studio 2008
[33]
3.2 Database Manipulation & Query
In previous section, you have learned on how to establish connection to database. In the next section, we will
look into how to Insert, Update and Delete record.
Adding Project Module
We have seen that whenever the application wants to interact with the database, we need to establish the
database connection. Therefore, every form that we want to add into the project, which interact with the
database, must include the following code.
Const cnString As String = "PROVIDER=Microsoft.ACE.OLEDB.12.0;Data Source = ..\Data\Sales.accdb"
Dim con As OleDb.OleDbConnection
con = New OleDbConnection(cnString)
In order to simplify the code, the best practice is, we add a module into our project and write the code which we
will be using repeatedly in the module.
Click Project Add Module
Rename the module name as ProjectModule and click Add.
Inside the module, add in the following line (Note: The statement should be in a single line and not three as it is
below):
Database Programming Using Access 2007 & Visual Studio 2008
[34]
Public Const conString As String = "PROVIDER=Microsoft.ACE.OLEDB.12.0;Data Source =
..\Data\Sales.accdb"
Public conn As OleDbConnection = New OleDbConnection(conString)
At the very top of your code window, before Module ProjectModule, type the following:
Imports System.Data.OleDb
Your coding window should now look like this:
Insert New Record.
Previously, you have created database named Sales.accdb with three tables, Product, Customer and
SalesOrder. So now, we are going to create a form that will serve as an interface for user to add new record into
the Product table.
Add new windows form and rename it as InsertProductForm.
Add five TextBox on the form as the number of fields in Product table is five. Set the Name properties as follows:
Database Programming Using Access 2007 & Visual Studio 2008
[66]
4.3 Step 3 : Adding project components
The third step involves establishing connections and database variables that is going to be used in
the project. All the connection properties and public variables will be stored in a module.
In order to create a module, click at the add new item icon and click at add module.
The default name for the module is Module1.vb, rename the module as dbConnection.vb to make it
more meaningful.
In order to use ADODB components, it has to be initialized, to do this, go to Project -> Add
Reference and click at adodb then click ok. This step is very important because adodb components
will not be feasible throughout the project if it’s not been initialized.
Database Programming Using Access 2007 & Visual Studio 2008
[67]
4.4 Step 4 : Variable declaration
By adding adodb components, we can use its object in this project, but before it can be used, it has
to be declared. Below are the list of adodb objects that is going to be used in the project and its
declaration. Note that all the declaration had to be done in the dbConnection module.
Object Description Declaration
Recordset Used to hold a set of records from database table in rows and columns format.
Public rec1 as ADODB.recordset
Connection Create a connection to database. Public con as ADODB.connection
Besides ADODB variables, there are also other variables that will be used throughout the project.
Below are the common variables that are used in a database programming project.
Description Data Type Declaration
Used to hold the connection string String Public strConnection as String
Used to hold SQL statement String Public strSQL as String
Used to hold user name, password and level field
String Public strUserName, strPassword, strLevel as String
All variable declaration should be done on the declaration section.
Database Programming Using Access 2007 & Visual Studio 2008
[68]
4.5 Step 5 : Connection String & Data Source
In order to create a connection with the database (in this case the database is dbADOExample),
the connection string and the data source has to be establish in the module.
Code Description Public Sub conn() Sub procedure header Con = New ADODB.Connection Initializing connection object Con.ConnectionString = "PROVIDER=Microsoft.ACE.OLEDB.12.0;Data Source = C:\Users\hishamuum\Documents\dbAdoExample.accdb"
Setting up the connection string provider. For Access 2007, the provider is Microsoft.Ace.OLEDB.12.0 Data source is the path where the database is being kept.
Con.Open() Opening the connection rec1 = New ADODB.Recordset Initializing recordset object End Sub Closing procedure header
Public rec1 As ADODB.Recordset
Public Con As ADODB.Connection
Public strConnection As String
Public strUserName As String
Public strPassword As String
Public strLevel As String
Public strSql As String
Public Sub conn()
Con = New ADODB.Connection
Con.ConnectionString =
"PROVIDER=Microsoft.ACE.OLEDB.12.0;Data Source =
C:\Users\hishamuum\Documents\dbAdoExample.accdb"
Con.Open()
rec1 = New ADODB.Recordset
End Sub
4.6 Step 6 : Connection State
When performing query, the connection state of recordset is important, each time a query is
executed, the recordset must be not be in active state. To ensure this, a procedure has to be
created and this procedure must be called each time a query is executed to ensure that the correct
state of the recordset is in place. The code is as below and also located in dbConnection module.
Public Sub checkConn()
If rec1.State = 1 Then rec1.Close()
End Sub
Database Programming Using Access 2007 & Visual Studio 2008
[69]
4.7 Step 7 : Form Code
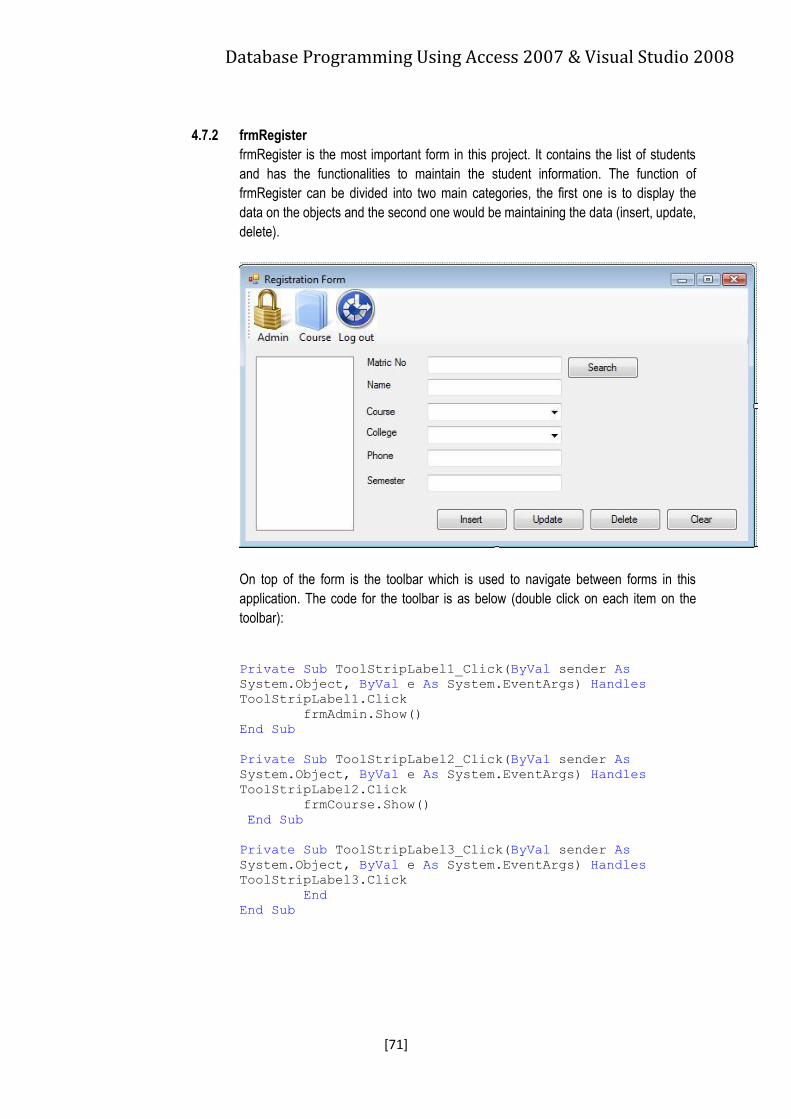
4.7.1 frmLogin
There are two important events that has to be coded in the frmLogin. The first one is
form load event and the second would be the buttons click event.
Form Load:
Double click anywhere (except on the objects such as text box) on the form and form
load event header will be generated. In this event, call the procedure conn from the
dbConnection module by writing its name to establish the connection with the
database (dbADOExample.accdb).
Public Class frmLogin
Private Sub frmLogin_Load(ByVal sender As
System.Object, ByVal e As System.EventArgs) Handles
MyBase.Load
conn()
End Sub
End Class
Login button:
Double click on top of the login button and the click event header for login button will
be generated.
Private Sub cmdLogin_Click(ByVal sender As System.Object,
ByVal e As System.EventArgs) Handles cmdLogin.Click
End Sub
Validating the input
If txtUserName.Text = "" Or txtPassword.Text = "" Then
MsgBox("Incomplete Login Information, Please Try
Again")
Exit Sub
End If
The block of code above is to ensure system user cannot enter the system if the user
name or password text box is empty.
Database Programming Using Access 2007 & Visual Studio 2008
[70]
Retrieve user information to perform authentication
checkConn()
strSql = "SELECT * FROM tblLogin WHERE UserName='" &
Database Programming Using Access 2007 & Visual Studio 2008
[76]
Performing Data Manipulation
Performing data manipulation in this application involves the use of three important
SQL commands for data manipulation which are; INSERT, UPDATE and DELETE.
The data manipulation function will be done through the click event of command
button.
UPDATE & DELETE existing data
After selecting which data to be edited, the next process is to write the SQL statement
to execute the UPDATE operation. Double click cmdUpdate and cmdDelete Button
and write the following code:
Private Sub cmdUpdate_Click(ByVal sender As
System.Object, ByVal e As System.EventArgs) Handles
cmdUpdate.Click
strSql = "UPDATE tblRegistration SET StudName='"
& txtName.Text & "',StudPhone='" & txtPhone.Text
& "',StudSem='" & txtSemester.Text & "' WHERE
StudMatric='" & strStudMatric & "'"
Con.Execute(strSql)
loadList()
End Sub
Field involves in the update process are StudName, StudPhone and StudSem. strStudMatric variable which is retrieved when the list is selected is used as the condition. loadList() procedure is called to refresh the list each time UPDATE and DELETE statement is being executed.
Field involves in the update process are StudName, StudPhone and StudSem. strStudMatric variable which is retrieved when the list is selected is used as the condition in the UPDATE and DELETE statement. All text boxes is being cleared after the deletion process.
Private Sub cmdDelete_Click(ByVal sender As
System.Object, ByVal e As System.EventArgs) Handles
cmdDelete.Click
strSql = "DELETE FROM tblRegistration WHERE
StudMatric='" & strStudMatric & "'"
Con.Execute(strSql)
txtMatricNo.Text = ""
strStudMatric = ""
txtName.Text = ""
cmbCourse.Text = ""
cmbCollege.Text = ""
txtPhone.Text = ""
txtSemester.Text = ""
loadList()
End Sub
Database Programming Using Access 2007 & Visual Studio 2008
[77]
INSERT new data
Inserting new data to the table involves the use of SQL INSERT statement. Try the
following code to insert new data in the tblRegistration.
Private Sub cmdInsert_Click(ByVal sender As
System.Object, ByVal e As System.EventArgs) Handles