75
Datacard ® SD/CD Series Card Printers OpenCard Data Format Guide November 2012 Part No. 527262-001 Rev. B
Datacard® SD/CD Series Card PrintersOpenCard Data Format Guide
November 2012
Part No. 527262-001 Rev. B

NoticeRefer to the notices in the SD/CD Series Card Printers Installation and User Guide.
Please do not attempt to operate or repair this equipment without adequate training. Any use, operation, or repair in contravention of this document is at your own risk. Datacard assumes no liability for incidental, special, or consequential damage of any kind.
Proprietary NoticeAll drawings and information herein are the property of DataCard Corporation. All unauthorized use and reproduction is prohibited.
Trademark AcknowledgmentsDatacard is a registered trademark and service mark of DataCard Corporation in the United States and other countries.
Chrome browser is a trademark of Google, Inc. Google is a registered trademark of Google, Inc.
inkscape is a registered product and trademark of inkscape.
Mozilla Firefox is a registered trademark of Mozilla.
SVG is a trademark (registered in numerous countries) of the World Wide Web Consortium; marks of the SVG are registered and held by its host institutions MIT INRIA and Keio.
Windows is a registered trademark of Microsoft Corporation.
XML is a trademark of MIT and a product of the World Wide Web Consortium (SVG).
All other product names are the property of their respective owners.
Datacard Group11111 Bren Road WestMinnetonka, MN 55343-9015Phone: 952-933-1223Fax: 952-933-7971www.datacard.com
© 2012 DataCard Corporation. All rights reserved.Printed in the United States of America.
ii

Revision LogSD and CD Series Printers OpenCard Data Formatting Guide
Revision Date Description of Changes
A June 2012 First release of this document.
B November 2012
iii

iv

Table of Contents
Chapter 1: About this Manual ______________________________________________ 1Organization___________________________________________________________________ 2Intended Audience ____________________________________________________________ 3Conventions this Manual Uses___________________________________________________ 4Related Publications ___________________________________________________________ 4
Chapter 2: Getting Started _________________________________________________ 5SD/CD Series Card Printers Option_______________________________________________ 5Legacy Option for Card Layouts from SP/CP Series Printers________________________ 7Printer Manager Tools __________________________________________________________ 8OpenCard Requirements _______________________________________________________ 8
Printer Requirements________________________________________________________ 8Network Requirements______________________________________________________ 8Other Requirements ________________________________________________________ 9
Enabling and Disabling OpenCard ______________________________________________ 9Enabling or Disabling OpenCard with the Printer’s LCD Menu _________________ 9Enabling OpenCard with Printer Manager __________________________________ 10Disabling OpenCard with Printer Manager __________________________________ 11
Setting Up a Generic/Text Driver with OpenCard Printers_________________________ 12Generic/Text Driver for Networks ___________________________________________ 12Generic/Text Driver for USB _________________________________________________ 16
Chapter 3: Creating Card Formats _________________________________________ 17About Card Formats for the SD/CD Series Printers________________________________ 17
Card Personalization Process Overview _____________________________________ 17The Card Format as an SVG Document_____________________________________ 18Card Format Structure and Conventions ____________________________________ 18
Naming a Card Format in the Data Stream______________________________ 19Naming Card Stock in the Data Stream _________________________________ 19ID Naming Conventions ________________________________________________ 20
Adding Elements to the Card Format ___________________________________________ 21Card Side Layers __________________________________________________________ 21Re-Mapping Data Characters with datacard:translations____________________ 21
Hexadecimal Notation for Translations __________________________________ 21Personalization Operations _________________________________________________ 23
Defining Monochrome for Text and Graphics ____________________________ 24Defining Color for Text and Graphics ____________________________________ 25Defining Topcoat Application __________________________________________ 26Defining Magnetic Stripe Tracks_________________________________________ 27Flipping the Personalization Operation with the datacard:flip Attribute____ 28
Adding Text and Image Layers _____________________________________________ 29Defining Text ID Layers _____________________________________________________ 29
Dynamic Text Elements_________________________________________________ 29
v

Static Text Elements ____________________________________________________ 30x Attribute _____________________________________________________________ 30y Attribute _____________________________________________________________ 30Font-Family Attribute ___________________________________________________ 30Font-Size Attribute______________________________________________________ 30Font-Weight Attribute __________________________________________________ 31Fill Attribute ____________________________________________________________ 31Transform Attribute (Rotating Text) ______________________________________ 31datacard:staticElement Attribute _______________________________________ 31datacard:appendData Attribute _______________________________________ 31datacard:format Attribute______________________________________________ 32datacard:remove Attribute ____________________________________________ 33Text Element Layer Example ____________________________________________ 33
Using Bar Code-Specific Attributes__________________________________________ 36datacard:barcode Attribute ___________________________________________ 36datacard:barRatio Attribute____________________________________________ 37datacard:barDensity Attribute__________________________________________ 37datacard:barHumanReadable Attribute ________________________________ 38datacard:barChecksum Attribute ______________________________________ 38
Defining Image Element Layers_____________________________________________ 39Defining Image ID Names ______________________________________________ 39datacard:positionReference Attribute __________________________________ 39x Attribute _____________________________________________________________ 40y Attribute _____________________________________________________________ 40Height Attribute________________________________________________________ 40Width Attribute ________________________________________________________ 40Transform Attribute (Rotating Images) ___________________________________ 40Defining the Image Name with xlink:href ________________________________ 41
Chapter 4: Exporting Legacy Card Layouts, Graphics, and Fonts ____________ 43Exporting Card Layouts from Legacy Series Printers with Telnet ___________________ 43Using Legacy Graphic/Logo Files ______________________________________________ 47Using Legacy Fonts____________________________________________________________ 48
Chapter 5: Working with Printer Manager___________________________________ 49Opening Printer Manager______________________________________________________ 49Importing a Card Format or Card Layout File____________________________________ 51Exporting a Card Format or Card Layout File ____________________________________ 52Importing a Graphic/Logo File _________________________________________________ 53Exporting a Graphic/Logo File _________________________________________________ 54Importing Fonts _______________________________________________________________ 55Exporting Fonts________________________________________________________________ 56Adding a Card Stock Definition ________________________________________________ 57Viewing the Print Request Log __________________________________________________ 58Viewing the OpenCard Data Stream ___________________________________________ 60
Chapter 6: Printing Cards__________________________________________________ 61
vi

Appendix A: Sample Card Formats ______________________________________________ A-1Sample 1—Multipanel Graphics.svg__________________________________________ A-1Sample 2—RiverViewCasino.svg _____________________________________________ A-3
Appendix B: Setting Up OS/400 __________________________________________________________________ B-1
Configuring the OS/400 Operating System _____________________________________ B-1
vii
Chapter 1: About this Manual
The chapter covers how this guide is organized, who should read this guide, and the conventions this guide uses.
This manual details system requirements, formatting, and printing features of OpenCard Data Format for the Datacard® SD/CD Series Card Printers, including support for the following card printer models:
• SD360
• CD800
This manual provides information for two options: the SD/CD Series Card Printers Option, used for printing cards using card format files created with Scalable Vector Graphics standard (SVG), and the Legacy Option, used for printing legacy card layouts originally created for the SP/CP Series printers.
SD/CD Series Card Printers OpenCard Data Format Guide 1
OrganizationInformation in this manual is organized as follows:
• Chapter 1, “About this Manual” on page 1—Contains information about this manual’s organization, its intended audience, and the conventions it uses.
• Chapter 2, “Getting Started” on page 5—Contains an overview of using OpenCard Data Format with the SD/CD Series card printers and the Legacy Option for SP/CP Series printers. It includes requirements for using OpenCard and initial setup procedures.
• Chapter 3, “Creating Card Formats” on page 17—Includes the information about how to create card formats for use with SD/CD Series card printers.
• Chapter 4, “Exporting Legacy Card Layouts, Graphics, and Fonts” on page 43—Includes information and procedures for using existing card layouts originally created for SP/CP Series printers to print on SD/CD Series card printers with OpenCard.
• Chapter 5, “Working with Printer Manager” on page 49—Explains how to set up the printer to work with OpenCard card formats.
• Chapter 6, “Printing Cards” on page 61—Provides information about printing cards on SD/CD card printers with OpenCard.
• Appendix A, “Sample Card Formats” on page A-1—Provides working samples of card formats.
• Appendix B, “Setting Up OS/400” on page B-1—Provides information about how to set up an existing OS/400 system to work with OpenCard.
2 About this Manual

Intended AudienceThis manual is intended primarily for personnel who create and manage files for card formats and data streams, referred to in this guide as card format designers.
Card format designer’s prior knowledge:
• Have a general idea of the appearance and content of the card formats they are defining.
• Understand the type of data to be printed on the cards (text, bar codes, logos).
• Be familiar with printer ribbons and ribbon panels (such as YMCKT ribbon panels).
• Be familiar with the source of the data to be printed on cards.
• Know how to use a command line, browser application, and how to work over a network.
Card format designer’s job responsibilities using OpenCard:
• Work with the Datacard Printer Manager browser menus to view and manage posted card format files, images, fonts, and font families.
• Card format designers who use the Legacy Option create card layouts for printing on Datacard SP55, SP60, CP60, and FP65 model printers and export these card layouts using Telnet. These designers use Printer Manager to import card layouts, fonts, and images to the SD/CD Series card printers.
• Card format designers who use the SD/CD Series card printers create card formats in Scalable Vector Graphics (SVG) markup language and use Printer Manager to import card formats, fonts, and images to the SD/CD Series card printers.
SD/CD Series Card Printers OpenCard Data Format Guide 3

Conventions this Manual UsesThis manual uses the conventions described in this section.
Related PublicationsFor details about the data stream, Telnet, or the original card layout file created for SP/CP Series card printers, refer to the OpenCard Data Formatting Guide (part number 539397-001 Rev D, dated November 2007). That manual supports the SP55, SP60, CP60, or FP65 card printers.
Convention Meaning
SD/CD Series References Datacard SD360 and CD800 card printers.
Legacy Option References Datacard SP/CP Series printers, including the SP55, SP60, CP60, and FP65 card printers.
<1234567890> Text displayed in this manual using the style at left is data stream content. Braces display at the start (<) and end (>), and text (1234567890) indicates data stream text.
Card layout This term refers to the card layout files originally created for use with Legacy SP55, SP60, CP60, or FP65 (SP/CP Series) card printers. Used to describe options and procedures for the OpenCard Legacy Option. For more about the original card layouts for printers, refer to the Data Formatting Guide.
Card format Document providing the instructions for card appearance and content. Uses Scalable Vector Graphics (SVG) standard markup language. Used for SD/CD Option.
4 About this Manual
Chapter 2: Getting Started
The chapter provides an overview of using the SD/CD Series printers with OpenCard Data Format, as well as an overview of the Legacy Option for converting existing card layouts from SP/CP Series printer card layouts. It also explains the requirements for using OpenCard and initial start up procedures.
The SD/CD Series card printers with OpenCard Data Format provide you with the following options:
• SD/CD Series Option — Provides enhanced text and graphics capabilities. Create a card format file in Scalable Vector Graphics (SVG) markup language, and import it for use with SD/CD Series card printers.
• Legacy Option for Using SP/CP Series Card Layouts — Provides compatibility with card layouts originally created for the Datacard SP55, SP60, CP60, or FP65 card printers with OpenCard. Export existing card layouts originally created for a legacy SP/CP Series card printer and import them to the SD/CD Series card printer for use with OpenCard.
• Printer Manager —Provides a browser-based set of menus for managing print operations for either option listed above. This guide provides an introduction to Printer Manager features relevant to OpenCard.
SD/CD Series Card Printers OptionFor SD/CD Series card printers, you create card formats saved as Scalable Vector Graphics (SVG) documents with any text editor or SVG-specific tool, such as SVG-edit. Using these card formats plus the data stream, OpenCard extracts text and magnetic stripe data from the data stream and places this data on cards in according to the appearance and location specifications you define in the card format. Rotate text, graphics, and bar codes individually, or rotate the entire design.
The SD/CD Series card printers option includes:
• The use of card formats written in SVG markup language
• Support for Unicode and ASCII data streams. Any host computer that can generate a Unicode or ASCII data stream and send it to a direct socket connection can send card data using OpenCard. (The printer does not support the Extended Binary Coded Decimal Interchange (EBCDIC) character set.)
Card formats designed with the SD/CD Series option are not supported on SP/CP Series printers.
SD/CD Series Card Printers OpenCard Data Format Guide 5
• Support for any operating system, including Windows, Linux, UNIX, etc.
• Front and back monochrome or color printing, and front and back topcoat
• ISO magnetic stripe tracks 1 – 3
• Support for manual card insertion at prompting
• Support for TrueType fonts and bar code fonts stored on the printer
Use text font typefaces that include but are not limited to typefaces within font families for Courier, Sans, and Serif, which come bundled with the printer. Define any size for fonts, within the practical limits of the card size and the font families installed on the printer.
Bar code font typefaces are bundled with the printer. They include but are not limited to:
• Support for a wide variety of image formats stored on the printer, including:
• Code39 • UPCA • EAN13
• Code128 • EAN8
• JPEG • TGA • PBM • XPM
• SVG • PNG • XBM • PPM
• MNG • TIFF • PGM
6 Getting Started

Legacy Option for Card Layouts from SP/CP Series PrintersIf your organization currently sends data tagged with OpenCard commands to an SP/CP Series card printer or embosser, you can use the same data stream to produce cards using the Legacy Option features shown in this guide. With the Legacy Option, you export the legacy card layouts originally created for a SP/CP Series card printer, and then import those card layouts and their graphics and fonts to the SD/CD Series card printer.
The Legacy Option supports OpenCard production data formatting containing text and magnetic stripe data items, as well as card layout selection.
Using the Legacy Option with OpenCard, legacy card layouts maintain their original capabilities:
• Front-side monochrome black printing of text, bar codes, and graphics on a single-sided, landscape-oriented card.
• Import up to four black-and-white image files to the printer. The printer does not provide the ability to download a different logo or graphic for each card.
• ISO magnetic stripe tracks 1, 2 and 3
• Printer-resident fonts, font-families and bar codes
To use the Legacy Option to produce cards on the SD/CD Series card printers, you must use text sizes and font typefaces that are available on the Legacy Series printers. These typefaces are within font families for Courier, Sans, and Serif, and are installed on SD/CD Series card printers.
Bar code font typefaces are also bundled with the Legacy Series printers. They include the following:
A note about printing The Legacy Option supports monochrome printing on one side of the card. On color printers, if you use a full-color ribbon in the printer when you send OpenCard data, the printer uses only the K panel in the ribbon. The color panels will not be used.
• Code39 • UPCA • EAN13
• Code128 • EAN8
SD/CD Series Card Printers OpenCard Data Format Guide 7

Printer Manager ToolsPrinter Manager is a browser-based utility for configuring and managing print jobs at the printer. Use Printer Manager to:
• Import the Scalable Vector Graphics (SVG) card format or SP/CP Series printers’ legacy OpenCard card layouts to the printer
• Import virtually unlimited images to the printer
• List, import, export, and delete card formats, fonts and font families, and card stocks
OpenCard RequirementsThe following components must be in place to use the SD/CD Series card printers with OpenCard Data Format.
Printer Requirements
Use any of the following SD/CD Series card printers fitted with the OpenCard Data Format option.
• SD360
• CD800
Network Requirements
Access or use these printers on networks set up with:
• Computers that are using Transmission Control Protocol/Internet Protocol (TCP/IP) communications.
• Web browsers installed on networked computers.
8 Getting Started
Other Requirements• If your organization uses the Legacy Option, you need a Telnet interface that provides card
layout menus for exporting existing SP/CP Series card layouts.
• For additional information on system set up requirements, except as noted in this guide, refer to your printer’s Installation and Administrator’s Guide.
Enabling and Disabling OpenCardThe printer’s OpenCard option is activated upon shipment. Should you require to disable or enable the OpenCard option, you can do this either from the printer’s LCD menu or from Printer Manager.
Enabling or Disabling OpenCard with the Printer’s LCD Menu
Use the following procedure to enable OpenCard for SD/CD Series printers from the front panel LCD menu.
1. Enter the menu system.
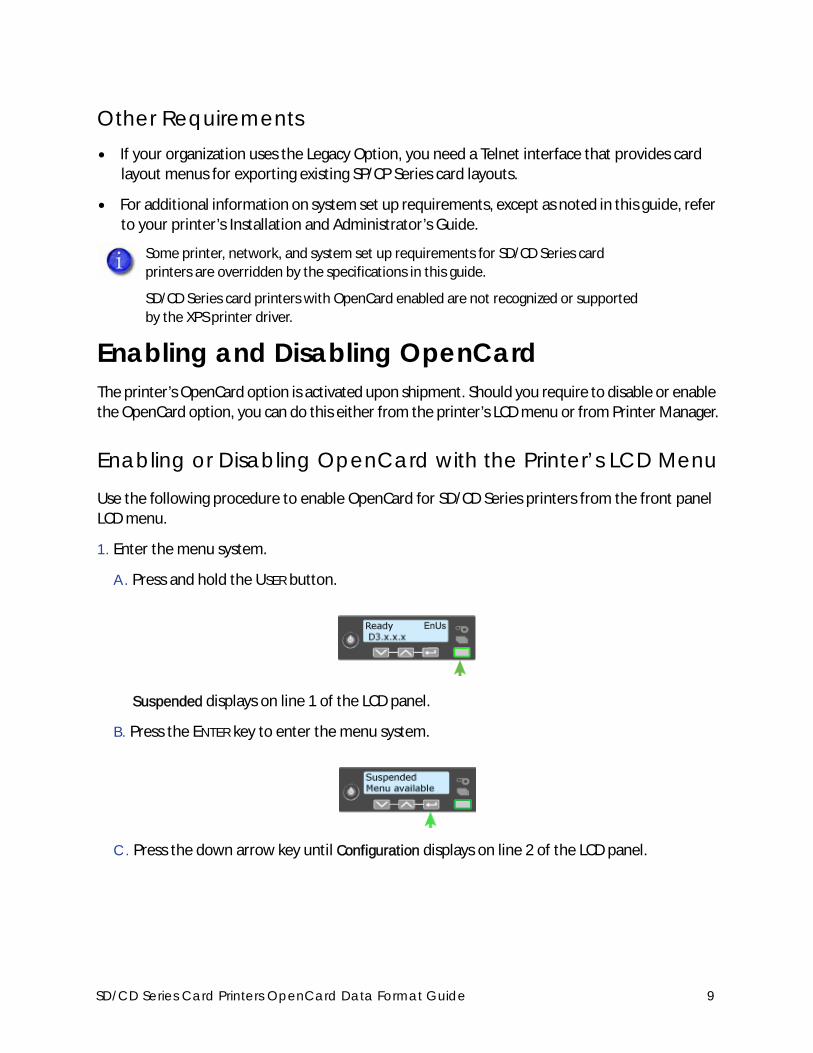
A. Press and hold the USER button.
Suspended displays on line 1 of the LCD panel.
B. Press the ENTER key to enter the menu system.
C. Press the down arrow key until Configuration displays on line 2 of the LCD panel.
Some printer, network, and system set up requirements for SD/CD Series card printers are overridden by the specifications in this guide.
SD/CD Series card printers with OpenCard enabled are not recognized or supported by the XPS printer driver.
SD/CD Series Card Printers OpenCard Data Format Guide 9

D. Press ENTER key to enter the Configuration menu.
2. Enable or Disable Opencard.
A. Press the down arrow key until OpenCard displays on line 2 of the LCD panel.
B. Press ENTER key to enter the OpenCard menu.
C. Press the down arrow key until Enable or Disable displays on line 2 of the LCD panel.
D. Press the ENTER key. Apply/Restart displays on line 2 of the LCD panel.
E. Press the ENTER key again to apply the setting change. Standby/Rebooting displays on the LCD panel and the printer powers off and then on again.
When the LCD panel displays Ready in line 1 and an asterisk (*) in the lower-right corner, OpenCard is enabled on the printer.
Enabling OpenCard with Printer Manager
To enable OpenCard with Printer Manager, you must have a Printer Manager account access level of WebAdmin or WebService. Refer to your printer’s Installation and Administrator’s Guide for more information about assigning Printer Manager access levels.
10 Getting Started
1. Before you start, make sure that your printer meets all requirements.
2. Make sure that the SD/CD Series card printer is connected to the computer with a TCP/IP interface.
3. Open Printer Manager. For instructions, refer to “Opening Printer Manager” on page 49.
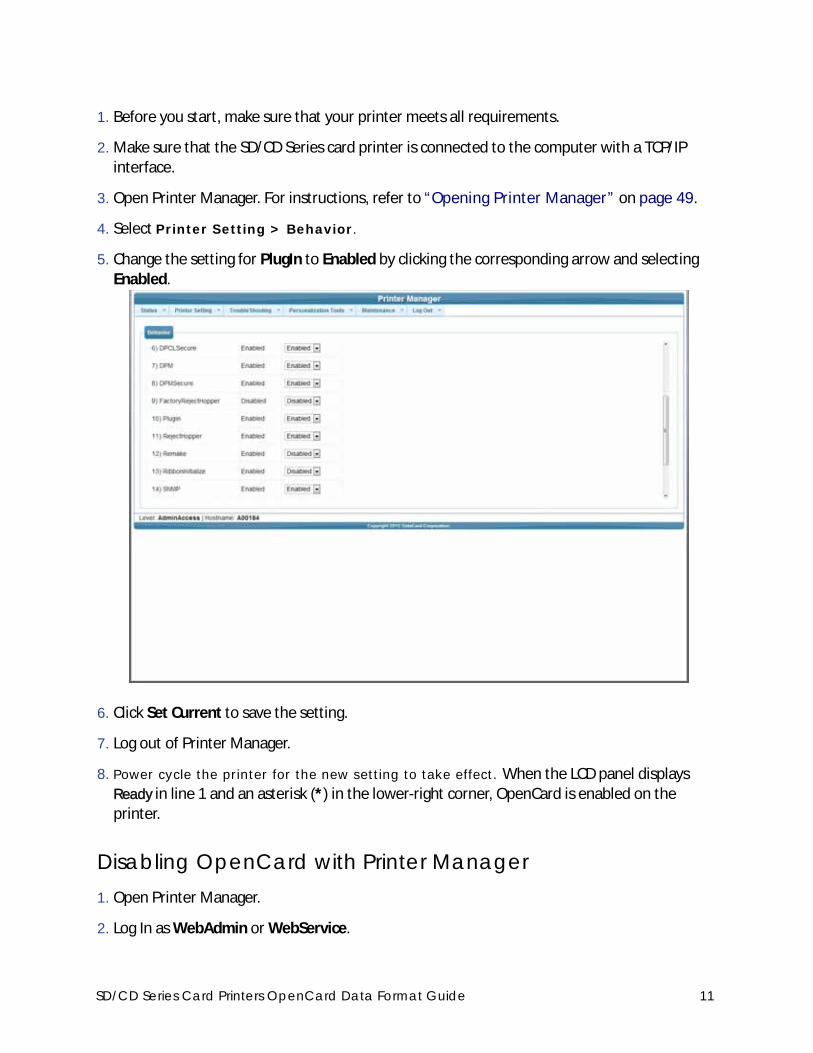
4. Select Printer Setting > Behavior.
5. Change the setting for PlugIn to Enabled by clicking the corresponding arrow and selecting Enabled.
6. Click Set Current to save the setting.
7. Log out of Printer Manager.
8. Power cycle the printer for the new setting to take effect. When the LCD panel displays Ready in line 1 and an asterisk (*) in the lower-right corner, OpenCard is enabled on the printer.
Disabling OpenCard with Printer Manager1. Open Printer Manager.
2. Log In as WebAdmin or WebService.
SD/CD Series Card Printers OpenCard Data Format Guide 11

3. Select Printer Setting > Behavior.
4. Change the setting for PlugIn to Disabled by clicking the arrow and selecting Disabled.
5. Click Set Current to send the new setting to the Printer (note that the printer’s LCD reads Busy while the printer processes the setting.
6. Log out of Printer Manager.
7. Power cycle the printer for the new setting to take effect. The LCD panel shows no asterisk in the lower-right corner. OpenCard is now disabled and the printer may now accept input from the XPS printer driver.
Setting Up a Generic/Text Driver with OpenCard PrintersUse this procedure for Windows applications that print using OpenCard format.
Generic/Text Driver for Networks1. Cick Add a printer.
12 Getting Started

2. Click Add a local printer..
3. Set up a new TCP/IP port.
A. Select Create a new port.
B. Select Standard TCP/IP Port from the drop down menu.
C. Click Next. .
SD/CD Series Card Printers OpenCard Data Format Guide 13

4. In the Hostname or IP address text box, enter the IP address, and then click Next.
5. Configure the generic driver.
A. In the Manufacturer list, click Generic.
B. In the Printers list, click Generic/Text Only .
C. Click Next.
14 Getting Started

6. In the Printer Name field, enter Generic / Text Only, and then click Next.
7. Select Do not share this printer, and then click Next. .
8. Click Finish.
SD/CD Series Card Printers OpenCard Data Format Guide 15
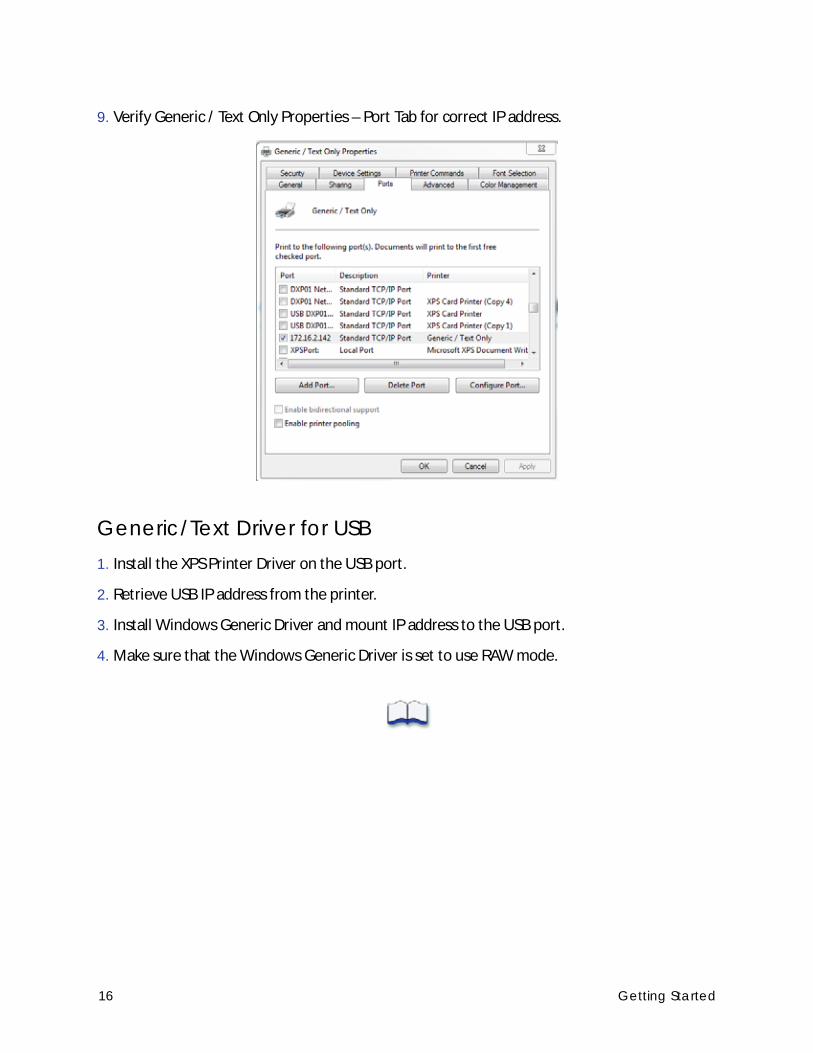
9. Verify Generic / Text Only Properties – Port Tab for correct IP address.
Generic/Text Driver for USB1. Install the XPS Printer Driver on the USB port.
2. Retrieve USB IP address from the printer.
3. Install Windows Generic Driver and mount IP address to the USB port.
4. Make sure that the Windows Generic Driver is set to use RAW mode.
16 Getting Started
Chapter 3: Creating Card Formats
This chapter presents an OpenCard process overview, and describes how to create an OpenCard card format to use with the SD/CD Series card printers.About Card Formats for the SD/CD Series PrintersThe new card format capabilities of the SD/CD Series printers include the ability to define personalization operations on both the front and back side of a card. OpenCard supports monochrome and color graphics, topcoat and printing on both sides of the card, and magnetic stripe. Enhanced capabilities include support for a full range of industry-standard graphics image formats and any TrueType font for text. In addition, you can define a wide range of image and text transformations.
Card Personalization Process Overview
Card formats merge with the OpenCard data stream to create a personalized card using the following process:
1. Setup
The card format designer creates a card format as an SVG document, creates or acquires the images and fonts called out in the card format, and prepares the data stream. The data stream is a text stream that can contain text lines, an optional magnetic stripe data line, and command lines. Preparing the data stream also includes optionally naming a specific card format with the @G command, which indicates which card format to use, and naming the card stock with the @C command.
2. Import
The card format designer uses Printer Manager to import the card format, images, and fonts to any SD/CD Series printer that is to use the card format.
3. Production
• The printer receives an OpenCard data stream.
• OpenCard locates the correct card format on the printer.
SD/CD Series Card Printers OpenCard Data Format Guide 17
• OpenCard uses the instructions in the card format to merge the data stream text, images, and magnetic stripe data into a card to be printed, similar to a mail merge. As in the mail merge process, the card format contains text and image named variables that OpenCard uses to map to the corresponding items in the data stream.
The Card Format as an SVG Document
The basis of the SD/CD Series card format is an XML-based document format, Scalable Vector Graphics, or SVG. The World Wide Web Consortium publishes the definition of the SVG format.
To create an OpenCard card format, the SVG standard defines 1) the basic structure of the card format, and 2) the majority of the attributes that define image and text items.
The SVG card format also uses Datacard-specific conventions and extensions compatible with the OpenCard data stream standard, affording access to the full range of capabilities available in SD/CD series printers. For information about the OpenCard data stream standard, refer to the Data Formatting Guide.
Card Format Structure and Conventions
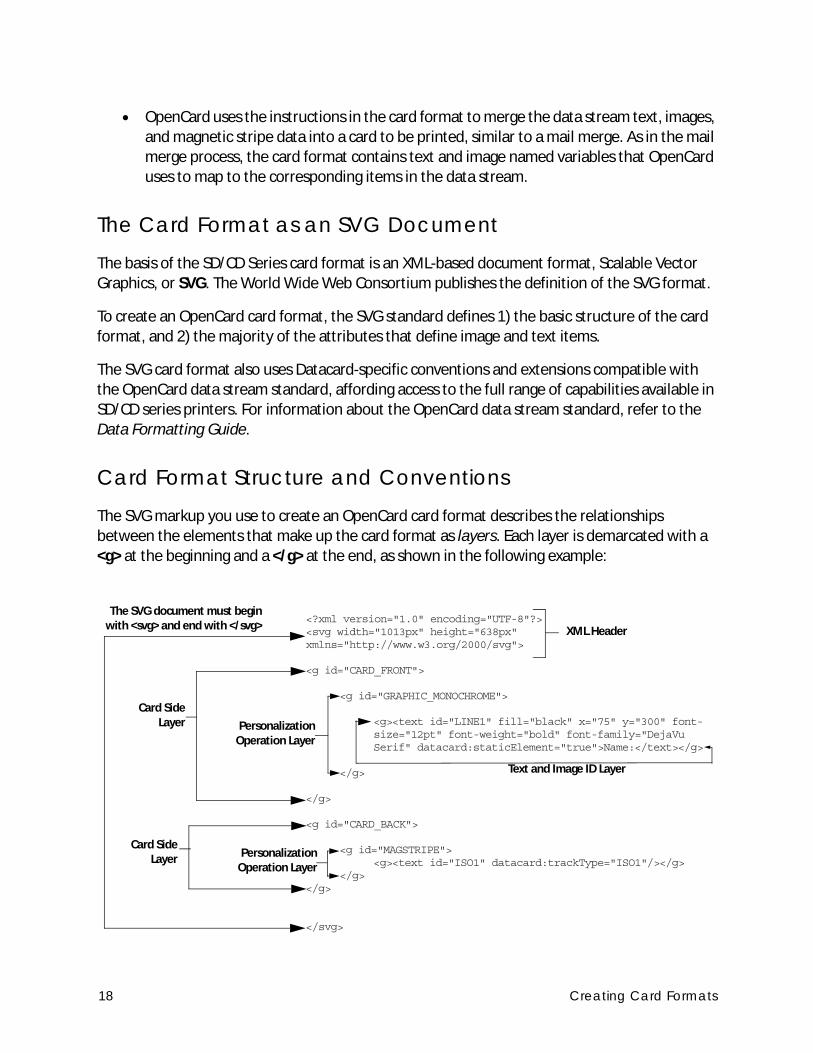
The SVG markup you use to create an OpenCard card format describes the relationships between the elements that make up the card format as layers. Each layer is demarcated with a <g> at the beginning and a </g> at the end, as shown in the following example:
Card SideLayer
<?xml version="1.0" encoding="UTF-8"?><svg width="1013px" height="638px" xmlns="http://www.w3.org/2000/svg">
<g id="CARD_FRONT">
<g id="GRAPHIC_MONOCHROME">
<g><text id="LINE1" fill="black" x="75" y="300" font-size="12pt" font-weight="bold" font-family="DejaVu Serif" datacard:staticElement="true">Name:</text></g>
</g>
</g>
<g id="CARD_BACK">
<g id="MAGSTRIPE"> <g><text id="ISO1" datacard:trackType="ISO1"/></g>
</g></g>
</svg>
PersonalizationOperation Layer
XML Header
The SVG document must beginwith <svg> and end with </svg>
Text and Image ID Layer
Card SideLayer
PersonalizationOperation Layer
18 Creating Card Formats
XML Header — The first line of an OpenCard card format must be a standard XML declaration. The header must also include the SVG declaration shown, with the beginning <svg> and its corresponding </svg> at the end of the card format. An XML header also includes the card dimensions, which correspond to the number of pixels (px) when printing at 300 dpi (width = 3.375” x 300 = 1013 px; height = 2.125” x 300 = 638 px). This is the only resolution supported.
Card Side Layer — Identifies on which side of the card the personalization occurs.
datacard:translations (not shown) — Applied at the same level as a card side layer, datacard:translations are instructions to apply translations to the data stream.
Personalization Operation —Defines monochrome or color graphics, and instructions for magnetic stripe and topcoat.
datacard:flip (not shown) — Applied at the same level as the personalization operation, datacard:flip flips the card to prepare it for personalization.
Image and Text ID Layers — Provide the appearance and placement details for images and text.
Naming a Card Format in the Data Stream
The @G command in the OpenCard data stream defines which card format (or Legacy SP/CP Series card layout ) to use to print the card.
• If an @G command is in the data stream, then the printer uses the card format. If the named card format is not loaded on the printer, then the card is rejected and does not print.
• If no @G command exists in the data stream, then the printer software uses the card format named Default. If Default doesn’t exist, the card is rejected and the request does not print.
Naming Card Stock in the Data Stream
The @C command in the OpenCard data stream defines which card stock to use. A card stock definition is required when setting up the LCD panel to prompt the user to insert a card in the exception slot of the input hopper. Prompts from the LCD panel are shown only with manual card insertion.
• If an @C command is in the data stream, then the printer uses the card stock requested.
• If the card stock is not defined on the printer, then the card will use the card stock defined in Printer Manager as Default. If Default doesn’t exist, the card is rejected and the request does not print.
SD/CD Series Card Printers OpenCard Data Format Guide 19
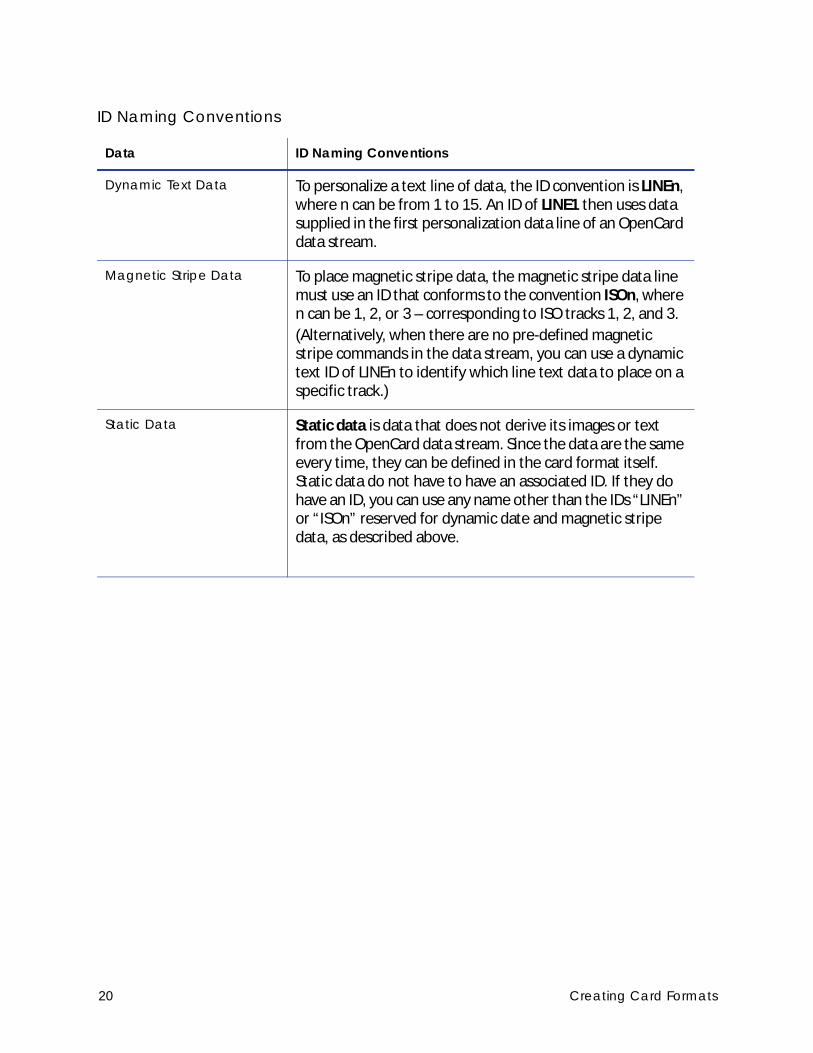
ID Naming Conventions
Data ID Naming Conventions
Dynamic Text Data To personalize a text line of data, the ID convention is LINEn, where n can be from 1 to 15. An ID of LINE1 then uses data supplied in the first personalization data line of an OpenCard data stream.
Magnetic Stripe Data To place magnetic stripe data, the magnetic stripe data line must use an ID that conforms to the convention ISOn, where n can be 1, 2, or 3 – corresponding to ISO tracks 1, 2, and 3.(Alternatively, when there are no pre-defined magnetic stripe commands in the data stream, you can use a dynamic text ID of LINEn to identify which line text data to place on a specific track.)
Static Data Static data is data that does not derive its images or text from the OpenCard data stream. Since the data are the same every time, they can be defined in the card format itself. Static data do not have to have an associated ID. If they do have an ID, you can use any name other than the IDs “LINEn” or “ISOn” reserved for dynamic date and magnetic stripe data, as described above.
20 Creating Card Formats

Adding Elements to the Card FormatThis section provides information about how to apply the elements available to create an OpenCard card format. Elements are listed here in the order they are applied in the SVG card format document.
Card Side Layers
Within the SVG document, a card format must define a front side layer and/or a back side layer.
• Use an ID of “CARD_FRONT” or “CARD_BACK”.
• Add personalization layers as children of each of the front and back side layers as needed.
• “CARD_FRONT” and “CARD_BACK” are the only layer IDs OpenCard recognizes at this level.
<?xml version="1.0" encoding="UTF-8"?><svg width="1013px" height="638px" xmlns="http://www.w3.org/2000/svg">
<g id="CARD_FRONT">... front side card personalization operations go here ...</g>
<g id="CARD_BACK">... back side card personalization operations go here ...</g>
</svg>
Re-Mapping Data Characters with datacard:translations
Translations allow for re-mapping of data characters. Using this element, the card format designer can define a list of characters to translate.
The datacard:translations element is placed at the same level as the card side layers because translations are applied to the data stream before it is merged into the card format. Translations affect the value of the data merged into any operation defined in the card format.
Hexadecimal Notation for Translations
For datacard:translations, control characters with values of less than 0x20 (ASCII SPACE character) must be encoded in hexadecimal notation using a leading 0x. For example, represent the null character 0x00. If a translation maps any data stream character to a null (0x00) then the presence of the null serves to end the data line at that point. Any data following the character that translates to null is not merged into the card format.
Card Side Layers Example
SD/CD Series Card Printers OpenCard Data Format Guide 21

The following is an example that will signal the printer software to translate:
• Any uppercase “A” character to a lowercase “a”
• Any lowercase “a” to an uppercase “A”
• Any uppercase “B” character to a null (0x00)
datacard:translations Example
OpenCard data stream
<123AaB9876>
Card format <?xml version=”1.0” encoding=”UTF-8”?><svg width=”1013px” height=”638px” xmlns=”http://www.w3.org/2000/svg”><datacard:translations><datacard:translate from=”A” to=”a”/><datacard:translate from=”a” to=”A”/><datacard:translate from=”B” to=”0x00”/></datacard:translations>
<g id=”CARD_FRONT”>
... front side card personalization operations go here ...</g>
<g id=”CARD_BACK”>
... back side card personalization operations go here ...
</g>
</svg>
Data merged into card format
LINE1=123aA
22 Creating Card Formats

Personalization Operations
Within each of the card side elements, the card format designer is able to create personalization operations, each as an SVG layer. Datacard-specified personalization operations include:
• Defining Monochrome for Text and Graphics on page 24
• Defining Color for Text and Graphics on page 25
• Defining Topcoat Application on page 26
• Defining Magnetic Stripe Tracks on page 27
• This layer also includes: Flipping the Personalization Operation with the datacard:flip Attribute on page 28
To define one of these personalization operations, create an SVG layer with the <g> element and set the ID attribute to one of the personalization operations. End the definition with a </g>.
SD/CD Series Card Printers OpenCard Data Format Guide 23
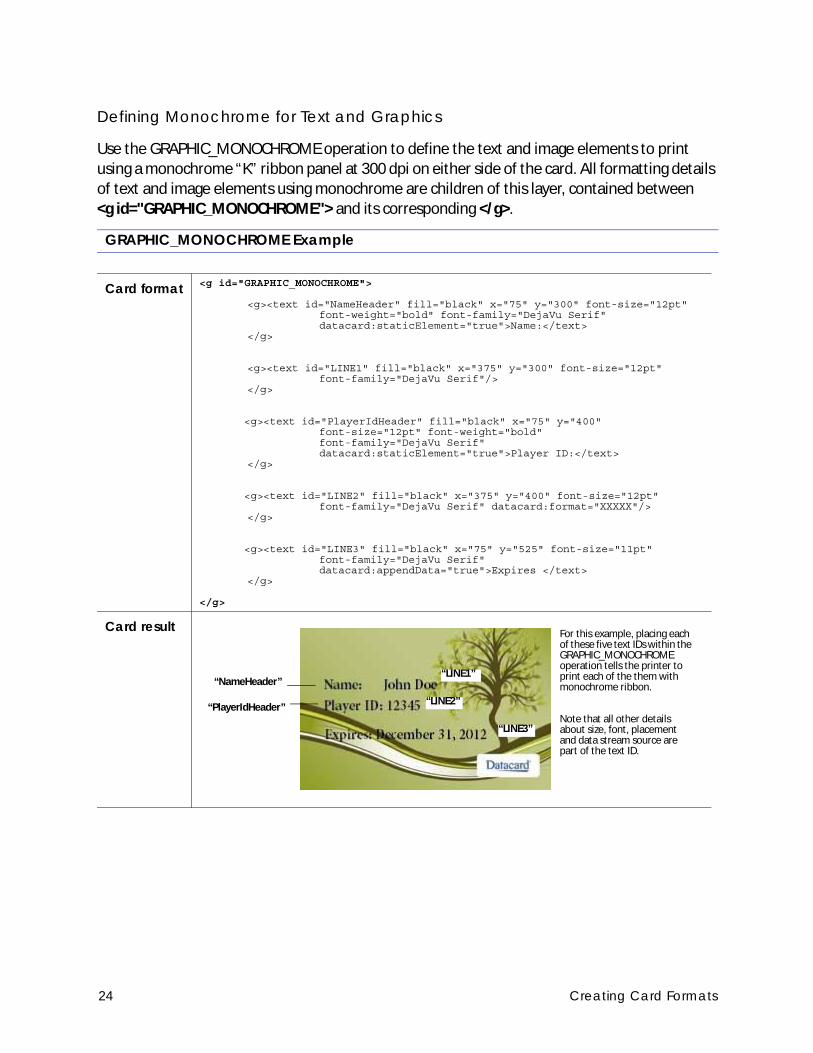
Defining Monochrome for Text and Graphics
Use the GRAPHIC_MONOCHROME operation to define the text and image elements to print using a monochrome “K” ribbon panel at 300 dpi on either side of the card. All formatting details of text and image elements using monochrome are children of this layer, contained between<g id="GRAPHIC_MONOCHROME"> and its corresponding </g>.
GRAPHIC_MONOCHROME Example
Card format <g id="GRAPHIC_MONOCHROME">
<g><text id="NameHeader" fill="black" x="75" y="300" font-size="12pt" font-weight="bold" font-family="DejaVu Serif" datacard:staticElement="true">Name:</text>
</g>
<g><text id="LINE1" fill="black" x="375" y="300" font-size="12pt"
font-family="DejaVu Serif"/></g>
<g><text id="PlayerIdHeader" fill="black" x="75" y="400" font-size="12pt" font-weight="bold" font-family="DejaVu Serif"datacard:staticElement="true">Player ID:</text>
</g>
<g><text id="LINE2" fill="black" x="375" y="400" font-size="12pt" font-family="DejaVu Serif" datacard:format="XXXXX"/>
</g>
<g><text id="LINE3" fill="black" x="75" y="525" font-size="11pt" font-family="DejaVu Serif" datacard:appendData="true">Expires </text>
</g>
</g>
Card result For this example, placing each of these five text IDs within the GRAPHIC_MONOCHROME operation tells the printer to print each of the them with monochrome ribbon.
Note that all other details about size, font, placement and data stream source are part of the text ID.
“NameHeader”“LINE1”
“LINE2”
“LINE3”
“PlayerIdHeader”
24 Creating Card Formats
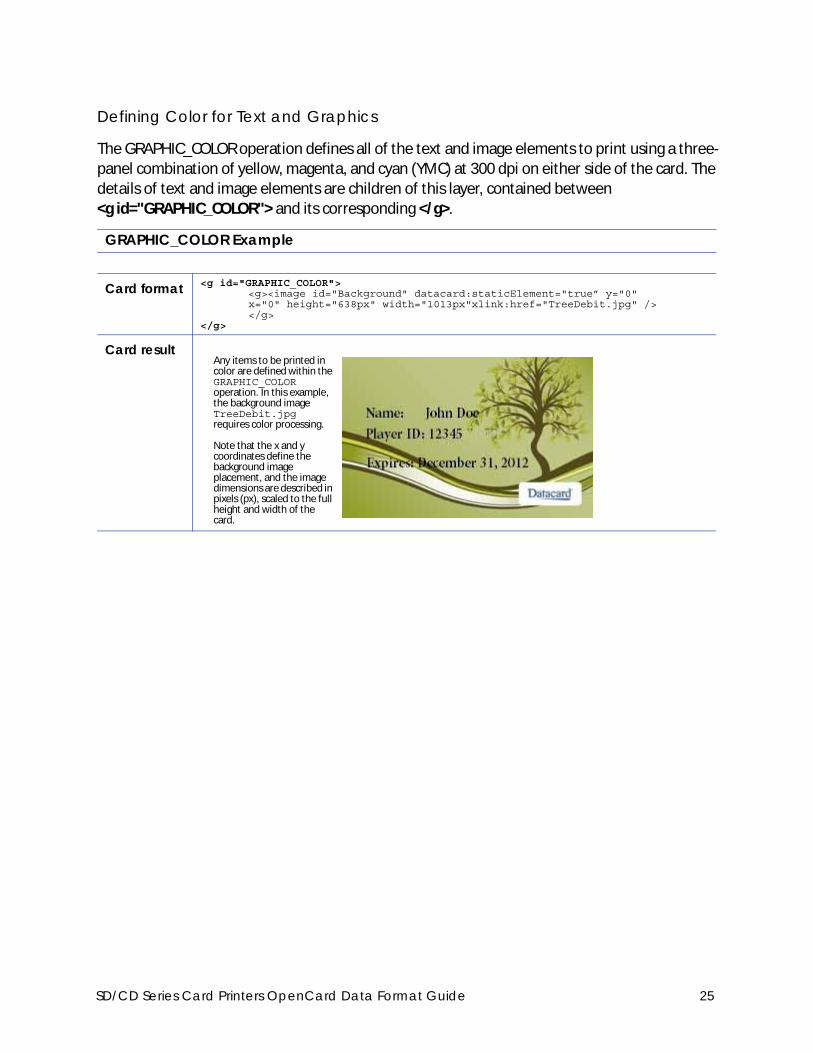
Defining Color for Text and Graphics
The GRAPHIC_COLOR operation defines all of the text and image elements to print using a three-panel combination of yellow, magenta, and cyan (YMC) at 300 dpi on either side of the card. The details of text and image elements are children of this layer, contained between <g id="GRAPHIC_COLOR"> and its corresponding </g>.
GRAPHIC_COLOR Example
Card format <g id="GRAPHIC_COLOR"> <g><image id="Background" datacard:staticElement="true” y="0" x="0" height="638px" width="1013px"xlink:href="TreeDebit.jpg" /></g>
</g>
Card resultAny items to be printed in color are defined within the GRAPHIC_COLOR operation. In this example, the background image TreeDebit.jpg requires color processing.
Note that the x and y coordinates define the background image placement, and the image dimensions are described in pixels (px), scaled to the full height and width of the card.
SD/CD Series Card Printers OpenCard Data Format Guide 25

Defining Topcoat Application
The TOPCOAT operation defines the image element to use to apply a topcoat pattern using the T ribbon panel at 300 dpi on either side of the card. The formatting details of image elements are children of this layer, contained between <g id="TOPCOAT"> and its corresponding </g>.
TOPCOAT Example
Card format <g id="TOPCOAT">
<g><image id="TopcoatImage" datacard:staticElement="true" y="0" x="0"height="638px" width="1013px" xlink:href="Topcoat_Full.png" />
</g></g>
Card result
topcoat height = 638pxor 2.125”
In this example, the topcoat is applied across the entire width and height of the card 3.375” x 2.125” (or 1013px by 638px)
topcoat width = 1013pxor 3.375”
26 Creating Card Formats

Defining Magnetic Stripe Tracks
The MAGSTRIPE operation defines the magnetic stripe tracks to personalize on the front and / or the back side of the card. There are two methods of encoding magnetic stripe tracks:
• Extract text data directly from the data stream and encoding the magnetic stripe using the “LINEn” text ID
• Extract magnetic stripe text data already identified with magnetic stripe commands and encoding using the “ISOn” text ID
Encoding Text Data to a Magetic Stripe Track Using the “LINEn” Text ID
To populate a magnetic stripe track with text data not originally identified as magnetic stripe data in the data stream, simply use the “LINEn” text ID in conjunction with the datacard:trackType definition, as shown below.
Encoding Magnetic Stripe Text on a Magnetic Stripe Track Using the “ISOn” Text ID
To populate a magnetic stripe track with prepared magnetic stripe date, OpenCard data stream uses the following magnetic stripe data identifiers:
When the OpenCard data stream has text data prepared for magnetic stripe in this way, identify which information encodes to each track using the “ISOn” text ID using the following rules:
• The text ID must be “ISO1” for track 1, “ISO2” for track 2, or “ISO3” track 3.
• The datacard:trackType value must match the ID name.
MAGSTRIPE Example 1
<g id="MAGSTRIPE"> <g><text id="LINE2" datacard:trackType="ISO1"/></g>
trackType Start Sentinel End Sentinel
ISO1 (IATA) % (25 hex) ? (3F hex)
ISO2 (ABA) ; (3B hex) ? (3F hex)
ISO3 (TTS) _ (5F hex) OR _; (5F3B hex) ? (3F hex)
SD/CD Series Card Printers OpenCard Data Format Guide 27

The following example shows how text defined for magnetic stripe in the data stream merges with the card format using these mappings. This merged card format becomes the final instructions for sending the data to the correct track on the magnetic stripe.
Flipping the Personalization Operation with the datacard:flip Attribute
If “true” this attribute will cause the entire personalization operation design to be flipped 180 degrees. Valid values are “true” and “false”, with the default false if the attribute is not present. This attribute does not have any effect on a MAGSTRIPE personalization operation.
<g id="GRAPHIC_MONOCHROME" datacard:flip=”true”>. . . text and image elements go here . . . </g>
MAGSTRIPE Example 2
OpenCard data stream
<”%TESTING321?;=1234567890?_;=0987654321?>
Card format <g id=”MAGSTRIPE”><g><text id=”ISO1” datacard:trackType=”ISO1”></text></g><g><text id=”ISO2” datacard:trackType=”ISO2”></text></g><g><text id=”ISO3” datacard:trackType=”ISO3”></text></g>
</g>
Data merged into card format
<g id="MAGSTRIPE"><g><text id="ISO1"datacard:trackType="ISO1">TESTING321</text></g><g><text id="ISO2"datacard:trackType="ISO2">=1234567890</text></g><g><text id="ISO3"datacard:trackType="ISO3">=0987654321</text></g>
</g>
Card result
datacard:flip Example
Track 1:TESTING321
Track 2: 1234567890
Track 3:0987654321
28 Creating Card Formats
Adding Text and Image Layers
Within each personalization operation, you create text and image layers that describe all aspects of the actual text and image, as described in the following:
• Defining Text ID Layers on page 29
• Using Bar Code-Specific Attributes on page 36
• Defining Image Element Layers on page 39
Defining Text ID Layers
Attributes for height, width, font-families, transformations, and other location and appearance details of text data to be personalized to a card are set here. In addition, bar code fonts and other bar code attributes are defined within a text id layer. Begin each text or image layer with <g>, add the text or graphic elements and their attributes, and then end the definition with </g>.
When used in a GRAPHIC_MONOCHROME or GRAPHIC_COLOR layer, OpenCard renders the text data using a TrueType font of the specified font-family at the specified font-size at the specified [x,y] location on the card. Other text attributes may be defined.
When used in a MAGSTRIPE layer, the personalization data is simply be encoded to the magnetic stripe track corresponding to the “datacard:trackType” defined.
Refer to the “Text Element Layer Example” on page 33 for a practical example of how text id layers are constructed.
There are two kinds of IDs that are important for use in OpenCard systems: dynamic text IDs and static text IDs.
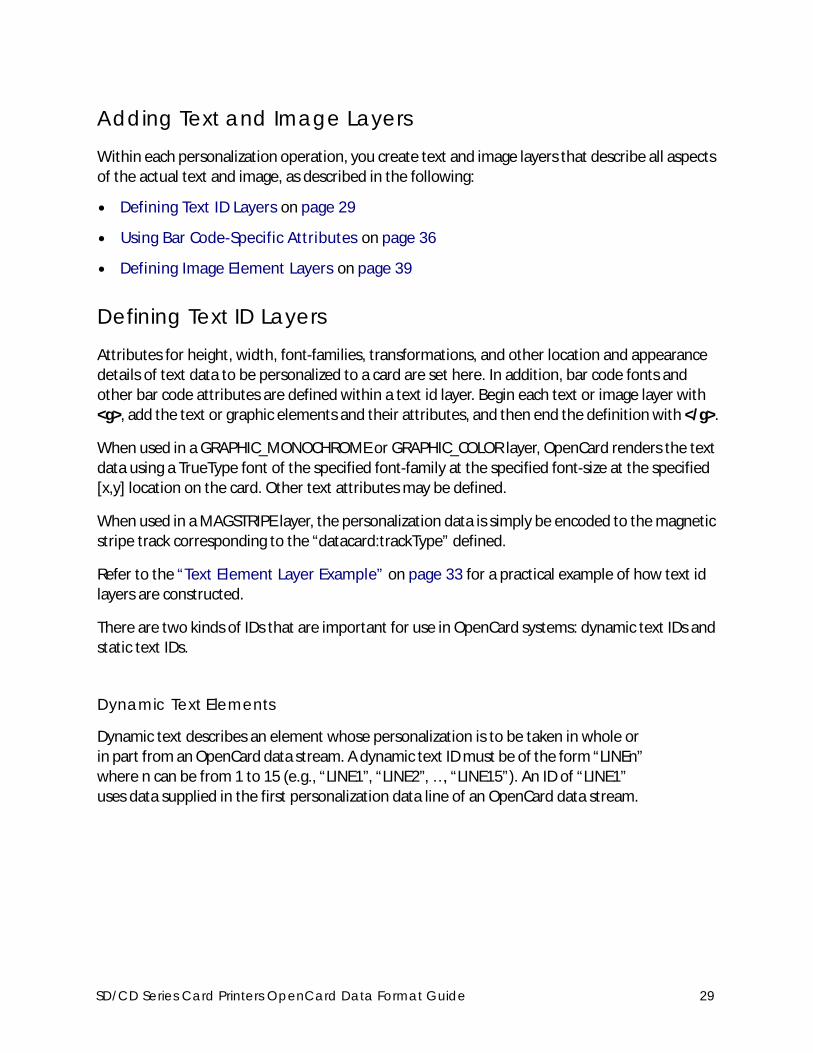
Dynamic Text Elements
Dynamic text describes an element whose personalization is to be taken in whole or in part from an OpenCard data stream. A dynamic text ID must be of the form “LINEn” where n can be from 1 to 15 (e.g., “LINE1”, “LINE2”, …, “LINE15”). An ID of “LINE1” uses data supplied in the first personalization data line of an OpenCard data stream.
SD/CD Series Card Printers OpenCard Data Format Guide 29

Static Text Elements
If a text element is static, non-changing personalization, define it using these rules:
• Use any ID value other than the form “LINEn”.
• Set the attribute datacard:staticElement to “true” to signal that this text item must not be dropped due to there being no ID match with any OpenCard data stream line data.
• Add the static data content at the end of the element.
• Include the end-of-text element (</text>) after the last static data character.
x Attribute
The x attribute defines the distance from the left edge of a card to the left edge of the first character of the text line. Default units are in pixels (px).
y Attribute
The y attribute defines the distance from the top edge of a card to the baseline of the text line. Default units are in pixels (px).
Font-Family Attribute
The font-family attribute selects the font for rendering this text line. To view a list of the font families that are currently installed in the printer, select Printer Manager > Personalization Tools > Managed Items > Font Families.
Font-Size Attribute
The font-size attribute sets the size at which the text is rendered. Default units are pixels (px), but point size (pt) is also accepted.
At 300 dpi:
pixel size = (point size / 72) * 300
OR
pixel size = point size * 4.167
30 Creating Card Formats

Font-Weight Attribute
The font-weight attribute specifies the rendering weight of text characters as “normal” or “bold”. The default is “normal” if the attribute is not defined.
Fill Attribute
The fill attribute defines the text color. Find the list of color keyword names (for example, fill=”blue”) at:
http://www.w3.org/TR/SVG11/types.html#ColorKeywords
Transform Attribute (Rotating Text)
The transform attribute is an SVG means of performing operations on the entire text element. The most likely used transformation for card format designers is rotating a text element. SVG allows rotation to any degree.x=”100” y=”400” transform=”rotate(90 100, 400)”
datacard:staticElement Attribute
When data for the text element is static this attribute must be set to “true”. The static data content must be added at the end of the element and the end-of-text element (</text>) must be included after the last static data character.
Valid values are “true” and “false”. The default is “false” if this attribute is not defined.
<g><text id="NameHeader" fill="black" x="75" y="300" font-size="12pt" font-weight="bold" font-family="DejaVu Serif” datacard:staticElement="true">Name:</text></g>
datacard:appendData Attribute
When the first part of the personalization data for the text element is static and the remainder comes from the OpenCard data stream, this attribute must be set to “true”. The static data content part must be added at the end of the element and the end-of-text element (</text>) must be included after the last static data character.
Color has full effect when used in a GRAPHIC_COLOR personalization operation, but also has an effect on intensity in a GRAPHIC_MONOCHROME operation even though the hue is not printed.
datacard:staticElement Example
SD/CD Series Card Printers OpenCard Data Format Guide 31

Valid values are “true” and “false”. The default is “false” if this attribute is not defined.
<g><text id="LINE3" fill="black" x="75" y="525" font-size="11pt" font-family="DejaVu Serif" datacard:appendData="true">Expires </text></g>
datacard:format Attribute
This attribute is used to
• Perform a character-by-character type validation.
• Insert data into the dynamic personalization data.
• Use only the first “n” characters from the personalization data.
The following type checking characters may be used to validate characters in the data:
To render a fixed-length bar code text item such as EAN8, the data item from this sample data stream supplies 7 numeric characters. In this case, the following datacard:format attribute can be defined:datacard:format=”9999999”
• If the data stream sends “1234567”, then this passes the type checking defined by the datacard:format attribute. The EAN8 bar code is rendered successfully.
• If the data stream sends “1234567890123”, then the first 7 characters still successfully pass the type checking. The EAN8 bar code is rendered successfully using only the first seven characters “1234567”.
• If the data stream sends “1234A67”, then the data fails the type checking with an error “Format requires numeric character”. The card is rejected in this case.
datacard:appendData Example
Checking Definition
9 Numeric only {0 .. 9}
A Alphabet only {A .. Z, a .. z}
N Alphabet or numeric {0 .. 9, A .. Z, a .. z}
X Any character acceptable
datacard:format Example #1
32 Creating Card Formats

Use the datacard:format attribute to insert characters when
• The data stream does not contain all of the data characters that must print on the card.
• The characters missing from the data stream are placed in the same place in the final data.
For example, use the datacard:format attribute if the data stream supplies an expiration date as “1016” but the printed card must use the date formatted as “10/16”. In this case, use the following datacard:format attribute:datacard:format=”99/99”
This inserts the ‘/’ character and verifies that the four data stream characters are numeric.
datacard:remove Attribute
The values accepted are whole number representations only. The default is zero.
If a datacard:remove attribute is defined, then the value of this attribute is used to cut that many data characters from the front of the data stream item that corresponds with the element’s ID.
Text Element Layer Example
datacard:format Example #2
datacard:remove Example
OpenCard data stream
<1234567890>
Card format <g><text id="LINE1" fill="black" x="375" y="300" datacard:remove=”3”font-size="12pt"font-family="DejaVu Serif"/></g>
Data merged into card format
<g><text id="LINE1" fill="black" x="375" y="300" datacard:remove=”3”font-size="12pt"font-family="DejaVu Serif">4567890</text></g>
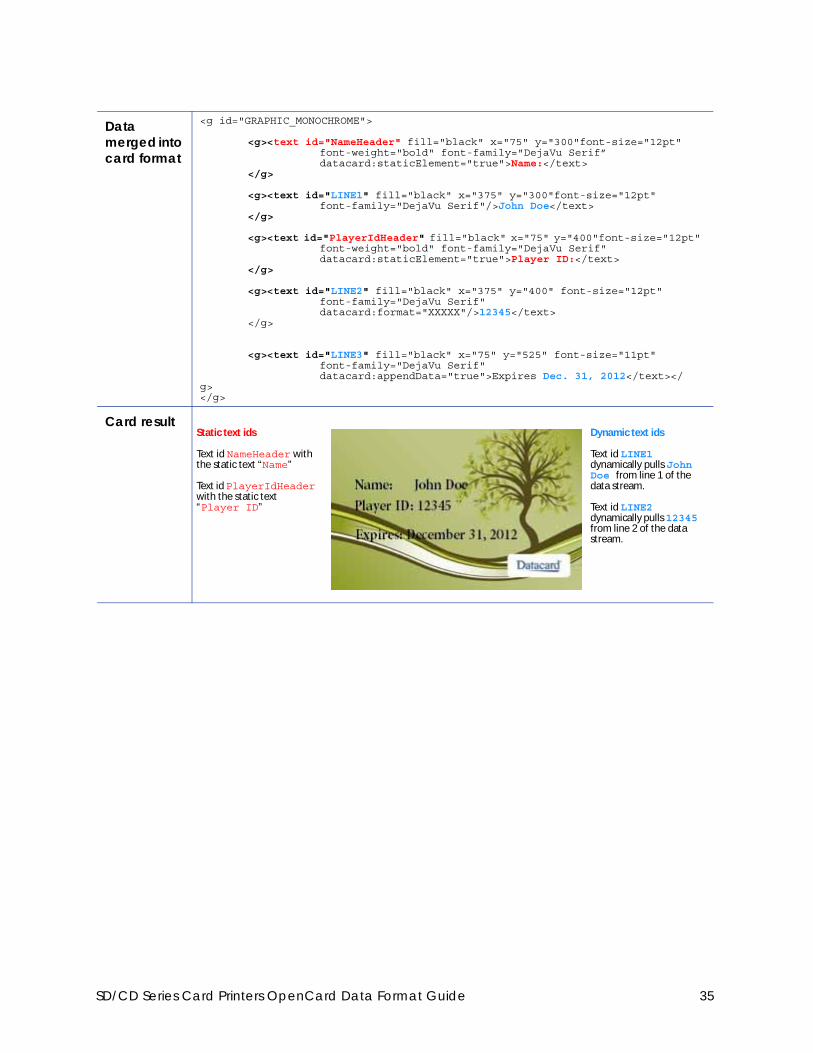
Text Element Layer ExampleThis example shows a GRAPHIC_MONOCHROME layer containing text element layers. The data merged into the card format becomes the instructions for rendering the monochrome text and graphics data.
SD/CD Series Card Printers OpenCard Data Format Guide 33

OpenCard data stream
<John Doe12345Dec. 31, 2012>
Card format <g id="GRAPHIC_MONOCHROME">
<g><text id="NameHeader" fill="black" x="75" y="300"font-size="12pt"font-weight="bold"font-family="DejaVuSerif”datacard:staticElement="true">Name:</text>
</g>
<g><text id="LINE1" fill="black" x="375" y="300"font-size="12pt"font-family="DejaVu Serif"/>
</g>
<g><text id="PlayerIdHeader" fill="black" x="75" y="400"font-size="12pt" font-weight="bold"font-family="DejaVu Serif" datacard:staticElement="true">Player ID:</text>
</g>
<g><text id="LINE2" fill="black x="375" y="400"font-size="12pt" font-family="DejaVu Serif" datacard:format="XXXXX"/>
</g>
<g><text id="LINE3" fill="black x="75" y="525"font-size="11pt" font-family="DejaVu Serif" datacard:appendData="true">Expires </text>
</g></g>
34 Creating Card Formats
Data merged into card format
<g id="GRAPHIC_MONOCHROME">
<g><text id="NameHeader" fill="black" x="75" y="300"font-size="12pt"font-weight="bold" font-family="DejaVu Serif”datacard:staticElement="true">Name:</text>
</g>
<g><text id="LINE1" fill="black" x="375" y="300"font-size="12pt" font-family="DejaVu Serif"/>John Doe</text>
</g>
<g><text id="PlayerIdHeader" fill="black" x="75" y="400"font-size="12pt" font-weight="bold" font-family="DejaVu Serif"datacard:staticElement="true">Player ID:</text>
</g>
<g><text id="LINE2" fill="black" x="375" y="400" font-size="12pt"font-family="DejaVu Serif"datacard:format="XXXXX"/>12345</text>
</g>
<g><text id="LINE3" fill="black" x="75" y="525" font-size="11pt" font-family="DejaVu Serif"datacard:appendData="true">Expires Dec. 31, 2012</text></
g></g>
Card resultStatic text ids
Text id NameHeader with the static text “Name”
Text id PlayerIdHeader with the static text “Player ID”
Dynamic text ids
Text id LINE1 dynamically pulls John Doe from line 1 of the data stream.
Text id LINE2 dynamically pulls 12345 from line 2 of the data stream.
SD/CD Series Card Printers OpenCard Data Format Guide 35

Using Bar Code-Specific Attributes
Datacard software has built-in support for the following one-dimensional bar code symbologies:
These may be called out in any GRAPHIC_MONOCHROME or GRAPHIC_COLOR personalization operation using a text layer. Because the bar code patterns for these built-in bar codes are not generated from a TrueType font, no TrueType font needs to be installed to the printer. However, if human-readable characters are required, the Datacard TrueType font “DCP OCR-B.ttf” must be installed in the printer.
The following attributes apply to the Datacard built-in bar codes. The designer is free to install any other bar code as a standard TrueType font and use standard text layer attributes to work with it.
datacard:barcode Attribute
Valid values are “true” and “false”. Default is “false” if the attribute is not defined.
If “true”, this attribute causes the software to interpret the “font-family” attribute value to be a built-in bar code selection as follows. All font-family names are case sensitive and must be exactly as specified:
• CODE39 • UPCA
• CODE128 • EAN8
• Interleaved 2 of 5 • EAN13
Bar code symbology Font-family
CODE39 font-family=”Code39”
CODE128 font-family=”Code128”
Interleaved 2 of 5 font-family=”I2Of5”
UPCA font-family=”UPC-A”
EAN8 font-family=”EAN-8”
EAN13 font-family=”EAN-13”
36 Creating Card Formats

datacard:barRatio Attribute
This attribute specifies the ratio of thickness between a narrow bar and a wide bar for a Code39 bar code. This attribute has no effect on any other built-in bar code. The values supported are:
• datacard:barRatio=“2to1” (default if no attribute present)
• datacard:barRatio=“3to1”
The final narrow and wide bar thickness for Code39 is determined by a combination of the datacard:barRatio and datacard:barDensity values as the datacard:barDensity attribute sets the narrow bar width.
datacard:barDensity Attribute
This attribute effectively sets the narrow bar width for bar codes CODE39, CODE128 and Interleaved 2 of 5 only and has no effect on the generation of bar codes UPCA, EAN8 and EAN13.
Bar code symbology Density value
Narrow bar width
CODE39 datacard:barDensity=”4.6” 4
datacard:barDensity=”5.76” 4
datacard:barDensity=”6.25” 3
datacard:barDensity=”7.69” 3
CODE128 datacard:barDensity=”narrow” 3
datacard:barDensity=”wide” 4
Interleaved 2 of 5 datacard:barDensity=”narrow” 2
datacard:barDensity=”medium” 3
datacard:barDensity=”wide” 4
datacard:barDensity=”extrawide” 5
SD/CD Series Card Printers OpenCard Data Format Guide 37

datacard:barHumanReadable Attribute
Valid values are “true” and “false”. Default is “false” if the attribute is not defined.
If “true”, the bar code is printed with human readable characters if the bar code symbology supports human readable characters. Interleaved 2 of 5 and Code128 do not support human readable characters.
datacard:barChecksum Attribute
Valid values are “true” and “false”. Default is “false” if the attribute is not defined.
If “true”, Datacard software will generate a checksum using a checksum generation algorithm associated with the selected bar code symbology according to this table:
Bar code symbology Check digit algorithm
CODE39 Modulo 43
CODE128 Modulo 103
Interleaved 2 of 5 Modulo 10
UPCA Modulo 10
EAN8 Modulo 10
EAN13 Modulo 10
38 Creating Card Formats

Defining Image Element Layers
Images are supported as static only. This means that data stream items may not be used in conjunction with images.
Images are printed bottom-to-top in the order that they appear in the card format. For example, if the full card tree graphic is followed by the Datacard logo, the tree graphic prints on the bottom with the Datacard logo printed on top.
There is no limit to the quantity of images that can be rendered to a personalization operation. However, card production throughput may be adversely affected by use of increasing quantities of images, as it takes time to read and process images in the printer.
Defining Image ID Names
For image IDs, choose any name that is useful to the card format, other than the OpenCard data naming pattern “LINEn”, which is reserved for dynamic text data.
datacard:positionReference Attribute
Valid values are:
• topLeft (SVG standard compatible option and default)
• bottomLeft
If “topLeft” is specified then the image y attribute will be a measure from the top edge of a card to the top edge of the image.
If “bottomLeft” is specified then the image ‘y’ attribute will be a measure from the bottom edge of a card to the bottom edge of the image.
SD/CD Series Card Printers OpenCard Data Format Guide 39

x Attribute
The x attribute defines the distance from the left edge of a card to the left edge of the image. Default units are in pixels (px).
y Attribute
Refer to datacard:positionReference above.
Default units are in pixels (px).
Height Attribute
The height attribute defines the height that the image is scaled to when printed on the card. Units default to pixels (“px”). If no height is defined, then the image is vertically rendered pixel-for-pixel at 300 dpi. If a height is defined, then no matter how many pixels are defined in the image, the image is scaled to the height specified.
Width Attribute
The width attribute describes the width that the image should be scaled to when printed on the card. Units default to pixels (px). If no width is defined, then the image will be horizontally rendered pixel-for-pixel at 300 dpi. If a width is defined, then no matter how many pixels are defined in the image, the image will be scaled to the width specified.
Transform Attribute (Rotating Images)
The transformation attribute is an SVG means of performing operations on the entire image element. SVG allows rotation to any degree.
x=”100” y=”200” transform=”rotate(90 100, 200)”
transform Attribute Example
40 Creating Card Formats

Defining the Image Name with xlink:href
Use the xlink:href element to define the the case-sensitive name of an image. Load images referenced in a card format onto the printer using Printer Manager prior to printing a card with that card format. Image file path information is not required, and is disregarded at production time.
The following example places the image “TreeDebit.jpg” at the upper left corner of the card (x=0 and y=0), and scales it to the full height and width of a card at 300 dpi (height=638 and width=1013). <g><image id="Background" datacard:staticElement="true" y="0" x="0"height="638px"
width="1013px" xlink:href="TreeDebit.jpg" /></g>
Image Element Example
SD/CD Series Card Printers OpenCard Data Format Guide 41

42 Creating Card Formats
Chapter 4: Exporting Legacy Card Layouts, Graphics, and Fonts
This chapter provides information about using existing Legacy card layouts from SP/CP Series printers to print on SD/CD Series printers with OpenCard. This includes how to export Legacy card layouts, how to use Legacy graphics/logos, and how to use Legacy fonts.Exporting Card Layouts from Legacy Series Printers with TelnetA card layout refers to Legacy card layout files originally created for the SP/CP Series card printers. You can export these card layouts, save the exported definition to a file, and then import the card layout files for use with OpenCard on SD/CD Series printers.
For more information about setting up Legacy SP/CP Series card layouts, refer to the Legacy SP/CP Series Data Formatting Guide.
1. Make sure that the PC is connected to the network using TCP/IP.
2. Establish a Telnet connection to the printer.
3. Enter the following at the command prompt or command line:
telnet ipaddress
Where ipaddress is the IP address displayed on the LCD panel of the printer (Printer Ready>Main Menu>Status>Status Menu>Network>Address Mode>DHCP (or Static)>Data Format>Open Card>IP Address>IP address of printer.
SD/CD Series Card Printers OpenCard Data Format Guide 43

The Card Layout Definition menu displays.
4. Make sure that the desired active card layout is displayed. Only the current active card layout and any currently defined character translations is exported.
5. From the Card Layout Definition menu, enter 8 to select Tools. The Tools menu displays.
6. From the Tools menu, enter 7 to select Export card layout.
44 Exporting Legacy Card Layouts, Graphics, and Fonts

The printer displays the card layout, followed by the Tools menu. The beginning and end of the card layout are marked with the words “begin” and “end.” The card layout is encoded.
7. Use the tools available in your Telnet interface to copy the exported card layouts, and then save the layouts in a text file.
For example, if you are using Telnet with the Windows command prompt, do the following:
A. Right-click on the title bar to display a pop up menu. Select Edit > Mark from the menu.
SD/CD Series Card Printers OpenCard Data Format Guide 45

B. Highlight the layout. Start at “Begin 444 opencard.txt” and go to “end.”
C. Right-click on the title bar and select Edit>Copy from the pop-up menu.
D. Open Notepad or a similar text editing application.
E. Paste the copied text in the text editing application.
F. Save the file using the following naming conventions:
46 Exporting Legacy Card Layouts, Graphics, and Fonts

• If you want this card layout to be the default SP/CP Series card format, then save to the file named Default.
• If you use the @G command to indicate the name of the card layout in the data stream, you must save the file using one of the following names:
• 0
• 1
• 2
• 3
• Where 0, 1, 2, or 3 corresponds to the specified @G0, @G1, @G2 or @G3 name of the card layout in the data stream. Make sure to save the file with no extension.
8. Continue to “Importing a Card Format or Card Layout File” on page 51 to import the card layout to the printer.
Using Legacy Graphic/Logo FilesLegacy graphic/logo files are not automatically exported with the card layout. Instead, you must import legacy graphics separately using Printer Manager. For more information about importing Legacy files using Printer Manager, refer to “Importing a Graphic/Logo File” on page 53.
When importing legacy logos originally created for SP/CP Series printers card layouts, you must use the original monochrome logos in TIFF format and name them one of the following:
• OpencardLogo1
• OpencardLogo2
• OpencardLogo3
• OpencardLogo4
Where 1, 2, 3, and 4 correspond to the original graphic/logo name in the data stream.
• The file name Default is case sensitive. Make sure to save the file as Default with no extension.
SD/CD Series Card Printers OpenCard Data Format Guide 47

Using Legacy FontsTo print to the SD/CD Series printers, Legacy fonts are bundled with the printer. OpenCard maps Legacy SP/CP Series printer fonts to their TrueType equivalents resident on the SD/CD Series printers, as shown below.
SP/CP Series Card Printers Equivalent SD/CD Series Printers with OpenCard
Serif ufonts.com_charter-bt-roman.ttf
Serif Bold ufonts.com_charter-bt-black.ttf
Courier ufonts.com_courier-10-pitch-bt.ttf
Courier Bold ufonts.com_courier-10-pitch-bold-bt.ttf
Sans ufonts.com_bitstream-vera-sans.ttf
Sans Bold ufonts.com_bitstream-vera-sans-bold.ttf
Used for bar code human-readable characters:DCP OCR-B.ttf
Some legacy printers use custom fonts designed specifically for that system. You must manually load any custom fonts onto the printer.
48 Exporting Legacy Card Layouts, Graphics, and Fonts
Chapter 5: Working with Printer Manager
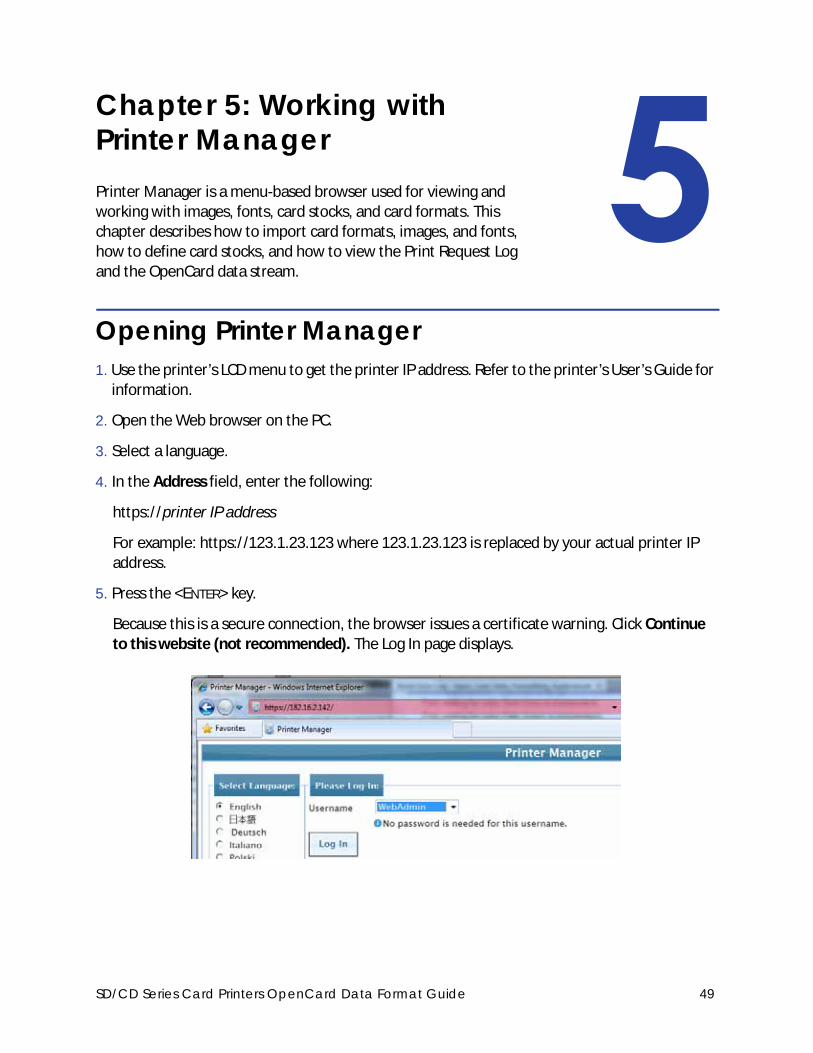
Printer Manager is a menu-based browser used for viewing and working with images, fonts, card stocks, and card formats. This chapter describes how to import card formats, images, and fonts, how to define card stocks, and how to view the Print Request Log and the OpenCard data stream.Opening Printer Manager1. Use the printer’s LCD menu to get the printer IP address. Refer to the printer’s User’s Guide for
information.
2. Open the Web browser on the PC.
3. Select a language.
4. In the Address field, enter the following:
https://printer IP address
For example: https://123.1.23.123 where 123.1.23.123 is replaced by your actual printer IP address.
5. Press the <ENTER> key.
Because this is a secure connection, the browser issues a certificate warning. Click Continue to this website (not recommended). The Log In page displays.
SD/CD Series Card Printers OpenCard Data Format Guide 49

6. In the Please Log In: area, enter the Username and Password.
• To gain access to OpenCard options, you must enter a user with WebAdmin.
• Your printer may require a password.
7. Click Log In. The Welcome to Printer Manager page displays.
50 Working with Printer Manager

Importing a Card Format or Card Layout FileUse this procedure to transfer card formats or card layouts to Printer Manager for printing on the SD/CD Series printers.
1. Make sure that the SD/CD Series printer is connected to the computer with a TCP/IP interface.
2. Open Printer Manager.
3. Select Personalization Tools > Managed Items. The Managed Items screen displays.
4. Select Card Format.
5. Click Browse to find the card layout file that was exported from the Legacy SP/CP Series printer.
6. Select the card format to import, and then click Add Item. The imported file name displays in the list.
SD/CD Series Card Printers OpenCard Data Format Guide 51
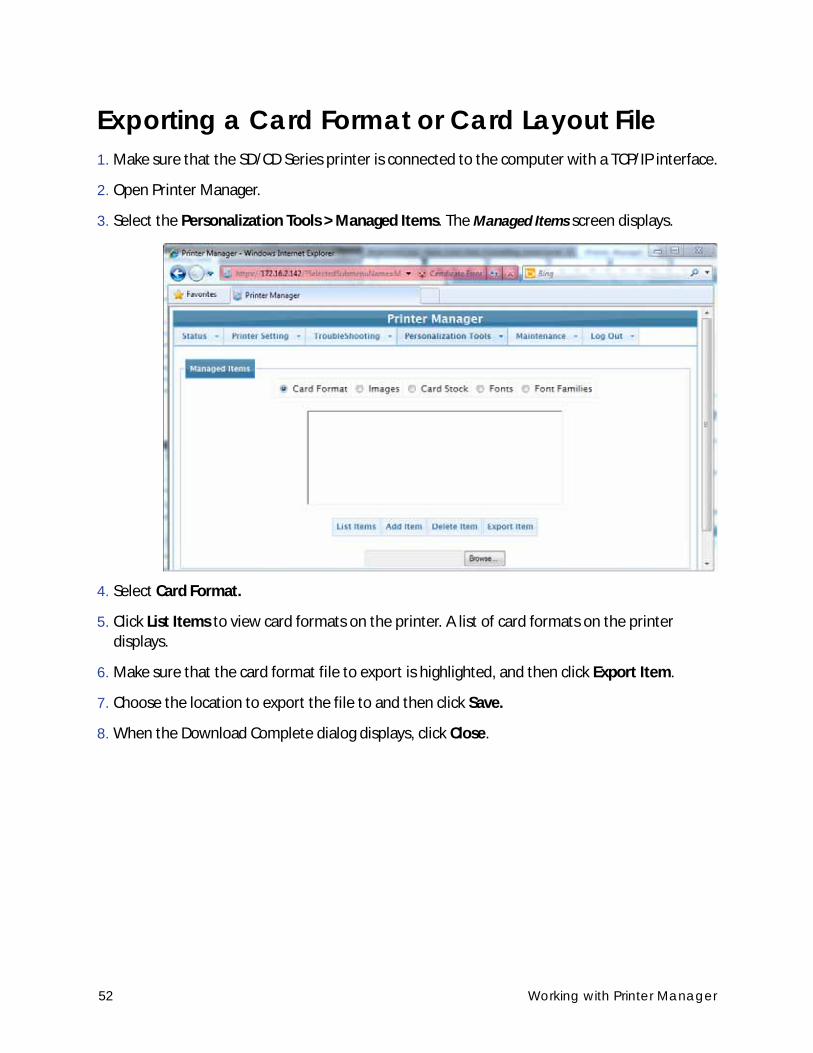
Exporting a Card Format or Card Layout File1. Make sure that the SD/CD Series printer is connected to the computer with a TCP/IP interface.
2. Open Printer Manager.
3. Select the Personalization Tools > Managed Items. The Managed Items screen displays.
4. Select Card Format.
5. Click List Items to view card formats on the printer. A list of card formats on the printer displays.
6. Make sure that the card format file to export is highlighted, and then click Export Item.
7. Choose the location to export the file to and then click Save.
8. When the Download Complete dialog displays, click Close.
52 Working with Printer Manager

Importing a Graphic/Logo File
1. Make sure that the printer is connected to the computer with a TCP/IP interface.
2. Open Printer Manager.
3. Select Personalization Tools>Manage Items. The Managed Items screen displays.
4. Select Images.
5. Click Browse to find the desired OpencardLogo graphic file.
6. Select the file, and then click Add Item. The imported file displays in the list on the Printer Manager Images screen.
For the Legacy Option only When importing legacy logos originally created for SP/CP Series printers card layouts, use the original monochrome logos in TIFF format and name them one of the following:
• OpencardLogo1
• OpencardLogo2
• OpencardLogo3
• OpencardLogo4
SD/CD Series Card Printers OpenCard Data Format Guide 53
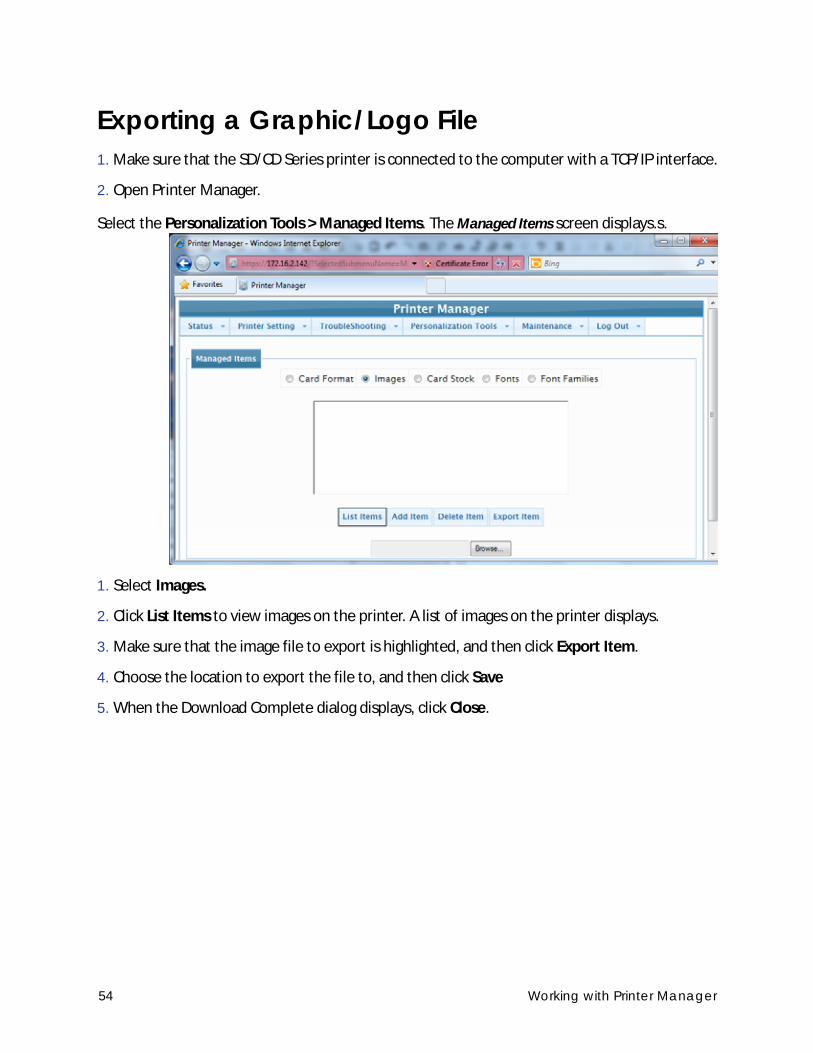
Exporting a Graphic/Logo File1. Make sure that the SD/CD Series printer is connected to the computer with a TCP/IP interface.
2. Open Printer Manager.
Select the Personalization Tools > Managed Items. The Managed Items screen displays.s.
1. Select Images.
2. Click List Items to view images on the printer. A list of images on the printer displays.
3. Make sure that the image file to export is highlighted, and then click Export Item.
4. Choose the location to export the file to, and then click Save
5. When the Download Complete dialog displays, click Close.
54 Working with Printer Manager
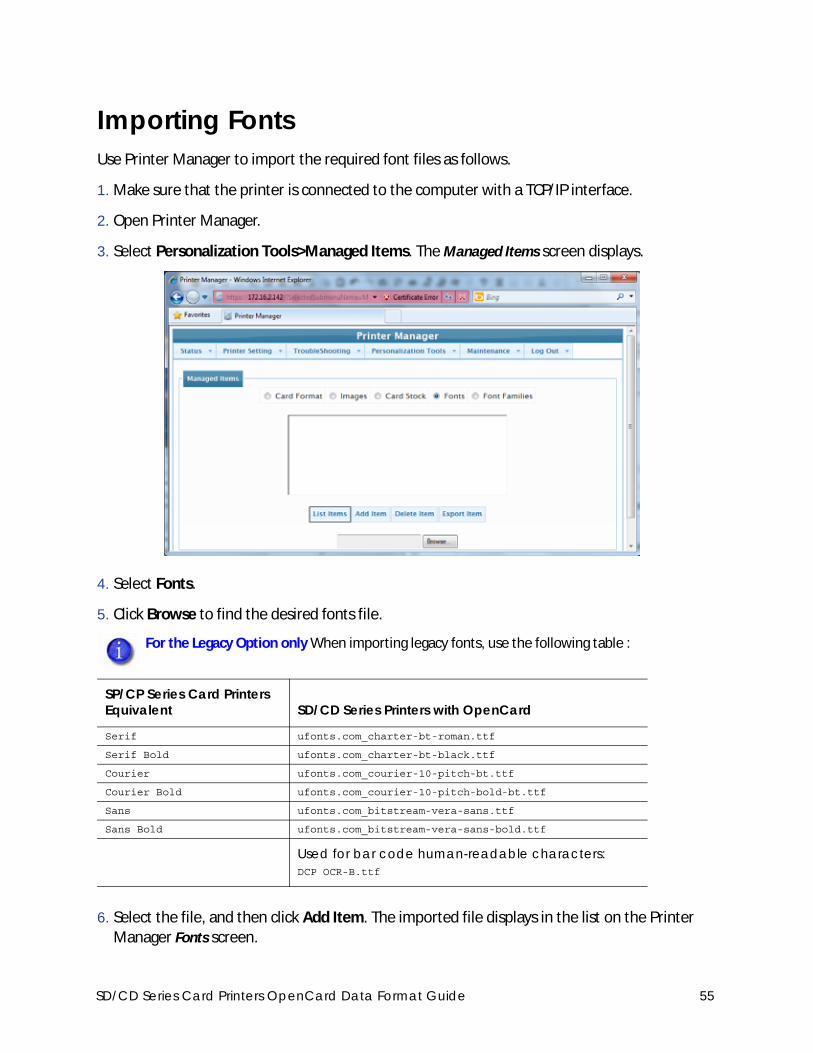
Importing FontsUse Printer Manager to import the required font files as follows.
1. Make sure that the printer is connected to the computer with a TCP/IP interface.
2. Open Printer Manager.
3. Select Personalization Tools>Managed Items. The Managed Items screen displays.
4. Select Fonts.
5. Click Browse to find the desired fonts file.
6. Select the file, and then click Add Item. The imported file displays in the list on the Printer Manager Fonts screen.
For the Legacy Option only When importing legacy fonts, use the following table :
SP/CP Series Card Printers Equivalent SD/CD Series Printers with OpenCard
Serif ufonts.com_charter-bt-roman.ttf
Serif Bold ufonts.com_charter-bt-black.ttf
Courier ufonts.com_courier-10-pitch-bt.ttf
Courier Bold ufonts.com_courier-10-pitch-bold-bt.ttf
Sans ufonts.com_bitstream-vera-sans.ttf
Sans Bold ufonts.com_bitstream-vera-sans-bold.ttf
Used for bar code human-readable characters:DCP OCR-B.ttf
SD/CD Series Card Printers OpenCard Data Format Guide 55

Exporting FontsUse Printer Manager to export font files as follows.
1. Make sure that the printer is connected to the computer with a TCP/IP interface.
2. Open Printer Manager.
3. Select Personalization Tools>Managed Items. The Managed Items screen displays.
4. Select Fonts.
5. Click List Items to view fonts on the printer. A list of fonts on the printer displays.
6. Make sure that the font file to export is highlighted, and then click Export Item.
7. Choose the location to export the file to, and then click Save
8. When the Download Complete dialog displays, click Close.
56 Working with Printer Manager
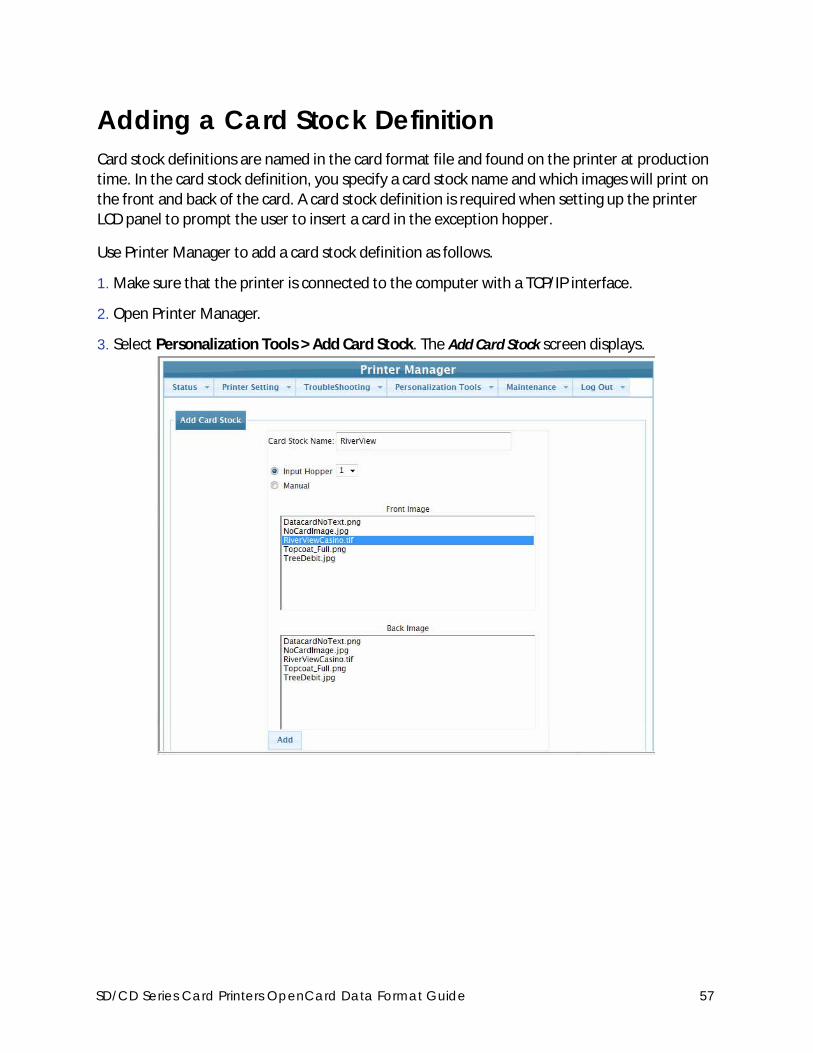
Adding a Card Stock DefinitionCard stock definitions are named in the card format file and found on the printer at production time. In the card stock definition, you specify a card stock name and which images will print on the front and back of the card. A card stock definition is required when setting up the printer LCD panel to prompt the user to insert a card in the exception hopper.
Use Printer Manager to add a card stock definition as follows.
1. Make sure that the printer is connected to the computer with a TCP/IP interface.
2. Open Printer Manager.
3. Select Personalization Tools > Add Card Stock. The Add Card Stock screen displays.
SD/CD Series Card Printers OpenCard Data Format Guide 57

4. Determine the input type.
• Select Input Hopper to designate which input hopper the printer will pick from when this card stock is defined in the card format.
• Select Manual if this card stock is used with a manual card picking process.
5. In the Card Stock Name field, enter a name for this card stock.
6. From the Front Image list, verify that the images this card stock uses are in the list.
7. From the Back Image list, verify that the images this card stock uses are in the list.
8. Click Add to save the card stock definition.
Viewing the Print Request LogView the Print Request log to determine the status of a print request. This page of Printer Manager displays print requests sent to the printer. The Print Request log entry is created on receipt of the OpenCard data stream. It is updated every time the state changes. After a card prints out or encounters an error, the software makes a log entry about it. The software then waits for the next data stream to be posted.
The log pages are displayed with the newest print request on top. The log entries let you know the state of a print request. Printer states, such as “PRINTED” or “FAILED,” display along with more detailed information about each print request describing the displayed state.
1. Make sure that the printer is connected to the computer using TCP/IP.
2. Open Printer Manager.
3. Select Troubleshooting > Print Request Log. The Print Request Log screen displays.
For the Legacy Option only Card stock must be named Default.
58 Working with Printer Manager
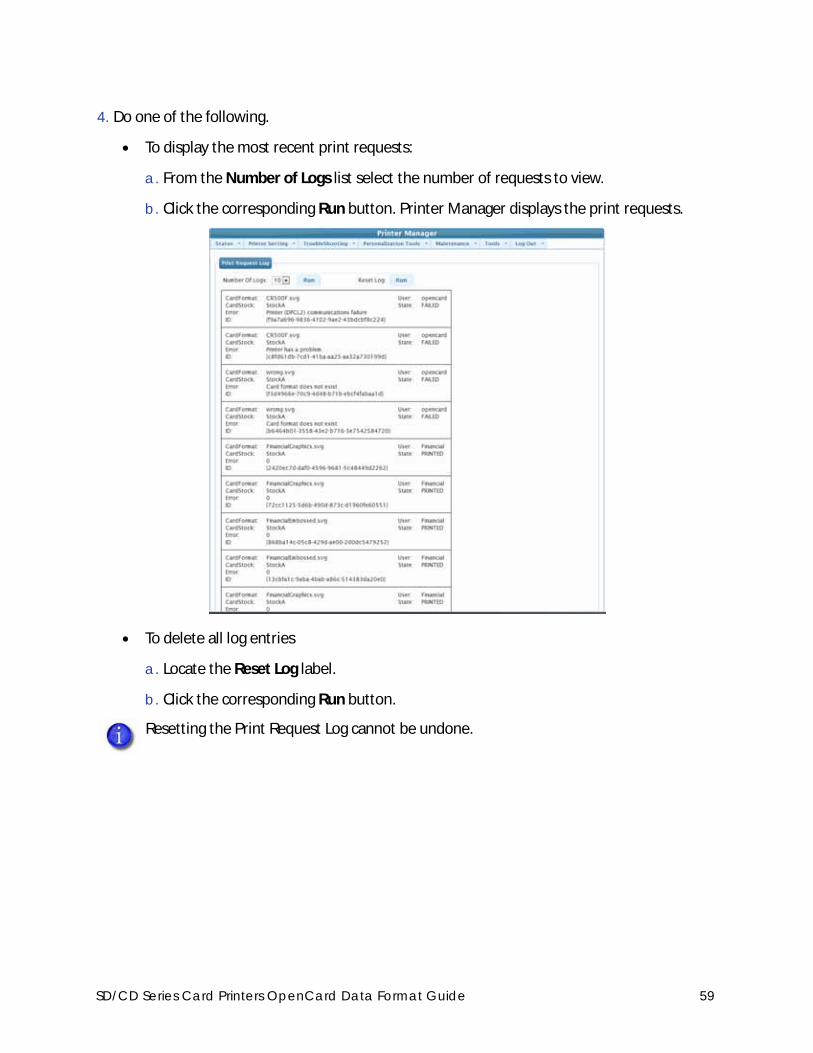
4. Do one of the following.
• To display the most recent print requests:
a. From the Number of Logs list select the number of requests to view.
b. Click the corresponding Run button. Printer Manager displays the print requests.
• To delete all log entries
a. Locate the Reset Log label.
b. Click the corresponding Run button.
Resetting the Print Request Log cannot be undone.
SD/CD Series Card Printers OpenCard Data Format Guide 59
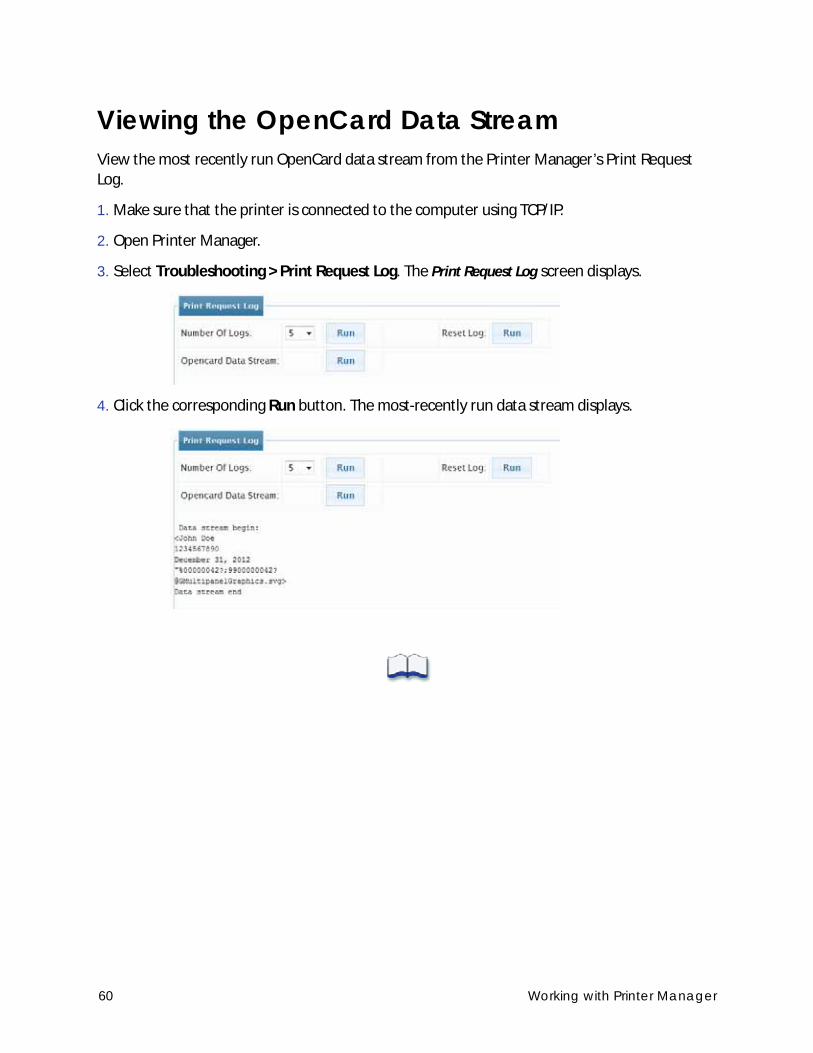
Viewing the OpenCard Data StreamView the most recently run OpenCard data stream from the Printer Manager’s Print Request Log.
1. Make sure that the printer is connected to the computer using TCP/IP.
2. Open Printer Manager.
3. Select Troubleshooting > Print Request Log. The Print Request Log screen displays.
4. Click the corresponding Run button. The most-recently run data stream displays.
60 Working with Printer Manager
Chapter 6: Printing Cards
This chapter includes information you need to print cards on SD/CD Series printers using OpenCard.
To print cards on SD/CD Series printers using OpenCard you must:
• Create a card format.
• Import card formats, images, and fonts to the printer, and define card stock using Printer Manager.
• Have a working data stream.
• Create a card stock.
1. Before you start printing, make sure that the printer is at the READY state.
2. Select Start Menu > Accessories and select Command prompt.
3. Enter file2prn [filename] ipaddress [portnumber] where:
filename is the name of a card data stream file.
ipaddress is the IP address of the printer to which you are printing the data stream.
portnumber is the port number at the printer to which you are printing the data stream. If you do not specify a port number, 9100 is assumed.
The following is displayed, indicating that the file was sent successfully:
sending file..............sent
4. Repeat steps 2 and 3 for each data stream to be printed.
If a card does not print, view the Print Request Log to find troubleshooting messages about the printer state.
SD/CD Series Card Printers OpenCard Data Format Guide 61

62 Printing Cards

Appendix A: Sample Card Formats
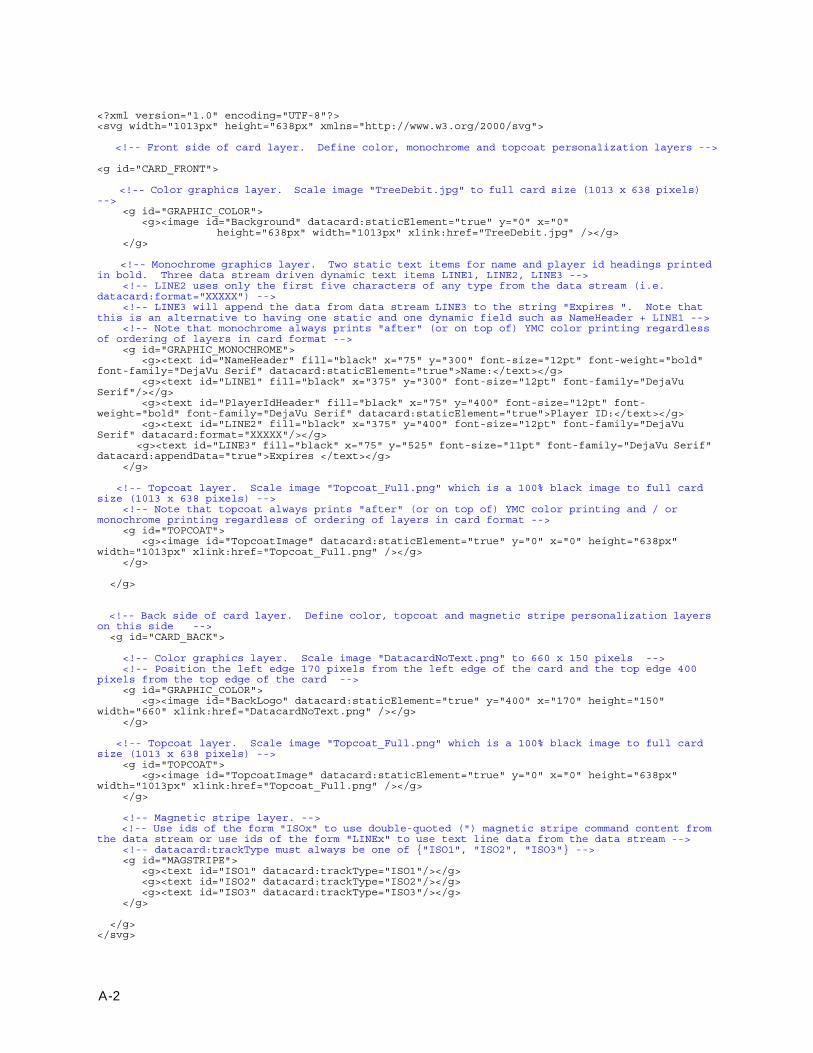
This appendix provides sample card formats with comments. Use it as a reference for creating OpenCard card formats for the SD/CD Series printers.Sample 1—Multipanel Graphics.svgThe card format shown below includes comments that describe how it creates the printed card shown. Note that since the CARD_BACK layer is defined, this card has elements on the back, including color graphics, topcoat, and a magnetic stripe.
Comments describing the sample begin with the <!- - symbols and ended with the --> symbols:
This example uses the following data stream:
OpenCard data stream
<John Doe1234December 31, [email protected]"%JOHN DOE^0205?;0205:2200000042?;1234567890?>
SD/CD Series Card Printers OpenCard Data Format Guide A-1
<?xml version="1.0" encoding="UTF-8"?><svg width="1013px" height="638px" xmlns="http://www.w3.org/2000/svg"> <!-- Front side of card layer. Define color, monochrome and topcoat personalization layers --> <g id="CARD_FRONT"> <!-- Color graphics layer. Scale image "TreeDebit.jpg" to full card size (1013 x 638 pixels) --> <g id="GRAPHIC_COLOR"> <g><image id="Background" datacard:staticElement="true" y="0" x="0"
height="638px" width="1013px" xlink:href="TreeDebit.jpg" /></g> </g> <!-- Monochrome graphics layer. Two static text items for name and player id headings printed in bold. Three data stream driven dynamic text items LINE1, LINE2, LINE3 --> <!-- LINE2 uses only the first five characters of any type from the data stream (i.e. datacard:format="XXXXX") --> <!-- LINE3 will append the data from data stream LINE3 to the string "Expires ". Note that this is an alternative to having one static and one dynamic field such as NameHeader + LINE1 --> <!-- Note that monochrome always prints "after" (or on top of) YMC color printing regardless of ordering of layers in card format --> <g id="GRAPHIC_MONOCHROME"> <g><text id="NameHeader" fill="black" x="75" y="300" font-size="12pt" font-weight="bold" font-family="DejaVu Serif" datacard:staticElement="true">Name:</text></g> <g><text id="LINE1" fill="black" x="375" y="300" font-size="12pt" font-family="DejaVu Serif"/></g> <g><text id="PlayerIdHeader" fill="black" x="75" y="400" font-size="12pt" font-weight="bold" font-family="DejaVu Serif" datacard:staticElement="true">Player ID:</text></g> <g><text id="LINE2" fill="black" x="375" y="400" font-size="12pt" font-family="DejaVu Serif" datacard:format="XXXXX"/></g> <g><text id="LINE3" fill="black" x="75" y="525" font-size="11pt" font-family="DejaVu Serif" datacard:appendData="true">Expires </text></g> </g> <!-- Topcoat layer. Scale image "Topcoat_Full.png" which is a 100% black image to full card size (1013 x 638 pixels) --> <!-- Note that topcoat always prints "after" (or on top of) YMC color printing and / or monochrome printing regardless of ordering of layers in card format --> <g id="TOPCOAT"> <g><image id="TopcoatImage" datacard:staticElement="true" y="0" x="0" height="638px" width="1013px" xlink:href="Topcoat_Full.png" /></g> </g> </g> <!-- Back side of card layer. Define color, topcoat and magnetic stripe personalization layers on this side --> <g id="CARD_BACK">
<!-- Color graphics layer. Scale image "DatacardNoText.png" to 660 x 150 pixels --> <!-- Position the left edge 170 pixels from the left edge of the card and the top edge 400 pixels from the top edge of the card --> <g id="GRAPHIC_COLOR"> <g><image id="BackLogo" datacard:staticElement="true" y="400" x="170" height="150" width="660" xlink:href="DatacardNoText.png" /></g> </g>
<!-- Topcoat layer. Scale image "Topcoat_Full.png" which is a 100% black image to full card size (1013 x 638 pixels) --> <g id="TOPCOAT"> <g><image id="TopcoatImage" datacard:staticElement="true" y="0" x="0" height="638px" width="1013px" xlink:href="Topcoat_Full.png" /></g> </g>
<!-- Magnetic stripe layer. --> <!-- Use ids of the form "ISOx" to use double-quoted (") magnetic stripe command content from the data stream or use ids of the form "LINEx" to use text line data from the data stream --> <!-- datacard:trackType must always be one of {"ISO1", "ISO2", "ISO3"} --> <g id="MAGSTRIPE"> <g><text id="ISO1" datacard:trackType="ISO1"/></g> <g><text id="ISO2" datacard:trackType="ISO2"/></g> <g><text id="ISO3" datacard:trackType="ISO3"/></g> </g> </g></svg>
A-2

Sample 2—RiverViewCasino.svgThe card format document shown below includes comments as to how it creates the card shown. Note that since the CARD_BACK layer is defined, this card has elements on the back, including a bar code and a magnetic stripe.
Comments describing the sample begin with the <!- - symbols and ended with the --> symbols.
This example uses the following data stream:
<?xml version="1.0" encoding="UTF-8"?><svg width="1013px" height="638px" xmlns="http://www.w3.org/2000/svg"> <!-- Front side of card layer. Define color, monochrome and topcoat personalization layers --><g id="CARD_FRONT"> <!-- Color graphics layer. Scale image "RiverViewCasino.tif" to full card size
(1013 x 638 pixels) --> <!-- Print name using LINE1 data item in blue. Print ID# using the first seven digits from the
LINE2 data item in blue, statically prepending a '#' --> <g id="GRAPHIC_COLOR">
<g><image id="Background" datacard:staticElement="true" y="0" x="0" height="638px" width="1013px" xlink:href="RiverViewCasino.tif" /></g>
<g><text id="LINE1" fill="blue" x="75" y="400" font-size="12pt" font-family="DejaVu Serif" font-weight="bold"/></g>
<g><text id="LINE2" fill="blue" x="75" y="525" font-size="12pt" font-family="DejaVu Serif" font-weight="bold" datacard:format="#9999999"/></g>
</g> <!-- Topcoat layer. Scale image "Topcoat_Full.png" which is a 100% black image to full card size (1013 x 638 pixels) --> <!-- Note that topcoat always prints after (or on top of) YMC color printing and / or monochrome printing regardless of ordering of layers in card format --> <g id="TOPCOAT"> <g><image id="TopcoatImage" datacard:staticElement="true" y="0" x="0" height="638px"
width="1013px" xlink:href="Topcoat_Full.png" /></g> </g> </g> <!-- Back side of card layer. Define color, topcoat and magnetic stripe personalization layers on this side -->
OpenCard data stream
<John Doe1234567890@[email protected]>
SD/CD Series Card Printers OpenCard Data Format Guide A-3

<g id="CARD_BACK">
<!-- Monochrome graphics layer. Print a Code39 barcode using the first seven digits from data item LINE2.--> <!-- Density=4.6 and bar ratio of 3:1, with human readable --> <!-- Note that monochrome always prints "after" (or on top of) YMC color printing regardless of ordering of layers in card format --> <g id="GRAPHIC_MONOCHROME"> <g><text id="LINE2" fill="black" x="225" y="400" font-size="18pt"
datacard:format="9999999" font-family="Code39" datacard:barcode="true" datacard:barHumanReadable="true" datacard:barDensity="4.6" datacard:barRatio="3to1"/></g>
</g>
<!-- Magnetic stripe layer. --><!-- Use ids of the form "ISOx" to use double-quoted (") magnetic stripe command content from the data stream or use ids of the form "LINEx" to use text line data from the data stream --> <!-- datacard:trackType must always be one of {"ISO1", "ISO2", "ISO3"} --><!-- This example shows how to extract data from LINE2 and use it to encode on ISO1 (Track1).--><g id="MAGSTRIPE"> <g><text id="LINE2" datacard:trackType="ISO1"/></g> </g> </g></svg>
A-4

Appendix B: Setting Up OS/400
This appendix provides information about how to prepare to use the OS400 operating system with OpenCard.The printer supports the LPD/LPR (line printer daemon/line printer remote)protocol to receive OpenCard data from a host computer.
Configuring the OS/400 Operating System1. To configure the OS/400 operating system, type the following from a
command line exactly as shown. This creates the output queue for the printer.
In this example, the queue name is SPOUTQ. The parametersin italic text are variable.
CRTOUTQ OUTQ(QUSRSYS/SPOUTQ) RMTSYS(*INTNETADR)RMTPRTQ(RAW) CNNTYPE(*IP) DESTTYPE(*OTHER)MFRTYPMDL(*WSCST) WSCST(QSYS/QWPDEFAULT)INTNETADR(’XXX.XXX.XXX.XXX’) SEPPAGE(*NO)TEXT(’SP Printer’)
2. To start the printer and start printing, type the following at a command line:
STRRMTWTR (QueueName)Comments
3. To stop all printing to the printer, type the following:
ENDWTR (QueueName)
4. To monitor the printer, type the following:
WRKOUTQ (QueueName)
B-1

Following is the result of the WRKOUTQD command:
5722SS1 V5R1M0 010525 AS3 03/19/04 11:08:21Queue: SPOUTQ Library: OLSONPStatus:Writer active . . . . . . . . . . . . . : YWriter name(s) if active . . . . . . . : SPOUTQOutput queue held . . . . . . . . . . : NMaximum spooled file size:Number of pages . . . . . . . . . . . : *NONEStarting time . . . . . . . . . . . . :Ending time . . . . . . . . . . . . . :Writers to autostart . . . . . . . . . : 1Display any file . . . . . . . . . . . : *NOJob separators . . . . . . . . . . . . : 0Operator controlled . . . . . . . . . . : *YESOrder of files on queue . . . . . . . . : *FIFOData queue . . . . . . . . . . . . . . : *NONELibrary . . . . . . . . . . . . . . . :Authority to check . . . . . . . . . . : *OWNERRemote system . . . . . . . . . . . . . : *INTNETADRRemote printer queue . . . . . . . . . : RAWQueue for writer messages . . . . . . . : QSYSOPRLibrary . . . . . . . . . . . . . . . : *LIBLConnection type . . . . . . . . . . . . : *IPInternet address . . . . . . . . . . . : 111.111.111.111Destination type . . . . . . . . . . . : *OTHERVM/MVS class . . . . . . . . . . . . . :FCB . . . . . . . . . . . . . . . . . . :Host print transform . . . . . . . . . : *YESUser data transform . . . . . . . . . :Library . . . . . . . . . . . . . . . :Manufacturer type and model . . . . . : *WSCSTWorkstation customizing object . . . . : QWPDEFAULTLibrary . . . . . . . . . . . . . . . . : QSYSImage configuration . . . . . . . . . . : *NONEDestination options . . . . . . . . . . : *NONEPrint separator page . . . . . . . . . : *NOUser defined option . . . . . . . . . . : *NONEUser defined object:Object . . . . . . . . . . . . . . . . : *NONELibrary . . . . . . . . . . . . . . . :Object type . . . . . . . . . . . . . . :User driver program . . . . . . . . . . : *NONELibrary . . . . . . . . . . . . . . . :Spooled file ASP . . . . . . . . . . . : *SYSTEMText description . . . . . . . . . . . : *BLANK* * * * * E N D O F L I S T I N G * * * * *
B-2


