158
Leader in Data Quality and Data Integration www.dataflux.com 877–846–FLUX International +44 (0) 1753 272 020 DataFlux qMDM Solution
Leader in Data Quality and Data Integration
www.dataflux.com 877–846–FLUX
International +44 (0) 1753 272 020
DataFlux qMDM Solution

This page is intentionally blank
DataFlux qMDM Solution Version 2.1
Updated: March 19, 2008

This page intentionally left blank
DataFlux - Contact and Legal Information Contact DataFlux
Corporate Headquarters European Headquarters
DataFlux Corporation DataFlux UK Limited 940 NW Cary Parkway, Suite 201 59-60 Thames Street Cary, NC 27513-2792 WINDSOR Toll Free Phone: 1-877-846-FLUX (3589) Berkshire Toll Free Fax: 1-877-769-FLUX (3589) SL4 ITX Local Telephone: 1-919-447-3000 United Kingdom Local Fax: 1-919-447-3100 UK (EMEA): +44(0) 1753 272 020 Web: www.dataflux.com
Contact Technical Support
Phone: 1-919-531-9000 Email: [email protected] Web: http://www.dataflux.com/Resources/DataFlux-Resources/Customer-Care-Portal/Technical-Support.aspx
Legal Information
Copyright © 1997 - 2009 DataFlux Corporation LLC, Cary, NC, USA. All Rights Reserved.
DataFlux and all other DataFlux Corporation LLC product or service names are registered trademarks or trademarks of, or licensed to, DataFlux Corporation LLC in the USA and other countries. ® indicates USA registration.
Apache Portable Runtime License Disclosure
Copyright © 2008 DataFlux Corporation LLC, Cary, NC USA.
Licensed under the Apache License, Version 2.0 (the "License"); you may not use this file except in compliance with the License. You may obtain a copy of the License at http://www.apache.org/licenses/LICENSE-2.0
Unless required by applicable law or agreed to in writing, software distributed under the License is distributed on an "AS IS" BASIS, WITHOUT WARRANTIES OR CONDITIONS OF ANY KIND, either express or implied. See the License for the specific language governing permissions and limitations under the License.
Apache/Xerces Copyright Disclosure
The Apache Software License, Version 1.1
Copyright (c) 1999-2003 The Apache Software Foundation. All rights reserved.
DataFlux® qMDM Solution 1

Redistribution and use in source and binary forms, with or without modification, are permitted provided that the following conditions are met:
1. Redistributions of source code must retain the above copyright notice, this list of conditions and the following disclaimer.
2. Redistributions in binary form must reproduce the above copyright notice, this list of conditions and the following disclaimer in the documentation and/or other materials provided with the distribution.
3. The end-user documentation included with the redistribution, if any, must include the following acknowledgment: "This product includes software developed by the Apache Software Foundation http://www.apache.org/." Alternately, this acknowledgment may appear in the software itself, if and wherever such third-party acknowledgments normally appear.
4. The names "Xerces" and "Apache Software Foundation" must not be used to endorse or promote products derived from this software without prior written permission. For written permission, please contact [email protected].
5. Products derived from this software may not be called "Apache", nor may "Apache" appear in their name, without prior written permission of the Apache Software Foundation.
THIS SOFTWARE IS PROVIDED "AS IS'' AND ANY EXPRESSED OR IMPLIED WARRANTIES, INCLUDING, BUT NOT LIMITED TO, THE IMPLIED WARRANTIES OF MERCHANTABILITY AND FITNESS FOR A PARTICULAR PURPOSE ARE DISCLAIMED. IN NO EVENT SHALL THE APACHE SOFTWARE FOUNDATION OR ITS CONTRIBUTORS BE LIABLE FOR ANY DIRECT, INDIRECT, INCIDENTAL, SPECIAL, EXEMPLARY, OR CONSEQUENTIAL DAMAGES (INCLUDING, BUT NOT LIMITED TO, PROCUREMENT OF SUBSTITUTE GOODS OR SERVICES; LOSS OF USE, DATA, OR PROFITS; OR BUSINESS INTERRUPTION) HOWEVER CAUSED AND ON ANY THEORY OF LIABILITY, WHETHER IN CONTRACT, STRICT LIABILITY, OR TORT (INCLUDING NEGLIGENCE OR OTHERWISE) ARISING IN ANY WAY OUT OF THE USE OF THIS SOFTWARE, EVEN IF ADVISED OF THE POSSIBILITY OF SUCH DAMAGE.
This software consists of voluntary contributions made by many individuals on behalf of the Apache Software Foundation and was originally based on software copyright (c) 1999, International Business Machines, Inc., http://www.ibm.com. For more information on the Apache Software Foundation, please see http://www.apache.org/.
DataDirect Copyright Disclosure
Portions of this software are copyrighted by DataDirect Technologies Corp., 1991 - 2008.
Expat Copyright Disclosure
Part of the software embedded in this product is Expat software.
Copyright (c) 1998, 1999, 2000 Thai Open Source Software Center Ltd.
Permission is hereby granted, free of charge, to any person obtaining a copy of this software and associated documentation files (the "Software"), to deal in the Software without restriction, including without limitation the rights to use, copy, modify, merge, publish, distribute, sublicense, and/or sell copies of the Software, and to permit persons to whom the Software is furnished to do so, subject to the following conditions:
2 DataFlux® qMDM Solution

The above copyright notice and this permission notice shall be included in all copies or substantial portions of the Software.
THE SOFTWARE IS PROVIDED "AS IS", WITHOUT WARRANTY OF ANY KIND, EXPRESS OR IMPLIED, INCLUDING BUT NOT LIMITED TO THE WARRANTIES OF MERCHANTABILITY, FITNESS FOR A PARTICULAR PURPOSE AND NONINFRINGEMENT. IN NO EVENT SHALL THE AUTHORS OR COPYRIGHT HOLDERS BE LIABLE FOR ANY CLAIM, DAMAGES OR OTHER LIABILITY, WHETHER IN AN ACTION OF CONTRACT, TORT OR OTHERWISE, ARISING FROM, OUT OF OR IN CONNECTION WITH THE SOFTWARE OR THE USE OR OTHER DEALINGS IN THE SOFTWARE.
gSOAP Copyright Disclosure
Part of the software embedded in this product is gSOAP software.
Portions created by gSOAP are Copyright (C) 2001-2004 Robert A. van Engelen, Genivia inc. All Rights Reserved.
THE SOFTWARE IN THIS PRODUCT WAS IN PART PROVIDED BY GENIVIA INC AND ANY EXPRESS OR IMPLIED WARRANTIES, INCLUDING, BUT NOT LIMITED TO, THE IMPLIED WARRANTIES OF MERCHANTABILITY AND FITNESS FOR A PARTICULAR PURPOSE ARE DISCLAIMED. IN NO EVENT SHALL THE AUTHOR BE LIABLE FOR ANY DIRECT, INDIRECT, INCIDENTAL, SPECIAL, EXEMPLARY, OR CONSEQUENTIAL DAMAGES (INCLUDING, BUT NOT LIMITED TO, PROCUREMENT OF SUBSTITUTE GOODS OR SERVICES; LOSS OF USE, DATA, OR PROFITS; OR BUSINESS INTERRUPTION) HOWEVER CAUSED AND ON ANY THEORY OF LIABILITY, WHETHER IN CONTRACT, STRICT LIABILITY, OR TORT (INCLUDING NEGLIGENCE OR OTHERWISE) ARISING IN ANY WAY OUT OF THE USE OF THIS SOFTWARE, EVEN IF ADVISED OF THE POSSIBILITY OF SUCH DAMAGE.
Microsoft Copyright Disclosure
Microsoft®, Windows, NT, SQL Server, and Access, are either registered trademarks or trademarks of Microsoft Corporation in the United States and/or other countries.
Oracle Copyright Disclosure
Oracle, JD Edwards, PeopleSoft, and Siebel are registered trademarks of Oracle Corporation and/or its affiliates.
PCRE Copyright Disclosure
A modified version of the open source software PCRE library package, written by Philip Hazel and copyrighted by the University of Cambridge, England, has been used by DataFlux for regular expression support. More information on this library can be found at: ftp://ftp.csx.cam.ac.uk/pub/software/programming/pcre/
Copyright (c) 1997-2005 University of Cambridge. All rights reserved.
Redistribution and use in source and binary forms, with or without modification, are permitted provided that the following conditions are met:
• Redistributions of source code must retain the above copyright notice, this list of conditions and the following disclaimer.
• Redistributions in binary form must reproduce the above copyright notice, this list of conditions and the following disclaimer in the documentation and/or other materials provided with the distribution.
DataFlux® qMDM Solution 3
• Neither the name of the University of Cambridge nor the name of Google Inc. nor the names of their contributors may be used to endorse or promote products derived from this software without specific prior written permission.
THIS SOFTWARE IS PROVIDED BY THE COPYRIGHT HOLDERS AND CONTRIBUTORS "AS IS" AND ANY EXPRESS OR IMPLIED WARRANTIES, INCLUDING, BUT NOT LIMITED TO, THE IMPLIED WARRANTIES OF MERCHANTABILITY AND FITNESS FOR A PARTICULAR PURPOSE ARE DISCLAIMED. IN NO EVENT SHALL THE COPYRIGHT OWNER OR CONTRIBUTORS BE LIABLE FOR ANY DIRECT, INDIRECT, INCIDENTAL, SPECIAL, EXEMPLARY, OR CONSEQUENTIAL DAMAGES (INCLUDING, BUT NOT LIMITED TO, PROCUREMENT OF SUBSTITUTE GOODS OR SERVICES; LOSS OF USE, DATA, OR PROFITS; OR BUSINESS INTERRUPTION) HOWEVER CAUSED AND ON ANY THEORY OF LIABILITY, WHETHER IN CONTRACT, STRICT LIABILITY, OR TORT (INCLUDING NEGLIGENCE OR OTHERWISE) ARISING IN ANY WAY OUT OF THE USE OF THIS SOFTWARE, EVEN IF ADVISED OF THE POSSIBILITY OF SUCH DAMAGE.
Red Hat Copyright Disclosure
Red Hat® Enterprise Linux®, and Red Hat Fedora™ are registered trademarks of Red Hat, Inc. in the United States and other countries.
SQLite Copyright Disclosure
The original author of SQLite has dedicated the code to the public domain. Anyone is free to copy, modify, publish, use, compile, sell, or distribute the original SQLite code, either in source code form or as a compiled binary, for any purpose, commercial or non-commercial, and by any means.
Sun Microsystems Copyright Disclosure
Java™ is a trademark of Sun Microsystems, Inc. in the U.S. or other countries.
Tele Atlas North American Copyright Disclosure
Portions © 2006 Tele Atlas North American, Inc. All rights reserved. This material is proprietary and the subject of copyright protection and other intellectual property rights owned by or licensed to Tele Atlas North America, Inc. The use of this material is subject to the terms of a license agreement. You will be held liable for any unauthorized copying or disclosure of this material.
USPS Copyright Disclosure
National ZIP®, ZIP+4®, Delivery Point Barcode Information, DPV, RDI. © United States Postal Service 2005. ZIP Code® and ZIP+4® are registered trademarks of the U.S. Postal Service.
DataFlux holds a non-exclusive license from the United States Postal Service to publish and sell USPS CASS, DPV, and RDI information. This information is confidential and proprietary to the United States Postal Service. The price of these products is neither established, controlled, or approved by the United States Postal Service.
4 DataFlux® qMDM Solution

Table of Contents DataFlux - Contact and Legal Information .......................................1
Overview ....................................................................................... 12
Introduction .................................................................................. 13
Customer Data............................................................................. 13
How qMDM Works ........................................................................ 13
Generic Architecture ..................................................................... 14
DataFlux dfPower Studio ............................................................... 15
DataFlux Integration Server ........................................................... 15
Master Reference Database ........................................................... 16
Master Repository Manager ............................................................ 16
Integration with the qMDM Solution ................................................ 17
Data Management Methodology .................................................... 19
Additional Information on Data Management .................................... 20
Feature List ................................................................................... 21
Sample Project Plan ...................................................................... 23
Understanding the qMDM Architecture .......................................... 25
Data Model .................................................................................... 26
Deployment Models ....................................................................... 27
Physical Model ............................................................................. 27
Virtual Model ............................................................................... 27
Design Considerations ................................................................... 28
General Design Notes .................................................................... 29
Deployment Order ........................................................................ 29
Special Fields and Keys ................................................................. 29
Database Sizing ............................................................................. 31
DataFlux® qMDM Solution 5

Assessing Database Table Size ....................................................... 31
Additional Estimation Techniques .................................................... 31
International Deployment ............................................................. 33
Display Codes .............................................................................. 33
Locales ....................................................................................... 33
Tiering ........................................................................................... 34
Implementing the DataFlux qMDM Solution .................................. 36
Conceptual Planning ...................................................................... 37
Entity Creation ............................................................................. 37
Entity Updates ............................................................................. 38
Events ........................................................................................ 39
Entity Changes Over Time ............................................................. 40
Building the qMDM Solution Team ................................................. 41
Team Composition ........................................................................ 41
Team Member Skill Sets ................................................................ 41
The AIC Principle ........................................................................... 44
Getting Started ............................................................................ 44
Operation Modes .......................................................................... 44
Preliminary Activities .................................................................... 46
Batch Load Operations .................................................................. 47
Identify Source Data and Stage ...................................................... 47
Validate ...................................................................................... 48
Cleanse ...................................................................................... 49
Generate Match Codes .................................................................. 49
Identify Relationships for Linking and Merging .................................. 50
Create DataFlux qMDM MR Database Load ....................................... 52
Batch Update ................................................................................. 53
6 DataFlux® qMDM Solution
Ongoing Activities ......................................................................... 56
Service Mode ................................................................................. 57
Services ...................................................................................... 58
External Data Provider Node .......................................................... 59
Validation Node ............................................................................ 59
Expression Node .......................................................................... 60
Additional Nodes .......................................................................... 60
Embedded Job Node ..................................................................... 60
Data Access (or SQL Lookup) Node ................................................. 61
Field Layout Node ......................................................................... 61
DataFlux qMDM Best Practices ...................................................... 62
Implementation Lifecycle .............................................................. 64
Plan ........................................................................................... 64
Develop ...................................................................................... 65
Test ........................................................................................... 66
Promote ...................................................................................... 67
Maintain ...................................................................................... 67
Identity Management .................................................................... 69
Match Concepts ........................................................................... 69
Match Definitions ......................................................................... 70
Removing Duplicate Data .............................................................. 71
Manual Identity Management ......................................................... 72
DataFlux Clustering Options ........................................................... 72
Data Quality .................................................................................. 77
Working with International Data ..................................................... 77
Parsing Data ................................................................................ 78
Standardizing Data ....................................................................... 79
DataFlux® qMDM Solution 7

Non-Valid Records and Exceptions .................................................. 80
Using External Data Quality Functionality ......................................... 81
Using Database Connections for Saved Connections .......................... 82
Real-time Service Performance Tuning ......................................... 84
Clustering ................................................................................... 84
Sorting ....................................................................................... 85
Architect - Field Pass-throughs ....................................................... 86
Architect - Field Definitions ............................................................ 86
Architect Options .......................................................................... 87
Typical Service Job Flow ................................................................ 87
Job Annotation ............................................................................. 91
Changing Node Properties ............................................................. 92
Working with Large Architect Jobs and Services ................................ 95
Posting Services to the Server ...................................................... 97
Security Considerations for the qMDM Environment ........................... 97
Auditing and Reporting ............................................................... 100
Using dfPower Profile .................................................................. 100
Using qMDM Data for Reporting .................................................. 101
Master Reference Database Purge ............................................... 102
Trimming Historical Data ............................................................. 102
Performance Considerations ....................................................... 104
Cleansing Transformations ........................................................... 104
Parse Resource Level and Depth ................................................... 104
Parse Strategy ........................................................................... 104
Match Criteria Complexity ............................................................ 105
Survivorship Rule Complexity ....................................................... 105
DataFlux Process Memory Allocation ............................................. 105
8 DataFlux® qMDM Solution
Delaying Memory Allocation ......................................................... 106
Multi-Threaded Sorting/Joining/Clustering ...................................... 106
Process Log and Debug Log Disablement ....................................... 106
Memory Loading Small Tables ...................................................... 106
SQL Query Inputs and Parameterized SQL Queries .......................... 107
Text File Outputs ........................................................................ 107
Bulk Loading Database Table Inserts ............................................. 107
Pass-Thru Field Reduction ............................................................ 108
Expression Code Complexity ........................................................ 108
Work flow Branching ................................................................... 108
Alternating Union Rows ............................................................... 109
Hub Optimization ....................................................................... 109
Database Drivers........................................................................ 109
Storing History ........................................................................... 109
Storing Attributes ....................................................................... 110
Activity on the Hub ..................................................................... 110
Indexes After Inserts .................................................................. 111
Minimizing Clustering .................................................................. 111
The qMDM User Interface ............................................................ 112
Common Page Elements .............................................................. 113
Entities ........................................................................................ 116
Common Elements ..................................................................... 116
Entity Search Pane ..................................................................... 117
Entity Editor .............................................................................. 119
Search Results Pane ................................................................... 119
Relationships .............................................................................. 121
Entity Search Pane ..................................................................... 122
DataFlux® qMDM Solution 9

Search Results Pane ................................................................... 122
Relationships Editor .................................................................... 122
Errors ....................................................................................... 125
Reports ....................................................................................... 126
Report Explorer Pane .................................................................. 127
Report (Center) Pane .................................................................. 127
Results Pane .............................................................................. 128
Administration ............................................................................ 129
Configuration ............................................................................. 130
Services ...................................................................................... 131
Integration Server Explorer Pane .................................................. 132
Jobs and Services (Center) Pane .................................................. 132
Results Pane .............................................................................. 132
Accelerators ................................................................................ 134
Accelerators Explorer .................................................................. 134
Appendixes ................................................................................. 135
Appendix A: Job and Service List ................................................. 136
TBL Services .............................................................................. 136
STWD Services .......................................................................... 137
MRM Services ............................................................................ 140
MDM Services ............................................................................ 142
Report Jobs and Services ............................................................. 143
SS Services ............................................................................... 145
STAGING Jobs ........................................................................... 145
META Jobs ................................................................................. 145
BULK Jobs ................................................................................. 146
ACCEL Services .......................................................................... 147
10 DataFlux® qMDM Solution

UTIL Services ............................................................................ 149
Appendix B: Data Model Design ................................................... 151
Table Names and Descriptions ...................................................... 151
DataFlux® qMDM Solution 11

Overview The following topics provide an overview of the DataFlux® qMDM Solution.
Introduction
Feature List
Generic Architecture
12 DataFlux® qMDM Solution
Introduction Customer Data A wealth of information may exist in your CRM, ERP, or other enterprise applications, but how do you discern between critical information and useless filler? Only through determined data management and strategic integration, can you and your customers realize the full benefits of what you have.
The DataFlux® quality Master Data Management Solution (qMDM throughout the rest of this Help documentation) combines technologies and processes that manage the integration of data held within customer information systems so you can manage interactions to benefit both your customer and your business.
To effectively bridge the gap between disparate applications and customer information, the DataFlux qMDM Solution provides a single, accurate, synchronized view of the customer.
How qMDM Works MDM pulls critical customer information from your customer data sources, and validates the data to make sure it is correct and meets your business standards. Over time, MDM solutions can update the customer data with internal and external information, and store, manage, and maintain the customer data to provide the best customer information to your entire organization.
The expertise that DataFlux brings to general data management and data quality is reflected in the DataFlux qMDM Solution, which permits us to employ the rigorous methodology that we apply to challenging data integration products of all types directly to the problem of integrating disparate customer data.
Because our customer base is so varied, encompassing an array of industries that include financial services, retail, telecommunications, manufacturing, and health care, DataFlux has the breadth of experience to ensure solutions that offer consistent, accurate, and reliable information to make mission-critical business decisions.
DataFlux® qMDM Solution 13

Generic Architecture The DataFlux® qMDM Solution employs a robust Master Reference (MR) database to support essential attributes and relationships within the database. All on-demand interaction with this database is through a Service Oriented Architecture1 (SOA) that enables any system to talk to the customer database and request or update information there. You can also access this database through batch jobs. Because DataFlux uses common Web service industry standards, integration of our qMDM Solution with other operational or online systems is relatively simple.
Following are the main components of the qMDM Solution:
• DataFlux dfPower® Studio
• DataFlux Integration Server (DIS)
• Master Reference Database
• Master Repository Manager
• Architect Job Templates/Business Services
• Quality Knowledge Base Locales
• Web Services and the SOA Environment
The following figure diagrams these components and how they fit together.
1 Enables any system to talk to the customer database and request or update information as necessary.
14 DataFlux® qMDM Solution

DataFlux MDM Architecture
DataFlux dfPower Studio dfPower Studio is a GUI-based application for job flow management and customization. The basic architecture for the DataFlux qMDM Solution uses the Architect component of dfPower Studio working synchronously with the Integration Server to build and manage the Master Reference database. The Architect component can alone build and maintain the DataFlux qMDM MR database in batch mode in a Windows environment, while the Integration Server and the associated Service Oriented Architecture (SOA) are needed for non-Windows environments and for real-time/transactional usage.
dfPower Studio is represented by a 1 in the DataFlux MDM Architecture diagram.
DataFlux Integration Server To ensure enterprise-wide data quality and consistent enterprise data integration practices, all of your systems should enforce data management rules that pull from the same repository to achieve a consistent, accurate, and reliable view of all your enterprise data.
DataFlux® qMDM Solution 15

The DataFlux Integration Server enables data management and integration processes to be deployed across an IT environment. dfPower Studio’s interaction with the Integration Server is limited to creating jobs that are posted to the Integration Server. The rest of the solution functionality, such as database connectivity, the shared metadata repository for data management rules, and the server for processing data management jobs, is considered to be part of the Integration Server.
DataFlux Integration Server is represented by a 2 in the DataFlux MDM Architecture diagram.
Master Reference Database An integral part of the DataFlux qMDM Solution is the Master Reference database. At a minimum, it supports essential entity attributes, address attributes, contact data attributes, and entity relationships. But it is also extensible to support customer-requested attributes and relationships. You can keep most of your customer oriented, non-transactional data in this database, if you desire.
However, the DataFlux qMDM Solution can also support a virtual style (also called a registry) deployment where only critical pieces of information are stored in the database and references back to original source systems build virtual views of the data when needed. This object registry capability offers particular value and flexibility to our customers.
The Master Reference Database is represented by a 3 the DataFlux MDM Architecture diagram.
Master Repository Manager The Master Repository Manager is a Web-based application that is designed to give individuals a way to interact directly with the Master Reference Database through DataFlux Integration Server. The business analyst or data steward can use this functionality to perform such tasks as adding new customers (or other defined entities) to the master repository, or querying the repository for the existence of a particular customer or entity. This application is standards based and can dynamically change as needed to adapt to new or changing qMDM services located on the Integration Server.
In addition to the components mentioned previously, and referenced in the figure DataFlux MDM Architecture, there are other elements that make up the qMDM Solution.
The Master Repository Manager is represented by a 4 the DataFlux MDM Architecture diagram.
Architect Job Templates/Business Services
As previously mentioned, dfPower Studio can be used to modify and build work flows called jobs. These jobs are delivered as templates that can be customized by consultants or other IT professionals. These jobs can be used in a batch mode; jobs used in a real-time mode can be considered business services. Many job templates
16 DataFlux® qMDM Solution

are delivered with the solution to accommodate such functions as address verification, merging, assigning IDs, standardizing data, querying data, etc.
Quality Knowledge Base Locales
The Quality Knowledge Base (QKB) contains the files, file relationships, and metadata needed to correctly parse, match, standardize, and otherwise process data as required for the qMDM Solution. The QKB can be customized to meet unique client needs and new locales can be utilized to internationalize the qMDM Solution.
Web Services and the SOA Environment
The real-time/transactional piece of the solution is brought to other applications through an SOA environment. Specifically, the ability to call business services hosted on the Integration Server is done through Web services. Batch jobs derived from base qMDM templates can be re-purposed as business services that accept data on a record-by-record basis. This aspect of the solution allows enforcement of business logic, exception handling, identity management, and data quality across the various modes of data processing.
Integration with the qMDM Solution There are two ways to integrate other end-user or enterprise applications, as well as ETL2 software, with the DataFlux® qMDM Solution. The first option is direct-database or flat-file access running batch load or batch update processes. In this case, DataFlux Integration Server can connect directly to data sources, transform data, load it into the MR database, and write data back to the original data source.
The second option is communicating with Integration Server using Web services. Any application or process that can make a Web service call can send data to the MR database through Integration Server and, conversely, receive data from the MR database in the same manner. In practice, both of these methods will typically be used to interact with the qMDM Solution. In some cases, it may make sense to directly communicate with Integration Server from an application integration layer of an enterprise application like Siebel or SAP, but in other cases using an enterprise messaging mechanism like Tibco or WebMethods may make sense if that infrastructure is already deployed in an organization.
You will also have the option of making Web service calls directly from a .NET or Java component or application that can utilize Web services. This type of scenario might be common in circumstances where internally designed and built operational or reporting processes need to interact with Integration Server to access customer data inside the MR database.
2 Extract, Transform, Load
DataFlux® qMDM Solution 17
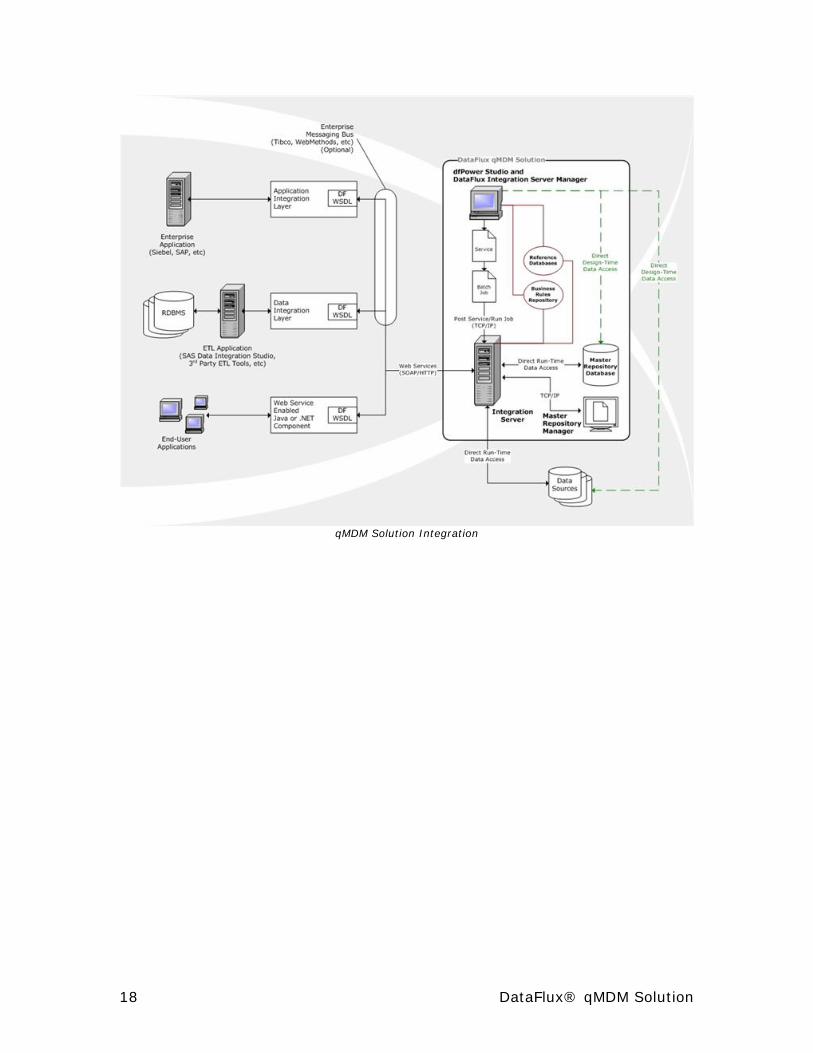
qMDM Solution Integration
18 DataFlux® qMDM Solution

Data Management Methodology The cost of ineffective data management can be much higher than the cost of managing data well. Effective data can guide you to make effective business decision, whereas faulty data can lead to faulty choices and the subsequent financial costs of those faulty choices.
How do you manage the data and leverage it effectively? DataFlux® approaches data management initiatives using an Analyze, Improve, and Control process (AIC). AIC is a method of finding data problems, building reusable transformations, and strategically applying those transformations to improve the usability and reliability of your data.
The AIC process is used to apply five building blocks of data management:
1. Data profiling
2. Data quality
3. Data integration
4. Data enrichment
5. Data monitoring
The AIC process comprises five building blocks
The DataFlux qMDM Solution permits you to leverage the proven process methodology developed by DataFlux, and deliver superior data management. It uses
DataFlux® qMDM Solution 19
the technically superior DataFlux Enterprise Data Integration platform to create a powerful and customizable solution.
Additional Information on Data Management
Managing International Data
The DataFlux qMDM Solution is flexible enough to handle international data, both at the data quality level and at the data model level. The qMDM process uses the Quality Knowledge Base (QKB) managed system of locales to support data quality functionality for regions across the globe. For example, this capability means that the qMDM system can validate address information for German data as well as parse name information in French data all in one pass. The locales can be customized and extended as needed to address the unique needs of every qMDM implementation.
In the data model, an internationalized approach has been taken as well. Table attributes are not country specific, and the reference code tables used to define and describe qMDM codes such as address type, language type, or market segment code can all be displayed in the language of the user’s choice, without changing the model in any way.
Managing Historical Data
The qMDM Solution from DataFlux has been designed from the beginning to handle and store slowly changing data. Generally speaking, information does not leave the DataFlux qMDM MR database; it only becomes inactive or retired when replaced by data that has been determined by the system to be more complete or more accurate. Valid from and to date, as well as time stamps, facilitate this functionality. The dates are updated and queried appropriately when new data enters the system. At any given time, you can run a service that shows only the active, uniquely-identified entity, or the complete history of a uniquely-identified entity.
20 DataFlux® qMDM Solution

Feature List Some of the general features of the DataFlux® qMDM Solution are as follows:
Batch and Transactional Modes
The qMDM Solution fully supports batch operations and real-time Web service processing of customer data.
Identity Management
Using the industry leading matching and survivorship capabilities provided by DataFlux®, the qMDM can be configured to use just about any kind of match rule or best record creation rule.
Customer Linking
Householding, peer relationships, and entity hierarchies are all supported in the qMDM data model and by business services. The Master Repository Manager makes it easy to search and browse different entity relationships.
Data Quality Functionality
DataFlux is an industry leader in address verification, standardization, parsing, and other data quality-based functionality. A fully extensible knowledge base can be customized with a GUI-based application to make sure cleansing rules can be implemented to meet your specifications.
Master Customer Hub Querying
Either at the Web service (API) level or through the Master Repository Manager, systems and users can interrogate the qMDM database to find entities using many different kinds of attributes.
Master Customer Hub Entity Management
The Master Repository Manager facilitates the management of entities. These entities (primarily customer in this context) can be added, modified, retired, and linked to other entities.
Historical Tracking
The qMDM hub design makes it possible to historically rebuild views of data. Any change to a customer is captured and preserved along with who made the modifications and when.
Data Stewardship Functionality
Data stewards can use the Master Repository Manager to view reports, search through customer data, modify customer information, and track problems.
DataFlux® qMDM Solution 21
Tiering
The qMDM solution supports the concept of tiering, which means that it is possible to have multiple best records. For some projects, it is beneficial not to have all source system data interact. The option to create multiple best records helps systems have a different representation of a customer in light of the data contributing to the customer view.
Database and Business Services Support Localization
All database tables and DataFlux business services support localization of the solution. Attributes and other labels can be modified in the hub database, and those changes can be used to present the data in a localized language in the Master Repository Manager.
Entity-Based Data Model
The data model for the qMDM hub is entity based. This means that data types beyond customer, such as product or patient, can be supported using the same data model.
Dynamic Attribute Updates
The entity-based data model also uses extensive metadata tables to define attributes. Once the attributes are defined, they are instantly available to all views and business services. This makes it easy to extend entity attribute definitions without having to make wholesale changes in the business services.
Multiple Deployment Styles
Registry, coexistence/hybrid, and transactional styles of Customer Data Integration are all supported to some degree in the DataFlux qMDM solution.
22 DataFlux® qMDM Solution

Sample Project Plan The sample project plan below describes a more task-based process than the conceptual plan discussed in the conceptual planning section. Use this plan as a guide to direct your deployment activities.
Many factors can impact or inform this plan such as: system availability, data volumes, match and survivorship rule complexity, multi-language support, application integration, and so on. The estimated time for each task should be entered into the Duration column based upon these factors.
Stage Task Duration
Hardware Requirements Determine database Determine DataFlux® Integration Server (DIS) platform Determine web server type
Data Platform Setup DataFlux dfPower® Studio, QKB, DIS, etc.
Discovery Data source discovery Data profiling Catalog data defects Catalog source file types Catalog available entity elements Determine use of third-party data
Entity Definition Determine required attributes that describe each entity type used to define customer Determine transformations needed to describe entity type consistently Define entity relationships (household, company/employee, etc.)
Data Quality Compare qMDM business service functionality with discovered defects Multi-language support (English, etc.) Address verification Other enrichment data (geocode, etc.) Data validation rules Data quality rules Build data quality test cases Validate DQ functionality
Matching/Survivorship Determine matching rules Determine survivorship rules Determine tiering criteria (if any) Configure match engine Build match/survivorship test cases Test match/survivorship/tiering results
qMDM Hub Load Data connectivity Identify sample data Set-up staging environment
DataFlux® qMDM Solution 23
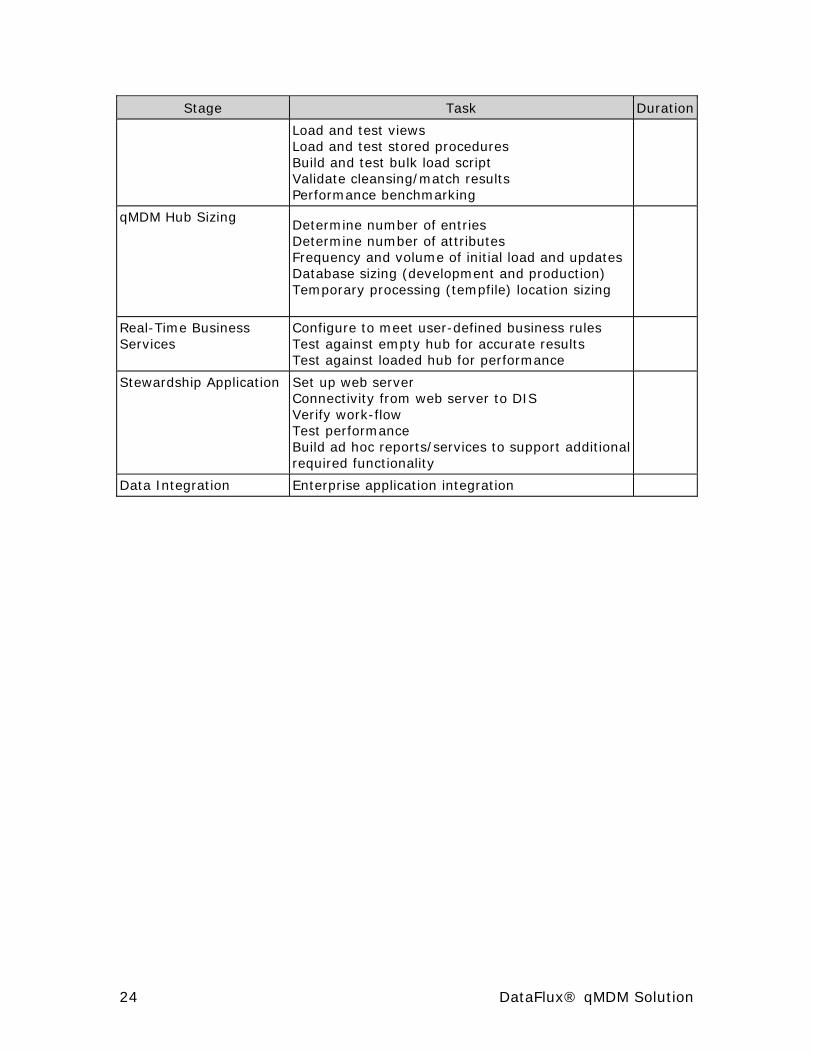
Stage Task Duration
Load and test views Load and test stored procedures Build and test bulk load script Validate cleansing/match results Performance benchmarking
qMDM Hub Sizing Determine number of entries Determine number of attributes Frequency and volume of initial load and updates Database sizing (development and production) Temporary processing (tempfile) location sizing
Real-Time Business Services
Configure to meet user-defined business rules Test against empty hub for accurate results Test against loaded hub for performance
Stewardship Application Set up web server Connectivity from web server to DIS Verify work-flow Test performance Build ad hoc reports/services to support additional required functionality
Data Integration Enterprise application integration
24 DataFlux® qMDM Solution
Understanding the qMDM Architecture The following topics explain some of the functioning of the DataFlux® qMDM Solution, and how it is deployed.
• Entities and the Data Model
• Deployment Models: Introduction
• Physical Deployment Model
• Virtual Deployment Model
DataFlux® qMDM Solution 25

Data Model The DataFlux® qMDM Solution data model has a top level object called entity. An entity can be an individual or an organization (or a product, for that matter). Each entity can have multiple addresses, email addresses, or other attributes unique to that entity type. You can group them in any fashion, such as peers or hierarchies. The data model uses metadata files to establish the attributes for each entity. Adding attributes does not require changes to the database table structures, only to the metadata itself.
The key to establishing and managing identity management links is a set of tables in the DataFlux qMDM MR database responsible for maintaining information about relationships among entities. These tables contain match codes and linking IDs that relate entities to other entities. These relationships can imply duplicates where one record in a duplicate cluster is the active record, or they can imply relationships like those used for householding.
In addition, the DataFlux qMDM MR data model supports historical tracking of information. Tracking is accomplished through date/time pairs that establish when a particular piece of information is valid. No data is deleted during normal operation of the DataFlux qMDM Solution. Entities that are no longer valid are simply ended or retired by changing the valid date field where appropriate.
You can also use the data model to show reference codes and descriptions in many different languages. This task is done through a language code field that is populated appropriately to signify which codes belong to which language.
While the DataFlux qMDM Solution makes use of a generic data model to facilitate identity and relationship management, you can extend the model to more accurately depict the type of customer relationships that are important in your industry. In addition, you can use the DataFlux qMDM Solution with your own data model when dictated by the business processes of your organization.
The DataFlux qMDM Solution employs an extensible data model that informs the physical structure of the MR database. The logical model represents the different entities and relationships common to customer data or other data types. It is designed to accommodate international data where appropriate. The physical model used by the DataFlux qMDM MR database can, optionally, be slightly de-normalized to improve performance.
26 DataFlux® qMDM Solution

Deployment Models The DataFlux® qMDM Solution supports two basic approaches to storing information about customer entities in the DataFlux qMDM MR database:
• Physical Deployment Model—This model anticipates that a great deal of information about customers will be stored in the MR database.
• Virtual Deployment Model—This model expects that only minimal customer information used for identity management will be stored in the MR database, and that other information about individuals or organizations can be referenced by source system code and source system ID to round out the complete view of each customer.
Both deployment models have identically functioning linking and clustering tables at their core, but the physical deployment model is equipped to accept a good deal more information to be stored in the DataFlux qMDM MR database, in addition to this linking information.
Physical Model Most DataFlux qMDM Solution implementations will use the physical deployment model type. This approach means that uniquely identifying information for individuals and organizations is stored in the MR database, including the more common attributes such as gender, education level, and marital status.
Source system codes and source system IDs are also stored in the MR database so that the provenance of the information used to identify and describe individuals can be recorded. This capability also allows for the ability to link or reference source system data, and describes key relationships with the data as it exists in the DataFlux qMDM MR database.
Virtual Model The virtual deployment model uses a skeletal DataFlux qMDM MR database to drive qMDM functionality. Like the physical deployment model, several link tables track and relate unique entities. However, attributes that are not used for the identity management process are not typically stored in the MR database. This approach means that the source system code and the source system ID that are recorded for each incoming customer are used to access originating systems and retrieve additional attributes as necessary to give a complete view of each customer. While the process of querying originating source systems and joining the information stored in the DataFlux qMDM MR database can be accomplished by using the DataFlux technology platform, the qMDM Solution does not supply this functionality out of the box.
DataFlux® qMDM Solution 27
Design Considerations The following topics discuss some of the methodology behind the structure and operation of the DataFlux® qMDM Solution.
Deployment Order
Special Fields and Keys:
Source System Identifiers
Tracking Changes Over Time
Processed Date/Time
Data Management Methodology
Data Management Methodology
Managing International Data
Managing Historical Data
International Deployment:
Display Codes
Locales
Tiering
28 DataFlux® qMDM Solution

General Design Notes Deployment Order The basic order of deployment of the qMDM Solution is as follows:
1. Client and Server software installation
2. Metadata design and loading
3. Master reference (MR) database creation
4. Batch load MR database
5. Batch update MR database
6. Transactional update or query of MR database
Special Fields and Keys
Source System Identifiers
In the MR database it is often useful to retain the primary source system identifier (also known as business key or natural key) as well as the retained keys in the rows of the tables. The two standard columns in the MR database tables that define the identifier and system are named MDM_SOURCE_SYSTEM_REC_ID and MDM_SOURCE_SYSTEM_ID. For example, in one table:
MDM_IND_RK
MDM_VALID_FROM_DTTM
MDM_VALID_TO_DTTM
MDM_IND_ID
MDM_SOURCE_SYSTEM_ID
1001 01-JAN-2002 10:25:06
31-DEC-4545 12:00:00
23086549C
SAP
Tracking Changes Over Time
In the preceding table, the MDM_VALID_FROM_DTTM and MDM_VALID_TO_DTTM columns are used in conjunction with primary keys to track changes over time. These dates describe the time period during which the contents of the row is valid. It is recommended that the MDM_VALID_TO_DTTM be set to a date far into the future for ease of joins. If the source system does not track historical changes to records, the MDM_VALID_FROM_DTTM and MDM_VALID_TO_DTTM would correspond to the date and time the DDS was loaded.
MDM_CUSTOMER_
RK MDM_VALID_FROM_D
TTM MDM_VALID_TO_DT
TM MDM_ORG_N
M 100 01-JAN-1999 12:00:00 31-DEC-2000
23:59:59 DataFlux
DataFlux® qMDM Solution 29
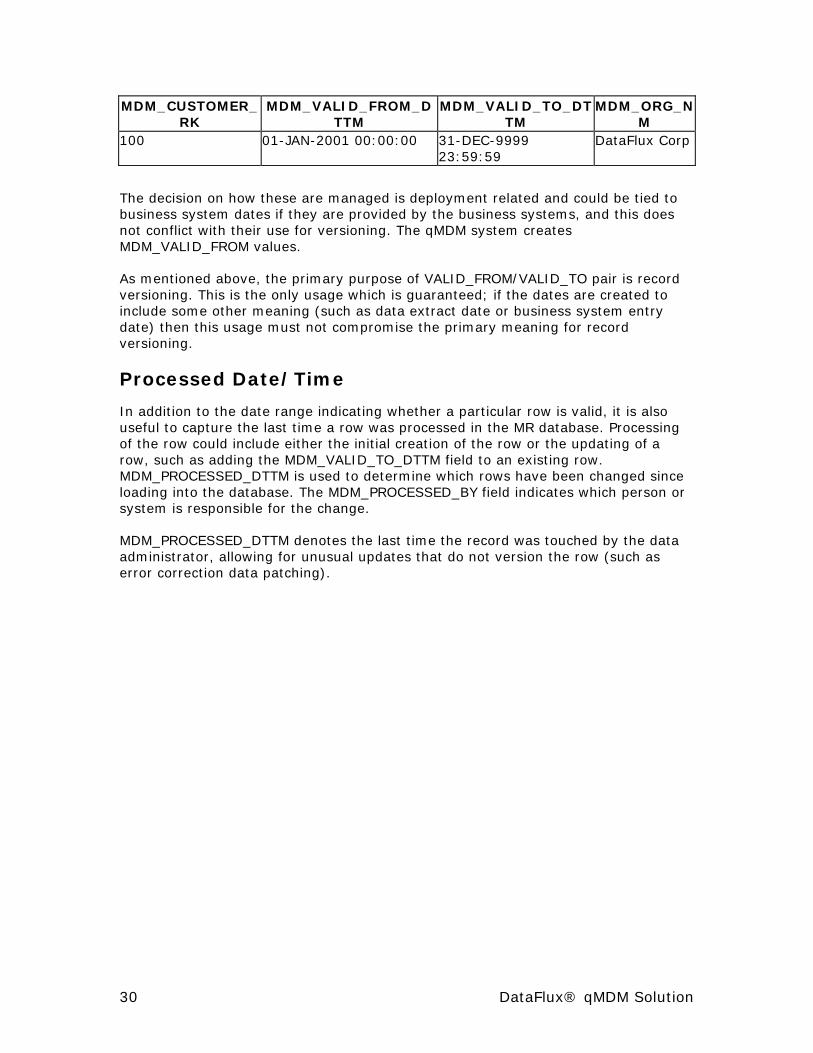
MDM_CUSTOMER_RK
MDM_VALID_FROM_DTTM
MDM_VALID_TO_DTTM
MDM_ORG_NM
100 01-JAN-2001 00:00:00 31-DEC-9999 23:59:59
DataFlux Corp
The decision on how these are managed is deployment related and could be tied to business system dates if they are provided by the business systems, and this does not conflict with their use for versioning. The qMDM system creates MDM_VALID_FROM values.
As mentioned above, the primary purpose of VALID_FROM/VALID_TO pair is record versioning. This is the only usage which is guaranteed; if the dates are created to include some other meaning (such as data extract date or business system entry date) then this usage must not compromise the primary meaning for record versioning.
Processed Date/Time
In addition to the date range indicating whether a particular row is valid, it is also useful to capture the last time a row was processed in the MR database. Processing of the row could include either the initial creation of the row or the updating of a row, such as adding the MDM_VALID_TO_DTTM field to an existing row. MDM_PROCESSED_DTTM is used to determine which rows have been changed since loading into the database. The MDM_PROCESSED_BY field indicates which person or system is responsible for the change.
MDM_PROCESSED_DTTM denotes the last time the record was touched by the data administrator, allowing for unusual updates that do not version the row (such as error correction data patching).
30 DataFlux® qMDM Solution
Database Sizing Assessing Database Table Size A rough estimate of database size can be determined from existing databases used for current hub activities. This estimate is fairly simple and is based on the fact that there is a certain number of entities and attributes per entity.
The following query yields the number of bytes per table and, given the number of rows in that table, you can calculate the bytes per row. Once you have this number, you can estimate total size in a very basic sense, though you will want to plan for additional space for growth.
select segment_name, BYTES * 1024 * 1024 as TOTAL_MB from user_segments where segment_name like 'MDM%'
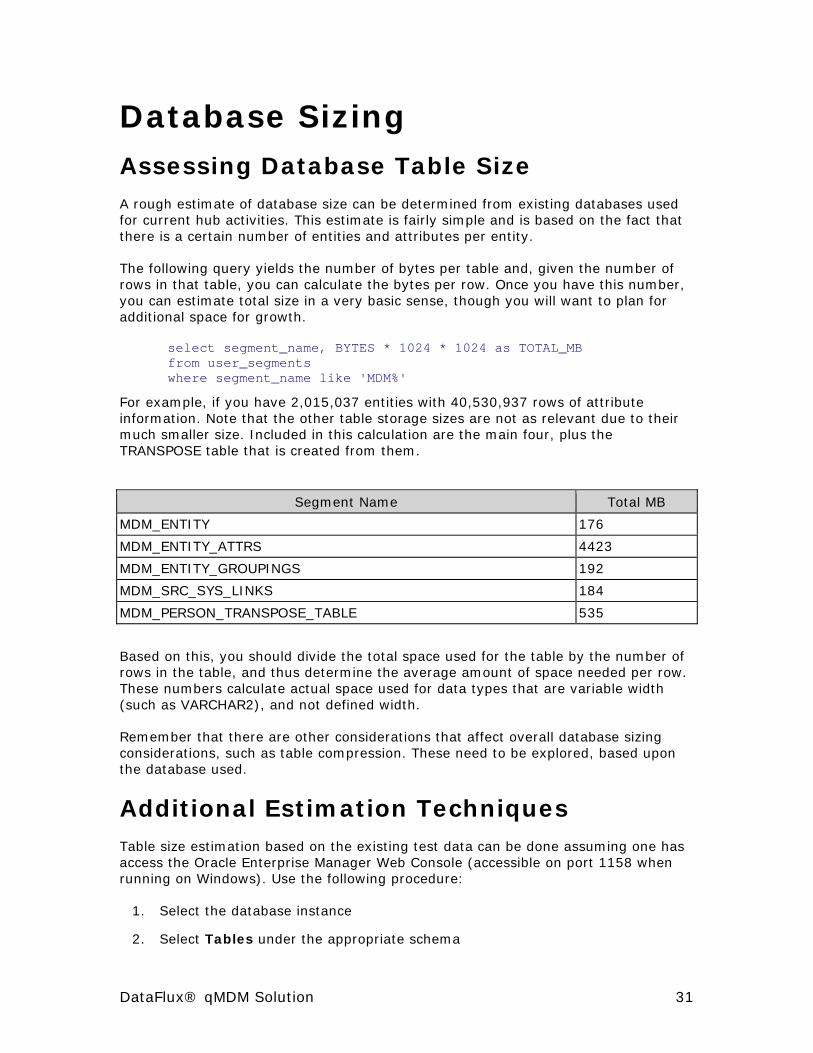
For example, if you have 2,015,037 entities with 40,530,937 rows of attribute information. Note that the other table storage sizes are not as relevant due to their much smaller size. Included in this calculation are the main four, plus the TRANSPOSE table that is created from them.
Segment Name Total MB
MDM_ENTITY 176
MDM_ENTITY_ATTRS 4423
MDM_ENTITY_GROUPINGS 192
MDM_SRC_SYS_LINKS 184
MDM_PERSON_TRANSPOSE_TABLE 535
Based on this, you should divide the total space used for the table by the number of rows in the table, and thus determine the average amount of space needed per row. These numbers calculate actual space used for data types that are variable width (such as VARCHAR2), and not defined width.
Remember that there are other considerations that affect overall database sizing considerations, such as table compression. These need to be explored, based upon the database used.
Additional Estimation Techniques Table size estimation based on the existing test data can be done assuming one has access the Oracle Enterprise Manager Web Console (accessible on port 1158 when running on Windows). Use the following procedure:
1. Select the database instance
2. Select Tables under the appropriate schema
DataFlux® qMDM Solution 31
3. Click Go (such that you get all objects rather than just one)
4. Select a table you would like to estimate
5. Click Go beside Create Like (Create Like is in the drop down)
6. Enter any name for the table
7. Click Estimate Table Size
8. Enter the number of rows you anticipate
9. Click Estimate Table Size
Example:
• Assume 38,000,000 rows for the MDM_ENTITY table of the qMDMhub, based upon an estimated 19,000,000 entity rows.
• There is 1 additional row for the surviving record.
• The total, based on the design of that table, is 29,687.50 megabytes.
This estimate is large and represents a worst case scenario because this calculation takes the defined width of variable-width data types like VARCHAR2. If all are defined as widths of 255, that is the number used for calculating table sizes. Contrast this to the method that looks at actual widths of data already in the database.
Repeating this process for the other tables would yield a very realistic estimation. This procedure can be performed by DataFlux as part of deployment planning, or this can be done by DBAs or others who are on site.
32 DataFlux® qMDM Solution
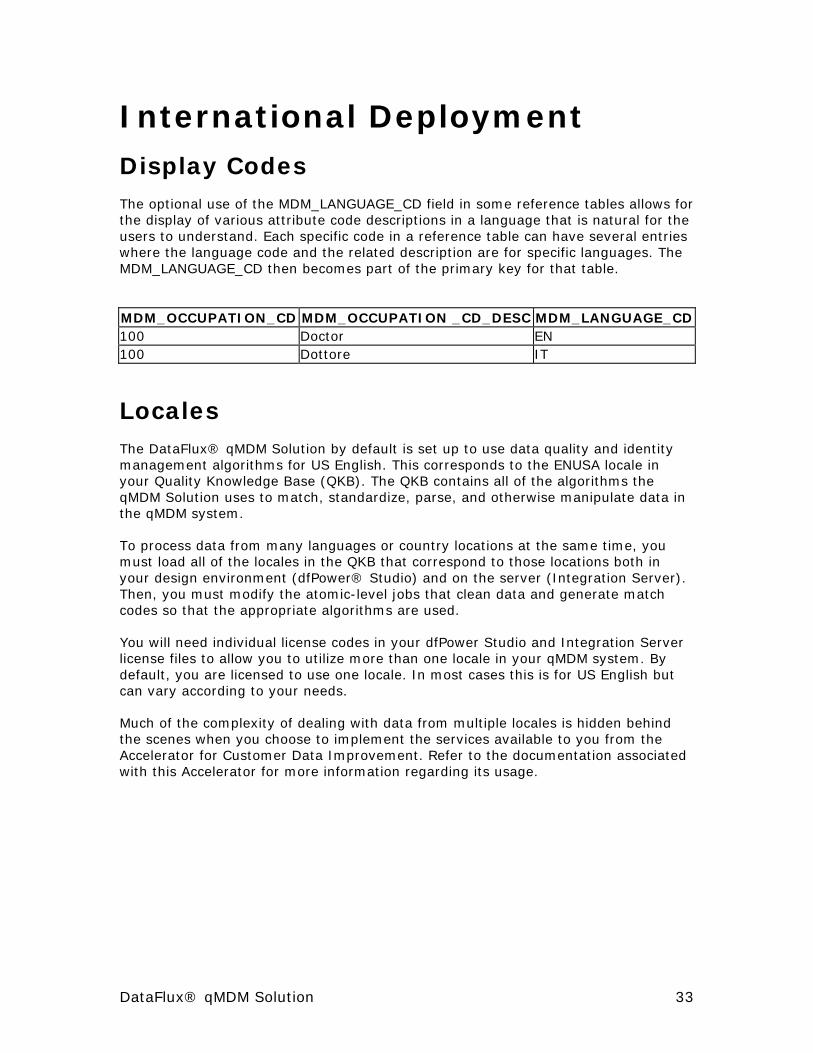
International Deployment Display Codes The optional use of the MDM_LANGUAGE_CD field in some reference tables allows for the display of various attribute code descriptions in a language that is natural for the users to understand. Each specific code in a reference table can have several entries where the language code and the related description are for specific languages. The MDM_LANGUAGE_CD then becomes part of the primary key for that table.
MDM_OCCUPATION_CD MDM_OCCUPATION _CD_DESC MDM_LANGUAGE_CD 100 Doctor EN 100 Dottore IT
Locales The DataFlux® qMDM Solution by default is set up to use data quality and identity management algorithms for US English. This corresponds to the ENUSA locale in your Quality Knowledge Base (QKB). The QKB contains all of the algorithms the qMDM Solution uses to match, standardize, parse, and otherwise manipulate data in the qMDM system.
To process data from many languages or country locations at the same time, you must load all of the locales in the QKB that correspond to those locations both in your design environment (dfPower® Studio) and on the server (Integration Server). Then, you must modify the atomic-level jobs that clean data and generate match codes so that the appropriate algorithms are used.
You will need individual license codes in your dfPower Studio and Integration Server license files to allow you to utilize more than one locale in your qMDM system. By default, you are licensed to use one locale. In most cases this is for US English but can vary according to your needs.
Much of the complexity of dealing with data from multiple locales is hidden behind the scenes when you choose to implement the services available to you from the Accelerator for Customer Data Improvement. Refer to the documentation associated with this Accelerator for more information regarding its usage.
DataFlux® qMDM Solution 33
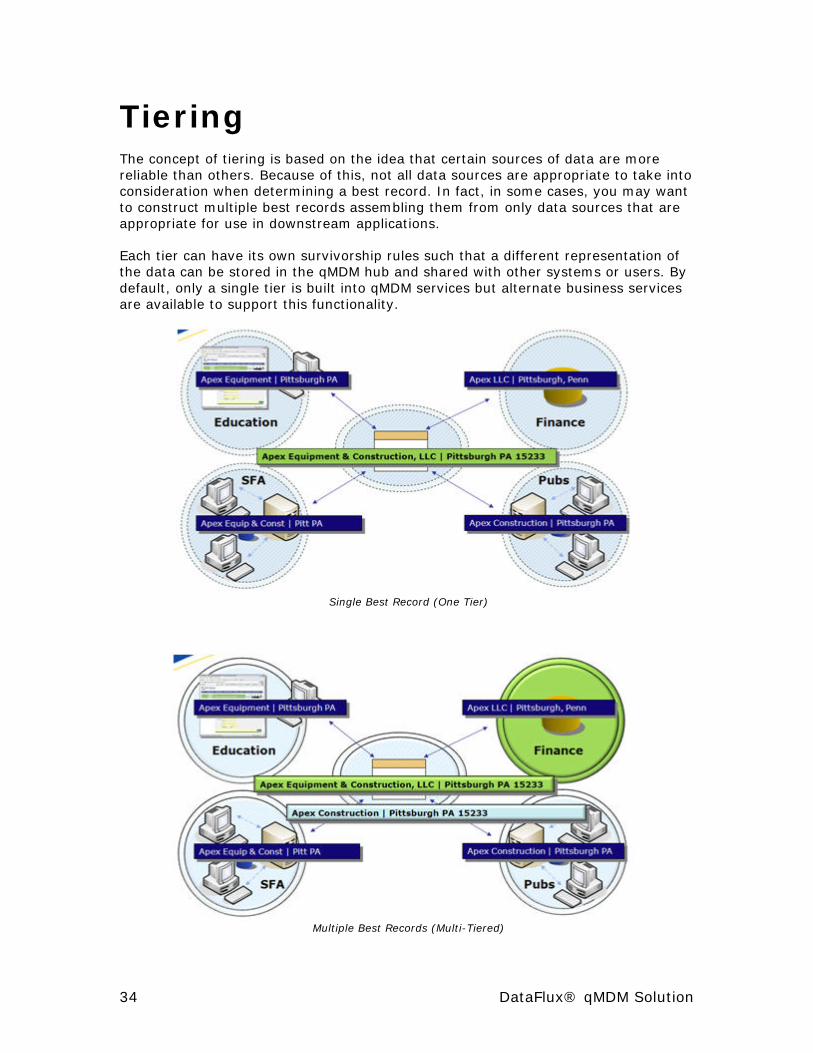
Tiering The concept of tiering is based on the idea that certain sources of data are more reliable than others. Because of this, not all data sources are appropriate to take into consideration when determining a best record. In fact, in some cases, you may want to construct multiple best records assembling them from only data sources that are appropriate for use in downstream applications.
Each tier can have its own survivorship rules such that a different representation of the data can be stored in the qMDM hub and shared with other systems or users. By default, only a single tier is built into qMDM services but alternate business services are available to support this functionality.
Single Best Record (One Tier)
Multiple Best Records (Multi-Tiered)
34 DataFlux® qMDM Solution

The following table demonstrates how multi-tiering works. Tier 1 is only allowed consumer source data from sources A, B or C. Tier 2 can consume the additional source D data. Tier 3 is allowed to work with data from all sources regardless of reliability.
Sample Tiered Data Sources
The outcome from setting up tiering and survivorship is shown below. Notice how different data available in the various source systems can come to be part of different composite view of the customer based on the business rules in place that are responsible for interpreting that data.
Sample Tiered Best Records
DataFlux® qMDM Solution 35

Implementing the DataFlux qMDM Solution The following topics describe how to put the DataFlux® qMDM Solution to work for you.
• Conceptual Planning
• Building the Solution Team
• The AIC Principle
• Preliminary Activities
• Batch Load Operations
• Batch Update
• Ongoing Activities
• Service Mode
36 DataFlux® qMDM Solution

Conceptual Planning Details on the various operation modes are in this implementation section, along with other project implementation activities. Use this material as a methodological foundation to build appropriate processes for constructing and maintaining the DataFlux® qMDM MR database. Apply the AIC building blocks to various data integration activities through the various operational modes and other data management tasks described in the various topics in this section.
Entity Creation
Pre-Processing
When creating the initial qMDM hub, no pre-processing is required. Data cleansing, match code generation, and data clustering all are part of the main process of the hub load. It is certainly possible to insert a step between source system data extraction and qMDM hub load, and in some cases this might make sense. For example, you might build a process that filters out all rows from a source system that lack minimum criteria to be loaded into the qMDM hub. Or you could remove duplicate source system data prior to the qMDM hub load if that redundant data has no use in creating the entity best record, or if you don’t care to record the history of all the duplicates in a source system but only want to send one version of each source system entity into the hub. Removing source system duplicates in an off-line process reduces the burden of loading the hub since almost of the work can be done in memory and results can be written to a temporary text file that is easily picked up by the main qMDM load process.
For qMDM hub updates, some pre-processing techniques are described in some detail below. The key is to identify the data additions and changes the hub needs to know about. These are from the rows of data that might have changes but not in attributes that the hub persists in its database. It might be possible to do some additional pre-processing of data to prepare it for the qMDM hub update process. Removing duplicate data rows that record the same source system attribute change, for example, would reduce the number for rows sent through the qMDM hub update process.
Managing Entity Types
Entity type definition can be done in few different ways. Primarily, this occurs either by loading entity definition files (simple pre-defined text files) using DataFlux jobs, or through the Master Repository Manager. This establishes the entities and their attributes.
You relate entity types to each other by adding relationship definitions to a table in the qMDM hub. Again, this can be done through the loading of definition files with DataFlux or through the Master Repository Manager.
Modifying, adding, or deleting attributes works in much the same way except that you don’t work with definition files, you work with the definition data already in the database. The main point to consider here is that it is relatively easy to add or drop
DataFlux® qMDM Solution 37

attributes that don’t impact entity match clusters. If you edit one of the cluster-impacting attributes (for example, deleting a field used as a match criterion), you may have to re-cluster the entire database, so keeping the critical attributes relatively stable is important.
Defining Matching Business Rules
For each entity type, you define those fields on which transformations need to occur to build business rules for matching. This information is part of the entity definition file. Often these transformations are match codes but they could be data derived from other fields through simple string manipulation (for example, creating a field to contain only the year of a birth date).
Once all fields are known for building business rules for matching, each entity type gets its own clustering and survivorship process. This is a DataFlux job for each entity type, and it is accessed when that type of data is loaded to or updated in the hub. These DataFlux jobs contain the match criteria needed to find matches, as well as the survivorship rules needed to determine best records. Both primary and secondary entity types are handled this way. All of these entity matching jobs are identical except for the entity-specific match criteria and survivorship rules.
Entity Updates
Identifying Source System Changes
It is certainly possible to re-process every row that might have changed in a weekly update in the same manner, but this is not the most efficient way to handle changes. If each source system could be made to record changes to its own records and identify new or deleted records, then just those changes could be selected and processed as updates against the hub. The delta files could be created using any ETL process, or using DataFlux assuming it can access the files themselves.
But if changed, added or deleted records cannot be found prior to direct qMDM hub interaction, then it is still possible to pre-process the data file and get better performance from the main qMDM hub update process. Data clustering and best-record creation (survivorship) together are the slowest processes in the qMDM solution. While at initial batch load time this can be designed to run quite quickly because much of it can be done in memory, when the customer hub is already loaded, the process must first query the database to find similar rows and then clustering and best record creation can take place.
Rather than re-cluster the entire hub or even re-cluster for every possible new or updated customer record on its way into the hub, we can identify the types of changes in data updates bound for the hub. By determining those rows in the update set that are new, or could create changes to clusters, or those that will not affect clusters, and are unchanged, we can route only a subset of the batch update through the more intensive clustering processing (in this case the new and possible cluster-changing rows). Other rows can be dropped or sent through a much quicker DataFlux process that can be used to update attributes that don’t have any clustering or best record implications. DataFlux can be used for this process or other tools with data access and data comparison capabilities can be used for the job.
38 DataFlux® qMDM Solution

The main requirement for pulling this type of procedure off is to have constant unique identifiers in source systems. The source system ID and source system code are saved with every entity in the hub. Using these keys, we can relate what is currently in the hub to potential updates to the hub, and categorize the types of updates prior to initiating the load process.
Pushing and Pulling Source System Changes
A wise strategy for the update process most likely is a three step process. The first step is batch processes on source systems that pull out potentially changed data. The second step sifts through the potential updates and categorizes the data into groups bound for the hub. The last step takes new and modified data, and runs it through a DataFlux process to update the hub.
It would also be possible, though it would require changes to the way source systems operate, to call a real-time DataFlux process after every significant change to a source system record. This process could check the hub, go through the process described above, and place the data in a temporary location if the hub needs to be updated due to this change. All of the changes could be pooled over a period of time and then the updates can be processed all at once using standard DataFlux qMDM functionality.
Managing Re-Clustering of qMDM Data
To a certain extent, this was described previously. It is important for performance considerations to identify changes that will have no impact on data matches. For example, if a mailability flag is changed, that change can be made very quickly in the hub because there are no cluster changing implications. However, an address change could certainly have an impact on how one entity is related to another. These types of changes need to go through the main qMDM update process where data is queried, clustered, and a new best record is generated.
Events
Event Management Strategy
If certain events in source systems need to trigger changes in the hub, we can deal with this as a whole, or through a real-time mechanism that alerts the hub to a possible change. These events could be DataFlux monitoring events that are centrally managed in DataFlux.
For example, if after every addition an event needs to be triggered to change the qMDM hub for a certain kind of attribute; you could define the trigger in a DataFlux Business Rule Repository, and associate several events with that trigger. In this case, the triggered events can cause the new data element to be written to a table to be picked up by the next batch update, or the event can launch a DataFlux batch job or service to actually act on the hub. Any other non-DataFlux application can be executed too assuming it has a command line interface. This strategy would keep events that are associated with the qMDM hub all in the DataFlux environment.
DataFlux® qMDM Solution 39

It would of course be possible to do this outside of DataFlux as well. For example, simple database triggers on a source system database can collect over the course of a week all of the potential changes made to source systems.
Entity Changes Over Time
Keeping History
The DataFlux qMDM Solution is designed to capture changes to entities over time. For standard entities like INDIVIDUAL, every change to an attribute, every change of a best record, and every shift of that entity from one match group to another is stored in the Customer hub and set off by valid to and from dates. For derived entities like HOUSEHOLD that can be built from standard entities, the same concept can be applied.
For the creation and updating of tables and views for derived entities, DataFlux jobs can be used, starting with standard entity information found in entity-specific transposed tables. If the virtual definition of the derived entity changes, the older definition can be slightly modified to take into account only the time frame for which it applied, since all of the valid from and to information is always available for all entities. This retiring of a virtual entity definition can be done in the DataFlux process that builds the derived entity table and view on demand, taking the older date stamps as parameters to create the object in the database.
40 DataFlux® qMDM Solution

Building the qMDM Solution Team Before you begin your customer data management and integration effort, assemble a team that resembles the following in ratio. Naturally, large DataFlux® qMDM Solution projects will require more individuals. Team members can be actual members of the organization, or consultants hired by the organization to assist in the deployment of the qMDM Solution.
Team Composition A typically-sized qMDM Solution team includes the following members:
• Project Manager (1)
• Business Analyst (2)
• Data Steward (1 or more)
• DBA (1)
• Developer (1)
• Data Modeler (1)
Several of these job skills will be required during varying periods of the qMDM Implementation. The qMDM Project Manager and at least one Business Analyst will be required full-time on the project.
Team Member Skill Sets Following are descriptions of the skill sets required of each team member.
Project Manager
The project manager on a typical qMDM implementation project is the individual tasked with building the qMDM team, marshalling IT and business resources, and communicating the vision of the qMDM project both within the immediate team and to the larger organization. This individual needs to have access to and interaction with the executive team, and also must be able to build cross-departmental teams to achieve qMDM project success. The primary responsibilities of the Project Manager include:
• Build the qMDM team
• Communicate the qMDM vision
• Establish timelines and milestones
• Lead communication strategy behind project and deliverable deployment
DataFlux® qMDM Solution 41

• Convey the importance of qMDM to management personnel
• Build bridges to disparate groups within an organization
• Assume final authority on technology and/or consultancy purchasing
Business Analyst
The business analysts on the qMDM team are intimately familiar with the inner workings of customer data-based business processes. They usually can identify business data producers and consumers and can evaluate the usefulness of data for a particular process. They may have some technical database management and reporting skills. The primary responsibilities of the Business Analysts include:
• Document identity management criteria
• Document data quality criteria
• Identify business data producers and consumers
• Identify business processes impacted by qMDM project implementation
• Establish business metrics to evaluate potential impact of qMDM implementation
Data Steward
The data steward strategically manages corporate data across the enterprise, while ensuring high levels of data availability. This individual is ultimately responsible for data quality conventions and standards that have been developed by business analysts and, in some cases, database analysts. The data steward may also evaluate and select all infrastructure components (such as software) for data management and business intelligence systems. The primary responsibilities of the data steward include:
• Manage strategic enterprise data creation, travel, and storage
• Review identity management criteria
• Review data quality criteria
• Collaborate with the qMDM Project Manager and Business Analysts to create normalized and strategic data quality and definitions
• Assist in the creation of a metadata repository
• Establish and assess preliminary data profiling and ongoing data monitoring reports that give immediate feedback on the health of the qMDM system
Database Administrator (DBA)
Every data integration team will need a DBA, a person skilled in developing, maintaining, securing, and integrating disparate databases across an enterprise. DBAs on a qMDM project team will build, maintain, and tune staging and master
42 DataFlux® qMDM Solution
databases used in the qMDM process. The primary responsibilities of the Database Administrator include:
• Review qMDM batch jobs and real-time services that interact with staging or master databases
• Build and maintain connections to source data and the qMDM MR database
• Assist the Data Modeler with refinement and implementation of database creation scripts
• Manage volatility of database constructs
• Manage purge of historical data
• Evaluate database performance
Developer
A developer is necessary in a qMDM project, usually at the application integration level where any number of systems needs to interface with the qMDM system. The developer can also help build and modify some of the more sophisticated qMDM services that allow applications or humans to interact directly with the qMDM Master database. The primary responsibilities of the developer include:
• Customize and build qMDM batch jobs and real-time services
• Build and test applications that might directly interact with the qMDM system
Data Modeler
A data modeler works with the DBA and the business analysts to ensure that the DataFlux-delivered qMDM data model meets the needs of all of the departments that rely on the qMDM system for customer information. The primary responsibilities of the data modeler include:
• Apply relational and dimensional modeling concepts.
• Ensure that qMDM model meets the needs of the business.
• Ensure that the qMDM data model can optimally describe entities (customers, products, etc.) in the organization.
DataFlux® qMDM Solution 43

The AIC Principle In order to get the best results from your data management and integration endeavor, you must begin a committed and sustained effort that fully applies the principles of AIC—Analysis, Improvement, and Control:
• Analyze—Study your data processes and effects, analyze the root causes of problems, and plan improvements.
• Improve—Fix the faulty process(es) and eliminate defects.
• Control—Manage the processes and establish goals for data quality.
Getting Started Be aware that this process is iterative and continuous. With each data transformation, you will glean more and better means of fully managing and leveraging that data.
As you institute the AIC effort, you will apply the five building blocks mentioned earlier:
1. Profiling—Conduct discovery and audit activities to assess the composition, organization, and quality of the database.
2. Quality—Complete, correct, update, and validate existing data.
3. Integration—Link and join disparate data sets.
4. Enrichment—Supplement databases with external data and services.
5. Monitoring—Establish triggers and alerts to apprise the team when predetermined data metrics meet or exceed limits set during the profiling baseline phase.
You will use the AIC building blocks as you integrate data using the qMDM Solution. Data migration into the DataFlux® qMDM Solution can occur using various operation modes, which are described next.
Operation Modes Because customer data can come one record at time from legacy systems, operational systems, or even from the Internet, the DataFlux qMDM Solution supports several modes of operation: batch load, batch update, and transactional.
Batch loads and updates provide you with the means to move tens of thousands of records at a time into the qMDM Solution. The transactional mode provides near real-time access to the information within the qMDM Solution.
• Batch load—Used to create the initial DataFlux qMDM MR database.
44 DataFlux® qMDM Solution

• Batch update—Used to add large sets of records to the DataFlux qMDM MR database.
• Transactional—Used to add, modify, or end records in the DataFlux qMDM MR database one entity at a time.
The hierarchy and flow of the batch modes is shown in the following graphic.
qMDM Batch Modes
DataFlux® qMDM Solution 45

Preliminary Activities Begin preliminary data integration activities for the DataFlux® qMDM Solution with the tasks listed in the following table. After these tasks are completed, follow up with batch load and batch update activities. In the following examples, a customer entity type is used as the basis for the activities listed.
Step Action Notes
1a. Profile source systems, which can vary widely from client to client.
Results are critical to determine which fields are useful for establishing business rules for matching and linking, as well as data validation and cleansing.
1b. Establish data quality Rules
Determine what cleansing activities must occur on the basis of reports generated from dfPower® Profile. The DataFlux qMDM MR database will contain standardized values for key data elements. Once you establish enforcement rules, you will have a data quality standard in place.
1c. Establish matching and linking business rules.
Set rules according to the type of data you are working with. You can match, remove duplicates, and link various records. Obvious criteria for removing duplicates are identification fields like name, address, email, and telephone data. But other types of information are also useful, such as government-assigned unique ID numbers (like Social Security numbers in the US), industry license numbers, or third party-managed IDs such as Dun & Bradstreet D-U-N-S numbers.
Using these various sources of information, you can extend the default rules in the DataFlux qMDM Solution for merging and linking data or construct your own business rules.
Proceed to the batch load process.
46 DataFlux® qMDM Solution

Batch Load Operations Batch Load operations comprise various activities:
• Identify essential data fields
• Aggregating and creating a staging file
• Validating data
• Cleansing data
• Generating the match codes
• Linking and merging data
• Creating the MR database
Identify Source Data and Stage The process of creating a staging file varies widely for each technology environment. You should provide for a minimum number of fields to start the qMDM master database build.
Note: Although the information in these fields can be empty, the information inside the DataFlux qMDM MR database becomes less reliable when such data is sparse.
Step Action Note
2a. Identify the essential fields in your source system data and note their overall usability. For customer data, possible fields include:
• Full Name
• Organization Name
• Address Line 1
• Address Line 2
• Address Line 3
• City Name
• State/Region Name
• Postal Code
• Country Name
You may need to apply validation or cleansing steps to fill in missing data or to reject non-valid entries prior to qMDM system load.
DataFlux® qMDM Solution 47
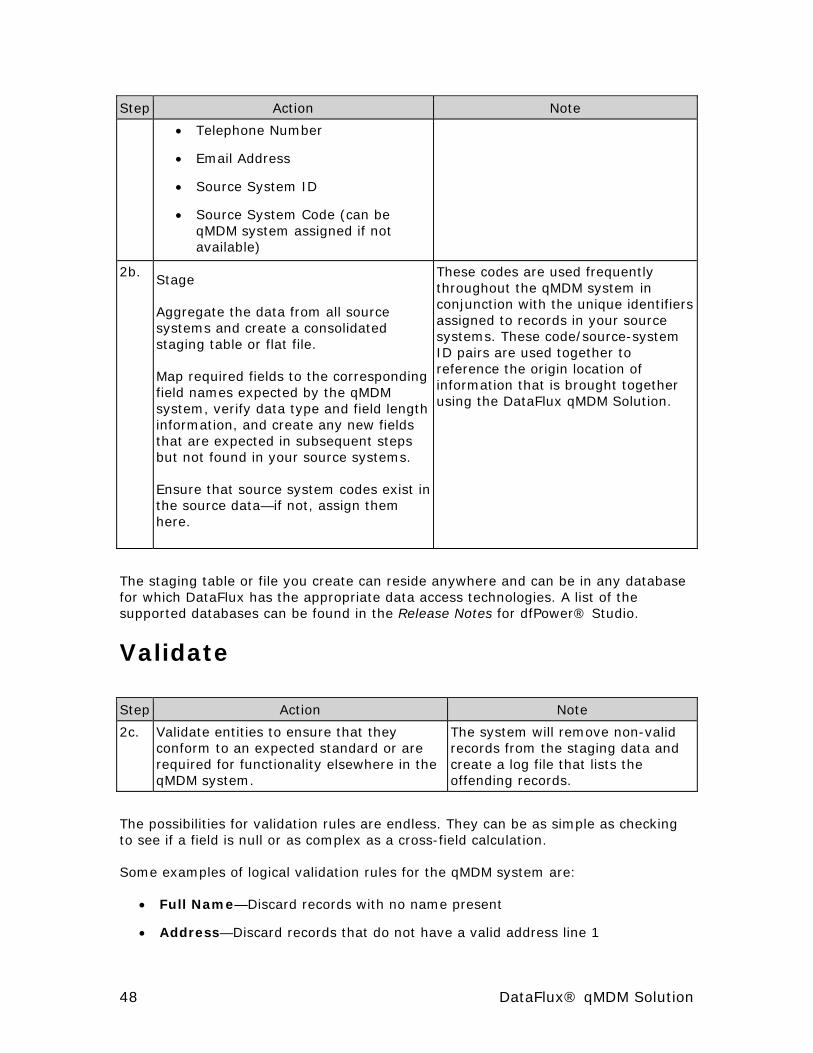
Step Action Note
• Telephone Number
• Email Address
• Source System ID
• Source System Code (can be qMDM system assigned if not available)
2b. Stage
Aggregate the data from all source systems and create a consolidated staging table or flat file.
Map required fields to the corresponding field names expected by the qMDM system, verify data type and field length information, and create any new fields that are expected in subsequent steps but not found in your source systems.
Ensure that source system codes exist in the source data—if not, assign them here.
These codes are used frequently throughout the qMDM system in conjunction with the unique identifiers assigned to records in your source systems. These code/source-system ID pairs are used together to reference the origin location of information that is brought together using the DataFlux qMDM Solution.
The staging table or file you create can reside anywhere and can be in any database for which DataFlux has the appropriate data access technologies. A list of the supported databases can be found in the Release Notes for dfPower® Studio.
Validate Step Action Note
2c. Validate entities to ensure that they conform to an expected standard or are required for functionality elsewhere in the qMDM system.
The system will remove non-valid records from the staging data and create a log file that lists the offending records.
The possibilities for validation rules are endless. They can be as simple as checking to see if a field is null or as complex as a cross-field calculation.
Some examples of logical validation rules for the qMDM system are:
• Full Name—Discard records with no name present
• Address—Discard records that do not have a valid address line 1
48 DataFlux® qMDM Solution

• Telephone—Discard records with no area code
• Email—Discard records with an invalid email format
Cleanse The cleansing step is a key component of the DataFlux qMDM Solution. The DataFlux qMDM MR database should keep a clean, standardized, and verified version of each core attribute.
Step Action Note
2d. Apply appropriate cleansing processes to scrub and format data from source systems.
Cleansing activities fall into a few broad categories:
• Address Verification
• Parsing
• Assigning Gender
• Standardization
• Casing
• Identification
Generate Match Codes Match code generation is probably the most critical aspect to getting the most of your DataFlux qMDM Solution. Match codes (also known as match keys) ensure that data that shares some fundamental similarities will come together into match clusters when match codes are compared. When used in groups with conditional logic, match codes provide a powerful way to match and link records that do not contain obvious similarities.
In the preliminary activities phase, you determine records that match or share some kind of business-defined relationship. Match codes are used where a degree of fuzziness is required to find all potential matches or relationships.
Step Action Note
2e. Identify fields such as Name or Address, or any such suitable identifying field.
For data types that are unique to your organization, design the matching logic first, so that the match code algorithm works as expected. For most data types, the qMDM Solution can generate the necessary match code.
DataFlux® qMDM Solution 49

Example: To identify all the records in a data set where Ronald Jeffries exists, you could simply scan the data set for exact matches. However, that approach may miss Ron Jeffries and Ronnie Jefferys who may be the same person. Using match codes, the qMDM system can identify these individuals as potential duplicates, and the qMDM system will process business rules to determine the nature of their relationship.
Note: The criteria (match definition and match sensitivity) that are used to generate match codes for each data field must be the same criteria used during the batch update and the transactional modes of qMDM processing. Usually, you will generate match codes for between 7–10 fields, which will then be used in the subsequent Link and Merge step.
Identify Relationships for Linking and Merging Step Action Note
2f. Establish definitive identities and identity relationships for the entities in your data set.
Design the business logic to process the match codes correctly so that the DataFlux qMDM Solution can manage identity information as dictated by your business needs. The qMDM Solution has some default logic to handle the core fields of data such as name and address, which inform the identity management process, but each organization can tailor its own rules.
Linking and merging logic helps identify unique and related individuals. First, decide which fields you will use for matching and linking. Usually these are combinations of match code fields that were previously described, but they do not have to be. They could be things like account number fields, or government ID fields that might uniquely identify parties entering the DataFlux qMDM MR database.
Example: To determine unique individuals in your database, you might set up the following rule:
IF... THEN...
... these fields match:
FULL NAME (Match Code) ADDRESS LINE 1 (Match Code) CITY NAME (Match Code) POSTAL CODE
... a cluster has been identified that contains several records that represent the same individual. You can use similar logic to find match clusters for organizations, households, etc.
50 DataFlux® qMDM Solution

IF... THEN...
(Match Code)
OR… these fields match:
FULL NAME (Match Code) CONTACT NUMBER (Match Code)
Successful identity management uses as many fields as possible to limit the potential for false matches. For example, if you use only full name fields for match criteria, the result may be hundreds of instances of John Smith, most of which are not duplicates because they live at different addresses. By including address information in your matching criteria, you can significantly improve the matching and linking results.
Add as many rules as you need to sufficiently support the types of relationship discovery that you want the qMDM Solution to perform.
You can now progress to the second critical activity for identity management through linking and merging: Determining the best record for each entity. You can use the DataFlux qMDM Solution to add rules pertinent to your organization to best build the true view of your customers.
Example: When establishing the identity of unique individuals, you may find that you have two similar addresses listed for a particular individual. The business logic has identified these two records as matches, but the qMDM system must determine which address should be used as the standard.
Your rules should process the related clusters of information and pull together the correct pieces to create an accurate whole. In the earlier example of how to determine unique individuals in the database, a rule might state that when you have near duplicate address information, you should use the address that comes from source system 1 (the CRM system), because the addresses are updated more regularly than the other source systems.
The DataFlux qMDM Solution can translate this rule into usable business logic inside the qMDM Solution to correctly identify that individual. All of the logic used for identity management is completely customizable within the DataFlux qMDM Solution.
Deterministic matching ensures that match keys can persist over time. Similar data is assigned the same match keys (or codes). These codes are invaluable for data linking and householding. They can also be used to consolidate records. An instance of the usefulness of matching might occur when a customer submits Web-based address data that differs from the information in the existing customer table. Match code comparison enables you to update the address using the same standardization and verification rules already established. You might match on customer name, address, or telephone number, for example.
DataFlux® qMDM Solution 51

Linking does not require removal of match data, but can tie together like records from separate databases. This feature is useful in instances such as Healthcare organizations that need to share patient data, while maintaining privacy restrictions.
The match codes and the identity management IDs created by the previous Match Code and Linking and Merging steps are the core information generated and managed by the DataFlux qMDM Solution. The Solution carries forward this information into the DataFlux qMDM MR database and compares it to new records or modified records that are added to the system.
Create DataFlux qMDM MR Database Load After you have cleansed and validated data and applied the appropriate identity management rules, you can construct the DataFlux qMDM MR database from the staging data.
Step Action Note
2g. Construct the DataFlux qMDM MR database from the staging data.
The data model for the qMDM database is highly normalized and the processes that load the MR database can break apart the data in the staging database in such a way that all record relationships, explicit or inferred by the qMDM system, will remain intact upon load. You can now query, modify, and add to this MR database either in bulk or one record at a time.
Proceed to the batch update process.
52 DataFlux® qMDM Solution

Batch Update The following steps comprise the batch update procedure.
Step (including
description) Action Note
3a. Add new source data
Look for the same set of core fields used for the original load when you add a new data set.
3b. Create a new staging table (optional)
Create another staging table to modify data before it enters the DataFlux® qMDM MR database.
3c. Validate updates
Apply similar rules to validate batch updates as those used for batch load.
Profile the new data to ensure that the validation rules sufficiently weed out potential problem data.
This new data set could have distinct anomalies that you must accommodate in your validation rules.
3d. Cleanse the data updates
Apply similar cleansing processes for batch updates as those used for batch load.
If designed properly, the cleansing rules set up for the original batch run can correctly standardize, parse, and identify values in this data set as well as the previous data set. The qMDM system has been developed so that cleansing rules (and validation and identity management rules) are all shared among processes so the standards you develop can be enforced system wide.
3e. Generate match codes
Use identical match code creation rules for batch updates as those used for batch load.
All the fields for which match codes were generated in the batch load should be present and have match codes generated in this new data set, using the same sensitivities and match definitions.
3f. Add new data to DataFlux qMDM MR database
Bring together the existing match codes and linking IDs with the new
This approach will ensure that the identity and relationship management component of qMDM are working properly, and that correct relationships can be discerned during
DataFlux® qMDM Solution 53

Step (including Action Note description)
match codes. subsequent identity updates.
IF... THEN…
... you are not using transactional processes to interact with the DataFlux qMDM MR database (that is, you are using only the batch facilities of the DataFlux qMDM Solution)
... add the new cleansed and match-coded data to the original staged data, which has match codes and linking IDs already created.
... you are using transactional processes ... you will call business services that can access already matched data in the hub and correctly link the new data to exitsing matching entity clusters..
Step (including
description)
Action Note
3g. Update Identity Records
Process the new records, comparing new match codes to existing ones to see if these newly added records are duplicates of existing records or records in this new set of data; to see if they have relationships with existing records or relationships with records in this new set of data; or to see if these new records are potentially unique to the system.
The identity management rules for this new set of data should be the same as the rules used for the batch load. This duplication will ensure that the same criteria are used to find unique records, duplicate records, and related records.
3h. Use Identity Difference (optional)
Perform Identity Difference so the qMDM system can survey the link information generated in the previous step and determine which records are impacted by the newly added data.
Many existing records will remain unchanged, but existing records could now match the new clusters of records once the new data has been processed. It is also probable that the active record for each unique entity has been modified by the addition of a new, more complete record.
Example: An active record in the DataFlux qMDM MR database might have no information in an Address Line 2 field. A business rule may exist to ensure that in a matching cluster, an Address Line 2 field with information should contribute that data to the active record, even if the rest of that record information is not used in the composite active record. If a new record comes in and matches that original record and contains information in the Address Line 2 field, then the business rule dictates that it be used in the active record. The Identity Difference step will recognize that a change has been made in the original record and that the new information should be
54 DataFlux® qMDM Solution

Step Action Note (including
description)
updated accordingly in the DataFlux qMDM MR database.
3i. Update DataFlux qMDM MR database–add
Add new information unique to the system to the DataFlux qMDM MR database.
New Master IDs are assigned as necessary.
3j. Update DataFlux qMDM MR database–update
Make the required changes to the DataFlux qMDM MR database as dictated by the results of the previous step.
Review and implement the ongoing activities processes as necessary.
DataFlux® qMDM Solution 55
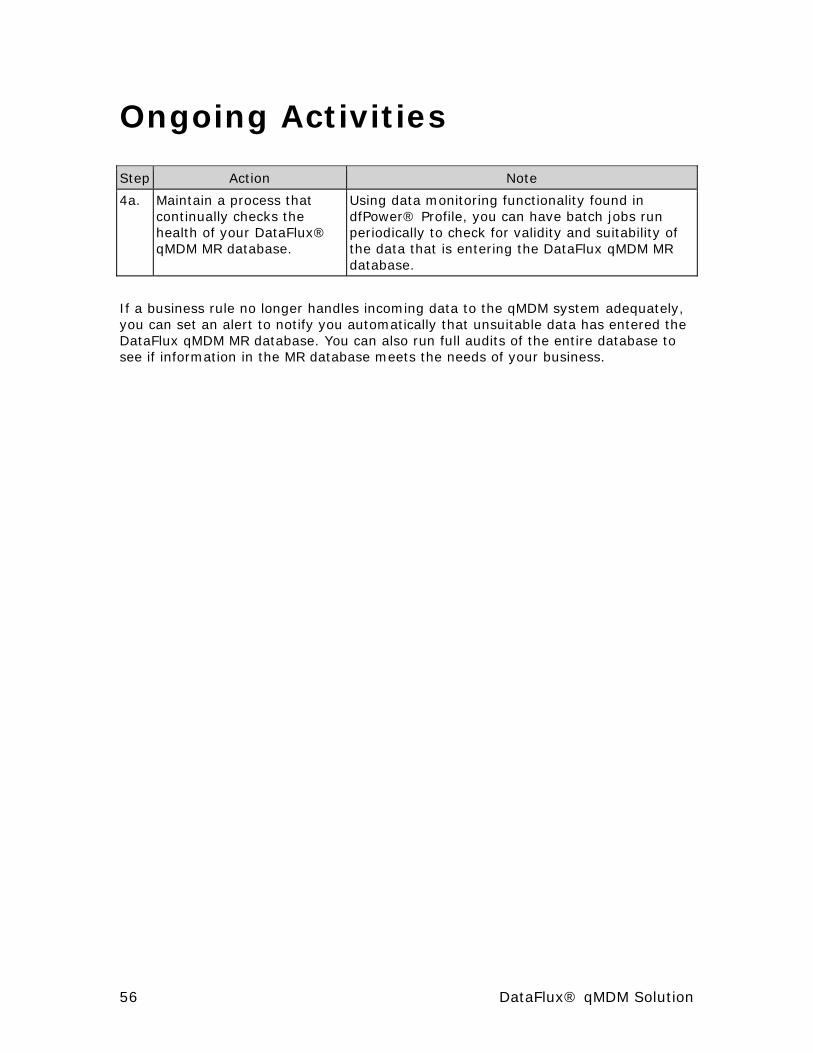
Ongoing Activities Step Action Note
4a. Maintain a process that continually checks the health of your DataFlux® qMDM MR database.
Using data monitoring functionality found in dfPower® Profile, you can have batch jobs run periodically to check for validity and suitability of the data that is entering the DataFlux qMDM MR database.
If a business rule no longer handles incoming data to the qMDM system adequately, you can set an alert to notify you automatically that unsuitable data has entered the DataFlux qMDM MR database. You can also run full audits of the entire database to see if information in the MR database meets the needs of your business.
56 DataFlux® qMDM Solution
Service Mode • Services
• External Data Provider Node
• Validation Node
• Expression Node
• Additional Nodes
• Embedded Job Node
• Data Access (or SQL Lookup) Node
• Field Layout Node
Recall that the transactional mode is used to add, modify, or end records in the DataFlux® qMDM MR database one entity at a time. The service mode provides near real-time access to the information within the DataFlux qMDM Solution. Refer to the following figure for a diagram of a sample transactional service using the DataFlux qMDM Solution.
DataFlux® qMDM Solution 57

Sample Real-Time Service
Services Services are used primarily by other enterprise applications to pass records to the DataFlux qMDM MR database one record at a time. They can be considered as functions or methods exposed from the DataFlux qMDM Solution. These services are typically accessed through a Web service call. SOAP messages are constructed by enterprise applications that pass data to the DataFlux qMDM MR database; these applications typically expect to receive some information in return.
58 DataFlux® qMDM Solution

There are many different categories of services in the solution, as described:
• bulk—These jobs support the bulk loading of large data volumes. They are typicall used at the beginning of a qMDM hub load process when millions of rows need to be loaded into the qMDM hub.
• mdm—These services operate at the entity level and may call other services. It is in these services that attribute or entity information is collected or transformed before being sent to database stored procedures.
• meta—These jobs are used for the initial load of qMDM metadata tables.
• mrm—These services are used to support functionality in the MR Manager application. Many of these are directly related to row-level manipulation of entity metadata.
• rpt—These files are templates for reports. Batch reports that genereate HTML output are included here and dynamic real-time reports with input parameters are also found here.
Following is a typical real-time service is described. Some of the more common nodes found in real-time services are also described.
External Data Provider Node The External Data Provider node lets a job flow become a service. It is a critical step in deploying dfPower® Architect jobs to accomplish the following services for applications or processes that want to pass data into dfPower Architect one record at a time. An embedded job flow always has to start with an External Data Provider node. This node is the first step of a job flow, thus making it the data source step. You will later add the data input fields in the External Data Provider step. These input fields are used through the job flow in subsequent steps.
Step Action Note
5a Call this node from other job flows or call it by posting it to and accessing it from the Integration Server.
The fields specified here become the input (and in some cases, output) fields of the API-like call you make to interact with the service.
Once the External Data Provider step is defined with appropriate data input fields, any other job step available in Architect can be added to build the desired job flow
Validation Node The dfPower Architect Validation node step is used to analyze the content of data by setting validation conditions.
Step Action Note
5b Identify improper input by setting These conditions create validation
DataFlux® qMDM Solution 59

Step Action Note
validation conditions within the validation node step, and then analyzing the data content.
expressions that filter data for a more accurate view of that data.
Data Validation uses the dfPower Studio Expression Language. This language can be used for single values, multiple values, single conditions, or multiple conditions, and to compare fields. Based on the Boolean result of the expression, Data Validation can flag the record or remove it from the output.
Expression Node dfPower Architect’s Expression runs a scriptinglanguage to process data sets in ways that are not built into dfPower Studio. The Expression language provides many statements, functions, and variables for manipulating data.
Step Action Note
5c • Uses variables for data input paths and filenames, and for the dfPower Architect Expression engine.
• The results from the Expression node are determined by the code on the Expression Properties screen. Access this screen by double-clicking Expression in the nodes list on the left of the dfPower Architect main screen.
dfPower Architect reads these variables from the architect.cfg file on your design-time computer, or from the run-time computer, or from the location specified when the job is launched from the command line.
Additional Nodes Step Action Note
5d Add any number of nodes to a service.
An embedded job can have any number of nodes.
Embedded Job Node Step Action Note
5e The Embedded Job node embeds another dfPower Architect job into the job flow.
Data passes from this job into the external job, is processed, and then returns in line back to this job.
60 DataFlux® qMDM Solution
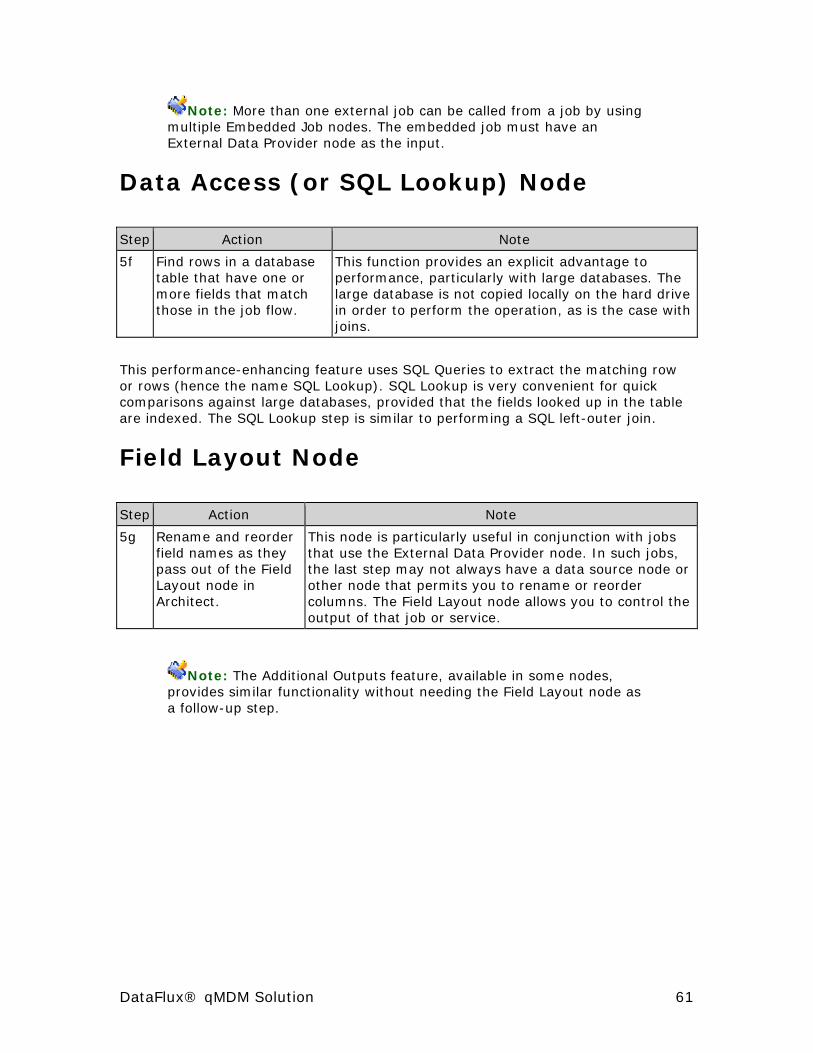
Note: More than one external job can be called from a job by using multiple Embedded Job nodes. The embedded job must have an External Data Provider node as the input.
Data Access (or SQL Lookup) Node Step Action Note
5f Find rows in a database table that have one or more fields that match those in the job flow.
This function provides an explicit advantage to performance, particularly with large databases. The large database is not copied locally on the hard drive in order to perform the operation, as is the case with joins.
This performance-enhancing feature uses SQL Queries to extract the matching row or rows (hence the name SQL Lookup). SQL Lookup is very convenient for quick comparisons against large databases, provided that the fields looked up in the table are indexed. The SQL Lookup step is similar to performing a SQL left-outer join.
Field Layout Node Step Action Note
5g Rename and reorder field names as they pass out of the Field Layout node in Architect.
This node is particularly useful in conjunction with jobs that use the External Data Provider node. In such jobs, the last step may not always have a data source node or other node that permits you to rename or reorder columns. The Field Layout node allows you to control the output of that job or service.
Note: The Additional Outputs feature, available in some nodes, provides similar functionality without needing the Field Layout node as a follow-up step.
DataFlux® qMDM Solution 61

DataFlux qMDM Best Practices The DataFlux® building blocks of data management provide all of the functionality needed to build consistent, accurate, and reliable data. DataFlux solutions work with customer contact records, product data, inventory information, or transactional data — virtually any data that drives your business. With DataFlux data management solutions, you can strengthen the data you use on a daily basis to communicate with customers and conduct business with your suppliers and trading partners.
Through the industry’s first integrated data management technology, DataFlux solutions can inspect, correct, integrate, enhance, and control your business-critical data. With better data, you can make better business decisions that can give you a competitive edge. In addition, improved information increases the productivity of your information-based initiatives such as CRM, ERP, data warehouse creation, and management and database marketing.
The DataFlux qMDM Solution is a combination of software, data model, templates, documentation, and services that together provide the functionality and processes necessary to build and maintain a master repository database.
Therefore, the master repository database is a set of tables and table relationships that contain customer information and require entity ID keys and linking information to give end-users or other applications the ability to see a complete view of the customer and his or her relationships with other customers. In addition, the master repository database can be used as the sole source for creating and maintaining global customer IDs that can be referenced by other applications or processes. Source system IDs, important to other enterprise applications or data sources, are also kept in the master customer database to facilitate linking activities with other data providers and/or consumers.
In this section, DataFlux highlights some best practice tips on using the master data management methodology, services, and approach. This information should be used as a guide to developing efficient, functional, and scalable integration toolsets within the DataFlux dfPower® Studio development environment.
DataFlux offers dfPower Studio as its integration suite of products. Today’s information-based initiatives require a solution that encompasses all aspects of data management. The people that control your organization’s data—whether a database administrator in IT or a data steward on the business side—need to be able to inspect, correct, integrate, enhance, and control that information from virtually any source system. Through an easy-to-use yet powerful interface dfPower Studio goes beyond typical analysis and correction technologies, allowing you to:
• Analyze and profile your data—and immediately begin building business rules to fix data problems
• Merge customer and prospect databases while verifying and completing address information
• Transform and standardize product codes to help drive value from your supply chain
62 DataFlux® qMDM Solution

• Standardize and validate information across systems to allow you to make business decisions based on consistent, accurate, and reliable data
• Perform just about any other data management process required by your organization
In related sections, we document many of the tried and true best practices in the development of the DataFlux qMDM Solution, built upon the DataFlux dfPower Studio Integration Server platform.
DataFlux® qMDM Solution 63
Implementation Lifecycle Like any major Information Technology initiative, a deployment methodology must be used to ensure project rollout and project maintenance success. Implementing a sophisticated MDM solution is no different. If we look at a standard plan-develop-test-promote-maintain implementation cycle it fits nicely with the DataFlux qMDM Solution methodology and with the DataFlux data management methodology because all of these efforts require substantial preliminary planning, an iterative process for development of processes unique to your organization, and mechanisms to gauge and monitor ongoing performance of the system and process.
Highlighted below are the five main phases of project implementation and the activities or critical success factors as related to the qMDM Solution deployment. Note that this section should not be construed as a full DataFlux MDM deployment methodology as it relates to resource planning, scheduling, etc. It is meant only to illustrate technical requirements of the MDM system as the project moves through the deployment process. The deployment methodology will be brought to the project and managed by DataFlux professional service team members as they assist in project implementation.
The recommendations below make no distinction between customer staff, DataFlux consultants, or third-party consultants. It is only a guide that should be mapped back to project resources that will support your qMDM Solution deployment.
Plan It’s no surprise the initial planning is critical to successful deployment of the qMDM Solution. This planning entails technical resources and also includes cross-departmental business initiative reviews. The goal is two-fold: 1) A list of available and required technical resources (people, software, and hardware), and 2) a compilation of business requirements that contain affected systems and processes, current data quality standards, and current identity management rules.
Here are a few more items to consider:
• Identify those members of your team who will be working directly with qMDM jobs and services. Consider dfPower® Studio and dfPower Customize training for these individuals.
• Check published MDM hardware and software specifications to ensure your IT environment can support the qMDM Solution.
• Investigate whether or not those team members who can compile or delineate data quality and identity management rules are capable of working directly with DataFlux software. If not, map out a strategy to get that information from those individuals to those on the team who will be implementing the solution.
• Thoroughly review the DataFlux qMDM Solution data model. Does it meet your needs? Does it need to be extended or modified? Decide early on what kind of changes need to be made to the model. Revise the model and modify jobs and services accordingly.
64 DataFlux® qMDM Solution
• Catalog the types of enterprise applications or home-grown applications that will interact with the qMDM system. Look for Web service support and document any other specifics about how information will need to enter and exit those systems to support the qMDM Solution.
Develop It is important to note that qMDM jobs and services are both, in essence, Architect jobs built in dfPower Studio. These Architect jobs have an extension of .dmc in the DataFlux development environment but they are actually XML files. This has a few implications. The first is that jobs and services can be stored in a source control system and the usual techniques for managing and versioning code can be used on them. In fact, you are strongly encouraged to use a source control system that has file difference and rollback functionality, if possible.
The second implication is that qMDM jobs can be generated outside of Architect in XML. While this is not suggested in most cases, it does give users the opportunity to generate new services on the fly and deploy them to the Integration Server rapidly, if necessary.
In most cases, development of new qMDM jobs and services will not be required for project deployment. However, it is a fact that the templates delivered with the qMDM system will need to be customized to fit with your organization’s IT landscape and to meet your business operation needs. So the development phase includes both new development, of which there may be very little, and modification of existing templates and services.
Here are a few other considerations:
• When setting up many developers to work simultaneously building qMDM jobs and services using dfPower Studio, you should share certain resources in a central location. The first is the Quality Knowledge Base (QKB). Many jobs reference this repository for data quality functionality and it is imperative that all developers are pulling that information from the same place so they achieve the same results. This becomes especially true when developers use dfPower Customize to make changes to the QKB. To have those changes instantly available to other users when they load jobs for the first time on their local machine, the QKB location must be shared among them. The mechanism to share the QKB is described in the Global Variables section, and entails modifying your architect.cfg file to point to the central shared location of the QKB.
• Developers need to share the locations for other reference databases like those used for geocoding and address verification.
• Developers need to take care in setting up connections to data sources. The data source names used in their jobs must correspond to the data source names used by other developers and by the computer that hosts the Integration Server.
• Once the data sources are established, developers need to use the Database Connections feature in dfPower Studio so that database connection information is not stored in the qMDM jobs themselves but rather in data source
DataFlux® qMDM Solution 65

configuration files that are specific to their machine. This makes it possible to port the jobs from computer to computer even if data connection credentials or path locations to the data source are different.
• For any jobs or services that call other jobs or read or write to text files, developers need to use macros so that explicit physical path information is not stored in the job. This entails writing macros in the architect.cfg file for all users of the jobs and services including the server. While the macro names remain the same, the actual values stored in the architect.cfg file can be changed according to the user’s environment.
• Designate a computer to be used as the development server. Developers using dfPower Studio and the Integration Server Manager will need connection information to this server so they can post jobs to the server and run them there.
• You will want to build a development database in the same environment that will be used for production. It can be difficult to develop using a DB2 database, for instance, when Oracle will be the production database.
• Make sure that all users have the same version of the software installed and have the latest patches applied.
Test When you are ready, you can choose to deploy all modified or newly constructed jobs and services to a clean test environment. This environment could be the same as the one used for development. Ideally, however, it should closely resemble what the production environment will look like. To move jobs, services, and the MR database from development to testing, do the following:
• On the test server, ensure that all macro values in the architect.cfg file and in the dfexec.cfg file (used by Integration Server) contain valid paths to job files, reference data sources, and database systems.
• On the server, make sure that values that can be changed to enhance performance in the configuration files via global variables (like those for sorting, clustering, and address verification) are set to values that can take advantage of the high performance server environment.
• Ensure that you are using the same QKB on the server as you have in development. If the server can access the QKB directly on the network that was used in development, you can point to it directly. Otherwise, particularly when moving from Microsoft® Windows® development environments to UNIX® test environments, you must FTP the entire QKB to the UNIX system where it can be found by the server.
• Make sure that data sources are set up and use the same DSN names as you have on the development environment. Be sure to use the Database Connection feature as specified in the previous section.
• If deploying services that are accessed by other systems through Web service calls to the Integration Server, test connections to the server by following the procedures spelled out in the Integration Server documentation.
66 DataFlux® qMDM Solution

• If available, use file versioning functionality for jobs and services in the source control application.
Promote Many of the items described in the Test phase of the deployment methodology are similar to the activities required for moving jobs, services, and the MR database to a production environment.
• On the production server, ensure that all macro values in the architect.cfg file and in the dfexec.cfg file (used by the Integration Server) contain valid paths to job files, reference data sources, and database systems.
• On the production server, ensure that values that can be changed to enhance performance in the configuration files via global variables (such as those used for sorting, clustering, and address verification). Set these values to take advantage of the high performance server environment.
• Ensure that you are using the same QKB on the production server as you have in the test environment. Physically move all reference data sources and the QKB to a production environment. Do not share these resources with development or test environments.
• Make sure that data sources are set up to use the same DSN names as you have on the test environment. Use the Connection feature in dfPower as specified in the previous section to implement this.
• If deploying services that are accessed by other systems through Web service calls to the Integration Server, verify connections to the production server by following the procedures in the Integration Server documentation.
• The WSDL3 used to describe the Web services interface to the Integration Server can change as the Integration Server is updated. Ensure that applications that call the Integration Server have written Web service calls using the WSDL that is currently supported by the Integration Server.
Maintain One of the biggest areas of concern for the maintenance of a large IT project is what to do about software updates and patches. DataFlux will make every effort to maintain backwards compatibility as new features are added to the qMDM Solution. Part of the qMDM Solution consists of what is called the DataFlux platform. This is the packaged DataFlux software that the qMDM Solution is built upon. The main components of the platform: dfPower Studio, Enterprise Integration Server, and the Contact Information Quality Knowledge Base will all have routine upgrades and patches. You will have access to these if you have agreed to a maintenance agreement with DataFlux. Before you choose to upgrade the platform, you should wait for DataFlux to officially certify that the qMDM Solution will work as designed with the new features.
3 Web Services Description Language
DataFlux® qMDM Solution 67
The QKB is a special case with regard to updates. Your developers may have extensively customized the QKB during the deployment cycle and you must be sure that these changes are not overwritten when a new QKB from DataFlux becomes available. It is good practice to back-up your existing QKBs before installing the new QKB. The QKB installation process will merge new additions to the QKB into your existing QKB while still keeping your customizations intact. If you need to recreate a previous state of the qMDM Solution, you will have the original QKB intact. Individual QKB files cannot be maintained in a source control application the same way that Architect jobs can, so take extra care to document the changes you make to the QKB over time.
If new qMDM Solution upgrades become available for the data model, templates, jobs, or services, then you may implement these assuming that you have upgraded the platform as prescribed by DataFlux. Some newer services may have features that are not supported by previous versions of the platform.
68 DataFlux® qMDM Solution
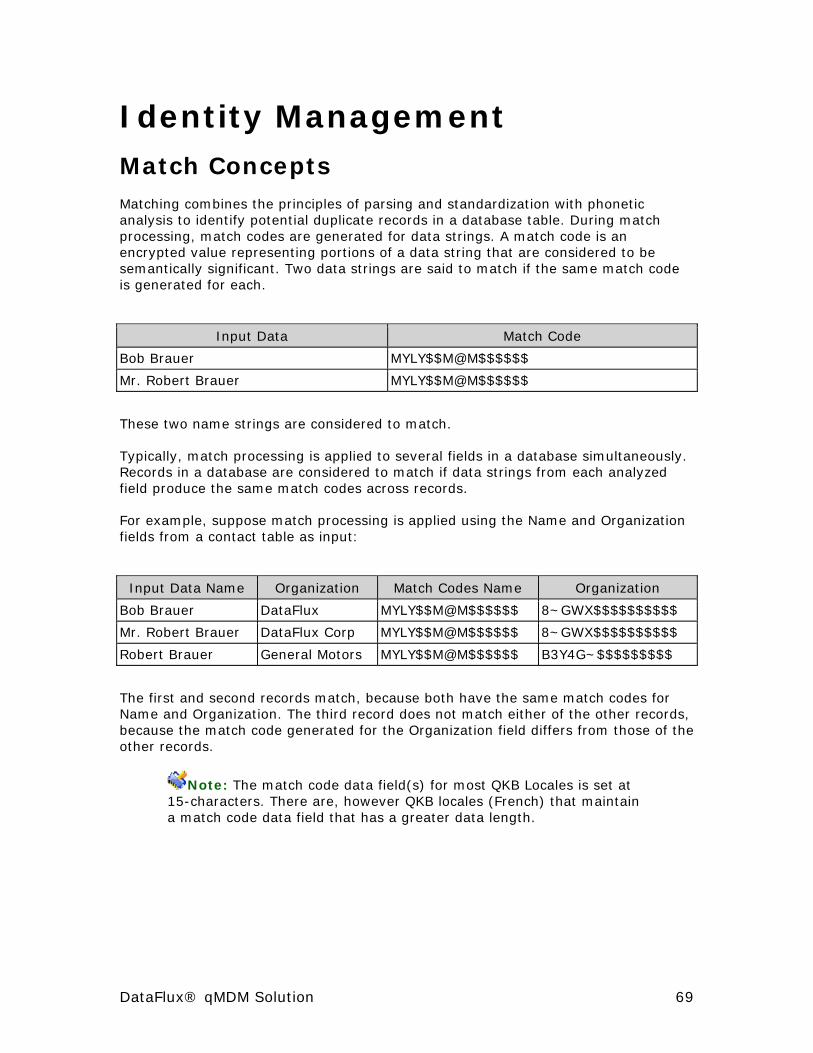
Identity Management Match Concepts Matching combines the principles of parsing and standardization with phonetic analysis to identify potential duplicate records in a database table. During match processing, match codes are generated for data strings. A match code is an encrypted value representing portions of a data string that are considered to be semantically significant. Two data strings are said to match if the same match code is generated for each.
Input Data Match Code
Bob Brauer MYLY$$M@M$$$$$$
Mr. Robert Brauer MYLY$$M@M$$$$$$
These two name strings are considered to match.
Typically, match processing is applied to several fields in a database simultaneously. Records in a database are considered to match if data strings from each analyzed field produce the same match codes across records.
For example, suppose match processing is applied using the Name and Organization fields from a contact table as input:
Input Data Name Organization Match Codes Name Organization
Bob Brauer DataFlux MYLY$$M@M$$$$$$ 8~GWX$$$$$$$$$$
Mr. Robert Brauer DataFlux Corp MYLY$$M@M$$$$$$ 8~GWX$$$$$$$$$$
Robert Brauer General Motors MYLY$$M@M$$$$$$ B3Y4G~$$$$$$$$$
The first and second records match, because both have the same match codes for Name and Organization. The third record does not match either of the other records, because the match code generated for the Organization field differs from those of the other records.
Note: The match code data field(s) for most QKB Locales is set at 15-characters. There are, however QKB locales (French) that maintain a match code data field that has a greater data length.
DataFlux® qMDM Solution 69

Generating Match Codes
In dfPower® Architect, we propose that you cleanse the data prior to matching for standardization/display purposes. (You are not required to parse/standardize data prior to matching but the MDM methodology calls for it since, in addition to generating the match codes from the data, you also want to store it in a clean and valid format.)
Match Definitions dfPower Quality - Match uses many match definitions for various data types and performs specific matching techniques and algorithms on each of those types. For example, the logic used to match name fields is very different from that used to match address fields. If a field is to be included in a match job for a given table, you must associate one of the available field types to that field. The accuracy of a match report can be adversely affected by not choosing the field type that most closely resembles the data in the field. For example, the phrases William Street and Bill Street would be considered duplicates using the Name match definition, but they would not be considered duplicates using the Address match definition.
Match Sensitivity
Match sensitivity defines how closely dfPower Quality - Match compares data to determine if duplicate records exist. Adjusting the sensitivity provides the flexibility needed to accurately identify a wide array of duplicate and near-duplicate records.
You must apply one of the available match sensitivities to each field that is used to identify duplicate records. The sensitivity and match definition combine to make up the match job for the selected field. The following is a brief description of the sensitivity functionality:
• Sensitivity—Uses the DataFlux proprietary data quality algorithms to create match codes that are clustered together to identify the duplicate and near-duplicate records contained in a database. You can apply a number from 50 to 95. Adjusting this number will increase or decrease the accuracy and precision of the generated match codes. The default sensitivity is 85.
• Exact option—Specifying the Exact option in the Match Definition field for a given record performs a character-for-character match on the specified field. You can also select the number of characters on which to match; these
70 DataFlux® qMDM Solution
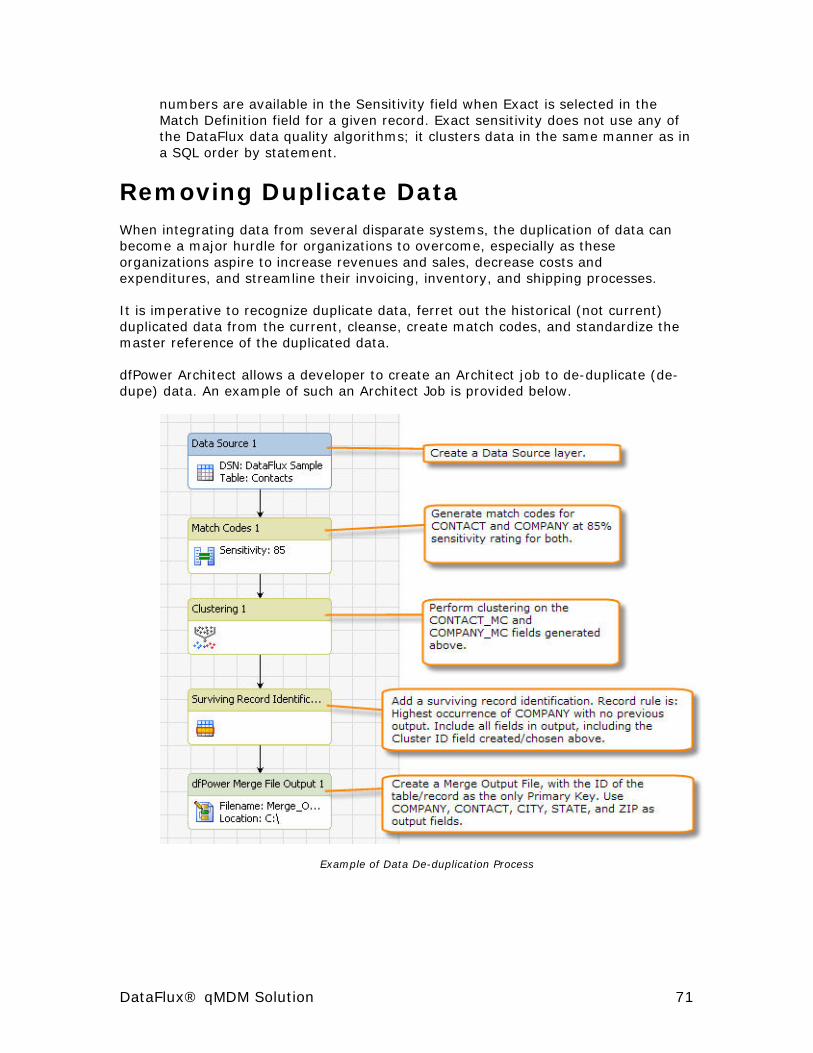
numbers are available in the Sensitivity field when Exact is selected in the Match Definition field for a given record. Exact sensitivity does not use any of the DataFlux data quality algorithms; it clusters data in the same manner as in a SQL order by statement.
Removing Duplicate Data When integrating data from several disparate systems, the duplication of data can become a major hurdle for organizations to overcome, especially as these organizations aspire to increase revenues and sales, decrease costs and expenditures, and streamline their invoicing, inventory, and shipping processes.
It is imperative to recognize duplicate data, ferret out the historical (not current) duplicated data from the current, cleanse, create match codes, and standardize the master reference of the duplicated data.
dfPower Architect allows a developer to create an Architect job to de-duplicate (de-dupe) data. An example of such an Architect Job is provided below.
Example of Data De-duplication Process
DataFlux® qMDM Solution 71
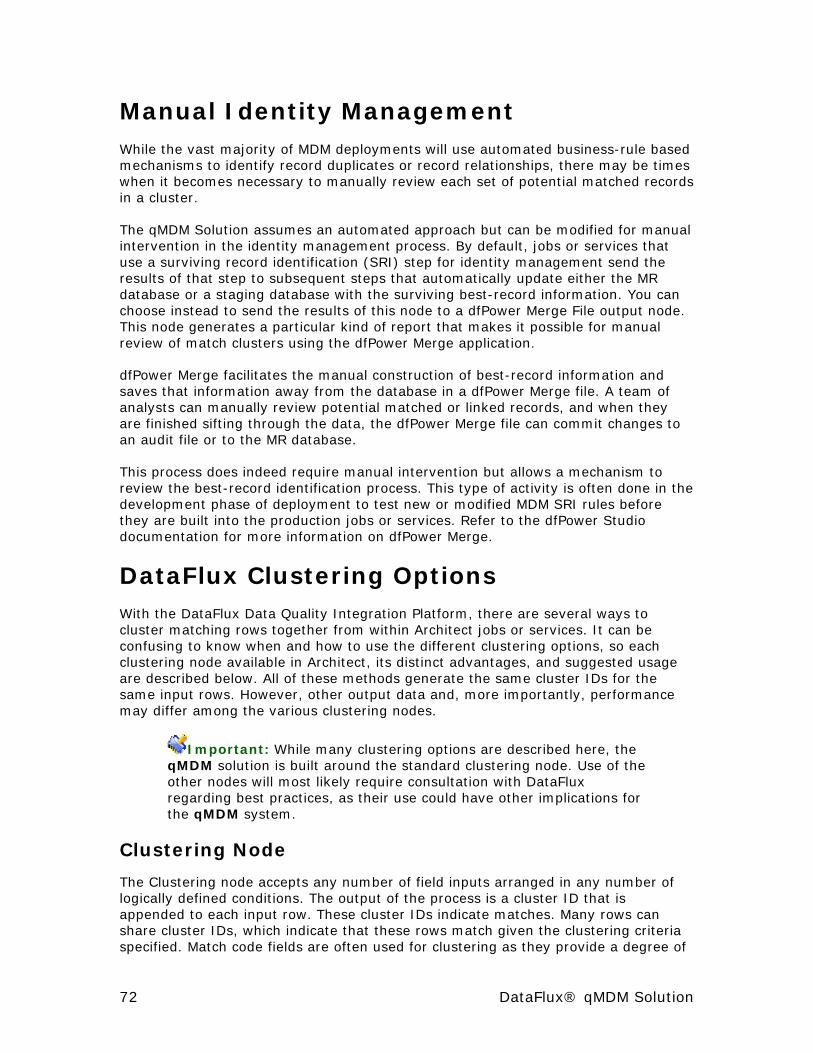
Manual Identity Management While the vast majority of MDM deployments will use automated business-rule based mechanisms to identify record duplicates or record relationships, there may be times when it becomes necessary to manually review each set of potential matched records in a cluster.
The qMDM Solution assumes an automated approach but can be modified for manual intervention in the identity management process. By default, jobs or services that use a surviving record identification (SRI) step for identity management send the results of that step to subsequent steps that automatically update either the MR database or a staging database with the surviving best-record information. You can choose instead to send the results of this node to a dfPower Merge File output node. This node generates a particular kind of report that makes it possible for manual review of match clusters using the dfPower Merge application.
dfPower Merge facilitates the manual construction of best-record information and saves that information away from the database in a dfPower Merge file. A team of analysts can manually review potential matched or linked records, and when they are finished sifting through the data, the dfPower Merge file can commit changes to an audit file or to the MR database.
This process does indeed require manual intervention but allows a mechanism to review the best-record identification process. This type of activity is often done in the development phase of deployment to test new or modified MDM SRI rules before they are built into the production jobs or services. Refer to the dfPower Studio documentation for more information on dfPower Merge.
DataFlux Clustering Options With the DataFlux Data Quality Integration Platform, there are several ways to cluster matching rows together from within Architect jobs or services. It can be confusing to know when and how to use the different clustering options, so each clustering node available in Architect, its distinct advantages, and suggested usage are described below. All of these methods generate the same cluster IDs for the same input rows. However, other output data and, more importantly, performance may differ among the various clustering nodes.
Important: While many clustering options are described here, the qMDM solution is built around the standard clustering node. Use of the other nodes will most likely require consultation with DataFlux regarding best practices, as their use could have other implications for the qMDM system.
Clustering Node
The Clustering node accepts any number of field inputs arranged in any number of logically defined conditions. The output of the process is a cluster ID that is appended to each input row. These cluster IDs indicate matches. Many rows can share cluster IDs, which indicate that these rows match given the clustering criteria specified. Match code fields are often used for clustering as they provide a degree of
72 DataFlux® qMDM Solution

“fuzziness” in the clustering process. An example of typical clustering conditions found in a Clustering node is found later in this section.
• Condition 1: FULL_NAME_MATCH_CODE; ADDRESS_MATCH_CODE, or
• Condition 2: FULL_NAME_MATCH_CODE; PHONE_NUMBER_MATCH_CODE, or
• Condition 3: EMAIL_ADDRESS_MATCH_CODE; ACCOUNT_NUMBER; GENDER_CD
The criteria in this example state that a row should match if the full name match code field and the address match code field are the same or if the full name match code field and the phone number match code field are the same or if the email address match code field and the account number field and the gender code field are the same.
This node is typically used in a batch setting where you want to process thousands or millions of rows at a time. All output from this step, including conditions matched flags4 are completely correct for every row. This node also has a few options that the other real time clustering nodes do not have, namely the way various sets of clustered rows are or are not output from the node.
Using the previous example, consider this clustering step output:
Primary Key Cluster ID COND_1 COND_2 COND_3
1 1 false false false
2 2 true true false
3 2 true false false
4 2 false false true
Conditions Matched Output
There are three condition matched columns corresponding to the three conditions specified in the clustering logic and they are numbered sequentially according to the layout of the conditions read from top to bottom. We see that row 1 has no duplicates; it is a singleton. Singletons will always show false in all condition matched output fields, because it does not match any other row in the data set given the criteria. Rows 2 through 4 are clustered together and are considered duplicates. Row 2 matched an indeterminate number of other rows in the cluster either by matching those rows by condition 1 or condition 2 as indicated by the true value in the corresponding column. Row 3 matched other rows in the cluster only by condition 1 and row 4 matched other rows in the cluster only by condition 3. Rows that are part of a cluster will always have at least one condition matched flag set to true.
The utility of this output becomes apparent when you consider that some of the conditions you specified for clustering (matching) may be more reliable than others.
4 Conditions matched flags refer to the optional output information available in all clustering steps that indicate those rules that caused that particular row to match other rows in its cluster.
DataFlux® qMDM Solution 73

With this output, a developer could write post-clustering logic that flags rows for manual review when the matching condition is not very reliable. Rows that are matched using reliable conditions could then be considered automatic matches.
The downside to using this functionality is that the same clustering process with this feature enabled will run twice as long. In fact, if you choose to use the conditions matched option, the sort, or don’t output options performance for that process will be reduced, sometimes considerably depending on the configuration.
You can choose to save the cluster state file generated during batch processing for use by a subsequent Real Time Clustering process. This would allow new rows to be processed and potentially added to existing clusters without the need to recreate and reprocess the entire initial set of rows used for clustering in the first place. See the Real Time Clustering nodes described in this topic for further description. Also, refer to the Clustering node documentation in the dfPower Studio User’s Guide for more information about setting different options that can change the way clusters are processed and outputted.
Exclusive Real Time Clustering Node
The Exclusive Real Time Clustering (ERTC) node in Architect was designed to facilitate near real time addition of new rows to previously clustered data. While the Cluster Update node requires that all rows be re-clustered to find out if one new row is unique or matches another row, the ERTC node does not have this requirement.
The ERTC node holds cluster criteria and input fields in memory while new rows are added to the cluster. If not enough memory was set during node configuration, disk space is also used (this negatively impacts performance). The ERTC node also has the ability to save the cluster information it generates during the clustering process as a physical cluster state file so that clustering new data can begin where the previous cluster left off. This happens by loading the cluster state file into memory prior to the initiation of the new cluster process. Since the Clustering and Cluster Update nodes can generate cluster state files, the ERTC node can be used after a Clustering node as long as the Clustering node generates and saves the cluster state file for access by the ERTC node. Remember, the same conditions must be defined for the ERTC node that were defined for the Clustering node.
This process is suited for real time use. It can be used for batch processing but some of the output information, in particular the condition matched flags equal to false, are only correct with respect to the rows that have been clustered before the row currently being considered. When assessing one row at a time and taking action on the output for that row, this is not an issue, because the information for the current row is also correct with respect to previous rows. However, if this node is used for adding multiple rows in batch processing, it is possible that a false value may be incorrect because a subsequent new row may match the current row. The ERTC process will not know about it while it is updating the match condition flag information for the current row. A return value for the condition matched flag that is equal to true is always correct no matter how many more rows are added, but false cases might end up being incorrect because of the additional rows.
To make this a bit clearer, consider the first row you run through an ERTC process. It always has false values for condition matched flag fields because there is no other row with which it can match. Now consider what would happen if the very next row
74 DataFlux® qMDM Solution
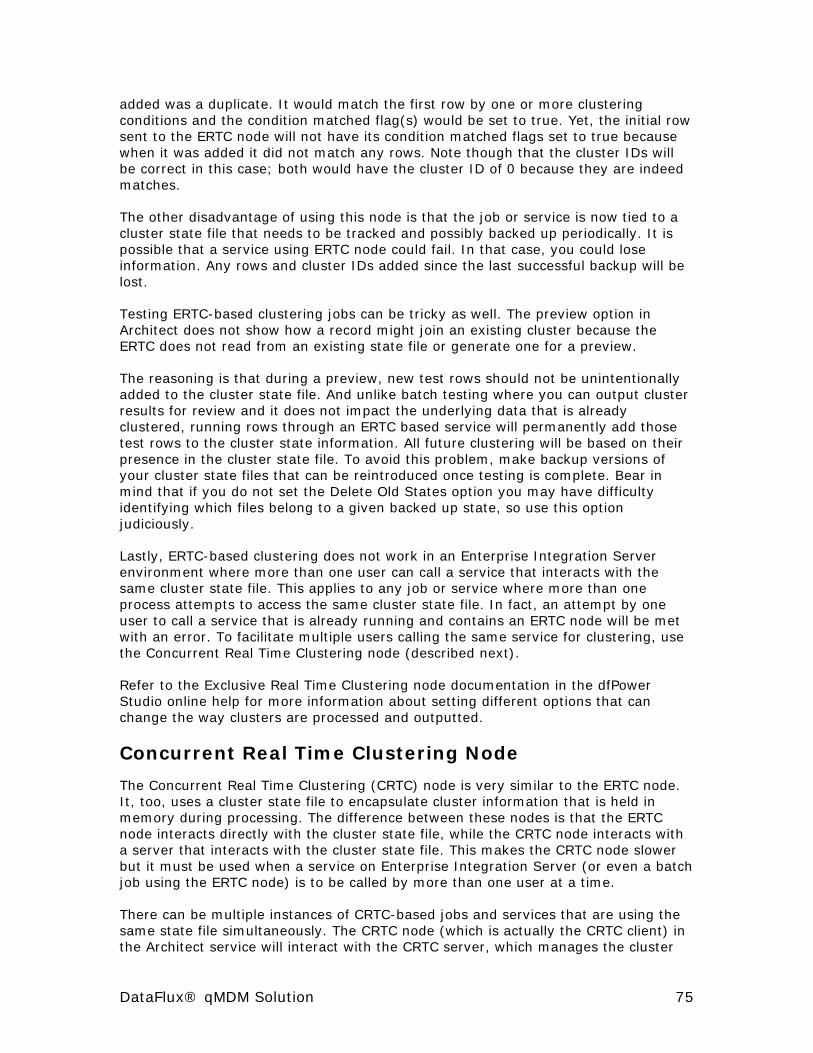
added was a duplicate. It would match the first row by one or more clustering conditions and the condition matched flag(s) would be set to true. Yet, the initial row sent to the ERTC node will not have its condition matched flags set to true because when it was added it did not match any rows. Note though that the cluster IDs will be correct in this case; both would have the cluster ID of 0 because they are indeed matches.
The other disadvantage of using this node is that the job or service is now tied to a cluster state file that needs to be tracked and possibly backed up periodically. It is possible that a service using ERTC node could fail. In that case, you could lose information. Any rows and cluster IDs added since the last successful backup will be lost.
Testing ERTC-based clustering jobs can be tricky as well. The preview option in Architect does not show how a record might join an existing cluster because the ERTC does not read from an existing state file or generate one for a preview.
The reasoning is that during a preview, new test rows should not be unintentionally added to the cluster state file. And unlike batch testing where you can output cluster results for review and it does not impact the underlying data that is already clustered, running rows through an ERTC based service will permanently add those test rows to the cluster state information. All future clustering will be based on their presence in the cluster state file. To avoid this problem, make backup versions of your cluster state files that can be reintroduced once testing is complete. Bear in mind that if you do not set the Delete Old States option you may have difficulty identifying which files belong to a given backed up state, so use this option judiciously.
Lastly, ERTC-based clustering does not work in an Enterprise Integration Server environment where more than one user can call a service that interacts with the same cluster state file. This applies to any job or service where more than one process attempts to access the same cluster state file. In fact, an attempt by one user to call a service that is already running and contains an ERTC node will be met with an error. To facilitate multiple users calling the same service for clustering, use the Concurrent Real Time Clustering node (described next).
Refer to the Exclusive Real Time Clustering node documentation in the dfPower Studio online help for more information about setting different options that can change the way clusters are processed and outputted.
Concurrent Real Time Clustering Node
The Concurrent Real Time Clustering (CRTC) node is very similar to the ERTC node. It, too, uses a cluster state file to encapsulate cluster information that is held in memory during processing. The difference between these nodes is that the ERTC node interacts directly with the cluster state file, while the CRTC node interacts with a server that interacts with the cluster state file. This makes the CRTC node slower but it must be used when a service on Enterprise Integration Server (or even a batch job using the ERTC node) is to be called by more than one user at a time.
There can be multiple instances of CRTC-based jobs and services that are using the same state file simultaneously. The CRTC node (which is actually the CRTC client) in the Architect service will interact with the CRTC server, which manages the cluster
DataFlux® qMDM Solution 75

state information. Consequently, many users can call a service that communicates with a server that dynamically manages the additions of rows from different services that communicate with the same cluster state file. The CRTC server starts automatically when the first CRTC node requests a particular state file and exits automatically when the last CRTC node exits.
Additionally, like the ERTC node, this node can be used after a Clustering or Cluster Update node as long as those nodes were set to generate the cluster state file after processing completed and the clustering criteria are identical.
The disadvantages spelled out for the ERTC node remains true for this node as well save for the single user issue. Also remember that the CRTC node should only be used if multiple jobs or services are intended to interact with the same state file simultaneously. Otherwise, the ERTC node is much faster and guarantees exclusive access.
Refer to the Concurrent Real Time Clustering node documentation in the dfPower Studio online help for more information about setting different options that can change the way clusters are processed and outputted.
Clustering Nodes Compared
Architect
Node Preferred
Mode Generate State File
State File Dependent
Concurrent Use
Completely Correct Output
Reprocess Entire Set
for Updates
Clustering Batch Yes No No Yes n/a
Cluster Update
Batch Yes No No Yes Yes
Exclusive Real Time Clustering
Real Time
Yes Yes No Batch - No No
Concurrent Real Time Clustering
Real Time
Yes Yes Yes Batch - No No
Clustering Quick Reference
76 DataFlux® qMDM Solution

Data Quality Working with International Data The DataFlux® dfPower® Studio installation procedure installs a set of directories and files that are collectively known as the Sample Quality Knowledge Base. Typically, dfPower Studio will reference by default the main Quality Knowledge Base that is usually installed in a directory called DataFlux\QltyKB, unless you choose a different location during the installation process. The main Quality Knowledge Base is the set of files that all DataFlux products reference and use to perform data analysis, parsing, standardization, and matching.
To view the Quality Knowledge Base locales that are presently loaded on your system for dfPower Studio to use, you can navigate to: Tools > Options > Quality Knowledge Base.
Choosing QKB Locales
A DataFlux developer is inclined to load multiple locales and then use the guess locale feature to guess the country (locale) to which their data applies, and create an additional field that contains the locale's code.
dfPower Architect's Locale Guessing job flow step uses information from the Quality Knowledge Base and your data to guess the country (locale) to which your data applies, and creates an additional field that contains the locale's code. For example,
DataFlux® qMDM Solution 77

if you have records with city names such as Roma and Milano, Locale Guessing will guess those records apply to Italy, and will put ITITA—the dfPower Architect code for the Italian (Italy) locale—in an additional field.
Locale Guessing information can be very useful in later nodes for determining how data should be processed. For example, if a record contains address information for Italy, you will want to specify the Italian (Italy) locale when processing that record with match codes.
Results from Locale Guessing are placed in fields as specified on the Guess Locale Properties screen, including a new field that contains locale codes for each record. You can access this screen by double-clicking Locale Guessing in the nodes list on the left of the dfPower Architect main screen. To access this screen for a Locale Guessing icon that is already part of your job flow, double-click that icon or right-click and choose Properties.
The output field would specify the name of the field for placing the locale codes.
Note: It is important to note that the DataFlux MDM Data Model is set up to support multiple locales using generic field naming for addresses, email naming conventions, individual name fields, etc.
Parsing Data dfPower Architect's Parsing node is a simple but intelligent tool for separating multi-part field values into multiple, single-part fields. For example, if you have a Name field that includes the value Mr. James M Williamson III, Esq., you can use parsing to create six separate fields:
• Name Prefix: Mr.
• Given Name: James
• Middle Name: M
• Family Name: Williamson
• Name Suffix: III
• Name Appendage: Esq.
You can access this screen by double-clicking Parsing in the nodes list on the left of the dfPower Architect main screen. To access this screen for a Parsing icon that is already part of your job flow, double-click that icon or right-click and choose Properties.
78 DataFlux® qMDM Solution
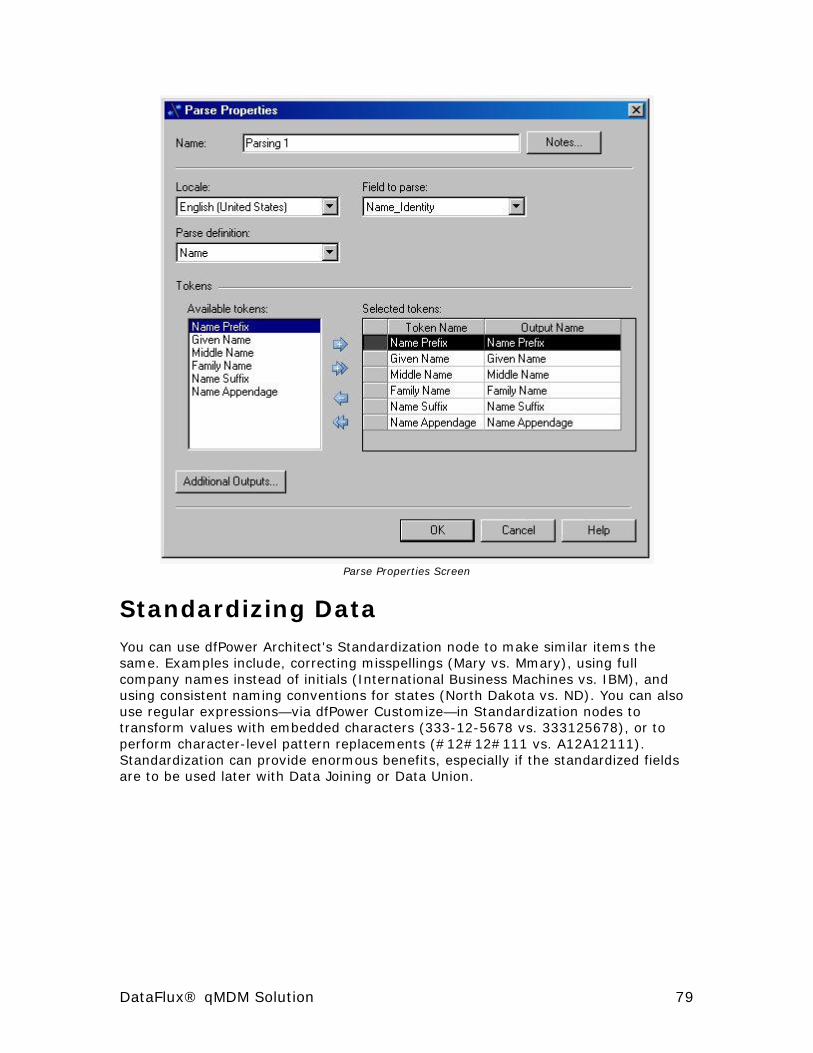
Parse Properties Screen
Standardizing Data You can use dfPower Architect's Standardization node to make similar items the same. Examples include, correcting misspellings (Mary vs. Mmary), using full company names instead of initials (International Business Machines vs. IBM), and using consistent naming conventions for states (North Dakota vs. ND). You can also use regular expressions—via dfPower Customize—in Standardization nodes to transform values with embedded characters (333-12-5678 vs. 333125678), or to perform character-level pattern replacements (#12#12#111 vs. A12A12111). Standardization can provide enormous benefits, especially if the standardized fields are to be used later with Data Joining or Data Union.
DataFlux® qMDM Solution 79

Standardization Properties Screen
Non-Valid Records and Exceptions DataFlux developers have the ability to use the dfPower Architect Data Validation node to analyze the content of data by setting validation conditions. These conditions create validation expressions that you can use to filter data for a more accurate view of that data. Data Validation uses the dfPower Studio Expression language. You can use this language for single values, multiple values, single conditions, or multiple conditions, and to compare fields. Based on the boolean result of the expression, you can have the Data Validation node flag the record or remove it from the output.
You can access the Data Validation Properties screen by double-clicking Data Validation in the nodes list on the left of the dfPower Architect main screen. To access this screen for a Data Validation icon that is already part of your job flow, double-click the icon, or right-click and choose Properties.
80 DataFlux® qMDM Solution
Data Validation Properties Screen
Using External Data Quality Functionality The DataFlux qMDM Solution works best when you choose to use DataFlux technology for the cleansing, matching, and identity management aspect of the MDM implementation. However, you can access functionality from other vendors for these activities using your Architect job flows. You have several options:
1. COM Plugin—If the vendor you choose to use for cleansing and match key generation has a dll, application, or code that can be called from a COM dll, you can write a DataFlux COM dll that can be accessed directly from your Architect job flow. See the dfPower Studio documentation for more information on this process.
2. Expression Engine—You can to use the Expression node in Architect to call an application directly with any number of parameters if your third-party data quality application can be called using a command line. Again, see the dfPower Studio online documentation for more information.
DataFlux® qMDM Solution 81
3. File or Table Access—An Architect job flow can read information from any number of databases and flat file formats. You could output information from an Architect job in one of these formats, have your third-party application be kicked off by some sort of trigger that processes information in that table, and then another Architect process could pick the data set file up and continue processing.
4. Java Plugin—It is possible to access Java code directly from an Architect work flow. This can be useful when external code has been developed that needs to be utilized from within a DataFlux process. Review the documentation for dfPower Studio for more information.
Using Database Connections for Saved Connections As described in the qMDM installation documentation, developers can use the Database Connections functionality in dfPower Studio to store dataset connection information. The benefit of using the power of the Database Connections is that Architect service jobs accessing a particular data source (for example, MDM_TARGET) can be ported from a standalone computer to the DataFlux Integration Server (DIS) with ease. The only requirement is that the dataset naming convention of the client computer ODBC connection must equate to that of the server. To clarify, the database must be called MDM_TARGET on both the client machine (developer’s machine) and the server (where the DIS is installed).
Note: Dataflux best practices when developing Architect service jobs call for using the Database Connections functionality in dfPower Studio to set up and store connection information to any ODBC data source. When this practice is followed, the process of using global variables increases the flexibility and portability of Architect jobs and services between data sources.
For example, if the Database Connections functionality is used to connect to a certain data source and global variables are used within an Architect job or service to accept or retrieve data from another data source, the connection information to the master reference database is made permanent and independent of the Architect job or service. This connection information is stored in the dac folder on the job’s run-time machine.
For example, take the case where we have a database called MDM_TARGET resident on Machine S. An Architect service is created on Machine A. We would recommend that a DataFlux developer:
1. On A, connect to the MDM_TARGET database on S using the Database Connections functionality and save the connection settings.
2. Add a global variable named MDM_TARGET_DSN in the architect.cfg file on both your desktop computer for design-time work, and in the architect.cfg file on the server for run-time processing. Set that global variable like this: MDM_DSN='DSN=MDM_TARGET'
82 DataFlux® qMDM Solution

3. When connecting to this database in your job or service, enter the global variable in the Advanced tab of the Architect node that contains the database connection in this format: %%MDM_DSN%%
(Usually this Advanced Property is labeled as DSN or something similar.)
The above detail allows a DataFlux developer to create an Architect service job that is portable and irrespective of where the data source resides (provided it is named the same on the client and server machines).
DataFlux® qMDM Solution 83

Real-time Service Performance Tuning DataFlux® developers make a concerted effort to provide the users of dfPower® Studio the best in highly tunable and performance-based data quality and data integration tools.
Many of the DataFlux toolsets are delivered to customers with available performance tuning mechanisms. Other performance tuning mechanisms are not as explicit, and are defined here.
Clustering Clustering can be referred to as the grouping of patterns that are designated, designed, and measured by some pre-defined data metric. For instance, we want to group all of the Major League Baseball teams based upon where their home field location (North, South, East, or West region of the United States and Canada). In order to perform this grouping, we must know certain information related to each team such as home country, home state/province, and home zip code. Once we have this information, we can then begin to group the teams together, either manually or automatically.
The DataFlux Clustering engine allows developers to group similar data items based upon the information defined in the Quality Knowledge Base (QKB). All the grouping and clustering definitions of data are stored in the QKB. If an organization wants to group based on a name format, or a product being represented in a particular fashion, this information will be stored in the QKB. A developer is allowed to update the QKB, but careful consideration should be given to this practice.
A DataFlux developer could improve Architect job efficiency by simply altering the clustering functionality. DataFlux allows an organization to treat blank field values as null characters, sort output by cluster numbers, and eliminate single-row clusters from output. All of these capabilities drastically improve the efficiency of an organization’s grouping of data. In addition, the refinement and flexibility borne into the QKB, dictates how efficient the grouping mechanisms will operate.
Increasing Clustering Performance
To take advantage of the clustering performance in dfPower Studio, you may want to consider the following information:
• Have as much RAM as possible on the client computer, preferably 4 GB.
• Terminate all non-essential processes to free up memory resources.
• Set the Microsoft® Windows® Sort Bytes memory allocation parameter close to 75-80% of total physical RAM.
• De-fragment the hard drive used for temporary cluster engine files.
84 DataFlux® qMDM Solution

• Use the fastest hard drive for cluster engine temporary files.
• De-fragment the page file disk.
• Manually set both minimum and maximum values of the Windows Virtual Memory file size to the same value.
• Disable Fast User Switching in Windows XP®.
Clustering Properties Screen
For a detailed explanation of the information above, please refer to the dfPower Studio online documentation.
Sorting A developer can make use of the DataFlux Sorting mechanism at any point in an Architect job. The benefits of sorting data may appear obvious, but when attempting to integrate millions of rows of disparate data, sorting and grouping become paramount to data quality and data integration initiatives.
Sorted data can easily be branched for cleansing, validation, and verification job steps that will efficiently process the sorted data based on pre-defined business rules.
DataFlux® qMDM Solution 85

Since sorting and grouping of data are memory intensive routines, having the data standardized, cleansed, and qualified prior to the sort and/or cluster node steps is critical to the performance of a large data integration job.
Setting Sort Memory
Architect has an option called Amount of Memory to Use During Sorting Operations that allocates the amount of memory used for sorting. You can access this option from the Architect main screen by selecting Tools > Options. The number for this option indicates the amount of memory Architect uses for sorting and joining operations. This number is represented in bytes, and the default is 64MB. Increasing this number allows more memory to be used for these types of procedures, and can improve performance substantially if your computer has the RAM available. As a rule, if you have only one join or sort step in an Architect job flow, you should not set this number greater than half the total available memory. If you have multiple uses of sorts and joins, divide this number by the number of sorts or joins in the job flow.
Architect - Field Pass-throughs In addition to sorting and grouping (clustering) data, a third method for increasing data integration job performance is to limit the usage of unnecessary, unwanted, and un-needed data in the decision-critical portions of your job steps.
For instance, if you have developed an Architect job that cleanses, standardizes, and verifies the customer’s name, it is not prudent to pass through (pass from node step to node step) all of the customer’s address and product information.
A standard rule of thumb is: If the data is not used later do not pass it forward now.
Architect - Field Definitions When integrating millions of records of disparate customer data, memory is valued and should be treated as such.
When it comes to trying to decide on the length of data items in your Architect jobs, remember to pay close attention to the length of the field definitions in all of your job node steps, particularly the External Data Provider and Expression node steps.
The default for a string-based data entry is 255 characters. If the full 255 characters is not needed, but used as default, this field length may jeopardize the performance and processing of the job’s clustering, sorting, and union functions.
86 DataFlux® qMDM Solution

Architect Options Typical Service Job Flow As noted elsewhere, you can build large Architect jobs by referencing other Architect jobs that have External Data Provider (EDP) nodes as their input. Many MDM jobs and services use this functionality. Any number of EDP based nodes can be referenced in an Architect job by using the Embedded Job node to pass information from the current job out to the EDP based job, and have the EDP job pass the information back to the job that launched the process. You can also nest jobs within jobs using the same logic. This entails using an Embedded Job node in an Architect job flow that has an EDP node as the input.
Typical Service Job Flow
What are the advantages of designing jobs this way? Consider EDP based jobs to be similar to functions in a programming language. Functions usually encapsulate frequently used functionality and expose their use to other parts of the program. This helps the programmer avoid writing the same code over and over; it makes it easier
DataFlux® qMDM Solution 87

to make changes because changes need to occur in far fewer places; and it enforces programmatic logic because all parts of the program look to the same part of the code to perform the same activities.
While building MDM jobs and services using Architect, it is important to note that a developer or user can re-use the same method (or job or service) to achieve the same results. To enforce data quality standards, for instance, you can have one job that standardizes address fields, and have all other jobs that require that functionality call the address-standardization job to accomplish this. You only need to specify the parameters and settings once, and they are maintained throughout the entire process. When working with identity management and match codes, it is imperative that match codes for different types of data are always created the same way. Therefore, creating component jobs that generate match codes identically each time is the best way to enforce this. For processes that work in batch and on-demand modes, the reuse of common functionality across the different modes is critical to ensuring that both batch and real-time operations produce the same results.
Any job with an EDP node as an input step can be called from any other job, but it does not always make sense to do so. To build efficient MDM jobs and services, first identify the processes that can be made into smaller, repeatable elements, then catalog the different higher-level processes that might need to access this functionality.
A DataFlux developer typically tries to build a service in such a way that the service is easily modified and readable to another developer or end-user. Extra effort is usually taken to modularize any code-steps and annotate (either through the use of service notes or node step notes) the service.
In dfPower® Studio Architect there are two types of services: 1) batch and 2) real time (used by a SOAP Web-service message call).
88 DataFlux® qMDM Solution

Real-time dfPower Studio Architect Service
Real-time Service
A DataFlux dfPower Studio Architect real-time service must include an External Data Provider node step as the initial node step of the service. Other jobs can then embed this job into them, passing in values specified by this step and returning values to the calling job, depending on what processes are taking place.
The External Data Provider node is a critical step in deploying dfPower Architect jobs that act as services for applications or processes that want to pass data into dfPower Architect one record at a time. This node can also be used as the first step in a job used from within another job that contains an Embedded Job node.
When designing a stand-alone real-time service, this node needs to be the first step of a job, and you must manually add data input and outputs to the step. These are the fields that the external application pass information through. Steps in the job subsequent to this node that produce output fields as part of their functionality are also passed as output without having to explicitly add them.
An Expression may be the next node used by a DataFlux developer to process an externally provided data source. The Expression node step allows the user to write
DataFlux® qMDM Solution 89
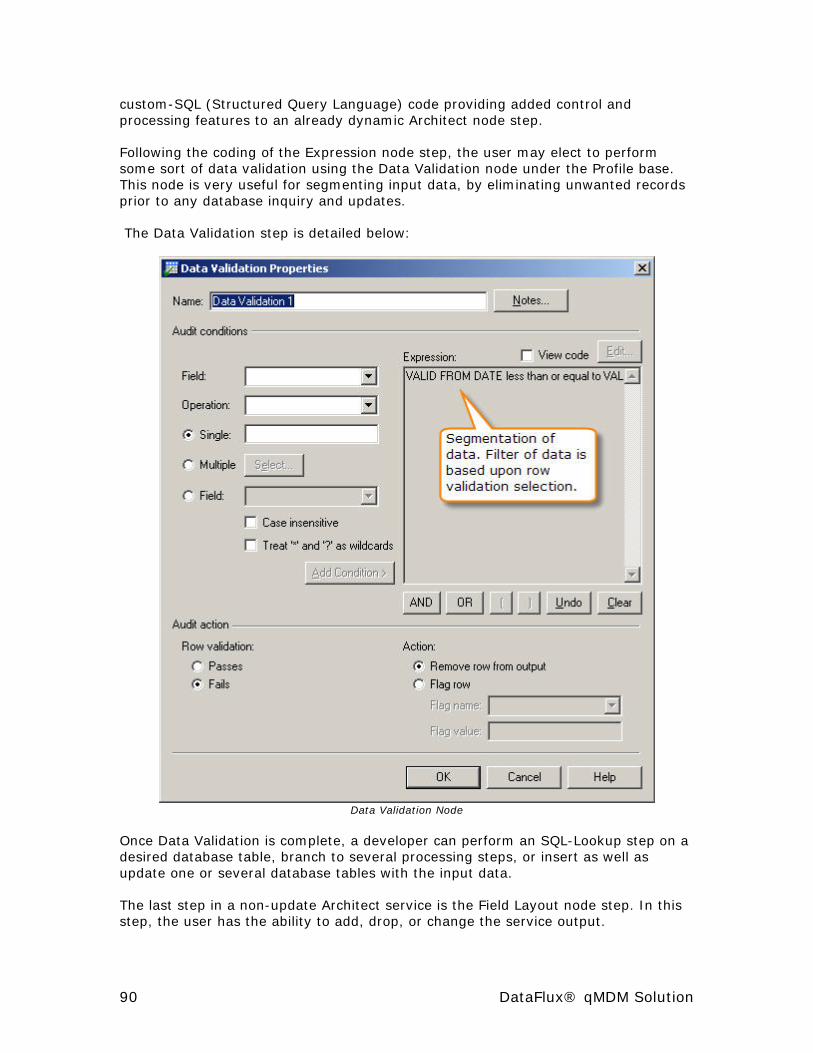
custom-SQL (Structured Query Language) code providing added control and processing features to an already dynamic Architect node step.
Following the coding of the Expression node step, the user may elect to perform some sort of data validation using the Data Validation node under the Profile base. This node is very useful for segmenting input data, by eliminating unwanted records prior to any database inquiry and updates.
The Data Validation step is detailed below:
Data Validation Node
Once Data Validation is complete, a developer can perform an SQL-Lookup step on a desired database table, branch to several processing steps, or insert as well as update one or several database tables with the input data.
The last step in a non-update Architect service is the Field Layout node step. In this step, the user has the ability to add, drop, or change the service output.
90 DataFlux® qMDM Solution

The Field Layout node in Architect allows you to rename and reorder field names as they pass out of this node. For nodes that have the Additional Outputs feature, you can achieve similar functionality through that mechanism rather than using a Field Layout node as a follow-up step.
This node is particularly useful when used in conjunction with jobs that use the External Data Provider node. In those types of jobs, you may not always have a data source node or some other node that allows you to rename or reorder your columns as your last step. This node will allow you to control the output of that job or service.
Field Layout Node
Job Annotation dfPower Studio Architect allows a user to attach a note (or multiple notes) to any portion of the workspace. To attach a note to an Architect job, simply click the Insert Note icon on the upper right portion of the Architect Explorer screen:
Using Sticky Notes
DataFlux® qMDM Solution 91
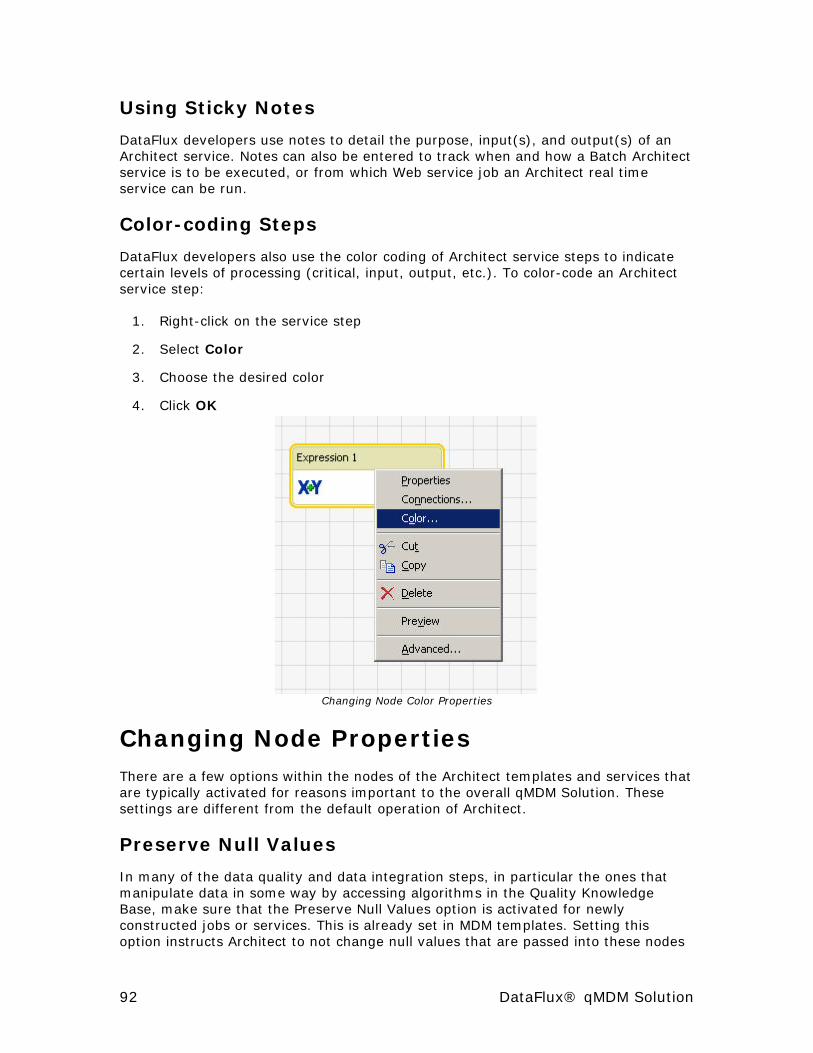
Using Sticky Notes
DataFlux developers use notes to detail the purpose, input(s), and output(s) of an Architect service. Notes can also be entered to track when and how a Batch Architect service is to be executed, or from which Web service job an Architect real time service can be run.
Color-coding Steps
DataFlux developers also use the color coding of Architect service steps to indicate certain levels of processing (critical, input, output, etc.). To color-code an Architect service step:
1. Right-click on the service step
2. Select Color
3. Choose the desired color
4. Click OK
Changing Node Color Properties
Changing Node Properties There are a few options within the nodes of the Architect templates and services that are typically activated for reasons important to the overall qMDM Solution. These settings are different from the default operation of Architect.
Preserve Null Values
In many of the data quality and data integration steps, in particular the ones that manipulate data in some way by accessing algorithms in the Quality Knowledge Base, make sure that the Preserve Null Values option is activated for newly constructed jobs or services. This is already set in MDM templates. Setting this option instructs Architect to not change null values that are passed into these nodes
92 DataFlux® qMDM Solution

into empty string values. This is important not only for database integrity, but also because many services use logic that tests for null conditions in certain fields to determine if changes have been made on the MR database.
Compact Cluster Numbers
For newly built or modified MDM jobs, make sure that the Compact Cluster Numbers option is not selected in the cluster update node. The MDM Solution does not want to reuse cluster numbers as they are used to uniquely identify entities over time. By compacting cluster numbers, you instruct Architect that if matching clusters are merged in an update process, the newly available cluster number that has been relinquished by one of the clusters can be reused by a new match cluster. With this option de-selected, the MDM system will not reuse identifiers, which is the required behavior.
Sort Output by Cluster Number
The setting called Sort Output by Cluster Number found in the cluster and cluster update nodes is required to be selected for MDM jobs or services that implement the clustering mechanism for identity management purposes. Otherwise data is corrupted as it moves through a subsequent surviving record identification step.
Global Variables
Because it is best practice to make jobs and services as portable as possible for the move from development to test to production, store certain settings in the architect.cfg file rather than in the general dfPower Studio settings location. This makes it easier to transfer those settings to multiple test machines or to Integration Server by copying the configuration file and modifying as required to handle differing network paths to the same shared location. Set these values in the architect.cfg file found in the dfPower Studio bin directory. If you don’t, the required settings will be read from the dfPower Studio ini configuration file. Following are the more common settings to set in the architect.cfg file both on the computer hosting dfPower Studio and on the computer running Integration Server. Other variables specific to MDM are set in this file too. Those variables are covered elsewhere in this document.
BLUEFUSION/QKB=[Path to active QKB] VERIFY/GEO=[Path to Geocode/PhonePlus database] VERIFY/USPS=[Path to US Address database] VERIFY/CANADA=[Path to active Canadian database]
Generate Null Match Codes for Blank Field Values
This option is found on the Match Codes and Match Codes Parsed nodes. This option should be selected for match code generation steps and is selected by default in jobs and services used by the MDM system. Selecting this option instructs the MDM identity management algorithms to act in a certain way regarding null or missing values when clustering similar items together. Generally speaking, using this option will yield better match results especially in data that is sparsely populated. For instance, take the following example:
DataFlux® qMDM Solution 93

ID NAME ADDRESS LINE 1
1001 DAVID SMITH 100 MAIN STREET
1002 DAVID SMITH
1003 DAVID SMITHE
With the Generate Null Match Codes option selected, and the match criteria being “NAME MC AND ADDR1 MC,” the following results occur:
ID NAME NAME MATCH
CODE ADDRESS
LINE 1 ADDRESS LINE MATCH CODE
MATCH CLUSTER
1001 DAVID SMITH
XYZ 100 MAIN STREET
FGH 1
1002 DAVID E. SMITH
XYZ <null> 2
1003 DAVID SMITHE
XYZ <null> 3
Above, rows 2 and 3 are not matched together because they contain missing information. Neither of those match other rows because the rule looks in the name and address match code fields, not just the name field. The engine sees null values for match codes in ADDR1 and cannot use those in match clusters and therefore consider those rows to be matches since information is missing. If the Generate Null Match Codes option was not selected, you would see the following results:
ID NAME NAME MATCH
CODE ADDRESS
LINE 1 ADDRESS LINE MATCH CODE
MATCH CLUSTER
1001 DAVID SMITH
XYZ 100 MAIN STREET
FGH 1
1002 DAVID E. SMITH
XYZ <null> $$$ 2
1003 DAVID SMITHE
XYZ <null> $$$ 2
Rows 2 and 3 match because a default match code is generated for the null or blank value in rows 2 and 3 that satisfies the condition NAME MC AND ADDR1 MC.
Database SQL Activity Logging
While working with Architect jobs or services you may find it necessary to have a report that logs database SQL activity. This report can be invaluable when attempting to troubleshoot problems that appear to be database related. You can generate this log for Architect and Profile jobs or services on Microsoft® Windows® and the many supported UNIX platforms. To enable SQL activity logging:
94 DataFlux® qMDM Solution
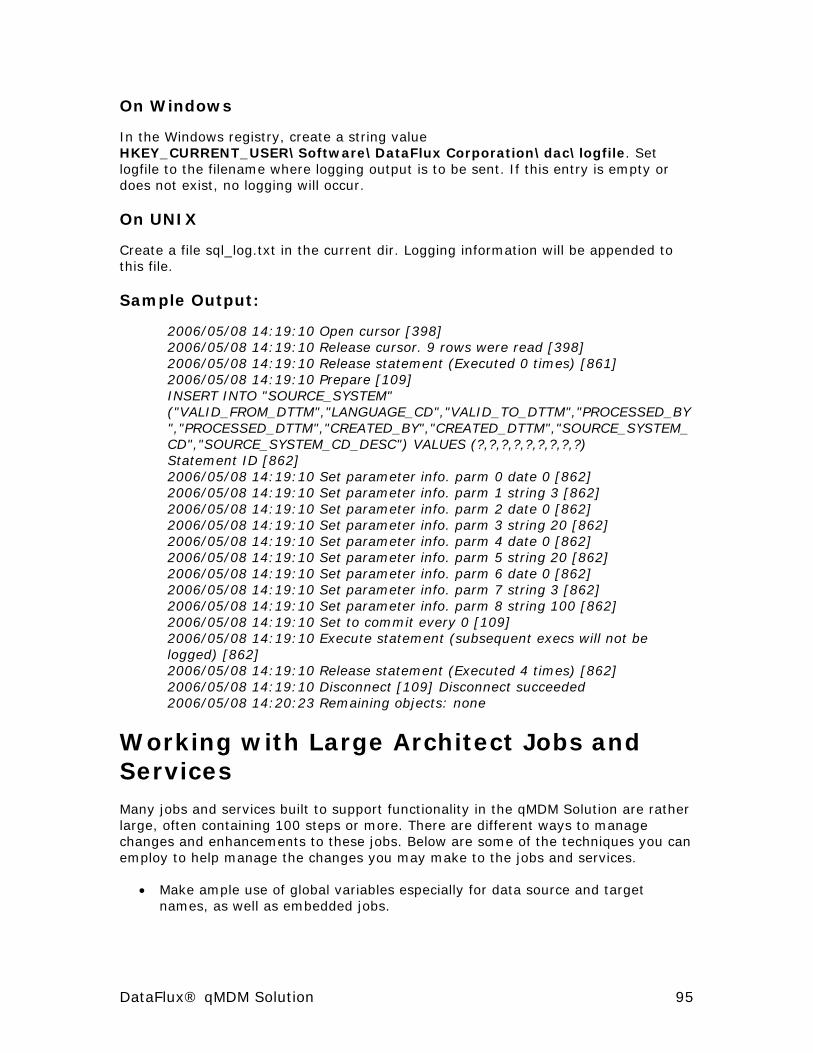
On Windows
In the Windows registry, create a string value HKEY_CURRENT_USER\Software\DataFlux Corporation\dac\logfile. Set logfile to the filename where logging output is to be sent. If this entry is empty or does not exist, no logging will occur.
On UNIX
Create a file sql_log.txt in the current dir. Logging information will be appended to this file.
Sample Output:
2006/05/08 14:19:10 Open cursor [398] 2006/05/08 14:19:10 Release cursor. 9 rows were read [398] 2006/05/08 14:19:10 Release statement (Executed 0 times) [861] 2006/05/08 14:19:10 Prepare [109] INSERT INTO "SOURCE_SYSTEM" ("VALID_FROM_DTTM","LANGUAGE_CD","VALID_TO_DTTM","PROCESSED_BY","PROCESSED_DTTM","CREATED_BY","CREATED_DTTM","SOURCE_SYSTEM_CD","SOURCE_SYSTEM_CD_DESC") VALUES (?,?,?,?,?,?,?,?,?) Statement ID [862] 2006/05/08 14:19:10 Set parameter info. parm 0 date 0 [862] 2006/05/08 14:19:10 Set parameter info. parm 1 string 3 [862] 2006/05/08 14:19:10 Set parameter info. parm 2 date 0 [862] 2006/05/08 14:19:10 Set parameter info. parm 3 string 20 [862] 2006/05/08 14:19:10 Set parameter info. parm 4 date 0 [862] 2006/05/08 14:19:10 Set parameter info. parm 5 string 20 [862] 2006/05/08 14:19:10 Set parameter info. parm 6 date 0 [862] 2006/05/08 14:19:10 Set parameter info. parm 7 string 3 [862] 2006/05/08 14:19:10 Set parameter info. parm 8 string 100 [862] 2006/05/08 14:19:10 Set to commit every 0 [109] 2006/05/08 14:19:10 Execute statement (subsequent execs will not be logged) [862] 2006/05/08 14:19:10 Release statement (Executed 4 times) [862] 2006/05/08 14:19:10 Disconnect [109] Disconnect succeeded 2006/05/08 14:20:23 Remaining objects: none
Working with Large Architect Jobs and Services Many jobs and services built to support functionality in the qMDM Solution are rather large, often containing 100 steps or more. There are different ways to manage changes and enhancements to these jobs. Below are some of the techniques you can employ to help manage the changes you may make to the jobs and services.
• Make ample use of global variables especially for data source and target names, as well as embedded jobs.
DataFlux® qMDM Solution 95
• Use Field Layout steps in conjunction with branch steps to control how fields are passed through subsequent steps in the job.
• Architect jobs are XML jobs so they can be checked into a source control system for diff and rollback functionality. This helps track changes on large jobs.
• Make ample use of notes to document jobs.
• Make use of the grid to layout jobs more clearly and effectively.
• Use color coded steps to indicate special conditions like identifying a step that needs work or one that is optional.
• If you can afford the possible performance degradation (accessing source data multiple times), break jobs up and put them on separate pages.
• For real-time job testing, create a text file that mimics the external data provider inputs and use it as a data source so you can see actual data passing through the job.
• Avoid using embedded jobs for processes that sort, add to, or subtract from the data set being passed into the embedded job unless you are not using the pass through feature of an embedded job. Otherwise you will get incorrect results.
• Create embedded jobs for things like logging, timestamps, and other often used processes. Remember that an expression step can generate data even if no records are passed into it. This is useful for generating data that can be made generic and accessed by many services or other jobs.
• For multi-locale deployment, jobs and services need to branch and add the country code and locale guess component.
• Try to avoid passing extraneous fields through jobs and services.
• Be careful to check your output steps after modifying jobs or services as field pass-through functionality might automatically update job or service outputs.
• Do not build jobs or services before data quality and identity management rules are designed.
96 DataFlux® qMDM Solution

Posting Services to the Server Any DataFlux® dfPower® Studio Architect job that you wish to run as an on-demand service can be posted to the DataFlux Integration Server. The Architect job must meet the basic criteria for an on-demand service (one that processes data one record at a time instead of in large batches). This means the service must have as its top-most input node an External Data Provider step. This allows information to be passed through the job flow one record at a time.
Once you have your service built, use the DataFlux Integration Server Manager to post that job to the server. The Integration Server can be running on your local machine or it can be on the network. Once the service is on the network, other applications that can interface with Web services can access that service’s functionality. To facilitate this communication, developers use the arch.wsdl supplied by DataFlux to build integration points to send data to and get data out of the service that is hosted on the Integration Server.
Security Considerations for the qMDM Environment qMDM Solution administrators may find it necessary to control how, when, and by whom various qMDM jobs or services can be accessed or executed. There are two mechanisms in place to facilitate qMDM security at the server.
IP Address-Based Security
Security at this level can be set to allow or deny requests coming from certain IP addresses. You have two choices on the level of access given or restricted from these IP addresses. There is a general access setting, and there is one limited to posting and deleting of jobs and services.
This method of limiting the access of requests made from certain IP addresses or IP address ranges is useful for things like:
• Allowing only qMDM Solution access to users from a particular business group.
• Ensuring that requests are not coming from outside your company network.
• Limiting general access to the system to developers and testers prior to putting the qMDM Solution into production.
However, this method generally does not permit fine-grained control over specifically-defined users or groups who may have access, for example, to view but not run services, or may have access to run only a limited subset of services available from a larger group. For this kind of control, use the DIS security subsystem settings that control this type of access. See the next section for more information on the security subsystem.
DataFlux® qMDM Solution 97

User and Group Level Security
The DIS security subsystem gives qMDM administrators the ability, in a very granular way, to limit the way various users can access or execute qMDM jobs and services. Access and control can be defined by named user, by group, or they can be explicitly assigned to jobs and services themselves. The ability for users or groups to get job lists, post new jobs, delete existing jobs, and query for jobs status all can be controlled using this subsystem. Additionally, those activities can be limited for every service available in the qMDM Solution or for new services created to meet the needs of your organization.
The usernames and passwords that the qMDM Solution administrator sets up are needed for any interaction with the DIS. If the interaction is at the application level, SOAP messages made to DIS must contain a username and password set up in the subsystem that allows the right level of access for the request being made. The Master Reference (MR) Manager also needs to pass credentials to the DIS. When a user logs into the MR Manager, the username and password given for the login screen is passed along with each qMDM service request. If the user does not have the proper permissions for the action being performed, an error occurs.
Most qMDM Solution implementations (assuming the DIS security subsystem is enabled—it can be disabled in the dfexec.cfg file) require at least one user to be defined as an all-access user. Generally, this is an administrator’s account. Others may have all access to jobs and services, but more frequently, only certain privileges are given to the average business user. Data stewards, on the other hand, may be allowed to perform almost any activity called for with the qMDM Solution.
A standard security setup for the DIS as it applies to the qMDM Solution might look like the following list. Be aware that permission settings for various groups or individuals may differ depending on whether the DIS is a development or production server.
For users, there should be several levels of decreasing access set up. Shown is an example of what the permissions options might be for the level of user described in the user name.
GROUPS MDM_Steward:MDM_Steward_User:1111111111111 MM_SrcSys:MDM_SrcSys_User:1110000001110 MDM_BizUser:MDM_BizUser_User:1110000001110 administrators:admin:1111111111111 USERS MDM_Steward_User:693c18f51a2e2adc34b549a3eaf55ac4e628b8a0:1111111111111 MDM_SrcSys_User:f1b2128bc4101cd52984fdc082e6624946f32d5b:1110000001110 MDM_BizUser_User:ed9b41b57fee2ce0984f19d229db6a3b8ffc0e5a:1110000001110 MDM_PowerUser_User:9f643ae7f7d8c52af499b9d334498bd584eaf9f0:1111110001110 admin:d033e22ae348aeb5660fc2140aec35850c4da997:1111111111111
98 DataFlux® qMDM Solution

Objects
ACL files can be set up for each job or service to give file-object level access rights to individuals or groups. For example, for a Change Address service, maybe only a certain individual or groups of individuals in an organization are allowed to commit that change to the Master Reference database. Their usernames or their associated group can be given special access rights to this service that no one else has (except for the administrator). For very sensitive services, an administrator will want to explicitly deny everyone access in the ACL, and then explicitly allow some users or a group to access or run the job or service.
For more information on setting up permission levels, how user, group, and object level permissions interact, and how ownership of objects impacts user and group definitions, refer to the security subsystem section of the DIS documentation.
DataFlux® qMDM Solution 99
Auditing and Reporting Using dfPower Profile Often times, a DataFlux® developer will use dfPower® Profile to analyze data in the Master Reference Database using profiling metrics. These metrics make it possible to preview the structure of your data, thus helping you to gain valuable insight into the quality and integrity of your content in an effort to meet your specific data needs.
With dfPower Profile, one can easily find defects within the data and correct those defects with the goal of maintaining data quality and data integrity.
Using dfPower Profile, you can:
• Select and connect to multiple databases of your choice (via ODBC) without worrying about your sources being local, over a network, on a different platform, or at a remote location.
• Create virtual tables using business rules from your data sources in order to scrutinize and filter your data.
• Simultaneously run multiple data metrics operations on different data sources.
• Run primary and foreign key, as well as redundant data analyses, to maintain the referential integrity of your data.
• Monitor the structure of your data as you change and update your content.
To simplify its use, dfPower Profile is divided into three components:
• Configurator—Data Sources and Metrics
• Viewer—Output Reports
• Executor—Engine To Run Your Jobs
100 DataFlux® qMDM Solution

Using qMDM Data for Reporting Using Transpose Tables
When the metadata for entities is defined and loaded, a table is created for each entity. For example, if you create an entity called PERSON, you will end up with a table in your qMDM database called MDM_PERSON_TRANSPOSE_TABLE. This table is a more traditional view of the data that is derived from data stored in several other tables. MDM_ENTITY and MDM_ENTITY_ATTRS are the most important contributing tables. When new PERSON data is added to the qMDM hub, is added to these tables and then a new transposed view of the data is added to the MDM_PERSON_TRANSPOSE_TABLE so you see attributes for each person stored in the usual columnar format instead of in the row-based attribute format of the MDM_ENTITY_ATTRS table.
Once the data is stored in this format it is available in a view that brings additional useful fields together to make reporting and querying the qMDM hub much easier. For PERSON, a view called MDM_PERSON_TRANSPOSE_VW will be created; it joins data from the following tables: MDM_SRC_SYS_LINKS, MDM_PERSON_TRANSPOSE_TABLE, MDM_ENTITY and MDM_ENTITY_GROUPINGS. The result is a table with all contributing and surviving records (active and inactive) for the PERSON entity type.
Typically, users will not want the contributing or inactive records in a result set when reading from this table. They will want active best records only. For standard reports against this table, your select query should include the following in the where clause: MDM_SURVIVOR = 1 and MDM_VALID_TO_DTTM > (today's date) and MDM_STAGED = 0.
DataFlux® qMDM Solution 101
Master Reference Database Purge Trimming Historical Data It is important to note that the qMDM Master Reference Database (MRD) does not have self-purging capabilities. The database continues to expand with each batch or transactional table insert and update. Therefore, it is prudent to institute a safe practice of coding DataFlux® dfPower® Studio Architect service steps that purge the MRD of unused data.
To create a purge service, a developer may read in an arbitrary date using an External Data Provider node step. This date is used to select all database table records (a particular database table or tables will need to be selected in order to correctly perform this function). Following the External Data Provider step, the developer may choose to have an Expression step or Data Validation step further segmenting and filtering the data. Lastly, a Delete Record node step is used to remove unwanted records from a database table.
The SQL Delete Record node is used to eliminate records from a data source using the unique key of those records. Simply select the data source that contains the records you want to delete and map the primary keys from the current data input to that data source. This step works nicely with a Data Validation placed immediately before it. You can instruct the Validation step to output only those records that fail validation, then use the Delete Record node to delete those records from the data source.
You can access this screen by double-clicking Delete Record in the nodes list on the left of the dfPower Architect main screen. To access this screen for a Delete Record icon that is already part of your job flow, double-click that icon, or right-click and choose Properties.
102 DataFlux® qMDM Solution
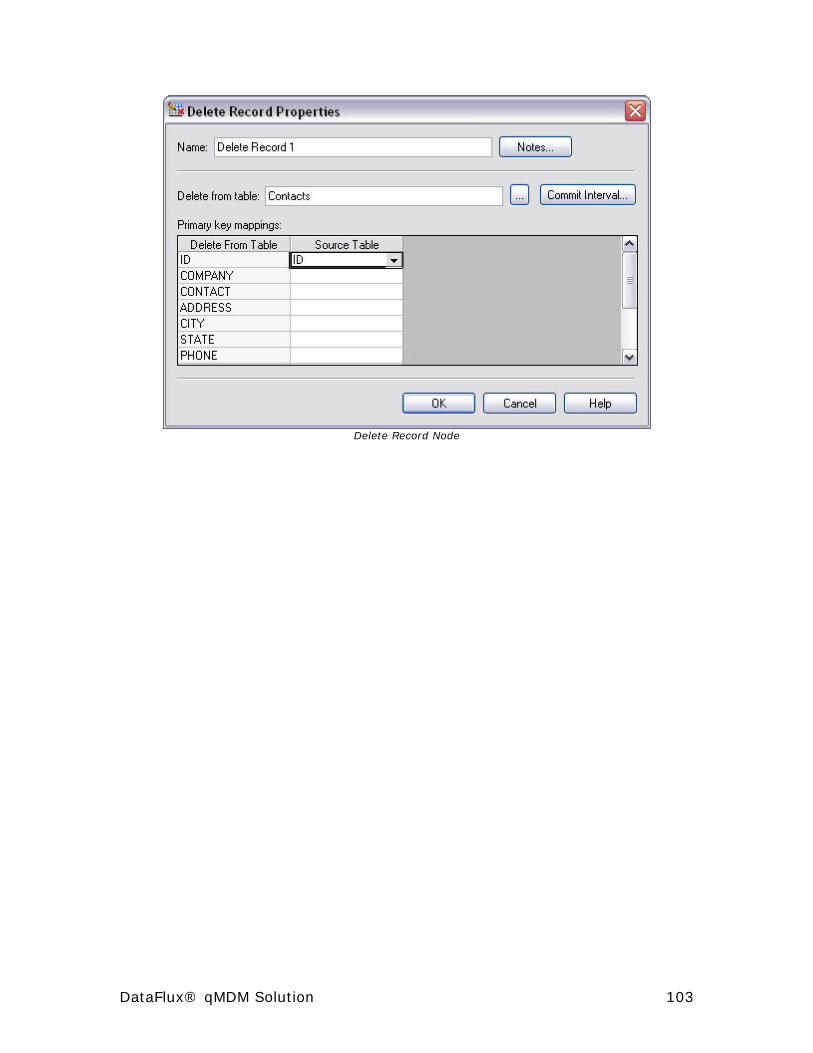
Delete Record Node
DataFlux® qMDM Solution 103

Performance Considerations The following factors should be taken into consideration when configuring, tuning, and using the DataFlux® qMDM Solution. These suggestions have been gleaned from an understanding of the underlying processes within the qMDM Solution, as well as real-world experience gained during development and deployment.
Cleansing Transformations Some transformations done for cleansing purposes can slow down processing times if used incorrectly. For example, certain processes like Standardization may parse data (depending on the data type) prior to generating a standardized version of the data. You can use a Parsing node to parse the data first (assuming the data is not already parsed in the input) and then pass tokens directly to the Standardization (Parsed) node, side-stepping the parse.
Similarly, there is no need to standardize data prior to generating a match code for it. Match codes have standardizations built into them that are unique to each data type. However, if you are performing the standardization because you want to transform the data and persist the change, there may be no way to avoid the standardization. The number of standardizations, gender guesses, and identification processes that are run directly affect performance, so it is good practice to limit their uses as much as possible. You may also choose to use simple Expression node functions to perform actions like uppercasing a value or trimming a trailing space rather than using a Change Case or Standardization node if the transformations are simple and don’t need to be locale aware.
Parse Resource Level and Depth Parsing data elements into smaller tokens (such as turning a full name field into a given name and surname field) can be resource intensive. Longer input data elements—addresses for example—take longer to process.
To improve parsing performance, you can adjust the resource level and scoring depth for each job node that uses parsing. This includes the Parsing node, the Identification Analysis node, the Standardization node, and the Match Code node. Lowering the resource level instructs the system to use less memory, thereby freeing it up for other processes. The scoring depth setting can be set lower so that the parsing engine will not consider as many parsing solutions, and that will reduce the overall time needed to complete parsing operations.
For relatively clean data, both of the steps can be taken to improve performance. For "dirtier" or more complex data, however, making these adjustments can lead to incorrectly parsed data elements.
Parse Strategy Data parsing is resource intensive. However there are steps that can be taken to reduce the burden of parsing on system resources. If you plan to parse a data
104 DataFlux® qMDM Solution

element and then generate a match code for it, it is better to parse the data element first and then use the Match Codes (Parsed) node in dfPower® Studio. Otherwise, the data element will be parsed twice.
The first pass parses the element into tokens and the second pass parses the element again when generating the match code. If you use the Match Codes (Parsed) node, you can pass already-parsed data into the Standard Match Code node and side-step the second parse action. This advice holds true for gender analysis and standardization processing as well. The both have Parsed input options and should be considered if your data is already parsed or if you plan to parse it first in your work-flow.
Match Criteria Complexity Matching criteria refer to the combination of fields chosen for generating match codes bound for clustering and the clustering conditions themselves. Clustering is a word used to describe the action of finding similar data elements in rows of data and grouping those rows together using a unique key to signify that they have a relationship.
If you decide that you need to generate match codes for many fields (match codes get you the fuzzy match in dfPower Studio), your jobs will run more slowly than if you choose not to use match codes. However, match codes are integral to DataFlux matching process, so you will want to take advantage of them but plan their use wisely
Clustering conditions are those rules you define that indicate what constitutes a matching record. For example, a common clustering condition for customer data would take into consideration a full name and uniquely identifying parts of an address. The more AND and OR conditions you use, the harder the system works to find the matches. This slows performance down and uses more resources.
Survivorship Rule Complexity Once matching data rows have been identified and clustered, a common activity is creating a single best record (survivor) out of those matching rows. You can create survivorship rules as complex as you wish, but as they grow in number and complexity, performance will decrease.
DataFlux Process Memory Allocation If a lot of physical memory is available on the computer hosting dfPower Studio, allocating a good portion of the memory to dfPower can really increase performance. For example, if you allocate 512MB RAM to cluster processing, dfPower can do a lot more of the work (and in some cases, all of the work) in memory, which is very efficient.
When dfPower runs out of memory for the clustering, sorting, and joining of data (three memory-intensive processes), it then begins to write temporary files to disk. This process is much slower than in-memory processing. The caveat to allocating lots of memory to these kinds of processes is that you can over allocate the memory by
DataFlux® qMDM Solution 105
accident. For example, if you give two nodes in the same work flow each 600MB of memory and you only have 1G available, the job will not complete because it cannot allocate the specified amount of memory.
Delaying Memory Allocation One way to deal with accidental over allocation of memory is to use the delay memory allocation option in Clustering nodes. If you have several clustering nodes in a single work-flow, you can instruct DataFlux to only allocate the memory when data gets to each clustering node rather than pre-allocating the memory for both nodes prior to job execution. In this way, the same memory can be used for multiple clustering processes. The downside to using this option is that if data gets to the second clustering node while the first is still processing, your job will show an error except the error will occur mid-run instead of prior to execution as would be the case if you were not using this option.
Multi-Threaded Sorting/Joining/Clustering One of the best ways to improve performance of processes that use clustering, sorting, and joining is to enable multi-threaded processing. Data processing can be distributed across cores and across threads so that processing can be done simultaneously, breaking the main process into smaller more efficient chunks of work. In some cases we have seen 10x to 20x performance improvements using these options with joining, sorting, and clustering nodes. It is suggested to set the number of threads to 2x the number of cores. Then you can allocate how much memory can be used by each thread. Depending on resources of the computer hosting the hub, it may be possible to allocate quite a bit of memory for each thread.
Process Log and Debug Log Disablement The various logs that are generated by the qMDM Solution (and by database drivers) can be very useful when designing work-flows, but they can also slow performance. When you are ready to commence the performance test phase or begin production, enable only the logging level needed for the project. Certain log items like database driver traces can significantly reduce performance. Additionally, if you are using data access (dac) logging, this can slow performance as well. It should be turned off when not needed for debugging.
Memory Loading Small Tables You may often find it necessary to join two branches of your work flow together. When one side of the branch is relatively small and is being joined with a much larger set, you can choose to load the smaller data set fully into memory. This should improve performance for these types of activities. This option is available in the Data Joining node of dfPower.
106 DataFlux® qMDM Solution
SQL Query Inputs and Parameterized SQL Queries Where possible, you should take advantage of the ability of most databases to perform sort and join processes efficiently. While you can certainly sort and join data in dfPower, using the database to do this has real benefits.
For example, if your data input to a work flow entails reading a subset of data from the database, you could either use a Data Source node in dfPower that reads in all rows of data into your work flow and then filter that data with a Data Validation node, or you could use a SQL Query node and write a SQL statement that selects and subsets the data.
The latter approach is much more efficient and performs much faster. Using these nodes successfully means that a certain amount of performance tuning is required in the database itself. Proper indexing, partitioning (as needed), compression, and table analysis/statistics are all crucial to solution performance. With Oracle specifically, hints and related features may be embedded in queries issued from dfPower nodes.
Text File Outputs Under certain circumstances, significant performance gains can be had by writing results to a text file before loading into a database table. This procedure depends on the context. For example, if you process 500K rows of data and then plan to update a database table with those 500K rows, you can first write those rows to a text file in the first page of your batch work flow. In the second page you can read from that text file and write the updates to the table.
There are several reasons why writing to text files may improve performance. One significant reason is that memory is released and reallocated for each page of a work flow. If you perform lots of complex operations on one page, you can spread the processing out to several pages and use more memory per process, allowing dfPower to do more work in memory without resorting to temporary file creation on disk.
Bulk Loading Database Table Inserts In cases where many rows of data need to be loaded or updated into a database, you can use a bulk loading feature built into the Data Target (Insert) node to improve performance. This is supported on Oracle, but it should be noted that this does not work with all database types.
You can set the maximum number of rows to bulk load at 50,000 and set the commit interval to 1. This will bulk load batches of 50,000 rows of data into the database very quickly because the process avoids the frequent communication with the database server as would happen with smaller packets of data.
DataFlux® qMDM Solution 107

Pass-Thru Field Reduction As a general rule, the more data that passes through your work flow, the slower it will perform. If you have 20 fields in an input table, it is easy to select all those rows and pass them through your entire work flow. But this may not be necessary, and should be evaluated. If you do not plan to output a row or do not need it for an operation in the work flow, be sure to clear it from your input step. A work flow that uses ten fields will perform more quickly than one with twenty fields.
Expression Code Complexity The Expression node in dfPower is a great utility tool but can also lead to performance bottlenecks. Inefficiently written expression code can slow down overall job performance. There certainly may be times when you need to use it but you should rely on the other nodes to do the heavy processing where possible since they were designed for performance with specific purposes in mind. Some common Expression node actions that can perform slowly:
• Regular expressions
• Grouping
• The print() function used for each row
• Inadvertent use of the pushrow() function
• Reading and writing to/from text file objects incorrectly
Work flow Branching Work flow branching is a necessary part of building complex batch jobs and real-time services. If these branches can remain independent then there is minimal performance implication. However, it is often the case that data in branches need to be joined back together and this can decrease performance if done too much.
The problem can become more acute when working with real-time services or embedded jobs. Because services can only pass back data from one branch to a calling job or application, a join or union is often required to bring back together all desired output in one branch. Try to design your jobs to avoid this performance hit if possible.
It is possible to allocate extra memory for the Branch node itself. Similar to other nodes, this node uses physical memory to separate data into individual work flow segments. When the allocated physical memory is used up, the system will begin to write temporary files to disk.
By allocating more memory to branching operations, you should be able to improve performance. But remember to take into consideration all factors. You should add up memory allocations for all sort, join, cluster, and branch nodes in a single page of your work flow to understand how much you have to work with for each individual process.
108 DataFlux® qMDM Solution
Alternating Union Rows There is an advanced option in the Data Union node called Alternate that can be set to true to improve performance. If it is set to false, all rows from one side are cached in memory (and then to disk if memory runs out), and the other side are added to the bottom of the complete set.
When set to true, rows are alternated in the output of the node and caching can be avoided. Database environment testing has shown that certain bulk load utilities as can be found in Oracle and other databases can be very useful when loading large amounts of data into database tables. Oracle has a utility called SQL Loader that can load data very quickly. For initial loading of the qMDM hub, you might consider processing data through dfPower to clean, cluster and survive it, but then write that output to text files as previously described. Then those text files can be used as input for SQL Loader, and the data can be loaded into the database quickly.
Hub Optimization You may end up with many tables (and views to support those entities) in the qMDM hub, depending on the entities that are tracked. It is critical to set indexes correctly to get the best performance for lookups into the hub, both for data updates and for suppression-type processing. Setting up entity metadata is also important for this process.
Look closely at how data types are defined for each attribute and see that the right type and size are being used for each. Avoid defaulting to string(255) if possible—be more specific with the expected size of data coming into the hub. Use data profiling techniques to help set these numbers. Check to see that attribute relationships (how certain attributes are transformed into others, for matching purposes for example) are set up correctly as well so no extra attributes are being carried around in the work flows or the hub database itself.
Database Drivers Look closely at the way the database drivers are set up for your database type. Certain drivers for Oracle and other databases have settings for optimized performance. For example, you can set a larger array size and turn off enable scrollable cursors in the Oracle Wire Protocol driver to get some performance benefits. Native drivers have similar performance settings as well. It is worth reviewing the documentation to see what the optimal settings are. Do not forget to disable driver logging and tracing at runtime as leaving them on can dramatically decrease performance.
Storing History The qMDM hub is set up to capture and store all data that is processed by it. Non-active or older records do not get deleted, they just get retired. Having a strategy in place to reduce the number for rows in the hub is critical for performance since the number of entities will continue to grow.
DataFlux® qMDM Solution 109

Ultimately it is a business decision as to how much data to store. If you want the clustering and best record process to have access to all historical rows in the hub, you may choose to keep 12 months or more of data in the hub. If, however, you feel that the current best record is always the best representation of the data, you might choose to only keep 2-3 months of data in the hub at any point in time. Then when best records are determined, only the previous best record is considered for building the new best record, in addition to the updated row on hand.
Storing Attributes Attributes for entities stored in the hub are stored in row fashion rather than in more traditional fields. This makes adapting to new entities types or additional attributes much easier, but it does create a very long and very narrow attribute table in the hub database. Consider carefully how many attributes you want to store in the hub. Every additional attribute creates a number of rows equal to the number of total entities stored in the hub times 2 (since you will get all source system rows and a new best record row for each entity).
So, for example, in a 10 million entity hub with each customer entity containing 10 attributes, you will get a 200 million attribute rows, as follows: 10.000.000 x 10 x 2 = 200.000.000
It should be said that dfPower can transpose these attribute rows into more traditional columns very quickly, but additional attributes do add up. Thirty attributes per entity type is probably on the high end of a reasonable number of attributes to store per entity in the hub. There is another additional consideration: For data types that can be derived from others (as HOUSEHOLD can from INDIVIDUAL), you probably should consider building household identifiers using views or tables built from the INDIVIDUAL view of the data. Not only is it more flexible because it can change without changes to the customer hub, it will perform better and you will not add more attributes to the database. The caveat here is that any attribute needed for householding should be present in the data from which it is being derived—in this case, in the INDIVIDUAL view. In conjunction with archiving strategies, further considerations for larger tables are 1) compression of the tables to save blocks, and 2) table partitioning.
Activity on the Hub It probably goes without saying that DataFlux software and database software should be on separate computers. That way they do not have to compete for resources. However, network latency then needs to be considered. Also, take a close look at other applications that will be using the same database server. You may consider that at times when DataFlux processes are loading or updating large amounts of data, that the database if off limits to other users. When real-time activity is introduced, the same consideration applies. You may decide to schedule windows of time when the hub database is offline so that resources can be dedicated to the large volume process both in the DataFlux environment and the database environment.
110 DataFlux® qMDM Solution

Indexes After Inserts Especially for the initial load of the Customer hub, take care to remove indexes from the database tables in play prior to initiating the load process. Indexes can slow down this type of operation even though they are critical for updates and queries and need to be added after the load process finishes. This is generally handled in work flows but needs to be reviewed in light of the attributes used for clustering and querying for updates and real-time data processing.
Minimizing Clustering Data clustering and best record creation (survivorship) together are the slowest processes in the solution. At initial batch load time, this can be designed to run quite quickly because much of it can be done in memory. However, when the customer hub is already loaded, the process must first query the database to find similar rows, and then clustering and best record creation can take place.
Rather than re-cluster the entire hub or even re-cluster for every possible new or updated customer record on its way into the hub, we can identify the types of changes in data updates bound for the hub. By determining those rows in the update set that are 1) new, 2) could create changes to clusters, 3) won’t affect clusters, and 4) are unchanged, we can route only a subset of the batch update through the more intensive clustering processing (in this case the new and possible cluster-changing rows). Other rows can be dropped or sent through a much quicker process that can be used to update attributes do not have any clustering or best record implications.
DataFlux® qMDM Solution 111
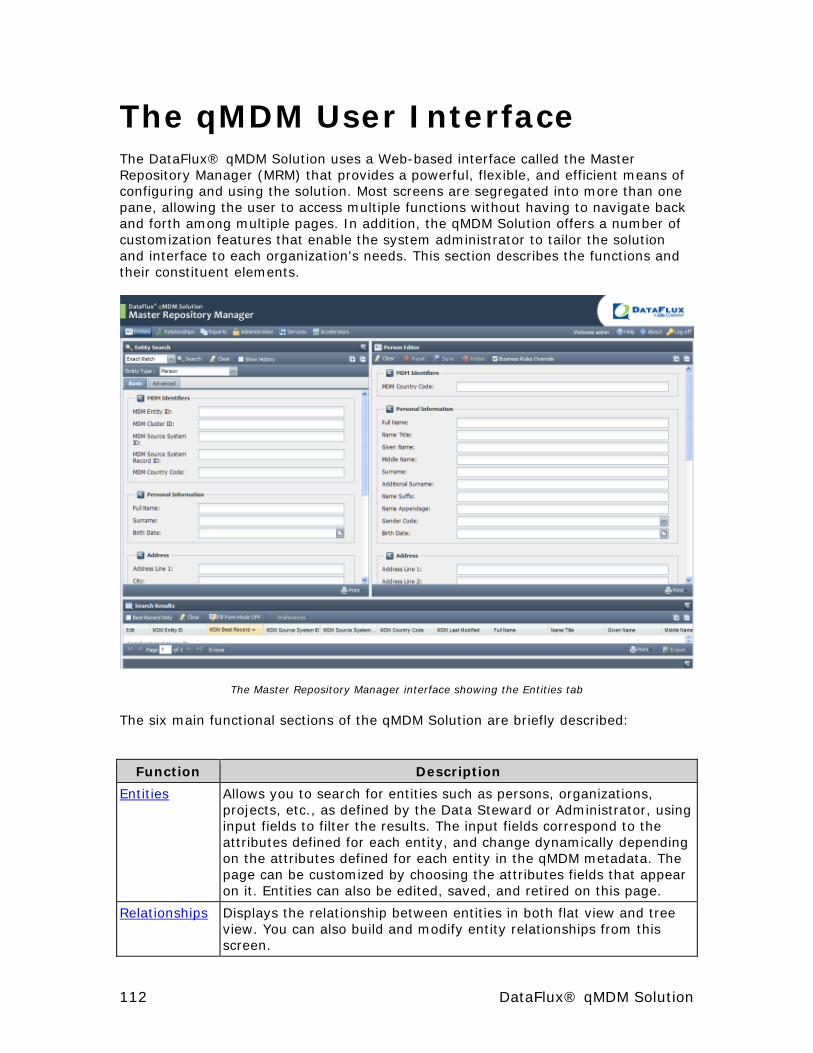
The qMDM User Interface The DataFlux® qMDM Solution uses a Web-based interface called the Master Repository Manager (MRM) that provides a powerful, flexible, and efficient means of configuring and using the solution. Most screens are segregated into more than one pane, allowing the user to access multiple functions without having to navigate back and forth among multiple pages. In addition, the qMDM Solution offers a number of customization features that enable the system administrator to tailor the solution and interface to each organization's needs. This section describes the functions and their constituent elements.
The Master Repository Manager interface showing the Entities tab
The six main functional sections of the qMDM Solution are briefly described:
Function Description
Entities Allows you to search for entities such as persons, organizations, projects, etc., as defined by the Data Steward or Administrator, using input fields to filter the results. The input fields correspond to the attributes defined for each entity, and change dynamically depending on the attributes defined for each entity in the qMDM metadata. The page can be customized by choosing the attributes fields that appear on it. Entities can also be edited, saved, and retired on this page.
Relationships Displays the relationship between entities in both flat view and tree view. You can also build and modify entity relationships from this screen.
112 DataFlux® qMDM Solution

Function Description
Reports Provides the ability to search for and run pre-defined reports. You can run dynamic reports that expect user input, or you can run batch reports. Results from both can be viewed in this screen and can be exported to different output format like CSV.
Administration Used by the Data Steward to update qMDM administration-related metadata tables, including entity and attribute definitions.
Services Allows you to call real-time services and Architect jobs services.
Accelerators Provides a framework within which you can access and use the various optional Accelerators available in your system.
Common Page Elements Following are descriptions of the elements that are common to all pages within the MRM.
Use the Expand and Collapse buttons to reveal or hide the contents of the entity groups within the Entity Search and Entity Editor panes, as well as the clusters within the Search Results pane.
Use the collapse/expand button to toggle a pane between its collapsed and open state. The direction of the arrows vary according to the placement of the pane whether it opens horizontally or vertically. You can resize most panes by clicking and dragging the resize bar that is between panes.
Click the Print button to open a selection dialog that lets you choose a print option.
Click the Export button to export the results of a search in the format selected.
Header
The left side of the Header contains buttons to navigate to the six main functional areas of the solution. Click once to navigate to the chosen page. Any information or data displaying on a screen remains in the browser history when navigating away to another page. It will be there when you return to the previous page, unless the session has timed out and closed, or you have logged out without saving the data. Note also that the graphic shown on the right side of the header can be replaced by another image. Refer to the installation documentation for more information.
DataFlux® qMDM Solution 113

Navigation buttons for the six primary MRM functional areas
The right side of the header indicates the user who is currently logged into this instance of the solution.
Note: If security is enabled on the server, logging in with the correct credentials will enable the functionality in MRM that is specific to the user group you belong to.
Right side of Header
In addition, the following three buttons are located in this area:
Button Description
Help Opens the HTML-based Help system in a new browser window.
About Opens a small information window that displays the version number, legal and copyright information, and the name of the user who is currently logged in. Click OK to close the window.
Log off Logs the current user off the system. Click Log off and a confirmation dialog box appears asking if you are sure you want to exit. Click Yes to exit; click No (or the X in the upper right corner) to cancel the log off function and return to the page you were on previously.
Paging
Search results and other windows or window panes that display database data will usually require multiple pages to hold the results. In these cases, navigation across the pages is made possible by paging controls.
Navigation Controls
The arrow controls are standard First Page, Previous Page, Next Page, and Last Page buttons. They display tool tips when your cursor hovers over each one. You can also directly enter a page number into the entry field. Built-in logic prevents navigation problems if an erroneous entry (such as a negative number or a page number that exceeds the last page) is entered.
114 DataFlux® qMDM Solution
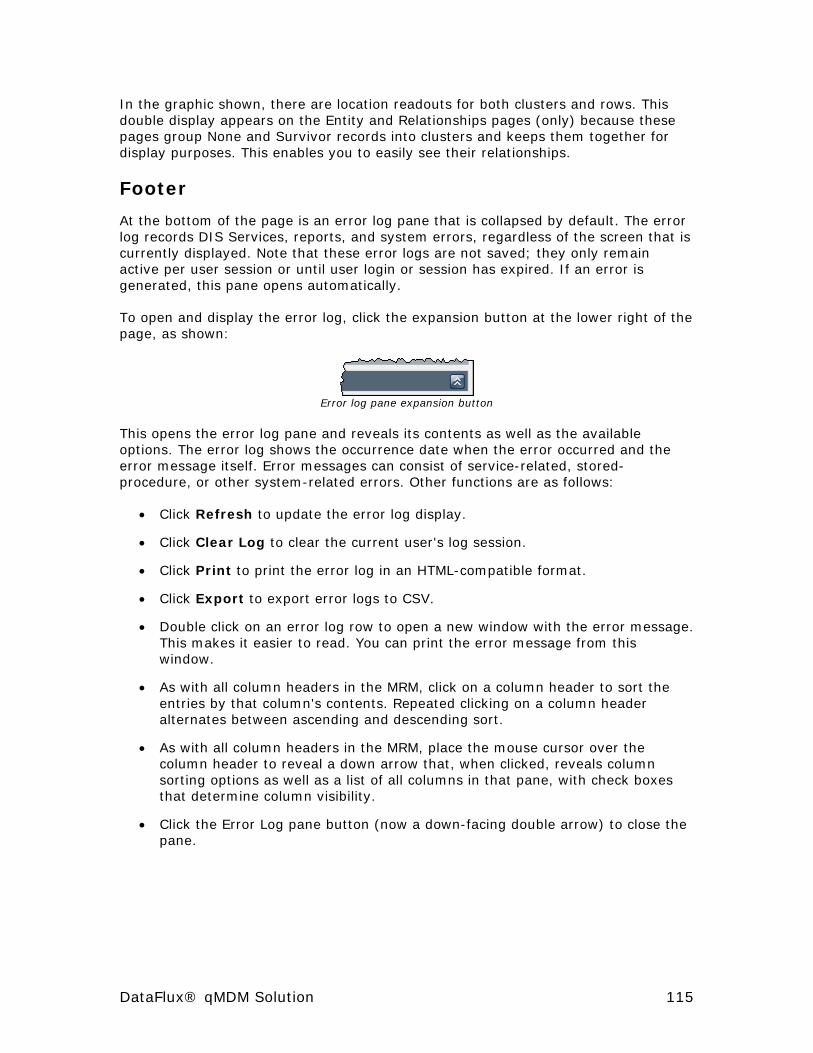
In the graphic shown, there are location readouts for both clusters and rows. This double display appears on the Entity and Relationships pages (only) because these pages group None and Survivor records into clusters and keeps them together for display purposes. This enables you to easily see their relationships.
Footer
At the bottom of the page is an error log pane that is collapsed by default. The error log records DIS Services, reports, and system errors, regardless of the screen that is currently displayed. Note that these error logs are not saved; they only remain active per user session or until user login or session has expired. If an error is generated, this pane opens automatically.
To open and display the error log, click the expansion button at the lower right of the page, as shown:
Error log pane expansion button
This opens the error log pane and reveals its contents as well as the available options. The error log shows the occurrence date when the error occurred and the error message itself. Error messages can consist of service-related, stored-procedure, or other system-related errors. Other functions are as follows:
• Click Refresh to update the error log display.
• Click Clear Log to clear the current user's log session.
• Click Print to print the error log in an HTML-compatible format.
• Click Export to export error logs to CSV.
• Double click on an error log row to open a new window with the error message. This makes it easier to read. You can print the error message from this window.
• As with all column headers in the MRM, click on a column header to sort the entries by that column's contents. Repeated clicking on a column header alternates between ascending and descending sort.
• As with all column headers in the MRM, place the mouse cursor over the column header to reveal a down arrow that, when clicked, reveals column sorting options as well as a list of all columns in that pane, with check boxes that determine column visibility.
• Click the Error Log pane button (now a down-facing double arrow) to close the pane.
DataFlux® qMDM Solution 115

Entities The Entities page will probably be one of the most used pages in the DataFlux® qMDM Solution. It is the main window of the Master Repository Manager. Here you can search for and edit records, as well as retire obsolete records.
Common Elements The Entities page is divided into three panes (in addition to the Error Log pane):
• The Search Pane on the upper left is where you enter your search terms. The layout and operation of this pane are determined by which tab is selected: Basic or Advanced.
• The Search Results pane at the bottom of the page is where the matching records are displayed.
• The Entity Editor on the upper right is where you edit attribute values for the record that you select in the Search Results pane.
Entities panes
The Entity Search and Entity Editor panes dynamically change when you select a different entity type (Person, Policy, etc.) using the Entity Type drop-down selector. Note that entity types can be reconfigured or deleted, and new entity types can be created in the Administration page.
116 DataFlux® qMDM Solution
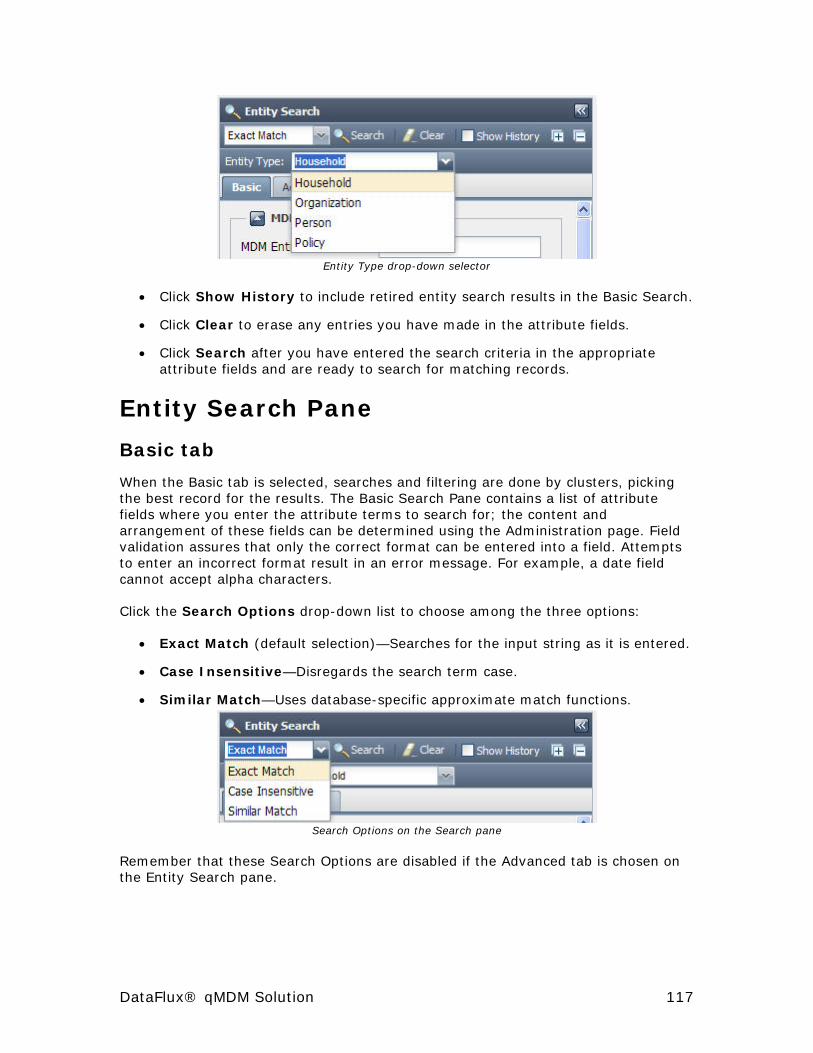
Entity Type drop-down selector
• Click Show History to include retired entity search results in the Basic Search.
• Click Clear to erase any entries you have made in the attribute fields.
• Click Search after you have entered the search criteria in the appropriate attribute fields and are ready to search for matching records.
Entity Search Pane
Basic tab
When the Basic tab is selected, searches and filtering are done by clusters, picking the best record for the results. The Basic Search Pane contains a list of attribute fields where you enter the attribute terms to search for; the content and arrangement of these fields can be determined using the Administration page. Field validation assures that only the correct format can be entered into a field. Attempts to enter an incorrect format result in an error message. For example, a date field cannot accept alpha characters.
Click the Search Options drop-down list to choose among the three options:
• Exact Match (default selection)—Searches for the input string as it is entered.
• Case Insensitive—Disregards the search term case.
• Similar Match—Uses database-specific approximate match functions.
Search Options on the Search pane
Remember that these Search Options are disabled if the Advanced tab is chosen on the Entity Search pane.
DataFlux® qMDM Solution 117

Advanced tab
Click the Advanced tab to reconfigure the Search pane to let you create custom search queries. This tab appears by default if there are no entity types defined. The Advanced search does not search or filter by clusters—it returns exactly what you specify in the search criteria. Therefore the Advanced search does not guarantee best record, clustering, survivorship, and so on.
Note: Both the Show History checkbox and the Search Options drop-down list become disabled when you use the Advanced tab.
Advanced tab of the Entities Search pane
You can manually type SQL statements in to the SQL Where field. Both where and AND are implied in the statements, and ? is added automatically. You can drag and drop one or more attribute names (called Database Name in the column heading) from the Attribute Browser. Note that the attributes that appear in this list are the same ones that appear in the Basic tab; these are configurable in the Administration page. Replace ? in each statement with the value you wish to search for. Query failures produce an error message. A sample query in this field might look like this:
FULL_NAME = '?' AND ADDRESS1 = '?'
Note: DELETE, UPDATE, and INSERT are not allowed in SQL statements.
118 DataFlux® qMDM Solution
Entity Editor The Entity Editor is where you edit the attribute data for the row that you select in the Search Results pane. The configuration of this pane changes according to your selection in the Entity Type drop-down list, and the settings in the Administration page determine which fields are visible.
Note: When the Basic tab is used for searching, only the best record is opened in the Entity Editor regardless of which record you click in the Search Results pane. However, this can be overridden if you click Fill Form Mode ON on the Search Results toolbar, and then click the radio button in front of the desired record.
The Entity Editor toolbar buttons function as follows:
• Click Clear to clear the current edit form. This does not alter the selected record.
• Click Reset to return the information in the form to the previous values.
• Click Save to save the record as currently configured (with the current values in each field). This actually creates a new best record and preserves the previous one for historical audit purposes.
• Click Retire to set this cluster as inactive from the database. Keep in mind that retired clusters are not deleted, but are simply no longer active. This is for historical audit purposes, as well as the ability to retrieve the cluster of an entity in the future, if needed.
• Click Business Rules Override to disregard automatic entity survivorship rules for a given entity when it is being saved. Essentially, this option tells the system to ignore all other pre-defined best record creation rules. This enables you to manually correct records that would normally be subject to rules defined in the qMDM system.
Some fields have format restrictions and will give you an error if you try to enter the wrong format into them. Such fields will usually have helpful shortcuts such as drop-down lists or a calendar entry widget that you can use to enter correctly-formatted data.
You can also create a new record simply by entering new information into a blank Entity Editor. Click Save and the new record is added. This process also creates cluster records, and re-populates the search results.
Search Results Pane Successful searches will return one or more records, which are displayed in rows in this pane, and grouped by cluster ID. The Survivors are highlighted. A cluster ID groups similar entities together based on match criteria set in the qMDM system. If a group of entities share a cluster ID it mean that they are considered to be the same entity by the qMDM hub
DataFlux® qMDM Solution 119

The Search Results toolbar elements function as follows:
• Click the Best Record only checkbox to filter the results pane to display only active best records for matching clusters.
• Click Clear to remove all results from the pane.
• Fill Form Mode ON lets you edit any record regardless if it is NONE or SURVIVOR. The radio checkboxes are enabled and allow the user to select the record to be loaded into the entity editor.
• Fill Form Mode OFF means that the entity editor is always loaded with the SURVIVOR row, no matter which row is selected.
120 DataFlux® qMDM Solution
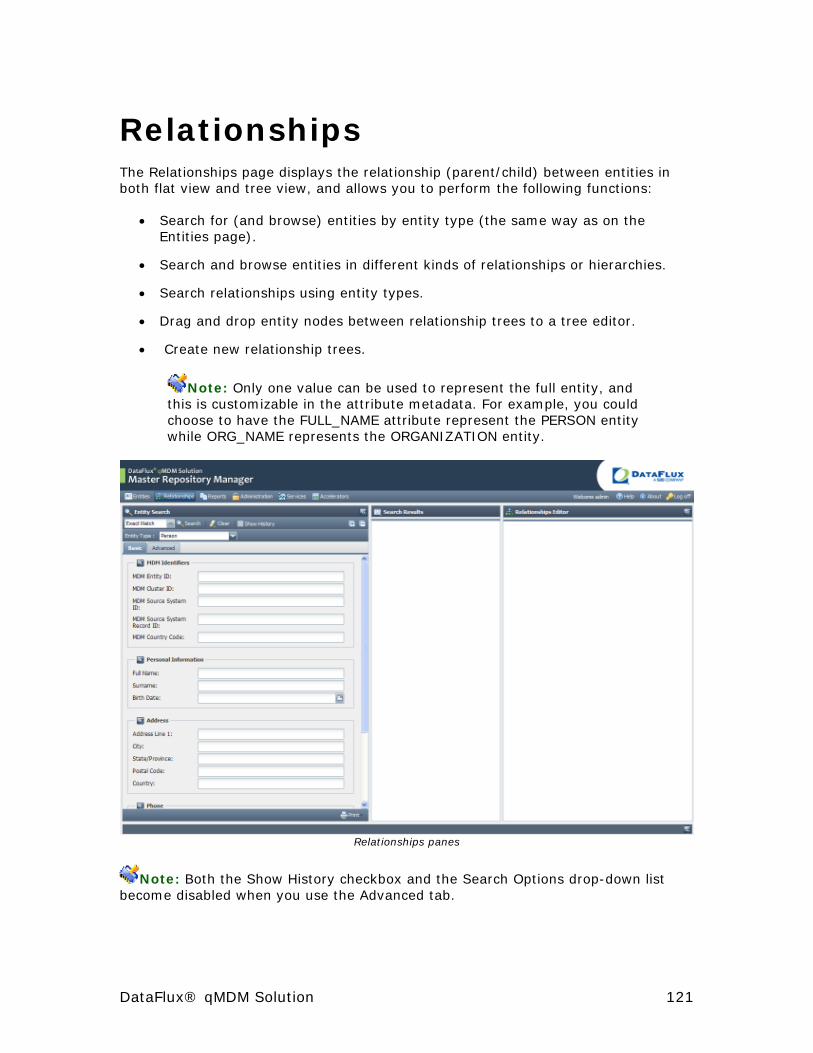
Relationships The Relationships page displays the relationship (parent/child) between entities in both flat view and tree view, and allows you to perform the following functions:
• Search for (and browse) entities by entity type (the same way as on the Entities page).
• Search and browse entities in different kinds of relationships or hierarchies.
• Search relationships using entity types.
• Drag and drop entity nodes between relationship trees to a tree editor.
• Create new relationship trees.
Note: Only one value can be used to represent the full entity, and this is customizable in the attribute metadata. For example, you could choose to have the FULL_NAME attribute represent the PERSON entity while ORG_NAME represents the ORGANIZATION entity.
Relationships panes
Note: Both the Show History checkbox and the Search Options drop-down list become disabled when you use the Advanced tab.
DataFlux® qMDM Solution 121

Entity Search Pane The functioning of Entity Search pane is the same as that found on the Entities page. See that section for more information.
Search Results Pane The Search Results pane displays the results of each entity search in both a tree view and flat view, with a new tab created for each search you perform. This way, you can quickly navigate among the various searches, and drag selected entities from them to construct new relationships in the Relationships Editor.
Individual entities can be dragged to the Relationships Editor pane to establish new relationships. This is true even if the entity already has a particular relationship established, as indicated by the relationship tree icon below its name. However, previously established relationships for a particular entity cannot be dragged into the Relationships Editor in an attempt to expand upon them; all relationships within the Relationships Editor must be newly defined within the editor.
Search results
Relationships Editor The Relationships Editor lets you create new relationships from existing entities that appear in the Search Results pane. To create a new relationship tree, follow these steps:
1. Select the Entity Type from the drop-down list in the Entity Search pane.
122 DataFlux® qMDM Solution
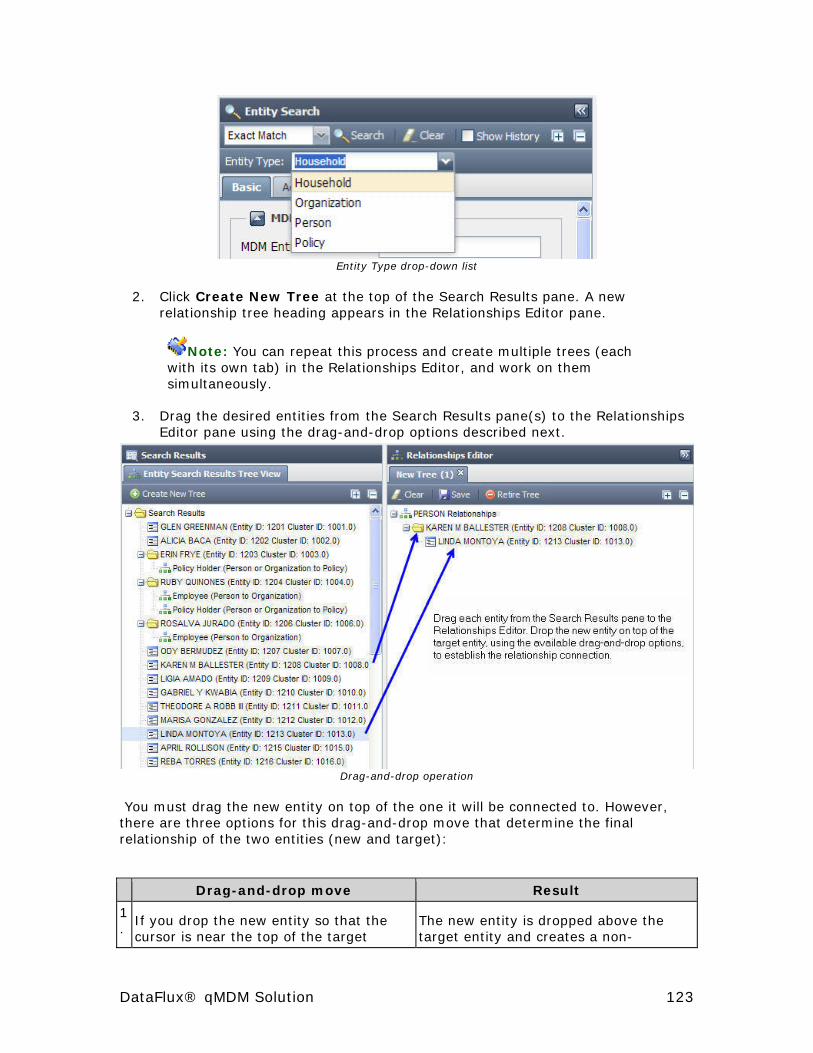
Entity Type drop-down list
2. Click Create New Tree at the top of the Search Results pane. A new relationship tree heading appears in the Relationships Editor pane.
Note: You can repeat this process and create multiple trees (each with its own tab) in the Relationships Editor, and work on them simultaneously.
3. Drag the desired entities from the Search Results pane(s) to the Relationships Editor pane using the drag-and-drop options described next.
Drag-and-drop operation
You must drag the new entity on top of the one it will be connected to. However, there are three options for this drag-and-drop move that determine the final relationship of the two entities (new and target):
Drag-and-drop move Result
1.
If you drop the new entity so that the cursor is near the top of the target
The new entity is dropped above the target entity and creates a non-
DataFlux® qMDM Solution 123

Drag-and-drop move Result
entity, a dotted blue line appears above the target entity, and an insert above
icon appears alongside the new entity.
parent/child relationship.
2.
If you drop the new entity so that the cursor is in the middle of the target entity, a plus-sign icon appears alongside the new entity.
The dropped entity becomes a child of the target entity, and a folder icon appears next to the target entity (along with expand and collapse controls). This parent/child relationship can be changed later by re-dragging the new entity somewhere else.
3.
If you drop the new entity so that the cursor is near the bottom of the target entity, a dotted blue line appears below the target entity, and an insert below
icon appears alongside the new entity.
The new entity is dropped below the target entity and creates a non-parent/child relationship.
124 DataFlux® qMDM Solution

4. When you have configured the new relationship tree as desired, click Save to establish that new relationship between the entities involved. Future searches that involve that relationship type (Person, Household, Organization, Policy) and the particular entities will show this new relationship.
Additional options:
• Click Retire Tree to retire the relationship tree from your search. When you right click on a tree node you can select Retire Tree Node which retires this node and any first level nodes or first level children associated to this node. This applies only when editing an existing tree. Right clicking on new trees lets you select Remove Tree Node. This just removes it from the tree view and does not retire anything since you have not saved it. Note that the Retire Tree button does not appear until you save a new tree or edit an existing one.
• If you move an existing, saved node to a different parent/child combination, this is in a effect a retire operation. It retires all the old parent/child relationships.
• If you wish to change an entity's relationship type, right click its entry in the Relationship Editor and select Edit Relationship Type.
• Click Clear to erase all the entities from this pane and start over.
Errors Relationship trees can be defined by multiple users, possibly leading to problems because entities, nodes, and relationships could be duplicated or otherwise create conflicts. To avoid such problems, the system pre-checks new trees that you are attempting to save to see if there are duplicate relationships or if the added nodes have already been used. There are two primary conditions that will trigger error messages for these types of conditions:
1. Duplicate Relationships—This is where a user attempts to define a new tree that is identical to another tree of the same relationship type. You can define a new relationship for an entity, as long as it is a different type. You will also get this message if a parent/child has already been used another tree of the same relationship type. In the tree itself, the icons for the affected entities will have a red X on them.
2. Already Used Node Error—This the case where a node you are trying to add for a given tree has been already been used by a parallel tree of the same type. For example, Tree A, an Employee relationship type, uses Node A. Tree B (Employee relationship Type) cannot use Node A, since they are of the same relationship type. If Tree B had a different relationship type (for example, Policy), than it would be permissible to use Node A.
DataFlux® qMDM Solution 125
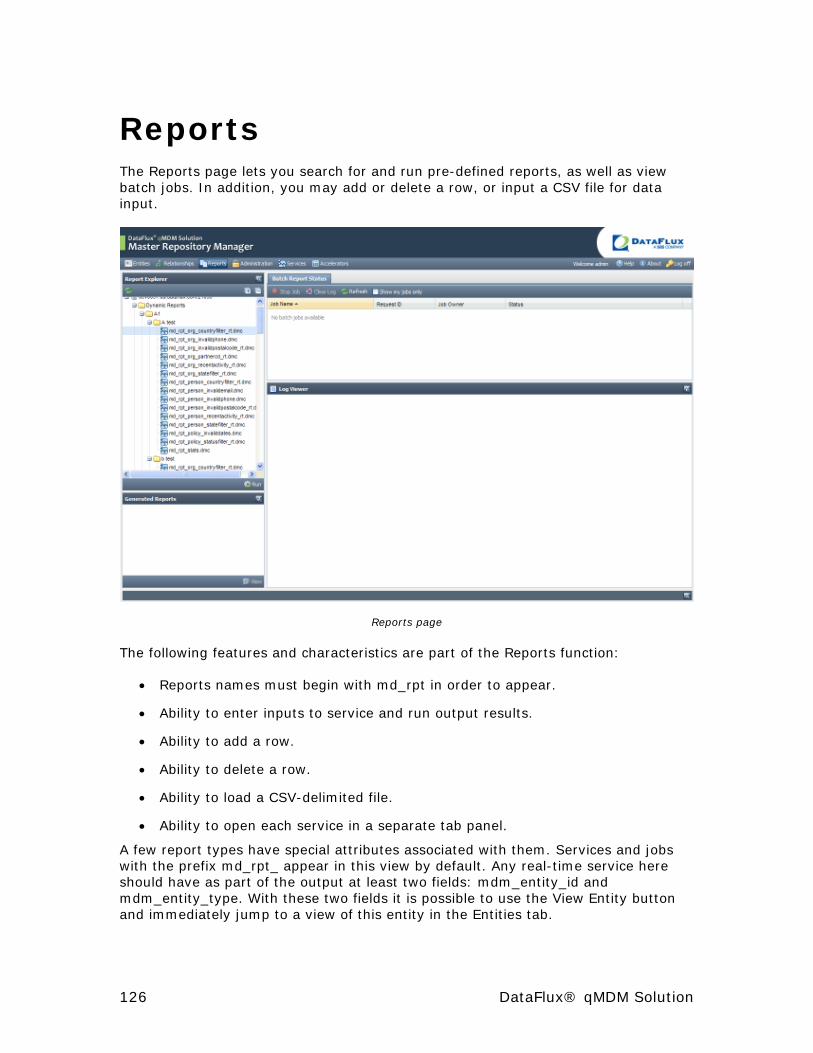
Reports The Reports page lets you search for and run pre-defined reports, as well as view batch jobs. In addition, you may add or delete a row, or input a CSV file for data input.
Reports page
The following features and characteristics are part of the Reports function:
• Reports names must begin with md_rpt in order to appear.
• Ability to enter inputs to service and run output results.
• Ability to add a row.
• Ability to delete a row.
• Ability to load a CSV-delimited file.
• Ability to open each service in a separate tab panel.
A few report types have special attributes associated with them. Services and jobs with the prefix md_rpt_ appear in this view by default. Any real-time service here should have as part of the output at least two fields: mdm_entity_id and mdm_entity_type. With these two fields it is possible to use the View Entity button and immediately jump to a view of this entity in the Entities tab.
126 DataFlux® qMDM Solution
• Dynamic reports—These reports are generated from real-time services designed in Architect. When you run one of these reports, you are expected to type some data into the input grid that queries the qMDM database in some way. The output from calling a dynamic report is sent directly to a result grid on the report pane. This report type supports the jump to entity functionality described previously.
• Batch Reports—These are standard DataFlux batch jobs. Usually they query the qMDM using a pre-determined SQL string defined in the Architect job itself. While the ouput of the report can be sent anywhere and can be a text file or written to a database table, most reports of this type will write to an HTML file that is saved in a location that can be accessed by the Master Repository Manager.
Additionally, if you have batch processes that run periodically and generate HTML file output, the files will be visible in the lower left part of the screen. From here, you can double-click the file and view the contents. This is perfect for reviewing batch files containing problems that must be reviewed regularly.
Report Explorer Pane This pane defaults to show only services or dynamic and batch reports with a prefix of md_rpt. Services are displayed in a tree format.
• Double click on a selected dynamic report to populate the center panel with inputs and output views for the report.
• Double click on a batch report to run the report. The batch report status tab will be shown so you can see the status of the batch report.
• Click the Refresh button to refresh the services.
Report (Center) Pane Double click a dynamic report in the Explorer pane to open it in the center pane. You can have a number of reports open concurrently in this pane (both dynamic inputs and outputs, as well as batch results); each one has its own tab. If you have a lot of tabs open, use the directional buttons to scroll through them. Click the x on a tab to close it.
The toolbar buttons available along the top of the tab depend on the tab type in focus. For dynamic reports, the following buttons are available:
• Click Add Row to add a new row to the grid
• Click Delete Row to delete the row(s) that have checks in their corresponding checkboxes.
• Click Load File to open a dialog box that lets you browse for the desired CSV text file.
• Click Reload Service to reload the service.
DataFlux® qMDM Solution 127

• Click Options to open a dialog box that lets you set the Operation Timeout in seconds.
• Click Run Report to execute the service with the given inputs.
• Double click a row cell to edit a field in accordance to the field type: string fields are by default text input fields; date fields are displayed as a date calendar widget.
Results Pane If the service runs correctly, you will see an output grid in the Results Pane displaying a matching entity type related report. If you double click a row, you are redirected to the Entities page where the current best of record is loaded in the Entity Editor.
• Click View Entity, after selecting an entity row from the search results, to redirect you the Entities page (this is the same function as double clicking a row, described in the previous paragraph).
• Click Export to export the results as a CSV text file.
• The Service Loaded Successfully button, while formatted as a clickable button, does not perform any function when clicked. However, if this button shows a failure message, clicking it opens a dialog box listing the same error as in the log.
128 DataFlux® qMDM Solution

Administration The Administration page allows the Data Steward and Administrator to configure the administration-related tables in the DataFlux® qMDM Master Repository Manager (MRM) and, thus, determine the appearance and function of the various pages within the MRM. Certain tasks and views of data are only accessible to data stewards5.
Administration page
The Administrative Task pane on left lists all the attributes, entities, groups, clusters, etc. that have been defined for your installation of the MRM, displayed in a tree format. Double clicking each one opens it as a unique tab in the main configuration pane. Within each task tab, the various items that are part of the task are listed vertically, and the configuration elements and options (fields) for each one run horizontally across the page.
The mdm_valid_from_dttm and mdm_valid_to_dttm data elements are filled in automatically when you add a new row of metadata through any of the administration tasks. The from date is set to the current date and time and the to date is set to the system-defined date and time contained in the DataFlux macro MDM_DEF_VALID_TO. If you want to set these dates manually you can do so, but you may not be able to edit these data elements if the from date is set to some future date or if the to date is set to a date in the past (which would essentially retire the row before it ever became active). If the from date is set to a future date, you can edit the row once the from date moves into the past. 5 The data steward strategically manages corporate data across the enterprise, while ensuring high levels of data availability.
DataFlux® qMDM Solution 129

Configuration Following are miscellaneous notes on configuring the various fields that make up the MRM pages.
• Some fields have built-in constraints that limit you specific characters, such as M,F, and U for Gender. Other constraints specify the allowable format for inputting characters.
• Semicolons (;) act as delimiters.
• The mdm_hier_display_flag field is used for building relationship trees. Only one attribute can serve as the common, connecting attribute, so only one attribute should be designated as True and display a 1 in that field.
• Display order columns use numbers to designate where on the page the element is placed, with lower-numbered items appearing vertically above those with higher-numbers. This holds true for elements (such as attributes like Address1, City/Province, Postal Code) that are found within groups (such as Address). Both the attributes and the higher-level groups are placed on the page according to the numerical values within their respective display order columns. It is suggested that you use numbers in the hundreds (100, 200, 300, ...) when designating the order. This provides a wide range of intermediate values that can be used in case you wish to interpose a new element between two existing ones. Otherwise, you will be forced to re-number numerous elements to fit the new one in. As long as the display order is something other than 0, the element will appear on the page.
130 DataFlux® qMDM Solution

Services The services tab allows users to view files and activity on the DataFlux Integration Server (DIS), which supports qMDM functionality. Through this tab, data stewards can view, test, and run real-time services, Architect jobs, and Profile jobs on DIS, as well as view batch jobs.
Services panes
In addition to the functions listed previously, the Services page lets you do the following:
• Ability to filter and search MD_ tables (where md_ is a default filter).
• Ability to run batch jobs.
• Ability to view batch job status.
• Ability to enter inputs to the service and run output results.
• Ability to add a row.
• Ability to delete a row.
• Ability to load a CSV-delimited file.
• Ability to open each service in a separate tab panel.
DataFlux® qMDM Solution 131
Integration Server Explorer Pane This pane lets you view and access DIS jobs and services, which are displayed in a tree format.
You can filter the jobs and services by entering a search term into the filter field next
to the Clear Filter button . The tree will automatically be filtered
to match the string you entered and the Clear Filter button will change to . Click this button to clear the filter field and repopulate the tree with all jobs and services.
• Click Refresh to update the filtered list using the filter term.
• Click Run Service to run the selected service.
Jobs and Services (Center) Pane Double click on a job or service in the Explorer pane to open it in the center pane. You can have a number of reports open concurrently in this pane; each one has its own tab. If you have a lot of tabs open, use the directional buttons to scroll through them. Click the x on a tab to close it. Right click a tab to reveal other options: Close Tab, Close Other Tabs, and Close All Tabs.
The toolbar buttons available along the top of the tab depend on the tab type in focus. For reports, the following buttons are available:
• Click Add Row to add a new row to the grid
• Click Delete Row to delete the row(s) that have checks in their corresponding checkboxes.
• Click Load File to open a dialog box that lets you browse for the desired CSV text file.
• Click Reload Service to reload the service.
• Click Macros to access any macros that have been created.
• Click Options to open a dialog box that lets you set the Operation Timeout in seconds.
• Click Run Service to executes the service with the given inputs.
• Double click a row cell to edit a field in accordance to the field type: string fields are by default text input fields; date fields are displayed as a date calendar widget.
Results Pane If the service runs correctly, you will see an output grid in the Results Pane displaying a matching entity type related report. If you double click a row, you are
132 DataFlux® qMDM Solution

redirected to the Entities page where the current best of record is loaded in the Entity Editor.
• Click View Entity, after selecting an entity row from the search results, to redirect you the Entities page (this is the same function as double clicking a row, described in the previous paragraph).
• Click Export to export the results as a CSV text file.
• The Service Completed Successfully button, while formatted as a button, does not perform any function when clicked. However, if this button shows a failure message, clicking it opens a dialog box listing the same error as in the log.
DataFlux® qMDM Solution 133
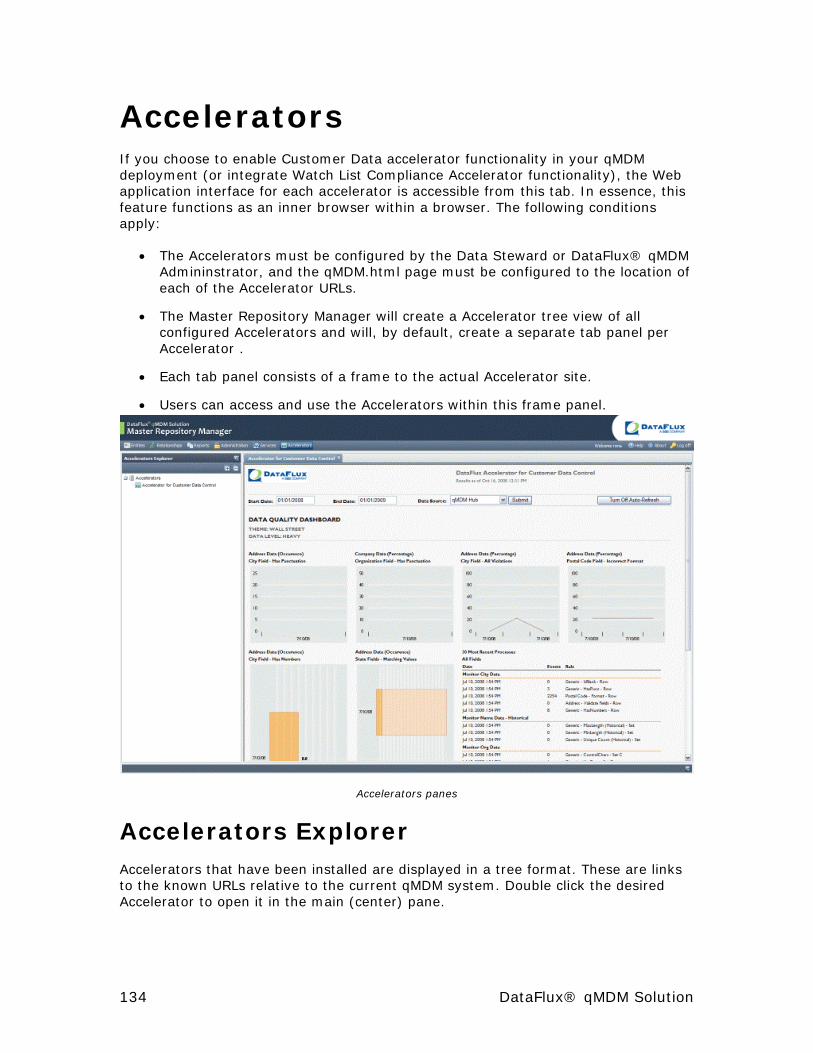
Accelerators If you choose to enable Customer Data accelerator functionality in your qMDM deployment (or integrate Watch List Compliance Accelerator functionality), the Web application interface for each accelerator is accessible from this tab. In essence, this feature functions as an inner browser within a browser. The following conditions apply:
• The Accelerators must be configured by the Data Steward or DataFlux® qMDM Admininstrator, and the qMDM.html page must be configured to the location of each of the Accelerator URLs.
• The Master Repository Manager will create a Accelerator tree view of all configured Accelerators and will, by default, create a separate tab panel per Accelerator .
• Each tab panel consists of a frame to the actual Accelerator site.
• Users can access and use the Accelerators within this frame panel.
Accelerators panes
Accelerators Explorer Accelerators that have been installed are displayed in a tree format. These are links to the known URLs relative to the current qMDM system. Double click the desired Accelerator to open it in the main (center) pane.
134 DataFlux® qMDM Solution

Appendixes The Appendixes section contains the following topics and resources:
Appendix A: Job and Service List
Appendix B: Data Model Design
DataFlux® qMDM Solution 135

Appendix A: Job and Service List
• Table Services
• Data Steward Functions
• Master Repository Manager Services
• Master Data Management Services
• Report Jobs and Services
• SS Services
• Staging Jobs
• Meta Jobs
• Bulk Jobs
• Accelerators Services
• Utility Services
TBL Services These real time services are used for functions that act directly on database tables.
Job/Service Name Description
md_tbl_attr_a.dmc This service template adds a single record to this table. It’s available to all source systems
md_tbl_attr_q.dmc This service template queries this table. It’s available to all source systems with some restrictions
md_tbl_attrdatatype_a.dmc This service template adds a single record to this table. It’s available to all source systems
md_tbl_attrdatatype_q.dmc This service template queries this table. It’s available to all source systems with some restrictions
md_tbl_clustergroupingtype_a.dmc This service template adds a single record to this table. It’s available to all source systems
md_tbl_clustergroupingtype_q.dmc This service template queries this table. It’s available to all source systems with some restrictions
md_tbl_clusterrelationshiptype_a.dmc This service template adds a single record to this table. It’s available to all source systems
136 DataFlux® qMDM Solution

Job/Service Name Description
md_tbl_clusterrelationshiptype_q.dmc This service template queries this table. It’s available to all source systems with some restrictions
md_tbl_country_a.dmc This service template adds a single record to this table. It’s available to all source systems
md_tbl_country_q.dmc This service template queries this table. It’s available to all source systems with some restrictions
md_tbl_entitygroupingtype_a.dmc This service template adds a single record to this table. It’s available to all source systems
md_tbl_entitygroupingtype_q.dmc This service template queries this table. It’s available to all source systems with some restrictions
md_tbl_entitytype_a.dmc This service template adds a single record to this table. It’s available to all source systems
md_tbl_entitytype_q.dmc This service template queries this table. It’s available to all source systems with some restrictions
md_tbl_language_a.dmc This service template adds a single record to this table. It’s available to all source systems
md_tbl_language_q.dmc This service template queries this table. It’s available to all source systems with some restrictions
md_tbl_metadatatable_a.dmc This service template adds a single record to this table. It’s available to all source systems
md_tbl_metadatatable_q.dmc This service template queries this table. It’s available to all source systems with some restrictions
md_tbl_srcsys_a.dmc This service template adds a single record to this table. It’s available to all source systems
md_tbl_srcsys_q.dmc This service template queries this table. It’s available to all source systems with some restrictions
STWD Services The services in the following section are restricted to data steward functionality. They can be called directly by other applications but are primarily used by the Master Repository Manager.
Job/Service Name Description
md_stwd_attr_c.dmc This service template commits a single record to this table. This service is hidden
DataFlux® qMDM Solution 137
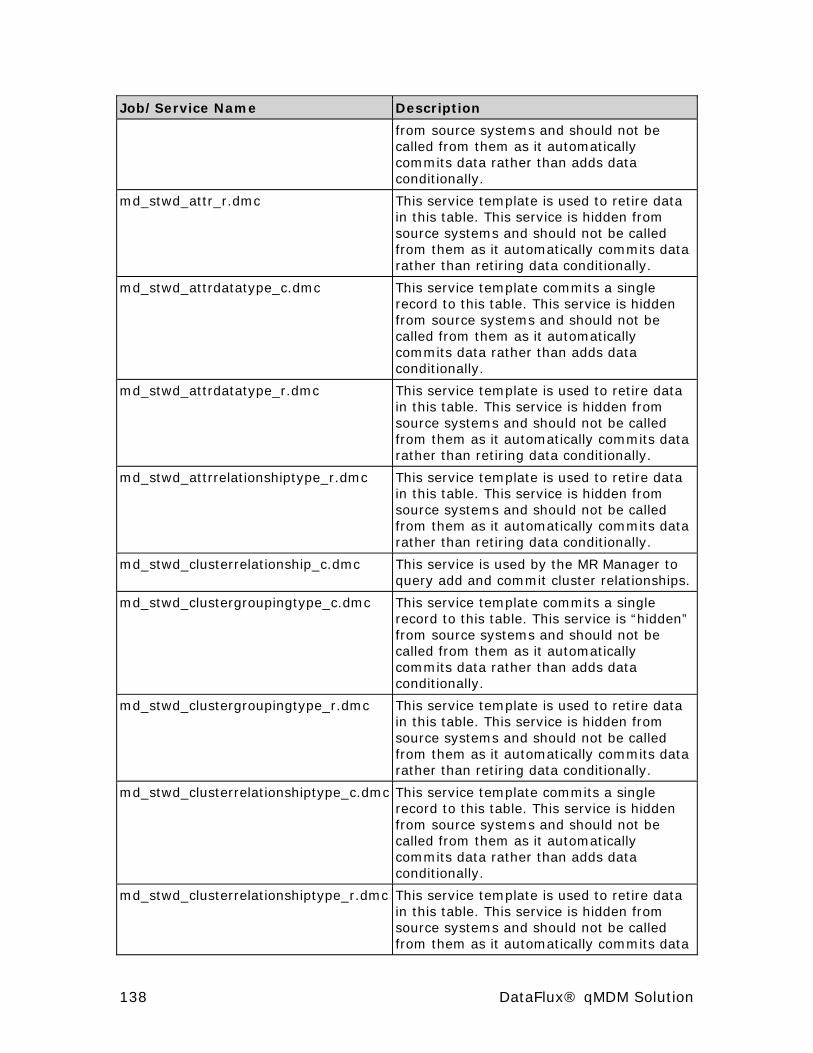
Job/Service Name Description
from source systems and should not be called from them as it automatically commits data rather than adds data conditionally.
md_stwd_attr_r.dmc This service template is used to retire data in this table. This service is hidden from source systems and should not be called from them as it automatically commits data rather than retiring data conditionally.
md_stwd_attrdatatype_c.dmc This service template commits a single record to this table. This service is hidden from source systems and should not be called from them as it automatically commits data rather than adds data conditionally.
md_stwd_attrdatatype_r.dmc This service template is used to retire data in this table. This service is hidden from source systems and should not be called from them as it automatically commits data rather than retiring data conditionally.
md_stwd_attrrelationshiptype_r.dmc This service template is used to retire data in this table. This service is hidden from source systems and should not be called from them as it automatically commits data rather than retiring data conditionally.
md_stwd_clusterrelationship_c.dmc This service is used by the MR Manager to query add and commit cluster relationships.
md_stwd_clustergroupingtype_c.dmc This service template commits a single record to this table. This service is “hidden” from source systems and should not be called from them as it automatically commits data rather than adds data conditionally.
md_stwd_clustergroupingtype_r.dmc This service template is used to retire data in this table. This service is hidden from source systems and should not be called from them as it automatically commits data rather than retiring data conditionally.
md_stwd_clusterrelationshiptype_c.dmc This service template commits a single record to this table. This service is hidden from source systems and should not be called from them as it automatically commits data rather than adds data conditionally.
md_stwd_clusterrelationshiptype_r.dmc This service template is used to retire data in this table. This service is hidden from source systems and should not be called from them as it automatically commits data
138 DataFlux® qMDM Solution

Job/Service Name Description
rather than retiring data conditionally.
md_stwd_country_c.dmc This service template commits a single record to this table. This service is hidden from source systems and should not be called from them as it automatically commits data rather than adds data conditionally.
md_stwd_country_r.dmc This service template is used to retire data in this table. This service is hidden from source systems and should not be called from them as it automatically commits data rather than retiring data conditionally.
md_stwd_entityattr_a.dmc This service template is used to add entity attribute information from steward-type applications.
md_stwd_entitygroupingtype_c.dmc This service template commits a single record to this table. This service is hidden from source systems and should not be called from them as it automatically commits data rather than adds data conditionally.
md_stwd_entitygroupingtype_r.dmc This service template is used to retire data in this table. This service is hidden from source systems and should not be called from them as it automatically commits data rather than retiring data conditionally.
md_stwd_entitytype_c.dmc This service template commits a single record to this table. This service is hidden from source systems and should not be called from them as it automatically commits data rather than adds data conditionally.
md_stwd_entitytype_r.dmc This service template is used to retire data in this table. This service is hidden from source systems and should not be called from them as it automatically commits data rather than retiring data conditionally.
md_stwd_language_c.dmc This service template commits a single record to this table. This service is hidden from source systems and should not be called from them as it automatically commits data rather than adds data conditionally.
md_stwd_language_r.dmc This service template is used to retire data in this table. This service is hidden from source systems and should not be called from them as it automatically commits data rather than retiring data conditionally.
DataFlux® qMDM Solution 139

Job/Service Name Description
md_stwd_metadatatable_c.dmc This service template commits a single record to this table. This service is hidden from source systems and should not be called from them as it automatically commits data rather than adds data conditionally.
md_stwd_metadatatable_r.dmc This service template is used to retire data in this table. This service is hidden from source systems and should not be called from them as it automatically commits data rather than retiring data conditionally.
md_stwd_srcsys_c.dmc This service template commits a single record to this table. This service is hidden from source systems and should not be called from them as it automatically commits data rather than adds data conditionally.
md_stwd_srcsys_r.dmc This service template is used to retire data in this table. This service is hidden from source systems and should not be called from them as it automatically commits data rather than retiring data conditionally.
MRM Services The following services do not have corresponding stored procedures. These MRM services deal exclusively with the Master Repository Manager.
Job/Service Name Description
md_mrm_attr_a.dmc This service template is used to add data to this table from the MR Manager and restricts attribute manipulation as dictated by metadata.
md_mrm_attr_q.dmc This service template is used to query this table from the MR Manager and restricts data that can be queried from this application.
md_mrm_attrdatatype_a.dmc This service template is used to add data to this table from the MR Manager and restricts attribute manipulation as dictated by metadata.
md_mrm_attrdatatype_q.dmc This service template is used to query this table from the MR Manager and restricts data that can be queried from this application.
140 DataFlux® qMDM Solution
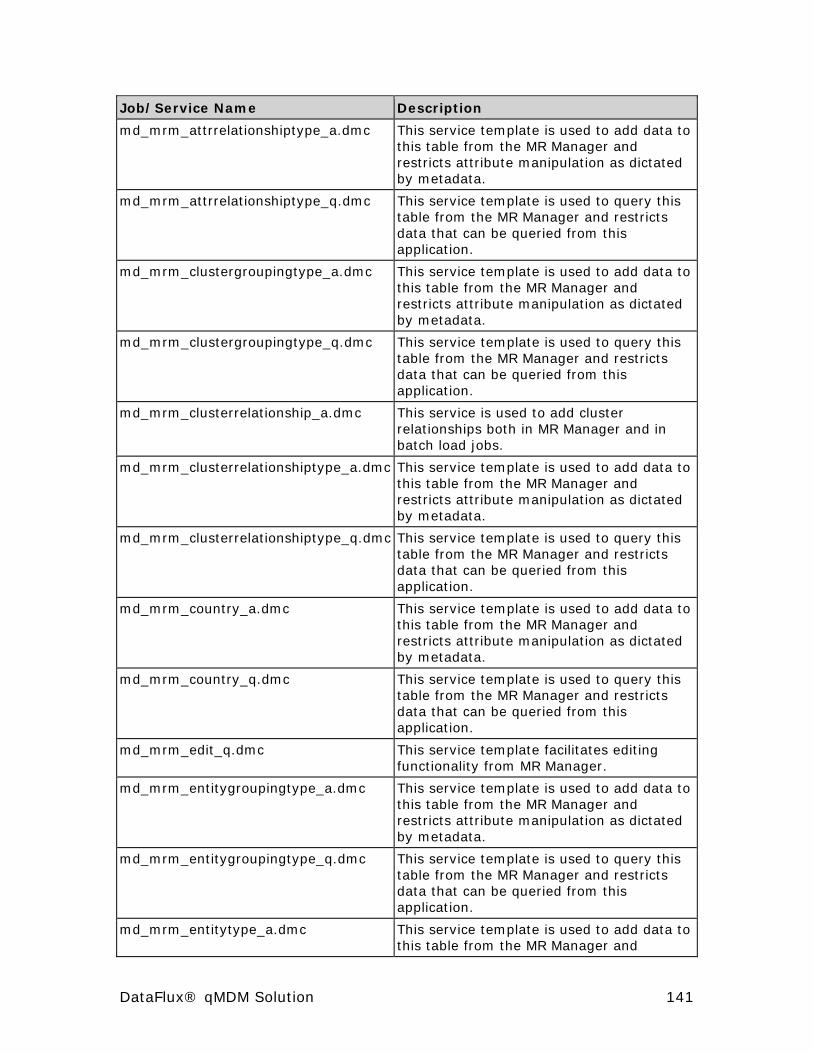
Job/Service Name Description
md_mrm_attrrelationshiptype_a.dmc This service template is used to add data to this table from the MR Manager and restricts attribute manipulation as dictated by metadata.
md_mrm_attrrelationshiptype_q.dmc This service template is used to query this table from the MR Manager and restricts data that can be queried from this application.
md_mrm_clustergroupingtype_a.dmc This service template is used to add data to this table from the MR Manager and restricts attribute manipulation as dictated by metadata.
md_mrm_clustergroupingtype_q.dmc This service template is used to query this table from the MR Manager and restricts data that can be queried from this application.
md_mrm_clusterrelationship_a.dmc This service is used to add cluster relationships both in MR Manager and in batch load jobs.
md_mrm_clusterrelationshiptype_a.dmc This service template is used to add data to this table from the MR Manager and restricts attribute manipulation as dictated by metadata.
md_mrm_clusterrelationshiptype_q.dmc This service template is used to query this table from the MR Manager and restricts data that can be queried from this application.
md_mrm_country_a.dmc This service template is used to add data to this table from the MR Manager and restricts attribute manipulation as dictated by metadata.
md_mrm_country_q.dmc This service template is used to query this table from the MR Manager and restricts data that can be queried from this application.
md_mrm_edit_q.dmc This service template facilitates editing functionality from MR Manager.
md_mrm_entitygroupingtype_a.dmc This service template is used to add data to this table from the MR Manager and restricts attribute manipulation as dictated by metadata.
md_mrm_entitygroupingtype_q.dmc This service template is used to query this table from the MR Manager and restricts data that can be queried from this application.
md_mrm_entitytype_a.dmc This service template is used to add data to this table from the MR Manager and
DataFlux® qMDM Solution 141
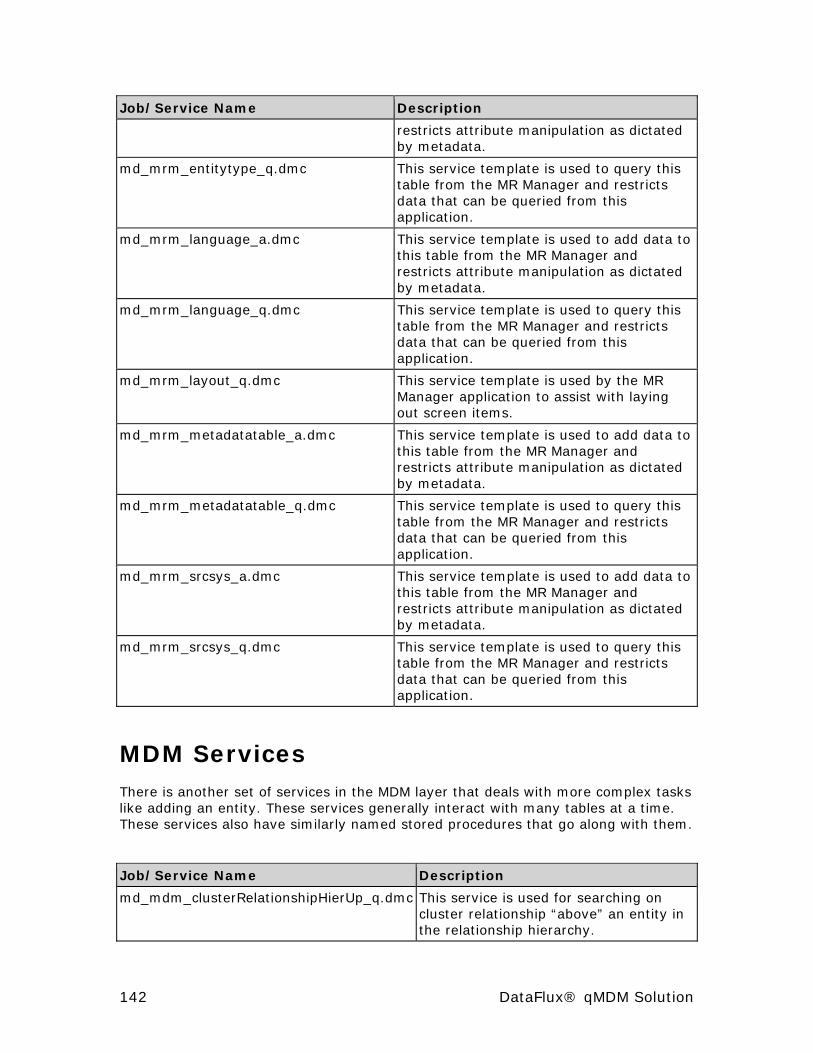
Job/Service Name Description
restricts attribute manipulation as dictated by metadata.
md_mrm_entitytype_q.dmc This service template is used to query this table from the MR Manager and restricts data that can be queried from this application.
md_mrm_language_a.dmc This service template is used to add data to this table from the MR Manager and restricts attribute manipulation as dictated by metadata.
md_mrm_language_q.dmc This service template is used to query this table from the MR Manager and restricts data that can be queried from this application.
md_mrm_layout_q.dmc This service template is used by the MR Manager application to assist with laying out screen items.
md_mrm_metadatatable_a.dmc This service template is used to add data to this table from the MR Manager and restricts attribute manipulation as dictated by metadata.
md_mrm_metadatatable_q.dmc This service template is used to query this table from the MR Manager and restricts data that can be queried from this application.
md_mrm_srcsys_a.dmc This service template is used to add data to this table from the MR Manager and restricts attribute manipulation as dictated by metadata.
md_mrm_srcsys_q.dmc This service template is used to query this table from the MR Manager and restricts data that can be queried from this application.
MDM Services There is another set of services in the MDM layer that deals with more complex tasks like adding an entity. These services generally interact with many tables at a time. These services also have similarly named stored procedures that go along with them.
Job/Service Name Description
md_mdm_clusterRelationshipHierUp_q.dmc This service is used for searching on cluster relationship “above” an entity in the relationship hierarchy.
142 DataFlux® qMDM Solution

Job/Service Name Description
md_mdm_clusterrelationshiprevhier_q.dmc This service template facilitates queries of relationship hierarchy data.
md_mdm_entity_a.dmc This service template handles adding entity data and source system linkage and is called by other services.
md_mdm_entity_r.dmc This service template handles the retirement of entities and is called by other services.
md_mdm_entityattr_a.dmc This service template adds entity attributes and is called by other services.
md_mdm_entityattr_f.dmc This service template manages calls to ACCEL services and is called by other services.
md_mdm_entityGrouping_r.dmc This service is used to retire entity groupings.
md_mdm_household_l.dmc This service template handles clustering and survivorship for this entity type.
md_mdm_household_q.dmc This service template handles queries for this entity type and transposes attributes.
md_mdm_org_l.dmc This service template handles clustering and survivorship for this entity type.
md_mdm_org_q.dmc This service template handles queries for this entity type and transposes attributes.
md_mdm_person_l.dmc This service template handles clustering and survivorship for this entity type.
md_mdm_person_q.dmc This service template handles queries for this entity type and transposes attributes.
md_mdm_policy_l.dmc This service template handles clustering and survivorship for this entity type.
md_mdm_policy_q.dmc This service template handles queries for this entity type and transposes attributes.
md_mdm_relationship_q.dmc This service is used for querying entity relationships.
Report Jobs and Services These files represent some sample jobs and services to show how reports are built against entities in the database. Note they are specific to entities and will need to be modified if you are not using the standard definition of these entities delivered with
DataFlux® qMDM Solution 143

the solution. An _rt designates reports as dynamic real-time services while the others are batch reports.
Job/Service Name Description
md_rpt_org_countryfilter_rt.dmc Sample dynamic organization report template for filtering entities by country.
md_rpt_org_invalidphone.dmc Sample organization batch report template for finding invalid phone numbers (US by default).
md_rpt_org_invalidpostalcode_rt.dmc Sample dynamic organization report template for finding invalid postal codes (US by default).
md_rpt_org_partnercd_rt.dmc Sample organization dynamic report template to find data by partner codes.
md_rpt_org_recentactivity_rt.dmc Sample dynamic organization report template to show recent activity.
md_rpt_org_statefilter_rt.dmc Sample dynamic organization report template to filter data by state (US by default).
md_rpt_person_countryfilter_rt.dmc Sample dynamic person report template for filtering entities by country.
md_rpt_person_invalidemail.dmc Sample person batch report template for finding invalid email addresses.
md_rpt_person_invalidphone.dmc Sample person batch report template for finding invalid phone numbers (US by default).
md_rpt_person_invalidpostalcode_rt.dmc Sample dynamic person report template for finding invalid postal codes (US by default).
md_rpt_person_recentactivity_rt.dmc Sample dynamic person report template to show recent activity.
md_rpt_person_statefilter_rt.dmc Sample dynamic person report template to filter data by state (US by default).
md_rpt_policy_invaliddates.dmc Sample batch report template for invalid policy dates.
md_rpt_policy_statusfilter_rt.dmc Sample dynamic policy report template to filter on status codes.
md_rpt_stats.dmc Standard qMDM database statistics report template.
144 DataFlux® qMDM Solution

SS Services These services provide a wrapper around groups of the other services such that for convenience only one service call needs to be made instead of the multiple service calls that would be available to other enterprise applications or source systems.
Job/Service Name Description
md_ss_household_a.dmc This service template is used to cluster, survive and add new entities for this entity type.
md_ss_household_q.dmc This service template is used to query entities of this entity type.
md_ss_person_a.dmc This service template is used to cluster, survive and add new entities for this entity type.
md_ss_person_q.dmc This service template is used to query entities of this entity type.
md_ss_org_a.dmc This service template is used to cluster, survive and add new entities for this entity type.
md_ss_org_q.dmc This service template is used to query entities of this entity type.
md_ss_policy_a.dmc This service template is used to cluster, survive and add new entities for this entity type.
md_ss_policy_q.dmc This service template is used to query entities of this entity type.
STAGING Jobs These are batch jobs that support staging activities.
Job/Service Name Description
md_stage_create_oracle.dmc This batch job template invokes the command line Oracle interface to build qMDM database structure.
md_stage_create_sqlserver.dmc This batch job template invokes the command line SQL Server interface to build qMDM database structure.
META Jobs These job templates are used exclusively to load metadata files that define entities and attributes in the qMDM hub.
Job/Service Name Description
DataFlux® qMDM Solution 145
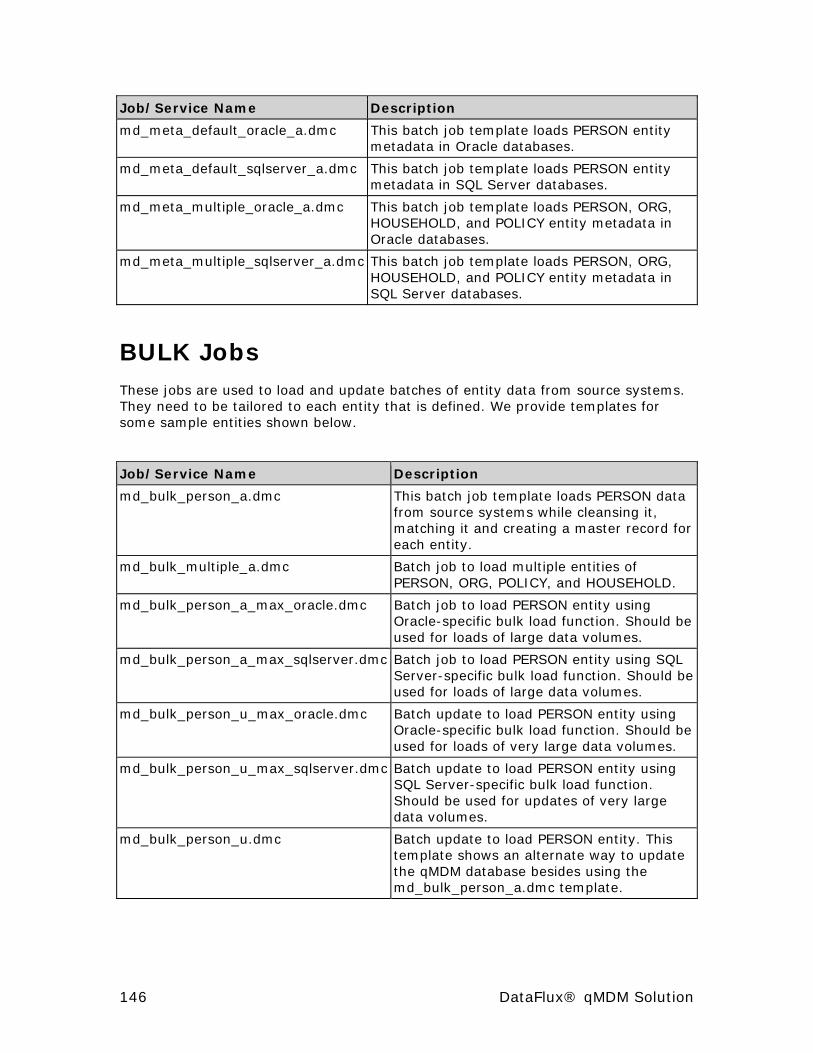
Job/Service Name Description
md_meta_default_oracle_a.dmc This batch job template loads PERSON entity metadata in Oracle databases.
md_meta_default_sqlserver_a.dmc This batch job template loads PERSON entity metadata in SQL Server databases.
md_meta_multiple_oracle_a.dmc This batch job template loads PERSON, ORG, HOUSEHOLD, and POLICY entity metadata in Oracle databases.
md_meta_multiple_sqlserver_a.dmc This batch job template loads PERSON, ORG, HOUSEHOLD, and POLICY entity metadata in SQL Server databases.
BULK Jobs These jobs are used to load and update batches of entity data from source systems. They need to be tailored to each entity that is defined. We provide templates for some sample entities shown below.
Job/Service Name Description
md_bulk_person_a.dmc This batch job template loads PERSON data from source systems while cleansing it, matching it and creating a master record for each entity.
md_bulk_multiple_a.dmc Batch job to load multiple entities of PERSON, ORG, POLICY, and HOUSEHOLD.
md_bulk_person_a_max_oracle.dmc Batch job to load PERSON entity using Oracle-specific bulk load function. Should be used for loads of large data volumes.
md_bulk_person_a_max_sqlserver.dmc Batch job to load PERSON entity using SQL Server-specific bulk load function. Should be used for loads of large data volumes.
md_bulk_person_u_max_oracle.dmc Batch update to load PERSON entity using Oracle-specific bulk load function. Should be used for loads of very large data volumes.
md_bulk_person_u_max_sqlserver.dmc Batch update to load PERSON entity using SQL Server-specific bulk load function. Should be used for updates of very large data volumes.
md_bulk_person_u.dmc Batch update to load PERSON entity. This template shows an alternate way to update the qMDM database besides using the md_bulk_person_a.dmc template.
146 DataFlux® qMDM Solution

ACCEL Services These are service templates that can be used for transforming attributes, generating match codes, and for other data enrichment activities. Services from other DataFlux® Accelerators can also be integrated with these to provide more functionality if needed.
• Filter—filter name used to route data to appropriate transformation in the md_mdm_entityAttr_f.dmc service. The filter name is referenced in the md_attrs_<entity> metadata.
• Standardization/Tokenization—output name for field after tokenization and/or standardization. The output name is referenced in the md_attr_relationship metadata.
• Match Codes—output name for field after match code generation. The output name is referenced in the md_attr_relationship metadata.
• Other—output name for field after other processing as specified in the service. The output name is referenced in the md_attr_relationship metadata.
Job/Service Name
Description Filter Standardization/Tokenization
Match Codes
Other
md_cdia_addressline_f.dmc
This service template cleanses, enriches and generates match codes for address line 1 data.
ADDRESSLINE
addressline_mc
md_cdia_city_f.dmc
This service template cleanses, enriches and generates match codes for city address data.
CITY city_mc
md_cdia_country_f.smc
Cleanses and generates match codes for country data.
COUNTRY country_stnd city_mc
md_cdia_email_f.dmc
This service template cleanses, enriches and generates
EMAIL email_stnd email_mc
DataFlux® qMDM Solution 147
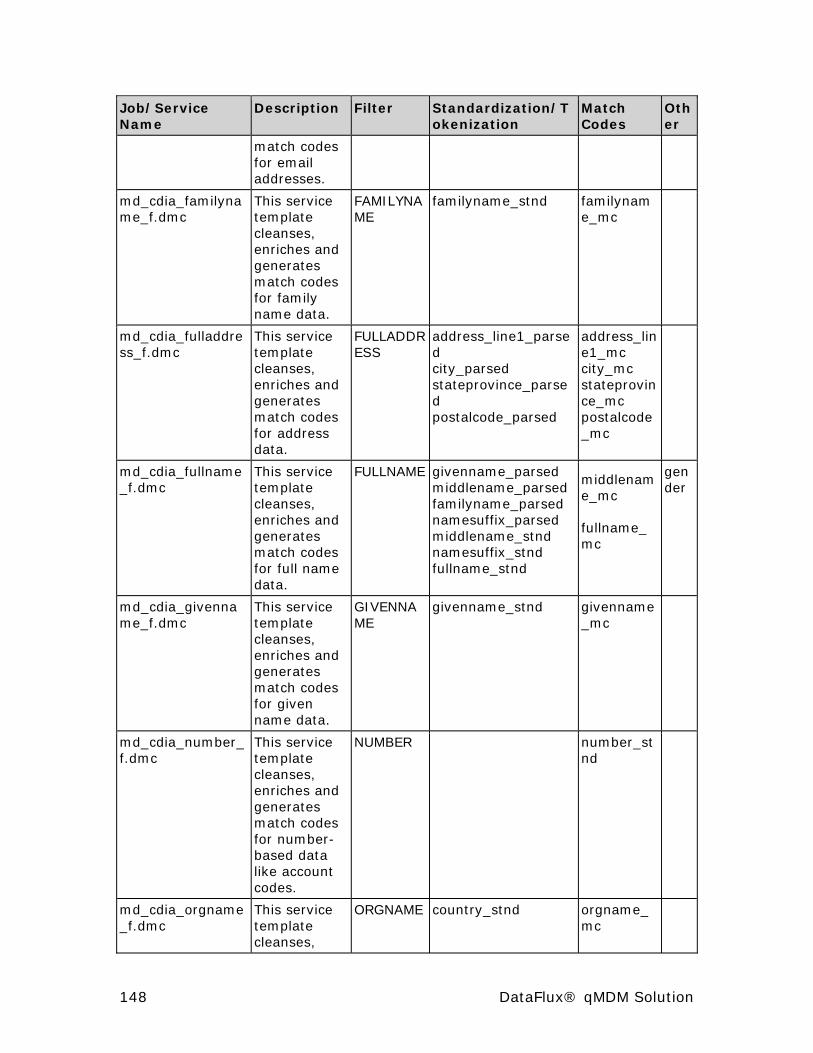
Job/Service Description Filter Standardization/T Match OthName okenization Codes er
match codes for email addresses.
md_cdia_familyname_f.dmc
This service template cleanses, enriches and generates match codes for family name data.
FAMILYNAME
familyname_stnd familyname_mc
md_cdia_fulladdress_f.dmc
This service template cleanses, enriches and generates match codes for address data.
FULLADDRESS
address_line1_parsed city_parsed stateprovince_parsed postalcode_parsed
address_line1_mc city_mc stateprovince_mc postalcode_mc
md_cdia_fullname_f.dmc
This service template cleanses, enriches and generates match codes for full name data.
FULLNAME givenname_parsed middlename_parsed familyname_parsed namesuffix_parsed middlename_stnd namesuffix_stnd fullname_stnd
middlename_mc
fullname_mc
gender
md_cdia_givenname_f.dmc
This service template cleanses, enriches and generates match codes for given name data.
GIVENNAME
givenname_stnd givenname_mc
md_cdia_number_f.dmc
This service template cleanses, enriches and generates match codes for number-based data like account codes.
NUMBER number_stnd
md_cdia_orgname_f.dmc
This service template cleanses,
ORGNAME country_stnd orgname_mc
148 DataFlux® qMDM Solution

Job/Service Description Filter Standardization/T Match OthName okenization Codes er
enriches and generates match codes for organization name data.
md_cdia_phone_f.dmc
This service template cleanses, enriches and generates match codes for phone number data.
PHONE phone_stnd phone_mc
md_cdia_postalcode_f.dmc
This service template cleanses, enriches and generates match codes for postal code data.
POSTALCODE
postalcode_mc
md_cdia_stateprovince_f.dmc
This service template cleanses, enriches and generates match codes for state/province/county data.
STATEPROVINCE
stateprovince_mc
md_cdia_text_f.dmc
This service template generates match codes for general text data.
TEXT text_mc
UTIL Services These are a collection of services that support maintenance and clean-up of the qMDM database.
Job/Service Name Description
DataFlux® qMDM Solution 149
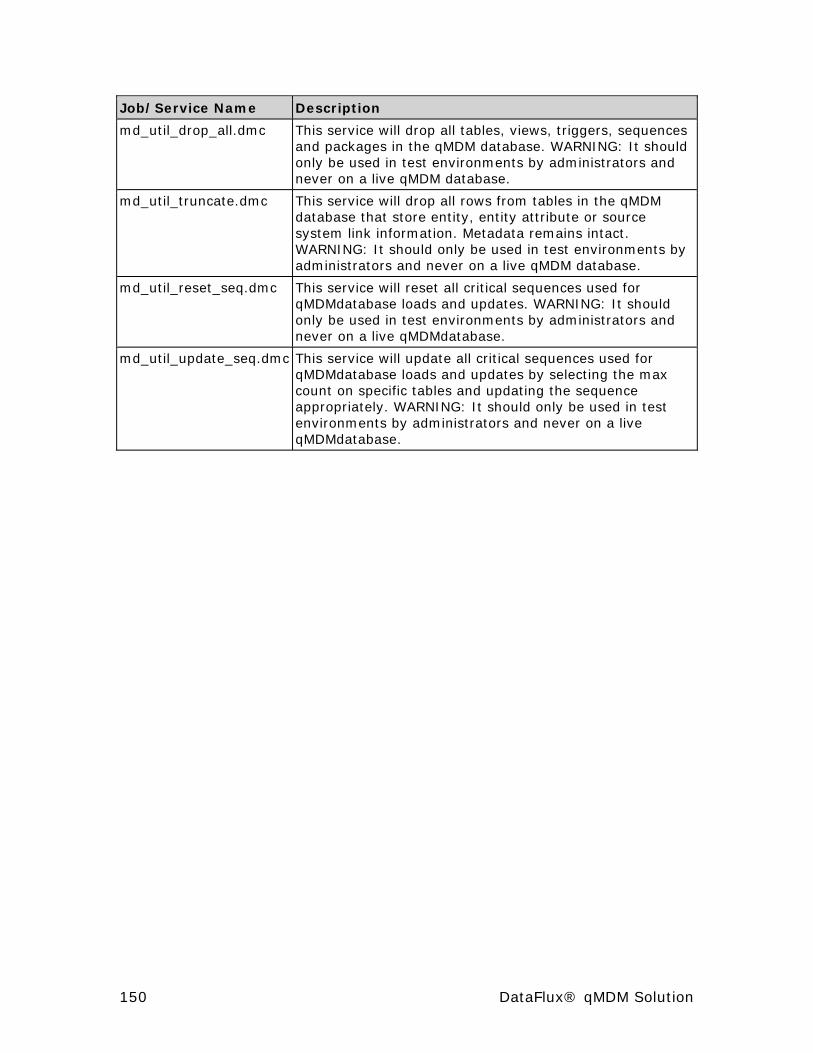
Job/Service Name Description
md_util_drop_all.dmc This service will drop all tables, views, triggers, sequences and packages in the qMDM database. WARNING: It should only be used in test environments by administrators and never on a live qMDM database.
md_util_truncate.dmc This service will drop all rows from tables in the qMDM database that store entity, entity attribute or source system link information. Metadata remains intact. WARNING: It should only be used in test environments by administrators and never on a live qMDM database.
md_util_reset_seq.dmc This service will reset all critical sequences used for qMDMdatabase loads and updates. WARNING: It should only be used in test environments by administrators and never on a live qMDMdatabase.
md_util_update_seq.dmc This service will update all critical sequences used for qMDMdatabase loads and updates by selecting the max count on specific tables and updating the sequence appropriately. WARNING: It should only be used in test environments by administrators and never on a live qMDMdatabase.
150 DataFlux® qMDM Solution
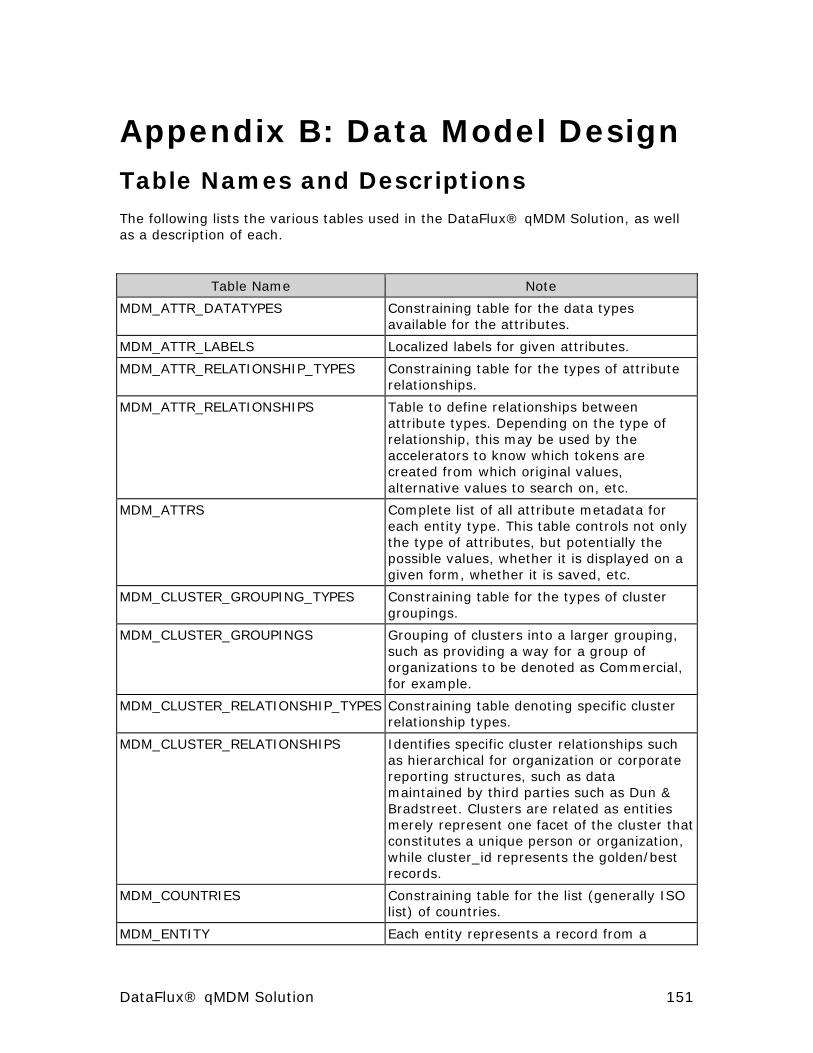
Appendix B: Data Model Design Table Names and Descriptions The following lists the various tables used in the DataFlux® qMDM Solution, as well as a description of each.
Table Name Note
MDM_ATTR_DATATYPES Constraining table for the data types available for the attributes.
MDM_ATTR_LABELS Localized labels for given attributes.
MDM_ATTR_RELATIONSHIP_TYPES Constraining table for the types of attribute relationships.
MDM_ATTR_RELATIONSHIPS Table to define relationships between attribute types. Depending on the type of relationship, this may be used by the accelerators to know which tokens are created from which original values, alternative values to search on, etc.
MDM_ATTRS Complete list of all attribute metadata for each entity type. This table controls not only the type of attributes, but potentially the possible values, whether it is displayed on a given form, whether it is saved, etc.
MDM_CLUSTER_GROUPING_TYPES Constraining table for the types of cluster groupings.
MDM_CLUSTER_GROUPINGS Grouping of clusters into a larger grouping, such as providing a way for a group of organizations to be denoted as Commercial, for example.
MDM_CLUSTER_RELATIONSHIP_TYPES Constraining table denoting specific cluster relationship types.
MDM_CLUSTER_RELATIONSHIPS Identifies specific cluster relationships such as hierarchical for organization or corporate reporting structures, such as data maintained by third parties such as Dun & Bradstreet. Clusters are related as entities merely represent one facet of the cluster that constitutes a unique person or organization, while cluster_id represents the golden/best records.
MDM_COUNTRIES Constraining table for the list (generally ISO list) of countries.
MDM_ENTITY Each entity represents a record from a
DataFlux® qMDM Solution 151
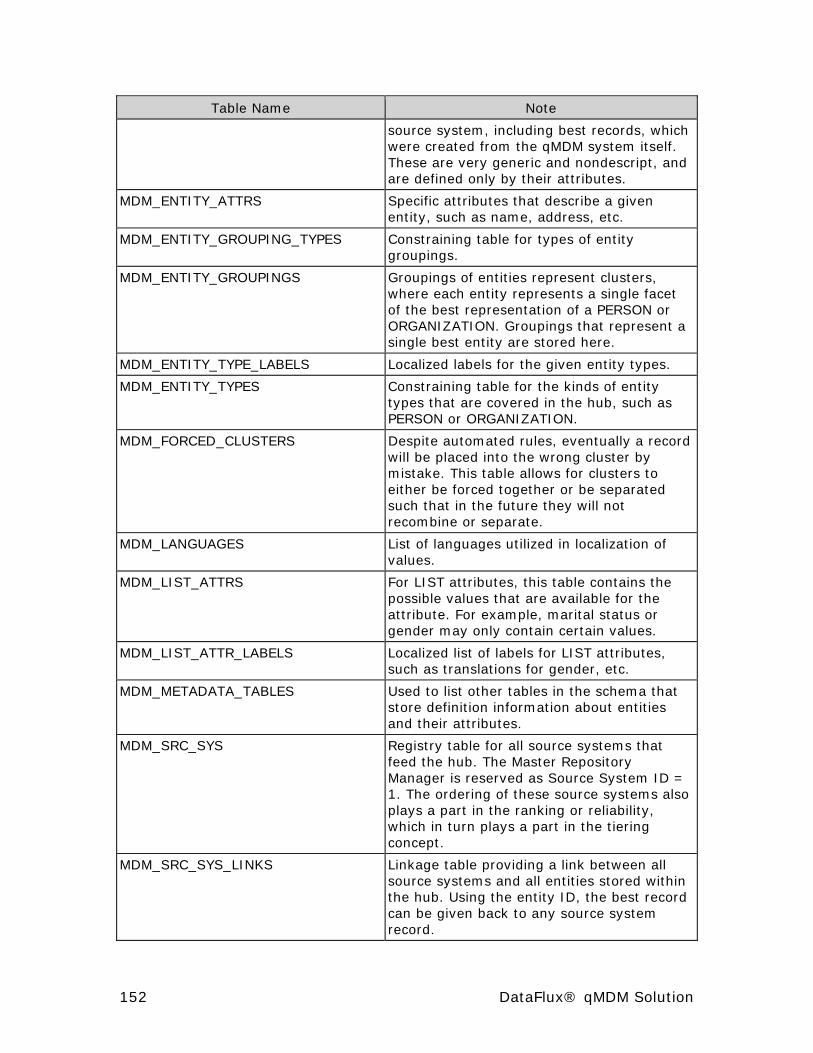
Table Name Note
source system, including best records, which were created from the qMDM system itself. These are very generic and nondescript, and are defined only by their attributes.
MDM_ENTITY_ATTRS Specific attributes that describe a given entity, such as name, address, etc.
MDM_ENTITY_GROUPING_TYPES Constraining table for types of entity groupings.
MDM_ENTITY_GROUPINGS Groupings of entities represent clusters, where each entity represents a single facet of the best representation of a PERSON or ORGANIZATION. Groupings that represent a single best entity are stored here.
MDM_ENTITY_TYPE_LABELS Localized labels for the given entity types.
MDM_ENTITY_TYPES Constraining table for the kinds of entity types that are covered in the hub, such as PERSON or ORGANIZATION.
MDM_FORCED_CLUSTERS Despite automated rules, eventually a record will be placed into the wrong cluster by mistake. This table allows for clusters to either be forced together or be separated such that in the future they will not recombine or separate.
MDM_LANGUAGES List of languages utilized in localization of values.
MDM_LIST_ATTRS For LIST attributes, this table contains the possible values that are available for the attribute. For example, marital status or gender may only contain certain values.
MDM_LIST_ATTR_LABELS Localized list of labels for LIST attributes, such as translations for gender, etc.
MDM_METADATA_TABLES Used to list other tables in the schema that store definition information about entities and their attributes.
MDM_SRC_SYS Registry table for all source systems that feed the hub. The Master Repository Manager is reserved as Source System ID = 1. The ordering of these source systems also plays a part in the ranking or reliability, which in turn plays a part in the tiering concept.
MDM_SRC_SYS_LINKS Linkage table providing a link between all source systems and all entities stored within the hub. Using the entity ID, the best record can be given back to any source system record.
152 DataFlux® qMDM Solution

DataFlux® qMDM Solution 153

154 DataFlux® qMDM Solution
Table Organization


