70
PRACTICAL INNOVATION DataPaq™ User Guide DataPaq™ Version 2.00 Manual Version rev 3

P R A C T I C A L I N N O V A T I O N
DataPaq™ User Guide
DataPaq™ Version 2.00 Manual Version rev 3

DataPaq™ User Guide
All Rights Reserved. Ziath™ and DataPaq™ are registered trademarks of Ziath Ltd. No part of this
publication, in either its printed or electronic format, may be copied, reproduced or transmitted in any form
or by any means, electronic or mechanical, for any purpose involving resale for profit or gain, through any
form of paid membership or subscription service, without the express permission of Ziath Ltd.
DataPaq™ User Guide © Copyright 2008, 2009, 2010, 2011, 2012, 2013 Ziath Ltd.
Revised 17/01/2013
This is Version 2.00 of the DataPaq™ User Guide

DataPaq™ User Guide • Page 3 of 70
Table of Contents
Introduction ............................................................................................................................................ 9
To Connect by Remote Control ...................................................................................................... 9
Installation .............................................................................................................................................. 9
Multi-Rack Scanner Installation (ZTS-A4) ....................................................................................... 9
High Speed Scanner Installation (ZTS-A6) .................................................................................... 10
Deep Focus Scanner Installation (ZTS-AV6 and ZTS-AV62) .......................................................... 10
Linear Rack Barcode Scanner Installation (ZTS-1DR) ................................................................... 11
Linear Rack Barcode Scanner Version 2 Installation (ZTS-1DR2) ................................................. 11
Registration ........................................................................................................................................... 12
Automatic Registration ................................................................................................................ 12
Manual Registration ..................................................................................................................... 12
Trial Version ................................................................................................................................. 14
Configuration ........................................................................................................................................ 15
Add Scanner ................................................................................................................................. 15
Import Rack Configuration ........................................................................................................... 16
Add New Rack Group ................................................................................................................... 17
Calibration .................................................................................................................................... 19
Calibration of Multi-Rack Scanner ................................................................................................ 23
Export to Excel or Text Configuration ................................................................................................... 26
Linear (1D) Barcode Scanner Configuration ......................................................................................... 33
External Linear Scanner ................................................................................................................ 34
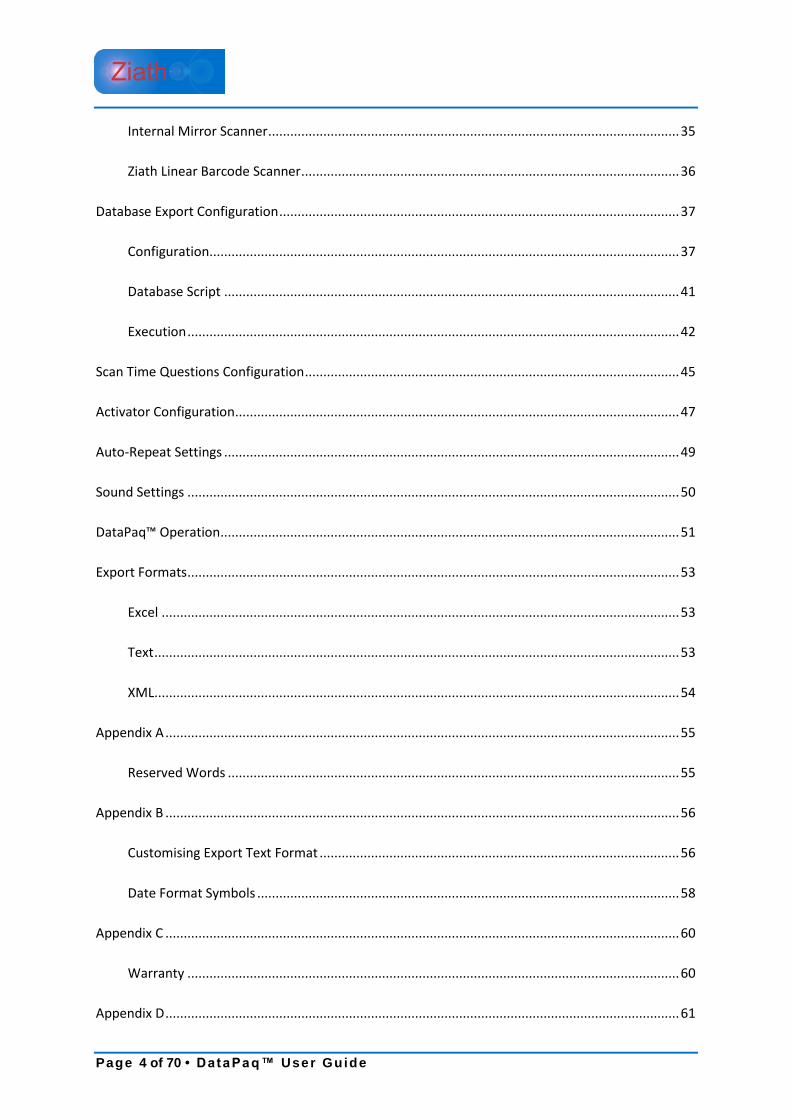
Page 4 of 70 • DataPaq™ User Guide
Internal Mirror Scanner ................................................................................................................ 35
Ziath Linear Barcode Scanner ....................................................................................................... 36
Database Export Configuration ............................................................................................................. 37
Configuration ................................................................................................................................ 37
Database Script ............................................................................................................................ 41
Execution ...................................................................................................................................... 42
Scan Time Questions Configuration ...................................................................................................... 45
Activator Configuration ......................................................................................................................... 47
Auto-Repeat Settings ............................................................................................................................ 49
Sound Settings ...................................................................................................................................... 50
DataPaq™ Operation ............................................................................................................................. 51
Export Formats ...................................................................................................................................... 53
Excel ............................................................................................................................................. 53
Text ............................................................................................................................................... 53
XML ............................................................................................................................................... 54
Appendix A ............................................................................................................................................ 55
Reserved Words ........................................................................................................................... 55
Appendix B ............................................................................................................................................ 56
Customising Export Text Format .................................................................................................. 56
Date Format Symbols ................................................................................................................... 58
Appendix C ............................................................................................................................................ 60
Warranty ...................................................................................................................................... 60
Appendix D ............................................................................................................................................ 61

DataPaq™ User Guide • Page 5 of 70
CE and RoHS Certificates .............................................................................................................. 61

Page 6 of 70 • DataPaq™ User Guide
Table of Figures
Figure 1 : ZTS-1DR, Linear Rack Barcode Reader ................................................................................. 11
Figure 2 : Assembled Linear Rack Barcode Reader ............................................................................. 11
Figure 3 : Linear Rack Barcode Scanner, Version 2, attached to Ziath 2D barcode scanner ............. 11
Figure 4 : Licence Registration Dialogue .............................................................................................. 12
Figure 5 : No Internet Connection Dialogue ........................................................................................ 12
Figure 6 : Manual Licence Registration Diaglogue .............................................................................. 13
Figure 7 : Manual Licence Registration Webpage ............................................................................... 13
Figure 8 : Manual Licence Registration Download .............................................................................. 13
Figure 9 : Add Scanner Configuration .................................................................................................. 15
Figure 10 : Main User Interface, New Scanner .................................................................................... 15
Figure 11 : Add New Scanner Interface ............................................................................................... 15
Figure 12 : Configuration Menu ........................................................................................................... 16
Figure 13: Browse Menu ...................................................................................................................... 16
Figure 14 : Example of Rack group image for an imported rack ......................................................... 16
Figure 15 : Select Rack Type User Interface ........................................................................................ 17
Figure 16 : Rack Group Configuration .................................................................................................. 18
Figure 17 : Rack Group Image .............................................................................................................. 18
Figure 18: Calibrate Rack Group .......................................................................................................... 19
Figure 19: Calibration Instructions ...................................................................................................... 19
Figure 20 : Scan progress ...................................................................................................................... 20
Figure 21 : Successful Calibration ........................................................................................................ 20
Figure 22 : Manual Calibration Dialogue ............................................................................................. 21
Figure 23 : Image of the Rack with a White Overlay ........................................................................... 21
Figure 24 : Overlay corrected ............................................................................................................... 21
Figure 25 : Multi-Rack Scanner added ................................................................................................. 23
Figure 26 : Adding Rack to the Multi-Rack Scanner ............................................................................ 23
Figure 27 : Choosing the mask type for the Multi-Rack Scanner ........................................................ 24
Figure 28 : Choosing the Rack Type for the Multi-Rack Scanner ........................................................ 24
Figure 29 : Rack Group Configuration for Multi-Rack Scanner ........................................................... 25
Figure 30 : Configuration Menu ........................................................................................................... 26
Figure 31 : File Export Configuration Dialogue .................................................................................... 26
Figure 32 : Excel Export Template ........................................................................................................ 28

DataPaq™ User Guide • Page 7 of 70
Figure 33 : Text Export Template ......................................................................................................... 31
Figure 34 : Test Scan Time Export - Results ......................................................................................... 31
Figure 35 : Test Scan Time Export –showing error in format .............................................................. 32
Figure 36 : Test Scan Time Export – Results showing error in format ................................................ 32
Figure 37 : Menu Configuration Selection ........................................................................................... 33
Figure 38 : Configuration window ....................................................................................................... 33
Figure 39 : Barcode Scanner Icon ......................................................................................................... 33
Figure 40 : Configure Barcode Dialogue .............................................................................................. 34
Figure 41 : External Linear Barcode Scanner Options ......................................................................... 34
Figure 42 : Internal Mirror Scanner ..................................................................................................... 35
Figure 43 : Ziath Linear Barcode Scanner Options .............................................................................. 36
Figure 44 : Select Option Menu ........................................................................................................... 37
Figure 45 : Configuration Front Page ................................................................................................... 37
Figure 46 : Database Configuration Front Page................................................................................... 38
Figure 47 : Database Connection Configuration ................................................................................. 38
Figure 48 : Successful Connection Dialogue [1] ................................................................................... 40
Figure 49 : Successful Connection Dialogue [2] ................................................................................... 40
Figure 50 : Option Menu Selection ...................................................................................................... 41
Figure 51 : Configuration Front Page ................................................................................................... 41
Figure 52 : Database Connection Script Editor .................................................................................... 41
Figure 53 : Script Preview .................................................................................................................... 43
Figure 54 : Select Options Menu .......................................................................................................... 45
Figure 55 : Configure Dialogue ............................................................................................................. 45
Figure 56 : Scan Time Questions Dialogue .......................................................................................... 46
Figure 57 : Accessing Options from the Configure menu .................................................................... 47
Figure 58 : Configure Dialogue ............................................................................................................. 47
Figure 59: Activator Options Configuration ........................................................................................ 48
Figure 60 : Configure Menu .................................................................................................................. 49
Figure 61 : Front page of Options Menu .............................................................................................. 49
Figure 62 : Other Settings Configuration ............................................................................................. 50
Figure 63 : Sound Configuration in "Other Settings" .......................................................................... 50
Figure 64 : Main Operation Dialogue .................................................................................................. 51
Figure 65 : Scan Time Questions Dialogue .......................................................................................... 51

Page 8 of 70 • DataPaq™ User Guide
Figure 66 : Cancel Dialogue .................................................................................................................. 52
Figure 67 : Result Window ................................................................................................................... 52
Figure 68 : Results window showing Scan Time Questions ................................................................ 52
Figure 69 : Example Excel Output ........................................................................................................ 53
Figure 70 : Example Text Output ......................................................................................................... 54

DataPaq™ User Guide • Page 9 of 70
Introduction
The following is a brief set of instructions on installing and configuring your DataPaq™ application.
To Connect by Remote Control
Please refer to the manual: DataPaq™ Remote Control User Manual. This can be found on the
supplied disk, or downloaded from www.ziath.com
Installation
Successful set up of the scanner requires the installation of
(a) A driver program to run the scanner device and
(b) The DataPaq™ scanning software program.
These programs are provided on the installation disk; alternatively, the most current versions can be
downloaded from the Ziath website.
Installation instructions are below. Download and install the appropriate driver before connecting
the scanner and installing the DataPaq™ software. (If Windows Vista is the operating system, the
installer will request permission to install onto the computer. Ensure access is granted to allow
DataPaq™ to install.)
BEFORE INSTALLING DATAPAQ™ ENSURE THE TRANSPORT LOCK ON
THE SCANNER IS IN THE UNLOCKED POSITION
Multi-Rack Scanner Installation (ZTS-A4)
1. Install the driver: The driver for this is on the installation disk provided with the scanner;
alternatively, to ensure the most current version is being used, download it from:
http://www.ziath.com/ziath_downloads/sd68-win-9000f-16_0_3-ej.exe.
2. If the scanner is an older model (power button is at the back, top right) the driver required is as
follows:
a. for a 32 bit windows PC:
http://www.ziath.com/ziath_downloads/8800fvst1300ej.exe

Page 10 of 70 • DataPaq™ User Guide
b. for a 64 bit machine windows PC:
http://www.ziath.com/ziath_downloads/8800fwin641305ea24.exe.
3. Release the transport lock on the scanner (top of the scanner in the top right position).
4. Connect the scanner to the computer and switch on using the button at the back by the power
and USB ports.
5. Install DataPaq™.
High Speed Scanner Installation (ZTS-A6)
1. Install the driver: the driver for this is on the installation disk in the folder Fujitsu Driver Installer;
alternatively, to ensure the most current version is being used, download it from:
http://www.ziath.com/ziath_downloads/fujitsu_driver_installer.zip
Extract the zip file. Before plugging the scanner in or installing DataPaq™ install the driver from
either of these two sources. Double click setup.exe to initiate the setup program and follow the
on-screen instructions.
2. Release the transport lock (at the back of the scanner next to the power and USB ports)
3. Connect the scanner to the computer and install DataPaq™
Deep Focus Scanner Installation (ZTS-AV6 and ZTS-AV62)
1. Install the driver: The driver for this will be on the installation disk in the folder AVA6 Driver
Installer. Alternatively, to ensure the most current version is being used, download it from:
http://www.ziath.com/ziath_downloads/ava6_driver_installer.zip
Extract the zip file. Before plugging the scanner in or installing DataPaq™, install the driver from
either of these two sources. Double click setup.exe to initiate the setup program and follow the
on-screen instructions.
2. Release the transport lock (underneath the scanner)
3. Connect the scanner to the computer and install DataPaq™

DataPaq™ User Guide • Page 11 of 70
Linear Rack Barcode Scanner Installation (ZTS-1DR)
Figure 1 : ZTS-1DR, Linear Rack Barcode Reader
Install the driver before assembly and before connecting to the computer.
To install the driver:
a. For a 32-bit Windows PC go to:
http://www.ziath.com/ziath_downloads/optousb32.exe
b. For a 64-bit Windows PC go to:
http://www.ziath.com/ziath_downloads/optousb64.exe
Assemble the scanner components together to produce the system below:
Figure 2 : Assembled Linear Rack Barcode Reader
For more detailed instructions further instructions are available at
http://www.ziath.com/ziath_downloads/zts_1dr_assembly.pdf
NOTE THAT THIS DEVICE CONTAINS A CLASS 2 LASER; DO NOT LOOK DIRECTLY INTO THE LASER.
Linear Rack Barcode Scanner Version 2 Installation (ZTS-1DR2)
Figure 3 : Linear Rack Barcode Scanner, Version 2, attached to Ziath 2D barcode scanner
The appropriate bracket for the scanner needs to be attached to the scanner. This has a strong
magnet to accurately locate the linear scanner.
This does not need a driver; simply attach the scanner to a USB port.

Page 12 of 70 • DataPaq™ User Guide
Registration
Automatic Registration
The first time the software is run, it will prompt for a licence key with the following user interface:
Figure 4 : Licence Registration Dialogue
Ensure that the computer is connected to the internet and enter the licence key enclosed with the
scanner. Click Activate software now and DataPaq™ will attempt to register the installation. If
DataPaq™ cannot connect to the licence server (perhaps due to a local security restriction on your
system, for example) it will prompt for manual registration.
Manual Registration
If the following window appears, there is a problem registering the licence automatically, this is
usually caused by security software on the computer.
Figure 5 : No Internet Connection Dialogue
DataPaq™ User Guide • Page 13 of 70
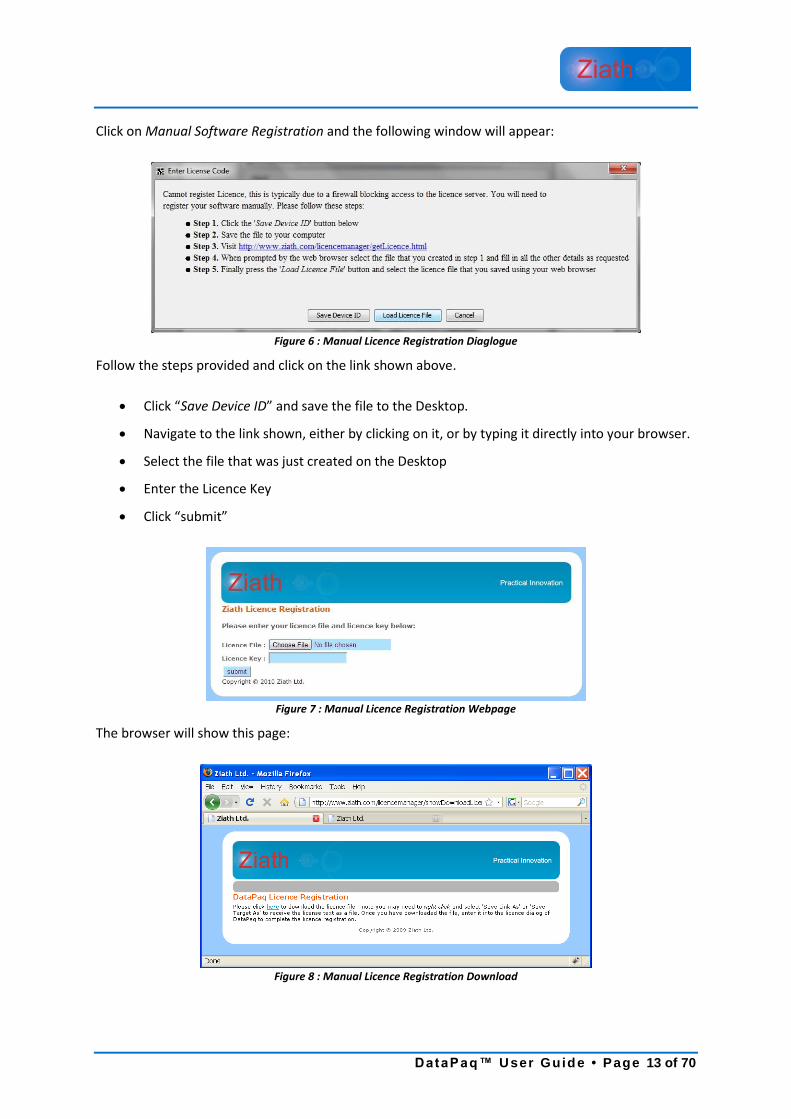
Click on Manual Software Registration and the following window will appear:
Figure 6 : Manual Licence Registration Diaglogue
Follow the steps provided and click on the link shown above.
Click “Save Device ID” and save the file to the Desktop.
Navigate to the link shown, either by clicking on it, or by typing it directly into your browser.
Select the file that was just created on the Desktop
Enter the Licence Key
Click “submit”
Figure 7 : Manual Licence Registration Webpage
The browser will show this page:
Figure 8 : Manual Licence Registration Download

Page 14 of 70 • DataPaq™ User Guide
Download the licence file by right clicking on the “here” link
Select Save Link As (Firefox and Chrome) or Save Target As (Internet Explorer)
Save the file to the Desktop
Return to the DataPaq user interface
Select Load Licence File
Load the downloaded file (from the last step)
DataPaq™ will register the installation.
If you do not have a licence key or experience problems with this step, contact [email protected].
Trial Version
To use the software as a “Trial Version”, click Trial on the Licence Registration Dialogue – this will
allow DataPaq™ to be used without requiring a licence. Note that 10% of the read barcodes will be
obscured with the text ‘TRIAL’.
DataPaq™ User Guide • Page 15 of 70
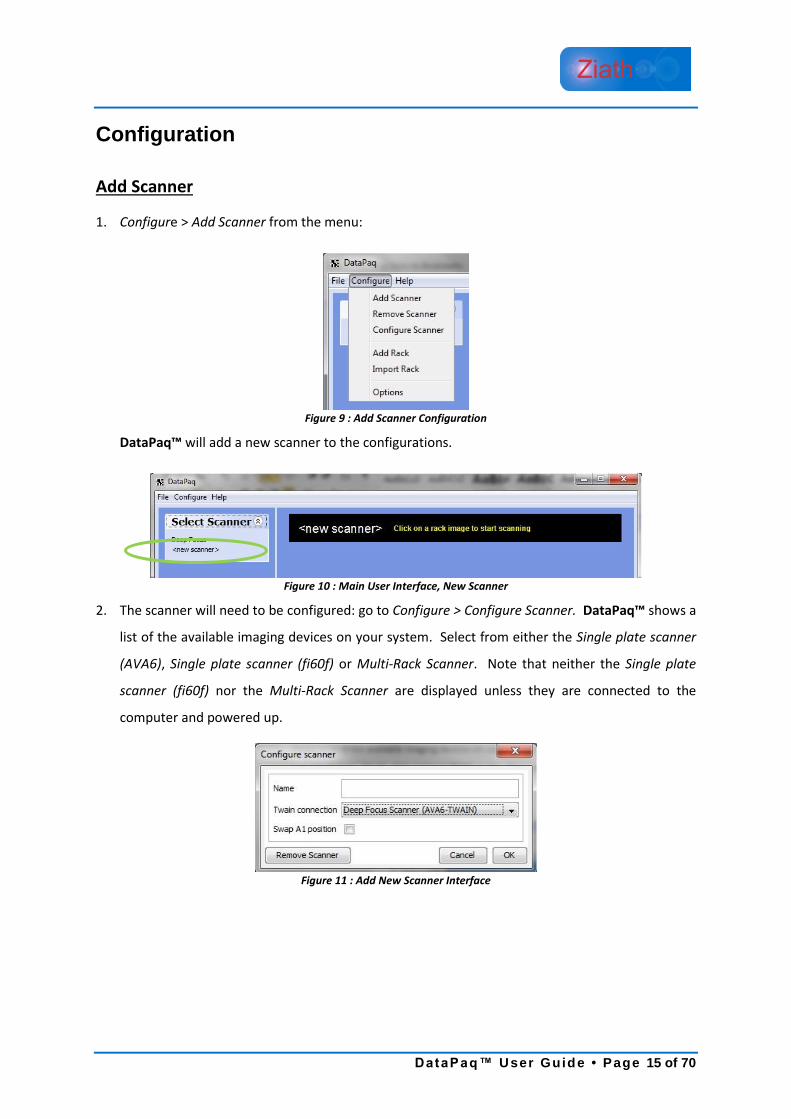
Configuration
Add Scanner
1. Configure > Add Scanner from the menu:
Figure 9 : Add Scanner Configuration
DataPaq™ will add a new scanner to the configurations.
Figure 10 : Main User Interface, New Scanner
2. The scanner will need to be configured: go to Configure > Configure Scanner. DataPaq™ shows a
list of the available imaging devices on your system. Select from either the Single plate scanner
(AVA6), Single plate scanner (fi60f) or Multi-Rack Scanner. Note that neither the Single plate
scanner (fi60f) nor the Multi-Rack Scanner are displayed unless they are connected to the
computer and powered up.
Figure 11 : Add New Scanner Interface

Page 16 of 70 • DataPaq™ User Guide
Import Rack Configuration
If there is a pre-configured import file for a rack group select Configure > Import Rack from the
menu. This also configures the scanner:
Figure 12 : Configuration Menu
Browse to the rack group XML file:
Figure 13: Browse Menu
Click Open and the rack group is added. The rack and the scanner are pre-calibrated:
Figure 14 : Example of Rack group image for an imported rack

DataPaq™ User Guide • Page 17 of 70
Add New Rack Group
A rack group sets the template and configuration of the particular rack types to be scanned E.g.
Standard SBS with 96 tube positions, SBS layout with 48 2ml tube positions etc.
1. To add a rack group, select Configure > Add Rack from the menu. From the list select the
appropriate rack group; (the rack orientation is automatically set for the type of scanner chosen
in “New Scanner Calibration”, above). Here we have selected the 96 vial SBS rack, as shown in
the top-middle of the following figure:
Figure 15 : Select Rack Type User Interface
2. A prompt appears to configure the scanner bed (Refer to Figure 12):
a. Enter a name for the rack group and the number of racks of this type the scanner can
hold at once. Here we will enter 96 SBS Rack for the name and select 1 rack.
b. The unique ID is used for remote interaction. If this feature is being used, select an ID to
use for the remote interface – ensure the system integrator and/or automation scientist
knows what this ID is.
c. One of “Old style REMP tubes” or “All other tube types” must be selected. This is needed
as REMP racks need to be scanned in colour whereas the other rack types are scanned in
black and white.
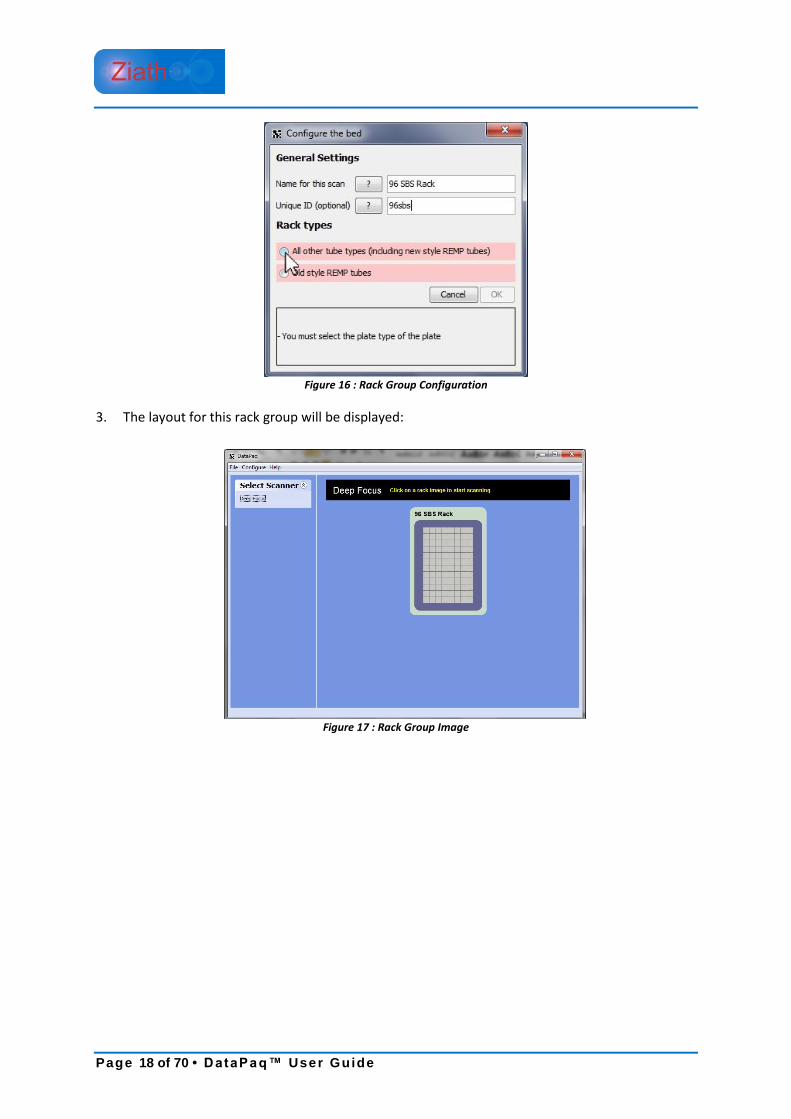
Page 18 of 70 • DataPaq™ User Guide
Figure 16 : Rack Group Configuration
3. The layout for this rack group will be displayed:
Figure 17 : Rack Group Image

DataPaq™ User Guide • Page 19 of 70
Calibration
On first use the scanner needs to be calibrated to detect the rack and the locations of the tubes in
the rack. This only needs to be done once for that rack group.
Automatic Calibration:
1. The first time a rack is scanned, DataPaq™ will calibrate the rack group. To do this either click
the rack image (the first time after creation) or right click the rack and select Calibrate Rack
Group.
Figure 18: Calibrate Rack Group
2. As prompted, place a full rack on the scanner:
Figure 19: Calibration Instructions
Page 20 of 70 • DataPaq™ User Guide
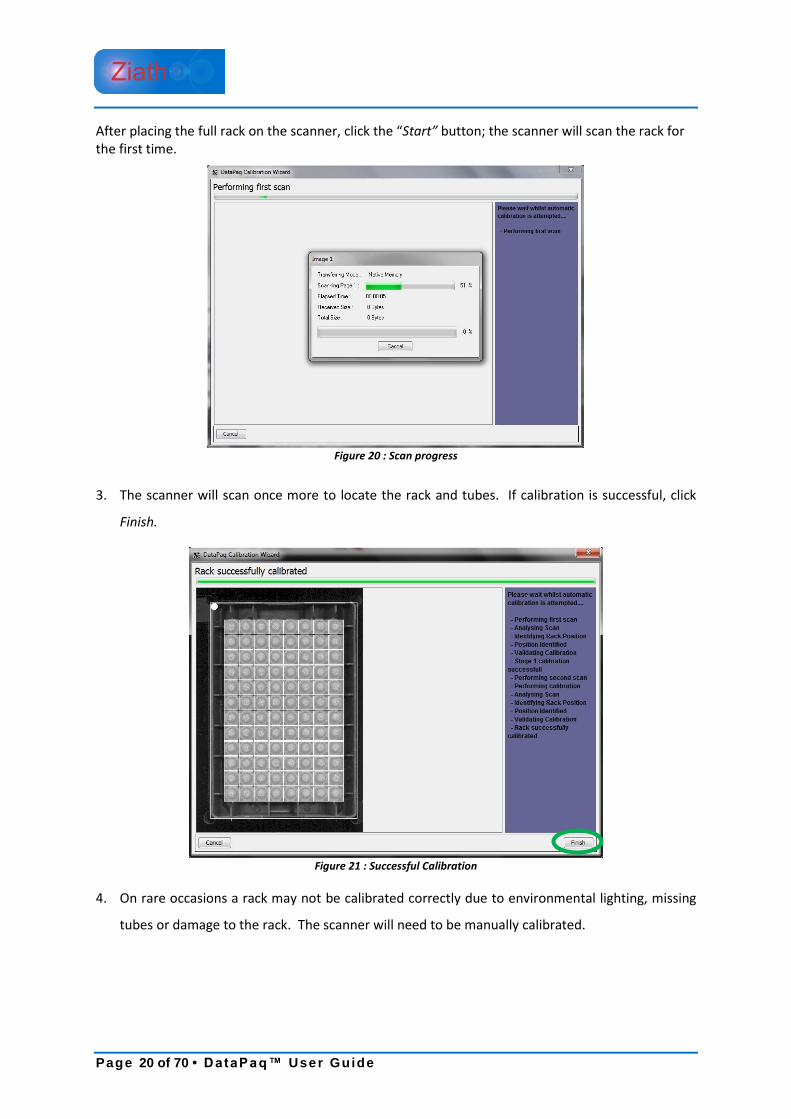
After placing the full rack on the scanner, click the “Start” button; the scanner will scan the rack for the first time.
Figure 20 : Scan progress
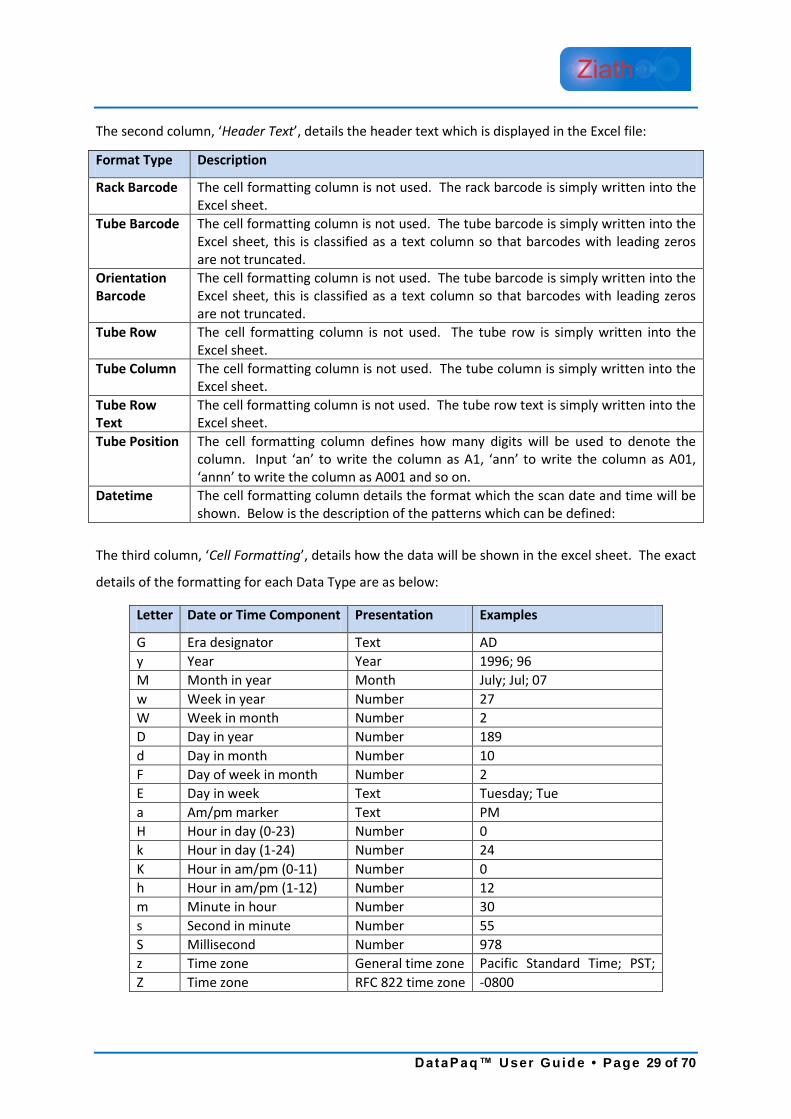
3. The scanner will scan once more to locate the rack and tubes. If calibration is successful, click
Finish.
Figure 21 : Successful Calibration
4. On rare occasions a rack may not be calibrated correctly due to environmental lighting, missing
tubes or damage to the rack. The scanner will need to be manually calibrated.

DataPaq™ User Guide • Page 21 of 70
Manual Calibration
1. If the automated calibration has not detected the rack, click Yes! Manually Calibrate on the
following screen:
Figure 22 : Manual Calibration Dialogue
2. A prompt will appear to start Calibration again. Click Start to begin.
3. The scanner will scan to locate the rack. The image of the rack will be shown, with a white
overlay to show where the software thinks the rack is placed:
Figure 23 : Image of the Rack with a White Overlay
4. Move the cursor over the white overlay and drag to the right, so it is overlaid over the rack.
Figure 24 : Overlay corrected

Page 22 of 70 • DataPaq™ User Guide
5. After this click Next, and the scanner will scan the rack again. It will again show the rack image
and the white overlay, reposition the white overlay. This process is teaching the software where
the tube positions are and creating the correct offset. Do not be alarmed when, on the second
scan, the white overlay is not positioned directly over the tubes this is deliberate.
6. Click Finish. The manual calibration is now complete.

DataPaq™ User Guide • Page 23 of 70
Calibration of Multi-Rack Scanner
Due to the many varied ways in which a Multi-Rack scanner can be calibrated, the setup for this is
different than for the single rack scanners. The method to add the scanner is the same as for the
single-rack scanners (Configure > Add Scanner). Once this is done, the screen will now showing the
following:
Figure 25 : Multi-Rack Scanner added
1. To add the type of racks that are being used, click on Configure > Add Rack:
Figure 26 : Adding Rack to the Multi-Rack Scanner
2. A prompt appears to choose the mask that is being used on the scanner. From the drop-
down menu, choose the configuration of racks. There is also a diagrammatical
representation below the drop-down menu.

Page 24 of 70 • DataPaq™ User Guide
Figure 27 : Choosing the mask type for the Multi-Rack Scanner
3. Click on Choose rack types in the lower right corner of the window.
4. Choose the rack types to be placed in each location. Please note that only racks which ‘fit’
into the location are displayed for the location.
Figure 28 : Choosing the Rack Type for the Multi-Rack Scanner
5. Click Next.
6. Configure the racks
a. Enter a name for the rack group.
b. The unique ID is used for remote interaction. If this feature is being used, select an
ID to use for the remote interface – ensure the system integrator and/or automation
scientist knows what this ID is.

DataPaq™ User Guide • Page 25 of 70
c. One of “Old style REMP tubes” or “All other tube types” must be selected. This is
needed as REMP racks need to be scanned in colour, whereas the other rack types
are scanned in black and white.
Figure 29 : Rack Group Configuration for Multi-Rack Scanner
7. Click Finish
The scanner is now ready to be used.
Please note, the Multi-Rack scanner does not need to be separately configured (the Single Rack
Scanner does need separate configuration). The above instructions include all the configuration the
scanner requires.

Page 26 of 70 • DataPaq™ User Guide
Export to Excel or Text Configuration
To access the Export Configuration Options, go to Configure > Options from the top menu:
Figure 30 : Configuration Menu
The following dialogue is shown:
Figure 31 : File Export Configuration Dialogue
On this dialogue there are three tabbed sections.
File Details: The first tab, entitled ‘File Details’, has a few options for the file details:
Default File Pattern – this is the default file name which will appear in the Save as file
chooser or will be saved automatically if automatic export is selected (see below). Note the
substitution for the special elements as follows:
o <date> – places the date in the file name
o <time> – places the time in the file name

DataPaq™ User Guide • Page 27 of 70
o <n> – places the rack number (or ALL if all racks are exported) in the filename
o <barcode>–- places the barcode in the filename (if all racks are exported the
barcodes are separated with an underscore) text
An automatic extension is shown beneath as the text is entered. In addition, be aware this
pattern excludes the extension for the file name if exporting a text file; for an Excel file the
extension .xls will be added if one is not already present.
Default Save Dir – this is the default save directory which will be used in the Save as file
chooser or will be saved automatically if automatic export is selected (see below).
Append Data – if the file to be saved to already exists, data will be appended to the file
instead of being overwritten and/or a dialogue warning of being overwritten is displayed. If
the export is text, the data will be written at the end of the file and if the export is Excel, a
new Excel sheet will be written. Note that this is ignored if export type is XML as it is not
possible to append to an XML file.
Automatic Export – if this is selected after scanning, the resulting data from the scan will
automatically be saved using the options in this dialogue. There are two choices for the
export; either to write the data if there are no read errors detected (only empty of
confirmed reads are detected) or to always write the data regardless of the results in the
read.
Export Type – if automatic export is selected, this determines the format which will be
automatically exported. The options are Text, Excel and XML.
Split Racks – if selected, each decoded rack will be saved in a separate file – this is only of
use for the Multirack scanner which has more than one rack scanned at the same time.

Page 28 of 70 • DataPaq™ User Guide
The second tab entitled ‘Excel File Format’ allows the editing of the Excel file format columns. The
dialogue shown below allows this function.
Figure 32 : Excel Export Template
The details of the user interface are as follows:
Excel File Format
Each line represents a column in the export file. The first line represents the first column in the
Excel sheet, the second line as the second column and so on. There are a limited number of
parameters shown. Should further “Data Types” wish to be entered, click on “Add Column” and
then click on the new cell in “Data Type” and choose the type from the drop-down box.
The first column, ‘Data Type’, details the information that is to be exported:
Data Type Description
Rack Barcode barcode of the rack which has been read
Tube Barcode barcode of the tube which has been read
Orientation Barcode barcode on the underside of the rack
Tube Position location of the tube, note that this has a dependent formatting string
Tube Column column of the tube
Tube Row row of the tube
Tube Row Text row of the tube as text, starting from A
Date date of the scan, note that this has a dependent formatting string
Time time of the scan, note that this has a dependent formatting string
Datetime time and date of the scan, note that this has a dependent formatting string
DataPaq™ User Guide • Page 29 of 70
The second column, ‘Header Text’, details the header text which is displayed in the Excel file:
The third column, ‘Cell Formatting’, details how the data will be shown in the excel sheet. The exact
details of the formatting for each Data Type are as below:
Letter Date or Time Component Presentation Examples
G Era designator Text AD
y Year Year 1996; 96
M Month in year Month July; Jul; 07
w Week in year Number 27
W Week in month Number 2
D Day in year Number 189
d Day in month Number 10
F Day of week in month Number 2
E Day in week Text Tuesday; Tue
a Am/pm marker Text PM
H Hour in day (0-23) Number 0
k Hour in day (1-24) Number 24
K Hour in am/pm (0-11) Number 0
h Hour in am/pm (1-12) Number 12
m Minute in hour Number 30
s Second in minute Number 55
S Millisecond Number 978
z Time zone General time zone Pacific Standard Time; PST;
GMT-08:00 Z Time zone RFC 822 time zone -0800
Format Type Description
Rack Barcode The cell formatting column is not used. The rack barcode is simply written into the Excel sheet.
Tube Barcode The cell formatting column is not used. The tube barcode is simply written into the Excel sheet, this is classified as a text column so that barcodes with leading zeros are not truncated.
Orientation Barcode
The cell formatting column is not used. The tube barcode is simply written into the Excel sheet, this is classified as a text column so that barcodes with leading zeros are not truncated.
Tube Row The cell formatting column is not used. The tube row is simply written into the Excel sheet.
Tube Column The cell formatting column is not used. The tube column is simply written into the Excel sheet.
Tube Row Text
The cell formatting column is not used. The tube row text is simply written into the Excel sheet.
Tube Position The cell formatting column defines how many digits will be used to denote the column. Input ‘an’ to write the column as A1, ‘ann’ to write the column as A01, ‘annn’ to write the column as A001 and so on.
Datetime The cell formatting column details the format which the scan date and time will be shown. Below is the description of the patterns which can be defined:
Page 30 of 70 • DataPaq™ User Guide
Some examples are detailed below:
Date – presents the scan date, all formatting characters which refer to the
time are not allowed in the formatting string.
Time – presents the scan date, all formatting characters which refer to the
date are not allowed in the formatting string.
o No Error – Should there be a problem with the cell formatting string while editing,
this will explain the problem
o Write Header – If this is selected the column header will be written into the Excel
sheet which is the name of the data type being written
o Add Column – This will add an extra column to the export template for the specified
data
o Remove Column – This will remove the selected row from the export template
o Up Arrow – This will move the selected row up the table
o Down Arrow – This will the selected row down the table
Text File Format
The third tab is labelled ‘Text File format’; using this tab the export can be configured. The format is
written in a system called a mark-up language; this is explained in greater detail in Appendix B. The
export can be prepared for both scan results and scan time questions. The fields shown below can
be typed in:
Date and Time Pattern Result
yyyy.MM.dd G 'at' HH:mm:ss z 2001.07.04 AD at 12:08:56 PDT
EEE, MMM d, ''yy" Wed, Jul 4, '01
h:mm a 12:08 PM
hh 'o''clock' a, zzzz 12 o'clock PM, Pacific Daylight Time
K:mm a, z 0:08 PM, PDT
yyyyy.MMMMM.dd GGG hh:mm aaa 02001.July.04 AD 12:08 PM
EEE, d MMM yyyy HH:mm:ss Z Wed, 4 Jul 2001 12:08:56 -0700
yyMMddHHmmssZ 010704120856-0700
yyyy-MM-dd'T'HH:mm:ss.SSSZ 2001-07-04T12:08:56.235-0700
DataPaq™ User Guide • Page 31 of 70
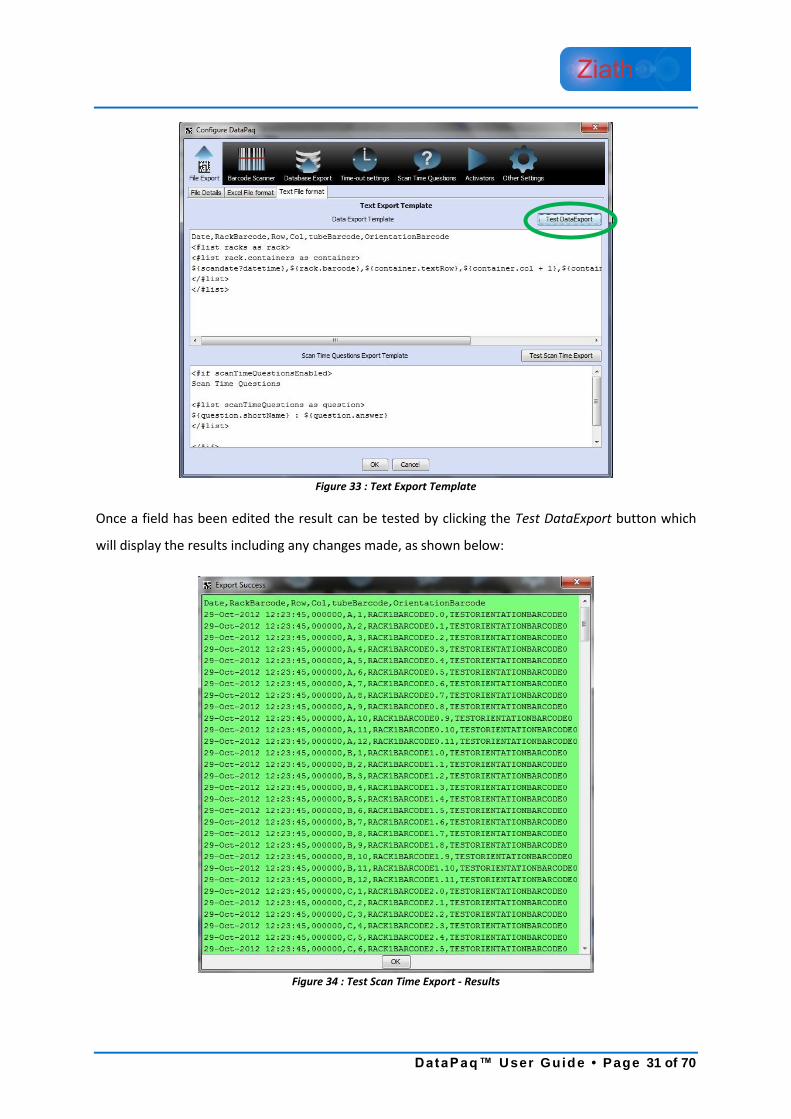
Figure 33 : Text Export Template
Once a field has been edited the result can be tested by clicking the Test DataExport button which
will display the results including any changes made, as shown below:
Figure 34 : Test Scan Time Export - Results
Page 32 of 70 • DataPaq™ User Guide
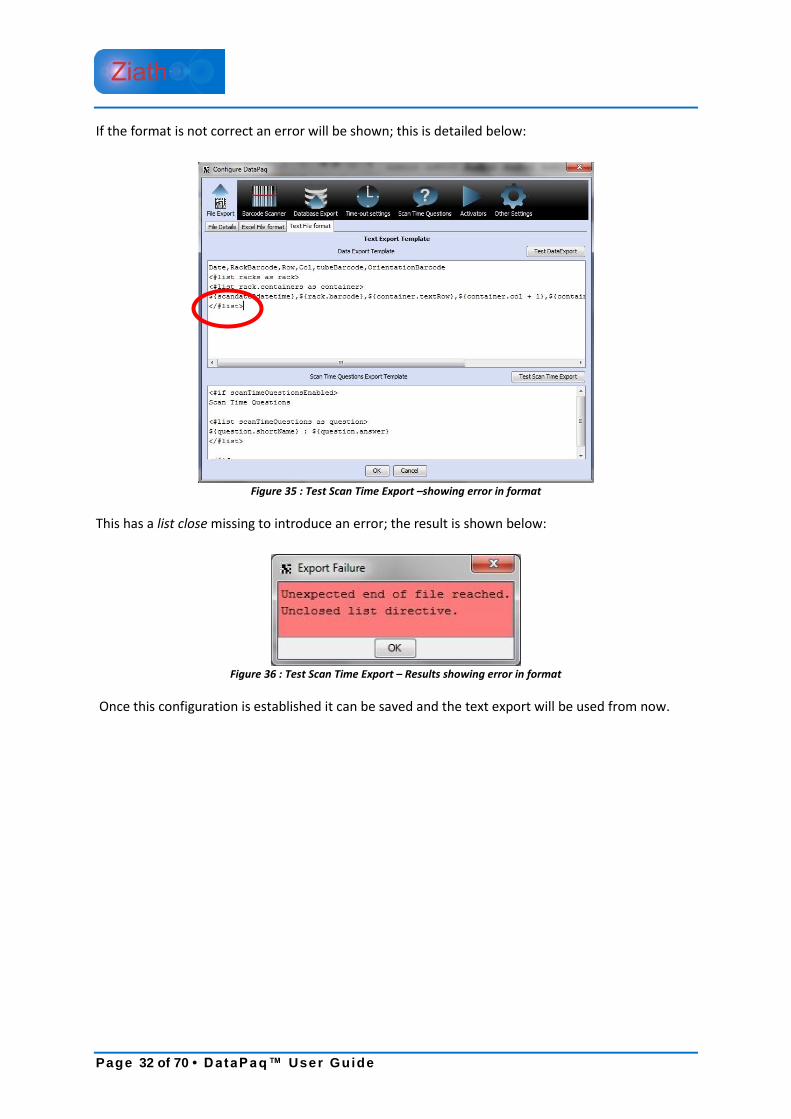
If the format is not correct an error will be shown; this is detailed below:
Figure 35 : Test Scan Time Export –showing error in format
This has a list close missing to introduce an error; the result is shown below:
Figure 36 : Test Scan Time Export – Results showing error in format
Once this configuration is established it can be saved and the text export will be used from now.
DataPaq™ User Guide • Page 33 of 70
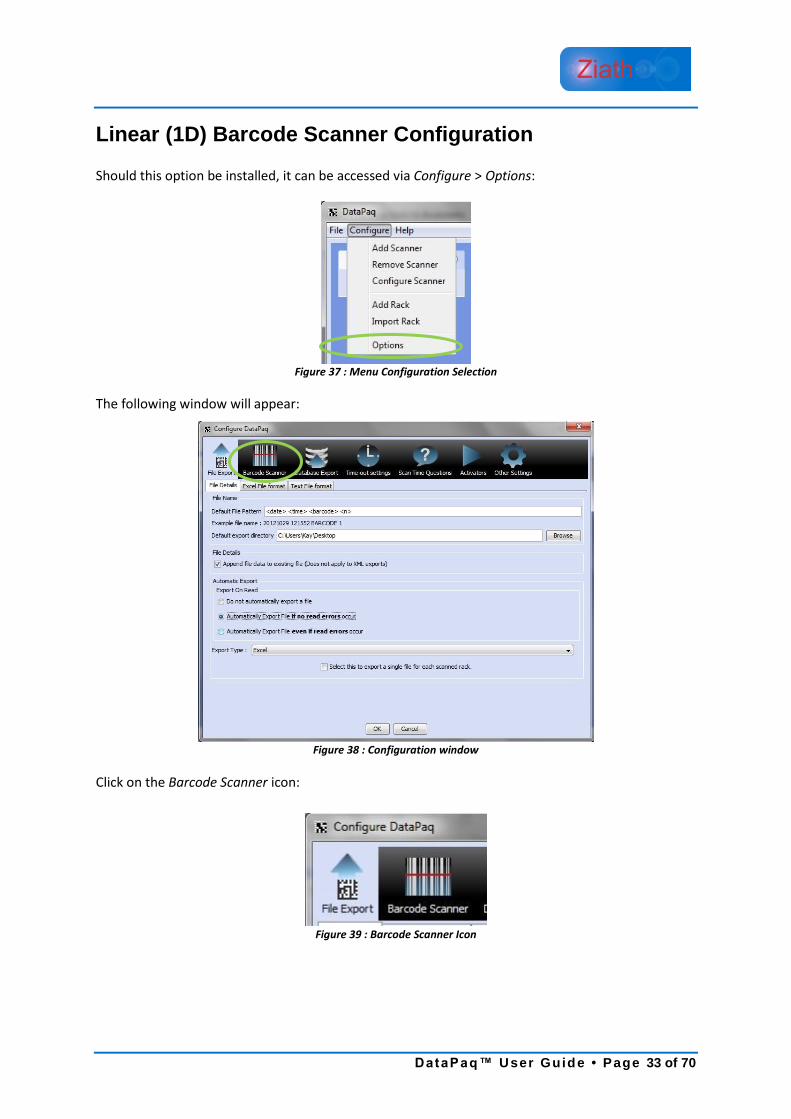
Linear (1D) Barcode Scanner Configuration
Should this option be installed, it can be accessed via Configure > Options:
Figure 37 : Menu Configuration Selection
The following window will appear:
Figure 38 : Configuration window
Click on the Barcode Scanner icon:
Figure 39 : Barcode Scanner Icon

Page 34 of 70 • DataPaq™ User Guide
The following configuration options are shown:
Figure 40 : Configure Barcode Dialogue
Three types of linear barcode scanner can be configured.
External Linear Scanner
This is an external laser based scanner; selecting this option brings up the following dialogue:
Figure 41 : External Linear Barcode Scanner Options
Plug in the Linear scanner to a USB port. It should be automatically detected once it has loaded onto
the PC – usually indicated by a beep.
DataPaq™ User Guide • Page 35 of 70
Test – This will trigger the barcode scanner. Before testing, place a barcoded rack on
the scanner and click the button. If the scanner successfully reads the barcode the
text will be green; the text will be red if it cannot talk to the scanner or the scanner
cannot read a barcode.
If the scanner does not automatically load, check the options below:
Select Com Port – This is needed to determine the ‘address’ the software needs to use to
talk to the barcode scanner. If this is not known, it can be determined by plugging the
scanner in and out of the machine and inspecting the ports (to refresh the ports just close
and open the window). If there are no ports available, the text ‘No COM ports detected’ will
be shown.
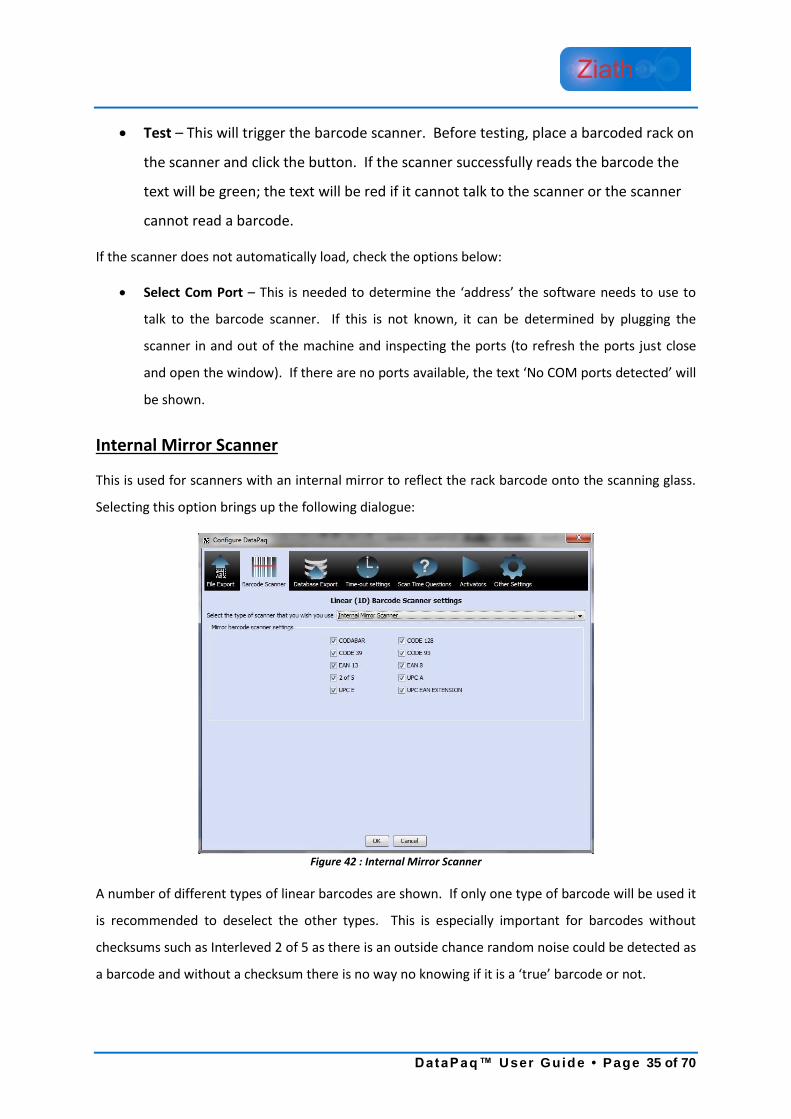
Internal Mirror Scanner
This is used for scanners with an internal mirror to reflect the rack barcode onto the scanning glass.
Selecting this option brings up the following dialogue:
Figure 42 : Internal Mirror Scanner
A number of different types of linear barcodes are shown. If only one type of barcode will be used it
is recommended to deselect the other types. This is especially important for barcodes without
checksums such as Interleved 2 of 5 as there is an outside chance random noise could be detected as
a barcode and without a checksum there is no way no knowing if it is a ‘true’ barcode or not.

Page 36 of 70 • DataPaq™ User Guide
Ziath Linear Barcode Scanner
This is a camera based scanner; selecting this option brings up the following dialogue:
Figure 43 : Ziath Linear Barcode Scanner Options
A number of different types of linear barcodes are shown. If only one type of barcode will be used it
is recommended to deselect the other types. This is especially important for barcodes without
checksums such as Interleaved 2 of 5 as there is an outside chance random noise could be detected
as a barcode and without a checksum there is no way no knowing if it is a ‘true’ barcode or not.

DataPaq™ User Guide • Page 37 of 70
Database Export Configuration
The database interaction feature allows for the results of a read to be inputted directly to a
database. The results will be sent to the database system as long as no tubes fail to read.
Configuration
A database connection can be setup either directly to the most common database systems (Oracle,
Postgres, MySQL, SQL Server), by an ODBC connection configured on the computer running
DataPaq™ or a compatible driver can be uploaded to communicate with another database system
(e.g. Derby, SQLite). To access the configuration, go to Configure > Options as shown:
Figure 44 : Select Option Menu
After clicking this, the following window will appear:
Figure 45 : Configuration Front Page
To access the database configuration, click on the Database Export icon and the following window
will appear:
Page 38 of 70 • DataPaq™ User Guide
Figure 46 : Database Configuration Front Page
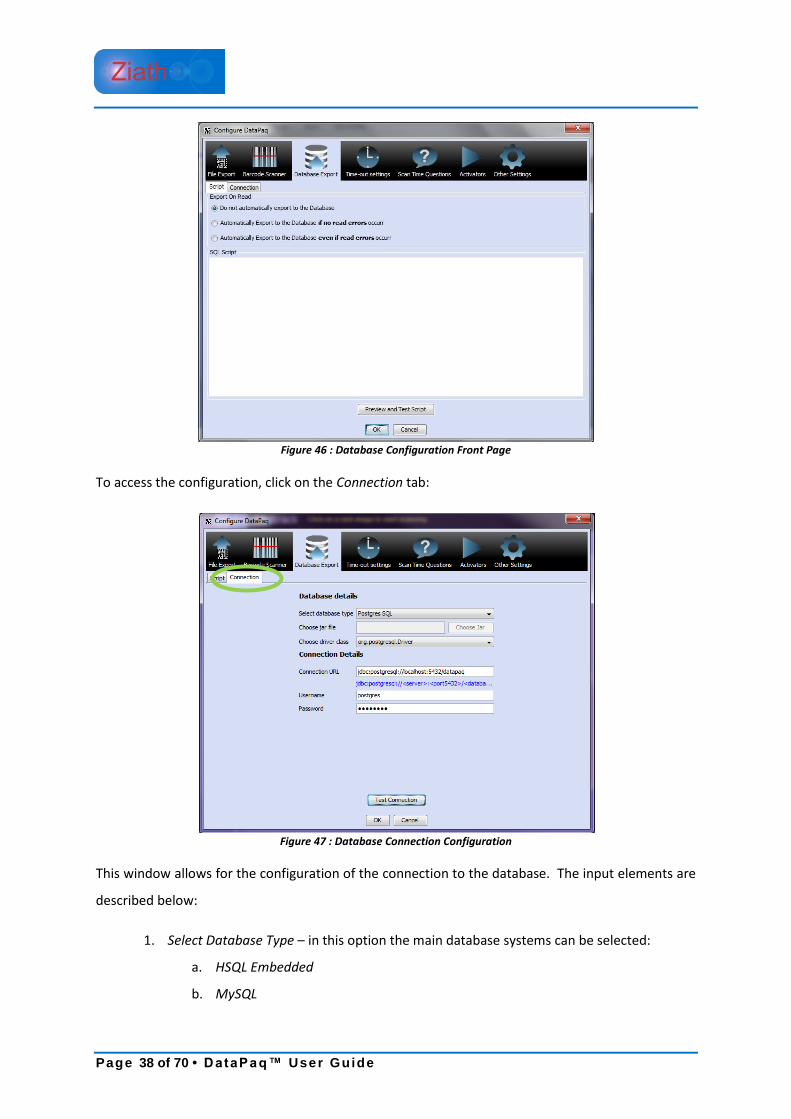
To access the configuration, click on the Connection tab:
Figure 47 : Database Connection Configuration
This window allows for the configuration of the connection to the database. The input elements are
described below:
1. Select Database Type – in this option the main database systems can be selected:
a. HSQL Embedded
b. MySQL

DataPaq™ User Guide • Page 39 of 70
c. JAVA/ODBC bridge
d. Postgres SQL
e. Oracle Thin
f. Other (see below)
g. SQL Server
2. Choose Jar File – this is only active if Other has been selected in the previous option. In
this case locate a JDBC compatible driver for your database which is packaged in a jar file
to use. Ensure that this file is locatable in the future (for example, store it on the hard
drive of the machine running DataPaq). Should there be difficulty in locating a driver for
your database system, contact Ziath at [email protected].
3. Choose Driver Class – this is this is only active if Other has been selected in the previous
option. In this case select a driver class to use. Should there be more than one option,
consult the documentation from the driver manufacturer. Should there be difficulty in
locating a driver class for your database system, contact Ziath at [email protected].
4. Connection URL – this will differ from system to system as different database systems
have differing requirements. A brief summary of the types is detailed below:
a. HSQL Embedded – jdbc:hsqldb:<database> – In this case enter the name of the
embedded database to use. This is only of use if DataPaq™ is embedded into a
larger Java system.
b. MySQL – jdbc:mysql://<server>:<port3306>/<database> – The server is the
name or IP address where the database is running and the port is where the
MySQL server is listening. The database is the name of the database to be
connected to.
c. JAVA/ODBC Bridge – jdbc:odbc:<datasource> – The datasource is the name of
the ODBC connection which has been setup on the local machine. If possible it
is preferable to configure a direct connection but this option is available should
it be required.
d. Postgres SQL – jdbc:postgresql://<server>:<port5432>/<database> – The server
is the name or IP address where the database is running and the port is where
the Postgres SQL server is listening. The database is the name of the database
to be connected to.

Page 40 of 70 • DataPaq™ User Guide
e. Oracle Thin – jdbc:oracle:thin:@<server>:<port1521>:<sid> – The server is the
name or IP address where the database is running and the port is where the
Postgres SQL server is listening.
f. Other – This is detailed above.
g. SQL Server –
jdbc:jtds:sqlserver://<server>:<port1433>;DatabaseName=<database> – The
server is the name or IP address where the database is running and the port is
where the MySQL server is listening. The database is the name of the database
to be connected to. Note that this is not the default Microsoft server but an
alternative Open Source version – this is due to licensing restrictions from
Microsoft.
5. Username – This is the username to use to connect to the database
6. Password – This is the password to use to connect to the database; note that it is stored
on the hard drive in a non-obvious format but still in a format which, with
determination, can be read by a third party.
The Test Connection button will use the above properties and attempt to connect to the database in
question. If the connection is successful the following dialogue will appear:
Figure 48 : Successful Connection Dialogue [1]
From here some SQL can be entered which will be executed against the database. The results of the
call will be displayed in a separate dialogue:
Figure 49 : Successful Connection Dialogue [2]

DataPaq™ User Guide • Page 41 of 70
Database Script
To access the configuration, go to Configure > Options as shown:
Figure 50 : Option Menu Selection
After clicking this, the following window will appear:
Figure 51 : Configuration Front Page
To access the database configuration, click on the Database Export icon:
Figure 52 : Database Connection Script Editor

Page 42 of 70 • DataPaq™ User Guide
The window above shows a sample script. A script defines the SQL statements which will be
executed after a rack has been scanned. Variables can be used to represent a value which is
enclosed between two "at" symbols: @. The available variables are shown below:
RACK_UUID – this is a unique id which is generated for every rack that is scanned.
WELL_UUID - this is a unique id which is generated for every tube that is scanned.
LINEAR – this is the barcode of the scanned rack.
ORIENTATION - this is the 2D barcode on the underside of the rack
BARCODE – this is the barcode of the scanned tube.
COL – this is the column of the scanned tube.
ROW – this is the row of the scanned tube.
NUM_ROWS – the number of rows in the rack
NUM_COLS – the number of columns in the rack
For each well a query with the available variables will be executed; however, if a query would be
exactly repeated it is not executed twice. An example script follows:
insert into rack (id, barcode) values ('@RACK_UUID@', '@LINEAR@');
insert into tube (id, rack_id, rack_col, rack_row, barcode)
values ('@WELL_UUID@', '@RACK_UUID@', @COL@, @ROW@, '@BARCODE@');
This would generate one SQL statement (96 identical copies of the same statement mean
that the statement would only be executed once) to insert the rack and (assuming a 96 tube
rack) 96 SQL statements to insert the well data.
Execution
For testing purposes, Preview and Test Script button, on the script interface, can be clicked. This will
display the exact SQL statements which will be executed as follows:

DataPaq™ User Guide • Page 43 of 70
Figure 53 : Script Preview
If the Execute button at the top left of the window is clicked, the SQL will be executed against the
host database. The data which is loaded in will have the barcodes beginning with TEST so they can
be identified and purged from the database after the test.
For operation, the system can be configured to automatically execute when a rack is scanned as long
as no read failures occur by clicking the Automatically Export checkbox on the script entry dialogue.
The available options are below:
Do not automatically export to the Database – the export will not happen under any
circumstances
Automatically export if no read errors occur – only export if every well is either read or
marked as empty
Automatically export even if read errors occur – always export, even if a tube is not read
correctly
All the data which is uploaded will be in one single transaction. Therefore, if there is a problem with
the update the entire update will be cancelled – avoiding part racks from being uploaded.
Example
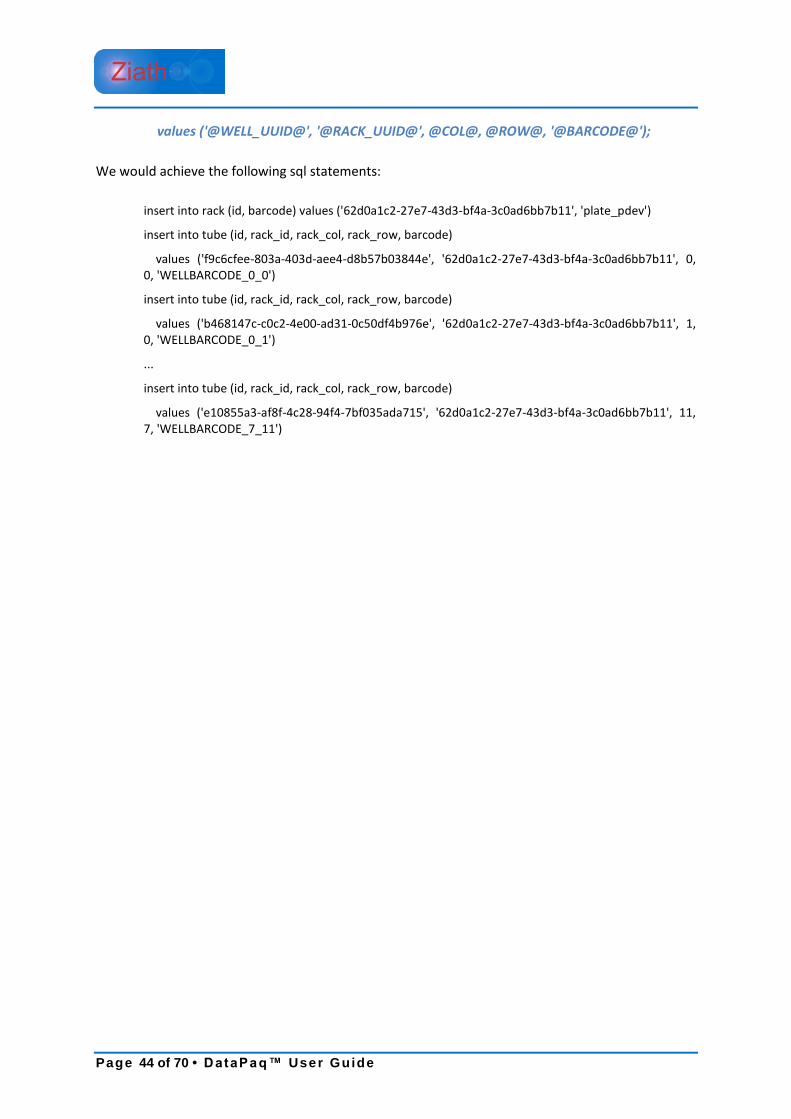
We shall take an example of a 96 tube rack as follows:
Rack Barcode : plate_pdev
Well barcodes are from WELLBARCODE_0_0 to WELLBARCODE_7_11
Using the script of:
insert into rack (id, barcode) values ('@RACK_UUID@', '@LINEAR@');
insert into tube (id, rack_id, rack_col, rack_row, barcode)
Page 44 of 70 • DataPaq™ User Guide
values ('@WELL_UUID@', '@RACK_UUID@', @COL@, @ROW@, '@BARCODE@');
We would achieve the following sql statements:
insert into rack (id, barcode) values ('62d0a1c2-27e7-43d3-bf4a-3c0ad6bb7b11', 'plate_pdev')
insert into tube (id, rack_id, rack_col, rack_row, barcode)
values ('f9c6cfee-803a-403d-aee4-d8b57b03844e', '62d0a1c2-27e7-43d3-bf4a-3c0ad6bb7b11', 0, 0, 'WELLBARCODE_0_0')
insert into tube (id, rack_id, rack_col, rack_row, barcode)
values ('b468147c-c0c2-4e00-ad31-0c50df4b976e', '62d0a1c2-27e7-43d3-bf4a-3c0ad6bb7b11', 1, 0, 'WELLBARCODE_0_1')
...
insert into tube (id, rack_id, rack_col, rack_row, barcode)
values ('e10855a3-af8f-4c28-94f4-7bf035ada715', '62d0a1c2-27e7-43d3-bf4a-3c0ad6bb7b11', 11, 7, 'WELLBARCODE_7_11')

DataPaq™ User Guide • Page 45 of 70
Scan Time Questions Configuration
The Scan Time Questions configuration allows the system to prompt the user to input a series of
defined questions to the user scanning a rack. To configure the questions go to Configure > Options,
as shown in figure 47.
Figure 54 : Select Options Menu
The following screen below will appear:
Figure 55 : Configure Dialogue
Select the ‘Scan Time Questions’ icon and the following screen will appear.
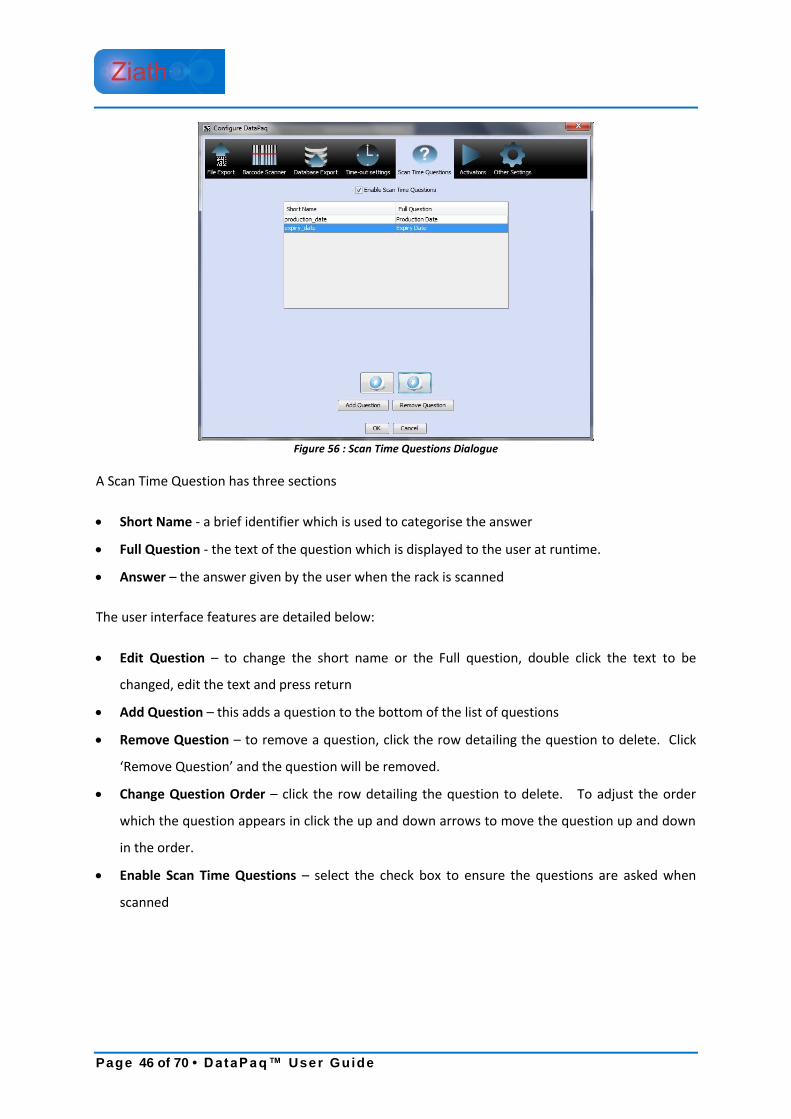
Page 46 of 70 • DataPaq™ User Guide
Figure 56 : Scan Time Questions Dialogue
A Scan Time Question has three sections
Short Name - a brief identifier which is used to categorise the answer
Full Question - the text of the question which is displayed to the user at runtime.
Answer – the answer given by the user when the rack is scanned
The user interface features are detailed below:
Edit Question – to change the short name or the Full question, double click the text to be
changed, edit the text and press return
Add Question – this adds a question to the bottom of the list of questions
Remove Question – to remove a question, click the row detailing the question to delete. Click
‘Remove Question’ and the question will be removed.
Change Question Order – click the row detailing the question to delete. To adjust the order
which the question appears in click the up and down arrows to move the question up and down
in the order.
Enable Scan Time Questions – select the check box to ensure the questions are asked when
scanned

DataPaq™ User Guide • Page 47 of 70
Activator Configuration
The activator allows a rack to be automatically scanned when a rack is placed on the scanner. This
works with the Ziath Linear Reader attached to the system and detects the linear barcode on the
side of the rack. To access the Activator Configuration, go to Configure > Options as shown below:
Figure 57 : Accessing Options from the Configure menu
The following window appears:
Figure 58 : Configure Dialogue
Click on the icon “Activators”. When the Ziath Linear Reader, attached to the system detects the
linear barcode on the side of the rack, the rack will automatically be scanned as shown below:

Page 48 of 70 • DataPaq™ User Guide
Figure 59: Activator Options Configuration
The available options are:
Ziath Scanner Active – this turns on the Activator
Plate Group to Read – the scan to execute when the rack is detected
Read Duplicate Barcodes – if the same barcode on a rack will be read twice in a row
Delay between barcodes – the gap in between reads for a rack to be automatically scanned
by the Activator when reading the same rack barcode twice

DataPaq™ User Guide • Page 49 of 70
Auto-Repeat Settings
Due to external factors; a tube may sometimes not decode correctly but can be decoded with
another scan. Therefore if DataPaq scans a tube which is not detected it can be configured to rescan
the rack a number of times to attempt to decode the tube again. This can be configured in the
options menu. Go to Configure > Options menu as shown below:
Figure 60 : Configure Menu
The following window will appear:
Figure 61 : Front page of Options Menu

Page 50 of 70 • DataPaq™ User Guide
This can be accessed in the ‘Other Settings’ menu as shown below:
Figure 62 : Other Settings Configuration
To activate this click the top check box and then select the number of times the scanner will repeat. The high speed scanner can especially benefit from this feature
Sound Settings
DataPaq can be configured to play a sound when a rack is correctly scanned or scanned with a failed
well. The options are accessed by going to Configure > Options and click on “Other Settings” in the
configure panel:
Figure 63 : Sound Configuration in "Other Settings"
The sounds will play according to the tick boxes.

DataPaq™ User Guide • Page 51 of 70
DataPaq™ Operation
DataPaq™ is now ready to use. Simply place the rack or racks in the scanner and click the rack image
to read the rack.
Figure 64 : Main Operation Dialogue
DataPaq™ will ask for an identifier for the rack – should the barcode scanner option be installed, the
barcode scanner will attempt to read the rack barcode. If it fails to do this, it will prompt for a rack
barcode.
If the scan time questions have been enabled a dialogue prompting the questions to answer will be
shown as in the example below:
Figure 65 : Scan Time Questions Dialogue
Answer the questions and click OK (or press enter in the last answer box)
While scanning, DataPaq™ will attempt to read every well; however, if the rack has not been placed
on the scanner correctly DataPaq™ may take some time to read the rack, the precise time is detailed
according to the parameters set in the Abort Policy. If this is clearly a human user mistake, the read
can be cancelled clicking the Cancel button shown in the decoding ticker as shown below:

Page 52 of 70 • DataPaq™ User Guide
Figure 66 : Cancel Dialogue
After scanning, the results of the codes are shown; if a tube is correctly read it will be outlined
green; if missing it will be boxed grey; and if present but damaged it will be boxed red.
Figure 67 : Result Window
Should Scan Time Questions be enabled, the results of the Scan Time Questions will also be
displayed as shown below:
Figure 68 : Results window showing Scan Time Questions

DataPaq™ User Guide • Page 53 of 70
Export Formats
There are three export formats that can be selected: Excel, Text and XML.
Excel
The Excel file that is generated is a ‘true’ Excel file (rather than a csv file). The format of this is fixed
so as to ensure reproducibility between DataPaq™ versions. The header is coloured in red and the
data is in rows beneath as shown here:
Figure 69 : Example Excel Output
Should Scan Time Questions be enabled, the questions and the shortname will be shown as an extra
column in the Excel file.
Text
The text output is formatted to an initial default format with the column headers defined for the
output and the necessary information detailed as shown below:

Page 54 of 70 • DataPaq™ User Guide
Figure 70 : Example Text Output
Should Scan Time Questions be enabled, the answers to the questions will be displayed at the top of
the file. However, should this format need to be changed, see Appendix B for detailed instructions.
XML
This format is used for integration and is a self-describing, fixed format. Should Scan Time Questions
be enabled, the full details of the Scan Time Questions will be added as discrete elements at the top
of the file. Should further information be required on this format, contact Ziath.
DataPaq™ User Guide • Page 55 of 70
Appendix A
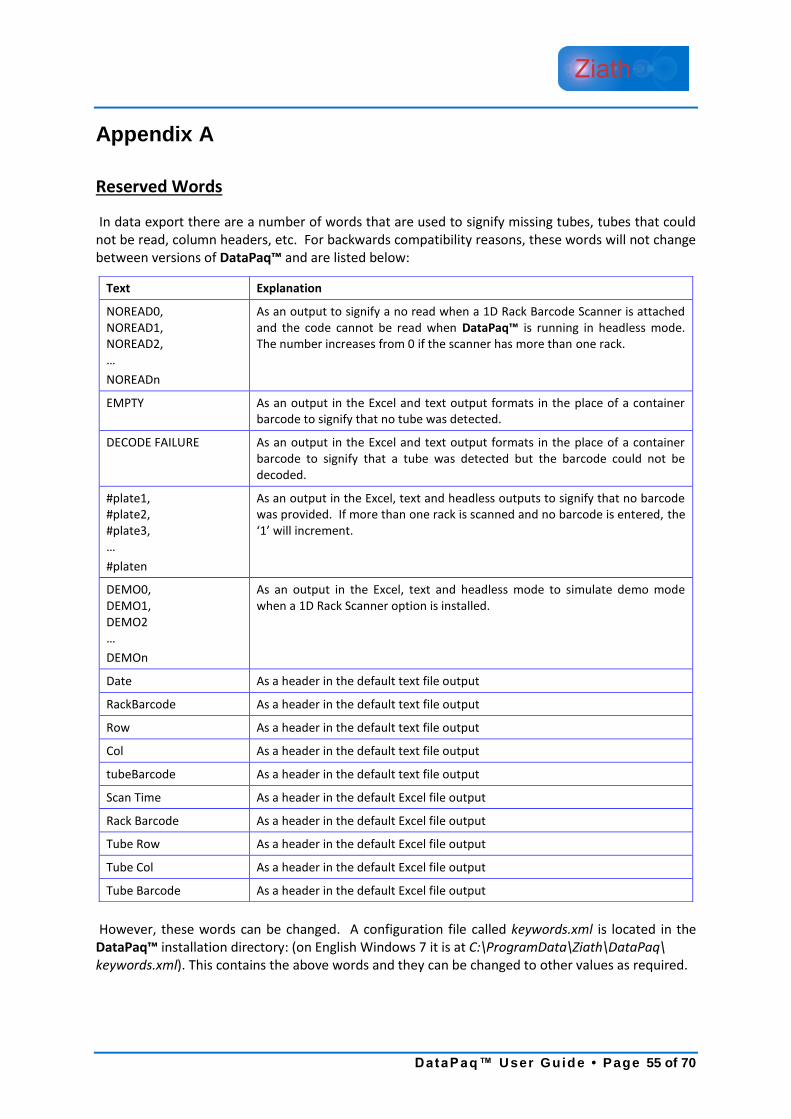
Reserved Words
In data export there are a number of words that are used to signify missing tubes, tubes that could not be read, column headers, etc. For backwards compatibility reasons, these words will not change between versions of DataPaq™ and are listed below:
However, these words can be changed. A configuration file called keywords.xml is located in the DataPaq™ installation directory: (on English Windows 7 it is at C:\ProgramData\Ziath\DataPaq\ keywords.xml). This contains the above words and they can be changed to other values as required.
Text Explanation
NOREAD0, NOREAD1, NOREAD2, …
NOREADn
As an output to signify a no read when a 1D Rack Barcode Scanner is attached and the code cannot be read when DataPaq™ is running in headless mode. The number increases from 0 if the scanner has more than one rack.
EMPTY As an output in the Excel and text output formats in the place of a container barcode to signify that no tube was detected.
DECODE FAILURE As an output in the Excel and text output formats in the place of a container barcode to signify that a tube was detected but the barcode could not be decoded.
#plate1, #plate2, #plate3, …
#platen
As an output in the Excel, text and headless outputs to signify that no barcode was provided. If more than one rack is scanned and no barcode is entered, the ‘1’ will increment.
DEMO0, DEMO1, DEMO2 …
DEMOn
As an output in the Excel, text and headless mode to simulate demo mode when a 1D Rack Scanner option is installed.
Date As a header in the default text file output
RackBarcode As a header in the default text file output
Row As a header in the default text file output
Col As a header in the default text file output
tubeBarcode As a header in the default text file output
Scan Time As a header in the default Excel file output
Rack Barcode As a header in the default Excel file output
Tube Row As a header in the default Excel file output
Tube Col As a header in the default Excel file output
Tube Barcode As a header in the default Excel file output
Page 56 of 70 • DataPaq™ User Guide
Appendix B
Customising Export Text Format
While there is a suitable default for exporting it is recognised that an individual organisation may
wish to change the export format for a variety of reasons including (for example) interaction with
existing systems or for local language compatibility. For this reason the text file format is totally
flexible.
The textual export is created using a technology called a templating language – with this technology
it is possible to change the headers, the exported data, the format of the columns and rows and
even the format of the date (US/EU date formats are one example).
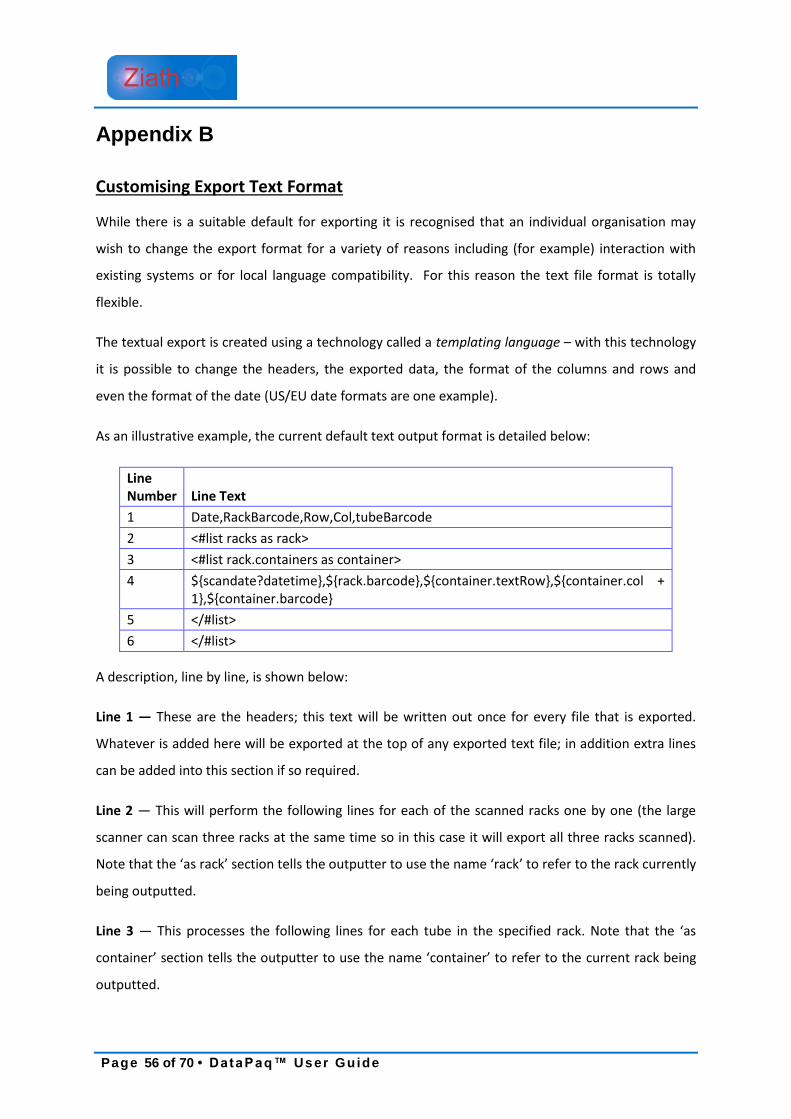
As an illustrative example, the current default text output format is detailed below:
Line Number
Line Text
1 Date,RackBarcode,Row,Col,tubeBarcode
2 <#list racks as rack>
3 <#list rack.containers as container>
4 ${scandate?datetime},${rack.barcode},${container.textRow},${container.col + 1},${container.barcode}
5 </#list>
6 </#list>
A description, line by line, is shown below:
Line 1 — These are the headers; this text will be written out once for every file that is exported.
Whatever is added here will be exported at the top of any exported text file; in addition extra lines
can be added into this section if so required.
Line 2 — This will perform the following lines for each of the scanned racks one by one (the large
scanner can scan three racks at the same time so in this case it will export all three racks scanned).
Note that the ‘as rack’ section tells the outputter to use the name ‘rack’ to refer to the rack currently
being outputted.
Line 3 — This processes the following lines for each tube in the specified rack. Note that the ‘as
container’ section tells the outputter to use the name ‘container’ to refer to the current rack being
outputted.

DataPaq™ User Guide • Page 57 of 70
Line 4 — For each tube this will export the following information:
i. ${scandate?datetime scandate} – this will export the date in the default configuration as
defined on the PC DataPaq™ is running on. Entering a pattern to specify the date and time
format can change the format of this; for example entering ${scandate?string("yyyy-MM-dd
HH:mm:ss”)} will output 2009-06-08 21:24:44 for the scan date time. For full details see the
table in Date Format Symbols, in the second part of this appendix.
ii. ${rack.barcode} – the barcode of the rack the tube is in.
iii. ${container.textRow} – the row of the tube from A – H (or more if the format is more than
96 wells). Should the row be required in numeric format enter ${container.row}. Note that
this will count the first row as zero; to count from 1 enter ${container.row+1}.
iv. ${container.colmun+1} – the column. As above, the counting is from zero; here, ‘+1’ is used
for counting from 1.
v. ${container.barcode} – the barcode of the container.
Line 5 —instructs the outputter to stop cycling through all the tubes in the rack.
Line 6 —instructs the outputter to stop cycling through all the racks.
In addition to the result file output there is also a template for ScanTimeQuestions output. The
default of this is as follows:
Line Number
Line Text
1 <#if scanTimeQuestionsEnabled>
2 Scan Time Questions
3
4 <#list scanTimeQuestions as question>
5 ${question.shortName} : ${question.answer}
6 </#list>
7
8 </#if>
The lines are detailed as follows:
Page 58 of 70 • DataPaq™ User Guide
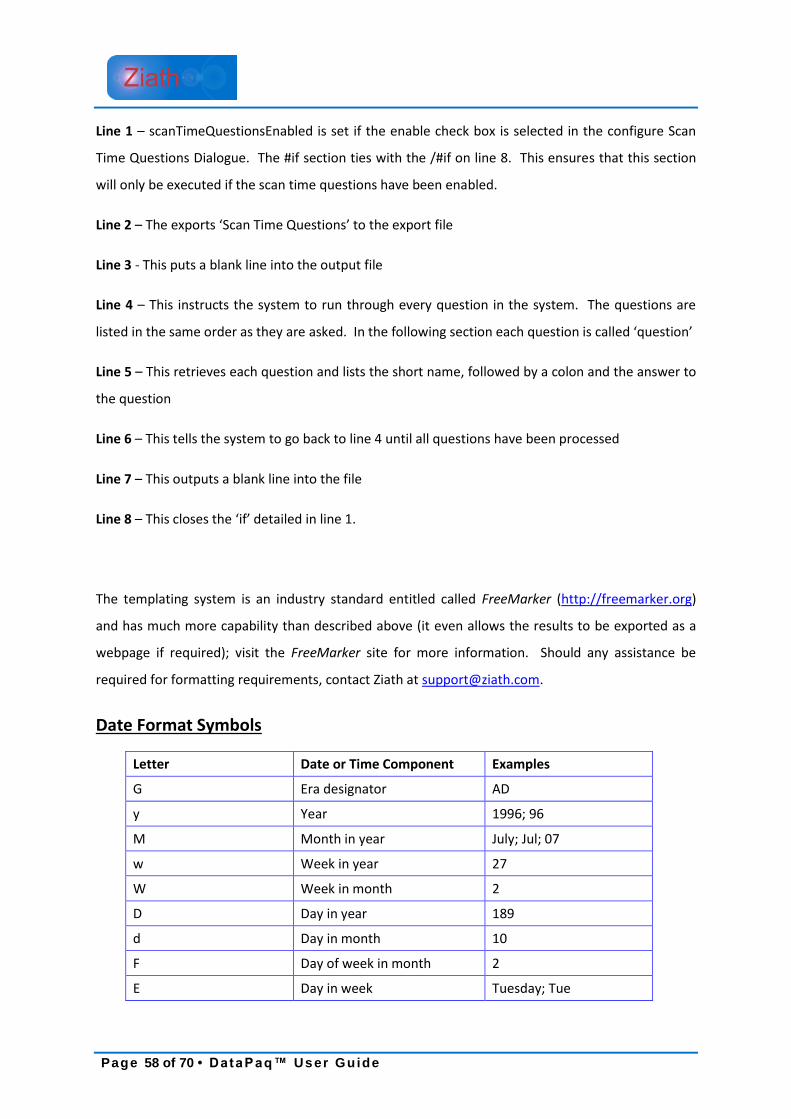
Line 1 – scanTimeQuestionsEnabled is set if the enable check box is selected in the configure Scan
Time Questions Dialogue. The #if section ties with the /#if on line 8. This ensures that this section
will only be executed if the scan time questions have been enabled.
Line 2 – The exports ‘Scan Time Questions’ to the export file
Line 3 - This puts a blank line into the output file
Line 4 – This instructs the system to run through every question in the system. The questions are
listed in the same order as they are asked. In the following section each question is called ‘question’
Line 5 – This retrieves each question and lists the short name, followed by a colon and the answer to
the question
Line 6 – This tells the system to go back to line 4 until all questions have been processed
Line 7 – This outputs a blank line into the file
Line 8 – This closes the ‘if’ detailed in line 1.
The templating system is an industry standard entitled called FreeMarker (http://freemarker.org)
and has much more capability than described above (it even allows the results to be exported as a
webpage if required); visit the FreeMarker site for more information. Should any assistance be
required for formatting requirements, contact Ziath at [email protected].
Date Format Symbols
Letter Date or Time Component Examples
G Era designator AD
y Year 1996; 96
M Month in year July; Jul; 07
w Week in year 27
W Week in month 2
D Day in year 189
d Day in month 10
F Day of week in month 2
E Day in week Tuesday; Tue

DataPaq™ User Guide • Page 59 of 70
a Am/pm marker PM
H Hour in day (0-23) 0
k Hour in day (1-24) 24
K Hour in am/pm (0-11) 0
h Hour in am/pm (1-12) 12
m Minute in hour 30
s Second in minute 55
S Millisecond 978
z Time zone Pacific Standard Time; PST; GMT-08:00
Z Time zone -0800

Page 60 of 70 • DataPaq™ User Guide
Appendix C
Warranty
This document sets out the repair service (the "warranty") offered by Ziath Limited ("Ziath") for the
Ziath DataPaq™ Scanner (the "product") referenced in this manual. For purposes of this warranty,
the "product" refers to both hardware and software and other peripheral items, as supplied by Ziath,
but specifically excludes any consumable items.
Ziath provides warranty on the product on the following terms:
1. The terms of this warranty apply to the product as purchased and are for the benefit of the
original purchaser only. Ziath makes no express or implied warranty on the product in the
event the product is sold on or transferred to any third party.
2. Ziath will repair or replace defective parts and/or equipment within a reasonable time
period (up to one year), and within the service levels applicable to original or extended
warranties.
3. As part of the warranty offered by Ziath, part of or the entire product may be replaced. In
order to take advantage of this service, you will be required to confirm that you have not
transferred any rights in the product to a third party. You also agree that Ziath may remove
the product from your location in order to effect the repair as necessary, which
determination of necessary removal will be made at Ziath's sole discretion. The repair or
replacement of the product will not extend the original warranty period selected at the time
of purchase.
4. Warranty service will be void in the event unauthorized modifications have been made to
the product. This warranty does not cover faults or damage caused by other equipment or
persons or by failure to operate and maintain the product in accordance with the
instructions set forth in this user manual.
5. The costs of any repair or replacement made within the terms of this warranty will be borne
by Ziath.
6. Ziath has no liability or responsibility toward the purchaser of this product other than for
repair or replacement of the original product, as specified in this warranty.

DataPaq™ User Guide • Page 61 of 70
Appendix D
CE and RoHS Certificates
Please see the following pages for the CE and RoHS certificates for all devices detailed in this
manual:

Page 62 of 70 • DataPaq™ User Guide

DataPaq™ User Guide • Page 63 of 70

Page 64 of 70 • DataPaq™ User Guide

DataPaq™ User Guide • Page 65 of 70

Page 66 of 70 • DataPaq™ User Guide

DataPaq™ User Guide • Page 67 of 70

Page 68 of 70 • DataPaq™ User Guide

DataPaq™ User Guide • Page 69 of 70

Page 70 of 70 • DataPaq™ User Guide


![Rainbow Heart - artecy.com · 7777777 777777777 7777777777777 ooooooo 77777 7777777 7777777777777 oooooo]]]]] ddd ddd ddd ddd ddd ™™™™™™™™™™™ ™™™™™™™™™™™™™™™™™](https://static.documents.pub/doc/80x56/5f4a4ec8ec2fea16bc048a6a/rainbow-heart-7777777-777777777-7777777777777-ooooooo-77777-7777777-7777777777777.jpg)


