10
Dawn Model 4010 Floating Row Cleaner Assembly and Operation Manual

Dawn Model 4010 Floating Row Cleaner Assembly and Operation Manual
2©2012 Dawn Equipment Company, Inc. 370 N Cross Sycamore, IL 60178 USA www.dawnequipment.com Toll Free: 800.554.0007 Fax:815.899.3663
PLEASE CAREFULLY READ THIS MANUALIt is strongly recommended that you become familiar with all operation and maintenance procedures of your Dawn agricultural equipment.
Failure to follow safety recommendations while this implement is in operation, and/or failure to properly store thisimplement, and/or failure to adequately prepare thisimplement for transport, could result in equipment damage, personal injury or death. Please make yourself aware of all federal and local laws that may apply to the transport, use and sale of this implement.
WARRANTY INFORMATIONAll new Dawn Equipment Company products carry a limited warranty. Warranty assurances vary by device, and can be found in the appendices of this or any other Dawn Equipment Company Users Manual. Warranty information is also available upon request by contacting Dawn toll-free at 800.554.0007, or you can request a copy in writing. Request warranty information by e-mail at [email protected], or by US Post at Dawn Equipment Company, PO Box 497, Sycamore IL 60178.
Dawn Equipment Company prides itself on the manufacture of quality American made row crop tools. Warranties will be honored by Dawn to dealers authorized to sell Dawn Equipment products who, in turn, honor such warranties to the original retail purchaser. Should this equipment be improperly cared for, or should it be modified to change performance beyond OEM specifications, applicable Dawn warranties will become void, and Dawn sponsored implement improvements will not be granted.
DISCLAIMER: Dawn Equipment Company makes no claim to the safety or reliability of non Dawn OEM parts or whole goods used in conjunction with Dawn OEM equipment, and shall not be held responsible for any personal injury or property damage, or for any complications with operational performance caused by non Dawn OEM parts or whole goods. Please familiarize yourself with the users manuals and safety recommendations of all non Dawn OEM equipment.
WEIGHTS AND MEASURESAll Dawn Equipment Company part and whole good designs adhere to the United States Customary Unit System (Inch-Pound). All measurements in this manual are labeled using only the aforementioned units, unless otherwise explicitly specified.
USING THIS MANUALAll Dawn manuals are named and numbered and should be considered a principal element of the device they accompany. Please ensure this manual is kept in a location not subject to extreme conditions (i.e. excess humidity, hydraulic fluid, exposed to natural elements, etc.). Please ensure that this manual remains with the implement if traded, leased or sold.
ADDITIONAL INFORMATIONAdditional information on this, and any other Dawn tool can be found on the web at www.dawnequipment.com. You may also contact Dawn for information by phone at 800.554.0007, by fax at 815.899.3663, or by e-mail at [email protected].
Introduction
3©2012 Dawn Equipment Company, Inc. 370 N Cross Sycamore, IL 60178 USA www.dawnequipment.com Toll Free: 800.554.0007 Fax:815.899.3663
Safety............................................................................................ General Safety.................................................................. Safety Word Definitions....................................... Safety Symbols.................................................... Farm & Tractor First Aid...................................... Protective Clothing..............................................
Installation.................................................................................... Installing the Mount Assembly.......................................... Trashwheel Arm Orientation............................................. Trashwheel Assembly....................................................... Offset Vs. Intersecting - 12.75” vs 14”................. Depth Bands....................................................... Trashwheel Installation..................................................... Stripper Orientation.............................................
Operation..................................................................................... Frame Height.................................................................... Frame Level..................................................................... Screw Adjustments..........................................................
Care, Maintenance and Storage.................................................
Appendix A: Warranty.................................................................
Appendix B: Quick Reference Assembly Guide.......................
Table of Contents
4
6
8
8
9
10
4©2012 Dawn Equipment Company, Inc. 370 N Cross Sycamore, IL 60178 USA www.dawnequipment.com Toll Free: 800.554.0007 Fax:815.899.3663
SAFETY DEFINITIONSIt is essential that you be able to recognize safety signal words and their associated symbols. Please be alert to any signs posted on your Dawn Equipment Company products, and/or in your users manual. Make sure you have read all safety messages and that you clearly understand the recommended precautions. If you have questions about any Dawn safety sign, or have further questions about safety recommenda-tions on this or any other Dawn product, please contact us at 800.554.0007.
SAFETY SYMBOLSA complete list of Dawn Equipment Company safety signs with explanations can be found in the appendix of this manual, or any other Dawn Equipment Company users manual. Please review and understand all safety signs and symbols.
DANGER - Indicates an imminently hazardous situation that, if not avoided, will result in serious injury or death, and/or property damage.
WARNING - Indicates a potentially hazardous situation that, if not avoided, will result in serious injury or death, and/or property damage.
CAUTION - Indicates a potentially hazardous situation that, if not avoided, may result in minor or moderate injury, and/or property damage.
FOLLOW SAFETY INSTRUCTIONSIt is important to read, understand and follow safety instructions from Dawn Equipment Company products as well as any and all third party products being used. Do not operate Dawn tools without proper working knowledge of the product and do not let others operate equipment without similar instruc-tion. If you have any questions about safely operating your Dawn Equipment Company tolls, please contact Dawn directly at 800.554.0007.
REPORTING AN EMERGENCYEnsure that you have access to a radio or mobile phone when operating or repairing farm machinery. Working with a partner whenever possible significantly increases the chances of receiving timely emergency care should one party become severely injured, and/or incapacitated.
MAINTENANCE AND UPKEEPFor safety reasons, it is important to keep your implements in proper working order. Unauthorized modifications to Dawn Equipment Company products may compromise the efficiency and/or safe operation of the product and will void any and all warranties through Dawn Equipment Company. Please read your manual before attempting any repair work to your Dawn tool. If you need to work on your Dawn tool, make sure to support it before partially or fully removing it from the attachment points. Do not adjust your Dawn tools while they are moving. Before making adjustments to your Dawn fx tool, make sure to disengage the hydraulic circuit and disconnect the power source.
PROPER WASTE DISPOSALPlease familiarize yourself with all waste disposal laws applicable to your area before dumping.
General Safety Information
5©2012 Dawn Equipment Company, Inc. 370 N Cross Sycamore, IL 60178 USA www.dawnequipment.com Toll Free: 800.554.0007 Fax:815.899.3663
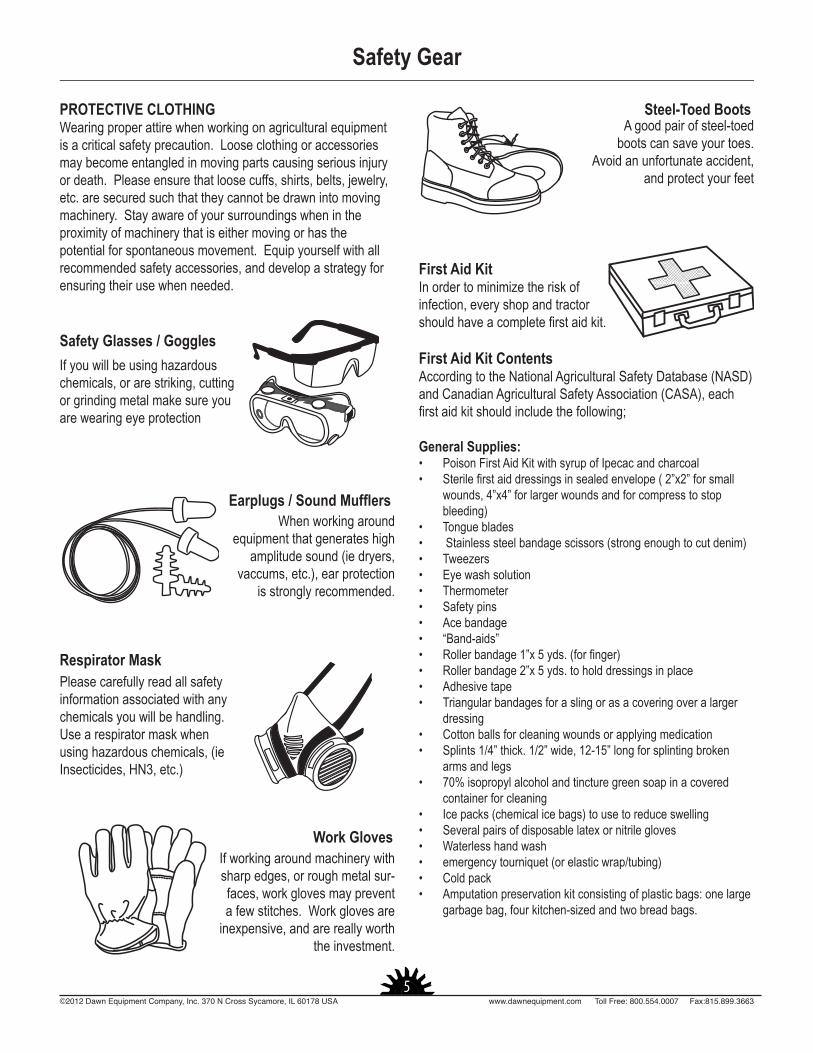
PROTECTIVE CLOTHINGWearing proper attire when working on agricultural equipment is a critical safety precaution. Loose clothing or accessories may become entangled in moving parts causing serious injury or death. Please ensure that loose cuffs, shirts, belts, jewelry, etc. are secured such that they cannot be drawn into moving machinery. Stay aware of your surroundings when in the proximity of machinery that is either moving or has the potential for spontaneous movement. Equip yourself with all recommended safety accessories, and develop a strategy for ensuring their use when needed.
Safety Glasses / Goggles
Earplugs / Sound Mufflers
Respirator Mask
Work Gloves
If you will be using hazardous chemicals, or are striking, cutting or grinding metal make sure you are wearing eye protection
Please carefully read all safety information associated with any chemicals you will be handling. Use a respirator mask when using hazardous chemicals, (ie Insecticides, HN3, etc.)
When working around equipment that generates high
amplitude sound (ie dryers, vaccums, etc.), ear protection
is strongly recommended.
If working around machinery with sharp edges, or rough metal sur-faces, work gloves may prevent a few stitches. Work gloves are
inexpensive, and are really worth the investment.
Steel-Toed Boots
First Aid KitIn order to minimize the risk of infection, every shop and tractor should have a complete first aid kit.
First Aid Kit ContentsAccording to the National Agricultural Safety Database (NASD) and Canadian Agricultural Safety Association (CASA), each first aid kit should include the following;
General Supplies:• Poison First Aid Kit with syrup of Ipecac and charcoal• Sterile first aid dressings in sealed envelope ( 2”x2” for small
wounds, 4”x4” for larger wounds and for compress to stop bleeding)
• Tongue blades• Stainless steel bandage scissors (strong enough to cut denim)• Tweezers• Eye wash solution• Thermometer• Safety pins• Ace bandage• “Band-aids”• Roller bandage 1”x 5 yds. (for finger)• Roller bandage 2”x 5 yds. to hold dressings in place• Adhesive tape• Triangular bandages for a sling or as a covering over a larger
dressing• Cotton balls for cleaning wounds or applying medication• Splints 1/4” thick. 1/2” wide, 12-15” long for splinting broken
arms and legs• 70% isopropyl alcohol and tincture green soap in a covered
container for cleaning• Ice packs (chemical ice bags) to use to reduce swelling• Several pairs of disposable latex or nitrile gloves• Waterless hand wash • emergency tourniquet (or elastic wrap/tubing)• Cold pack• Amputation preservation kit consisting of plastic bags: one large
garbage bag, four kitchen-sized and two bread bags.
A good pair of steel-toed boots can save your toes.
Avoid an unfortunate accident, and protect your feet
Safety Gear
6©2012 Dawn Equipment Company, Inc. 370 N Cross Sycamore, IL 60178 USA www.dawnequipment.com Toll Free: 800.554.0007 Fax:815.899.3663
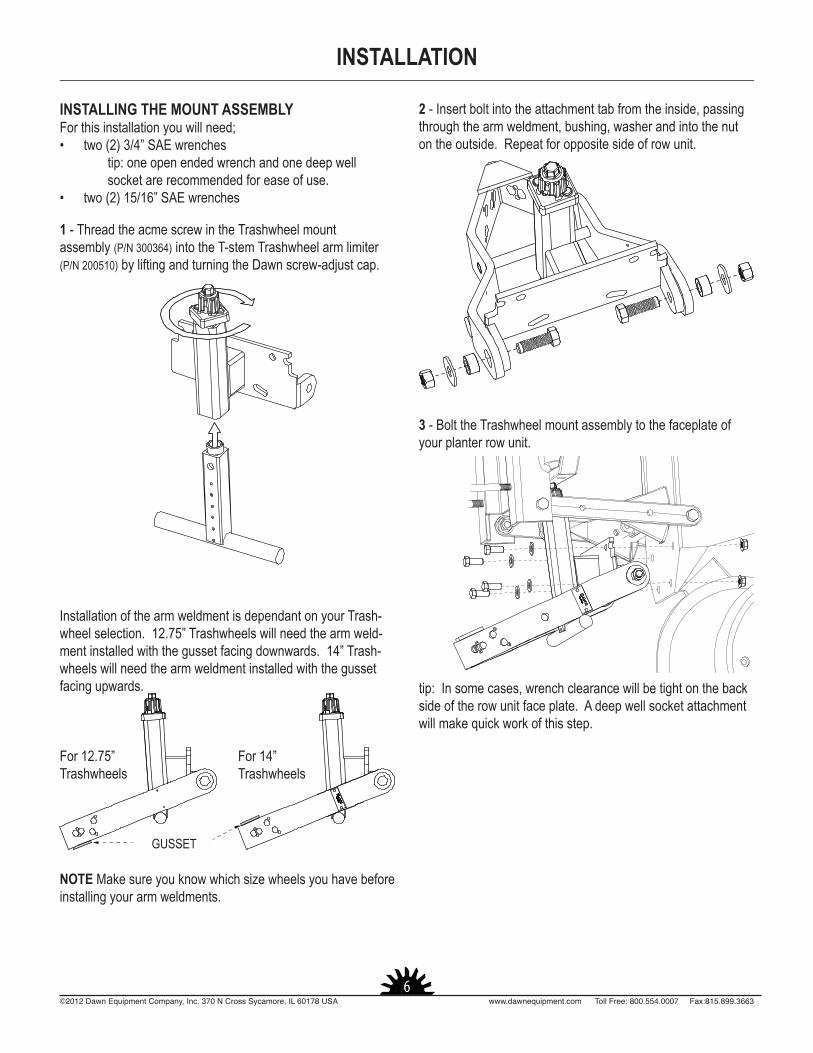
2 - Insert bolt into the attachment tab from the inside, passing through the arm weldment, bushing, washer and into the nut on the outside. Repeat for opposite side of row unit.
3 - Bolt the Trashwheel mount assembly to the faceplate of your planter row unit.
tip: In some cases, wrench clearance will be tight on the back side of the row unit face plate. A deep well socket attachment will make quick work of this step.
INSTALLING THE MOUNT ASSEMBLYFor this installation you will need;• two (2) 3/4” SAE wrenches tip: one open ended wrench and one deep well socket are recommended for ease of use.• two (2) 15/16” SAE wrenches
1 - Thread the acme screw in the Trashwheel mount assembly (P/N 300364) into the T-stem Trashwheel arm limiter (P/N 200510) by lifting and turning the Dawn screw-adjust cap.
Installation of the arm weldment is dependant on your Trash-wheel selection. 12.75” Trashwheels will need the arm weld-ment installed with the gusset facing downwards. 14” Trash-wheels will need the arm weldment installed with the gusset facing upwards.
NOTE Make sure you know which size wheels you have before installing your arm weldments.
GUSSET
For 12.75” Trashwheels
For 14”Trashwheels
INSTALLATION
7©2012 Dawn Equipment Company, Inc. 370 N Cross Sycamore, IL 60178 USA www.dawnequipment.com Toll Free: 800.554.0007 Fax:815.899.3663
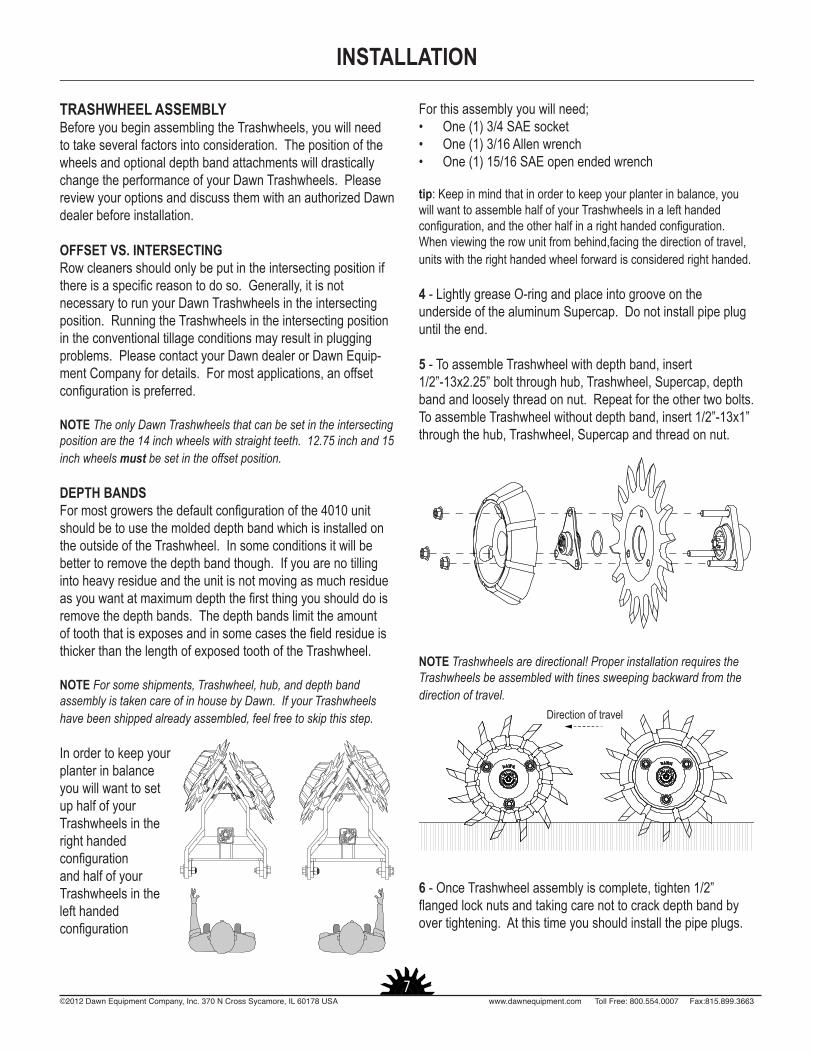
For this assembly you will need;• One (1) 3/4 SAE socket• One (1) 3/16 Allen wrench• One (1) 15/16 SAE open ended wrench
tip: Keep in mind that in order to keep your planter in balance, you will want to assemble half of your Trashwheels in a left handed configuration, and the other half in a right handed configuration. When viewing the row unit from behind,facing the direction of travel, units with the right handed wheel forward is considered right handed.
4 - Lightly grease O-ring and place into groove on the underside of the aluminum Supercap. Do not install pipe plug until the end.
5 - To assemble Trashwheel with depth band, insert 1/2”-13x2.25” bolt through hub, Trashwheel, Supercap, depth band and loosely thread on nut. Repeat for the other two bolts. To assemble Trashwheel without depth band, insert 1/2”-13x1” through the hub, Trashwheel, Supercap and thread on nut.
NOTE Trashwheels are directional! Proper installation requires the Trashwheels be assembled with tines sweeping backward from thedirection of travel.
6 - Once Trashwheel assembly is complete, tighten 1/2” flanged lock nuts and taking care not to crack depth band by over tightening. At this time you should install the pipe plugs.
TRASHWHEEL ASSEMBLYBefore you begin assembling the Trashwheels, you will need to take several factors into consideration. The position of the wheels and optional depth band attachments will drastically change the performance of your Dawn Trashwheels. Please review your options and discuss them with an authorized Dawn dealer before installation.
OFFSET VS. INTERSECTINGRow cleaners should only be put in the intersecting position if there is a specific reason to do so. Generally, it is not necessary to run your Dawn Trashwheels in the intersecting position. Running the Trashwheels in the intersecting position in the conventional tillage conditions may result in plugging problems. Please contact your Dawn dealer or Dawn Equip-ment Company for details. For most applications, an offset configuration is preferred.
NOTE The only Dawn Trashwheels that can be set in the intersecting position are the 14 inch wheels with straight teeth. 12.75 inch and 15 inch wheels must be set in the offset position.
DEPTH BANDSFor most growers the default configuration of the 4010 unit should be to use the molded depth band which is installed on the outside of the Trashwheel. In some conditions it will be better to remove the depth band though. If you are no tilling into heavy residue and the unit is not moving as much residue as you want at maximum depth the first thing you should do is remove the depth bands. The depth bands limit the amount of tooth that is exposes and in some cases the field residue is thicker than the length of exposed tooth of the Trashwheel.
NOTE For some shipments, Trashwheel, hub, and depth band assembly is taken care of in house by Dawn. If your Trashwheels have been shipped already assembled, feel free to skip this step.
In order to keep yourplanter in balanceyou will want to setup half of your Trashwheels in theright handedconfigurationand half of yourTrashwheels in theleft handedconfiguration
INSTALLATION
Direction of travel
8©2012 Dawn Equipment Company, Inc. 370 N Cross Sycamore, IL 60178 USA www.dawnequipment.com Toll Free: 800.554.0007 Fax:815.899.3663
OPERATIONTo get the most out of your Dawn tool, please refer to the following suggestions for setting your tool up for success.
FRAME HEIGHTFor optimum performance of your Dawn 4010 floating Trashwheels, it is important to remember that it is designed to work best when the tool bar is kept within 2 inches of the industry standard height of 20” from the bottom of the tool bar to the ground. This is the case with all Dawn planter attachments and implements. For use on larger planters with multiple sections and a central fill seed distribution system, the center of the frame almost always runs deeper than the ends of the wings. If you do NOT have markers on the planter you may want to consider adding a weight kit to the ends of the frame if necessary to level out the length of the tool bar, especially on narrow row spaced planters.
NOTE Do NOT check the frame height on concrete or similar surface. Measuring tool bar height must be done in the field.
tip: Consult your planter manual on how to make adjustments. It is also possible to alleviate this problem by running the row units under the center section in a higher hole setting than the wings so that under the full weight of the central seed fill hopper the frame height will be more uniform.
Frame LevelFor optimum performance, it is important to remember that it is designed to work best when the tool bar is level. This is the case with all Dawn planter attachments and implements. Extreme nose-up and nose-down angles of attack will lead to poor performance not only from your Dawn tool, but from the whole planter.
CARE, MAINTENANCE and STORAGE
LUBRICATIONAt least once a year, remove the pipe plugs on your Dawn Trashwheels and insert a grease zerk for lubrication. Grease should be injected into the hub until you see clean grease exit the seal area at the back of the hub. Wipe off excess with a rag. Reinsert pipe plugs for field usage. Greasing is heavily dependent on usage and conditions. Make sure that whatever your level of usage, your hubs remain well lubricated and in proper adjustment.
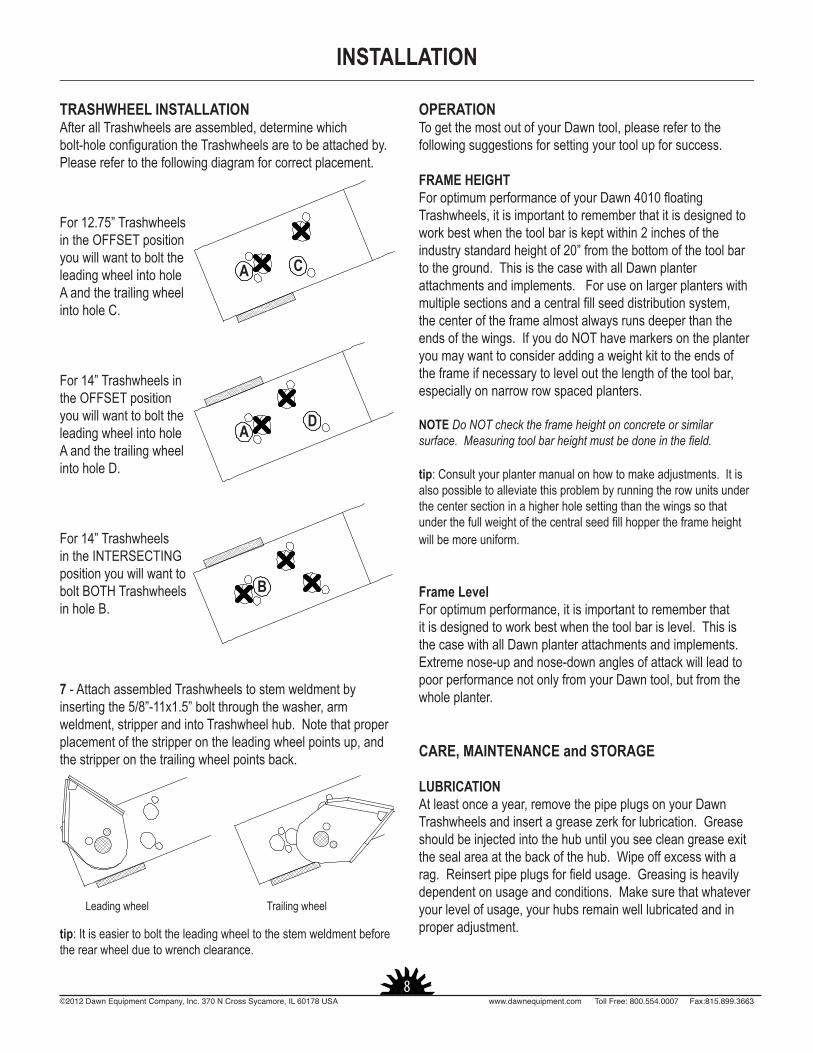
TRASHWHEEL INSTALLATIONAfter all Trashwheels are assembled, determine which bolt-hole configuration the Trashwheels are to be attached by. Please refer to the following diagram for correct placement.
7 - Attach assembled Trashwheels to stem weldment by inserting the 5/8”-11x1.5” bolt through the washer, arm weldment, stripper and into Trashwheel hub. Note that proper placement of the stripper on the leading wheel points up, and the stripper on the trailing wheel points back.
tip: It is easier to bolt the leading wheel to the stem weldment before the rear wheel due to wrench clearance.
For 12.75” Trashwheels in the OFFSET position you will want to bolt the leading wheel into hole A and the trailing wheel into hole C.
For 14” Trashwheels in the OFFSET position you will want to bolt the leading wheel into hole A and the trailing wheel into hole D.
For 14” Trashwheels in the INTERSECTING position you will want to bolt BOTH Trashwheels in hole B.
Leading wheel Trailing wheel
A
B
C
DA
INSTALLATION

9©2012 Dawn Equipment Company, Inc. 370 N Cross Sycamore, IL 60178 USA www.dawnequipment.com Toll Free: 800.554.0007 Fax:815.899.3663
The following warranties with respect to new Dawn Equipment Company (“Dawn”) products, excepting as hereafter provided, is made by Dawn to Dealers (“Dealers”) authorized by Dawn to sell the products involved and each selling Dealer, in turn, make such warranties to the original retail purchaser (the “Purchaser”).A. Duration and Extent of Warranty 1.
2.
3.
4.
5.
6.
B. Warranty Exclusions; Dawn will not be responsible for any of the following: 1.
2.
3.
4.
C. Remedies Exclusive: NO Other WarrantiesThe obligations of Dawn and the Dealers are limited to the obligations set forth in this Limited Warranty. THIS LIMITED WARRANTY IS IN LIEU OF ALL OTHER WARRANTIES OF DAWN, AND THE DEALERS, EXPRESSED OR IMPLIED. WARRANTIES BY DAWN OR THE DEALER OF CONDITION QUALITY, MERCHANT ABILITY OR FITNESS FOR A PARTICULAR PURPOSE ARE EXCLUDED, AS ARE ALL OTHER REPRESENTATIONS BY DAWN AND THE DEALERS TO THE PURCHASE OR USER AND ALL OTHER OBLIGATIONS OR LIABILITIES OF DAWN AND THE DEALERS. NO OTHER PERSON IS AUTHORIZED TO GIVE ANY OTHER WARRANTY OR TO ASSUME ANY OTHER LIABILITY ON BEHALF OF DAWN OR THE DEALERS. THIS LIMITED WARRANTY MAY NOT BE TRANSFERRED BY THE PURCHASER TO ANY SUBSEQUENT OWNER.
D. The instruction manual supplied with the Product contains important maintenance and service information. Read the manual and follow the recommendations contained herein. Please remember that failures due to improper maintenance or service are not covered by the Limited Warranty.
Dawn Equipment Company reserves the right to make changes in design or specifications at any time without obligation to purchasers or equipment and components previously sold. this warranty shall not be altered or changed in any way.
Products, except all working, moving and all or any parts subject to wear, except as hereafter provided, which are defective in materials or workmanship as delivered to the Purchaser by a Dealer will be repaired by a Dealer or replaced by Dawn, only, as Dawn elects, without charge for materials or labor, if such defect appears in not more than 12 months, or from and after the date of delivery to the Purchase by the Dealer.
Those working and moving parts consisting of
Dawn warrants that the Trashwheels planter attachment wheels (Dawn part #s 200015, 101550, 102185M-L, 102185M-R) will not bend or break during its useful lifetime.
Liability of Dawn for defective parts or material is specifically limited to the value of the parts or materials, only.
All parts or materials requiring warranty work MUST be returned by delivery to the selling Dealer for repair or for delivery to Dawn within thirty (30) days of occurrence of the defect of failure of the part or material, all freight prepaid by the Dealer. Upon completion of the warranty work, dawn will ship parts or material to the Dealer, freight prepaid by Dawn.
All decisions by Dawn pertaining to warranty are final.
Defects or damage resulting from use, repairs or service performed in a manner not approved by Dawn or from repairs or service performed by someone other than an authorized Dawn Dealer service department (after approval from Dawn) or Dawn to repair or replace the product involved.
Defects, damage or failure resulting from any alteration or additions done in a manner not approved by Dawn.
Defects, damage or failure or depreciation resulting from wear and tear, accident, misuses, negligence, improper maintenance or improper protection and storage.
INCIDENTAL OR CONSEQUENTIAL DAMAGES, INCLUDING BUT NOT LIMITED TO, LOSS OF PROFITS, LOSS OF TIME, LOSS OF CROPS, INCONVENIENCE, LOSS OF USE OF THE PRODUCT OR OTHER MACHINERY, EQUIPMENT OR VEHICLE USED WITH THE PRODUCTS, COST OF RENTALS OR REPLACEMENT OF THE PRODUCTS OR OTHER COMMERCIAL LOSS.
Appendix A - Warranty
10©2012 Dawn Equipment Company, Inc. 370 N Cross Sycamore, IL 60178 USA www.dawnequipment.com Toll Free: 800.554.0007 Fax:815.899.3663
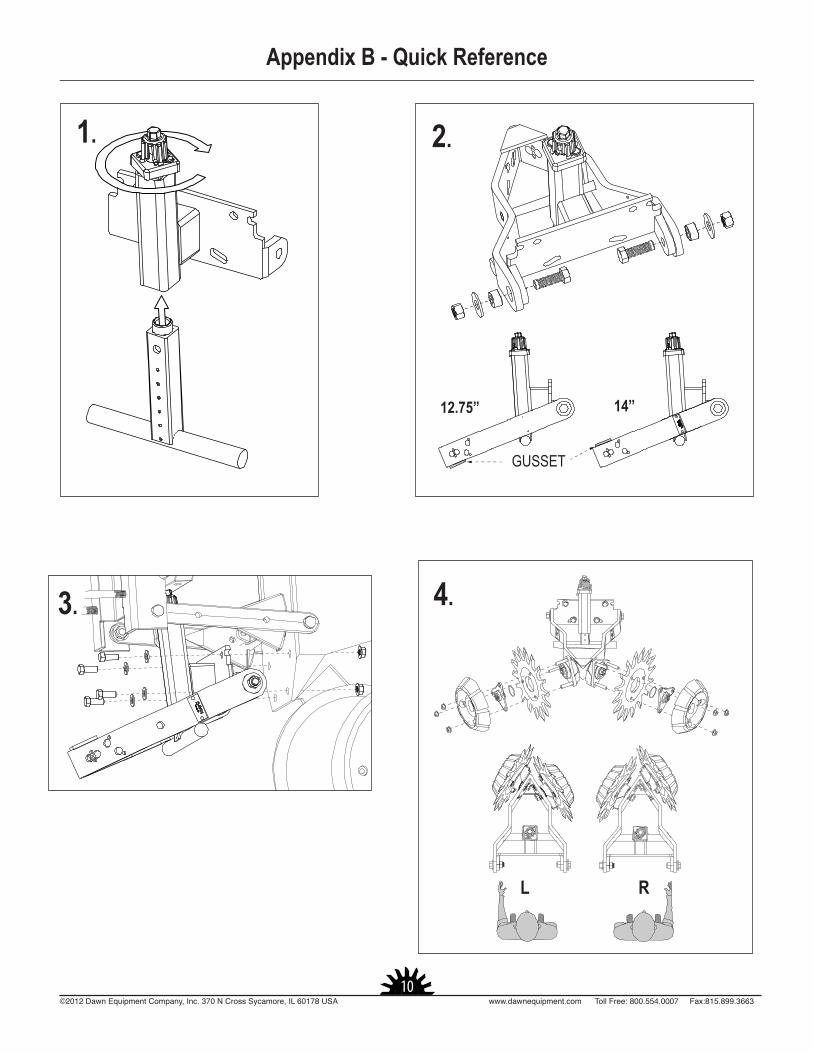
GUSSET
12.75” 14”
1.
3.
2.
4.
Appendix B - Quick Reference
L R


