20
DCN Next Generation Software Installation Instruction en Software Installation Instruction

DCN Next Generation Software Installation Instruction
en Software Installation Instruction

Windows, Windows 2000 Professional, Windows XP Professional, Windows XP Professional x64 Edition are owned by Microsoft.
Manual conventions For clarity this user manual uses consistent styles, symbols and typographical conventions. They are:
i Note
General notes are contained within rules and indicated with this symbol at the left margin. Notes are used to draw attention to special actions or information.
i Caution
A caution is contained within rules and indicated with this symbol at the left margin. Cautions are used to draw attention to actions or commands that could lead to a loss of information or damage to equipment
i Tip
A tip is contained within a box and indicated with this symbol at the left margin. Tips are used to provide supplementary information that may make an action quicker or easier to carry out.
• An action (to be carried out by the user) is shown with a larger round bullet mark.
Typographical conventions The following typographical conventions (text styles) are used in this manual: • Typed input - information to be typed in using
the keyboard is shown as: Filename
• Single key - input via a single key (or keys) on the keyboard is shown as:
<enter>, <shift>, etc. • Multiple keys - input via a combination of keys
pressed together is shown as: <ctrl>+<p>, <alt>+<f4>
• Screen text - information that appears on screen is shown as:
‘Choose Startup Modules:’ Hyperlinks This manual is also available as a digital document in the Adobe Portable Document Format (PDF). All references to pages, figures, tables, etc. in this digital document contain hyperlinks to the referenced location.

DCN Next Generation System Software Installation Instruction en | 3
Table of contents 1 DCN Next Generation Software......................... 4 1.1 Introduction .............................................................. 4 1.2 Installing the software............................................ 4 1.2.1 Start the installation procedure........................... 4 1.3 Repair or removing the software......................... 7 2 Card Encoder .............................................................. 8 2.1 Installing the driver ................................................. 8 3 Windows 2000 ......................................................... 10 3.1 Installing a network...............................................10 3.2 Configuring a server ............................................12 3.3 Configuring a client..............................................13 3.4 Reconfiguring PCs...............................................14 4 Windows XP.............................................................. 15 4.1 Installing a network...............................................15 4.2 Configuring a server PC .....................................19 4.3 Configuring a client PC.......................................19 4.4 Reconfiguring PCs...............................................19
Bosch Security Systems B.V. | 2005 October | 9922 141 81694

DCN NG Software Installation Instructions en | 4
1 DCN Next Generation Software
1.1 Introduction Welcome to the Bosch Digital Congress Network Next Generation system. These instructions explain how to install the software onto your computer. You should be in possession of the DCN Next Generation CD-ROM (LBB 4190)
i Note
Before installing the software, it is advisable to make a backup copy of the CDROM and store it in a safe location.
1.2 Installing the software The software can be installed on Windows 2000 Professional or Windows XP Professional.
i Note
The software can only be used with Windows 2000 Professional or Windows XP Professional. Windows XP Professional x64 Edition cannot be used in combination with DCN. Also other Windows 2000 and Windows XP versions are not supported.
i Note
If you wish to make the software available to all users, you must perform the installation using a user account with administrative right.
Usually the CD-ROM will start automatically, if the CD-ROM doesn’t start automatically: • Click on the ‘Start’ button and select ‘Run...’ A dialogue box will appear:
Figure 1 Run Dialog Box
• Type <drive>:\setup.exe and click on the ‘OK’ button. Where <drive> is the drive letter of the CD-ROM drive.
Internet explorer is started and a webpage is shown.
• Select ‘Install Software’ to go to the Install Software page.
• Click the link ‘Install Software’ to install the software.
1.2.1 Start the installation procedure The InstallShield Wizard starts and prepares for installing:
Figure 2 Install Shield Wizard
The InstallShield stops if any of the pre-requisites are not fulfilled: • Windows 2000 or Windows XP • Pentium III or higher • hard disk present • At least 30 MB of free space on the hard disk The preparation will take some time. When it is complete, a window will appear:
Figure 3 DCN Next Generation Setup
Bosch Security Systems B.V. | 2005 October | 9922 141 81694

DCN NG Software Installation Instructions en | 5
• Click the ‘Next’ button
The following window appears:
Figure 4 Welcome window
• Click the ‘Next’ button
The license Agreement window appears:
Figure 5 License Agreement
Please read the license agreement carefully.
• Click the ‘Yes’ button to accept the agreement
• Click the ‘Back’ button to go back to the welcome window
If, at any time, the ‘Cancel’ button (or the ‘No’ button in the license agreement window) is pressed during the installation process, the installation will be cancelled and the following window appears:
Figure 6 Installation cancelled
• Click the ‘Yes’ button to quit the setup
• Click the ‘No’ button to continue
If the ‘Yes’ button is pressed the following window is displayed:
Figure 7 InstallShield complete
InstallShield displays the destination folder for the program files on the hard disk where DCN Next Generation will be installed:
Figure 8 Program files destination folder
• To change the folder click the ‘Browse’ button
• Click the ‘Next’ button to keep the folder
If the ‘Browse’ button is pressed the following window appears:
Bosch Security Systems B.V. | 2005 October | 9922 141 81694
DCN NG Software Installation Instructions en | 6
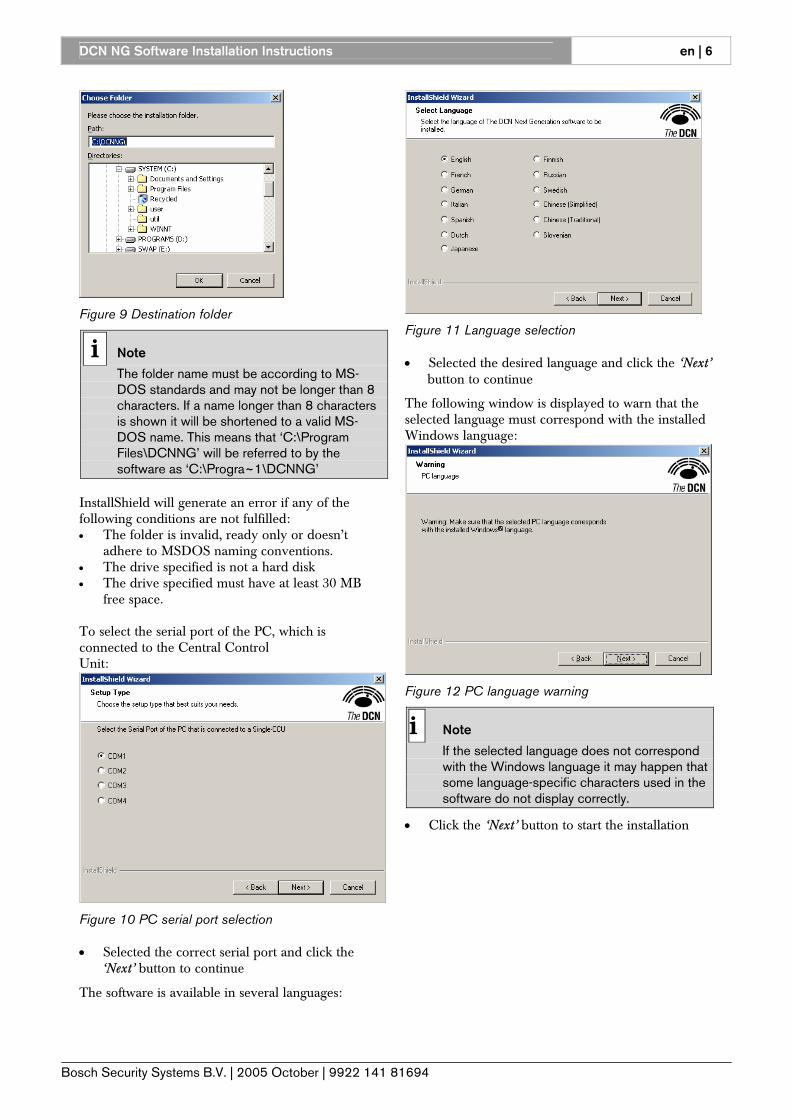
Figure 9 Destination folder
i Note
The folder name must be according to MS-DOS standards and may not be longer than 8 characters. If a name longer than 8 characters is shown it will be shortened to a valid MS-DOS name. This means that ‘C:\Program Files\DCNNG’ will be referred to by the software as ‘C:\Progra~1\DCNNG’
InstallShield will generate an error if any of the following conditions are not fulfilled: • The folder is invalid, ready only or doesn’t
adhere to MSDOS naming conventions. • The drive specified is not a hard disk • The drive specified must have at least 30 MB
free space. To select the serial port of the PC, which is connected to the Central Control Unit:
Figure 10 PC serial port selection
• Selected the correct serial port and click the ‘Next’ button to continue
The software is available in several languages:
Figure 11 Language selection
• Selected the desired language and click the ‘Next’ button to continue
The following window is displayed to warn that the selected language must correspond with the installed Windows language:
Figure 12 PC language warning
i Note
If the selected language does not correspond with the Windows language it may happen that some language-specific characters used in the software do not display correctly.
• Click the ‘Next’ button to start the installation
Bosch Security Systems B.V. | 2005 October | 9922 141 81694
DCN NG Software Installation Instructions en | 7
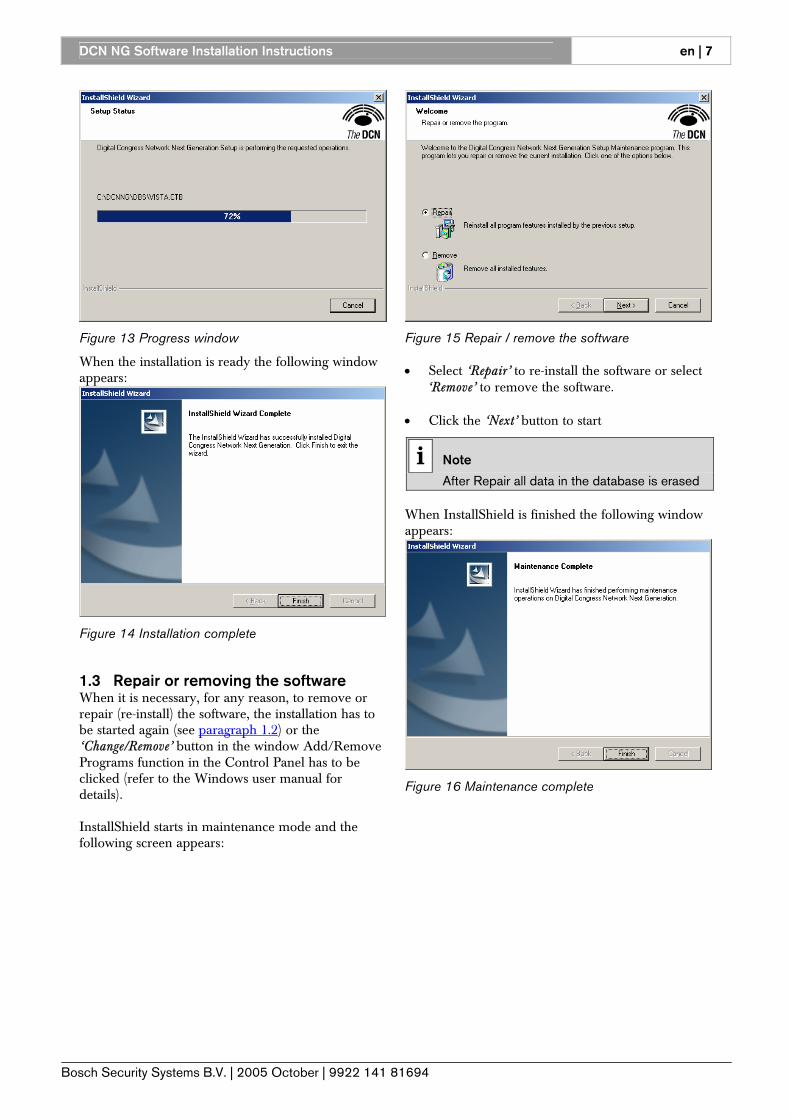
Figure 13 Progress window
When the installation is ready the following window appears:
Figure 14 Installation complete
1.3 Repair or removing the software When it is necessary, for any reason, to remove or repair (re-install) the software, the installation has to be started again (see paragraph 1.2) or the ‘Change/Remove’ button in the window Add/Remove Programs function in the Control Panel has to be clicked (refer to the Windows user manual for details). InstallShield starts in maintenance mode and the following screen appears:
Figure 15 Repair / remove the software
• Select ‘Repair’ to re-install the software or select ‘Remove’ to remove the software.
• Click the ‘Next’ button to start
i Note
After Repair all data in the database is erased When InstallShield is finished the following window appears:
Figure 16 Maintenance complete
Bosch Security Systems B.V. | 2005 October | 9922 141 81694

DCN NG Software Installation Instructions en | 8
2 Card Encoder
2.1 Installing the driver To install the driver for the card encoder the following procedure is necessary.
i Note
Don’t connect the Card Encoder to the PC before the driver of the card is installed and the PC is rebooted.
• Click on the ‘Start button and select ‘Run…’
A dialog box appears:
Figure 17 Run dialog box
i Note
It is also possible to start the card-encoder driver installation from the PC Control software CDROM.
The InstallShield Wizard starts and prepares for installing:
Figure 18 SCR131 InstallShield window
• Click the ‘Next’ button to continue
If the ‘Cancel’ button is pressed during the installation process, the installation will be cancelled and the following window appears:
Figure 19 Cancel notification window
• Click the ‘Yes’ button to quit the setup
The ‘InstallShield Wizard Completed’ window appears:
Figure 20 Installation cancelled
• Click the ‘No’ button to continue
The license agreement window appears:
Figure 21 The license agreement window
• Whenever the ‘Back’ button is clicked the previous window will appear.
Bosch Security Systems B.V. | 2005 October | 9922 141 81694

DCN NG Software Installation Instructions en | 9
• Click the accept radio button and click ‘Next’.
• Click ‘Next’.
• Click ‘Next’.
• Click ‘Install’.
When InstallShield is ready the following window appears:
Figure 22 InstallShield Wizard Completed window
• Select the ‘Yes, I want to shut down my computer now’ radio button and click ‘Finish’
Now the PC will reboot and the driver is installed. After reboot the Card Encoder can be connected to the PC. After connecting the Card Encoder the new hardware has to be found.
• From the ‘Start’, ‘Settings’, ‘Control Panel’ select ‘Add/Remove Hardware’
The wizard appears
Figure 23The 'Add/Remove Hardware Wizard’ window
• Click ‘Next’
• Select ‘Add/Troubleshoot a device’ and click ‘Next’
The new hardware is found:
• Select the Card Encoder and click ‘Next’
• Click ‘Finish’ to finish and close the wizard
Bosch Security Systems B.V. | 2005 October | 9922 141 81694
DCN NG Software Installation Instructions en | 10
3 Windows 2000
3.1 Installing a network If you wish more than one PC to control the congress system, it is necessary to first install the Microsoft Network.
i Note
Full functionality is guaranteed up to 4 PC's. Limited functionality is possible with up to 10 PC's. More information is available on request.
i Note
The configuration procedure that follows assumes that DCN computers are connected to a dedicated, stand-alone network, to which noting else is connected. This is the recommended configuration. If this kind of dedicated network is not possible, contact the local ICT department and use the following procedure as a reference.
i Note
Before continuing this procedure. Be sure to disable all power saving options. Also the auto disconnect of your network driver should be disabled. For more information about these issues refer to the manual of the PC.
To install the network, first log in as an administrator. From the ‘Start’ menu:
• Select ‘Settings’, ‘Control Panel’.
• Double-click on ‘Network and Dial-up Connections’.
• Double-click on ‘Local Area Connection’.
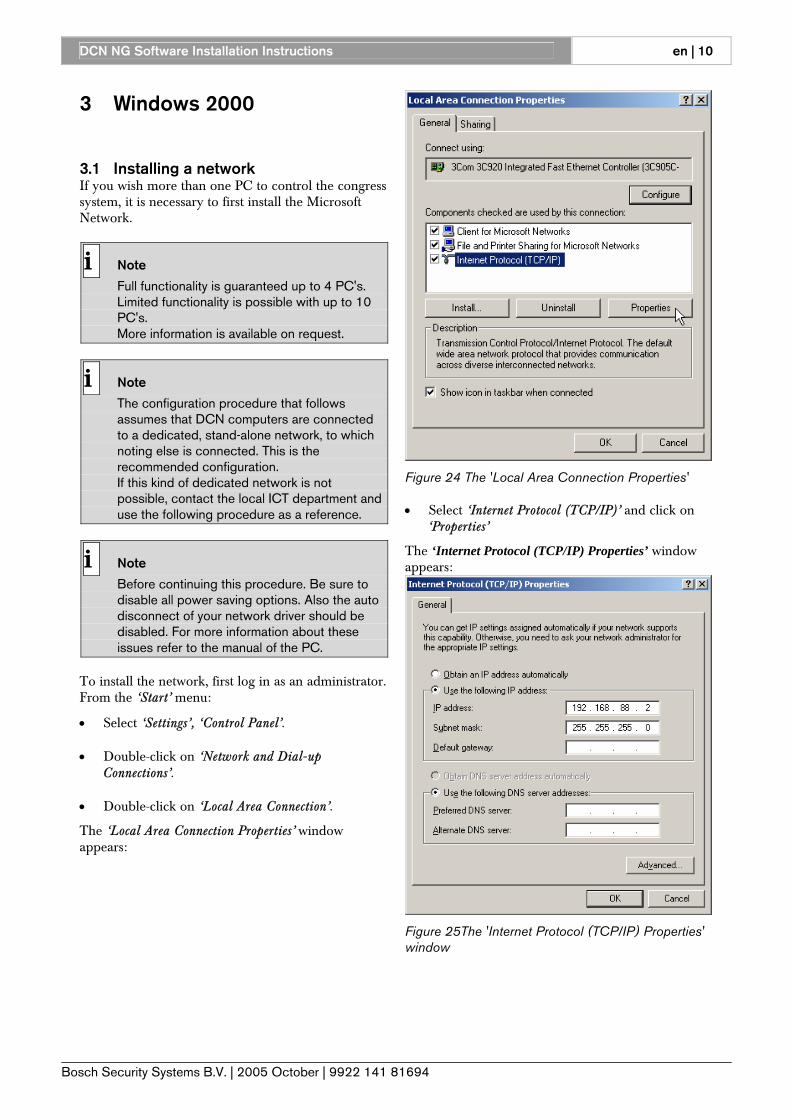
The ‘Local Area Connection Properties’ window appears:
Figure 24 The 'Local Area Connection Properties'
• Select ‘Internet Protocol (TCP/IP)’ and click on ‘Properties’
The ‘Internet Protocol (TCP/IP) Properties’ window appears:
Figure 25The 'Internet Protocol (TCP/IP) Properties' window
Bosch Security Systems B.V. | 2005 October | 9922 141 81694

DCN NG Software Installation Instructions en | 11
• Select ‘Use the following IP address’
• Enter an IP address from the following range 192.168.88.2 – 192.168.88.254. Each PC must have a different IP address.
• Enter the following subnet mask : 255.255.255.0
• Leave ‘Use the following DNS server addresses’ empty
• Click on ‘Advanced’ and select the tab ‘WINS’ and select ‘Enable NETBIOS over TCP/IP’
• Click on ‘OK’ and select ‘Yes’
• Click on ‘OK’ to leave the ‘Local Area Connection Properties’ window.
It is now necessary to set the network identification. From the Control Panel:
• Double-click on ‘System’.
• Select the ‘Network Identification’ tab.
• Click on ‘Properties’.
The ‘Identification Changes’ window appears:
Figure 26 The 'Identification Changes' window
• Enter an unique and logical Computer name in the text box, e.g. ‘Server’, ‘DCN1’, ‘DCN2’, etc. The name may not exceed 12 characters.
• Select the ‘Workgroup’ radio button.
• Enter a workgroup name in the text box e.g. ‘DCN’. All computers must have the same workgroup name.
• Click on ‘OK’ to leave the ‘Identification Changes’ window.
• Click on ‘OK’ to leave the ‘System’ window.
In most cases Windows will ask for a reboot of the PC. Select to reboot before continuing. On the PC that will be the server it is now necessary to enable the default ‘Guest’ user in Windows 2000. To do so:
• From the desktop, select ‘Start’, ‘Settings’ then ‘Control Panel’.
• Double-click on ‘Users and Passwords’.
• Click on the ‘Advanced’ tab, and click on the ‘Advanced’ button in the ‘Advanced User Management’ section.
Figure 27 The 'Local Users and Groups' window
• Double-click on the ‘Users’ folder in the ‘local Users and Groups’ window.
• Click with the RIGHT mouse button on ‘Guest’ and select ‘Properties’.
Bosch Security Systems B.V. | 2005 October | 9922 141 81694
DCN NG Software Installation Instructions en | 12
The ‘Guest Properties’ window appears:
Figure 28 The 'Guest Properties' window
• Enable the account by un-checking the ‘Account is disabled’ tick box.
i Note
This is disabled by default.
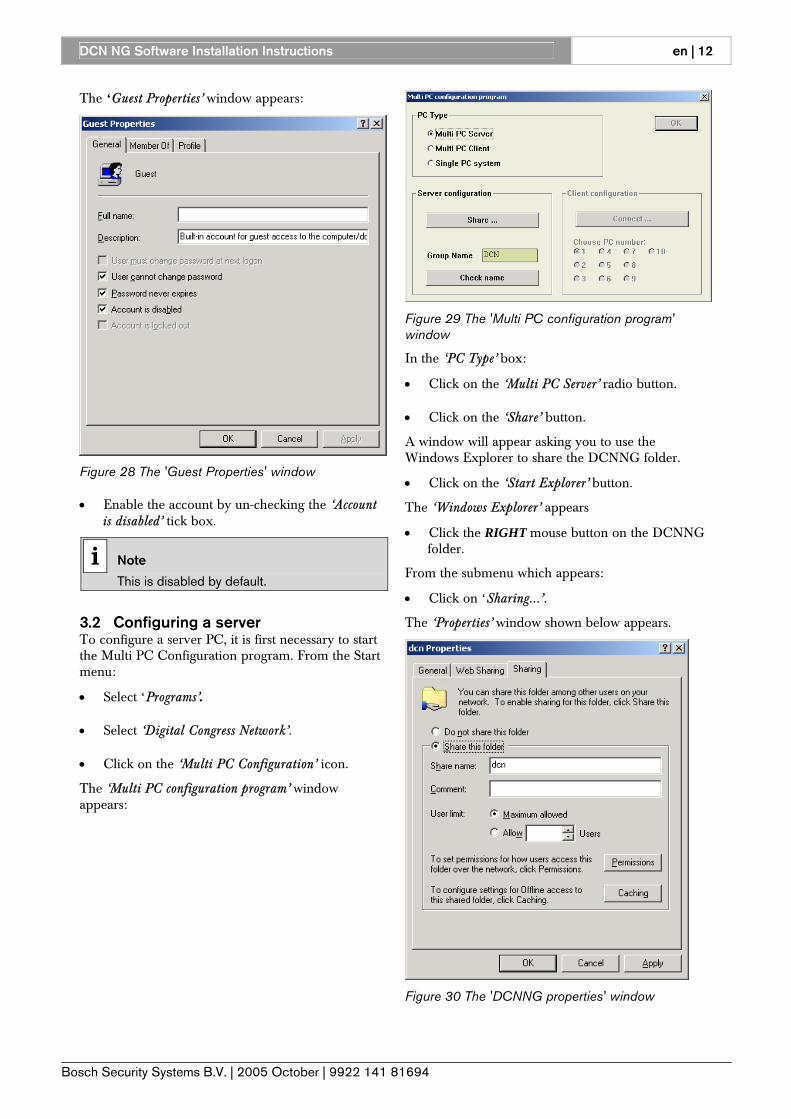
3.2 Configuring a server To configure a server PC, it is first necessary to start the Multi PC Configuration program. From the Start menu:
• Select ‘Programs’.
• Select ‘Digital Congress Network’.
• Click on the ‘Multi PC Configuration’ icon.
The ‘Multi PC configuration program’ window appears:
Figure 29 The 'Multi PC configuration program' window
In the ‘PC Type’ box:
• Click on the ‘Multi PC Server’ radio button.
• Click on the ‘Share’ button.
A window will appear asking you to use the Windows Explorer to share the DCNNG folder.
• Click on the ‘Start Explorer’ button.
The ‘Windows Explorer’ appears
• Click the RIGHT mouse button on the DCNNG folder.
From the submenu which appears:
• Click on ‘Sharing...’.
The ‘Properties’ window shown below appears.
Figure 30 The 'DCNNG properties' window
Bosch Security Systems B.V. | 2005 October | 9922 141 81694

DCN NG Software Installation Instructions en | 13
• Click on the ‘Shared As’ radio button.
In the ‘Share Name:’ text box:
• Enter a name that identifies this share on the server.
In the ‘Comment:’ text box:
• Enter any additional text describing the system.
• Click on the ‘Permissions’ button.
The ‘Permissions’ window shown below appears.
Figure 31 The 'Permissions' window
The settings should be as illustrated, with ‘Everyone’ having ‘Full Control’. If ‘Everyone’ is not in this list:
• Click on the ‘Add...’ button.
The ‘Select Users, Computers or Groups’ window shown below appears.
Figure 32 The 'Select Users or Groups' window
• Select ‘Everyone’ and click on the ‘Add’ button.
To return to the ‘Permissions’ window:
• Click on the ‘OK’ button.
• Select ‘Everyone’ and set ‘Full Control’ to ‘Allow’.
• Click on the ‘OK’ button to accept the changes.
• Click on the ‘OK’ button to exit the ‘Permissions’ window.
• Click on the ‘OK’ button to exit the ‘Properties’ window.
• Close the Windows Explorer by clicking on the cross on the upper right corner of the Explorer window.
You will return to the ‘Multi PC configuration’ window.
• Enter the desired Group Name in the text box and click the ‘Check name’ button.
The computer will now check if a valid group name has been entered. If the group name is invalid, an error message will appear and you must enter a valid group name.
• Click on the ‘OK’ push button.
The PC is now configured as a server PC.
3.3 Configuring a client To configure a client PC, it is first necessary to start the Multi PC Configuration program. From the Start menu:
• Select ‘Programs’.
• Select ‘Digital Congress Network’.
• Click on the ‘Multi PC Configuration’ icon.
The ‘Multi PC configuration program’ window appears:
Bosch Security Systems B.V. | 2005 October | 9922 141 81694
DCN NG Software Installation Instructions en | 14
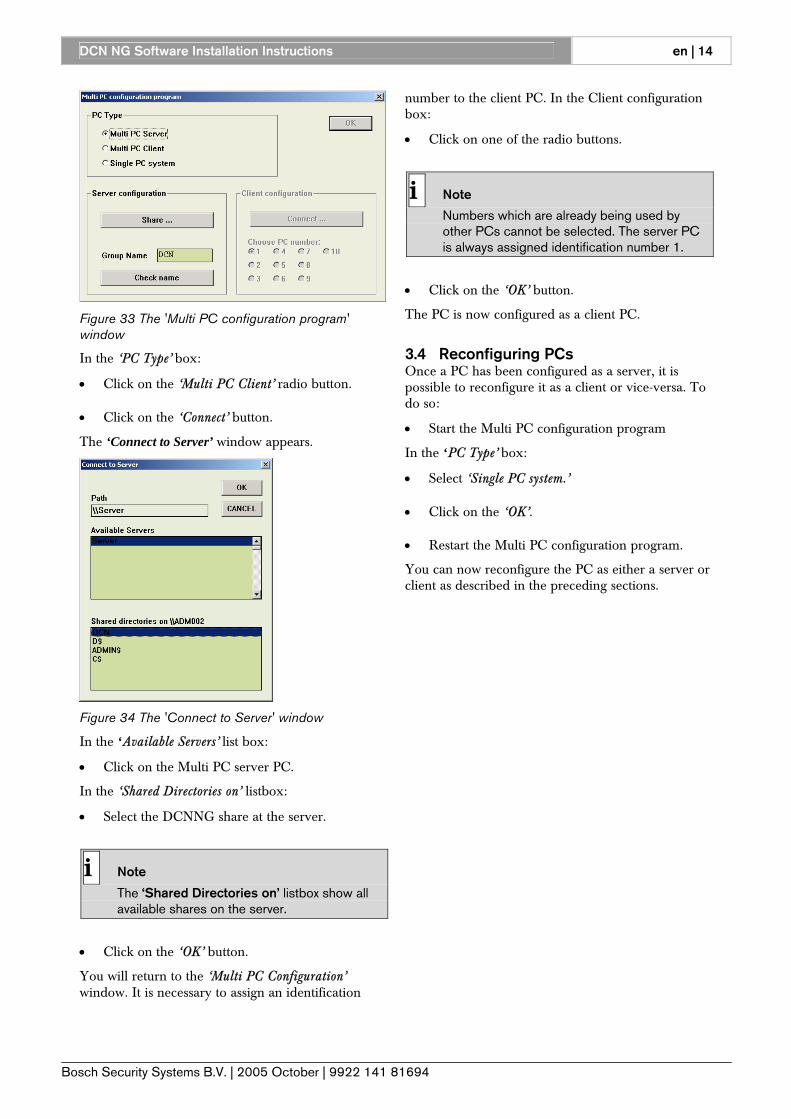
Figure 33 The 'Multi PC configuration program' window
In the ‘PC Type’ box:
• Click on the ‘Multi PC Client’ radio button.
• Click on the ‘Connect’ button.
The ‘Connect to Server’ window appears.
Figure 34 The 'Connect to Server' window
In the ‘Available Servers’ list box:
• Click on the Multi PC server PC.
In the ‘Shared Directories on’ listbox:
• Select the DCNNG share at the server.
i Note
The ‘Shared Directories on’ listbox show all available shares on the server.
• Click on the ‘OK’ button.
You will return to the ‘Multi PC Configuration’ window. It is necessary to assign an identification
number to the client PC. In the Client configuration box:
• Click on one of the radio buttons.
i Note
Numbers which are already being used by other PCs cannot be selected. The server PC is always assigned identification number 1.
• Click on the ‘OK’ button.
The PC is now configured as a client PC.
3.4 Reconfiguring PCs Once a PC has been configured as a server, it is possible to reconfigure it as a client or vice-versa. To do so:
• Start the Multi PC configuration program
In the ‘PC Type’ box:
• Select ‘Single PC system.’
• Click on the ‘OK’.
• Restart the Multi PC configuration program.
You can now reconfigure the PC as either a server or client as described in the preceding sections.
Bosch Security Systems B.V. | 2005 October | 9922 141 81694

DCN NG Software Installation Instructions en | 15
4 Windows XP
4.1 Installing a network If you wish more than one PC to control the congress system, it is necessary to first install the Microsoft Network.
i Note
Full functionality is guaranteed up to 4 PC's. Limited functionality is possible with up to 10 PC's. More information is available on request.
i Note
The configuration procedure that follows assumes that DCN computers are connected to a dedicated, stand-alone network, to which noting else is connected. This is the recommended configuration. If this kind of dedicated network is not possible, contact the local ICT department and use the following procedure as a reference.
i Note
Service Pack 2 for Windows XP is required to use a Windows XP computer in a DCN Next Generation network. This Service Pack can be downloaded from the Microsoft website. http://www.microsoft.com
i Note
Before continuing this procedure. Be sure to disable all power saving options. Also the auto disconnect of your network driver should be disabled. For more information about these issues refer to the manual of the PC.
To setup the network, first log in as an administrator.
• From the desktop click the right mouse button on the ‘Start’ menu and click on ‘Properties’.
The ‘Taskbar and Start Menu Properties’ window appears:
Figure 35 The ‘Taskbar and Start Menu Properties’ window
• Select the ‘Classic Start menu’ radio button.
• Click on ‘OK’.
• Open the Windows Explorer
The ‘Windows Explorer’ appears
Figure 36The 'Windows Explorer’ window
• Select ‘Folder Options’ options from the ‘Tools’ menu.
Bosch Security Systems B.V. | 2005 October | 9922 141 81694
DCN NG Software Installation Instructions en | 16
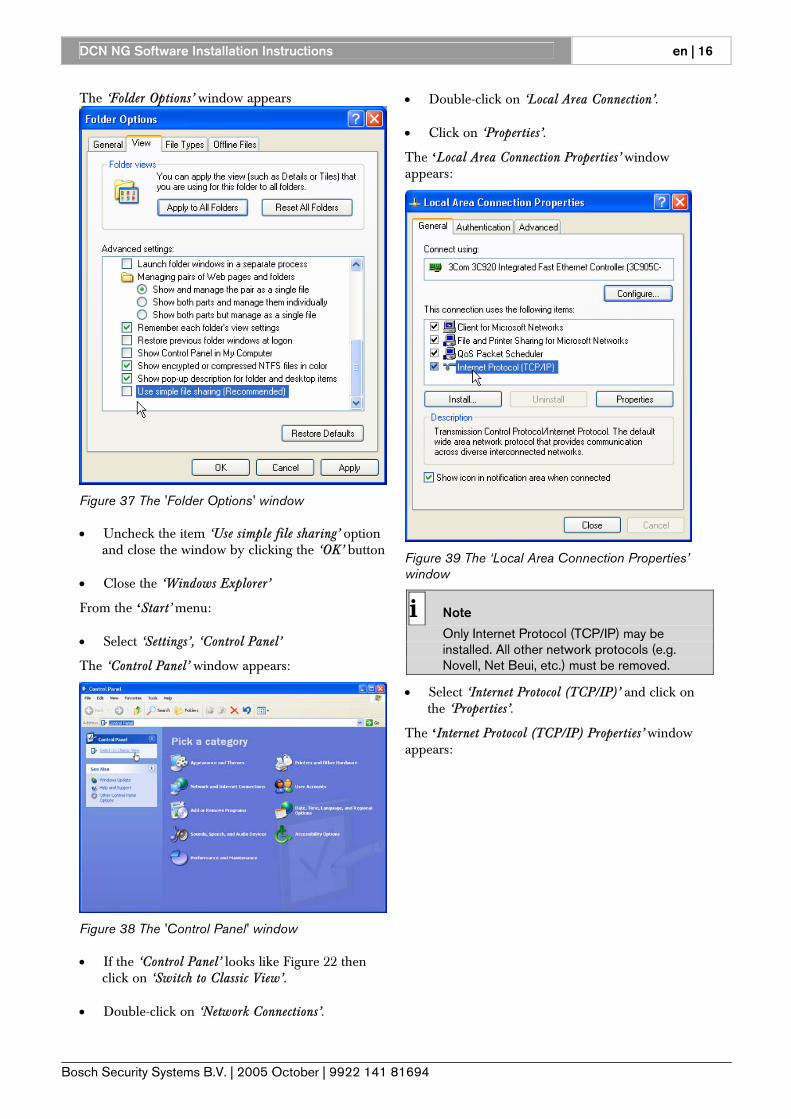
The ‘Folder Options’ window appears
Figure 37 The 'Folder Options' window
• Uncheck the item ‘Use simple file sharing’ option and close the window by clicking the ‘OK’ button
• Close the ‘Windows Explorer’
From the ‘Start’ menu:
• Select ‘Settings’, ‘Control Panel’
The ‘Control Panel’ window appears:
Figure 38 The 'Control Panel' window
• If the ‘Control Panel’ looks like Figure 22 then click on ‘Switch to Classic View’.
• Double-click on ‘Network Connections’.
• Double-click on ‘Local Area Connection’.
• Click on ‘Properties’.
The ‘Local Area Connection Properties’ window appears:
Figure 39 The ‘Local Area Connection Properties’ window
i Note
Only Internet Protocol (TCP/IP) may be installed. All other network protocols (e.g. Novell, Net Beui, etc.) must be removed.
• Select ‘Internet Protocol (TCP/IP)’ and click on the ‘Properties’.
The ‘Internet Protocol (TCP/IP) Properties’ window appears:
Bosch Security Systems B.V. | 2005 October | 9922 141 81694

DCN NG Software Installation Instructions en | 17
Figure 40 The ‘Internet Protocol (TCP/IP) Properties’ window
• Select ‘Use the following IP address’
• Enter an IP address from the flowing range 192.168.88.2 – 192.168.88.254. Each PC must have a different IP address.
• Enter the following subnet mask: 255.255.255.0
• Leave ‘Use the following DNS server addresses’ empty
• Click on ‘Advanced’ and select the tab ‘WINS’ and select ‘Enable NETBIOS over TCP/IP’
• Click on ‘OK’ and select ‘Yes’
• Click on ‘OK’ to leave the ‘Local Area Connection Properties’ window.
Now the firewall must be switched of for software to work correctly in a network.
• Click on the ‘Advanced’ tab
The ‘Local Area Connection Properties Advanced’ tab appears:
Figure 41 The ‘Local Area Connection Properties’ tab
• Click the ‘Settings’ button to go to the firewall settings
Figure 42 'Windows Firewall/' window
• Select ‘Off (not recommended)’ to switch off the firewall
Bosch Security Systems B.V. | 2005 October | 9922 141 81694

DCN NG Software Installation Instructions en | 18
• Click on ‘OK’ to leave the ‘Windows Firewall’ window.
• Click on ‘OK’ to leave the ‘Local Area Connection Properties’ window.
• Close the ‘Network Connections’ window. Click ‘Back’ to return to the ‘Control Panel’.
It is now necessary to set the network identification. From the ‘Control Panel’:
• Double-click on ‘System’.
The ‘System Properties’ window appears:
Figure 43 The 'System Properties' window
• Select the ‘Computer Name’ tab.
• Click on ‘Change’.
The ‘Computer Name Changes’ window appears:
Figure 44 The 'Computer Name Changes' window
• Enter the desired ‘Computer Name’ e.g. server.
i Note
Although Widows allows more than 12 characters, the computer name may not be more than 12 characters. Never use the same computer name twice in the same network
• Select the ‘Workgroup’ radio button.
• Enter the desired workgroup in the text box e.g. ‘DCN’.
i Note
All PCs in the network must have the same workgroup name.
• Click on ‘OK’ to leave the ‘Computer Name Changes’ window.
• Click on ‘OK’.
• Click on ‘OK’ to leave the ‘System Properties’ window.
• Click on ‘Yes’ to restart your computer.
Bosch Security Systems B.V. | 2005 October | 9922 141 81694

DCN NG Software Installation Instructions en | 19
It is now necessary to ensure that all PCs can log into the server easily by enabling the default ‘Guest’ user in Windows XP. To do so:
• From the desktop, select ‘Start’, ‘Settings’, ‘Control Panel’, ‘Administrative Tools’ and ‘Local Security Policy’.
The ‘Local Security Settings’ window appears:
Figure 45 The 'Local Security Settings' window
• Select on the left side ‘Users Rights Assignments’ and double click on the right side ‘Deny access to this computer from the network’.
• Select Guest and click ‘Remove’ and click ‘OK’
• Close the Local Security Settings’ window.
4.2 Configuring a server PC The procedure for configuring a server PC under Windows XP is the same as already described for Windows 2000.
4.3 Configuring a client PC The procedure for configuring a client PC under Windows XP is the same as already described for Windows 2000.
4.4 Reconfiguring PCs The procedure for reconfiguring PCs under Windows XP is the same as already described for Windows 2000.
Bosch Security Systems B.V. | 2005 October | 9922 141 81694

For more information please visit www.boschsecurity.com
© 2005 Bosch Security Systems B.V. Data subject to change without notice October 2005 | 9922 141 81694


