34


Dear Valued Customer,
Congratulations on making a smart choice! You have joined an elite group of cookingenthusiasts who demand only the very best from their appliances. A Capital Cooking appliancepromises years of enjoyment and maximum pleasure, allowing cooks everywhere to createculinary memories that last a lifetime.
Because of the unique features found in our appliances, we urge you to read this manualthoroughly before installation and use. And please RETAIN THIS MANUAL FOR FUTUREREFERENCE: it is an invaluable guide to help you better understand your Capital Cooking
appliance.
Since your satisfaction is our topmost priority, please feel free to contact our service experts.You may reach us toll free at 866-402-4600, or dial the factory direct at 562-903-1168. You canfax us a list of your concerns, comments, and/or compliments at 562-903-1167, or drop us anemail at [email protected]. Feel free to also write us at 13211 EastFlorence Avenue, Santa Fe Springs, CA 90670.
Our products are designed and proudly manufactured in America. We trust that our strictadherence to the highest quality assurance standards will provide you with years of troubledfree, gourmet cooking.
Happy Cooking!
Capital Cooking Test Kitchen Specialists

WARNING!
FOR OUTDOOR USE ONLY!
WARNING!DO NOT attempt to light grill without reading the LIGHTING INSTRUCTIONS section inthis manual.
WARNING!If the information in this manual is not followed exactly, a fire or explosion may result,causing property damage, personal injury or death. Please read the installation, operatingand maintenance instructions thoroughly before use.
WARNING!DO NOT store or use gasoline or any other flammable liquids in the vicinity of this or anyother appliance.
DANGER!If You Smell Gas
Shut off gas to the applianceExtinguish any open flames
Open lidIf odor continues, keep away from the appliance and immediately call your gas supplier
or your fire department.
WARNING!Our grills produce intense heat with temperatures in excess of 1000 degrees. To avoid therisk of damaging (warping) the lid and causing injury, DO NOT operate the grill with allburners on HI (including rotisserie burner) and lid closed for more than 8 minutes at anygiven time.
Failure to follow provided instructions or follow basic safety precautions will voidall warranties.Capital Cooking is not responsible for damages or injuries caused by a failure tofollow instructions or basic safety practices.
NOTE:Children and pets should never be left alone or unattended in area where the grill is beingused.
PLEASE RETAIN THIS MANUAL FOR FUTURE REFERENCE
Tested in accordance with ANSI Z21.58b-2002/CGA 1.6 b2002 For US and Canada for LP and Natural Gas.STANDARD FOR OUTDOOR USE ONLY.
Check your local building codes for the proper method of installation. In the absence of local codes, thisunit should be installed in accordance with the National Fuel gas Code. No. Z223.1-1998 and National
Electrical Code ANSI/NFPA No. 70-1990

SAFETY PRACTICES AND PRECAUTIONS
WARNING!When in use, portions of this grill get hot enough to cause severe burns. Children and petsshould never be left alone or unattended in an area where the grill is being used. Never allowchildren to sit, stand, or play on or around the grill at any time.
When properly cared for, your Precision Series" grill will give you years of safe and reliable enjoyment.However, extreme care must be taken since the grill produces intense heat, increasing the risk ofaccident. When using this appliance, basic safety practices must be followed, including the following:
To reduce the risk of fire, burns, or other injury, read this Use and Care guide thoroughly. Begin byensuring proper installation and servicing. Do not repair or replace any part of the grill unless specificallyrecommended in this manual. All other service must be referred to a qualified Factory AuthorizedTechnician.
DO NOT store items of interest to children in or around the grill. Never allow children to crawlinside the cart storage drawers or inside access doors.
NEVER let clothing, pot holders or other flammable materials come into contact with or come tooclose to any grate, burner or hot surface until it has cooled. Fabric may ignite and result inpersonal injury.
DO NOT heat unopened food containers. A build up of pressure may cause the container to burst.
ALWAYS use a covered hand when opening the grill lid and only do so slowly to allow heat andsteam to escape.
NEVER lean on an open grill. When lighting a burner, always pay close attention to what you aredoing. Be certain the gill has electricity connected and the igniter glows when a burner knob isturned ON
DO NOT touch the grill burner grate, warming rack, lights or any item in the interior cavity orsurrounding area of the grill when burners are on. These areas become extremely hot and couldcause severe burns.
GREASE is flammable. Let hot grease cool before attempting to handle it. Avoid letting greasedeposits collect in the drip pan. Clean the grill often.
DO NOT line drip tray or grill racks with aluminum foil. This may severely disrupt combustionairflow or trap excessive heat in the controlled area. This may result in melted knobs and/origniter, damage to the lighting system and may cause excessive heat on the control panel area.
TAKE PRECAUTION when cleaning the grill. To avoid steam burns do not use a wet sponge orcloth to clean the grill while it is hot. Some cleaners produce noxious fumes or can ignite if appliedto a hot surface.
SAFETY PRACTICES AND PRECAUTIONS
BE SURE all control knobs are in the OFF position and grill is cool prior to using any aerosolcleaner on or around the grill. The chemical that produces the spraying action could, in thepresence of heat, ignite or cause metal part to corrode.
ALWAYS use dry potholders: moist or damp potholders on hot surfaces may cause steam burns.Do not use a towel or bulky cloth in place of potholders.
DO NOT let potholders touch hot portions of the grill rack or burner.
DO NOT use the grill to cook excessively fatty meats or products that promote flare-ups.
NEVER use the grill without the drip tray in place and pushed all the way to the back of the grill.Grease could leak downward and produce a fire or explosion hazard.
DO NOT operate the grill under unprotected combustible construction. Use only in a wellventilated area. DO NOT obstruct the flow of combustion and ventilation air.
DO NOT use the grill in buildings, garages, sheds, breezeway or other such enclosed areas. Thisunit is for Outdoor Use Only!
KEEP ALL electrical cords away from the heated areas of the grill.
BEGIN by ensuring proper installation and servicing. Follow the installation instructions providedwith this product. Have your grill installed by a qualified technician. Have the installer show youwhere the gas supply shut off valve is located so you know where to shut off the gas to the grill inan emergency.
IF YOU SMELL GAS, your installer has not done a proper job of checking for leaks. If theconnections are not perfectly sealed, you can have a small leak and therefore a faint gas smell.Finding a leak is not a “do-it-yourself” procedure. Some leaks can only be found with the burnercontrol in the “ON” position. This must be done only by a qualified technician.
IMPORTANT SAFETY NOTICE REGARDING LP TANKS:Certain Liquid Propane dealers may fill liquid propane cylinders for use in the grill beyondcylinder filling capacity. This “Overfilling” may create a dangerous condition.
“Overfilled” tanks can build up excess pressure. As a safety device, the tank’s pressure reliefvalve will vent propane gas vapor to relieve this excess pressure. This vapor is combustible andtherefore can be ignited. To reduce this danger, you should take the following safety precautions:
1. When you have your tank filled, be sure you tell the supplier to fill it to no more than ¾(75%) of its total filling capacity.
2. If you own or use an extra tank, or have a disconnected tank, you should never store itnear or under the grill unit or heat box, or near any other ignition or heat source.

SAFETY PRACTICES AND PRECAUTIONS
NEVER store a spare LP cylinder under or near the unit.NEVER fill the tank beyond ¾ full.
A fire causing death or serious injury may occur.
Never use a dented or rusty LP tank.
A NOTE ON CLOTHING:For personal safety, wear proper apparel. Loose fitting garments or sleeves should never be worn while using this
appliance. Some synthetic fabrics are highly flammable and should not be worn while cooking.
A NOTE ON COOKWARE:Only certain types of glass, heat-proof glass ceramic, earthenware, or other glazed utensils are suitable for grill use.Other types of materials may break with sudden temperature changes. Use only on low or medium heat settingaccording to the manufacturer’s directions.
WARNING:Spiders and insects can nest in the burners of this and any other grill, and cause the gas to flow from thefront of the burner. This is a very dangerous condition that can cause a fire to occur behind the valve panel,thereby damaging the grill and making it unsafe to operate.
WARNING:Keep the area surrounding the grill free from combustible materials, trash, combustible fluids and vaporssuch as gasoline or charcoal lighter fluid. DO NOT obstruct the flow of combustion and ventilation air.
WARNING:NEVER use the grill in windy conditions. If located in a consistently windy area (oceanfront, mountaintop,etc.) a windbreaker will be required. Always adhere to specific clearances listed.
CALIFORNIA PROPOSITION 65 WARNING: The burning of gas cooking fuel generates some by-productswhich are on the list of substances which are known by the State of California to cause Cancer orreproductive harm. California law requires businesses to warn customers of potential exposure to suchsubstances. To minimize exposure to these substances, always operate this unit according to the Use andCare Guide, and ensure you provide good ventilation when cooking with gas.

NATURAL GAS REQUIREMENTS
Verify the type of gas to be used, either LP(propane), or Natural gas, and make sure themarking on the appliance rating plate agrees with thatof the supply.The rating plate is located under the drip tray of thegrill. Never connect an unregulated gas line to theappliance.
An installer supplied gas shut-off valve must beinstalled in an easily accessible location. All installer-supplied parts must conform to local codes, or in theabsence of local codes, with the National ElectricalCodes, ANSI/NFPA 70-1990, and the National FuelGas code, ANSI Z223.1-1998.
All pipe sealants must be an approved type andresistant to the actions of LP gases. Never use pipesealant on flare fittings. All gas connections shouldbe made by a qualified technician and in accordancewith local codes and ordinances.In the absence of local codes, the installation mustcomply with the National Fuel Gas code, ANSIZ223.1-1998. Gas conversion kits are available fromthe factory. When ordering gas conversion kits,please have the model # and gas type (natural or LP)available from your grill.

LP GAS REQUIREMENTS
����$1 ' �����&$5 7�0 2 ' ( / 6�
OR 30# HORIZONTAL TANK
WILL ACCOMODATE A 20# VERTICAL
20# 30#

LEAK TESTING
GENERAL:Although all gas connections on the grill are leak tested at the factory prior to shipment, a complete gas tightnesscheck must be performed at the installation site due to possible mishandling in shipment, or excessive pressureunknowingly being applied to the unit. Periodically check the whole system for leaks, or immediately check if thesmell of gas is detected.
BEFORE TESTING:Do not smoke while leak testing. Extinguish all open flames. Never leak test with an open flame. Make a soapsolution of one part liquid detergent and one part water. You will need a spray bottle, brush, or rag to apply thesolution to the fittings For LP units, check with a full cylinder. The valve panel must be removed to check the valvesand fittings First, remove the knobs. Next, pull the drip pan tray forward slightly to access the screws that affix thefront panel to the unit. Using a screwdriver, remover the screws. Finally, gently pull the panel downward and out,making sure that you are not pulling out the wires. Remove the screws which hold the service panel in place.
TO TEST:Make sure that all control valves are in the “OFF”position. Turn the gas supply “ON”. Check allconnections from the supply line, or LP cylinderup to and including the manifold. Soap bubbleswill appear where a leak is present. If a leak ispresent, immediately turn off gas supply, tightenany leaking connections, turn gas on, andrecheck. Check all the gas connections at thebase of the control valves where they screw intothe manifold pipe.
To check rotisserie burner and safety valve, theburner must be lit, then leak test the connectionslocated behind the service panel. If you cannotstop a gas leak, turn off the gas supply and callyour local company, or the dealer from whom youpurchased the grill. Only those partsrecommended by the manufacturer should beused on the Grill. Substitution can void thewarranty.
Do not use the grill until all connections havebeen checked and do not leak.
Check all gas supply fittings for leaks before eachuse. It is handy to keep a spray bottle of soapywater near the shut-off valve of the gas supplyvalve. Spray all the fitting. Bubbles indicate leaks.(See Fig 3 and 4)

LOCATING GRILL/ BUILT IN CLEARANCES
LOCATION:When determining a suitable location, take intoaccount concerns such as exposure to wind,proximity to traffic paths and keeping any gas orelectrical supply lines as short as possible.Locate the grill only in a well- ventilated area.Never locate the grill inside a building garage,breezeway, shed or other such enclosure areawithout an approved ventilation system. Duringheavy use, the grill will produce a lot of smoke.Ensure there is adequate area for the smoke todissipate.
IMPORTANT:A minimum of 12” clearance from the side and aminimum of 12” from the back must bemaintained from the grill above and below thecooking surface to adjacent vertical combustibleconstruction. See (Fig 6) on the next page.
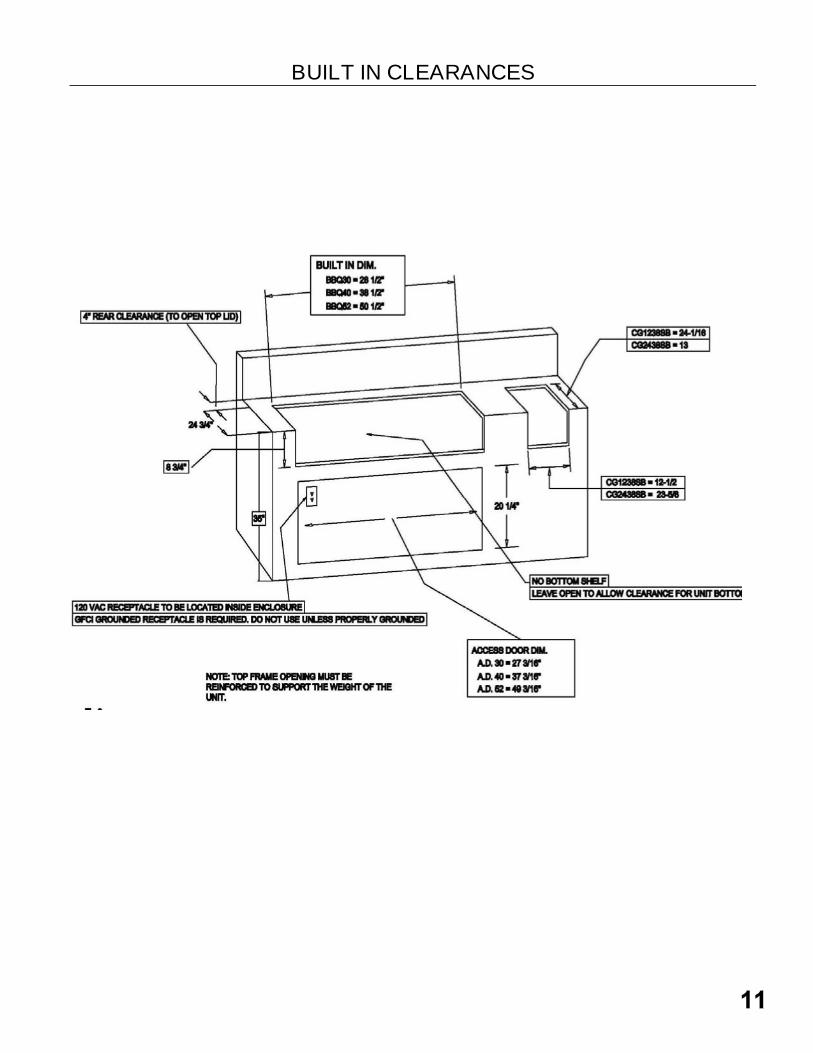
BUILT IN CLEARANCES

ELECTRICAL CONNECTION INSTRUCTIONS
ELECTRICAL CONNECTIONUse an approved extension cord, rated for 120 VAC, 15 Amps, to connect power to the transformer box.
Make sure there are no cuts in the insulation to prevent electric shock. A certified GFIC receptacle must beinstalled and used for safety. The receptacle must be properly grounded.
This appliance is equipped with a three-prong (grounding) receptacle for your protection against shockhazard and should be plugged directly into a properly grounded GFIC receptacle using an appropriateextension cord. Do not cut or remove the grounding prong from the extension cord.
NOTE: The use of a qualified technican/electrican is recommended for all electric connection.

FLAME HEIGHT
GRILL BURNER FLAME HEIGHT:
To access the grill burner air shutters, first remove the grill racks and radiant trays, Lift the burner out as describedin the section BURNER CLEANING. With a screw driver, loosen the set-screw on the air shutter. Light the burnerand adjust according to the directions below. Access for the side burner air shutters is through the top afterremoving the top burner grate and aeration pan assembly (see Fig 7).
BURNER ADJUSTMENTS
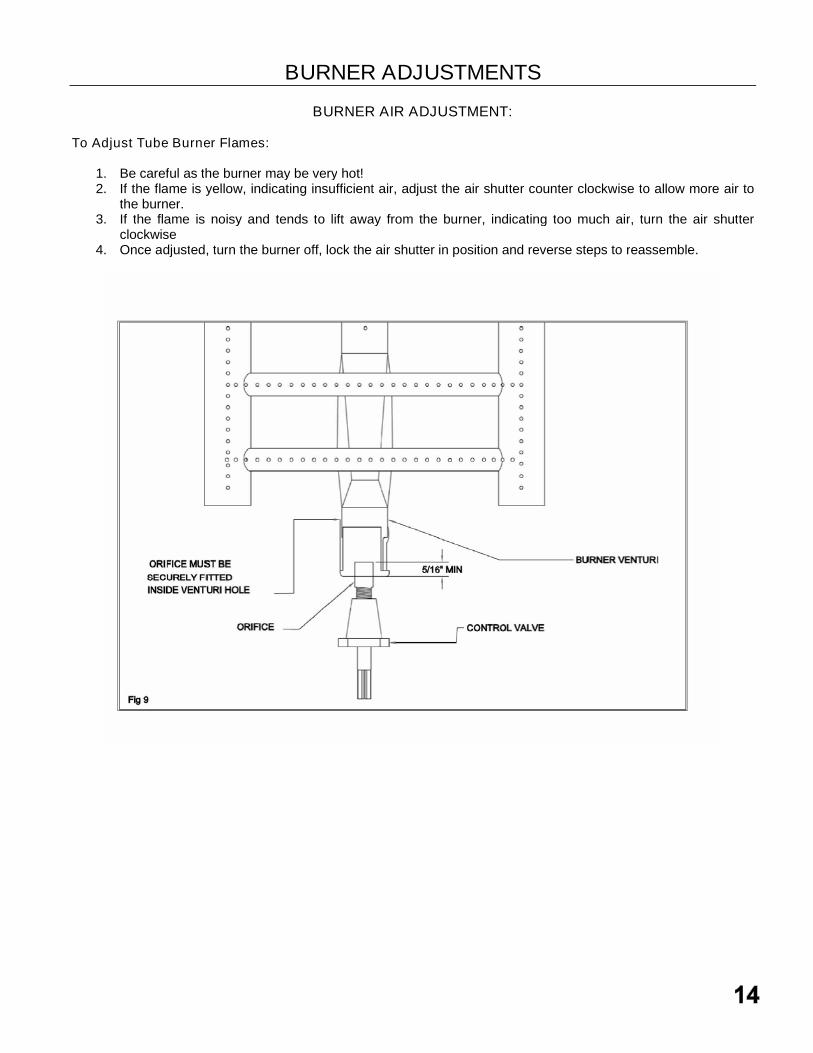
BURNER AIR ADJUSTMENT:
To Adjust Tube Burner Flames:
1. Be careful as the burner may be very hot!2. If the flame is yellow, indicating insufficient air, adjust the air shutter counter clockwise to allow more air to
the burner.3. If the flame is noisy and tends to lift away from the burner, indicating too much air, turn the air shutter
clockwise4. Once adjusted, turn the burner off, lock the air shutter in position and reverse steps to reassemble.

BURNER ADJUSTMENTS (continued)
To Adjust:(Tools Required: Pliers, Flat Head Screwdriver)
1. Light the burner.2. Turn the control knob to the lowest setting (all the way counter clockwise).3. Remove the knob.4. While holding the valve shaft with the pliers, insert a thin flat-Head screwdriver into the shaft and while
viewing the burner adjust to a minimum stable flame. (Fig 10)
WARNING: IMPORTANT!Before lighting, inspect the gassupply piping or hose prior toturning the gas “ON”. If there isevidence of damage or excessivewear, it must be replaced prior touse.

USING THE GRILL/FEATURES
USING THE GRILL:Each grill section consists of a large stainless steel “W” shaped burner or a Sear-Perfect Zone infrared grill burner,stainless heat baffles a series of hybrid stainless steel and ceramic radiants. Each “W” shaped burner is rated at25,000 BTU/Hr. Above the burners are hybrid stainless/ceramic radiants which provide even heat, reduce flare-upsand protect the burner ports from blockage due to spills.
PRECISION “W” BURNER:The Precision Series" gas grills feature the Capital exclusive “W” shaped burners. These are constructed fromheavy gauge 304 stainless steel. They are rated at 25,000 BTU/HR. Due to their large size they offer greatercoverage across entire grill surface, which means no more cold spots! Our 30 inch 40 inch, and 52 inch models alsofeature an infrared Burner/s
A TRUE RADIANT SYSTEM:Capital’s new Precision Series grills utilize a revolutionary “hybrid” radiant system that takes the best features of astainless steel radiant and combines them with the characteristics of a ceramic radiant, while eliminating theweaknesses of each. These radiants prevent flames from directly contacting cooking food and prevent uneventemperatures. They suppress flare-ups considerably. This radiant system also enhances flavors by burningdrippings from the cooking food and basting the food in the smoke of the drippings.
The unique design of the stainless steel encased ceramic radiant elements allows the burner flames to directly heatthe ceramics for a near instantaneous heat transfer over the entire cooking area. The ceramics absorb and thenevenly distribute heat which eliminates hot spots and reduces flare ups. By retaining heat, the ceramics also reducethe amount of gas required to maintain a hot grill.
The stainless steel protects the ceramic elements from breakage, common with ceramic materials, while containingthem for ease of handling and use. Each radiant module is removable and reversible to allow self cleaning afterheavy soiling.
The new Capital hybrid radiant combines the durability and design flexibility of a stainless steel radiant with all thebenefits modern ceramic materials can provide.
BBQ’ING or GRILLING ? YOUR CHOICE!Did you know there is difference between BBQ’ing and Grilling? BBQ’ing requires slow cooking foods with low tomoderate heat, and grilling requires intense searing heat to lock in the juices. The Precision Series" is the mostversatile grill on the market, because it allows you to do both simultaneously. Our main “w” burners allow forcontrolled heat, slow cooking vegetables, fish and poultry over a long period of time to ensure maximum resultswhile the Sear-Perfect Zone" allows rapid, intense cooking that locks in juices. But turn down the heat and you canslow cook your food to perfection. Cooked either way, the wonderful results will speak for themselves.
WHAT’S YOUR FAVORITE CHANNEL?Our 40 and 52 inch grills feature a superior grill rack system that channels grease and allows it to flow into specialseep holes and down to the drip tray for easy clean-up. Our channel grate are constructed of a heavy gaugestainless steel; which are electro-polished for a brilliant finish. We recommend that you clean the grill racks aftereach use to maintain their superior grease channeling design. Discoloration after first use is normal. Our 30” Grillsutilize traditional rod grates but Channel Grates are available as an accessory. Please ask your dealer for details.

USING THE GRILL/FEATURES
HIT THE LIGHTS!Each model in the Precision Series" line features night-lights. There are located on the rotisserie panel and pointdownward to illuminate the entire grilling surface. Each light is rated at 20 W and is operated by a switch located onthe front panel. Say goodbye to clunky night-lights and cumbersome extension cords. Now you can grill all night tillthe break of dawn and beyond.Go on, “Hit the Lights!”
REPLACEMENT OF REGULATOR AND HOSE:The pressure regulator and hose assembly supplied with the unit must be used. The replacement pressureregulators and hose assembly must be the type specified by the manufacturer. Do not use the grill if the odor of gasis present. If the unit is LP, screw the regulator into the tank and leak check the hose and regulator connections witha soap and water solution before operating the grill. Turn all knobs to “OFF” then turn on the gas supply. If LP, isthere gas in the tank? Always keep your face and body as far away as possible from the grill when lighting.
--DO NOT leave the grill unattended while cooking.--KEEP a spray bottle of soapy water near the gas supply valve and check the
connections before each use.--DO NOT attempt to “Light” the grill if odor of gas is detected.
--WAIT five minutes before relighting a hot grill.
IMPORTANT: Using the GrillGrilling requires high heat for searing and proper browning. Most foods are cooked at the ‘MEDIUM’ heat setting forthe entire cooking time. However, when grilling large pieces of meat or poultry, it may be necessary to turn the heatto a lower setting after the initial browning. This cooks the food through without burning the outside. Foods cookedfor a long time or basted with a sugary marinade may need a lower setting near the end of the cooking time.
Check to be certain the drip pan and grease tray are in place.Light the grill burners using the instructions provided in this Use and Care Guide. Lighting Instructions arefound on the inside of the drip pan tray sleeve.With the grill lid open, turn the control knob to “HI” to light. Preheat the grill for 5 to 10 minutes.Place the food on the grill racks and cook to the desired doneness. Adjust heat setting, if necessary. Thecontrol knob maybe set to any position between “HIGH” and “LOW”. Note that most BBQ’ing is performedusing a medium to low flame. Adjust the flame to suit your food requirements.Allow the grill to cool and clean the grates, drip pan and grease tray after each use.
Note: If using LP gas, your preheat time may be shorter than recommended. To preventovercooking or burning, you may want to lower heat settings.

HELPFUL HINTS
A FEW WORDS ON MEAT:The doneness of the meat, whether rare, medium or well done, is affected to a large degree by the thickness of thecut. Expert chefs say that it is impossible to have a rare doneness with a thin cut of meat. The cooking time isaffected by the kind of meat, the size and shape of the cut, the temperature of the meat when cooking begins, andthe degree of doneness desired. When defrosting meats it is recommended that it be done overnight in therefrigerator as opposed to a microwave. This in general yields a juicier cut of meat. Use a spatula instead of tongsor a fork to turn the meat. A spatula will not puncture the meat and let the juices run out. To get the juiciest meats,and seasoning or salt after the cooking is finished and turn the meat only once (juices are lost when the meat isturned several times.) Turn the meat just after the juices begin to bubble to the surface. Trim any excess fat fromthe meat before cooking. To prevent steaks or chops from curling during cooking, slit the fat around the edges at 2-inch intervals.
A FEW WORDS ABOUT FLARE-UPS
Flare ups are unavoidable and usually relate directly to the type of meat being cooked and its fat content.OurPrecision Series Barbecues utilizes hybrid stainless steel/ceramic wave shaped radiants that reduce flare upsconsiderably as compared to all stainless or all ceramic Radiants used by other manufacturers. Always trimexcessive fat and use marinades sparingly.
REPLACING THE LIGHTS
1. Carefully wedge a flat tipped screwdriver between the backglass of the light cover and the rotisserie back panel asshown in Fig A.
2. Using extreme care, push screwdriver back and catch thelight cover with opposing hand as shown in Fig B.
3. Access the bulb and carefully pull to remove. Fig C.
4. Replace bulb with a new one as shown in Fig D.
FIG A FIG B FIG C
FIG D

LIGHTING INSTRUCTIONS
Lighting The Grill Burner:
Note: Open the grill lid before lighting. Turn all knobs to “OFF”. Turn the main gas supply on. If you smell gas, shut-off gas-supply and call for service.
Turn the selected burner knob to “HIGH.” A glow will be visible from the burner igniter during ignition and will remainON while the burner is in use. This is normal and will re-light the burner if the flame goes out and there is gasavailable. If the burner does not light within 4 to 5 seconds, turn knob “OFF” and wait 5 minutes before trying againto allow any accumulated gas to dissipate.
Match or Butane Lighting Method:
CAUTION: Keep your face and hands as far away from the grill as possible when manually lighting burners.
In the event of a power failure or if a burner igniter is damaged, the unit can still be used. If an attempt has just beenmade to ignite a burner, wait 5 minutes and follow the procedure listed below:
1. Prior to lighting, locate the “ignition areas” which are the igniter shields for the burner to be lit. The shieldsare small stainless steel boxes below the grates.
2. Separate two grates above the desired burner as shown in Fig. 12 to allow access to the ignition area3. Using the match holder provided (shown below), located inside the drip tray drawer area, securely place a
match in the clip side of the holder.4. Ignite the match and insert it between the separated grates. Place the flame as close as possible to the
igniter shield of the desired burner.5. Push and turn the control knob for the associated burner to “HIGH”. If the burner does not light in 4
seconds, turn the knob “OFF”, wait 5 minutes to allow gas to dissipate and try again (Fig. 11 and Fig. 12).6. Monitor manually lit burners. If the flame is extinguished they will not automatically reignite. If a flame is
extinguished while in use, turn the burner OFF and wait 5 minutes before relighting to allow gas todissipate.
FIG 11 FIG 12MATCH HOLDERLOCATION
USING THE ROTISSERIE
Lighting the Rotisserie Burner:
NOTE: The safety valve on all Precision Series" rotisserie sections is included in the mainburner valve. No separate safety button is necessary to operate the rotisserie safety feature.
NEVER USE ROTISSERIE BURNER WHEN GRILLING SURFACE ISUSED.
The location of the rotisserie burner makes it moresusceptible to strong wind conditions than theprotected grill burners. For this reason you shouldavoid operating the rotisserie during windy conditions.As an added safety feature we’ve equipped the burnerwith an automatic safety valve that will not allow gas toflow to the rotisserie burner unless the followingconditions are present with the knob on.
The safety valve button is pressed and helddown.The safety valve thermocouple has beensufficiently heated to keep safety valve open.
Open the lid. Push and turn the control valve to “HI”and wait 5 seconds. The igniter will glow brightly toignite the burner. Hold the knob pressed in until therotisserie burner lights. Once lit keep knob pushed inand held in position for 10 seconds. DO NOT let goof the control knob once burner is lit. The burner willnot stay lit unless it is hot. After 10 seconds, releasethe knob and set the knob to the desired setting. Ifthe burner does not light within 4 to 5 seconds,release the safety valve button and turn the controlknob “OFF” and wait 5 minutes before trying again.
If relighting a hot burner, wait 5 minutes.Never leave the control knob ON if rotisserieis not in use.Never light the bottom burners while therotisserie burner is lit.
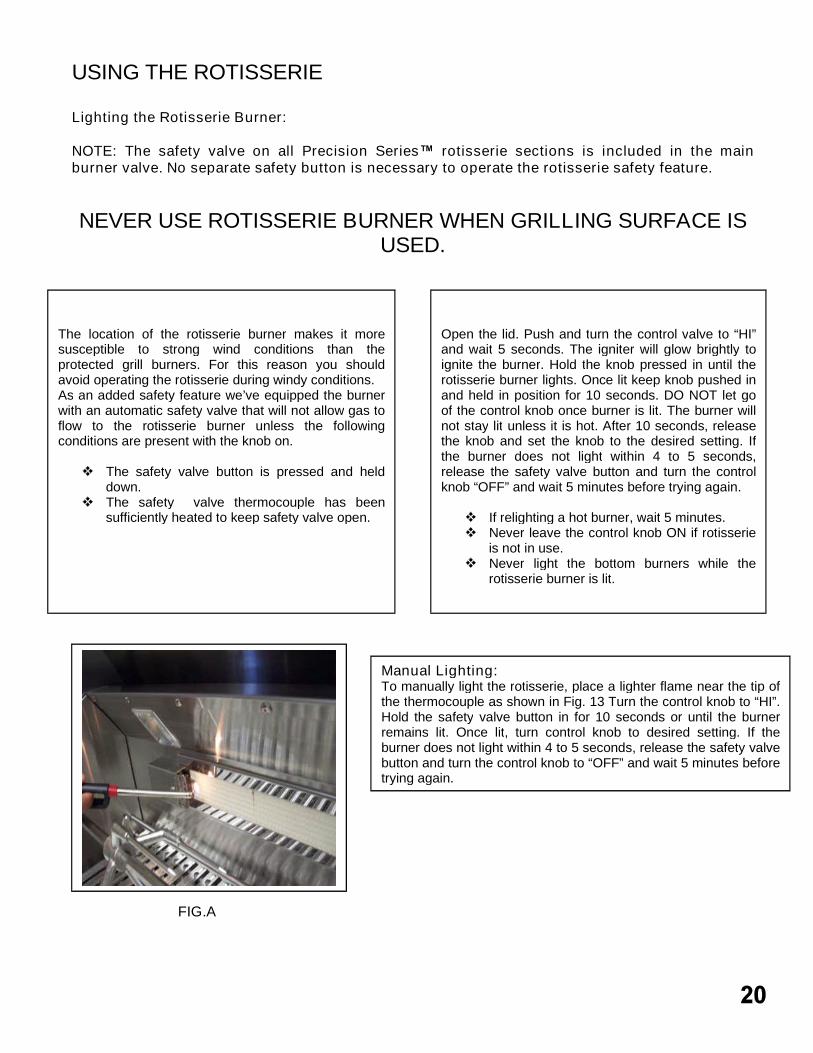
Manual Lighting:To manually light the rotisserie, place a lighter flame near the tip ofthe thermocouple as shown in Fig. 13 Turn the control knob to “HI”.Hold the safety valve button in for 10 seconds or until the burnerremains lit. Once lit, turn control knob to desired setting. If theburner does not light within 4 to 5 seconds, release the safety valvebutton and turn the control knob to “OFF” and wait 5 minutes beforetrying again.
FIG.A

USING THE ROTISSERIE (continued):
Once lit, the rotisserie burner will reach cooking temperatures in about 1 minute. the orange/red glow will even outin about 5 minutes. The rotisserie is equipped with metal gears and is capable of turning up to a 50 lb cut of meat orpoultry.
PREPARATION
Recommended Equipment:Butcher string, scissors, broiler pan (bottom only), pliers, instant read thermometer, foil, and hot pads.
Work Area:Allow enough space to accommodate food and rotisserie rod assembly in a clean environment.
Meat Preparation:Tie meat with butcher string or dental floss in three areas. Buy a roast that is equally balanced from top to bottom insize. The meat will cook more evenly while on the rotisserie. For poultry, tie wings and legs to the body using dentalfloss or butcher string to prevent flopping around.
Determine the center placement for the food, put 1st prong on Rod, turn “L” shaped screw to tighten.
Center tied meat/poultry on rod and place second prong. Turn ”L” shaped screw to tighten.
Pick up rod, rotate it to check for balance, If not balanced, adjust prongs and food to balance it. Take pliersand tighten the “L” shaped screw on both sides of the prong.
Remove grates and warming rack on the grill. Place bottom portion of broiler pan on radiant trays to catchmeat drippings.
Place prepared rod into motor socket, lay across to other side in groove/ball bearings and begin.
NOTE: The grill rotisserie system is designedto cook items from the back using infraredheat. The location of the burner allow theplacement of the rotisserie basting pan(included) beneath the food to collect juicesand drippings for basting and gravy. Toflavor the contents of the basting pan youcan add herbs, onion, garlic, or spices. Hamsare especially good with the addition ofpineapple slices and brown sugar to bastingpan. The rotisserie burner is an infrared typethat provides intense, searing radiant heat.Preferred by chefs over other methods, thisintense heat is magnificent for searing in thenatural juices and nutrients found in qualitycuts of meats.

USING THE ROTISSERIE (continued:)
WARNING! Never have the grill burners (bottom burners) ON during rotisserie cooking. Itwill burn your meat and make it extremely dry. Use either grill or rotisserie at a time.
USING THE ROTISSERIE (continued):
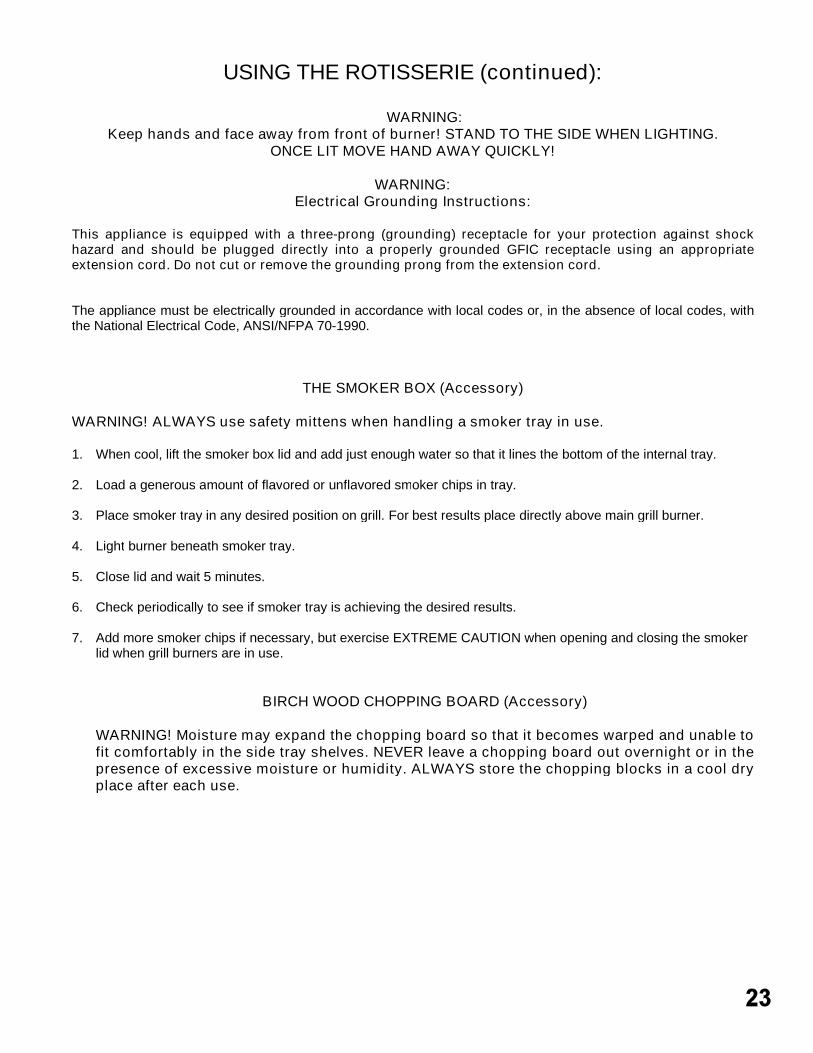
WARNING:Keep hands and face away from front of burner! STAND TO THE SIDE WHEN LIGHTING.
ONCE LIT MOVE HAND AWAY QUICKLY!
WARNING:Electrical Grounding Instructions:
This appliance is equipped with a three-prong (grounding) receptacle for your protection against shockhazard and should be plugged directly into a properly grounded GFIC receptacle using an appropriateextension cord. Do not cut or remove the grounding prong from the extension cord.
The appliance must be electrically grounded in accordance with local codes or, in the absence of local codes, withthe National Electrical Code, ANSI/NFPA 70-1990.
THE SMOKER BOX (Accessory)
WARNING! ALWAYS use safety mittens when handling a smoker tray in use.
1. When cool, lift the smoker box lid and add just enough water so that it lines the bottom of the internal tray.
2. Load a generous amount of flavored or unflavored smoker chips in tray.
3. Place smoker tray in any desired position on grill. For best results place directly above main grill burner.
4. Light burner beneath smoker tray.
5. Close lid and wait 5 minutes.
6. Check periodically to see if smoker tray is achieving the desired results.
7. Add more smoker chips if necessary, but exercise EXTREME CAUTION when opening and closing the smokerlid when grill burners are in use.
BIRCH WOOD CHOPPING BOARD (Accessory)
WARNING! Moisture may expand the chopping board so that it becomes warped and unable tofit comfortably in the side tray shelves. NEVER leave a chopping board out overnight or in thepresence of excessive moisture or humidity. ALWAYS store the chopping blocks in a cool dryplace after each use.

CARE AND CLEANING

BURNER REMOVAL AND CLEANING
ORIFICE CLEANING:With the burner removed, remove the orifice and shine a flashlight through the opening to ensure there isno blockage. Use a needle to clear any debris. Be extremely careful not to enlarge the hole or break offthe needle.
WARNING! It is extremely important to engage the burner on the orifice properly to prevent a firehazard or explosion.
Be careful not to upset the air shutter’s original position (unless readjusting). Lower the rear of the burnerinto the cut outs on the support channel at the rear of the burner box. Make sure it is level and does notrock. Light all the burners and check for proper flame characteristics. If adjustments are necessary, referto section on Flame Adjustment in this guide. Do this prior to cooking on the grill.
GRILL BURNER:
WARNING! To prevent burns, make sure theburner is cool before removing for cleaning.
Remove the grill grates. Then lift out the radianttrays. Grasp the burner and pull it up carefullyand slightly towards the rear wall of the unit sothe burner head comes off the brass orifice atthe front. Angle the burner sideways andremove.(Fig 14 AND FIG 15)
GRILL BURNER CLEANING:Clean the burner exterior with a wire brush. Clear stubbornscale with a metal scraper. Clear any clogged ports with astraightened paper clip. Never use a wooden toothpick as itmay break off and clog the port. Shake out any debris throughthe air shutter. Use a flashlight to inspect the burner inlet toensure it is not blocked. If obstructions is seen, use astraightened metal wire coat hanger to remove debris.
FIG 14
FIG 15

TROUBLE SHOOTING
Before Calling For Service:
If the grill does not function properly, use the following checklist before contacting your dealer for service.You may save the cost of a service call. Troubleshooting is for general purposes only. If the problempersist and require a service call, contact your dealer or the nearest authorized service agency to performservice. Only authorized service agencies can perform warranty service. Call Capital precision SeriesSpecialist at 1.866.402.4600
Grill won’t light when knob is turned:Remove the grill top grates and the radiant trays, watch the ignition tip. You should see the igniterrod glow brightly.If there is no glow when the knob is in an ON position, check the electrical connections andbreakers.


WE RESERVE THE RIGHT TO CHANGE THESE SPECIFICATIONS OR DESIGN WITHOUT NOTICE.
THE ART OF PRECISION"
13211 E. FLORENCE AVE. SANTA FE SPRINGS, CA 90670.PHONE 866-402-4600
WWW.CAPITAL-COOKING.COM
PART NO 87093-01


