42
Defensive Principles Manual 2009 We Must Work Together as One Arrowhead Zone Man to Man
| Date post: | 14-Dec-2015 |
| Category: |
Documents |
| Upload: | tianna-berringer |
| View: | 216 times |
| Download: | 0 times |

Defensive PrinciplesManual 2009
We Must Work Together as One
Arrowhead Zone
Man to Man

Arrowhead Zone
• All that matter is how many guys the opponent has behind the net.
• 1 Behind– Seen in 2-3-1 and 1-4-1 sets
• 2 Behind– Seen in 2-2-2 and 1-3-2 sets
• This Defense can be run as out man-down set with just one less middie
Back to Home

1 Behind Positioning and Movement
• The Middies play man to man in the top zone and are continually rotating.
• The Wing D spoke out to the ball and snap back in to cover the passing lane.
• The Crease D-man strings behind as the pass goes, and comes back to help the crease as the pass goes above the goal line extended (GLE). Do not play heavy defense behind.
Back to Home

1 Man Behind Positioning
Midfielders
Wing Defense
(Anchor)
Wing Defense
(Anchor)
Crease D
Back to Home
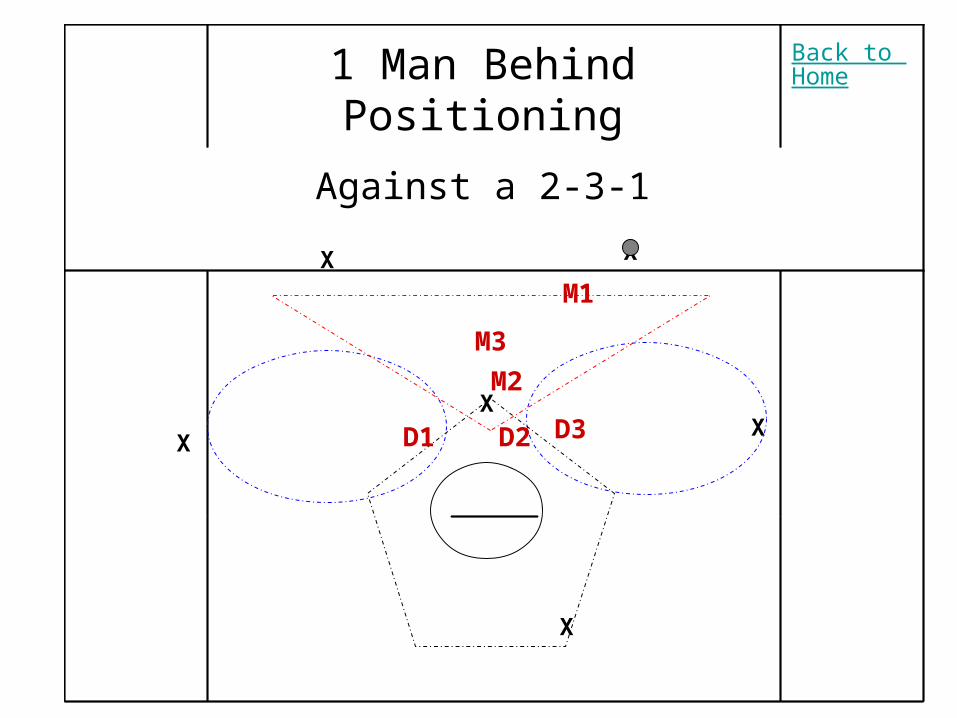
1 Man Behind Positioning
Against a 2-3-1
X
X
XX
X
X
M2
M3
M1
D2 D3D1
Back to Home

1 Man Behind Positioning
Against a 1-4-1
X
XX
X
X
XM2
M3
M1
D2 D3D1
Back to Home

1 Behind Help Slides
• Help comes from the adjacent Zone
• Crease D fills the empty adjacent zone
• Midfielder drops to fill Crease D zone.
• Man who was slid to drops to low midfield position.
• ***If slide is to a midfielder within the midfielder zone, try to keep wings and anchors and crease in correct spots.
Back to Home

1 Man Behind Help Example
X
X
XX
X
X
M2
M3
M1
D2 D3D1
ROTATE!
Back to Home

2 Behind Positioning and Movement
• The Middies play man to man in the top zone and are continually rotating.
• The Wing D spoke out to the ball and snap back in to cover the passing lane.– D can play aggressive behind in the 2 Behind
Zone.
• The Crease D-man stays in the crease and helps cover the Middies if needed.
Back to Home

Arrowhead Zone
2 Men Behind
Wing Defense
(Anchor)
Wing Defense
(Anchor)
Midfielders
Crease D
Back to Home

Arrowhead Zone
Against a 2-2-2
X
X
X
XX
X
M2
M3M1
D2D3D1
Back to Home

Arrowhead Zone
Against a 3-1-2
X
X
X
XX
X
M2
M3M1
D3
D3D1
Back to Home

Arrowhead Zone
Against a 1-3-2
XXX
XX
X
M2M3 M1D3
D3D1
Back to Home

2 Behind Help Slides(same as 1 behind)
• Help comes from the adjacent Zone
• Crease D fills the empty adjacent zone
• Midfielder drops to fill Crease D zone.
• Man who was slid to drops to low midfield position.
• ***If slide is to a midfielder within the midfielder zone, try to keep wings and anchors and crease in correct spots.
Back to Home

2 Men Behind Example
X
X
X
XX
X
M2
M3M1
D3
D3D1 ROTATE!
Back to Home

Man to Man
• Positioning and Stances
• Slides From Crease
• Adjacent Slides
Back to Home
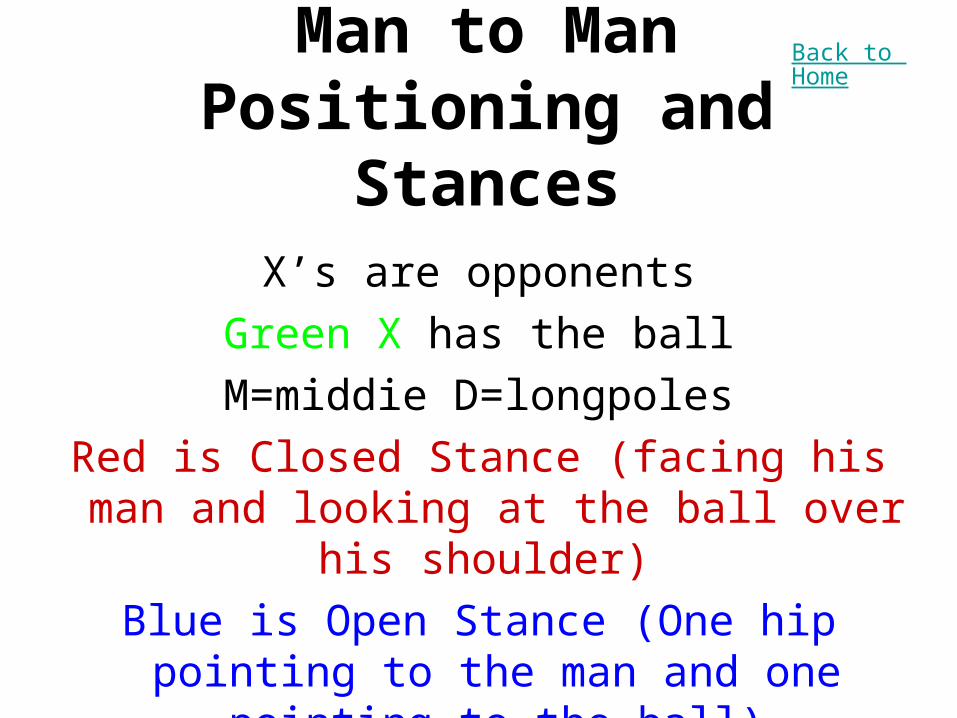
Man to ManPositioning and Stances
X’s are opponents
Green X has the ball
M=middie D=longpoles
Red is Closed Stance (facing his man and looking at the ball over his shoulder)
Blue is Open Stance (One hip pointing to the man and one pointing to the ball)
Back to Home

XX
X
X
X
X
M2M3
M1
D2D3
D1
Defensive players should always create a triangle between the ball
and the man that they are covering.
Back to Home

XX
X
X
X
XM2
M3
M1
D2
D3D1
Defensive players should always control where their man
goes through their body positioning.
Back to Home

XX
X
X
XX
M2
M3M1
D2
D3
D1
Defensive players should never get caught looking at the all behind which can allow their
man to cut behind them.
Back to Home

Man to ManCrease Slides
X’s are opponents
Green X has the ball
M=middie D=longpoles
Red is hot
Blue is free
Back to Home

XX
X
X
X
X
M2
M3M1
D2
D3D1
1. M3 drops in to free M2. D3 drops to provide support in the middle. M2 is hot, D3 is free
2. M2 slides yelling “fire.” D3 clicks to be ball side of the crease man. M1 drops back to the crease and kicks . D1 presses out to make the
adjacent pass harder (Don’t get Back Cut!)
Crease slide from a dodge up top against a 2-3-1
Back to Home
XX
X
X
X
XM2
M3M1
D2
D3
D1
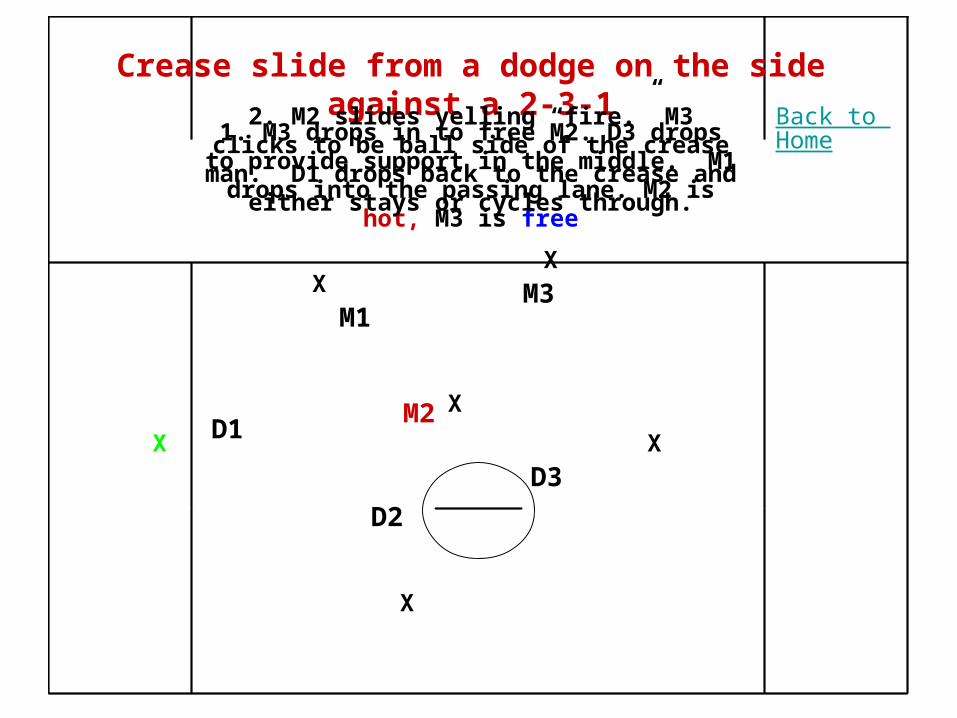
Crease slide from a dodge on the side against a 2-3-1
1. M3 drops in to free M2. D3 drops to provide support in the middle. M1 drops into the
passing lane. M2 is hot, M3 is free
2. M2 slides yelling “fire.” M3 clicks to be ball side of the crease man. D1 drops back to the
crease and either stays or cycles through.
Back to Home

XX
X
X
X
XM2
M3M1
D2
D3
D1
Crease slide from a dodge from behind against a 2-3-1
1. M3 drops in to free M2. M1 drops in to cover two (back to the cage). M2 is hot, M3 is free
2. M2 slides yelling “fire.” M3 clicks to be ball side of the crease man. D1 drops back to the
crease and either stays or cycles through.
Back to Home

XX
XX
XX
M2
M3M1
D2D1
1. M3 drops in to free M2. D3 drops to provide support in the middle. M2 is hot, D3 is free
2. M2 slides yelling “fire.” D3 clicks to be ball side of the crease man. M1 drops back to the
crease. D3 falls back to his man. D1 presses out to make the adjacent pass harder (Don’t get
Back Cut!)
Crease slide from a dodge up top against a 2-2-2
Back to Home
D3
XX
X
X
X
X
M2
M3M1
D2D3
D1
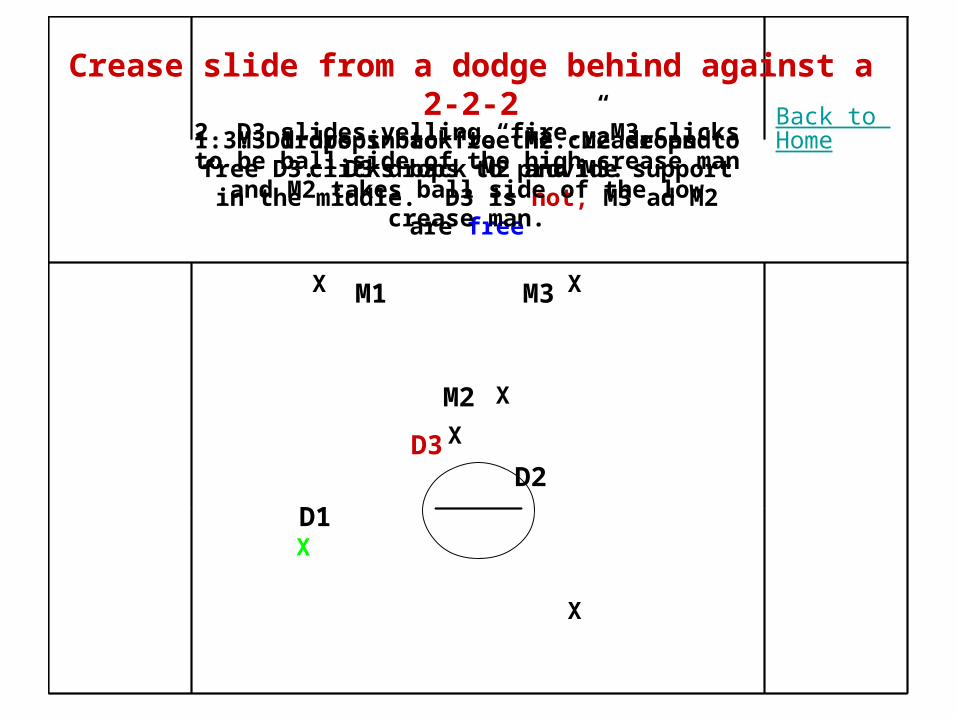
1. M3 drops in to free M2. M2 drops to free D3. D3 drops to provide support in the middle. D3
is hot, M3 ad M2 are free
2. D3 slides yelling “fire.” M3 clicks to be ball side of the high crease man and M2 takes ball
side of the low crease man.
Crease slide from a dodge behind against a 2-2-2
3. D1 drops back to the crease and clicks back M2 and M3.
Back to Home

Man to ManAdjacent slides
• Against a 2-3-1
• Against a 2-2-2
• Against a 3-1-2
• Against a 3-3
• Against a 1-4-1
Back to Home

X
X
X
X
X
X
M2M3
M1
D2
D3D1
Against a 2-3-1Ball Up Top
Back to Home

XX
X
X
X
X
M2
M3M1
D2
D3D1
Against a 2-3-1Ball On the Side
Back to Home

XX
X
XX
X
M2
M3M1
D2D3
D1
Against a 2-3-1Ball Behind
Back to Home

X
X
X
X
X
X
M2M3
M1
D2
D3D1
Against a 2-2-2Ball Up Top
Back to Home

X
X
X
X
X
X
M2
M3M1
D2 D3
D1
Against a 2-2-2Ball Behind
Back to Home
XX
X
XX
X
M2
M3
M1
D2
D3D1
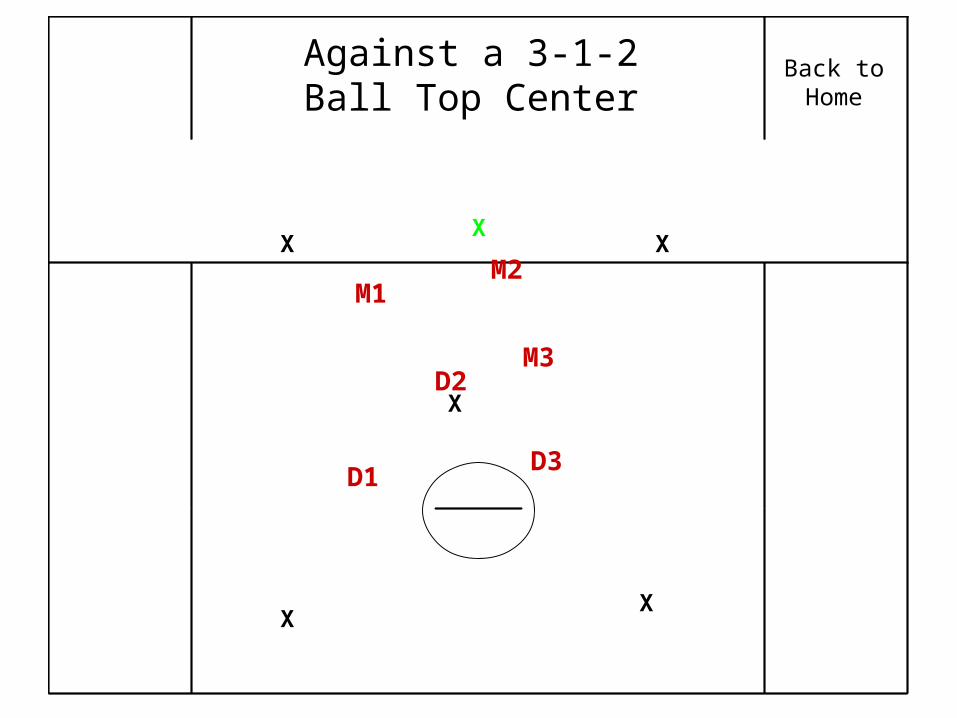
Against a 3-1-2Ball Top Center
Back to Home

XX
X
XX
X
M2
M3
M1
D2
D3D1
Against a 3-1-2Ball Top Side
Back to Home

XX
X
X
X
X
M2M3M1
D2
D3D1
Against a 3-1-2Ball Behind
Back to Home

X
X
X
X
XX
M2M3
M1
D2 D3D1
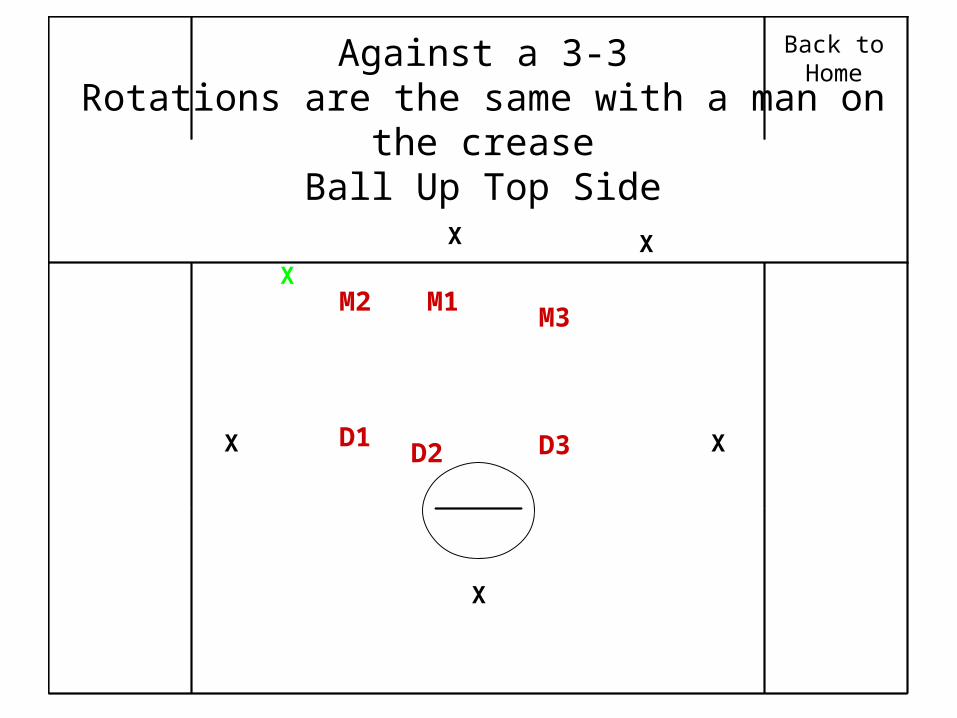
Against a 3-3Rotations are the same with a man on the crease
Ball Up Top Center
Back to Home
X
X
X
X
X
XM2
M3M1
D2 D3D1
Against a 3-3Rotations are the same with a man on the crease
Ball Up Top Side
Back to Home

XX
X
X
X
X
M2M3
M1
D2 D3D1
Against a 3-3Rotations are the same with a man on the crease
Ball On the Side
Back to Home

X
X
X
X
X
X
M2M3
M1
D2
D3
D1
Against a 3-3Rotations are the same with a man on the crease
Ball Behind
Back to Home

X
X
X
XX
X
M2
M3
M1
D2
D3D1
Against a 1-4-1Ball Up Top
Back to Home
X
X
X
X
X
XM2
M3M1
D2
D3D1
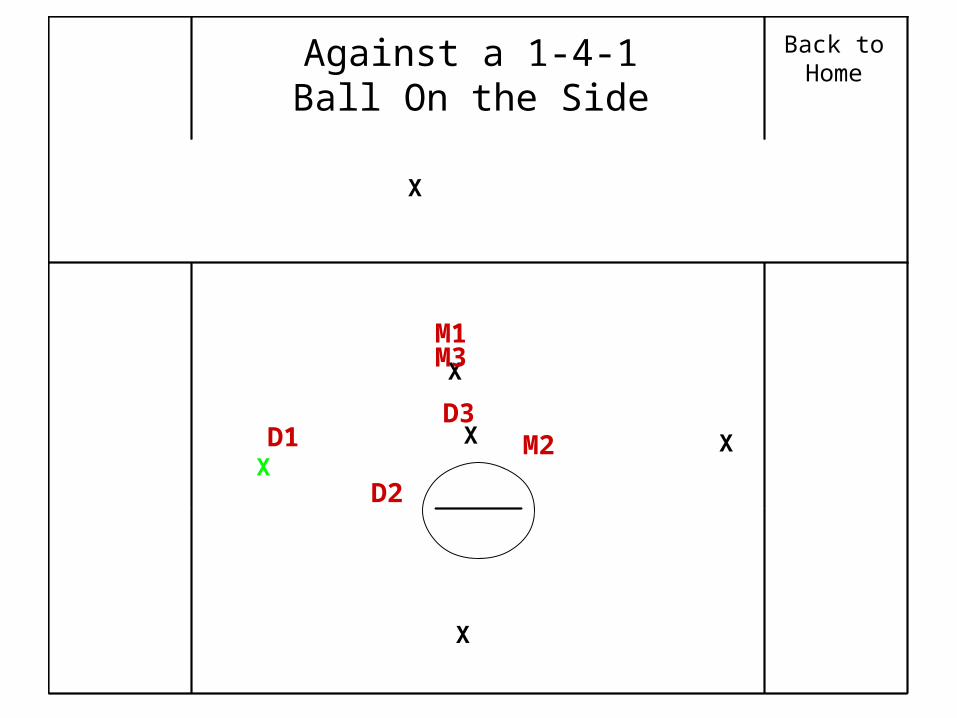
Against a 1-4-1Ball On the Side
Back to Home

XX
X
X
X
X
M2
M3M1
D2
D3D1
Against a 1-4-1Ball Behind
Back to Home


