19
Defining Styles and Automatically Creating Table of Contents and Indexes Word Processing 4.03
| Date post: | 26-Dec-2015 |
| Category: |
Documents |
| Upload: | derick-garrison |
| View: | 217 times |
| Download: | 0 times |
Defining Styles and Automatically Creating
Table of Contents and Indexes
Word Processing
4.03

Styles The use of styles in MS Word will allow a user to quickly
format a document consistently and professionally.
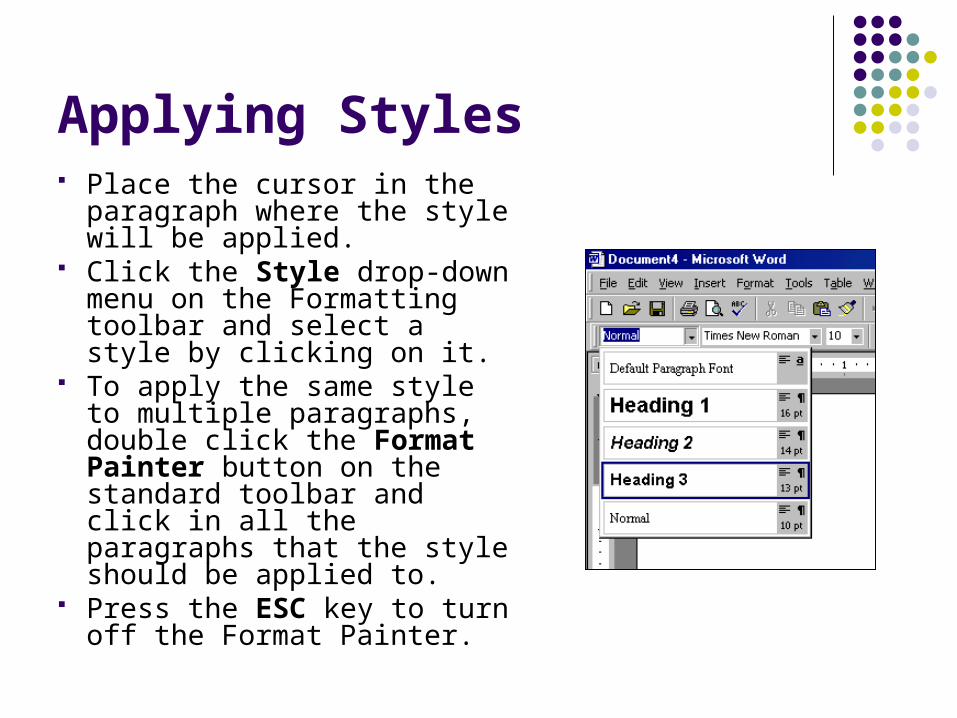
Applying Styles Place the cursor in the
paragraph where the style will be applied.
Click the Style drop-down menu on the Formatting toolbar and select a style by clicking on it.
To apply the same style to multiple paragraphs, double click the Format Painter button on the standard toolbar and click in all the paragraphs that the style should be applied to.
Press the ESC key to turn off the Format Painter.

Applying Styles Choose from a larger selection of
styles from the Style dialog box. Click in the paragraph where the
style is to be added. Select Format, Styles and
Formatting from the menu bar. From the List drop-down menu,
choose All styles to view all the styles available.
The styles are displayed in the Styles list.
Preview each style by clicking once on the name.
Select the style to apply to the paragraph and click Apply.

Creating a New Style A new style can be created
from previously formatted text.
Place the cursor in the desired paragraph where the new style can be set.
Click the Style box on the formatting toolbar so the style name is Selected.
Delete the text in the field and type the name of the new style.
Press the ENTER key to save the new style.

Modifying a Style An existing style can be changed
or modified. Select Format, Styles and
Formatting from the menu bar. Select the style from the Styles
list that needs to be modified. Click the Modify button. Use the same methods to change
the style from the Modify Style dialog box that were used for the New Style box.
To only rename the style, type a new name in the Name field.
Click OK when finished with the modifications.
Click Apply to update the style in the document.
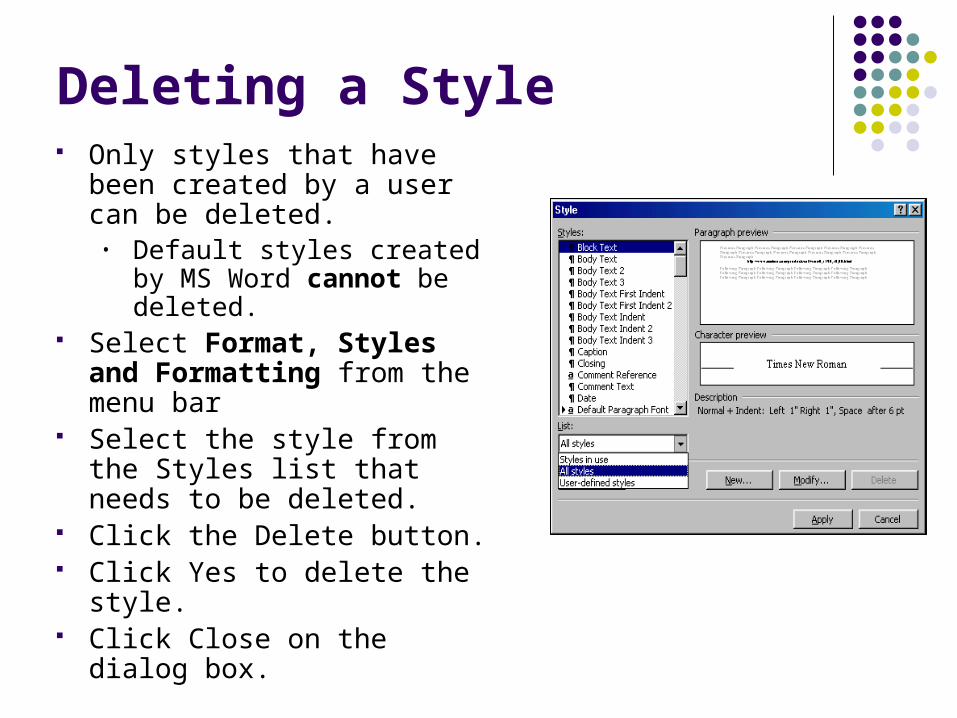
Deleting a Style Only styles that have been
created by a user can be deleted.
• Default styles created by MS Word cannot be deleted.
Select Format, Styles and Formatting from the menu bar
Select the style from the Styles list that needs to be deleted.
Click the Delete button. Click Yes to delete the style. Click Close on the dialog box.

Using the Task Pane
The Task Pane is an office feature that offers shortcuts.
The Task Pane can be used for styles to:• Select.• Modify.• Delete.
Task Pane

Use of Styles
Styles can quickly and easily assist in: Formatting a document. Creating a Table of Contents. Creating an Outline. Creating Bulleted and Numbered Lists.

Table of Contents Use the “heading” styles. MS Word will generate a
Table of Contents automatically.
To create a Table of Contents go to:• Insert, References,
Indexes and Tables.

Table of Contents If you've already applied
custom styles to your headings, you can tell Microsoft Word which styles to use when it's building the table of contents.
Click where you want to insert the table of contents.
On the Insert menu, point to References, and click Index and Tables.
Click the Table of Contents tab.
Click Options.

Table of Contents Under Available styles, find a style
you've applied to headings in your document.
Under TOC level, to the right of the style name, enter a number from 1 to 9 to indicate the level you want that heading style to represent.
If you want to use only custom styles, remove the TOC level numbers for the built-in styles, such as Heading 1.
Repeat steps for each heading style you want to include in the table of contents.
Click OK. To use one of the available
designs, click a design in the Formats box.

Outline An outline is a type of
enumeration or order list. To create an outline use the
“heading” styles. View the document in
Outline mode. Go to:
• View and Outline Text can be adjusted to
various levels as a means of indenting information.

Outline Symbols and
indentations in outline mode show you how a document is organized.
Makes it easy to quickly restructure a document.
Symbols can be expanded to show the entire document. This document is expanded.
Symbols can also be collapsed to show just the headings.
Heading

Index An index lists the
terms and topics discussed in a document, along with the pages they appear on.
To create an index, you mark the index entries in your document and then build the index.
To Mark Entries: Select the word. Go to Insert,
References, and Select the Index tab.
Click on Mark Entry.

Index You can create an index
entry: For an individual word,
phrase, or symbol. For a topic that spans a
range of pages. After you've marked all
the index entries, you choose an index design and build the finished index.
Word then collects the index entries, sorts them alphabetically, references their page numbers, finds and removes duplicate entries from the same page, and displays the index in the document.

Index
Once you mark an index entry, Microsoft Word adds a special XE (Index Entry) field to your document.
Index
Entry
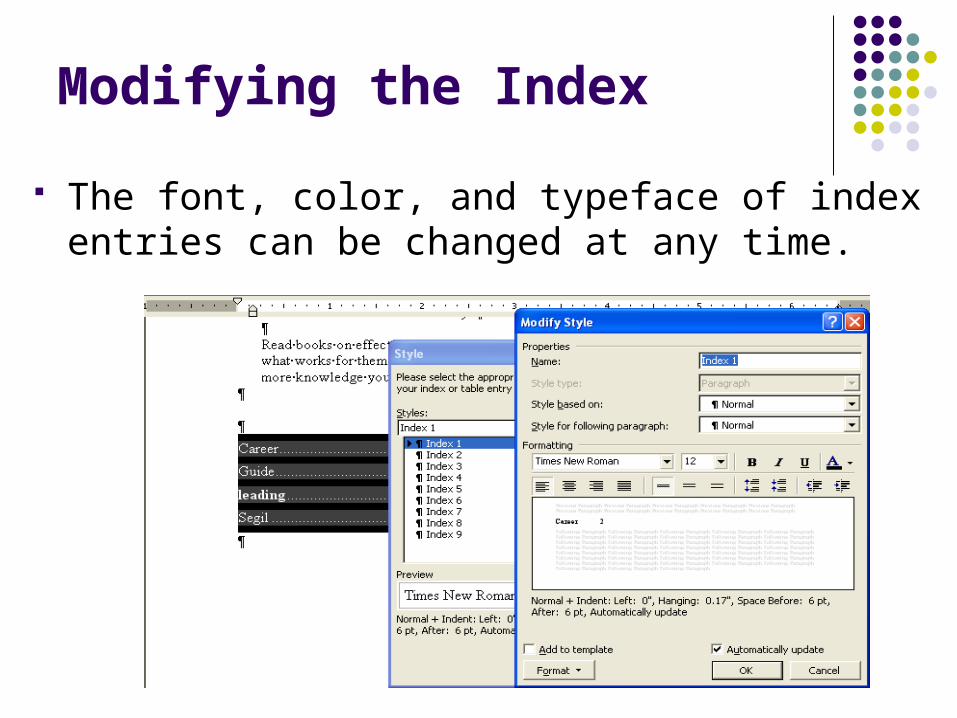
Modifying the Index
The font, color, and typeface of index entries can be changed at any time.

Updating an Index An index can be updated by striking F9 on the
keyboard. New words/phrases can be added and updated at any
time.


