Delays in Endoscope Reprocessing … and the Biofilms Within By Melinda Benedict, MS, CIC, CFER Manager, Infection Control Program Olympus Corporation of the Americas Introduction Endoscope reprocessing is becoming more time consuming and more complex as scientific knowledge increases and infection control issues are addressed. An article published in 2017 suggests that the average hands-on time required per endoscope during reprocessing was 76 minutes, and this may increase as additional technology is introduced into the market to improve the safety margins associated with endoscope reprocessing. 1 In addition to the time commitment required by staff, there are time constraints that need to be adhered to in order to reprocess devices effectively. One such time constraint is the maximum time delay allowed by endoscope manufacturers between precleaning of the endoscope at bedside after the procedure has been completed and the start of leak testing and manual cleaning. Olympus mandates a maximum dwell time between precleaning and manual cleaning of 60 minutes. If the endoscope sits awaiting manual cleaning for over 60 minutes, then a delayed reprocessing or presoaking protocol must be performed in order for the device to be reprocessed effectively. 2 Immediate precleaning at bedside after procedure Proceed with manual cleaning FDA Involvement in Design of Reprocessing Protocols The United States Food and Drug Administration (FDA) requires medical device manufacturers to validate their device cleaning processes using worst-case scenario testing. All medical devices intended to be marketed to the public in the United States must go through the 510(k) Premarket Notification process in which the manufacturer demonstrates that the device is safe and effective. Validated cleaning instructions are included with the device’s 510(k) documents and reviewed by the FDA. If there is a delay of >60 minutes, presoak endoscope Why do endoscope manufacturers put a time limit on the start of reprocessing? Why does Olympus require a maximum of 60 minutes between steps and not 30 minutes, 90 minutes or any other amount of time? The answer is multifaceted and includes input from the FDA, the process of reprocessing instruction validation, and the science behind biofilm formation. Studies show that patient infections have occurred when reprocessing was delayed. 12, 13 It is important to understand that reprocessing endoscopes as soon as possible after procedural use is essential and to be aware of the extra steps that must be taken if reprocessing is delayed beyond prescribed time limits.
Transcript
Delays in Endoscope Reprocessing … and the Biofilms WithinBy Melinda Benedict, MS, CIC, CFERManager, Infection Control ProgramOlympus Corporation of the Americas
Introduction
Endoscope reprocessing is becoming more time consuming and more complex as scientific knowledge increases and infection control issues are addressed. An article published in 2017 suggests that the average hands-on time required per endoscope during reprocessing was 76 minutes, and this may increase as additional technology is introduced into the market to improve the safety margins associated with endoscope reprocessing.1
In addition to the time commitment required by staff, there are time constraints that need to be adhered to in order to reprocess devices effectively. One such time constraint is the maximum time delay allowed by endoscope manufacturers between precleaning of the endoscope at bedside after the procedure has been completed and the start of leak testing and manual cleaning.
Olympus mandates a maximum dwell time between precleaning and manual cleaning of 60 minutes. If the endoscope sits awaiting manual cleaning for over 60 minutes, then a delayed reprocessing or presoaking protocol must be performed in order for the device to be reprocessed effectively.2
Immediate precleaning at bedside after procedure Proceed with manual cleaning
FDA Involvement in Design of Reprocessing Protocols
The United States Food and Drug Administration (FDA) requires medical device manufacturers to validate their device cleaning processes using worst-case scenario testing. All medical devices intended to be marketed to the public in the United States must go through the 510(k) Premarket Notification process in which the manufacturer demonstrates that the device is safe and effective. Validated cleaning instructions are included with the device’s 510(k) documents and reviewed by the FDA.
If there is a delay of >60 minutes, presoak endoscope
Why do endoscope manufacturers put a time limit on the start of reprocessing?
Why does Olympus require a maximum of 60 minutes between steps and not 30 minutes, 90 minutes or any other amount of time? The answer is multifaceted and includes input from the FDA, the process of reprocessing instruction validation, and the science behind biofilm formation.
Studies show that patient infections have occurred when reprocessing was delayed.12, 13 It is important to understand that reprocessing endoscopes as soon as possible after procedural use is essential and to be aware of the extra steps that must be taken if reprocessing is delayed beyond prescribed time limits.
Delays in Endoscope Reprocessing …and the Biofilms WithinBy Melinda Benedict, MS, CIC, CFER
2
FDA Involvement in Design of Reprocessing Protocols (continued)
Olympus bases its cleaning validation test protocols on the FDA’s Guidance for Industry, “Reprocessing Medical Devices in Health Care Settings: Validation Methods and Labeling.” 3 This requirement encompasses the most challenging and difficult to reprocess situations that may realistically be encountered during normal use of the device in a clinical setting.
Carefully designing test protocols regarding clinically relevant worst-case test soils, selecting inoculation sites and simulating real-world use conditions are all part of this requirement. For example, when validating a cleaning process for a colonoscope, the device manufacturer would likely use an artificial test soil, including substances representative of blood, mucous and stool.
The condition of devices used for cleaning validation studies is taken into account, and the FDA requires device manufacturers to use devices that have undergone previous simulated clinical worst-case use in order to assess the cleaning process on soils that have built up over the course of time. The specific sites on the endoscope that are chosen to inoculate with test soils during cleaning validation should also mimic worst-case clinical conditions and encompass the most difficult locations on the device to clean.
The FDA also requires device manufacturers to take into account possible cleaning delays in order to best simulate worst-case use conditions. Validation methods must incorporate the drying of soils for a period of time before the start of the proposed reprocessing protocol. This time needs to simulate the longest estimated time that a device would realistically be left to dry between the procedure and the start of cleaning.3
Manufacturer’s Validated Reprocessing Instructions Must Be Followed
It is of utmost importance that those responsible for the reprocessing of flexible endoscopes follow the validated reprocessing instructions provided by the endoscope manufacturer. The manufacturer-provided instructions for the automated endoscope reprocessor must also be strictly followed, if one is used. These cleaning instructions have been shown to be effective only when executed as written. This is also true regarding the endoscope manufacturer’s instructions on the timing of reprocessing. As mentioned before, Olympus has validated its reprocessing instructions to be effective when a maximum of one hour passes between precleaning and manual cleaning.
Although a one-hour dwell period was validated by Olympus during the 510(k) process, all efforts should be made to
Together with the FDA, Olympus decided on a 60-minute dwell time between precleaning and manual cleaning to simulate worst-case drying of soils on endoscope surfaces.
VALIDATION PROTOCOL
DESIGN
COLLABORATE WITH FDA
60-MINUTE DWELL TIME
DECISION
3
decrease the amount of time that lapses between reprocessing steps as much as possible. Any delays in the journey of the device from patient use to reprocessing and then to proper storage can impair the efficacy of the decontamination process. Endoscopes should be transported from the procedure area to the reprocessing area without significant delay.3
This statement is corroborated by multiple professional society guidelines, including the Association for the Advancement of Medical Instrumentation, the Association of periOperative Registered Nurses and the Society of Gastroenterology Nurses and Associates.4-6
A major concern is the drying of bioburden on endoscopes before cleaning is initiated, as studies show that dried debris is much harder to remove during the cleaning process. Moving the endoscope through the reprocessing steps in a timely manner helps to prevent bacteria and bioburden from hardening onto device surfaces and discourages microorganism adherence.7-9 In turn, incomplete cleaning can affect the disinfection and/or sterilization processes that come afterwards.10 In regards to ongoing concern over prion diseases such as Creutzfeldt-Jakob disease, it is worth noting that prion proteins are especially difficult to remove once they have been allowed to dry
on a surface and destruction of the device may be recommended.11
Endoscope reprocessing begins with precleaning at the patient bedside. Precleaning should be performed immediately after the end of the procedure.4,6,8 Ideally, a technician will wipe the insertion tube and flush water or detergent through the channels according to the instructions for use for the specific endoscope as soon as the endoscope is removed from the patient.6-7
Transport to the reprocessing area and manual cleaning should begin as soon as possible once the endoscope has been precleaned.5,7
Failure to adhere to the endoscope manufacturer’s reprocessing protocol and delaying the cleaning of endoscopes may compromise patient safety and lead to an infection control risk. For example, a report of a nosocomial outbreak in France was partially attributed to the delayed reprocessing of an endoscope. 12
Add i t i ona l l y , a case s tudy on an ou tb reak o f Pseudomonas aeruginosa infections after thoracic surgeries reported poor adherence to bronchoscope reprocessing protocols and guidelines. This includes reusing bronchoscopes multiple times during procedures without cleaning, which likely resulted in the drying of secretions between uses and subsequent cleaning and disinfection failure.13
These are only two examples of what can happen when endoscope reprocessing does not begin immediately after clinical use and is delayed for a time beyond that of what is recommended without performing any manufacturer-suggested remedial actions.
Delays in Endoscope Reprocessing …and the Biofilms WithinBy Melinda Benedict, MS, CIC, CFER
Delays in Reprocessing and Biofilm Growth
As mentioned previously, drying of bioburden onto medical devices makes cleaning more difficult, but it is a concern for another important reason. Biofilms are much more likely to occur when secretions dry and adhere to surfaces.
In general, a biofilm is a multilayered organized matrix of bacterial, fungal, algal or protozoan cells held onto a surface and each other by a mesh of polysaccharides. Microorganisms in the natural world exist primarily in biofilms, such as pond scum, layers of algae on rocks near water sources and even soap scum on shower curtains.
In the healthcare industry, biofilms can be found as dental plaque and on implants such as catheters and artificial joints. Biofilms can also form on medical devices if conditions are correct, as the environment inside an endoscope lumen that has not been timely cleaned may be conducive to their formation.14
When a bacterial biofilm begins to form, there is an initial attachment of bacteria to a surface. At this point, the attachment is reversible and can be removed by following the manufacturer’s validated reprocessing protocols, such as thorough manual brushing and flushing. However, failure to remove the initial reversible attachment of microorganisms can eventually result in the formation of irreversible attachment, colonization and the establishment of a mature biofilm.14
The basic biofilm life-cycle. Attachment of bacteria to the surface; growth and maturation; detachment and dispersion.
Once the biofilm has attached and begins to mature, a protective barrier of polysaccharides and proteins is secreted by the bacteria. This self-created barrier protects the bacteria from physical and chemical damage. This causes the biofilm to be resistant to mechanical cleaning methods (e.g. brushing), high-level disinfection and sterilization as the uppermost layers of bacteria protect the layers underneath.15
No cleaning agent, whether chemical or heat-based, can be effective on organisms it cannot reach.8 Once a biofilm is established, parts of the biofilm matrix may periodically detach and enter the patient during clinical use of the device and pose an infection control risk.9
Fortunately, adhering to the endoscope manufacturer’s validated cleaning instructions can prevent the initial attachment of bacteria to a device’s surface and disrupt the formation of mature biofilms. The prompt start of reprocessing is a fundamental step in biofilm prevention for this reason. Research shows that manual cleaning is the most important step of endoscope reprocessing, and performing manual cleaning promptly after precleaning can help prevent formation of mature biofilm even under conditions favorable for bacterial growth.5,14
BIOFILM GROWTH CYCLE
4
Attachment Growth Dispersal
5
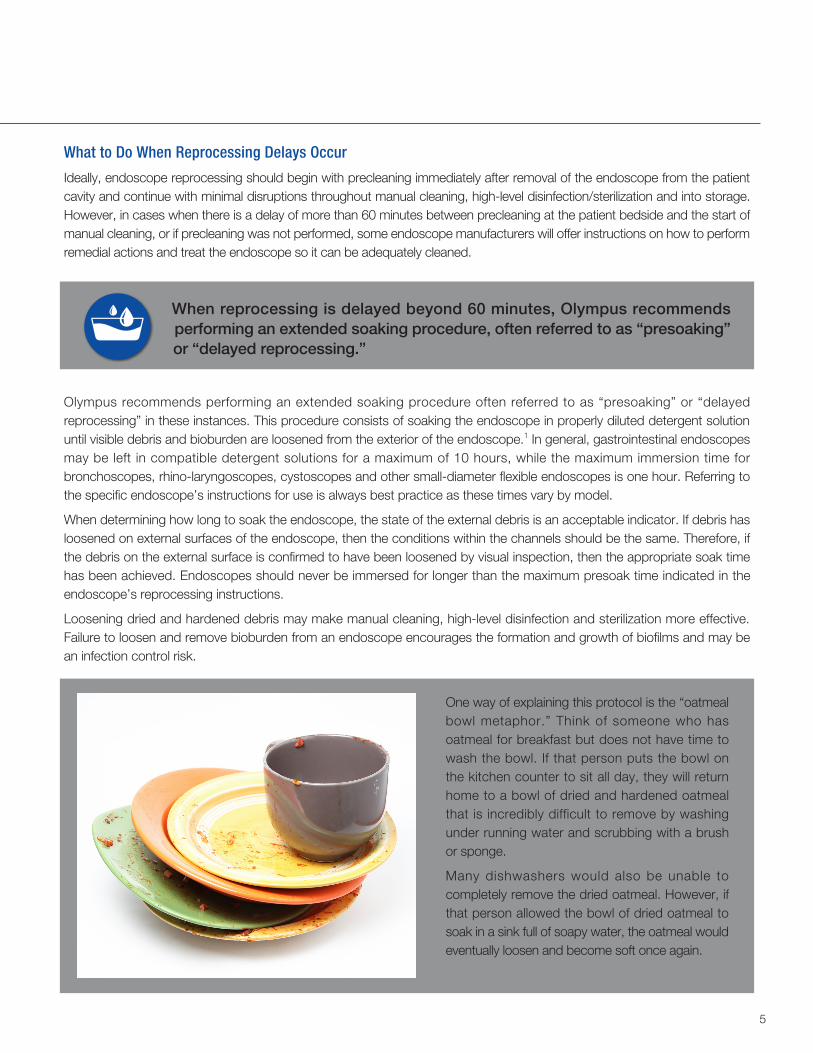
What to Do When Reprocessing Delays Occur
Ideally, endoscope reprocessing should begin with precleaning immediately after removal of the endoscope from the patient cavity and continue with minimal disruptions throughout manual cleaning, high-level disinfection/sterilization and into storage. However, in cases when there is a delay of more than 60 minutes between precleaning at the patient bedside and the start of manual cleaning, or if precleaning was not performed, some endoscope manufacturers will offer instructions on how to perform remedial actions and treat the endoscope so it can be adequately cleaned.
When reprocessing is delayed beyond 60 minutes, Olympus recommends performing an extended soaking procedure, often referred to as “presoaking” or “delayed reprocessing.”
Olympus recommends performing an extended soaking procedure often referred to as “presoaking” or “delayed reprocessing” in these instances. This procedure consists of soaking the endoscope in properly diluted detergent solution until visible debris and bioburden are loosened from the exterior of the endoscope.1 In general, gastrointestinal endoscopes may be left in compatible detergent solutions for a maximum of 10 hours, while the maximum immersion time for bronchoscopes, rhino-laryngoscopes, cystoscopes and other small-diameter flexible endoscopes is one hour. Referring to the specific endoscope’s instructions for use is always best practice as these times vary by model.
When determining how long to soak the endoscope, the state of the external debris is an acceptable indicator. If debris has loosened on external surfaces of the endoscope, then the conditions within the channels should be the same. Therefore, if the debris on the external surface is confirmed to have been loosened by visual inspection, then the appropriate soak time has been achieved. Endoscopes should never be immersed for longer than the maximum presoak time indicated in the endoscope’s reprocessing instructions.
Loosening dried and hardened debris may make manual cleaning, high-level disinfection and sterilization more effective. Failure to loosen and remove bioburden from an endoscope encourages the formation and growth of biofilms and may be an infection control risk.
One way of explaining this protocol is the “oatmeal bowl metaphor.” Think of someone who has oatmeal for breakfast but does not have time to wash the bowl. If that person puts the bowl on the kitchen counter to sit all day, they will return home to a bowl of dried and hardened oatmeal that is incredibly difficult to remove by washing under running water and scrubbing with a brush or sponge.
Many dishwashers would also be unable to completely remove the dried oatmeal. However, if that person allowed the bowl of dried oatmeal to soak in a sink full of soapy water, the oatmeal would eventually loosen and become soft once again.
Delays in Endoscope Reprocessing …and the Biofilms WithinBy Melinda Benedict, MS, CIC, CFER
6
When Does the Timer Start?
In some instances, it can be difficult to determine when the “timer” starts for this 60-minute period. Does it begin after the procedure? Does it begin as soon as the endoscope is removed from the patient? What about cases where an endoscope is used and set aside for possible use later in the procedure? Or those cases where two endoscopes are used in one procedure?
It is important to remember the purpose of beginning manual cleaning as soon as possible—organic debris should not be allowed to dry and harden on the endoscope. The 60-minute timer should begin as soon as the endoscope insertion tube is removed from the patient and precleaning is performed. This is the moment bioburden on the endoscope is exposed to external air and drying and hardening begins.
Precleaning should always take place immediately after the endoscope is removed from the patient.
In those cases where an endoscope is used on a patient and then set aside for possible reuse later on in the procedure:
The 60-minute timer should begin as soon as the endoscope insertion tube is removed from the patient and precleaning is performed.
n The precleaning protocol should still be performed immediately after the endoscope is removed from the patient, using fresh potable water or sterile water. Potable water is water that has been processed (i.e., filtered, deionized, or purified) to improve its chemical and/or microbiological quality.
n The endoscope should then be set aside on a clean or sterile drape in such a manner that it will not be damaged or contaminated while not in use.
n The endoscope should be checked periodically to ensure it does not dry and bioburden does not begin to harden. It is a good idea to perform the precleaning procedure with water at regular intervals during long procedures to prevent drying.
n A quick wipe with a clean, lint-free, wet cloth or sponge and flushing of the channels will keep the endoscope wet internally and externally. The goal is to keep the instrument moist until manual cleaning can begin.
7
Manual cleaning must begin within 60-minutes of precleaning or else the endoscope must undergo prolonged soaking.
Ensure the ETO valve and the MB-155 are free of water drops. Detach auxiliary water tube and attach leakage tester. Turn on air source and confirm expansion of the bending section. Immerse entire endoscope in clean water. Perform leakage test. Angulate tip during test. Remove from water. Turn off air source and detach leakage tester from air source. After the tip has deflated, detach leakage tester from endoscope.
While immersed:
WARNING: This guide is only a summary of the steps necessary to properly clean your endoscope. Be sure to follow the detailed steps outlined in the ENDOSCOPE REPROCESSING MANUAL that was included with your endoscope when purchased.
Refer to companion ENDOSCOPE DISINFECTION GUIDE for disinfection information
ENDOSCOPE CLEANING GUIDEENDOSCOPE CLEANING GUIDEEVIS (140/240), EXERA (160), EXERA II (180) & EXERA III (190) GI Endoscopes
While immersed: While immersed:
While immersed:
Wipe down insertion tube with a water-soaked cloth.
Disconnect all detachable parts.
Aspirate water, thenair through the suctionchannel.
Attach AW channel-cleaning adapter. Flushwater, then air, throughair/water channels.
Aspirate detergent solutioninto suction channel.
Attach injection tube and channel plug. Flush detergent solution into the air and water channels.Flush the forceps-elevator,if applicable.
Flush detergent solution into auxiliary-water / elevator-wire channel.
Wipe all external surfaces of endoscope and cleaning accessories, then soak in detergent solution for the time recommended by the detergent manufacturer.
Immerse the entire instrument inclean water and gently agitateto rinse.
Flush clean water through all channels (including auxiliary-water / elevator-wire, if applicable). Remove from water, then flush air through all channels.
Use a soft, lint-free cloth to remove excess moisture from endoscope and cleaning accessories in preparation fordisinfection.
MH-948AW Channel-
Cleaning Adapter
For endoscopes with elevators or auxiliary-water feeding only:
Channel Plug For endoscopes with elevatorsor auxiliary-water feeding only:
Brush the suctioncylinder and instrument channel port. Repeat until all debris is removed.
While immersed:
Immerse in freshly prepared detergent solution. Clean all external surfaces. Brush endoscope distal tip and, if applicable, brush and flush forceps-elevator.
Injection Tube
Channel Plug
Wear all appropriate personal protective equipment.
Meticulous cleaning is essential for effective disinfection/sterilization.
Be sure to reprocess all removable parts (e.g., valves) according to the reprocessing manual.
Visually inspect the equipment after cleaning. If debris remains, repeat the procedure.
Inspect the MB-155 (Leakage Test Connector) for signs of damage prior to use.
•
•
•
•
•
Flush water, then air, into elevator-wirechannel/auxiliary-water channel. (Alternatively, the auxiliary-water channel may be flushed using the OFP pump.) The auxiliary water tube should remain attached during transport to reprocessing room.
LEAKAGE TESTING
RINSING
MANUAL CLEANING
Brush the universal cord portion of the suction channel. Repeat until all debris is removed.
Brush the insertion tube portion of the suction channel. Repeat until all debris is removed.
IMPORTANT
Attach water-resistant cap. This step is omitted for 190 endoscopes. Transport to the reprocessing room in a covered container. NOTE: Ensure that the ETO cap is removed prior to leak testing 190 generation scopes.
Longer than 60 minutes- ADD PROLONGED SOAKING
PRECLEANING - Immediately after use LEAK TESTING
Ensure the ETO valve and the MB-155 are free of water drops. Detach auxiliary water tube and attach leakage tester. Turn on air source and confirm expansion of the bending section. Immerse entire endoscope in clean water. Perform leakage test. Angulate tip during test. Remove from water. Turn off air source and detach leakage tester from air source. After the tip has deflated, detach leakage tester from endoscope.
While immersed:
WARNING: This guide is only a summary of the steps necessary to properly clean your endoscope. Be sure to follow the detailed steps outlined in the ENDOSCOPE REPROCESSING MANUAL that was included with your endoscope when purchased.
Refer to companion ENDOSCOPE DISINFECTION GUIDE for disinfection information
ENDOSCOPE CLEANING GUIDEENDOSCOPE CLEANING GUIDEEVIS (140/240), EXERA (160), EXERA II (180) & EXERA III (190) GI Endoscopes
While immersed: While immersed:
While immersed:
Wipe down insertion tube with a water-soaked cloth.
Disconnect all detachable parts.
Aspirate water, thenair through the suctionchannel.
Attach AW channel-cleaning adapter. Flushwater, then air, throughair/water channels.
Aspirate detergent solutioninto suction channel.
Attach injection tube and channel plug. Flush detergent solution into the air and water channels.Flush the forceps-elevator,if applicable.
Flush detergent solution into auxiliary-water / elevator-wire channel.
Wipe all external surfaces of endoscope and cleaning accessories, then soak in detergent solution for the time recommended by the detergent manufacturer.
Immerse the entire instrument inclean water and gently agitateto rinse.
Flush clean water through all channels (including auxiliary-water / elevator-wire, if applicable). Remove from water, then flush air through all channels.
Use a soft, lint-free cloth to remove excess moisture from endoscope and cleaning accessories in preparation fordisinfection.
MH-948AW Channel-
Cleaning Adapter
For endoscopes with elevators or auxiliary-water feeding only:
Channel Plug For endoscopes with elevatorsor auxiliary-water feeding only:
Brush the suctioncylinder and instrument channel port. Repeat until all debris is removed.
While immersed:
Immerse in freshly prepared detergent solution. Clean all external surfaces. Brush endoscope distal tip and, if applicable, brush and flush forceps-elevator.
Injection Tube
Channel Plug
Wear all appropriate personal protective equipment.
Meticulous cleaning is essential for effective disinfection/sterilization.
Be sure to reprocess all removable parts (e.g., valves) according to the reprocessing manual.
Visually inspect the equipment after cleaning. If debris remains, repeat the procedure.
Inspect the MB-155 (Leakage Test Connector) for signs of damage prior to use.
•
•
•
•
•
Flush water, then air, into elevator-wirechannel/auxiliary-water channel. (Alternatively, the auxiliary-water channel may be flushed using the OFP pump.) The auxiliary water tube should remain attached during transport to reprocessing room.
LEAKAGE TESTING
RINSING
MANUAL CLEANING
Brush the universal cord portion of the suction channel. Repeat until all debris is removed.
Brush the insertion tube portion of the suction channel. Repeat until all debris is removed.
IMPORTANT
Attach water-resistant cap. This step is omitted for 190 endoscopes. Transport to the reprocessing room in a covered container. NOTE: Ensure that the ETO cap is removed prior to leak testing 190 generation scopes.
MANUAL CLEANING
Ensure the ETO valve and the MB-155 are free of water drops. Detach auxiliary water tube and attach leakage tester. Turn on air source and confirm expansion of the bending section. Immerse entire endoscope in clean water. Perform leakage test. Angulate tip during test. Remove from water. Turn off air source and detach leakage tester from air source. After the tip has deflated, detach leakage tester from endoscope.
While immersed:
WARNING: This guide is only a summary of the steps necessary to properly clean your endoscope. Be sure to follow the detailed steps outlined in the ENDOSCOPE REPROCESSING MANUAL that was included with your endoscope when purchased.
Refer to companion ENDOSCOPE DISINFECTION GUIDE for disinfection information
ENDOSCOPE CLEANING GUIDEENDOSCOPE CLEANING GUIDEEVIS (140/240), EXERA (160), EXERA II (180) & EXERA III (190) GI Endoscopes
While immersed: While immersed:
While immersed:
Wipe down insertion tube with a water-soaked cloth.
Disconnect all detachable parts.
Aspirate water, thenair through the suctionchannel.
Attach AW channel-cleaning adapter. Flushwater, then air, throughair/water channels.
Aspirate detergent solutioninto suction channel.
Attach injection tube and channel plug. Flush detergent solution into the air and water channels.Flush the forceps-elevator,if applicable.
Flush detergent solution into auxiliary-water / elevator-wire channel.
Wipe all external surfaces of endoscope and cleaning accessories, then soak in detergent solution for the time recommended by the detergent manufacturer.
Immerse the entire instrument inclean water and gently agitateto rinse.
Flush clean water through all channels (including auxiliary-water / elevator-wire, if applicable). Remove from water, then flush air through all channels.
Use a soft, lint-free cloth to remove excess moisture from endoscope and cleaning accessories in preparation fordisinfection.
MH-948AW Channel-
Cleaning Adapter
For endoscopes with elevators or auxiliary-water feeding only:
Channel Plug For endoscopes with elevatorsor auxiliary-water feeding only:
Brush the suctioncylinder and instrument channel port. Repeat until all debris is removed.
While immersed:
Immerse in freshly prepared detergent solution. Clean all external surfaces. Brush endoscope distal tip and, if applicable, brush and flush forceps-elevator.
Injection Tube
Channel Plug
Wear all appropriate personal protective equipment.
Meticulous cleaning is essential for effective disinfection/sterilization.
Be sure to reprocess all removable parts (e.g., valves) according to the reprocessing manual.
Visually inspect the equipment after cleaning. If debris remains, repeat the procedure.
Inspect the MB-155 (Leakage Test Connector) for signs of damage prior to use.
•
•
•
•
•
Flush water, then air, into elevator-wirechannel/auxiliary-water channel. (Alternatively, the auxiliary-water channel may be flushed using the OFP pump.) The auxiliary water tube should remain attached during transport to reprocessing room.
LEAKAGE TESTING
RINSING
MANUAL CLEANING
Brush the universal cord portion of the suction channel. Repeat until all debris is removed.
Brush the insertion tube portion of the suction channel. Repeat until all debris is removed.
IMPORTANT
Attach water-resistant cap. This step is omitted for 190 endoscopes. Transport to the reprocessing room in a covered container. NOTE: Ensure that the ETO cap is removed prior to leak testing 190 generation scopes.
Under 60 minutes- BEGIN LEAK TESTING AND MANUAL CLEANING
Ensure the ETO valve and the MB-155 are free of water drops. Detach auxiliary water tube and attach leakage tester. Turn on air source and confirm expansion of the bending section. Immerse entire endoscope in clean water. Perform leakage test. Angulate tip during test. Remove from water. Turn off air source and detach leakage tester from air source. After the tip has deflated, detach leakage tester from endoscope.
While immersed:
WARNING: This guide is only a summary of the steps necessary to properly clean your endoscope. Be sure to follow the detailed steps outlined in the ENDOSCOPE REPROCESSING MANUAL that was included with your endoscope when purchased.
Refer to companion ENDOSCOPE DISINFECTION GUIDE for disinfection information
ENDOSCOPE CLEANING GUIDEENDOSCOPE CLEANING GUIDEEVIS (140/240), EXERA (160), EXERA II (180) & EXERA III (190) GI Endoscopes
While immersed: While immersed:
While immersed:
Wipe down insertion tube with a water-soaked cloth.
Disconnect all detachable parts.
Aspirate water, thenair through the suctionchannel.
Attach AW channel-cleaning adapter. Flushwater, then air, throughair/water channels.
Aspirate detergent solutioninto suction channel.
Attach injection tube and channel plug. Flush detergent solution into the air and water channels.Flush the forceps-elevator,if applicable.
Flush detergent solution into auxiliary-water / elevator-wire channel.
Wipe all external surfaces of endoscope and cleaning accessories, then soak in detergent solution for the time recommended by the detergent manufacturer.
Immerse the entire instrument inclean water and gently agitateto rinse.
Flush clean water through all channels (including auxiliary-water / elevator-wire, if applicable). Remove from water, then flush air through all channels.
Use a soft, lint-free cloth to remove excess moisture from endoscope and cleaning accessories in preparation fordisinfection.
MH-948AW Channel-
Cleaning Adapter
For endoscopes with elevators or auxiliary-water feeding only:
Channel Plug For endoscopes with elevatorsor auxiliary-water feeding only:
Brush the suctioncylinder and instrument channel port. Repeat until all debris is removed.
While immersed:
Immerse in freshly prepared detergent solution. Clean all external surfaces. Brush endoscope distal tip and, if applicable, brush and flush forceps-elevator.
Injection Tube
Channel Plug
Wear all appropriate personal protective equipment.
Meticulous cleaning is essential for effective disinfection/sterilization.
Be sure to reprocess all removable parts (e.g., valves) according to the reprocessing manual.
Visually inspect the equipment after cleaning. If debris remains, repeat the procedure.
Inspect the MB-155 (Leakage Test Connector) for signs of damage prior to use.
•
•
•
•
•
Flush water, then air, into elevator-wirechannel/auxiliary-water channel. (Alternatively, the auxiliary-water channel may be flushed using the OFP pump.) The auxiliary water tube should remain attached during transport to reprocessing room.
LEAKAGE TESTING
RINSING
MANUAL CLEANING
Brush the universal cord portion of the suction channel. Repeat until all debris is removed.
Brush the insertion tube portion of the suction channel. Repeat until all debris is removed.
IMPORTANT
Attach water-resistant cap. This step is omitted for 190 endoscopes. Transport to the reprocessing room in a covered container. NOTE: Ensure that the ETO cap is removed prior to leak testing 190 generation scopes.
LEAK TESTING
Ensure the ETO valve and the MB-155 are free of water drops. Detach auxiliary water tube and attach leakage tester. Turn on air source and confirm expansion of the bending section. Immerse entire endoscope in clean water. Perform leakage test. Angulate tip during test. Remove from water. Turn off air source and detach leakage tester from air source. After the tip has deflated, detach leakage tester from endoscope.
While immersed:
WARNING: This guide is only a summary of the steps necessary to properly clean your endoscope. Be sure to follow the detailed steps outlined in the ENDOSCOPE REPROCESSING MANUAL that was included with your endoscope when purchased.
Refer to companion ENDOSCOPE DISINFECTION GUIDE for disinfection information
ENDOSCOPE CLEANING GUIDEENDOSCOPE CLEANING GUIDEEVIS (140/240), EXERA (160), EXERA II (180) & EXERA III (190) GI Endoscopes
While immersed: While immersed:
While immersed:
Wipe down insertion tube with a water-soaked cloth.
Disconnect all detachable parts.
Aspirate water, thenair through the suctionchannel.
Attach AW channel-cleaning adapter. Flushwater, then air, throughair/water channels.
Aspirate detergent solutioninto suction channel.
Attach injection tube and channel plug. Flush detergent solution into the air and water channels.Flush the forceps-elevator,if applicable.
Flush detergent solution into auxiliary-water / elevator-wire channel.
Wipe all external surfaces of endoscope and cleaning accessories, then soak in detergent solution for the time recommended by the detergent manufacturer.
Immerse the entire instrument inclean water and gently agitateto rinse.
Flush clean water through all channels (including auxiliary-water / elevator-wire, if applicable). Remove from water, then flush air through all channels.
Use a soft, lint-free cloth to remove excess moisture from endoscope and cleaning accessories in preparation fordisinfection.
MH-948AW Channel-
Cleaning Adapter
For endoscopes with elevators or auxiliary-water feeding only:
Channel Plug For endoscopes with elevatorsor auxiliary-water feeding only:
Brush the suctioncylinder and instrument channel port. Repeat until all debris is removed.
While immersed:
Immerse in freshly prepared detergent solution. Clean all external surfaces. Brush endoscope distal tip and, if applicable, brush and flush forceps-elevator.
Injection Tube
Channel Plug
Wear all appropriate personal protective equipment.
Meticulous cleaning is essential for effective disinfection/sterilization.
Be sure to reprocess all removable parts (e.g., valves) according to the reprocessing manual.
Visually inspect the equipment after cleaning. If debris remains, repeat the procedure.
Inspect the MB-155 (Leakage Test Connector) for signs of damage prior to use.
•
•
•
•
•
Flush water, then air, into elevator-wirechannel/auxiliary-water channel. (Alternatively, the auxiliary-water channel may be flushed using the OFP pump.) The auxiliary water tube should remain attached during transport to reprocessing room.
LEAKAGE TESTING
RINSING
MANUAL CLEANING
Brush the universal cord portion of the suction channel. Repeat until all debris is removed.
Brush the insertion tube portion of the suction channel. Repeat until all debris is removed.
IMPORTANT
Attach water-resistant cap. This step is omitted for 190 endoscopes. Transport to the reprocessing room in a covered container. NOTE: Ensure that the ETO cap is removed prior to leak testing 190 generation scopes.
MANUAL CLEANING
Ensure the ETO valve and the MB-155 are free of water drops. Detach auxiliary water tube and attach leakage tester. Turn on air source and confirm expansion of the bending section. Immerse entire endoscope in clean water. Perform leakage test. Angulate tip during test. Remove from water. Turn off air source and detach leakage tester from air source. After the tip has deflated, detach leakage tester from endoscope.
While immersed:
WARNING: This guide is only a summary of the steps necessary to properly clean your endoscope. Be sure to follow the detailed steps outlined in the ENDOSCOPE REPROCESSING MANUAL that was included with your endoscope when purchased.
Refer to companion ENDOSCOPE DISINFECTION GUIDE for disinfection information
ENDOSCOPE CLEANING GUIDEENDOSCOPE CLEANING GUIDEEVIS (140/240), EXERA (160), EXERA II (180) & EXERA III (190) GI Endoscopes
While immersed: While immersed:
While immersed:
Wipe down insertion tube with a water-soaked cloth.
Disconnect all detachable parts.
Aspirate water, thenair through the suctionchannel.
Attach AW channel-cleaning adapter. Flushwater, then air, throughair/water channels.
Aspirate detergent solutioninto suction channel.
Attach injection tube and channel plug. Flush detergent solution into the air and water channels.Flush the forceps-elevator,if applicable.
Flush detergent solution into auxiliary-water / elevator-wire channel.
Wipe all external surfaces of endoscope and cleaning accessories, then soak in detergent solution for the time recommended by the detergent manufacturer.
Immerse the entire instrument inclean water and gently agitateto rinse.
Flush clean water through all channels (including auxiliary-water / elevator-wire, if applicable). Remove from water, then flush air through all channels.
Use a soft, lint-free cloth to remove excess moisture from endoscope and cleaning accessories in preparation fordisinfection.
MH-948AW Channel-
Cleaning Adapter
For endoscopes with elevators or auxiliary-water feeding only:
Channel Plug For endoscopes with elevatorsor auxiliary-water feeding only:
Brush the suctioncylinder and instrument channel port. Repeat until all debris is removed.
While immersed:
Immerse in freshly prepared detergent solution. Clean all external surfaces. Brush endoscope distal tip and, if applicable, brush and flush forceps-elevator.
Injection Tube
Channel Plug
Wear all appropriate personal protective equipment.
Meticulous cleaning is essential for effective disinfection/sterilization.
Be sure to reprocess all removable parts (e.g., valves) according to the reprocessing manual.
Visually inspect the equipment after cleaning. If debris remains, repeat the procedure.
Inspect the MB-155 (Leakage Test Connector) for signs of damage prior to use.
•
•
•
•
•
Flush water, then air, into elevator-wirechannel/auxiliary-water channel. (Alternatively, the auxiliary-water channel may be flushed using the OFP pump.) The auxiliary water tube should remain attached during transport to reprocessing room.
LEAKAGE TESTING
RINSING
MANUAL CLEANING
Brush the universal cord portion of the suction channel. Repeat until all debris is removed.
Brush the insertion tube portion of the suction channel. Repeat until all debris is removed.
IMPORTANT
Attach water-resistant cap. This step is omitted for 190 endoscopes. Transport to the reprocessing room in a covered container. NOTE: Ensure that the ETO cap is removed prior to leak testing 190 generation scopes.
PROLONGED SOAKING
60 min.
Ensure Reprocessing is Performed Promptly
What can healthcare facilities do to ensure manual reprocessing is being performed within 60 minutes of precleaning to avoid the prolonged soaking required in the delayed reprocessing protocol? Utilizing a process to track the time from the end of the patient procedure and precleaning process to the initiation of manual cleaning is an optimal way to achieve this. This information helps staff determine if the delayed reprocessing protocol is required and also allows staff to prioritize the cleaning of scopes based on the amount of time that has passed since precleaning.5
One tracking product is Unifia by Olympus. Unifia is a reprocessing documentation, workflow and asset management system. Its wireless scanner technology allows users to easily capture and record information from multiple locations, including the reception desk, procedure room, storage locations, and soiled and reprocessing rooms.
PRECLEANING - Immediately after use
The Association for the Advancement of Medical Instrumentation (AAMI) recommends the use of electronic recordkeeping due to its superior accuracy, legibility, data integrity and security over manual recordkeeping methods.
8
Delays in Endoscope Reprocessing …and the Biofilms WithinBy Melinda Benedict, MS, CIC, CFER
Ensure Reprocessing is Performed Promptly (continued)
The data captured by Unifia includes times when procedures begin and end, when precleaning is performed, when leak testing is performed, when manual cleaning begins, and more. Time between reprocessing steps can be easily visualized on a Daily Dashboard view displayed on screens and monitors throughout the facility. Technicians can use this dashboard to quickly identify which endoscopes need to be cleaned in order to avoid performing delayed reprocessing and managers can use it to audit staff workloads and ensure endoscope reprocessing compliance from their desks.
Conclusion
Failing to keep accurate records of the time between precleaning and manual cleaning is not only a lapse in following reprocessing instructions but also a patient safety issue. The drying of organic debris and bioburden, even in the smallest amounts, can result in ineffective cleaning and disinfection of the endoscope and encourage growth of biofilms.
Each facility should develop a method of documenting the time when reprocessing steps occur. In addition to documentation, communication needs to occur between staff members within the facility. If the precleaning time is documented by a technician in the procedure room but that information is not communicated with reprocessing room staff, then the purpose of documentation is lost and errors will occur. Patient safety is of utmost importance, and preventing hospital-aquired infections through correct and effective reprocessing is a necessary practice.
Delays in Endoscope Reprocessing …and the Biofilms WithinBy Melinda Benedict, MS, CIC, CFER
References
1. Ofstead CL, Quick MR, Eiland JE, Adams, SJ. A Glimpse at the True Cost of Reprocessing Endoscopes: Results of a Pilot Project. Communiqué. May 2017.
2. EVIS EXERA III Gastrointestinal Videoscope and Colonovideoscope Reprocessing Manual. Olympus Medical Systems Corporation. Tokyo, Japan. 20140528.
3. “Reprocessing Medical Devices in Health Care Settings: Validation Methods and Labeling. Guidance for Industry and Food and Drug Administration Staff.,” U.S. Department of Health and Human Services - Food and Drug Administration, March 17, 2015.
4. “Health Technical Memorandum 01-06: Decontamination of flexible endoscopes, Part A: Policy and management.,” 2016.
5. ANSI/AAMI ST91:2015 Flexible and Semi-rigid Endoscope Processing in Health Care Facilities. Arlington, VA: Association for the Advancement of Medical Instrumentation; 2015.
6. Guideline For Processing Flexible Endoscopes. Denver, CO: Association of periOperative Registered Nurses, 2016.
7. Standards of Infection Prevention in Reprocessing Flexible Gastrointestinal Endoscopes. Chicago, IL: Society of Gastroenterology Nurses and Associates, 2016.
8. Beilenhoff U, Biering H, Blum R et al. “Prevention of multidrug-resistant infections from contaminated duodenoscopes: Position Statement of the European Society of Gastrointestinal Endoscopy (ESGE) and European Society of Gastroenterology Nurses and Associates (ESGENA),” Endoscopy, no. 49, p. 1098–1106, 2017.
9. “Infection Control in Endoscopy: Clinical Update.”, 2010.
10. Merritt K, Kitchins VM, Brown SA. “Safety and Cleaning of Medical Materials and Devices,” FDA, Center for Devices and Radiological Health, Division of Life Sciences, HFZ 112, Rockville, Maryland 20852.
11
11. Rutala WA, Weber DJ, and Healthcare Control Practices Advisory Committee. “Guideline for Disinfection and Sterilization in Healthcare Facilities,” 2008.
12. Naas T, Cuzon G, Babics A et al. “Endoscopy-associated transmission of carbapenem-resistant Klebsiella pneumoniae producing KPC-2 b-lactamase.,” J Antimicrob Chemother, 2010.
13. Shimono N, Takuma T, Tsuchimochi N et al. “An outbreak of Pseudomonas aeruginosa infections following thoracic surgeries occurring via the contamination of bronchoscopes and an automatic endoscope reprocesso,” J Infect Chemother, no. 14, p. 418–423, 2008.
14. Roberts CG. “The role of biofilms in reprocessing medical devices,” American Journal of Infection Control, no. 41, pp. S77-S80, 2013.
15. Pajkos A, Vickery K, Cossart Y. “Is biofilm accumulation on endoscope tubing a contributor to the failure of cleaning and decontamination?,” Journal of Hospital Infection, no. 58, p. 224–229, 2004.
For more information, contact your Olympus sales representative or call 800-848-9024.