27
Dell Command | Configure Version 4.5 User's Guide May 2021 Rev. A00

Dell Command | ConfigureVersion 4.5 User's Guide
May 2021Rev. A00

Notes, cautions, and warnings
NOTE: A NOTE indicates important information that helps you make better use of your product.
CAUTION: A CAUTION indicates either potential damage to hardware or loss of data and tells you how to avoid
the problem.
WARNING: A WARNING indicates a potential for property damage, personal injury, or death.
© 2021 Dell Inc. or its subsidiaries. All rights reserved. Dell, EMC, and other trademarks are trademarks of Dell Inc. or its subsidiaries. Othertrademarks may be trademarks of their respective owners.

Chapter 1: Introduction to Dell Command | Configure 4.5..............................................................5What’s new in this release.................................................................................................................................................5Other documents you may need......................................................................................................................................5
Accessing documents from the Dell EMC support site........................................................................................6
Chapter 2: Windows SMM Security Mitigations Table (WSMT) Compliance for Dell Command| Configure 4.5...........................................................................................................................7
Chapter 3: Using user interface for Dell Command | Configure 4.5................................................ 8Accessing Dell Command | Configure within Windows system................................................................................8Accessing Dell Command | Configure within Linux..................................................................................................... 8Files and folders of Dell Command | Configure ...........................................................................................................8Accessing the Dell Command | Configure GUI.............................................................................................................9Creating a BIOS package using the GUI........................................................................................................................ 9
Configure the general settings................................................................................................................................. 10Configuration options..................................................................................................................................................10Configuring the setup, system, and hard disk drive passwords........................................................................ 11Clearing setup, system and hard disk drive passwords using the existing password..................................12Password protection screen......................................................................................................................................12Configuring the autoon option.................................................................................................................................. 12Configuring the BIOSConnect profiles....................................................................................................................13Configuring the bootorder option............................................................................................................................ 15Boot order screen........................................................................................................................................................ 16Adding a new device to the boot order.................................................................................................................. 16Boot order type............................................................................................................................................................ 16Configuring the primarybatterycfg option..............................................................................................................17Configuring the advbatterychargecfg option........................................................................................................ 17Configuring the peakshiftcfg option........................................................................................................................18Password Configuration option................................................................................................................................ 19Configuring the keyboardbacklightcolor option.................................................................................................... 19
Advanced System Management....................................................................................................................................20Setting the non-critical threshold values.............................................................................................................. 20
BIOS option validation......................................................................................................................................................20Validating a multiplatform package or saved package....................................................................................... 20Validating a local system package............................................................................................................................21
Exporting the BIOS configuration.................................................................................................................................. 21Exporting the SCE (.EXE) file................................................................................................................................... 21Exporting the configuration without setting values............................................................................................22
Target system configuration.......................................................................................................................................... 22Applying INI or CCTK file........................................................................................................................................... 22Applying a shell script on Linux................................................................................................................................ 22Applying a SCE file...................................................................................................................................................... 23
Log details in Package History....................................................................................................................................... 23Viewing a log file..........................................................................................................................................................23
Contents
Contents 3

Deleting log details...................................................................................................................................................... 24Providing feedback on Dell Command | Configure ............................................................................................ 24
Chapter 4: Troubleshooting scenarios in Dell Command | Configure 4.5...................................... 25Contacting Dell.................................................................................................................................................................. 26
4 Contents

Introduction to Dell Command | Configure4.5
Dell Command | Configure is a software package that provides BIOS configuration capability for Dell client systems. ITadministrators can use this tool to configure BIOS settings and create BIOS packages using the Dell Command | ConfigureUser Interface (UI) or Command Line Interface (CLI).
Dell Command | Configure supports the following Windows and Linux operating systems:
● Windows 7● Windows 8● Windows 8.1● Windows 10● Windows Preinstallation Environment (Windows PE)● Red Hat Enterprise Linux 7● Red Hat Enterprise Linux 8● Ubuntu Desktop 16.04● Ubuntu Desktop 18.04● Ubuntu Desktop 20.04● Ubuntu Core 16
For information about using the CLI, see Dell Command | Configure Command Line Interface Reference Guide available atdell.com/support.
NOTE: This software was rebranded as Dell Command | Configure after Dell Client Configuration Toolkit version 2.2.1.
Topics:
• What’s new in this release• Other documents you may need
What’s new in this release● Support for the BIOSConnect profiles:
○ ConnectionProfile○ CloudAppProfile○ CsosProfile○ FotaProfile○ HttpBootProfile
● Support for the following BIOS attributes:○ TCCActOffset○ RgbPerKeyboardLang○ RgbPerKeyKeyboardColor
Other documents you may needIn addition to this guide, you can access the following documents at dell.com/support:
● The Dell Command | Configure Installation Guide provides information about installing Dell Command | Configure onsupported client systems. The guide is available at Dell Command | Configure documentation page.
● The Dell Command | Configure Command Line Interface Reference Guide provides information about configuring the BIOSoptions on supported Dell client systems.
1
Introduction to Dell Command | Configure 4.5 5

The Release Notes documentation is available as part of the Dell Command | Configure download on dell.com/support,provides the latest available information for the installation and operation of Dell Command | Configure .
Accessing documents from the Dell EMC support site
You can access the required documents by selecting your product.
1. Go to www.dell.com/manuals.2. Click Browse all products, click Software, and then click Client Systems Management.3. To view the documents, click the required product name and version number.
6 Introduction to Dell Command | Configure 4.5

Windows SMM Security Mitigations Table(WSMT) Compliance for Dell Command |
Configure 4.5The Windows (SMM) Security Mitigations Table contains information about the ACPI table that was created for the Windowsoperating system, which supports Windows virtualization-based security (VBS) features. Dell Command | Configure is WSMTcompatible. This is used for configuring the platform features on Dell Client Systems with WSMT enabled BIOS.
Following are the behavioral changes due to WSMT compliance:
● Configuration functionalities are available on the Dell Client Platforms which have the compatible version of BIOS supportingWMI/ACPI. For more information about the platform list, see Supported Platforms.
● The following limited functionalities are available when the systems are having incompatible BIOS:○ Dell Command | Configure user interface is used for viewing all the configuration features.○ Dell Command | Configure generates SCE for multiplatform packages.○ Dell Command | Configure generates the reports with the configured values.○ Dell Command | Configure opens a saved package.You may see the following warning messages with systems running an incompatible BIOS.○ During installation: This system does not have a WMI-ACPI compliant BIOS, so the limited functionality is available.
Update the BIOS with a compatible version, if available. For more information, see Dell Command | Configure ReleaseNotes.
○ Using CLI: This system does not have a WMI-ACPI compliant BIOS. Update the BIOS with a compatible version, ifavailable.
○ For local system package in user interface: This system does not have a WMI-ACPI compatible BIOS, and the localsystem SCE package does not work on this system. Update the BIOS with a compatible version, if available.
○ While running the SCE packages: This system does not have a WMI-ACPI compliant BIOS. Update the BIOS with acompatible version, if available.
2
Windows SMM Security Mitigations Table (WSMT) Compliance for Dell Command | Configure 4.5 7
Using user interface for Dell Command |Configure 4.5
Dell Command | Configure Graphical User Interface (Dell Command | Configure user interface) displays all BIOS configurationsthat are supported by Dell Command | Configure . Using the Dell Command | Configure user interface, you can perform thefollowing:
● Create BIOS configuration for client systems. For more information, see Creating a BIOS Package using GUI.● Validate the BIOS configuration against the BIOS configuration of the host system. For more information, see BIOS option
validation.● Export the customized BIOS configurations as a configuration file (INI or CCTK), Self-Contained Executable (SCE), shell
script, or report. For more information, see Exporting the BIOS configuration.
NOTE: To apply the configuration using the Dell Command | Configure Command Line Interface (CLI), run the required file
(INI, CCTK, or SCE).
NOTE: This system does not have a WMI-ACPI compliant BIOS, so the limited functionality is available. Update the BIOS
with a compatible version, if available. For more information, see Dell Command | Configure Release Notes.
Topics:
• Accessing Dell Command | Configure within Windows system• Accessing Dell Command | Configure within Linux• Files and folders of Dell Command | Configure• Accessing the Dell Command | Configure GUI• Creating a BIOS package using the GUI• Advanced System Management• BIOS option validation• Exporting the BIOS configuration• Target system configuration• Log details in Package History
Accessing Dell Command | Configure within Windowssystem1. Click Windows icon.
2. Enter Dell Command | Configure.
Accessing Dell Command | Configure within LinuxBrowse to /opt/dell/dcc directory.
NOTE: On the systems running Ubuntu Core, Dell Command | Configure can be accessed from any location using the
following command: dcc.cctk.
Files and folders of Dell Command | ConfigureThe following table displays the files and folders of Dell Command | Configure on systems running the Windows operatingsystem.
3
8 Using user interface for Dell Command | Configure 4.5

Table 1. Files and folders of Dell Command | Configure
Files/Folders Description
Dell Command | ConfigureCommand Prompt
Allows access to the Dell Command | Configure command prompt.
Dell Command | Configure Wizard Allows access to the Dell Command | Configure GUI.
Dell Command | Configure WINPE Allows access to the Windows PE scripts to create a bootable image. For more details, seethe Dell Command | Configure Installation Guide available at dell.com/support.
User’s Guide Online Provides access to the Dell Command | Configure documentation that is available atdell.com/support.
Accessing the Dell Command | Configure GUI
NOTE: Dell Command | Configure GUI is supported only on systems running the Windows operating system.
To access the GUI, click Start > All Programs > Dell > Dell Command | Configure Wizard or double-click Dell Command |Configure Wizard on the desktop.
Creating a BIOS package using the GUIUsing the Dell Command | Configure user interface, you can create a BIOS package containing valid settings to apply to targetclient systems.
To create a BIOS package:
1. Access the Configuration wizard.
For more information, see Accessing Dell Command | Configure GUI.
The Create Multiplatform Package screen is displayed with the following configuration options:● Create Multiplatform Package—Click to view the BIOS settings that are supported on all possible client systems.
Configure, validate, and export the settings as INI, CCTK, EXE, shell script, or HTML file.● Open a Dell Recommended Package—Click to view the security features and the supported BIOS options in the
system. The Dell recommended values are set in order to secure the system. Also, you have an option to modify thevalues as per the requirements. Configure, validate, and export the settings as INI, CCTK, EXE, shell script, or HTML file.
NOTE: The Dell Recommended Package of BIOS attributes must be checked by the organization's security team
prior to deployment. Dell is not responsible for security vulnerabilities that may arise which is related to the
deployment or modification of the Dell Recommended Package of the BIOS attributes.
NOTE: The status changes to caution when you modify a value that is not recommended by Dell.
For a complete list of the BIOS attributes, which are included in the Dell Recommended Package, see Dell Command |Configure Version 4.x Command Line Interface Reference Guide.
● Create Local System Package—Click to view the BIOS settings of the host system. Configure, validate, and exportthe settings as INI, CCTK, EXE, or HTML file. The file displays the supported and unsupported BIOS options for thesystem.
● Open a Saved Package—Click to import a saved configuration file. Configure, validate, and export the settings as INI,CCTK, EXE, shell script, or HTML file.
NOTE: To open a saved package, click Open a Saved Package, browse to the file location and then click Open.
2. Click the required option.All the options that are supported for configuration are displayed. For more information, see Configuration options.
3. Click Edit or double-click the option.
4. From the Value to Set drop-down list, select the values of the required option.The Apply Settings check box of the edited options is displayed as selected.
5. Select the required export option to export the edited options.
For more information, see Exporting the BIOS configuration.
Using user interface for Dell Command | Configure 4.5 9
NOTE: If you do not want to export an option, and then clear the Apply Settings check box.
NOTE:
If the option accepts the string as an input, and then it is not required to add an escape sequence to that option.
Related Links:
● Configuration options● Configuring the setup, system, and hard disk drive passwords● Clearing setup, system and hard disk drive passwords● Configuring auto on option● Configuring boot order● Configuring primary battery charging● Configuring advanced battery charging● Configuring peak shift battery charging● Configuring keyboard backlight color option
Configure the general settings
In the General tab, you can update the source catalog location and the download location, configure or modify Internet proxysettings for Dell Command | Configure to gather information of the update experience.
To configure the general settings:
1. On the title bar, click Settings.The Settings screen is displayed.
2. On the left pane, click General.
3. Click Browse under Download File Location, click Browse to set the default location or to change the default location.
NOTE: Dell Command | Configure automatically deletes the update files from this location after installing the updates.
4. You have the following options to set the Internet proxy settings:● To use the current Internet proxy settings, select Use current Internet proxy setting.● To configure a proxy server and port, select Custom proxy setting. To enable proxy authentication, select the Use
Proxy Authentication and provide proxy server, proxy port, username, and password.
NOTE: The username and password credentials are encrypted and saved.
5. On the left pane, click Sync.
6. Click CHECK to check for Dell Command | Configure updates.If there are updates available for Dell Command | Configure, a warning message is displayed Updates available. Would youlike to proceed?, click YES to proceed with the updates.
NOTE: Internet connection is mandatory to check for the updates.
7. To update the Dell Command | Configure without an internet connection, do the following:
a. Download a local copy of DellCommandConfigureCatalog.cab files from http://downloads.dell.com/catalog/.b. Extract the .cab file and replace the syscfg.xml and resdictionary.xml with the files that are available in Dell
Command | Configure. The installation path is C:\Program Files (x86)\Dell\Command Configure.
c. Replace Optionames_<language code>.xml file with the files that are available in Dell Command | Configure. Theinstallation path is C:\Program Files (x86)\Dell\Command Configure\Localization.
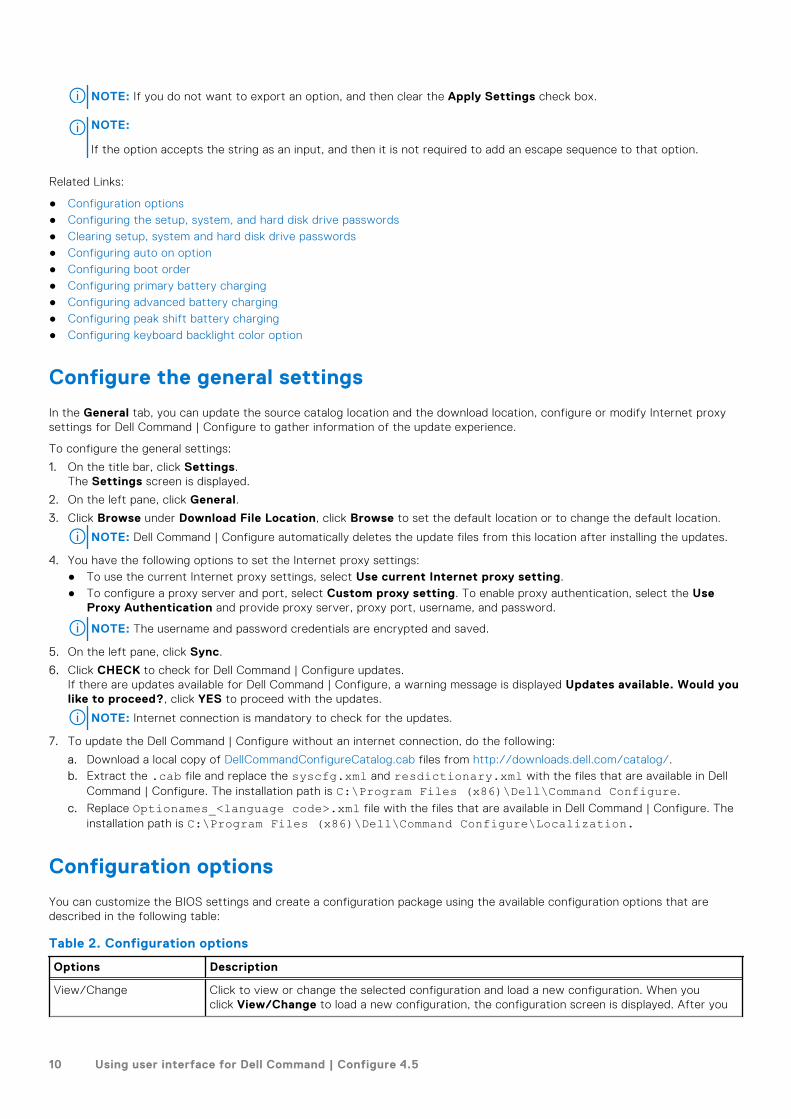
Configuration options
You can customize the BIOS settings and create a configuration package using the available configuration options that aredescribed in the following table:
Table 2. Configuration options
Options Description
View/Change Click to view or change the selected configuration and load a new configuration. When youclick View/Change to load a new configuration, the configuration screen is displayed. After you
10 Using user interface for Dell Command | Configure 4.5

Table 2. Configuration options (continued)
Options Description
have made the preferred modifications, click Save to save the changes, or click Cancel to returnto the previous configuration.
NOTE: If you try to load a new configuration without exporting the configured BIOS options,and then a screen is displayed. Click Discard Changes to discard the configured values orclick Cancel to go to the same configuration.
Edit Click to edit the loaded configuration.
Advanced view Click to view the configuration details such as, command-line options and possible values that youcan set for the option, current value of the option, options to apply settings, and description ofthe option.
NOTE: You can view the current value of an option if you have loaded the settings of thehost system.
Basic view Click to view the configuration details such as, category to which the option belongs, name ofthe option, possible values that you can set for the option, current value of the option, options toapply settings, and the description of the option.
NOTE: You can view the current value of an option if you have loaded the settings of thehost system.
Validate Click to validate the loaded configuration against the configuration of the host system. For moreinformation, see BIOS option validation.
Search Search for a text string in the table. Type the text in the search box and the first occurrence ofthe text in the table is selected.
Category Click to select the required categories from the drop-down list.
NOTE: You can view this option only in Basic View.
Name Displays the name of the options.
NOTE: You can view this option only in Basic View.
Value to set Displays the value of the option. Double-click the row or click Edit to change the values.
Present Value Displays the current value of the option.
NOTE: You can view this option if you have loaded the settings of the host system.
Apply settings Select the check box to export the option. By default, all the options that contain a value in theValue to set column are selected.
Description Displays a short description of the option.
Command-Line Options Displays the command-line representation of the options.
NOTE: You can view this option only in Advance View.
Status Displays the status of the options of the loaded configuration.
NOTE: The Status column is displayed only when you validate.
Configuring the setup, system, and hard disk drive passwords
You can set or change the setup password (setuppwd) also known as BIOS password, the system password (syspwd), and thehard disk drive password (hddpwd).
To edit the setup, system, or hard disk drive password:
1. In the Edit mode, click the Value to Set text box of the required option.The corresponding password screen is displayed.
NOTE: To display the password as clear text, select Show Password. When you select Show Password, then the
Confirm Password text box is not displayed. Type the password in the Password text box.
Using user interface for Dell Command | Configure 4.5 11

NOTE: The setup and system passwords must contain a minimum of four characters.
2. Type the same password in the Confirm Password text box to confirm the password.If both the entries match, then a green color check mark is displayed next to the Confirm Password text box. A red X markis displayed if both entries do not match.
3. Click SUBMIT.
4. To apply the modifications, export the configuration in ,ini or .exe format. See, Exporting the BIOS configuration.
Clearing setup, system and hard disk drive passwords using theexisting password
You can clear the configured setup, system, and hard disk drive passwords using the existing password.
NOTE: It is not possible to clear the password without knowing the existing password.
To clear the passwords:
1. In the Edit mode, click the Value to Set text box of the required option.The corresponding password screen is displayed.
NOTE: To display the password as clear text, select Show Password. If you select Show Password, then the
Confirm Password text box is not displayed.
2. Enter a blank space in the Password text box.
3. Enter a blank space in the Confirm Password text box to confirm the password.If both the entries match, a green check mark is displayed next to the Confirm Password text box. A red X mark isdisplayed if both entries do not match.
4. Click SUBMIT.
5. To apply the modifications, export the configuration in ,ini or .exe format. See, Exporting the BIOS configuration.
Password protection screen
A password protection screen is displayed while exporting a file or report with system or setup password. To export the file withthe password as clear text, click Continue. To export the file without the password, click Mask.
Configuring the autoon option
You can configure the days on which you want the system to automatically turn on using the autoon option from the Powerand Performance Management category.
To configure the days:
1. Click the required option:
● Create Multiplatform Package● Create Local System Package● Open a Dell Recommended Package● Open a Saved Package
NOTE: To open a saved package, click Open a Saved Package, browse to the file location, and then click Open.
2. Click Edit, or double-click the option.
3. In the autoon option row, click View/Change in the Value to set column.The auto on screen is displayed.
4. Select one of the following options from Auto On screen:
● Disabled — To turn off the feature.● Weekdays — To turn on the target system automatically only on weekdays.● Every Day — To turn on the target system automatically everyday.● Selected Days — To choose the days on which the target system has to turn on automatically.
5. Click OK.
12 Using user interface for Dell Command | Configure 4.5

6. To apply the modifications, export the configuration in, ini or .exe format. See, Exporting the BIOS configuration.
Configuring the BIOSConnect profiles
A BIOSConnect profile can be configured by using either the Connection, CloudApp, Fota, Csos, or HttpBoot profile option fromthe BIOS Connect profile category. You can edit or set the input data fields for the following BIOSConnect profiles:
● ConnectionProfile● CloudAppProfile● CsosProfile● FotaProfile● HttpBootProfile
To configure the BIOSConnect profile:
1. Click the required option:
● Create Multiplatform Package● Create Local System Package● Open a Dell Recommended Package● Open a Saved Package
NOTE: To open a saved package, click Open a Saved Package, browse to the file location, and then click Open.
2. Click Edit, or double-click the option.
3. In the BIOSConnect profile option, click View/Change in the Value to set column.
The profile screen is displayed with the current value for data fields.
● To create a Multiplatform Package, update the value of data fields on the profile screen.● To create a Local System Package and to open a Saved Package, update the existing value of data fields on the
profile screens.NOTE: Get for BIOSConnect profile is protected when the BIOS password is Set. After you click the Local
System Package, the BIOS password screen is displayed. It allows 3 attempts to provide the correct password. If
the correct password is not provided within 3 attempts, enumeration of the existing values for data field fails. If the
correct password is provided, the existing data for BIOSConnect profiles are displayed.
4. Click OK to save the configuration, or click CLOSE to discard the changes and close the BIOSConnect profile screen.
5. To apply the modifications, export the configuration in, an ini or .exe format. See, Exporting the BIOS configuration.
NOTE: After selecting export config or export .exe option, a warning message is displayed to mask the sensitive
values. Select Mask to hide the values of the sensitive data fields of BIOSConnect profiles. The masked values are set
as Hidden in exported .xml files. Select Continue to save the data fields in plain text.
The following table displays the available data fields to be provided for configuring BIOSConnect Profiles with DellCommand | Configure:
Table 3. BIOSConnect Profiles
Profile Data field Description
ConnectionProfile NA This feature displays and configures theBIOSConnect connection interface.
Preferred Interface Displays the preferred connectioninterface for Internet connectivity.
SSID Hidden When SSID is hidden, this option mustbe enabled.
SSID Name Displays the name of the SSID.
Pre Shared Key The data field is the authorization keyto connect the SSID.
Using user interface for Dell Command | Configure 4.5 13

Table 3. BIOSConnect Profiles (continued)
Profile Data field Description
Auto Preferred Interface When an option is selected as apreferred interface, you can select aWi-Fi or a wired connection.
CloudAppProfile NA This feature displays and configuresBIOSConnect for downloading recoveryapplications.
URL Type Displays the URL type.
URL Displays the URL to download the files.
Select Certificate Allows you to import the certificate toconnect the URL over https.
Response Format Displays the format in which responsesare available or downloaded.
Signed When enabled, this option displays theresponse information that is signed.
Select Response Certificate Allows you to import the key orcertificate to validate the responseinformation.
FotaProfile NA This feature displays and configures theBIOSConnect to download the BIOScatalogs.
URL Type Displays the URL type.
URL Displays the URL to download the files.
Select Certificate Allows you to import the certificate toconnect the URL over https.
Response Format Displays the format in which responsesare available or downloaded.
Signed When enabled, this option displays theresponse information that is signed.
Select Response Certificate Allows you to import the key orcertificate to validate the responseinformation.
CsosProfile NA This feature displays and configures theBIOSConnect to download the systemrecovery files.
URL Type Displays the URL type.
URL Displays the URL to download the files.
Select Certificate Allows you to import the certificate toconnect the URL over https.
Response Format Displays the format in which responsesare available or downloaded.
Signed When enabled, this option displays theresponse information that is signed.
Select Response Certificate Allows you to import the key orcertificate to validate the responseinformation.
14 Using user interface for Dell Command | Configure 4.5

Table 3. BIOSConnect Profiles (continued)
Profile Data field Description
OAuth Enabled When enabled, this option ensures thatthe server requires OAuth to downloadthe required files.
OAuth URL Type Displays the URL type for OAuth.
OAuth URL Displays the URL for OAuth.
OAuth Certificate Allows you to import the certificate toconnect the OAuth over https.
OAuth URL Format Displays the format of the OAuthresponse.
Signed When enabled, this option displays theOAuth response information that issigned.
Select OAuth Response Certificate Allows you to import the key orcertificate to validate the responseinformation.
ClientID Displays the ClientID for the OAuth.
Client Secret Displays the Client's Secret for theOAuth.
OAuth Grant Displays the OAuth Grant status.
HttpBootProfile NA This feature displays and configures theBIOSConnect to install the operatingsystem through HttpsBoot.
URL Type Displays the URL type.
URL Displays the URL to download the files.
Select Certificate Allows you to import the certificate toconnect the URL over https.
NOTE: The CloudApp, Fota, and HttpBoot profile pages have fields to display the certificate validation details. You
can proceed with the selected certificate even if the validation fails.
Configuring the bootorder option
You can configure the boot order of a client system using the bootorder option from the Boot Management category. Youcan add, remove, enable, disable, or change the boot order of the legacy and Unified Extensible Firmware Interface (UEFI) bootitems.
To configure the boot order:
1. Click the required option:
● Create Multiplatform Package● Create Local System Package● Open a Dell Recommended Package● Open a Saved Package
NOTE: To open a saved package, click Open a Saved Package, browse to the file location, and then click Open.
2. Click Edit , or double-click the option.
3. In the bootorder option row, click View/Change in the Value to set column.
The boot order screen is displayed with the current boot order type and boot order options. For more information, seeConfigure boot order.
Using user interface for Dell Command | Configure 4.5 15

● To create a multiplatform package, you can add devices.● To create a local system package and to open a saved package, you can add devices and edit the existing boot order, if
present.
NOTE: Use the arrow buttons at the bottom of the Boot Order screen to change the boot order of the devices.
4. Click OK to save the configuration, or click CLOSE to discard the changes and close the Boot Order screen.
5. To apply the modifications, export the configuration in, ini or .exe format. See, Exporting the BIOS configuration.
Related Links:
● Adding a new device to the boot order● Boot order type
Boot order screen
The following table displays the available options on the Dell Command | Configure - Boot Order screen.
Table 4. Options on the boot order screen
Options Description
Active Boot List You can configure or modify the Active Boot List for UEFI or Legacy based on the requirement. If theactive boot list is ON, and then the system boots with UEFI or Legacy based on the boot order type.
NOTE: In Local System Package, you cannot modify Active Boot List if the system supports onlyUEFI.
Device Type Displays the type of device.
Device Instance Displays a unique number to identify the device on the system.
Shortform Displays the short form of the device name. If the system has many devices of the same device type,and then the short form of the device is displayed with a .<number> notation. For example, if the systemhas an internal hard drive, eSATA HDD, and eSATA Dock HDD, and then the short forms are displayed ashdd.1, hdd.2, and hdd.3 respectively.
Description Displays a short description for the device.
Status Displays if the device is turned on or off.
Delete Removes the device from the boot order. Click X to remove a device.
NOTE: You can view this option if the boot order screen is in Edit mode.
Adding a new device to the boot order
To add a new device to the boot order:
1. Click Add Device on the Boot Order screen.
2. Select the device from the Device Type drop-down list.The Shortform, Description, and Status fields are automatically populated. By default, the Status of the device is On.
3. Select an instance for the device from the Device Instance drop-down list.
4. Click OK.
NOTE: If you select the same Device Type and Device Instance in the Boot Order Type for UEFI or Legacy, and
then the following warning message "Remove the duplicate entry from the input list." is displayed.
Boot order type
The boot order type displays the type of the loaded configuration. The two types of boot order are Legacy and UEFI. If the hostsystem file is loaded, and then it displays the currently active boot order type. If a saved file is loaded, and then it displays theboot order type that is saved in the file.
The common scenarios for boot order type are:
16 Using user interface for Dell Command | Configure 4.5
● If boot order type is not specified in the file and if any UEFI devices are present on the system, and then the system displaysthe boot order type as UEFI.
● If the boot order type is not specified in the file and if any legacy devices (other than hdd) are present on the system, andthen the system displays the boot order type as Legacy.
● If the boot order type is not specified and the loaded configuration file has only hdd items, and then the system prompts theuser to select the boot order type.
● If the boot order type is not specified for a legacy system and if both UEFI and legacy devices are present, and then thesystem displays a warning message and removes the legacy or UEFI devices depending on the order of occurrence of thedevice.
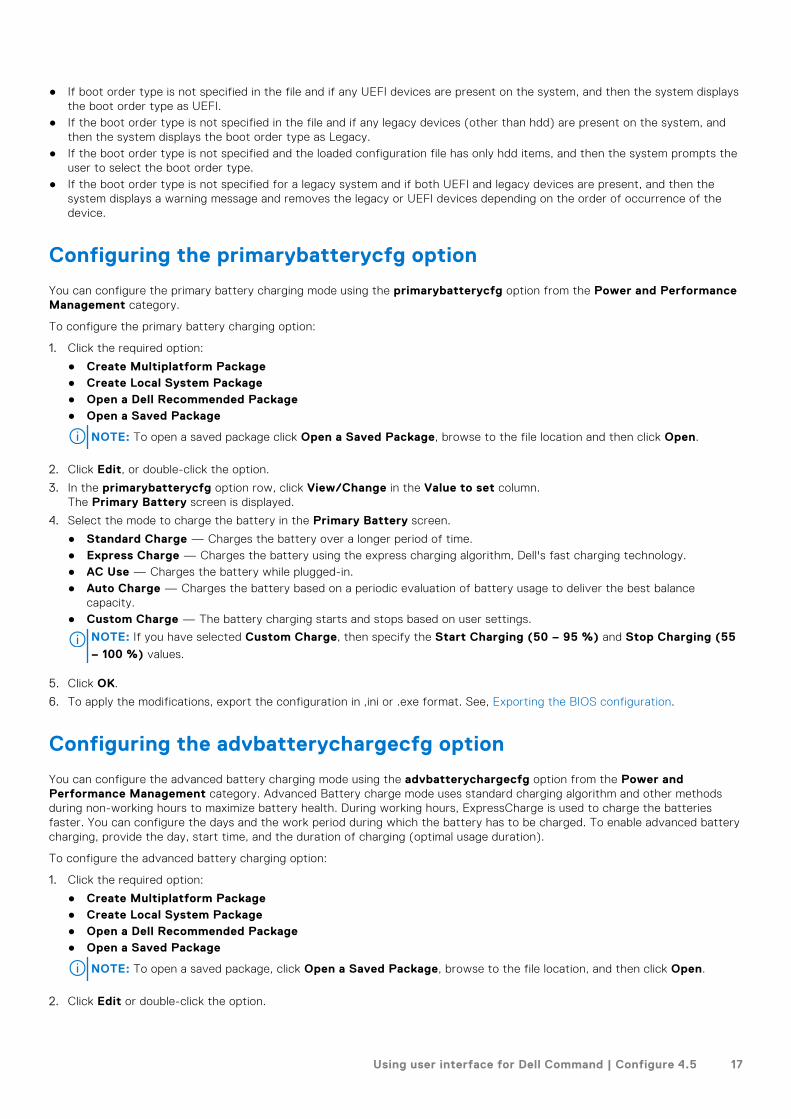
Configuring the primarybatterycfg option
You can configure the primary battery charging mode using the primarybatterycfg option from the Power and PerformanceManagement category.
To configure the primary battery charging option:
1. Click the required option:
● Create Multiplatform Package● Create Local System Package● Open a Dell Recommended Package● Open a Saved Package
NOTE: To open a saved package click Open a Saved Package, browse to the file location and then click Open.
2. Click Edit, or double-click the option.
3. In the primarybatterycfg option row, click View/Change in the Value to set column.The Primary Battery screen is displayed.
4. Select the mode to charge the battery in the Primary Battery screen.
● Standard Charge — Charges the battery over a longer period of time.● Express Charge — Charges the battery using the express charging algorithm, Dell's fast charging technology.● AC Use — Charges the battery while plugged-in.● Auto Charge — Charges the battery based on a periodic evaluation of battery usage to deliver the best balance
capacity.● Custom Charge — The battery charging starts and stops based on user settings.
NOTE: If you have selected Custom Charge, then specify the Start Charging (50 – 95 %) and Stop Charging (55
– 100 %) values.
5. Click OK.
6. To apply the modifications, export the configuration in ,ini or .exe format. See, Exporting the BIOS configuration.
Configuring the advbatterychargecfg option
You can configure the advanced battery charging mode using the advbatterychargecfg option from the Power andPerformance Management category. Advanced Battery charge mode uses standard charging algorithm and other methodsduring non-working hours to maximize battery health. During working hours, ExpressCharge is used to charge the batteriesfaster. You can configure the days and the work period during which the battery has to be charged. To enable advanced batterycharging, provide the day, start time, and the duration of charging (optimal usage duration).
To configure the advanced battery charging option:
1. Click the required option:
● Create Multiplatform Package● Create Local System Package● Open a Dell Recommended Package● Open a Saved Package
NOTE: To open a saved package, click Open a Saved Package, browse to the file location, and then click Open.
2. Click Edit or double-click the option.
Using user interface for Dell Command | Configure 4.5 17

3. In the advbatterychargecfg option row, click View/Change in the Value to set column.The Advanced Battery Settings screen is displayed.
4. Enable Advanced Battery Charge.
NOTE: If advanced battery charge mode is enabled in the BIOS Setup screen, the Enable Advanced Battery Charge
is selected by default.
5. Select the day of the week.
NOTE: To apply the same settings to all the days select the Apply these settings to other days option.
6. In the Beginning of Day drop-down list, select the time at which the advanced charging has to start.
7. In the Work Period drop-down list, select the duration of advanced charging.
8. Click OK.
9. To apply the modifications, export the configuration in ,ini or .exe format. See, Exporting the BIOS configuration.
Configuring the peakshiftcfg option
You can configure the Peak Shift battery charging mode using the peakshiftcfg option from the Power and PerformanceManagement category. Using Peak Shift configuration, you can minimize the consumption of AC power during the peak powerusage period of the day. You can set a start and end time for the Peak Shift period. During this period, the system runs onbattery if the battery charge is above the set battery threshold value. After the Peak Shift period, the system runs on AC powerwithout charging the battery. The system functions normally by using AC power and recharging the battery at the specifiedCharge Start Time.
To configure the Peak Shift Battery charging option:
1. Click the required option:
● Create Multiplatform Package● Create Local System Package● Open a Dell Recommended Package● Open a Saved Package
NOTE: To open a saved package, click Open a Saved Package, browse to the file location and click Open.
2. Click Edit, or double-click the option.
3. In the peakshiftcfg option row, click View/Change in the Value to set column.The Peak Shift screen is displayed.
4. Enable the peak shift settings option.
5. Select the day of the week.
NOTE: To apply the same settings to all the days select the Apply these settings to other days option.
6. From the Operate only on battery drop-down list, select the time from when you want the system to operate only onbattery.
7. From the Operate only on AC drop-down list, select the time from when you want the system to operate only on AC.
8. From the Resume normal power/charge drop-down list, select the time from when the system has to start using the ACpower and recharging the battery.
NOTE: The system adjusts the value in the drop-down list to meet the following criteria:
● Operate only on battery time should be less than or equal to the time specified for Operate only on AC.
● Operate only on battery time and Operate only on AC time should be less than or greater than the Resume
normal power/charge time.
9. Click OK.
NOTE: Select Apply these settings to other days check box to apply the same settings for all days of the week.
10. To apply the modifications, export the configuration in ,ini or .exe format. See, Exporting the BIOS configuration.
18 Using user interface for Dell Command | Configure 4.5

Password Configuration option
This feature displays and configures the password rules those are applicable to set SysPwd, SetupPwd, OwnerPwd, andHddPwd.
To configure the password configuration option:
1. Click the required option:
● Create Multiplatform Package● Create Local System Package● Open a Dell Recommended Package● Open a Saved Package
NOTE: To open a saved package, click Open a Saved Package, browse to the file location and click Open.
2. Click Edit, or double-click the option.
3. In the PasswordConfiguration option row, click View/Change in the Value to set column.The PasswordConfiguration screen is displayed.
4. Enable the Password Configuration settings option.
5. Select Lower Case Character, Upper Case Character, Digit, Special Character, and then set the minimum numberof characters that are mandatory for password.
NOTE: If the criteria PwdMinLen >=8, PwdLowerCaseRqd=Enabled, and PwdUpperCaseRqd=Enabled is followed, then
StrongPassword is Enabled. If this criteria is not followed, then StrongPassword is Disabled. Vice versa is also applicable.
6. To apply the modifications, export the configuration in ,ini or .exe format. See, Exporting the BIOS configuration.
Configuring the keyboardbacklightcolor option
You can configure the keyboard backlight color for the Dell Latitude rugged Extreme systems using thekeyboardbacklightcolor option from the System Configuration category. You can enable supported colors, set active color,and configure customcolor1 and customcolor2.
To configure the keyboard backlight color:
1. Click the required option:
● Create Multiplatform Package● Create Local System Package● Open a Dell Recommended Package● Open a Saved Package
NOTE: To open a saved package click Open a Saved Package, browse to the file location and then click Open.
2. Click Edit or double-click the option.
3. In the keyboardbacklightcolor option row, click View/Change in the Value to set column.The Keyboard Backlight Color screen is displayed.
4. Select the colors that you want to enable for the keyboard backlight from the list Enable.
NOTE:
● You can select and enable multiple colors at a time.
● If you select None, no color will be enabled. You cannot select other colors if you have selected the option None.
5. Select the color that you want to set as an active color for the keyboard backlight from the list Active.
NOTE: You can select only one active color for your keyboard backlight at a time.
6. Configure the Red, Green, and Blue (RGB) values if you have selected CustomColor1 or CustomColor2.
To configure the RGB values for customcolor1 or customcolor2,
a. Click CHANGE.b. Choose the color from the color canvas.c. Click Select.
Using user interface for Dell Command | Configure 4.5 19
7. Click OK.
8. To apply the modifications, export the configuration in ,ini or .exe format. See, Exporting the BIOS configuration.
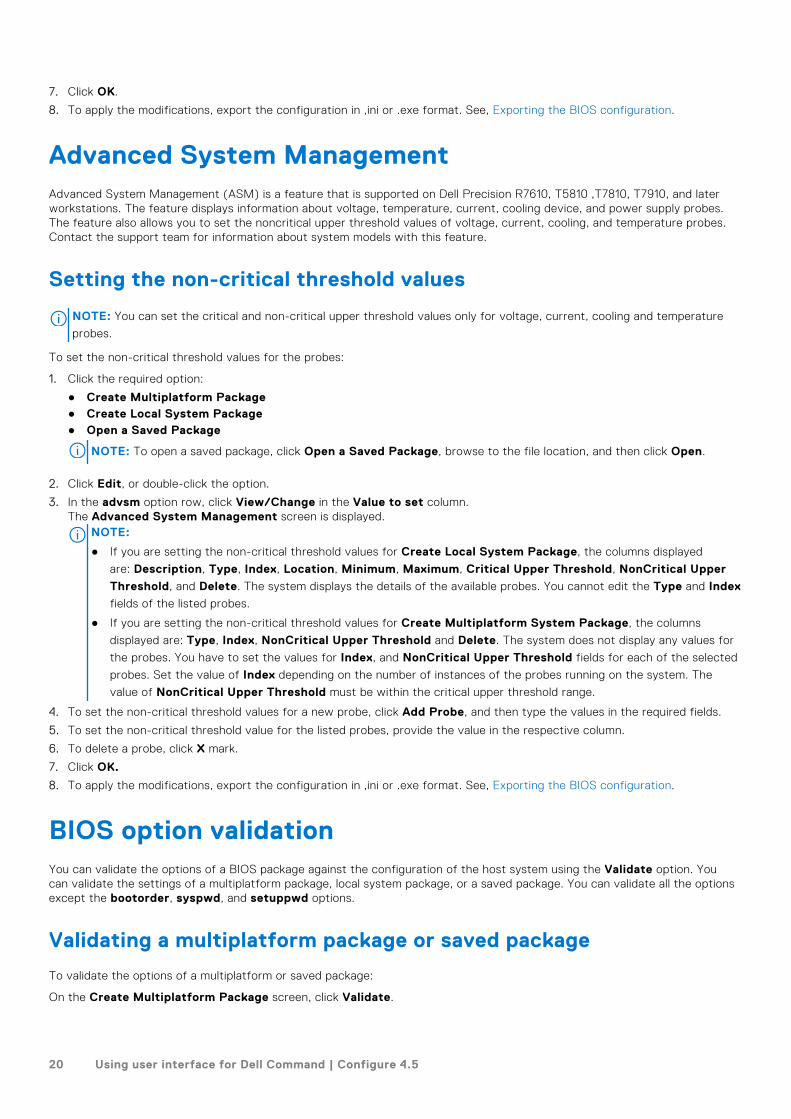
Advanced System ManagementAdvanced System Management (ASM) is a feature that is supported on Dell Precision R7610, T5810 ,T7810, T7910, and laterworkstations. The feature displays information about voltage, temperature, current, cooling device, and power supply probes.The feature also allows you to set the noncritical upper threshold values of voltage, current, cooling, and temperature probes.Contact the support team for information about system models with this feature.
Setting the non-critical threshold values
NOTE: You can set the critical and non-critical upper threshold values only for voltage, current, cooling and temperature
probes.
To set the non-critical threshold values for the probes:
1. Click the required option:
● Create Multiplatform Package● Create Local System Package● Open a Saved Package
NOTE: To open a saved package, click Open a Saved Package, browse to the file location, and then click Open.
2. Click Edit, or double-click the option.
3. In the advsm option row, click View/Change in the Value to set column.The Advanced System Management screen is displayed.
NOTE:
● If you are setting the non-critical threshold values for Create Local System Package, the columns displayed
are: Description, Type, Index, Location, Minimum, Maximum, Critical Upper Threshold, NonCritical Upper
Threshold, and Delete. The system displays the details of the available probes. You cannot edit the Type and Index
fields of the listed probes.
● If you are setting the non-critical threshold values for Create Multiplatform System Package, the columns
displayed are: Type, Index, NonCritical Upper Threshold and Delete. The system does not display any values for
the probes. You have to set the values for Index, and NonCritical Upper Threshold fields for each of the selected
probes. Set the value of Index depending on the number of instances of the probes running on the system. The
value of NonCritical Upper Threshold must be within the critical upper threshold range.
4. To set the non-critical threshold values for a new probe, click Add Probe, and then type the values in the required fields.
5. To set the non-critical threshold value for the listed probes, provide the value in the respective column.
6. To delete a probe, click X mark.
7. Click OK.
8. To apply the modifications, export the configuration in ,ini or .exe format. See, Exporting the BIOS configuration.
BIOS option validationYou can validate the options of a BIOS package against the configuration of the host system using the Validate option. Youcan validate the settings of a multiplatform package, local system package, or a saved package. You can validate all the optionsexcept the bootorder, syspwd, and setuppwd options.
Validating a multiplatform package or saved package
To validate the options of a multiplatform or saved package:
On the Create Multiplatform Package screen, click Validate.
20 Using user interface for Dell Command | Configure 4.5
● If the option and the configured value are supported on the host system, then a green check mark is displayed in the Statuscolumn.
● If the option is supported and if the configured value is not supported on the host system, then a red X mark is displayed inthe Status column.
● All unsupported options are greyed out and the Status column remains blank.● All the supported options on the host system are highlighted and the Status column remains blank with the Value to Set
field as Not Specified.
Validating a local system package
To validate the options of a local system package:
On the Create Local System Package screen, click Validate.
● All the options that are applicable on the host system are highlighted, and a green check mark is displayed in the Statuscolumn.
● All unsupported options are greyed out, and the Status column remains blank.
NOTE: You can configure the supported options on the host system even after you validate the local system package.
Exporting the BIOS configurationYou can export a customized configuration to apply the same settings on a target client system. You can export both supportedand unsupported options. You can export certain options (asset and propowntag) without specifying any values.
To export an option:
Select the Apply Settings check box of that option, and then export in any of the following formats:
● Self-Contained Executable—Click EXPORT.EXE to export the configuration settings as a SCE (EXE file). For moreinformation, see Setup, system, or hard disk drive passwords screen.
● Report—Click Report to export the configuration settings as a read-only HTML file.● Configuration file—Click EXPORT CONFIG to export the configuration settings as a CCTK or INI file.
NOTE: To display and configure the options on the user interface, double-click the CCTK file.
● Shell script—The shell script is generated at the location where the SCE file is exported, and contains the sameconfiguration as that of the SCE file. The shell script is used to configure a system running the Linux operating system.
Exporting the SCE (.EXE) file
Perform the following steps to export the BIOS configuration:
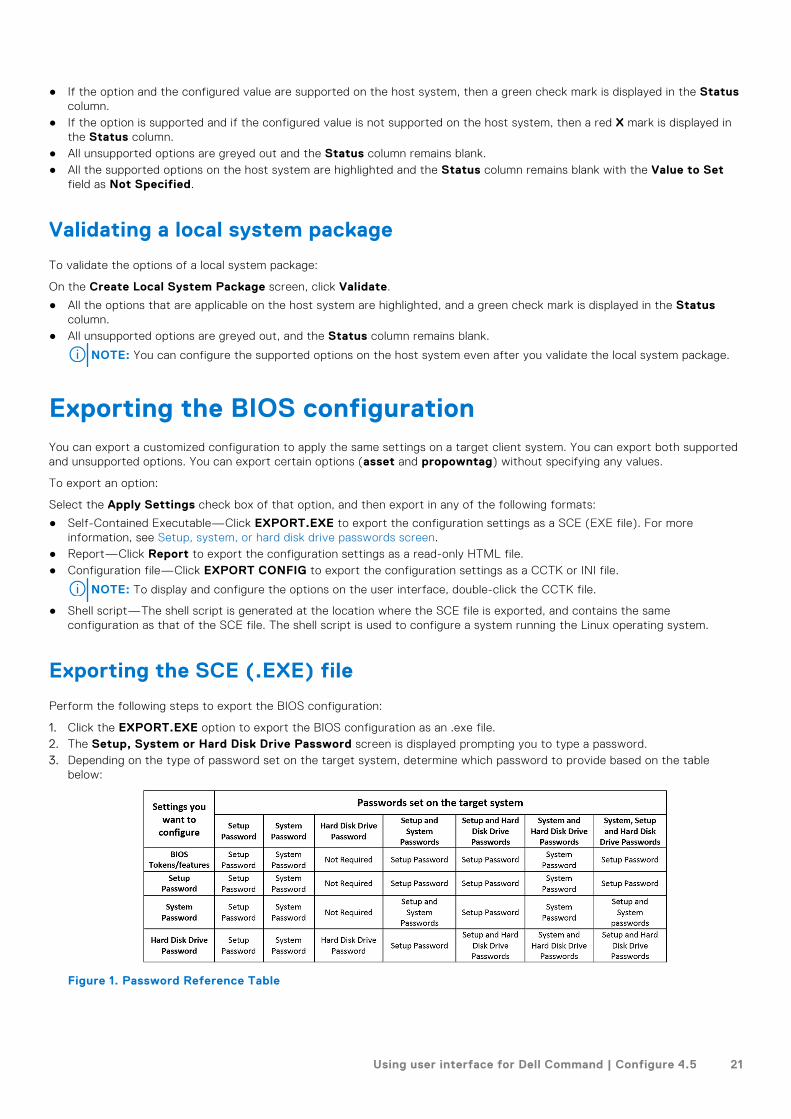
1. Click the EXPORT.EXE option to export the BIOS configuration as an .exe file.2. The Setup, System or Hard Disk Drive Password screen is displayed prompting you to type a password.3. Depending on the type of password set on the target system, determine which password to provide based on the table
below:
Figure 1. Password Reference Table
Using user interface for Dell Command | Configure 4.5 21

For example,
● If the setup password is set in the system, and you want to configure BIOS tokens/features, you need to provide setuppassword.
● If the setup and system passwords are set in the system, and you want to configure BIOS tokens/features, you need toprovide setup password.
● If the setup and system passwords are set in the system, and if you want to configure BIOS tokens/features as well aschange system password, you need to provide both system and setup passwords.
● If the setup, system and hard disk drive passwords are set in the system, and if you want to configure BIOS tokens/features as well as change hard disk drive password, you need to provide both setup and hard disk drive passwords.
4. Provide appropriate password(s) in order to be able to configure the desired settings.● To provide a setup password, click Setup Password, then select the Use the password information below option,
and then type the setup password.● To provide a system password, click System Password, then select the Use the password information below option
and type the system password.● To provide a hard disk drive password, click Hard Disk Drive Password, then select the Use the password
information below option and type the hard disk drive password.5. If the target system does not have a setup, system, or hard disk drive password, then select No password is required.6. The following warning message By exporting this BIOS configuration, your system, setup and hdd passwords will no
longer be secure. If you would like to proceed with your passwords displayed in clear text, select Contonue. Ifyou want to hide your passwords, select Mask is displayed. Click MASK to protect your password, else click Continue.
7. Click OK..
NOTE: SCE can be generated on non WMI-ACPI system using multi-system package.
Exporting the configuration without setting values
To export asset and propowntag without specifying changes to values:
Select the Apply Settings check box of the corresponding option and export.
Target system configurationYou can apply the exported INI, CCTK, SCE, and shell script files to configure the target client systems.
Related Links:
● Applying a INI or CCTK file● Applying a shell script on Linux systems● Applying a SCE file
Applying INI or CCTK file
The prerequisites for applying INI file or CCTK file are as follows:● Administrator privileges● Dell Command | Configure installed on the client system
To apply INI file or CCTK file, run cctk -i <filename>.NOTE: For systems running Ubuntu Core operating system, copy the file at var/snap/dcc/current and run, dcc.cctk
-i /var/snap/dcc/current/<filename>.ini
Applying a shell script on Linux
1. Copy the script to a system running the Linux operation system.
2. Run dos2unix on the system.
3. Run the script as: sh <filename.sh>
22 Using user interface for Dell Command | Configure 4.5

Applying a SCE file
NOTE: You must have Administrator privileges.
To apply SCE on a target system:
Double-click the SCE, or from the command prompt, browse to the directory where SCE is located and type the name of theSCE file.For example, C:\Users\SystemName\Documents>"<filename>”.
NOTE: You cannot run SCE on Windows PE systems. For more information on applying SCE on target systems running the
Windows PE operating systems, see Troubleshooting.
NOTE: The generated SCE file does not work on non WMI-ACPI system.
SCE details
Some of the common scenarios in which you might use SCE are:
● When you apply SCE on a target system, it performs a silent installation for the BIOS settings on the target system. Whenthe installation is complete, SCE generates a log file with the SCE name at the same location. The log file contains all theapplied options and the status of the SCE file.
NOTE: To generate the log file in the required location, specify the location of the log file. For example, SCE.exe /l="<folder_path>\log.txt".
● When you apply SCE on a target system from a read-only location, provide the /nolog option to prevent generation of thelog file. For example, SCE.exe /nolog. The /nolog option helps the SCE to run successfully and informs that a log file isnot created as SCE is in a read-only location.
● If you run SCE from a read-only location without providing /nolog, then SCE fails to run.
● To apply SCE on Windows PE, extract SCE from a system running the Window operating system using the /e option. Forexample, SCE.exe/e=<folder_path_to extract SCE>.
● If you have configured a setup or system password on the target system, and while exporting SCE, if you have not providedthe same password in the Setup, System, or Hard Disk Drive Password screen, then you cannot double-click and applySCE on the target system. However, while applying SCE from the command prompt, you can provide the setup or systempassword of the target system.
NOTE: Example of providing setup password: C:\Windows\Command Configure\SCE>"<filename>" --valsetuppwd= <password string>
NOTE: Example of providing system password: C:\Windows\Command Configure\SCE>"<filename>" --valsyspwd= <password string>
Related Links:
● Exporting the BIOS configuration● Exporting the configuration without setting values
Log details in Package HistoryYou can view the details of the BIOS configuration exports in the Package History screen. The Package History displays thedetails such as time, date, type of export, and the location to which the file is exported.
Related Links:
● Viewing a log file● Deleting log details
Viewing a log file
Click Package History, on the Dell Command | Configure page.
Using user interface for Dell Command | Configure 4.5 23
Deleting log details
On the Package History page, click the Clear Log.
Providing feedback on Dell Command | Configure
You can provide feedback on the Dell Command | Configure using the link on Dell Command | Configure GUI.
1. Click the Give us your feedback link to launch the online survey page.2. Provide your feedback and satisfactory ratings.3. Click Submit to share it with Dell.
24 Using user interface for Dell Command | Configure 4.5
Troubleshooting scenarios in Dell Command |Configure 4.5
Running Dell Command | Configure displays error messagesIf you get the error message, Required BIOS interface not found or HAPI load error. and then uninstall andreinstall Hardware Application Programming Interface (HAPI).
Running Dell Command | Configure on 32-bit and 64-bitWindows supported systemEnsure that you are running cctk.exe based on the architecture of the system. If you are running Dell Command | Configureon a 32-bit supported system, browse to the x86 directory in the installation directory, and run Dell Command | Configurecommands. If you are running cctk.exe on a 64-bit supported system, and then browse to the x86_64 directory and run DellCommand | Configure commands.
If you are running Dell Command | Configure for 32-bit supported systems on a 64-bit supported system, and then an errormessage is displayed: HAPI Driver Load Error.
If you are running Dell Command | Configure for 64-bit supported systems on a 32-bit supported system, and then an errormessage is displayed: Not a valid Win32 application.
Running Dell Command | Configure on Windows 7, Windows8, Windows 8.1, or Windows 10 when user account controlis enabledTo run Dell Command | Configure on systems running Windows 7 or later with User Account Control (UAC) enabled, right-clickthe Dell Command | Configure Command Prompt and select Run as administrator.
NOTE: On a Windows 7, Windows 8, or Windows 8.1, if UAC is enabled, and then a user with Administrator privileges
cannot install or uninstall Dell Command | Configure in silent mode. Make sure that you have an administrative privileges
before installing Dell Command | Configure in silent mode.
Running Dell Command | Configure on LinuxWhen you install Dell Command | Configure on a system running the Linux operating system, the entry, modprobe dcdbas, isadded in the /etc/rc.modules file. After uninstalling Dell Command | Configure , this entry is not removed.
TPM activationTrusted Platform Module (TPM) is an industry standard cryptographic module that provides attestation, integrity metrics andreporting, and a secure key hierarchy. Client systems use TPM to verify if the state of the system has changed between twoboot cycles.
To activate and check the TPM activation:
4
Troubleshooting scenarios in Dell Command | Configure 4.5 25

1. If not set, set the BIOS password on the system. Type:
cctk --setuppwd=<new-BIOS-password>2. If not enabled, enable TPM. by typing the following command:
cctk --tpm=on3. Reboot the system.4. To activate TPM, type the following command:
cctk --tpmactivation=activate --valsetuppwd=<Setuppwd>5. Reboot the system without interruption till the operating system loads.6. To check the status of TPM. type:
cctk --tpmactivation
The status is displayed as activate.
SCE failing to run on Windows Preinstallation Environment(Windows PE)The SCE generated using the Export option on the user interface is failing to run on Windows PE. To configure BIOS using SCE,on the target system running the Windows PE operating systems:
1. On systems running the Windows operating systems, extract the contents of SCE to a folder using the following command:
Sce.exe /e=<folder_path_to_extract_contents>
NOTE: For more information about using the command, use /h switch.
2. Copy the extracted contents to an accessible location on the system.3. From the location of the extracted contents, run the following command to apply the configuration:
applyconfig.bat /logfile <A valid and existing folder with write permission>\<A valid file name>
For example, applyconfig.bat /logfile C:\log.txtTo apply the configuration on a system, where setup or system password has been set, run the following command:applyconfig.bat /logfile <A valid and existing folder with write permission>\<A validfile name> "--valsetuppwd= <setup password>"Example 1: applyconfig.bat /logfile C:\log.txt "--valsetuppwd=password"Example 2: applyconfig.bat /logfile C:\log.txt "--valsyspwd=password"
Topics:
• Contacting Dell
Contacting DellNOTE: If you do not have an active Internet connection, you can find contact information on your purchase invoice, packing
slip, bill, or Dell product catalog.
Dell provides several online and telephone-based support and service options. Availability varies by country and product, andsome services may not be available in your area. To contact Dell for sales, technical support, or customer service issues:
1. Go to Dell.com/support.
2. Select your support category.
3. Verify your country or region in the Choose a Country/Region drop-down list at the bottom of the page.
26 Troubleshooting scenarios in Dell Command | Configure 4.5

4. Select the appropriate service or support link based on your need.
Troubleshooting scenarios in Dell Command | Configure 4.5 27


