142
Dell Encryption Enterprise Advanced Installation Guide v11.1 August 2021 Rev. A01

Dell Encryption EnterpriseAdvanced Installation Guide v11.1
August 2021Rev. A01

Notes, cautions, and warnings
NOTE: A NOTE indicates important information that helps you make better use of your product.
CAUTION: A CAUTION indicates either potential damage to hardware or loss of data and tells you how to avoid
the problem.
WARNING: A WARNING indicates a potential for property damage, personal injury, or death.
© 2012-2021 Dell Inc. All rights reserved. Registered trademarks and trademarks used in the Dell Encryption and Endpoint SecuritySuite Enterprise suite of documents: Dell™ and the Dell logo, Dell Precision™, OptiPlex™, ControlVault™, Latitude™, XPS®, and KACE™are trademarks of Dell Inc. Cylance®, CylancePROTECT, and the Cylance logo are registered trademarks of Cylance, Inc. in the U.S. andother countries. McAfee® and the McAfee logo are trademarks or registered trademarks of McAfee, Inc. in the US and other countries.Intel®, Pentium®, Intel Core Inside Duo®, Itanium®, and Xeon® are registered trademarks of Intel Corporation in the U.S. and othercountries. Adobe®, Acrobat®, and Flash® are registered trademarks of Adobe Systems Incorporated. Authen tec® and Eikon® are registeredtrademarks of Authen tec. AMD® is a registered trademark of Advanced Micro Devices, Inc. Microsoft®, Windows®, and Windows Server®,Windows Vista®, Windows 7®, Windows 10®, Active Directory®, Access®, BitLocker®, BitLocker To Go®, Excel®, Hyper-V®, Outlook®,PowerPoint®, Word®, OneDrive®, SQL Server®, and Visual C++® are either trademarks or registered trademarks of Microsoft Corporationin the United States and/or other countries. VMware® is a registered trademark or trademark of VMware, Inc. in the United States or othercountries. Box® is a registered trademark of Box. Dropbox ℠ is a service mark of Dropbox, Inc. Google™, Android™, Google™ Chrome™,Gmail™, and Google™ Play are either trademarks or registered trademarks of Google Inc. in the United States and other countries. Apple®,App Store℠, Apple Remote Desktop™, Boot Camp™, FileVault™, iPad®, iPhone®, iPod®, iPod touch®, iPod shuffle®, and iPod nano®,Macintosh®, and Safari® are either servicemarks, trademarks, or registered trademarks of Apple, Inc. in the United States and/or othercountries. EnCase™ and Guidance Software® are either trademarks or registered trademarks of Guidance Software. Entrust® is a registeredtrademark of Entrust®, Inc. in the United States and other countries. Mozilla® Firefox® is a registered trademark of Mozilla Foundationin the United States and/or other countries. iOS® is a trademark or registered trademark of Cisco Systems, Inc. in the United States andcertain other countries and is used under license. Oracle® and Java® are registered trademarks of Oracle and/or its affiliates. Travelstar® is aregistered trademark of HGST, Inc. in the United States and other countries. UNIX® is a registered trademark of The Open Group. VALIDITY™is a trademark of Validity Sensors, Inc. in the United States and other countries. VeriSign® and other related marks are the trademarks orregistered trademarks of VeriSign, Inc. or its affiliates or subsidiaries in the U.S. and other countries and licensed to Symantec Corporation.KVM on IP® is a registered trademark of Video Products. Yahoo!® is a registered trademark of Yahoo! Inc. Bing® is a registered trademark ofMicrosoft Inc. Ask® is a registered trademark of IAC Publishing, LLC. Other names may be trademarks of their respective owners.

Chapter 1: Introduction................................................................................................................. 5Before You Begin.................................................................................................................................................................5Using This Guide.................................................................................................................................................................. 6Contact Dell ProSupport....................................................................................................................................................6
Chapter 2: Requirements...............................................................................................................7All Clients............................................................................................................................................................................... 7Encryption............................................................................................................................................................................. 8Full Disk Encryption........................................................................................................................................................... 10Encryption on Server Operating Systems............................................................................................................12SED Manager...................................................................................................................................................................... 15BitLocker Manager............................................................................................................................................................ 18
Chapter 3: Registry Settings.......................................................................................................20Encryption...........................................................................................................................................................................20SED Manager......................................................................................................................................................................23Full Disk Encryption.......................................................................................................................................................... 25BitLocker Manager............................................................................................................................................................27
Chapter 4: Install Using the Master Installer............................................................................... 28Install Interactively Using the Master Installer........................................................................................................... 28Install by Command Line Using the Master Installer................................................................................................. 31
Chapter 5: Uninstall the Master Installer..................................................................................... 33Uninstall the Master Installer..........................................................................................................................................33
Chapter 6: Install Using the Child Installers.................................................................................34Install Drivers......................................................................................................................................................................35Install Encryption...............................................................................................................................................................35Install Full Disk Encryption.............................................................................................................................................. 39Install Encryption on Server Operating System.........................................................................................................40
Install Interactively....................................................................................................................................................... 41Install Using the Command Line...............................................................................................................................44Activate..........................................................................................................................................................................46
Install SED Manager and PBA Advanced Authentication........................................................................................ 48Install BitLocker Manager................................................................................................................................................49
Chapter 7: Uninstall Using the Child Installers............................................................................. 51Uninstall Encryption and Encryption on Server Operating System ..................................................................... 52Uninstall Full Disk Encryption......................................................................................................................................... 54Uninstall SED Manager.................................................................................................................................................... 55Uninstall BitLocker Manager.......................................................................................................................................... 56
Chapter 8: Data Security Uninstaller........................................................................................... 57
Contents
Contents 3

Chapter 9: Commonly Used Scenarios......................................................................................... 62Encryption Client...............................................................................................................................................................63SED Manager (including Advanced Authentication) and Encryption Client....................................................... 63SED Manager and Encryption External Media........................................................................................................... 64BitLocker Manager and Encryption External Media................................................................................................. 64
Chapter 10: Download the Software............................................................................................ 65
Chapter 11: Pre-Installation Configuration for SED UEFI, and BitLocker Manager........................ 67Initialize the TPM...............................................................................................................................................................67Pre-Installation Configuration for UEFI Computers..................................................................................................67Pre-Installation Configuration to Set Up a BitLocker PBA Partition.................................................................... 68
Chapter 12: Designate the Dell Server through Registry.............................................................. 69
Chapter 13: Extract Child Installers............................................................................................. 72
Chapter 14: Configure Key Server................................................................................................73Services Panel - Add Domain Account User...............................................................................................................73Key Server Config File - Add User for Security Management Server Communication....................................74Services Panel - Restart Key Server Service............................................................................................................. 75Management Console - Add Forensic Administrator................................................................................................75
Chapter 15: Use the Administrative Download Utility (CMGAd)....................................................77Use Forensic Mode............................................................................................................................................................77Use Admin Mode................................................................................................................................................................78
Chapter 16: Configure Encryption on a Server Operating System.................................................81
Chapter 17: Configure Deferred Activation.................................................................................. 84Deferred Activation Customization...............................................................................................................................84Prepare the Computer for Installation......................................................................................................................... 84Install Encryption with Deferred Activation................................................................................................................85Activate Encryption with Deferred Activation........................................................................................................... 85Troubleshoot Deferred Activation.................................................................................................................................86
Chapter 18: Troubleshooting....................................................................................................... 88All Clients - Troubleshooting.......................................................................................................................................... 88All Clients - Protection Status....................................................................................................................................... 88Dell Encryption Troubleshooting (client and server) ...............................................................................................88SED Troubleshooting........................................................................................................................................................98Dell ControlVault Drivers................................................................................................................................................. 99
Update Dell ControlVault Drivers and Firmware..................................................................................................99UEFI Computers................................................................................................................................................................112TPM and BitLocker.......................................................................................................................................................... 112
Chapter 19: Glossary.................................................................................................................. 141
4 Contents

IntroductionThis guide details how to install and configure Encryption, SED management, Full Disk Encryption, Web Protection and ClientFirewall, and BitLocker Manager.
All policy information and their descriptions are found in the AdminHelp.
Before You Begin1. Install the Dell Server before deploying clients. Locate the correct guide as shown below, follow the instructions, and then
return to this guide.
● Security Management Server Installation and Migration Guide● Security Management Server Virtual Quick Start Guide and Installation Guide● Verify that polices are set as desired. Browse through the AdminHelp, available from the ? at the top right of the screen.
AdminHelp is page-level help designed to help you set and modify policy and understand your options with your DellServer.
2. Thoroughly read the Requirements chapter of this document.3. Deploy clients to users.
1
Introduction 5

Using This GuideUse this guide in the following order.
● See Requirements for client prerequisites, computer hardware and software information, limitations, and special registrymodifications needed for features.
● If needed, see Pre-Installation Configuration for SED UEFI, and BitLocker.● If your clients will be entitled using Dell Digital Delivery, see Set GPO on Domain Controller to Enable Entitlements.● If installing clients using the master installer, see:
○ Install Interactively Using the Master Installer
or
○ Install by Command Line Using the Master Installer● If installing clients using the child installers, the child installer executable files must be extracted from the master installer.
See Extract the Child Installers from the Master Installer, then return here.
○ Install Child Installers by Command line:
■ Install Encryption - use these instructions to install Encryption, which is the component that enforces security policy,whether a computer is connected to the network, disconnected from the network, lost, or stolen.
■ Install Full Disk Encryption Client - use these instructions to install the Full Disk Encryption, which is a component thatenforces security policy, whether a computer is connected to the network, disconnected from the network, lost, orstolen.
■ Install SED Manager - use these instructions to install encryption software for SEDs. Although SEDs provide their ownencryption, they lack a platform to manage their encryption and policies. With SED Manager, all policies, storage, andretrieval of encryption keys are available from a single console, reducing the risk that computers are unprotected inthe event of loss or unauthorized access.
■ Install BitLocker Manager - use these instructions to install BitLocker Manager, designed to improve the security ofBitLocker deployments and to simplify and reduce the cost of ownership.
NOTE:
Most child installers can be installed interactively, but are not described in this guide.
● See Commonly Used Scenarios for scripts of our most commonly used scenarios.
Contact Dell ProSupportCall 877-459-7304, extension 4310039 for 24x7 phone support for your Dell product.
Additionally, online support for Dell products is available at dell.com/support. Online support includes drivers, manuals, technicaladvisories, FAQs, and emerging issues.
Be sure to help us quickly connect you to the right technical expert by having your Service Tag or Express Service Codeavailable when you call.
For phone numbers outside of the United States, see Dell ProSupport International Phone Numbers.
6 Introduction

Requirements
All ClientsThese requirements apply to all clients. Requirements listed in other sections apply to specific clients.
● IT best practices should be followed during deployment. This includes, but is not limited to, controlled test environments forinitial tests, and staggered deployments to users.
● The user account performing the installation/upgrade/uninstallation must be a local or domain administrator user, which canbe temporarily assigned by a deployment tool such as Microsoft SCCM. A non-administrator user that has elevated privilegesis not supported.
● Back up all important data before beginning installation/uninstallation.● Do not make changes to the computer, including inserting or removing external (USB) drives during installation.● Administrators should ensure all necessary ports are available.● Be sure to periodically check dell.com/support for the most current documentation and Technical Advisories.● The Dell Data Security line of products does not support Windows Insider Preview releases.
Prerequisites
● Microsoft .Net Framework 4.5.2 (or later) is required for the master and child installer's clients. The installer does not installthe Microsoft .Net Framework components.
● To verify the version of Microsoft .Net installed, follow these instructions on the computer targeted for installation. Seethese instructions to install Microsoft .Net Framework 4.5.2.
● If installing Encryption in FIPS mode, Microsoft .Net Framework 4.6 is required.
Hardware
● The following table details the minimum supported computer hardware.
Hardware
○ Intel Pentium or AMD Processor○ 110 MB of available disk space○ 512MB RAM
NOTE: Additional free disk space is required to encrypt files on the endpoint. Size varies based on enabled policies anddrive capacity.
Localization
● Dell Encryption, SED Manager, PBA advanced authentication, and BitLocker Manager are multilingual user interfacecompliant and are localized in the following languages.
Language Support
EN - English IT - Italian KO - Korean
ES - Spanish DE - German PT-BR - Portuguese, Brazilian
2
Requirements 7

Language Support
FR - French JA - Japanese PT-PT - Portuguese, Portugal (Iberian)
Encryption● The client computer must have network connectivity to activate.● To activate a Microsoft Live account with Dell Encryption, refer to this KB article 124722.● To reduce initial encryption time, run the Windows Disk Cleanup Wizard to remove temporary files and any other
unnecessary data.● Windows Hello for Business support requires Encryption Enterprise v11.0 or later running on Windows 10.● Windows Hello for Business support requires activation against a Dell Server running v11.0 or later.● Turn off sleep mode during the initial encryption sweep to prevent an unattended computer from going to sleep. Encryption
cannot occur on a sleeping computer (nor can decryption).● Encryption does not support dual boot configurations since it is possible to encrypt system files of the other operating
system, which would interfere with its operation.● Dell Encryption cannot be upgraded to v10.7.0 from versions earlier than v8.16.0. Endpoints running versions prior to v8.16.0
must upgrade to v8.16.0 then upgrade to v10.7.0.● The master installer does not support upgrades from pre-v8.0 components. Extract the child installers from the master
installer and upgrade the component individually. See Extract the Child Installers from the Master Installer for extractioninstructions.
● Encryption now supports Audit Mode. Audit Mode allows administrators to deploy Encryption as part of the corporate image,rather than using a third-party SCCM or similar solution. For instructions about how to install Encryption on a corporateimage, see KB article 129990.
● Encryption client is tested against and is compatible with several popular signature-based antiviruses and AI-drivenantivirus solutions including McAfee Virus Scan Enterprise, McAfee Endpoint Security, Symantec Endpoint Protection,CylancePROTECT, CrowdStrike Falcon, Carbon Black Defense, and several others. Hard-coded exclusions are included bydefault for many antivirus providers to prevent incompatibilities between antivirus scanning and encryption.
If your organization uses an unlisted antivirus provider or any compatibility issues are being seen, please see KB article126046 or Contact Dell ProSupport for assistance validating configuration for interoperation between your softwaresolutions and Dell Data Security solutions.
● Dell Encryption utilizes Intel's encryption instruction sets, Integrated Performance Primitives (IPP). For more information,see KB article 126015.
● The TPM is used for sealing the General Purpose Key. Therefore, if running Encryption, clear the TPM in the BIOS beforeinstalling a new operating system on the target computer.
● In-place operating system re-install is not supported. To re-install the operating system, perform a backup of the targetcomputer, wipe the computer, install the operating system, then recover the encrypted data following established recoveryprocedures.
● The master installer installs these components if not already installed on the target computer. When using the childinstaller, you must install these components before installing the clients.
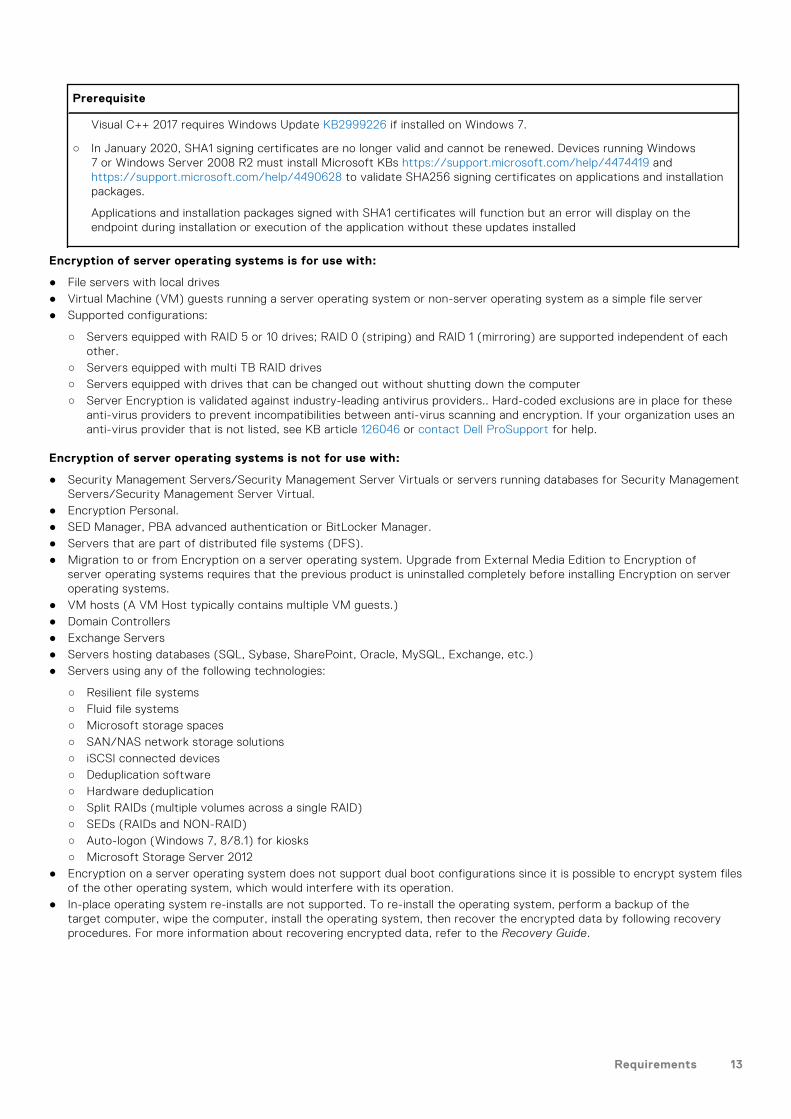
Prerequisite
○ Visual C++ 2012 Update 4 or later Redistributable Package (x86 or x64)○ Visual C++ 2017 or later Redistributable Package (x86 or x64)
Visual C++ 2017 requires Windows Update KB2999226 if installed on Windows 7.
○ In January 2020, SHA1 signing certificates are no longer valid and cannot be renewed. Devices running Windows7 or Windows Server 2008 R2 must install Microsoft KBs https://support.microsoft.com/help/4474419 andhttps://support.microsoft.com/help/4490628 to validate SHA256 signing certificates on applications and installationpackages.
Applications and installation packages signed with SHA1 certificates will function but an error will display on theendpoint during installation or execution of the application without these updates installed
● The Secured Windows Hibernation File and Prevent Unsecured Hibernation policies are not supported in UEFI mode.● Deferred activation allows the Active Directory user account used during activation to be independent of the account
used to login to the endpoint. Instead of the network provider capturing the authentication information, the user insteadmanually specifies the Active Directory-based account when prompted. Once the credentials are entered, the authentication
8 Requirements

information is securely sent to the Dell Server which validates it against the configured Active Directory domains. For moreinformation, see KB article 124736.
● Following Windows 10 feature upgrade, a restart is required to finalize Dell Encryption. The following message displays inthe notification area after Windows 10 feature upgrades:
Hardware
● The following table details supported hardware.
Optional Embedded Hardware
○ TPM 1.2 or 2.0
Operating Systems
● The following table details supported operating systems.
Windows Operating Systems (32- and 64-bit)
○ Windows 7 SP1: Enterprise, Professional, Ultimate○ Windows Embedded Standard 7 with Application Compatibility template○ Windows 8.1: Enterprise, Pro○ Windows Embedded 8.1 Industry Enterprise○ Windows 10: Education, Enterprise, Pro v1803-v21H1 (April 2018 Update/Redstone 4 - May 2021 Update/21H1)
Note: Windows 10 v2004 (May 2020 Update/20H1) does not support 32-bit architecture. For more information, seehttps://docs.microsoft.com/windows-hardware/design/minimum/minimum-hardware-requirements-overview
■ Windows 10 2016 LTSB■ Windows 10 2019 LTSC
○ VMware Workstation 12.5 and higher○ Deferred Activation includes support for all of the above
Encryption External Media
Operating Systems
● External media must have approximately 55MB available plus open space on the media that is equal to the largest file to beencrypted to host Encryption External Media.
● The following table details the operating systems supported when accessing media protected by Encryption External Media:
Windows Operating Systems Supported to Access Encrypted Media (32- and 64-bit)
○ Windows 7 SP1: Enterprise, Professional, Ultimate○ Windows Embedded Standard 7 with Application Compatibility template○ Windows 8.1: Enterprise, Pro
Requirements 9

Windows Operating Systems Supported to Access Encrypted Media (32- and 64-bit)
○ Windows Embedded 8.1 Industry Enterprise○ Windows 10: Education, Enterprise, Pro v1803-v21H1 (April 2018 Update/Redstone 4 - May 2021 Update/21H1)
Note: Windows 10 v2004 (May 2020 Update/20H1) does not support 32-bit architecture. For more information, seehttps://docs.microsoft.com/windows-hardware/design/minimum/minimum-hardware-requirements-overview
■ Windows 10 2016 LTSB■ Windows 10 2019 LTSC
Mac Operating Systems Supported to Access Encrypted Media (64-bit kernels)
○ macOS High Sierra 10.13.5 - 10.13.6○ macOS Mojave 10.14.0 - 10.14.4○ macOS Catalina 10.15.5 - 10.15.6
Full Disk Encryption● Full Disk Encryption requires activation against a Dell Server running v9.8.2 or later.● Full Disk Encryption is not currently supported within virtualized host computers.● Full Disk Encryption requires a discrete hardware TPM. PTT and firmware-based TPMs are not supported at this time.● Third-party credential providers will not function with FDE features installed and all third-party credential providers will be
disabled when the PBA is enabled.● The client computer must have network connectivity or access code to activate.● The computer must have a wired network connection for a smartcard user to log in through pre-boot authentication for the
first time.● Operating system Feature updates are not supported with Full Disk Encryption.● A wired connection is required for the PBA to communicate with the Dell Server.● An SED cannot be present on the target computer.● Full Disk Encryption utilizes Intel's encryption instruction sets, Integrated Performance Primitives (IPP). For more
information, see KB article 126015.● Full Disk Encryption is not supported with BitLocker or BitLocker Manager. Do not install Full Disk Encryption on a computer
on which BitLocker or BitLocker Manager is installed.● Dell recommends Intel Rapid Storage Technology Driver v15.2.0.0 or later, with NVMe drives.
● Any NVMe drive that is being leveraged for PBA:○ The BIOS’ SATA operation must be set to RAID ON, as Dell’s PBA management does not support AHCI on NVMe drives.○ The BIOS's boot mode must be UEFI and Legacy option ROMs must be disabled.
● Any non-NVMe drive that is being leveraged for PBA:○ The BIOS’ SATA operation must be set to AHCI, as Dell’s PBA management does not support RAID with non-NVMe
drives.
○ RAID ON is not supported because access to read and write RAID-related data (at a sector that is not available on alocked non-NVMe drive) is not accessible at start-up, and cannot wait to read this data until after the user is logged on.
○ The operating system will crash when switched from RAID ON > AHCI if the AHCI controller drivers are not pre-installed.For instructions on how to switch from RAID > AHCI (or vice versa), see KB article 124714.
● Full Disk Encryption management does not support dual boot configurations since it is possible to encrypt system files of theother operating system, which would interfere with its operation.
● In-place operating system re-install is not supported. To re-install the operating system, perform a backup of the targetcomputer, wipe the computer, install the operating system, then recover the encrypted data following established recoveryprocedures.
● Direct Feature Updates from Windows 10 v1607 (Anniversary Update/Redstone 1), to the Windows 10 v1903 (May 2019Update/19H1) are not supported with FDE. Dell recommends updating the operating system to a newer Feature Update ifupdating to Windows 10 v1903. Any attempts to update directly from Windows 10 v1607 to v1903 results in an error messageand the update is prevented.
● The master installer installs these components if not already installed on the target computer. When using the childinstaller, you must install these components before installing the clients.
10 Requirements

Prerequisite
○ Visual C++ 2017 or later Redistributable Package (x86 or x64)
Visual C++ 2017 requires Windows Update KB2999226 if installed on Windows 7.
○ In January 2020, SHA1 signing certificates are no longer valid and cannot be renewed. Devices running Windows7 or Windows Server 2008 R2 must install Microsoft KBs https://support.microsoft.com/help/4474419 andhttps://support.microsoft.com/help/4490628 to validate SHA256 signing certificates on applications and installationpackages.
Applications and installation packages signed with SHA1 certificates will function but an error will display on theendpoint during installation or execution of the application without these updates installed
● NOTE: A password is required with pre-boot authentication. Dell recommends a minimum password setting compliant
with internal security policies.
● NOTE: When PBA is used, the Sync All Users policy should be enabled if a computer has multiple users. Additionally, all
users must have passwords. Zero-length password users will be locked out of the computer following activation.
● NOTE: Computers protected by Full Disk Encryption must be updated to Windows 10 v1703 (Creators Update/Redstone
2) or later before updating to Windows 10 v1903 (May 2019 Update/19H1) or later. If this upgrade path is attempted, an
error message displays.
NOTE: Full Disk Encryption must be configured with Encryption Algorithm set to AES-256 and Encryption Mode set to
CBC.
NOTE: In-place operating system upgrades to a newer version - such as Windows 7 or Windows 8.1 - to Windows 10 is not
supported.
Hardware
● The following table details supported hardware.
Optional Embedded Hardware
○ TPM 1.2 or 2.0
Authentication Options with Full Disk Encryption Client
● Specific hardware is required, to use smart cards and to authenticate on UEFI computers. Configuration is required to usesmart cards with pre-boot authentication. The following tables show authentication options available by operating system,when hardware and configuration requirements are met.
Non-UEFI
PBA
Password Fingerprint Contacted Smartcard
SIPR Card
Windows 7 SP0-SP1 X1 X1 2
1. Available when authentication drivers are downloaded from support.dell.com.
Requirements 11

UEFI
PBA - on supported Dell Computers
Password Fingerprint Contacted Smartcard
SIPR Card
Windows 10 X1 X1
1. Available with supported UEFI computers.
Dell Computer Models Supported with UEFI Boot Mode
● For the most up-to-date list of platforms supported with the Full Disk Encryption, see KB article 126855.
● For a list of docking stations and adapters supported with Full Disk Encryption, see KB article 124241.
Operating Systems
● The following table details supported operating systems.
Windows Operating Systems (64-bit)
○ Windows 7 SP1: Enterprise, Professional, Ultimate (Legacy boot mode required)○ Windows 10: Education, Enterprise, Pro v1803-v21H1 (April 2018 Update/Redstone 4 - May 2021 Update/21H1)
Note: Windows 10 v2004 (May 2020 Update/20H1) does not support 32-bit architecture. For more information, seehttps://docs.microsoft.com/windows-hardware/design/minimum/minimum-hardware-requirements-overview
■ Windows 10 2016 LTSB■ Windows 10 2019 LTSC
Encryption on Server Operating SystemsEncryption of server operating systems is intended for use on computers running in server mode, particularly file servers.
● Encryption on server operating systems is compatible only with Encryption Enterprise and Endpoint Security SuiteEnterprise.
● Encryption on server operating systems provides:
○ Software encryption○ Removable media encryption○ Port controls
NOTE:
The server must support port controls.
Port Control System policies affect removable media on protected servers, for example, by controlling access and
usage of the server's USB ports by USB devices. USB port policy applies to external USB ports. Internal USB port
functionality is not affected by USB port policy. If USB port policy is disabled, the client USB keyboard and mouse do
not function and the user cannot use the computer unless a Remote Desktop Connection is set up before the policy
is applied.
● The master installer installs these components if not already installed on the target computer. When using the childinstaller, you must install these components before installing the clients.
Prerequisite
○ Visual C++ 2012 Update 4 or later Redistributable Package (x86 or x64)○ Visual C++ 2017 or later Redistributable Package (x86 or x64)
12 Requirements
Prerequisite
Visual C++ 2017 requires Windows Update KB2999226 if installed on Windows 7.
○ In January 2020, SHA1 signing certificates are no longer valid and cannot be renewed. Devices running Windows7 or Windows Server 2008 R2 must install Microsoft KBs https://support.microsoft.com/help/4474419 andhttps://support.microsoft.com/help/4490628 to validate SHA256 signing certificates on applications and installationpackages.
Applications and installation packages signed with SHA1 certificates will function but an error will display on theendpoint during installation or execution of the application without these updates installed
Encryption of server operating systems is for use with:
● File servers with local drives● Virtual Machine (VM) guests running a server operating system or non-server operating system as a simple file server● Supported configurations:
○ Servers equipped with RAID 5 or 10 drives; RAID 0 (striping) and RAID 1 (mirroring) are supported independent of eachother.
○ Servers equipped with multi TB RAID drives○ Servers equipped with drives that can be changed out without shutting down the computer○ Server Encryption is validated against industry-leading antivirus providers.. Hard-coded exclusions are in place for these
anti-virus providers to prevent incompatibilities between anti-virus scanning and encryption. If your organization uses ananti-virus provider that is not listed, see KB article 126046 or contact Dell ProSupport for help.
Encryption of server operating systems is not for use with:
● Security Management Servers/Security Management Server Virtuals or servers running databases for Security ManagementServers/Security Management Server Virtual.
● Encryption Personal.● SED Manager, PBA advanced authentication or BitLocker Manager.● Servers that are part of distributed file systems (DFS).● Migration to or from Encryption on a server operating system. Upgrade from External Media Edition to Encryption of
server operating systems requires that the previous product is uninstalled completely before installing Encryption on serveroperating systems.
● VM hosts (A VM Host typically contains multiple VM guests.)● Domain Controllers● Exchange Servers● Servers hosting databases (SQL, Sybase, SharePoint, Oracle, MySQL, Exchange, etc.)● Servers using any of the following technologies:
○ Resilient file systems○ Fluid file systems○ Microsoft storage spaces○ SAN/NAS network storage solutions○ iSCSI connected devices○ Deduplication software○ Hardware deduplication○ Split RAIDs (multiple volumes across a single RAID)○ SEDs (RAIDs and NON-RAID)○ Auto-logon (Windows 7, 8/8.1) for kiosks○ Microsoft Storage Server 2012
● Encryption on a server operating system does not support dual boot configurations since it is possible to encrypt system filesof the other operating system, which would interfere with its operation.
● In-place operating system re-installs are not supported. To re-install the operating system, perform a backup of thetarget computer, wipe the computer, install the operating system, then recover the encrypted data by following recoveryprocedures. For more information about recovering encrypted data, refer to the Recovery Guide.
Requirements 13

Operating Systems
The following table details supported operating systems.
Operating Systems (32- and 64-bit)
● Windows 7 SP1: Enterprise, Professional, Ultimate● Windows 8.1: Enterprise, Pro● Windows 10: Education, Enterprise, Pro v1803-v21H1 (April 2018 Update/Redstone 4 - May 2021 Update/21H1)
Note: Windows 10 v2004 (May 2020 Update/20H1) does not support 32-bit architecture. For more information, seehttps://docs.microsoft.com/windows-hardware/design/minimum/minimum-hardware-requirements-overview
○ Windows 10 2016 LTSB○ Windows 10 2019 LTSC
Supported Server Operating Systems
● Windows Server 2008 R2 SP1: Standard Edition, Datacenter Edition, Enterprise Edition, Webserver Edition● Windows Server 2012: Standard Edition, Essentials Edition, Datacenter Edition (Server Core is not supported)● Windows Server 2012 R2: Standard Edition, Essentials Edition, Datacenter Edition(Server Core is not supported)● Windows Server 2016: Standard Edition, Essentials Edition, Datacenter Edition (Server Core is not supported)● Windows Server 2019: Standard Edition, Datacenter Edition
Operating Systems Supported with UEFI Mode
● Windows 8.1: Enterprise, Pro● Windows 10: Education, Enterprise, Pro v1803-v21H1 (April 2018 Update/Redstone 4 - May 2021 Update/21H1)
Note: Windows 10 v2004 (May 2020 Update/20H1) does not support 32-bit architecture. For more information, seehttps://docs.microsoft.com/windows-hardware/design/minimum/minimum-hardware-requirements-overview
○ Windows 10 2016 LTSB○ Windows 10 2019 LTSC
NOTE:
On a supported UEFI computer, after selecting Restart from the main menu, the computer restarts and then displays
one of two possible logon screens. The logon screen that displays is determined by differences in computer platform
architecture.
Encryption External Media
Operating Systems
● External media must have approximately 55MB available plus open space on the media that is equal to the largest file to beencrypted to host Encryption External Media.
● The following details the supported operating systems when accessing Dell-protected media:
Windows Operating Systems Supported to Access Encrypted Media (32- and 64-bit)
● Windows 7 SP1: Enterprise, Professional, Ultimate● Windows 8.1 Enterprise, Pro● Windows 10: Education, Enterprise, Pro v1803-v21H1 (April 2018 Update/Redstone 4 - May 2021 Update/21H1)
Note: Windows 10 v2004 (May 2020 Update/20H1) does not support 32-bit architecture. For more information, seehttps://docs.microsoft.com/windows-hardware/design/minimum/minimum-hardware-requirements-overview
○ Windows 10 2016 LTSB○ Windows 10 2019 LTSC
14 Requirements
Supported Server Operating Systems
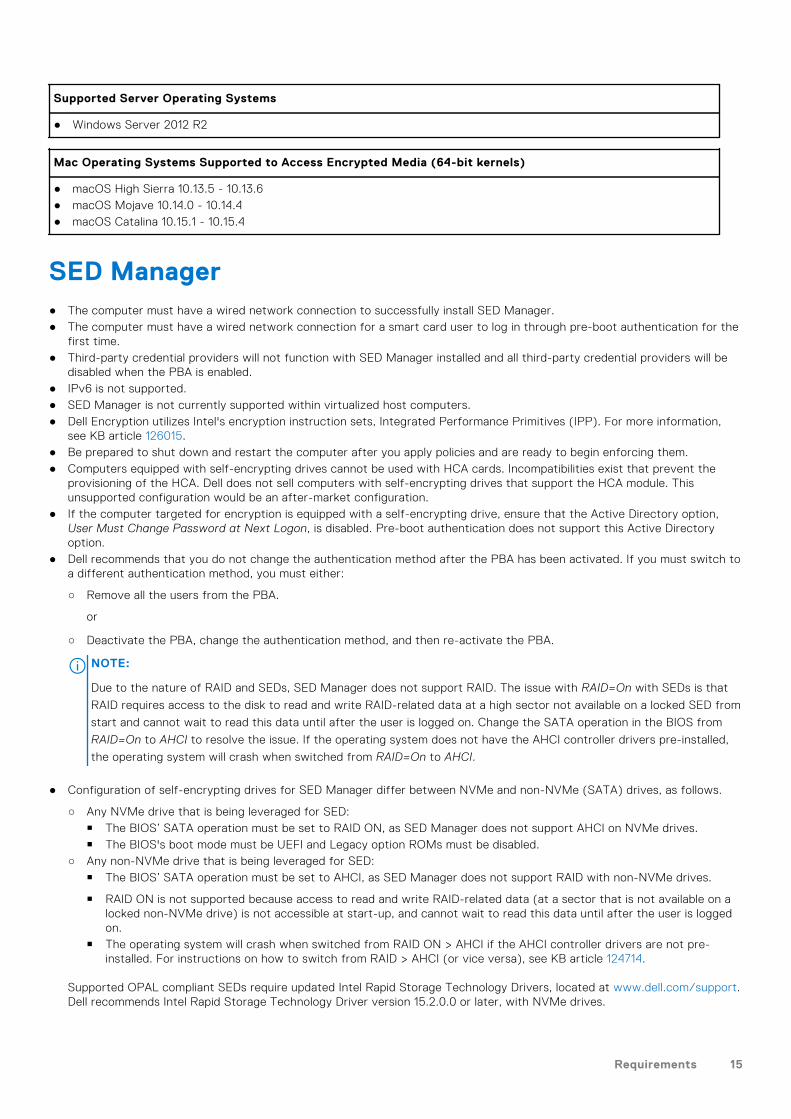
● Windows Server 2012 R2
Mac Operating Systems Supported to Access Encrypted Media (64-bit kernels)
● macOS High Sierra 10.13.5 - 10.13.6● macOS Mojave 10.14.0 - 10.14.4● macOS Catalina 10.15.1 - 10.15.4
SED Manager● The computer must have a wired network connection to successfully install SED Manager.● The computer must have a wired network connection for a smart card user to log in through pre-boot authentication for the
first time.● Third-party credential providers will not function with SED Manager installed and all third-party credential providers will be
disabled when the PBA is enabled.● IPv6 is not supported.● SED Manager is not currently supported within virtualized host computers.● Dell Encryption utilizes Intel's encryption instruction sets, Integrated Performance Primitives (IPP). For more information,
see KB article 126015.● Be prepared to shut down and restart the computer after you apply policies and are ready to begin enforcing them.● Computers equipped with self-encrypting drives cannot be used with HCA cards. Incompatibilities exist that prevent the
provisioning of the HCA. Dell does not sell computers with self-encrypting drives that support the HCA module. Thisunsupported configuration would be an after-market configuration.
● If the computer targeted for encryption is equipped with a self-encrypting drive, ensure that the Active Directory option,User Must Change Password at Next Logon, is disabled. Pre-boot authentication does not support this Active Directoryoption.
● Dell recommends that you do not change the authentication method after the PBA has been activated. If you must switch toa different authentication method, you must either:
○ Remove all the users from the PBA.
or
○ Deactivate the PBA, change the authentication method, and then re-activate the PBA.
NOTE:
Due to the nature of RAID and SEDs, SED Manager does not support RAID. The issue with RAID=On with SEDs is that
RAID requires access to the disk to read and write RAID-related data at a high sector not available on a locked SED from
start and cannot wait to read this data until after the user is logged on. Change the SATA operation in the BIOS from
RAID=On to AHCI to resolve the issue. If the operating system does not have the AHCI controller drivers pre-installed,
the operating system will crash when switched from RAID=On to AHCI.
● Configuration of self-encrypting drives for SED Manager differ between NVMe and non-NVMe (SATA) drives, as follows.
○ Any NVMe drive that is being leveraged for SED:■ The BIOS’ SATA operation must be set to RAID ON, as SED Manager does not support AHCI on NVMe drives.■ The BIOS's boot mode must be UEFI and Legacy option ROMs must be disabled.
○ Any non-NVMe drive that is being leveraged for SED:■ The BIOS’ SATA operation must be set to AHCI, as SED Manager does not support RAID with non-NVMe drives.
■ RAID ON is not supported because access to read and write RAID-related data (at a sector that is not available on alocked non-NVMe drive) is not accessible at start-up, and cannot wait to read this data until after the user is loggedon.
■ The operating system will crash when switched from RAID ON > AHCI if the AHCI controller drivers are not pre-installed. For instructions on how to switch from RAID > AHCI (or vice versa), see KB article 124714.
Supported OPAL compliant SEDs require updated Intel Rapid Storage Technology Drivers, located at www.dell.com/support.Dell recommends Intel Rapid Storage Technology Driver version 15.2.0.0 or later, with NVMe drives.
Requirements 15

NOTE: The Intel Rapid Storage Technology Drivers are platform dependent. You can find your system's driver at the link
above based on your computer model.
● The master installer installs these components if not already installed on the target computer. When using the childinstaller, you must install these components before installing the clients.
Prerequisite
○ Visual C++ 2017 or later Redistributable Package (x86 or x64)
Visual C++ 2017 requires Windows Update KB2999226 if installed on Windows 7.
○ In January 2020, SHA1 signing certificates are no longer valid and cannot be renewed. Devices running Windows7 or Windows Server 2008 R2 must install Microsoft KBs https://support.microsoft.com/help/4474419 andhttps://support.microsoft.com/help/4490628 to validate SHA256 signing certificates on applications and installationpackages.
Applications and installation packages signed with SHA1 certificates will function but an error will display on theendpoint during installation or execution of the application without these updates installed
● SED Manager is not supported with Encryption on server operating systems .● NOTE: A password is required with pre-boot authentication. Dell recommends a minimum password setting compliant
with internal security policies.
● NOTE: When PBA is used, the Sync All Users policy should be enabled if a computer has multiple users. Additionally, all
users must have passwords. Zero-length password users will be locked out of the computer following activation.
● NOTE: Computers protected by SED Manager must be updated to Windows 10 v1703 (Creators Update/Redstone 2) or
later before updating to Windows 10 v1903 (May 2019 Update/19H1) or later. If this upgrade path is attempted, an error
message displays.
● NOTE: In-place operating system upgrades to a newer version - such as Windows 7 or Windows 8.1 - to Windows 10 is
not supported.
Hardware
OPAL Compliant SEDs
● For the most up-to-date list of Opal compliant SEDs supported with the SED Manager, refer to this KB article 126855
● For the most up-to-date list of platforms supported with the SED Manager, see KB article 126855.
● For a list of docking stations and adapters supported with SED Manager, see KB article 124241.
Pre-Boot Authentication Options with SED Manager
● Specific hardware is required to use smart cards and to authenticate on UEFI computers. Configuration is required to usesmart cards with pre-boot authentication. The following tables show authentication options available by operating system,when hardware and configuration requirements are met.
Non-UEFI
PBA
Password Fingerprint Contacted Smartcard
SIPR Card
Windows 7 SP0-SP1 X1 X1 2
Windows 8.1 X1 X1 2
Windows 10 X1 X1 2
16 Requirements

Non-UEFI
PBA
Password Fingerprint Contacted Smartcard
SIPR Card
1. Available when authentication drivers are downloaded from dell.com/support
2. Available with a supported OPAL SED
UEFI
PBA - on supported Dell Computers
Password Fingerprint Contacted Smartcard
SIPR Card
Windows 7
Windows 8.1 X1 X1
Windows 10 X1 X1
1. Available with a supported OPAL SED on supported UEFI computers
International Keyboards
The following table lists international keyboards supported with Pre-boot Authentication on UEFI and non-UEFI computers.
International Keyboard Support - UEFI
DE-FR - (French Swiss) EN-GB - English (British English)
DE-CH - (German Swiss) EN-CA - English (Canadian English)
EN-US - English (AmericanEnglish)
International Keyboard Support - Non-UEFI
AR - Arabic (using Latin letters) EN-US - English (American English)
DE-FR - (French Swiss) EN-GB - English (British English)
DE-CH - (German Swiss) EN-CA - English (Canadian English)
Operating Systems
● The following table details the supported operating systems.
Windows Operating Systems (32- and 64-bit)
○ Windows 7 SP0-SP1: Enterprise, Professional, Ultimate (supported with Legacy Boot mode but not UEFI)
NOTE:
NVMe self-encrypting drives are not supported with Windows 7.
○ Windows 8.1: Enterprise, Pro○ Windows 10: Education, Enterprise, Pro v1803-v21H1 (April 2018 Update/Redstone 4 - May 2021 Update/21H1)
Requirements 17

Windows Operating Systems (32- and 64-bit)
Note: Windows 10 v2004 (May 2020 Update/20H1) does not support 32-bit architecture. For more information, seehttps://docs.microsoft.com/windows-hardware/design/minimum/minimum-hardware-requirements-overview
■ Windows 10 2016 LTSB■ Windows 10 2019 LTSC
Localization
SED Manager is a multilingual user interface compliant and is localized the following languages. UEFI mode and PBA advancedauthentication are supported in the following languages:
Language Support
EN - English JA - Japanese
FR - French KO - Korean
IT - Italian PT-BR - Portuguese, Brazilian
DE - German PT-PT - Portuguese, Portugal (Iberian)
ES - Spanish
BitLocker Manager● Consider reviewing Microsoft BitLocker requirements if BitLocker is not yet deployed in your environment,● Ensure that the PBA partition is already set up. If BitLocker Manager is installed before the PBA partition is set up, BitLocker
cannot be enabled and BitLocker Manager will not be operational. See Pre-Installation Configuration to Set Up a BitLockerPBA Partition.
● A Dell Server is required to use BitLocker Manager.● Ensure a signing certificate is available within the database. For more information, see KB article 124931.● The keyboard, mouse, and video components must be directly connected to the computer. Do not use a KVM switch to
manage peripherals as the KVM switch can interfere with the computer's ability to properly identify hardware.● Turn on and enable the TPM. BitLocker Manager takes ownership of the TPM and does not require a reboot. However, if a
TPM ownership already exists, BitLocker Manager begins the encryption setup process (no restart is required). The point isthat the TPM must be owned and enabled.
● The BitLocker Manager uses the approved AES FIPS validated algorithms if FIPS mode is enabled for the GPO securitysetting "System cryptography: Use FIPS compliant algorithms for encryption, hashing, and signing" on the device and youmanage that device via our product. BitLocker Manager does not force this mode as default for BitLocker-encrypted clientsbecause Microsoft now suggests customers not use their FIPS validated encryption due to numerous issues with applicationcompatibility, recovery, and media encryption: http://blogs.technet.com.
● BitLocker Manager is not supported with Encryption of server operating systems.● When using a Remote Desktop connection with an endpoint leveraging BitLocker Manager, Dell recommends running any
Remote Desktop sessions in console mode to avoid any UI interaction issues with the existing user session via the followingcommand:
mstsc /admin /v:<target_ip_address>● The master installer installs these components if not already installed on the target computer. When using the child
installer, you must install these components before installing the clients.
Prerequisite
○ Visual C++ 2017 or later Redistributable Package (x86 or x64)
Visual C++ 2017 requires Windows Update KB2999226 if installed on Windows 7.
18 Requirements

Prerequisite
○ In January 2020, SHA1 signing certificates are no longer valid and cannot be renewed. Devices running Windows7 or Windows Server 2008 R2 must install Microsoft KBs https://support.microsoft.com/help/4474419 andhttps://support.microsoft.com/help/4490628 to validate SHA256 signing certificates on applications and installationpackages.
Applications and installation packages signed with SHA1 certificates will function but an error will display on theendpoint during installation or execution of the application without these updates installed
● NOTE: Computers protected by Bitlocker Manager must be updated to Windows 10 v1703 (Creators Update/Redstone
2) or later before updating to Windows 10 v1903 (May 2019 Update/19H1) or later. If this upgrade path is attempted, an
error message displays.
● NOTE: In-place operating system upgrades to a newer version - such as Windows 7 or Windows 8.1 - to Windows 10 is
not supported.
Hardware
● The following table details supported hardware.
Optional Embedded Hardware
○ TPM 1.2 or 2.0
Operating Systems
● The following table details supported operating systems.
Windows Operating Systems
○ Windows 7 SP0-SP1: Enterprise, Ultimate (32- and 64-bit)
NOTE: BitLocker Manager does not support TPM 2.0 on Windows 7 devices. Devices with BitLocker Manager onWindows 7 may not have KB article KB3133977 or KB3125574 installed. To resolve issues with BitLocker Manageron Windows 7, ensure these KBs are not installed.
○ Windows 8.1: Enterprise Edition, Pro Edition (64-bit)○ Windows 10: Education, Enterprise, Pro v1803-v21H1 (April 2018 Update/Redstone 4 - May 2021 Update/21H1)
Note: Windows 10 v2004 (May 2020 Update/20H1) does not support 32-bit architecture. For more information, seehttps://docs.microsoft.com/windows-hardware/design/minimum/minimum-hardware-requirements-overview
■ Windows 10 2016 LTSB■ Windows 10 2019 LTSC
○ Windows Server 2008 R2: Standard Edition, Enterprise Edition (64-bit)○ Windows Server 2012 R2: Standard Edition, Enterprise Edition (64-bit)○ Windows Server 2016: Standard Edition, Datacenter Edition (64-bit)○ Windows Server 2019: Standard Edition, Datacenter Edition (64-bit)
Windows updates KB3133977 and KB3125574 must not be installed if installing BitLocker Manager on Windows 7.
Requirements 19

Registry Settings● This section details all Dell ProSupport approved registry settings for local client computers, regardless of the reason for the
registry setting. If a registry setting overlaps two products, it is listed in each category.● These registry changes should be done by administrators only and may not be appropriate or function in all scenarios.
Encryption● If a self-signed certificate is used on the Dell Server. For Windows, certificate trust validation must remain disabled on
the client computer (trust validation is disabled by default with Dell Server). Before enabling trust validation on the clientcomputer, the following requirements must be met.
○ A certificate signed by a root authority, such as EnTrust or Verisign, must be imported into Dell Server.○ The full chain of trust of the certificate must be stored in the Microsoft keystore on the client computer.○ To enable trust validation for Encryption, change the value of the following registry entry to 0 on the target computer.
[HKLM\SOFTWARE\Microsoft\Windows NT\CurrentVersion\Winlogon\CMGShield]
"IgnoreCertErrors"=DWORD:00000000
0 = Fail if a certificate error is encountered
1= Ignores errors
● To create an Encryption Removal Agent log file, create the following registry entry on the computer targeted for decryption.See (Optional) Create an Encryption Removal Agent Log File.
[HKLM\Software\Credant\DecryptionAgent]
"LogVerbosity"=DWORD:2
0: no logging
1: logs errors that prevent the service from running
2: logs errors that prevent complete data decryption (recommended level)
3: logs information about all decrypting volumes and files
5: logs debugging information
● To disable prompting the user to reboot their computer after the Encryption Removal Agent finishes its final state in thedecryption process, modify the following registry value or modify the Force Reboot on Update policy in the ManagementConsole.
[HKLM\Software\Dell\Dell Data Protection]
"ShowDecryptAgentRebootPrompt"=DWORD
1 = enabled (displays prompt)
0 = disabled (hides prompt)
● By default, during installation, the notification area icon is displayed. Use the following registry setting to hide the notificationarea icon for all managed users on a computer after the original installation. Create or modify the registry setting:
[HKLM\Software\CREDANT\CMGShield]
"HIDESYSTRAYICON"=DWORD:1
● By default, all temporary files in the c:\windows\temp directory are automatically deleted during installation. Deletion oftemporary files speeds initial encryption and occurs before the initial encryption sweep.
However, if your organization uses a third-party application that requires the file structure within the \temp directory to bepreserved, you should prevent this deletion.
To disable temporary file deletion, create or modify the registry setting as follows:
3
20 Registry Settings

[HKLM\SOFTWARE\CREDANT\CMGShield]
"DeleteTempFiles"=REG_DWORD:0
Not deleting temporary files increases initial encryption time.
● Encryption displays the length of each policy update delay prompt for five minutes each time. If the user does not respondto the prompt, the next delay begins. The final delay prompt includes a countdown and progress bar, and it displays until theuser responds, or the final delay expires and the required logoff/reboot occurs.
You can change the behavior of the user prompt to begin or delay encryption, to prevent encryption processing after no userresponse to the prompt. To do this, set the value:
[HKLM\Software\Microsoft\Windows NT\CurrentVersion\Winlogon\CMGShield]
"SnoozeBeforeSweep"=DWORD:1
Any non-zero value changes the default behavior to snooze. With no user interaction, encryption processing is delayed up tothe number of configurable allowed delays. Encryption processing begins when the final delay expires.
Calculate the maximum possible delay as follows (a maximum delay would involve the user never responding to a delayprompt, each of which displays for 5 minutes):
(NUMBER OF POLICY UPDATE DELAYS ALLOWED × LENGTH OF EACH POLICY UPDATE DELAY) + (5 MINUTES ×[NUMBER OF POLICY UPDATE DELAYS ALLOWED - 1])
● Use the registry setting to have Encryption poll the Dell Server for a forced policy update. Create or modify the registrysetting:
[HKLM\SOFTWARE\Credant\CMGShield\Notify]
"PingProxy"=DWORD value:1
The registry setting automatically disappears when done.
● Use the registry settings to allow Encryption to send an optimized, full (activated and unactivated users), or full (activatedusers only) inventory to the Dell Server.
○ Send Optimized Inventory to Dell Server:
Create or modify the registry setting:
[HKLM\SOFTWARE\Microsoft\Windows NT\CurrentVersion\Winlogon\CMGShield]
"OnlySendInvChanges"=REG_DWORD:1
If no entry is present, optimized inventory is sent to the Dell Server.
○ Send Full Inventory to Dell Server:
Create or modify the registry setting:
[HKLM\SOFTWARE\Microsoft\Windows NT\CurrentVersion\Winlogon\CMGShield]
"OnlySendInvChanges"=REG_DWORD:0
If no entry is present, optimized inventory is sent to the Dell Server.
○ Send Full Inventory for All Activated Users
[HKLM\SOFTWARE\Microsoft\Windows NT\CurrentVersion\Winlogon\CMGShield]
"RefreshInventory"=REG_DWORD:1
This entry is deleted from the registry as soon as it is processed. The value is saved in the vault, so even if the computeris rebooted before the inventory upload takes place, Encryption still honors this request the next successful inventoryupload.
This entry supersedes the OnlySendInvChanges registry value.
● Slotted Activation is a feature that allows you to spread activations of clients over a set time period to ease Dell Serverload during a mass deployment. Activations are delayed based on algorithmically generated time slots to provide a smoothdistribution of activation times.
For users requiring activation through VPN, a slotted activation configuration for the client may be required, to delay initialactivation for long enough to allow time for the VPN client to establish a network connection.
These registry entries require a restart of the computer for the updates to take effect.
○ Slotted Activation
Registry Settings 21
To enable or disable this feature, create a DWORD with the name SlottedActivation under the parent key:
[HKLM\Software\Microsoft\Windows NT\CurrentVersion\Winlogon\CMGShield\]
○ Activation Slot
To enable or disable this feature, create a subkey with the name ActivationSlot under the parent key:
[HKLM\Software\Microsoft\Windows NT\CurrentVersion\Winlogon\CMGShield\]
Activation Slot - a string that defines the period within which Encryption attempts to activate with the Dell Server. Thesevalues are defined in seconds, and the syntax is defined by <lowervalue>,<uppervalue>. An example would be 120,300.This means that Encryption attempts to activate at a random time between 2 minutes and 5 minutes after user login.
■ Calendar Repeat
To enable or disable this feature, create a subkey with the name CalRepeat under the parent key:
[HKLM\Software\Microsoft\Windows NT\CurrentVersion\Winlogon\CMGShield\ActivationSlot]
CalRepeat - A DWORD that defines the time period in seconds that the activation slot interval occurs. Use thissetting to override the time period in seconds that the activation slot interval occurs. 25200 seconds are available forslotting activations during a seven-hour period. The default setting is 86400 seconds, which represents a daily repeat.The suggested decimal value is 600, which represents 10 minutes.
■ Slot Interval
To enable or disable this feature, create a subkey with the name SlotInterval under the parent key:
[HKLM\Software\Microsoft\Windows NT\CurrentVersion\Winlogon\CMGShield\ActivationSlot]
Slot Interval - A string value that defines the intervals between slot activations. The suggested setting is 45,120. Thisrepresents activation time being randomly assigned between 45 and 120 seconds.
■ Missed Threshold
To enable or disable this feature, create a subkey with the name MissThreshold under the parent key:
[HKLM\Software\Microsoft\Windows NT\CurrentVersion\Winlogon\CMGShield\ActivationSlot]
MissThreshold - a DWORD value that contains a positive integer that defines the number of attempts to activatebefore a log off is required. If the MissThreshold is reached, activation attempts cease until the next login for theunactivated user. The count for MissThreshold is always reset on logoff.
The registry keys collect slotted activation user data:
[HKCU/Software/CREDANT/ActivationSlot] (per-user data)
Deferred time to attempt the slotted activation, which is set when the user logs onto the network for the first timeafter slotted activation is enabled. The activation slot is recalculated for each activation attempt.
[HKCU/Software/CREDANT/SlotAttemptCount] (per-user data)
Number of failed or missed attempts, when the time slot arrives and activation is attempted but fails. When thisnumber reaches the value set in ACTIVATION_SLOT_MISSTHRESHOLD, the computer attempts one immediateactivation upon connecting to the network.
● To detect unmanaged users on the client computer, set the registry value on the client computer:
[HKLM\SOFTWARE\Credant\CMGShield\ManagedUsers\]
"UnmanagedUserDetected"=DWORD value:1
Detect unmanaged users on this computer=1
Do not detect unmanaged users on this computer=0
● Access to external media encrypted with Encryption External Media can be restricted to computers with access to the DellServer that produced the encryption keys with which the media was encrypted.
This feature is enabled by setting the registry:
[ HKEY_LOCAL_MACHINE\SOFTWARE\Microsoft\Windows NT\CurrentVersion\Winlogon\CMGShield]
"EnterpriseUsage"=DWORD:0
Off (default)=0
File Access Restricted to Enterprise=1
22 Registry Settings

If this value is changed after files on external media are encrypted, the files are re-encrypted based on the updated registrykey value when the media is connected to the computer on which the registry setting was updated.
● To enable silent automatic reactivation in the rare case that a user becomes deactivated, the registry value must be set onthe client computer.
[HKEY_LOCAL_MACHINE\SYSTEM\CurrentControlSet\Services\CMGShield]
"AutoReactivation"=DWORD:00000001
0=Disabled (default)
1=Enabled
● System Data Encryption (SDE) is enforced based on the policy value for SDE Encryption Rules. Additional directories areprotected by default when the SDE Encryption Enabled policy is Selected. For more information, search "SDE EncryptionRules" in AdminHelp. When Encryption is processing a policy update that includes an active SDE policy, the current userprofile directory is encrypted by default with the SDUser key (a User key) rather than the SDE key (a Device key). TheSDUser key is also used to encrypt files or folders that are copied (not moved) into a user directory that is not a encryptedwith SDE.
To disable the SDUser key and use the SDE key to encrypt these user directories, create the registry on the computer:
[HKEY_LOCAL_MACHINE\SOFTWARE\Credant\CMGShield]
"EnableSDUserKeyUsage"=DWORD:00000000
If this registry key is not present or is set to anything other than 0, the SDUser key will be used to encrypt these userdirectories.
For more information about SDUser, see KB article 131035
● Setting the registry entry, EnableNGMetadata, if issues occur related with Microsoft updates on computers with Commonkey-encrypted data or with encrypting, decrypting, or unzipping large numbers of files within a folder.
Set the EnableNGMetadata registry entry in the following location:
[HKEY_LOCAL_MACHINE\System\CurrentControlSet\Services\CmgShieldFFE]
"EnableNGMetadata" = DWORD:1
0=Disabled (default)
1=Enabled
● The non-domain activation feature can be enabled by contacting Dell ProSupport and requesting instructions.● The Encryption Management Agent no longer outputs policies by default. To output future consumed policies, create the
following registry key:
HKLM\Software\Dell\Dell Data Protection\
" DumpPolicies" = DWORD
Value=1
Note: Logs are written to C:\ProgramData\Dell\Dell Data Protection\Policy .
● To disable or enable the Encrypt for Sharing option in the right-click menu use the following registry key.
HKEY_LOCAL_MACHINE\SOFTWARE\Dell\Dell Data Protection\Encryption
"DisplaySharing"=DWORD
0 = disable the Encrypt for Sharing option in the right-click context menu
1 = enable the Encrypt for Sharing option in the right-click context menu
SED Manager● To set the retry interval when the Dell Server is unavailable to communicate with SED Manager, add the following registry
value.
[HKLM\System\CurrentControlSet\Services\DellMgmtAgent\Parameters]
"CommErrorSleepSecs"=DWORD:300
Registry Settings 23

This value is the number of seconds SED Manager waits to attempt to contact the Dell Server if it is unavailable tocommunicate. The default is 300 seconds (5 minutes).
● If a self-signed certificate is used on the Dell Server for SED Manager, SSL/TLS trust validation must remain disabled onthe client computer (SSL/TLS trust validation is disabled by default with SED Manager). Before enabling SSL/TLS trustvalidation on the client computer, the following requirements must be met.
○ A certificate signed by a root authority, such as EnTrust or Verisign, must be imported into Dell Server.○ The full chain of trust of the certificate must be stored in the Microsoft keystore on the client computer.○ To enable SSL/TLS trust validation for SED Manager, change the value of the following registry entry to 0 on the client
computer.
[HKLM\System\CurrentControlSet\Services\DellMgmtAgent\Parameters]
"DisableSSLCertTrust"=DWORD:0
0 = Enabled
1 = Disabled
● To determine if the PBA is activated, ensure that the following value is set:
[HKLM\SYSTEM\CurrentControlSet\services\DellMgmtAgent\Parameters]
"PBAIsActivated"=DWORD (32-bit):1
A value of 1 means that the PBA is activated. A value of 0 means the PBA is not activated.
● To determine if a smart card is present and active, ensure the following value is set:
HKLM\SOFTWARE\Dell\Dell Data Protection\
"SmartcardEnabled"=DWORD:1
If SmartcardEnabled is missing or has a value of zero, the Credential Provider will display only Password for authentication.
If SmartcardEnabled has a non-zero value, the Credential Provider will display options for Password and smart cardauthentication.
● The following registry value indicates whether Winlogon should generate a notification for logon events from smart cards.
HKEY_LOCAL_MACHINE\Software\Microsoft\Windows NT\CurrentVersion\Winlogon\Notify
"SmartCardLogonNotify"=DWORD:1
0 = Disabled
1 = Enabled
● To prevent SED Manager from disabling third-party credential providers, create the following registry key:
HKLM\SOFTWARE\Dell\Dell Data Protection\
"AllowOtherCredProviders" = DWORD:1
0=Disabled (default)
1=Enabled
NOTE: This value may prevent the Dell credential provider from properly syncing credentials initially due to third-partycredential providers being disabled. Ensure the devices using this registry key can properly communicate with the DellServer.
● To set the interval that SED Manager attempts to contact the Dell Server when it is unavailable to communicate, set thefollowing value on the target computer:
[HKLM\System\CurrentControlSet\Services\DellMgmtAgent\Parameters]
"CommErrorSleepSecs"=DWORD Value:300
This value is the number of seconds SED Manager waits to attempt to contact the Dell Server if it is unavailable tocommunicate. The default is 300 seconds (5 minutes).
● The Security Server host may be changed from the original installation location if needed. The host information is read everytime a policy poll occurs. Change the following registry value on the client computer:
[HKLM\SYSTEM\CurrentControlSet\services\DellMgmtAgent]
"ServerHost"=REG_SZ:<newname>.<organization>.com
24 Registry Settings

● The Security Server port may be changed from the original installation location if needed. This value is read every time apolicy poll occurs. Change the following registry value on the client computer:
[HKLM\SYSTEM\CurrentControlSet\services\DellMgmtAgent]
ServerPort=REG_SZ:8888
● The Security Server URL may be changed from the original install location if needed. This value is read by the clientcomputer every time a policy poll occurs. Change the following registry value on the client computer:
[HKLM\SYSTEM\CurrentControlSet\services\DellMgmtAgent]
"ServerUrl"=REG_SZ:https://<newname>.<organization>.com:8888/agent
● (With pre-boot authentication only) If you do not want PBA advanced authentication to change the services associated withsmart cards and biometric devices to a startup type of "automatic", disable the service startup feature. Disabling this featurealso suppresses warnings associated with the required services not running.
When disabled, PBA advanced authentication does not attempt to start these services:
○ SCardSvr - Manages access to smart cards read by the computer. If this service is stopped, this computer is unable toread smart cards. If this service is disabled, any services that explicitly depend on it fail to start.
○ SCPolicySvc - Allows the system to be configured to lock the user desktop upon smart card removal.○ WbioSrvc - The Windows biometric service gives client applications the ability to capture, compare, manipulate, and store
biometric data without gaining direct access to any biometric hardware or samples. The service is hosted in a privilegedSVCHOST process.
By default, if the registry key does not exist or the value is set to 0, this feature is enabled.
[HKLM\SOFTWARE\DELL\Dell Data Protection]
SmartCardServiceCheck=REG_DWORD:0
0 = Enabled
1 = Disabled
● To use smart cards with SED PBA Authentication, the following registry value must be set on the client computer that isequipped with an SED.
[HKLM\SOFTWARE\DigitalPersona\Policies\Default\SmartCards]
"MSSmartcardSupport"=DWORD:1
Set the Authentication Method policy to Smart Card in the Management Console, and commit the change.
● To suppress all Toaster notifications from the Encryption Management Agent, the following registry value must be set on theclient computer.
[HKEY_LOCAL_MACHINE\SOFTWARE\Dell\Dell Data Protection]
"PbaToastersAllowClose" =DWORD:1
0=Enabled (default)
1=Disabled
Full Disk Encryption● This section details all Dell ProSupport approved registry settings for local computers, regardless of the reason for the
registry setting. If a registry setting overlaps two products, it is listed in each category.● These registry changes should be done by administrators only and may not be appropriate or function in all scenarios.● To set the retry interval when the Dell Server is unavailable to communicate with Full Disk Encryption, add the following
registry value.
[HKLM\System\CurrentControlSet\Services\DellMgmtAgent\Parameters]
"CommErrorSleepSecs"=DWORD:300
This value is the number of seconds Full Disk Encryption waits to attempt to contact the Dell Server if it is unavailable tocommunicate with Full Disk Encryption. The default is 300 seconds (5 minutes).
Registry Settings 25

● If a self-signed certificate is used on the Dell Server for Full Disk Encryption, SSL/TLS trust validation must remain disabledon the client computer (SSL/TLS trust validation is disabled by default with Full Disk Encryption). Before enabling SSL/TLStrust validation on the client computer, the following requirements must be met.
○ A certificate signed by a root authority, such as EnTrust or Verisign, must be imported into Dell Server.○ The full chain of trust of the certificate must be stored in the Microsoft keystore on the client computer.○ To enable SSL/TLS trust validation for Dell Encryption management, change the value of the following registry entry to 0
on the client computer.
[HKLM\System\CurrentControlSet\Services\DellMgmtAgent\Parameters]
"DisableSSLCertTrust"=DWORD:0
0 = Enabled
1 = Disabled
● To determine if the PBA is activated, ensure that the following value is set:
[HKLM\SYSTEM\CurrentControlSet\services\DellMgmtAgent\Parameters]
"PBAIsActivated"=DWORD (32-bit):1
A value of 1 means that the PBA is activated. A value of 0 means the PBA is not activated.
NOTE: Manually deleting this key can create unintended results for users syncing with the PBA resulting in the need for
manual recovery.
● To determine if a smart card is present and active, ensure the following value is set:
HKLM\SOFTWARE\Dell\Dell Data Protection\
"SmartcardEnabled"=DWORD:1
If SmartcardEnabled is missing or has a value of zero, the Credential Provider will display only Password for authentication.
If SmartcardEnabled has a non-zero value, the Credential Provider will display options for Password and smart cardauthentication.
● The following registry value indicates whether Winlogon should generate a notification for logon events from smart cards.
HKEY_LOCAL_MACHINE\Software\Microsoft\Windows NT\CurrentVersion\Winlogon\Notify
"SmartCardLogonNotify"=DWORD:1
0 = Disabled
1 = Enabled
● The Security Server host may be changed from the original installation location if needed. The host information is read by theclient computer every time a policy poll occurs. Change the following registry value on the client computer:
[HKLM\SYSTEM\CurrentControlSet\services\DellMgmtAgent]
"ServerHost"=REG_SZ:<newname>.<organization>.com
● The Security Server port may be changed from the original installation location if needed. This value is read by the clientcomputer every time a policy poll occurs. Change the following registry value on the client computer:
[HKLM\SYSTEM\CurrentControlSet\services\DellMgmtAgent]
ServerPort=REG_SZ:8888
● (With pre-boot authentication only) If you do not want PBA advanced authentication to change the services associated withsmart cards and biometric devices to a startup type of "automatic", disable the service startup feature. Disabling this featurealso suppresses warnings associated with the required services not running.
When disabled, PBA advanced authentication does not attempt to start these services:
○ SCardSvr - Manages access to smart cards read by the computer. If this service is stopped, this computer is unable toread smart cards. If this service is disabled, any services that explicitly depend on it fail to start.
○ SCPolicySvc - Allows the system to be configured to lock the user desktop upon smart card removal.○ WbioSrvc - The Windows biometric service gives client applications the ability to capture, compare, manipulate, and store
biometric data without gaining direct access to any biometric hardware or samples. The service is hosted in a privilegedSVCHOST process.
By default, if the registry key does not exist or the value is set to 0, this feature is enabled.
26 Registry Settings
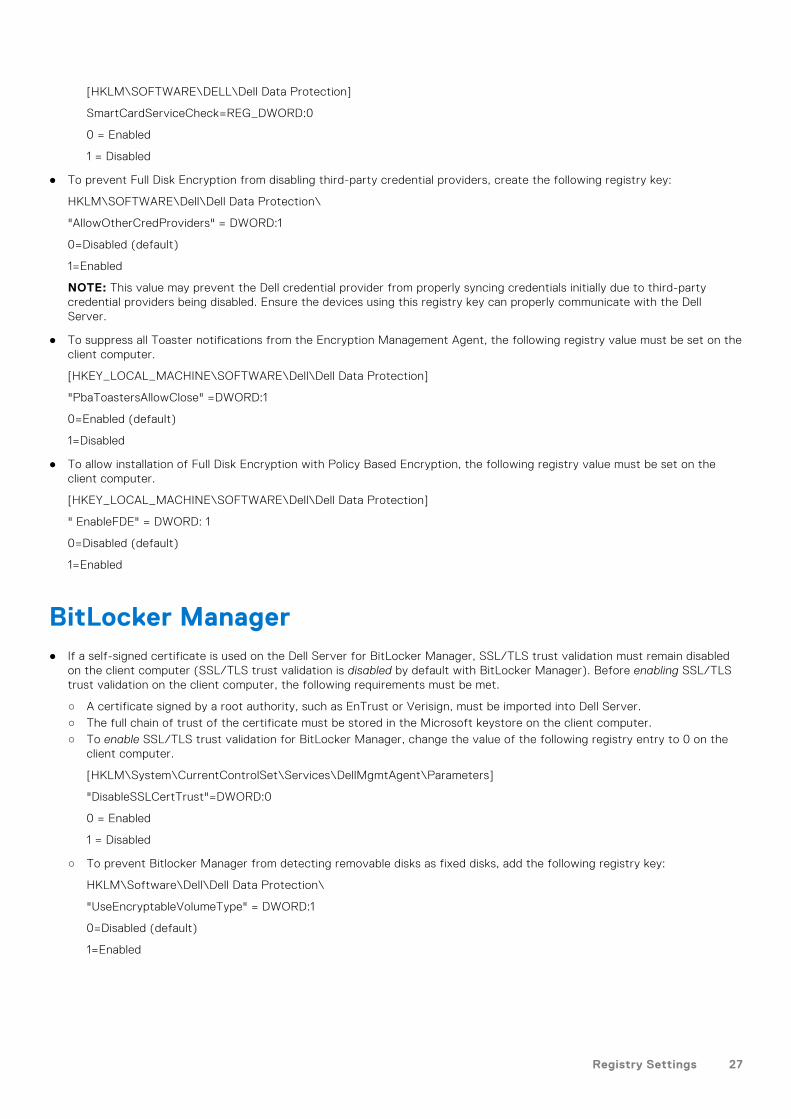
[HKLM\SOFTWARE\DELL\Dell Data Protection]
SmartCardServiceCheck=REG_DWORD:0
0 = Enabled
1 = Disabled
● To prevent Full Disk Encryption from disabling third-party credential providers, create the following registry key:
HKLM\SOFTWARE\Dell\Dell Data Protection\
"AllowOtherCredProviders" = DWORD:1
0=Disabled (default)
1=Enabled
NOTE: This value may prevent the Dell credential provider from properly syncing credentials initially due to third-partycredential providers being disabled. Ensure the devices using this registry key can properly communicate with the DellServer.
● To suppress all Toaster notifications from the Encryption Management Agent, the following registry value must be set on theclient computer.
[HKEY_LOCAL_MACHINE\SOFTWARE\Dell\Dell Data Protection]
"PbaToastersAllowClose" =DWORD:1
0=Enabled (default)
1=Disabled
● To allow installation of Full Disk Encryption with Policy Based Encryption, the following registry value must be set on theclient computer.
[HKEY_LOCAL_MACHINE\SOFTWARE\Dell\Dell Data Protection]
" EnableFDE" = DWORD: 1
0=Disabled (default)
1=Enabled
BitLocker Manager● If a self-signed certificate is used on the Dell Server for BitLocker Manager, SSL/TLS trust validation must remain disabled
on the client computer (SSL/TLS trust validation is disabled by default with BitLocker Manager). Before enabling SSL/TLStrust validation on the client computer, the following requirements must be met.
○ A certificate signed by a root authority, such as EnTrust or Verisign, must be imported into Dell Server.○ The full chain of trust of the certificate must be stored in the Microsoft keystore on the client computer.○ To enable SSL/TLS trust validation for BitLocker Manager, change the value of the following registry entry to 0 on the
client computer.
[HKLM\System\CurrentControlSet\Services\DellMgmtAgent\Parameters]
"DisableSSLCertTrust"=DWORD:0
0 = Enabled
1 = Disabled
○ To prevent Bitlocker Manager from detecting removable disks as fixed disks, add the following registry key:
HKLM\Software\Dell\Dell Data Protection\
"UseEncryptableVolumeType" = DWORD:1
0=Disabled (default)
1=Enabled
Registry Settings 27

Install Using the Master Installer● Command line switches and parameters are case-sensitive.● To install using non-default ports, use the child installers instead of the master installer.● Master installer log files are located at C:\ProgramData\Dell\Dell Data Protection\Installer.
NOTE: If Policy-Based Encryption is installed before the Encryption Management Agent, computer crash may occur.
This issue is caused by failure to load the encryption Sleep driver that manages the PBA environment. As a workaround,
use the master installer or ensure that Policy-Based Encryption is installed after the Encryption Management Agent.
● Instruct users to see the following document and help files for application assistance:
○ See the Dell Encrypt Help to learn how to use the features of Encryption. Access the help from <Installdir>\Program Files\Dell\Dell Data Protection\Encryption\Help.
○ See the Encryption External Media Help to learn how the features of Encryption External Media. Access the help from<Install dir>\Program Files\Dell\Dell Data Protection\Encryption\EMS.
○ See the Encryption Enterprise Help to learn how to use the features of . Access the help from <Installdir>\Program Files\Dell\Dell Data Protection\Client Security Framework\Help.
● Users should update their policies by right-clicking the Dell Encryption icon in the notification area and selecting Check forPolicy Updates after installation completes.
● The master installer installs the entire suite of products. There are two methods to install using the master installer. Chooseone of the following.
○ Install Interactively Using the Master Installer
or
○ Install by Command Line Using the Master Installer
Install Interactively Using the Master Installer● The master installer can be located at:
○ From dell.com/support - If needed, Obtain the Software from dell.com/support○ From Your Dell FTP Account - Locate the installation bundle at Dell-Encryption-8.x.x.xxx.zip
● Use these instructions to install or update Dell Encryption Enterprise interactively using the master installer. This method canbe used to install the suite of products on one computer at a time.
1. Locate DDSSetup.exe in the Dell installation media. Copy it to the local computer.
2. Double-click to launch the installer. This may take several minutes.
3. Click Next in the Welcome dialog.
4. Read the license agreement, accept the terms, and click Next.
5. In On-Prem Dell Server Name, enter the fully qualified hostname of the Dell Server to manage the target user.
Enter port values in Core Server Port and Security Server Port if your organization uses non-standard ports.
Click Next.
4
28 Install Using the Master Installer

6. Click Next to install the product in the default location of C:\Program Files\Dell\Dell Data Protection\.Dell recommends installing in the default location only, as problems may arise when installing in otherlocations.
7. Select the components to be installed.
Security Framework installs the underlying security framework, the Encryption Management Agent, and PBA authentication.
BitLocker Manager installs the BitLocker Manager client, designed to enhance the security of BitLocker deployments bysimplifying and reducing the cost of ownership through centralized management of BitLocker encryption policies.
Encryption installs the component that enforces security policy, whether a computer is connected to the network,disconnected from the network, lost, or stolen.
Encryption External Media installs the component that enforces Encryption External Media.
Full Disk Encryption installs the component that enforces Full Disk Encryption.
Click Next when your selections are complete.
Install Using the Master Installer 29

8. Click Install to begin the installation. Installation takes several minutes.
9. Select Yes, I want to restart my computer now and click Finish.
30 Install Using the Master Installer

Installation is complete.
Install by Command Line Using the Master Installer● The switches must be specified first in a command line installation. Other parameters go inside an argument that is passed to
the /v switch.
Switches
● The following table describes the switches that can be used with the master installer.
NOTE: If your organization requires the use of third-party credential providers, the Encryption Management Agent must
be installed or upgraded with the FEATURE=BLM or FEATURE=BASIC parameter.
Switch Description
/s Silent installation
/z Pass variables to the .msi inside the DDSSetup.exe
Parameters
● The following table describes the parameters that can be used with the master installer.
Parameter Description
SUPPRESSREBOOT Suppresses the automatic reboot after the installation completes. Can be used in SILENT mode.
SERVER Specifies the URL of the Dell Server.
InstallPath Specifies the path for the installation. Can be used in SILENT mode.
FEATURES Specifies the components that can be installed in SILENT mode.
DE = Drive Encryption client only
Install Using the Master Installer 31

Parameter Description
EME = Encryption External Media only
BLM = BitLocker Manager
SED = SED Manager (Encryption Management Agent/Manager, PBA/GPE Drivers)
BLM_ONLY=1 Must be used when using FEATURES=BLM in the command line to exclude the SED Managerplugin.
Example Command Line
● Command line parameters are case-sensitive.● This example installs all components using the master installer on standard ports, silently, in the default location of C:
\Program Files\Dell\Dell Data Protection\, and configures it to use the specified Dell Server.
"DDSSetup.exe" /s /z"\"SERVER=server.organization.com\""● This example installs SED Manager and Encryption External Media with the master installer, on standard ports, silently, with
a suppressed reboot, in the default location of C:\Program Files\Dell\Dell Data Protection\, and configures itto use the specified Dell Server.
"DDSSetup.exe" /s /z"\"SERVER=server.organization.com, FEATURES=EME-SED,SUPPRESSREBOOT=1\""
● This example installs SED Manager with the master installer, on standard ports, silently, with a suppressed reboot, in thedefault location of C:\Program Files\Dell\Dell Data Protection\, and configures it to use the specified DellServer.
"DDSSetup.exe" /s /z"\"SERVER=server.organization.com, FEATURES=SED, SUPPRESSREBOOT=1\""● This example installs SED Manager with the master installer, on standard ports, silently, in the default location of C:
\Program Files\Dell\Dell Data Protection\, and configures it to use the specified Dell Server.
"DDSSetup.exe" /s /z"\"SERVER=server.organization.com, FEATURES=SED\""● This example installs Encryption and BitLocker Manager (without the SED Manager plugin), with the master installer,
on standard ports, silently, in the default location of C:\Program Files\Dell\Dell Data Protection\, andconfigures it to use the specified Dell Server.
"DDSSetup.exe" /s /z"\"SERVER=server.organization.com, FEATURES=DE-BLM, BLM_ONLY=1\""● This example installs BitLocker Manager (with the SED Manager plugin) and Encryption External Media, with the master
installer, on standard ports, silently, with a suppressed reboot, in the default location of C:\Program Files\Dell\DellData Protection\, and configures it to use the specified Dell Server.
"DDSSetup.exe" /s /z"\"SERVER=server.organization.com, FEATURES=BLM-EME,SUPPRESSREBOOT=1\""
● This example installs BitLocker Manager (without the SED Manager plugin) and Encryption External Media, with the masterinstaller, on standard ports, silently, with a suppressed reboot, in the default location of C:\Program Files\Dell\DellData Protection\, and configures it to use the specified Dell Server.
"DDSSetup.exe" /s /z"\"SERVER=server.organization.com, FEATURES=BLM-EME, BLM_ONLY=1,SUPPRESSREBOOT=1\""
32 Install Using the Master Installer

Uninstall the Master Installer● Dell recommends using the Data Security Uninstaller to remove the Data Security suite.● Each component must be uninstalled separately, followed by uninstallation of the master installer. The clients must be
uninstalled in a specific order to prevent uninstallation failures.● Follow the instructions in Extract the Child Installers from the Master Installer to obtain child installers.● Ensure that the same version of master installer (and thereby clients) is used for uninstallation as installation.● This chapter refers you to other chapters that contain detailed instructions of how to uninstall the child installers. This
chapter explains the last step only, uninstalling the master installer.● Uninstall the clients in the following order.
1. Uninstall Encryption .2. Uninstall SED Manager.3. Uninstall Full Disk Encryption4. Uninstall BitLocker Manager.
● Proceed to Uninstall the Master Installer.
Uninstall the Master InstallerNow that all of the individual clients have been uninstalled, the master installer can be uninstalled.
Command Line Uninstallation
● The following example silently uninstalls the master installer.
"DDSSetup.exe" /s /xReboot the computer when finished.
5
Uninstall the Master Installer 33

Install Using the Child Installers● To install or upgrade each client individually, the child executable files must first be extracted from the master installer, as
shown in Extract the Child Installers from the Master Installer.● Command examples included in this section assume the commands are run from C:\extracted.
● Command line switches and parameters are case-sensitive.● Be sure to enclose a value that contains one or more special characters, such as a blank space in the command line, in
escaped quotation marks.● Use these installers to install the clients using a scripted installation, batch files, or any other push technology available to
your organization.● The reboot has been suppressed in the command line examples. However, an eventual reboot is required.
Note: Policy-Based Encryption cannot begin until the computer has rebooted.
● Log files - Windows creates unique child installer installation log files for the logged in user at %temp%, located at C:\Users\<UserName>\AppData\Local\Temp.If you decide to add separate a log file when you run the installer, ensure that the log file has a unique name, as childinstaller log files do not append. The standard .msi command can be used be create a log file by using /l*v C:\<anydirectory>\<any log file name>.log.
● All child installers use the same basic .msi switches and display options, except where noted, for command line installations.The switches must be specified first. The /v switch is required and takes an argument. Other parameters go inside anargument that is passed to the /v switch.
Display options can be specified at the end of the argument passed to the /v switch to achieve the expected behavior. Donot use both /q and /qn in the same command line. Only use ! and - after /qb.
Switch Meaning
/v Pass variables to the .msi inside the setup.exe. The content must always beenclosed in plain-text quotes.
/s Silent mode
/x Uninstall mode
NOTE:
With /v, the Microsoft default options are available. For a list of options, see this article.
Option Meaning
/q No Progress dialog, restarts itself after process completion
/qb Progress dialog with Cancel button, prompts for restart
/qb- Progress dialog with Cancel button, restarts itself after process completion
/qb! Progress dialog without Cancel button, prompts for restart
/qb!- Progress dialog without Cancel button, restarts itself after process completion
/qn No user interface
/norestart Suppress reboot
● Instruct users to see the following document and help files for application assistance:
6
34 Install Using the Child Installers
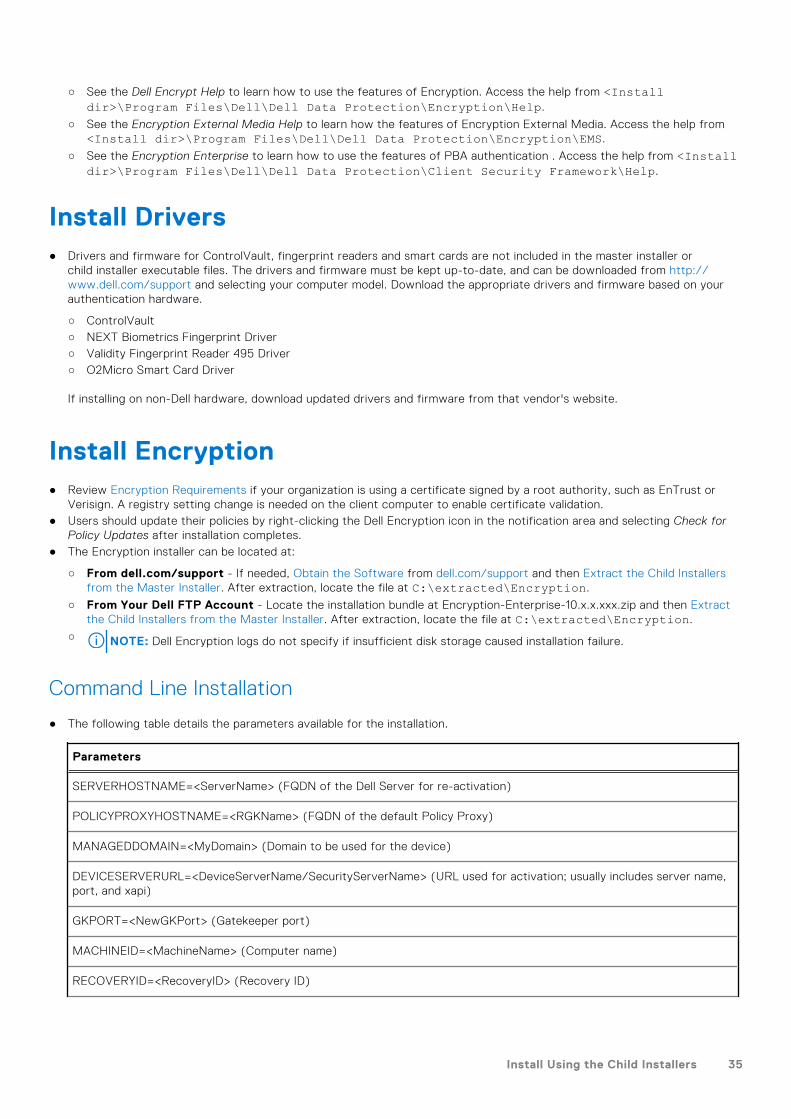
○ See the Dell Encrypt Help to learn how to use the features of Encryption. Access the help from <Installdir>\Program Files\Dell\Dell Data Protection\Encryption\Help.
○ See the Encryption External Media Help to learn how the features of Encryption External Media. Access the help from<Install dir>\Program Files\Dell\Dell Data Protection\Encryption\EMS.
○ See the Encryption Enterprise to learn how to use the features of PBA authentication . Access the help from <Installdir>\Program Files\Dell\Dell Data Protection\Client Security Framework\Help.
Install Drivers● Drivers and firmware for ControlVault, fingerprint readers and smart cards are not included in the master installer or
child installer executable files. The drivers and firmware must be kept up-to-date, and can be downloaded from http://www.dell.com/support and selecting your computer model. Download the appropriate drivers and firmware based on yourauthentication hardware.
○ ControlVault○ NEXT Biometrics Fingerprint Driver○ Validity Fingerprint Reader 495 Driver○ O2Micro Smart Card Driver
If installing on non-Dell hardware, download updated drivers and firmware from that vendor's website.
Install Encryption● Review Encryption Requirements if your organization is using a certificate signed by a root authority, such as EnTrust or
Verisign. A registry setting change is needed on the client computer to enable certificate validation.● Users should update their policies by right-clicking the Dell Encryption icon in the notification area and selecting Check for
Policy Updates after installation completes.● The Encryption installer can be located at:
○ From dell.com/support - If needed, Obtain the Software from dell.com/support and then Extract the Child Installersfrom the Master Installer. After extraction, locate the file at C:\extracted\Encryption.
○ From Your Dell FTP Account - Locate the installation bundle at Encryption-Enterprise-10.x.x.xxx.zip and then Extractthe Child Installers from the Master Installer. After extraction, locate the file at C:\extracted\Encryption.
○ NOTE: Dell Encryption logs do not specify if insufficient disk storage caused installation failure.
Command Line Installation
● The following table details the parameters available for the installation.
Parameters
SERVERHOSTNAME=<ServerName> (FQDN of the Dell Server for re-activation)
POLICYPROXYHOSTNAME=<RGKName> (FQDN of the default Policy Proxy)
MANAGEDDOMAIN=<MyDomain> (Domain to be used for the device)
DEVICESERVERURL=<DeviceServerName/SecurityServerName> (URL used for activation; usually includes server name,port, and xapi)
GKPORT=<NewGKPort> (Gatekeeper port)
MACHINEID=<MachineName> (Computer name)
RECOVERYID=<RecoveryID> (Recovery ID)
Install Using the Child Installers 35

Parameters
REBOOT=ReallySuppress (Null allows for automatic reboots, ReallySuppress disables reboot)
HIDEOVERLAYICONS=1 (0 enables overlay icons, 1 disables overlay icons)
HIDESYSTRAYICON=1 (0 enables the icon in the notification area, 1 disables the icon in the notification area)
ENABLE_FDE_LM=1 (Allows installation of Dell Encryption on a computer with active Full Disk Encryption)
EME=1 (Install Encryption External Media mode)
OPTIN=1 (Install in Deferred Activation mode)
For a list of basic .msi switches and display options that can be used in command lines, refer to Install Using the ChildInstallers.
● The following table details additional optional parameters related with activation.
Parameters
SLOTTEDACTIVATON=1 (0 disables delayed/scheduled activations, 1 enables delayed/scheduled activations)
SLOTINTERVAL=45,120 (Schedules activations through x,x notation where the first value is the lower limit of theschedule and the second value is the upper limit - in seconds)
CALREPEAT=600 (MUST match or exceed the upper limit set in SLOTINTERVAL. Number of seconds Encryption waitsbefore generating an activation attempt based on SLOTINTERVAL.)
Example Command Line
NOTE: Replace DEVICESERVERURL=https://server.organization.com:8081/xapi (without the trailing
forward slash) if your Security Management Server is pre-v7.7.
● The following example installs Dell Encryption with default parameters (Encryption, Encrypt for Sharing, no dialogue,no progress bar, automatic restart, installed in the default location of C:\Program Files\Dell\Dell DataProtection\Encryption).
DDPE_XXbit_setup.exe /s /v"SERVERHOSTNAME=server.organization.comPOLICYPROXYHOSTNAME=rgk.organization.com MANAGEDDOMAIN=ORGANIZATIONDEVICESERVERURL=https://server.organization.com:8443/xapi/ /qn"MSI Command:
msiexec.exe /i "Dell Data Protection Encryption.msi" /qn REBOOT="ReallySuppress"SERVERHOSTNAME="server.organization.com" POLICYPROXYHOSTNAME="rgk.organization.com"MANAGEDDOMAIN="ORGANIZATION" DEVICESERVERURL="https://server.organization.com:8443/xapi/"
● The following example installs Encryption and Encrypt for Sharing, hides the Dell Encryption notification area icon, hidesthe overlay icons, no dialogue, no progress bar, suppresses restart, installed in the default location of C:\ProgramFiles\Dell\Dell Data Protection\Encryption.DDPE_XXbit_setup.exe /s /v"SERVERHOSTNAME=server.organization.comPOLICYPROXYHOSTNAME=rgk.organization.com MANAGEDDOMAIN=ORGANIZATIONDEVICESERVERURL=https://server.organization.com:8443/xapi/ HIDESYSTRAYICON=1HIDEOVERLAYICONS=1 REBOOT=ReallySuppress /qn"MSI Command:
msiexec.exe /i "Dell Data Protection Encryption.msi" /qn REBOOT="ReallySuppress"SERVERHOSTNAME="server.organization.com" POLICYPROXYHOSTNAME="rgk.organization.com"MANAGEDDOMAIN="ORGANIZATION" DEVICESERVERURL="https://server.organization.com:8443/xapi/"HIDESYSTRAYICON="1" HIDEOVERLAYICONS="1"Example Command Line to Install Encryption External Media Only
36 Install Using the Child Installers

● Silent installation, no progress bar, automatic restart, installed in the default location of C:\Program Files\Dell\DellData Protection\Encryption.DDPE_XXbit_setup.exe /s /v"SERVERHOSTNAME=server.organization.comPOLICYPROXYHOSTNAME=rgk.organization.com MANAGEDDOMAIN=ORGANIZATIONDEVICESERVERURL=https://server.organization.com:8443/xapi/ EME=1 /qn"MSI Command:
msiexec.exe /i "Dell Data Protection Encryption.msi" /qn REBOOT="ReallySuppress"SERVERHOSTNAME="server.organization.com" POLICYPROXYHOSTNAME="rgk.organization.com"MANAGEDDOMAIN="ORGANIZATION" DEVICESERVERURL="https://server.organization.com:8443/xapi/"
● Silent installation, no reboot, installed in the default location of C:\Program Files\Dell\Dell DataProtection\Encryption).
DDPE_XXbit_setup.exe /s /v"EME=1SERVERHOSTNAME=server.organization.com POLICYPROXYHOSTNAME=rgk.organization.comDEVICESERVERURL=https://server.organization.com:8443/xapi/ MANAGEDDOMAIN=ORGANIZATION /norestart /qn"MSI Command:
msiexec.exe /i "Dell Data Protection Encryption.msi" /qn REBOOT="ReallySuppress" EME="1"SERVERHOSTNAME="server.organization.com" POLICYPROXYHOSTNAME="rgk.organization.com"DEVICESERVERURL="https://server.organization.com:8443/xapi/" MANAGEDDOMAIN="ORGANIZATION"
● NOTE:
Although the About box in the client displays software version number information, it does not display
whether Encryption (full install) or Encryption External Media only. To locate this information, go to C:\ProgramData\Dell\Dell Data Protection\Encryption\CMGShield.log and find the following entry:
[<date/timestamp> DeviceInfo: < >] Shield Information - SM=External Media Only, SB=DELL, UNF=FQUN, last
sweep={0, 0}
Example Command Line to Convert Encryption External Media to Encryption (full install)
NOTE: Converting Encryption External Media to Encryption (full install) is not supported with upgrades.
● Decryption is not needed when converting Encryption External Media to Encryption (full install).
DDPE_XXbit_setup.exe /s /v"SERVERHOSTNAME=server.organization.comPOLICYPROXYHOSTNAME=rgk.organization.com MANAGEDDOMAIN=ORGANIZATIONDEVICESERVERURL=https://server.organization.com:8443/xapi/ REINSTALL=ALL EME=0REINSTALLMODE=vamus /qn"MSI Command:
msiexec.exe /i "Dell Data Protection Encryption.msi" /qn REBOOT="ReallySuppress"SERVERHOSTNAME="server.organization.com" POLICYPROXYHOSTNAME="rgk.organization.com"MANAGEDDOMAIN="ORGANIZATION" DEVICESERVERURL="https://server.organization.com:8443/xapi/"REINSTALL="ALL" EME="0" REINSTALLMODE="vamus"
● Example Command Line to Install in Deferred Activation Mode
● The following example installs Dell Encryption in deferred activation mode in the default location of C:\ProgramFiles\Dell\Dell Data Protection\Encryption).
DDPE_XXbit_setup.exe /s /v"OPTIN=1SERVERHOSTNAME=server.organization.com POLICYPROXYHOSTNAME=rgk.organization.comDEVICESERVERURL=https://server.organization.com:8443/xapi/ MANAGEDDOMAIN=ORGANIZATION"MSI Command:
msiexec.exe /i "Dell Data Protection Encryption.msi" OPTIN="1"SERVERHOSTNAME="server.organization.com" POLICYPROXYHOSTNAME="rgk.organization.com"DEVICESERVERURL="https://server.organization.com:8443/xapi/" MANAGEDDOMAIN="ORGANIZATION"
● The following example installs Dell Encryption in deferred activation mode and with default parameters (Encryption, Encryptfor Sharing, no dialogue, no progress bar, no restart, hides overlay icons, installed in the default location of C:\ProgramFiles\Dell\Dell Data Protection\Encryption).
Install Using the Child Installers 37

DDPE_XXbit_setup.exe /s /v"SERVERHOSTNAME=server.organization.comPOLICYPROXYHOSTNAME=rgk.organization.com MANAGEDDOMAIN=ORGANIZATIONDEVICESERVERURL=https://server.organization.com:8443/xapi/ OPTIN=1 HIDEOVERLAYICONS=1REBOOT=ReallySuppress /qn"MSI Command:
msiexec.exe /i "Dell Data Protection Encryption.msi" /qnREBOOT="ReallySuppress" OPTIN="1" SERVERHOSTNAME="server.organization.com"POLICYPROXYHOSTNAME="rgk.organization.com" MANAGEDDOMAIN="ORGANIZATION"DEVICESERVERURL="https://server.organization.com:8443/xapi/" HIDEOVERLAYICONS="1"
● Example Command Line to Install Dell Encryption with Full Disk Encryption
\Encryption
● The following example installs Dell Encryption with default parameters (Encryption, Encrypt for Sharing, no dialogue,no progress bar, automatic restart, installed in the default location of C:\Program Files\Dell\Dell DataProtection\Encryption).
DDPE_XXbit_setup.exe /s /v"SERVERHOSTNAME=server.organization.comPOLICYPROXYHOSTNAME=rgk.organization.com MANAGEDDOMAIN=ORGANIZATIONDEVICESERVERURL=https://server.organization.com:8443/xapi/ /qn"Then:
\Encryption Management Agent
The following example installs remotely managed Full Disk Encryption and allows installation on a Dell Encryption protectedcomputer (silent installation, no reboot, no entry in the Control Panel Programs list, installed in the default location ofC:\Program Files\Dell\Dell Data Protection\Encryption).
EMAgent_64bit_setup.exe /s /v"CM_EDITION=1 ENABLE_FDE_LM=1FEATURE=FDE SERVERHOST=server.organization.com SERVERPORT=8888SECURITYSERVERHOST=server.organization.com SECURITYSERVERPORT=8443 ARPSYSTEMCOMPONENT=1 /norestart /qn"
● Example Command Line to Install Encryption External Media and Full Disk Encryption.
\Encryption
The following example installs Encryption External Media with Silent installation, no progress bar, automatic restart, installedin the default location of C:\Program Files\Dell\Dell Data Protection\Encryption.DDPE_XXbit_setup.exe /s /v"SERVERHOSTNAME=server.organization.comPOLICYPROXYHOSTNAME=rgk.organization.com MANAGEDDOMAIN=ORGANIZATIONDEVICESERVERURL=https://server.organization.com:8443/xapi/ EME=1 /qn"Then:
\Encryption Management Agent
The following example installs remotely managed Full Disk Encryption and allows installation on a Dell Encryption protectedcomputer (silent installation, no reboot, no entry in the Control Panel Programs list, installed in the default location ofC:\Program Files\Dell\Dell Data Protection).
EMAgent_64bit_setup.exe /s /v"CM_EDITION=1 ENABLE_FDE_LM=1FEATURE=FDE SERVERHOST=server.organization.com SERVERPORT=8888SECURITYSERVERHOST=server.organization.com SECURITYSERVERPORT=8443 ARPSYSTEMCOMPONENT=1 /norestart /qn"
● Example Command Line to Install Encryption External Media over an existing Full Disk Encryption installation.
The following example enables installation of Encryption External Media over an existing Full Disk Encryption installation withSilent installation, no progress bar, automatic restart, installed in the default location of C:\Program Files\Dell\DellData Protection.
DDPE_XXbit_setup.exe /s /v"EME=1 SERVERHOSTNAME=server.organization.comPOLICYPROXYHOSTNAME=rgk.organization.com MANAGEDDOMAIN=ORGANIZATIONDEVICESERVERURL=https://server.organization.com:8443/xapi/ ENABLE_FDE_LM=1 /norestart /qn"
● Example Command Line to Install Remotely Managed Encryption client over an existing Full Disk Encryptioninstallation.
38 Install Using the Child Installers

The following example enables installation of Dell Encryption over an existing Full Disk Encryption installation with defaultparameters (Encryption client, Encrypt for Sharing, no dialogue, no progress bar, automatic restart, installed in the defaultlocation of C:\Program Files\Dell\Dell Data Protection\Encryption) and installation logs in C:\Dell.Note: For successful log generation, the directory C:\Dell must exist prior to installation.
DDPE_XXbit_setup.exe /s /v"SERVERHOSTNAME=server.organization.comPOLICYPROXYHOSTNAME=rgk.organization.com MANAGEDDOMAIN=ORGANIZATIONDEVICESERVERURL=https://server.organization.com:8443/xapi/ ENABLE_FDE_LM=1 /norestart /qn /l*v C:\Dell\DellEncryptionInstall.log"
NOTE: Some older versions may require escape characters of \" around the values of parameters. For example:
DDPE_XXbit_setup.exe /v"CMG_DECRYPT=\"1\" CMGSILENTMODE=\"1\" DA_SERVER=\"server.organization.com\"DA_PORT=\"8050\" SVCPN=\"[email protected]\" DA_RUNAS=\"domain\username\"DA_RUNASPWD=\"password\" /qn
Install Full Disk Encryption● Review Full Disk Encryption Requirements if your organization is using a certificate signed by a root authority, such as
EnTrust or Verisign. A registry setting change is needed on the client computer to enable SSL/TLS trust validation.● Users log in to the PBA using their Windows credentials.
Command Line Installation
● The following table details the parameters available for the installation.
Parameters
CM_EDITION=1 (remote management)
INSTALLDIR=(change the installation destination)
SERVERHOST=(securityserver.organization.com)
SERVERPORT=8888
SECURITYSERVERHOST=(securityserver.organization.com)
SECURITYSERVERPORT=8443
FEATURE=FDE
ENABLE_FDE_LM=1 (Allows installation of Full Disk Encryption on a computer with active Dell Encryption)
For a list of basic .msi switches and display options that can be used in command lines, refer to Install Using the ChildInstallers.
Example Command Line
Encryption Management Agent
● The following example installs remotely managed Full Disk Encryption (silent installation, no reboot, installed in the defaultlocation of C:\Program Files\Dell\Dell Data Protection\Encryption).
EMAgent_64bit_setup.exe /s /v"CM_EDITION=1 FEATURE=FDE SERVERHOST=server.organization.comSERVERPORT=8888 SECURITYSERVERHOST=server.organization.com SECURITYSERVERPORT=8443 /norestart /qn"
● Encryption Management Agent
● The following example installs remotely managed Full Disk Encryption and allows installation on a Dell Encryption protectedcomputer (silent installation, no reboot, installed in the default location of C:\Program Files\Dell\Dell DataProtection\Encryption).
Install Using the Child Installers 39

EMAgent_64bit_setup.exe /s /v"CM_EDITION=1 ENABLE_FDE_LM=1FEATURE=FDE SERVERHOST=server.organization.com SERVERPORT=8888SECURITYSERVERHOST=server.organization.com SECURITYSERVERPORT=8443 /norestart /qn"
● Example Command Line to Install Full Disk Encryption and Encryption External Media.
Encryption
The following example installs Encryption External Media with Silent installation, no progress bar, automatic restart, installedin the default location of C:\Program Files\Dell\Dell Data Protection\Encryption.DDPE_XXbit_setup.exe /s /v"SERVERHOSTNAME=server.organization.comPOLICYPROXYHOSTNAME=rgk.organization.com MANAGEDDOMAIN=ORGANIZATIONDEVICESERVERURL=https://server.organization.com:8443/xapi/ EME=1 /qn"Then:
Encryption Management Agent
The following example installs remotely managed Full Disk Encryption and allows installation on a Dell Encryption protectedcomputer (silent installation, no reboot, no entry in the Control Panel Programs list, installed in the default location ofC:\Program Files\Dell\Dell Data Protection\Encryption).
EMAgent_64bit_setup.exe /s /v"CM_EDITION=1 ENABLE_FDE_LM=1FEATURE=FDE SERVERHOST=server.organization.com SERVERPORT=8888SECURITYSERVERHOST=server.organization.com SECURITYSERVERPORT=8443 /norestart /qn"
Install Encryption on Server Operating SystemThere are two methods available to install Encryption on server operating system. Choose one of the following methods:
● Install Encryption on server operating system Interactively
Encryption on server operating system can be installed interactively only on computers running server operatingsystems. Installation on computers running non-server operating systems must be performed by command line, with theSERVERMODE=1 parameter specified.
● Install Encryption on server operating system Using the Command Line
Virtual User Account
● As part of the installation, a virtual server user account is created for the exclusive use of Encryption on server operatingsystem. Password and DPAPI authentication are disabled so that only the virtual server user can access encryption keys.
Before You Begin
● The user account performing the installation must be a domain user with administrator-level permissions.● To override this requirement, or to run Encryption on server operating system on non-domain or multi-domain servers, set
the ssos.domainadmin.verify property to false in the application.properties file. The file is stored in the following file paths,based on the Dell Server you are using:
Security Management Server - <installation dir>/Security Server/conf/application.properties
Security Management Server Virtual - /opt/dell/server/security-server/conf/application.properties
● The server must support port controls.
Port Control System policies affect removable media on protected servers, for example, by controlling access and usage ofthe server's USB ports by USB devices. USB port policy applies to external USB ports. Internal USB port functionality is notaffected by USB port policy. If USB port policy is disabled, a USB keyboard and mouse do not function and the user cannotuse the computer unless a Remote Desktop Connection is set up before the policy is applied.
● To successfully activate, the computer must have network connectivity.● When the Trusted Platform Module (TPM) is available, it is used for sealing the General Purpose Key on Dell hardware. If a
TPM is not available, Microsoft's Data Protection API (DPAPI) is used to protect the General Purpose Key.
When installing a new operating system on a Dell computer with TPM that is running Server Encryption, clear the TPM in theBIOS. See this article for instructions.
40 Install Using the Child Installers

● The installation log file is located in the user's %temp% directory, located at C:\Users\<username>\AppData\Local\Temp. To locate the correct log file, find the file name that begins with MSI and ends witha .log extension. The file includes a date/time stamp matching the time when the installer was run.
● Encryption is not supported on servers that are part of distributed file systems (DFS).
Extract the Child Installer
● To install Encryption on server operating system, you must first extract the child installer, DDPE_xxbit_setup.exe, fromthe master installer. See Extract the Child Installers from the Master Installer.
Install Interactively
● Use these instructions to install Encryption on server operating system interactively. This installer includes the componentsneeded for software encryption.
1. Locate DDPE_XXbit_setup.exe in the C:\extracted\Encryption folder. Copy it to the local computer.
2. If you are installing Encryption on server operating system, double-click DDPE_XXbit_setup.exe to launch the installer.
NOTE:
When Encryption on server operating system is installed on a computer that is running a server operating system, such
as Windows Server 2012 R2, the installer automatically installs in SERVERMODE.
3. In the Welcome dialog, click Next.
4. In the License Agreement screen, read the license agreement, agree to the terms, and click Next.
5. Select On-Prem Dell Management Server then click
Next.
6. Click Next to install in the default location.
7. Click Next to skip the Management Type dialog.
8. In Security Management Server Name, enter/validate the fully qualified host name of the Dell Server to manage the targetuser (example, server.organization.com).
Enter the domain name in Managed Domain (example, organization). Click Next.
Install Using the Child Installers 41

9. In Policy Proxy hostname and port, enter/validate the information and click Next.
10. In Device Server URL, enter/validate the information and click Next.
42 Install Using the Child Installers

11. Click Install to begin the installation.
Installation may take several minutes.
12. Once the configuration is complete, click Finish.
Install Using the Child Installers 43

Installation is complete.
13. Restart the computer. Dell recommends snoozing the reboot only if time is needed to save your work and close applications.Encryption cannot begin until the computer has rebooted.
Install Using the Command Line
Locate the installer in C:\extracted\Encryption● Use DDPE_xxbit_setup.exe to install or upgrade using a scripted installation, using batch files, or any other push
technology available to your organization.
Switches
The following table details the switches available for the installation.
Switch Meaning
/v Pass variables to the .msi inside the DDPE_XXbit_setup.exe
/a Administrative installation
/s Silent mode
Parameters
The following table details the parameters available for the installation.
Component Log File Command Line Parameters
All /l*v [fullpath][filename].log * SERVERHOSTNAME=<Security Management Server Name>
SERVERMODE=1
POLICYPROXYHOSTNAME=<RGK Name>
44 Install Using the Child Installers

Component Log File Command Line Parameters
MANAGEDDOMAIN=<My Domain>
DEVICESERVERURL=<Activation Server Name>
GKPORT=<New GK Port>
MACHINEID=<Machine Name>
RECOVERYID=<Recovery ID>
REBOOT=ReallySuppress
HIDEOVERLAYICONS=1
HIDESYSTRAYICON=1
EME=1
NOTE:
Although the reboot can be suppressed, an eventual reboot is required. Encryption cannot begin until the computerhas rebooted.
Options
The following table details the display options that can be specified at the end of the argument passed to the /v switch.
Option Meaning
/q No Progress dialog, restarts itself after process completion
/qb Progress dialog with Cancel button, prompts for restart
/qb- Progress dialog with Cancel button, restarts itself after process completion
/qb! Progress dialog without Cancel button, prompts for restart
/qb!- Progress dialog without Cancel button, restarts itself after process completion
/qn No user interface
NOTE:
Do not use both /q and /qn in the same command line. Only use ! and - after /qb.
● The command line parameter, SERVERMODE=1, is honored only during new installations. The parameter is ignored foruninstallations.
● Enclose a value that contains one or more special characters, such as a blank space, in escaped quotation marks.● The DEVICESERVERURL parameter is case sensitive.
Example Command Line Installation
● The following example installs Encryption in server operating system mode with default parameters (Encryption, silentinstallation, Encrypt for Sharing, no dialogue, no progress bar, automatic restart, installed in the default location of C:\Program Files\Dell\Dell Data Protection).
DDPE_XXbit_setup.exe /s /v"SERVERMODE=1 SERVERHOSTNAME=server.organization.comPOLICYPROXYHOSTNAME=rgk.organization.com MANAGEDDOMAIN=ORGANIZATIONDEVICESERVERURL=https://server.organization.com:8443/xapi/ /qn"MSI Command:
Install Using the Child Installers 45

msiexec.exe /i "Dell Data Protection Encryption.msi" /qnREBOOT="ReallySuppress" SERVERMODE="1" SERVERHOSTNAME="server.organization.com"POLICYPROXYHOSTNAME="rgk.organization.com" MANAGEDDOMAIN="ORGANIZATION"DEVICESERVERURL="https://server.organization.com:8443/xapi/"
● The following example installs Encryption in server operating system mode with a log file and default parameters (Encryption,silent installation, Encrypt for Sharing, no dialogue, no progress bar, no restart, installed in the default location of C:\Program Files\Dell\Dell Data Protection\Encryption) and specifies a custom log file name ending with anumber (DDP_ssos-090.log) that is incremented if the command line is run more than once on the same server. To specify alog location other than the default location where the executable is located, provide the complete path in the command. Forexample, /l*v C:\Logs\DDP_ssos-090.log creates install logs in C:\Logs.
DDPE_XXbit_setup.exe /s /v"SERVERMODE=1 SERVERHOSTNAME=server.organization.comPOLICYPROXYHOSTNAME=rgk.organization.com MANAGEDDOMAIN=ORGANIZATIONDEVICESERVERURL=https://server.organization.com:8443/xapi/ /l*v DDP_ssos-090.log /norestart/qn"MSI Command:
msiexec.exe /i "Dell Data Protection Encryption.msi" /qn SERVERMODE="1"SERVERHOSTNAME="server.organization.com" POLICYPROXYHOSTNAME="rgk.organization.com"MANAGEDDOMAIN="ORGANIZATION" DEVICESERVERURL="https://server.organization.com:8443/xapi/" /l*v DDP_ssos-090.log /norestart/qn"
Restart the computer after installation. Dell recommends snoozing the reboot only if time is needed to save your work and closeapplications. Encryption cannot begin until the computer has rebooted.
Activate
● Ensure that the computer name of the server is the endpoint name to display in the Management Console.● An interactive user with domain administrator credentials must log on to the server at least once for the purpose of the initial
activation. The logged on user can be of any type - domain or non-domain, remote desktop-connected or interactive user atthe server, but activation requires domain administrator credentials.
● Following the restart after installation, the Activation dialog displays. The administrator must enter domain administratorcredentials with a user name in User Principal Name (UPN) format. Encryption of server operating systems does not activateautomatically.
● During initial activation, a virtual server user account is created. After initial activation, the computer is restarted so thatdevice activation can begin.
● During the authentication and device activation phase, the computer is assigned a unique Machine ID, encryption keysare created and bundled, and a relationship is established between the encryption key bundle and the virtual server user.The encryption key bundle associates the encryption keys and policies with the new virtual server user to create anunbreakable relationship between the encrypted data, the specific computer, and the virtual server user. After deviceactivation, the virtual server user displays in the Management Console as SERVER-USER@<fully qualified server name>. Formore information about activation, see Activation on a Server Operating System.
NOTE:
If you rename the server after activation, its display name does not change in the Management Console. However, if
Encryption of server operating systems activates again after the server name is changed, the new server name will then
display in the Management Console.
An Activation dialog displays once after each restart to prompt the user to activate Encryption on a server operating system. Tocomplete activation, follow these steps:
1. Log on to the server either at the server or through Remote Desktop Connection.2. Enter the user name of a domain administrator in UPN format and password and click Activate. This is the same Activation
dialog that displays each time an unactivated system is restarted.
46 Install Using the Child Installers

The Dell Server issues an encryption key for the Machine ID, creates the virtual server user account, creates anencryption key for the user account, bundles the encryption keys, and creates the relationship between the encryptionbundle and the virtual server user account.
3. Click Close.
After activation, encryption begins.
4. After the encryption sweep has finished, restart the computer to process any files that were previously in use. This is animportant step for security purposes.
NOTE:
If the Secure Windows Credentials policy is enabled, Encryption of server operating systems
encrypts the \Windows\system32\config files, which includes Windows credentials. The files in
\Windows\system32\config are encrypted even if the SDE Encryption Enabled policy is disabled. By default, the
Secure Windows Credentials policy is selected.
NOTE:
After restarting the computer, authentication to the Common encryption key always requires the protected server's
Machine key. The Dell Server returns an unlock key to access the encryption keys and policies in the vault (The keys and
policies are for the server, not for the user). Without the server's Machine key, the Common encryption key cannot be
unlocked, and the computer cannot receive policy updates.
Confirm Activation
From the local console, open the About dialog to confirm that Encryption of server operating systems is installed,authenticated, and in Server mode. If the Encryption Client ID is red, encryption has not yet been activated.
Install Using the Child Installers 47

Virtual Server User
● In the Management Console, a protected server can be found under its machine name. In addition, each protected server hasits own virtual server user account. Each account has a unique static user name and unique machine name.
● The virtual server user account is only used by Encryption on server operating systems and is otherwise transparent to theoperation of the protected server. The virtual server user is associated with the encryption key bundle and the Policy Proxy.
● After activation, the virtual server user account is the user account that is activated and associated with the server.● After the virtual server user account is activated, all server logon/logoff notifications are ignored. Instead, during startup,
the computer automatically authenticates with the virtual server user, and then downloads the Machine key from the DellServer.
Install SED Manager and PBA AdvancedAuthentication● Review SED Requirements if your organization is using a certificate signed by a root authority, such as EnTrust or Verisign. A
registry setting change is needed on the client computer to enable SSL/TLS trust validation.● Users log in to the PBA using their Windows credentials.● The SED Manager and PBA Advanced Authentication installers can be located at:
○ From dell.com/support - If needed, Obtain the Software from dell.com/support and then Extract the Child Installersfrom the Master Installer. After extraction, locate the file at C:\extracted\Encryption Management Agent.
○ From Your Dell FTP Account - Locate the installation bundle at Encryption-Enterprise-10.x.x.xxx.zip and then Extractthe Child Installers from the Master Installer. After extraction, locate the file at C:\extracted\EncryptionManagement Agent.
48 Install Using the Child Installers
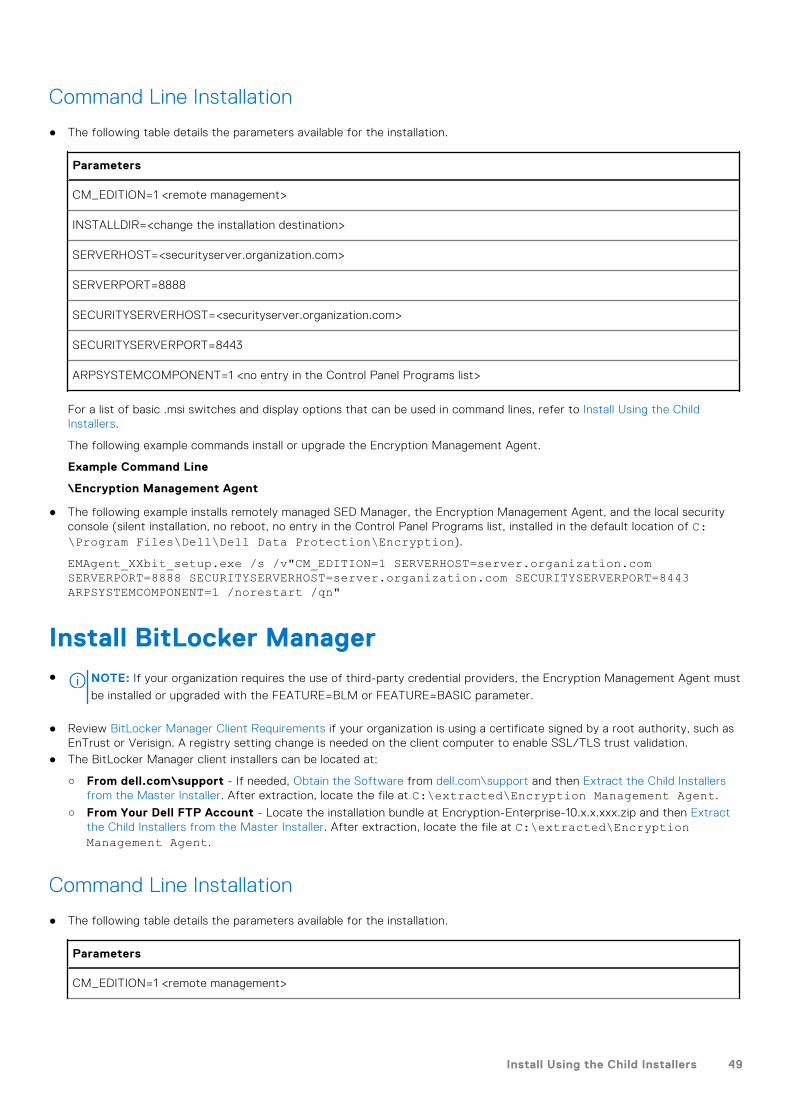
Command Line Installation
● The following table details the parameters available for the installation.
Parameters
CM_EDITION=1 <remote management>
INSTALLDIR=<change the installation destination>
SERVERHOST=<securityserver.organization.com>
SERVERPORT=8888
SECURITYSERVERHOST=<securityserver.organization.com>
SECURITYSERVERPORT=8443
ARPSYSTEMCOMPONENT=1 <no entry in the Control Panel Programs list>
For a list of basic .msi switches and display options that can be used in command lines, refer to Install Using the ChildInstallers.
The following example commands install or upgrade the Encryption Management Agent.
Example Command Line
\Encryption Management Agent
● The following example installs remotely managed SED Manager, the Encryption Management Agent, and the local securityconsole (silent installation, no reboot, no entry in the Control Panel Programs list, installed in the default location of C:\Program Files\Dell\Dell Data Protection\Encryption).
EMAgent_XXbit_setup.exe /s /v"CM_EDITION=1 SERVERHOST=server.organization.comSERVERPORT=8888 SECURITYSERVERHOST=server.organization.com SECURITYSERVERPORT=8443ARPSYSTEMCOMPONENT=1 /norestart /qn"
Install BitLocker Manager● NOTE: If your organization requires the use of third-party credential providers, the Encryption Management Agent must
be installed or upgraded with the FEATURE=BLM or FEATURE=BASIC parameter.
● Review BitLocker Manager Client Requirements if your organization is using a certificate signed by a root authority, such asEnTrust or Verisign. A registry setting change is needed on the client computer to enable SSL/TLS trust validation.
● The BitLocker Manager client installers can be located at:
○ From dell.com\support - If needed, Obtain the Software from dell.com\support and then Extract the Child Installersfrom the Master Installer. After extraction, locate the file at C:\extracted\Encryption Management Agent.
○ From Your Dell FTP Account - Locate the installation bundle at Encryption-Enterprise-10.x.x.xxx.zip and then Extractthe Child Installers from the Master Installer. After extraction, locate the file at C:\extracted\EncryptionManagement Agent.
Command Line Installation
● The following table details the parameters available for the installation.
Parameters
CM_EDITION=1 <remote management>
Install Using the Child Installers 49

Parameters
INSTALLDIR=<change the installation destination>
SERVERHOST=<securityserver.organization.com>
SERVERPORT=8888
SECURITYSERVERHOST=<securityserver.organization.com>
SECURITYSERVERPORT=8443
FEATURE=BLM <install BitLocker Manager only>
FEATURE=BLM,SED <install BitLocker Manager with SED>
ARPSYSTEMCOMPONENT=1 <no entry in the Control Panel Programs list>
For a list of basic .msi switches and display options that can be used in command lines, refer to Install Using the ChildInstallers.
Example Command Line
● The following example installs BitLocker Manager only (silent installation, no reboot, no entry in the Control Panel Programslist, installed in the default location of C:\Program Files\Dell\Dell Data Protection)
EMAgent_XXbit_setup.exe /s /v"CM_EDITION=1 SERVERHOST=server.organization.comSERVERPORT=8888 SECURITYSERVERHOST=server.organization.com SECURITYSERVERPORT=8443FEATURE=BLM /norestart /qn"
● The following example installs BitLocker Manager with SED (silent installation, no reboot, no entry in the Control PanelPrograms list, installed in the default location of C:\Program Files\Dell\Dell Data Protection)
EMAgent_XXbit_setup.exe /s /v"CM_EDITION=1 SERVERHOST=server.organization.comSERVERPORT=8888 SECURITYSERVERHOST=server.organization.com SECURITYSERVERPORT=8443FEATURE=BLM,SED /norestart /qn"
● Example Command Line to Install BitLocker Manager and Dell Encryption
The following example installs BitLocker Manager only (silent installation, no reboot, no entry in the Control Panel Programslist, installed in the default location of C:\Program Files\Dell\Dell Data Protection)
EMAgent_XXbit_setup.exe /s /v"CM_EDITION=1 SERVERHOST=server.organization.comSERVERPORT=8888 SECURITYSERVERHOST=server.organization.com SECURITYSERVERPORT=8443FEATURE=BLM /norestart /qn"Then:
The following example installs the client with default parameters (Encryption client, Encrypt for Sharing, no dialogue,no progress bar, automatic restart, installed in the default location of C:\Program Files\Dell\Dell DataProtection).
DDPE_XXbit_setup.exe /s /v"SERVERHOSTNAME=server.organization.comPOLICYPROXYHOSTNAME=rgk.organization.com MANAGEDDOMAIN=ORGANIZATIONDEVICESERVERURL=https://server.organization.com:8443/xapi/ /qn"
50 Install Using the Child Installers

Uninstall Using the Child Installers● Dell recommends using the Data Security Uninstaller to remove the Data Security suite.● To uninstall each client individually, the child executable files must first be extracted from the master installer, as shown in
Extract the Child Installers from the Master Installer Alternatively, run an administrative installation to extract the .msi.● Ensure that the same versions of client are used for uninstallation as installation.● Command line switches and parameters are case-sensitive.● Be sure to enclose a value that contains one or more special characters, such as a blank space in the command line, in
escaped quotation marks. Command line parameters are case-sensitive.● Use these installers to uninstall the clients using a scripted installation, batch files, or any other push technology available to
your organization.● Log files - Windows creates unique child installer uninstallation log files for the logged in user at %temp%, located at
C:\Users\<UserName>\AppData\Local\Temp.If you decide to add separate a log file when you run the installer, ensure that the log file has a unique name, as childinstaller log files do not append. The standard .msi command can be used be create a log file by using /l C:\<anydirectory>\<any log file name>.log. Dell does not recommend using "/l*v" (verbose logging) in a command lineuninstallation, as the username/password is recorded in the log file.
● All child installers use the same basic .msi switches and display options, except where noted, for command lineuninstallations. The switches must be specified first. The /v switch is required and takes an argument. Other parameters goinside an argument that is passed to the /v switch.
Display options can be specified at the end of the argument passed to the /v switch to achieve the expected behavior. Donot use both /q and /qn in the same command line. Only use ! and - after /qb.
Switch Meaning
/v Pass variables to the .msi inside the setup.exe. The content must always beenclosed in plain-text quotes.
/s Silent mode
/x Uninstall mode
/a Administrative install (copies all files inside the .msi)
NOTE:
With /v, the Microsoft default options are available. For a list of options, see https://msdn.microsoft.com/en-us/
library/windows/desktop/aa367988(v=vs.85).aspx.
Option Meaning
/q No Progress dialog, restarts itself after process completion
/qb Progress dialog with Cancel button, prompts for restart
/qb- Progress dialog with Cancel button, restarts itself after process completion
/qb! Progress dialog without Cancel button, prompts for restart
/qb!- Progress dialog without Cancel button, restarts itself after process completion
/qn No user interface
7
Uninstall Using the Child Installers 51

Uninstall Encryption and Encryption on ServerOperating System● To reduce decryption time, run the Windows Disk Cleanup Wizard to remove temporary files and other unneeded data.● Plan to decrypt overnight, if possible.● Turn off sleep mode to prevent an unattended computer from going to sleep. Decryption cannot occur on a sleeping
computer.● Shut down all processes and applications to minimize decryption failures because of locked files.● Once the uninstall is complete and decryption is in progress, disable all network connectivity. Otherwise, new policies may be
acquired that re-enable encryption.● Follow your existing process for decrypting data, such as issuing a policy update.● Encryption and Encryption External Media update the Dell Server to change the status to Unprotected at the beginning of
a client uninstall process. However, in the event that the client cannot contact the Dell Server, regardless of the reason,the status cannot be updated. In this case, you will need to manually Remove Endpoint in the Management Console. If yourorganization uses this workflow for compliance purposes, Dell recommends that you verify that Unprotected has been set asexpected, either in the Management Console or Managed Reports.
Process
● Before beginning the uninstall process, see (Optional) Create an Encryption Removal Agent Log File. This log file isuseful for troubleshooting an uninstall/decryption operation. If you do not intend to decrypt files during the uninstall process,you do not need to create an Encryption Removal Agent log file.
● The Key Server (and Security Management Server) must be configured prior to uninstallation if using the EncryptionRemoval Agent's Download Keys from Server option. See Configure Key Server for Uninstallation of Encryption ClientActivated Against Security Management Server for instructions. No prior action is needed if the client to uninstall isactivated against a Security Management Server Virtual, as Security Management Server Virtual does not use the KeyServer.
● You must use the Dell Administrative Utility (CMGAd) prior launching the Encryption Removal Agent if using the EncryptionRemoval Agent's Import Keys from a file option. This utility is used to obtain the encryption key bundle. See Use theAdministrative Download Utility (CMGAd) for instructions. The utility can be located in the Dell installation media.
● Run WSScan to ensure that all data is decrypted after uninstallation is complete, but before restarting the computer. SeeUse WSScan for instructions.
● Periodically Check Encryption Removal Agent Status. Data decryption is still in process if the Encryption Removal Agentservice still exists in the services panel.
Command Line Uninstallation
● Once extracted from the master installer, the Encryption installer can be located at C:\extracted\Encryption\DDPE_XXbit_setup.exe.
● The following table details the parameters available for the uninstallation.
Parameter Selection
CMG_DECRYPT Property for selecting the type of Encryption RemovalAgent installation:
3 - Use LSARecovery bundle
2 - Use previously downloaded forensics key material
1 - Download keys from the Dell Server
0 - Do not install Encryption Removal Agent
CMGSILENTMODE Property for silent uninstallation:
1 - Silent - required when running with msiexec variablescontaining /q or /qn
52 Uninstall Using the Child Installers

Parameter Selection
0 - Not Silent - only possible when msiexec variablescontaining /q are not present in the command line syntax
Required Properties
DA_SERVER FQHN for the Security Management Server hosting thenegotiate session.
DA_PORT Port on the Security Management Server for request(default is 8050).
SVCPN User name in UPN format that the Key Server service islogged on as on the Security Management Server.
DA_RUNAS User name in SAM compatible format under whose contextthe key fetch request is made. This user must be in the KeyServer list in the Security Management Server.
DA_RUNASPWD Password for the runas user.
FORENSIC_ADMIN The forensic administrator account on the Dell Server,which can be used for forensic requests for uninstalls orkeys.
FORENSIC_ADMIN_PWD The password for the forensic administrator account.
Optional Properties
SVCLOGONUN User name in UPN format for Encryption Removal Agentservice log on as parameter.
SVCLOGONPWD Password for log on as user.
● The following example silently uninstalls Encryption and downloads the encryption keys from the Security ManagementServer.
DDPE_XXbit_setup.exe /s /x /v"CMG_DECRYPT=1 CMGSILENTMODE=1DA_SERVER=server.organization.com DA_PORT=8050 [email protected]_RUNAS=domain\username DA_RUNASPWD=password /qn"MSI Command:
msiexec.exe /s /x "Dell Data Protection Encryption.msi" /qn REBOOT="ReallySuppress"CMG_DECRYPT="1" CMGSILENTMODE="1" DA_SERVER="server.organization.com" DA_PORT="8050"SVCPN="[email protected]" DA_RUNAS="domain\username" DA_RUNASPWD="password" /qnReboot the computer when finished.
● The following example silently uninstalls Encryption and downloads the encryptions keys using a forensic administratoraccount.
DDPE_XXbit_setup.exe /s /x /v"CMG_DECRYPT=1 [email protected] FORENSIC_ADMIN_PWD=tempchangeit /qn"MSI Command:
msiexec.exe /s /x "Dell Data Protection Encryption.msi" /qnCMG_DECRYPT=1 CMGSILENTMODE=1 [email protected]_ADMIN_PWD=tempchangeit REBOOT=REALLYSUPPRESSReboot the computer when finished.
NOTE:
Dell recommends the following actions when using a forensic administrator password on the command line:
Uninstall Using the Child Installers 53

1. Create a forensic administrator account in the Management Console for the purpose of performing the silent
uninstallation.
2. Use a temporary password for that account that is unique to that account and time period.
3. After the silent uninstallation has been completed, remove the temporary account from the list of administrators or
change its password.
Some older clients may require escape characters of \" around the values of parameters. For example:
DDPE_XXbit_setup.exe /x /v"CMG_DECRYPT=\"1\"CMGSILENTMODE=\"1\" DA_SERVER=\"server.organization.com\" DA_PORT=\"8050\"SVCPN=\"[email protected]\" DA_RUNAS=\"domain\username\"DA_RUNASPWD=\"password\" /qn"
Uninstall Encryption External Media
Once extracted from the master installer, the Encryption installer can be located at C:\extracted\Encryption\DDPE_XXbit_setup.exe.
Command Line Uninstallation
Run a command line similar to the following:
DDPE_XXbit_setup.exe /s /x /v"/qn"Reboot the computer when finished.
Uninstall Full Disk Encryption● Network connection to the Dell Server is required for PBA deactivation.
Process
● Deactivate the PBA, which removes all PBA data from the computer and unlocks the Full Disk Encryption keys.● Uninstall Full Disk Encryption.
Deactivate the PBA
1. As a Dell administrator, log in to the Management Console.2. In the left pane, click Populations > Endpoints.3. Select the appropriate Endpoint Type.4. Select Show >Visible, Hidden, or All.5. If you know the Hostname of the computer, enter it in the Hostname field (wildcards are supported). You may leave the field
blank to display all computers. Click Search.
If you do not know the Hostname, scroll through the list to locate the computer.
A computer or list of computers displays based on your search filter.
6. Select the hostname of the desired computer.7. Click Security Policies on the top menu.8. Select Full Disk Encryption from the Windows Encryption group.9. Change the Full Disk Encryption and policy from On to Off.
10. Click Save.11. In the left pane, click the Commit Policies banner.12. Click Commit Policies.
Wait for the policy to propagate from the Dell Server to the computer targeted for deactivation.
Uninstall Full Disk Encryption and PBA Advanced Authentication after the PBA is deactivated.
54 Uninstall Using the Child Installers
Uninstall Full Disk Encryption Client
Command Line Uninstallation
● Once extracted from the master installer, the Full Disk Encryption can be located at C:\extracted\EncryptionManagement Agent\EMAgent_XXbit_setup.exe.
○ The following example silently uninstalls Full Disk Encryption.
EMAgent_XXbit_setup.exe /x /s /v" /qn"Shut down and restart the computer when finished.
Uninstall SED Manager● Network connection to the Dell Server is required for PBA deactivation.
Process
● Deactivate the PBA, which removes all PBA data from the computer and unlocks the SED keys.● Uninstall SED Manager.
Deactivate the PBA
1. As a Dell administrator, log in to the Management Console.2. In the left pane, click Populations > Endpoints.3. Select the appropriate Endpoint Type.4. Select Show >Visible, Hidden, or All.5. If you know the Hostname of the computer, enter it in the Hostname field (wildcards are supported). You may leave the field
blank to display all computers. Click Search.
If you do not know the Hostname, scroll through the list to locate the computer.
A computer or list of computers displays based on your search filter.
6. Select the hostname of the desired computer.7. Click Security Policies on the top menu.8. Select Self-Encrypting Drives from the Policy Category page.9. Change the Self-Encrypting Drive (SED) and policy from On to Off.
10. Click Save.11. In the left pane, click the Commit Policies banner.12. Click Commit Policies.
Wait for the policy to propagate from the Dell Server to the computer targeted for deactivation.
Uninstall SED Manager and PBA Advanced Authentication after the PBA is deactivated.
Uninstall SED Client
Command Line Uninstallation
● Once extracted from the master installer, the SED Manager installer can be located at C:\extracted\EncryptionManagement Agent\EMAgent_XXbit_setup.exe.
○ The following example silently uninstalls SED Manager.
EMAgent_XXbit_setup.exe /x /s /v" /qn"Shut down and restart the computer when finished.
Uninstall Using the Child Installers 55

Uninstall BitLocker Manager
Command Line Uninstallation
● Once extracted from the master installer, the BitLocker Manager installer can be located at C:\extracted\EncryptionManagement Agent\EMAgent_XXbit_setup.exe.
● The following example silently uninstalls BitLocker Manager.
EMAgent_XXbit_setup.exe /x /s /v" /qn"Reboot the computer when finished.
56 Uninstall Using the Child Installers

Data Security Uninstaller
UninstallDell provides the Data Security Uninstaller as a master uninstaller. This utility gathers the currently installed products andremoves them in the appropriate order.
This Data Security Uninstaller is available in: C:\Program Files (x86)\Dell\Dell Data ProtectionFor more information or to use command line interface (CLI), see KB article 125052.
Logs are generated in C:\ProgramData\Dell\Dell Data Protection\ for all of the components that are removed.
To run the utility, open the containing folder, right-click DataSecurityUninstaller.exe, and select Run as administrator.
Click Next.
8
Data Security Uninstaller 57

Optionally clear any application from removal and click Next.
Required dependencies are automatically selected or cleared.
58 Data Security Uninstaller

To remove applications without installing the Encryption Removal Agent, choose Do not install Encryption Removal Agentand select Next.
Data Security Uninstaller 59

Select Encryption Removal Agent - Download Keys from Server.
Enter the fully qualified credentials of a forensic administrator and select Next.
Select Remove to begin the uninstall.
60 Data Security Uninstaller
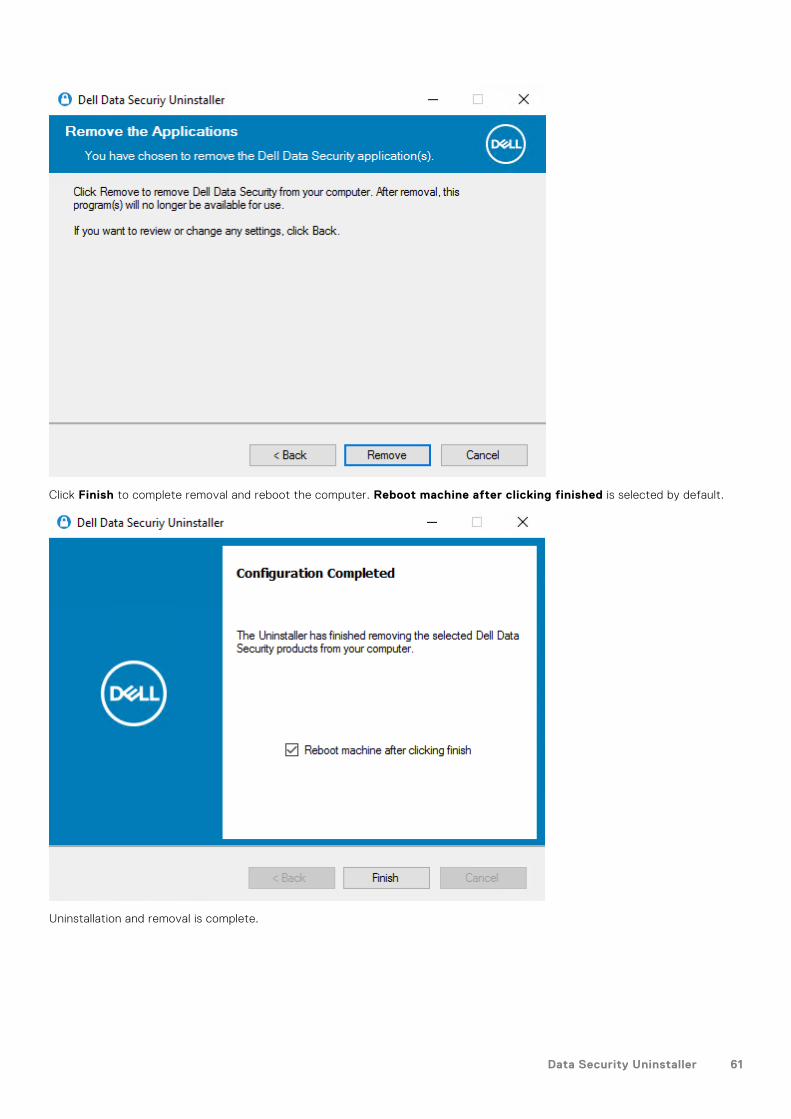
Click Finish to complete removal and reboot the computer. Reboot machine after clicking finished is selected by default.
Uninstallation and removal is complete.
Data Security Uninstaller 61

Commonly Used Scenarios● To install each client individually, the child executable files must first be extracted from the master installer, as shown in
Extract the Child Installers from the Master Installer.● Command line switches and parameters are case-sensitive.● Be sure to enclose a value that contains one or more special characters, such as a blank space in the command line, in
escaped quotation marks.● Use these installers to install the clients using a scripted installation, batch files, or any other push technology available to
your organization.● The reboot has been suppressed in the command line examples. However, an eventual reboot is required. Encryption cannot
begin until the computer has rebooted.● Log files - Windows creates unique child installer installation log files for the logged in user at %temp%, located at C:
\Users\<UserName>\AppData\Local\Temp.If you decide to add separate a log file when you run the installer, ensure that the log file has a unique name, as childinstaller log files do not append. The standard .msi command can be used be create a log file by using /l*v C:\<anydirectory>\<any log file name>.log.
● All child installers use the same basic .msi switches and display options, except where noted, for command line installations.The switches must be specified first. The /v switch is required and takes an argument. Other parameters go inside anargument that is passed to the /v switch.
Display options can be specified at the end of the argument passed to the /v switch to achieve the expected behavior. Donot use both /q and /qn in the same command line. Only use ! and - after /qb.
Switch Meaning
/v Pass variables to the .msi inside the *.exe
/s Silent mode
/i Install mode
Option Meaning
/q No Progress dialog, restarts itself after process completion
/qb Progress dialog with Cancel button, prompts for restart
/qb- Progress dialog with Cancel button, restarts itself after process completion
/qb! Progress dialog without Cancel button, prompts for restart
/qb!- Progress dialog without Cancel button, restarts itself after process completion
/qn No user interface
● Instruct users to see the following document and help files for application assistance:
○ See the Dell Encrypt Help to learn how to use the features of Encryption. Access the help from <Install dir>:\Program Files\Dell\Dell Data Protection\Encryption\Help.
○ See the Encryption External Media Help to learn how the features of Encryption External Media. Access the help from<Install dir>:\Program Files\Dell\Dell Data Protection\Encryption\EMS
○ See the Encryption Enterprise Help to learn how to use the features of. Access the help from <Install dir>:\Program Files\Dell\Dell Data Protection\Authentication \Help.
9
62 Commonly Used Scenarios

Encryption Client● The following example installs SED management and the Encryption Management Agent (silent installation, no reboot, no
entry in the Control Panel Programs list, installed in the default location of C:\Program Files\Dell\Dell DataProtection\Encryption).
EMAgent_XXbit_setup.exe /s /v"CM_EDITION=1 SERVERHOST=server.organization.comSERVERPORT=8888 SECURITYSERVERHOST=server.organization.com SECURITYSERVERPORT=8443ARPSYSTEMCOMPONENT=1 /norestart /qn"Then:
● The following example installs Encryption with default parameters (Encryption and Encrypt for Sharing, nodialogue, no progress bar, no restart, installed in the default location of C:\Program Files\Dell\Dell DataProtection\Encryption).
DDPE_XXbit_setup.exe /s /v"SERVERHOSTNAME=server.organization.comPOLICYPROXYHOSTNAME=rgk.organization.com MANAGEDDOMAIN=ORGANIZATIONDEVICESERVERURL=https://server.organization.com:8443/xapi/ /norestart /qn"Replace DEVICESERVERURL=https://server.organization.com:8081/xapi (without the trailing forward slash) ifyour Security Management Server is pre-v7.7.
SED Manager (including Advanced Authentication)and Encryption Client● The following example installs drivers for Trusted Software Stack (TSS) for the TPM and Microsoft hotfixes at the specified
location, does not create an entry in the Control Panel Programs list, and suppresses the reboot.
These drivers must be installed when installing the Encryption client.
setup.exe /S /z"\"InstallPath=<c:\location>, ARPSYSTEMCOMPONENT=1, SUPPRESSREBOOT=1\""Then:
● The following example installs remotely managed SED Manager (silent installation, no reboot, no entry in the Control PanelPrograms list, installed in the default location of C:\Program Files\Dell\Dell Data Protection).
EMAgent_XXbit_setup.exe /s /v"CM_EDITION=1 SERVERHOST=server.organization.comSERVERPORT=8888 SECURITYSERVERHOST=server.organization.com SECURITYSERVERPORT=8443ARPSYSTEMCOMPONENT=1 /norestart /qn"Then:
● The following example installs Advanced Authentication (silent installation, no reboot, installed in the default location ofC:\Program Files\Dell\Dell Data Protection\Authentication).
setup.exe /s /v"/norestart /qn ARPSYSTEMCOMPONENT=1"Then:
● The following example installs the client with default parameters (Encryption client and Encrypt for Sharing, no dialogue, noprogress bar, no restart, installed in the default location of C:\Program Files\Dell\Dell Data Protection).
DDPE_XXbit_setup.exe /s /v"SERVERHOSTNAME=server.organization.comPOLICYPROXYHOSTNAME=rgk.organization.com MANAGEDDOMAIN=ORGANIZATIONDEVICESERVERURL=https://server.organization.com:8443/xapi/ /norestart /qn"Replace DEVICESERVERURL=https://server.organization.com:8081/xapi (without the trailing forward slash) ifyour Security Management Server is pre-v7.7.
Commonly Used Scenarios 63

SED Manager and Encryption External Media● The following example installs SED Manager, the Encryption Management Agent, and the local security console (silent
installation, no reboot, no entry in the Control Panel Programs list, installed in the default location of C:\ProgramFiles\Dell\Dell Data Protection\Encryption).
EMAgent_XXbit_setup.exe /s /v"CM_EDITION=1 SERVERHOST=server.organization.comSERVERPORT=8888 SECURITYSERVERHOST=server.organization.com SECURITYSERVERPORT=8443ARPSYSTEMCOMPONENT=1 /norestart /qn"Then:
● The following example installs Encryption External Media only (silent installation, no reboot, installed in the default location ofC:\Program Files\Dell\Dell Data Protection).
DDPE_XXbit_setup.exe /s /v"EME=1SERVERHOSTNAME=server.organization.com POLICYPROXYHOSTNAME=rgk.organization.comDEVICESERVERURL=https://server.organization.com:8443/xapi/ MANAGEDDOMAIN=ORGANIZATION /norestart /qn"Replace DEVICESERVERURL=https://server.organization.com:8081/xapi (without the trailing forward slash) ifyour Security Management Server is pre-v7.7.
BitLocker Manager and Encryption External Media● BitLocker Manager and Encryption External Media interact based on encryption sequence. If a BitLocker Manager encrypted
drive is inserted to a computer with Encryption External Media, the BitLocker Manager password must be entered beforeEncryption External Media can read and encrypt the drive.
● If Encryption External Media is active on a drive, BitLocker Manager encryption can be applied to the same drive.● The following example installs BitLocker Manager (silent installation, no reboot, no entry in the Control Panel Programs list,
installed in the default location of C:\Program Files\Dell\Dell Data Protection).
EMAgent_XXbit_setup.exe /s /v"CM_EDITION=1 SERVERHOST=server.organization.comSERVERPORT=8888 SECURITYSERVERHOST=server.organization.com SECURITYSERVERPORT=8443FEATURE=BLM /norestart /qn"Then:
● The following example installs Encryption External Media only (silent installation, no reboot, installed in the default location ofC:\Program Files\Dell\Dell Data Protection).
DDPE_XXbit_setup.exe /s /v"EME=1SERVERHOSTNAME=server.organization.com POLICYPROXYHOSTNAME=rgk.organization.comDEVICESERVERURL=https://server.organization.com:8443/xapi/ MANAGEDDOMAIN=ORGANIZATION /norestart /qn"
Replace DEVICESERVERURL=https://server.organization.com:8081/xapi (without the trailing forward slash) ifyour Security Management Server is pre-v7.7.
64 Commonly Used Scenarios

Download the SoftwareThis section details obtaining the software from dell.com/support. If you already have the software, you can skip this section.
Go to dell.com/support to begin.
1. On the Dell Support webpage, select Browse all products.
2. Select Security from the list of products.
3. Select Dell Data Security.
After this selection has been made once, the website remembers.
10
Download the Software 65

4. Select the Dell product.
Examples:
Dell Encryption Enterprise
Dell Endpoint Security Suite Enterprise
5. Select Drivers & downloads.
6. Select the desired client operating system type.
7. Select Dell Encryption in the matches. This is only an example, so it will likely look slightly different. For example, there maynot be four files to choose from.
8. Select Download .
66 Download the Software
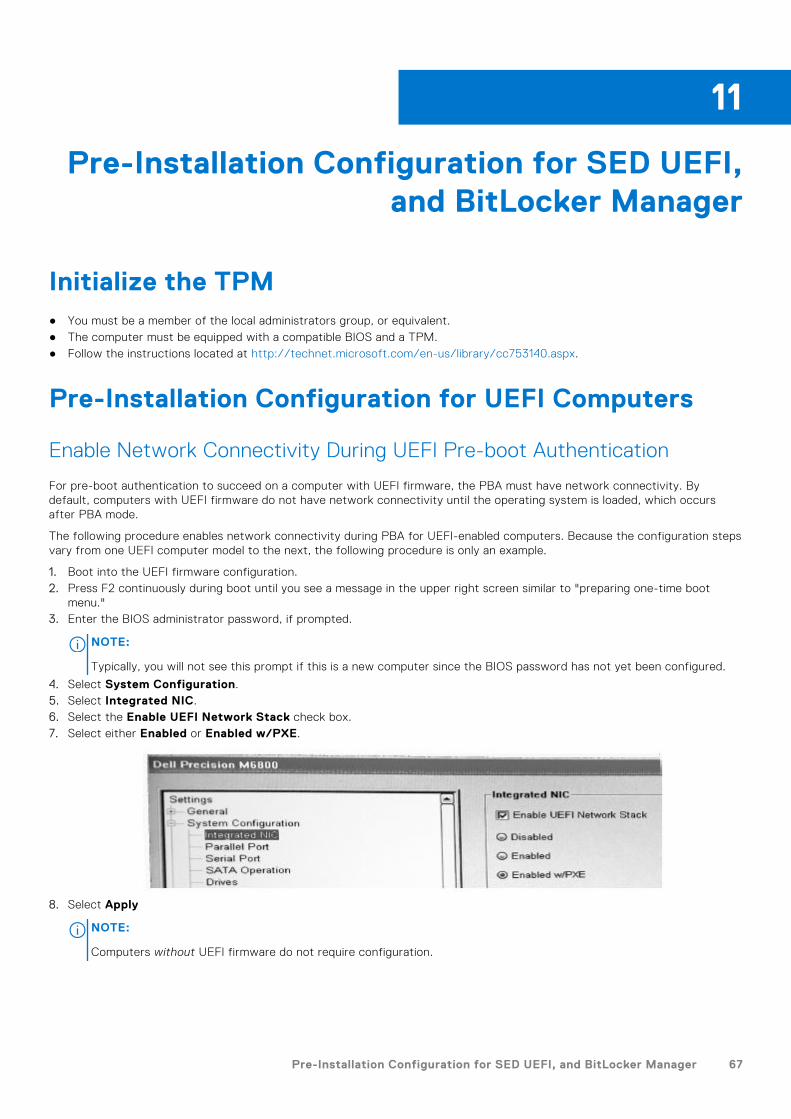
Pre-Installation Configuration for SED UEFI,and BitLocker Manager
Initialize the TPM● You must be a member of the local administrators group, or equivalent.● The computer must be equipped with a compatible BIOS and a TPM.● Follow the instructions located at http://technet.microsoft.com/en-us/library/cc753140.aspx.
Pre-Installation Configuration for UEFI Computers
Enable Network Connectivity During UEFI Pre-boot Authentication
For pre-boot authentication to succeed on a computer with UEFI firmware, the PBA must have network connectivity. Bydefault, computers with UEFI firmware do not have network connectivity until the operating system is loaded, which occursafter PBA mode.
The following procedure enables network connectivity during PBA for UEFI-enabled computers. Because the configuration stepsvary from one UEFI computer model to the next, the following procedure is only an example.
1. Boot into the UEFI firmware configuration.2. Press F2 continuously during boot until you see a message in the upper right screen similar to "preparing one-time boot
menu."3. Enter the BIOS administrator password, if prompted.
NOTE:
Typically, you will not see this prompt if this is a new computer since the BIOS password has not yet been configured.
4. Select System Configuration.5. Select Integrated NIC.6. Select the Enable UEFI Network Stack check box.7. Select either Enabled or Enabled w/PXE.
8. Select Apply
NOTE:
Computers without UEFI firmware do not require configuration.
11
Pre-Installation Configuration for SED UEFI, and BitLocker Manager 67

Disable Legacy Option ROMs
Ensure that the Enable Legacy Option ROMs setting is disabled in the BIOS.
1. Restart the computer.2. As it is restarting, press F12 repeatedly to bring up the UEFI computer's boot settings.3. Press the down arrow, highlight the BIOS Settings option, and press Enter.4. Select Settings > General > Advanced Boot Options.5. Clear the Enable Legacy Option ROMs check box and click Apply.
Pre-Installation Configuration to Set Up a BitLockerPBA Partition● You must create the PBA partition before installing BitLocker Manager.● Turn on and activate the TPM before installing BitLocker Manager. BitLocker Manager takes ownership of the TPM (a
reboot is not required). However, if the TPM's ownership already exists, BitLocker Manager begins the encryption setupprocess. The point is that the TPM must be owned and enabled.
● You may need to partition the disk manually. See Microsoft's description of the BitLocker Drive Preparation Tool for furtherinformation.
● Use the BdeHdCfg.exe command to create the PBA partition. The default parameter indicates that the command line toolfollows the same process as the BitLocker Setup Wizard.
BdeHdCfg -target defaultNOTE:
For more options available for the BdeHdCfg command, see Microsoft's BdeHdCfg.exe Parameter Reference.
68 Pre-Installation Configuration for SED UEFI, and BitLocker Manager

Designate the Dell Server through Registry● If your clients are entitled through Dell Digital Delivery, follow these instructions to set a registry through Group Policy
Objects to preset the Dell Server to use after installation.● The workstation must be a member of the OU where the Group Policy Objects is applied or the registry settings must be
manually set on the endpoint.
● Ensure that outbound port 443 is available to communicate from the Dell Server to cloud.dell.com. If port 443 is blocked (forany reason), acquiring the entitlement fails and an entitlement is consumed from the available pool.
NOTE: If you do not set this registry value when attempting to install through Dell Digital Delivery or do not specifying a
SERVER in the Master Installer, the activation URL defaults to 199.199.199.199.
Manually Set the Registry Key
For endpoints that not domain-joined or setting a Group Policy Object is not possible, pre-set a registry key to activate against aspecific Dell Server during installation.
1. In the search box on the taskbar, type regedit then right-click and select Run as administrator.2. Navigate to and create the following registry key:
HKEY_LOCAL_MACHINE\SOFTWARE\Dell\Dell Data Protection
REG_SZ: Server
Value: <FQDN or IP address of the Dell Server>
3. Install Encryption through Dell Digital Delivery or the Master Installer.
Create the Group Policy Object
1. On the Domain Controller to manage the clients, click Start > Administrative Tools > Group Policy Management.2. Right-click the OU where the policy should be applied and select Create a GPO in this domain, and Link it here.3. Enter a name for the new GPO, select (none) for Source Starter GPO, and click OK.
4. Right-click the GPO that was created and select Edit.
12
Designate the Dell Server through Registry 69

5. The Group Policy Management Editor loads. Access Computer Configuration > Preferences > Windows Settings >Registry.
6. Right-click the Registry and select New > Registry Item. Complete the following.
Action: Create
Hive: HKEY_LOCAL_MACHINE
Key Path: SOFTWARE\Dell\Dell Data Protection
Value name: Server
Value type: REG_SZ
Value data: <FQDN or IP address of the Dell Server>
7. Click OK.
70 Designate the Dell Server through Registry

8. Log out and then back into the workstation, or run gpupdate /force to apply the group policy.
Designate the Dell Server through Registry 71

Extract Child Installers● To install each client individually, extract the child executable files from the installer.● The master installer is not a master uninstaller. Each client must be uninstalled individually, followed by uninstallation of the
master installer. Use this process to extract the clients from the master installer so that they can be used for uninstallation.1. From the Dell installation media, copy the DDSSetup.exe file to the local computer.2. Open a command prompt in the same location as the DDSSetup.exe file and enter:
DDSSetup.exe /s /z"\"EXTRACT_INSTALLERS=C:\Extracted""The extraction path cannot exceed 63 characters.
Before you begin installation, ensure that all prerequisites have been met and all required software has been installed foreach child installer that you plan to install. Refer to Requirements for details.
The extracted child installers are located at C:\extracted\.
13
72 Extract Child Installers

Configure Key Server● This section explains how to configure components for use with Kerberos Authentication/Authorization when using an
Security Management Server. The Security Management Server Virtual does not use the Key Server.
The Key Server is a service that listens for clients to connect on a socket. Once a client connects, a secure connection isnegotiated, authenticated, and encrypted using Kerberos APIs (if a secure connection cannot be negotiated, the client isdisconnected).
The Key Server then checks with the Security Server (formerly the Device Server) to see if the user running the client isallowed to access keys. This access is granted via individual domains in the Management Console.
● If Kerberos Authentication/Authorization is to be used, then the server that contains the Key Server component needs to bepart of the affected domain.
● Because the Security Management Server Virtual does not use the Key Server, typical uninstallation is affected. Whenan Encryption client that is activated against a Security Management Server Virtual is uninstalled, standard forensickey retrieval through the Security Server is used, instead of the Key Server's Kerberos method. See Command LineUninstallation for more information.
Services Panel - Add Domain Account User1. On the Security Management Server, navigate to the services panel (Start > Run > services.msc > OK).2. Right-click Key Server and select Properties.
3. Select the Log On tab and select the This account: option.
In This account:, add the domain account user. This domain user must have at least local administrator rights to the KeyServer folder (must be able to write to the Key Server config file, as well as the ability to write to the log.txt file).
Enter and confirm the password for the domain user.
Click OK.
14
Configure Key Server 73

4. Restart the Key Server service (leave the services panel open for further operation).5. Navigate to <Key Server install dir> log.txt to verify that the service started properly.
Key Server Config File - Add User for SecurityManagement Server Communication1. Navigate to <Key Server install dir>.2. Open Credant.KeyServer.exe.config with a text editor.
3. Go to <add key="user" value="superadmin" /> and change the "superadmin" value to the name of the appropriate user (youmay also leave as "superadmin").
The "superadmin" format can be any method that can authenticate to the Security Management Server. The SAM accountname, UPN, or DOMAIN\Username is acceptable. Any method that can authenticate to the Security Management Server isacceptable because validation is required for that user account for authorization against Active Directory.
For example, in a multi-domain environment, only entering a SAM account name such as "jdoe" will likely fail because theSecurity Management Server cannot authenticate "jdoe" because it cannot find "jdoe". In a multi-domain environment, theUPN is recommended, although the DOMAIN\Username format is acceptable. In a single domain environment, the SAMaccount name is acceptable.
4. Go to <add key="epw" value="<encrypted value of the password>" /> and change "epw" to "password". Then change"<encrypted value of the password>" to the password of the user from Step 3. This password is re-encrypted when theSecurity Management Server restarts.
If using "superadmin" in Step 3, and the superadmin password is not "changeit", it must be changed here. Save and close thefile.
74 Configure Key Server

Sample Configuration File
<?xml version="1.0" encoding="utf-8" ?>
<configuration>
<appSettings>
<add key="port" value="8050" /> [TCP port the Key Server will listen to. Default is 8050.]
<add key="maxConnections" value="2000" /> [number of active socket connections the Key Server will allow]
<add key="url" value="https://keyserver.domain.com:8443/xapi/" /> [Security Server (formerly Device Server) URL (theformat is 8081/xapi for a pre-v7.7 Security Management Server)]
<add key="verifyCertificate" value="false" /> [true verifies certs/set to false to not verify or if using self-signed certs]
<add key="user" value="superadmin" /> [User name used to communicate with the Security Server. This user must have theadministrator role selected in the Management Console. The "superadmin" format can be any method that can authenticateto the Security Management Server. The SAM account name, UPN, or DOMAIN\Username is acceptable. Any method thatcan authenticate to the Security Management Server is acceptable because validation is required for that user account forauthorization against Active Directory. For example, in a multi-domain environment, only entering a SAM account name suchas "jdoe" will likely fail because the Security Management Server cannot authenticate "jdoe" because it cannot find "jdoe". In amulti-domain environment, the UPN is recommended, although the DOMAIN\Username format is acceptable. In a single domainenvironment, the SAM account name is acceptable.]
<add key="cacheExpiration" value="30" /> [How often (in seconds) the Service should check to see who is allowed toask for keys. The Service keeps a cache and keeps track of how old it is. Once the cache is older than the value, it gets a newlist. When a user connects, the Key Server needs to download authorized users from the Security Server. If there is no cacheof these users, or the list has not been downloaded in the last "x" seconds, it is downloaded again. There is no polling, but thisvalue configures how stale the list can become before it is refreshed when it is needed.]
<add key="epw" value="encrypted value of the password" /> [Password used to communicate with the SecurityManagement Server. If the superadmin password has been changed, it must be changed here.]
</appSettings>
</configuration>
Services Panel - Restart Key Server Service1. Go back to the services panel (Start > Run > services.msc > OK).
2. Restart the Key Server service.
3. Navigate to <Key Server install dir> log.txt to verify that the service started properly.
4. Close the services panel.
Management Console - Add Forensic Administrator1. As a Dell administrator, log in to the Management Console.
2. Click Populations > Domains.
3. Select the appropriate Domain.
4. Click the Key Server tab.
5. In Account, add the user to perform the administrator activities. The format is DOMAIN\Username. Click Add Account.
Configure Key Server 75

6. Click Users in the left menu. In the search box, search for the user name added in Step 5. Click Search.
7. Once the correct user is located, click the Admin tab.
8. Select Forensic Administrator and click Update.
The components are now configured for Kerberos Authentication/Authorization.
76 Configure Key Server

Use the Administrative Download Utility(CMGAd)
● This utility allows the download of a key material bundle for use on a computer that is not connected to a Dell Server.● This utility uses one of the following methods to download a key material bundle, depending on the command line parameter
passed to the application:
○ Forensic Mode - Used if -f is passed on the command line or if no command line parameter is used.○ Admin Mode - Used if -a is passed on the command line.
Log files can be located at C:\ProgramData\CmgAdmin.log
Use Forensic Mode1. Double-click cmgad.exe to launch the utility or open a command prompt where CMGAd is located and type cmgad.exe
-f (or cmgad.exe).
2. Enter the following information (some fields may be pre-populated).
Device Server URL: Fully qualified Security Server (Device Server) URL. The format is https://securityserver.domain.com:8443/xapi/. If your Dell Server is pre-v7.7, the format is https://deviceserver.domain.com:8081/xapi (different port number, without the trailing slash).
Dell Admin: Name of the administrator with forensic administrator credentials, such as jdoe (Enabled in the ManagementConsole)
Password: Forensic administrator password
MCID: Machine ID, such as machineID.domain.com
DCID: First eight digits of the 16-digit Shield ID
NOTE:
Specifying either the MCID or DCID is usually sufficient. However, if both are known, it is helpful to enter both. Each
parameter contains different information used by this utility.
Click Next.
15
Use the Administrative Download Utility (CMGAd) 77

3. In Passphrase:, enter a passphrase to protect the download file. The passphrase must be at least eight characters long, andcontain at least one alphabetic and one numeric character. Confirm the passphrase.
Either accept the default name and location of where the file will be saved or click ... to select another location.
Click Next.
A message displays, indicating that the key material was successfully unlocked. Files are now accessible.
4. Click Finish when complete.
Use Admin ModeThe Security Management Server Virtual does not use the Key Server, so Admin mode cannot be used to obtain a key bundlefrom a Security Management Server Virtual. Use Forensic mode to obtain the key bundle if the client is activated against aSecurity Management Server Virtual.
78 Use the Administrative Download Utility (CMGAd)

1. Open a command prompt where CMGAd is located and type cmgad.exe -a.
2. Enter the following information (some fields may be pre-populated).
Server: Fully qualified hostname of the Key Server, such as keyserver.domain.com
Port Number: The default port is 8050
Server Account: The domain user the Key Server is running as. The format is DOMAIN\Username. The domain user runningthe utility must be authorized to perform the download from the Key Server
MCID: Machine ID, such as machineID.domain.com
DCID: First eight digits of the 16-digit Shield ID
NOTE:
Specifying either the MCID or DCID is usually sufficient. However, if both are known, it is helpful to enter both. Each
parameter contains different information used by this utility.
Click Next.
3. In Passphrase:, type a passphrase to protect the download file. The passphrase must be at least eight characters long, andcontain at least one alphabetic and one numeric character.
Confirm the passphrase.
Either accept the default name and location of where the file will be saved or click ... to select another location.
Click Next.
Use the Administrative Download Utility (CMGAd) 79

A message displays, indicating that the key material was successfully unlocked. Files are now accessible.
4. Click Finish when complete.
80 Use the Administrative Download Utility (CMGAd)

Configure Encryption on a Server OperatingSystem
Enable Encryption on a Server Operating SystemNOTE:
Encryption of server operating systems converts User encryption to Common encryption.
1. As a Dell administrator, log in to the Management Console.2. Select Endpoint Group (or Endpoint), search for the endpoint or endpoint group to enable, select Security Policies, and
then select the Server Encryption policy category.3. Set the following policies:
● Server Encryption - Select to enable Encryption on a server operating system and related policies.● SDE Encryption Enabled - Select to turn on SDE encryption.● Encryption Enabled - Select to turn on Common encryption.● Secure Windows Credentials - This policy is Selected by default.
When the Secure Windows Credentials policy is Selected (the default), all files in the \Windows\system32\config filesfolder are encrypted, including Windows credentials. To prevent Windows credentials from being encrypted, set theSecure Windows Credentials policy to Not Selected. Encryption of Windows credentials occurs independently of theSDE Encryption Enabled policy setting.
4. Save and commit the policies.
Customize Activation Logon DialogThe Activation Logon dialog displays:
● When an unmanaged user logs on.● When the user selects Activate Dell Encryption from the Encryption icon's menu, located in the notification area.
Set Encryption External Media PoliciesThe original encrypting computer is the computer that originally encrypts a removable device. When the original computer isa protected server - a server with Encryption on a server operating system installed and activated - and the protected serverfirst detects the presence of a removable device, the user is prompted to encrypt the removable device.
16
Configure Encryption on a Server Operating System 81

● Encryption External Media policies control removable media access to the server, authentication, encryption, and more.● Port Control policies affect removable media on protected servers, for example, by controlling access and usage of the
server's USB ports by USB devices.
The policies for removable media encryption can be found in the Management Console in the Server Encryption technologygroup.
Encryption on a Server Operating System and External Media
When the protected server's EMS Encrypt External Media policy is Selected, external media is encrypted. Encryption links thedevice to the protected server with the Machine key and to the user, with the User Roaming key of the removable device'sowner/user. All files added to the removable device are then encrypted with those same keys, regardless of the computer it isconnected to.
NOTE:
Encryption on a server operating system converts User encryption to Common encryption, except on removable devices.
On removable devices, encryption is performed with the User Roaming key associated with the computer.
When the user does not agree to encrypt a removable device, the user's access to the device can be set to blocked when usedon the protected server, Read only while used on the protected server, or Full access. The protected server's policies determinethe level of access on an unprotected removable device.
Policy updates occur when the removable device is re-inserted into the original protected server.
Authentication and External Media
The protected server's policies determine authentication functionality.
After a removable device has been encrypted, only its owner/user can access the removable device on the protected server.Other users cannot access the encrypted files on the removable media.
Local automatic authentication allows the protected removable media to be automatically authenticated when inserted in theprotected server when the owner of that media is logged in. When automatic authentication is disabled, the owner/user mustauthenticate to access the protected removable device.
When a removable device's original encrypting computer is a protected server, the owner/user must always log in to theremovable device when using it in computers that are not the original encrypting computer, regardless of the EncryptionExternal Media policy settings defined on the other computers.
Refer to AdminHelp for information on Server Encryption Port Control and Encryption External Media policies.
Suspend an Encryption on a Server Operating SystemSuspending an encrypted server prevents access to its encrypted data after a restart. The virtual server user cannot besuspended. Instead, the encrypted server's Machine key is suspended.
NOTE:
Suspending the server endpoint does not immediately suspend the server. The suspension takes place the next time the key
is requested, typically the next time the server is restarted.
NOTE:
Use with care. Suspending an encrypted server could result in instability, depending on policy settings and whether the
protected server is suspended while disconnected from the network.
Prerequisites
● Help desk administrator rights, assigned in the Management Console, are required to suspend an endpoint.● The administrator must be logged in to the Management Console.
In the left pane of the Management Console, click Populations > Endpoints.
Search or select a hostname, then click the Details & Actions tab.
Under Server Device Control, click Suspend then Yes.
82 Configure Encryption on a Server Operating System

NOTE:
Click Reinstate to allow Encryption of server operating systems to access encrypted data on the server after it
restarts.
Configure Encryption on a Server Operating System 83

Configure Deferred ActivationThe Encryption client with Deferred Activation differs from the Encryption client activation in two ways:
Device-based Encryption policies
The Encryption client policies are user-based; the Encryption client with Deferred Activation's encryption policies are device-based. User encryption is converted to Common encryption. This difference allows the user to bring a personal device to usewithin the organization's domain, while the organization maintains its security by centrally managing encryption policies.
Activation
With the Encryption client, activation is automatic. When with Deferred Activation is installed, automatic activation is disabled.Instead, the user chooses whether to activate encryption, and when to activate it.
NOTE:
Before a user permanently leaves the organization and while his email address is still active, the user must run the
Encryption Removal Agent and uninstall the Encryption client from his personal computer.
Deferred Activation CustomizationThese client-side tasks allow Deferred Activation customization.
● Add a disclaimer to the Activation Logon dialog box● Disable automatic re-activation (optional)
Add a disclaimer to the Activation Logon dialog box
The Activation Logon dialog displays at these times:
● When an unmanaged user logs on.● When the user selects Activate Dell Encryption from the Encryption icon's menu, located in the notification area.
Prepare the Computer for InstallationIf the data is encrypted with a non-Dell encryption product, before installing the Encryption client, decrypt data using theexisting encryption software, and then uninstall the existing encryption software. If the computer does not restart automatically,restart the computer.
Create a Windows Password
Dell highly recommends that a Windows password be created (if one does not already exist) to protect access to the encrypteddata. Creating a password for the computer prevents others from logging on to your user account without your password.
17
84 Configure Deferred Activation

Uninstall Previous Versions of the Encryption Client
Before uninstalling a previous version of the Encryption client, stop or pause an encryption sweep, if necessary.
If the computer is running a version of Dell Encryption earlier than v8.6, uninstall the Encryption client from the command line.For instructions, see Uninstall Encryption and Server Encryption Client.
NOTE:
If you plan to install the latest version of the Encryption client immediately after uninstallation, it is not necessary to run the
Encryption Removal Agent to decrypt the files.
To upgrade a previous version of the Encryption client installed with Deferred Activation, uninstall with the Data Security
Uninstaller or the Child Installers. These uninstallation methods are possible even if OPTIN is disabled.
NOTE:
If no users were previously activated, the Encryption client clears the OPTIN setting from the SDE vault since the setting is
left-over from a previous installation. The Encryption client blocks Deferred Activations if users previously activated but the
OPTIN flag is not set in the SDE vault.
Install Encryption with Deferred ActivationTo install the Encryption client with Deferred Activation, install the Encryption client with the OPTIN=1 parameter. For moreinformation about client installation with the OPTIN=1 parameter, see Install Encryption.
Activate Encryption with Deferred Activation● Activation associates a domain user with a local user account and a specific computer.● Multiple users can activate on the same computer, provided they use unique local accounts and have unique domain email
addresses.
● A user can activate the Encryption client only once per domain account.
Before you activate the Encryption client:
● Log in to the local account that you use the most often. The data associated with this account is the data to encrypt.● Connect to your organization's network.1. Log on to the workstation or server.2. Enter the domain email address and password and click Activate.
NOTE:
Non-domain or personal email addresses cannot be used for activation.
3. Click Close.
Configure Deferred Activation 85

The Dell Server combines the encryption key bundle with the user's credentials and with the computer's unique ID (machineID), creating an unbreakable relationship between the key bundle, the specific computer, and the user.
4. Restart the computer to begin the encryption sweep.
NOTE:
The local Management Console, accessible from the notification area icon, shows the policies sent by the server, not the
effective policy.
Troubleshoot Deferred Activation
Troubleshoot Activation
Problem: Cannot access certain files and folders
Inability to access certain files and folders is a symptom of being logged in with a different account than the one under whichthe user activated.
The Activation Logon dialog automatically displays even though the user has previously activated.
Possible Solution
Log out and log back in with the credentials of the activated account and try to access the files again.
In the rare event that the Encryption client cannot authenticate the user, the Activation Logon dialog prompts the user forcredentials to authenticate and access encryption keys. To use the automatic re-activation feature, the AutoReactivation andAutoPromptForActivation registry keys must BOTH be enabled. Although the feature is enabled by default, it can be manuallydisabled. For more information, see Disable Automatic Re-activation.
Error Message: Server Authentication Failed
The server was not able to authenticate the email address and password.
Possible Solutions
● Use the email address associated with the organization. Personal email addresses cannot be used for activation.● Re-enter the email address and password and ensure there are no typographical errors.● Ask the administrator to verify that the email account is active and is not locked.● Ask the administrator to reset the user's domain password.
Error Message: Network connection error
The Encryption client could not communicate with the Dell Server.
Possible Solutions
● Connect directly to the organization's network and try to activate again.● If VPN access is required to connect to the network, check the VPN connection and try again.● Check the Dell Server URL to ensure it matches the URL provided by the administrator.
86 Configure Deferred Activation
The URL and other data that the user entered into the installer are stored in the registry. Check theaccuracy of the data under [HKLM\SOFTWARE\Microsoft\Windows NT\CurrentVersion\Winlogon\CMGShield] and[HKLM\SOFTWARE\Microsoft\Windows NT\CurrentVersion\Winlogon\CMGShield\Servlet]
● Disconnect and reconnect:
Disconnect the computer from the network.
Reconnect to the network.
Restart the computer.
Try to connect to the network again.
Error Message: Legacy Server Not Supported
Encryption cannot be activated against a legacy server; the Dell Server must be v9.1 or higher.
Possible Solution
● Check the Dell Server URL to ensure it matches the URL provided by the administrator.
The URL and other data that the user entered into the installer are stored in the registry.
● Check the accuracy of the data under [HKLM\Software\Microsoft\Windows NT\CurrentVersion\Winlogon\CMGShield]and [HKLM\Software\Microsoft\Windows NT\CurrentVersion\Winlogon\CMGShield\Servlet]
Error Message: Domain User Already Activated
A second user has logged on to the local computer and tried to activate against a domain account that has already beenactivated.
A user can activate the Encryption client only once per domain account.
Possible Solution
Decrypt and uninstall the Encryption client while logged in as the second activated user.
Error Message: Server Error General
An error has occurred on the server.
Possible Solution
The administrator should check the Server logs to ensure services are running.
The user should try to activate later.
Tools
CMGAd
Use the CMGAd utility prior to launching the Encryption Removal Agent to obtain the encryption key bundle. The CMGAd utilityand its instructions are located in the Dell installation media (Dell-Offline-Admin-XXbit)
Log Files
In C:\ProgramData\Dell\Dell Data Protection\Encryption, look for the log file called CmgSysTray.
Search for the phrase "Manual activation result".
The error code is on the same line, followed by " status = "; the status indicates what went wrong.
Configure Deferred Activation 87

Troubleshooting
All Clients - Troubleshooting● Master Suite installer log files are located at C:\ProgramData\Dell\Dell Data Protection\Installer.● Windows creates unique child installer installation log files for the logged in user at %temp%, located at C:
\Users\<UserName>\AppData\Local\Temp.● Windows creates log files for client prerequisites, such as Visual C++, for the logged in
user at %temp%, located at C:\Users\<UserName>\AppData\Local\Temp. For example, C:\Users\<UserName>\AppData\Local\Temp\dd_vcredist_amd64_20160109003943.log
● Follow the instructions at http://msdn.microsoft.com to verify the version of Microsoft .Net that is installed on thecomputer targeted for installation.
Go to https://www.microsoft.com/en-us/download/details.aspx?id=30653to download the full version of Microsoft .NetFramework 4.5.2 or later.
● See this document if the computer targeted for installation has (or has had in the past) Dell Access installed. Dell Access isnot compatible with this suite of products.
All Clients - Protection StatusA new method for deriving a device's protected status has been implemented in the Dell Server v9.8.2. Previously, the EndpointProtected Status area in the Management Console's dashboard would only denote the state of Encryption per device.
As of Dell Server v9.8.2, Protected status is now denoted if any of the following criteria have been met:● Advanced Threat Prevention is installed and enabled.● Web Protection or Client Firewall is installed and either Web Protection or Client Firewall's policy is enabled.● Self-Encrypting Drive Manager is installed, enabled, and the PBA is enabled.● Full Disk Encryption is installed, enabled, and the PBA is enabled.● BitLocker Manager is installed, enabled, and encryption has completed. ● Dell Encryption (Mac) is installed and enabled, and Encrypt Using FileVault for Mac has been enforced.● Dell Encryption (Windows) is installed, enabled, Policy-Based Encryption has been set for the endpoint, and device sweeps
are completed.
Dell Encryption Troubleshooting (client and server)
Activation on a Server Operating System
When Encryption is installed on a server operating system, activation requires two phases of activation: initial activation anddevice activation.
Troubleshooting Initial Activation
Initial activation fails when:
● A valid UPN cannot be constructed using the supplied credentials.● The credentials are not found in the enterprise vault.● The credentials used to activate are not domain administrator's credentials.
Error Message: Unknown user name or bad password
The user name or password does not match.
18
88 Troubleshooting
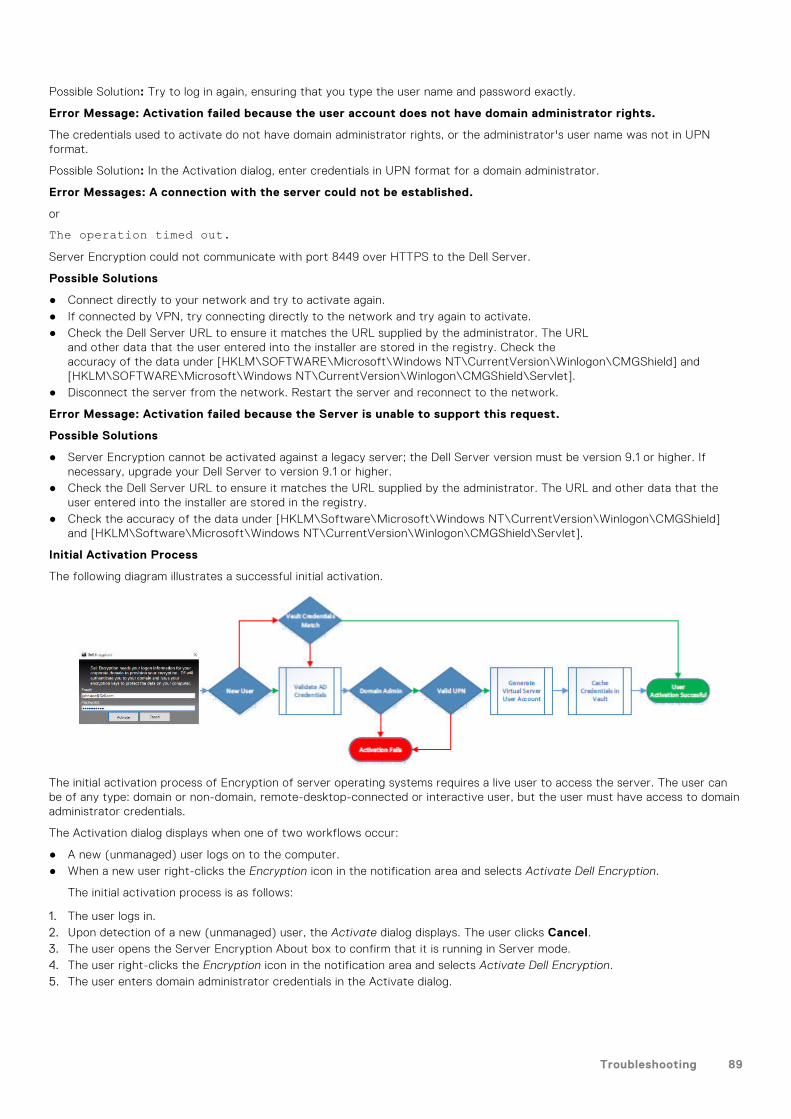
Possible Solution: Try to log in again, ensuring that you type the user name and password exactly.
Error Message: Activation failed because the user account does not have domain administrator rights.
The credentials used to activate do not have domain administrator rights, or the administrator's user name was not in UPNformat.
Possible Solution: In the Activation dialog, enter credentials in UPN format for a domain administrator.
Error Messages: A connection with the server could not be established.
or
The operation timed out.Server Encryption could not communicate with port 8449 over HTTPS to the Dell Server.
Possible Solutions
● Connect directly to your network and try to activate again.● If connected by VPN, try connecting directly to the network and try again to activate.● Check the Dell Server URL to ensure it matches the URL supplied by the administrator. The URL
and other data that the user entered into the installer are stored in the registry. Check theaccuracy of the data under [HKLM\SOFTWARE\Microsoft\Windows NT\CurrentVersion\Winlogon\CMGShield] and[HKLM\SOFTWARE\Microsoft\Windows NT\CurrentVersion\Winlogon\CMGShield\Servlet].
● Disconnect the server from the network. Restart the server and reconnect to the network.
Error Message: Activation failed because the Server is unable to support this request.
Possible Solutions
● Server Encryption cannot be activated against a legacy server; the Dell Server version must be version 9.1 or higher. Ifnecessary, upgrade your Dell Server to version 9.1 or higher.
● Check the Dell Server URL to ensure it matches the URL supplied by the administrator. The URL and other data that theuser entered into the installer are stored in the registry.
● Check the accuracy of the data under [HKLM\Software\Microsoft\Windows NT\CurrentVersion\Winlogon\CMGShield]and [HKLM\Software\Microsoft\Windows NT\CurrentVersion\Winlogon\CMGShield\Servlet].
Initial Activation Process
The following diagram illustrates a successful initial activation.
The initial activation process of Encryption of server operating systems requires a live user to access the server. The user canbe of any type: domain or non-domain, remote-desktop-connected or interactive user, but the user must have access to domainadministrator credentials.
The Activation dialog displays when one of two workflows occur:
● A new (unmanaged) user logs on to the computer.● When a new user right-clicks the Encryption icon in the notification area and selects Activate Dell Encryption.
The initial activation process is as follows:
1. The user logs in.2. Upon detection of a new (unmanaged) user, the Activate dialog displays. The user clicks Cancel.3. The user opens the Server Encryption About box to confirm that it is running in Server mode.4. The user right-clicks the Encryption icon in the notification area and selects Activate Dell Encryption.5. The user enters domain administrator credentials in the Activate dialog.
Troubleshooting 89

NOTE:
The requirement for domain administrator credentials is a safety measure that prevents Encryption of server operating
systems from being rolled out to unsupported server environments. To disable the requirement for domain administrator
credentials, see Before You Begin.
6. Dell Server checks for the credentials in the enterprise vault (Active Directory or equivalent) to verify that the credentialsare domain administrator credentials.
7. A UPN is constructed using the credentials.8. With the UPN, the Dell Server creates a new user account for the virtual server user, and stores the credentials in the Dell
Server's vault.
The virtual server user account is for the exclusive use of the Encryption client. It is used to authenticate with the server,to handle Common encryption keys, and to receive policy updates.
NOTE:
Password and DPAPI authentication are disabled for this account so that only the virtual server user can access
encryption keys on the computer. This account does not correspond to any other user account on the computer or on
the domain.
9. When activation is successful, the user restarts the computer, which kicks off the second phase, authentication and deviceactivation.
Troubleshooting Authentication and Device Activation
Device activation fails when:
● The initial activation failed.● The connection to the server could not be established.● The trust certificate could not be validated.
After activation, when the computer is restarted, Encryption for server operating systems automatically logs in as the virtualserver user, requesting the Machine key from the Dell Server. This takes place even before any user can log in.
● Open the About dialog to confirm that Encryption for server operating systems is authenticated and in Server mode.
● If the Encryption client ID is red, encryption has not yet been activated.● In the Management Console, the version of a server with Server Encryption installed is listed as Shield for Server.● If the Machine key retrieval fails due to a network failure, Server Encryption registers for network notifications with the
operating system.● If the Machine key retrieval fails:
○ The virtual server user logon is still successful.○ Set up the Retry Interval Upon network Failure policy to make key retrieval attempts on a timed interval.
For details on the Retry Interval Upon network Failure policy, refer to AdminHelp, available in the Management Console.
Authentication and Device Activation
The following diagram illustrates successful authentication and device activation.
90 Troubleshooting

1. When restarted after a successful initial activation, a computer with Server Encryption automatically authenticates using thevirtual server user account and runs the Encryption client in Server mode.
2. The computer checks its device activation status with the Dell Server:
● If the computer has not previously device-activated, the Dell Server assigns the computer an MCID, a DCID, and a trustcertificate, and stores all of the information in the Dell Server's vault.
● If the computer had previously been device-activated, the Dell Server verifies the trust certificate.3. After the Dell Server assigns the trust certificate to the server, the server can access its encryption keys.4. Device activation is successful.
NOTE:
When running in Server mode, the Encryption client must have access to the same certificate as was used for device
activation to access the encryption keys.
(Optional) Create an Encryption Removal Agent Log File
● Before beginning the uninstall process, you can optionally create an Encryption Removal Agent log file. This log file is usefulfor troubleshooting an uninstall/decryption operation. If you do not intend to decrypt files during the uninstall process, youdo not need to create this log file.
● The Encryption Removal Agent log file is not created until after the Encryption Removal Agent service runs, which does nothappen until the computer is restarted. Once the client is successfully uninstalled and the computer is fully decrypted, thelog file is permanently deleted.
● The log file path is C:\ProgramData\Dell\Dell Data Protection\Encryption.● Create the following registry entry on the computer targeted for decryption.
[HKLM\Software\Credant\DecryptionAgent]
"LogVerbosity"=DWORD:2
0: no logging
1: logs errors that prevent the service from running
2: logs errors that prevent complete data decryption (recommended level)
3: logs information about all decrypting volumes and files
5: logs debugging information
Find TSS Version
● TSS is a component that interfaces with the TPM. To find the TSS version, go to (default location) C:\ProgramFiles\Dell\Dell Data Protection\Drivers\TSS\bin > tcsd_win32.exe. Right-click the file and selectProperties. Verify the file version on the Details tab.
Troubleshooting 91

Encryption External Media and PCS Interactions
To Ensure Media is Not Read-Only and the Port is Not Blocked
The EMS Access to unShielded Media policy interacts with the Port Control System - Class: Storage > Subclass Storage:External Drive Control policy. If you intend to set the EMS Access to unShielded Media policy to Full Access, ensure that theSubclass Storage: External Drive Control policy is also set to Full Access to ensure that the media is not set to read-only and theport is not blocked.
To Encrypt Data Written to CD/DVD
● Set Windows Media Encryption = On.● Set EMS Exclude CD/DVD Encryption = not selected.● Set Subclass Storage: Optical Drive Control = UDF Only.
Use WSScan
● WSScan allows you to ensure that all data is decrypted when uninstalling Encryption as well as view encryption status andidentify unencrypted files that should be encrypted.
● Administrator privileges are required to run this utility.
NOTE: WSScan must be run in System Mode with the PsExec tool if a target file is owned by the system account.
Run WSScan
1. From the Dell installation media, copy WSScan.exe to the Windows computer to scan.2. Launch a command line at the location above and enter wsscan.exe at the command prompt. WSScan launches.3. Click Advanced.4. Select the type of drive to scan: All Drives, Fixed Drives, Removable Drives, or CDROMs/ DVDROMs.5. Select the Encryption Report Type: Encrypted FIles, Unencrypted FIles, All FIles, or Unencrypted FIles in Violation:
● Encrypted FIles - To ensure that all data is decrypted when uninstalling Encryption. Follow your existing process fordecrypting data, such as issuing a decryption policy update. After decrypting data, but before performing a restart inpreparation for uninstall, run WSScan to ensure that all data is decrypted.
● Unencrypted FIles - To identify files that are not encrypted, with an indication of whether the files should be encrypted(Y/N).
● All FIles - To list all encrypted and unencrypted files, with an indication of whether the files should be encrypted (Y/N).● Unencrypted FIles in Violation - To identify files that are not encrypted that should be encrypted.
6. Click Search.
92 Troubleshooting

OR
1. Click Advanced to toggle the view to Simple to scan a particular folder.2. Go to Scan Settings and enter the folder path in the Search Path field. If this field is used, the selection in the menu is
ignored.3. If you do not want to write WSScan output to a file, clear the Output to File check box.4. Change the default path and file name in Path, if desired.5. Select Add to Existing File if you do not want to overwrite any existing WSScan output files.6. Choose the output format:
● Select Report Format for a report style list of scanned output. This is the default format.● Select Value Delimited File for output that can be imported into a spreadsheet application. The default delimiter is "|",
although it can be changed to up to 9 alphanumeric, space, or keyboard punctuation characters.● Select the Quoted Values option to enclose each value in double quotation marks.● Select Fixed Width File for non-delimited output containing a continuous line of fixed-length information about each
encrypted file.7. Click Search.
Click Stop Searching to stop your search. Click Clear to clear displayed messages.
Troubleshooting 93

WSScan Command Line Usage
WSScan [-ta] [-tf] [-tr] [-tc] [drive] [-s] [-o<filepath>] [-a] [-f<format specifier>] [-r][-u[a][-|v]] [-d<delimeter>] [-q] [-e] [-x<exclusion directory>] [-y<sleep time>]
Switch Meaning
Drive Drive to scan. If not specified, the default is all local fixed hard drives. Can be a mappednetwork drive.
-ta Scan all drives
-tf Scan fixed drives (default)
-tr Scan removable drives
-tc Scan CDROMs/DVDROMs
94 Troubleshooting

Switch Meaning
-s Silent operation
-o Output file path
-a Append to output file. The default behavior truncates the output file.
-f Report format specifier (Report, Fixed, Delimited)
-r Run WSScan without administrator privileges. Some files may not be visible in thismode.
-u Include unencrypted files in output file.
This switch is sensitive to order: "u" must be first, "a" must be second (or omitted), "-"or "v" must be last.
-u- Only include unencrypted files in output file
-ua Report unencrypted files also, but use all user policies to display the "should" field.
-ua- Report unencrypted files only, but use all user policies to display the "should" field.
-uv Report unencrypted files that violate policy only (Is=No / Should=Y)
-uav Report unencrypted files that violate policy only (Is=No / Should=Y), using all userpolicies.
-d Specifies what to use as a value separator for delimited output
-q Specifies the values that should be in enclosed in quotes for delimited output
-e Include extended encryption fields in delimited output
-x Exclude directory from scan. Multiple exclusions are allowed.
-y Sleep time (in milliseconds) between directories. This switch results in slower scans, butpotentially a more responsive CPU.
WSScan Output
WSScan information about encrypted files contains the following information.
Example Output:
[2015-07-28 07:52:33] SysData.7vdlxrsb._SDENCR_: "c:\temp\Dell - test.log" is still AES256 encrypted
Output Meaning
Date/time stamp The date and time the file was scanned.
Encryption type The type of encryption used to encrypt the file.
SysData: SDE key.
User: User encryption key.
Common: Common encryption key.
WSScan does not report files encrypted using Encrypt for Sharing.
KCID The Key Computer ID.
As shown in the example above, "7vdlxrsb"
Troubleshooting 95

Output Meaning
If you are scanning a mapped network drive, the scanning report does not return aKCID.
UCID The User ID.
As shown in the example above, "_SDENCR_"
The UCID is shared by all the users of that computer.
File The path of the encrypted file.
As shown in the example above, "c:\temp\Dell - test.log"
Algorithm The encryption algorithm being used to encrypt the file.
As shown in the example above, "is still AES256 encrypted"
RIJNDAEL 128
RIJNDAEL 256
AES-128
AES-256
3DES
Use WSProbe
The Probing Utility is for use with all versions of Encryption, with the exception of Encryption External Media policies. Use theProbing Utility to:
● Scan or schedule scanning of an encrypted computer. The Probing Utility observes the Workstation Scan Priority policy.● Temporarily disable or re-enable the current user Application Data Encryption List.● Add or remove process names on the privileged list.● Troubleshoot as instructed by Dell ProSupport.
Approaches to Data Encryption
If you specify policies to encrypt data on Windows devices, you can use any of the following approaches:
● The first approach is to accept the default behavior of the client. If you specify folders in Common Encrypted Foldersor User Encrypted Folders, or set Encrypt "My Documents", Encrypt Outlook Personal Folders, Encrypt Temporary Files,Encrypt Temporary Internet Files, or Encrypt Windows Paging File to selected, affected files are encrypted either when theyare created, or (after being created by an unmanaged user) when a managed user logs on. The client also scans foldersspecified in or related to these policies for possible encryption/decryption when a folder is renamed, or when the clientreceives changes to these policies.
● You can also set Scan Workstation on Logon to Selected. If Scan Workstation on Logon is Selected, when a user logs on, theclient compares how files in currently- and previously-encrypted folders are encrypted to the user policies, and makes anynecessary changes.
● To encrypt files that meet your encryption criteria but were created prior to your encryption policies going into effect, butdo not want the performance impact of frequent scanning, you can use this utility to scan or schedule scanning of thecomputer.
Prerequisites
● The Windows device to work with must be encrypted.● The user to work with must be logged on.
Use the Probing Utility
WSProbe.exe is located in the installation media.
Syntax
wsprobe [path]
96 Troubleshooting

wsprobe [-h]wsprobe [-f path]wsprobe [-u n] [-x process_names] [-i process_names]Parameters
Parameter To
path Optionally specify a particular path on the device to scan for possible encryption/decryption. If you do not specify a path, this utility scans all folders related to yourencryption policies.
-h View command line Help.
-f Troubleshoot as instructed by Dell ProSupport
-u Temporarily disable or re-enable the user Application Data Encryption List. This listis only effective if Encryption Enabled is selected for the current user. Specify 0 todisable or 1 to re-enable. The current policy in force for the user is reinstated at thenext logon.
-x Add process names to the privileged list. The computer and installerprocess names on this list, plus those you add using this parameter orHKLM\Software\CREDANT\CMGShield\EUWPrivilegedList, are ignored if specified inthe Application Data Encryption List. Separate process names with commas. If your listincludes one or more spaces, enclose the list in double quotes.
-i Remove process names previously added to the privileged list (you cannot removehard-coded process names). Separate process names with commas. If your list includesone or more spaces, enclose the list in double quotes.
Check Encryption Removal Agent Status
The Encryption Removal Agent displays its status in the description area of the services panel (Start > Run > services.msc >OK) as follows. Periodically refresh the service (highlight the service > right-click > Refresh) to update its status.
● Waiting for SDE Deactivation - Encryption is still installed, is still configured, or both. Decryption does not start untilEncryption is uninstalled.
● Initial sweep - The service is making an initial sweep, calculating the number of encrypted files and bytes. The initial sweepoccurs one time.
● Decryption sweep - The service is decrypting files and possibly requesting to decrypt locked files.● Decrypt on Reboot (partial) - The decryption sweep is complete and some locked files (but not all) are to be decrypted on
the next restart.● Decrypt on Reboot - The decryption sweep is complete and all locked files are to be decrypted on the next restart.● All files could not be decrypted - The decryption sweep is complete, but all files could not be decrypted. This status
means one of the following occurred:
○ The locked files could not be scheduled for decryption because they were too big, or an error occurred while making therequest to unlock them.
○ An input/output error occurred while decrypting files.○ The files could not be decrypted by policy.○ The files are marked as should be encrypted.○ An error occurred during the decryption sweep.○ In all cases, a log file is created (if logging is configured) when LogVerbosity=2 (or higher) is set. To troubleshoot, set the
log verbosity to 2 and restart the Encryption Removal Agent service to force another decryption sweep. See (Optional)Create an Encryption Removal Agent Log File for instructions.
● Complete - The decryption sweep is complete. The service, the executable, the driver, and the driver executable are allscheduled for deletion on the next restart.
Troubleshooting 97

SED Troubleshooting
Use the Initial Access Code
● This policy is used to log on to a computer when network access is unavailable. Meaning, access to the Dell Server and ADare both unavailable. Only use the Initial Access Code policy if absolutely necessary. Dell does not recommend this methodto log in. Using the Initial Access Code policy does not provide the same level of security as the usual method of logging inusing user name, domain, and password.
In addition to being a less secure method of logging in, if a user is activated using the Initial Access Code, then there is norecord on the Dell Server of that user activating on this computer. In turn, there is no way to generate a Response Codefrom the Dell Server for the user if they fail password and self help questions.
● The Initial Access Code can only be used one time, immediately after activation. After an end user has logged in, the InitialAccess Code will not be available again. The first domain login that occurs after the Initial Access Code is entered will becached, and the Initial Access Code entry field will not display again.
● The Initial Access Code only displays under the following conditions:
○ A user has never activated inside the PBA.○ The client has no connectivity to the network or Dell Server.
Use Initial Access Code
1. Set a value for the Initial Access Code policy in the Management Console.2. Save and commit the policy.3. Start the local computer.4. Enter the Initial Access Code when the Access Code screen displays.5. Click the blue arrow.6. Click OK when the Legal Notice screen displays.7. Log in to Windows with the user credentials for this computer. These credentials must be part of the domain.8. After logging in, open the Data Security Console and verify that the PBA user was successfully created.
Click Log in the top menu and look for the message Created PBA user for <DOMAIN\Username>, which indicates theprocess was successful.
9. Shut down and restart the computer.10. At the login screen, enter the user name, domain, and password that was previously used to log in to Windows.
You must match the user name format that was used when creating the PBA user. Thus, if you used the formatDOMAIN\Username, you must enter DOMAIN\Username for the Username.
11. Click Login when the Legal Notice screen displays.
98 Troubleshooting

Windows now launches and the computer can be used as usual.
Create a PBA Log File for Troubleshooting
● There may be cases when a PBA log file is needed for troubleshooting PBA issues, such as:
○ You are unable to see the network connection icon, yet you know there is network connectivity. The log file containsDHCP information to resolve the issue.
○ You are unable to see the Dell Server connection icon. The log file contains information to help diagnose connectivityissues.
○ Authentication fails even when entering correct credentials. The log file used with the Dell Server Server logs can helpdiagnose the issue.
Capture Logs When Booting Into the PBA (Legacy PBA)
1. Create a folder on a USB drive and name it \CredantSED, at the root level of the USB drive.
2. Create a file named actions.txt and place it in the \CredantSED folder.
3. In actions.txt, add the line:
get logs4. Save and close the file.
Do not insert the USB drive when the computer is powered down. If the USB drive is already inserted during the shutdownstate, remove the USB drive.
5. Power on the computer reproduce the issue. Insert the USB drive into the computer that the logs are to be collected fromduring this step.
6. After inserting the USB drive, wait for 5-10 seconds, then remove the drive.
A credpbaenv.tgz file is created in the \CredantSED folder that contains the needed log files.
Capture Logs When Booting Into the PBA (UEFI PBA)
1. Create a file called PBAErr.log at the root level of the USB drive.2. Insert the USB drive before powering on the computer.3. Remove the USB drive after reproducing the issue requiring the logs.
The PBAErr.log file is updated and written in real-time.
Dell ControlVault Drivers
Update Dell ControlVault Drivers and Firmware
● Dell ControlVault drivers and firmware that are installed on Dell computers at the factory are outdated and should beupdated by following this procedure, in this order.
● If an error message is received during client installation prompting you to exit the installer to update Dell ControlVaultdrivers, the message may be safely dismissed to continue with the installation of the client. The Dell ControlVault drivers(and firmware) can be updated after the client installation is complete.
Download Latest Drivers
1. Go to dell.com/support.
Troubleshooting 99

2. Select your computer model.
3. Select Drivers & Downloads.
4. Select the Operating System of the target computer.
100 Troubleshooting

5. Select the Security category.
6. Download and save the Dell ControlVault Drivers.
7. Download and save the Dell ControlVault Firmware.
Troubleshooting 101

8. Copy the drivers and firmware to the target computers, if needed.
Install Dell ControlVault Driver
1. Navigate to the folder which you downloaded the driver installation file.
2. Double-click the Dell ControlVault driver to launch the self-extracting executable file.
NOTE:
Be sure to install the driver first. The file name of the driver at the time of this document creation is
ControlVault_Setup_2MYJC_A37_ZPE.exe.
3. Click Continue to begin.
102 Troubleshooting

4. Click Ok to unzip the driver files in the default location of C:\Dell\Drivers\<New Folder>.
5. Click Yes to allow the creation of a new folder.
6. Click Ok when the successfully unzipped message displays.
7. The folder which contains the files should display after extraction. If not, navigate to the folder to which you extracted thefiles. In this case, the folder is JW22F.
Troubleshooting 103
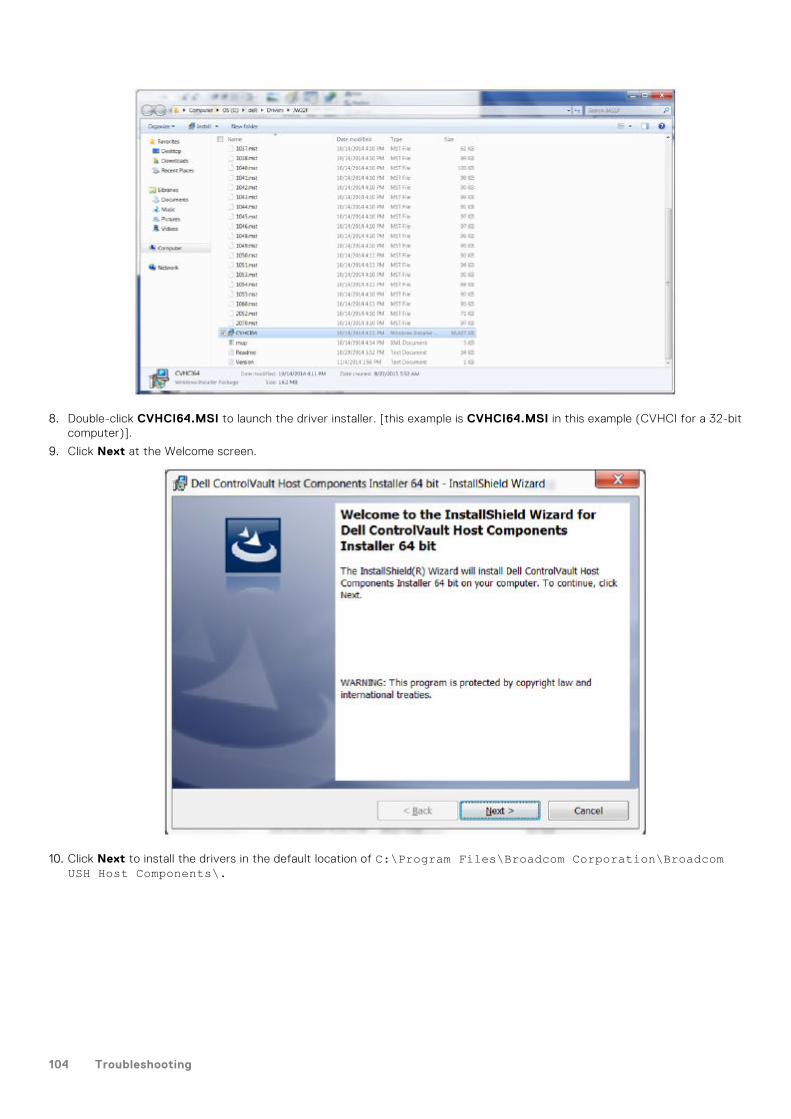
8. Double-click CVHCI64.MSI to launch the driver installer. [this example is CVHCI64.MSI in this example (CVHCI for a 32-bitcomputer)].
9. Click Next at the Welcome screen.
10. Click Next to install the drivers in the default location of C:\Program Files\Broadcom Corporation\BroadcomUSH Host Components\.
104 Troubleshooting

11. Select the Complete option and click Next.
12. Click Install to begin the installation of the drivers.
Troubleshooting 105

13. Optionally check the box to display the installer log file. Click Finish to exit the wizard.
Verify Driver Installation
● The Device Manager will have a Dell ControlVault device (and other devices) depending on the operating system andhardware configuration.
Install Dell ControlVault Firmware
1. Navigate to the folder which you downloaded the firmware installation file.
106 Troubleshooting
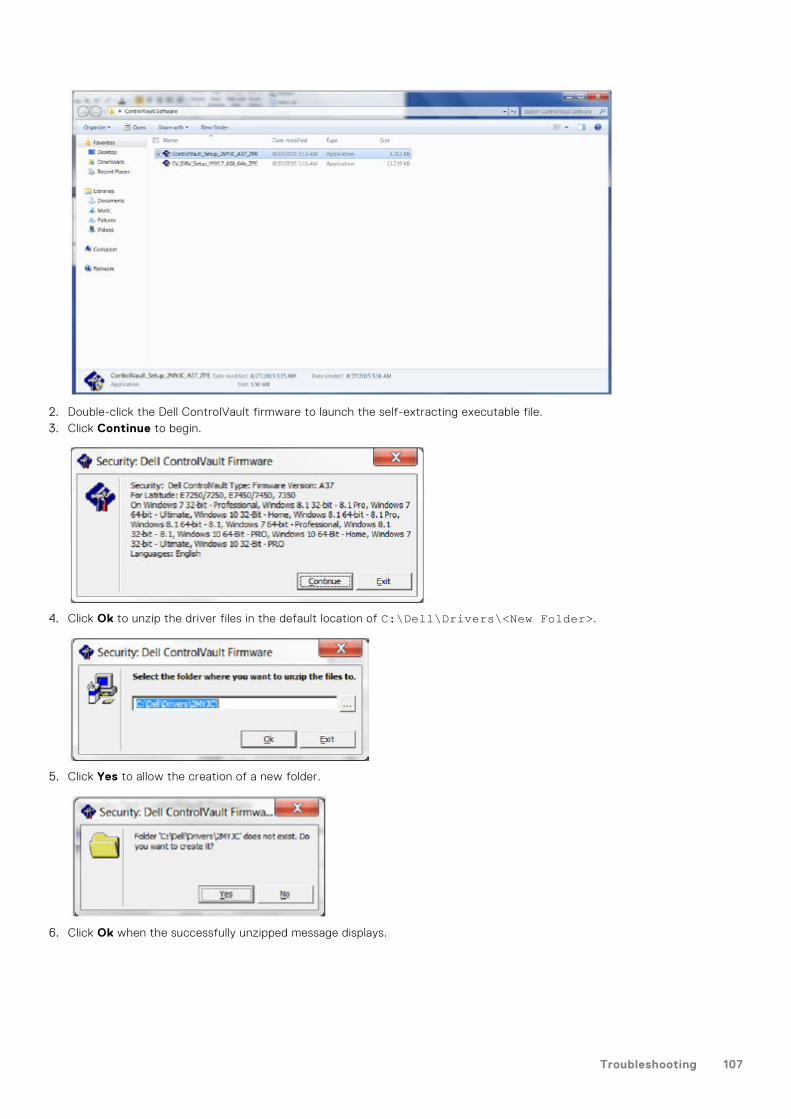
2. Double-click the Dell ControlVault firmware to launch the self-extracting executable file.3. Click Continue to begin.
4. Click Ok to unzip the driver files in the default location of C:\Dell\Drivers\<New Folder>.
5. Click Yes to allow the creation of a new folder.
6. Click Ok when the successfully unzipped message displays.
Troubleshooting 107

7. The folder which contains the files should display after extraction. If not, navigate to the folder to which you extracted thefiles. Select the firmware folder.
8. Double-click ushupgrade.exe to launch the firmware installer.9. Click Start to begin the firmware upgrade.
108 Troubleshooting

NOTE:
You may be asked to enter the administrator password if upgrading from an older version of firmware. Enter Broadcomas the password and click Enter if presented with this dialog.
Several status messages display.
Troubleshooting 109

110 Troubleshooting
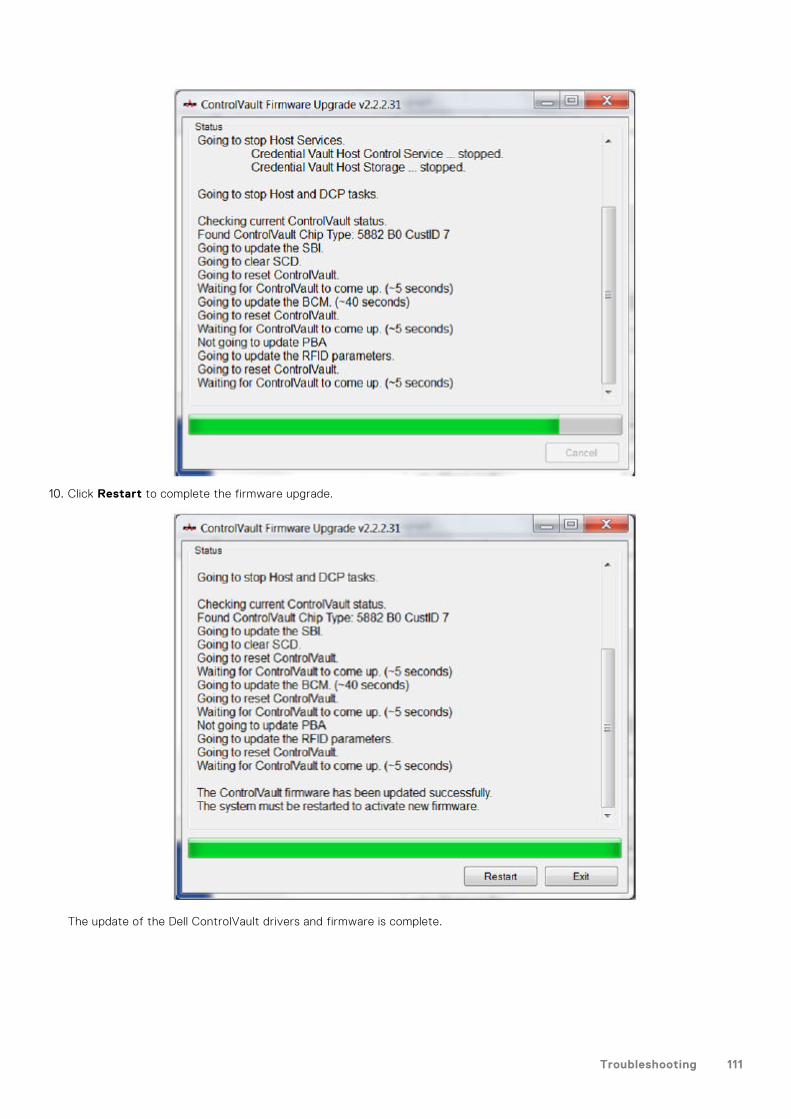
10. Click Restart to complete the firmware upgrade.
The update of the Dell ControlVault drivers and firmware is complete.
Troubleshooting 111

UEFI Computers
Troubleshoot Network Connection
● For pre-boot authentication to succeed on a computer with UEFI firmware, the PBA mode must have network connectivity.By default, computers with UEFI firmware do not have network connectivity until the operating system is loaded, whichoccurs after PBA mode. If the computer procedure outlined in Pre-Installation Configuration for UEFI Computers issuccessful and is configured properly, the network connection icon displays on the pre-boot authentication screen whenthe computer is connected to the network.
● Check the network cable to ensure it is connected to the computer if the network connection icon still does not displayduring pre-boot authentication. Restart the computer to restart PBA mode if it was not connected or was loose.
TPM and BitLocker
TPM and BitLocker Error Codes
Constant/Value Description
TPM_E_ERROR_MASK
0x80280000
This is an error mask to convert TPM hardware errors towin errors.
TPM_E_AUTHFAIL
0x80280001
Authentication failed.
TPM_E_BADINDEX
0x80280002
The index to a PCR, DIR or other register is incorrect.
TPM_E_BAD_PARAMETER
0x80280003
One or more parameters is bad.
TPM_E_AUDITFAILURE
0x80280004
An operation completed successfully but the auditing of thatoperation failed.
TPM_E_CLEAR_DISABLED
0x80280005
The clear disable flag is set and all clear operations nowrequire physical access.
TPM_E_DEACTIVATED
0x80280006
Activate the TPM.
TPM_E_DISABLED
0x80280007
Enable the TPM.
TPM_E_DISABLED_CMD
0x80280008
The target command has been disabled.
TPM_E_FAIL
0x80280009
The operation failed.
112 Troubleshooting

Constant/Value Description
TPM_E_BAD_ORDINAL
0x8028000A
The ordinal was unknown or inconsistent.
TPM_E_INSTALL_DISABLED
0x8028000B
The ability to install an owner is disabled.
TPM_E_INVALID_KEYHANDLE
0x8028000C
The key handle cannot be interpreted.
TPM_E_KEYNOTFOUND
0x8028000D
The key handle points to an invalid key.
TPM_E_INAPPROPRIATE_ENC
0x8028000E
Unacceptable encryption scheme.
TPM_E_MIGRATEFAIL
0x8028000F
Migration authorization failed.
TPM_E_INVALID_PCR_INFO
0x80280010
PCR information could not be interpreted.
TPM_E_NOSPACE
0x80280011
No room to load key.
TPM_E_NOSRK
0x80280012
There is no Storage Root Key (SRK) set.
TPM_E_NOTSEALED_BLOB
0x80280013
An encrypted blob is invalid or was not created by this TPM.
TPM_E_OWNER_SET
0x80280014
The TPM already has an owner.
TPM_E_RESOURCES
0x80280015
The TPM has insufficient internal resources to perform therequested action.
TPM_E_SHORTRANDOM
0x80280016
A random string was too short.
TPM_E_SIZE
0x80280017
The TPM does not have the space to perform the operation.
TPM_E_WRONGPCRVAL
0x80280018
The named PCR value does not match the current PCRvalue.
TPM_E_BAD_PARAM_SIZE
0x80280019
The paramSize argument to the command has the incorrectvalue
TPM_E_SHA_THREAD
0x8028001A
There is no existing SHA-1 thread.
Troubleshooting 113

Constant/Value Description
TPM_E_SHA_ERROR
0x8028001B
The calculation is unable to proceed because the existingSHA-1 thread has already encountered an error.
TPM_E_FAILEDSELFTEST
0x8028001C
The TPM hardware device reported a failure during itsinternal self test. Try restarting the computer to resolvethe problem. If the problem continues, you might need toreplace your TPM hardware or motherboard.
TPM_E_AUTH2FAIL
0x8028001D
The authorization for the second key in a 2 key functionfailed authorization.
TPM_E_BADTAG
0x8028001E
The tag value sent to for a command is invalid.
TPM_E_IOERROR
0x8028001F
An IO error occurred transmitting information to the TPM.
TPM_E_ENCRYPT_ERROR
0x80280020
The encryption process had a problem.
TPM_E_DECRYPT_ERROR
0x80280021
The decryption process did not complete.
TPM_E_INVALID_AUTHHANDLE
0x80280022
An invalid handle was used.
TPM_E_NO_ENDORSEMENT
0x80280023
The TPM does not have an Endorsement Key (EK) installed.
TPM_E_INVALID_KEYUSAGE
0x80280024
The usage of a key is not allowed.
TPM_E_WRONG_ENTITYTYPE
0x80280025
The submitted entity type is not allowed.
TPM_E_INVALID_POSTINIT
0x80280026
The command was received in the wrong sequence relativeto TPM_Init and a subsequent TPM_Startup.
TPM_E_INAPPROPRIATE_SIG
0x80280027
Signed data cannot include additional DER information.
TPM_E_BAD_KEY_PROPERTY
0x80280028
The key properties in TPM_KEY_PARMs are not supportedby this TPM.
TPM_E_BAD_MIGRATION
0x80280029
The migration properties of this key are incorrect.
TPM_E_BAD_SCHEME
0x8028002A
The signature or encryption scheme for this key is incorrector not permitted in this situation.
TPM_E_BAD_DATASIZE
0x8028002B
The size of the data (or blob) parameter is bad orinconsistent with the referenced key.
114 Troubleshooting
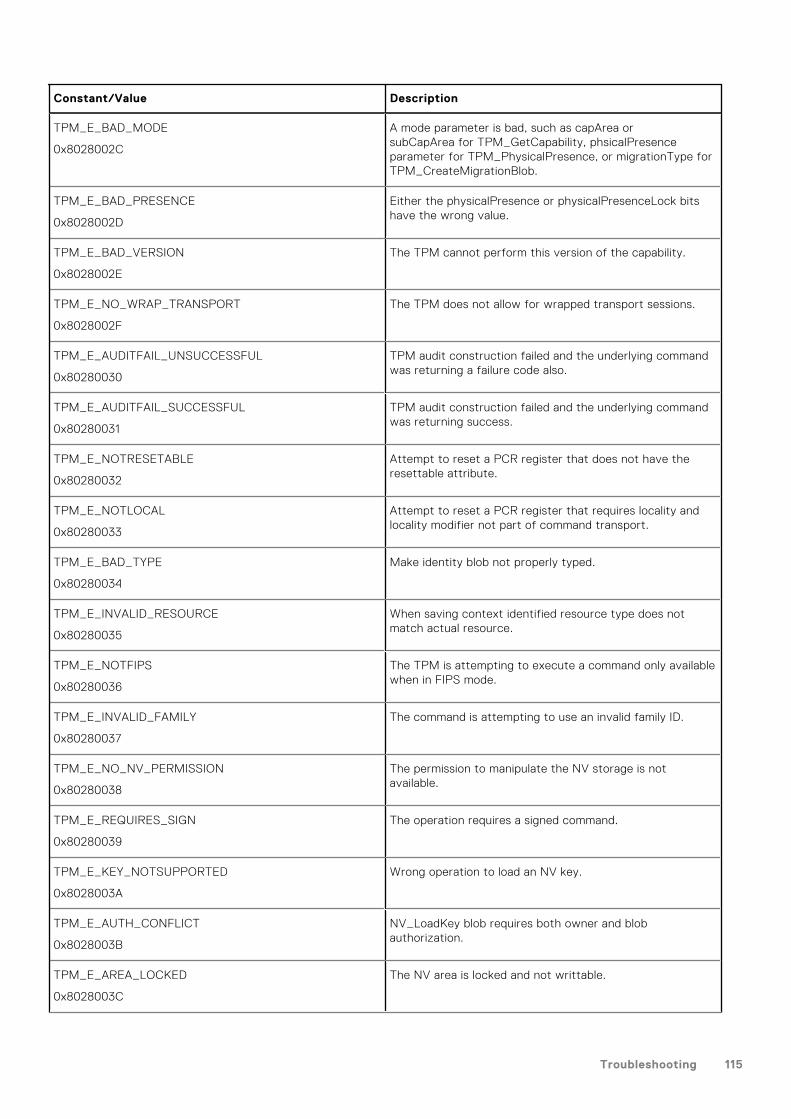
Constant/Value Description
TPM_E_BAD_MODE
0x8028002C
A mode parameter is bad, such as capArea orsubCapArea for TPM_GetCapability, phsicalPresenceparameter for TPM_PhysicalPresence, or migrationType forTPM_CreateMigrationBlob.
TPM_E_BAD_PRESENCE
0x8028002D
Either the physicalPresence or physicalPresenceLock bitshave the wrong value.
TPM_E_BAD_VERSION
0x8028002E
The TPM cannot perform this version of the capability.
TPM_E_NO_WRAP_TRANSPORT
0x8028002F
The TPM does not allow for wrapped transport sessions.
TPM_E_AUDITFAIL_UNSUCCESSFUL
0x80280030
TPM audit construction failed and the underlying commandwas returning a failure code also.
TPM_E_AUDITFAIL_SUCCESSFUL
0x80280031
TPM audit construction failed and the underlying commandwas returning success.
TPM_E_NOTRESETABLE
0x80280032
Attempt to reset a PCR register that does not have theresettable attribute.
TPM_E_NOTLOCAL
0x80280033
Attempt to reset a PCR register that requires locality andlocality modifier not part of command transport.
TPM_E_BAD_TYPE
0x80280034
Make identity blob not properly typed.
TPM_E_INVALID_RESOURCE
0x80280035
When saving context identified resource type does notmatch actual resource.
TPM_E_NOTFIPS
0x80280036
The TPM is attempting to execute a command only availablewhen in FIPS mode.
TPM_E_INVALID_FAMILY
0x80280037
The command is attempting to use an invalid family ID.
TPM_E_NO_NV_PERMISSION
0x80280038
The permission to manipulate the NV storage is notavailable.
TPM_E_REQUIRES_SIGN
0x80280039
The operation requires a signed command.
TPM_E_KEY_NOTSUPPORTED
0x8028003A
Wrong operation to load an NV key.
TPM_E_AUTH_CONFLICT
0x8028003B
NV_LoadKey blob requires both owner and blobauthorization.
TPM_E_AREA_LOCKED
0x8028003C
The NV area is locked and not writtable.
Troubleshooting 115

Constant/Value Description
TPM_E_BAD_LOCALITY
0x8028003D
The locality is incorrect for the attempted operation.
TPM_E_READ_ONLY
0x8028003E
The NV area is read only and cannot be written to.
TPM_E_PER_NOWRITE
0x8028003F
There is no protection on the write to the NV area.
TPM_E_FAMILYCOUNT
0x80280040
The family count value does not match.
TPM_E_WRITE_LOCKED
0x80280041
The NV area has already been written to.
TPM_E_BAD_ATTRIBUTES
0x80280042
The NV area attributes conflict.
TPM_E_INVALID_STRUCTURE
0x80280043
The structure tag and version are invalid or inconsistent.
TPM_E_KEY_OWNER_CONTROL
0x80280044
The key is under control of the TPM Owner and can only beevicted by the TPM Owner.
TPM_E_BAD_COUNTER
0x80280045
The counter handle is incorrect.
TPM_E_NOT_FULLWRITE
0x80280046
The write is not a complete write of the area.
TPM_E_CONTEXT_GAP
0x80280047
The gap between saved context counts is too large.
TPM_E_MAXNVWRITES
0x80280048
The maximum number of NV writes without an owner hasbeen exceeded.
TPM_E_NOOPERATOR
0x80280049
No operator AuthData value is set.
TPM_E_RESOURCEMISSING
0x8028004A
The resource pointed to by context is not loaded.
TPM_E_DELEGATE_LOCK
0x8028004B
The delegate administration is locked.
TPM_E_DELEGATE_FAMILY
0x8028004C
Attempt to manage a family other than the delegated family.
TPM_E_DELEGATE_ADMIN
0x8028004D
Delegation table management not enabled.
116 Troubleshooting

Constant/Value Description
TPM_E_TRANSPORT_NOTEXCLUSIVE
0x8028004E
There was a command executed outside of an exclusivetransport session.
TPM_E_OWNER_CONTROL
0x8028004F
Attempt to context save a owner evict controlled key.
TPM_E_DAA_RESOURCES
0x80280050
The DAA command has no resources available to executethe command.
TPM_E_DAA_INPUT_DATA0
0x80280051
The consistency check on DAA parameter inputData0 hasfailed.
TPM_E_DAA_INPUT_DATA1
0x80280052
The consistency check on DAA parameter inputData1 hasfailed.
TPM_E_DAA_ISSUER_SETTINGS
0x80280053
The consistency check on DAA_issuerSettings has failed.
TPM_E_DAA_TPM_SETTINGS
0x80280054
The consistency check on DAA_tpmSpecific has failed.
TPM_E_DAA_STAGE
0x80280055
The atomic process indicated by the submitted DAAcommand is not the expected process.
TPM_E_DAA_ISSUER_VALIDITY
0x80280056
The issuer's validity check has detected an inconsistency.
TPM_E_DAA_WRONG_W
0x80280057
The consistency check on w has failed.
TPM_E_BAD_HANDLE
0x80280058
The handle is incorrect.
TPM_E_BAD_DELEGATE
0x80280059
Delegation is not correct.
TPM_E_BADCONTEXT
0x8028005A
The context blob is invalid.
TPM_E_TOOMANYCONTEXTS
0x8028005B
Too many contexts held by the TPM.
TPM_E_MA_TICKET_SIGNATURE
0x8028005C
Migration authority signature validation failure.
TPM_E_MA_DESTINATION
0x8028005D
Migration destination not authenticated.
TPM_E_MA_SOURCE
0x8028005E
Migration source incorrect.
Troubleshooting 117

Constant/Value Description
TPM_E_MA_AUTHORITY
0x8028005F
Incorrect migration authority.
TPM_E_PERMANENTEK
0x80280061
Attempt to revoke the EK and the EK is not revocable.
TPM_E_BAD_SIGNATURE
0x80280062
Bad signature of CMK ticket.
TPM_E_NOCONTEXTSPACE
0x80280063
There is no room in the context list for additional contexts.
TPM_E_COMMAND_BLOCKED
0x80280400
The command was blocked.
TPM_E_INVALID_HANDLE
0x80280401
The specified handle was not found.
TPM_E_DUPLICATE_VHANDLE
0x80280402
The TPM returned a duplicate handle and the commandneeds to be resubmitted.
TPM_E_EMBEDDED_COMMAND_BLOCKED
0x80280403
The command within the transport was blocked.
TPM_E_EMBEDDED_COMMAND_UNSUPPORTED
0x80280404
The command within the transport is not supported.
TPM_E_RETRY
0x80280800
The TPM is too busy to respond to the commandimmediately, but the command could be resubmitted at alater time.
TPM_E_NEEDS_SELFTEST
0x80280801
SelfTestFull has not been run.
TPM_E_DOING_SELFTEST
0x80280802
The TPM is currently executing a full self test.
TPM_E_DEFEND_LOCK_RUNNING
0x80280803
The TPM is defending against dictionary attacks and is in atime-out period.
TBS_E_INTERNAL_ERROR
0x80284001
An internal software error has been detected.
TBS_E_BAD_PARAMETER
0x80284002
One or more input parameters is bad.
TBS_E_INVALID_OUTPUT_POINTER
0x80284003
A specified output pointer is bad.
TBS_E_INVALID_CONTEXT
0x80284004
The specified context handle does not refer to a validcontext.
118 Troubleshooting

Constant/Value Description
TBS_E_INSUFFICIENT_BUFFER
0x80284005
A specified output buffer is too small.
TBS_E_IOERROR
0x80284006
An error occurred while communicating with the TPM.
TBS_E_INVALID_CONTEXT_PARAM
0x80284007
One or more context parameters is invalid.
TBS_E_SERVICE_NOT_RUNNING
0x80284008
The TBS service is not running and could not be started.
TBS_E_TOO_MANY_TBS_CONTEXTS
0x80284009
A new context could not be created because there are toomany open contexts.
TBS_E_TOO_MANY_RESOURCES
0x8028400A
A new virtual resource could not be created because thereare too many open virtual resources.
TBS_E_SERVICE_START_PENDING
0x8028400B
The TBS service has been started but is not yet running.
TBS_E_PPI_NOT_SUPPORTED
0x8028400C
The physical presence interface is not supported.
TBS_E_COMMAND_CANCELED
0x8028400D
The command was canceled.
TBS_E_BUFFER_TOO_LARGE
0x8028400E
The input or output buffer is too large.
TBS_E_TPM_NOT_FOUND
0x8028400F
A compatible TPM Security Device cannot be found on thiscomputer.
TBS_E_SERVICE_DISABLED
0x80284010
The TBS service has been disabled.
TBS_E_NO_EVENT_LOG
0x80284011
No TCG event log is available.
TBS_E_ACCESS_DENIED
0x80284012
The caller does not have the appropriate rights to performthe requested operation.
TBS_E_PROVISIONING_NOT_ALLOWED
0x80284013
The TPM provisioning action is not allowed by thespecified flags. For provisioning to be successful, one ofseveral actions may be required. The TPM managementconsole (tpm.msc) action to make the TPM Ready mayhelp. For further information, see the documentationfor the Win32_Tpm WMI method 'Provision'. (Theactions that may be required include importing theTPM Owner Authorization value into the system, callingthe Win32_Tpm WMI method for provisioning the TPMand specifying TRUE for either 'ForceClear_Allowed' or'PhysicalPresencePrompts_Allowed' (as indicated by the
Troubleshooting 119

Constant/Value Description
value returned in the Additional Information), or enabling theTPM in the system BIOS.)
TBS_E_PPI_FUNCTION_UNSUPPORTED
0x80284014
The Physical Presence Interface of this firmware does notsupport the requested method.
TBS_E_OWNERAUTH_NOT_FOUND
0x80284015
The requested TPM OwnerAuth value was not found.
TBS_E_PROVISIONING_INCOMPLETE
0x80284016
The TPM provisioning did not complete. For moreinformation on completing the provisioning, call theWin32_Tpm WMI method for provisioning the TPM('Provision') and check the returned Information.
TPMAPI_E_INVALID_STATE
0x80290100
The command buffer is not in the correct state.
TPMAPI_E_NOT_ENOUGH_DATA
0x80290101
The command buffer does not contain enough data tosatisfy the request.
TPMAPI_E_TOO_MUCH_DATA
0x80290102
The command buffer cannot contain any more data.
TPMAPI_E_INVALID_OUTPUT_POINTER
0x80290103
One or more output parameters was NULL or invalid.
TPMAPI_E_INVALID_PARAMETER
0x80290104
One or more input parameters is invalid.
TPMAPI_E_OUT_OF_MEMORY
0x80290105
Not enough memory was available to satisfy the request.
TPMAPI_E_BUFFER_TOO_SMALL
0x80290106
The specified buffer was too small.
TPMAPI_E_INTERNAL_ERROR
0x80290107
An internal error was detected.
TPMAPI_E_ACCESS_DENIED
0x80290108
The caller does not have the appropriate rights to performthe requested operation.
TPMAPI_E_AUTHORIZATION_FAILED
0x80290109
The specified authorization information was invalid.
TPMAPI_E_INVALID_CONTEXT_HANDLE
0x8029010A
The specified context handle was not valid.
TPMAPI_E_TBS_COMMUNICATION_ERROR
0x8029010B
An error occurred while communicating with the TBS.
TPMAPI_E_TPM_COMMAND_ERROR
0x8029010C
The TPM returned an unexpected result.
120 Troubleshooting

Constant/Value Description
TPMAPI_E_MESSAGE_TOO_LARGE
0x8029010D
The message was too large for the encoding scheme.
TPMAPI_E_INVALID_ENCODING
0x8029010E
The encoding in the blob was not recognized.
TPMAPI_E_INVALID_KEY_SIZE
0x8029010F
The key size is not valid.
TPMAPI_E_ENCRYPTION_FAILED
0x80290110
The encryption operation failed.
TPMAPI_E_INVALID_KEY_PARAMS
0x80290111
The key parameters structure was not valid
TPMAPI_E_INVALID_MIGRATION_AUTHORIZATION_BLOB
0x80290112
The requested supplied data does not appear to be a validmigration authorization blob.
TPMAPI_E_INVALID_PCR_INDEX
0x80290113
The specified PCR index was invalid
TPMAPI_E_INVALID_DELEGATE_BLOB
0x80290114
The data given does not appear to be a valid delegate blob.
TPMAPI_E_INVALID_CONTEXT_PARAMS
0x80290115
One or more of the specified context parameters was notvalid.
TPMAPI_E_INVALID_KEY_BLOB
0x80290116
The data given does not appear to be a valid key blob
TPMAPI_E_INVALID_PCR_DATA
0x80290117
The specified PCR data was invalid.
TPMAPI_E_INVALID_OWNER_AUTH
0x80290118
The format of the owner auth data was invalid.
TPMAPI_E_FIPS_RNG_CHECK_FAILED
0x80290119
The random number generated did not pass FIPS RNGcheck.
TPMAPI_E_EMPTY_TCG_LOG
0x8029011A
The TCG Event Log does not contain any data.
TPMAPI_E_INVALID_TCG_LOG_ENTRY
0x8029011B
An entry in the TCG Event Log was invalid.
TPMAPI_E_TCG_SEPARATOR_ABSENT
0x8029011C
A TCG Separator was not found.
TPMAPI_E_TCG_INVALID_DIGEST_ENTRY
0x8029011D
A digest value in a TCG Log entry did not match hasheddata.
Troubleshooting 121

Constant/Value Description
TPMAPI_E_POLICY_DENIES_OPERATION
0x8029011E
The requested operation was blocked by current TPMpolicy. Please contact your system administrator forassistance.
TBSIMP_E_BUFFER_TOO_SMALL
0x80290200
The specified buffer was too small.
TBSIMP_E_CLEANUP_FAILED
0x80290201
The context could not be cleaned up.
TBSIMP_E_INVALID_CONTEXT_HANDLE
0x80290202
The specified context handle is invalid.
TBSIMP_E_INVALID_CONTEXT_PARAM
0x80290203
An invalid context parameter was specified.
TBSIMP_E_TPM_ERROR
0x80290204
An error occurred while communicating with the TPM
TBSIMP_E_HASH_BAD_KEY
0x80290205
No entry with the specified key was found.
TBSIMP_E_DUPLICATE_VHANDLE
0x80290206
The specified virtual handle matches a virtual handle alreadyin use.
TBSIMP_E_INVALID_OUTPUT_POINTER
0x80290207
The pointer to the returned handle location was NULL orinvalid
TBSIMP_E_INVALID_PARAMETER
0x80290208
One or more parameters is invalid
TBSIMP_E_RPC_INIT_FAILED
0x80290209
The RPC subsystem could not be initialized.
TBSIMP_E_SCHEDULER_NOT_RUNNING
0x8029020A
The TBS scheduler is not running.
TBSIMP_E_COMMAND_CANCELED
0x8029020B
The command was canceled.
TBSIMP_E_OUT_OF_MEMORY
0x8029020C
There was not enough memory to fulfill the request
TBSIMP_E_LIST_NO_MORE_ITEMS
0x8029020D
The specified list is empty, or the iteration has reached theend of the list.
TBSIMP_E_LIST_NOT_FOUND
0x8029020E
The specified item was not found in the list.
TBSIMP_E_NOT_ENOUGH_SPACE
0x8029020F
The TPM does not have enough space to load the requestedresource.
122 Troubleshooting

Constant/Value Description
TBSIMP_E_NOT_ENOUGH_TPM_CONTEXTS
0x80290210
There are too many TPM contexts in use.
TBSIMP_E_COMMAND_FAILED
0x80290211
The TPM command failed.
TBSIMP_E_UNKNOWN_ORDINAL
0x80290212
The TBS does not recognize the specified ordinal.
TBSIMP_E_RESOURCE_EXPIRED
0x80290213
The requested resource is no longer available.
TBSIMP_E_INVALID_RESOURCE
0x80290214
The resource type did not match.
TBSIMP_E_NOTHING_TO_UNLOAD
0x80290215
No resources can be unloaded.
TBSIMP_E_HASH_TABLE_FULL
0x80290216
No new entries can be added to the hash table.
TBSIMP_E_TOO_MANY_TBS_CONTEXTS
0x80290217
A new TBS context could not be created because there aretoo many open contexts.
TBSIMP_E_TOO_MANY_RESOURCES
0x80290218
A new virtual resource could not be created because thereare too many open virtual resources.
TBSIMP_E_PPI_NOT_SUPPORTED
0x80290219
The physical presence interface is not supported.
TBSIMP_E_TPM_INCOMPATIBLE
0x8029021A
TBS is not compatible with the version of TPM found on thesystem.
TBSIMP_E_NO_EVENT_LOG
0x8029021B
No TCG event log is available.
TPM_E_PPI_ACPI_FAILURE
0x80290300
A general error was detected when attempting to acquirethe BIOS's response to a Physical Presence command.
TPM_E_PPI_USER_ABORT
0x80290301
The user failed to confirm the TPM operation request.
TPM_E_PPI_BIOS_FAILURE
0x80290302
The BIOS failure prevented the successful execution ofthe requested TPM operation (e.g. invalid TPM operationrequest, BIOS communication error with the TPM).
TPM_E_PPI_NOT_SUPPORTED
0x80290303
The BIOS does not support the physical presence interface.
TPM_E_PPI_BLOCKED_IN_BIOS
0x80290304
The Physical Presence command was blocked by currentBIOS settings. The system owner may be able toreconfigure the BIOS settings to allow the command.
Troubleshooting 123

Constant/Value Description
TPM_E_PCP_ERROR_MASK
0x80290400
This is an error mask to convert Platform Crypto Providererrors to win errors.
TPM_E_PCP_DEVICE_NOT_READY
0x80290401
The Platform Crypto Device is currently not ready. It needsto be fully provisioned to be operational.
TPM_E_PCP_INVALID_HANDLE
0x80290402
The handle provided to the Platform Crypto Provider isinvalid.
TPM_E_PCP_INVALID_PARAMETER
0x80290403
A parameter provided to the Platform Crypto Provider isinvalid.
TPM_E_PCP_FLAG_NOT_SUPPORTED
0x80290404
A provided flag to the Platform Crypto Provider is notsupported.
TPM_E_PCP_NOT_SUPPORTED
0x80290405
The requested operation is not supported by this PlatformCrypto Provider.
TPM_E_PCP_BUFFER_TOO_SMALL
0x80290406
The buffer is too small to contain all data. No informationhas been written to the buffer.
TPM_E_PCP_INTERNAL_ERROR
0x80290407
An unexpected internal error has occurred in the PlatformCrypto Provider.
TPM_E_PCP_AUTHENTICATION_FAILED
0x80290408
The authorization to use a provider object has failed.
TPM_E_PCP_AUTHENTICATION_IGNORED
0x80290409
The Platform Crypto Device has ignored the authorizationfor the provider object, to mitigate against a dictionaryattack.
TPM_E_PCP_POLICY_NOT_FOUND
0x8029040A
The referenced policy was not found.
TPM_E_PCP_PROFILE_NOT_FOUND
0x8029040B
The referenced profile was not found.
TPM_E_PCP_VALIDATION_FAILED
0x8029040C
The validation was not successful.
PLA_E_DCS_NOT_FOUND
0x80300002
Data Collector Set was not found.
PLA_E_DCS_IN_USE
0x803000AA
The Data Collector Set or one of its dependencies is alreadyin use.
PLA_E_TOO_MANY_FOLDERS
0x80300045
Unable to start Data Collector Set because there are toomany folders.
PLA_E_NO_MIN_DISK
0x80300070
Not enough free disk space to start Data Collector Set.
124 Troubleshooting

Constant/Value Description
PLA_E_DCS_ALREADY_EXISTS
0x803000B7
Data Collector Set already exists.
PLA_S_PROPERTY_IGNORED
0x00300100
Property value will be ignored.
PLA_E_PROPERTY_CONFLICT
0x80300101
Property value conflict.
PLA_E_DCS_SINGLETON_REQUIRED
0x80300102
The current configuration for this Data Collector Setrequires that it contain exactly one Data Collector.
PLA_E_CREDENTIALS_REQUIRED
0x80300103
A user account is required in order to commit the currentData Collector Set properties.
PLA_E_DCS_NOT_RUNNING
0x80300104
Data Collector Set is not running.
PLA_E_CONFLICT_INCL_EXCL_API
0x80300105
A conflict was detected in the list of include/exclude APIs.Do not specify the same API in both the include list and theexclude list.
PLA_E_NETWORK_EXE_NOT_VALID
0x80300106
The executable path you have specified refers to a networkshare or UNC path.
PLA_E_EXE_ALREADY_CONFIGURED
0x80300107
The executable path you have specified is alreadyconfigured for API tracing.
PLA_E_EXE_PATH_NOT_VALID
0x80300108
The executable path you have specified does not exist.Verify that the specified path is correct.
PLA_E_DC_ALREADY_EXISTS
0x80300109
Data Collector already exists.
PLA_E_DCS_START_WAIT_TIMEOUT
0x8030010A
The wait for the Data Collector Set start notification hastimed out.
PLA_E_DC_START_WAIT_TIMEOUT
0x8030010B
The wait for the Data Collector to start has timed out.
PLA_E_REPORT_WAIT_TIMEOUT
0x8030010C
The wait for the report generation tool to finish has timedout.
PLA_E_NO_DUPLICATES
0x8030010D
Duplicate items are not allowed.
PLA_E_EXE_FULL_PATH_REQUIRED
0x8030010E
When specifying the executable that you want to trace, youmust specify a full path to the executable and not just afilename.
PLA_E_INVALID_SESSION_NAME
0x8030010F
The session name provided is invalid.
Troubleshooting 125

Constant/Value Description
PLA_E_PLA_CHANNEL_NOT_ENABLED
0x80300110
The Event Log channel Microsoft-Windows-Diagnosis-PLA/Operational must be enabled to perform this operation.
PLA_E_TASKSCHED_CHANNEL_NOT_ENABLED
0x80300111
The Event Log channel Microsoft-Windows-TaskSchedulermust be enabled to perform this operation.
PLA_E_RULES_MANAGER_FAILED
0x80300112
The execution of the Rules Manager failed.
PLA_E_CABAPI_FAILURE
0x80300113
An error occurred while attempting to compress or extractthe data.
FVE_E_LOCKED_VOLUME
0x80310000
This drive is locked by BitLocker Drive Encryption. You mustunlock this drive from Control Panel.
FVE_E_NOT_ENCRYPTED
0x80310001
The drive is not encrypted.
FVE_E_NO_TPM_BIOS
0x80310002
The BIOS did not correctly communicate with the TPM.Contact the computer manufacturer for BIOS upgradeinstructions.
FVE_E_NO_MBR_METRIC
0x80310003
The BIOS did not correctly communicate with the masterboot record (MBR). Contact the computer manufacturer forBIOS upgrade instructions.
FVE_E_NO_BOOTSECTOR_METRIC
0x80310004
A required TPM measurement is missing. If there is abootable CD or DVD in your computer, remove it, restartthe computer, and turn on BitLocker again. If the problempersists, ensure the master boot record is up to date.
FVE_E_NO_BOOTMGR_METRIC
0x80310005
The boot sector of this drive is not compatible withBitLocker Drive Encryption. Use the Bootrec.exe tool in theWindows Recovery Environment to update or repair theboot manager (BOOTMGR).
FVE_E_WRONG_BOOTMGR
0x80310006
The boot manager of this operating system is notcompatible with BitLocker Drive Encryption. Use theBootrec.exe tool in the Windows Recovery Environment toupdate or repair the boot manager (BOOTMGR).
FVE_E_SECURE_KEY_REQUIRED
0x80310007
At least one secure key protector is required for thisoperation to be performed.
FVE_E_NOT_ACTIVATED
0x80310008
BitLocker Drive Encryption is not enabled on this drive. Turnon BitLocker.
FVE_E_ACTION_NOT_ALLOWED
0x80310009
BitLocker Drive Encryption cannot perform requestedaction. This condition may occur when two requests areissued at the same time. Wait a few moments and then trythe action again.
FVE_E_AD_SCHEMA_NOT_INSTALLED
0x8031000A
The Active Directory Domain Services forest does notcontain the required attributes and classes to host BitLockerDrive Encryption or TPM information. Contact your domain
126 Troubleshooting

Constant/Value Description
administrator to verify that any required BitLocker ActiveDirectory schema extensions have been installed.
FVE_E_AD_INVALID_DATATYPE
0x8031000B
The type of the data obtained from Active Directory wasnot expected. The BitLocker recovery information may bemissing or corrupted.
FVE_E_AD_INVALID_DATASIZE
0x8031000C
The size of the data obtained from Active Directory wasnot expected. The BitLocker recovery information may bemissing or corrupted.
FVE_E_AD_NO_VALUES
0x8031000D
The attribute read from Active Directory does not containany values. The BitLocker recovery information may bemissing or corrupted.
FVE_E_AD_ATTR_NOT_SET
0x8031000E
The attribute was not set. Verify that you are loggedon with a domain account that has the ability to writeinformation to Active Directory objects.
FVE_E_AD_GUID_NOT_FOUND
0x8031000F
The specified attribute cannot be found in Active DirectoryDomain Services. Contact your domain administrator toverify that any required BitLocker Active Directory schemaextensions have been installed.
FVE_E_BAD_INFORMATION
0x80310010
The BitLocker metadata for the encrypted drive is not valid.You can attempt to repair the drive to restore access.
FVE_E_TOO_SMALL
0x80310011
The drive cannot be encrypted because it does not haveenough free space. Delete any unnecessary data on thedrive to create additional free space and then try again.
FVE_E_SYSTEM_VOLUME
0x80310012
The drive cannot be encrypted because it contains systemboot information. Create a separate partition for use asthe system drive that contains the boot information and asecond partition for use as the operating system drive andthen encrypt the operating system drive.
FVE_E_FAILED_WRONG_FS
0x80310013
The drive cannot be encrypted because the file system isnot supported.
FVE_E_BAD_PARTITION_SIZE
0x80310014
The file system size is larger than the partition size in thepartition table. This drive may be corrupt or may have beentampered with. To use it with BitLocker, you must reformatthe partition.
FVE_E_NOT_SUPPORTED
0x80310015
This drive cannot be encrypted.
FVE_E_BAD_DATA
0x80310016
The data is not valid.
FVE_E_VOLUME_NOT_BOUND
0x80310017
The data drive specified is not set to automatically unlock onthe current computer and cannot be unlocked automatically.
FVE_E_TPM_NOT_OWNED
0x80310018
You must initialize the TPM before you can use BitLockerDrive Encryption.
Troubleshooting 127

Constant/Value Description
FVE_E_NOT_DATA_VOLUME
0x80310019
The operation attempted cannot be performed on anoperating system drive.
FVE_E_AD_INSUFFICIENT_BUFFER
0x8031001A
The buffer supplied to a function was insufficient to containthe returned data. Increase the buffer size before runningthe function again.
FVE_E_CONV_READ
0x8031001B
A read operation failed while converting the drive. The drivewas not converted. Please re-enable BitLocker.
FVE_E_CONV_WRITE
0x8031001C
A write operation failed while converting the drive. The drivewas not converted. Please re-enable BitLocker.
FVE_E_KEY_REQUIRED
0x8031001D
One or more BitLocker key protectors are required. Youcannot delete the last key on this drive.
FVE_E_CLUSTERING_NOT_SUPPORTED
0x8031001E
Cluster configurations are not supported by BitLocker DriveEncryption.
FVE_E_VOLUME_BOUND_ALREADY
0x8031001F
The drive specified is already configured to be automaticallyunlocked on the current computer.
FVE_E_OS_NOT_PROTECTED
0x80310020
The operating system drive is not protected by BitLockerDrive Encryption.
FVE_E_PROTECTION_DISABLED
0x80310021
BitLocker Drive Encryption has been suspended on thisdrive. All BitLocker key protectors configured for this driveare effectively disabled, and the drive will be automaticallyunlocked using an unencrypted (clear) key.
FVE_E_RECOVERY_KEY_REQUIRED
0x80310022
The drive you are attempting to lock does not have anykey protectors available for encryption because BitLockerprotection is currently suspended. Re-enable BitLocker tolock this drive.
FVE_E_FOREIGN_VOLUME
0x80310023
BitLocker cannot use the TPM to protect a data drive. TPMprotection can only be used with the operating system drive.
FVE_E_OVERLAPPED_UPDATE
0x80310024
The BitLocker metadata for the encrypted drive cannot beupdated because it was locked for updating by anotherprocess. Please try this process again.
FVE_E_TPM_SRK_AUTH_NOT_ZERO
0x80310025
The authorization data for the storage root key (SRK) ofthe TPM is not zero and is therefore incompatible withBitLocker. Please initialize the TPM before attempting touse it with BitLocker.
FVE_E_FAILED_SECTOR_SIZE
0x80310026
The drive encryption algorithm cannot be used on thissector size.
FVE_E_FAILED_AUTHENTICATION
0x80310027
The drive cannot be unlocked with the key provided.Confirm that you have provided the correct key and tryagain.
FVE_E_NOT_OS_VOLUME The drive specified is not the operating system drive.
128 Troubleshooting

Constant/Value Description
0x80310028
FVE_E_AUTOUNLOCK_ENABLED
0x80310029
BitLocker Drive Encryption cannot be turned off on theoperating system drive until the auto unlock feature hasbeen disabled for the fixed data drives and removable datadrives associated with this computer.
FVE_E_WRONG_BOOTSECTOR
0x8031002A
The system partition boot sector does not perform TPMmeasurements. Use the Bootrec.exe tool in the WindowsRecovery Environment to update or repair the boot sector.
FVE_E_WRONG_SYSTEM_FS
0x8031002B
BitLocker Drive Encryption operating system drives mustbe formatted with the NTFS file system in order to beencrypted. Convert the drive to NTFS, and then turn onBitLocker.
FVE_E_POLICY_PASSWORD_REQUIRED
0x8031002C
Group Policy settings require that a recovery password bespecified before encrypting the drive.
FVE_E_CANNOT_SET_FVEK_ENCRYPTED
0x8031002D
The drive encryption algorithm and key cannot be set ona previously encrypted drive. To encrypt this drive withBitLocker Drive Encryption, remove the previous encryptionand then turn on BitLocker.
FVE_E_CANNOT_ENCRYPT_NO_KEY
0x8031002E
BitLocker Drive Encryption cannot encrypt the specifieddrive because an encryption key is not available. Add a keyprotector to encrypt this drive.
FVE_E_BOOTABLE_CDDVD
0x80310030
BitLocker Drive Encryption detected bootable media (CD orDVD) in the computer. Remove the media and restart thecomputer before configuring BitLocker.
FVE_E_PROTECTOR_EXISTS
0x80310031
This key protector cannot be added. Only one key protectorof this type is allowed for this drive.
FVE_E_RELATIVE_PATH
0x80310032
The recovery password file was not found because a relativepath was specified. Recovery passwords must be saved to afully qualified path. Environment variables configured on thecomputer can be used in the path.
FVE_E_PROTECTOR_NOT_FOUND
0x80310033
The specified key protector was not found on the drive. Tryanother key protector.
FVE_E_INVALID_KEY_FORMAT
0x80310034
The recovery key provided is corrupt and cannot be usedto access the drive. An alternative recovery method, suchas recovery password, a data recovery agent, or a backupversion of the recovery key must be used to recover accessto the drive.
FVE_E_INVALID_PASSWORD_FORMAT
0x80310035
The format of the recovery password provided is invalid.BitLocker recovery passwords are 48 digits. Verify that therecovery password is in the correct format and then tryagain.
FVE_E_FIPS_RNG_CHECK_FAILED
0x80310036
The random number generator check test failed.
Troubleshooting 129

Constant/Value Description
FVE_E_FIPS_PREVENTS_RECOVERY_PASSWORD
0x80310037
The Group Policy setting requiring FIPS complianceprevents a local recovery password from being generatedor used by BitLocker Drive Encryption. When operating inFIPS-compliant mode, BitLocker recovery options can beeither a recovery key stored on a USB drive or recoverythrough a data recovery agent.
FVE_E_FIPS_PREVENTS_EXTERNAL_KEY_EXPORT
0x80310038
The Group Policy setting requiring FIPS complianceprevents the recovery password from being saved toActive Directory. When operating in FIPS-compliant mode,BitLocker recovery options can be either a recovery keystored on a USB drive or recovery through a data recoveryagent. Check your Group Policy settings configuration.
FVE_E_NOT_DECRYPTED
0x80310039
The drive must be fully decrypted to complete thisoperation.
FVE_E_INVALID_PROTECTOR_TYPE
0x8031003A
The key protector specified cannot be used for thisoperation.
FVE_E_NO_PROTECTORS_TO_TEST
0x8031003B
No key protectors exist on the drive to perform thehardware test.
FVE_E_KEYFILE_NOT_FOUND
0x8031003C
The BitLocker startup key or recovery password cannotbe found on the USB device. Verify that you have thecorrect USB device, that the USB device is plugged intothe computer on an active USB port, restart the computer,and then try again. If the problem persists, contact thecomputer manufacturer for BIOS upgrade instructions.
FVE_E_KEYFILE_INVALID
0x8031003D
The BitLocker startup key or recovery password fileprovided is corrupt or invalid. Verify that you have thecorrect startup key or recovery password file and try again.
FVE_E_KEYFILE_NO_VMK
0x8031003E
The BitLocker encryption key cannot be obtained from thestartup key or recovery password. Verify that you have thecorrect startup key or recovery password and try again.
FVE_E_TPM_DISABLED
0x8031003F
The TPM is disabled. The TPM must be enabled, initialized,and have valid ownership before it can be used withBitLocker Drive Encryption.
FVE_E_NOT_ALLOWED_IN_SAFE_MODE
0x80310040
The BitLocker configuration of the specified drive cannotbe managed because this computer is currently operating inSafe Mode. While in Safe Mode, BitLocker Drive Encryptioncan only be used for recovery purposes.
FVE_E_TPM_INVALID_PCR
0x80310041
The TPM was not able to unlock the drive because thesystem boot information has changed or a PIN was notprovided correctly. Verify that the drive has not beentampered with and that changes to the system bootinformation were caused by a trusted source. After verifyingthat the drive is safe to access, use the BitLocker recoveryconsole to unlock the drive and then suspend and resumeBitLocker to update system boot information that BitLockerassociates with this drive.
FVE_E_TPM_NO_VMK
0x80310042
The BitLocker encryption key cannot be obtained from theTPM.
130 Troubleshooting

Constant/Value Description
FVE_E_PIN_INVALID
0x80310043
The BitLocker encryption key cannot be obtained from theTPM and PIN.
FVE_E_AUTH_INVALID_APPLICATION
0x80310044
A boot application has changed since BitLocker DriveEncryption was enabled.
FVE_E_AUTH_INVALID_CONFIG
0x80310045
The Boot Configuration Data (BCD) settings have changedsince BitLocker Drive Encryption was enabled.
FVE_E_FIPS_DISABLE_PROTECTION_NOT_ALLOWED
0x80310046
The Group Policy setting requiring FIPS compliance prohibitsthe use of unencrypted keys, which prevents BitLocker frombeing suspended on this drive. Please contact your domainadministrator for more information.
FVE_E_FS_NOT_EXTENDED
0x80310047
This drive cannot be encrypted by BitLocker DriveEncryption because the file system does not extend to theend of the drive. Repartition this drive and then try again.
FVE_E_FIRMWARE_TYPE_NOT_SUPPORTED
0x80310048
BitLocker Drive Encryption cannot be enabled on theoperating system drive. Contact the computer manufacturerfor BIOS upgrade instructions.
FVE_E_NO_LICENSE
0x80310049
This version of Windows does not include BitLocker DriveEncryption. To use BitLocker Drive Encryption, pleaseupgrade the operating system.
FVE_E_NOT_ON_STACK
0x8031004A
BitLocker Drive Encryption cannot be used because criticalBitLocker system files are missing or corrupted. UseWindows Startup Repair to restore these files to yourcomputer.
FVE_E_FS_MOUNTED
0x8031004B
The drive cannot be locked when the drive is in use.
FVE_E_TOKEN_NOT_IMPERSONATED
0x8031004C
The access token associated with the current thread is notan impersonated token.
FVE_E_DRY_RUN_FAILED
0x8031004D
The BitLocker encryption key cannot be obtained. Verifythat the TPM is enabled and ownership has been taken. Ifthis computer does not have a TPM, verify that the USBdrive is inserted and available.
FVE_E_REBOOT_REQUIRED
0x8031004E
You must restart your computer before continuing withBitLocker Drive Encryption.
FVE_E_DEBUGGER_ENABLED
0x8031004F
Drive encryption cannot occur while boot debugging isenabled. Use the bcdedit command-line tool to turn off bootdebugging.
FVE_E_RAW_ACCESS
0x80310050
No action was taken as BitLocker Drive Encryption is in rawaccess mode.
FVE_E_RAW_BLOCKED
0x80310051
BitLocker Drive Encryption cannot enter raw access modefor this drive because the drive is currently in use.
Troubleshooting 131

Constant/Value Description
FVE_E_BCD_APPLICATIONS_PATH_INCORRECT
0x80310052
The path specified in the Boot Configuration Data (BCD) fora BitLocker Drive Encryption integrity-protected applicationis incorrect. Please verify and correct your BCD settings andtry again.
FVE_E_NOT_ALLOWED_IN_VERSION
0x80310053
BitLocker Drive Encryption can only be used for limitedprovisioning or recovery purposes when the computer isrunning in pre-installation or recovery environments.
FVE_E_NO_AUTOUNLOCK_MASTER_KEY
0x80310054
The auto-unlock master key was not available from theoperating system drive.
FVE_E_MOR_FAILED
0x80310055
The system firmware failed to enable clearing of systemmemory when the computer was restarted.
FVE_E_HIDDEN_VOLUME
0x80310056
The hidden drive cannot be encrypted.
FVE_E_TRANSIENT_STATE
0x80310057
BitLocker encryption keys were ignored because the drivewas in a transient state.
FVE_E_PUBKEY_NOT_ALLOWED
0x80310058
Public key based protectors are not allowed on this drive.
FVE_E_VOLUME_HANDLE_OPEN
0x80310059
BitLocker Drive Encryption is already performing anoperation on this drive. Please complete all operationsbefore continuing.
FVE_E_NO_FEATURE_LICENSE
0x8031005A
This version of Windows does not support this feature ofBitLocker Drive Encryption. To use this feature, upgrade theoperating system.
FVE_E_INVALID_STARTUP_OPTIONS
0x8031005B
The Group Policy settings for BitLocker startup optionsare in conflict and cannot be applied. Contact your systemadministrator for more information.
FVE_E_POLICY_RECOVERY_PASSWORD_NOT_ALLOWED
0x8031005C
Group policy settings do not permit the creation of arecovery password.
FVE_E_POLICY_RECOVERY_PASSWORD_REQUIRED
0x8031005D
Group policy settings require the creation of a recoverypassword.
FVE_E_POLICY_RECOVERY_KEY_NOT_ALLOWED
0x8031005E
Group policy settings do not permit the creation of arecovery key.
FVE_E_POLICY_RECOVERY_KEY_REQUIRED
0x8031005F
Group policy settings require the creation of a recovery key.
FVE_E_POLICY_STARTUP_PIN_NOT_ALLOWED
0x80310060
Group policy settings do not permit the use of a PIN atstartup. Please choose a different BitLocker startup option.
FVE_E_POLICY_STARTUP_PIN_REQUIRED
0x80310061
Group policy settings require the use of a PIN at startup.Please choose this BitLocker startup option.
132 Troubleshooting

Constant/Value Description
FVE_E_POLICY_STARTUP_KEY_NOT_ALLOWED
0x80310062
Group policy settings do not permit the use of a startup key.Please choose a different BitLocker startup option.
FVE_E_POLICY_STARTUP_KEY_REQUIRED
0x80310063
Group policy settings require the use of a startup key.Please choose this BitLocker startup option.
FVE_E_POLICY_STARTUP_PIN_KEY_NOT_ALLOWED0x80310064
Group policy settings do not permit the use of a startup keyand PIN. Please choose a different BitLocker startup option.
FVE_E_POLICY_STARTUP_PIN_KEY_REQUIRED
0x80310065
Group policy settings require the use of a startup key andPIN. Please choose this BitLocker startup option.
FVE_E_POLICY_STARTUP_TPM_NOT_ALLOWED
0x80310066
Group policy does not permit the use of TPM-only atstartup. Please choose a different BitLocker startup option.
FVE_E_POLICY_STARTUP_TPM_REQUIRED
0x80310067
Group policy settings require the use of TPM-only atstartup. Please choose this BitLocker startup option.
FVE_E_POLICY_INVALID_PIN_LENGTH
0x80310068
The PIN provided does not meet minimum or maximumlength requirements.
FVE_E_KEY_PROTECTOR_NOT_SUPPORTED
0x80310069
The key protector is not supported by the version ofBitLocker Drive Encryption currently on the drive. Upgradethe drive to add the key protector.
FVE_E_POLICY_PASSPHRASE_NOT_ALLOWED
0x8031006A
Group policy settings do not permit the creation of apassword.
FVE_E_POLICY_PASSPHRASE_REQUIRED
0x8031006B
Group policy settings require the creation of a password.
FVE_E_FIPS_PREVENTS_PASSPHRASE
0x8031006C
The group policy setting requiring FIPS complianceprevented the password from being generated or used.Please contact your domain administrator for moreinformation.
FVE_E_OS_VOLUME_PASSPHRASE_NOT_ALLOWED
0x8031006D
A password cannot be added to the operating system drive.
FVE_E_INVALID_BITLOCKER_OID
0x8031006E
The BitLocker object identifier (OID) on the drive appears tobe invalid or corrupt. Use manage-BDE to reset the OID onthis drive.
FVE_E_VOLUME_TOO_SMALL
0x8031006F
The drive is too small to be protected using BitLocker DriveEncryption.
FVE_E_DV_NOT_SUPPORTED_ON_FS
0x80310070
The selected discovery drive type is incompatible with thefile system on the drive. BitLocker To Go discovery drivesmust be created on FAT formatted drives.
FVE_E_DV_NOT_ALLOWED_BY_GP
0x80310071
The selected discovery drive type is not allowed by thecomputer's Group Policy settings. Verify that Group Policysettings allow the creation of discovery drives for use withBitLocker To Go.
Troubleshooting 133

Constant/Value Description
FVE_E_POLICY_USER_CERTIFICATE_NOT_ALLOWED
0x80310072
Group Policy settings do not permit user certificates such assmart cards to be used with BitLocker Drive Encryption.
FVE_E_POLICY_USER_CERTIFICATE_REQUIRED
0x80310073
Group Policy settings require that you have a valid usercertificate, such as a smart card, to be used with BitLockerDrive Encryption.
FVE_E_POLICY_USER_CERT_MUST_BE_HW
0x80310074
Group Policy settings requires that you use a smart card-based key protector with BitLocker Drive Encryption.
FVE_E_POLICY_USER_CONFIGURE_FDV_AUTOUNLOCK_NOT_ALLOWED
0x80310075
Group Policy settings do not permit BitLocker-protectedfixed data drives to be automatically unlocked.
FVE_E_POLICY_USER_CONFIGURE_RDV_AUTOUNLOCK_NOT_ALLOWED
0x80310076
Group Policy settings do not permit BitLocker-protectedremovable data drives to be automatically unlocked.
FVE_E_POLICY_USER_CONFIGURE_RDV_NOT_ALLOWED
0x80310077
Group Policy settings do not permit you to configureBitLocker Drive Encryption on removable data drives.
FVE_E_POLICY_USER_ENABLE_RDV_NOT_ALLOWED
0x80310078
Group Policy settings do not permit you to turn on BitLockerDrive Encryption on removable data drives. Please contactyour system administrator if you need to turn on BitLocker.
FVE_E_POLICY_USER_DISABLE_RDV_NOT_ALLOWED
0x80310079
Group Policy settings do not permit turning off BitLockerDrive Encryption on removable data drives. Please contactyour system administrator if you need to turn off BitLocker.
FVE_E_POLICY_INVALID_PASSPHRASE_LENGTH
0x80310080
Your password does not meet minimum password lengthrequirements. By default, passwords must be at least 8characters in length. Check with your system administratorfor the password length requirement in your organization.
FVE_E_POLICY_PASSPHRASE_TOO_SIMPLE
0x80310081
Your password does not meet the complexity requirementsset by your system administrator. Try adding upper andlowercase characters, numbers, and symbols.
FVE_E_RECOVERY_PARTITION
0x80310082
This drive cannot be encrypted because it is reserved forWindows System Recovery Options.
FVE_E_POLICY_CONFLICT_FDV_RK_OFF_AUK_ON
0x80310083
BitLocker Drive Encryption cannot be applied to this drivebecause of conflicting Group Policy settings. BitLockercannot be configured to automatically unlock fixed datadrives when user recovery options are disabled. If you wantBitLocker-protected fixed data drives to be automaticallyunlocked after key validation has occurred, please ask yoursystem administrator to resolve the settings conflict beforeenabling BitLocker.
FVE_E_POLICY_CONFLICT_RDV_RK_OFF_AUK_ON
0x80310084
BitLocker Drive Encryption cannot be applied to this drivebecause of conflicting Group Policy settings. BitLockercannot be configured to automatically unlock removabledata drives when user recovery option are disabled. Ifyou want BitLocker-protected removable data drives to beautomatically unlocked after key validation has occurred,
134 Troubleshooting

Constant/Value Description
please ask your system administrator to resolve the settingsconflict before enabling BitLocker.
FVE_E_NON_BITLOCKER_OID
0x80310085
The Enhanced Key Usage (EKU) attribute of the specifiedcertificate does not permit it to be used for BitLocker DriveEncryption. BitLocker does not require that a certificatehave an EKU attribute, but if one is configured it mustbe set to an object identifier (OID) that matches the OIDconfigured for BitLocker.
FVE_E_POLICY_PROHIBITS_SELFSIGNED
0x80310086
BitLocker Drive Encryption cannot be applied to this driveas currently configured because of Group Policy settings.The certificate you provided for drive encryption is self-signed. Current Group Policy settings do not permit the useof self-signed certificates. Obtain a new certificate fromyour certification authority before attempting to enableBitLocker.
FVE_E_POLICY_CONFLICT_RO_AND_STARTUP_KEY_REQUIRED
0x80310087
BitLocker Encryption cannot be applied to this drivebecause of conflicting Group Policy settings. When writeaccess to drives not protected by BitLocker is denied, theuse of a USB startup key cannot be required. Please haveyour system administrator resolve these policy conflictsbefore attempting to enable BitLocker.
FVE_E_CONV_RECOVERY_FAILED
0x80310088
BitLocker Drive Encryption cannot be applied to thisdrive because there are conflicting Group Policy settingsfor recovery options on operating system drives.Storing recovery information to Active Directory DomainServices cannot be required when the generation ofrecovery passwords is not permitted. Please have yoursystem administrator resolve these policy conflicts beforeattempting to enable BitLocker.
FVE_E_VIRTUALIZED_SPACE_TOO_BIG
0x80310089
The requested virtualization size is too big.
FVE_E_POLICY_CONFLICT_OSV_RP_OFF_ADB_ON
0x80310090
BitLocker Drive Encryption cannot be applied to thisdrive because there are conflicting Group Policy settingsfor recovery options on operating system drives.Storing recovery information to Active Directory DomainServices cannot be required when the generation ofrecovery passwords is not permitted. Please have yoursystem administrator resolve these policy conflicts beforeattempting to enable BitLocker.
FVE_E_POLICY_CONFLICT_FDV_RP_OFF_ADB_ON
0x80310091
BitLocker Drive Encryption cannot be applied to this drivebecause there are conflicting Group Policy settings forrecovery options on fixed data drives. Storing recoveryinformation to Active Directory Domain Services cannot berequired when the generation of recovery passwords is notpermitted. Please have your system administrator resolvethese policy conflicts before attempting to enable BitLocker.
FVE_E_POLICY_CONFLICT_RDV_RP_OFF_ADB_ON
0x80310092
BitLocker Drive Encryption cannot be applied to this drivebecause there are conflicting Group Policy settings forrecovery options on removable data drives. Storing recoveryinformation to Active Directory Domain Services cannot berequired when the generation of recovery passwords is not
Troubleshooting 135

Constant/Value Description
permitted. Please have your system administrator resolvethese policy conflicts before attempting to enable BitLocker.
FVE_E_NON_BITLOCKER_KU
0x80310093
The Key Usage (KU) attribute of the specified certificatedoes not permit it to be used for BitLocker Drive Encryption.BitLocker does not require that a certificate have a KUattribute, but if one is configured it must be set to eitherKey Encipherment or Key Agreement.
FVE_E_PRIVATEKEY_AUTH_FAILED
0x80310094
The private key associated with the specified certificatecannot be authorized. The private key authorization waseither not provided or the provided authorization wasinvalid.
FVE_E_REMOVAL_OF_DRA_FAILED
0x80310095
Removal of the data recovery agent certificate must bedone using the Certificates snap-in.
FVE_E_OPERATION_NOT_SUPPORTED_ON_VISTA_VOLUME
0x80310096
This drive was encrypted using the version of BitLockerDrive Encryption included with Windows Vista and WindowsServer 2008 which does not support organizationalidentifiers. To specify organizational identifiers for this driveupgrade the drive encryption to the latest version using the"manage-bde -upgrade" command.
FVE_E_CANT_LOCK_AUTOUNLOCK_ENABLED_VOLUME
0x80310097
The drive cannot be locked because it is automaticallyunlocked on this computer. Remove the automatic unlockprotector to lock this drive.
FVE_E_FIPS_HASH_KDF_NOT_ALLOWED
0x80310098
The default BitLocker Key Derivation Function SP800-56Afor ECC smart cards is not supported by your smartcard. The Group Policy setting requiring FIPS-complianceprevents BitLocker from using any other key derivationfunction for encryption. You have to use a FIPS compliantsmart card in FIPS restricted environments.
FVE_E_ENH_PIN_INVALID
0x80310099
The BitLocker encryption key could not be obtained fromthe TPM and enhanced PIN. Try using a PIN containing onlynumerals.
FVE_E_INVALID_PIN_CHARS
0x8031009A
The requested TPM PIN contains invalid characters.
FVE_E_INVALID_DATUM_TYPE
0x8031009B
The management information stored on the drive containedan unknown type. If you are using an old version ofWindows, try accessing the drive from the latest version.
FVE_E_EFI_ONLY
0x8031009C
The feature is only supported on EFI systems.
FVE_E_MULTIPLE_NKP_CERTS
0x8031009D
More than one Network Key Protector certificate has beenfound on the system.
FVE_E_REMOVAL_OF_NKP_FAILED
0x8031009E
Removal of the Network Key Protector certificate must bedone using the Certificates snap-in.
FVE_E_INVALID_NKP_CERT
0x8031009F
An invalid certificate has been found in the Network KeyProtector certificate store.
136 Troubleshooting

Constant/Value Description
FVE_E_NO_EXISTING_PIN
0x803100A0
This drive is not protected with a PIN.
FVE_E_PROTECTOR_CHANGE_PIN_MISMATCH
0x803100A1
Please enter the correct current PIN.
FVE_E_PROTECTOR_CHANGE_BY_STD_USER_DISALLOWED
0x803100A2
You must be logged on with an administrator account tochange the PIN or password. Click the link to reset the PINor password as an administrator.
FVE_E_PROTECTOR_CHANGE_MAX_PIN_CHANGE_ATTEMPTS_REACHED
0x803100A3
BitLocker has disabled PIN and password changes after toomany failed requests. Click the link to reset the PIN orpassword as an administrator.
FVE_E_POLICY_PASSPHRASE_REQUIRES_ASCII
0x803100A4
Your system administrator requires that passwords containonly printable ASCII characters. This includes unaccentedletters (A-Z, a-z), numbers (0-9), space, arithmetic signs,common punctuation, separators, and the following symbols:# $ & @ ^ _ ~ .
FVE_E_FULL_ENCRYPTION_NOT_ALLOWED_ON_TP_STORAGE
0x803100A5
BitLocker Drive Encryption only supports used space onlyencryption on thin provisioned storage.
FVE_E_WIPE_NOT_ALLOWED_ON_TP_STORAGE
0x803100A6
BitLocker Drive Encryption does not support wiping freespace on thin provisioned storage.
FVE_E_KEY_LENGTH_NOT_SUPPORTED_BY_EDRIVE
0x803100A7
The required authentication key length is not supported bythe drive.
FVE_E_NO_EXISTING_PASSPHRASE
0x803100A8
This drive is not protected with a password.
FVE_E_PROTECTOR_CHANGE_PASSPHRASE_MISMATCH
0x803100A9
Please enter the correct current password.
FVE_E_PASSPHRASE_TOO_LONG
0x803100AA
The password cannot exceed 256 characters.
FVE_E_NO_PASSPHRASE_WITH_TPM
0x803100AB
A password key protector cannot be added because a TPMprotector exists on the drive.
FVE_E_NO_TPM_WITH_PASSPHRASE
0x803100AC
A TPM key protector cannot be added because a passwordprotector exists on the drive.
FVE_E_NOT_ALLOWED_ON_CSV_STACK
0x803100AD
This command can only be performed from the coordinatornode for the specified CSV volume.
FVE_E_NOT_ALLOWED_ON_CLUSTER
0x803100AE
This command cannot be performed on a volume when it ispart of a cluster.
Troubleshooting 137

Constant/Value Description
FVE_E_EDRIVE_NO_FAILOVER_TO_SW
0x803100AF
BitLocker did not revert to using BitLocker softwareencryption due to group policy configuration.
FVE_E_EDRIVE_BAND_IN_USE
0x803100B0
The drive cannot be managed by BitLocker because thedrive's hardware encryption feature is already in use.
FVE_E_EDRIVE_DISALLOWED_BY_GP
0x803100B1
Group Policy settings do not allow the use of hardware-based encryption.
FVE_E_EDRIVE_INCOMPATIBLE_VOLUME
0x803100B2
The drive specified does not support hardware-basedencryption.
FVE_E_NOT_ALLOWED_TO_UPGRADE_WHILE_CONVERTING
0x803100B3
BitLocker cannot be upgraded during disk encryption ordecryption.
FVE_E_EDRIVE_DV_NOT_SUPPORTED
0x803100B4
Discovery Volumes are not supported for volumes usinghardware encryption.
FVE_E_NO_PREBOOT_KEYBOARD_DETECTED
0x803100B5
No pre-boot keyboard detected. The user may not be ableto provide required input to unlock the volume.
FVE_E_NO_PREBOOT_KEYBOARD_OR_WINRE_DETECTED
0x803100B6
No pre-boot keyboard or Windows Recovery Environmentdetected. The user may not be able to provide requiredinput to unlock the volume.
FVE_E_POLICY_REQUIRES_STARTUP_PIN_ON_TOUCH_DEVICE
0x803100B7
Group Policy settings require the creation of a startup PIN,but a pre-boot keyboard is not available on this device. Theuser may not be able to provide required input to unlock thevolume.
FVE_E_POLICY_REQUIRES_RECOVERY_PASSWORD_ON_TOUCH_DEVICE
0x803100B8
Group Policy settings require the creation of a recoverypassword, but neither a pre-boot keyboard nor WindowsRecovery Environment is available on this device. The usermay not be able to provide required input to unlock thevolume.
FVE_E_WIPE_CANCEL_NOT_APPLICABLE
0x803100B9
Wipe of free space is not currently taking place.
FVE_E_SECUREBOOT_DISABLED
0x803100BA
BitLocker cannot use Secure Boot for platform integritybecause Secure Boot has been disabled.
FVE_E_SECUREBOOT_CONFIGURATION_INVALID
0x803100BB
BitLocker cannot use Secure Boot for platform integritybecause the Secure Boot configuration does not meet therequirements for BitLocker.
FVE_E_EDRIVE_DRY_RUN_FAILED
0x803100BC
Your computer does not support BitLocker hardware-basedencryption. Check with your computer manufacturer forfirmware updates.
FVE_E_SHADOW_COPY_PRESENT
0x803100BD
BitLocker cannot be enabled on the volume because itcontains a Volume Shadow Copy. Remove all VolumeShadow Copies before encrypting the volume.
138 Troubleshooting
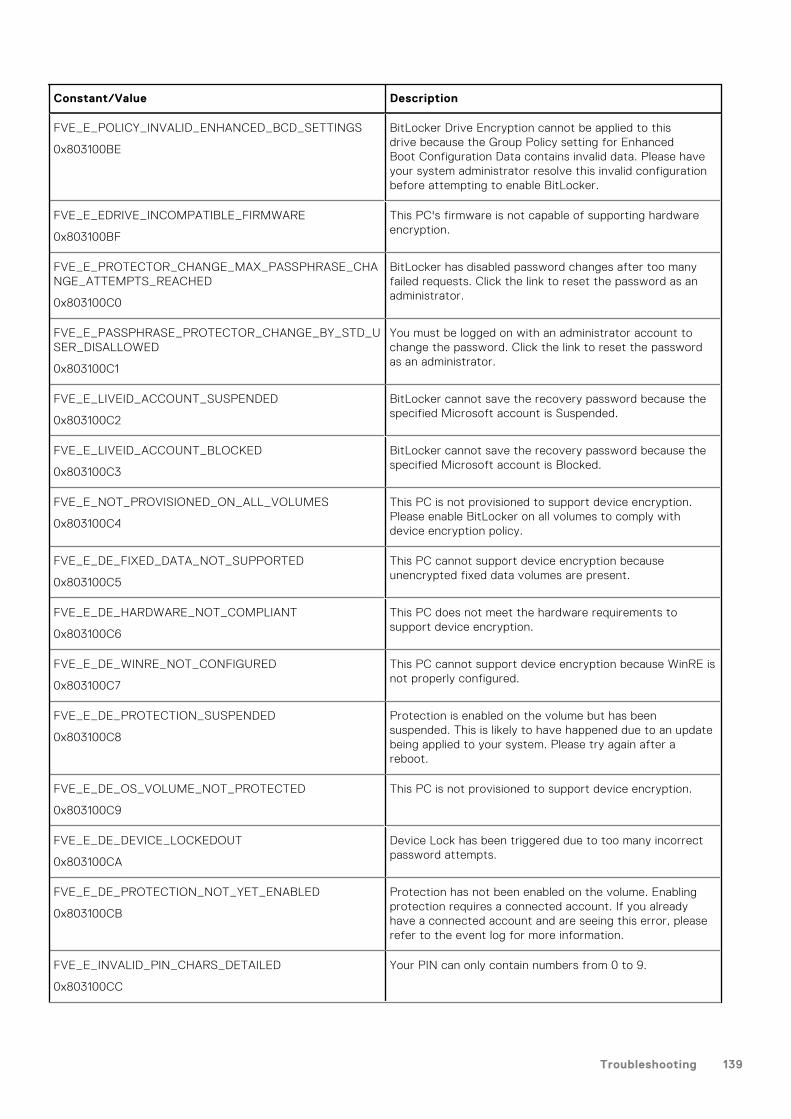
Constant/Value Description
FVE_E_POLICY_INVALID_ENHANCED_BCD_SETTINGS
0x803100BE
BitLocker Drive Encryption cannot be applied to thisdrive because the Group Policy setting for EnhancedBoot Configuration Data contains invalid data. Please haveyour system administrator resolve this invalid configurationbefore attempting to enable BitLocker.
FVE_E_EDRIVE_INCOMPATIBLE_FIRMWARE
0x803100BF
This PC's firmware is not capable of supporting hardwareencryption.
FVE_E_PROTECTOR_CHANGE_MAX_PASSPHRASE_CHANGE_ATTEMPTS_REACHED
0x803100C0
BitLocker has disabled password changes after too manyfailed requests. Click the link to reset the password as anadministrator.
FVE_E_PASSPHRASE_PROTECTOR_CHANGE_BY_STD_USER_DISALLOWED
0x803100C1
You must be logged on with an administrator account tochange the password. Click the link to reset the passwordas an administrator.
FVE_E_LIVEID_ACCOUNT_SUSPENDED
0x803100C2
BitLocker cannot save the recovery password because thespecified Microsoft account is Suspended.
FVE_E_LIVEID_ACCOUNT_BLOCKED
0x803100C3
BitLocker cannot save the recovery password because thespecified Microsoft account is Blocked.
FVE_E_NOT_PROVISIONED_ON_ALL_VOLUMES
0x803100C4
This PC is not provisioned to support device encryption.Please enable BitLocker on all volumes to comply withdevice encryption policy.
FVE_E_DE_FIXED_DATA_NOT_SUPPORTED
0x803100C5
This PC cannot support device encryption becauseunencrypted fixed data volumes are present.
FVE_E_DE_HARDWARE_NOT_COMPLIANT
0x803100C6
This PC does not meet the hardware requirements tosupport device encryption.
FVE_E_DE_WINRE_NOT_CONFIGURED
0x803100C7
This PC cannot support device encryption because WinRE isnot properly configured.
FVE_E_DE_PROTECTION_SUSPENDED
0x803100C8
Protection is enabled on the volume but has beensuspended. This is likely to have happened due to an updatebeing applied to your system. Please try again after areboot.
FVE_E_DE_OS_VOLUME_NOT_PROTECTED
0x803100C9
This PC is not provisioned to support device encryption.
FVE_E_DE_DEVICE_LOCKEDOUT
0x803100CA
Device Lock has been triggered due to too many incorrectpassword attempts.
FVE_E_DE_PROTECTION_NOT_YET_ENABLED
0x803100CB
Protection has not been enabled on the volume. Enablingprotection requires a connected account. If you alreadyhave a connected account and are seeing this error, pleaserefer to the event log for more information.
FVE_E_INVALID_PIN_CHARS_DETAILED
0x803100CC
Your PIN can only contain numbers from 0 to 9.
Troubleshooting 139

Constant/Value Description
FVE_E_DEVICE_LOCKOUT_COUNTER_UNAVAILABLE
0x803100CD
BitLocker cannot use hardware replay protection becauseno counter is available on your PC.
FVE_E_DEVICELOCKOUT_COUNTER_MISMATCH
0x803100CE
Device Lockout state validation failed due to countermismatch.
FVE_E_BUFFER_TOO_LARGE
0x803100CF
The input buffer is too large.
140 Troubleshooting

GlossaryActivate - Activation occurs when the computer has been registered with the Dell Server and has received at least an initial setof policies.
Active Directory (AD) - A directory service created by Microsoft for Windows domain networks.
Application Data Encryption - Application Data Encryption encrypts any file written by a protected application, using a category2 override. This means that any directory that has a category 2 protection or better, or any location that has specific extensionsprotected with category 2 or better, cause ADE to not encrypt those files.
BitLocker Manager - Windows BitLocker is designed to help protect Windows computers by encrypting both data and operatingsystem files. To improve the security of BitLocker deployments and to simplify and reduce the cost of ownership, Dellprovides a single, central management console that addresses many security concerns and offers an integrated approachto managing encryption across other non-BitLocker platforms, whether physical, virtual, or cloud-based. BitLocker Managersupports BitLocker encryption for operating systems, fixed drives, and BitLocker To Go. BitLocker Manager enables you toseamlessly integrate BitLocker into your existing encryption needs and to manage BitLocker with the minimum effort whilestreamlining security and compliance. BitLocker Manager provides integrated management for key recovery, policy managementand enforcement, automated TPM management, FIPS compliance, and compliance reporting.
Cached Credentials - Cached credentials are credentials that are added to the PBA database when a user successfullyauthenticates with Active Directory. This information about the user is retained so that a user can log in when they do nothave a connection to Active Directory (for example, when taking their laptop home).
Common Encryption – The Common key makes encrypted files accessible to all managed users on the device where they werecreated.
Deactivate - Deactivation occurs when SED Manager is turned OFF in the Management Console. Once the computer isdeactivated, the PBA database is deleted and there is no longer any record of cached users.
Encryption External Media - This service within Encryption protects removable media and external storage devices.
Encryption External Media Access Code - This service allows for recovery of Encryption External Media protected deviceswhere the user forgets their password and can no longer login. Completing this process allows the user to reset the passwordset on the media.
Encryption - On-device component that enforces security policies, whether an endpoint is connected to the network,disconnected from the network, lost, or stolen. Creating a trusted computing environment for endpoints, Encryption operates asa layer on top of the device operating system, and provides consistently-enforced authentication, encryption, and authorizationto maximize the protection of sensitive information.
Endpoint - Depending on context, a computer, mobile device, or external media..
Encryption Keys - In most cases, the Encryption client uses the User key plus two additional encryption keys. However, thereare exceptions: All SDE policies and the Secure Windows Credentials policy use the SDE key. The Encrypt Windows Paging Filepolicy and Secure Windows Hibernation File policy use their own key, the General Purpose Key (GPK). The Common key makesfiles accessible to all managed users on the device where they were created. The User key makes files accessible only to theuser who created them, only on the device where they were created. The User Roaming key makes files accessible only to theuser who created them, on any Shielded Windows (or Mac) device.
Encryption sweep - The process of scanning folders to be encrypted to ensure the contained files are in the proper encryptionstate. Ordinary file creation and rename operations do not trigger an encryption sweep. It is important to understand when anencryption sweep may happen and what may affect the resulting sweep times, as follows: - An encryption sweep occurs uponinitial receipt of a policy that has encryption enabled. This can occur immediately after activation if your policy has encryptionenabled. - If the Scan Workstation on Logon policy is enabled, folders specified for encryption are swept on each user logon.- A sweep can be re-triggered under certain subsequent policy changes. Any policy change related to the definition of theencryption folders, encryption algorithms, encryption key usage (common verses user), triggers a sweep. In addition, togglingbetween encryption enabled and disabled triggers an encryption sweep.
Machine key – When encryption is installed on a server, the Machine key protects a server’s file encryption and policy keys. TheMachine Key is stored on the Dell Server. The new server exchanges certificates with the Dell Server during activation and usesthe certificate for subsequent authentication events.
Pre-boot Authentication (PBA) - Pre-boot Authentication serves as an extension of the BIOS or boot firmware and guaranteesa secure, tamper-proof environment external to the operating system as a trusted authentication layer. The PBA prevents
19
Glossary 141

anything being read from the hard disk, such as the operating system, until the user has confirmed they have the correctcredentials.
SED Manager - SED Manager provides a platform for securely managing self-encrypting drives. Although SEDs provide theirown encryption, they lack a platform to manage their encryption and available policies. SED Manager is a central, scalablemanagement component, which allows you to more effectively protect and manage your data. SED Manager ensures that youcan administer your enterprise more quickly and easily.
Server user – A virtual user account created by Encryption for the purpose of handling encryption keys and policy updates ona server operating system. This user account does not correspond to any other user account on the computer or within thedomain, and it has no user name and password that can be used physically. The account is assigned a unique UCID value in theManagement Console.
System Data Encryption (SDE) - SDE is designed to encrypt the operating system and program files. To accomplish thispurpose, SDE must be able to open its key while the operating system is booting. Its intent is to prevent alteration or offlineattacks on the operating system by an attacker. SDE is not intended for user data. Common and User key encryption areintended for sensitive user data because they require a user password to unlock encryption keys. SDE policies do not encryptthe files needed by the operating system to start the boot process. SDE policies do not require pre-boot authentication orinterfere with the Master Boot Record in any way. When the computer boots up, the encrypted files are available before anyuser logs in (to enable patch management, SMS, backup and recovery tools). Disabling SDE triggers automatic decryption of allSDE encrypted files and directories for the relevant users, regardless of other SDE policy values, such as SDE Encryption Rules.
Trusted Platform Module (TPM) - TPM is a security chip with three major functions: secure storage, measurement, andattestation. The Encryption client uses TPM for its secure storage function. The TPM can also provide encrypted containers forthe software vault.
User Encryption – The User key makes files accessible only to the user who created them, only on the device where they werecreated. When running Dell Server Encryption, User encryption is converted to Common encryption. One exception is made forremovable media devices; when inserted into a server with Encryption installed, files are encrypted with the User Roaming key.
142 Glossary


