51
User Guide Dell ™ KB813 Smart Card Keyboard

User Guide
Dell™ KB813 Smart Card Keyboard
Content
IntroductionSetupUsing the KeyboardTroubleshootingSpecificationsRegulatoryCertifications
Information in this document is subject to change without notice. © 2012 - 2015 Dell Inc. All rights reserved. Reproduction of these materials in any manner whatsoever without the written permission of Dell Inc. is strictly forbidden. Trademarks used in this text: Dell and the DELL logo are trademarks of Dell Inc. Microsoft®, Windows®, and Windows Vista® are either trademarks or registered trademarks of Microsoft Corporation in the United States and / or other countries. Other trademarks and trade names may be used in this document to refer to either the entities claiming the marks and names or their products. Dell Inc. disclaims any proprietary interest in trademarks and trade names other than its own. October 2015 Rev.A01

Introduction

Back to Contents Page
Overview
Congratulations on the purchase of your new Dell SmartCard Keyboard.
This user's guide has been developed to provide information that will assist you in the setup and operation of your new smart card keyboard.
The Dell Smart Card Keyboard can be used on PC systems running Windows 2000, Windows XP (32/64 bit), Windows Vista (32/64 bit), Windows 7 (32/64 bit), Windows 8 (32/64bit), Windows 10 (32/64bit), Windows Server 2003, Windows Server 2008, Windows Server 2008 R2, Windows Server 2012, ,Linux Ubuntu, OpenSuse and RedHat.
This product can be used for banking transactions, identification systems, secure web applications, and secure logon. This smart card interface can be used with all microprocessor smart cards.
For more details see Features.
Overview | System Requirement | Features

Setup
NOTE: The drivers are already factory installed if the keyboard is purchased with computer. This section is included in case you have to re-load your operating system.
Install the Keyboard
Connect the Keyboard to any USB port on the computer. The USB port shown in the diagram is at the rear of the computer. USB ports may also be located at the front.
Follow the instructions in Install the driver section.
Overview | System Requirement | Features
Back to Contents Page

System Requirements
In order to properly install and operate your Dell Smart Card
Keyboard, the following system requirements are necessary:
• Windows 2000, Windows XP (32/64 bit), Windows Vista
(32/64 bit), Windows 7 (32/64 bit), Windows 8 (32/64 bit),
Windows 10 (32/64 bit), Windows Server 2003, Windows
Server 2008, Windows Server 2008 R2, Windows Server 2012,
Linux Ubuntu, OpenSuse, and RedHat.
• The Smart Card Keyboard Driver CD
• One free USB port
Features
• Reads from and writes to all ISO7816-1/2/3/4 microprocessorsmart cards (T=0, T=1) up to 826Kbds (TA1=17) @4.8Mhzdepending on smart card
• Supports 3 V, 5 V, and 1.8 V cards
• Powers off automatically when the card is removed
• Smart Card secure PIN entry
• PC/SC 2.0 driver up to Windows 10
Overview | System Requirement | Features
Back to Contents Page

2. Then the following window will appear:
Install the Keyboard | Install the Windows XP driver | Install the Vista driver
Install the Windows 7 driver | Install the Windows 8 driver
Install the Windows 10 driver
Update the Windows XP driver | Update the Vista driver
Update the Windows 7 driver | Update the Windows 8 driver
Update the Windows 10 driver
Install the Windows XP driver
1. When the Dell Smart Card Keyboard is plugged into aUSB port, the following window will appear:
Back to Contents Page

3. The installation wizard will install the driver. After a successfulinstallation, the system will prompt you with the following message:
4. Select Finish. Your Smartcard Keyboard is now ready for use.
Install the Keyboard | Install the Windows XP driver | Install the Vista driver
Install the Windows 7 driver | Install the Windows 8 driver
Install the Windows 10 driver
Update the Windows XP driver | Update the Vista driver
Update the Windows 7 driver | Update the Windows 8 driver
Update the Windows 10 driver
Back to Contents Page

Install the Vista driver
1. When the Dell Smart Card Keyboard is plugged into aUSB port, the following window will appear:
2. Wizard will install driver. After a successful installation,the system will prompt you with the following message:
Install the Keyboard | Install the Windows XP driver | Install the Vista driver
Install the Windows 7 driver | Install the Windows 8 driver
Install the Windows 10 driver
Update the Windows XP driver | Update the Vista driver
Update the Windows 7 driver | Update the Windows 8 driver
Update the Windows 10 driver
Back to Contents Page
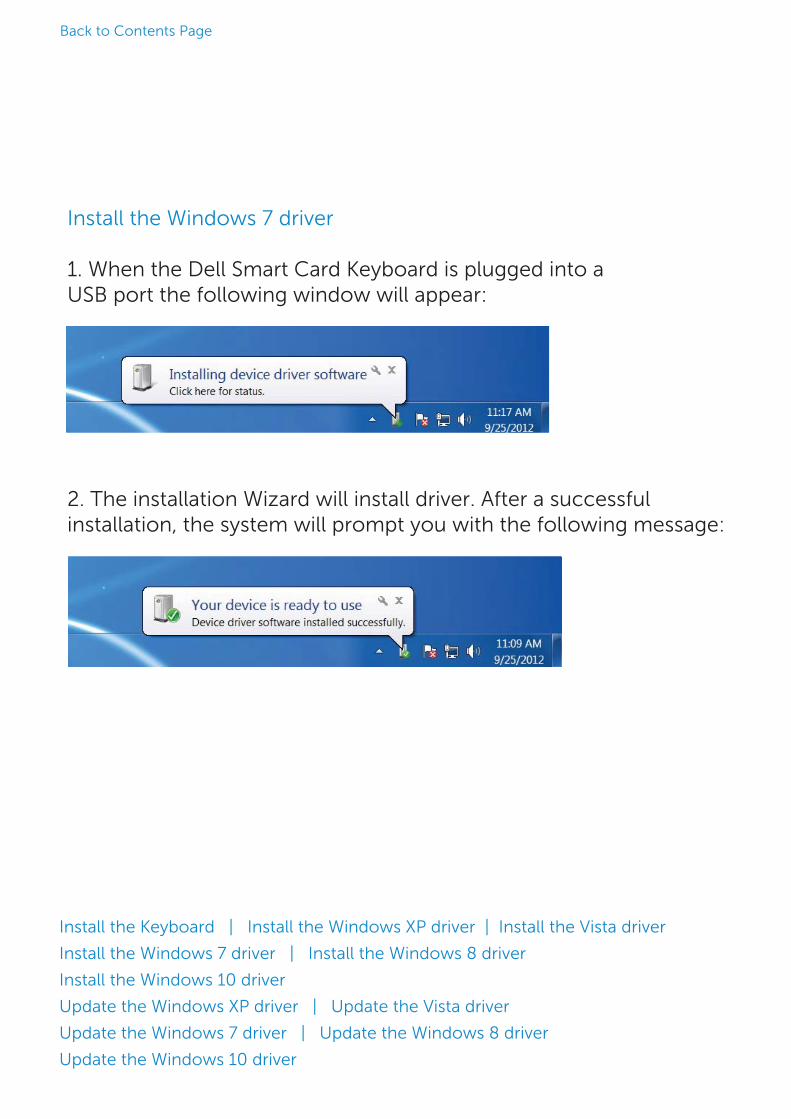
Install the Windows 7 driver
1. When the Dell Smart Card Keyboard is plugged into aUSB port the following window will appear:
2. The installation Wizard will install driver. After a successfulinstallation, the system will prompt you with the following message:
Install the Keyboard | Install the Windows XP driver | Install the Vista driver
Install the Windows 7 driver | Install the Windows 8 driver
Install the Windows 10 driver
Update the Windows XP driver | Update the Vista driver
Update the Windows 7 driver | Update the Windows 8 driver
Update the Windows 10 driver
Back to Contents Page
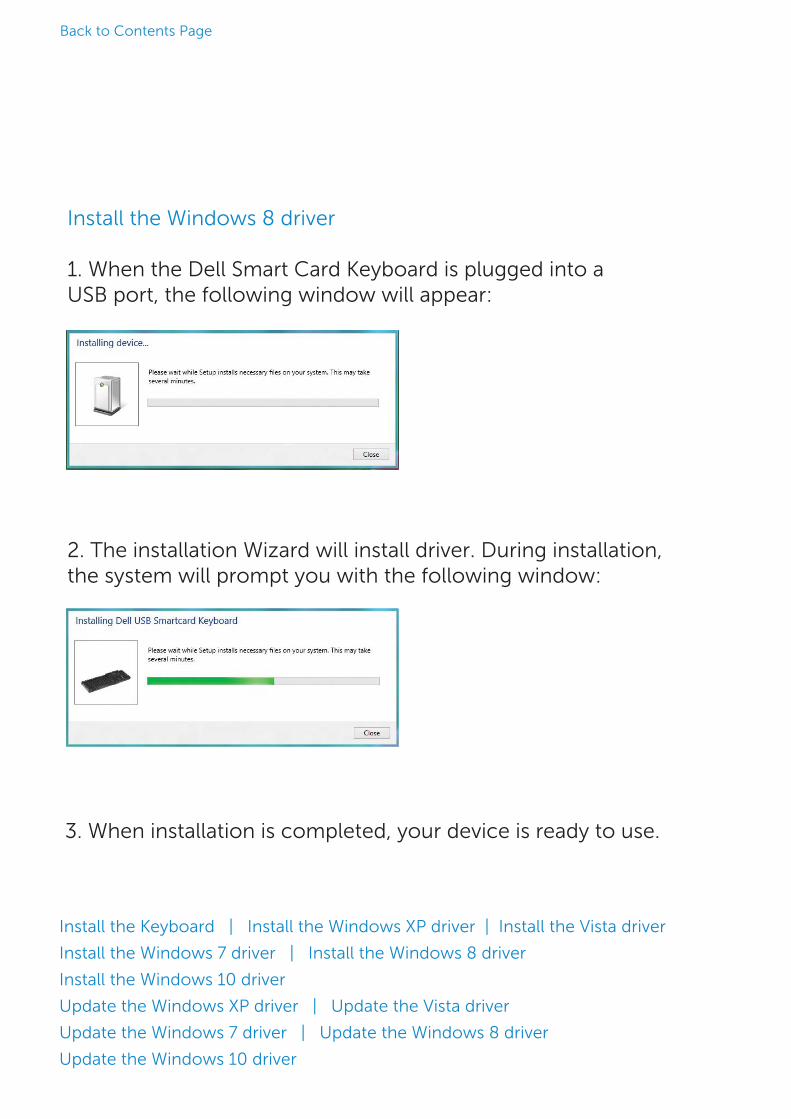
Install the Windows 8 driver
1. When the Dell Smart Card Keyboard is plugged into aUSB port, the following window will appear:
2. The installation Wizard will install driver. During installation,the system will prompt you with the following window:
3. When installation is completed, your device is ready to use.
Install the Keyboard | Install the Windows XP driver | Install the Vista driver
Install the Windows 7 driver | Install the Windows 8 driver
Install the Windows 10 driver
Update the Windows XP driver | Update the Vista driver
Update the Windows 7 driver | Update the Windows 8 driver
Update the Windows 10 driver
Back to Contents Page
Back to Contents Page
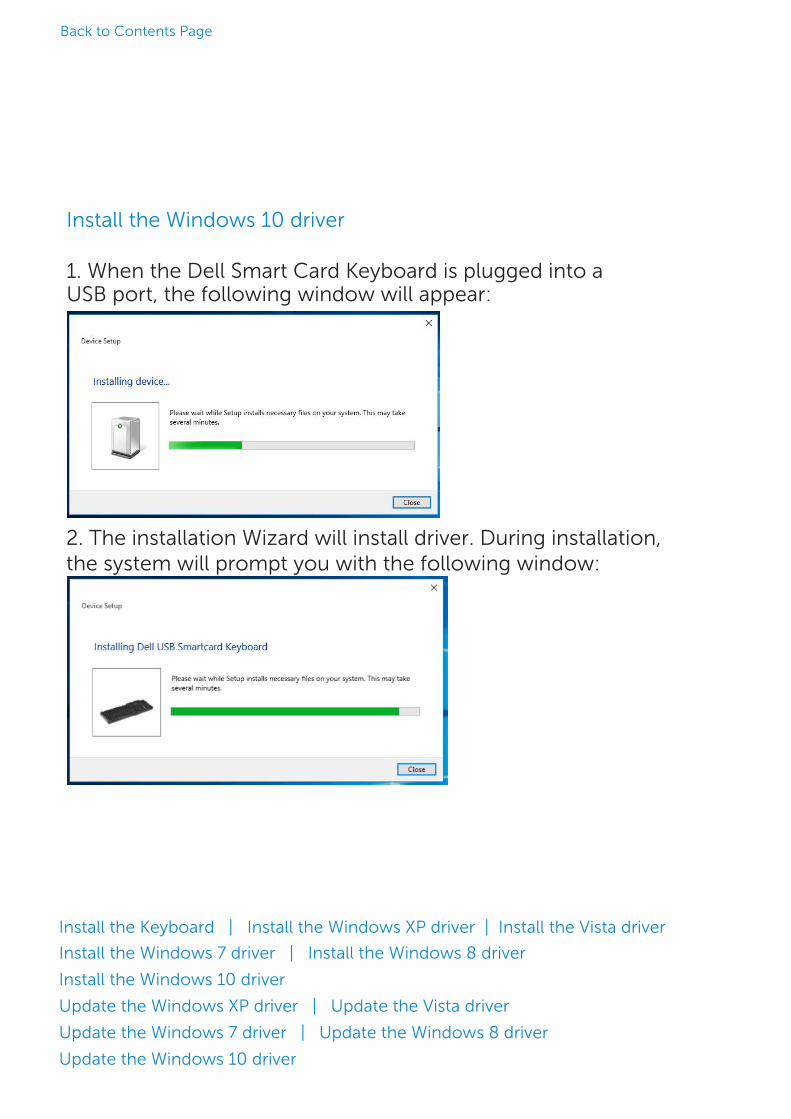
Install the Windows 10 driver
1. When the Dell Smart Card Keyboard is plugged into aUSB port, the following window will appear:
Install the Keyboard | Install the Windows XP driver | Install the Vista driver
Install the Windows 7 driver | Install the Windows 8 driver
Install the Windows 10 driver
Update the Windows XP driver | Update the Vista driver
Update the Windows 7 driver | Update the Windows 8 driver
Update the Windows 10 driver
2. The installation Wizard will install driver. During installation,the system will prompt you with the following window:
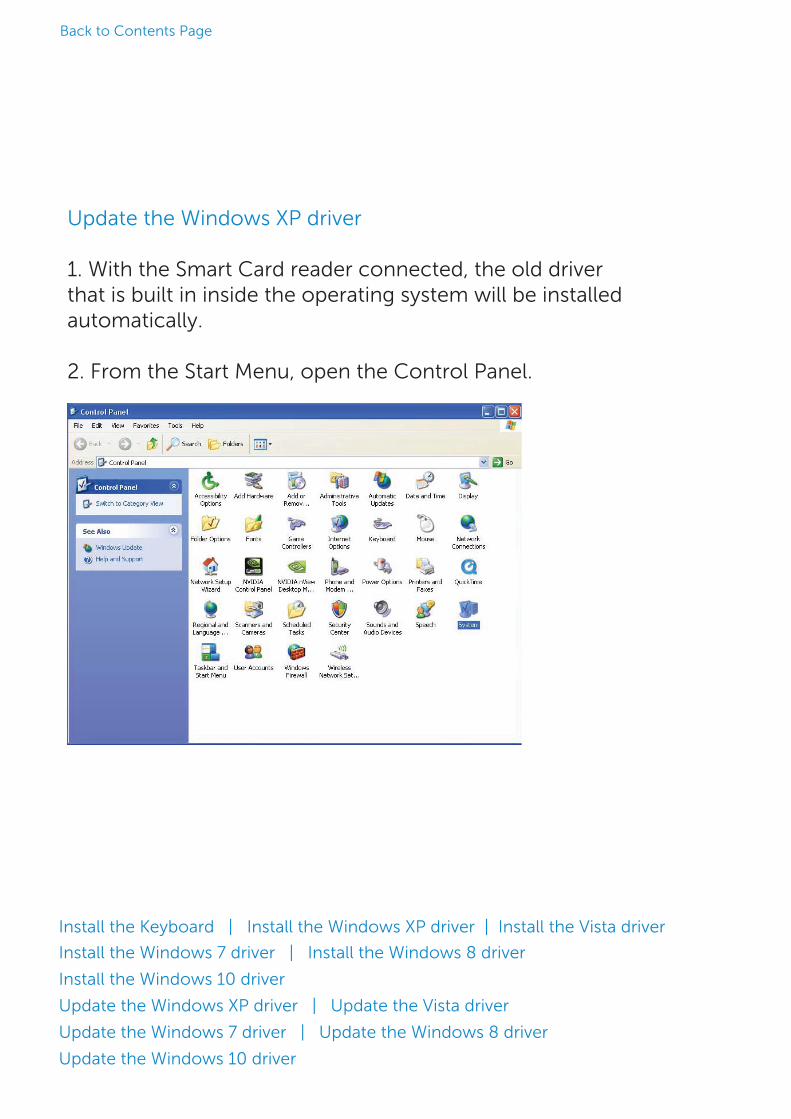
Update the Windows XP driver
1. With the Smart Card reader connected, the old driverthat is built in inside the operating system will be installedautomatically.
2. From the Start Menu, open the Control Panel.
Back to Contents Page
Install the Keyboard | Install the Windows XP driver | Install the Vista driver
Install the Windows 7 driver | Install the Windows 8 driver
Install the Windows 10 driver
Update the Windows XP driver | Update the Vista driver
Update the Windows 7 driver | Update the Windows 8 driver
Update the Windows 10 driver
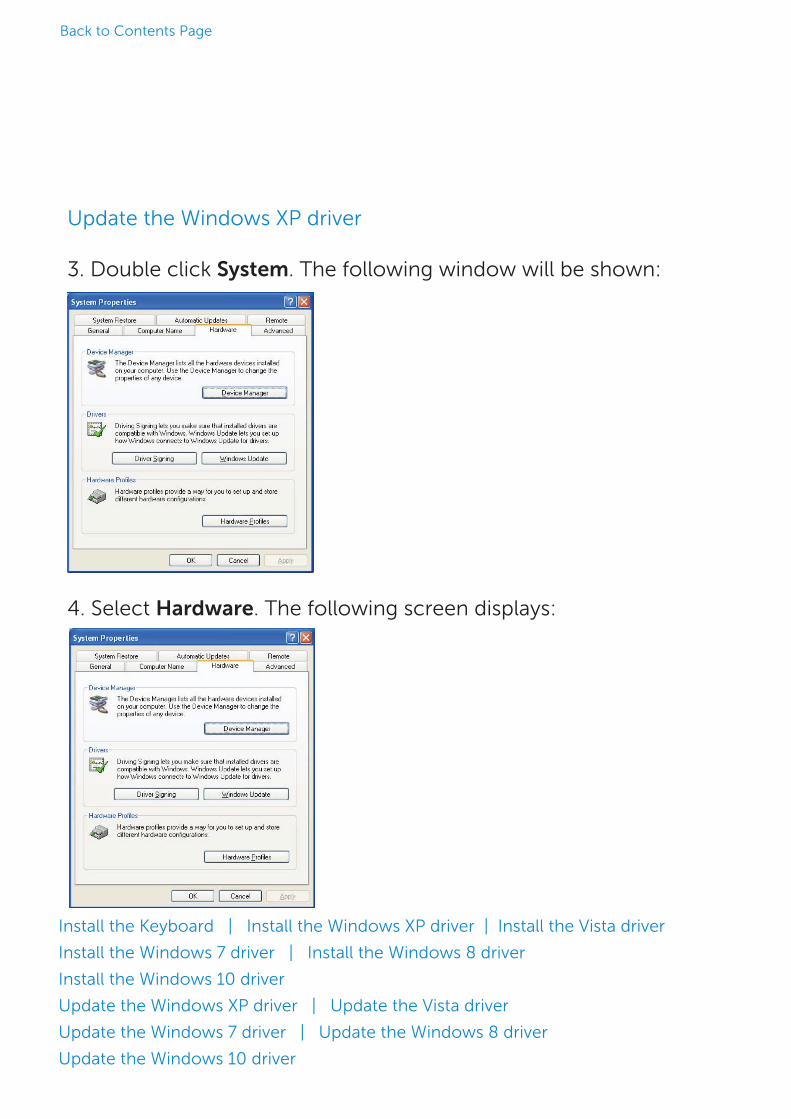
Update the Windows XP driver
3. Double click System. The following window will be shown:
4. Select Hardware. The following screen displays:
Back to Contents Page
Install the Keyboard | Install the Windows XP driver | Install the Vista driver
Install the Windows 7 driver | Install the Windows 8 driver
Install the Windows 10 driver
Update the Windows XP driver | Update the Vista driver
Update the Windows 7 driver | Update the Windows 8 driver
Update the Windows 10 driver

Update the Windows XP driver
5. Select Device Manager.
6. The following screen will be shown.Select Smart card readers.
Back to Contents Page
Install the Keyboard | Install the Windows XP driver | Install the Vista driver
Install the Windows 7 driver | Install the Windows 8 driver
Install the Windows 10 driver
Update the Windows XP driver | Update the Vista driver
Update the Windows 7 driver | Update the Windows 8 driver
Update the Windows 10 driver
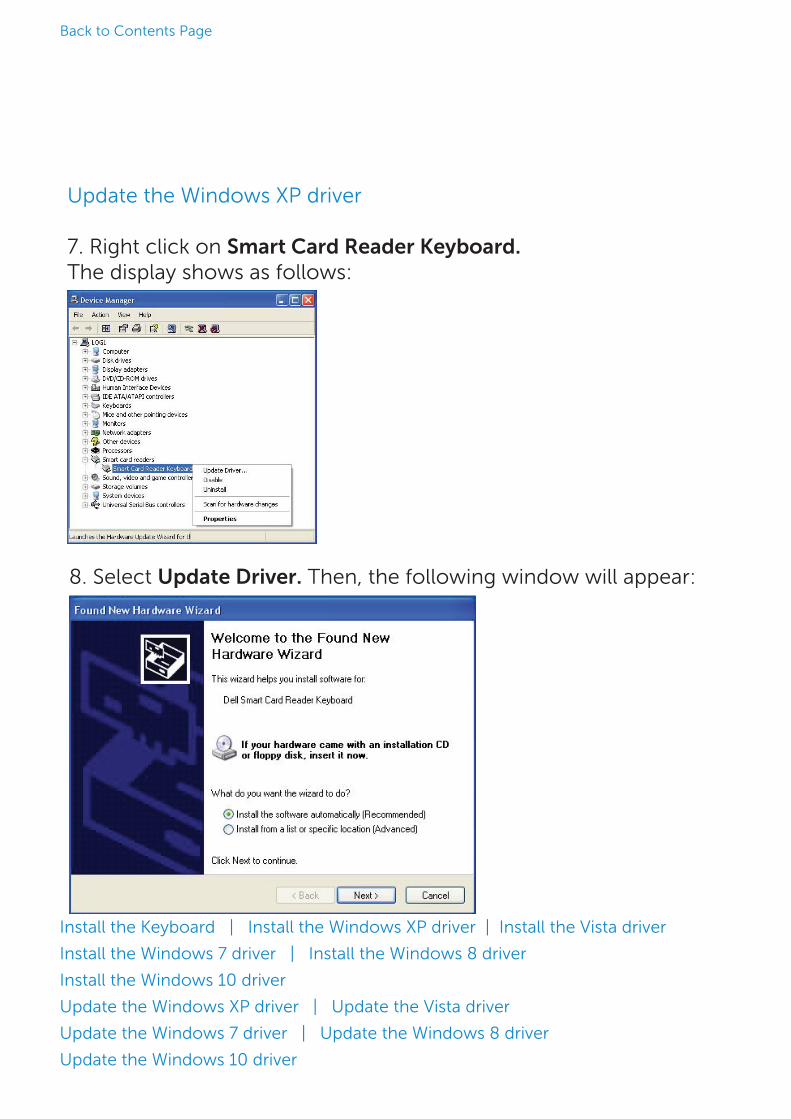
Update the Windows XP driver
7. Right click on Smart Card Reader Keyboard.The display shows as follows:
8. Select Update Driver. Then, the following window will appear:
Back to Contents Page
Install the Keyboard | Install the Windows XP driver | Install the Vista driver
Install the Windows 7 driver | Install the Windows 8 driver
Install the Windows 10 driver
Update the Windows XP driver | Update the Vista driver
Update the Windows 7 driver | Update the Windows 8 driver
Update the Windows 10 driver
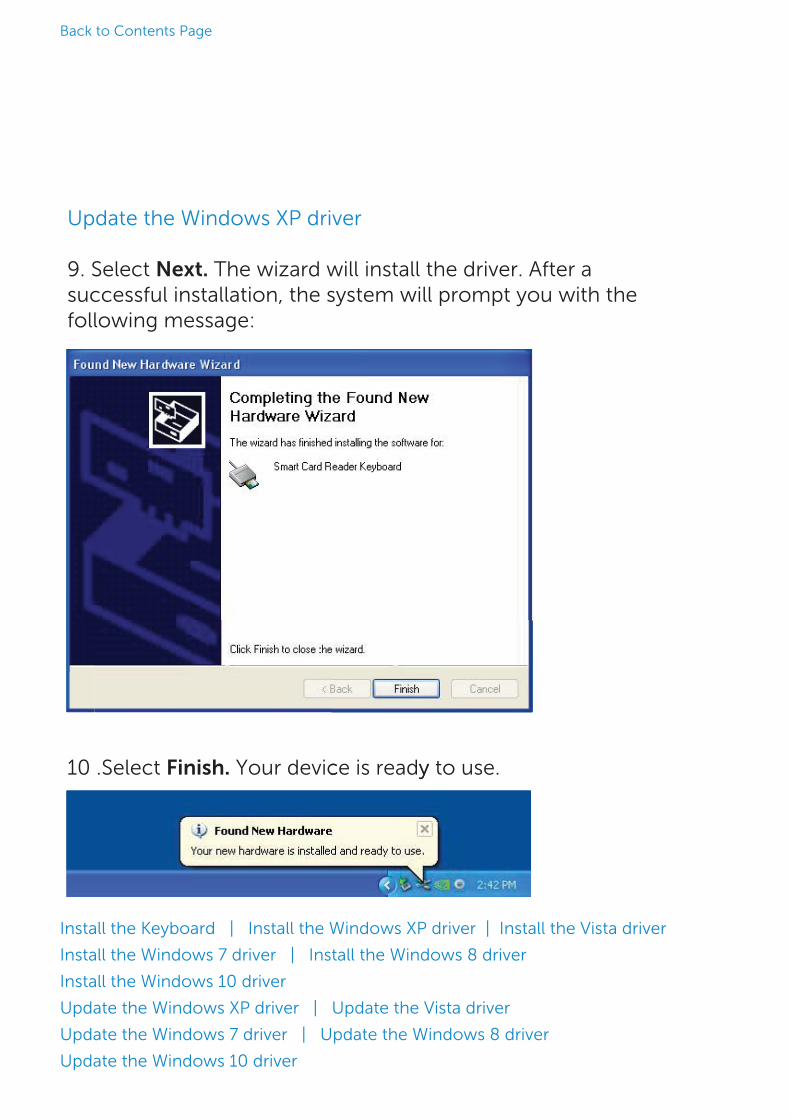
Update the Windows XP driver
9. Select Next. The wizard will install the driver. After asuccessful installation, the system will prompt you with thefollowing message:
10 .Select Finish. Your device is ready to use. 10 ce is ready to use. y.Select Finish. Your devic
Back to Contents Page
Install the Keyboard | Install the Windows XP driver | Install the Vista driver
Install the Windows 7 driver | Install the Windows 8 driver
Install the Windows 10 driver
Update the Windows XP driver | Update the Vista driver
Update the Windows 7 driver | Update the Windows 8 driver
Update the Windows 10 driver

Update the Windows Vista driver
1. With the Smart Card reader connected, the old driver thatis built in inside the operating system will be installedautomatically.
2. From the Start Menu, open the Control Panel:
Back to Contents Page
Install the Keyboard | Install the Windows XP driver | Install the Vista driver
Install the Windows 7 driver | Install the Windows 8 driver
Install the Windows 10 driver
Update the Windows XP driver | Update the Vista driver
Update the Windows 7 driver | Update the Windows 8 driver
Update the Windows 10 driver

Update the Windows Vista driver
3. Select System and Maintenance.
4. Select Device Manager. Then, the operating system will pop upthe Windows needs your permission to continue dialog box.Click Continue to install.
Back to Contents Page
Install the Keyboard | Install the Windows XP driver | Install the Vista driver
Install the Windows 7 driver | Install the Windows 8 driver
Install the Windows 10 driver
Update the Windows XP driver | Update the Vista driver
Update the Windows 7 driver | Update the Windows 8 driver
Update the Windows 10 driver
Update the Windows Vista driver
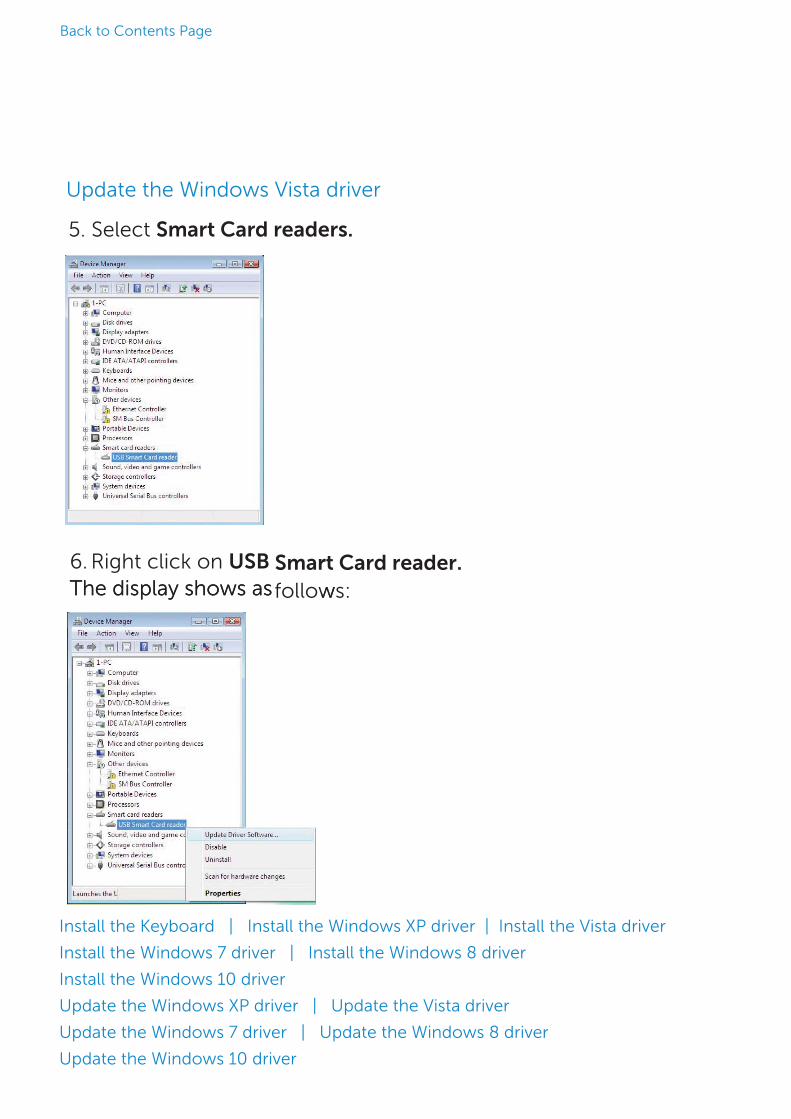
5. Select Smart Card readers.
6. Right click on USB Smart Card reader.follows:
6. Right click on USB SmarTThe display shows as he display shows as follow
Back to Contents Page
Install the Keyboard | Install the Windows XP driver | Install the Vista driver
Install the Windows 7 driver | Install the Windows 8 driver
Install the Windows 10 driver
Update the Windows XP driver | Update the Vista driver
Update the Windows 7 driver | Update the Windows 8 driver
Update the Windows 10 driver
Update the Windows Vista driver
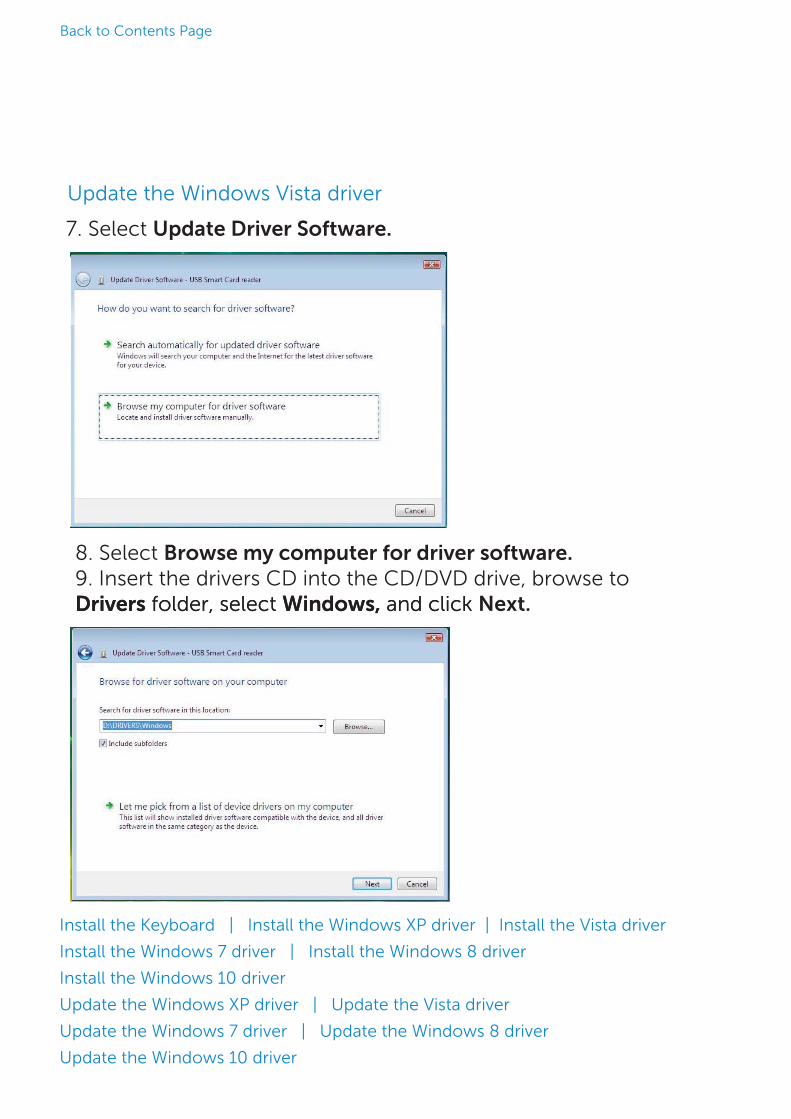
7. Select Update Driver Software.
8. Select Browse my computer for driver software.9. Insert the drivers CD into the CD/DVD drive, browse toDrivers folder, select Windows, and click Next.Drivers folder, select Windows, and click
Back to Contents Page
Install the Keyboard | Install the Windows XP driver | Install the Vista driver
Install the Windows 7 driver | Install the Windows 8 driver
Install the Windows 10 driver
Update the Windows XP driver | Update the Vista driver
Update the Windows 7 driver | Update the Windows 8 driver
Update the Windows 10 driver
Update the Windows Vista driver
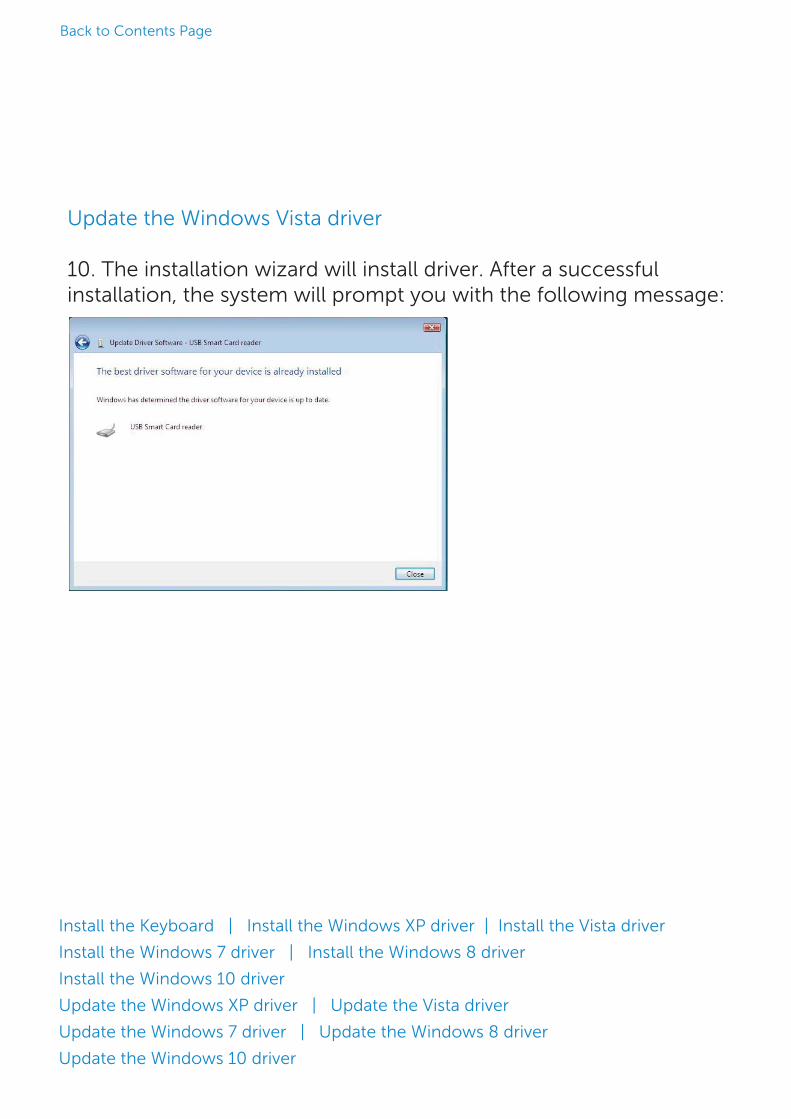
10. The installation wizard will install driver. After a successfulinstallation, the system will prompt you with the following message:
Back to Contents Page
Install the Keyboard | Install the Windows XP driver | Install the Vista driver
Install the Windows 7 driver | Install the Windows 8 driver
Install the Windows 10 driver
Update the Windows XP driver | Update the Vista driver
Update the Windows 7 driver | Update the Windows 8 driver
Update the Windows 10 driver
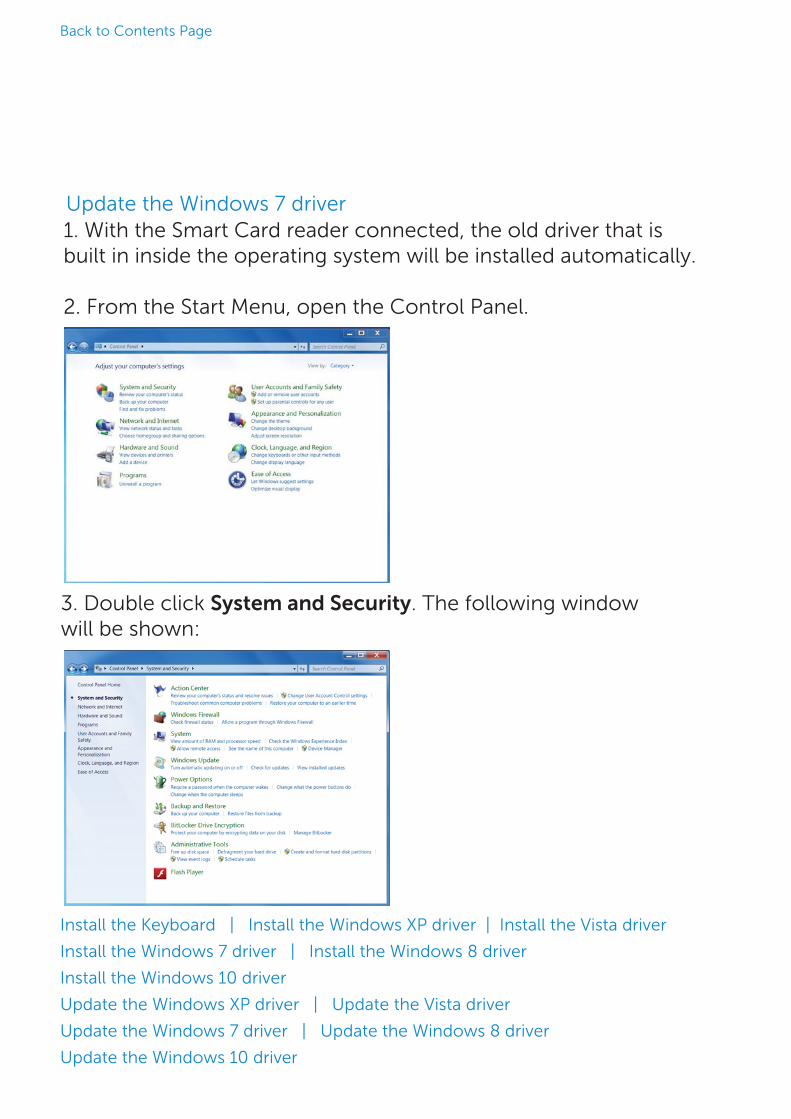
Update the Windows 7 driver1. With the Smart Card reader connected, the old driver that isbuilt in inside the operating system will be installed automatically.
2. From the Start Menu, open the Control Panel.
3. Double click System and Security. The following windowwill be shown:
Back to Contents Page
Install the Keyboard | Install the Windows XP driver | Install the Vista driver
Install the Windows 7 driver | Install the Windows 8 driver
Install the Windows 10 driver
Update the Windows XP driver | Update the Vista driver
Update the Windows 7 driver | Update the Windows 8 driver
Update the Windows 10 driver
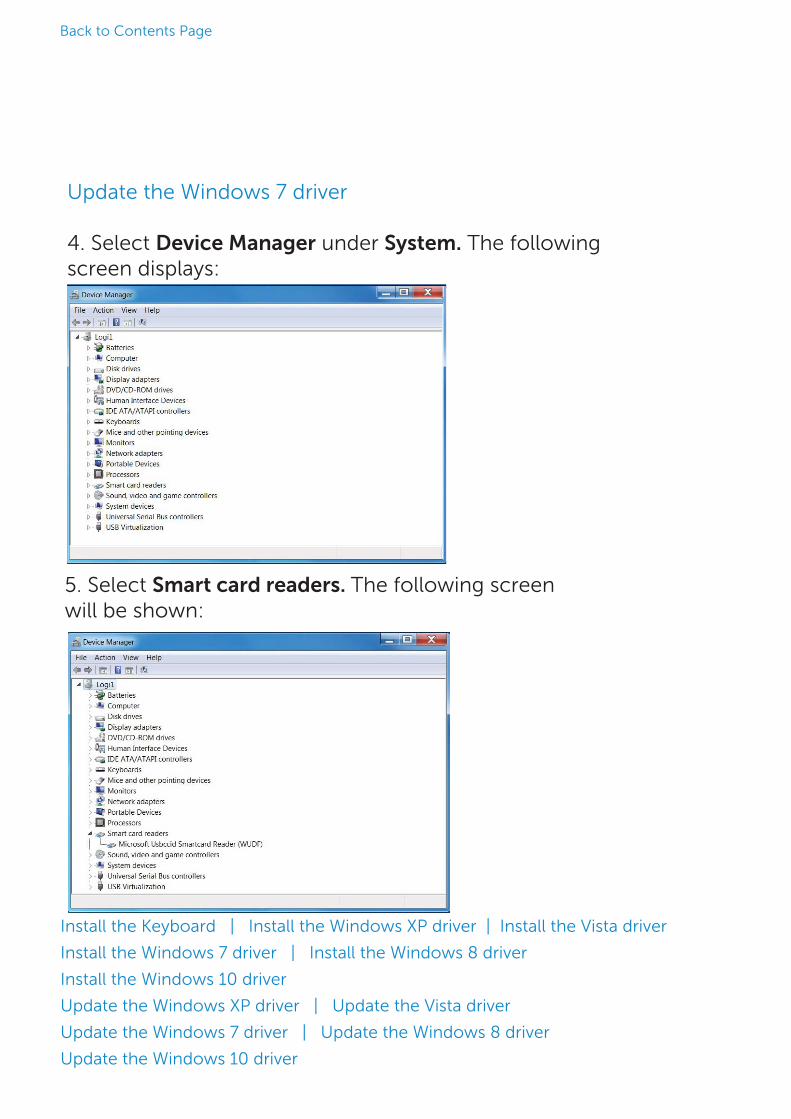
Update the Windows 7 driver
4. Select Device Manager under System. The followingscreen displays:
5. Select Smart card readers. The following screenwill be shown:
Back to Contents Page
Install the Keyboard | Install the Windows XP driver | Install the Vista driver
Install the Windows 7 driver | Install the Windows 8 driver
Install the Windows 10 driver
Update the Windows XP driver | Update the Vista driver
Update the Windows 7 driver | Update the Windows 8 driver
Update the Windows 10 driver
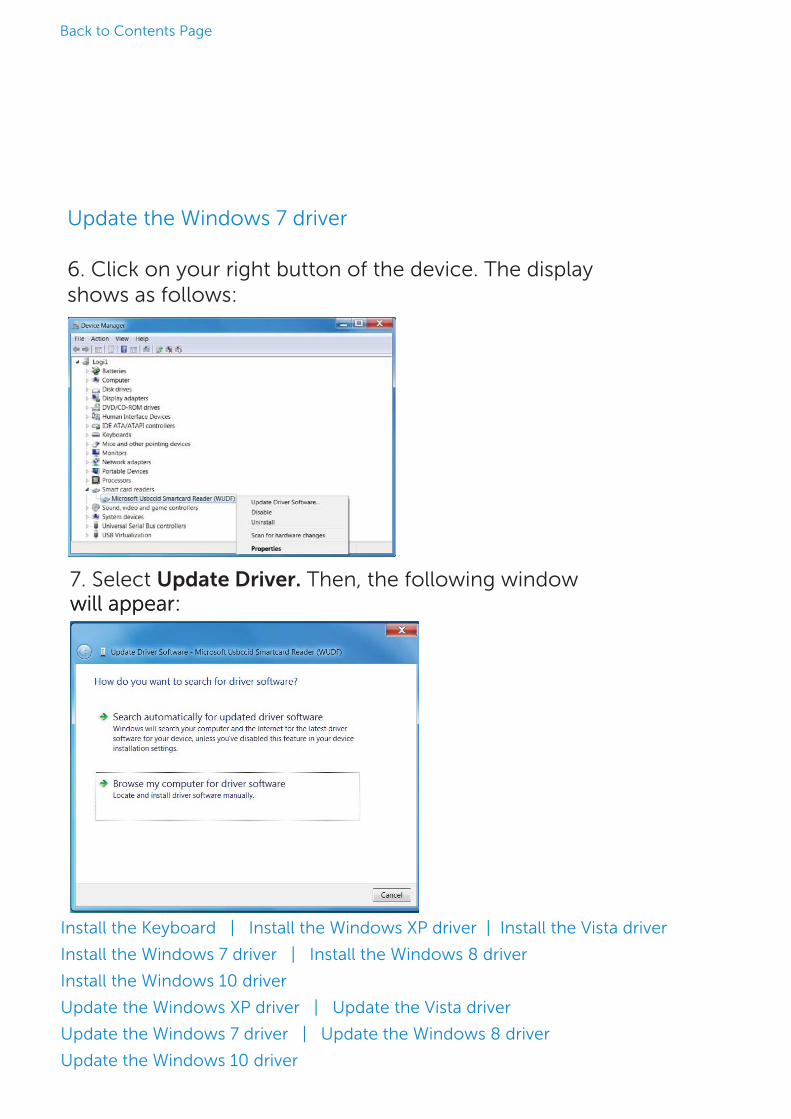
Update the Windows 7 driver
6. Click on your right button of the device. The displayshows as follows:
7. Select Update Driver. Then, the following windowwill appear:will appear:
Back to Contents Page
Install the Keyboard | Install the Windows XP driver | Install the Vista driver
Install the Windows 7 driver | Install the Windows 8 driver
Install the Windows 10 driver
Update the Windows XP driver | Update the Vista driver
Update the Windows 7 driver | Update the Windows 8 driver
Update the Windows 10 driver

Update the Windows 7 driver
8. Insert the drivers CD into the CD/DVD drive, browse tothe Drivers folder, select Windows, and click Next.
9. Select Next. The installation wizard will install the driver.After a successful installation, the system will prompt youwith the following message, and the device is ready to use.g g ,
Back to Contents Page
Install the Keyboard | Install the Windows XP driver | Install the Vista driver
Install the Windows 7 driver | Install the Windows 8 driver
Install the Windows 10 driver
Update the Windows XP driver | Update the Vista driver
Update the Windows 7 driver | Update the Windows 8 driver
Update the Windows 10 driver

Update the Windows 8 driver
1. With the Smart Card reader connected, the old driver that isbuilt in inside the operating system will be installed automatically.
2. Open the Control Panel.
3. Double click System. The following window will be shown:3. Double click System. The following
Back to Contents Page
Install the Keyboard | Install the Windows XP driver | Install the Vista driver
Install the Windows 7 driver | Install the Windows 8 driver
Install the Windows 10 driver
Update the Windows XP driver | Update the Vista driver
Update the Windows 7 driver | Update the Windows 8 driver
Update the Windows 10 driver

Update the Windows 8 driver
4. Select Device Manager under System. The followingscreen displays:
Back to Contents Page
Install the Keyboard | Install the Windows XP driver | Install the Vista driver
Install the Windows 7 driver | Install the Windows 8 driver
Install the Windows 10 driver
Update the Windows XP driver | Update the Vista driver
Update the Windows 7 driver | Update the Windows 8 driver
Update the Windows 10 driver
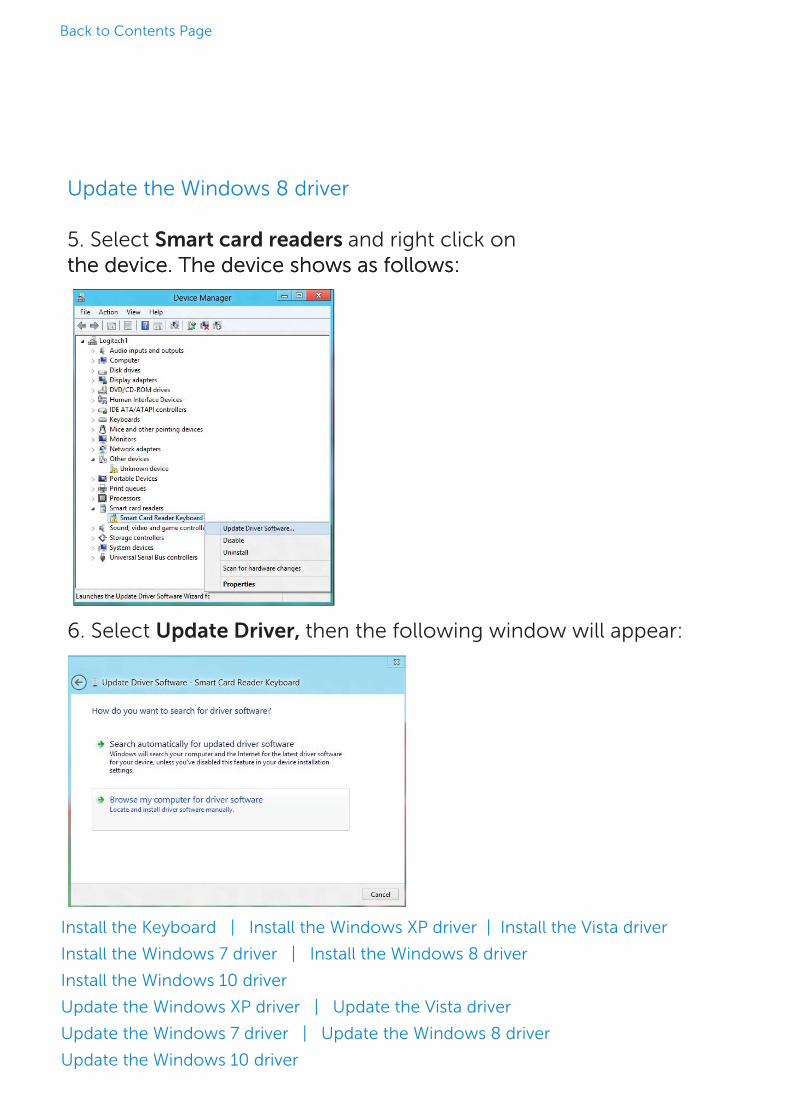
Update the Windows 8 driver
5. Select Smart card readers and right click onthe device. The device shows as follows:
6. Select Update Driver, then the following window will appear:
the device. The device shows as follows:
Back to Contents Page
Install the Keyboard | Install the Windows XP driver | Install the Vista driver
Install the Windows 7 driver | Install the Windows 8 driver
Install the Windows 10 driver
Update the Windows XP driver | Update the Vista driver
Update the Windows 7 driver | Update the Windows 8 driver
Update the Windows 10 driver

Update the Windows 8 driver
7. Insert the drivers CD into the CD/DVD drive, browse to the Driversfolder, select Windows, and click Next.
8. The installation wizard will install the driver. After a successful installation, the system will prompt you with the following message and your device is now ready to use.
8. The installation wizard will instainstallation, the system will prompand your device is now ready to u
Back to Contents Page
Install the Keyboard | Install the Windows XP driver | Install the Vista driver
Install the Windows 7 driver | Install the Windows 8 driver
Install the Windows 10 driver
Update the Windows XP driver | Update the Vista driver
Update the Windows 7 driver | Update the Windows 8 driver
Update the Windows 10 driver
Back to Contents Page
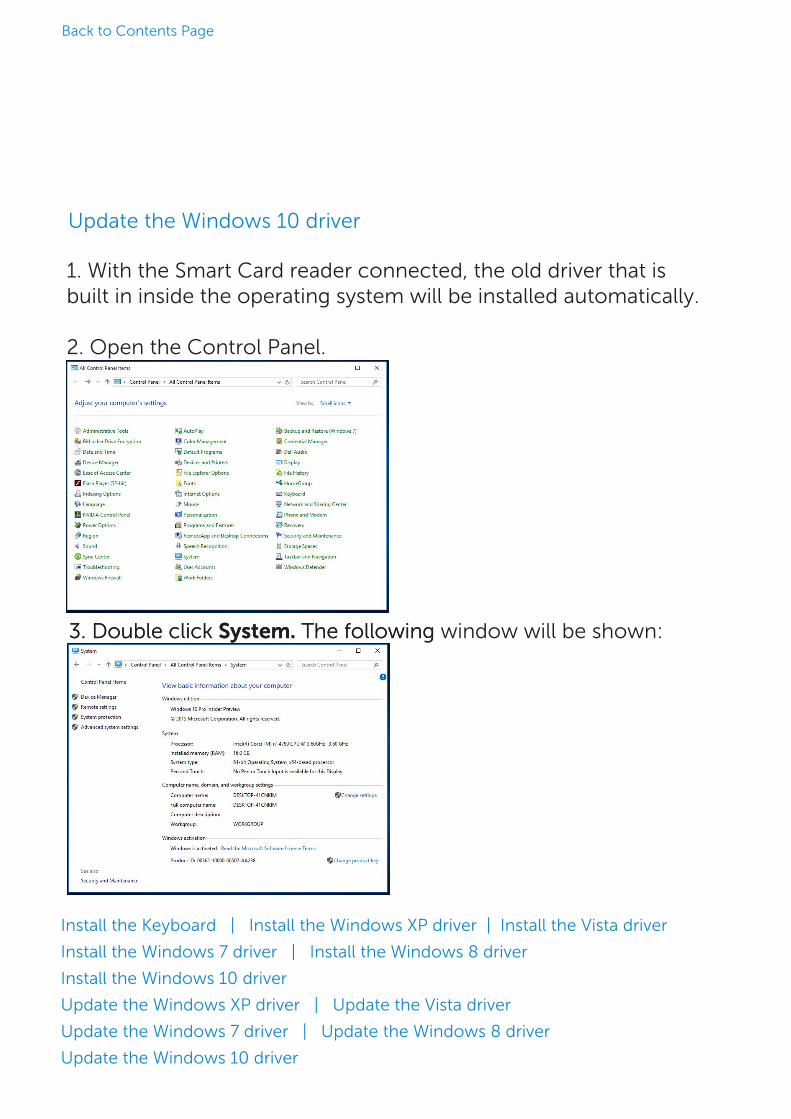
Update the Windows 10 driver
1. With the Smart Card reader connected, the old driver that isbuilt in inside the operating system will be installed automatically.
2. Open the Control Panel.
33.. DoublDouble click e click SySystem.stem. The following The following window will be shown:
Install the Keyboard | Install the Windows XP driver | Install the Vista driver
Install the Windows 7 driver | Install the Windows 8 driver
Install the Windows 10 driver
Update the Windows XP driver | Update the Vista driver
Update the Windows 7 driver | Update the Windows 8 driver
Update the Windows 10 driver

Back to Contents Page
Update the Windows 10 driver
4. Select Device Manager under System. The followingscreen displays:
Install the Keyboard | Install the Windows XP driver | Install the Vista driver
Install the Windows 7 driver | Install the Windows 8 driver
Install the Windows 10 driver
Update the Windows XP driver | Update the Vista driver
Update the Windows 7 driver | Update the Windows 8 driver
Update the Windows 10 driver

Back to Contents Page
6. Select Update Driver, then the following window will appear:
Install the Keyboard | Install the Windows XP driver | Install the Vista driver
Install the Windows 7 driver | Install the Windows 8 driver
Install the Windows 10 driver
Update the Windows XP driver | Update the Vista driver
Update the Windows 7 driver | Update the Windows 8 driver
Update the Windows 10 driver
Update the Windows 10 driver
5. Select Smart card readers and right click onthe device. The device showsthe device. The device shows as follows:as follows:

Back to Contents Page
Update the Windows 10 driver
7. Insert the drivers CD into the CD/DVD drive, browse to the Driversfolder, select Windows, and click Next.
8. The installation Wizard will install the driver. After a successfulinstallation, the system will prompt you with the following message andyour device is now ready to use.
Install the Keyboard | Install the Windows XP driver | Install the Vista driver
Install the Windows 7 driver | Install the Windows 8 driver
Install the Windows 10 driver
Update the Windows XP driver | Update the Vista driver
Update the Windows 7 driver | Update the Windows 8 driver
Update the Windows 10 driver
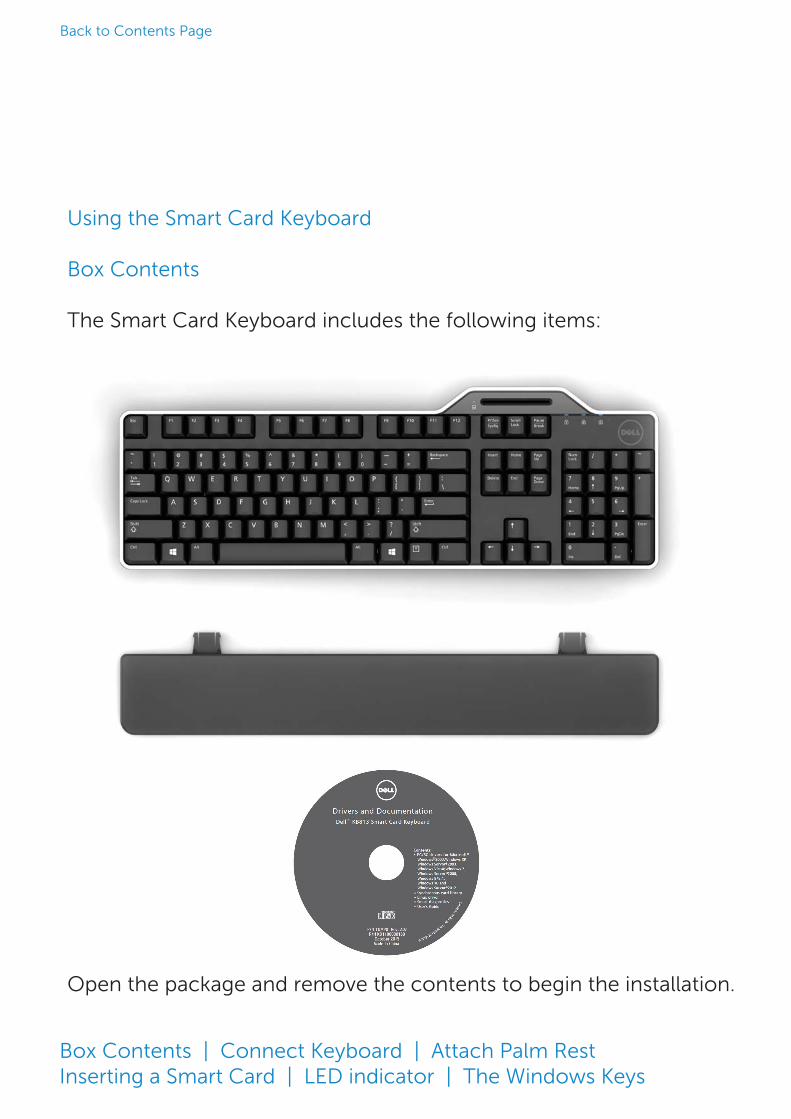
Using the Smart Card Keyboard
Box Contents
The Smart Card Keyboard includes the following items:
Open the package and remove the contents to begin the installation.
Box Contents | Connect Keyboard | Attach Palm Rest Inserting a Smart Card | LED indicator | The Windows Keys
Back to Contents Page

Connect Keyboard
• Connect the keyboard to any USB port on the computer.
• The USB port shown in the diagram is at the rear ofthe computer. USB ports may also be located at the front.
Box Contents | Connect Keyboard | Attach Palm Rest Inserting a Smart Card | LED indicator | The Windows Keys
Back to Contents Page

Attach Palm Rest
• As an option, you may attach the Palm Rest to the keyboard
as shown.
(picture need to be replaced with Cardinal one)
Box Contents | Connect Keyboard | Attach Palm Rest
Inserting a Smart Card | LED indicator | The Windows Keys
Back to Contents Page

Inserting a Smart Card
To insert a smart card in the Dell Smart Card keyboard, the side of the smart card with the metallic part (contacts) must face you. In the case of a credit card, your name must face you.
If the Dell Smart Card Keyboard is installed properly (see section Setup) and the smart card is inserted correctly, the smart card indicator LED should turn blue (see section LED Indicator for details about smart card indicator).
Box Contents | Connect Keyboard | Attach Palm Rest Inserting a Smart Card | LED indicator | The Windows Keys
Back to Contents Page

LED indicator
On the Dell Smart Card Keyboard, there are four LED indicators:
• Three standard keyboard LEDs: Num Lock, Caps Lock,and Scroll Lock.• One additional LED (2 colors) to indicate the smart cardinterface status as below:
LED status Description
OFF Smart Card is OFF or absent
Blue ON Smart Card is present and powered on
Blue Flashing Smart Card is used
Amber ON Secure PIN Entry procedure : this is the safe
moment to enter your PIN code
Box Contents | Connect Keyboard | Attach Palm Rest Inserting a Smart Card | LED indicator | The Windows Keys
Back to Contents Page
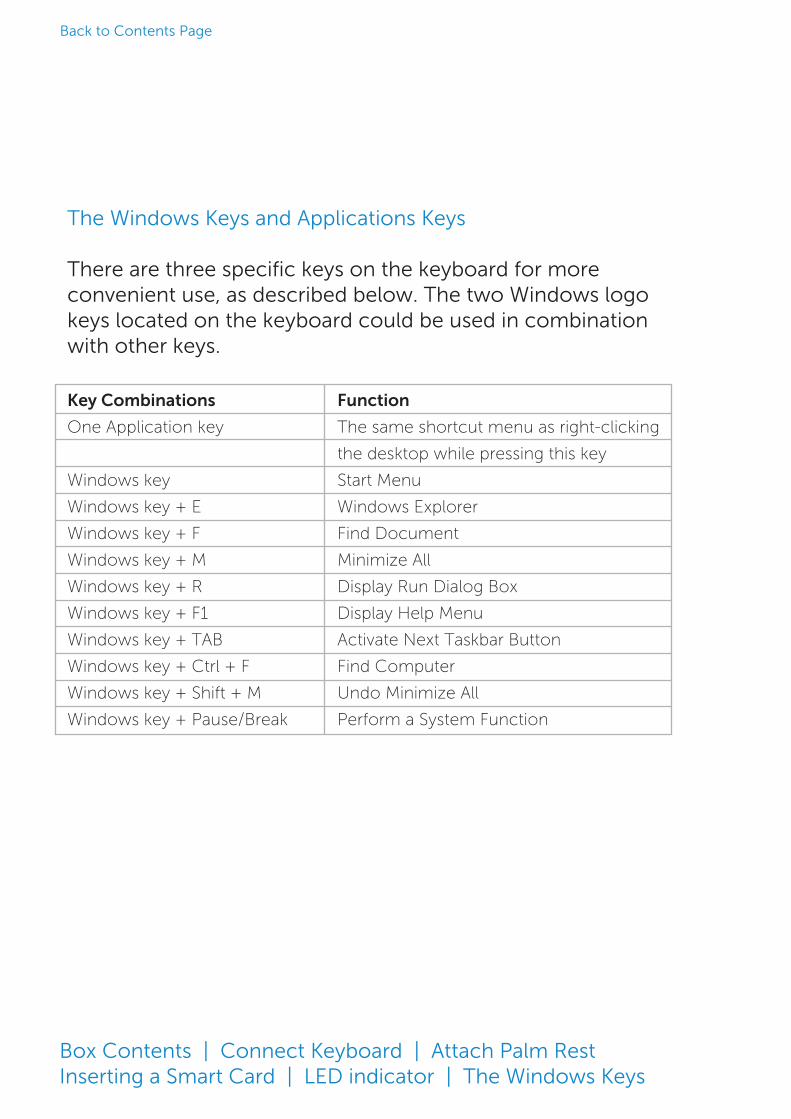
The Windows Keys and Applications Keys
There are three specific keys on the keyboard for more convenient use, as described below. The two Windows logo keys located on the keyboard could be used in combination with other keys.
Key Combinations Function
One Application key The same shortcut menu as right-clicking
the desktop while pressing this key
Windows key Start Menu
Windows key + E Windows Explorer
Windows key + F Find Document
Windows key + M Minimize All
Windows key + R Display Run Dialog Box
Windows key + F1 Display Help Menu
Windows key + TAB Activate Next Taskbar Button
Windows key + Ctrl + F Find Computer
Windows key + Shift + M Undo Minimize All
Windows key + Pause/Break Perform a System Function
Box Contents | Connect Keyboard | Attach Palm Rest Inserting a Smart Card | LED indicator | The Windows Keys
Back to Contents Page

Diagnostic and Troubleshooting
Diagnostics
NOTE 1: The diagnostic program needs to be installed on your system from the CD.
NOTE 2: Run this diagnostic software if you are having issues using smart cards with your application. It will be able to determine if the smart card software and hardware are loaded and functioning properly.
Install the Diagnostic Program
1. To install the diagnostic program in the CD-ROM.
Click DIAGNOSTICS folder, and select the desired language.Then, launch the SmartDiag.msi under the desiredlanguage folder.
2. Click "Next."
Diagnostics | Troubleshooting
Back to Contents Page

Diagnostic and Troubleshooting
3. Click Next.
4. Read the agreement and then click Install.
Diagnostics | Troubleshooting
Back to Contents Page
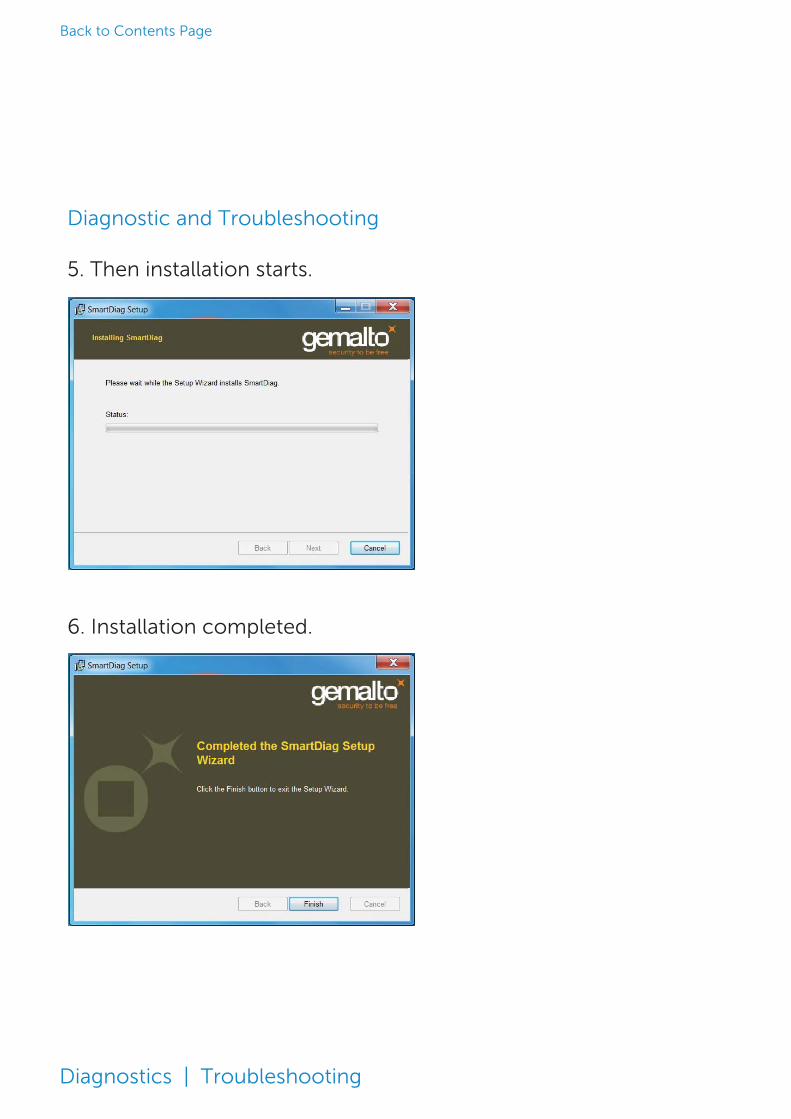
Diagnostic and Troubleshooting
5. Then installation starts.
6. Installation completed.
Diagnostics | Troubleshooting
Back to Contents Page
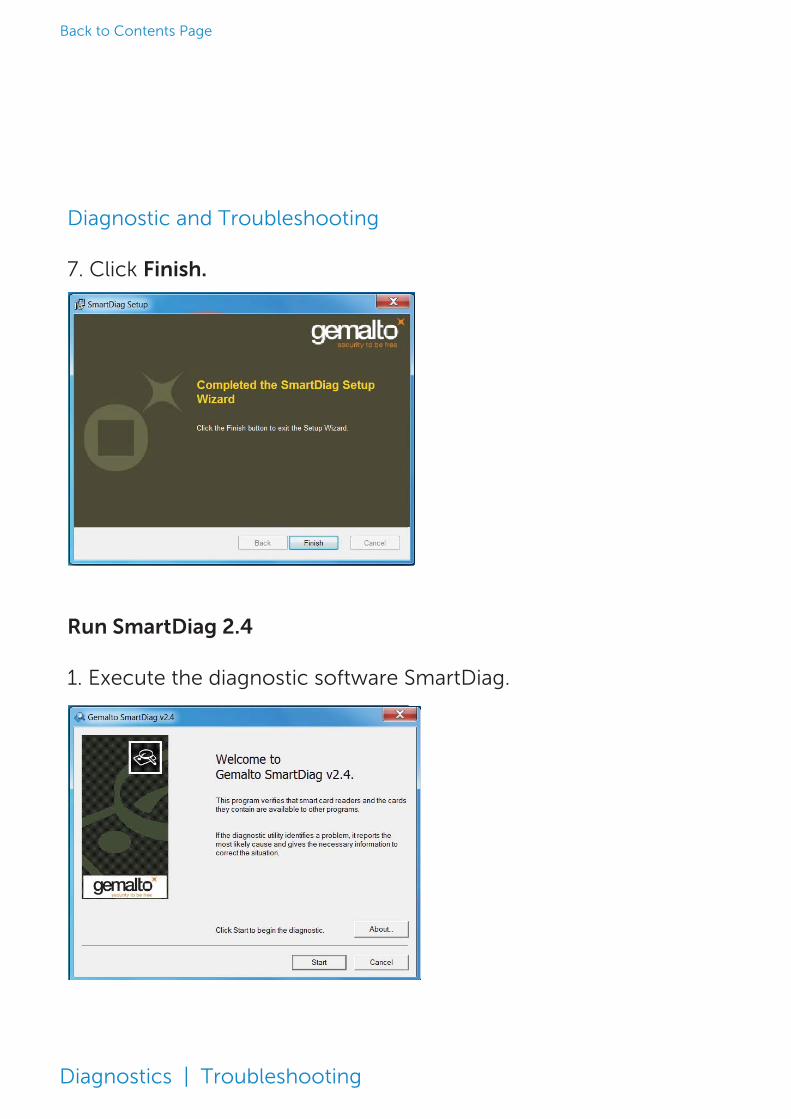
Diagnostic and Troubleshooting
7. Click Finish.
Run SmartDiag 2.4
1. Execute the diagnostic software SmartDiag.
Diagnostics | Troubleshooting
Back to Contents Page

Diagnostic and Troubleshooting
2. Click Start.
3. If no smart card is present, the above screen will appear.Insert a smart card and click Next.
Diagnostics | Troubleshooting
Back to Contents Page
Diagnostic and Troubleshooting
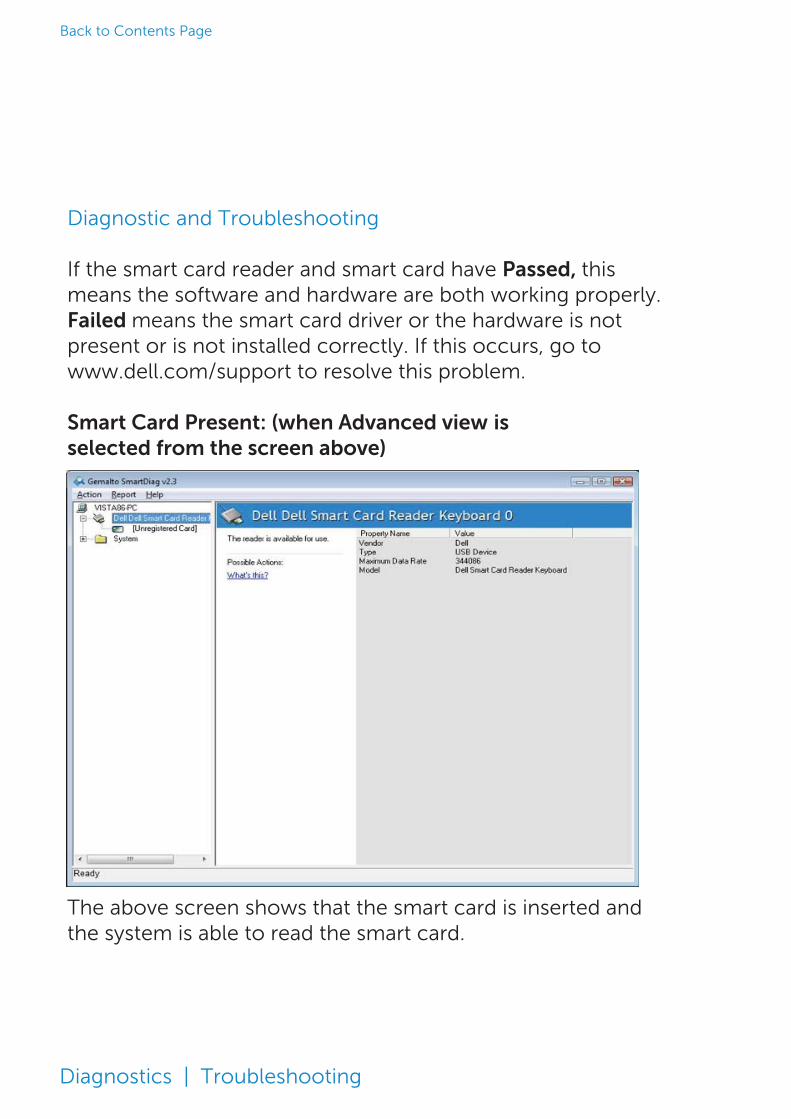
If the smart card reader and smart card have Passed, this means the software and hardware are both working properly. Failed means the smart card driver or the hardware is not present or is not installed correctly. If this occurs, go to www.dell.com/support to resolve this problem.
Smart Card Present: (when is selected from the screen above)
The above screen shows that the smart card is inserted and the system is able to read the smart card.
Diagnostics | Troubleshooting
Back to Contents Page

Diagnostic and Troubleshooting
Smart Card Removed
When the smart card is removed, the above screen will appear.
Diagnostics | Troubleshooting
Back to Contents Page
Diagnostic and Troubleshooting
Troubleshooting
My smart card is not detected.
A. The driver may not be installed or you may not be using the correct driver.
Reinstall the driver (see Reinstall the Driver).
B. The reader could be contaminated. Extract and reinsert the smart card
several times to dislodge any contaminants such as dust or foreign objects.
C. The smart card chip is damaged. Obtain a new smart card.
My smart card is detected, but does not work.
A. The smart card is not inserted correctly. The smart card must be inserted
chip-end first. See diagram (section Inserting a smart card)
B. The smart card contacts may be dirty and need to be cleaned. To clean the
smart card contacts use a dry tissue.
C. The smart card chip is damaged. Obtain a new smart card.
I can see the Dell Smart Card Keyboard in Windows device manager,
but I cannot communicate with the smart card.
If this occurs, it is possible that the Microsoft Smart Card Resource Manager did
not start. Type net start scardsvr.exe in the run dialog box. Once the Smart
Card Resource Manager has been successfully started, the smart cards should
be accessible. On the next boot, the resource manager should auto start.
The Dell Smart Card Keyboard LED goes solid green for a few seconds
when I insert a smart card and then goes off again.
This is normal Operating System behavior. Please refer to Usage
section of the User's Guide regarding LED indicators.
The Dell Smart Card Keyboard is not functioning under
Windows NT4.0.
Windows NT4.0 does not support USB interfaces (see System Requirements).
Diagnostics | Troubleshooting
Back to Contents Page
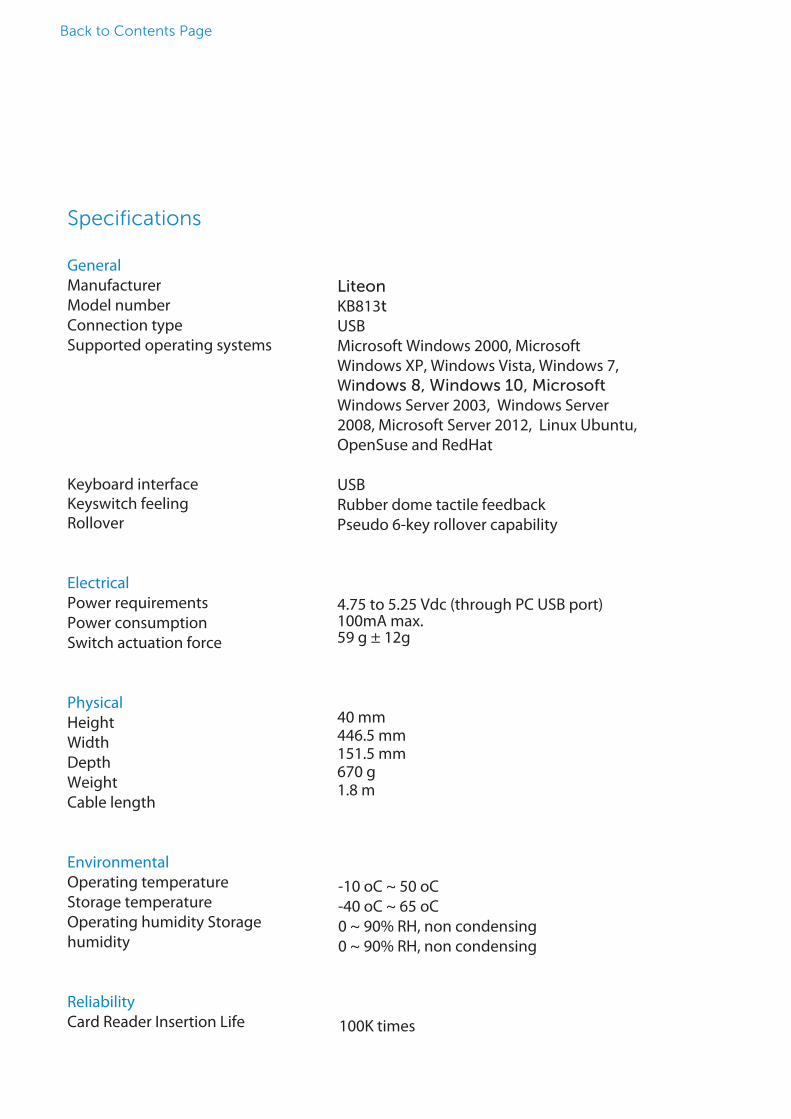
LiteonKB813tUSBMicrosoft Windows 2000, Microsoft Windows XP, Windows Vista, Windows 7, Windows 8, Windows 10, Microsoft Windows Server 2003, Windows Server 2008, Microsoft Server 2012, Linux Ubuntu, OpenSuse and RedHat
USBRubber dome tactile feedbackPseudo 6-key rollover capability
4.75 to 5.25 Vdc (through PC USB port) 100mA max.59 g ± 12g
40 mm446.5 mm151.5 mm670 g1.8 m
-10 oC ~ 50 oC-40 oC ~ 65 oC0 ~ 90% RH, non condensing0 ~ 90% RH, non condensing
Specifications
GeneralManufacturerModel number Connection type Supported operating systems
Keyboard interface Keyswitch feeling Rollover
ElectricalPower requirements Power consumption Switch actuation force
PhysicalHeightWidthDepthWeightCable length
EnvironmentalOperating temperature Storage temperature Operating humidity Storage humidity
ReliabilityCard Reader Insertion Life 100K times
Back to Contents Page
Regulatory
Regulatory Model : KB813t
Regulatory Notices
For additional regulatory information, see the Regulatory Compliance home page on www.dell.com at the following location: www.dell.com/ regulatory_compliance
Back to Contents Page
Certifications
Microsoft WHQL LogoThe Dell Smart Card Keyboard/Reader has passed WHQL logo testing by
Microsoft Windows Hardware Quality Labs.
WHQL Logo is a certification provided by Microsoft Windows Hardware
Quality Labs. This logo ensures that the hardware and accompanying software
for the Dell Smart Card Keyboard are compatible with Microsoft
Operating Systems.
EMV Level 1 ComplianceThe Dell Smart card Keyboard is EMV Level 1 compliant.
EMV certification ensures security for customer card payments by
reducing fraudulent transactions on counterfeited or lost/stolen cards.
USB IF ComplianceThe Dell Smart Card Keyboard is compliant with USB Logo Testing
Requirements.
The compliance testing ensures the quality of products and compatibility
with other USB peripherals.
FIPS 201 CertificationThe Dell Smart Card Keyboard is FIPS201 compliant.
FIPS 201 is a United States Federal Government standard that specifies
Personal Identity Verification (PIV) requirements for Federal employees and
contractors. The certification makes the product meet the standard.
Back to Contents Page


