65
HOSPITALITY DEMO KIT USER GUIDE ROOM 8XX U S E R G U I D E

HOSPITALITY DEMO KIT
USER GUIDE
ROOM 8XX
U S E R G U I D E

Hospitality Demo Kit User Guide
Ref. EP 970140203-1 Ed.20 Page 2/65
Edition Date Author Modifications / Comments / Details
01 2014-02-03 Serge LE LOUET /
Eric PINAULT Creation
02 2015-03-02 Serge LE LOUET Modification
03 2015-03-09 Serge LE LOUET Modification
04 2015-05-11 Serge LE LOUET Modification: Update Documentation
05 2015-07-17 Serge LE LOUET Modification: Mobile Application for Smart Guest Applications
06 2015-07-27 Serge LE LOUET Modification: OpenTouch Notification Service Application update
07 2015-07-29 Serge LE LOUET Modification: IP Desktop Softphone tandem modification
08 2015-10-05 Serge LE LOUET Modification: 8088 set
09 2015-10-20 Serge LE LOUET Modification: Smart Guest Applications Background 10 2015-12-8 Serge LE LOUET Modification: Language menu
11 2016-01-27 Serge LE LOUET Modification: IP Desktop Softphone visitor Onboarding
12 2016-03-02 Serge LE LOUET Modification: Update Documentation
13 2016-03-23 Serge LE LOUET Modification: SBC, Visual Automated Attendant for Mobile Guest Softphone
14 2016-04-19 Serge LE LOUET Update Documentation
15 2016-05-16 Serge LE LOUET Update Documentation
16 2016-10-13 Serge LE LOUET Update Otns feature
17 2016-12-07 Serge LE LOUET Update OmniPcxRecord 18 2017-01-02 Serge LE LOUET Update ENS and Otns
19 2017-03-29 Serge LE LOUET Update Sga
20 2017-06-14 Serge LE LOUET Update Otns and ENS account

Hospitality Demo Kit User Guide
Ref. EP 970140203-1 Ed.20 Page 3/65
Table of contents
1 . I n t r o d u c t i on 4
2 . E nv i r o n m e nt 5
2.1 High level architecture diagram .................................................................. 5
2.2 Configuration ......................................................................................... 6
2.3 Server details ........................................................................................ 7
3 . U s e C a s e 1 6
3.1 Smart Guest Applications ......................................................................... 16
3.2 Mobile Guest Softphone ........................................................................... 33
3.3 Automated Attendant .............................................................................. 41
3.4 IP Desktop Softphone .............................................................................. 44
3.5 Emergency Notification Server .................................................................. 47
3.6 OmniPCX RECORD .................................................................................. 51
3.7 OpenTouch Notification Service ................................................................. 55
3.8 IP Desktop Softphone onboarding ............................................................... 63

Hospitality Demo Kit User Guide
Ref. EP 970140203-1 Ed.20 Page 4/65
1. Introduction
The aim of this document is to describe all aspects of the Hospitality Demo Kit. It contains the architecture of the demo, and explains how to configure each component of the Hospitality demo. This document also contains demo scripts, which will help the demonstrator carry out the various demos cases.
The concerned products, tools and solutions are:
• The Smart Guest Applications (SGA)
• The Mobile Guest Softphone (MGS)
• The IP Desktop Softphone (IPDSP)
• The OmniPCX Record Suite
• The Emergency Notification Service (ENS)
• The OpenTouch Notification Service (OTNS)
• The Visual Automated Attendant (VAA)
Before a demo please book and check the system availability on: http://edemo.al-mydemo.com/?page_id=1215
In order to ensure the quality of your demonstration and the relevance of the speech you want to deliver, please complete the Hospitality Solutions online training available on the Knowledge Hub platform:
• Access the Knowledge Hub: https://enterprise-education.csod.com/
• Fill in the general search field with the course Reference : HOSPWSA001 (1 hour) You also want to refer to the following technical datasheets that can give your answers to the questions from the audience:
• The 8088 Smart DeskPhone: o http://enterprise.alcatel-
lucent.com/assets/documents/8088_Smart_DeskPhone_Hospitality_datasheet_EN.pdf
• The Smart Guest Applications: o http://enterprise.alcatel-
lucent.com/assets/documents/201602040004EN_Smart_Guest_Applications_Datasheet.pdf
• The Mobile Guest Softphone: o http://enterprise.alcatel-
lucent.com/assets/documents/Mobile_Guest_Softphone_Datasheet_EN.pdf
• The IP Desktop Softphone o http://enterprise.alcatel-lucent.com/assets/documents/IP-desktop-softphone-
datasheet-EN.pdf

Hospitality Demo Kit User Guide
Ref. EP 970140203-1 Ed.20
2. Environment
2.1 High level architecture diagram
Page 5/
High level architecture diagram
/65

Hospitality Demo Kit User Guide
Ref. EP 970140203-1 Ed.20 Page 6/65
2.2 Configuration
User display name Phone type Phone number
Guest Number 18xx
Room main phone (suite 18xx)
808x 38xx
Room mobile (suite 18xx)
Smartphone 1008912xx/92xx
Concierge IP Desktop Softphone
on tablet 78xx
Reception IP Desktop Softphone
on PC 68xx
Room service 8068 28xx
Room service tandem
IP Desktop Softphone on mobile
100828xx
SmartApps iOS iPad or iPhone 69xx
SmartApps Android Tablet or Smartphone 79xx
Rap SSID: thanks-edemo-
team itrulyloveyou
Wifi Qr code (Android Use Only) (all set default password is “0000”)
• Demo PC
Name IP Description
PC1 DHCP Login: reception68xx Password: Aludemo2012! Windows7sp1 pro, Firefox Chrome Java virtual room simulator (need flashplayer) OmniPCX Record screen capture ENS Desktop Notifier: PC-Reception-68xx Vlc
• Rap
• On your laptop launch a web browser and access the management URL (*)

Hospitality Demo Kit User Guide
Ref. EP 970140203-1 Ed.20 Page 7/65
• Enter 195.128.146.40 as IP address for the OAW gateway, then press continue.
(*) refer to rap documentation
2.3 Server details
Useful bookmarks http://srv73.al-mydemo.com:8090/custom/hospitality/links.html
2.3.1 Oxe8
All users are registered without specific rights (no voicemail, no DDI…). All phones/rooms are in English. All phones default password is “0000”
• IP Desktop Softphone Tftp server : 192.168.111.108
• 80x8 set Dynamic Dhcp
2.3.2 OmniPcx Record
Concierge (78xx) and Reception (68xx) are configured to record all calls. Login: reception68xx with password: Aludemo2012! This demo allows to listen the recorded calls for the Concierge (78xx) and the Reception (68xx). http://srv26.al-mydemo.com/OmniPCXRecord/default.aspx with login: reception68xx and password: Aludemo2012! Please refer to the “OmniPCX Record R2-3 Hardware & Software specification” document for the browsers and plug-in compatibilities.

Hospitality Demo Kit User Guide
Ref. EP 970140203-1 Ed.20 Page 8/65
o OmniPCX Record screen capture :
� http://srv26.al-mydemo.com/OmniPCXRecord/default.aspx with login: reception68xx and password: Aludemo2012!
� Download menu
� Set UP : Server IP : 192.168.111.26

Hospitality Demo Kit User Guide
Ref. EP 970140203-1 Ed.20 Page 9/65
2.3.3 Emergency Notification Server
The Emergency Notification Server is configured to ring the Reception (68xx) as a PSAP (Public Safety Answering Point)
� Room service 28xx : voice prompt, listen and talk mini-message
� Reception 68xx : mini-message, email : [email protected], PC
notification : PC-Reception-68xx
� Concierge 78xx : listen, mini-message
http://srv68.al-mydemo.com/E911WebAccess/E911Configuration/ Login: Security8xx and password: Aludemo2012!
o Emergency Notification Server Desktop Notifier: http://srv68.al-mydemo.com/E911WebAccess/install/ DesktopNotifierSetup-x.x.x.exe
Emergency Notification Server main server IP: 192.168.111.68 Hostname used for this client: PC-Security-8xx
2.3.4 Smart Guest Applications server with virtual room
Room 38xx is configured with “automation”: control 4 mock linked to virtual room. http://192.168.181.XX:8080/vrs
2.3.5 Smart Guest Applications Background
Room 38xx is configured with default background and screensaver. You can customize them on: http://srv73.al-mydemo.com:8090/custom/hospitality/

Hospitality Demo Kit User Guide
Ref. EP 970140203-1 Ed.20 Page 10/65
You can personalize: logo, background and screensaver or revert to default value. Take care with: Icon Position:
Time and date font color: black Position
Time Date Room font color: White Position
2.3.6 Mobile Guest Softphone server
Room set 38xx can be associated with 2 mobiles. http://srv54.al-mydemo.com:8080/BYOD/ Login: staff, password: Aludemo2012!

Hospitality Demo Kit User Guide
Ref. EP 970140203-1 Ed.20 Page 11/65
iOS applications :Mobile Guest Softphone iPhone and iPad
Android application : Mobile Guest SoftPhone for Android
Device compatibility (ref Prerequisites document ALESVC57161 avalable on BPWS) :
2.3.7 OpenTouch Notification Service
• Fire alarm scenario: o Loudspeaker announcement on “room service” set o Full voice message on “concierge” set o Floorplan display (*) o Real time Console display (*) o SmartApps notification
(*) http://srv13.al-mydemo.com:8080/UMS , login: Security8xx, password: Aludemo2012!

Hospitality Demo Kit User Guide
Ref. EP 970140203-1 Ed.20 Page 12/65
• Minibar opening scenario: mini-message to room service and reception
• SmartApps Application:
• iOS applications : Smartapps iPhone and iPad
� SmartApps configuration � OpenTouch Notification Service URL http://192.168.111.13:9004/xml-rpc � Device name : 69xx � SIP server : 192.168.111.108 � Login 69xx � Password : 0000 � SIP identity sip:[email protected] � Registration internal � Activation key is “rt79Q45”.
• Android application : SmartApps for Android

Hospitality Demo Kit User Guide
Ref. EP 970140203-1 Ed.20 Page 13/65
Server address : 192.168.111.13 Login : SmartApp79xx Password : Aludemo2012! Configure the SIP settings:
Domain : 192.168.111.108 Username : 79xx
2.3.8 IP Desktop Softphone
• iOS applications : ALE IP Desktop Softphone iPhone and iPad

Hospitality Demo Kit User Guide
Ref. EP 970140203-1 Ed.20 Page 14/65
• Android application : ALE IP Desktop Softphone
Configuration parameters: Tftp : 192.168.111.108
• Windows application : avalable on https://businessportal2.alcatel-lucent.com/

Hospitality Demo Kit User Guide
Ref. EP 970140203-1 Ed.20 Page 15/65
� • MacOs Application: avalable on https://businessportal2.alcatel-lucent.com/
Hospitality Demo Kit User Guide
Ref. EP 970140203-1 Ed.20 Page 16/65
3. Use Case
Before a demo please book and check system availability on: http://edemo.al-mydemo.com/?page_id=1215
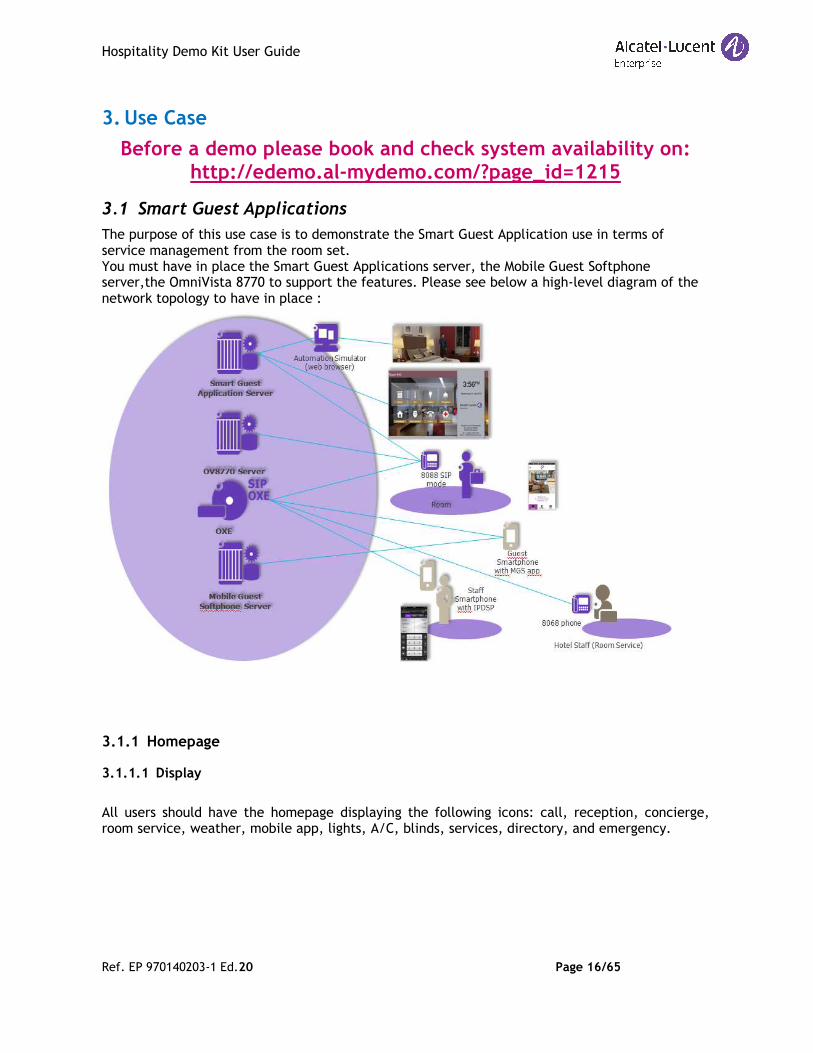
3.1 Smart Guest Applications
The purpose of this use case is to demonstrate the Smart Guest Application use in terms of service management from the room set. You must have in place the Smart Guest Applications server, the Mobile Guest Softphone server,the OmniVista 8770 to support the features. Please see below a high-level diagram of the network topology to have in place :
3.1.1 Homepage
3.1.1.1 Display
All users should have the homepage displaying the following icons: call, reception, concierge, room service, weather, mobile app, lights, A/C, blinds, services, directory, and emergency.

Hospitality Demo Kit User Guide
Ref. EP 970140203-1 Ed.20 Page 17/65
Smart DeskPhone 8082
Smart DeskPhone 8088
3.1.1.2 Call from reception
From the reception, phone, by dialing the guest number (18xx), all phones of the room should ring: the call can be taken from any device.
3.1.1.3 Call to reception and record
From room set (38xx), a press on the reception key should ring the reception phone. The call can be listened from the OmniPCX Record interface.
3.1.1.4 Call to concierge and record
From room set (38xx), a press on the Concierge key should ring the Concierge phone. The call can be listened from the OmniPCX Record interface.
3.1.1.5 Call to Room Service
From room set (38xx), a press on the Room service key should ring the Room service phone.
3.1.1.6 Missed Call
A press on icon
- or for the 8088
- or for the 8082

Hospitality Demo Kit User Guide
Ref. EP 970140203-1 Ed.20 Page 18/65
Smart DeskPhone 8088 Smart DeskPhone 8082
3.1.1.7 Emergency call
See chapter : Emergency Notification Server
3.1.1.8 Do Not Disturb
- By clicking the circle sensitive key on Smart DeskPhone 8082 ,or on Smart DeskPhone 8088
- Or by pressing “Do not Disturb” , all users should be able to set/unset the Do Not Disturb status. When DnD is active:
- Calls between room set and mobile are not possible - The message “Do not Disturb” is displayed on the calling set:

Hospitality Demo Kit User Guide
Ref. EP 970140203-1 Ed.20
3.1.1.9 Dial pad
By launching the dial pad, speed dials should be
(The mobile button is active only when the Mobile Guest guest’s mobile)
3.1.2 Weather forecast
3.1.2.1 Launching
By clicking the weather button on the home
Page 19/
By launching the dial pad, speed dials should be displayed as follows:
Smart DeskPhone 8082
Smart DeskPhone 8088
when the Mobile Guest Softphone application is
eather button on the homepage, the weather forecast application is launched.
Smart DeskPhone 8082
/65
Softphone application is running on the
recast application is launched.

Hospitality Demo Kit User Guide
Ref. EP 970140203-1 Ed.20 Page 20/65
Smart DeskPhone 8088
Smart DeskPhone 8088
By clicking the notification button , the icon is displayed Favorites: when clicking the Favorites button of the weather forecast application, several cities are listed: Paris, Dubai, Los Angeles, New York and Sydney are available. By selecting the city and clicking OK, the weather forecast of the selected favorite city appears.
When clicking the display will switch to Fahrenheit , the display will switch to Celsius.
By clicking it’s possible to search a specific town, a shown below:

Hospitality Demo Kit User Guide
Ref. EP 970140203-1 Ed.20 Page 21/65
3.1.3 Hotel Directory
3.1.3.1 Launching
By clicking the Directory button on the homepage, the Directory view is launched as it follows:
Smart DeskPhone 8082
Smart DeskPhone 8088
3.1.3.2 Navigate
By selecting a new item, a description and picture of each hotel service is displayed.

Hospitality Demo Kit User Guide
Ref. EP 970140203-1 Ed.20 Page 22/65
3.1.3.3 Launch call
By clicking the Call button, a call is launched. For laundry, bar, restaurant, SPA and casino, the call is launched to the Reception (68xx).
3.1.3.4 Map
By selecting Map, the floor plan and room location are displayed.
3.1.4 Automation lights
From room set 38xx: By clicking the Light button on the homepage, the Light view displays as follows:
Smart DeskPhone 8082

Hospitality Demo Kit User Guide
Ref. EP 970140203-1 Ed.20
By clicking/selecting a light, the corresponding By clicking the night mode scene, all light leds are turned off.
3.1.5 Automation lights with virtual room
By clicking the Light button on the home
Page 23/
Smart DeskPhone 8088
corresponding led on the top right corner is turned on.ight mode scene, all light leds are turned off.
Smart DeskPhone 8082
irtual room
button on the homepage, the Light view displays as follows:
Smart DeskPhone 8082
/65
led on the top right corner is turned on.

Hospitality Demo Kit User Guide
Ref. EP 970140203-1 Ed.20 Page 24/65
Smart DeskPhone 8088
By clicking the “All off” button, all light leds are turned off and the view is updated on the virtual room (38xx).
Smart DeskPhone 8082
Smart DeskPhone 8088

Hospitality Demo Kit User Guide
Ref. EP 970140203-1 Ed.20 Page 25/65
By clicking the “All on” button, all light leds are turned on and the view is updated on the virtual room (38xx).
3.1.6 Automation A/C (air conditioning)
By clicking the A/C button on the homepage, the A/C view is launched as follows:
Smart DeskPhone 8082
Smart DeskPhone 8088
By clicking the “On” button, the desired temperature displays:
By clicking the / buttons on the Smart DeskPhone 8082

Hospitality Demo Kit User Guide
Ref. EP 970140203-1 Ed.20 Page 26/65
By moving the cursor on the Smart DeskPhone 8088, the desired temperature is displayed:
If the desired temperature is higher than the current:
- label is visible on the Smart DeskPhone 8082
- icon is visible on the Smart DeskPhone 8088
If the desired temperature is lower than the current:
- label is visible on the Smart DeskPhone 8082 - icon is visible on the Smart DeskPhone 8088
3.1.7 Automation A/C with virtual room
Same behavior as “3.1.6 Automation A/C (air conditioning)” with an updated view on virtual room (Room 38xx). By clicking the “On” button:
- The air conditioning simulation will start :

Hospitality Demo Kit User Guide
Ref. EP 970140203-1 Ed.20 Page 27/65
- the desired temperature displays
3.1.8 Blinds
By clicking the Open/Close/Stop button, the blinds open, close or stop:
Smart DeskPhone 8082
Smart DeskPhone 8088

Hospitality Demo Kit User Guide
Ref. EP 970140203-1 Ed.20 Page 28/65
3.1.9 Automation services with virtual room
By clicking the Services button on the home page, the Services view is launched as follows:
Smart DeskPhone 8082
Smart DeskPhone 8088

Hospitality Demo Kit User Guide
Ref. EP 970140203-1 Ed.20 Page 29/65
Smart DeskPhone 8082
Smart DeskPhone 8082
Smart DeskPhone 8088

Hospitality Demo Kit User Guide
Ref. EP 970140203-1 Ed.20 Page 30/65
Smart DeskPhone 8082 By clicking any button, the services status are updated on the top right corner (room privacy and room service cannot be set to “On” at the same time).
3.1.10 Language
By clicking , you can modify language
3.1.11 Interactive clock screen saver
When the phone is idle for 45 seconds, the Smart Guest Applications interactive clock screen saver appears:

Hospitality Demo Kit User Guide
Ref. EP 970140203-1 Ed.20 Page 31/65
Smart DeskPhone 8082
Smart DeskPhone 8088
• By clicking the Blinds button, the automation blinds view is launched
• By clicking the A/C, the automation A/C view is launched
• By clicking the Lights, the automation lights view is launched
• By clicking the Reception button, a call to room service is launched, same behavior as “3.1.1.3 Call to reception and record”
• By clicking the Home button, the 8082 My IC Phone homepage displays
• By clicking the Room Service button, a call to room service is launched, same behavior as “3.1.1.5 Call to Room Service”
• By clicking the Call button, standard call view displays
• By clicking the Emergency button, an emergency call is launched, same behavior as “3.1.1.7 Emergency call”
3.1.12 Wake Up
Press for the Smart DeskPhone 8088 or for the Smart DeskPhone 8082 Enter the wake up hour:

Hospitality Demo Kit User Guide
Ref. EP 970140203-1 Ed.20 Page 32/65
Smart DeskPhone 8088 Smart DeskPhone 8082
Smart DeskPhone 8088 Smart DeskPhone 8082 Validate
Smart DeskPhone 8088 Smart DeskPhone 8082 A new icon appears to indicate that an alarm is active.
Smart DeskPhone 8088 Smart DeskPhone 8082 When answering to the call , a voice guide is played :”This is your alarm call:15hours 40minutes”

Hospitality Demo Kit User Guide
Ref. EP 970140203-1 Ed.20 Page 33/65
3.2 Mobile Guest Softphone
The purpose of this use case is to demonstrate the Mobile Guest Softphone solution use inside the hotel wireless coverage. In terms of hotel network infrastructure, you must have in place a wireless LAN to support the feature, below a high level diagram of the network topology to have in place :
The Mobile Guest Softphone application has to be installed first on the smartphone (see the iOS video : http://edemo.al-mydemo.com/video/applestore.mp4). The smartphone should be connected to the wireless SSID : thanks-edemo-team ( password: itrulyloveyou).(see the iOS video : http://edemo.al-mydemo.com/video/wifi.mp4)
3.2.1 Add a phone to the room
There are differents possibilities to get the registration QR code:
• From the Mobile Guest Softphone administrator interface: o Login on http://srv54.al-mydemo.com:8080/BYOD/ o with the login: staff and password: Aludemo2012!
o From the guest profiles menu search your room 38xx

Hospitality Demo Kit User Guide
Ref. EP 970140203-1 Ed.20 Page 34/65
The maximum number per room is 2
o Click 38xx.
o Click then the “Show QRCode” button.
: deletes the room and associated devices
NB: don’t delete the room

Hospitality Demo Kit User Guide
Ref. EP 970140203-1 Ed.20 Page 35/65
o Click then the “Send mail” button.
Email is sent to guest
Click on URL
If application is already install , click on Open

Hospitality Demo Kit User Guide
Ref. EP 970140203-1 Ed.20 Page 36/65
• From the Mobile App from the homepage of the room set
Press QR Code
If you need help press . This will call the Reception phone

Hospitality Demo Kit User Guide
Ref. EP 970140203-1 Ed.20 Page 37/65
From the Mobile Guest Softphone application:
Scan the QRCode (the phone should be logged-in), the following screen then displays:
Example video : http://edemo.al-mydemo.com/video/register.mp4
If this icon appears : check you wireless connection
3.2.2 Call the room
From the reception phone, by dialing room number (18xx), all phones of the room should ring: the call can be taken from any device.
Example video : http://edemo.al-mydemo.com/video/callroom.mp4

Hospitality Demo Kit User Guide
Ref. EP 970140203-1 Ed.20 Page 38/65
3.2.3 Call Services
Example video : http://edemo.al-mydemo.com/video/callservice.mp4
3.2.4 Call from the room
Smart DeskPhone 8082 Smart DeskPhone 8088 Press dial pad then mobile button.

Hospitality Demo Kit User Guide
Ref. EP 970140203-1 Ed.20 Page 39/65
3.2.5 My contacts
This allows a guest to add their own personal contacts and call them via the Mobile Guest Softphone. Each registered mobile is added as a contact to the other mobile: Contact names can be changed or updated:
Calling a contact :

Hospitality Demo Kit User Guide
Ref. EP 970140203-1 Ed.20 Page 40/65
Adding a contact :
3.2.6 Wake up call
If a wake up call is programmed from the room set or operator,
a call is received on the guest mobile with a wake up message.

Hospitality Demo Kit User Guide
Ref. EP 970140203-1 Ed.20
3.2.7 Emergency Call
See chapter : Emergency Notification Server
3.2.8 Mobile Guest Softphone use case using SBC configuration
The purpose of this use case is to demonstrate hotel wireless coverage though (e.gIn terms of hotel network infrastructure you must have in place SBC and the feature. Please see below a high level diagram of the network topology to have in place :
What to do for the demo : On a registered mobile, deactivate Mobile Guest Softphone server will be reThe Guest Mobile Guest Softphone aif it was under the hotel wireless coverage.
: If this is displayed, the Mobile Guest Softphone
3.3 Automated Attendant
In this demo use case we demonstrate the Visual AutoBy calling the Visual Automated Attendant you will be able to key in the room number you want to reach or call hotel services.
Page 41/
Emergency Notification Server
use case using SBC configuration
The purpose of this use case is to demonstrate the Mobile Guest Softphone solution use outg. : 4G or hotspots).
In terms of hotel network infrastructure you must have in place SBC and Reverse Pbelow a high level diagram of the network topology to have in place :
ctivate WiFi or switch to a “hot spot” wireless SSID; the connection to l be re-established through SBC; do not log-out.app can call the hotel services or be called by ho
coverage.
obile Guest Softphone access to cellular data must be activated
In this demo use case we demonstrate the Visual Automated Attendant solution. Attendant you will be able to key in the room number you want
/65
solution use outside
Proxy to support below a high level diagram of the network topology to have in place :
the connection to out.
pp can call the hotel services or be called by hotel services as
ellular data must be activated
Attendant you will be able to key in the room number you want

Hospitality Demo Kit User Guide
Ref. EP 970140203-1 Ed.20 Page 42/65
Note : If you want to demonstrate the Mobile Guest Softphone solution without being connected though a RAP and without getting all the phones connected, it could be done with this demo scenario : you only need your Mobile Guest Softphone app, your QR Code and a phone calling the Visual Automated Attendant DID. For a specific Visual Automated Attendant demo please refer to: http://edemo.al-mydemo.com/?page_id=1692 By dialing +33298285360, you reach the reach the Visual Automated Attendant and can go through the below menus :

Hospitality Demo Kit User Guide
Ref. EP 970140203-1 Ed.20 Page 43/65
Visual Automated Attendant menu:

Hospitality Demo Kit User Guide
Ref. EP 970140203-1 Ed.20 Page 44/65
3.4 IP Desktop Softphone
3.4.1 IP Desktop Softphone on a tablet
3.4.1.1 Login
The user “Concierge” should be able to launch the IP Desktop Softphone with the 78xx phone number on the OmniPCX Enterprise, whose IP address is 192.168.111.108
3.4.1.2 Call by number
The Concierge should be able to call the guest by dialing 18xx.
3.4.1.3 Call by name
The Concierge should be able to call the Room Service by pressing the “Room Service” button.
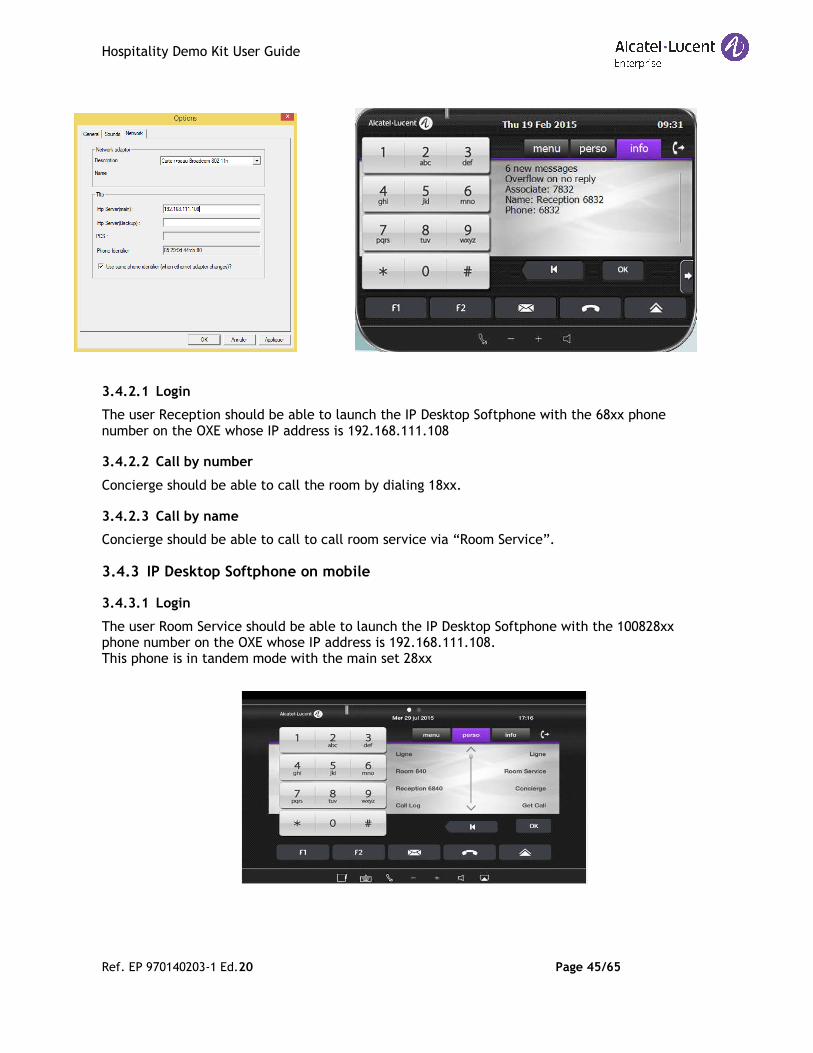
3.4.2 IP Desktop Softphone on PC1
Install the IP Desktop Softphone application Right click � Options � Applications � Network. The user “Reception” should be able to launch the IP Desktop Softphone with the 68xx phone number on the OXE whose IP address is 192.168.111.108
Hospitality Demo Kit User Guide
Ref. EP 970140203-1 Ed.20 Page 45/65
3.4.2.1 Login
The user Reception should be able to launch the IP Desktop Softphone with the 68xx phone number on the OXE whose IP address is 192.168.111.108
3.4.2.2 Call by number
Concierge should be able to call the room by dialing 18xx.
3.4.2.3 Call by name
Concierge should be able to call to call room service via “Room Service”.
3.4.3 IP Desktop Softphone on mobile
3.4.3.1 Login
The user Room Service should be able to launch the IP Desktop Softphone with the 100828xx phone number on the OXE whose IP address is 192.168.111.108. This phone is in tandem mode with the main set 28xx

Hospitality Demo Kit User Guide
Ref. EP 970140203-1 Ed.20 Page 46/65
3.4.3.2 Call by number
Room service should be able to call the room by dialing 18xx.
3.4.3.3 Call by name
Room service should be able to call to call Room Service via “Room Service”.
3.4.3.4 Get Call
Call Room service from room set Both tandem sets will ring Answer from mobile Press the Get Call key on main phone to shift call from mobile to deskphone

Hospitality Demo Kit User Guide
Ref. EP 970140203-1 Ed.20
3.5 Emergency Notification Server
The purpose of this use case is to demonstrainside the hotel.
3.5.1 Ens
What to do for the demo:
From room set (38xx) or mobile set
• Ring reception (68xx) first
• Then add to the loop conciergesuite
• A pop-up appears on PC1“Show Details” button, the caller details display with a geolocation map to locate where the emergency call was set up.
Page 47/
Emergency Notification Server
The purpose of this use case is to demonstrate the Emergency Notification Server
obile set , a press on the emergency key should:
) first
concierge (78xx) and room service (28xx) from any device of any
PC1 displaying the emergency call details. When clicking the ” button, the caller details display with a geolocation map to locate
where the emergency call was set up.
/65
otification Server solution use
from any device of any
ll details. When clicking the ” button, the caller details display with a geolocation map to locate

Hospitality Demo Kit User Guide
Ref. EP 970140203-1 Ed.20 Page 48/65

Hospitality Demo Kit User Guide
Ref. EP 970140203-1 Ed.20 Page 49/65
• An email is sent to the Reception: o Login: Al-mydemo/Security8xx o Password: Aludemo2012!
• A mini-message displays on the sets 78xx,8xx, 68xx as follows:

Hospitality Demo Kit User Guide
Ref. EP 970140203-1 Ed.20 Page 50/65
• Call log on the Emergency Notification Server interface :
• Listen to the call from the Emergency Notification Server interface :
3.5.2 Conference
http://srv68.al-mydemo.com:8191/ens-realtimepanel/ call 3950 from room device
- Possible to add participant from user list
- Possible to mute a participant

Hospitality Demo Kit User Guide
Ref. EP 970140203-1 Ed.20 Page 51/65
- Possible to pause a participant - Possible to remove a participant - Possible to Call Back a participant
3.6 OmniPCX RECORD
The purpose of this use case is to demonstrate the OmniPCX Record solution use inside the hotel. Below a high level diagram of the network topology to have in place :
What to do for the demo :
3.6.1 User Interface
http://srv26.al-mydemo.com/OmniPCXRecord/default.aspx

Hospitality Demo Kit User Guide
Ref. EP 970140203-1 Ed.20 Page 52/65
Reception 68xx is configured as the team manager and has the following rights:
• Can listen to the room service and concierge recordings
• Can discretely listen to ongoing conversations (silent monitoring).
• Generate reports

Hospitality Demo Kit User Guide
Ref. EP 970140203-1 Ed.20 Page 53/65
Searching for calls
Right click on a recording to listen:
Click recording to listen

Hospitality Demo Kit User Guide
Ref. EP 970140203-1 Ed.20 Page 54/65
3.6.2 Call to Reception and record
From room set (38xx), a press on the Reception key should ring the reception phone. The call can be listened to from the OmniPCX Record interface.
3.6.3 Call to Concierge and record
From room set (38xx), a press on the Concierge key should ring the Concierge phone. The call can be listened to from the OmniPCX Record interface.
3.6.4 Call to Room Service
From room set (38xx), a press on the Room service key should ring the Room service phone.
• Record on demand: the Concierge and Room Service can activate the Record on demand from their set as shown:

Hospitality Demo Kit User Guide
Ref. EP 970140203-1 Ed.20
3.7 OpenTouch Notification Service
The purpose of this use case is to demonstrate the usage of the OmniTouch Notification Server solution in-side Hotel. Below a high level diagram of the network topology to have in place :Virtual Room Simulator alarm is sent through email to Otns server
3.7.1 Minibar notification
Page 55/
penTouch Notification Service
The purpose of this use case is to demonstrate the usage of the OmniTouch Notification Server side Hotel. Below a high level diagram of the network topology to have in place :m Simulator alarm is sent through email to Otns server
/65
The purpose of this use case is to demonstrate the usage of the OmniTouch Notification Server side Hotel. Below a high level diagram of the network topology to have in place :

Hospitality Demo Kit User Guide
Ref. EP 970140203-1 Ed.20 Page 56/65
When the guest opens the minibar, a notification via mini message is sent to the reception as follows:
3.7.2 Fire alarm notification

Hospitality Demo Kit User Guide
Ref. EP 970140203-1 Ed.20 Page 57/65
http://srv13.al-mydemo.com:8080/UMS: login: Security8xx, password: Aludemo2012! SIP Number : 78xx
When a fire alert is triggered from the fire detector, the following actions are taken by the OpenTouch Notification Service application:
• Loudspeaker announcement on the room service phone set

Hospitality Demo Kit User Guide
Ref. EP 970140203-1 Ed.20 Page 58/65
• Loudspeaker announcement on the reception phone set
• Floorplan display (*). See the next screenshot: o Building Hospitality 8x (eg 85 for room 85x, 82 for room 82x)
- Download hotelcorridor.html : security camera simulation Right click to clear alarms
• Real Time Console display (*)
- Download hotelcorridor.html : security camera simulation

Hospitality Demo Kit User Guide
Ref. EP 970140203-1 Ed.20 Page 59/65
SmartApps : Notification and call back Accept or reject the alarm History menu
3.7.3 Room Service Alarm
On room service set press “alarm” key
- Alarm is displayed on floor plan and real time console

Hospitality Demo Kit User Guide
Ref. EP 970140203-1 Ed.20 Page 60/65
- Download servicecorridor.html : security camera simulation
3.7.4 Android SmartApps Alarm
Press Panic Alarm
On Real Time Console:
Click on Message content link

Hospitality Demo Kit User Guide
Ref. EP 970140203-1 Ed.20 Page 61/65
Google maps location is display
3.7.5 Reports
3.7.6 Virtual Room Simulator Alarm Reset
From the virtual room, click the 8082 My IC Phone icon to reinitialize the virtual room simulator alarms.

Hospitality Demo Kit User Guide
Ref. EP 970140203-1 Ed.20 Page 62/65

Hospitality Demo Kit User Guide
Ref. EP 970140203-1 Ed.20 Page 63/65
3.8 IP Desktop Softphone onboarding
3.8.1 Server
The Onboarding administration will allow to configure a new IP Desktop Softphone temporary user for a dedicated period of time. The access to administration server is done via following URL : http://srv36.al-mydemo.com/kioskipdsp/admin/phone
Login : reception Password : Aludemo2012!
Directory number : the first free number Private Calling Number: leave blank Lastname : Firstname: Email : to receive registration information Registration end date :

Hospitality Demo Kit User Guide
Ref. EP 970140203-1 Ed.20 Page 64/65
: to validate modification
: remove set and user information
: to scan the QR code from mobile
: send registration information to user email - 1st mail with registration URL - 2nd mail with registration security code
3.8.2 Mobile registration using emails
Once registered, the user will receive the two emails (ie. on his mobile). The emails will allow him/her to download the IP Desktop Softphone application and to register for the period of time.
Connect your smartphone to SSID Thanksedemoteam. Using the first email, download the application from AppleStore or GooglePlay.

Hospitality Demo Kit User Guide
Ref. EP 970140203-1 Ed.20 Page 65/65
Enter the password received in the second email. Open the IP Desktop Softphone, the registration is done.
To unregister the set : in the Administration page click The set is unregistered.
End of document


