20
Design Guidelines for Injection Molding

Design Guidelines for
Injection Molding

01 of 20
TABLE OF CONTENTS
INTRODUCTION TO INJECTION MOLDING
INJECTION MOLDING BASICS
INJECTION MOLDING DETAILS
A. Where is it used?
B. Importance of prototyping
C. Types of prototypes
A. The machine
B. The mold
C. The materials
D. The process
A. Wall thickness
B. Draft
C. Ribs
D. Bosses
E. Finishes
F. Text

02 of 20
INTRODUCTION TO INJECTION MOLDING
POWER TIP:
Selecting a plastic resin is an important first step. When molds are engineered, they are
made for a specific type of plastic. Each type of plastic shrinks as it cools, but they all
shrink differently. Once a mold is complete, it’s only good for parts made from plastics
with similar shrink rates, so a finished mold limits the kinds of plastic you can use.

INTRODUCTION TO INJECTION MOLDING
03 of 20
WHERE IS IT USED?
WHERE DO YOU SEE EXAMPLES?
Just about everywhere you look, across
every industry, you can find injection
molded parts. Some examples of
injection molded parts are bottle caps,
airplane windows, car dash knobs,
cell phone cases, and coffee makers.
THE MAIN DISADVANTAGE
The main disadvantage with plastic
injection molding is the initial cost and
time to build a mold. Molds are typically
built from tool grade steel and the time
and effort to produce a mold are great.
THE APPLICATIONS OF PLASTIC
INJECTION MOLDING
Plastic injection molding is the most
common way to mass produce parts.
Injection molding is great if you want to
produce the same item over and over
again. There are two main reasons why
it is so popular: first, after an initial
investment in a mold, it is the
lowest cost par part; second, since the
part comes out of a fixed mold, the parts
are very repeatable with very accurate
results. There are other reasons for its
popularity as well: minimal scrap, low
energy usage, and limited need for post
processing.

INTRODUCTION TO INJECTION MOLDING
04 of 20
THE IMPORTANCE OF PROTOTYPING PLASTIC INJECTION
MOLDED PARTS
Since the main disadvantage to plastic injection molding is the upfront mold cost, it
makes sense that when it’s time to purchase a mold you want to make sure to get it right
the first time. Making a mold and having to scrap it can be extremely costly. That almost
never happens, though, because we encourage customers to fully prototype the parts to
verify the design before moving ahead with production.
It‘s a lot less expensive to verify your design with a prototype or two than to throw away a mold.
IMPORTANCE OF PROTOTYPING

INTRODUCTION TO INJECTION MOLDING
05 of 20
TYPES OF PROTOTYPES FOR INJECTION MOLDING
There are three main ways to prototype a plastic part and RevPart offers all three. These
include additive prototyping (3D printing), subtractive prototyping (CNC Machining),
and prototype molding.
Low cost
Quick turnaround
Make complex geometry
Limited functionality
Typically not used for production
May not be suitable for complex geometry
Use production grade plastic
Quick turnaround
Functional parts
Some geometry constraints
Medium cost
Least expensive per-part cost
Final production grade part
More finishing and decoration options
Mold build time
Mold cost

06 of 20
POWER TIP:
Design your part just as you would for injection molding—even if you’re
starting out with 3D printing. This will help ensure a good part when
it’s time to move to production.
INJECTION MOLDING BASICS

INJECTION MOLDING BASICS
07 of 20
TYPES OF MACHINES
Injection molding machines are sized by how many tons of force they can apply to the
mold halves. Typical sizes range from 100 tons — 500 ton machines. The size of the
machine needed is determined by the size of the plastic part. The bigger the part, the
more force is required to help the two mold halves pushed together.
PURPOSE OF INJECTION MOLDING MACHINES
The simplified purpose of an injection molding machine is to hold two halves of a metal
mold together, deliver a measured amount of pressurized molten plastic to the cavity
chamber, and to do this as quickly and precisely as possible.
KEY INJECTION MOLDING MACHINE FEATURES
Hopper – This is the funnel where the plastic pellets are poured.
Barrel screw – This is where the plastic is melted and pressurized.
Motor – This is what turns the screw to pressurize and deliver the plastic.
Injection nozzle – This interfaces with the mold and controls the amount of
plastic delivered.
Moving platen – This is where the mold is mounted. These move back and forth and
can clamp with tons of force.
THE MACHINE

INJECTION MOLDING BASICS
08 of 20
MOLDS
Molds are big pieces of metal split in half with a hollow cavity in the shape of the part
you’re trying to create. Molds are very beefy and contain a lot of metal because they
have to withstand the high injection pressure, they have to withstand the
machine clamping pressure, and they are expected to make a large number of parts.
HOW MOLDS ARE MADE
For very simple cavities, the mold can be CNC machined. Molds that require greater
complexity are made by using an EDM (Electrical Discharge Machining) process. EDM
uses a machined electrode to eat away the metal layer by layer. This process is slow but
results in a very accurate and high quality cavity.
RevPart has developed a proprietary process which allows us to produce a
prototype mold in ten days that is good for ten thousand shots.
ANATOMY
Ejector pins – These are sliding pins that
push the part out of the mold after it
opens.
Gate – This is the areas where the plastic
enters the mold and flows to the cavity.
Vent – This is the area in which the gas is
released from the mold as the
plastic flows in.
Slide – Slides are moving parts that allow
complex part geometry. The part is
molded then they slide out of the way so
the part can be ejected.
DAYS THOUSAND
THE MOLD

INJECTION MOLDING BASICS
09 of 20
SELECTING A PLASTIC RESIN
Selecting a plastic resin is always a difficult task. With over 10,000 different types
available, the options can be a little overwhelming. Luckily, plastic resin falls into
categories that have similar properties. You can compare the pros and cons of each
plastic category, and once you find a suitable category, narrow it down to which specific
resin will work for your application.
THE MATERIALS
Polyethylene
terephthalate
(PET)
High density
polyethylene
Polyvinyl
Chloride (PVC)
Low Density
Polyethylene
Polypropylene Polystyrene
(PS)
Clarity Clear Hazy translu-
cent
Clear Translucent Translucent Clear
Moisture Barrier
(MTVR)
Good Excellent Good Very Good Excellent Poor
Oxygen Barrier Good Poor Good Poor Poor Poor
Distortion
Temperature
155°F 160°F 150°F 110°F 200°F 170°F
Rigidity High Moderate High Low Moderate High
Stress Crack
Resistance
Excellent Fair Excellent Good Excellent Fair
Cold Resistance Good Excellent Fair Excellent Poor Poor
Impact
Resistance
Good Excellent Good Excellent Fair Poor
Alcohol
Resistance
Good Good Excellent Good Good Fair
Alkalis
Resistance
Poor Good Excellent Good Good Fair
Solvent
Resistance
Good Poor Good Poor Poor Poor
Oil Resistance Fair Good Good Good Good Poor
Acid Resistance Fair Good Good Good Good Fair
INJECTION MOLDING BASICS
10 of 20
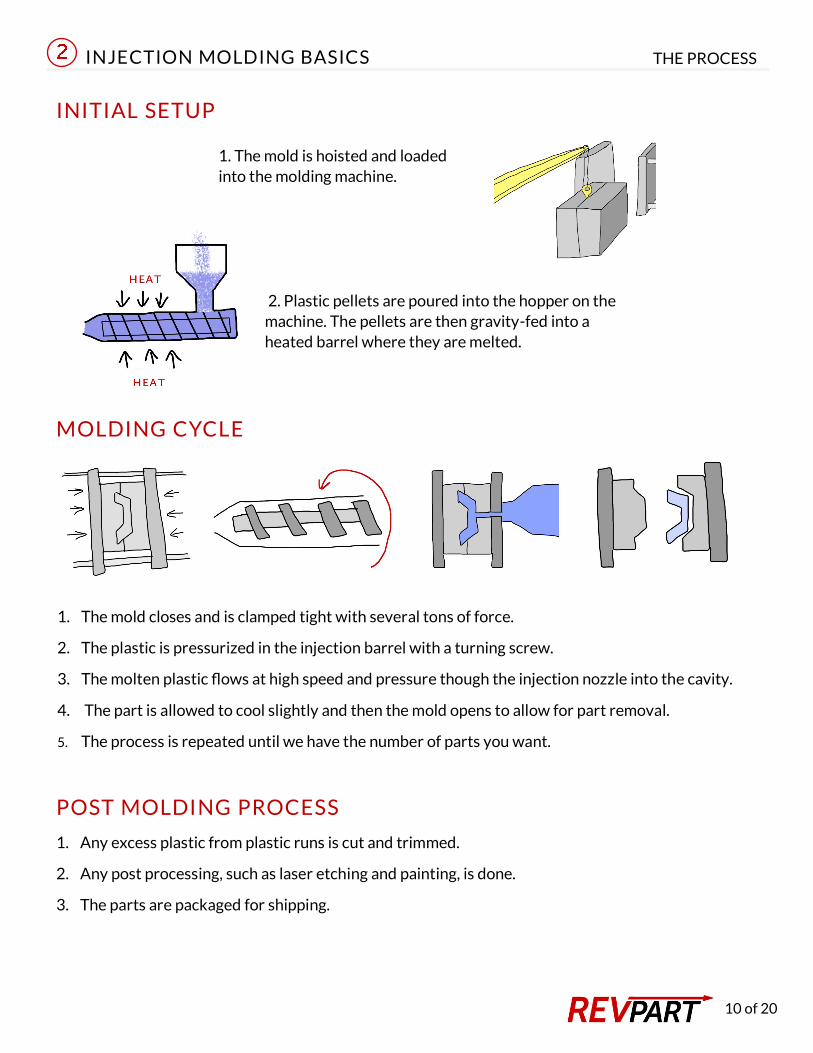
INITIAL SETUP
POST MOLDING PROCESS
1. Any excess plastic from plastic runs is cut and trimmed.
2. Any post processing, such as laser etching and painting, is done.
3. The parts are packaged for shipping.
1. The mold closes and is clamped tight with several tons of force.
2. The plastic is pressurized in the injection barrel with a turning screw.
3. The molten plastic flows at high speed and pressure though the injection nozzle into the cavity.
4. The part is allowed to cool slightly and then the mold opens to allow for part removal.
5. The process is repeated until we have the number of parts you want.
1. The mold is hoisted and loaded
into the molding machine.
2. Plastic pellets are poured into the hopper on the
machine. The pellets are then gravity-fed into a
heated barrel where they are melted.
MOLDING CYCLE
THE PROCESS

11 of 20
INJECTION MOLDING DETAILS
POWER TIP:
When trying to choose between 3D printing and CNC machining for prototyping,
consider where you are in the design process. If at an early stage, you may want to start
with a 3D print, but if you’re fairly confident in your design, a CNC machined part will
give you the best representation.

INJECTION MOLDING DETAILS
12 of 20
WHY IS WALL THICKNESS IMPORTANT?
The wall thickness you select determines the amount of
plastic that will flow through the cavity. Wall thickness is the
most important feature to consider when designing your part.
Cost, quality, and production speed can all be effected by the
wall thickness you select. In general, your goal should be to
use the thinnest wall possible. Using thinner walls uses less
material and takes less time to cool in the machine, reducing
cost.
HIGH SPEED MACHINES
RevPart offers a variety of
specialized machines to make your
ideas possible. One of the
specialized machines we offer is a
high speed injection molding
machine. This machine shoots
plastic at a very high rate allowing
us to mold features down to .3mm
thin and 12mm thick.
UNIFORM WALL THICKNESS
When you have a design with varying thicknesses, it can lead to quality problems such
as warping. The thin walls cool before the thick wall, and the already cooled areas pull
on the warm ones, causing warp. To avoid this issue, it is critical to keep the walls at a
uniform thickness. If varying thicknesses are needed, make the
transition as gradual as possible to avoid cooling differences.
RECCOMENDED WALL THICKNESS

INJECTION MOLDING DETAILS
13 of 20
WHY IS ADDING DRAFT IMPORTANT?
Adding draft (or taper) to a part ensures that it can be removed from the mold
during the ejection phase. Without draft, the part would remain in the cavity with no
way of removing it safely. The amount of draft needed depends on the depth of the draw
and the texture on the surface.
TEXTURE AND DRAFT
As the depth of the texture increases, more draft needs to be added so the part will
eject properly and leave an aesthetically pleasing finish behind without pull or scrape
marks.
RECOMMENDED DRAFT ANGLES
The typical draft angle is between 1 –3 degrees with 1.5 degrees being the most
common. Draft angle can vary depending on part geometry and surface texture.
It is recommended to start with a 1.5 degree draft and let your engineer identify areas
that need a larger draft angle.

INJECTION MOLDING DETAILS
14 of 20
WHY ARE RIBS USED?
Ribs are commonly used in plastic injection molding to reinforce sections and add
stiffness. The use of ribs is often necessary due to the uniform wall thickness
requirement. You can’t have thick sections to stiffen a part, but you can add several ribs
in order to accomplish the same goal.
RIB THICKNESS
Just like the rest of your part, ribs should have draft in order to release properly from
the mold. It is important to keep the base of the rib thickness 40%-60% of the part
thickness. Thick ribs can cause sinking—a cosmetic defect. Often, it is better to use
many small ribs distributed along the part than it is to use larger ribs.
RIBS

INJECTION MOLDING DETAILS
15 of 20
WHAT ARE BOSSES USED FOR?
Bosses are used for attaching a fastener or registering a mating part. They are often
used for mounting things like a PCB (printed circuit board) or attaching one plastic piece
to another. If bosses are to take a threaded fastener like a screw, they often have a metal
insert molded. Another common thing to do with bosses is to use self-tapping fasteners.
BOSS THICKNESS AND REINFORCEMENT
The following should be taken into account:
The wall thickness of a boss should be less than 60% (at the base of the boss) of
the part’s wall thickness.
The height of a boss should be less than 5 times the part wall thickness.
Bosses should have a minimum of .5-1 degree draft.
Bosses can be strengthened by ribs at the base.
BOSSES

INJECTION MOLDING DETAILS
16 of 20
SURFACE FINISH
Plastic injection molded parts take on the surface of the mold. There are many
options when it comes to surface finish, from a glossy polished surface to a
simulated wood grain finish. The most common finishes you see are polished
surfaces and textured surfaces resembling a sand blasted finish. Texture is added
to the mold either by manual removal or by chemical etching.
POLISH AND TEXTURE STANDARDS
Texture is typically called out using a set of industry standards such as SPI or Mold
Tech (MT) finishes. SPI finish is a requirement for mold surface finishes and is typically
used for calling out the degree of polish you want on a surface. MT finishes are typi-
cally used when you want a texture on a surface.
THE MOST COMMON SPI POLISH CALLOUTS
HOW TO CALL IT OUT IN THE DRAWING
In most cases, we find the surface finish is called out in the notes of the drawing with a
bubble reference pointing to the surfaces with that finish. Please see the example:
FINISHES
SPI A-1 #3 DIAMOND BUFF GLOSSY POLISHED
SPI A-2 #6 DIAMOND BUFF GLOSSY POLISHED
SPI A-3 #15 DIAMOND BUFF GLOSSY, LIGHT SCRATCHES
SPI B-1 600 GRIT PAPER LOW HAZE, SCRATCHES
SPI B-1 400 GRIT PAPER HAZY, SCRATCHES

INJECTION MOLDING DETAILS
17 of 20
ADDING TEXT, LOGOS AND MORE TO YOUR PART
Adding information or designs to a part is very common with injection molding.
Common items you see in molds are text, logos, part numbers, plastic recycle codes,
cavity numbers, and date codes. Since the text is placed directly into the mold, it doesn't
significantly affect the part price.
TEXT REQUIREMENTS
It is recommended that text be at least 1.5mm high and that the thickness of the text
and distance between features be at least 0.5mm thick. You can choose either to
emboss or deboss your text, but the text height or depth should be no more than
1 times the thickness of the letters. Please note that if you want to change the text in
the future, such as patent pending, it may be a good place to ask for an insert plate.
An insert plate is a removable plate in the mold that allows you to change text without
the need for a tooling modification or replacement.
TEXT

GETTING A QUOTE IS EASY
Thanks to our simple three step quoting process, getting a quote couldn’t be easier.
GET A QUOTE TODAY
POWER TIP:
When adding text to your design, remember that debossed text is easier to remove
because you’re simply removing some metal from the mold. If you foresee needing to
change your text, ask about using an insert plate for an even easier change.

19 of 20
DID YOU LIKE OUR BOOK?
a b c
PLEASE TAKE A MOMENT AND FOLLOW US ON SOCIAL MEDIA FOR UPDATES, COOL CONTENT, FREEBIES, EXCLUSIVE COUPONS,
AND MORE….


![Injection Molding Design Guidelines - Polymer Housepolymerhouse.com/datasheets/GE_Thermo Plastic DesignGuide_[1].pdf · Injection Molding Design ... The typical plastic part may be](https://static.documents.pub/doc/80x56/5a70d0327f8b9a93538c5fa1/injection-molding-design-guidelines-polymer-housepolymerhousecomdatasheetsgethermo.jpg)


