Secret Garden Box and Pop-Up Card Set Monthly Project Featuring: Secret Garden DCE Designed by Robin Shakoor Graphic 45® Supplies: 1 pack of Secret Garden DCE (4501421) 1 each Book Box - Ivory (4501161) Additional Supplies: 4 sheets Ivory cardstock 8½” x 11” 2 each Self adhesive pearls - large 35” – Moss green seam binding (HUG SNUG – 618) 8” – Twine (May Arts – FN09) 35” – Peach ribbon (May Arts – SN12) 48” – Blue ribbon (May Arts – SK34) 34” – Ivory ribbon (May Arts – SK14-09) 34” – Light green ribbon (May Arts – SK14-98) Optional Metal Version Supplies: 1 each Shabby Chic Metal Keys (4500839) 1 each Shabby Chic Metal Key Holes (4500840) 52” – Ivory Jute/Twine (May Arts 451-09) Tools, Adhesives & Ink: Paper trimmer, bone folder, ruler, pencil, scissors, brayer, hole-punch (or Crop-a-dile), scoring board, quick dry liquid adhesive, dimensional foam adhesive, double sided adhesive, *Optional: Distressing inks & blending tool – Colors used: tumbled glass, frayed burlap, ripe persimmon, peeled paint & shaded lilac Notes: • If you have a sanding block or sandpaper, smooth the edges of the chipboard elements before adhering. • If time permits, distress paper edges and chipboard pieces with ink and a blending sponge. • Dimensions are width x height unless noted otherwise. Directions: 1. Cut a 4 7 ⁄ 8” x 7” rectangle from Pretty Primrose, ink and adhere to the back of the cover. Cut a 2 3 ⁄ 8” x 7” strip from Leafy Treetops, ink and adhere to the inside spine. Cut a 4 1 ⁄ 8” x 6¼” rectangle from Leafy Treetops, ink and adhere inside the compartment of the box. www.g45papers.com | [email protected]pg 1 of 4
Transcript
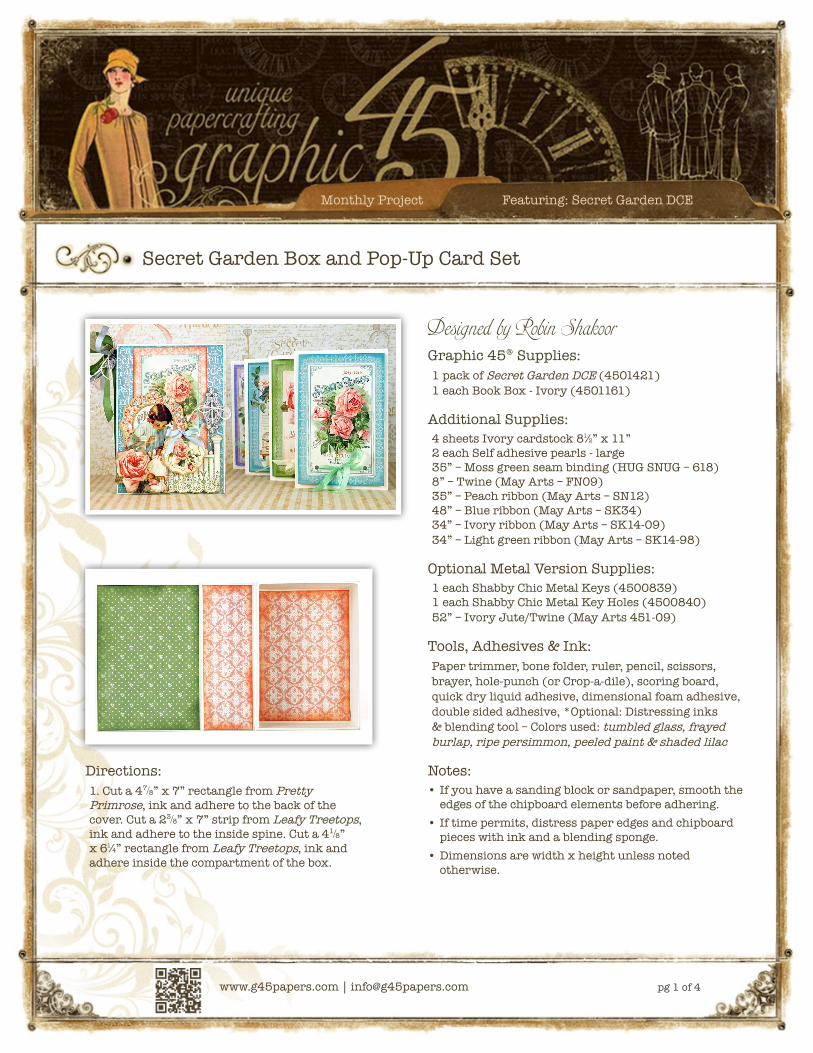
Secret Garden Box and Pop-Up Card Set
Monthly Project Featuring: Secret Garden DCE
Designed by Robin Shakoor Graphic 45® Supplies:1 pack of Secret Garden DCE (4501421) 1 each Book Box - Ivory (4501161)
Additional Supplies: 4 sheets Ivory cardstock 8½” x 11” 2 each Self adhesive pearls - large 35” – Moss green seam binding (HUG SNUG – 618) 8” – Twine (May Arts – FN09)35” – Peach ribbon (May Arts – SN12)48” – Blue ribbon (May Arts – SK34)34” – Ivory ribbon (May Arts – SK14-09)34” – Light green ribbon (May Arts – SK14-98)
Optional Metal Version Supplies: 1 each Shabby Chic Metal Keys (4500839)1 each Shabby Chic Metal Key Holes (4500840)52” – Ivory Jute/Twine (May Arts 451-09)
Notes:•If you have a sanding block or sandpaper, smooth the
edges of the chipboard elements before adhering.•If time permits, distress paper edges and chipboard
pieces with ink and a blending sponge.•Dimensions are width x height unless noted
otherwise.
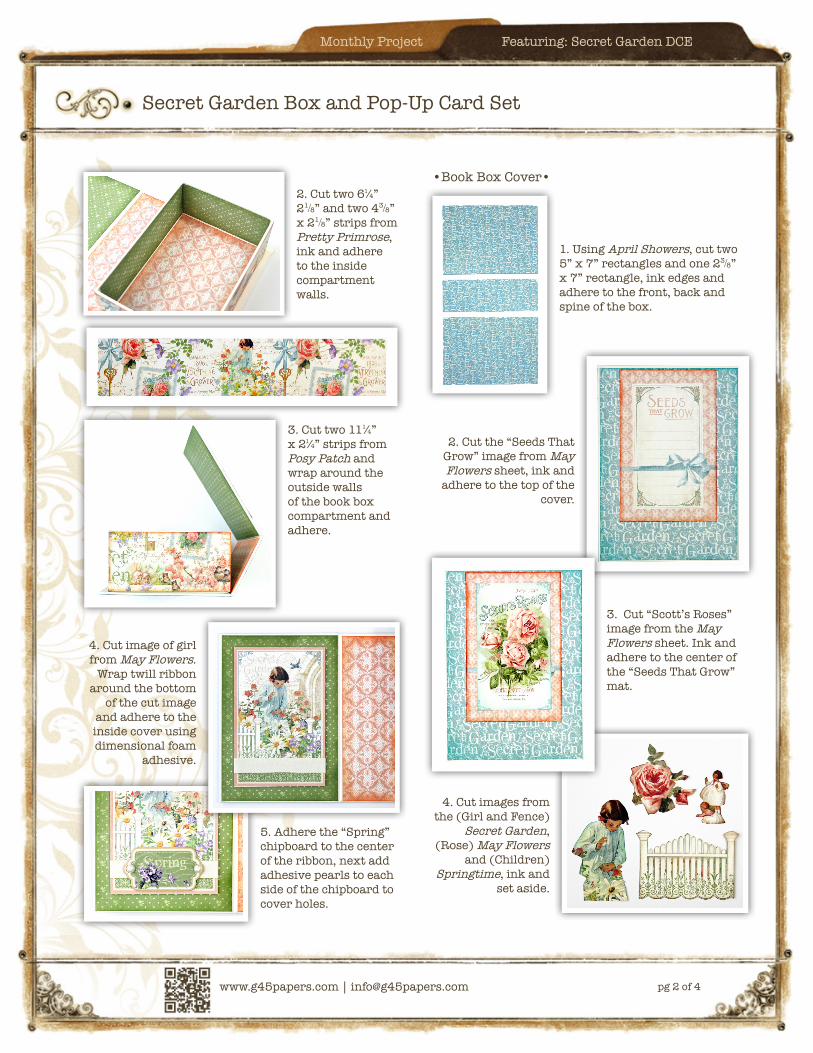
Directions:1. Cut a 47 ⁄8” x 7” rectangle from Pretty Primrose, ink and adhere to the back of the cover. Cut a 23 ⁄8” x 7” strip from Leafy Treetops, ink and adhere to the inside spine. Cut a 41 ⁄8” x 6¼” rectangle from Leafy Treetops, ink and adhere inside the compartment of the box.
6. Adhere the girl image to the back left side of the fence cutout as shown.
7. Place dimensional foam tape on the
back side of the girl and fence cutout
strategically so that you do not tape on the
chipboard.
8. Adhere the girl and fence images using the dimensional foam adhesive to the front cover as shown.
9. Add the remaining images to the cover. First adhere the rose image to the bottom left corner, then the children playing to the right of that. Locate the rose chipboard piece and tie a bow with a piece of blue ribbon. Adhere to the cover as shown.
10. *Optional: If adding metal staples, add the metal key hole above the fence post using strong adhesive.
11. Tie green, blue and peach ribbon around the spine, at the top of the book. *If using metal
embellishments, add ivory twine and a metal key.
•Pop-upCardSet•
1. Create card base using ivory cardstock. Cut cardstock to 8½” x 6¼”, score in the center and fold. Your card will measure 4¼ ” x 6¼”.
2. To create the pop up insert using Seed Fairy, trim paper to 8¼” x 6”, score in the center and fold so that the flowerpatternsare on the outside. Use a pencil and from the top of the insert, measure and mark 2½” down from the top and 2½” from the bottom. Measure 1” from the edge, then connect your marks to create a square. Cut only the sides of the square to create the pop up. Push the square through to the inside of the paper as shown and close to create a crease, using a bone folder if needed.
3. Add adhesive to the back
of the insert. Do not add
adhesive to the pop up.
4. From Springtime cut images "rose", "violet", "lily of the valley" and "daisy".
5. Place adhesive on the left side of
the pop up fold and adhere the 4 cutout
cards as shown.
6. Cut images from May Flowers. Punch a hole in each image. The holes should be ¾” from the bottom and ¾” from the edges.
7. Use 17” of ribbon on each card, string
through the holes and tie a bow. Adhere to the card base using