FERMI NATIONAL ACCELERATOR LABORATORY Designer Training Manual SharePoint 2010 Fang Wang, Kimberly Myles 3/7/2013 Version 5.0 This training manual provides information and hands-on examples for how to use the Fermilab instance of SharePoint for those with Design-level site permissions, including: creating lists, document libraries and creating and editing pages.
Transcript
FERMI NATIONAL ACCELERATOR LABORATORY
Designer Training Manual SharePoint 2010
Fang Wang, Kimberly Myles
3/7/2013 Version 5.0
This training manual provides information and hands-on examples for how to use the Fermilab instance of SharePoint for those with Design-level site permissions, including: creating lists, document libraries and creating and editing pages.
Contents i. Useful Resources ................................................................................................................................... 3
ii. Additional training opportunities ......................................................................................................... 4
a. SharePoint computer-based training for Employees ........................................................................ 4
b. Learning Tree .................................................................................................................................... 4
3.1 Modify the left navigation bar....................................................................................................... 10
3.2 Modify the top navigation bar .................................................................................................... 11
4. Working with Document Libraries ...................................................................................................... 13
4.1 Create a Document Library ........................................................................................................... 13
4.2 Grant access to a Library ............................................................................................................. 14
4.3 Require check-out of files ........................................................................................................... 14
4.4 Enable versioning for a library .................................................................................................... 15
5. Working with Lists ............................................................................................................................... 16
5.1 Create a List ................................................................................................................................. 17
5.2 Manage a List .............................................................................................................................. 18
5.3 Delete a List ................................................................................................................................. 19
5.4 Import a spreadsheet to create a List ......................................................................................... 19
5.4 Create a Custom List ................................................................................................................... 21
5.4.1 Add a column from the List Menu: ..................................................................................... 22
5.4.2 Add a column from the List Settings menu ......................................................................... 22
5.5 Working with Calculated Columns .............................................................................................. 23
5.5.1 Procedure to insert a calculated column into a SharePoint List ......................................... 23
Fermi National Accelerator Laboratory | Designer Training Manual 1
6. Working with Views ............................................................................................................................ 24
6.1 Create a View .............................................................................................................................. 24
6.2 Modify an existing view .............................................................................................................. 26
6.3 Delete a View .............................................................................................................................. 27
Fermi National Accelerator Laboratory | Designer Training Manual 2
a. SharePoint computer-based training for Employees Fermilab employees can request online, Computer-based SharePoint training through the Fermilab Service Desk:
1. Login to the Service Desk. From the “Self-Service” area, select “Service Catalog”.
2. From the “Desktops and Laptops” area, select “Microsoft E-Learning”
3. A page appears providing more detail on how to register and a link to what courses are available.
b. Learning Tree Learning Tree offers a series of SharePoint classes suitable for all levels of users.
List of SharePoint classes offered by learning tree:
This user guide seeks to highlight best practices and suggestions for the actions a SharePoint Designer can take to design, update and maintainin a SharePoint site. Each SharePoint site collection has one or more designers assigned to it. Site Designer responsibilities include:
• Creating, editing and deleting lists and libraries • Making design changes to the Shared View for the site • Applying themes, styles and modifying pages
1. Working with team sites
The standard SharePoint site for departments, groups and any other organization at Fermilab is a team site. A team site is a collection of “wiki” web pages. SharePoint wikis are designed to make it easy to publish content. Wiki pages contain rich content, such as text, tables, links, and images.
By default, team sites have a shared document library, lists (including a calendar and tasks), and a team discussion board. Designers can also add Web Parts to their team sites.
Tip: Wikis derive their name from the Hawaiian word for “quick”.
1.1 Create a My Site Team Site for production testing purposes Anyone with a Services Account and password can create a My Site team site sub-site for use as a production sandbox to test basic SharePoint features covered in training.
NOTE: For more complex testing, please test in the integration environment: https://intranet-int.fnal.gov/Pages/Default.aspx
1.1.1. To create a My Site team sub-site insite in production: 1. In the upper right hand corner of any page, click the link for your name.
2. Select "My site" from the dropdown menu.
3. From the My Site page that appears, select "My Content" from the top menu.
Fermi National Accelerator Laboratory | Designer Training Manual 5
4. From the team site page that appears (with your name as title), select "Site Actions" and then "New Site."
5. In the create menu that appears, select the Team Site template.
6. Add a title such as "Kim's sandbox" and name the URL (which can be the same as the title).
7. Click "Create" to create your new sandbox team site collection.
Fermi National Accelerator Laboratory | Designer Training Manual 6
1.2 Design and Edit a team site As Designer, you can change the title and default image on the landing page to make it easier to identify your site with your department, group or organization.
1.2.1 To edit a page title: 1. To edit a page, select the paper and pencil icon from the top menu to enter edit mode. (You can also
select “Site actions” and the “Edit page” button).
2. Select the “Format Text” tab from the “Editing Tools” menu to access editing options (including font, font color, font size, text layout, markup styles and styles).
3. Click the Save icon from the top menu or the Save & Close icon from the Ribbon to save changes.
Fermi National Accelerator Laboratory | Designer Training Manual 7
1.2.2 To insert a picture, table, link or Web-part: 1) From the Insert tab, you can add a picture to your page or a table, link, list or Web Part by selecting
the icon for that item.
NOTE: Please do not cut and paste content into a wiki page from any sources outside of SharePoint. This can cause formatting issues and freeze the page. Instead, please cut
and paste content into a text editor such as Notepad for Windows or Text Edit for Mac first and then paste content into SharePoint.
2. Working with Pages
2.1 Create a new page 1. From the Site Actions menu, select “More Options…”
2. From the left quick launch menu, in the Filter By area, select “Library.” 3. Select the “Page “icon.
Fermi National Accelerator Laboratory | Designer Training Manual 8
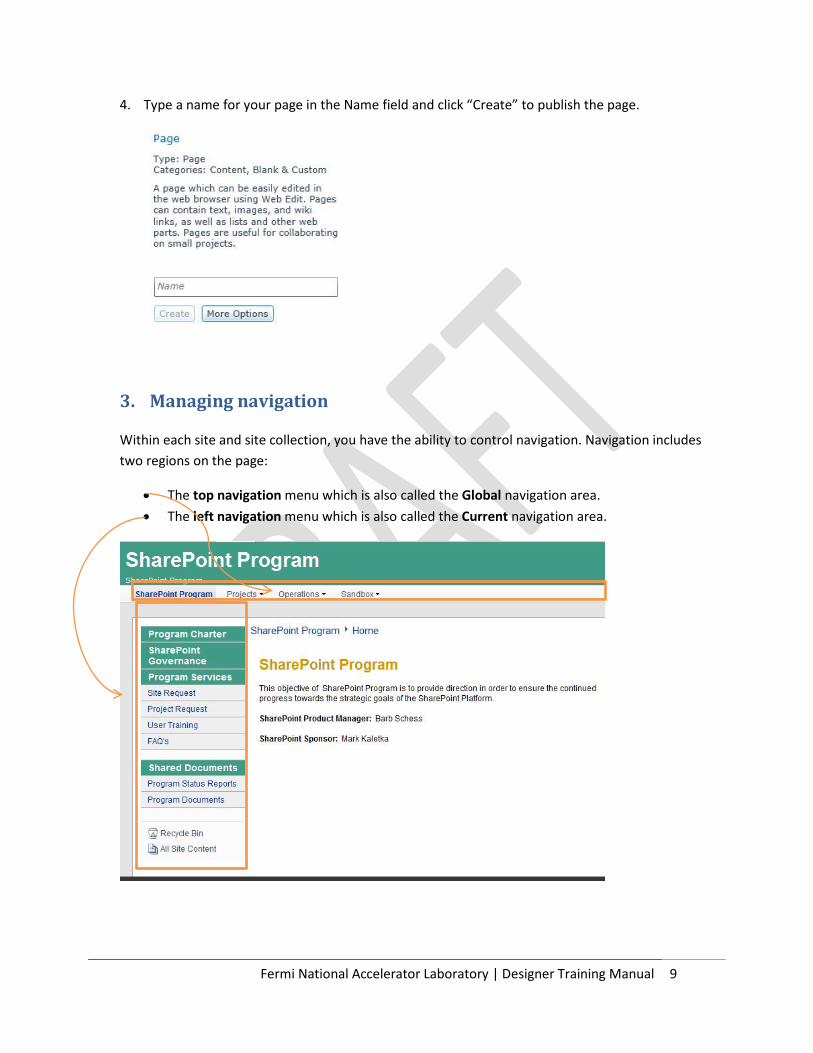
4. Type a name for your page in the Name field and click “Create” to publish the page.
3. Managing navigation
Within each site and site collection, you have the ability to control navigation. Navigation includes two regions on the page:
• The top navigation menu which is also called the Global navigation area. • The left navigation menu which is also called the Current navigation area.
Fermi National Accelerator Laboratory | Designer Training Manual 9
3.1 Modify the left navigation bar 1. From the Site Actions menu, click “Site Settings.”
2. From the Site Settings page, in the “Look And Feel” area, select “Navigation.”
Fermi National Accelerator Laboratory | Designer Training Manual 10
3. From the Navigation Settings page that appears, in the “Sorting” section, select the “Sort manually” option.
4. From the navigation Editing and Sorting section, select the Current Navigation folder and click “Add Heading…” or “Add Link…”
5. Add content and click “OK.” 6. Click the new heading or link to select it. Then click “Move Up” or “Move Down” until the menu
item is listed in the order you desire. 7. Click “OK.”
3.2 Modify the top navigation bar 1. From the Site Action menu, select “Site Settings.”
Fermi National Accelerator Laboratory | Designer Training Manual 11
2. From the Site Settings page, in the Look and Feel area, select “Navigation.”
3. In the Global Navigation section, select the option to “Show sub-sites.”
4. In the Navigation Editing and Sorting section, select the "Global Navigation" folder.
5. You have the option to add a heading, a link or hide a site. 6. Click “OK” to accept your changes.
Fermi National Accelerator Laboratory | Designer Training Manual 12
4. Working with Document Libraries A Document Library is a special kind of List. Document Libraries allow you to manage files such as documents, spreadsheets, and presentations by adding them to a central location.
You can have one or many Document Libraries, and each Document Library can contain a hierarchy of folders and files.
NOTE: the best practice recommendation is NOT to have too many folders or sub-folders within a Document Library. For ease of navigation, create multiple Document Libraries instead.
Each team site comes with a default Document Library named “Shared Documents”. You can additional Document Libraries.
4.1 Create a Document Library 1. From the Site Actions menu, Click “More Options…”
2. From the Create page that appears, from the Filter By” area, choose “Library.”
Fermi National Accelerator Laboratory | Designer Training Manual 13
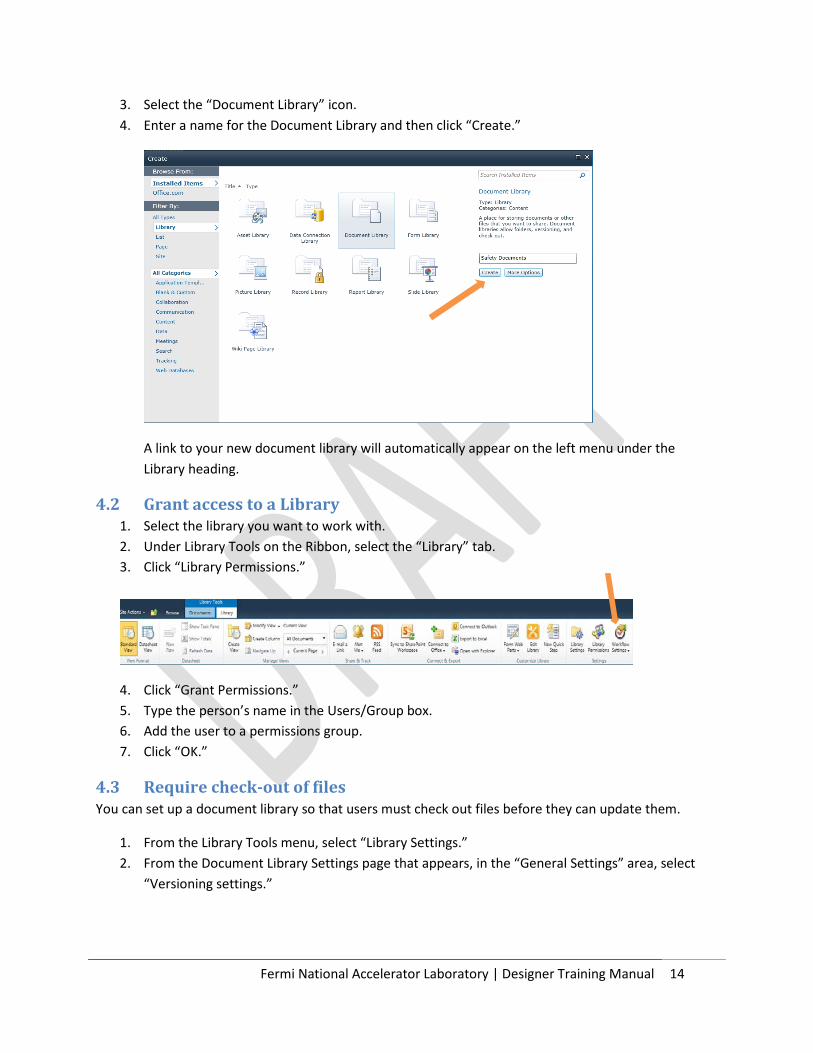
3. Select the “Document Library” icon. 4. Enter a name for the Document Library and then click “Create.”
A link to your new document library will automatically appear on the left menu under the Library heading.
4.2 Grant access to a Library 1. Select the library you want to work with. 2. Under Library Tools on the Ribbon, select the “Library” tab. 3. Click “Library Permissions.”
4. Click “Grant Permissions.” 5. Type the person’s name in the Users/Group box. 6. Add the user to a permissions group. 7. Click “OK.”
4.3 Require check-out of files You can set up a document library so that users must check out files before they can update them.
1. From the Library Tools menu, select “Library Settings.” 2. From the Document Library Settings page that appears, in the “General Settings” area, select
“Versioning settings.”
Fermi National Accelerator Laboratory | Designer Training Manual 14
3. From the “Versioning Settings” form that appears, in the “Require Check Out” area, select “Yes.”
4. Click “OK.”
The next time a user tries to open a file, a check out will be required.
4.4 Enable versioning for a library 1. From the Library Tools menu, select the Library tab. 2. From the Library tab, select the “Library Settings” icon. 3. From the Document Library Settings page that appears, in the “General Settings” area, select
“Versioning settings.”
1. 4. From the Versioning Settings form that appears, enable your preferred settings. a. In the Document Version History area, select the setting to “Create major versions”
or “Create major and minor (draft) versions.” b. You can also “Optionally limit the number of versions to retain” by entering a
number in this field. 5. Click “OK” to enable versioning for the library.
Fermi National Accelerator Laboratory | Designer Training Manual 15
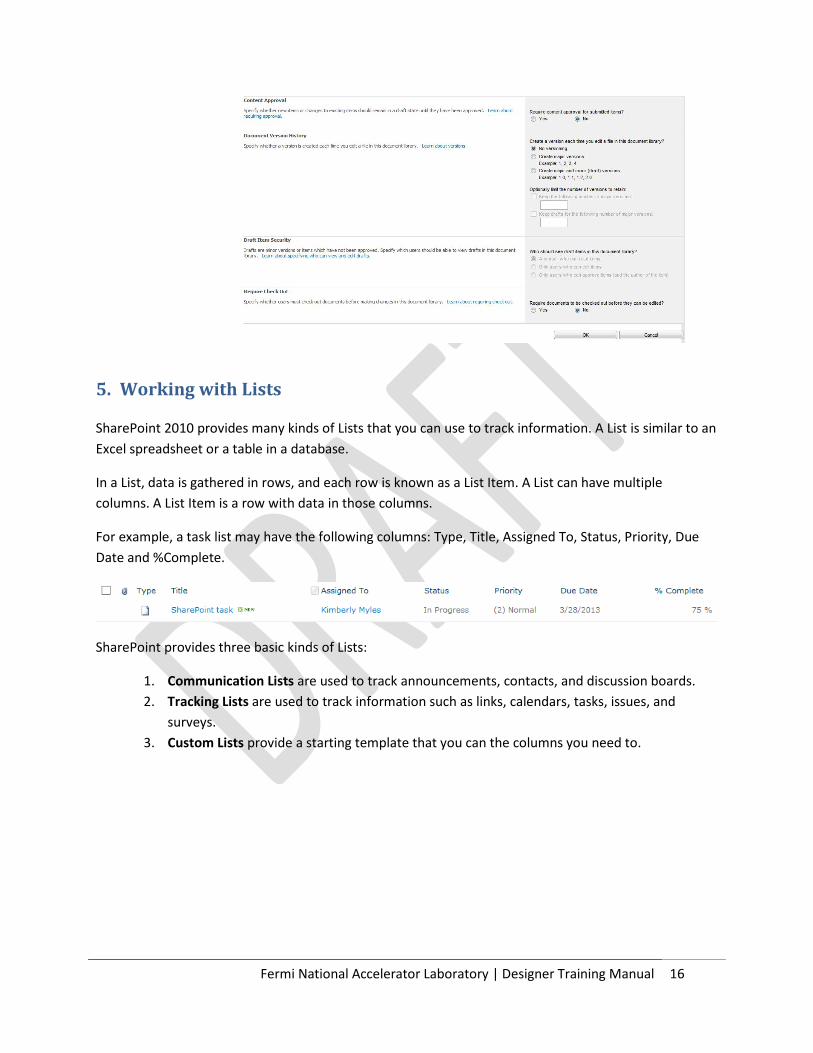
5. Working with Lists
SharePoint 2010 provides many kinds of Lists that you can use to track information. A List is similar to an Excel spreadsheet or a table in a database.
In a List, data is gathered in rows, and each row is known as a List Item. A List can have multiple columns. A List Item is a row with data in those columns.
For example, a task list may have the following columns: Type, Title, Assigned To, Status, Priority, Due Date and %Complete.
SharePoint provides three basic kinds of Lists:
1. Communication Lists are used to track announcements, contacts, and discussion boards. 2. Tracking Lists are used to track information such as links, calendars, tasks, issues, and
surveys. 3. Custom Lists provide a starting template that you can the columns you need to.
Fermi National Accelerator Laboratory | Designer Training Manual 16
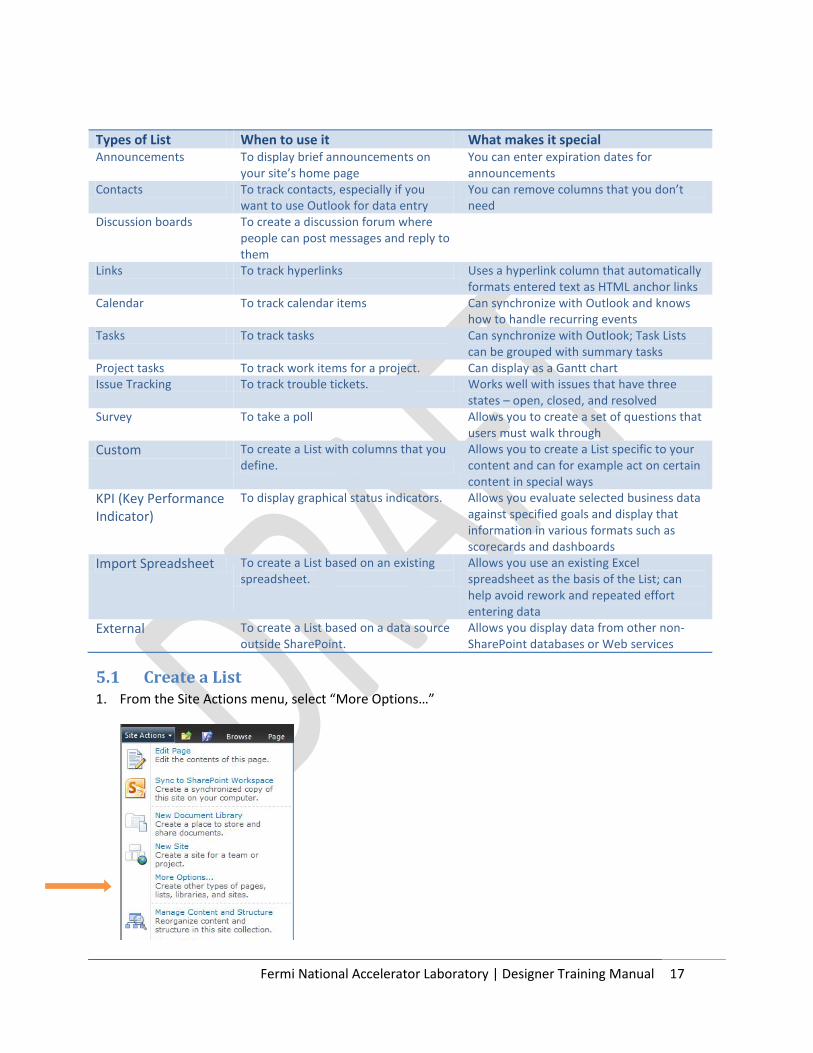
Types of List When to use it What makes it special Announcements To display brief announcements on
your site’s home page You can enter expiration dates for announcements
Contacts To track contacts, especially if you want to use Outlook for data entry
You can remove columns that you don’t need
Discussion boards To create a discussion forum where people can post messages and reply to them
Links To track hyperlinks Uses a hyperlink column that automatically formats entered text as HTML anchor links
Calendar To track calendar items Can synchronize with Outlook and knows how to handle recurring events
Tasks To track tasks Can synchronize with Outlook; Task Lists can be grouped with summary tasks
Project tasks To track work items for a project. Can display as a Gantt chart Issue Tracking To track trouble tickets. Works well with issues that have three
states – open, closed, and resolved Survey To take a poll Allows you to create a set of questions that
users must walk through Custom To create a List with columns that you
define. Allows you to create a List specific to your content and can for example act on certain content in special ways
KPI (Key Performance Indicator)
To display graphical status indicators. Allows you evaluate selected business data against specified goals and display that information in various formats such as scorecards and dashboards
Import Spreadsheet To create a List based on an existing spreadsheet.
Allows you use an existing Excel spreadsheet as the basis of the List; can help avoid rework and repeated effort entering data
External To create a List based on a data source outside SharePoint.
Allows you display data from other non-SharePoint databases or Web services
5.1 Create a List 1. From the Site Actions menu, select “More Options…”
Fermi National Accelerator Laboratory | Designer Training Manual 17
2. On the Create page, from the “Filter By” area, select “List.”
3. Click the icon for the kind of List you want to create. 4. Type a name for your List and click “Create.”
5.2 Manage a List All SharePoint Lists display the Ribbon at the top of the List. You can use the Ribbon to access the features that will enable you to update the look, feel and content of your list.
The menu commands you see in the Ribbon depend on the kind of List you are viewing. The Ribbon usually displays List commands in one of two tabs:
The Items tab displays all of the commands you need for working with items.
The List tab displays all of the commands for managing and customizing the entire List, such as creating views and exporting the List to Excel.
Fermi National Accelerator Laboratory | Designer Training Manual 18
5.3 Delete a List 1. Select the List you want to delete. 2. From the List tab, click “List Settings.”
3. From the list settings page, in the Permissions and Management area, click “Delete This List.”
4. Click “OK.”
5.4 Import a spreadsheet to create a List 1. From the Site Actions menu, select “More Options…”
2. On the Create page, from the “List Filter” area, select “List.”
Fermi National Accelerator Laboratory | Designer Training Manual 19
3. Click the “Import Spreadsheet” icon, and then click “Create.” 4. Fill out the Name for your list and click “Browse” to select the spreadsheet to import.
5. Make your selection and click “Open” to select the spreadsheet. 6. Click “Import” to import the spreadsheet into a SharePoint list.
Fermi National Accelerator Laboratory | Designer Training Manual 20
5.4 Create a Custom List 1. From the Site Actions menu, select “More Options…”
2. On the Create page, from the “Filter By” area, select “List”. 3. Select the “Custom List” icon.
4. Name your list and click “Create.”
You can customize your list further by adding columns. You can add columns from the list menu or the List settings menu.
Fermi National Accelerator Laboratory | Designer Training Manual 21
5.4.1 Add a column from the List Menu: 1. From the List menu, select “Create Column.”
2. From the “Create Column” form that appears, name your column and select the type of information that will appear in this column such as single lines of text, date and time, or a choice column which allows you to create drop-down, check box or radio button items to select from or a calculated column.
3. Make your selections and click “OK” to create your column.
5.4.2 Add a column from the List Settings menu 1. From the Ribbon, select the List Settings button. 2. From the List Settings page that appears, in the “Columns” area, choose the option to “Create a
Column.”
Fermi National Accelerator Laboratory | Designer Training Manual 22
5.5 Working with Calculated Columns
You can use the calculated column feature to display information based on automatic calculations that you determine and that SharePoint performs. Most of the available calculations are similar to Microsoft Excel “functions and syntax.” If you are familiar with Excel, then you should be able to create a formula for a calculated column.
Calculated columns can be used to automatically generate data. Some scenarios include:
• Calculating the difference between two time periods- i.e. the number of days from project commencement to completion.
• Finding out the weighted average of 2 columns • Concatenate data i.e. display a full name by adding first, middle and last name columns • Showing time without the date from a date and time column
5.5.1 Procedure to insert a calculated column into a SharePoint List
In order to use the calculated column feature, you must first insert a calculated column into your SharePoint list.
1. Navigate to the list that you want to work with. 2. From the List tools menu, select the “List” tab and from the ribbon, select “Create Column.” 3. In the” Create Column” form that appears, add the following:
• Add a name for your column. • For the Name and Type option, choose “Calculated.” • In the Additional Column Settings area in the “Formula” field, add an “=” sign and then choose
the columns that you want to work with from the “Insert Column” field and click “Add to formula” to add them to the formula field.
• Once the columns appear in the formula field, update the formula field with the formula syntax that you want to use. (For example, you could add a “+” sign between the two columns if you wanted to add them or a “-“to subtract the difference between the two columns.)
• For the “data type returned from this formula is” field, select the format you want the results to appear in from the following options: single line of text, number, currency, date and time, or yes/no response.
4. Click “OK” to save your changes and create the calculated column.
Fermi National Accelerator Laboratory | Designer Training Manual 23
Example formulas
For a list of common formulas you can use, please see the following page from the official Microsoft site:
Column types that can and cannot be used with calculated columns
Not all column types can be used with calculated columns. For example, columns with multiple lines of text or choice checkboxes will not work. Following is a helpful blog discussing what column types you can and cannot use when creating a calculated column formula:
6. Working with Views For a list or library, you can decide to show or hide columns and present them in the order you want by creating a “View”. There are different view formats you can select such as Gantt chart, Datasheet or calendar, but the type of view you will likely work with the most is the “Standard” view, which displays your list or library in the same format that is used for lists and libraries in SharePoint by default.
6.1 Create a View
You can create a view for a list (or library) and show or hide columns for that list (or library) in your new view.
1. From the List (or Library) tab, select “Create View.”
2. From the Create View page that appears, select “Standard View.”
3. In the form that appears, name your view and select whether you want the view to be personal (for only you to see) or public.
Fermi National Accelerator Laboratory | Designer Training Manual 24
4. In the “Columns” field, enable checkboxes next to each column you want to display (or uncheck the columns you want to hide.)
5. Order the columns by selecting a number next to each column name.
6. You can filter your columns by entering conditional statements in the Filter field.
7. You can Group your list by choosing either one or two columns to group your list by in the “Group by” field.
8. Click “OK” to save your view. 9. You can select your “view” from the list tab dropdown menu under “Current View” to display the
view of your list.
Fermi National Accelerator Laboratory | Designer Training Manual 25
6.2 Modify an existing view
1. From the List (or Library) tab, select “Modify View.”
2. In the Edit View form that appears, make updates such as changing the order of columns, adding “group by”, “filter” or “Sort” criteria.
Fermi National Accelerator Laboratory | Designer Training Manual 26
3. Click “OK” to save your changes. Your view will now be updated to reflect your changes.
6.3 Delete a View
1. From the List (or Library) tab, select the view you want to delete from the “Current View” drop-down list.
2. Select “Modify this View.”
3. In the top area of the form that appears, click “Delete.” 4. Click “OK” to accept and delete the view.
Tip: For more information regarding views, please see the following official procedures from Microsoft: http://office.microsoft.com/en-us/sharepoint-server-help/create-modify-or-delete-a-view-HA010377693.aspx
Fermi National Accelerator Laboratory | Designer Training Manual 27