Designing Your Web Pages WHAT YOU WILL LEARN IN THIS CHAPTER: ‰ What CSS is and why you need it ‰ How CSS looks and how to write it ‰ The different ways to add CSS code to your ASP.NET pages and to external files ‰ The numerous tools that VS offers you to quickly write CSS WROX.COM CODE DOWNLOADS FOR THIS CHAPTER You can find the wrox.com code downloads for this chapter on the Download Code tab at www.wrox.com/remtitle.cgi?isbn=1118311809. The code is in the Chapter 3 download. The pages you created in the previous two chapters look pretty plain and dull. That’s because they lack styling information and therefore default to the standard layout that the browser applies. To spruce up your pages, you need a way to change their presentation in the browser. The most common way to do this is by using the cascading style sheets ( CSS) language. CSS is the de facto language for formatting and designing information on the web, including ASP.NET web pages. With CSS you can quickly change the appearance of your web pages, giving them that great look that your design or corporate identity dictates. Solid support for working with CSS was initially added in Visual Web Developer (VWD) 2008, one of the predecessors of VS Express 2012 for Web. This support has been further enhanced in the previous version of Visual Studio, VWD 2010. The new VS 2012 builds on top of this CSS support and improves it in a number of ways, making the CSS editor a first- class citizen in VS, with editor features similar to other languages such as C# and VB. The CSS tools enable you to create your CSS code visually, making it much easier to style your pages without the need to know or remember every little detail of CSS. 3
Transcript
Designing Your Web PagesWHAT YOU WILL LEARN IN THIS CHAPTER:
‰ What CSS is and why you need it
‰ How CSS looks and how to write it
‰ The diff erent ways to add CSS code to your ASP.NET pages and to external fi les
‰ The numerous tools that VS off ers you to quickly write CSS
WROX.COM CODE DOWNLOADS FOR THIS CHAPTER
You can fi nd the wrox.com code downloads for this chapter on the Download Code tab at www.wrox.com/remtitle.cgi?isbn=1118311809. The code is in the Chapter 3 download.
The pages you created in the previous two chapters look pretty plain and dull. That’s because they lack styling information and therefore default to the standard layout that the browser applies. To spruce up your pages, you need a way to change their presentation in the browser. The most common way to do this is by using the cascading style sheets (CSS) language. CSS is the de facto language for formatting and designing information on the web, including ASP.N ET web pages. With CSS you can quickly change the appearance of your web pages, giving them that great look that your design or corporate identity dictates.
Solid support for working with CSS was initially added in Visual Web Developer (VWD) 2008, one of the predecessors of VS Express 2012 for Web. This support has been further enhanced in the previous version of Visual Studio, VWD 2010. The new VS 2012 builds on top of this CSS support and improves it in a number of ways, making the CSS editor a fi rst-class citizen in VS, with editor features similar to other languages such as C# and VB. The CSS tools enable you to create your CSS code visually, making it much easier to style your pages without the need to know or remember every lit tle detail of CSS.
3
c03.indd 65c03.indd 65 10/8/2012 9:46:45 AM10/8/2012 9:46:45 AM
66 x CHAPTER 3 DESIGNING YOUR WEB PAGES
To understand the relevance of and need for CSS in your ASP.N ET websites, you need to understand the shortcomings of H TM L fi rst. The next section looks at the problems that plain H TM L presents, and how CSS is able to overcome these issues.
WHY DO YOU NEED CSS?In the early days of the Internet, web pages consisted mostly of text and images. The text was for-matted using plain H TM L, using tags like <b> to make the text bold, and the <font> tag to infl u-ence the font family, size, and color. Web developers soon realized that they needed more power to format their pages, so CSS was created to address some of H TM L’s styling shortcomings.
Problems of HTML FormattingO ne of the problems with using H TM L for formatting is that it offers only a limited set of options to style your pages. You can use elements like <i>, <b>, and <font> to change the appearance of text and use attributes like bgcolor to change the background color of H TM L elements. You also have a number of other attributes at your disposal for changing the way links appear in your page.
Obviously, this feature set isn’t rich enough to create the attractive web pages that your users expect and demand.
Another problem of H TM L with a lot more impact on how you build your web pages is the way the styling information is applied to the page. By design, H TM L forces you to embed your formatting in your H TM L document, making it harder to reuse or change the design later. Consider the following example:
<p><font face="Arial" color="red" size="+1"> This is red text in an Arial type face and slightly larger than the default text.</font></p>
The problem with this code snippet is that the actual data (the text in the <p> element) is mixed with the presentation (the formatting of the text with the <font> tag in this example). Ideally, the two should be separated, so each of them is easier to change without affecting the other.
Imagine you used the <p> and <font> elements to mark up the fi rst paragraph of every page in your site. What happens when you decide to change the color of the font from red to dark blue? Or what if your corporate identity dictates a Verdana font instead of Arial? You would need to visit each and every page in your site, making the required changes.
Besides maintainability, another problem with H TM L formatting is the fact that you can’t eas-ily change the formatting at run time in the user’s browser. With the H TM L from the previous code snippet, there is no way to let your visitor change things like the font size or color, a common request to help people who are visually impaired. If you want to offer your visitors an alternative version of the page with a larger font size or a different color, you’d need to create a copy of the original page and make the necessary changes.
The fi nal problem with H TM L formatting is that the additional markup in your page adds consider-ably to the size of the page. This makes it slower to download and display because the information needs to be downloaded with each page in your website. It also makes it harder to maintain your pages because you’d need to scroll through large H TM L fi les to fi nd the content you need.
c03.indd 66c03.indd 66 10/8/2012 9:46:50 AM10/8/2012 9:46:50 AM
An Introduction to CSS x 67
To summarize, formatting with H TM L suffers from the following problems:
‰ Its feature set severely limits the formatting possibilities that your pages require. ‰ Data and presentation are mixed within the same fi le. ‰ HTML doesn’t enable you to easily switch formatting at run time in the browser. ‰ The required formatting tags and attributes make your pages larger and thus slower to load,
display, and maintain.
Fortunately, CSS enables you to overcome all of these problems.
How CSS Fixes Formatting ProblemsCSS is designed to format your web pages in almost every possible way. It offers a rich set of options to change every lit tle aspect of your web page, including fonts (size, color, family, and so on), colors and background colors, borders around H TM L elements, positioning of elements in your page, and much more. CSS is widely understood by all major browsers today, so it’s the language for visual presentation of web pages and very popular among web developers.
CSS overcomes the problem of mixed data and presentation by enabling you to defi ne all format-ting information in external fi les. Your ASPX or H TM L pages can then reference these fi les and the browser will apply the correct styles for you. With this separation, the H TM L document contains what you want to display, and the CSS fi le defi nes how you want to display it, enabling you to change or replace one of the two documents, leaving the other unmodifi ed. In addition, you can place CSS directly in an H TM L or ASPX page, which gives you a chance to add small snippets of CSS exactly where you need them. You should be cautious when placing CSS directly in an H TM L or ASPX page, because you can then no longer control style information from a single, central location.
Because you can place all CSS code in a separate fi le, it’s easy to offer the user a choice between dif-ferent styles—for example, one with a larger font size. You can create a copy of the external style sheet, make the necessary changes, and then offer this alternative style sheet to the user. You see how this works in Chapter 6 when ASP.N ET Themes are discussed.
Another benefi t of a separate style sheet fi le is the decrease in bandwidth that is required for your site. Style sheets don’t change with each request, so a browser saves a local copy of the style sheet the fi rst time it downloads it. From then on, it uses this cached copy instead of requesting it from the server over and over again. Sometimes this caching can work against you when the browser doesn’t download the latest CSS fi les with your changes. If you fi nd that the browser is not picking up the changes you made to a CSS fi le, use Ctrl+F5 or Ctl+R in the browser (not in VS) to get a fresh copy from the server.
Now that you have seen why CSS is so important, it’s time to fi nd out how it looks and how to use it.
AN INTRODUCTION TO CSSIn terms of syntax, CSS is an easy language to learn. Its “grammar” consists of only a few concepts. That makes it relatively easy to get started with. What makes CSS a bit more diffi cult is the way all major browsers render a page. Although virtually every modern desktop browser understands CSS,
c03.indd 67c03.indd 67 10/8/2012 9:46:50 AM10/8/2012 9:46:50 AM
68 x CHAPTER 3 DESIGNING YOUR WEB PAGES
they all have their quirks when it comes to displaying a page according to the CSS standard. This standard, maintained by the same organization that maintains the H TM L standard, the W orld W ide W eb Consortium , or W 3C for short, comes in three different versions: 1.0, 2.1, and 3.0. From these three versions, 2.1 is the most applicable today. It contains everything that version 1.0 contains but also adds a lot of possibilities on top of that. It’s also the version that VS uses and generates by default. Version 3.0 is currently under development and it’s expected to take some time before the major browsers have solid support for it.
Before you look at the actual syntax of CSS, it’s a good idea to see an example fi rst. In the following exercise, you write a simple ASPX page that contains some CSS to format the contents of the page. This helps in understanding the CSS language, which is discussed in full detail in the section that follows.
TRY IT OUT Writing Your First CSS
In this Try It O ut you write some CSS that changes the appearance of a header and two paragraphs. You’ll hand code the page for now; the second half of this chapter shows you how to use the CSS tools available in VS.
1. In the Demos folder of the Planet Wrox project, create a new Web Form called CssDemo.aspx. For this exercise, it doesn’t matter if you choose inline code or Code Behind.
2. Make sure the page is in Markup View and then locate the closing </title> tag in the source. Position your cursor at the end of the line and press Enter to create an empty line between the <title> and <head> tags. On this new line type the word style and then press Tab. VS completes the <style> element for you. Press Enter twice to create some room between the tags and then complete the block as follows: <title></title> <style type="text/css">
</style></head>
NOTE This code completion feature uses code snippets that enable you to associate a piece of code (like the <style> element) with an identifi er (like style in this example). Code snippets are very useful for inserting pieces of code quickly by typing only the short identifi er. Many more code snippets are available, and where appropriate I’ll point them out throughout this book.
Instead of using the style code snippet, you can also type the full code yourself. Note that as soon as you type the opening angle bracket (<), a list pops up that enables you to select the <style> tag. The same applies to the type attribute; simply type the letters ty and the type attribute is preselected in the list. All you need to do to complete the word is press the Tab or Enter key. And, once more, the same help is available for the attribute value text/css. Simply select it in the list and press Tab or Enter, and the value is inserted for you automatically, nicely surrounded by the double quotes.
c03.indd 68c03.indd 68 10/8/2012 9:46:50 AM10/8/2012 9:46:50 AM
An Introduction to CSS x 69
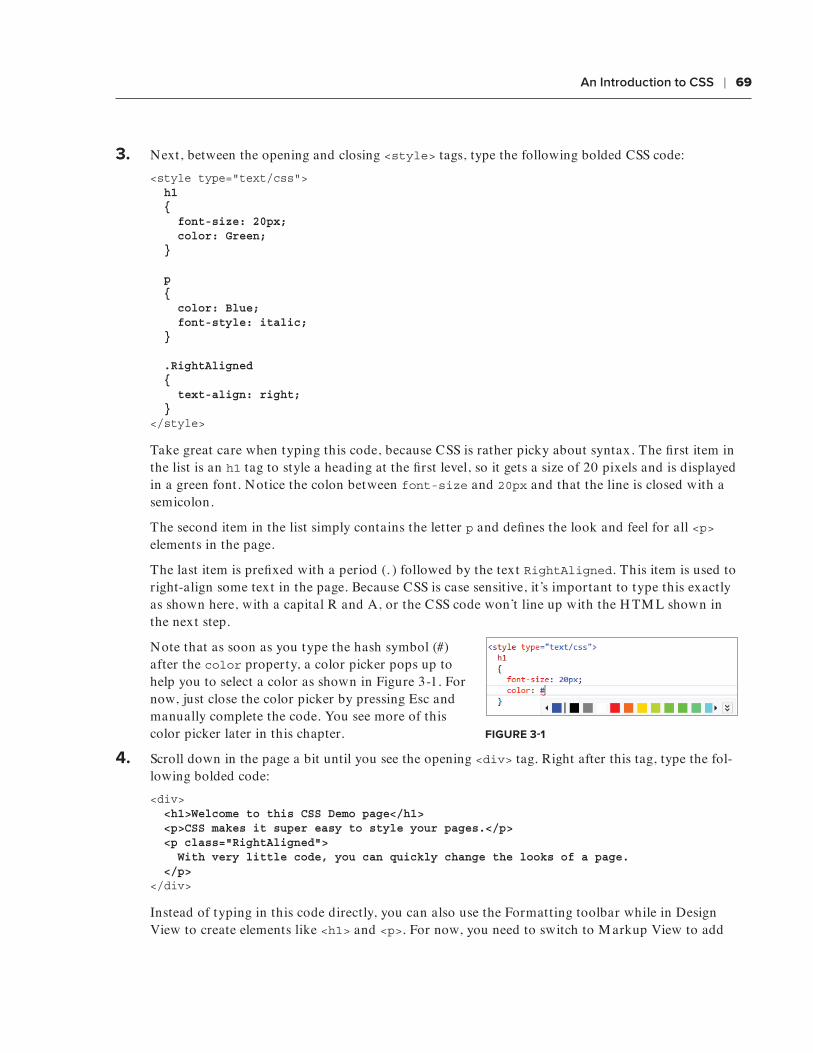
3. Next, between the opening and closing <style> tags, type the following bolded CSS code:<style type="text/css"> h1 { font-size: 20px; color: Green; }
p { color: Blue; font-style: italic; }
.RightAligned { text-align: right; }</style>
Take great care when typing this code, because CSS is rather picky about syntax. The fi rst item in the list is an h1 tag to style a heading at the fi rst level, so it gets a size of 20 pixels and is displayed in a green font. Notice the colon between font-size and 20px and that the line is closed with a semicolon.
The second item in the list simply contains the letter p and defi nes the look and feel for all <p> elements in the page.
The last item is prefi xed with a period (.) followed by the text RightAligned. This item is used to right-align some text in the page. Because CSS is case sensitive, it’s important to type this exactly as shown here, with a capital R and A, or the CSS code won’t line up with the H TM L shown in the next step.
Note that as soon as you type the hash symbol (#) after the color property, a color picker pops up to help you to select a color as shown in Figure 3-1. For now, just close the color picker by pressing Esc and manually complete the code. You see more of this color picker later in this chapter.
4. Scroll down in the page a bit until you see the opening <div> tag. Right after this tag, type the fol-lowing bolded code:<div> <h1>Welcome to this CSS Demo page</h1> <p>CSS makes it super easy to style your pages.</p> <p class="RightAligned"> With very little code, you can quickly change the looks of a page. </p></div>
Instead of typing in this code directly, you can also use the Formatting toolbar while in Design View to create elements like <h1> and <p>. For now, you need to switch to M arkup View to add
FIGURE 3-1
c03.indd 69c03.indd 69 10/8/2012 9:46:50 AM10/8/2012 9:46:50 AM
70 x CHAPTER 3 DESIGNING YOUR WEB PAGES
class="RightAligned", but in later exercises in this chapter you see how you can have the IDE write this code for you.
5. If you switch to Design View (or Split View), you’ll see that the designer shows your text with the formatting defi ned in the <style> element of the page. Figure 3-2 shows the page in Split View so you can see the code and the design at the same time.
FIGURE 3-2
Although this black-and-white book makes it diffi cult to see different font colors, in Figure 3-2 you can see clearly that the <h1> has a larger font size. The fi gure also shows that all paragraphs are now displayed with an italic font. Finally, you can see that the last paragraph is aligned to the right of the window, because the class attribute on the tag is set to RightAligned.
COMMON MISTAKES If you don’t see the last paragraph glued to the right bor-der of the Document Window make sure you typed RightAligned exactly the same in the <style> tag and in the class attribute. Because CSS is case sensi-tive, there’s a big diff erence between RightAligned and rightaligned.
6. Press Ctrl+F5 to view CssDemo.aspx in your browser. The page you see in the browser is identical to the preview you got in the Design View of VS.
How It Works
Although the code you typed in this exercise is relatively simple, there’s a lot going on under the hood of the browser (and the Design View of VS) to make this possible. You started by adding some styles to the <head> section of the page:
<style type="text/css"> h1
c03.indd 70c03.indd 70 10/8/2012 9:46:50 AM10/8/2012 9:46:50 AM
An Introduction to CSS x 71
{ font-size: 20px; color: Green; } ...</style>
The <style> tag is used to wrap a style sheet that is embedded in the page with its type attribute set to text/css. This text/css value is currently the only applicable type for a <style> block and tells the browser to interpret the code that follows as CSS.
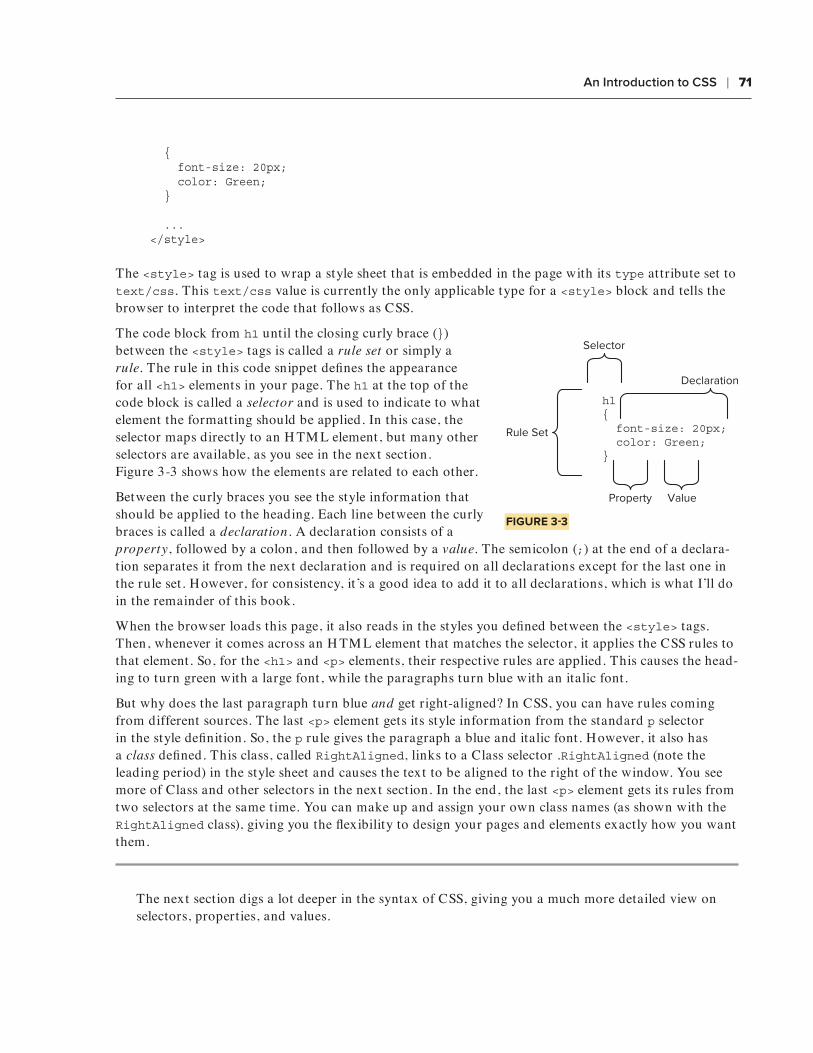
The code block from h1 until the closing curly brace (}) between the <style> tags is called a rule set or simply a rule. The rule in this code snippet defi nes the appearance for all <h1> elements in your page. The h1 at the top of the code block is called a selector and is used to indicate to what element the formatting should be applied. In this case, the selector maps directly to an H TM L element, but many other selectors are available, as you see in the next section. Figure 3-3 shows how the elements are related to each other.
Between the curly braces you see the style information that should be applied to the heading. Each line between the curly braces is called a declaration. A declaration consists of a property, followed by a colon, and then followed by a value. The semicolon (;) at the end of a declara-tion separates it from the next declaration and is required on all declarations except for the last one in the rule set. However, for consistency, it’s a good idea to add it to all declarations, which is what I’ll do in the remainder of this book.
When the browser loads this page, it also reads in the styles you defi ned between the <style> tags. Then, whenever it comes across an H TM L element that matches the selector, it applies the CSS rules to that element. So, for the <h1> and <p> elements, their respective rules are applied. This causes the head-ing to turn green with a large font, while the paragraphs turn blue with an italic font.
But why does the last paragraph turn blue and get right-aligned? In CSS, you can have rules coming from different sources. The last <p> element gets its style information from the standard p selector in the style defi nition. So, the p rule gives the paragraph a blue and italic font. However, it also has a class defi ned. This class, called RightAligned, links to a Class selector .RightAligned (note the leading period) in the style sheet and causes the text to be aligned to the right of the window. You see more of Class and other selectors in the next section. In the end, the last <p> element gets its rules from two selectors at the same time. You can make up and assign your own class names (as shown with the RightAligned class), giving you the fl exibility to design your pages and elements exactly how you want them.
The next section digs a lot deeper in the syntax of CSS, giving you a much more detailed view on selectors, properties, and values.
hl{ font-size: 20px; color: Green;}
Rule Set
Selector
Declaration
Property Value
FIGURE 3-3
72 x CHAPTER 3 DESIGNING YOUR WEB PAGES
CSS — The LanguageAs you saw in the previous Try It O ut exercise, a cascading style sheet is actually a collection of rules. A rule is a combination of a selector and one or more declarations, which in turn can be broken down to a property and a value. You’re probably getting a lit tle dizzy from all the new terms that were introduced in the past few paragraphs, so in the next section, you see most of them again, with a detailed explanation and code examples that show you what they are used for and how they work.
The Style SheetThe style sheet contains all the relevant style information that should be applied to page elements. In its simplest form, a style sheet looks like this:
h1{ color: Green;}
A style sheet can also contain more than one rule, as you saw in the previous exercise. At the same time, each rule can contain multiple declarations, enabling you to group them under a single selector:
h1{ font-size: 20px; color: Green;}
The code you just saw is functionally identical to this:h1{ font-size: 20px;}h1{ color: Green;}
The condensed form, where the two declarations are grouped under the same selector, is much easier to read, understand, and maintain, so it’s advisable to use this syntax as much as possible.
To be able to style an element on a page, a browser has to know three things:
‰ What element of the page must be styled? ‰ What part of that element must be styled? ‰ How do you want that part of the selected element to look?
The answers to these questions are given by selectors, properties, and values.
c03.indd 72c03.indd 72 10/8/2012 9:46:51 AM10/8/2012 9:46:51 AM
An Introduction to CSS x 73
SelectorsAs its name implies, a selector is used to select or point to one or more specifi c elements within your page. A number of different selectors are available, giving you fi ne control over what elements you want to style. The selector answers the fi rst question: What element of the page must be styled? The next section shows you the four most important types of selectors.
The Universal SelectorThe Universal selector, indicated by an asterisk (*), applies to all elements in your page. You can use the Universal selector to set global settings like a font family. The following rule set changes the font for all elements in your page to Arial:
*{ font-family: Arial;}
The Type SelectorThe Type selector enables you to point to an H TM L element of a specifi c type. With a Type selector, all H TM L elements of that type will be styled accordingly.
h1{ color: Green;}
This Type selector now applies to all <h1> elements in your code and gives them a green color. Type selectors are not case sensitive, so you can use both h1 and H1 to refer to the same heading. I prefer to use all lowercase for my Type selectors though, so that’s what you’ll see in this book.
The ID SelectorThe ID selector is always prefi xed by a hash symbol (#) and enables you to refer to a single element in the page. Within an H TM L or ASPX page, you can give an element a unique ID using the id attribute. With the ID selector, you can change the behavior for that single element, like this:
#IntroText{ font-style: italic;}
Because you can reuse this ID across multiple pages in your site (it only has to be unique within a single page), you can use this rule to quickly change the appearance of an element that you use once per page, but more than once in your site, for example, with the following H TM L code:
<p id="IntroText">I am italic because I have the right ID.</p><p id="BodyText">I am NOT italic because I have a different ID.</p>
In this example, the #IntroText selector changes the font of the fi rst paragraph — which has the matching id attribute — but leaves the other paragraph unmodifi ed. ID selectors are case sensitive, so make sure that the id attribute and the selector always use the same casing.
74 x CHAPTER 3 DESIGNING YOUR WEB PAGES
Notice that the selector uses a hash symbol (#) in its name, but you don’t use this symbol in the id attribute.
The Class SelectorThe Class selector enables you to style multiple H TM L elements through the class attribute. This is handy when you want to give the same type of formatting to a number of unrelated H TM L ele-ments. The following rule changes the text to red and bold for all H TM L elements that have their class attributes set to Highlight:
.Highlight{ color: Red; font-weight: bold;}
The following code snippet uses the Highlight class to make the contents of a <span> element and a link (<a>) appear with a bold typeface:
This is normal text but <span class="Highlight">this is Red and Bold.</span>This is also normal text but <a href="CssDemo.aspx" class="Highlight">this link is Red and Bold as well.</a>
Notice that the selector uses a period in its name, but you don’t use this period when referring to the selector in the class attribute. The class attribute is very useful because it enables you to reuse a piece of CSS for many different purposes, regardless of the H TM L element that uses the class. Class selectors are case-sensitive so make sure you type them correctly (or let IntelliSense help you pick the classes from the list when possible).
CSS supports more types of selectors, giving you even more control over the elements you want to target, but the four different types you just saw are the most widely used.
Grouping and Combining SelectorsCSS also enables you to group multiple selectors by separating them with a comma. This is handy if you want to apply the same styles to different elements. The following rule turns all headings in the page to red:
h1, h2, h3, h4, h5, h6{ color: Red;}
Moreover, with CSS you can also com bine selectors, enabling you to hierarchically point to a spe-cifi c element in a page. You can do this by separating the selectors with a space. The following example targets all <p> elements that fall within a <section> element with an id of MainContent, leaving all other paragraphs unmodifi ed. Also note there’s no space between section and #MainContent. This results in that part of the selector targeting a <section> element with an id of MainContent.
section#MainContent p{ font-size: 18px;}
An Introduction to CSS x 75
Note that combining is very different from grouping. Grouping is just a shortcut to avoid typing the same declarations over and over again, whereas combining enables you to target specifi c elements in your document.
With combining, you’re not limited to ID and Type selectors; you can also use it with the other selectors, as is demonstrated with the following example:
This rule changes all paragraphs with the class Attention within the <section> element with its id set to MainContent and leaves all others untouched. The following H TM L snippet uses this rule to show the effect:
<section id="MainContent"> <p class="Attention">My class is Attention, so my text is bold.</p> <p>My text is not bold, as it lacks the Attention class.</p></section><p class="Attention">I am NOT bold because I don't fall within MainContent.</p>
The second question that needs to be answered to apply a certain style in your page is about what part of the element must be styled. You do this with properties.
PropertiesProperties are the part of the element that you want to change with your style sheet. The CSS speci-fi cation defi nes a long list of properties (VS’s IntelliSense list shows more than 100 items), although you won’t use all of them in most websites. The following table lists some of the most common CSS properties and describes where they are used.
PROPERTY DESCRIPTION EXAMPLE
background-colorbackground-image
Specifi es the background color or image of an element.
display Changes the way elements are displayed, enabling you to hide or show them.
display: none;This causes the element to be hidden, and not take up any screen space.
float Enables you to “fl oat” an ele-ment in the page using a left or right fl oat. Other content is then placed on the opposite side.
float: left;This setting causes other content following a fl oat to be placed at the top-right corner of the element. You see how this works later in the chapter.
continues
76 x CHAPTER 3 DESIGNING YOUR WEB PAGES
PROPERTY DESCRIPTION EXAMPLE
font-familyfont-sizefont-stylefont-weight
Changes the appearance of fonts used on your page.
Sets the height or width of elements in your page.
height: 100px;width: 200px;
marginpadding
Sets the amount of free space inside (padding) and outside (margin) of an element.
padding: 0;margin: 20px;
visibility Controls whether an ele-ment is visible in the page. Invisible elements still take up screen space; you just don’t see them.
visibility: hidden;This causes the element to be invisible. However, it still takes up its original space in the page. It’s as if the element is still there, but completely transparent.
Fortunately, VS helps you to fi nd the right property with its many CSS tools, so you don’t have to remember them all.
NOTE Many more selectors and properties are available in CSS than I have described here. For more detail on CSS, consult VS’s IntelliSense lists or take a look at www.w3schools.com/cssref/.
For a property to be useful, you need to give it a value, which answers the third question: How do you want the part of the selected element to look?
ValuesJust as with properties, values come in many fl avors. The values you have available depend on the property. For example, the color attribute takes values that represent a color. This can be a named color (such as White), a hexadecimal number representing a red, green, and blue (RGB) component (such as #FF0000), or you can set it using the CSS rgb notation. The following examples are all functionally equivalent and set the color of the h1 element to red:
h1{ color: Red;}
h1{
(continued)
An Introduction to CSS x 77
color: #FF0000;}
h1{ color: rgb(100%, 0%, 0%);}
You can also specify the transparency of a color using the rgba notation where the fourth parameter is a decimal number between 0 (fully transparent) and 1 (no transparency) like this:
color: rgba(255, 0, 0, 0.50);
Using named colors can increase the readability of your CSS code, but because you’re limited to a rela-tively short list of named colors, you often need the hexadecimal notation to get the exact color you want. Later in this chapter you see how to use the built-in color picker to create the exact color you need.
M any other values are possible as well, including size units (px, em, and so on), font families, images (which take the form of url(SomeImage.jpg)), or so-called enumerations like the border-style, which enables you to set a border style such as solid, dashed, double.
Using ShorthandM any of the CSS properties enable you to write a shorthand version as well as a more expanded ver-sion. Take, for example, the border property. In its shortest form, you can set the border property like this:
border: 1px solid Black;
This border property applies a border to all four sides of an H TM L element. The border size is 1px, the style is solid (some of the other options include dashed, dotted, and double), and the border color is set to Black.
This is an easy way to quickly set all four borders of the H TM L to the same values. However, if you want more control over the individual borders and their properties, you can use the expanded version:
This long version causes the exact same style to be applied: a solid black border on all four sides with a thickness of 1 pixel. In most cases, you should favor shorthand notation over its expanded counterpart, because it’s much easier to read and maintain. However, if you need absolute control over the border — for example, if you want a 2-pixel dashed border on the left and top sides, and
78 x CHAPTER 3 DESIGNING YOUR WEB PAGES
a green, solid border on the right and bottom sides of the H TM L element — it’s good to know that you can set each border property of all four directions individually. You can also mix these options. The following example sets the border on all four sides to a 1-pixel solid black line, and then over-rides just the color of the left border:
border: 1px solid Black;border-left-color: Blue;
O ther CSS properties that support shorthand include font, background, list-style, margin, and padding. If you’re unsure whether a property supports shorthand, consult the IntelliSense pop-up list that appears by pressing Ctrl+Space when you’re entering a property in a CSS fi le or a <style> block.
Although at times it seems you need to write CSS by trial and error, and just hope for the right result, there’s actually a quite accurate model behind CSS that determines how items should be laid out on the page. This model is called the CSS Box Model.
The CSS Box ModelThe CSS Box Model describes the way three important CSS properties are applied to H TM L elements: padding, border, and margin. Figure 3-4 shows a graphical representation of the box model.
In the middle there is an H TM L element like a <p> or a <div> with a certain height and width. Just around it there is padding; the whitespace that surrounds the element within its border. Immediately after the padding you can see the border and fi nally on the outside there is the m argin, which defi nes the room between an ele-ment (including its padding and border) and its surrounding elements. The three outer properties of an element — padding, border, and margin — add up to the space that an element takes up in the page. To see how this works, consider the following CSS and H TM L:
This renders a rectangle in the browser with the <div> element surrounded by a black border of two pixels, as shown in Figure 3-5.
ElementLeft Right
Padding
Border
Margin
Top
Bottom
FIGURE 3-4
Element
How wide is this arrow?
FIGURE 3-5
An Introduction to CSS x 79
Before you read on, try answering the question: How wide is the arrow below the <div> element?
If you guessed 224 pixels, you are correct. The width of the arrow is the sum of three values: the width of the actual element (200 pixels), plus the width of the padding surrounding it on both sides (two times 10 pixels), plus the width of the borders on both sides (two times 2 pixels), resulting in a total width of 224 pixels. So, if you wanted the entire box to be 200 pixels wide instead, you’d need to set the width property of the MyDiv selector to 176px. O utside the border of the element, margin could further infl uence the gap between this element and its surrounding elements.
The example shows the effect on the width only, but the same principles apply to the height of ele-ments. Keep this box model in mind when laying out your pages. When things end up wider or taller than you anticipated, check the width, height, padding, border, and margin properties in the CSS style sheet.
In the next exercise, you modify the site’s homepage that you created in the previous chapter. You add the basic layout for the site, which is then styled using a style sheet. In Chapter 6 you use this page again when you upgrade it to a master page.
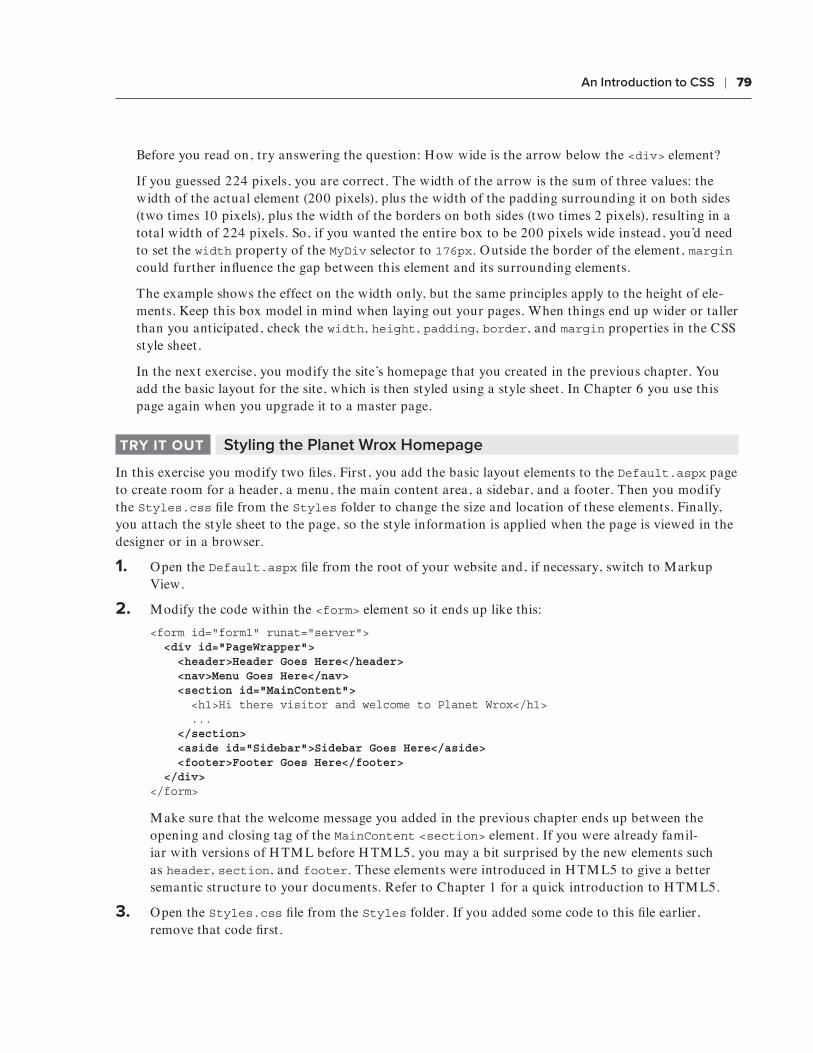
TRY IT OUT Styling the Planet Wrox Homepage
In this exercise you modify two fi les. First, you add the basic layout elements to the Default.aspx page to create room for a header, a menu, the main content area, a sidebar, and a footer. Then you modify the Styles.css fi le from the Styles folder to change the size and location of these elements. Finally, you attach the style sheet to the page, so the style information is applied when the page is viewed in the designer or in a browser.
1. Open the Default.aspx fi le from the root of your website and, if necessary, switch to Markup View.
2. Modify the code within the <form> element so it ends up like this:<form id="form1" runat="server"> <div id="PageWrapper"> <header>Header Goes Here</header> <nav>Menu Goes Here</nav> <section id="MainContent"> <h1>Hi there visitor and welcome to Planet Wrox</h1> ... </section> <aside id="Sidebar">Sidebar Goes Here</aside> <footer>Footer Goes Here</footer> </div></form>
M ake sure that the welcome message you added in the previous chapter ends up between the opening and closing tag of the MainContent <section> element. If you were already famil-iar with versions of H TM L before H TM L5, you may a bit surprised by the new elements such as header, section, and footer. These elements were introduced in H TM L5 to give a better semantic structure to your documents. Refer to Chapter 1 for a quick introduction to H TM L5.
3. Open the Styles.css fi le from the Styles folder. If you added some code to this fi le earlier, remove that code fi rst.
c03.indd 79c03.indd 79 10/8/2012 9:46:52 AM10/8/2012 9:46:52 AM