19
ACOUSTIC PERFORATED PLASTERBOARD WITH AIR PURIFYING FOR CEILINGS AND WALLS Designpanel
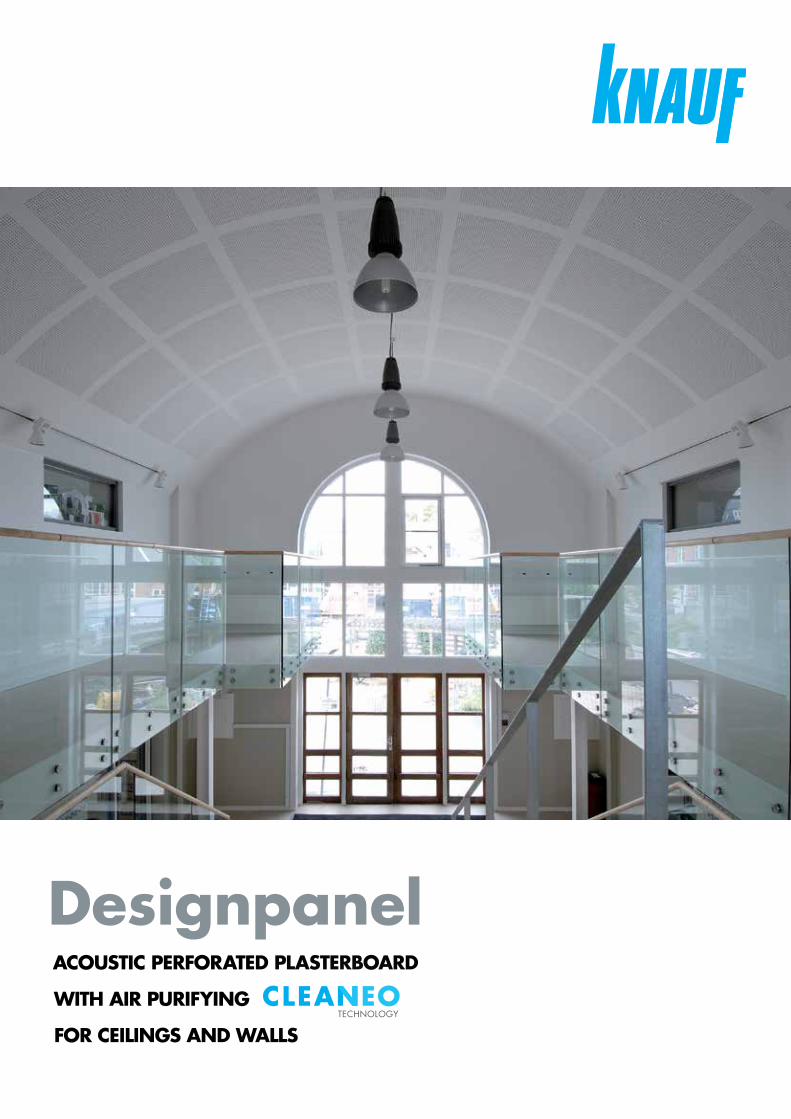
ACOUSTIC PERFORATED PLASTERBOARD
WITH AIR PURIFYING
FOR CEILINGS AND WALLS
Designpanel

knaufplasterboard.com.au
DisclaimerProducts manufactured and systems designed by Knauf are produced in accordance with the Building Code of Australia and relevant Australian Standards. Information in this document is to be used as a guide only and is subject to project approval as many aspects of construction are not comprehensively covered. It is also the responsibility of the project to determine if Knauf’s products and systems are suitable for the intended application. Knauf Plasterboard will not be held responsible for any claims resulting from the installation of its products or other associated products not in accordance with the recommendations of the manufacturer’s technical literature or relevant Australian Standard.
Knauf technical information is regularly updated. To ensure this document is current with the latest information, visit: knaufplasterboard.com.au or please contact Knauf’s Customer Service Centre on 1300 724 505.
WarrantyKnauf products are guaranteed by a 10 Year Warranty. Visit knaufplasterboard.com.au
Version 6 December 2016
SYSTEM Reg.nr. 5001
Quality Systemaccording
toDS/EN ISO 9001
byDet Norske Veritas,
Certification Dept.Danmark A/S
Introduction 1
Designpanel Range 2
Performance 4
Air Cleaning 6
Acoustic Performance 8
Care and Use 10
Installation 11
Finishing 14
Construction Details 15
Case Study 16
Contents
Designpanel is manufactured in accordance with quality systems certified as complying to ISO 9001:2008.

knaufplasterboard.com.au
Introduction
1
Designpanel is part of Knauf’s DesignLine range of acoustic plasterboard products, developed and manufactured by Knauf Danoline in Denmark. Designpanel offers not only great acoustic performance with beautiful aesthetic, but now also offers air cleaning properties with inbuilt CLEANEO Technology.
It is ideal for use in a range of commercial applications where controlling the sound reverberation time is required for large open areas such as lecture theatres, shopping centres and schools. Designpanel can also be installed in residential ceiling and wall systems, to provide noise absorption in open plan living areas and home theatres.
The acoustic performance of Designpanel is achieved through a combination of sound diffusion, whereby reflected sound is spread out and through sound absorption whereby sound travels through the perforation holes and acoustic fleece backing.
The result is a high quality sound experience with excellent speech intelligibility. Additional optional insulation improves the sound absorption.
The range of square, round and oval perforations allow for the creation of several distinct styles, complementing both the form and function of interior design.
Designpanel now has the added advantage of CLEANEO Technology for air cleaning and with four recessed edges, Designpanel is also easy to install.
Designpanel has been certified by Global Green Tag to GreenRate Level A, recognised by the GBCA for materials and VOC credits.
Contents
Project: Dorpat Hotel, Estonia

knaufplasterboard.com.au2
Designpanel Range
Designpanel Range
Perforation Open Area (%)
Thickness (mm)
Width (mm)
Length (mm)
Weight** (kg/m2)
6mm circles 8.6 12.5 1200 2400 8.9
Perforation Open Area (%)
Thickness (mm)
Width (mm)
Length (mm)
Weight** (kg/m2)
3 x 3mm squares 8.6 12.5 1200 2400 8.9
GLOBE G2F
MICRO M2F
**Weights indicated are nominal
2400
478
1200
61
6112
247
861
47812247812247812247861
3
3
3 5.3
35.3
4861144862400
486
114
486
1200
57
5757
6
6
96
96

knaufplasterboard.com.au 3
Designpanel Range
Perforation Open Area (%)
Thickness (mm)
Width (mm)
Length (mm)
Weight** (kg/m2)
12 x 12mm squares 11.6 12.5 1200 2400 8.8
Perforation Open Area (%)
Thickness (mm)
Width (mm)
Length (mm)
Weight** (kg/m2)
4 x 14mm ovals 13.3 12.5 900 2400 8.8
QUADRIL Q2F
TANGENT T3L4*
* Non stock item - subject to minimum quantities and lead times**Weights indicated are nominal
4921084922400
492
108
492
1200
54
5454
12
12
1812
1812
14
4
614
64
R2
2400
184
116
900
63
5818
411
618
458
47412647412647412647463

knaufplasterboard.com.au4
Performance
ACOUSTIC COMFORT
Design of any building is about creating an experience of space, and acoustic comfort is a major factor in that experience. To achieve that comfort, it is essential that all sound frequencies are evenly absorbed and that the sound is spread out and distributed where it is required.
All rooms present acoustic challenges, whether it be high ceilings, large expanses of glass or other hard surfaces, sparse furnishing and/or excessive noise. Where design constraints don’t allow architecture to solve these acoustic challenges, absorbent ceiling and wall linings must be used.
Designpanel’s acoustic performance is achieved by vibrations in the board and by generating resonance vibrations through air gaps in the perforation resulting in good sound absorption.
The degree to which sound is reflected or absorbed can be described by “reverberation time” which is the time it takes for sound to bounce around a room before being absorbed by the materials and the air in the room. Spaces without absorbing materials such as empty rooms have long reverberation times and spaces with lots of absorbent materials such as cinemas have short reverberation times.
The w rating and NRC of a product describes how much it absorbs sound and therefore influences the
reverberation time. All materials respond to sound in some way such as reflecting, diffusing or absorbing sound. Well designed acoustic materials absorb sound evenly across the frequency range, avoiding peaks or troughs in one area of the frequency range.
By using Designpanel, it is not necessary to compromise on acoustic performance. Designpanel has good sound absorption values across the frequency range and achieves an w rating of up to 0.65 or an NRC of up to 0.7*.
The range of perforation patterns; Globe, Quadril and Tangent, provide good sound absorption in the intermediate frequency range. This is ideal in medium sized rooms with hard materials or in larger furnished and carpeted rooms. Designpanel Micro is better suited to provide good sound absorption evenly throughout the frequency range. This is typically required in rooms with high ceilings, schools and other public buildings.
*Quadril Q2F, 200mm cavity with 50mm EarthWool 14kg/m3
ACOUSTIC CALCULATOR
Knauf Reverberation Time Calculator is an innovative acoustic online tool that calculates the Reverberation Time (RT60 or T) of a room.
The acoustic calculator has been developed in-house and is unique and exclusive to Knauf.
Find it at http://www.knaufplasterboard.com.au/calculators
Performance

knaufplasterboard.com.au 5
Performance
AESTHETICALLY STYLISH
The Designpanel range is manufactured to a high degree of precision creating sharp, clean perforation lines. It is not just the perforations that are significant, the edges are also important. The Designpanel range is available with four recessed edges to eliminate butt joints and incorporate seamless set joints all round, thus ensuring a consistent finish across the whole area.
GLOBE MICRO TANGENT QUADRIL
Music rehearsals
Auditoriums
Gymnasiums
Cafeterias
Classrooms
0 0.2 0.4 0.6 0.8 1 1.2 1.4 1.6 1.8
Suitable Reverberation Times
The ideal reverberation time depends on the use of the space. The chart below highlights some suggested reverberation times to optimise the acoustic environment.
RT in seconds

knaufplasterboard.com.au6
Air Cleaning
The quality of the air we breathe has a profound effect on human health and wellbeing.
865μg/m3
• 40%
2,200
2,000
1,800
1,600
1,400
1,200
1,000
800
600
400
200
0
Example*: Reduction TVOC in room for smokers comparing measurements with samples from passive accumulations, room volume 75m3, configuration rate 0.3m2/m3
100%2,185μg/m3
• 100%
μg/m3
Standard acoustic plasterboard
Acoustic plasterboard with
CLEANEO Technology
In Air pollutants and odours
Out Cleansed air
How CLEANEO Technology Works
* Source: Stuttgart College of Technology with supporting measurements and tests undertaken by Stuttgart Central Laboratory, University of Kaiserlautern and others.
TVO
C/m
3 in
door
air
Apart from just being generally unpleasant, poor air quality in buildings can lead to headaches, fatigue and concentration problems. Studies show that we spend up to 90% of our time indoors, so it’s vitally important that we maintain the quality of the air in buildings. But the air in many public and private buildings is heavily contaminated with toxic compounds and unpleasant odours and the problem isn’t confined to offices and residential buildings. Many schools suffer from very poor indoor air quality, which can impact the concentration and performance of students. The air in hospitals can also be contaminated and despite so much care being taken to keep wards and operating theatres clean, patients can be exposed to health risks from breathing contaminated air.
Everyday substances including paints and lacquers, cleaning and fabric-care products, perfumes, hair sprays, glues and solvents all create potentially harmful emissions, including a family of chemicals called Volatile Organic Compounds (VOCs), which have been linked to allergies, asthma and even cancer.
Computers and electronic equipment further contribute to the problem. Even the very materials that the building’s made of can release pollutants, from plywood or particleboard to foam insulation and other materials. It’s an unsettling thought that the room you’re sitting in right now, may be silently exhaling a mixture of toxins, including formaldehyde, benzene and trichloroethylene, into the air that you’re breathing.
To make matters worse, in a bid to maximise energy efficiency, many new buildings are effectively airtight cells. As well as effectively containing heat, some modern buildings can trap pollutants, allowing the contaminants to build up.
In most commercial buildings, ceilings and walls provide the greatest surface area interacting with indoor air. When the ceiling or walls are lined with Designpanel with CLEANEO Technology, cleaner air and a major impact on wellbeing can be achieved.
Air Cleaning
knaufplasterboard.com.au 7
Air Cleaning
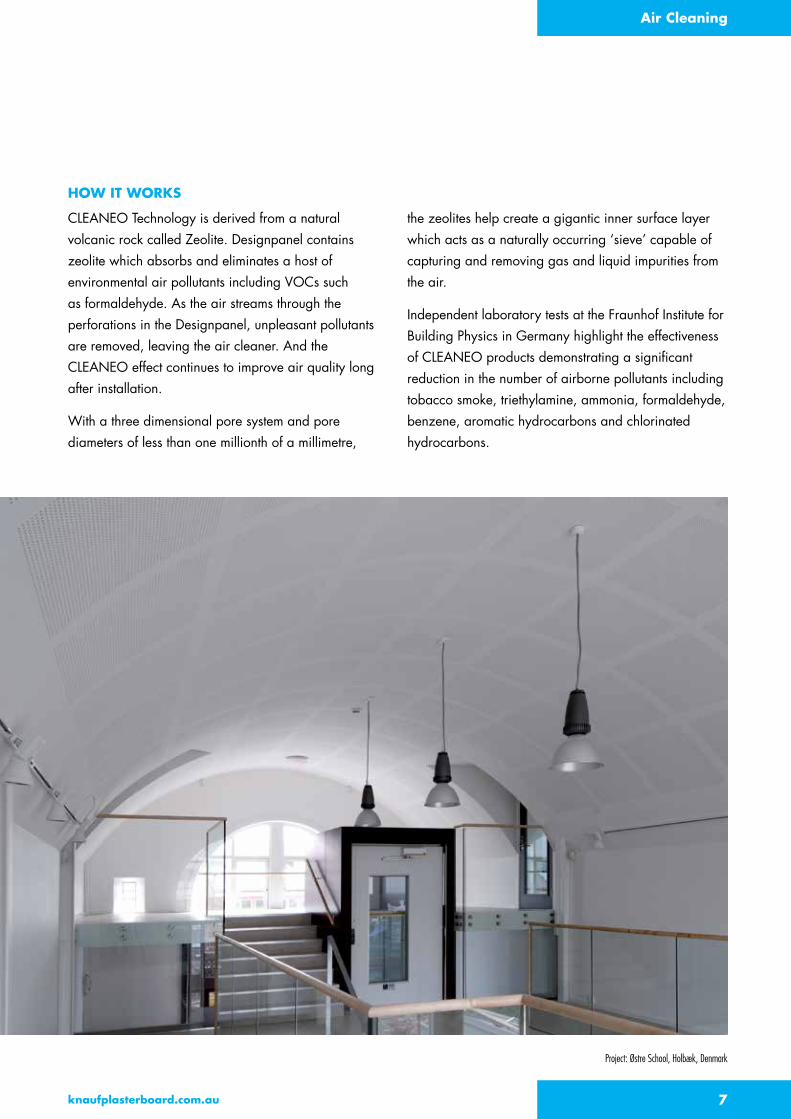
HOW IT WORKS
CLEANEO Technology is derived from a natural volcanic rock called Zeolite. Designpanel contains zeolite which absorbs and eliminates a host of environmental air pollutants including VOCs such as formaldehyde. As the air streams through the perforations in the Designpanel, unpleasant pollutants are removed, leaving the air cleaner. And the CLEANEO effect continues to improve air quality long after installation.
With a three dimensional pore system and pore diameters of less than one millionth of a millimetre,
the zeolites help create a gigantic inner surface layer which acts as a naturally occurring ‘sieve’ capable of capturing and removing gas and liquid impurities from the air.
Independent laboratory tests at the Fraunhof Institute for Building Physics in Germany highlight the effectiveness of CLEANEO products demonstrating a significant reduction in the number of airborne pollutants including tobacco smoke, triethylamine, ammonia, formaldehyde, benzene, aromatic hydrocarbons and chlorinated hydrocarbons.
Project: Østre School, Holbæk, Denmark

knaufplasterboard.com.au8
Acoustic Performance
Acoustic Performance
GLOBE G2FMaximum Furring Channel Centres: 600mm Open Area: 8.6%
Ceiling Cavity (mm)
p Frequency (Hz)
w NRC
125 250 500 1000 2000 4000
Without Insulation
65 0.15 0.3 0.55 0.7 0.5 0.35 0.5 0.5
200 0.4 0.55 0.65 0.55 0.45 0.35 0.5 0.55
500 0.35 0.65 0.65 0.7 0.6 0.55 0.65 0.65
50mm EarthWool 14 kg/m³ or
75mm EarthWool 11 kg/m³
65 0.35 0.6 0.7 0.65 0.5 0.45 0.55 0.6
200 0.5 0.65 0.65 0.55 0.5 0.45 0.55 0.6
MICRO M2FMaximum Furring Channel Centres: 600mm Open Area: 8.6%
Ceiling Cavity (mm)
p Frequency (Hz)
w NRC
125 250 500 1000 2000 4000
Without Insulation
65 0.2 0.35 0.5 0.6 0.55 0.45 0.55 0.5
200 0.4 0.5 0.55 0.5 0.5 0.45 0.55 0.5
500 0.35 0.5 0.5 0.55 0.55 0.5 0.55 0.55
50mm EarthWool 14 kg/m³ or 75mm EarthWool 11 kg/m³
65 0.4 0.55 0.6 0.55 0.5 0.5 0.55 0.55
200 0.45 0.6 0.6 0.6 0.6 0.6 0.6 0.6
3
3
3 5.3
35.3
6
6
96
96

knaufplasterboard.com.au 9
Acoustic Performance
QUADRIL Q2FMaximum Furring Channel Centres: 600mm Open Area: 11.6%
Ceiling Cavity (mm)
p Frequency (Hz)
w NRC
125 250 500 1000 2000 4000
Without Insulation
65 0.15 0.3 0.55 0.7 0.55 0.35 0.5 0.55
200 0.45 0.55 0.65 0.6 0.5 0.4 0.55 0.6
500 0.5 0.6 0.55 0.65 0.65 0.5 0.6 0.6
50mm EarthWool 14 kg/m³ or 75mm EarthWool 11 kg/m³
65 0.4 0.6 0.7 0.65 0.55 0.45 0.6 0.65
200 0.5 0.7 0.75 0.65 0.6 0.5 0.65 0.7
TANGENT T3L4Maximum Furring Channel Centres: 600mm Open Area: 13.3%
Ceiling Cavity (mm)
p Frequency (Hz)
w NRC
125 250 500 1000 2000 4000
Without Insulation65 0.2 0.25 0.35 0.5 0.5 0.45 0.45 0.4
200 0.35 0.55 0.65 0.55 0.5 0.55 0.55 0.55
50mm EarthWool 14 kg/m³ or 75mm EarthWool 11 kg/m³
65 0.35 0.5 0.6 0.55 0.5 0.55 0.55 0.55
200 0.55 0.6 0.55 0.5 0.55 0.55 0.55 0.55
400 0.4 0.6 0.6 0.6 0.55 0.6 0.6 0.6
14
4
614
64
R2
12
12
1812
1812

knaufplasterboard.com.au10
Care and Use
Care and Use
SAFETY
Designpanel is not classified as hazardous according to the criteria of the National Occupational Health and Safety Commission (NOHSC). It is non-toxic and non-flammable.
A Material Safety Data Sheet (MSDS) for Designpanel is available at knaufplasterboard.com.au or by calling 1300 724 505.
HANDLING, DELIVERY AND STORAGETo ensure Designpanel remains in the best condition prior to installation it is important to follow these key recommendations. Generally the board should be protected from any damage or conditions which could affect the final appearance or performance.
Designpanel must be kept dry and should be stacked clear of the floor, fully protected from the weather and delivered to sites when lock up stage is complete.
To reduce the possibility of damage, delivery to site should occur immediately before installation.
Care should be taken not to damage edges or the surface of the board.
Exposure to excessive humidity during storage can result in plasterboard becoming damp and soft, and may appear defective. In this case the plasterboard should be allowed to dry out and handled with care during installation.
Project: Club 7 at La Cigale Hotel, Qatar
To help protect plasterboard from absorbing humidity:
Avoid open sources of water such as wet floors
Wrap the plasterboard with plastic
Provide ventilation
Install soon after delivery
Install during dry weather for best results.

knaufplasterboard.com.au 11
Installation
GENERAL REQUIREMENTS
Plan the ceiling layout to suit the Designpanel size in order to minimise the number of joints and create symmetrical patterns.
Use the Knauf Reverberation time calculator to assist in determining how much of the ceiling and or wall area should be covered.
Alternatively involve an acoustic consultant, especially for very high ceilings and unusually shaped rooms such as those with domed or sloping ceilings.
As Designpanel is a perforated plasterboard all requirements for plasterboard installation on ceilings apply to Designpanel.
Install control joints in plasterboard ceilings at:
12m maximum intervals
All control joints in the structure
Any change in the substrate material
At the junction of a large room and passageway.
Separate Designpanel ceilings from other building elements, such as walls and columns by creating control joints that allow for movement, e.g. utilising a shadow line profile or tear away head.
All ceilings in this section are non-trafficable. Do not walk on plasterboard ceilings!
Attach ceiling fixtures to framing members only. Ensure the framing is designed to carry any additional load.
Limit dead loads on Designpanel ceilings to 2 kg/m2 for 600mm framing centres.
Limit dead loads on Designpanel ceilings to 2.5 kg/m2 for 450mm framing centres.
FRAMING
Framing members in this section are designed using either steel or timber joists, Lipped C type steel studs or a furring channel system.
Steel framed ceiling systems must be designed by an engineer according to the relevant Australian Standard.
Cut Top Cross Rail (TCR) and furring channel to leave 20mm expansion gaps at each wall.
Stagger joints in TCR and furring channel by 1200mm.
Install additional framing members around openings.
The framing tables in this section apply to Knauf Metal components.
Alternative components may only be used:
In accordance with the manufacturer’s literature, or
If their performance is equivalent or better and they comply with the relevant standard.
MAXIMUM SPAN (FRAMING CENTRES) FOR DESIGNPANEL
Perforation Max Span
Globe G2F 600mm
Micro M2F 600mm
Quadril Q2F 600mm
Tangent T3L4 600mm
* For areas of intermittent high humidity, decrease the spans to 300mm.
LAYOUT
Install Designpanel perpendicular to framing.
Fix short edges on a framing member.
Line up perforations in both directions.
Installation

knaufplasterboard.com.au12
80%Diagram for Furring Channel Table - Perspective
Floor/roof joists
Furring channel spanFurring channel spacing
Floor/roof joists
Furring channel spanFurring channel spacing
Furring channel wall track
Furring channel spacing
Top cross rail span Furring channel span andTop cross rail spacing
Furring channel wall track
FIGURE 2 Top Cross Rail and Furring Channel Span and Spacing
SELECTED TOP CROSS RAIL (TCR) AND FURRING CHANNEL FRAMING OPTIONS
System TCR span (mm)
TCR spacing (mm)
Demand per hanger (kN)
1 Layer of 13mm Designpanel with TCR 25 1200 750 1.01
1 Layer of 13mm Designpanel with TCR 30 1200 860 1.16
1 Layer of 13mm Designpanel with TCR 38 1200 1050 1.42
1 If furring channel track is not used, the furring channel must be supported 200mm from ends.2 2 - or - more spans only. 3 W ultimate = 0.5 kPa, Strength Load Case: 1.2G + Wu.4 W serviceability = 0.325 kPa, Serviceability Load Case 1: G [Limit is L/600], Serviceability Load Case 2: G + Ws [Limit is L/200]5 Connections to be independently checked.
MAXIMUM SPAN OF FURRING CHANNEL
Plasterboard 28mm Furring Channel (AFC28)at 600mm spacing
18mm Furring Channel (AFC18)at 600mm spacing
Single Span (mm)
2 - or - more Spans (mm)
Single Span (mm)
Continuous Span (mm)
1 layer of 13mm Designpanel 1200 1260 800 970
1 If furring channel track is not used, the furring channel must be supported 200mm from ends.2 W ultimate = 0.5 kPa, Strength Load Case: 1.2G + Wu3 W serviceability = 0.325 kPa, Serviceability Load Case 1: G [Limit is L/600], Serviceability Load Case 2:G + Ws [Limit is L/200].
Installation
FIGURE 1 Furring Channel Span and Spacing
knaufplasterboard.com.au 13
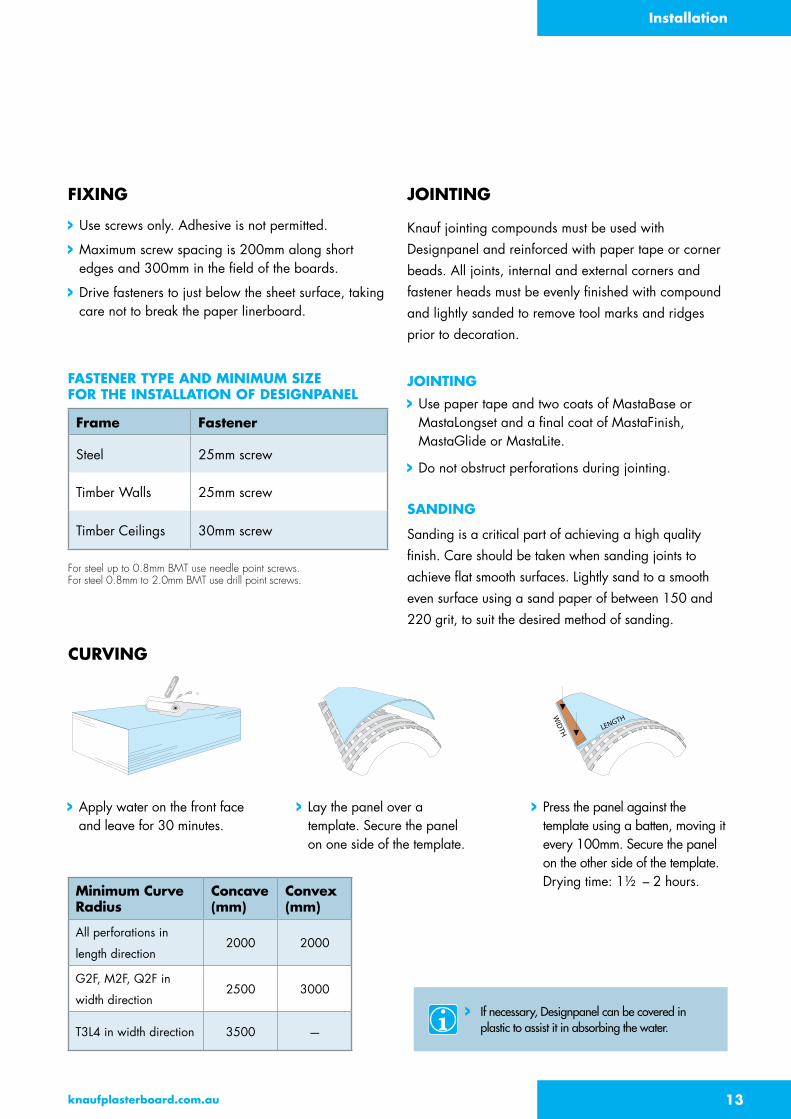
FIXING
Use screws only. Adhesive is not permitted.
Maximum screw spacing is 200mm along short edges and 300mm in the field of the boards.
Drive fasteners to just below the sheet surface, taking care not to break the paper linerboard.
FASTENER TYPE AND MINIMUM SIZE FOR THE INSTALLATION OF DESIGNPANEL
Frame Fastener
Steel 25mm screw
Timber Walls 25mm screw
Timber Ceilings 30mm screw
For steel up to 0.8mm BMT use needle point screws. For steel 0.8mm to 2.0mm BMT use drill point screws.
JOINTING
Knauf jointing compounds must be used with Designpanel and reinforced with paper tape or corner beads. All joints, internal and external corners and fastener heads must be evenly finished with compound and lightly sanded to remove tool marks and ridges prior to decoration.
JOINTING
Use paper tape and two coats of MastaBase or MastaLongset and a final coat of MastaFinish, MastaGlide or MastaLite.
Do not obstruct perforations during jointing.
SANDING
Sanding is a critical part of achieving a high quality finish. Care should be taken when sanding joints to achieve flat smooth surfaces. Lightly sand to a smooth even surface using a sand paper of between 150 and 220 grit, to suit the desired method of sanding.
InstallationInstallation
CURVING
If necessary, Designpanel can be covered in plastic to assist it in absorbing the water.
LENGTH
WID
TH
LENGTH
WID
TH
LENGTH
WID
TH
Apply water on the front face and leave for 30 minutes.
Lay the panel over a template. Secure the panel on one side of the template.
Press the panel against the template using a batten, moving it every 100mm. Secure the panel on the other side of the template. Drying time: 11/2 – 2 hours.
Minimum Curve Radius
Concave (mm)
Convex (mm)
All perforations in
length direction2000 2000
G2F, M2F, Q2F in
width direction2500 3000
T3L4 in width direction 3500 —

knaufplasterboard.com.au14
COMPOUNDS
All joints, internal and external corners and fastener heads must be evenly finished with compounds and lightly sanded to remove tool marks and ridges prior to decoration. Both setting and air-drying compounds can be used for jointing Designpanel. Hot and dry conditions may dry out the setting compound before it sets resulting in reduced strength and tape
adhesion issues. Setting compounds must not be applied over air-drying compounds. Previous coats of air-drying or setting compound must be completely dry before applying the next coat and
before sanding. Air-drying compounds must not be used in temperatures lower than 10°C.
PAINTING
A three coat paint system must be applied in accordance with Australian Standard AS/NZS 2311, Guide to the painting of buildings. Both the quality of the paint and how it is applied have a large effect on the finished appearance of the plasterboard.
Only use roller application for painting.
Spray application of paint is not permitted. Follow the paint manufacturer’s instructions for application. Apply the paint with a short napped roller and avoid the application of excess paint at any time.
Roller application applies a uniform texture over the entire surface and ensures the paint does not clog up the perforations or contact the acoustic felt on the back of the plasterboard.
Finishing
Project: Adnec Exhibition Centre, Abu Dhabi, UAE
Finishing

knaufplasterboard.com.au 15
Construction Details
Construction Details
Furring Channel
Top cross railJoiner clip
Plasterboard Screw 25mm
Fabric
Short edge joint Designpanel.c1 Long edge jointDesignpanel.c2
Joiner clipFurring Channel
Fabric
Plasterboard Screw 25mmDesignpanel
Use paper tape withDesignpanel
Top cross rail
Top cross rail
Stopping bead
Furring Channel
Furring Channel TrackTear away bead
Plasterboard
Designpanel Plasterboard stripPlasterboard screw 25mm
Top Cross Rail
Plasterboard strip
Furring Channel
Joiner clip
Connection to wallDesignpanel.c3 Connection to wall with exposed jointDesignpanel.c4
MastaBase/MastaLongestand a Knauf finishing compound
Use paper tape withMastaBase/MastaLongestand a Knauf finishing compound
Use paper tape withMastaBase/MastaLongestand a Knauf finishing compound
Furring Channel
Top cross railJoiner clip
Plasterboard Screw 25mm
Fabric
Short edge joint Designpanel.c1 Long edge jointDesignpanel.c2
Joiner clipFurring Channel
Fabric
Plasterboard Screw 25mmDesignpanel
Use paper tape withDesignpanel
Top cross rail
Top cross rail
Stopping bead
Furring Channel
Furring Channel TrackTear away bead
Plasterboard
Designpanel Plasterboard stripPlasterboard screw 25mm
Top Cross Rail
Plasterboard strip
Furring Channel
Joiner clip
Connection to wallDesignpanel.c3 Connection to wall with exposed jointDesignpanel.c4
MastaBase/MastaLongestand a Knauf finishing compound
Use paper tape withMastaBase/MastaLongestand a Knauf finishing compound
Use paper tape withMastaBase/MastaLongestand a Knauf finishing compound
FIGURE 3 Short Edge Joint FIGURE 4 Long Edge Joint
FIGURE 5 Connection to Wall FIGURE 6 Connection to Wall with Shadowline
Construction Details

knaufplasterboard.com.au16
Case Study
Case Study
PROJECT: Melton Library, Victoria, Australia
In collaboration with fjmt architects, Melton local council in Victoria embarked on a $20 million design and build project that was ambitious from the outset; to create a 5 Star Green Star Design and As-Built Rated building (against the Green Building Council of Australia Public Building PILOT tool) that would serve the community.
With their goal to spread their Green Star points across the whole project the team at fjmt were very particular in the specification of products to be used. Knauf Designpanel perforated plasterboard sheets were used in the ceilings.
“One of the important factors when choosing products that boast environmental credentials is that they are 3rd party accredited. The Knauf Designpanel product used in the ceilings, in addition to being 3rd party certified GreenRate Level A, is made up of 90% recycled content, giving it the highest environmental credentials,” says Lance White, Senior Associate, fjmt. “This was a significant deciding factor for us.

Knauf Plasterboard Pty Ltd ABN 61 003 621 010 31 Military Road Matraville NSW 2036
Customer Service AU 1300 724 505 knaufplasterboard.com.au


