96
Desktop Delivery Controller 2.0 Citrix® XenDesktop™ Desktop Delivery Controller Administrator’s Guide
Desktop Delivery Controller 2.0Citrix® XenDesktop™
Desktop Delivery Controller Administrator’s Guide

Copyright and Trademark NoticeInformation in this document is subject to change without notice. Companies, names, and data used in examples herein are fictitious unless otherwise noted. Other than printing one copy for personal use, no part of this document may be reproduced or transmitted in any form or by any means, electronic or mechanical, for any purpose, without the express written permission of Citrix Systems, Inc.
Copyright © 2008 Citrix Systems, Inc. All rights reserved.
Citrix, ICA (Independent Computing Architecture), and Program Neighborhood are registered trademarks, and XenDesktop, Citrix XenApp, Citrix Presentation Server, Citrix Access Gateway, Citrix XenServer, SpeedScreen and GoToAssist are trademarks of Citrix Systems, Inc. in the United States and other countries.
This product includes software developed by The Apache Software Foundation (http://www.apache.org/).
Adobe, Reader, and PostScript are trademarks or registered trademarks of Adobe Systems Incorporated in the U.S. and/or other countries.
Internet Explorer, Microsoft, MS-DOS, Windows, Windows Server, Windows NT, Windows XP, Win32, Access, Visual J#, and Active Directory are either registered trademarks or trademarks of Microsoft Corporation in the United States and/or other countries.
Java is a trademark of Sun Microsystems, Inc. in the United States and other countries.
VMware is a trademark of VMware Inc.
All other trademarks and registered trademarks are the property of their owners.
Last Updated: May 19, 2008 (SC)

Contents 3
Contents
1 Introduction . . . . . . . . . . . . . . . . . . . . . . . . . . . . . . . . . . . . . . . . . . . . . . . . . . . . . . . . . . . . . . . . . . . 7How to Use this Guide . . . . . . . . . . . . . . . . . . . . . . . . . . . . . . . . . . . . . . . . . . . . . . . . . . . . . . .7Finding More Information . . . . . . . . . . . . . . . . . . . . . . . . . . . . . . . . . . . . . . . . . . . . . . . . . . . .7Getting Support and Training . . . . . . . . . . . . . . . . . . . . . . . . . . . . . . . . . . . . . . . . . . . . . . . . . .8Introducing Desktop Delivery Controller. . . . . . . . . . . . . . . . . . . . . . . . . . . . . . . . . . . . . . . . .8
Key Features . . . . . . . . . . . . . . . . . . . . . . . . . . . . . . . . . . . . . . . . . . . . . . . . . . . . . . . . . . .10
2 Planning Your Deployment . . . . . . . . . . . . . . . . . . . . . . . . . . . . . . . . . . . . . . . . . . . . . . . . . . . . . 13Planning Your Farm . . . . . . . . . . . . . . . . . . . . . . . . . . . . . . . . . . . . . . . . . . . . . . . . . . . . . . . .13Using Active Directory with Desktop Delivery Controller . . . . . . . . . . . . . . . . . . . . . . . . . .17Using the Web Interface with Desktop Delivery Controller . . . . . . . . . . . . . . . . . . . . . . . . .19Security Planning . . . . . . . . . . . . . . . . . . . . . . . . . . . . . . . . . . . . . . . . . . . . . . . . . . . . . . . . . .21
Security Best Practices . . . . . . . . . . . . . . . . . . . . . . . . . . . . . . . . . . . . . . . . . . . . . . . . . . .21Deployment Scenarios. . . . . . . . . . . . . . . . . . . . . . . . . . . . . . . . . . . . . . . . . . . . . . . . . . . .23
Upgrading from Previous Versions of Desktop Delivery Controller . . . . . . . . . . . . . . . . . .24
3 Planning the User Experience . . . . . . . . . . . . . . . . . . . . . . . . . . . . . . . . . . . . . . . . . . . . . . . . . . . 25Client Software . . . . . . . . . . . . . . . . . . . . . . . . . . . . . . . . . . . . . . . . . . . . . . . . . . . . . . . . . . . .25
Using Clients in Windows Environments . . . . . . . . . . . . . . . . . . . . . . . . . . . . . . . . . . . . .26Your Environment. . . . . . . . . . . . . . . . . . . . . . . . . . . . . . . . . . . . . . . . . . . . . . . . . . . . . . . . . .27
User Types . . . . . . . . . . . . . . . . . . . . . . . . . . . . . . . . . . . . . . . . . . . . . . . . . . . . . . . . . . . . .27Network Environment . . . . . . . . . . . . . . . . . . . . . . . . . . . . . . . . . . . . . . . . . . . . . . . . . . . .28
Desktop Connection Scenarios . . . . . . . . . . . . . . . . . . . . . . . . . . . . . . . . . . . . . . . . . . . . . . . .29Scenario A: Connecting from an Appliance . . . . . . . . . . . . . . . . . . . . . . . . . . . . . . . . . . .29Scenario B: Connecting from a Domain-Joined or Repurposed Computer . . . . . . . . . . .31Scenario C: Connecting from a Fat Client Device on a LAN . . . . . . . . . . . . . . . . . . . . .32Scenario D: Connecting from Remote Computers . . . . . . . . . . . . . . . . . . . . . . . . . . . . . .36
4 System Requirements . . . . . . . . . . . . . . . . . . . . . . . . . . . . . . . . . . . . . . . . . . . . . . . . . . . . . . . . . 39Requirements for Delivery Controllers . . . . . . . . . . . . . . . . . . . . . . . . . . . . . . . . . . . . . . . . .39
4 Desktop Delivery Controller Administrator’s Guide
Data Store Database Requirements. . . . . . . . . . . . . . . . . . . . . . . . . . . . . . . . . . . . . . . . . . . . .40Separate Components Requirements . . . . . . . . . . . . . . . . . . . . . . . . . . . . . . . . . . . . . . . . . . .42
Citrix Licensing Requirements . . . . . . . . . . . . . . . . . . . . . . . . . . . . . . . . . . . . . . . . . . . . .42Management Console Requirements. . . . . . . . . . . . . . . . . . . . . . . . . . . . . . . . . . . . . . . . .43Client Requirements . . . . . . . . . . . . . . . . . . . . . . . . . . . . . . . . . . . . . . . . . . . . . . . . . . . . .44
Active Directory Requirements . . . . . . . . . . . . . . . . . . . . . . . . . . . . . . . . . . . . . . . . . . . . . . .44Virtual Desktop Requirements . . . . . . . . . . . . . . . . . . . . . . . . . . . . . . . . . . . . . . . . . . . . . . . .45
Hosting Infrastructures . . . . . . . . . . . . . . . . . . . . . . . . . . . . . . . . . . . . . . . . . . . . . . . . . . .45
5 Installing Desktop Delivery Controller . . . . . . . . . . . . . . . . . . . . . . . . . . . . . . . . . . . . . . . . . . . . 47Overview . . . . . . . . . . . . . . . . . . . . . . . . . . . . . . . . . . . . . . . . . . . . . . . . . . . . . . . . . . . . . . . . .47Licensing . . . . . . . . . . . . . . . . . . . . . . . . . . . . . . . . . . . . . . . . . . . . . . . . . . . . . . . . . . . . . . . . .48Creating the Farm Data Store . . . . . . . . . . . . . . . . . . . . . . . . . . . . . . . . . . . . . . . . . . . . . . . . .48Installing Desktop Delivery Controller on a Single Server . . . . . . . . . . . . . . . . . . . . . . . . . .49
To install Desktop Delivery Controller and create a farm . . . . . . . . . . . . . . . . . . . . . . . .49Configuring Active Directory . . . . . . . . . . . . . . . . . . . . . . . . . . . . . . . . . . . . . . . . . . . . . .51Using a Separate Database Server. . . . . . . . . . . . . . . . . . . . . . . . . . . . . . . . . . . . . . . . . . .52
Installing the Virtual Desktop Agent . . . . . . . . . . . . . . . . . . . . . . . . . . . . . . . . . . . . . . . . . . .52To install the Virtual Desktop Agent . . . . . . . . . . . . . . . . . . . . . . . . . . . . . . . . . . . . . . . .54To configure firewalls manually . . . . . . . . . . . . . . . . . . . . . . . . . . . . . . . . . . . . . . . . . . . .55
Installing the Citrix Desktop Receiver . . . . . . . . . . . . . . . . . . . . . . . . . . . . . . . . . . . . . . . . . .56To install the Citrix Desktop Receiver . . . . . . . . . . . . . . . . . . . . . . . . . . . . . . . . . . . . . . .56
Adding Controllers to Your Farm. . . . . . . . . . . . . . . . . . . . . . . . . . . . . . . . . . . . . . . . . . . . . .56To add a controller to a farm . . . . . . . . . . . . . . . . . . . . . . . . . . . . . . . . . . . . . . . . . . . . . . .57
Installing the Management Consoles Separately . . . . . . . . . . . . . . . . . . . . . . . . . . . . . . . . . .58To install the management consoles on a separate computer . . . . . . . . . . . . . . . . . . . . . .58
Starting the Access Management Console . . . . . . . . . . . . . . . . . . . . . . . . . . . . . . . . . . . . . . .59To configure and run discovery. . . . . . . . . . . . . . . . . . . . . . . . . . . . . . . . . . . . . . . . . . . . .59
Uninstalling Desktop Delivery Controller . . . . . . . . . . . . . . . . . . . . . . . . . . . . . . . . . . . . . . .59Uninstalling Controller Components . . . . . . . . . . . . . . . . . . . . . . . . . . . . . . . . . . . . . . . .59Uninstalling the Virtual Desktop Agent . . . . . . . . . . . . . . . . . . . . . . . . . . . . . . . . . . . . . .61
6 Working with Virtual Desktop Groups . . . . . . . . . . . . . . . . . . . . . . . . . . . . . . . . . . . . . . . . . . . . 63Overview . . . . . . . . . . . . . . . . . . . . . . . . . . . . . . . . . . . . . . . . . . . . . . . . . . . . . . . . . . . . . . . . .63To Create a VM-Based Desktop Group . . . . . . . . . . . . . . . . . . . . . . . . . . . . . . . . . . . . . . . . .64To Create a PC- or Blade-Based Desktop Group. . . . . . . . . . . . . . . . . . . . . . . . . . . . . . . . . .67Importing and Exporting Virtual Desktop and User Assignment Data . . . . . . . . . . . . . . . . .68
To export data to a file. . . . . . . . . . . . . . . . . . . . . . . . . . . . . . . . . . . . . . . . . . . . . . . . . . . .70To import data from a file . . . . . . . . . . . . . . . . . . . . . . . . . . . . . . . . . . . . . . . . . . . . . . . . .70
Contents 5
Updating Desktop Groups. . . . . . . . . . . . . . . . . . . . . . . . . . . . . . . . . . . . . . . . . . . . . . . . . . . .71To update a desktop group. . . . . . . . . . . . . . . . . . . . . . . . . . . . . . . . . . . . . . . . . . . . . . . . .71To delete a desktop group . . . . . . . . . . . . . . . . . . . . . . . . . . . . . . . . . . . . . . . . . . . . . . . . .74
7 Customizing Your Desktop Delivery Controller Environment. . . . . . . . . . . . . . . . . . . . . . . . . 75Overview . . . . . . . . . . . . . . . . . . . . . . . . . . . . . . . . . . . . . . . . . . . . . . . . . . . . . . . . . . . . . . . . .75Creating Administrators . . . . . . . . . . . . . . . . . . . . . . . . . . . . . . . . . . . . . . . . . . . . . . . . . . . . .76
Delegating Active Directory Access Control . . . . . . . . . . . . . . . . . . . . . . . . . . . . . . . . . .76Delegating Desktop Delivery Controller Administration Tasks . . . . . . . . . . . . . . . . . . .76
Optimizing the User Experience. . . . . . . . . . . . . . . . . . . . . . . . . . . . . . . . . . . . . . . . . . . . . . .77Configuring Time Zone Settings. . . . . . . . . . . . . . . . . . . . . . . . . . . . . . . . . . . . . . . . . . . .77Configuring Connection Timers . . . . . . . . . . . . . . . . . . . . . . . . . . . . . . . . . . . . . . . . . . . .78Disabling RDP . . . . . . . . . . . . . . . . . . . . . . . . . . . . . . . . . . . . . . . . . . . . . . . . . . . . . . . . . .79Removing the Shut Down Command . . . . . . . . . . . . . . . . . . . . . . . . . . . . . . . . . . . . . . . .79
8 Managing Your Deployment . . . . . . . . . . . . . . . . . . . . . . . . . . . . . . . . . . . . . . . . . . . . . . . . . . . . 81Overview . . . . . . . . . . . . . . . . . . . . . . . . . . . . . . . . . . . . . . . . . . . . . . . . . . . . . . . . . . . . . . . . .81Putting Virtual Desktops into Maintenance Mode. . . . . . . . . . . . . . . . . . . . . . . . . . . . . . . . .82
To put a virtual desktop into maintenance mode . . . . . . . . . . . . . . . . . . . . . . . . . . . . . . .82Managing Sessions . . . . . . . . . . . . . . . . . . . . . . . . . . . . . . . . . . . . . . . . . . . . . . . . . . . . . . . . .82
To view sessions for a desktop group . . . . . . . . . . . . . . . . . . . . . . . . . . . . . . . . . . . . . . . .82To view all sessions for a particular user . . . . . . . . . . . . . . . . . . . . . . . . . . . . . . . . . . . . .82To disconnect or log off a session . . . . . . . . . . . . . . . . . . . . . . . . . . . . . . . . . . . . . . . . . . .83To send a message to users . . . . . . . . . . . . . . . . . . . . . . . . . . . . . . . . . . . . . . . . . . . . . . . .83
Manually Controlling Virtual Machines. . . . . . . . . . . . . . . . . . . . . . . . . . . . . . . . . . . . . . . . .83To start virtual machines . . . . . . . . . . . . . . . . . . . . . . . . . . . . . . . . . . . . . . . . . . . . . . . . . .83To shut down and restart virtual machines . . . . . . . . . . . . . . . . . . . . . . . . . . . . . . . . . . . .84
Migrating Controllers to Other Farms . . . . . . . . . . . . . . . . . . . . . . . . . . . . . . . . . . . . . . . . . .84To migrate a controller to another farm . . . . . . . . . . . . . . . . . . . . . . . . . . . . . . . . . . . . . .85
Migrating Virtual Desktops to Other Farms. . . . . . . . . . . . . . . . . . . . . . . . . . . . . . . . . . . . . .85
9 Command-Line Tools . . . . . . . . . . . . . . . . . . . . . . . . . . . . . . . . . . . . . . . . . . . . . . . . . . . . . . . . . . 87Installing Controllers Using Setup.exe . . . . . . . . . . . . . . . . . . . . . . . . . . . . . . . . . . . . . . . . . .87
Examples . . . . . . . . . . . . . . . . . . . . . . . . . . . . . . . . . . . . . . . . . . . . . . . . . . . . . . . . . . . . . .89Installing the Virtual Desktop Agent Using XdsAgent.msi. . . . . . . . . . . . . . . . . . . . . . . . . .90Configuring Active Directory Using ADSetup . . . . . . . . . . . . . . . . . . . . . . . . . . . . . . . . . . .90
Index. . . . . . . . . . . . . . . . . . . . . . . . . . . . . . . . . . . . . . . . . . . . . . . . . . . . . . . . . . . . . . . . . . . . . . . . . . . . 93

6 Desktop Delivery Controller Administrator’s Guide
1
Introduction
This chapter introduces you to Desktop Delivery Controller for Citrix XenDesktop. Topics include:
• How to use this guide
• An introduction to Desktop Delivery Controller, describing key features and benefits
How to Use this GuideThe Desktop Delivery Controller Administrator’s Guide is for system administrators responsible for installing, configuring, and maintaining Desktop Delivery Controller. It is part of the Citrix XenDesktop documentation set; you can download documentation for XenDesktop and its components fromhttp://support.citrix.com/product/xd/v2.0/#tab-doc.
This guide assumes knowledge of basic Windows server administration, and knowledge of Active Directory. You can find useful references to Active Directory documentation at http://www.microsoft.com/windowsserver2003/technologies/directory/activedirectory/default.mspx.
Some of the procedures you follow to administer Desktop Delivery Controller are the same as those used to administer Citrix XenApp (XenApp is the new name for Presentation Server). Most of these procedures are not repeated in this guide; instead, cross-references are made to the Citrix Presentation Server 4.5 document set, which you can download from http://support.citrix.com.
Finding More InformationMore information is available from the sources listed below. You can download all the guides from http://support.citrix.com/product/xd/v2.0/#tab-doc.
• For a general overview of XenDesktop and how to set up a complete evaluation deployment of all components, see Getting Started with Citrix XenDesktop.
8 Desktop Delivery Controller Administrator’s Guide
• The Desktop Delivery Controller readme file contains information about last-minute updates and any known issues. Citrix advises you to read this file before installing the product.
• For information about installing and using the Citrix Desktop Receiver Embedded Edition (the client software supplied with Desktop Delivery Controller), see the Citrix Desktop Receiver Embedded Edition Release Note.
• A guide is available for each hosting infrastructure plug-in supported by Desktop Delivery Controller.
• On-screen assistance in the Desktop Delivery Controller user interface.
Getting Support and TrainingThe Citrix Knowledge Center (http://support.citrix.com) offers a variety of technical support services, tools, and developer resources.
Information about Citrix training is available at http://www.citrix.com/edu/.
Introducing Desktop Delivery ControllerDesktop Delivery Controller is the component of Citrix XenDesktop that enables you to deliver virtual desktops to your users. It provides the essential functionality required to effectively manage, maintain, and optimize all virtual desktop connections, enabling organizations’ IT teams to provide users with the best performance and ease of use.
Desktop Delivery Controller integrates several core technologies to provide:
• Dynamic pooling, on-demand assignment, and pre-assignment of virtual desktops to users, based on appropriate policies, roles, or other criteria
• An instant-on intuitive experience for users, enabling them to use virtual desktops as if they were their own local desktop
• Fast, resilient connections, even over high-latency or bandwidth-constrained networks, using the ICA protocol, which includes SpeedScreen technologies
• Integration with virtualization infrastructures, enabling administrators to dynamically manage the state of virtual desktops to make best use of resources, deliver instant-on experience for the user, and enable the reversion to a known state of pooled desktops after each use
1 Introduction 9
• A central management interface for all virtual desktops, whether they are VM-based, blade-based, or PC-based
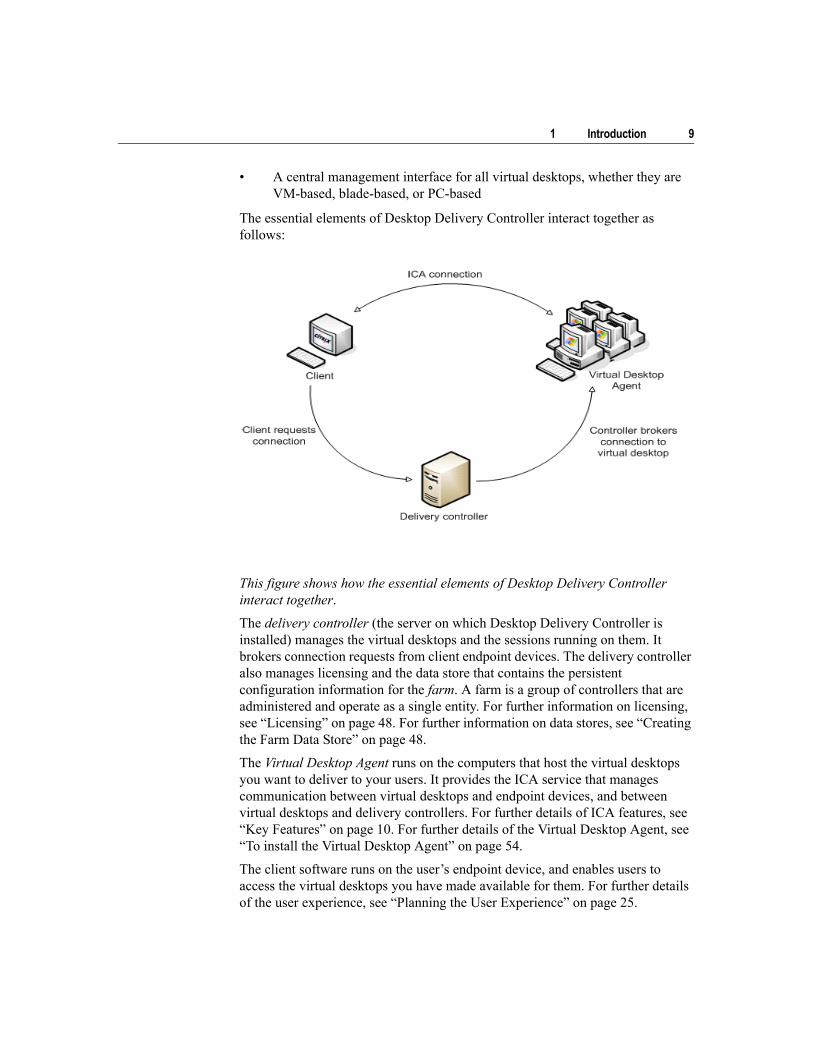
The essential elements of Desktop Delivery Controller interact together as follows:
This figure shows how the essential elements of Desktop Delivery Controller interact together.
The delivery controller (the server on which Desktop Delivery Controller is installed) manages the virtual desktops and the sessions running on them. It brokers connection requests from client endpoint devices. The delivery controller also manages licensing and the data store that contains the persistent configuration information for the farm. A farm is a group of controllers that are administered and operate as a single entity. For further information on licensing, see “Licensing” on page 48. For further information on data stores, see “Creating the Farm Data Store” on page 48.
The Virtual Desktop Agent runs on the computers that host the virtual desktops you want to deliver to your users. It provides the ICA service that manages communication between virtual desktops and endpoint devices, and between virtual desktops and delivery controllers. For further details of ICA features, see “Key Features” on page 10. For further details of the Virtual Desktop Agent, see “To install the Virtual Desktop Agent” on page 54.
The client software runs on the user’s endpoint device, and enables users to access the virtual desktops you have made available for them. For further details of the user experience, see “Planning the User Experience” on page 25.

10 Desktop Delivery Controller Administrator’s Guide
Key FeaturesDesktop Delivery Controller Version 2.0 builds on Desktop Server 1.0 to include the following features:
• Windows Vista support. Users can connect to virtual desktops running on either Windows Vista or Windows XP. For details of versions supported, see “Virtual Desktop Requirements” on page 45.
• ICA connection. Users connect to virtual desktops directly through Citrix’s Independent Computing Architecture (ICA). ICA is the protocol that enables Citrix to separate screen updates and user input processing from the rest of the logic on the desktop. All desktop logic executes on the virtual desktop, and only screen updates, mouse movements, keystrokes, and other data such as audio and printing data are transmitted through the ICA session. Connections are made directly to the Virtual Desktop Agent through ICA. ICA features are fully described in the Clients for Windows Administrator’s Guide. The following ICA features are available through the Virtual Desktop Agent:
• Session reliability
• SpeedScreen Image Acceleration
• SpeedScreen Browser Acceleration
• Endpoint device drive, LPT, and COM port mapping
• Printing using the Universal Printer Driver
• SecureICA
• Bi-directional audio is available when connecting to Windows XP virtual desktops, but not those running on Windows Vista
• Multimonitor support
• Microsoft ClearType support
• USB flash drive support through dynamic client drive mapping
There is no support for the following ICA features:
• Smart card authentication
• Single sign-on using the Kerberos virtual channel
• TWAIN mapping
• USB PDA synchronization
• SmartAuditor
1 Introduction 11
• SpeedScreen Multimedia Acceleration
• SpeedScreen Flash Acceleration
• SpeedScreen Latency Reduction Manager
• Shadowing
• SSL Relay direct to the virtual desktop
• Session monitoring and control
For further information about the Virtual Desktop Agent, see “To install the Virtual Desktop Agent” on page 54.
• Virtual machine (VM) pool management. You can manage pools of virtual machines hosted on XenServer, VMware Infrastructure 3, or Microsoft System Center Virtual Machine Manager 2007. For details of creating VM-based desktop groups, see “To Create a VM-Based Desktop Group” on page 64. For information about using each plug-in with Desktop Delivery Controller, see the guides available at http://support.citrix.com/product/xd/v2.0/#tab-doc.
• Assigned and pooled virtual desktops. You can assign a virtual desktop to a particular user either as soon as the desktop is created or when the first connection is made. Alternatively, you can create groups of pooled desktops, which are allocated to users on a per-session, first-come-first-served basis. For further information on desktop assignment, see “Overview” on page 63.
• Full-screen-only mode virtual desktops. When users log on to their endpoint device, they can automatically be presented with a virtual desktop used in full-screen-only mode, giving them an instant-on experience. When they log off from the virtual desktop, they are also logged off from their endpoint device. For users who need to use only a single virtual desktop, this provides an experience that is as close as possible to using their local desktop. For further details of planning different types of user access experience, see “Planning the User Experience” on page 25.
• Flexible user access through automatically installed Web sites. When you install Desktop Delivery Controller, three Web sites are installed automatically to enable you to provide a flexible user access experience:
• Full-screen-only mode sites. Two sites are provided to enable you to deliver full-screen-only virtual desktops. One is for use with XenDesktop-ready desktop appliances, and is known as the desktop appliance connector site. The other is for use with domain-joined
12 Desktop Delivery Controller Administrator’s Guide
Windows XP and XPe devices, and is known as the XenDesktop Services site.
XenDesktop-ready desktop appliances are terminals that are specifically configured by manufacturers to provide user access to XenDesktop only. For further information on these appliances, see http://www.citrix.com/citrixready.
For information on how to configure domain-joined Windows XP and XPe devices to provide full-screen-mode-only virtual desktops, see the Citrix Desktop Receiver Embedded Edition Release Note.
• Window mode site. An additional site, the XenDesktop Web site, is provided for users who need to be able to access multiple virtual desktops or to access virtual desktops from a Web browser. When the user has logged on to their endpoint device, they browse to the XenDesktop Web site and then select a virtual desktop from a list of those available to them. The virtual desktop is presented in a window. The user can control the appearance of the window and interact with their local desktop using the controls on the Citrix Desktop Toolbar as described below.
For further details on the default sites and the user experience they provide, see “Planning the User Experience” on page 25.
• Citrix Desktop Toolbar. Users who access their virtual desktop in window mode are provided with a set of controls that allow them to manage the appearance of the virtual desktop. For further details of using the Citrix Desktop Toolbar, see “Scenario C: Connecting from a Fat Client Device on a LAN” on page 32. The Citrix Desktop Toolbar is currently available only for Windows-based endpoint devices.
• USB device support. Plug and play behavior for USB mass storage devices (USB flash drives) is provided through dynamic client drive mapping. USB 1.0 and 2.0 drives are supported by default in a virtual desktop session whether they are plugged in to the endpoint device before or during a session. For further details of using USB devices with XenDesktop endpoints, see the Citrix Desktop Receiver Embedded Edition Release Note. To configure USB device support through Citrix policies, see “Customizing Your Desktop Delivery Controller Environment” on page 75.
2
Planning Your Deployment
Before you install Desktop Delivery Controller you need to plan your deployment to ensure that it meets your organization’s needs effectively. This section provides information about the following topics:
• Planning your farm
• Using Active Directory with Desktop Delivery Controller
• Using the Web Interface with Desktop Delivery Controller
• Security planning
• Upgrading from previous versions of Desktop Delivery Controller
Note: For information about how to set up a complete XenDesktop evaluation deployment incorporating Provisioning Server, XenServer, Desktop Delivery Controller, and the XenDesktop Client, see Getting Started with Citrix XenDesktop.
Planning Your FarmDesktop Delivery Controller allows you to grow your deployment at the rate that best suits your organization. You can start with a simple, default, configuration that provides you with a working deployment on a minimum number of computers. You can then add further controllers to the farm as necessary.
The essential elements you need to have in place for a working Desktop Delivery Controller farm are:
• A server to host:
• The main delivery controller component.
• Citrix Licensing. By default, this is installed when you install Desktop Delivery Controller, but you can choose to use a separate
14 Desktop Delivery Controller Administrator’s Guide
server for licensing. For further information on licensing, see “Licensing” on page 48.
• A farm data store. This is where persistent information about the farm, such as configuration information and administrator account information, is stored. By default, a database for this is created locally when you create your server farm, but you can choose to use a database on a separate server. For further information on farm data stores, see “Creating the Farm Data Store” on page 48.
• Management consoles, to enable you to create virtual desktop groups and manage your deployment. These are installed by default on servers on which you install Desktop Delivery Controller, and you can also install them on separate computers if you want to manage your deployment remotely. You carry out most management tasks using the Access Management Console; the Presentation Server Console is used only for configuring printing and policies.
• A domain controller running Active Directory. Active Directory is required for Desktop Delivery Controller, but you cannot install Desktop Delivery Controller on a domain controller. For more information on using Active Directory, see “Using Active Directory with Desktop Delivery Controller” on page 17.
• VMs, PCs, or blades hosting the virtual desktops you want to deliver to your users. You install the Virtual Desktop Agent on these computers to manage communications and broker connections.
• Endpoint devices running the client to enable your users to access virtual desktops.
2 Planning Your Deployment 15
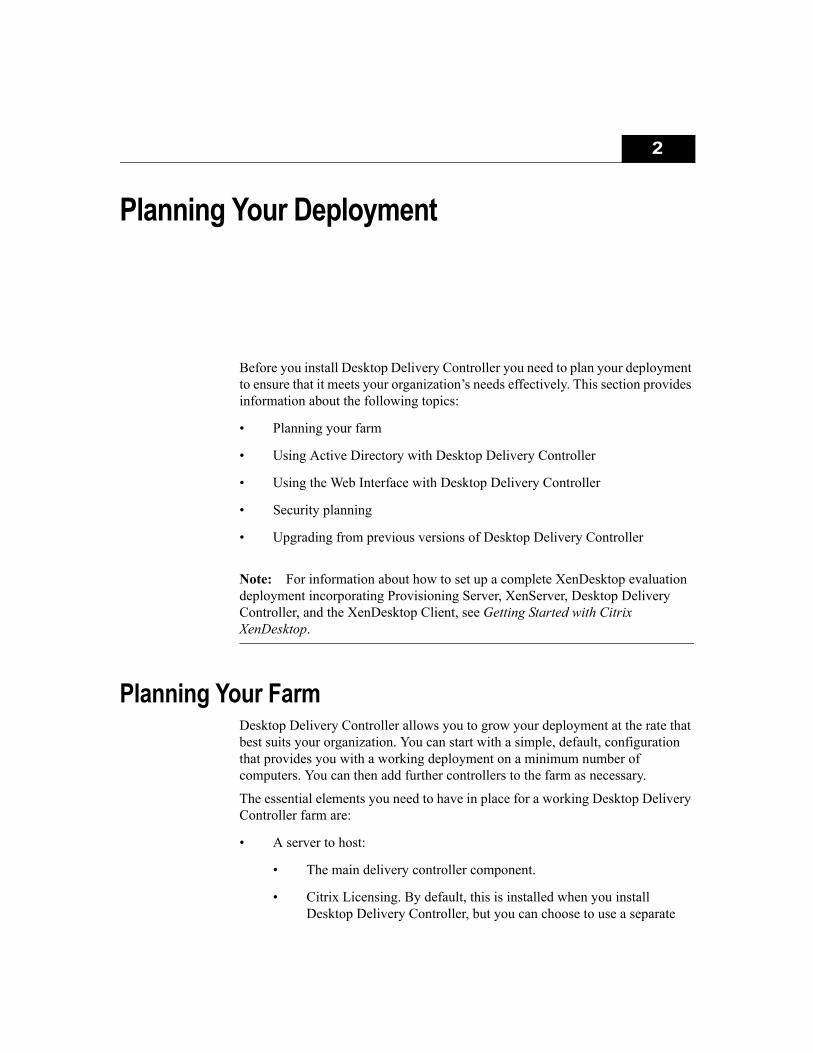
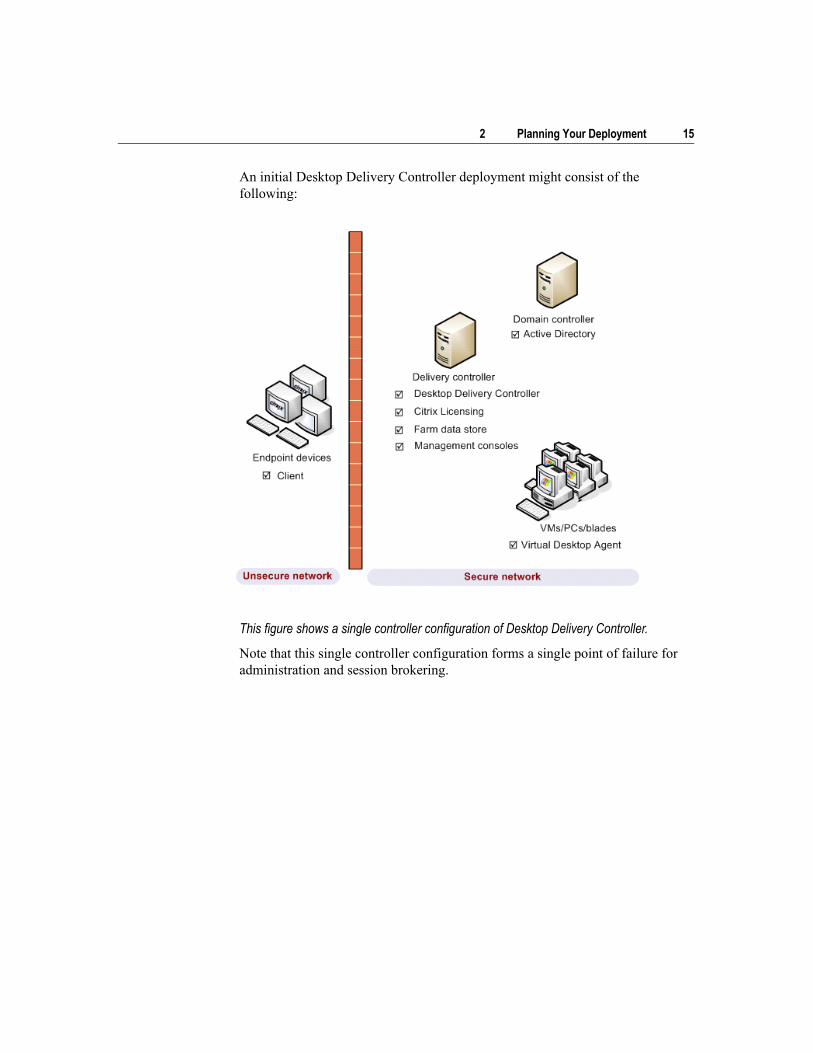
An initial Desktop Delivery Controller deployment might consist of the following:
This figure shows a single controller configuration of Desktop Delivery Controller.
Note that this single controller configuration forms a single point of failure for administration and session brokering.
16 Desktop Delivery Controller Administrator’s Guide
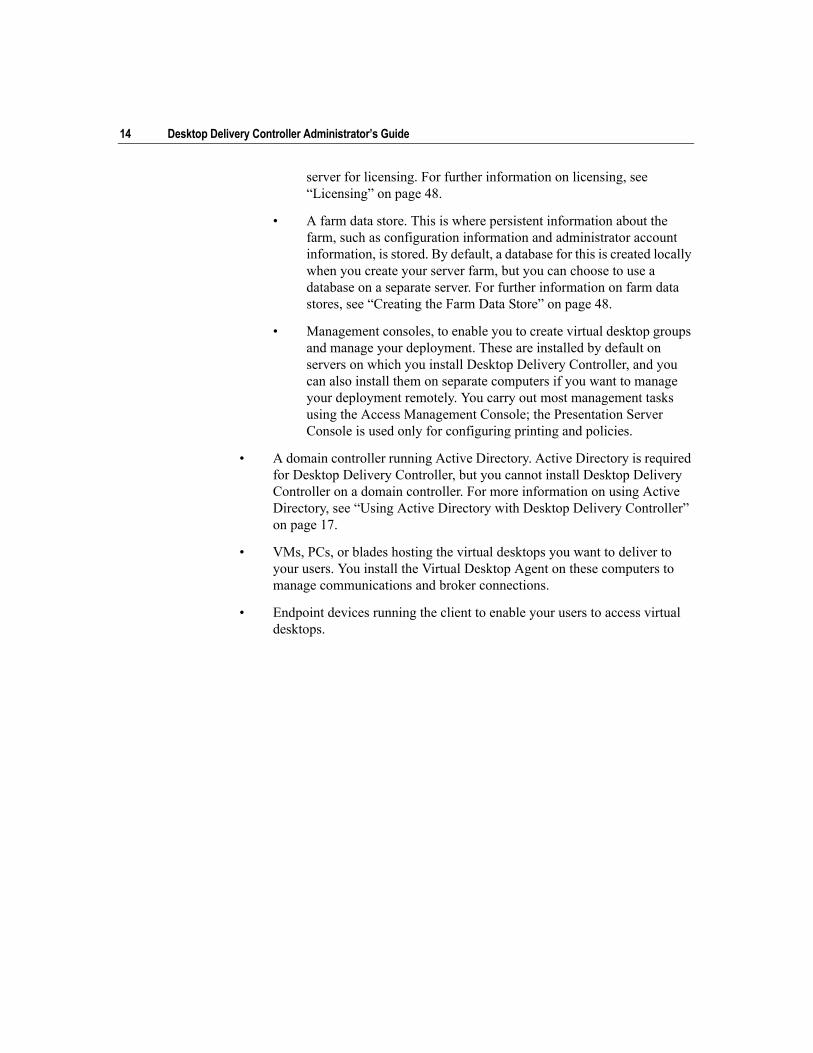
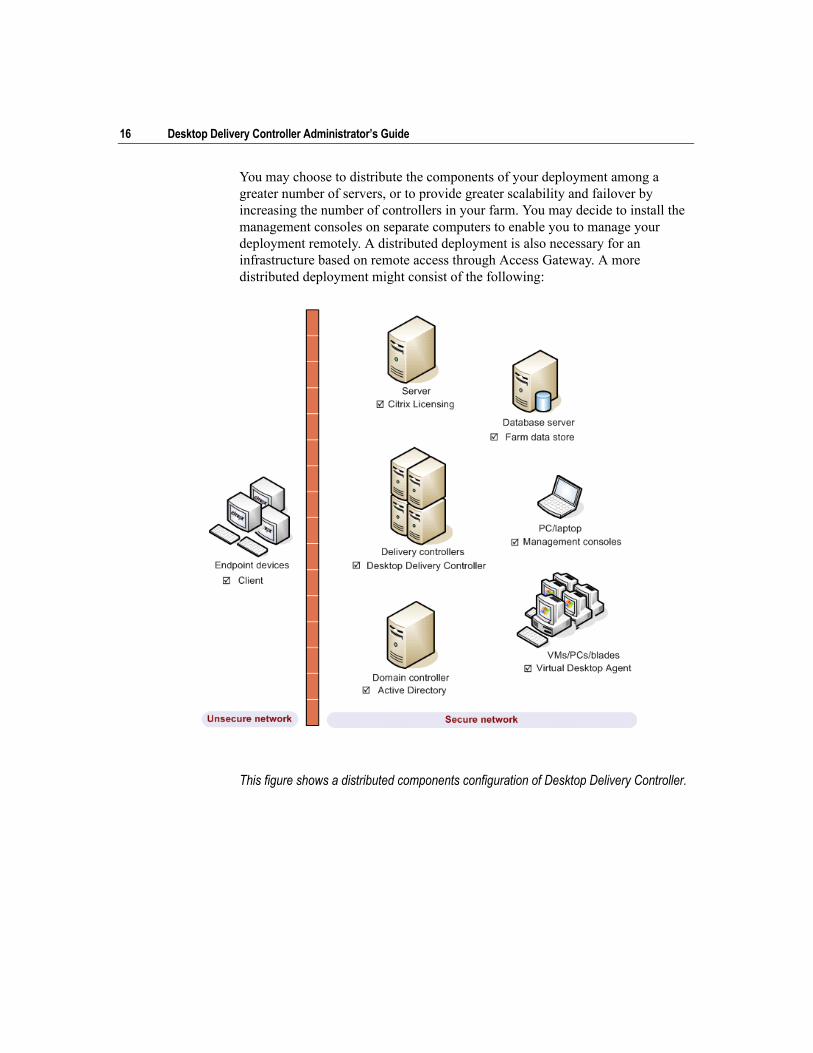
You may choose to distribute the components of your deployment among a greater number of servers, or to provide greater scalability and failover by increasing the number of controllers in your farm. You may decide to install the management consoles on separate computers to enable you to manage your deployment remotely. A distributed deployment is also necessary for an infrastructure based on remote access through Access Gateway. A more distributed deployment might consist of the following:
This figure shows a distributed components configuration of Desktop Delivery Controller.
2 Planning Your Deployment 17
Using Active Directory with Desktop Delivery ControllerDesktop Delivery Controller uses the services provided by Active Directory. It requires that all computers in a farm are members of the same domain, or of mutually trusting domains in a single Active Directory forest. The reason for this requirement and some of the effects of Desktop Delivery Controller’s use of Active Directory are explained in this topic. It is important to understand how Desktop Delivery Controller uses Active Directory to appreciate the implications for your Active Directory environment.
Desktop Delivery Controller uses Active Directory for two main purposes:
• Active Directory’s inbuilt security infrastructure is used by virtual desktops to check that incoming communications from controllers come from authorized controllers in the appropriate farm. Active Directory’s security infrastructure also ensures that the data exchanged by virtual desktops and controllers is confidential. Desktop Delivery Controller uses Active Directory's inbuilt Kerberos infrastructure to guarantee the authenticity and confidentiality of communication. For more information about Kerberos, refer to Microsoft’s product documentation.
• Active Directory is used by virtual desktops to discover the controllers that constitute a farm. This means you can add a new controller to a farm without having to reconfigure all desktops in the farm. Instead, desktops determine which controllers are available by referring to information that controllers publish in Active Directory.
When you create a farm, a corresponding Organizational Unit (OU) must be created in Active Directory. The OU can be created in any domain in the forest that contains your computers. As best practice the OU should also contain the delivery controllers in the farm, but this is not enforced or required. A domain administrator with appropriate privileges can create the OU as an empty container. This administrator can then delegate administrative authority over the OU to the Desktop Delivery Controller administrator. If, however, the installing administrator has CreateChild permissions on a parent OU, this administrator can create the farm OU through the Active Directory Configuration wizard during installation. You can use the standard Active Directory Users and Computers MMC snap-in to configure these permissions. For further information about how to create the OU, see “Configuring Active Directory” on page 51.
During the Desktop Delivery Controller installation process, a small number of objects that are essential for the operation of the farm are created in the OU.
Note: Only standard Active Directory objects are created and used by Desktop Delivery Controller. It is not necessary to extend the schema.
18 Desktop Delivery Controller Administrator’s Guide
The set of objects created includes:
• A Controllers security group. The computer account of all controllers in the farm must be a member of this security group. By default, this is done as part of installing Desktop Delivery Controller on a server. Virtual desktops in a farm accept data from controllers only if they are members of this security group.
• A Service Connection Point (SCP) object that contains meta-information about the farm, such as the farm’s name.
Note: If you use the Active Directory Users and Computers administrative tool to inspect a farm OU, you may have to enable Advanced Features in the View menu to see SCP objects.
• A container called RegistrationServices, which is created within the farm’s OU. This contains one SCP object for each controller in the farm. The SCP is created when Desktop Delivery Controller is installed on a server. Each time the controller starts, it validates the contents of its SCP and updates them if necessary.
If multiple administrators are likely to add and remove controllers after the initial installation is complete, they need permissions to create and delete children on the RegistrationServices container and write properties on the Controllers security group. (These permissions are granted automatically to the administrator who installs the farm.) Either the domain administrator or the original installing administrator can grant these permissions, and Citrix recommends setting up a security group to do this
The following points are important to bear in mind when you are using Desktop Delivery Controller:
• Information is written to Active Directory only when installing or uninstalling Desktop Delivery Controller, or when a controller starts and needs to update the information in its SCP (for example, because the controller was renamed or because the communication port was changed). By default, the installation routine sets up permissions on the objects in the farm’s OU appropriately, giving controllers Write access to their SCP. The contents of the objects in the farm OU are used to establish trust between virtual desktops and controllers. You should ensure that:
• Only authorized Desktop Delivery Controller administrators can add or remove computers from the Controllers security group, using the security group’s access control list (ACL)
2 Planning Your Deployment 19
• Only authorized administrators and the respective controller can change the information in the controller’s SCP
• Depending on your Active Directory infrastructure, you should be aware of replication and its impact on a Desktop Delivery Controller implementation. Refer to Microsoft’s documentation to understand the concepts of replication and associated delays. This is particularly important if you create the farm’s OU in a domain that has domain controllers located in multiple Active Directory sites. Depending on the location of virtual desktops, delivery controllers, and domain controllers, changes that are made to Active Directory when you are initially creating the OU for the farm, installing or uninstalling controllers, or changing controller names or communication ports may not be visible to virtual desktops until that information is replicated to the appropriate domain controller. The symptoms of such replication delay include virtual desktops that cannot establish contact with controllers and are, therefore, not available for user connections.
• Desktop Delivery Controller uses some of the standard computer object attributes in Active Directory to manage virtual desktops. Depending on your setup, the machine object’s fully qualified domain name, as stored in the desktop’s Active Directory record, can be included as part of the connection settings that are returned to the user to make a connection. It is, therefore, important to ensure that this information is consistent with information held in your DNS environment.
Using the Web Interface with Desktop Delivery ControllerAs described in “Key Features” on page 10, three Web sites are installed on all servers on which you install Desktop Delivery Controller. These sites are provided through the Citrix Web Interface, which is also installed automatically. This topic provides details about the additional options you have in relation to the Web Interface and the default Web sites. To make best use of the information provided here, you should be familiar with the Web Interface and have access to the Web Interface documentation.
The default sites are as follows:
• The desktop appliance connector site is:
\Inetpub\wwwroot\Citrix\DesktopAppliance
• The XenDesktop Services site, for full-screen-only use with domain-joined Windows XP and XPe appliances, is:
\Inetpub\wwwroot\Citrix\PNAgent
20 Desktop Delivery Controller Administrator’s Guide
• The XenDesktop Web site, for window mode users who need to be able to access multiple desktops or to access desktops from a browser, is:
\Inetpub\wwwroot\Citrix\DesktopWeb
This is the default site that users are presented with if they browse just to the controller address.
To modify the desktop appliance connector site, you must edit the configuration files as described in the Web Interface Administrator’s Guide.
You can modify the other default sites through the Access Management Console Web Interface extension. This extension is not installed as part of a Desktop Delivery Controller installation. It is provided on the Desktop Delivery Controller installation media for you to install manually if necessary.
If you do not want to install the Web Interface and the default sites when you install Desktop Delivery Controller, you must carry out the installation through the command line, using Setup.exe with the -nosites option, as described in “Installing Controllers Using Setup.exe” on page 87.
For remote access through Access Gateway, you need to create a new Web Interface site. To do this, you must install the Web Interface and the Access Management Console Web Interface extension. Both are available on the Desktop Delivery Controller installation media:
• The Web Interface is at:
\Web Interface\WebInterface.exe
• The Web Interface Access Management Console extension is at:
\Administration\Access Management Console\ Setup\ ASC_WebInterface.msi
For information about installing the Web Interface and creating sites, see the Web Interface Administrator’s Guide. To modify the user interface of the site to refer to desktops rather than applications, edit the configuration files as described in the Web Interface Administrator’s Guide.
2 Planning Your Deployment 21
Security PlanningThis topic describes:
• General security best practices when using Desktop Delivery Controller, and any security-related differences between Desktop Delivery Controller and a conventional computer environment
• Potential deployment scenarios and their security implications
• The security aspects of Desktop Delivery Controller compared to a conventional desktop environment
Your organization may need to meet specific security standards to satisfy regulatory requirements. This guide does not cover this topic, because such security standards change over time. For up-to-date information on security standards and Citrix products, consult https://www.citrix.com/security, or contact your Citrix representative.
Note: Citrix Secure Gateway is not a component of Citrix XenDesktop. However, Citrix XenDesktop supports delivering virtual desktops within a deployment that includes Secure Gateway.
Security Best PracticesKeep all computers in your environment up to date with security patches. One advantage of Desktop Delivery Controller is that you can use desktop appliances as terminals, which simplifies this task.
Protect all computers in your environment with antivirus software.
Protect all computers in your environment with perimeter firewalls, including at enclave boundaries as appropriate.
If you are migrating a conventional environment to Desktop Delivery Controller, you may need to reposition an existing perimeter firewall or add new perimeter firewalls. For example, suppose there is a perimeter firewall between a conventional client and database server in the data center. When Desktop Delivery Controller is used, that perimeter firewall must instead be placed so that the virtual desktop and endpoint device are on one side of it, and the database servers and delivery controllers in the data center are on the other side. You should, therefore, consider creating an enclave within your data center to contain the servers and controllers used by Desktop Delivery Controller.
22 Desktop Delivery Controller Administrator’s Guide
All computers in your environment should be protected by a personal firewall on the computer. When Desktop Delivery Controller is installed, it prompts for consent to adjust the configuration of the Microsoft Windows Firewall to add any necessary program exceptions or port exceptions so that Desktop Delivery Controller will operate correctly. These exceptions are displayed by Windows Firewall in the usual way. The exceptions are removed if Desktop Delivery Controller is uninstalled. If you are using a personal firewall other than Windows Firewall, you must adjust the firewall configuration manually. For further details about configuring firewalls, see “To configure firewalls manually” on page 55.
All network communications should be appropriately secured and encrypted as appropriate to match your security policy. You can secure all communication between Microsoft Windows computers using IPSec; refer to your operating system documentation for details about how to do this. In addition, communication between endpoint devices and virtual desktops is secured through Citrix SecureICA, which is configured by default to 128-bit encryption. You can configure SecureICA when you are creating or updating a desktop group; see “Working with Virtual Desktop Groups” on page 63. For further information on SecureICA settings, see the Citrix Presentation Server Administrator’s Guide.
You should grant users only the capabilities they require. Microsoft Windows privileges continue to be applied to desktops in the usual way: configure privileges through User Rights Assignment and group memberships through Group Policy. One advantage of Desktop Delivery Controller is that it is possible to grant a user administrative rights to a virtual desktop without also granting physical control over the computer on which the virtual desktop is stored.
When planning for desktop privileges, note:
• By default, when nonprivileged users connect to a virtual desktop, they see the time zone of the system running the desktop instead of the time zone of their own endpoint device. For information on how to allow users to see their local time when using virtual desktops, see “Configuring Time Zone Settings” on page 77.
• A user who is an administrator on a virtual desktop has full control over that desktop. If a desktop is a pooled desktop rather than an assigned desktop, the user must be trusted in respect of all other users of that desktop, including future users. All users of the desktop need to be aware of the potential permanent risk to their data security posed by this situation. This is equivalent to the security of an ordinary computer: the users of a computer must trust the administrators of that computer. This consideration does not apply to assigned desktops, which have only a single user; that user should not be an administrator on any other desktop.
2 Planning Your Deployment 23
Note: For information about how to use standard Windows procedures to grant users administrative privileges only over the virtual desktop to which they are connected, see http://support.citrix.com/article/CTX116942.
• A user who is an administrator on a virtual desktop can generally install software on that desktop, including potentially malicious software. The user can also potentially monitor or control traffic on any network connected to the desktop. Again, this is equivalent to the security of an ordinary computer.
Deployment ScenariosYour user environment could consist of either endpoint devices that are unmanaged by your organization and completely under the control of the user, or of endpoints that are managed and administered by your organization. The security considerations for these two environments are generally different.
Managed Endpoint DevicesManaged endpoint devices are under effective administrative control; they are either under your own control, or the control of another organization that you trust. You may configure and supply endpoints directly to users; alternatively, you may provide terminals on which a single virtual desktop runs in full-screen-only mode (XenDesktop-ready desktop appliances). You should follow the guidelines described in “Security Best Practices” on page 21 for all managed endpoints. Desktop Delivery Controller has the advantage that minimal software is required on an endpoint.
A managed endpoint device can be set up to be used in full-screen-only mode or in window mode:
• If an endpoint is configured to be used in full-screen-only mode, users log on to it with the usual Log On To Windows screen. The same user credentials are then used to log on automatically to XenDesktop.
• If an endpoint is configured so that users see their virtual desktop in a floating window, users first log on to the endpoint, then log on to XenDesktop through the XenDesktop Web site supplied with Desktop Delivery Controller.
24 Desktop Delivery Controller Administrator’s Guide
Unmanaged Endpoint DevicesEndpoint devices that are not managed and administered by a trusted organization cannot be assumed to be under effective administrative control. For example, you might permit users to obtain and configure their own endpoints, but users might not follow the general security best practices described above. Desktop Delivery Controller has the advantage that it is possible to deliver virtual desktops securely to unmanaged endpoints. These endpoints should still have basic antivirus protection that will defeat keylogger and similar input attacks.
Pooled or Assigned DesktopsWhen using Desktop Delivery Controller, you can prevent users from storing data on endpoint devices that are under their physical control. However, you must still consider the implications of users storing data on desktops. It is not good practice for users to store data on desktops; data should be held on file servers, database servers, or other repositories where it can be appropriately protected.
Your desktop environment may consist of pooled desktops or assigned desktops:
• Users should never store data on pooled desktops.
• If users store data on an assigned desktop, that data should be removed if the desktop is later made available to other users. Further advice about this is provided in “To update a desktop group” on page 71.
Upgrading from Previous Versions of Desktop Delivery Controller
You cannot upgrade a controller running a Technical Preview or Beta version of Desktop Delivery Controller, or Desktop Server 1.0. You must uninstall the old version before installing Version 2.0.
Citrix does not support mixed farms of servers running Desktop Server 1.0 and servers running Desktop Delivery Controller 2.0.
You cannot upgrade from Presentation Server to Desktop Delivery Controller.
After you have installed Desktop Delivery Controller 2.0 you can import data from Desktop Server 1.0. For information about importing and exporting data, see “Importing and Exporting Virtual Desktop and User Assignment Data” on page 68.
3
Planning the User Experience
This topic describes how users experience connecting to virtual desktops and the factors that can affect this experience. Administrators should examine each factor while planning their deployment.
This topic includes:
• A short description of the client software that connects users to their virtual desktops
• The characteristics of your environment that affect the user experience
• A set of typical connection scenarios covering most deployments
Client SoftwareYou may be planning to use endpoint devices that are preconfigured with Citrix client software, or you may be responsible for installing that software on unconfigured devices. In both cases, the software (which is available on the Desktop Delivery Controller installation media or from the XenDesktop product pages of the Citrix Web site) has the same function. It allows users to connect to and use virtual desktops created with Desktop Delivery Controller.
Depending on your hardware, the client software is designed for the following operating systems:
• 32-bit and 64-bit editions of Microsoft Windows, including Windows Vista
• Windows CE
• Linux and UNIX
• Macintosh OS X
For detailed information about installing, configuring, and using the client software on devices other than XenDesktop-ready desktop appliances, see the documentation that accompanies supported clients for any of these operating systems.
26 Desktop Delivery Controller Administrator’s Guide
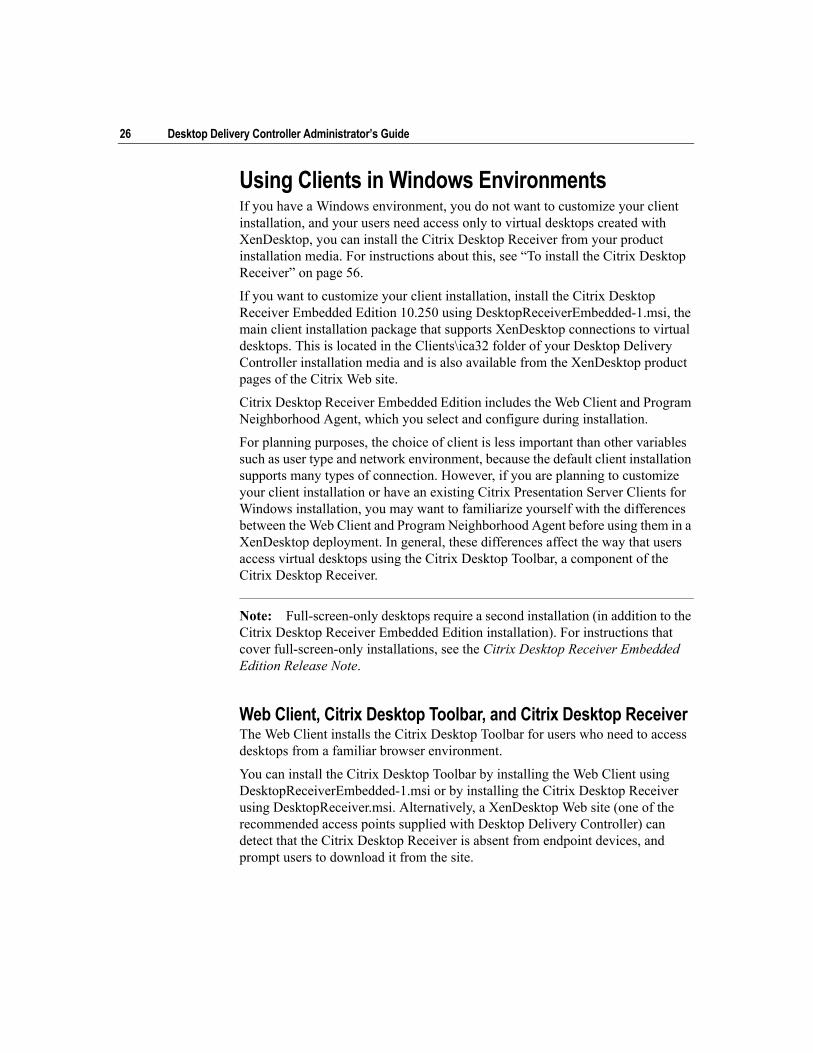
Using Clients in Windows EnvironmentsIf you have a Windows environment, you do not want to customize your client installation, and your users need access only to virtual desktops created with XenDesktop, you can install the Citrix Desktop Receiver from your product installation media. For instructions about this, see “To install the Citrix Desktop Receiver” on page 56.
If you want to customize your client installation, install the Citrix Desktop Receiver Embedded Edition 10.250 using DesktopReceiverEmbedded-1.msi, the main client installation package that supports XenDesktop connections to virtual desktops. This is located in the Clients\ica32 folder of your Desktop Delivery Controller installation media and is also available from the XenDesktop product pages of the Citrix Web site.
Citrix Desktop Receiver Embedded Edition includes the Web Client and Program Neighborhood Agent, which you select and configure during installation.
For planning purposes, the choice of client is less important than other variables such as user type and network environment, because the default client installation supports many types of connection. However, if you are planning to customize your client installation or have an existing Citrix Presentation Server Clients for Windows installation, you may want to familiarize yourself with the differences between the Web Client and Program Neighborhood Agent before using them in a XenDesktop deployment. In general, these differences affect the way that users access virtual desktops using the Citrix Desktop Toolbar, a component of the Citrix Desktop Receiver.
Note: Full-screen-only desktops require a second installation (in addition to the Citrix Desktop Receiver Embedded Edition installation). For instructions that cover full-screen-only installations, see the Citrix Desktop Receiver Embedded Edition Release Note.
Web Client, Citrix Desktop Toolbar, and Citrix Desktop ReceiverThe Web Client installs the Citrix Desktop Toolbar for users who need to access desktops from a familiar browser environment.
You can install the Citrix Desktop Toolbar by installing the Web Client using DesktopReceiverEmbedded-1.msi or by installing the Citrix Desktop Receiver using DesktopReceiver.msi. Alternatively, a XenDesktop Web site (one of the recommended access points supplied with Desktop Delivery Controller) can detect that the Citrix Desktop Receiver is absent from endpoint devices, and prompt users to download it from the site.
3 Planning the User Experience 27
Program Neighborhood AgentProgram Neighborhood Agent can be installed using DesktopReceiverEmbedded-1.msi.
This client has a user interface that integrates the access point to the Citrix Desktop Toolbar into users’ local desktops. Depending on how you configure the client, access is through the Start menu, the notification area, and local desktop icons.
Program NeighborhoodProgram Neighborhood is another component included in DesktopReceiverEmbedded-1.msi, but it does not support connections to virtual desktops.
Your EnvironmentThis topic describes the user types supported by XenDesktop deployments and aspects of your network that you should consider while planning. Both sets of characteristics directly affect your configuration decisions and the user experience of connecting to virtual desktops.
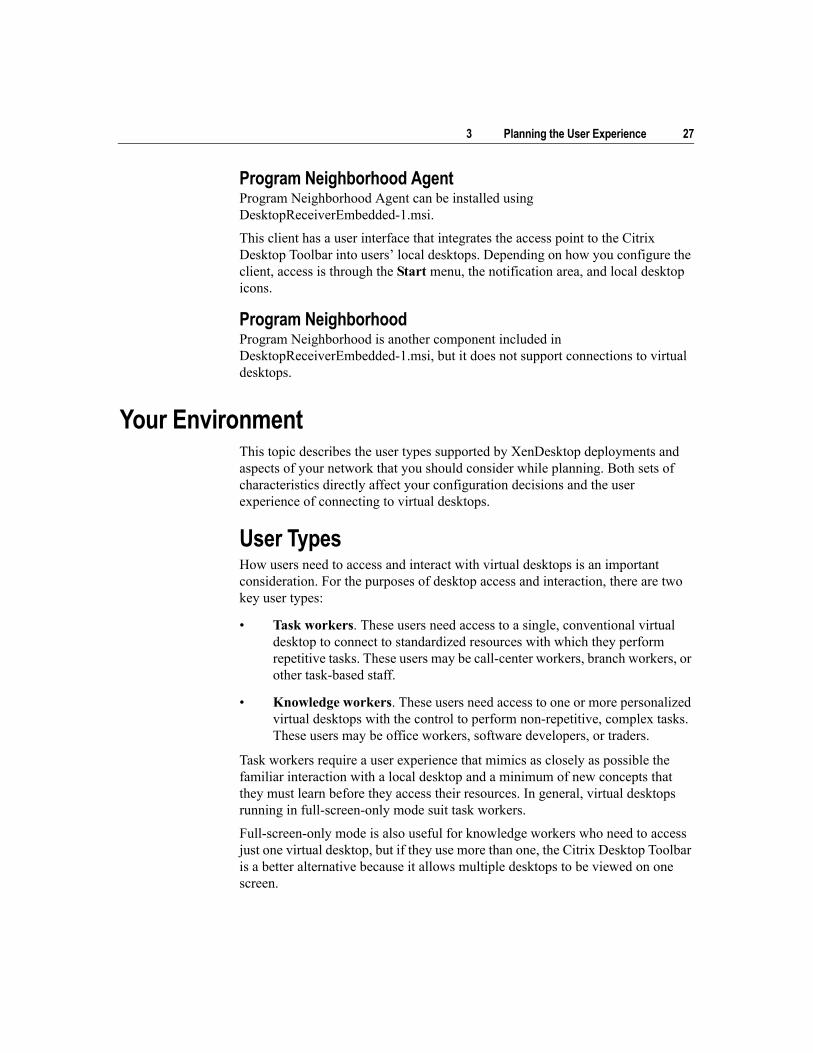
User TypesHow users need to access and interact with virtual desktops is an important consideration. For the purposes of desktop access and interaction, there are two key user types:
• Task workers. These users need access to a single, conventional virtual desktop to connect to standardized resources with which they perform repetitive tasks. These users may be call-center workers, branch workers, or other task-based staff.
• Knowledge workers. These users need access to one or more personalized virtual desktops with the control to perform non-repetitive, complex tasks. These users may be office workers, software developers, or traders.
Task workers require a user experience that mimics as closely as possible the familiar interaction with a local desktop and a minimum of new concepts that they must learn before they access their resources. In general, virtual desktops running in full-screen-only mode suit task workers.
Full-screen-only mode is also useful for knowledge workers who need to access just one virtual desktop, but if they use more than one, the Citrix Desktop Toolbar is a better alternative because it allows multiple desktops to be viewed on one screen.
28 Desktop Delivery Controller Administrator’s Guide
Network EnvironmentThe endpoint features available across all supported environments are broadly similar. For example, full-screen-only desktops are available from endpoints running Windows or Linux; the Citrix Desktop Toolbar can be used through a local area network (LAN) or remotely; and these features can be used on a variety of hardware. However, your hardware and software environment affects the details of how users connect to desktops created with Desktop Delivery Controller. Factors that you may want to consider include:
• Endpoint hardware. Does your organization use XenDesktop-ready desktop appliances, thin clients, or more powerful endpoint devices?
• Operating system.Which of the supported operating systems do your endpoints run?
• Browser availability. Will users have access to a browser?
• Endpoint location. Is the endpoint domain-joined? Is the user local or remote?
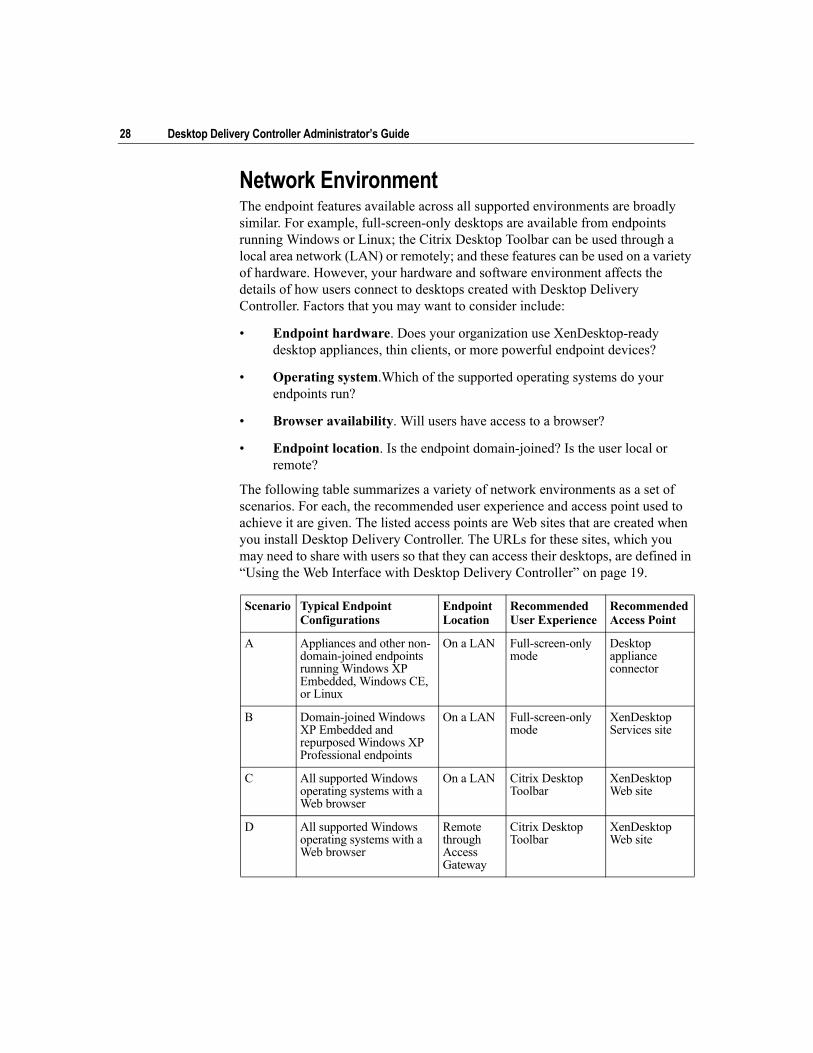
The following table summarizes a variety of network environments as a set of scenarios. For each, the recommended user experience and access point used to achieve it are given. The listed access points are Web sites that are created when you install Desktop Delivery Controller. The URLs for these sites, which you may need to share with users so that they can access their desktops, are defined in “Using the Web Interface with Desktop Delivery Controller” on page 19.
Scenario Typical Endpoint Configurations
Endpoint Location
Recommended User Experience
Recommended Access Point
A Appliances and other non-domain-joined endpoints running Windows XP Embedded, Windows CE, or Linux
On a LAN Full-screen-only mode
Desktop appliance connector
B Domain-joined Windows XP Embedded and repurposed Windows XP Professional endpoints
On a LAN Full-screen-only mode
XenDesktop Services site
C All supported Windows operating systems with a Web browser
On a LAN Citrix Desktop Toolbar
XenDesktop Web site
D All supported Windows operating systems with a Web browser
Remote through Access Gateway
Citrix Desktop Toolbar
XenDesktop Web site
3 Planning the User Experience 29
Multiple Monitors in Your EnvironmentEndpoints with a maximum of eight monitors are supported. The monitors on each endpoint must have identical screen resolutions. When the maximum number of monitors is used, screen resolutions up to 1024 x 768 per monitor (at 24 bits per pixel) are supported.
Because one virtual desktop can contain many open application windows, multimonitor users may find this feature useful because it allows them to reposition the windows across more than one monitor. Additionally, users who want to display multiple virtual desktops simultaneously can use one or more monitors for each desktop.
After users of such endpoints connect to a virtual desktop, it is displayed across all monitors.
To support endpoints with multiple monitors, no configuration of your desktop hosting infrastructure is required, but if possible you should ensure that the monitors are configured in a contiguous, rectangular arrangement.
Desktop Connection ScenariosThis topic contains a set of typical scenarios designed to help you understand how users interact with virtual desktops in a number of environments. The end-to-end experience of connecting to, using, and logging off from a virtual desktop is described.
In each case, the following prerequisites apply:
• The appropriate client software must be installed on the endpoint (except for scenarios involving XenDesktop Web sites, which can prompt the user to download the software when it is needed)
• Virtual desktop groups must be created correctly, using the instructions in “Working with Virtual Desktop Groups” on page 63
Scenario A: Connecting from an ApplianceThis scenario is suited to task workers and knowledge workers who require access to a single virtual desktop. The desktop is presented to users in full-screen-only mode. Typical hardware for this scenario includes XenDesktop-ready desktop appliances and non-domain-joined computers.
XenDesktop-ready desktop appliances are devices that, while having limited functionality compared to computers with a full operating system and set of applications, are preinstalled with software designed for accessing virtual desktops created with Desktop Delivery Controller. XenDesktop-ready desktop appliances run on Windows XP Embedded, Windows CE, and Linux.
30 Desktop Delivery Controller Administrator’s Guide
For more information about administering these desktop appliances, consult the manufacturer’s documentation. For more general information about XenDesktop-ready desktop appliances, see http://www.citrix.com/citrixready.
The user experience in this scenario is as follows. Depending on the appliance manufacturer and any customization that is performed, the screen appearance may vary:
1. The user turns on their local appliance and a connection is established to a desktop appliance connector (or a load-balanced address) on a server running Desktop Delivery Controller.
2. After the boot sequence on the appliance is complete, a Please Wait screen appears while a customized shell loads.
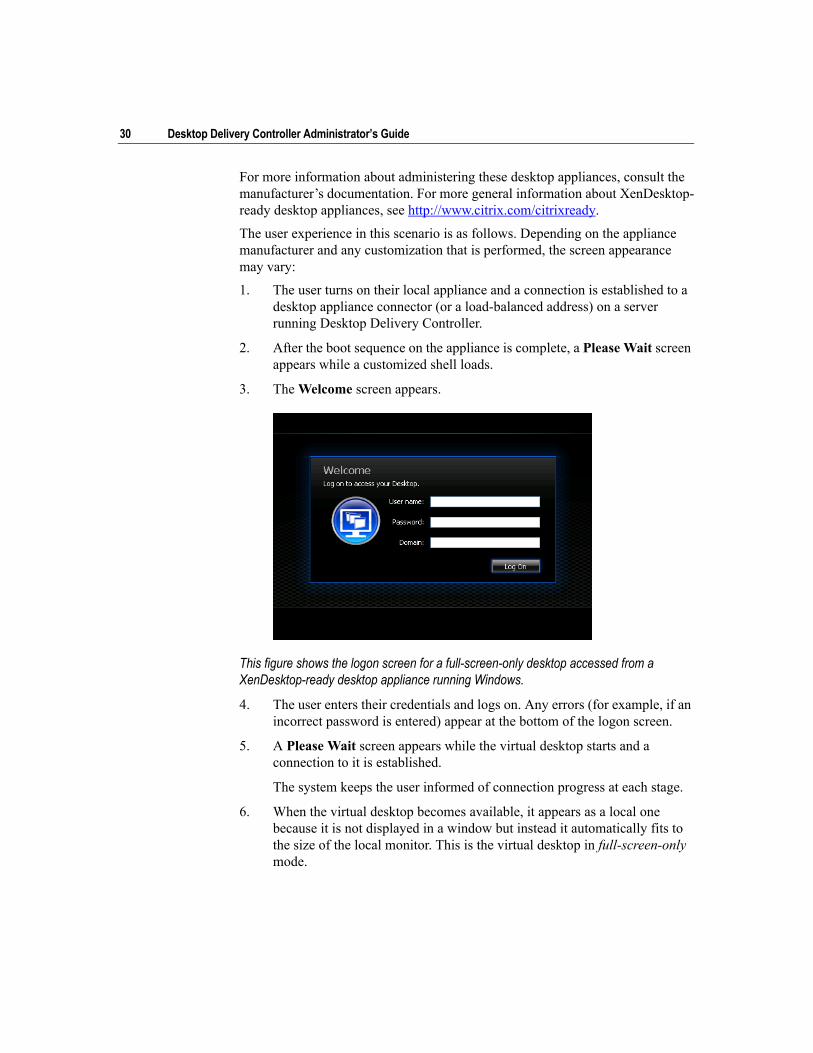
3. The Welcome screen appears.
This figure shows the logon screen for a full-screen-only desktop accessed from a XenDesktop-ready desktop appliance running Windows.
4. The user enters their credentials and logs on. Any errors (for example, if an incorrect password is entered) appear at the bottom of the logon screen.
5. A Please Wait screen appears while the virtual desktop starts and a connection to it is established.
The system keeps the user informed of connection progress at each stage.
6. When the virtual desktop becomes available, it appears as a local one because it is not displayed in a window but instead it automatically fits to the size of the local monitor. This is the virtual desktop in full-screen-only mode.
3 Planning the User Experience 31
The user can create and save work normally on the virtual desktop, use the mouse and keyboard in the usual way, and access network resources and most types of external device. Almost all input is directed to the virtual desktop. The user never interacts directly with the local desktop except for a few reserved key combinations (which may vary between operating systems). For more information about these key combinations in Windows environments, see the Citrix Desktop Receiver Embedded Edition Release Note.
USB drives are mounted automatically and are freely accessible, except for USB U3 drives and encrypted devices, which are not supported. Because full-screen-only desktops are designed to restrict the user’s ability to access the local computer, it is the virtual desktop, not the local one, that is responsible for controlling USB drives and displaying them in the user interface.
The user is in full control of the virtual desktop, just as if they were using it locally. The only exceptions that the user may notice are:
• Resizing. The user is prevented from resizing the virtual desktop. This avoids the difficulty of choosing unsuitable screen resolutions, resulting in distorted images and the appearance of scrollbars (neither of which would normally occur on the user’s physical screen). The user can, however, change other desktop properties such as font size.
• Screen locking. For security reasons, on some operating systems the key combinations that lock the local screen (CTRL+ALT+DELETE and Windows logo key+L on Windows) are not sent to the virtual desktop. When the user enters one of those combinations, a dialog box appears that tells them which alternative key combination to use.
When the user completes their work, they log off in the standard way (for example, from the Start menu on Windows). The shell automatically logs the user off from the local computer as well as the virtual desktop. This leaves their monitor displaying the logon screen. In this way, the user experiences the logoff as a local operation.
Scenario B: Connecting from a Domain-Joined or Repurposed ComputerThis scenario is suited to task workers and knowledge workers in a Microsoft Windows environment who require access to a single desktop. The desktop is presented to users in full-screen-only mode. Typical setups for this scenario include repurposed Windows XP Professional computers or domain-joined computers running Windows XP Embedded.
A prerequisite to this scenario is that you must install the Citrix Desktop Receiver Embedded Edition on the endpoint device.
The user experience in this scenario is as follows:
32 Desktop Delivery Controller Administrator’s Guide
1. The user turns on their local computer and a connection is established to the XenDesktop Services site (or a load-balanced address) on a server running Desktop Delivery Controller.
2. After the boot sequence on the computer is complete, the Log On to Windows dialog box appears while a customized shell starts.
3. The user enters their domain credentials and logs on. They should not log on as a local administrator.
4. From this point until the user logs off, the user experience is identical to that in Scenario A. A Please Wait screen appears while the virtual desktop starts and a connection to it is established.
The system keeps the user informed of connection progress at each stage.
5. When the virtual desktop becomes available, it appears as a local one because it is not displayed in a window but instead it automatically fits to the size of the local monitor. This is the virtual desktop in full-screen-only mode.
When the user completes their work, they log off in the standard way (for example, using the Start menu on Windows). The shell automatically logs the user off from the local computer as well as the virtual desktop. This leaves their monitor displaying the Log On to Windows dialog box.
Scenario C: Connecting from a Fat Client Device on a LANThis scenario is suited to knowledge workers in a Microsoft Windows environment who require access to one or more desktops. Desktops are presented to users through the Citrix Desktop Toolbar. Access to more than one desktop mandates the use of this user interface rather than full-screen-only mode, which can be used only when access to a single desktop is required. Typical hardware for this scenario includes fat clients connected to a LAN.
Unlike Scenario B, the Citrix Desktop Receiver Embedded Edition does not need to be installed on the endpoint as a prerequisite. Instead, users can be prompted to download it when they need it.
The user experience in this scenario is as follows:
1. The user is already logged on to Windows from their local computer. They decide to connect to one of their virtual desktops.
2. The user opens a browser window, and browses (for the first time) to a XenDesktop Web site (or a load-balanced address) on a server running Desktop Delivery Controller. For convenience, they bookmarked the site address that you sent them when they were set up as a XenDesktop user.
3 Planning the User Experience 33
3. A Please Wait screen appears while a connection to the site is established.
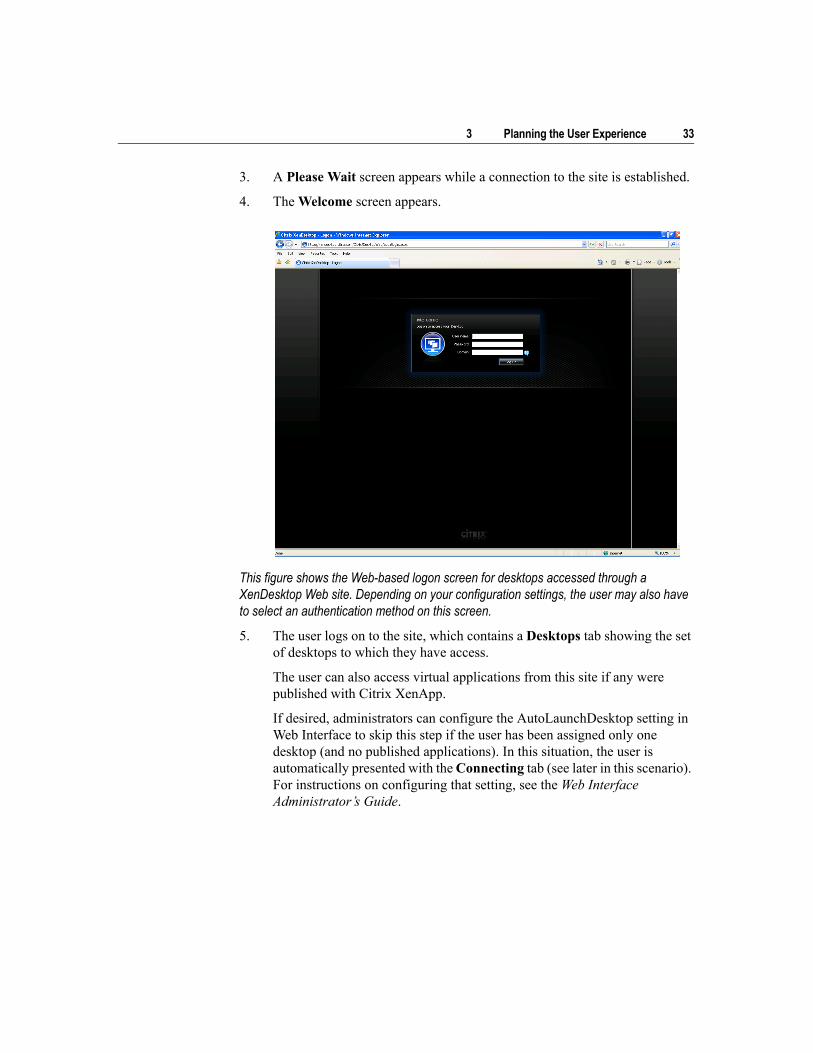
4. The Welcome screen appears.
This figure shows the Web-based logon screen for desktops accessed through a XenDesktop Web site. Depending on your configuration settings, the user may also have to select an authentication method on this screen.
5. The user logs on to the site, which contains a Desktops tab showing the set of desktops to which they have access.
The user can also access virtual applications from this site if any were published with Citrix XenApp.
If desired, administrators can configure the AutoLaunchDesktop setting in Web Interface to skip this step if the user has been assigned only one desktop (and no published applications). In this situation, the user is automatically presented with the Connecting tab (see later in this scenario). For instructions on configuring that setting, see the Web Interface Administrator’s Guide.
34 Desktop Delivery Controller Administrator’s Guide
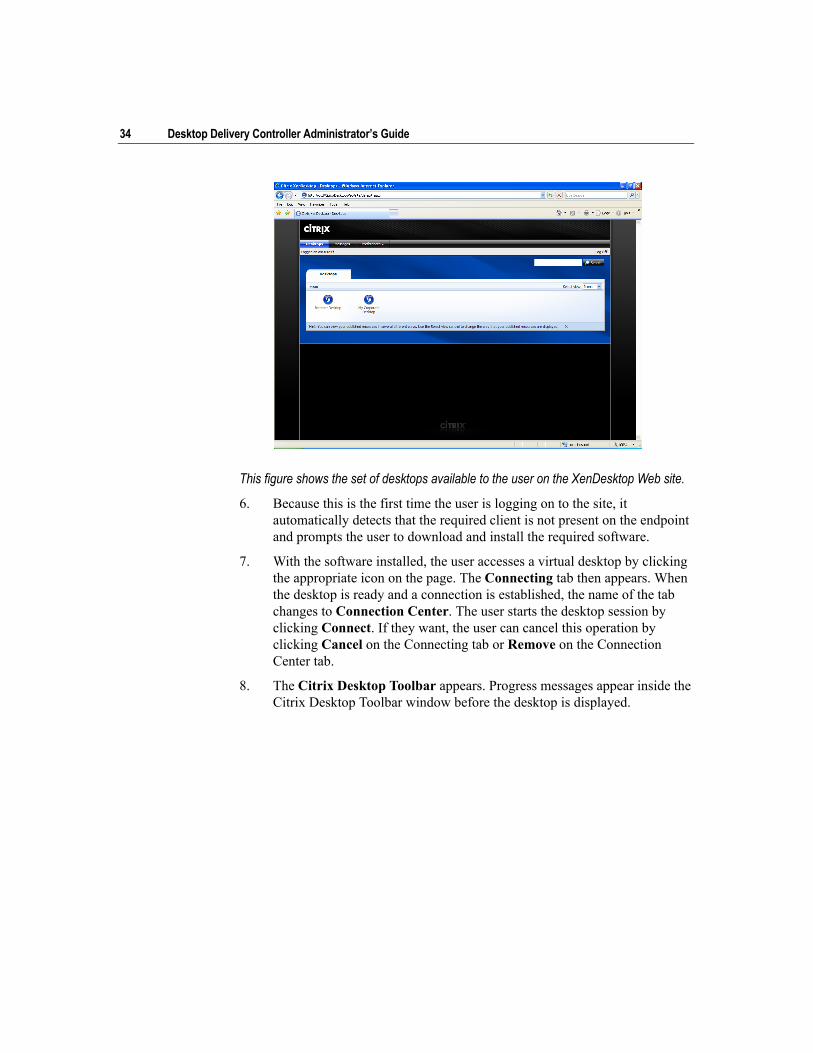
This figure shows the set of desktops available to the user on the XenDesktop Web site.
6. Because this is the first time the user is logging on to the site, it automatically detects that the required client is not present on the endpoint and prompts the user to download and install the required software.
7. With the software installed, the user accesses a virtual desktop by clicking the appropriate icon on the page. The Connecting tab then appears. When the desktop is ready and a connection is established, the name of the tab changes to Connection Center. The user starts the desktop session by clicking Connect. If they want, the user can cancel this operation by clicking Cancel on the Connecting tab or Remove on the Connection Center tab.
8. The Citrix Desktop Toolbar appears. Progress messages appear inside the Citrix Desktop Toolbar window before the desktop is displayed.
3 Planning the User Experience 35
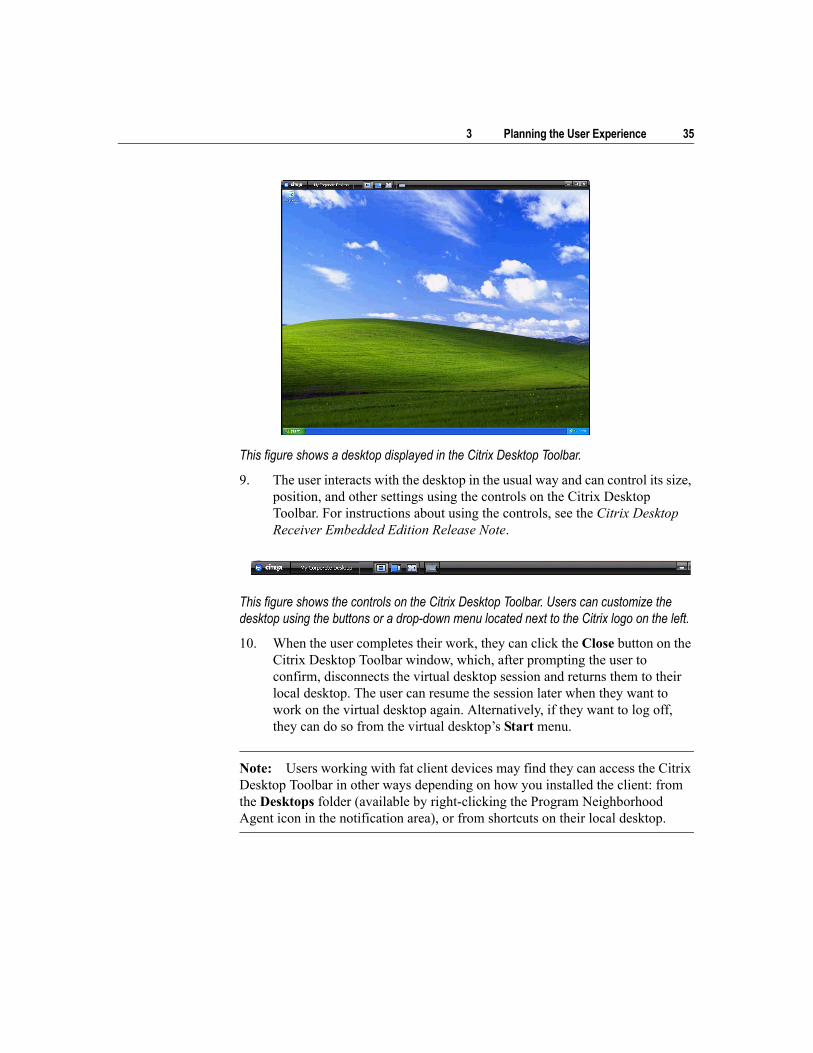
This figure shows a desktop displayed in the Citrix Desktop Toolbar.
9. The user interacts with the desktop in the usual way and can control its size, position, and other settings using the controls on the Citrix Desktop Toolbar. For instructions about using the controls, see the Citrix Desktop Receiver Embedded Edition Release Note.
This figure shows the controls on the Citrix Desktop Toolbar. Users can customize the desktop using the buttons or a drop-down menu located next to the Citrix logo on the left.
10. When the user completes their work, they can click the Close button on the Citrix Desktop Toolbar window, which, after prompting the user to confirm, disconnects the virtual desktop session and returns them to their local desktop. The user can resume the session later when they want to work on the virtual desktop again. Alternatively, if they want to log off, they can do so from the virtual desktop’s Start menu.
Note: Users working with fat client devices may find they can access the Citrix Desktop Toolbar in other ways depending on how you installed the client: from the Desktops folder (available by right-clicking the Program Neighborhood Agent icon in the notification area), or from shortcuts on their local desktop.
36 Desktop Delivery Controller Administrator’s Guide
Scenario D: Connecting from Remote ComputersThis scenario is suited to knowledge workers with any supported Microsoft Windows operating system who are working remotely, outside your LAN, and need secure access to virtual desktops that are inside it. Typically, connections are routed from fat client devices through Citrix Access Gateway and Web Interface. These two components can be configured in a variety of ways. This scenario uses one of the standard configurations in which the Web Interface server is located in the Demilitarized Zone (DMZ).
In this scenario, desktops are always presented to users through the Citrix Desktop Toolbar.
The user experience in this scenario is as follows:
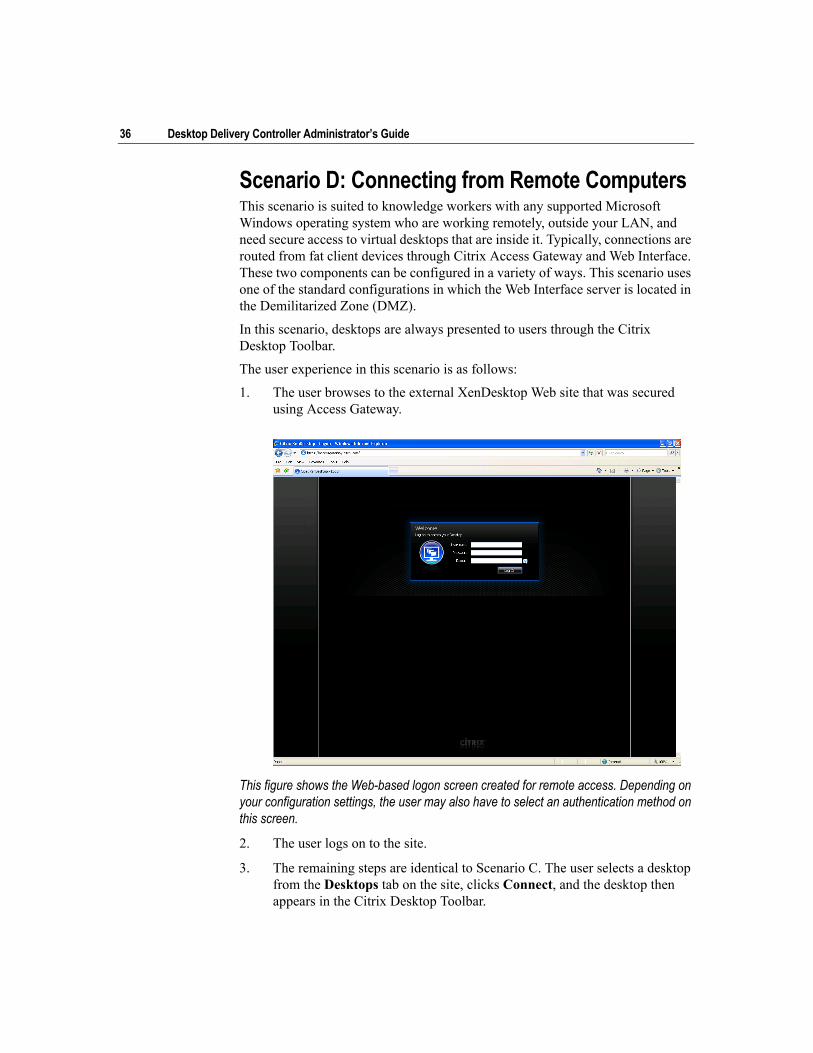
1. The user browses to the external XenDesktop Web site that was secured using Access Gateway.
This figure shows the Web-based logon screen created for remote access. Depending on your configuration settings, the user may also have to select an authentication method on this screen.
2. The user logs on to the site.
3. The remaining steps are identical to Scenario C. The user selects a desktop from the Desktops tab on the site, clicks Connect, and the desktop then appears in the Citrix Desktop Toolbar.
3 Planning the User Experience 37
4. When the user completes their work, they can click the Close button on the Citrix Desktop Toolbar window, which, after prompting the user to confirm, disconnects the virtual desktop session and returns them to their local desktop. The user can resume the session later when they want to work on the virtual desktop again. Alternatively, if they want to log off, they can do so from the virtual desktop’s Start menu.

38 Desktop Delivery Controller Administrator’s Guide
4
System Requirements
This section describes the requirements for installing Desktop Delivery Controller, based on the configuration choices available to you through the installer.
Requirements for Delivery ControllersIf you install all the delivery controller components on a single server, that server must meet all the requirements detailed in this topic.
Where a requirement applies to a component that is needed by only one controller in the farm, this is noted. The only component that you must have on all controllers in the farm is Desktop Delivery Controller itself.
You cannot install Desktop Delivery Controller on a domain controller.
Servers must meet the following requirements:
• One of the following operating systems:
• Microsoft Windows Server 2003 (Standard, Enterprise, or Datacenter Edition, with Service Pack 2 installed)
• Microsoft Windows Server 2003 R2
Both 32-bit and 64-bit versions of the above operating systems are supported.
You can mix operating systems within a farm.
• Terminal Services running in application mode
If you do not have this on your server, you are prompted for the Windows Server 2003 installation media, and Terminal Services is installed for you. No Terminal Services Client Access Licenses (CALs) are needed.
• Microsoft .NET Framework, Version 3.5
If you do not have this on your server, it is installed automatically for you. The Desktop Delivery Controller installation media also contain this installer in the Support\DotNet35 folder.
40 Desktop Delivery Controller Administrator’s Guide
• Java Runtime Environment (JRE) Version 1.5.0_15
If you do not have this on your server, it is installed automatically for you. The Desktop Delivery Controller installation media also contain this installer in the Support\JRE1.5 folder.
The version of the JRE included with Desktop Delivery Controller is suitable only for environments where JRE auto-update is effective and consistent with your organization’s security policy. Citrix recommends that you use Desktop Delivery Controller only after JRE auto-update has successfully taken place.
Note: The JRE is required only for licensing and for the Presentation Server Console.
• Microsoft Internet Information Services (IIS) Version 6.0 and ASP.NET
If you do not have these on your server, you are prompted for the Windows Server 2003 installation media, and they are installed for you.
• Microsoft Visual J# 2.0 Redistributable Package, Second Edition
If you do not have this on your server, it is installed automatically for you. The Desktop Delivery Controller installation media also contain this installer in the Support\Jsharp20 folder.
• Internet Explorer 5.0 or later, if you are running licensing on the controller
• Disk space requirements:
• 400 MB for Desktop Delivery Controller
• 50 MB for the Presentation Server Console
• 25 MB for the Access Management Console
• 30 MB for the licensing components
Data Store Database RequirementsDesktop Delivery Controller supports the following types of database for a farm data store:
• Microsoft Access:
• Microsoft Access Jet Database Engine for Windows Server 2003 with Service Pack 1
4 System Requirements 41
• Microsoft Access Jet Database Engine for Windows Server 2003 x64
An Access database is automatically locally created when you create a new farm, unless you choose to use an existing database server. The database is created here:
%Program Files%\Citrix\Independent Management Architecture
Note: You need only one database for all the controllers in a farm.
• Microsoft SQL Server:
• Microsoft SQL Server 2005 Express Edition (32-bit) with Service Pack 2 for Windows Server 2003 with Service Pack 2
• Microsoft SQL Server 2005 Express Edition (32-bit) with Service Pack 2 for Windows Server 2003 x64 with Service Pack 2
• Microsoft SQL Server 2000 with Service Pack 4 for Windows Server 2003 with Service Pack 2
• Microsoft SQL Server 2005 with Service Pack 2 for Windows Server 2003 with Service Pack 2
• Microsoft SQL Server 2005 with Service Pack 2 for Windows Server 2003 x64 with Service Pack 2
• Oracle
• Oracle Enterprise 10.2.0.1.0 for Windows Server 2003 with Service Pack 2
• Oracle Enterprise 10.2.0.1.0 for Windows Server 2003 x64 with Service Pack 2
Oracle databases require an ODBC database client driver to be installed on each controller. The supported versions of Microsoft Access, SQL Server and SQL Server 2005 Express Edition SP2 are verified for MDAC 2.8.
For further information about sizing and setting up farm data stores, see the Citrix Presentation Server Administrator’s Guide.
42 Desktop Delivery Controller Administrator’s Guide
Separate Components RequirementsThis topic describes requirements for each of the Desktop Delivery Controller components that are individually installable:
• Citrix Licensing.
• Management consoles.
• Clients. Note that you will benefit from the full functionality of Desktop Delivery Controller 2.0 only if you use the Citrix Desktop Receiver Embedded Edition 10.250, which is included with Desktop Delivery Controller 2.0.
You can install any of these components on the same server as the main Desktop Delivery Controller component. The requirements are included in “Requirements for Delivery Controllers” on page 39.
Citrix Licensing RequirementsBefore installing Citrix Licensing you should consult the Getting Started with Citrix Licensing Guide, which you can download fromhttp://support.citrix.com/article/CTX109108, for any further details and possible updates to the requirements described below.
License ServerYou can install the license server on servers running the following Microsoft operating systems. Citrix recommends that you install the latest Microsoft service pack for the operating system.
• Windows 2000 Server Family (all editions)
• Windows Server 2003 Family (all editions)
• Windows Server 2008 Family (all editions)
Note: Ensure that you have MSI 3.0 installed with your operating system. You can find MSI 3.0 in the Support folder on the media or download.
License Management ConsoleBecause the optional License Management Console must be installed on the same server as the license server, refer to the License Server section, above, for the operating platform requirements. In addition, the License Management Console requires the following software:
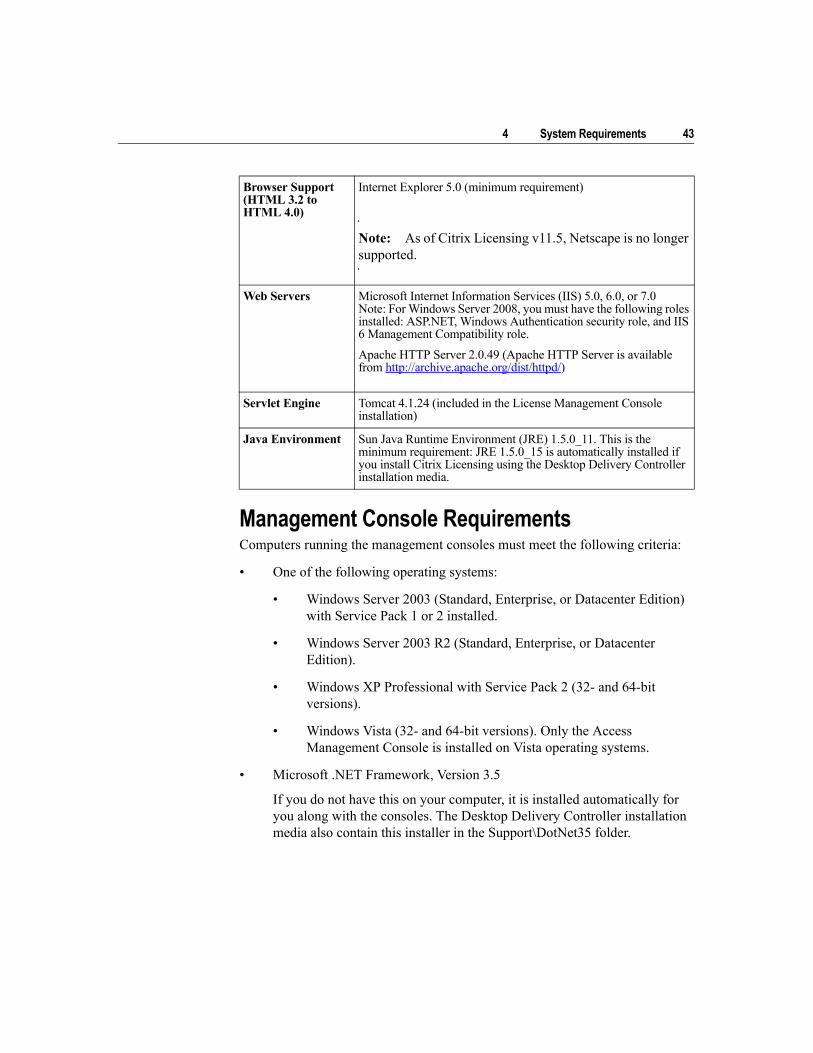
4 System Requirements 43
Management Console RequirementsComputers running the management consoles must meet the following criteria:
• One of the following operating systems:
• Windows Server 2003 (Standard, Enterprise, or Datacenter Edition) with Service Pack 1 or 2 installed.
• Windows Server 2003 R2 (Standard, Enterprise, or Datacenter Edition).
• Windows XP Professional with Service Pack 2 (32- and 64-bit versions).
• Windows Vista (32- and 64-bit versions). Only the Access Management Console is installed on Vista operating systems.
• Microsoft .NET Framework, Version 3.5
If you do not have this on your computer, it is installed automatically for you along with the consoles. The Desktop Delivery Controller installation media also contain this installer in the Support\DotNet35 folder.
Browser Support (HTML 3.2 to HTML 4.0)
Internet Explorer 5.0 (minimum requirement)
Note: As of Citrix Licensing v11.5, Netscape is no longer supported.
Web Servers Microsoft Internet Information Services (IIS) 5.0, 6.0, or 7.0Note: For Windows Server 2008, you must have the following roles installed: ASP.NET, Windows Authentication security role, and IIS 6 Management Compatibility role.Apache HTTP Server 2.0.49 (Apache HTTP Server is available from http://archive.apache.org/dist/httpd/)
Servlet Engine Tomcat 4.1.24 (included in the License Management Console installation)
Java Environment Sun Java Runtime Environment (JRE) 1.5.0_11. This is the minimum requirement: JRE 1.5.0_15 is automatically installed if you install Citrix Licensing using the Desktop Delivery Controller installation media.

44 Desktop Delivery Controller Administrator’s Guide
• Java Runtime Environment (JRE) Version 1.5.0_15
If you do not have this on your computer, it is installed automatically for you along with the consoles. The Desktop Delivery Controller installation media also contain this installer in the Support\JRE1.5 folder.
• Microsoft Windows Installer (MSI) 3.1
If you do not have this on your computer, it is installed automatically for you along with the consoles.
• Disk space requirements: 75 MB
Client RequirementsTo run the Citrix Desktop Receiver Embedded Edition 10.250, endpoint devices must meet the requirements listed in the Citrix Desktop Receiver Embedded Edition Release Note.
The following clients are also provided with the Desktop Delivery Controller installation media, but they do not support the Citrix Desktop Toolbar, full-screen-only mode virtual desktops, or dynamic client drive mapping:
• Client for Linux x86 10.x
• Client for Macintosh OS X 10.x
For further information on the functionality and requirements for the clients in the above list, go to http://www.citrix.com/English/SS/downloads/downloads.asp?dID=2755
Active Directory RequirementsActive Directory is required for Desktop Delivery Controller. All domain and forest functional levels are supported.
You cannot install Desktop Delivery Controller on a domain controller.
For further information on how Desktop Delivery Controller uses Active Directory, see “Using Active Directory with Desktop Delivery Controller” on page 17.
Note: Non-Active Directory environments, such as Novell NDS, are not supported.
4 System Requirements 45
Virtual Desktop RequirementsVirtual desktops must be running one of the following:
• Windows XP Professional 32-bit with Service Pack 2 or later
• Windows Vista 32-bit Business, Ultimate, or Enterprise editions
Support components, such as .NET Framework 3.5 and the Visual C++ 2005 Runtime Library, are installed automatically if they are not already on the desktop.
Hosting InfrastructuresDesktop Delivery Controller enables you to manage virtual desktops supported on the following systems:
• Citrix XenServer Standard and Enterprise 4.1. For information on system requirements, see:
http://citrix.com/English/ps2/products/feature.asp?contentID=1297950
• VMware Infrastructure 3. For information on system requirements, see:
http://www.vmware.com/support/pubs/vi_pubs.html
• Microsoft System Center Virtual Machine Manager 2007. For information on system requirements, see:
http://www.microsoft.com/systemcenter/scvmm/default.mspx

46 Desktop Delivery Controller Administrator’s Guide
5
Installing Desktop Delivery Controller
OverviewThis section provides information about the following topics:
• Licensing
• Creating the farm data store
• Installing Desktop Delivery Controller on a single server and creating a farm
• Configuring Active Directory
• Installing the Virtual Desktop Agent
• Installing the Citrix Desktop Receiver
• Adding controllers to your farm
• Installing the management consoles separately
• Starting the Access Management Console and running discovery
• Uninstalling Desktop Delivery Controller
Citrix recommends the following installation sequence:
1. Licensing.
2. Farm data store. For further details of this, see “Creating the Farm Data Store” on page 48.
3. Server running Desktop Delivery Controller, which can then be configured with the license server and data store server locations.
4. Computers running the Virtual Desktop Agent, which can then connect to the delivery controllers.
5. Consoles.
48 Desktop Delivery Controller Administrator’s Guide
6. Citrix Desktop Receiver.
Command-line tools are also available for installation tasks and for configuring Active Directory. For information on these tools, see “Command-Line Tools” on page 87.
Important: Citrix supports installation of Desktop Delivery Components only through the procedures described in this guide.
When you have installed the necessary components, you can start the Access Management Console and create virtual desktop groups. Starting the Access Management Console is described on page 59, and creating virtual desktop groups is described in “Working with Virtual Desktop Groups” on page 63. You can also choose to customize aspects of your deployment, as described in “Customizing Your Desktop Delivery Controller Environment” on page 75.
LicensingYou can either run Citrix Licensing on the server on which you install Desktop Delivery Controller, or you can run it on a separate server. If your organization uses other Citrix products, for example, it may be more convenient for you to download your XenDesktop licenses to the license server that you are already using. You must configure the license server and install valid licenses before using XenDesktop. After you point the product to a valid license server, you have a 96-hour out-of-box grace period to ensure that a valid license is present on the license server. This grace period allows two concurrent connections.
For details of the editions and licensing options available for XenDesktop, see Getting Started with Citrix XenDesktop. For details of how to install and run Citrix Licensing, see the Getting Started with Citrix Licensing Guide, which you can download from http://support.citrix.com/article/CTX109108.
Creating the Farm Data StoreIf you are creating a new farm and plan to use Microsoft SQL Server, SQL Server 2005 Express Edition, or Oracle for the farm data store, you must create the data store before installing Desktop Delivery Controller.
For more information, see the topics about planning and setting up the farm data store in the Citrix Presentation Server Administrator’s Guide.
5 Installing Desktop Delivery Controller 49
Installing Desktop Delivery Controller on a Single ServerThis topic describes how to install Desktop Delivery Controller on a single server and how to create a farm. Adding controllers to your farm is described in “Adding Controllers to Your Farm” on page 56.
You cannot install Desktop Delivery Controller on a domain controller.
Citrix recommends that Desktop Delivery Controller installation be carried out by a domain user with local administrator rights. Before you start the installation process, ensure that you read “Using Active Directory with Desktop Delivery Controller” on page 17, and that the necessary Active Directory permissions are in place.
Citrix recommends that you do not install Desktop Delivery Controller through RDP. If you have to use RDP, use a console session to avoid reconnection issues if your session becomes disconnected.
If you have created the farm data store on a separate database server, ensure that you know:
• The server name and database name for the data store, because you have to specify these during the installation process
• The user name and password of an account that Desktop Delivery Controller will use to access the farm data store
Note: The Citrix Web Interface is installed automatically on all servers on which you install Desktop Delivery Controller. If you do not want to install the Web Interface you must install Desktop Delivery Controller through the command line using Setup.exe with the -nosites option, as described in “Installing Controllers Using Setup.exe” on page 87.
To install Desktop Delivery Controller and create a farm1. Insert the Desktop Delivery Controller installation media in the appropriate
drive.
If the Welcome page does not appear automatically, use Windows Explorer to open Autorun.exe.
2. On the Welcome page, click Install Server Components.
The End User License Agreement appears.
50 Desktop Delivery Controller Administrator’s Guide
3. Select I accept the license agreement, then click Next.
You cannot click Back on this page. To change the installation option you chose, you must click Cancel, then restart the installation.
4. On the Select Components page, to install all the components on this controller, leave all the check boxes selected.
If you are running or plan to run Citrix Licensing on a separate server, clear the Citrix Licensing check box.
Click Next.
5. On the Create or Join a Farm page, select Create new farm.
6. Type a name for the farm. Click Next.
7. On the Specify Farm Edition page, select the XenDesktop edition for which you have licenses, then click Next.
8. On the Optional Server Configuration page, you can configure:
• Using an existing database server. If you have chosen to create a farm, by default an Access database for the farm data store is created locally. If you want to use a separate database server instead, select Use an existing database server.
• Licensing. This option appears only if you cleared the Citrix Licensing check box on the Select Components page. To specify a separate server for Citrix Licensing, select Configure license server now.
If you have selected to use a separate database server, you are then prompted for the details. For further information about this, see “Using a Separate Database Server” on page 52.
If you have selected to use a separate license server, you are then prompted for the license server’s name or IP address and port number.
If you have selected to use both a separate database server and a separate license server, you are first prompted for the database server details, then for the license server details.
Click Next.
9. On the Start Installation page, click Next. A progress indicator page then appears that shows you the installation progress for each component.
5 Installing Desktop Delivery Controller 51
Note: Near the end of the installation, you may be prompted to restart your server. To complete the installation, the user who started the installation must log on to the server. If you are installing from a network share, you may need to connect to your network share after restarting for the installation to continue.
When installation is complete, click Next.
10. On the Setup complete page, ensure that the Configure an Active Directory OU now check box is selected, then click Finish. Configuring Active Directory is described on page 51.
If no valid licenses are installed, an option to start the License Management Console is also provided. If you select this check box, the Licence Management Console opens in a separate window and you can install licenses after configuring Active Directory.
Configuring Active DirectoryBefore you can create desktop groups, you need to create and configure the Active Directory Organizational Unit (OU) for the farm. Citrix provides a wizard to assist you with this. The wizard is integrated with the Desktop Delivery Controller installation process, and guides you through the following steps:
1. On the first page of the Active Directory Configuration wizard, click Next.
2. To select an existing OU for this farm, browse to the relevant OU, select it, then click Next.
To create a new OU for the farm, browse to the OU that you want to be its parent, select it, then select the Create the farm OU within the OU selected above check box. You must have CreateChild permissions on the parent OU to do this. You can create the OU in any domain in the forest that contains your computers.Type a name for the new OU, then click Next.
3. The final page of the wizard provides a summary of the configuration you set up. To change it, click Back. To apply the configuration, click Finish. The progress and outcome of the configuration is then displayed.
4. Click Finish.
After you install Desktop Delivery Controller, you can also run the wizard from the Windows Start menu by selecting All Programs > Citrix > Administrator Tools > Active Directory Configuration Wizard.
Alternatively, you can use the command-line tool that corresponds to this wizard. The tool is described in “Configuring Active Directory Using ADSetup” on page 90.
52 Desktop Delivery Controller Administrator’s Guide
Using a Separate Database ServerWhen installing Desktop Delivery Controller, you can choose to use a separate database server to host the farm data store.
The connection you configure must be to an existing database to be used as the farm data store.
To use a separate database server for the farm data store1. When the Optional Server Configuration page of the installation wizard
appears, select Use an existing database server.
2. On the Database Configuration page, select the database server type, then click Configure.
3. The dialog boxes that follow are the standard Microsoft user interface for configuring ODBC settings. Refer to Microsoft documentation for details about these. When you complete them, you are returned to the Database Configuration page, which displays the name of the database you have selected for the farm data store.
4. Click Next.
5. If you selected Windows NT authentication when you were configuring ODBC settings, the Database Credentials page appears. Enter the details of the user account that will be used to manage the databases. Click Next.
If you did not select to use Windows NT authentication, continue to the next step.
6. If, on the Optional Server Configuration page, you also chose to use a separate license server, you are now prompted for the license server details. Otherwise, the Start Installation page appears and the installation continues as normal.
Installing the Virtual Desktop AgentThis topic describes how to install the desktop-side components of Desktop Delivery Controller, known collectively as the Virtual Desktop Agent. This set of components consists of:
• The Citrix Desktop Service, which manages communication between the delivery controller and the virtual desktops. It handles initial brokering of connections, settings for connections, and interaction with sessions from the Access Management Console.
• The Citrix ICA Service, which manages communication between the endpoint device and the virtual desktop. It handles the remoting of graphics from the desktop to the endpoint device and the remoting of input from the
5 Installing Desktop Delivery Controller 53
endpoint device to the desktop. Several drivers are associated with this service for handling the remoting of display, keyboard, and mouse.
• Supporting services: additional services help with other features such as auto-reconnection, printing, and encryption.
For the Virtual Desktop Agent to operate correctly, virtual desktops need to determine which farm they belong to. You can provide this information in either of the following ways:
• By default, when you are installing the Virtual Desktop Agent, the Farm Selection page appears. Provided you are a domain user and have local administration rights, you can select the farm here.
• You can manage virtual desktops’ farm membership through Group Policy. The Desktop Delivery Controller Farm Globally Unique Identifier (GUID) policy enables you to use a generic virtual desktop image with multiple Desktop Delivery Controller deployments. The administrative template (ADM) file is supplied on the Desktop Delivery Controller installation media:
platform\lang\support\configuration\FarmGUID.adm
If this policy is applied before the Virtual Desktop Agent is installed, the Farm Selection page does not appear during installation.
For information about how to use ADM files, consult your Active Directory documentation.
The farm GUID is one of the farm properties displayed in the Access Management Console.
If you want users to be able to connect to XenApp streamed or remote applications from their virtual desktop, you also need to install the Citrix clients on the computer hosting the virtual desktops. Citrix recommends that you install the latest clients directly from http://support.citrix.com.
You can install the Virtual Desktop Agent manually, using the installation procedure below. Alternatively, you can perform an unattended install, for example using Active Directory Group Policy or a third party software deployment tool. See “Installing the Virtual Desktop Agent Using XdsAgent.msi” on page 90 for details on the MSI properties of the Virtual Desktop Agent package.
You must create a farm by installing Desktop Delivery Controller on at least one server before installing the Virtual Desktop Agent on any computer.
54 Desktop Delivery Controller Administrator’s Guide
Note: Microsoft .NET Framework 3.5 is a prerequisite when installing the Virtual Desktop Agent through Group Policy. For information about how to install Microsoft .NET Framework 3.5, seehttp://msdn2.microsoft.com/en-us/library/cc160717.aspx.
To install the Virtual Desktop Agent1. Log on to the computer as a local user with local administration rights. To
select a farm to join, you also need to be a domain user.
2. Insert the Desktop Delivery Controller installation media in the appropriate drive.
If the Welcome page does not appear automatically, use Windows Explorer to open Autorun.exe.
3. On the Welcome page, click Install Virtual Desktop Components.
If Microsoft .NET Framework 3.5 is not installed, you are prompted to install it now. You are returned to the Virtual Desktop Agent installer when the .NET Framework install is complete. If .NET Framework requires a restart, you have to restart the Virtual Desktop Agent installer after this.
The Citrix Virtual Desktop Agent Setup wizard starts.
4. On the Welcome page, click Next.
5. When the End User License Agreement appears, select I accept the license agreement, then click Next.
6. On the Port Number page, type a valid TCP/IP port number in the range 1 to 65535 if you do not want to use the default number. This port number is used by the delivery controllers to communicate with the virtual desktop.
Important: To change the port number after installation, you must uninstall then reinstall the Virtual Desktop Agent.
Note: The standard session reliability and ICA ports are used by the endpoint device to connect to the virtual desktop; you cannot configure these ports as part of the installation process.
Click Next.
7. If the computer has a standard Windows firewall set up, the Windows Firewall Configuration page appears:
5 Installing Desktop Delivery Controller 55
• To configure the required ports automatically, ensure that the Automatically configure Windows firewall check box is selected, then click Next.
• If you want to configure the firewall yourself, clear the Automatically configure Windows firewall check box, then click Next.
If the computer does not have a standard Windows firewall set up, this page does not appear. If another firewall is enabled, you must configure this appropriately.
For information about configuring firewalls manually, see “To configure firewalls manually” on page 55.
8. If the Farm Selection page appears, select the farm to contact.
Note: If there is more than one farm with the same name, the GUIDs of the relevant Active Directory OUs are appended to the duplicate farm names in the list.
If the farm name is going to be configured later, click Configure the farm later.
Click Next.
9. On the Ready to Install page, click Install. A progress indicator page appears.
10. When the installation is complete, click Finish. You are prompted to restart the computer for the configuration changes to take effect.
To configure firewalls manuallyTo enable users to connect to virtual desktops, you must configure your firewall as follows:
For communication between endpoint devices and virtual desktops:
• %Program Files%\Citrix\ICAService\picaSvc.exe requires inbound TCP on port 1494. Because this connection uses a kernel driver, you may need to configure this setting as a port exception rather than a program exception, depending on your firewall software. If you are running Windows Firewall, you must configure this setting as a port exception.
• %Program Files%\Citrix\ICAService\CitrixCGPServer.exe requires inbound TCP on port 2598
56 Desktop Delivery Controller Administrator’s Guide
For communication between controllers and virtual desktops:
%Program Files%\Citrix\XenDesktop\WorkstationAgent.exe requires inbound HTTP (http.sys) on the TCP/IP port you configured at installation time. Because this connection uses a kernel driver, you may need to configure this setting as a port exception rather than a program exception, depending on your firewall software. If you are running Windows Firewall, you must configure this setting as a port exception.
Installing the Citrix Desktop ReceiverFor information on the client options available for Desktop Delivery Controller, see “Client Software” on page 25.
To install the Citrix Desktop Receiver1. Log on to the endpoint device as a user with local administrator rights.
2. Insert the Desktop Delivery Controller installation media in the appropriate drive.
If the Welcome page does not appear automatically, use Windows Explorer to open Autorun.exe.
3. Click Install Optional Components.
4. On the next page, click Install Clients.
A wizard guides you through the installation process. For details of the wizard, and of the additional steps you need to take to enable the endpoint device to run a desktop in full-screen-only mode, see the Citrix Desktop Receiver Embedded Edition Release Note.
Adding Controllers to Your FarmAfter you install your first controller and create a farm, as described in “Installing Desktop Delivery Controller on a Single Server” on page 49, you can add controllers to the farm.
Before you start adding a controller to a farm, ensure that you know the details of the farm data store, because you have to specify these during installation.
Citrix recommends that Desktop Delivery Controller installation be carried out by a domain user with local administrator rights. Before you start the installation process, ensure that you read “Using Active Directory with Desktop Delivery Controller” on page 17, and that the necessary Active Directory permissions are in place.
5 Installing Desktop Delivery Controller 57
To add a controller to a farm1. Insert the Desktop Delivery Controller installation media in the appropriate
drive.
If the Welcome page does not appear automatically, use Windows Explorer to open Autorun.exe.
2. On the Welcome page, click Install Server Components.
The End User License Agreement appears.
3. Select I accept the license agreement, then click Next.
You cannot click Back on this page. To change the installation option you chose, you must click Cancel, then restart the installation.
4. On the Select Components page, clear the check boxes for any components you do not want to install on this server. As a guideline, if licensing and the management consoles are already installed on at least one other controller in the farm, you do not need to install them again.
5. On the Create or Join a Farm page, select Join existing farm.
6. Type the name of any controller that is already in the farm. This must be the NetBIOS name, not the DNS name; for example, serversc, rather than serversc.eng.glarox.net.
Click Next.
7. On the Optional Server Configuration page, you must specify where the farm data store is.
If the farm data store is on a controller in the farm, leave the check box cleared.
If the farm data store is on a separate database server, select the check box. You are prompted for the server’s details; make sure you specify the same database server for all controllers in the farm.
Click Next.
8. On the Start Installation page, click Next. A progress indicator page appears that shows you the installation progress for each component.
Note: Near the end of the installation, you may be prompted to restart your server. To complete the installation, the user who started the installation must log on to the server. If you are installing from a network share, you may need to connect to your network share after restarting for the installation to continue.
58 Desktop Delivery Controller Administrator’s Guide
When installation is complete, click Next.
9. On the Setup Complete page, click Finish.
Installing the Management Consoles SeparatelyYou can manage your deployment remotely by installing the Access Management Console and the Presentation Server Console separately from the controllers. You must install both consoles on the same computer.
To install the management consoles on a separate computer1. Insert the Desktop Delivery Controller installation media in the appropriate
drive.
If the Welcome page does not appear automatically, use Windows Explorer to open Autorun.exe.
2. Click Install Optional Components.
3. On the next page, click Install Management Consoles.
The End User License Agreement appears.
4. Select I accept the license agreement, then click Next.
You cannot click Back on this page. To change the installation option you chose, you must click Cancel, then restart the installation.
5. On the Select Components page, ensure that Citrix Management Consoles is selected, then click Next.
6. On the Start Installation page, click Next. A progress indicator page appears that shows you the installation progress for each component. When installation is complete, click Next.
7. On the Setup Complete page, if you do not want to start the Access Management Console, clear the check box.
8. Click Finish. If you chose to start the Access Management Console, the console appears and the discovery process starts. For further details about this, see “Starting the Access Management Console” on page 59.

5 Installing Desktop Delivery Controller 59
Starting the Access Management ConsoleTo run the Access Management Console, click Start > All Programs > Citrix > Management Consoles > Access Management Console.
The first time you start the console after installing it, the Configure and Run Discovery wizard starts automatically. The discovery process checks your Citrix environment for the addition or removal of objects and devices.
To configure and run discovery1. On the Welcome page of the wizard, click Next.
2. On the Select Products or Components page, click Next.
3. On the Select Controllers page, add the name of one of the controllers in the farm or just click Add Local Computer. Click Next.
4. On the Preview Discovery page, ensure that the correct information appears, then click Next.
5. When discovery is complete, click Finish. The Access Management Console can now display all the contents of your farm and is ready for you to begin any Desktop Delivery Controller management tasks you need to carry out.
Uninstalling Desktop Delivery ControllerUninstalling Controller ComponentsTo uninstall Desktop Delivery Controller or any particular components of it that you have installed, use the Add or Remove Programs option in the Windows Control Panel.
To remove all components1. Remove the controller entry from the farm OU. To do this, use the
ADSetup command-line tool as described in “Configuring Active Directory Using ADSetup” on page 90.
2. On the Windows Control Panel Add or Remove Programs page, select Citrix Desktop Delivery Controller.
Caution: There are likely to be other programs related to Citrix and Desktop Delivery Controller listed on this page. Ensure that you select only Citrix Desktop Delivery Controller.
60 Desktop Delivery Controller Administrator’s Guide
3. Click Change/Remove.
4. On the Remove Options page, select to remove all components, then click Next.
5. On the Start Removal page, click Next.
A progress indicator page appears. This lists the installed components and displays progress as each one is removed.
6. During the removal process you are prompted to restart the computer.
7. After all components are removed, the Setup Complete page appears. A list of prerequisite items that were not removed appears. Note any items that you want to remove manually, then click Finish.
Note: To uninstall a controller that is not available (for example it may have experienced a hardware fault), run ADSetup on another controller to remove the unavailable controller from the farm, then remove the controller using the Access Management Console.
To remove selected components1. On the Windows Control Panel Add or Remove Programs page, select
Citrix Desktop Delivery Controller.
Caution: There are likely to be many other programs related to Citrix and Desktop Delivery Controller listed on this page. Ensure that you select only Citrix Desktop Delivery Controller.
2. Click Change/Remove.
3. On the Remove Options page, select to remove selected components, then click Next.
4. The Select Components page appears. The components present on your controller are listed, with a cleared check box next to each one. To remove a component, select the relevant check box.
After you select all the components you want to remove, click Next.
5. On the Start Removal page, click Next.
A progress indicator page appears. This lists the installed components and displays progress as each one is removed.
6. During the removal process you are prompted to restart the computer.
5 Installing Desktop Delivery Controller 61
7. After all components are removed, the Setup Complete page appears. A list of prerequisite items that were not removed is displayed. Note any items that you want to remove manually, then click Finish.
Uninstalling the Virtual Desktop AgentTo uninstall the Virtual Desktop Agent, use the Add or Remove Programs option in the Windows Control Panel.
To uninstall the Virtual Desktop Agent1. On the Windows Control Panel Add or Remove Programs page, select
Citrix Virtual Desktop Agent, then click Remove.
2. Confirm that you want to remove the Virtual Desktop Agent by clicking Yes. A progress indicator appears.
3. When removal is complete, you are prompted to restart your system.

62 Desktop Delivery Controller Administrator’s Guide
6
Working with Virtual Desktop Groups
OverviewThis section describes how to create and update the virtual desktop groups that you want to deliver to your users. Virtual desktop groups consist of virtual desktops that are pooled, pre-assigned, or assigned on first use. Each group can contain only one type of desktop.
Virtual desktops in pooled groups are allocated to users on a per-session, first-come-first-served basis. You can configure pools of VMs so that any change that the user makes to the desktop during a session is lost when the user logs off from the desktop; for information about how to do this, see the documentation for the relevant VM plug-in.
Virtual desktops in pre-assigned groups are permanently assigned to an individual user as soon as the group is created. Whenever a user requests a desktop, they are always connected to the same one. As a result, the user can safely customize the desktop to suit his or her own needs.
Virtual desktops in assigned-on-first-use groups are permanently assigned to the first user to connect to them. As with pre-assigned desktops, the user can then safely customize the desktop.
Virtual desktops can run on PCs, blades, or virtual machines (VMs) provided through a virtualization infrastructure. The process of creating desktop groups is very similar in both cases, but for VM-based groups, the following steps and features are added to the process:
• You have to specify the details of the server that hosts the VMs and the credentials to use when connecting to it.
• You can maintain an idle pool of pooled desktops. A defined number of VMs is kept in a powered-on state ready for users to connect. Other VMs that are not in use, and not in maintenance mode, are kept powered off. Maintenance mode is a state you can enable from the Access Management Console: connections to a desktop are temporarily prevented so that you
64 Desktop Delivery Controller Administrator’s Guide
can carry out maintenance tasks on it. See “Putting Virtual Desktops into Maintenance Mode” on page 82 for further information.
• You can configure what happens to VMs when a user logs off. Depending on the type of desktop, VMs can be made available immediately to other users, restarted, shut down, or suspended. You can also configure what happens if an assigned VM is disconnected.
All tasks described in this section are available only to full administrators. For information about the differences between full and delegated Desktop Delivery Controller administrators, and how to create administrators, see “Delegating Desktop Delivery Controller Administration Tasks” on page 76.
To Create a VM-Based Desktop Group1. Ensure that you are logged on to an account with full administrator
permissions.
2. In the console tree, select Desktop Groups.
3. From Common Tasks, select Create desktop group.
The Create Desktop Group wizard guides you through the process of creating a desktop group.
4. On the Welcome page, click Next.
5. On the Assignment Type page, select the type of desktops this group will consist of: pooled or assigned. If you select assigned, you must then select whether the desktops will be assigned on first use or pre-assigned to a specific user. Click Next.
Note: You cannot change the assignment type of a group after you create it.
6. On the Hosting Infrastructure page, select the hosting infrastructure for your desktops. Click Next.
Note: There is a guide for each hosting infrastructure plug-in supported by Desktop Delivery Controller. You can download these guides from http://support.citrix.com/product/xd/v2.0/#tab-doc.
7. On the Logon Information page, specify the address and user credentials for logging on to the server in your hosting infrastructure. Click Next.
8. The page that appears depends on the desktop group’s assignment type.
6 Working with Virtual Desktop Groups 65
For pooled or assign-on-first-use desktop groups, the Virtual Desktops page appears, prompting you to select the VMs whose desktops will be delivered to your users. For pre-assigned groups, the Virtual Desktops and Users page appears, prompting you to both select VMs and assign users to them.
You can add information by:
• Selecting VMs from the hosting infrastructure. To do this, click Add and select VMs from the list that appears. Where possible, the system then maps VM names to Active Directory computer accounts. If this is not possible, you must add the Active Directory computer account yourself. To do this, select the relevant line, click Edit, then from the Active Directory browser, select the correct account.
• Importing data from a file. For further details of importing data, see “To import data from a file” on page 70.
If you do not select any VMs or users, the desktop group is disabled.
9. For pooled and assign-on-first-use desktop groups, the Users page then appears. Add the users that will have access to this desktop group, then click Next. If you do not select any users, the desktop group is disabled.
For pre-assigned desktop groups, the wizard continues at the next step.
10. On the Desktop Group Name page, type the name and, optionally, a description that you want to be displayed to users of this group. Click Next.
11. On the Icon page, the current icon for this desktop group appears. If you want users to see a different icon, click Change Icon and select a new icon. Click Next.
12. On the Publishing Options page, if you do not want the desktop group to be available to users immediately, select the Disable desktop group initially check box. You can enable it later by updating the desktop group’s property page; the relevant check box is on the Desktop Group Name page.
You can also choose to modify the advanced settings for the desktop group. These comprise the following:
• Access Control. The default is to allow all connections to desktops in this group. You can modify this to restrict allowed connections to those that meet the criteria of specified Access Gateway filters.
• Idle pool settings. These settings are available only for pooled desktop groups. They enable you to configure the number of VMs to be kept in a powered-on state ready for users to connect. Other VMs
66 Desktop Delivery Controller Administrator’s Guide
that are not in use, and not in maintenance mode, are kept powered off.
If you do not want to maintain an idle pool, set the idle desktop count for all periods to 0.
• Logoff behavior. These settings enable you to configure what happens when the user logs off from a VM. For assigned desktops, you can also configure what happens if a session is disconnected.
For pooled desktops, by default, the VM becomes available to other users as soon as the current user logs off. Any change made to the system by the most recent user is retained, so this option is usually appropriate only for desktops that users cannot customize. Alternatively, you can use your hosting infrastructure to revert the VM to a clean state then restart it before making it available to other users.
For assigned desktops, the default is that when the user logs off, the VM is left powered on and ready for the user to reconnect to. Alternatively, you can specify that either of the following actions should be taken five minutes after the user logs off:
• Suspend the VM until the next time the user tries to reconnect to it.
• Shut down the VM. It will be restarted the next time the user tries to reconnect to it. Choosing this option keeps disk usage on the hosting infrastructure to a minimum. The disadvantage is that subsequent reconnections will be slower because they need to wait for the operating system to start up.
If you specify that an assigned VM should be suspended or shut down when the user logs off, you can choose to leave it powered on if the session is disconnected. By default, the VM is suspended if the session is disconnected.
• Client options. You can modify
• The colors for the virtual desktops in this group, which default to true color (24 bit). True color is the maximum supported.
• The client encryption setting (SecureICA). The default is128-bit. For full details of SecureICA settings, see the Citrix Presentation Server Administrator’s Guide.
Click Finish. All the objects and details you entered in the wizard appear in the console tree.
6 Working with Virtual Desktop Groups 67
To Create a PC- or Blade-Based Desktop Group1. Ensure that you are logged on to an account with full administrator
permissions.
2. In the console tree, select Desktop Groups.
3. From Common Tasks, select Create desktop group.
The Create Desktop Group wizard guides you through the process of creating a desktop group.
4. On the Welcome page, click Next.
5. On the Assignment Type page, select the type of desktops this group will consist of: pooled or assigned. If you select assigned, you must then select whether the desktops will be assigned on first use or pre-assigned to a specific user. Click Next.
Note: You cannot change the assignment type of a group after you create it.
6. On the Hosting Infrastructure page, select None, then click Next.
7. The page that appears depends on the desktop group’s assignment type.
For pooled or assign-on-first-use desktop groups, the Virtual Desktops page appears. You can select the computers that will provide the virtual desktops for the group either by clicking Add and using the Active Directory object picker, or by importing data from a file. For further details of importing data, see “To import data from a file” on page 70.
For pre-assigned desktop groups, the Virtual Desktops and Users page appears. You can select both computers and the users to assign to them either through the Active Directory object picker or by importing data from a file as above.
If you do not select any computers or users, the desktop group is disabled.
8. For pooled and assign-on-first-use desktop groups, the Users page appears. Add the users that will have access to this desktop group, then click Next. If you do not select any users, the desktop group is disabled.
For pre-assigned desktop groups, the wizard continues at the next step.
9. On the Desktop Group Name page, type the name and, optionally, a description that you want to be displayed to users of this group. Click Next.
68 Desktop Delivery Controller Administrator’s Guide
10. On the Icon page, the current icon for this desktop group appears. If you want users to see a different icon, click Change Icon and select a new icon. Click Next.
11. On the Publishing Options page, if you do not want the desktop group to be available to users immediately, select the Disable desktop group initially check box. You can enable it later by updating the desktop group’s property page; the relevant check box is on the Desktop Group Name page.
You can also choose to modify the advanced settings for the desktop group. These comprise the following:
• Access Control. The default is to allow all connections to desktops in this group. You can modify this to restrict allowed connections to those that meet the criteria of specified Access Gateway filters.
• Client options. You can modify
• The colors for the virtual desktops in this group, which default to true color (24 bit). True color is the maximum supported.
• The client encryption setting (SecureICA). The default is128-bit. For full details of SecureICA settings, see the Citrix Presentation Server Administrator’s Guide.
Click Finish. All the objects and details you entered in the wizard appear in the console tree.
Importing and Exporting Virtual Desktop and User Assignment Data
You can assign virtual desktops and users by importing data from a file. This file can contain data from Desktop Delivery Controller or from Desktop Server 1.0. You can also export desktop and user assignment data to a file. These files must have the following characteristics:
• They must be .csv files.
• The first line in the file must contain the column headings, which can be:
[ADComputerAccount],[AssignedUser],[VirtualMachine],[HostId] for a Desktop Delivery Controller 2.0 file
or
[WorkstationName],[IsWorkstationEnabled],[Pre-AllocatedUser] for a file exported from Desktop Server 1.0
6 Working with Virtual Desktop Groups 69
The column headings can be in any order, but they must be comma-separated.
• The subsequent lines contain the appropriate data, also comma-separated:
• The ADComputerAccount entries (or workstation names, for Desktop Server 1.0) can be any of the following:
• Common names (for example computer01)
• IP addresses (for example 10.50.10.80)
• Distinguished names (for example computer01.mydomain.com)
• Domain and computer name pairs (for example mydomain\computer01)
• The contents of the IsWorkStationEnabled column are ignored. This column contains data if the file is created by exporting data from Desktop Server 1.0, but this data is not used by Desktop Delivery Controller.
• The AssignedUser column entries (or Pre-AllocatedUser column, for Desktop Server 1.0) can be any of the following:
• Common names (for example user01)
• Distinguished names (for example user01.mydomain.com)
• Domain and user name pair (for example mydomain\user01)
• The VirtualMachine and HostId columns are required only for data about VM-based groups.
You can find sample files on the Desktop Delivery Controller installation media in \support\ImportExport.
Note: Desktop Server 1.0 data can be used only to update PC- or blade-based desktop groups.
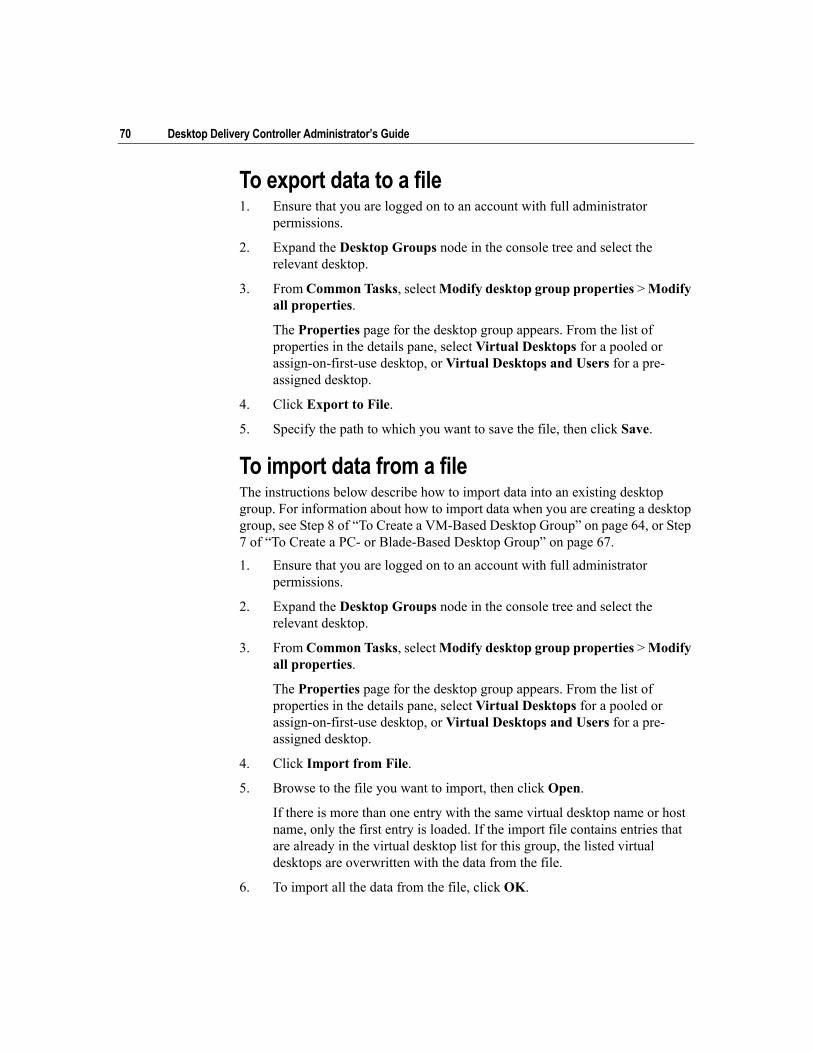
70 Desktop Delivery Controller Administrator’s Guide
To export data to a file1. Ensure that you are logged on to an account with full administrator
permissions.
2. Expand the Desktop Groups node in the console tree and select the relevant desktop.
3. From Common Tasks, select Modify desktop group properties > Modify all properties.
The Properties page for the desktop group appears. From the list of properties in the details pane, select Virtual Desktops for a pooled or assign-on-first-use desktop, or Virtual Desktops and Users for a pre-assigned desktop.
4. Click Export to File.
5. Specify the path to which you want to save the file, then click Save.
To import data from a fileThe instructions below describe how to import data into an existing desktop group. For information about how to import data when you are creating a desktop group, see Step 8 of “To Create a VM-Based Desktop Group” on page 64, or Step 7 of “To Create a PC- or Blade-Based Desktop Group” on page 67.
1. Ensure that you are logged on to an account with full administrator permissions.
2. Expand the Desktop Groups node in the console tree and select the relevant desktop.
3. From Common Tasks, select Modify desktop group properties > Modify all properties.
The Properties page for the desktop group appears. From the list of properties in the details pane, select Virtual Desktops for a pooled or assign-on-first-use desktop, or Virtual Desktops and Users for a pre-assigned desktop.
4. Click Import from File.
5. Browse to the file you want to import, then click Open.
If there is more than one entry with the same virtual desktop name or host name, only the first entry is loaded. If the import file contains entries that are already in the virtual desktop list for this group, the listed virtual desktops are overwritten with the data from the file.
6. To import all the data from the file, click OK.
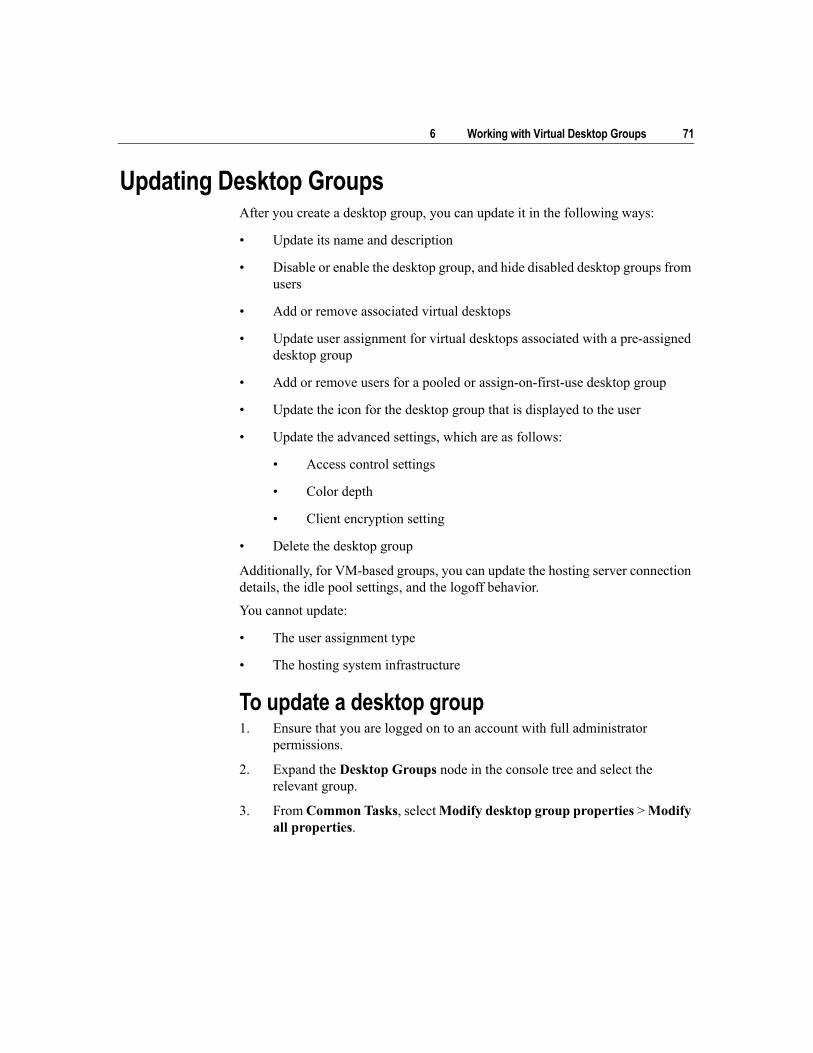
6 Working with Virtual Desktop Groups 71
Updating Desktop GroupsAfter you create a desktop group, you can update it in the following ways:
• Update its name and description
• Disable or enable the desktop group, and hide disabled desktop groups from users
• Add or remove associated virtual desktops
• Update user assignment for virtual desktops associated with a pre-assigned desktop group
• Add or remove users for a pooled or assign-on-first-use desktop group
• Update the icon for the desktop group that is displayed to the user
• Update the advanced settings, which are as follows:
• Access control settings
• Color depth
• Client encryption setting
• Delete the desktop group
Additionally, for VM-based groups, you can update the hosting server connection details, the idle pool settings, and the logoff behavior.
You cannot update:
• The user assignment type
• The hosting system infrastructure
To update a desktop group1. Ensure that you are logged on to an account with full administrator
permissions.
2. Expand the Desktop Groups node in the console tree and select the relevant group.
3. From Common Tasks, select Modify desktop group properties > Modify all properties.
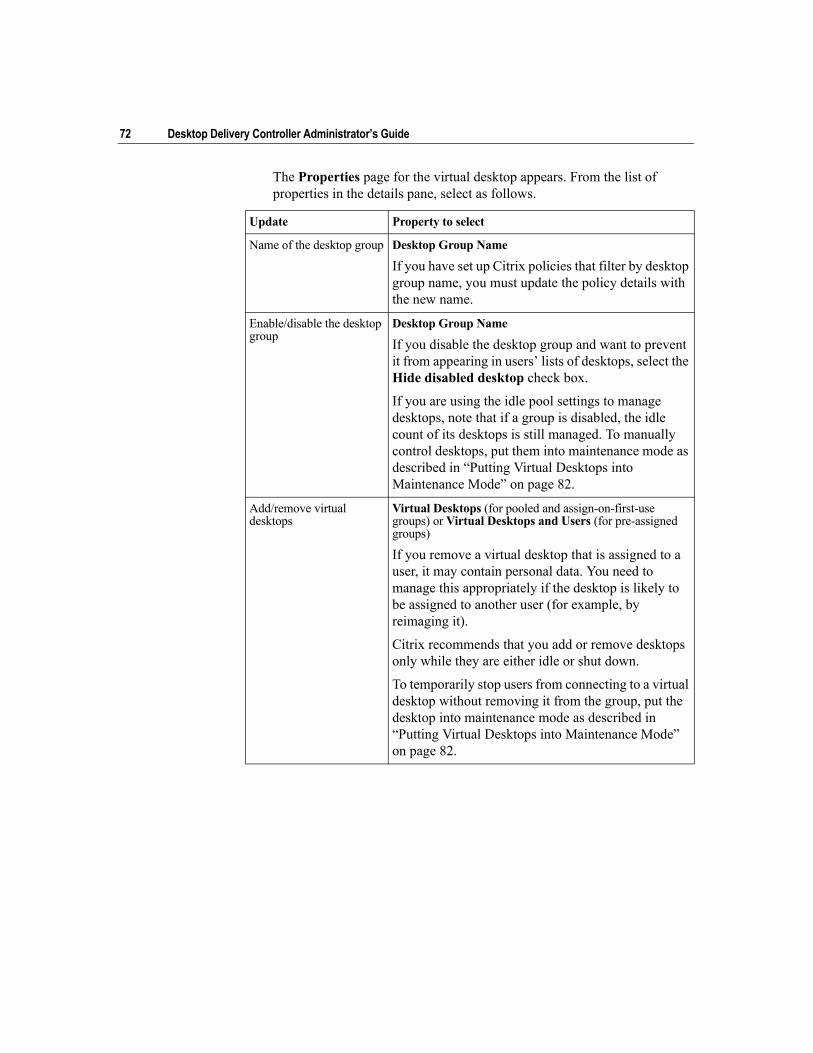
72 Desktop Delivery Controller Administrator’s Guide
The Properties page for the virtual desktop appears. From the list of properties in the details pane, select as follows.
Update Property to select
Name of the desktop group Desktop Group Name
If you have set up Citrix policies that filter by desktop group name, you must update the policy details with the new name.
Enable/disable the desktop group
Desktop Group Name
If you disable the desktop group and want to prevent it from appearing in users’ lists of desktops, select the Hide disabled desktop check box.
If you are using the idle pool settings to manage desktops, note that if a group is disabled, the idle count of its desktops is still managed. To manually control desktops, put them into maintenance mode as described in “Putting Virtual Desktops into Maintenance Mode” on page 82.
Add/remove virtual desktops
Virtual Desktops (for pooled and assign-on-first-use groups) or Virtual Desktops and Users (for pre-assigned groups)
If you remove a virtual desktop that is assigned to a user, it may contain personal data. You need to manage this appropriately if the desktop is likely to be assigned to another user (for example, by reimaging it).
Citrix recommends that you add or remove desktops only while they are either idle or shut down.
To temporarily stop users from connecting to a virtual desktop without removing it from the group, put the desktop into maintenance mode as described in “Putting Virtual Desktops into Maintenance Mode” on page 82.
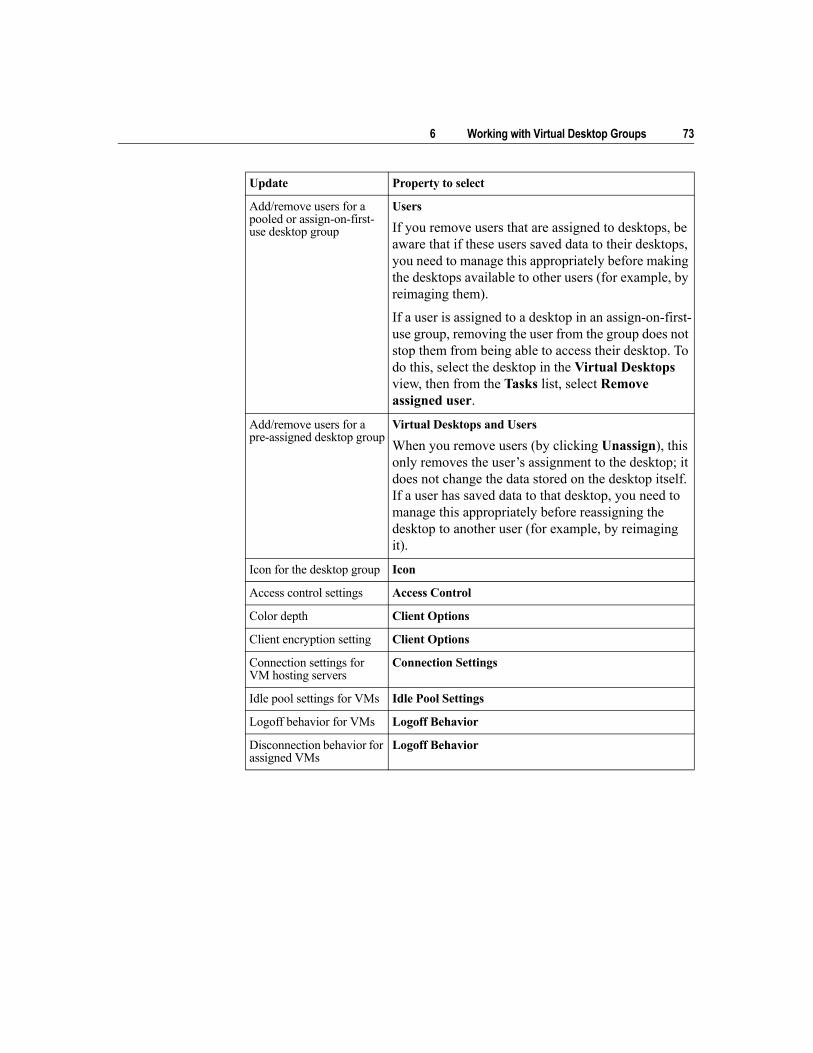
6 Working with Virtual Desktop Groups 73
Add/remove users for a pooled or assign-on-first-use desktop group
Users
If you remove users that are assigned to desktops, be aware that if these users saved data to their desktops, you need to manage this appropriately before making the desktops available to other users (for example, by reimaging them).
If a user is assigned to a desktop in an assign-on-first-use group, removing the user from the group does not stop them from being able to access their desktop. To do this, select the desktop in the Virtual Desktops view, then from the Tasks list, select Remove assigned user.
Add/remove users for a pre-assigned desktop group
Virtual Desktops and Users
When you remove users (by clicking Unassign), this only removes the user’s assignment to the desktop; it does not change the data stored on the desktop itself. If a user has saved data to that desktop, you need to manage this appropriately before reassigning the desktop to another user (for example, by reimaging it).
Icon for the desktop group Icon
Access control settings Access Control
Color depth Client Options
Client encryption setting Client Options
Connection settings for VM hosting servers
Connection Settings
Idle pool settings for VMs Idle Pool Settings
Logoff behavior for VMs Logoff Behavior
Disconnection behavior for assigned VMs
Logoff Behavior
Update Property to select
74 Desktop Delivery Controller Administrator’s Guide
To delete a desktop group1. In the console tree, select the group you want to delete.
2. From Common Tasks, select Delete desktop group.
When you delete a desktop group, all the desktops are removed from the group. The desktops themselves are not deleted, and no data stored on them is deleted automatically: ensure that you manage this data appropriately before making the desktops available to other users. If users were assigned to the desktops, the links between the users and the desktops are deleted.
7
Customizing Your Desktop Delivery Controller Environment
OverviewAfter you carry out the initial setup tasks for Desktop Delivery Controller, you should consider ways in which you can customize and optimize your deployment:
• Create additional administrators for the farm, if necessary. See “Creating Administrators” on page 76 for details.
• Set up any Citrix policies that you require, using the Presentation Server Console. See the Citrix Presentation Server Administrator’s Guide for details of configuring policies. Note the following points in relation to Desktop Delivery Controller:
• You can set up policies that filter on virtual desktop group name. If you rename the desktop group, you must update the policy with the new name.
• You cannot filter polices on server name.
• To restrict access to USB drives, set up a drive mapping policy with Turn off USB disk drives selected.
• Optimize the user experience by ensuring that settings for desktops and users are appropriate. See “Optimizing the User Experience” on page 77.
• Set up printers. See the Citrix Presentation Server Administrator’s Guide for details of setting up and managing printers. In Desktop Delivery Controller, the following XenApp printer management features are not available:
• Driver replication, compatibility, and mapping
• Support for legacy Windows CE and DOS clients that cannot correctly report which printers are attached to the endpoint device

76 Desktop Delivery Controller Administrator’s Guide
• Control of the total bandwidth limit of all printing connections to a particular controller
Creating AdministratorsTo manage your Desktop Delivery Controller environment efficiently, you may need to create additional administrators. You may also need to delegate Active Directory permissions to these administrators.
Delegating Active Directory Access ControlActive Directory is used to store information about the controllers in a farm. To add or remove controllers, administrators need certain Active Directory rights. For further information about this, see “Using Active Directory with Desktop Delivery Controller” on page 17.
Delegating Desktop Delivery Controller Administration TasksWhen you install Desktop Delivery Controller, you are automatically created as a full administrator with authority to manage and administer all areas of Desktop Delivery Controller farm management. You can then start the Access Management Console and create further full or delegated administrators. Delegated administrators can view all information in the Desktop Delivery Controller extension of the console and they can also:
• Send messages to users
• Disconnect users
• Log off users
• Put virtual desktops into maintenance mode and remove them from maintenance mode
• Start, stop, suspend, and resume virtual machines
To add an administrator, select Administrators in the console tree, and in the task pane, select Add administrator. The Add Citrix Administrator wizard guides you through the steps involved in creating a new full or delegated administrator.
Administrators who will run the Access Management Console remotely must have DCOM remote launch permissions. For information about this, seehttp://support.citrix.com/article/CTX109977.
7 Customizing Your Desktop Delivery Controller Environment 77
Optimizing the User ExperienceThis topic describes how to:
• Configure time zone settings to allow users to see their local time when using desktops.
• Configure connection timers to provide appropriate durations for uninterrupted connections, idle sessions, and disconnected sessions.
• Disable RDP, because the use of RDP can interfere with the operation of ICA.
• Remove the Shut Down command to prevent users from powering off their desktops, which would then need to be restarted manually by an administrator. This is not necessary for VM-based desktop groups.
To provide the best user experience, you should also consider preinstalling frequently used software, such as a Flash player or other browser plug-ins in your virtual desktops. Also consider enabling Microsoft ClearType or other font-smoothing technologies by default in users’ profiles.
Configuring Time Zone SettingsBy default, when non-privileged users connect to Windows XP virtual desktops, they see the time zone of the system running the desktop instead of the time zone of their own endpoint device. To allow them to see their local time when using these virtual desktops you need to give them rights to:
• Change the time on the system on which the desktop is running. To do this, set up a Group Policy with rights given to non-privileged users to change system time settings. For further information about how to do this, see http://msdn2.microsoft.com/en-us/library/ms813808.aspx.
• Change the time zone registry area. For information about how to do this, see http://support.microsoft.com/kb/300022.
After you do this, users who connect to Windows XP virtual desktops see their local time zone reflected in the desktop. When they log off or disconnect, the time zone of the desktop is reset to what it was before they logged on.
Note: Users who want to see their local time when using Windows Vista virtual desktops must have the Change the time zone privilege. This privilege is granted by default.
78 Desktop Delivery Controller Administrator’s Guide
Configuring Connection TimersYou can configure three connection timers:
• A maximum connection timer. This setting determines the maximum duration of an uninterrupted connection between an endpoint device and a virtual desktop. By default, this setting is disabled.
• A connection idle timer. This setting determines how long an uninterrupted endpoint device connection to a virtual desktop will be maintained if there is no input from the user. By default, this is set to 1440 minutes (24 hours).
• A disconnect timer. This setting determines how long a disconnected, locked virtual desktop can remain locked before the session is logged off. By default, this setting is disabled.
If you need to update any of these settings, it is your responsibility to ensure that settings are consistent across your deployment.
Note: These settings are configurable only through registry keys on the computer hosting the virtual desktop.
After you update any of these settings, you must restart the computer hosting the virtual desktop for the new setting to take effect.
Caution: Using Registry Editor incorrectly can cause serious problems that can require you to reinstall the operating system. Citrix cannot guarantee that problems resulting from incorrect use of Registry Editor can be solved. Use Registry Editor at your own risk. Make sure you back up the registry before you edit it.
To enable the maximum connection timer, create the following registry key (DWORD):
HKEY_LOCAL_MACHINE\SOFTWARE\Citrix\PortICA\Session\ConnectionTimer\enabled
and set the key to 1. To disable the timer, set the key to 0.
To update the maximum connection timer, create the following registry key (DWORD):
HKEY_LOCAL_MACHINE\SOFTWARE\Citrix\PortICA\Session\ConnectionTimer\MaxConnectionTime
and set the maximum connection time in minutes.
7 Customizing Your Desktop Delivery Controller Environment 79
To enable the connection idle timer, create the following registry key (DWORD):
HKEY_LOCAL_MACHINE\SOFTWARE\Citrix\PortICA\Session\IdleTimer\\enabled
and set the key to 1. To disable the timer, set the key to 0.
To update the connection idle timer, create the following registry key (DWORD):
HKEY_LOCAL_MACHINE\SOFTWARE\Citrix\PortICA\Session\IdleTimer\\MaxIdleTime
and set the maximum idle time in minutes.
To enable the disconnect timer, create the following registry key (DWORD):
HKEY_LOCAL_MACHINE\SOFTWARE\Citrix\PortICA\Session\DisconnectTimer\enabled
and set the key to 1. To disable the timer, set the key to 0.
To update the disconnect timer, create the following registry key (DWORD):
HKEY_LOCAL_MACHINE\SOFTWARE\Citrix\PortICA\SessionDisconnectTimer\MaxDisconnectTime
and set the maximum time in minutes to wait before logging off a disconnected session.
Disabling RDPIf a user makes an RDP connection to a virtual desktop, an ICA connection is not possible until either a user logs on interactively on the console of the computer hosting the virtual desktop or the computer is restarted. Disconnecting the RDP session or logging off from RDP is not sufficient. To avoid this issue, consider disabling RDP as described inhttp://technet.microsoft.com/en-us/library/bb457106.aspx.
Removing the Shut Down CommandCitrix recommends that you apply this Microsoft policy to all Desktop Delivery Controller users.
This prevents users from selecting Shut Down within a virtual desktop session and powering off the desktop, which would require manual intervention from the system administrator.
Locate this policy under User Configuration\Administrative Templates\Start Menu & Taskbar\Remove and prevent access to the Shut Down command and set it to Enabled.

80 Desktop Delivery Controller Administrator’s Guide
8
Managing Your Deployment
OverviewThis section describes how to carry out the following tasks:
• Putting virtual desktops into maintenance mode.
• Managing sessions. You can view, disconnect, and log off sessions. You can also send messages to users.
• Manually controlling VMs.
• Migrating controllers to other farms.
• Migrating virtual desktops to other farms.
The details of all these tasks are described in the following topics.
Other general management tasks, such as configuring connections and securing farms, are described in detail in the Citrix Presentation Server Administrator’s Guide.
Note: In order to be able to interpret security identifiers (SIDs) for either machines or users, you need the appropriate rights to read this information in Active Directory. If you run the Access Management Console as a user without these rights, only SIDs appear in the console, not machine or user names. You are not prompted to enter alternative credentials.
82 Desktop Delivery Controller Administrator’s Guide
Putting Virtual Desktops into Maintenance ModeIf you want to temporarily stop connections to a desktop so that maintenance tasks can be carried out, you can put the desktop into maintenance mode. If the desktop is in a group that uses the idle pool settings, note that it will be entirely under manual control until you take it out of maintenance mode again.
To put a virtual desktop into maintenance mode1. Select the relevant desktop group.
2. Select the Virtual Desktops view so that all the desktops for that group are listed.
3. Select the relevant desktop.
4. From the task pane, select Enable maintenance mode.
No user can now log on to that desktop. If a user is logged on when you select maintenance mode, maintenance mode takes effect as soon as that user logs off. If a user tries to connect to an assigned desktop while it is in maintenance mode, a message appears telling them that the desktop is currently unavailable and to try reconnecting.
When a desktop is in maintenance mode, the Disable maintenance mode task becomes available. To take a desktop out of maintenance mode, select the desktop, then select Disable maintenance mode.
Managing SessionsTo view sessions for a desktop group1. Select the relevant desktop group in the console tree.
2. Select the Virtual Desktops In Use view.
To view all sessions for a particular user1. From the Search options in the tasks pane, select Advanced search.
The Advanced Search dialog box appears.
2. From the Find list, select Session by user.
3. Type the user name.
4. Select the relevant node of the console tree (for example, Desktop Groups).
5. Click Search.
8 Managing Your Deployment 83
To disconnect or log off a session1. From the Virtual Desktops In Use view, select the session.
2. From the task pane, select Disconnect or Logoff respectively.
If you log off a session, it closes and the desktop becomes available to other users, unless it is assigned to a specific user.
If you disconnect a session, the user’s applications continue to run and the desktop remains assigned to that user. If the user reconnects, the same desktop is assigned. You can configure a time-out to ensure that disconnected sessions are logged off automatically after a certain number of minutes; for further information about this, see “Configuring Connection Timers” on page 78.
It is good practice to notify users if you are about to disconnect or log off a session.
To send a message to users1. From the task pane, select Send message.
2. In the dialog box that appears, type your message, then click OK to send the message to all selected users.
Manually Controlling Virtual MachinesFor VM-based desktop groups, you can manually control VMs through the Access Management Console.
If you want to manually control the power state of a VM in a group that uses the idle pool settings, put it into maintenance mode.
To start virtual machines1. Select the relevant desktop group in the console tree.
2. From the Virtual Desktops view, select the relevant desktops.
3. To start powered-off or suspended VMs, from the Tasks list, select Start. The VMs are powered-on or resumed and the list of virtual desktops is refreshed to show the new state.
Note: If the hosting infrastructure does not support the power-on function, the Start task is not available.
84 Desktop Delivery Controller Administrator’s Guide
To shut down and restart virtual machines1. Select the relevant desktop group in the console tree.
2. From the Virtual Desktops view, select the relevant desktops.
3. From the Tasks list, select Shutdown/suspend.
The Shutdown/Suspend Virtual Machine dialog box appears.
4. Select from the following options. Depending on the state of the machine, some of these options may not be available:
• Shutdown. Requests the VM’s operating system to shut down.
Note: If the machine does not shut down within 10 minutes, it is powered off. If Windows attempts to install updates during shutdown, there is a risk that the machine will be powered off before the updates are complete.
• Power off. Forcibly powers off the VM and refreshes the list of virtual desktops.
• Shutdown and Restart. Requests the VM’s operating system to shut down and then start the VM again. If the operating system is unable to do this, the VM remains in its current state.
• Power off and Restart. Forcibly restarts the VM.
• Suspend. Pauses the VM without shutting it down and refreshes the list of virtual desktops.
Migrating Controllers to Other FarmsIf, for example, you want to move a controller from a test or pilot farm into production, you may need to migrate it to another farm. To do this, you need Active Directory permissions over the OU structure of both the controller’s existing farm and the controller’s new farm.
If you remove all the controllers from a farm, Citrix recommends that you delete the farm OU.
Citrix recommends that you do not move controllers to a farm created using an earlier version of Desktop Delivery Controller or Desktop Server; if you do this your farm may become unusable.
8 Managing Your Deployment 85
To migrate a controller to another farm1. Remove the controller from the old farm OU. To do this, use the ADSetup
tool with the REMOVECONTROLLER parameter, as described in “Configuring Active Directory Using ADSetup” on page 90.
2. Use the chfarm utility to either create a new farm (if this is the first controller in the farm) or move the controller to the new farm (if this is the second or subsequent controller in the farm). For further information on chfarm, see the Citrix Presentation Server Administrator’s Guide.
When using chfarm to move a controller to a new farm, make sure you configure the zone name, zone preference, and license server details correctly, because you cannot easily change these later.
3. Add the controller to the new farm OU. To do this, use the ADSetup tool with the ADDCONTROLLER parameter, as described in “Configuring Active Directory Using ADSetup” on page 90.
Migrating Virtual Desktops to Other Farms1. Remove the desktops from the desktop group in the old farm. For details of
how to do this, see “To update a desktop group” on page 71.
2. Note the farm GUID of the new farm. This is one of the read-only farm properties in the Access Management Console.
3. In the new farm, add the desktops to an existing or new desktop group. There are various ways in which you can do this; for details, see “Working with Virtual Desktop Groups” on page 63.
4. Apply the new farm’s GUID to the desktops. To do this, use Group Policy. The Desktop Delivery Controller Farm GUID policy enables you to use a generic virtual desktop image with multiple Desktop Delivery Controller deployments. The administrative template (ADM) file is supplied on the Desktop Delivery Controller installation media:
platform\lang\support\configuration\FarmGUID.adm
For information about how to use ADM files, consult your Active Directory documentation.
5. Check the registry to ensure that the group policy has propagated to the desktop computer, then restart the computer. This registers the desktop with a controller in the new farm. Until you do this, the desktop is not available to users.

86 Desktop Delivery Controller Administrator’s Guide
9
Command-Line Tools
Tools are provided to enable you to install controllers and virtual desktops from the command line. You can also use a command-line tool to configure Active Directory.
Installing Controllers Using Setup.exeThe Setup.exe file supports several command-line options for controlling the installation and removal of Desktop Delivery Controller.
If you control the installation through the command line, you must also configure Active Directory from the command line. For further information, see “Configuring Active Directory Using ADSetup” on page 90. You have to configure Active Directory not only when you create a new farm, but also when you add a controller to a farm.
Option Description
-quiet No user interface is presented. This is intended to support unattended installs.When you are using the -quiet option, the only evidence that the product is being installed is that the Setup.exe process can be seen running if you look in Windows Task Manager.
-showui Shows every dialog box in the user interface for every subinstall. This option is most useful when you need to deviate from the deployment scenarios supported by the user interface.
-passive Shows only the progress user interface. No user interaction is required if you use this option. If you are installing through a network share that requires authentication, the authentication process must not require the share to be explicitly mounted or credentials to be entered.
-createfarm <farm_name> Creates a new farm with the specified farm name.
88 Desktop Delivery Controller Administrator’s Guide
-edition <edition_name> The edition of XenDesktop for which you have licenses. Use this option when you are creating a new farm. Must be one of the following, in either uppercase or lowercase:STD (Standard edition)ADV (Advanced edition)ENT (Enterprise edition)PLT (Platinum edition)
-components <component_list> The components to install.<component_list> must be a comma-separated list of one or more of the following:DDC (the core Desktop Delivery Controller component)CONSOLES (the management consoles)LIC_SERVER (Citrix Licensing)
-joinfarm <controller> Adds this controller to an existing farm.<controller> is the name of a controller already in the farm. It must be the NetBIOS name, not the DNS name.
-licenseserver <server> The license server to use.
-dsnfilepath <path> The path to an ODBC DSN database configuration file. Use this option when you are specifying an existing SQL database.
-dbusername <user> The user name for accessing the database specified in -dsnfilepath.
-dbpassword <password> The password for accessing the database specified in -dsnfilepath.
-nosites Prevents the Web Interface and the default sites from being installed automatically when you select Desktop Delivery Controller for installation either through the command line or through the GUI menu.
-remove Removes the Desktop Delivery Controller component.
Option Description
9 89
ExamplesThe -passive option is an efficient way to install a large number of controllers compared with using the Installation wizard on individual controllers.
Example 1: Installing a Single Componentsetup.exe -passive -components CONSOLES
where CONSOLES (the management consoles) is the component you are installing.
Example 2: Installing all the Desktop Delivery Controller Components on a Single Serversetup.exe -passive -createfarm MyFarm-components DDC,LIC_SERVER,CONSOLES-edition STD
where:
MyFarm is the farm you are creating, DDC, LIC_SERVER, and CONSOLES are the components you are installing on the server, and you are licensed to use XenDesktop Standard Edition.
Example 3: Creating a New Controller and Adding it to a FarmThe following example shows how to create a new controller, installing only the core Desktop Deliver Controller component, and then add that controller to an existing farm that is using an external database on a separate server:
setup.exe -passive -joinfarm ele1985 -components DDC -dsnfilepath c:\MF20.dsn -dbusername alexco -dbpassword libby02
where:
ele1985 is an existing controller in the farm, DDC is the component you want to install, c:\MF20.dsn is the path to the dsn file, alexco is the user name for accessing the database, and libby02 is the password for accessing the database.
In this example the MF20.dsn file was copied to the server before the installation process started.
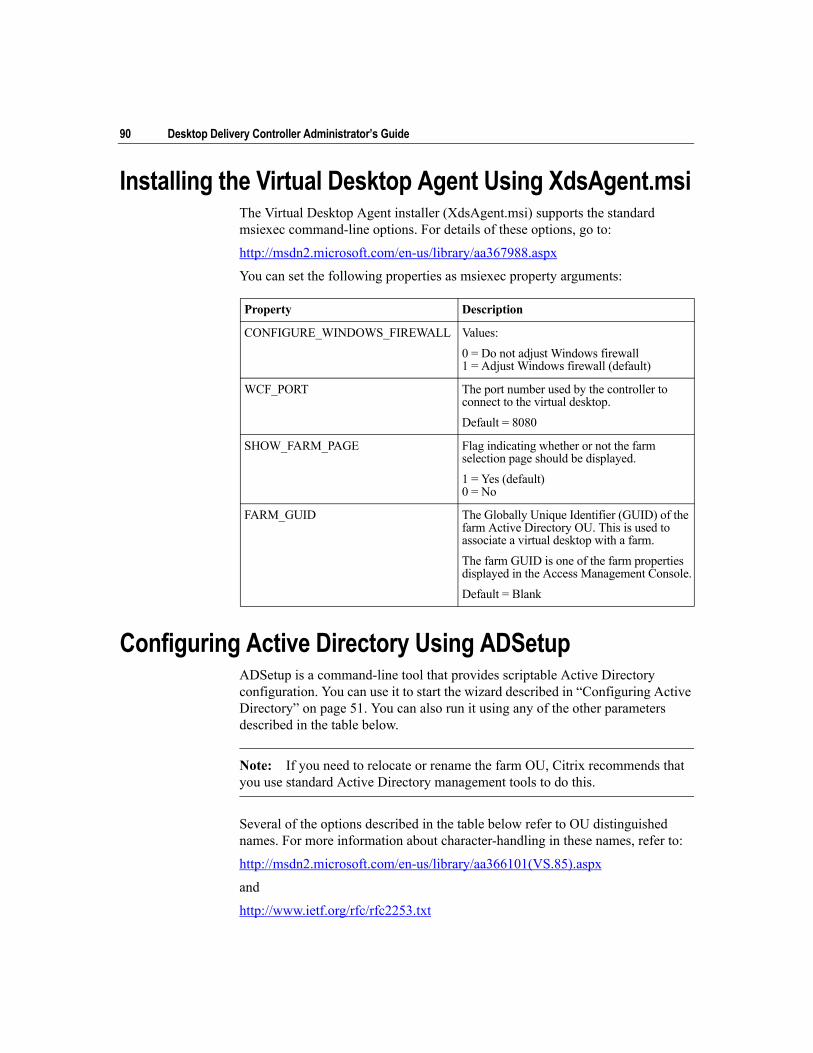
90 Desktop Delivery Controller Administrator’s Guide
Installing the Virtual Desktop Agent Using XdsAgent.msiThe Virtual Desktop Agent installer (XdsAgent.msi) supports the standard msiexec command-line options. For details of these options, go to:
http://msdn2.microsoft.com/en-us/library/aa367988.aspx
You can set the following properties as msiexec property arguments:
Configuring Active Directory Using ADSetupADSetup is a command-line tool that provides scriptable Active Directory configuration. You can use it to start the wizard described in “Configuring Active Directory” on page 51. You can also run it using any of the other parameters described in the table below.
Note: If you need to relocate or rename the farm OU, Citrix recommends that you use standard Active Directory management tools to do this.
Several of the options described in the table below refer to OU distinguished names. For more information about character-handling in these names, refer to:
http://msdn2.microsoft.com/en-us/library/aa366101(VS.85).aspx
and
http://www.ietf.org/rfc/rfc2253.txt
Property Description
CONFIGURE_WINDOWS_FIREWALL Values:0 = Do not adjust Windows firewall1 = Adjust Windows firewall (default)
WCF_PORT The port number used by the controller to connect to the virtual desktop.Default = 8080
SHOW_FARM_PAGE Flag indicating whether or not the farm selection page should be displayed.1 = Yes (default)0 = No
FARM_GUID The Globally Unique Identifier (GUID) of the farm Active Directory OU. This is used to associate a virtual desktop with a farm.The farm GUID is one of the farm properties displayed in the Access Management Console.Default = Blank
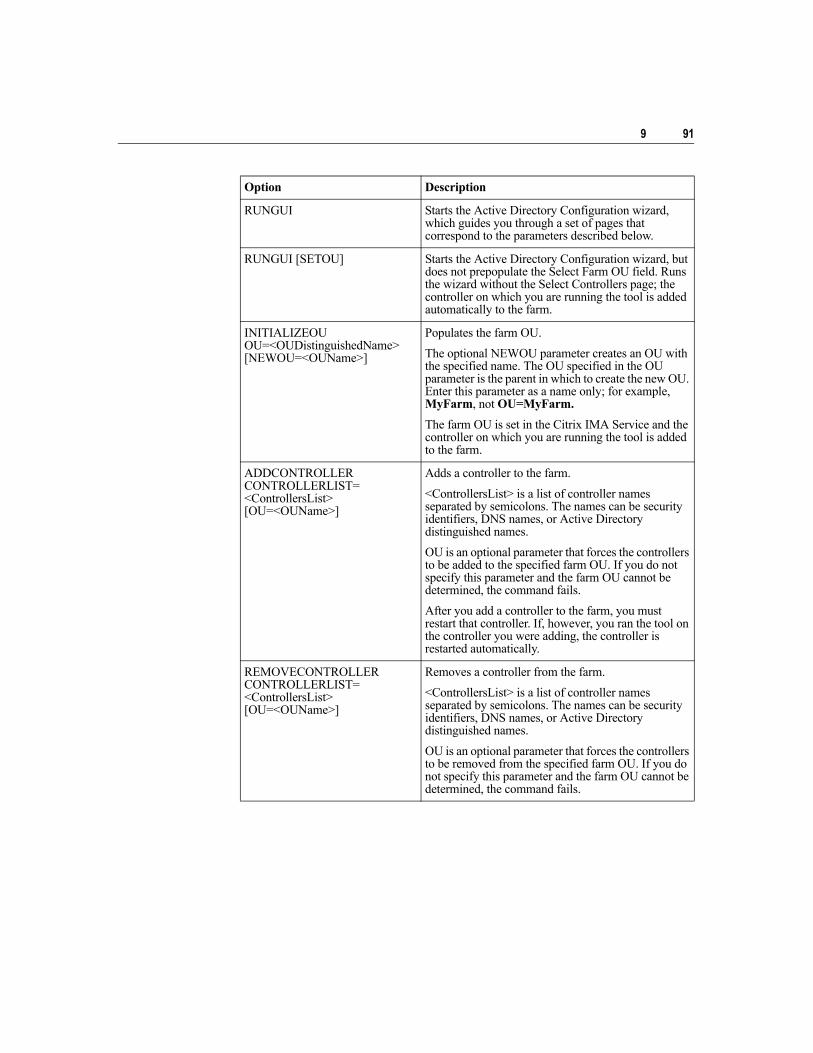
9 91
Option Description
RUNGUI Starts the Active Directory Configuration wizard, which guides you through a set of pages that correspond to the parameters described below.
RUNGUI [SETOU] Starts the Active Directory Configuration wizard, but does not prepopulate the Select Farm OU field. Runs the wizard without the Select Controllers page; the controller on which you are running the tool is added automatically to the farm.
INITIALIZEOU OU=<OUDistinguishedName> [NEWOU=<OUName>]
Populates the farm OU. The optional NEWOU parameter creates an OU with the specified name. The OU specified in the OU parameter is the parent in which to create the new OU. Enter this parameter as a name only; for example, MyFarm, not OU=MyFarm.The farm OU is set in the Citrix IMA Service and the controller on which you are running the tool is added to the farm.
ADDCONTROLLER CONTROLLERLIST=<ControllersList>[OU=<OUName>]
Adds a controller to the farm. <ControllersList> is a list of controller names separated by semicolons. The names can be security identifiers, DNS names, or Active Directory distinguished names.OU is an optional parameter that forces the controllers to be added to the specified farm OU. If you do not specify this parameter and the farm OU cannot be determined, the command fails.After you add a controller to the farm, you must restart that controller. If, however, you ran the tool on the controller you were adding, the controller is restarted automatically.
REMOVECONTROLLER CONTROLLERLIST=<ControllersList>[OU=<OUName>]
Removes a controller from the farm. <ControllersList> is a list of controller names separated by semicolons. The names can be security identifiers, DNS names, or Active Directory distinguished names.OU is an optional parameter that forces the controllers to be removed from the specified farm OU. If you do not specify this parameter and the farm OU cannot be determined, the command fails.

92 Desktop Delivery Controller Administrator’s Guide
Index 93
Index
AAccess Gateway
creating Web sites for remote access 20Access Management Console
starting 59Active Directory
configuring 51configuring using ADSetup 90containers 18delegating access control 76Organizational Units 17replication 19requirements 44security groups 18Service Connection Points 18using with Desktop Delivery Controller 17
administrator permissionsconfiguring 76
ADSetup command-line tool 90appliances
connecting from 29assigned-on-first-use desktops
definition 63
Bblade-based desktop groups
creating 67
CCitrix Desktop Receiver 26
installing 56Citrix Desktop Service 52Citrix Desktop Toolbar 26
overview 12Citrix ICA Service 52Citrix policies
creating 75
clientinstalling 56
client encryption settingconfiguring 66
colors for virtual desktopsmodifying 66
command-line parameters for Setup.exe 87connection timers
configuring 78connections to desktops
preventing temporarily 82controllers
adding to farms 56migrating to other farms 84system requirements 39
Ddata store requirements 40database requirements 40default Web sites
modifying 20overview 11
delegated administrationconfiguring 76
desktop appliance connector siteoverview 11
desktop privilegesplanning 22
discoveryrunning 59
domain-joined computersconnecting from 31
Eendpoint devices
security planning 23exporting desktop and user data 68
94 Desktop Delivery Controller Administrator’s Guide
Ffarm
creating 49farm data store
creating 48hosting on separate server 52
fat client devicesconnecting from 32
features overview 10firewalls
configuring manually 55full-screen-only mode desktops
overview 11
IICA features available 10idle pool settings
configuring 65importing desktop and user data 68installation command-line parameters 87installing Desktop Delivery Controller on a single server
49
Kkey features 10
Llicensing 48logoff behavior for VMs
configuring 66
Mmaintenance mode
desktops 82management consoles
installing separately 58requirements 43
messagessending to users 83
Microsoft System Center Virtual Machine Manager 2007 45
monitorsusing multiple monitors 29
OOracle database
using 52
PPC-based desktop groups
creating 67permissions
configuring 76planning
network environment 28user types 27
policiescreating 75
pooled desktopsdefinition 63
pre-assigned desktopsdefinition 63
RRDP
disabling 79remote computers
connecting from 36replication, effects of 19repurposed computers
connecting from 31
SSecureICA 21
configuring 66security planning 21sessions
disconnecting 83logging off 83viewing for desktop groups 82viewing for user 82
Setup.exe command-line parameters 87Shut Down command
removing 79SQL Server
using 52
Ttime zone settings
configuring 77
Uunattended install 87uninstalling controller components 59uninstalling Desktop Delivery Controller 59
Index 95
uninstalling Virtual Desktop Agent 61upgrading from previous versions 24USB device support
overview 12USB drives
restricting access to 75user privileges
planning 22users
planning user experience 25
VVirtual Desktop Agent
installing 52installing using XdsAgent.msi 90uninstalling 61
virtual desktop group typesoverview 63
virtual desktop groupscreating 63deleting 74updating 71
virtual desktop requirements 45virtual desktops
migrating to other farms 85virtual machines
restarting 84shutting down 84starting 83
virtualization infrastructures supported 45VM-based desktop group
creating 64VMware 45
WWeb Interface
using with Desktop Delivery Controller 19Web sites
modifying 20overview 11
XXdsAgent.msi
properties 90XenDesktop Services site
overview 11XenDesktop Web site
overview 11XenServer 45

96 Desktop Delivery Controller Administrator’s Guide


