58
HotFuzz Developer’s guide Authors: Dusan Domany, Stepan Henek, Peter Kmet, Jan Stanek, Martin Zember

HotFuzzDeveloper’s guide
Authors: Dusan Domany, Stepan Henek, Peter Kmet, Jan Stanek, Martin Zember

HotFuzz Developer’s guide
Special Thanks
We would like to thank our project leader Daniel Toropila for his invaluable comments and leadership skills that lead this project to a successful finish. We would also like to express our never-ending gratitude to Pavel Kankovsky for his ideas, hints and advices during the whole project development phase.
2
HotFuzz Developer’s guide
Table of Contents1 Introduction......................................................................................................................................5
1.1 Purpose of the Project...............................................................................................................51.2 Components..............................................................................................................................51.3 Similar Work.............................................................................................................................8
The Peach Fuzzing Platform.......................................................................................................9Fusil the fuzzer............................................................................................................................9Sulley..........................................................................................................................................9Bunny the Fuzzer........................................................................................................................9SAGE..........................................................................................................................................9TAOF...........................................................................................................................................9SPIKE..........................................................................................................................................9Webfuzzer.................................................................................................................................10Scratch.......................................................................................................................................10Mangle......................................................................................................................................10
2 Employed Technologies..................................................................................................................112.1 Peach.......................................................................................................................................112.2 Wireshark................................................................................................................................112.3 Qt............................................................................................................................................12
3 Architecture....................................................................................................................................133.1 Peach in the Middle................................................................................................................13
Peach.........................................................................................................................................13Pitm...........................................................................................................................................14
GUI Communicator..............................................................................................................14Pitm Schema.........................................................................................................................16Proxy – TCP Version............................................................................................................17Handling Data.......................................................................................................................17Recording/Fuzzing...............................................................................................................18Finishing the Iteration..........................................................................................................19Monitoring the Applications.................................................................................................19Proxy – UDP Version...........................................................................................................20
Pitm Files Overview..................................................................................................................203.2 Data Analysis..........................................................................................................................21
Data2pcap Module....................................................................................................................22Data2pcap in HotFuzz...............................................................................................................22Data2pcap Usage.......................................................................................................................23How to Create a Fake UDP Packet and Save it to a Pcap File..................................................23How to Create a TCP Packet and Save it to a Pcap File...........................................................23Create a TCP Connection..........................................................................................................24Modification and Extension of Data2pcap................................................................................25Module tm_export.....................................................................................................................25
Introduction..........................................................................................................................25Technical Issues....................................................................................................................25Usage....................................................................................................................................26Example Usage.....................................................................................................................26Input/Output Structures........................................................................................................27Modification and Extension of tm_export............................................................................28
3

HotFuzz Developer’s guide
Calling Wireshark Code from Python.......................................................................................29Converting Wireshark Structures into Peach Structures...........................................................29
3.3 Data Matching.........................................................................................................................303.4 Recorded Data Aggregation ...................................................................................................313.5 Structure of the HotFuzz Configuration File..........................................................................32
4 GUI.................................................................................................................................................33Source Code Generation...........................................................................................................33Main Functions Overview.........................................................................................................33Application File Overview........................................................................................................33
4.1 Dialogs....................................................................................................................................34Basic Dialog Logic....................................................................................................................34Standard Qt Dialogs..................................................................................................................34Main Window Dialog................................................................................................................34Application Settings..................................................................................................................35Intro Dialog...............................................................................................................................35Preferences Dialog....................................................................................................................36New Project Dialog...................................................................................................................36Recent Project Dialog...............................................................................................................36Project Info Dialog....................................................................................................................36Action View Dialog...................................................................................................................37
4.2 Projects ...................................................................................................................................37Project Files...............................................................................................................................37XML Manipulation...................................................................................................................37Dump Files................................................................................................................................38
4.3 Widgets...................................................................................................................................38Own Widgets.............................................................................................................................39Qt Designer Plugin....................................................................................................................39Undo Actions.............................................................................................................................39
4.4 External Programs ..................................................................................................................39Peach Communicator................................................................................................................40Starting Pitm.............................................................................................................................40Stopping Pitm............................................................................................................................41
5 Development of HotFuzz...............................................................................................................425.1 History of the Project..............................................................................................................425.2 Development of the Dissection Process in HotFuzz...............................................................43
6 Strategic Decisions.........................................................................................................................456.1 Why Peach is Used.................................................................................................................456.2 Why the Wireshark Libraries are Used...................................................................................45
7 Future Work....................................................................................................................................467.1 GUI.........................................................................................................................................46
Appendix A: Structure of the HotFuzz Configuration File..............................................................48
4
HotFuzz Developer’s guide
1 Introduction
1.1 Purpose of the ProjectThe aim of the HotFuzz project is to provide a tool for discovering security vulnerabilities. It uses
a widely used approach called “fuzzing” that is based on providing invalid data to a program so that it could lead to an unexpected behaviour of the program. The HotFuzz project implements a proxy functionality between network applications. It modifies the data before forwarding them to the fuzzed program. The benefit of the HotFuzz project is that it can automatically parse the streams of data without a detailed user-provided protocol specification and apply the fuzzing rules to the resulting parsed blocks.
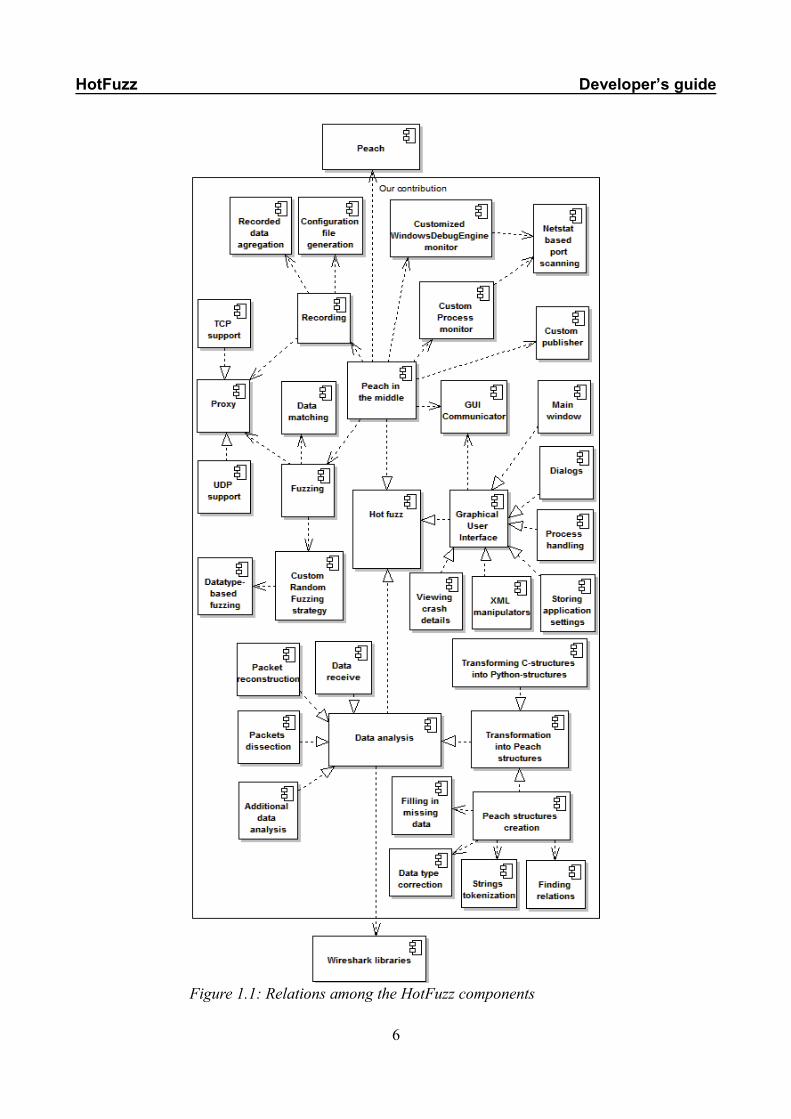
1.2 ComponentsFigure 1.1 (on the next page) displays relations between HotFuzz components. Short descriptions
of the components are listed below.
Peach in the middle: Peach in the middle is an adaptation of Peach, which transforms Peach into a network proxy and integrates most of the important HotFuzz ideas. It contains the central logic of the application and connects the other HotFuzz components together. Proxy: HotFuzz Proxy replaces the classical Peach State Model and handles the communication between the client and the server application. The proxy can run in recording or in fuzzing mode. It supports both TCP and UDP communication.
Recorded data aggregation: It merges similar messages from all the recorded test cases into a single data model. Creates a compact data representation of multiple cases of a client-server communication.
Configuration file generation: Creates a configuration file for the fuzzing phase based on the data recorded during the recording phase and the configuration done by the user via the Graphical User Interface.
Data matching: It identifies mutable elements during the fuzzing process. The matching is based on the comparison of the actual data forwarded through the proxy with the models recorded by the user during the recording phase.
Customized WindowsDebugEngine monitor: Customized version of the Peach debug monitor. The class was modified to provide the functionality required by HotFuzz.
Custom Process monitor: Custom HotFuzz monitor for handling basic process manipulation. In comparison with the original Peach process monitor it can handle much more complicated processes. The monitor was written from scratch to satisfy HofFuzz needs.
5
HotFuzz Developer’s guide
6
Figure 1.1: Relations among the HotFuzz components
HotFuzz Developer’s guide
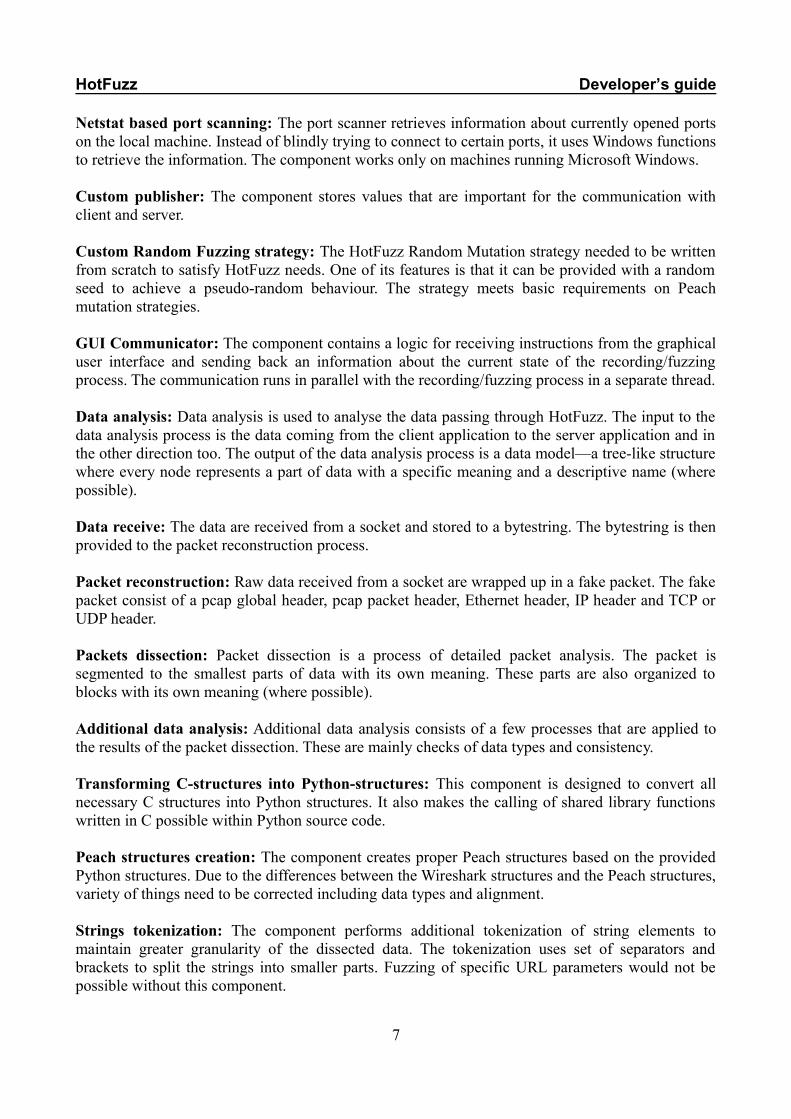
Netstat based port scanning: The port scanner retrieves information about currently opened ports on the local machine. Instead of blindly trying to connect to certain ports, it uses Windows functions to retrieve the information. The component works only on machines running Microsoft Windows.
Custom publisher: The component stores values that are important for the communication with client and server.
Custom Random Fuzzing strategy: The HotFuzz Random Mutation strategy needed to be written from scratch to satisfy HotFuzz needs. One of its features is that it can be provided with a random seed to achieve a pseudo-random behaviour. The strategy meets basic requirements on Peach mutation strategies.
GUI Communicator: The component contains a logic for receiving instructions from the graphical user interface and sending back an information about the current state of the recording/fuzzing process. The communication runs in parallel with the recording/fuzzing process in a separate thread. Data analysis: Data analysis is used to analyse the data passing through HotFuzz. The input to the data analysis process is the data coming from the client application to the server application and in the other direction too. The output of the data analysis process is a data model—a tree-like structure where every node represents a part of data with a specific meaning and a descriptive name (where possible).
Data receive: The data are received from a socket and stored to a bytestring. The bytestring is then provided to the packet reconstruction process.
Packet reconstruction: Raw data received from a socket are wrapped up in a fake packet. The fake packet consist of a pcap global header, pcap packet header, Ethernet header, IP header and TCP or UDP header.
Packets dissection: Packet dissection is a process of detailed packet analysis. The packet is segmented to the smallest parts of data with its own meaning. These parts are also organized to blocks with its own meaning (where possible).
Additional data analysis: Additional data analysis consists of a few processes that are applied to the results of the packet dissection. These are mainly checks of data types and consistency.
Transforming C-structures into Python-structures: This component is designed to convert all necessary C structures into Python structures. It also makes the calling of shared library functions written in C possible within Python source code.
Peach structures creation: The component creates proper Peach structures based on the provided Python structures. Due to the differences between the Wireshark structures and the Peach structures, variety of things need to be corrected including data types and alignment.
Strings tokenization: The component performs additional tokenization of string elements to maintain greater granularity of the dissected data. The tokenization uses set of separators and brackets to split the strings into smaller parts. Fuzzing of specific URL parameters would not be possible without this component.
7

HotFuzz Developer’s guide
Finding relations: A relation finding process tries to find relations between different parts of data contained within one message. We have implemented size relations so far (when a data segment represents the size of another data segment, etc.). Graphical User Interface: The GUI component is designed to make use of the HotFuzz program as easy and effective as possible. It consists of components listed below.
Dialogs: The Graphical User Interface contains many dialogs which handle interactive communication with the user. These dialogs provide the user with variety of controls for easy management of the application.
Main window: This window is the most important component of our GUI. It opens all other dialogs and processes signals from numerous types of events. Moreover, all external processes are started within this dialog.
Process handling: One of the main purposes of the GUI is to manage the Peach in the middle process, which has to carry out the recording and the fuzzing phases. There are also other external programs, which are started from the GUI: a text editor and a debugger.
Storing application settings: Whenever the Main Window is starting, it loads application settings and modifies its internal variables according to these settings. Whenever the Main Window is closing, it prompts whether to store unsaved changes to the project and then it stores its internal variables to the application settings.
XML manipulators: The GUI application is capable of manipulating (storing and loading) three types of XML files – fuzzing.xml, recording.xml and project.xml. The fuzzing and the recording XML are passed to Peach in the middle as one of its parameters. The project XML is used to store overall project information.
Viewing crash details: When Peach in the middle is started in the fuzzing mode a new directory in “project dir”/dumps/ appears. This directory is created by Peach and the GUI application is used to display its contents.
1.3 Similar WorkThe IT security community was asked1 to suggest a topic for the project. We were recommended
to enhance some of the existing tools instead of building yet another fuzzer or a fuzzing framework. Therefore we decided to implement extend an existing fuzzer so that it could be used also as a fuzzing proxy. There are some commercial fuzzers which implement this feature, but none of the open-source fuzzers fully integrates this functionality.
Different fuzzers and the fuzzing frameworks were tested by the development team at the early stage of the project. Here is the list of the examined fuzzers.
1 Dailydave mailing-list: http://lists.immunitysec.com/mailman/listinfo/dailydaveFuzzing mailing-list: http://www.whitestar.linuxbox.org/pipermail/fuzzing/
8
HotFuzz Developer’s guide
The Peach Fuzzing Platform
Peach is a framework for creating fuzzers. It is written in Python and it is easily extendible. We decided to use this program as the one of the main parts of the HotFuzz project. Peach is currently being developed and supported by the main author (Michael Eddington). Michael came up with many ideas that we used when designing the initial structure of our project. A detailed description of the Peach Fuzzing Platform is located in the other part of this document.
Fusil the fuzzer
Fusil the fuzzer is an open-source fuzzing framework written in Python. It was successfully used for finding security-related bugs in software like PHP, glibc, libexif, ClamAV. Many bugs were found in Python itself (see http://bitbucket.org/haypo/fusil/wiki/Python).
Sulley
Sulley is similar to Peach in the way that it has the abilities not only to generate data, but also to monitor the network, the target program, to revert the target program state if needed and to track and categorize detected faults.
It has an installation tool that can install all dependencies. We were inspired by this feature during the creation of our HotFuzz installer.
Bunny the Fuzzer
Bunny the Fuzzer is a “smart” fuzzer that uses a loop from the traced program. This feature provides the fuzzer with run-time feedback on how to alter the inputs to increase the code coverage.
SAGE
SAGE is a proprietary tool. It managed to crash an application shipped as part of Office 2007 43 times (ftp://ftp.research.microsoft.com/pub/tr/TR-2007-58.pdf).
TAOF
TAOF (The art of fuzzing) is a fuzzing framework that is easy to use even for people without programming skills and it is probably a good start for those that are new in the field of fuzzing. The official webpage provides some videos on how to discover vulnerabilities using TAOF.
SPIKE
SPIKE is an API that enables a programmer to specify a network protocol. The fuzzed data are generated according to this specification. It was created in 2002 and the language used is C.
9
HotFuzz Developer’s guide
Webfuzzer
Webfuzzer does not provide any user-friendly interface, it is focused on advanced users who can modify the source code according to their requirements. It does not provide almost any documentation and the source code itself is rather poorly commented. It has not been updated for years.
http://gunzip.altervista.org/g.php?f=projects.
Scratch
Scratch is another fuzzer that needs to modify the Python source code in order to configure it. It does not provide any documentation at all except a few comments in the code. It is probably not developed any more.
http://packetstormsecurity.org/UNIX/misc/scratch.rar
Mangle
Mangle has less than 500 lines of code. It creates a CGI script from a C source code which fuzzes HTML syntax and tries to crash the viewing browser.
http://lcamtuf.coredump.cx/soft/mangleme.tgz
10
HotFuzz Developer’s guide
2 Employed Technologies
2.1 PeachPeach is a framework for building fuzzers. It has been developed since 2004 by Michael
Eddington. Peach was released under MIT license, so any person is allowed to obtain a copy of Peach and deal in the Software without restriction.
Peach is basically being created by a single author and it is still under active development. Mr. Eddington organizes workshops for participants, who represent something like a small Peach community. Documentation of Peach can be found on http://peachfuzzer.com/. Many parts of the documentation are incomplete or missing. Many parts are also out of date. However, it is probably the best place to start getting familiar with Peach.
Another great source of information is the Peach mailing-list at [email protected]. Peach users ask many questions there and Mr. Eddington actively manages this mailing-list, answers the questions and gives advices on how to make Peach running, deals with different issues, etc. Some of the workshop students started to participate on the mailing-list management recently, too. More experienced users send bug fixes and proposals for new features. Some of them are being integrated into upcoming versions of Peach. One of the integrated bug fixes was also a correction of the Peach Agent behaviour proposed by the HotFuzz team.
2.2 WiresharkWireshark is a multiplatform packet analyser. It is the successor of Ethereal and has quite a long
development history beginning in the 1990s. Although it is definitely not the only packet analyser existing nowadays, we can say that it is surely the most widely used one. The biggest advantages of Wireshark are that it is free and open source.
Packet analysis is a process in which the network communication is captured and its parts (packets) are inspected and segmented into smaller parts with a defined meaning. Packet analysers are automated tools that provide the communication capturing and packet analysis functionality, often offering something extra like statistics, graphs etc. More information can be found at http://en.wikipedia.org/wiki/Packet_analyzer. We can also point you to the user manual part of the HotFuzz documentation which contains the description of some basic terms connected with this problematic in the Basic concepts section.
We do not wish to waste time and space by repeating things that are available in numerous places on the Internet so if you are interested in using Wireshark, you should definitely go to its homepage at www.wireshark.org. If you only need to know some basic information about Wireshark we recommend you to pay a visit to its Wikipedia page at http://en.wikipedia.org/wiki/Wireshark.
If you plan to adapt Wireshark or its libraries for your own project we highly recommend you to join the Wireshark development community and use one of the numerous mailing lists available at http://www.wireshark.org/lists/. This can save you quite some time and nerves.
11

HotFuzz Developer’s guide
2.3 QtThe GUI uses the PyQt4 library, which provides bindings for the Nokia’s Qt application
framework. This makes the GUI application very portable, because the Python interpreter and PyQt4 are ported to the vast majority of nowadays operating systems.
To create the code more effectively, we decided to use the Qt Designer to design a skeleton of dialogs.
12

HotFuzz Developer’s guide
3 Architecture
3.1 Peach in the Middle
Peach
To understand the Peach in the middle, it is first needed to understand how Peach works. The Peach execution process can be briefly described as follows:
The first step is the initialization of Peach, which consists of parsing of command line options and checks whether the Peach dependencies are properly installed.
The Peach Engine is then started. It uses the Peach Parser to parse the input configuration file and to create the appropriate components. After creation of all the necessary components and performing some additional initialization, the Peach Engine enters the main process loop, in which the test cases are executed.
During each of the test cases, Peach runs a State Machine. The State Machine is a deterministic finite state machine containing states based on the users configuration. One of these States needs to be flagged as initial. Each of these States consists of one or more Actions. When the State Machine enters a State, it runs sequentially all of its Actions. For each Action the user can also specify circumstances under which the Action should be performed. Peach has a fixed list of available
13
Figure 3.1:Peach Architecture
HotFuzz Developer’s guide
Action types, which include connecting to a remote host (connect), accepting connection (accept), sending data (output), receiving data (input), calling specific Python method (call), changing state (changeState) etc. If all of the Actions from a single State are executed without changing a State, the execution of the State Machine is ended.
Each output Action needs to have a template. This template is called Data Model and represents the structure of the message being sent. Whenever Peach runs an output Action, it performs a mutation on the specified template, concatenates all the values from the template and uses the result of the concatenation as an output.
The mutation is performed by a special object called Mutation Strategy, which uses its internal logic to select elements from the Data Model and applies Mutators to these elements. Mutators provide values for the elements and these values are then used instead of the original ones.
During the whole process Peach interacts with a Peach Agent to maintain control over the tested application and to receive information about the applications current state. The user needs to specify a Monitor which is used by the Agent to handle (start/stop) and monitor the tested application. After each iteration Peach requests the Agent to detect whether any fault occurred. A typical example of a fault is an application crash. If Peach receives a positive answer (e.g. the application crashed), it requests the Agent to send any information related to the fault that are available. To satisfy this Peach request, the Monitor needs to implement a specific method, which is used to retrieve the requested data. A typical example of such data is a WinDbg dump file. This file is generated by the Windows Debug Engine after an application crash, if the application ran with Windows Debugger attached.
The last object in the Peach Architecture schema is called Peach structures. These structures are defined in the file dom.py and include objects like Peach String, Peach Number etc., which come with number of useful methods and make the Peach code much more clear.
Pitm
Peach in the middle (shortly Pitm) changes the original Peach execution process in an early stage of the Peach State Machine run. If certain options are specified on the command line, then the execution of the Peach State Machine code is intercepted and HotFuzz code is used instead.
As the matter of fact, the changes were done very carefully, so Pitm can still be used as an original Peach and only if the user specifies certain options, the HotFuzz functionality is activated. We took care to limit modifications in the Peach code and to keep them localized, because Peach as a software is still evolving and we wanted to be able to easily migrate the HotFuzz functionality to the newer versions of Peach if needed.
GUI Communicator
One of the important enhancements introduced in HotFuzz is that the whole process can be controlled via a Graphical User Interface. We decided not to integrate the Graphical User Interface directly, because that would require a lot of modifications to the original Peach code, which we wanted to prevent. Instead, the GUI runs as an independent process and interactively communicates with the Pitm process via a local port. The Pitm process runs a separate thread, which handles the interactive communication with the GUI.
The thread receives UDP packets on the specified port. Received messages are expected to be 32-bit integers encoded into hex-format, so the length of the messages is expected to be exactly 8 bytes. The messages are decoded and the following values are recognized as instructions:
14
HotFuzz Developer’s guide
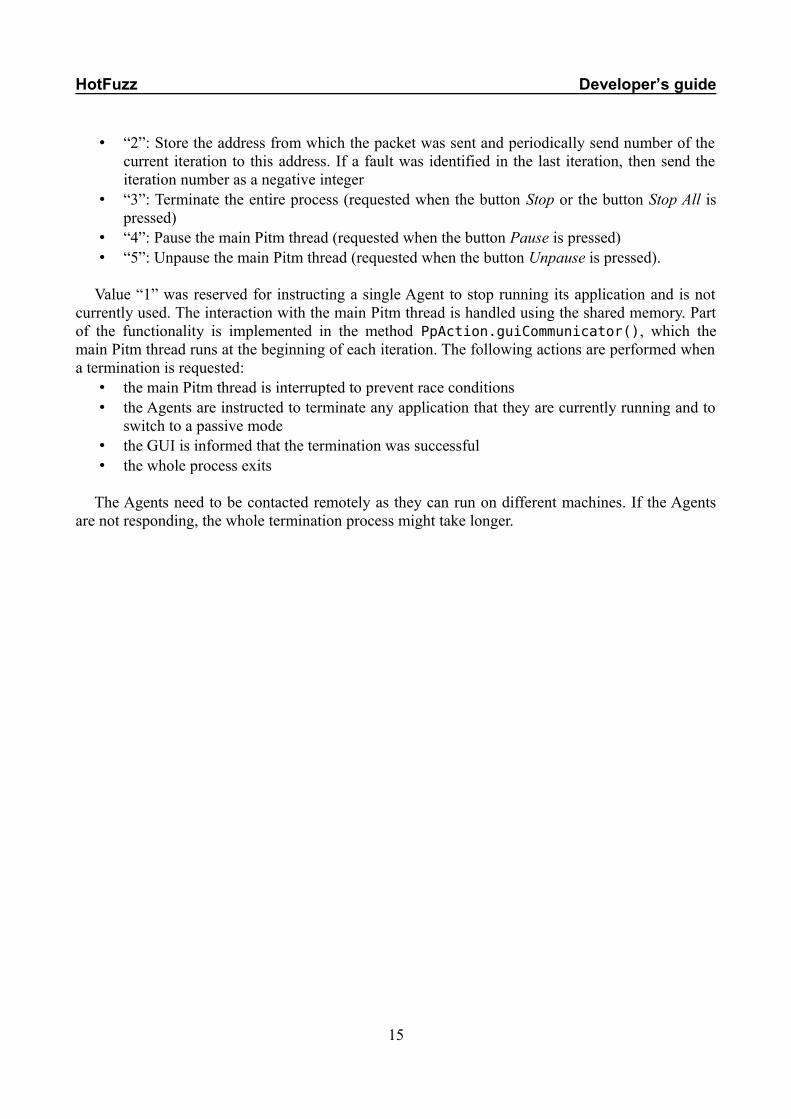
• “2”: Store the address from which the packet was sent and periodically send number of the current iteration to this address. If a fault was identified in the last iteration, then send the iteration number as a negative integer
• “3”: Terminate the entire process (requested when the button Stop or the button Stop All is pressed)
• “4”: Pause the main Pitm thread (requested when the button Pause is pressed)• “5”: Unpause the main Pitm thread (requested when the button Unpause is pressed).
Value “1” was reserved for instructing a single Agent to stop running its application and is not currently used. The interaction with the main Pitm thread is handled using the shared memory. Part of the functionality is implemented in the method PpAction.guiCommunicator(), which the main Pitm thread runs at the beginning of each iteration. The following actions are performed when a termination is requested:
• the main Pitm thread is interrupted to prevent race conditions• the Agents are instructed to terminate any application that they are currently running and to
switch to a passive mode• the GUI is informed that the termination was successful• the whole process exits
The Agents need to be contacted remotely as they can run on different machines. If the Agents are not responding, the whole termination process might take longer.
15
HotFuzz Developer’s guide
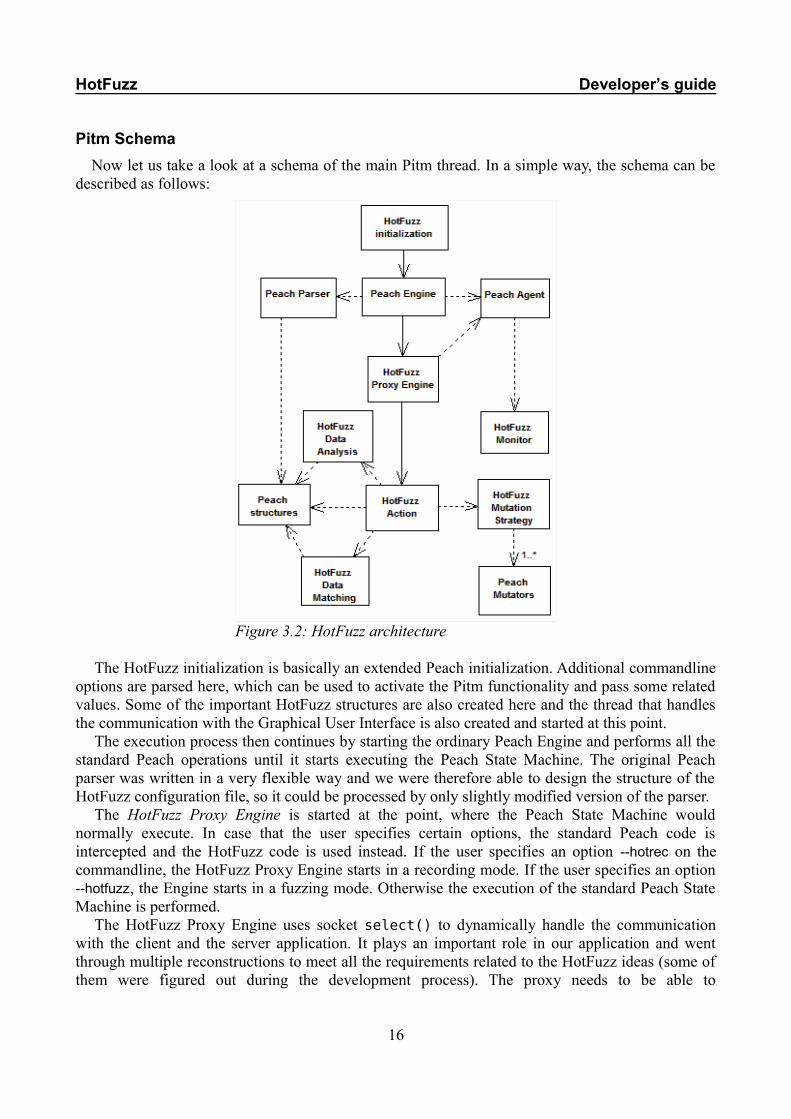
Pitm Schema
Now let us take a look at a schema of the main Pitm thread. In a simple way, the schema can be described as follows:
The HotFuzz initialization is basically an extended Peach initialization. Additional commandline options are parsed here, which can be used to activate the Pitm functionality and pass some related values. Some of the important HotFuzz structures are also created here and the thread that handles the communication with the Graphical User Interface is also created and started at this point.
The execution process then continues by starting the ordinary Peach Engine and performs all the standard Peach operations until it starts executing the Peach State Machine. The original Peach parser was written in a very flexible way and we were therefore able to design the structure of the HotFuzz configuration file, so it could be processed by only slightly modified version of the parser.
The HotFuzz Proxy Engine is started at the point, where the Peach State Machine would normally execute. In case that the user specifies certain options, the standard Peach code is intercepted and the HotFuzz code is used instead. If the user specifies an option --hotrec on the commandline, the HotFuzz Proxy Engine starts in a recording mode. If the user specifies an option --hotfuzz, the Engine starts in a fuzzing mode. Otherwise the execution of the standard Peach State Machine is performed.
The HotFuzz Proxy Engine uses socket select() to dynamically handle the communication with the client and the server application. It plays an important role in our application and went through multiple reconstructions to meet all the requirements related to the HotFuzz ideas (some of them were figured out during the development process). The proxy needs to be able to
16
Figure 3.2: HotFuzz architecture

HotFuzz Developer’s guide
simultaneously handle the communication with the client and the server. At the same time, it needs to have a good control over the communication, make sure that some messages are not sent too early etc. The proxy needs to know when it is supposed to read data and when it is allowed to send them. In short the features can be described as follows:
• Storing received messages• Requesting a real-time data analysis and a real-time fuzzing over the stored messages• Handling the situations when the data analysis requires more data before it can return the
result• Propagating connection close and dealing with network errors• Finishing the communication when the end of the iteration is identified
There are different instances for TCP and UDP, because these two protocol families require a slightly different approach. Let us take a look at the TCP version first.
Proxy – TCP Version
The proxy first binds a socket for a communication with the client and then requests client Agent to run the Activating Command (or start the client application in case of StartOnCall). So when the client tries to connect, the proxy is already listening on the specified port. The proxy then tries to connect to the server application. Because the server application might not be ready yet, the proxy makes 30 attempts during 30 seconds before it gives up.
Next, the proxy enters a reading phase. During this phase it tries to read as much data as possible in a very short time. This is the first line of defence against an issue that we called segmentation. The segmentation means that only part of the sent data were already received, so the data analysis might not be able to fully analyse the received message. There is no guaranteed way to protect against this issue. The segmentation might have many forms. The message (packet) can be split in the headers part, in the body part, it can be missing only a few last characters, or the received part of the message might be so short, that it is impossible to tell what it is. The dissection process might be therefore confused by the data it was supplied with. We brought multiple techniques into our application to deal with the issue and the current state is considered to be very stable. Majority of the techniques forms part of the Data analysis modules.
If the proxy does not receive any data in 0.01 second, it switches to a sending phase. During this phase the proxy first requests the data analysis over the stored messages. If the data analysis does not return any result, it means that the data it was supplied with were probably incomplete. In that case the proxy continues reading messages and passing them to the data analysis until the data analysis returns a valid result.
Handling Data
Now let us take a closer look at this step, because there is more going on here under the hood. The data analysis need to be supplied with some information regarding the data. This information includes the protocol family and the protocol standard port and is used to create proper fake packets in the data2pcap module. The fake packet is analysed by the tm_export module using Wireshark dissection libraries and the result is then translated into Python structures. But it is not fully prepared to be used in the fuzzing yet.
The first thing is that the values of the elements are encoded into a hex-format. The reason for that is that otherwise they could contain a ‘\0’character, which would cause, that the values would
17
HotFuzz Developer’s guide
become shortened in the process of the structures translation. The values need to be therefore decoded at this point. Another thing is that during the dissection process, some not important bytes of the supplied data might be skipped, which makes it impossible to accurately reconstruct the original message. These missing data need to be filled back in at the correct positions.
The structures need to be translated into proper Peach structures next. A deep understanding of these structures was necessary when implementing this part, because some of them have different behaviour than the others. Unfortunately, it is not possible to fully rely on the data types identified during the dissection process. For example a value of a “Content-length” header is a string that contains also a number, but the whole value is identified as a number. Though this might make sense in some context (like in the Wireshark GUI), it is not desired when creating the Peach structures. The data types need to be corrected at this point.
As the last thing we apply something that we call heuristics. Two heuristics are currently implemented. The first one is a string tokenization. The values of the elements that were identified as strings are tokenized based on a defined set of separators. It works simultaneously in two ways:
• Separation by brackets: works recursively and searches for specific types of brackets in the string
• Separation by single tokens: goes through the string, looks for specific characters and separates the string in places where these characters are found
The reason for this heuristic is that for example the URL from a HTTP request comes from the dissection process as a single string element. To be able to mutate parts of this element, like the URL parameters, it needs to be split into smaller parts.
The second heuristic searches for relations between different elements in the structure. Currently it searches only for size relations. It identifies that a value of one element is a size of another element. Later, during the process of fuzzing, if the value of the second element is mutated and its size is changed, the value of the first element is accordingly modified as well to make the data look authentic.
As a result we finally get a fully qualified Peach Data Model and we create a Peach Action that contains this Data Model. In HotFuzz we use Peach Actions and Peach States only as packages for our data.
Recording/Fuzzing
If we run in a recording mode, the Action is stored and the data are forwarded unchanged. If we run in a fuzzing mode, then the Data Matching module is requested to find a matching Action among the previously recorded data. If the matching Action is found, then its configuration is copied and a mutation is performed on the Data Model of the current Action. Otherwise the data are forwarded unchanged.
The mutation is performed by the HotFuzz Mutation Strategy. The strategy identifies mutable elements and randomly selects a subset of them. It then identifies the Peach Mutators that are applicable to the elements in the subset, randomly chooses one Mutator for each element and performs the mutation. It is possible to provide the strategy with a seed to make it behave as pseudo-random.
After the mutation, the values in the Data Model are concatenated into a single string and sent instead of the originally received data.
18
HotFuzz Developer’s guide
Finishing the Iteration
When the proxy has no more messages to send, it switches back to the reading phase. The proxy switches between the reading and the sending phase until one of the following events occurs:
• The proxy has no messages to send and no data were received in a number of seconds specified by the user as an Iteration timeout.
• The Data matching module identifies the end of the iteration. This occurs only in the fuzzing phase.
The end of the iteration can be identified using one of three methods (which one is used is decided in the Data Aggregation process during the recording phase):
• Finish when the Data Model of the recorded Action with the flag terminateTestCase is matched
• Finish when the server closes connection• Finish when a count of the output actions reaches the count of the recorded output actions
and the count of the input actions reaches the count of the recorded input actions
When the iteration is ended, the connections are closed and a partial clean up is performed. If we run in a recording mode and the number of the current iteration reaches the number of iterations to be recorded, the Data Aggregation is requested to aggregate the recorded data and the result is used to create a configuration file for the fuzzing phase.
Monitoring the Applications
During the process Pitm interacts with two Peach Agents – one for the client application and one for the server application. The Agents are the same as the original Peach Agents, but the monitors are different. HotFuzz implements two custom monitors for controlling the applications and reporting faults.
• HotFuzz Process Monitor: Custom HotFuzz monitor for handling basic process manipulation. Compared to the original Peach process monitor it can handle much more complicated processes by using Windows Jobs. This monitor does not report any information about the detected crashes. The motivation for writing this monitor was Mozilla Firefox, which could not be handled by the original Peach process monitor.
• HotFuzz Debug Monitor: Customized version of the Peach debug monitor. It was modified to provide the functionality required by HotFuzz. This monitor uses the Windows Debug Engine to report information about the detected crashes. When a monitored application crashes, the event is identified and reported by the HotFuzz Debug Monitor as a fault and WinDbg dump is sent to Pitm, which logs the file together with messages that were sent during the current iteration
Both monitors implement the following features that are typical for HotFuzz:• Activation command – It is possible to run the client application persistently and specify a
command that causes the application to make a request.• Running on port – It is possible to specify a port that is opened by the application when it
starts. This is useful when the application takes long to start. The Pitm process is deferred until the port is opened (but for the maximum of 10 seconds). This is especially useful for the UDP version of the proxy.
• Detecting CLOSE_WAIT ports – we have observed that the CesarFTP application tends to
19
HotFuzz Developer’s guide
get stuck after it receives a certain number of requests containing the ‘\0’ character. This character is a very common part of the values generated by the Peach Mutators. The application stops accepting any connections, so it is not possible to effectively continue in the fuzzing process. We were not able to figure out the exact cause, but we found out that the event went hand in hand with an increased number of ports in a CLOSE_WAIT state. We based our heuristic upon this observation and whenever the number of CLOSE_WAIT ports increases and the server port is among them, it is reported as a fault and the scenario is restarted, so the fuzzing process can continue. Unfortunately we are not currently able to provide any information about the fault as it is not considered to be a crash.
The ‘\0’ character seams to be hard to handle in general. For example when BadBlue application receives a request containing this character, it does not reply in any way. The communication does not continue and it is not possible to effectively identify the end of the iteration (only by the timeout).
The second and the third described feature both use something that we called Netstat based port scanner. The component does not try to connect to any ports, but uses Windows API to retrieve various information about currently opened ports on the local machine.
Proxy – UDP Version
The UDP version of the proxy runs the same HotFuzz Actions (for recording and for fuzzing) as the TCP version, but the proxy itself naturally works slightly different. It receives and sends data without establishing any connections. It activates the client only after it binds the socket and switches between reading and sending phase just like the TCP version. But there is no guaranteed way how to make sure that the server application is already running and ready to receive data. The Running on port feature of the server monitor therefore plays an important role here.
Pitm Files Overview
• peach.py – Contains all the necessary initializations before starting the main Engine. These initializations include checks whether the necessary dependencies are installed, command line options parsing etc. HotFuzz adds a couple of new command line options and does some initialization of its own.
• Peach/Engine/state.py – Contains Peach methods for managing the Peach State Machine and its actions. Method StateEngine._runState() was modified so that when specific variables are set, the HotFuzz code is executed instead of the standard Peach code.
• Peach/Engine/ppaction.py – Contains the HotFuzz Proxy Engine.• Peach/Agent/ppprocess.py – Contains the HotFuzz Process Monitor.• Peach/Agent/ppmonitor.py – Contains the HotFuzz Debug Monitor.• Peach/Analyzers/pptokenizer.py – Contains methods for string tokenization and methods for
creation of Peach structures.• Peach/Analyzers/pprelations.py – Contains methods for finding relations among different
elements in a Data Model.• Peach/Publishers/pppublisher.py – Contains a class for storing values that are important for
the communication with the client and the server.• Peach/MutateStrategies/ppstrategies.py – Contains HotFuzz Mutation Strategies.• Peach/Engine/ppGuiCommunicator.py – Contains the logic for receiving instructions from
20
HotFuzz Developer’s guide
the Graphical User Interface and sending back the information about the current state of the Pitm process.
3.2 Data AnalysisData analysis is one of the core components of HotFuzz. It is used to analyse the data passing
through HotFuzz. The input to the data analysis process are the data coming from the client application to the server application and in the other direction too. The output of the data analysis process is a datamodel—a tree-like structure where every node represents a part of data with specific meaning and a descriptive name (where possible).
The overall architecture of the whole data analysis process can be seen in the following picture.
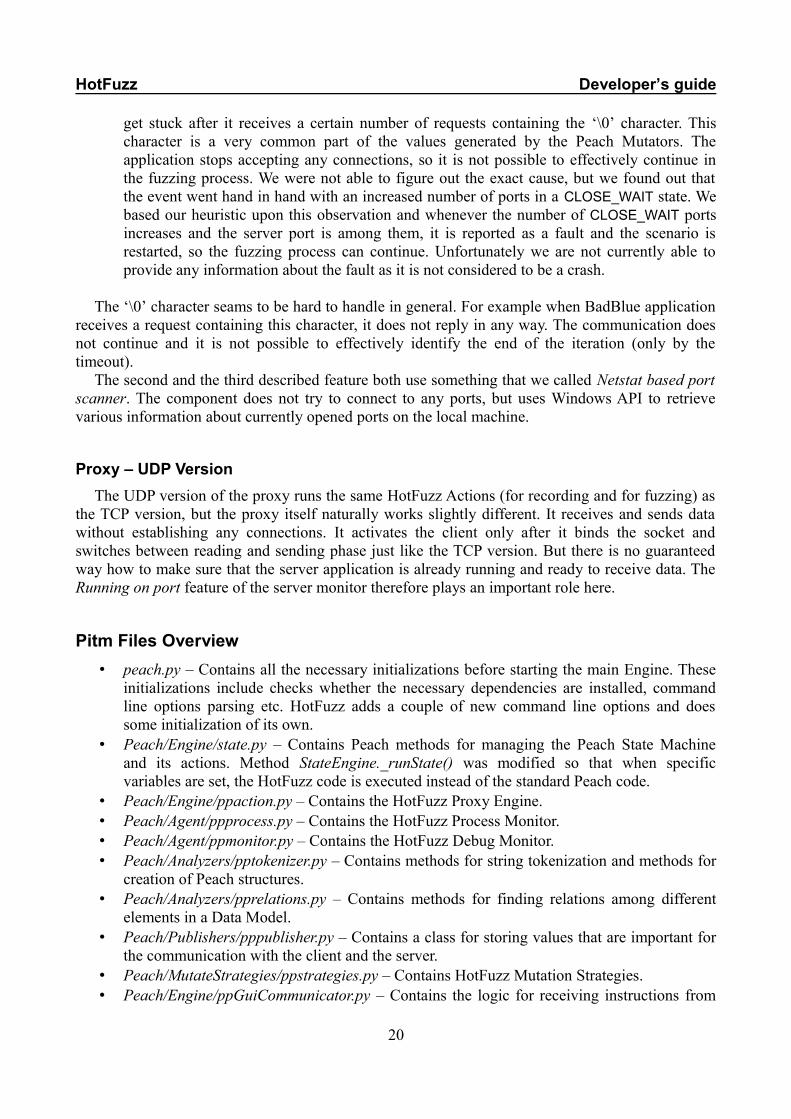
As we can see, the data analysis process consists of three tightly connected but separable phases. In the first phase, the raw data in a form of a byte stream are converted to fake packets, wrapping them up using appropriate artificially generated headers. These fake packets are used as an input for the packet dissection process in the second phase. In the third phase, the output from the dissection process is converted from C structures into Python objects.
Because these phases are separable, we decided to create a module for each of them, creating a typical modular architecture for the whole data analysis process. This decision offers future developers the possibility to use their own modules for the mentioned separated phases thus making the development process easier.
It might look a bit extraordinary to create fake packets even though we only want to analyse the raw data and to create at first C structures which then need to be converted to Python structures etc. We know it might look confusing but trust us that these decisions were taken after thorough investigation of the possibilities of how to implement the data analysis process. It will be better explained in the description of the individual modules.
Lets have a closer look at each of the data analysis modules now.
21
Figure 3.3: Data analysis
HotFuzz Developer’s guide
Data2pcap Module
Data2pcap is a Python module that provides the functionality of creating fake packets from raw data and saving them in a pcap format. Fake packets are formed from the raw data wrapped up in artificial headers so that the data can be used as an input for programs which expect packets on their inputs. These packets are well-formed, meaning that they have valid checksums and are zero-padded when needed. Current version of this module provides support for UDP and TCP on the transport layer, IP on the internet layer and Ethernet on the link layer, but can be easily extended.
We have decided to create this module because of two main reasons—one is that our data dissection module is based upon Wireshark libraries (more details about the dissection module can be found in the following section)–and the second reason is that we wanted to be able to store the communication going through HotFuzz in an easy-readable format. Pcap showed to be a very good choice for this.
Data2pcap in HotFuzz
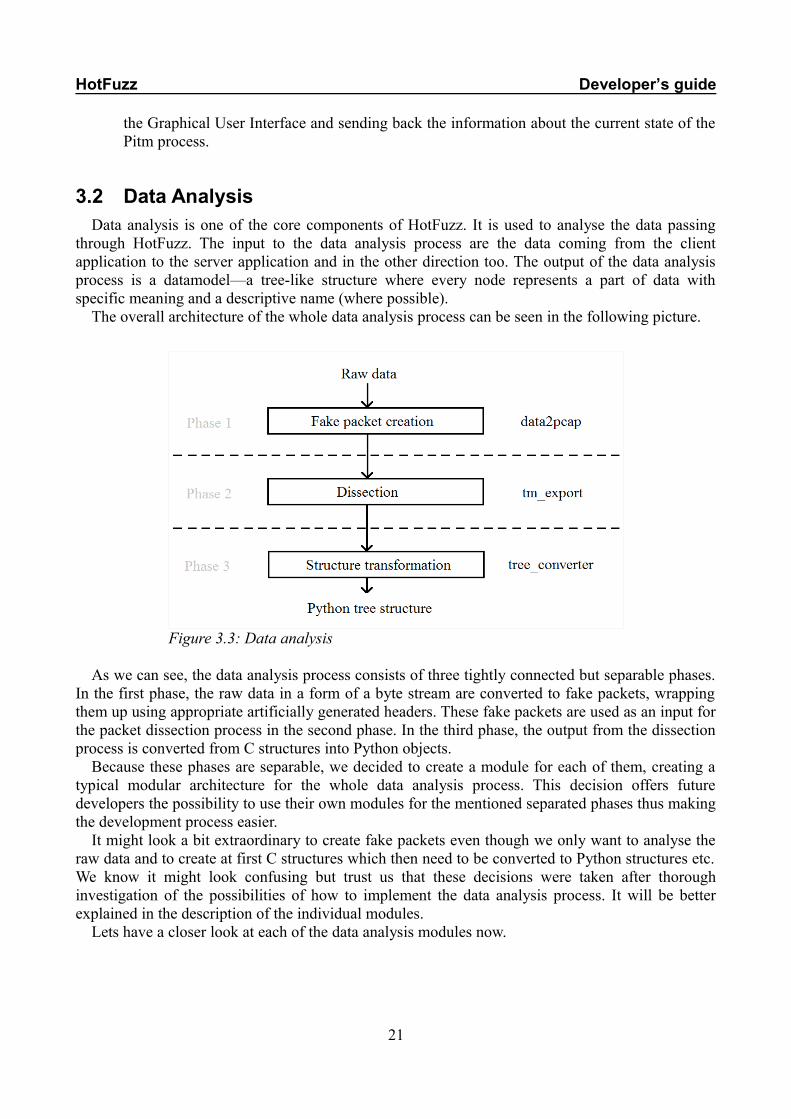
The data2pcap module takes place in the early phase of data processing in HotFuzz. Hotfuzz reads the data from a socket and right after the data are read, the data2pcap module is used to wrap them up in fake packets and store these packets to communication log files (if the logs are enabled). This situation is illustrated in the next picture.
The concrete source code of HotFuzz using the data2pcap module is to be found in HOTFUZZDIR/Peach/Engine/ppaction.py. To better understand the usage of the data2pcap module we recommend you to read the next section of this documentation.
22
Figure 3.4: data2pcap in HotFuzz
HotFuzz Developer’s guide
Data2pcap Usage
The data2pcap module was written with the emphasis on simplicity of use combined with the possibility to set all important parameters of the created packets. If you want to use the data2pcap module you need to use Python version 2.5 and to know only a few basic functions. These are:
• merge_headers_and_data(raw_data, protocol, src_ip, src_port, dst_ip, dst_port, seq=1000, ack=100)
• save_pcap_packet_to_pcap_file(data, pcap_file)
and if you want to create TCP packets with valid sequence and acknowledgement numbers then also
• update_tcp_control_length(mlen, old_tcp_ctrl)
With these functions you will be able to create fake UDP and TCP packets from raw data and save them to a pcap file. Even though we provide a full Doxygen documentation for this module that contains enough information to be able to work with the data2pcap module, we have written a few short examples to make the work with the module easier for you.
How to Create a Fake UDP Packet and Save it to a Pcap File
Suppose we have raw data in a bytestring called raw_data and want to create a fake UDP. The bytestring can be either read from a socket or constructed from any Python string using hexlify or you can use whatever magic you need to get it. We want to create a UDP packet coming from the IP address 1.1.1.1 port 50 to the IP address 2.2.2.2 port 60. We want to save the packet to a log file called log.pcap in the current directory. The following few lines are all we need to use:
# create a UDP packet with specified parametersmydata = merge_headers_and_data(raw_data, 'udp', '1.1.1.1', '50', '2.2.2.2', '60')# create a new file and write the created packet to itoutfile = file('log.pcap','wb')save_pcap_packet_to_pcap_file(mydata, outfile)outfile.close()
And that is it. You can try it and open the log.pcap file in any packet analyser to see the result which should be well-formed UDP packet with all parameters set up according to the specification.
If you want to simulate an UDP communication containing more packets, you can do it easily. You just have to use a loop. Move the file opening and file closing operations outside the loop and the data reading operation into the loop condition, leaving merge_headers_and_data and save_pcap_packet_to_pcap_file inside the loop and everything should work like a charm.
How to Create a TCP Packet and Save it to a Pcap File
This is very similar to creation of a UDP packet with one notable difference. The TCP communication contains sequence and acknowledgement numbers. If you want to create only one packet, you do not have to care about these and you can use the example presented for UDP with the simple change of “udp” to “tcp” in the call of the merge_headers_and_data function. You do
23

HotFuzz Developer’s guide
not need to update the sequence and the acknowledgement numbers, since we defined default values for them in the above mentioned function.
But if you want to simulate a communication flow between two sides containing more packets exchanged in both ways the situation becomes a bit more complicated. For more details read the “Create a TCP Connection” part.
Create a TCP Connection
It is a little tricky to simulate a TCP connection. It is necessary to keep the acknowledgement and sequential numbers for each packet from within the same connection updating correctly. We were aware of this behaviour and so we added support for computing right sequence and acknowledgement numbers for TCP packets. However, to keep things simple the resulting mechanism might seem a bit confusing. We will not go into details of SEQ/ACK arithmetic in here, if you are interested in it please consult http://packetlife.net/blog/2010/jun/7/understanding-tcp-sequence-acknowledgment-numbers/ which is a very good description of the subject.
The fact is that to simulate a TCP communication between A and B you need two integers. The first will serve as a sequence number for A and also as an acknowledgement number for B, the second will serve as a sequence number for B and consecutively as an acknowledgement number for A. To keep the numbers right you have to call the update_tcp_control_length() function on the first number every time A sends data to B and use the same function on the second number every time B sends data to A. Also it is recommended to initialize these numbers randomly at the start of the communication. Initialization to 1 might lead to problems when there are any segmented data at the beginning of the communication.
We know that the description might be confusing (even though we tried it to be as clear as possible) so we provide a simple example.
# sequence number of A, acknowledgement number of BseqA = 5000# sequence number of B, acknowledgement number of AseqB = 3000# A sends data to B, data are captured and transformed into a fake TCP packetmydata = merge_headers_and_data(raw_data, 'udp', '1.1.1.1', '50', '2.2.2.2', '60', seqA, seqB)# seqA is updatedseqA = update_tcp_control_length(len(raw_data), seqA)# any processing necessary happens here, new data from B arrives# B sends data to A (reply to the previous data from A)mydata = merge_headers_and_data(raw_data, 'udp', '2.2.2.2', '60', '1.1.1.1', '50', seqB, seqA)# seqB is updatedseqB = update_tcp_control_length(len(raw_data), seqB)# any processing necessary happens here, new data from A arrives# A sends data to B (reply to the previous data from B)mydata = merge_headers_and_data(raw_data, 'udp', '1.1.1.1', '50', '2.2.2.2', '60', seqA, seqB)# seqA is updatedseqA = update_tcp_control_length(len(raw_data), seqA)# …
24
HotFuzz Developer’s guide
This way you can simulate a TCP communication which will be correct. You can check this by using a packet analyser, it should not object against the sequence or acknowledgement numbers and should line up the packets appropriately.
Modification and Extension of Data2pcap
Let us first note that data2pcap is open and available for any type of modification you might need to do. In fact we will be glad if you will reuse it in your own work and if it can spare you some developing time.
The current version of data2pcap supports only creation of fake UDP and TCP packets over IP over Ethernet. This is because we needed only these types of packets for HotFuzz and we did not need to use any other types. However, we knew that someone might need to create other types of packets too and so we have written data2pcap module to be easily extensible.
Every fake packet creation is composed of calls to create_XXX_hdr() functions where XXX stands for the desired protocol type. A TCP packet is created by create_eth_hdr(), create_ip_hdr() and create_tcp_hdr() in this order. A pcap wrapper enabling the packet to be written to a pcap file is created by calls to create_pcap_global_hdr(), create_pcap_pckt_hdr() and then the function to construct the desired packet type. This approach leaves you an easy way of modification—if you for example need to simulate a token ring instead of Ethernet you can write a new function create_tr_hdr() and call it instead of create_eth_hdr(). And that is it.
We have also prepared some functions for manipulation with hexadecimal data in Python. These functions can be found in the first part of the data2pcap source. The checksum function computing a one-complement binary number used in many headers is also prepared for you to use if necessary.
Module tm_export
Introduction
The tm_export module was written in C and provides the packet dissection functionality. It is based mainly upon the Wireshark libraries. In short, we can say that it is a wrapper around the Wireshark core dissection process that takes a bytearray containing a packet on the input and produces a tree-like structure derived from the results of the dissection process on the output. Because we needed to slightly change some of the Wireshark sources in order to make tm_export work we recommend you to read the “Technical issues” part if you want to reuse or modify this module.
Note that due to the fact that the tm_export module was created in a form of a dynamically linked library there are almost no restrictions on the programming language in which you create your application that will use this module. The only thing is that you must be able to load the library. For this purpose we have used the ctypes module to generate a wrapper for Python but you are absolutely free in this decision.
Technical Issues
The tm_export module is based upon the developer version of Wireshark 1.3.5, revision 32446. Because Wireshark is evolving quite fast and it is not extraordinary that a big portion of the code is altered to better suite the new approach taken by its developers it is very important to use exactly
25

HotFuzz Developer’s guide
this revision if you ever need to recompile the tm_export module. If you cannot, for any reason, use this revision, we highly recommend you to check the versions of individual headers that have been changed in the tm_export source code against the version of these headers in the revision you want to use. If these revisions differ then the compatibility might be broken and even though you might be able to recompile the module, the result might not work right.
Also there is a known issue with the tm_export module when another version of Wireshark is already installed on the machine where you want to use this module. This situation might produce a tricky error when everything seems to be just fine until you try to actually call any function from within the tm_export module. That leads to a Windows pop-up message saying something like “The libwsutil.dll library cannot be loaded. You may fix this by reinstalling the conflicting program.” This error has nothing to do with the libwsutil library at all. The problem is in the load-chain of the libraries. The tm_export module depends on the libwireshark.dll library which depends on a dozen of other libraries. The problem is that one of those libraries tries to load Wireshark plug-ins from the directory path which it finds in the registry and since tm_export does not write anything to the registry, it takes path to the plug-ins of the installed version of Wireshark. Since the plug-ins are usually incompatible with the version of Wireshark libraries used by the tm_export module, an error occurs. There is a way how to solve this problem “manually”, one just needs to change the directory where the plug-ins are stored. For more information about this see section “Troubleshooting: How to keep Wireshark installed” in the installation manual. Other solution might be to change the path in the registry but it did not work for us when we tried it. If you have time and will, you surely can look further into this and we will be very glad if you provide us with a better solution.
Usage
The tm_export module was designed to be as easy-to-use as possible. You just provide the data in a bytearray, the module checks whether it looks like a valid packet and if so, it calls the Wireshark dissection core. This approach was fine for us since we just needed the packet to be dissected if the dissection core can do it and an indication of failure otherwise. If you need to control the dissection process anyhow, you might try to modify the tm_export module on your own (see the section Modification and extension of tm_export) but we recommend you to write to the Wireshark developer forum for some hints at first since adapting the Wireshark code is one of a hard cakes to bite.
To be able to use the tm_export module, you basically need the functions available in the tm_export.h file. We will skip their detailed description since you can find it in the generated Doxygen documentation or in the source code itself and we will have a look at the input and output structures and at a simple example of one packet dissection.
Example Usage
As we mentioned earlier, there are just a few functions you need to use when you want to use the tm_export module. You have to initialize global dissection structures and memory for them at the very beginning. Then you have to initialize local dissection structures for every individual communication (well, you does not have to, you can use the same local dissection structures for different communications but it is a bit memory-consuming then). Then you call the dissection process itself and use the output as you need. After you do not need the output any more you should free the memory that was allocated for it. When you are finished with dissection you call the cleanup functions for local and global dissection structures and that is all.
And how does it look in the pseudocode?
26
HotFuzz Developer’s guide
# initialize global dissection structureshf_dissect_init()# initialize local dissection structureshf_one_iteration_init()# do the dissection(0 stands for the NODEBUG mode)result = hf_dissect_one_packet(data,0)# now do some result processing you want to do# free the structures of the dissected packethf_free_datamodel(result)# free the local dissection structureshf_one_iteration_cleanup()# free the global dissection structureshf_dissect_cleanup()
Input/Output Structures
There are only two functions that expect an input from you. The first is the hf_dissect_one_packet() function that calls the dissection of the data you provide it with. The second is the hf_free_datamodel() function that expects to be called on the input of the first function after you no longer need it. Therefore you just need to understand what to provide to the hf_dissect_one_packet() function and what it returns you.
The input should be a bytearray containing a valid packet. You can use the wrapper generated around raw data using merge_headers_and_data() function from the data2pcap module or construct it using other ways. For an example of such input you may use the data2pcap module. Using C conventions, the input is defined as
unsigned char * in_data;
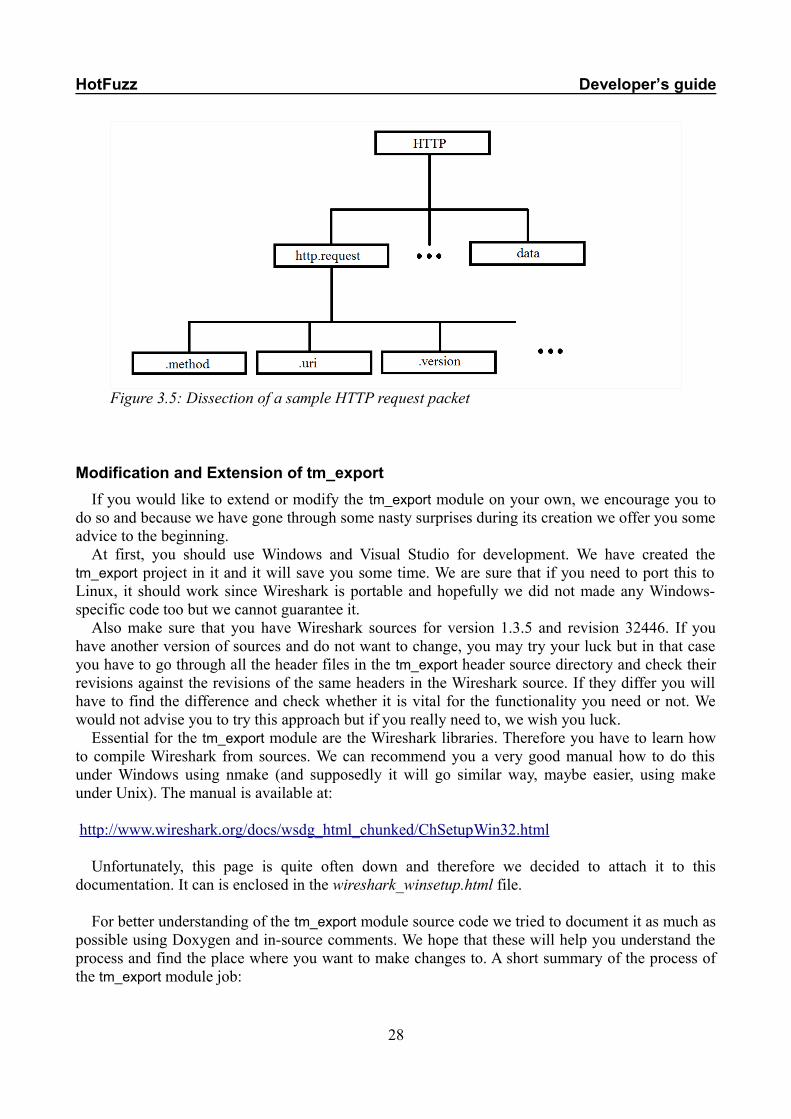
The output is a tree structure constructed from nodes with individual meaning. Every node has the same structure which can be seen in the Doxymentation to the hf_mynode struct or in the tm_export.h source file. A visualisation of the tree structure resulting from a simple HTTP packet dissection is in the following picture.
27
HotFuzz Developer’s guide
Modification and Extension of tm_export
If you would like to extend or modify the tm_export module on your own, we encourage you to do so and because we have gone through some nasty surprises during its creation we offer you some advice to the beginning.
At first, you should use Windows and Visual Studio for development. We have created the tm_export project in it and it will save you some time. We are sure that if you need to port this to Linux, it should work since Wireshark is portable and hopefully we did not made any Windows-specific code too but we cannot guarantee it.
Also make sure that you have Wireshark sources for version 1.3.5 and revision 32446. If you have another version of sources and do not want to change, you may try your luck but in that case you have to go through all the header files in the tm_export header source directory and check their revisions against the revisions of the same headers in the Wireshark source. If they differ you will have to find the difference and check whether it is vital for the functionality you need or not. We would not advise you to try this approach but if you really need to, we wish you luck.
Essential for the tm_export module are the Wireshark libraries. Therefore you have to learn how to compile Wireshark from sources. We can recommend you a very good manual how to do this under Windows using nmake (and supposedly it will go similar way, maybe easier, using make under Unix). The manual is available at:
http://www.wireshark.org/docs/wsdg_html_chunked/ChSetupWin32.html
Unfortunately, this page is quite often down and therefore we decided to attach it to this documentation. It can is enclosed in the wireshark_winsetup.html file.
For better understanding of the tm_export module source code we tried to document it as much as possible using Doxygen and in-source comments. We hope that these will help you understand the process and find the place where you want to make changes to. A short summary of the process of the tm_export module job:
28
Figure 3.5: Dissection of a sample HTTP request packet
HotFuzz Developer’s guide
• read the input bytearray
• check the pcap global and local headers for validity and strip them off
• prepare Wireshark dissection structures and variables
• do the dissection process
• check the sanity of the output from the dissection
• translate the output of the dissection process into a tree structure
• cleanup the dissection structures and variables
• return the output in a form of a tree structure
If you have any troubles during your modification work, feel free to contact us if it will be about the tm_export code or use Wireshark developer forum to find answers to questions about the behaviour of Wireshark libraries.
Calling Wireshark Code from Python
The Wireshark analyser is written in C and the Peach fuzzing framework is written in Python. This was quite a problem, since we wanted to use some particular parts of Wireshark inside Peach and we did not want to slow down the fuzzing process (e.g. by starting a new process during each iteration).
Fortunately, Python contains the ctypes module which allows Python scripts to call C functions from shared libraries (*.so, *.dll). So after we created the shared library, we were able to use the ctypes module to call a particular C function in our Python code. Unfortunately, using the ctypes module was not so easy. So we decided to use a program called ctypesgen. It generates a code, which wraps all necessary C functions and structures (from a single header file) into a valid Python script file using the ctypes module.
This was quite beneficial, because whenever we made a change in the API of the shared library, we were able to generate a corresponding Python code with no extra effort.
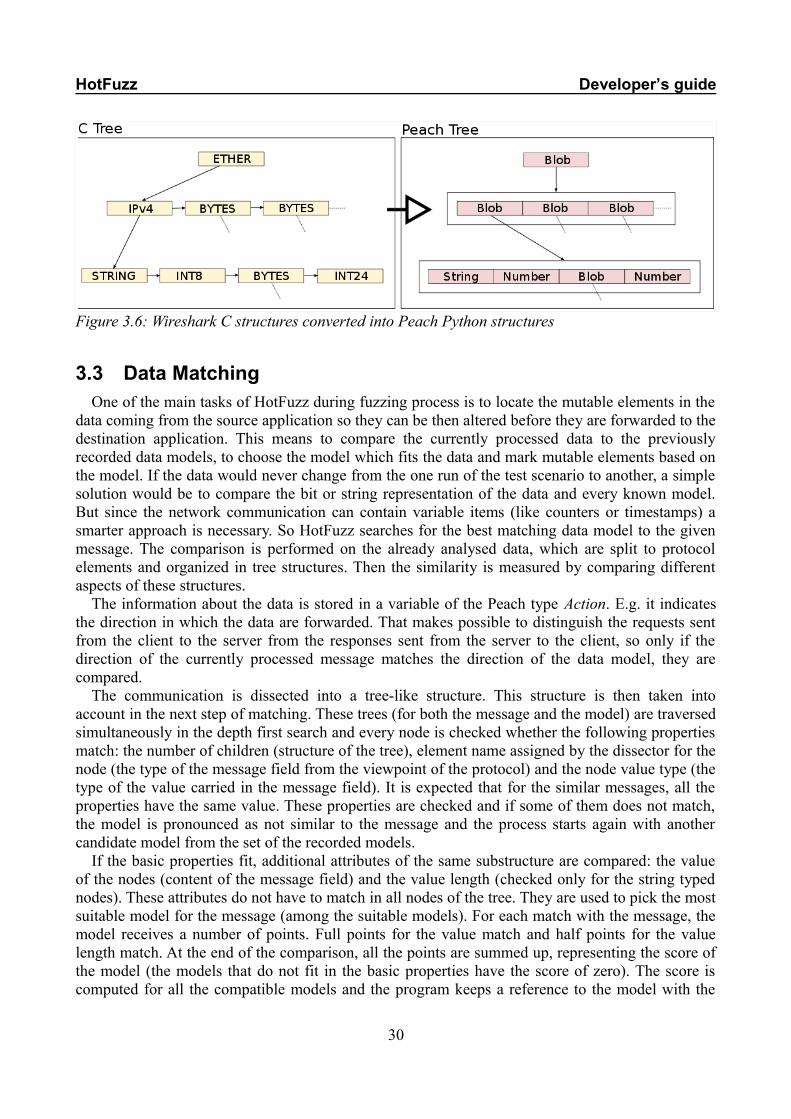
Converting Wireshark Structures into Peach Structures
The communication between Peach and the Wireshark analyser proceeds as follows. Peach sends the entire message as a parameter of a C function and receives a pointer to a C tree structure representing one Wireshark datamodel. This tree is not well suited for a further usage, so it is necessary to perform some conversion actions. The conversion changes the structure of the tree from the pointer linked structures (C approach) to array linked structures (Python approach). It also remaps the Wireshark types into the Peach types. The incoming C structures have more or less the same layout as the outgoing Python structures.
29
HotFuzz Developer’s guide
3.3 Data MatchingOne of the main tasks of HotFuzz during fuzzing process is to locate the mutable elements in the
data coming from the source application so they can be then altered before they are forwarded to the destination application. This means to compare the currently processed data to the previously recorded data models, to choose the model which fits the data and mark mutable elements based on the model. If the data would never change from the one run of the test scenario to another, a simple solution would be to compare the bit or string representation of the data and every known model. But since the network communication can contain variable items (like counters or timestamps) a smarter approach is necessary. So HotFuzz searches for the best matching data model to the given message. The comparison is performed on the already analysed data, which are split to protocol elements and organized in tree structures. Then the similarity is measured by comparing different aspects of these structures.
The information about the data is stored in a variable of the Peach type Action. E.g. it indicates the direction in which the data are forwarded. That makes possible to distinguish the requests sent from the client to the server from the responses sent from the server to the client, so only if the direction of the currently processed message matches the direction of the data model, they are compared.
The communication is dissected into a tree-like structure. This structure is then taken into account in the next step of matching. These trees (for both the message and the model) are traversed simultaneously in the depth first search and every node is checked whether the following properties match: the number of children (structure of the tree), element name assigned by the dissector for the node (the type of the message field from the viewpoint of the protocol) and the node value type (the type of the value carried in the message field). It is expected that for the similar messages, all the properties have the same value. These properties are checked and if some of them does not match, the model is pronounced as not similar to the message and the process starts again with another candidate model from the set of the recorded models.
If the basic properties fit, additional attributes of the same substructure are compared: the value of the nodes (content of the message field) and the value length (checked only for the string typed nodes). These attributes do not have to match in all nodes of the tree. They are used to pick the most suitable model for the message (among the suitable models). For each match with the message, the model receives a number of points. Full points for the value match and half points for the value length match. At the end of the comparison, all the points are summed up, representing the score of the model (the models that do not fit in the basic properties have the score of zero). The score is computed for all the compatible models and the program keeps a reference to the model with the
30
Figure 3.6: Wireshark C structures converted into Peach Python structures
HotFuzz Developer’s guide
currently highest score. At the end of the process, the most successful model is used to mark mutable fields of the message.
Due to many possible ways how the models can differ (caused by a wide range of protocols and their messages), there were many solutions considered for this task. The main concern is to find a reasonable compromise between choosing a model which in fact does not belong to the message (too loose comparison) and not identifying a model which in fact does belong to the message (too strict comparison). We started with a simple test of the isomorphism between the communication trees, which proved to work as a basic requirement and later we developed a several ideas for the finer selection, including the construction of sets of tree operations needed to transform a model to a given message. However, this approach appeared to be very difficult to implement in an early stage of its development. Therefore we started to experiment with the scoring function which could be implemented much faster and its basic idea fits the needed selection well. The testing on different protocols showed that the function gives satisfying results. In the most cases it chooses the model which really belongs to the message, thus we adopted it as the final solution. The disadvantage of the function is that it requires a rather complex modular design for the individual tests so they can be used separately and in the convenient way. This however causes that the same trees have to be traversed multiple times, making data matching slower.
3.4 Recorded Data Aggregation The purpose of the recorded data aggregation is to merge the data models produced in the
multiple test cases of the recording process. The merging is meant to make the resulting models smaller, more efficient and easier to use. For extensive communication like HTTP, one test case can easily produce data models of a size of megabytes (which is needed to be edited and processed), so with more test cases the aggregation has significant impact. The main aim of the aggregation is to eliminate all possible duplicities of the messages that are already a part of the cumulative data model set. At the beginning the set contains unchanged data models of the first test case. Then the models from the following test cases are included only if they are distinct from all the models, which are already in.
The decision about the duplicities and differences is based on the very same scoring function that is used for the data matching (for detailed description of the function, see the Data matching chapter). This is apparent and natural as multiple runs of recording can be, in terms of data model similarity, viewed the same as multiple runs of a fuzzing. If a given message would be matched with a given model during the fuzzing anyway, it makes sense to merge the message into the model right away.
Yet, some Actions have to be treated in a special way. These are the Actions that do not contain any data (one form of the terminating Action) or have the terminateTestCase flag set (another form of the terminating Action). More precisely, this is a problem how to aggregate an Action that will let HotFuzz know that the current test case should be finished. As soon as such Action is detected, the proxy terminates the test case and does not forward data any more. It is clear that only one terminating Action should be in the resulting data model, which is not always the case, particularly when the multiple test cases are considered. Thus, to achieve this, before searching for the similarities aggregation, the program looks for the number and the position of the close Actions. The close Action is triggered when the client closes the connection to the server so there should be one close Action at the very end of every recorded test case. If this holds, the close Action is also included in the aggregated data model in the same manner. If not, the client does not close the connection itself and it should be checked whether a test case can be terminated by a data action instead. This is possible if in the each case of communication is the very same last data Action,
31
HotFuzz Developer’s guide
again decided by data matching. In this case, the terminateTestCase flag is set for the last action in the aggregated data model.
3.5 Structure of the HotFuzz Configuration FileThe XML Schema in the Appendix A describes the structure of the HotFuzz configuration file.
The HotFuzz configuration files are in many aspects similar to Peach configuration files. The reason for that is that we wanted to minimize changes to Peach configuration file parser, which is fortunately written in a very flexible way, so we were able to insert additional information into our configuration files without needing to write a parser of our own. One of the results is that it is possible to include some of the Peach features, like Peach monitors, and use them to enhance the HotFuzz functionality. However full compatibility can not be guaranteed and a description of the Peach features that can be used along with HotFuzz is beyond the scope of this XML Schema.
32
HotFuzz Developer’s guide
4 GUI
The main purpose of the GUI application is to simplify the use of the Peach fuzzing framework back-end.
It does not provide any extra fuzzing related functions and all its functionality can be achieved by using the standard console Pitm application. Moreover the GUI application does not cover every fuzzing configuration, which can be set using the Peach fuzzing framework. It just covers a reasonable subset of its functionality related to the HotFuzz project. GUI is distributed under the same license as the Peach fuzzing framework, so feel free to extend and modify its features.
Source Code Generation
The Qt Designer does not directly generate Python source files. It generates ui files. (These files use an XML format to represent form elements and their characteristics.) PyQt4 provides with the pyuic4 utility, which is capable of converting the ui files to the Python source files. There is also one resource file (GUI/images/resource.qrc) containing informations about the images used, which has to be compiled using the pyrcc4 utility.
To automate these actions use the Python script file GUI/build.py or use the make command inside the GUI/ directory.
Main Functions Overview
• Providing a dialog logic (Dialogs) • Starting fuzzing and recording external processes (Main window dialog, programs) • Manipulating with fuzzing and recording XMLs (Main window dialog, XML manipulation) • Viewing crashes (Main window dialog, Action view dialog, Dump files) • Keeping application settings (Application settings, Main window dialog) • The project management (projects Project Files, Intro dialog) • Providing undo/redo actions (Undo Actions, Main window dialog)
Application File Overview
• GUI/udpcommunicator.py – Classes used for the communication with Pitm • GUI/xmlmanipulators.py – Classes used for the XML processing (loading and storing) • GUI/actionview.py – A logic of the Action View dialog • GUI/dumpreader.py – Classes used to process the crash informations • GUI/globals.py – Global definitions • GUI/hotfuzzplugin.py – Plugins for Qt designer • GUI/hotfuzzwidget.py – Specially modified widgets (for Qt designer and main window) • GUI/intro.py – A logic of the Intro Dialog • GUI/mutators.py – A class, which links the mutator widget with the element of the XML tree • GUI/preferences.py – A logic of the Preferences Dialog • GUI/project.py – A project class
33
HotFuzz Developer’s guide
• GUI/projectinfo.py – A logic of the Project Info Dialog • GUI/projectnew.py – A logic of the Project New Dialog • GUI/projectrecent.py – A logic of the Project Recent Dialog • GUI/settings.py – Application settings • GUI/shared.py – A file containing shared non-class functions • GUI/testport.py – A class for testing whether the given port on the given host is accessible • GUI/undoactions.py – Classes for performing GUI undo actions • GUI/window.py – A logic of the Main Window Dialog• GUI/schema/project.xsd – A schema for verification of project XML files • GUI/images/ – A directory for images • GUI/templates/ – A directory with templates for fuzzing and recording phases and a default
project XML • GUI/ui/ – A directory containing ui files created in the Qt Designer
4.1 Dialogs
Basic Dialog Logic
The GUI application is started by executing hotfuzzGUI.pyw from the project root directory. It initializes the Main Window, shows the splash screen and triggers the Intro Dialog. The purpose of the Intro Dialog is to open a project. If the Intro Dialog exits without opening a project, the whole application exits. The Intro Dialog can be opened only during a startup.
All other dialogs can be started from the Main Window Dialog.After a new dialog is started, the Main window becomes inaccessible until the dialog is closed.
The Main Window becomes inaccessible after a new dialog is started. It becomes accessible again after the dialog is closed.
Standard Qt Dialogs
We tried to use as many standard Qt dialogs as possible. Standard Qt dialogs are often customized according to the current window manager of a particular operating system, thus all Qt dialogs look like native system dialogs.
We use these dialogs to query for the path to existing/non-existing files/directories (Standard open/save dialogs), for short error messages and for short confirmation messages.
Main Window Dialog
This dialog is the most important dialog of our application. It opens all other dialogs and processes signals from numerous types of events. Moreover all external programs are started within this dialog.
Its basic skeleton was created in the Qt designer (see GUI/ui/window.ui and GUI/ui_window.py) and the main logic was added in GUI/window.py. It consists of 4 tabs, the Main Menu and the Status Bar.
The first tab is responsible for editing recording XMLs and starting Pitm in a recording mode. Note, that the most of its widgets start with a “recording” prefix.
34
HotFuzz Developer’s guide
The second tab is responsible for editing mutators and the “mutable” part inside the datamodel element in fuzzing XMLs. It can also restore last recorded XML (“project dir”/recording-out).
The third tab is responsible for editing fuzzing XMLs and starting Pitm in a fuzzing mode. Note that the most of its widgets start with a “fuzzing” prefix.
The fourth tab provides the user with a dump viewing functionality. It opens the Action View Dialog (Action view dialog) and starts an external debugger program (probably windbg).
The Main Menu contains:• standard save/open dialogs,• import/export recoding/fuzzing XMLs dialogs,• the Preferences Dialog,• About dialog,• the Project Info Dialog,• undo/redo actions.
We did not want to bother users with annoying message boxes, so the Status Bar is used to display all important messages.
The Main Window also stores informations about the currently opened project.
Application Settings
Whenever the Main Window is starting, it loads application settings and modifies its internal variables according to these settings. Whenever the Main Window is closing, it prompts whether to store unsaved changes to the project and then it stores its internal variables to the application settings.
These settings are stored in an ini format to a system dependent location using the reimplementation of the standard Qt QSettings class. In Windows, it is the file C:\Documents and Settings\USERNAME\Application Data\HotFuzz\HotFuzz GUI.ini.
These settings can be restored to defaults or modified in the Preferences Dialog.
Intro Dialog
An introductory application dialog. This dialog is not started from the Main Window Dialog, but from an application start wrapper (hotfuzzGUI.pyw). It can not be started from the Main Window. When this dialog exits without opening valid project, it closes the main window thus causing application to exit.
Its basic skeleton was created in the Qt Designer (see GUI/ui/intro.ui and GUI/ui_intro.py) and the main logic was added in GUI/intro.py. It consist of three tabs.
The recent projects tab reads a list of recent projects provided by the Main Window Class and displays some basic informations about these projects. The maximum count of the recent projects can be set in the Preferences Dialog.
The new project tab reads project template XML files (GUI/templates/fuzzing/, GUI/templates/recording/, GUI/templates/project/) and displays them in a fuzzing/recording template list. After hitting the Create Button, Qt dialog is opened. A path to a new project can be chosen there. Then these templates are copied to the new project directory. The project XML is modified according to the editable project informations.
The open project tab browses a path to an existing project. If the project XML file is valid, an info is shown and the project can be opened by the Open Button.
35
HotFuzz Developer’s guide
Preferences Dialog
This dialog is responsible for updating Main Window variables, which represent current application settings. The application settings themselves is updated when the Main Window exits. However, pressing the Restore Defaults Button causes that the application clears its settings, thus restoring the state, which was present during the first start of the application.
Its basic skeleton was created in the Qt Designer (see GUI/ui/preferences.ui and GUI/ui_preferences.py) and the main logic was added in GUI/preferences.py.
This dialog can be triggered only through the Main Menu or by pressing a corresponding shortcut.
New Project Dialog
The New Project Dialog is very similar to the new project part of the Intro Dialog. The code is more or less the same.
It reads project template XML files (GUI/templates/fuzzing/, GUI/templates/recording/, GUI/templates/project/) and places them into a fuzzing/recording template list. After hitting the Create button, a Qt dialog is opened. A path to a new project can be chosen there. Then these templates are copied to the new project directory. The project XML is modified according to the editable project informations.
Its basic skeleton was created in the Qt Designer (see GUI/ui/projectnew.ui and GUI/ui_projectnew.py) and the main logic was added in GUI/projectnew.py.
This dialog can be triggered only through the Main Menu or by pressing a corresponding shortcut.
Recent Project Dialog
The Recent Project Dialog is very similar to the recent project part of the intro dialog. The code is more or less the same.
It reads a list of recent projects provided by the Main Window Class and displays some basic informations about these projects. The maximum count of the recent projects can be set in the Preferences Dialog.
Its basic skeleton was created in the Qt designer (see GUI/ui/projectrecent.ui and GUI/ui_projectrecent.py) and the main logic was added in GUI/projectrecent.py.
This dialog can be triggered only through the Main Menu or by pressing a corresponding shortcut.
Project Info Dialog
This is a very simple dialog, which just modifies the informations about the currently opened project. The project structure itself is the one of a Main Windows variables.
Its basic skeleton was created in the Qt Designer (see GUI/ui/projectinfo.ui and GUI/ui_projectinfo.py) and the main logic was added in GUI/projectinfo.py.
This dialog can be triggered only through the Main Menu or by pressing a corresponding shortcut.
36
HotFuzz Developer’s guide
Action View Dialog
The purpose of this dialog is to show users the communication between a server and a client before the program crashed. It can open parts of the communication in an external text editor.
Its basic skeleton was created in the Qt Designer (see GUI/ui/actionview.ui and GUI/ui_actionview.py) and the main logic was added in GUI/actionview.py.
This dialog can be triggered only through the dump tab of the Main Window.
4.2 Projects An essential part of the GUI application is a project.Project is a class used by the Main Window to keep some informations about the currently opened
project. The project contains a path to a directory where all necessary files are located (a.k.a. the project directory). The project can be considered loaded when all of its files are successfully loaded into the Main Window (project.xml, fuzzing.xml, recording.xml and the dump/ directory). The Main Window has to have an opened project instance.
The project can be stored to a user-specified location. the user has to have necessary rights to create the project directory in the specified location. the user has to have a read permission to a project directory to load a project.
Project Files
The structure of the project directory is as following:
• recording.xml – A file used in the recording phase. (mandatory) • recording-out.xml – An output file of the recording phase. If this file is successfully loaded
after the recording phase, it becomes a new fuzzing-orig.xml and fuzzing.xml. (optional) • recording-edit.xml – A file edited by an external editor. If this file is successfully loaded after
the editor exits, it becomes a new recording.xml. (optional) • fuzzing-orig.xml – An output of a successful recording phase or the original fuzzing XML
template. (mandatory) • fuzzing.xml – A file used in the fuzzing phase. (mandatory) • fuzzing-edit.xml – A file edited by an external editor. If this file is successfully loaded after the
editor exits, it becomes a new fuzzing.xml. (optional) • project.xml – A file containing some project related informations. (mandatory) • dump/ – A directory for storing sessions and crashes of the fuzzing phase. (mandatory, but can
be empty)
XML Manipulation
The GUI application is capable of manipulating (storing and loading) with three types of XML files – fuzzing.xml, recording.xml and project.xml. The fuzzing and the recording XML are passed to Pitm as one of its parameters. The project XML is used to store overall project informations. The load operation always precedes the store operation.
The recoding.xml and the fuzzing.xml are files which are used by the external Pitm program, so manipulating with these files is quite similar.
37
HotFuzz Developer’s guide
After a file is loaded, a new XML element tree is created. Then, some known elements of the tree are used to update the corresponding GUI’s widgets.
Own Widgets and Undo Actions allow to perform undo/redo actions.The fuzzing manipulator also modifies the XML’s mutator section. Each mutator element is
bound to the one of the check boxes in the second tab. Whenever one of these check boxes changes its state, it triggers an immediate change of the fuzzing XML tree.
The fuzzing manipulator also modifies the datamodel XML tree elements. It sets the attribute mutable to “true” or “false” inside particular tree elements. Every datamodel is also bound to the one of the tree widget items. These items are created when the tree is loaded and placed in the datamodel tree widget. Whenever one of these tree widget items changes its state, the fuzzing XML tree is changed.
All other widgets change the XML element tree during the storing phase. The contents of the whole XML element tree is stored into an XML file at the end of the storing phase.
A manipulation with a project.xml file is easier, because no XML tree is created during this operation. All necessary elements are loaded into the project class instance of the Main Window. The store function places the corresponding variables of the project class appropriately.
Dump Files
When Pitm is started in the fuzzing mode, a new directory in <project-directory>/dumps/ appears. This directory is created by Pitm and the GUI application allows to examine its contents.
The directory contains a file with informations about the fuzzing session named status.txt.There are also some informations about each individual crash within the one of its many
subdirectories:
• ServerAgent_StackTrace.txt – A file containing some useful information about the crash. • ServerAgent_Dump.dmp – A dump file which can be opened in a debugger. • data_*.txt – Files which contain a communication sequence that caused the crash.
GUI tries to visualize these informations as well as possible (in the Action view dialog and the Main window dialog). GUI loads contents of the whole dump directory whenever the user stops the fuzzing phase or whenever the Refresh button is pressed. The user can see the current contents of the directory even when the fuzzing phase is still running.
4.3 WidgetsGUI uses a various kinds of Qt widgets (e.g. Check Boxes, Labels, Tabs, Layouts, etc.)
Unfortunately, these widgets does not provide all the functionality we need. So it was necessary to extend some of the existing widgets.
Own Widgets
GUI reimplements 4 types of the basic widgets: Check Box, Line Edit, Spin Box and Radio Button. These classes were modified to override the default focusInEvent and focusOutEvent event handlers. During the focusInEvent the class stores its original value to an internal class variable. The original value is compared to the current widget value during focusOutEvent and when these values differ, widget emits a signal containing the original value.
38
HotFuzz Developer’s guide
The Radio Button widget was modified more than the others. It was necessary to remember the state of the whole group to which the Radio Button belongs.
GUI also reimplements the tree widget items of the datamodel tree widget. These widgets are associated with a corresponding node of the fuzzing XML element tree. The change of the state of the widget can be immediately reflected in the fuzzing XML tree thanks to this feature.
Some other tree widget items are reimplemented as well. These modification extends the original class with additional informations (e.g. a path to dump file).
Qt Designer Plugin
Unfortunately, modified basic widgets can not be used in the Qt Designer, because the Qt Designer is not aware of their existence. This was quite unpleasant, since these widgets form the vast majority of widgets we use in the Main Window of the application.
So we created a new Qt Designer plugin for each widget. (See GUI/hotfuzzplugin.py). If you want to use the Qt Designer, you need to force the Qt Designer to load plugins from a specific location.
The easiest way to do this is to modify PYQTDESIGNERPATH environmental variable. E.g. export PYQTDESIGNERPATH="path to hotfuzz root dir"/GUI/Or you may just copy the plugin file into the standard Qt Designer plugin directory.After the Qt designer is started, four new components should appear in the Widget Box:
• HotFuzzRadioButtonWidget,
• HotFuzzCheckBoxWidget,
• HotFuzzLineEditWidget and
• HotFuzzSpinBoxWidget.
Undo Actions
The main reason why we have to use modified basic widgets is to provide useful undo/redo actions for the GUI application. The modified widgets generate signals, which are caught by the Main Window class. As a reaction to these signals, a new undo action is created and placed on the top of the active undo stack. There are 3 stacks, which are bound to a currently opened tab.
The undo/redo actions can be triggered through the Main Menu or by pressing a corresponding shortcut.
Undo stacks are cleared whenever a new project or a corresponding part of the project is loaded.
4.4 External Programs One of the main purposes of GUI is to manage the external Pitm program. The external Pitm
program has to carry out the recording and the fuzzing phases.There are also other external programs, which are start from GUI—a text editor and a debugger.
Path to both programs can be set in the Preferences Dialog.The Pitm proxy process and two Pitm agent processes can be started from GUI—an agent
process and a server process. The Agent process is a wrapper around client/server programs. It listens on a specified port and is responsible for managing the application process. It is not recommended to stop these processes during the fuzzing/recording phase. Sometimes it may happen
39

HotFuzz Developer’s guide
that these processes have to be killed manually. It is quite annoying, because these processes block the ports on which they communicate.
The Pitm process represents the main fuzzing/recording process. Its parameters and life cycle are quite complex. To provide some basic informations and to influence the process life cycle a special UDP communicator was added into the Pitm and GUI. A special UDP communicator was added into Pitm and GUI. GUI can query for some basic informations and influence the life cycle of the Pitm process through the communicator.
Peach Communicator
Pitm is considered to be a server process. It listens on a specified port (defaults to 12559). GUI connects to the Pitm process port in a separate thread.
A basic GUI requests are:• Pause Peach – A GUI thread sends a pause signal, waits for the answer and changes the state
of the Pause button (udpcommunicator::communicatorPauseThread)• UnPause Peach – A GUI thread sends an unpause signal, waits for the answer and changes
the state of the Pause button (udpcommunicator::communicatorUnPauseThread)• Register iteration – A GUI thread sends a registration signal to Pitm. Pitm sends a packet
with a iteration number and a crash indicator at the beginning of each iteration. (udpcommunicator::communicatorIterationThread)
• Kill Peach – A GUI thread sends this signal to force the Pitm process to quit. It does not wait for a return value. GUI started the Pitm process and can find out when exactly the process ended. (udpcommunicator::communicatorKillThread)
Starting Pitm
The Pitm starts from GUI using the Start button in the Pitm part of the fuzzing and recording tab. GUI uses a lot of command line parameters (e.g. a communicator port, a debug level, etc.). The most significant of those parameters is the path to the fuzzing or recording XML. GUI stores its current state into the fuzzing or recording XML in the tmp directory before it starts Pitm. The path to this XML is passed as a command line parameter (it is the most significant parameter on the command line, because the XML contains all fuzzing/recording related things). The complete list of the command line parameters is written to the Status Bar and into standard application output.
The dialogs also contain the Start All button. This button starts agents, waits until they start to listen on the specified ports and then starts the Pitm program. A special class was designed to perform the waiting operation. This waiting operation can be cancelled at any time by pressing the Escape key.
Stopping Pitm
Stopping the Pitm process at any time might be a problem. The Pitm process has to stop the client/server programs first. So GUI does not kill the Pitm process after hitting the Stop button. It only sends a kill signal through the communicator. This operation might not be always successful (e.g. when Pitm is not listening on the selected port yet). After the process stops, some cleaning actions are performed.
This approach brings more problems to the Stop All button implementation. It has to terminate Pitm first. After Pitm is successfully terminated, it can terminate both agents. So it sends a kill
40

HotFuzz Developer’s guide
signal to Pitm and then waits 10 seconds for Pitm to exit. If Pitm exits within the timeout, no harm is done and both agents are correctly terminated. However, when the timeout occurs, it kills Pitm instantly. This may cause that the client/server applications still occupy their ports.
41
HotFuzz Developer’s guide
5 Development of HotFuzz
5.1 History of the ProjectThis chapter describes the development process of the project core. The term core means the
functionality of a proxy that is able to capture and forward data; later, a packet dissection feature and fuzzing have been incorporated into the proxy. The following text describes the main tasks of the project in detail, explains the important features that have been implemented and some issues that needed to be resolved. They are listed in the form of separate paragraphs in the order they came up during the development process.
A lot of effort has been done to get familiar with Peach and its functionality. It was a challenge to actually install it and run the examples that are shipped with it. Since that time (April 2009), the installation of Peach has been changed (it is shipped as a compiled binary and a few bugs with its dependencies have been fixed), thus the installation process is easier today. As beginning users of Peach, we tried to alter some of the example configuration files to get familiar with it. There is a documentation for Peach, but it is limited and sometimes out-of-date. The Peach mailing-list turned out to be helpful, example configurations have been heavily used and the source code was studied in order to understand the program behaviour.
The Peach source code can be quite complicated to understand because of its volume. To be able to understand how it works, we wrote a minimalistic derivative of Peach, which provided the basic functionality (without checking all exceptions or cases that we were not interested in) and we were able to traverse and understand the code quickly. The Peach code itself is roughly commented.
Different team members were associated with different tasks, but almost all of them had to learn Python and understand Peach. One of the development team members wrote a paper that explained the Peach internals to the rest of the team members.
A proxy has been made that allowed client-server communication. This proxy was incorporated into our minimalistic version of Peach. A decision had to be made, whether to continue using this minimalistic version, or to transfer all new features back to the original Peach. The second option won and it turned out to be good choice in the end. The main reason for using the original Peach was higher compatibility of the source codes and that it would be easier to port changes made in Peach into HotFuzz and vice versa.
While using real client and server programs with this proxy, we realised that the server needs to be listening before the client program attempts to connect to it. This was not ensured at the beginning and the result were missing data for recording or unnecessary timeouts and errors. Currently, the client program attempts to initialize a connection after the port is open.
Another strategic decision was about the separation of the HotFuzz code—whether the Peach code will be modified, or the changes will be kept in separate files. The latter option has been chosen. Some changes in the Peach code have been necessary anyway, but we tried to keep them as few as possible.
During this work, the part involving Data analysis was getting done and ready for use within the proxy.
The first version of the proxy was not able to read data from the client side if it was expecting data from the server side and vice versa. The proxy could be considered working only after using the select() call and carefully mirroring the state of the sockets (i.e. if a server program shuts the socket down for reading, it will be done on the listening interface, too).
42
HotFuzz Developer’s guide
It is appropriate to allow the user to choose which parts of the transferred data are to be mutated and which are not. It was an important decision on how to achieve this. It seemed to be convenient for the user if he had the opportunity to see a typical communication and to mark the parts that he wants to mutate. Because a real client program and a real server program are used, there is no rule that the communication will be exactly the same when the same scenario is repeated (e.g. a web application generates a cookie with a session identification token that is pseudo-randomly generated, which means, practically, always different). Moreover, the applications can get into a state when they send some data that are different than the data sent at the beginning and shown to the user. (We assume that showing every “new” data to the user and waiting for the configuration of the mutable parts is not appropriate, since the fuzzing itself is expected to be an automated process without a lot of human attention.)
The result is, that a recording is performed first, the resulting data models are marked with mutable and immutable flags and the data, that are transferred during the fuzzing, are compared to those marked data models. If the currently processed data matches one of the data models from the configuration, mutable flags are applied and mutations are performed according to these flags.
Some parts were completely rewritten, like the proxy core, which code was growing with every edge case that needed to be checked for.
The first success was crashing the CesarFTP server that suffers from buffer overflow in the argument of the XMKD command. It was a proof that we are able to select only some parts of the communication to be fuzzed. If the communication was fuzzed during the authentication unintentionally, commands like XMKD could not be used.
The GUI became pretty much usable and almost all developers left the command-line and started to use the GUI for running HotFuzz.
Support for UDP protocols has been implemented. This was tested on the BIND server and it was functioning surprisingly well at the first run. Because the UDP protocol is much more simple than the TCP protocol, the code is also more simple. But there is one caveat: It is difficult to detect, when the connection is closed. If the server (or the client) sent all the data, the test case could be finished and a new test case could be started, but the UDP proxy does not receives any information like the TCP proxy does (e.g. packets flagged as FIN). Timeouts can be used, but this is very ineffective, as successful fuzzing relies on performing as many test cases as possible within a given time amount. There were solutions implemented to avoid unnecessary delays.
Some issues arise during the use of the BadBlue web server (shipped within the package), as this scenario produces a more extensive amount of communication. There were issues to be solved like that the dissected data returned by Wireshark did not contain all the data that were submitted into dissection. All such errors that we are aware of are now fixed.
The last two months (July and August 2010) of the HotFuzz project development were mainly about fixing errors and ensuring that the prepared projects are working.
5.2 Development of the Dissection Process in HotFuzzAt first, there was a need. A need to analyse the communication going through HotFuzz. The first
approach was to use Tshark, the commandline version of the Wireshark packet analyser, to capture and analyse the traffic. This approach was soon abandoned since we needed to use sockets to deliver data to and from HotFuzz and it was not possible to let Tshark capture the traffic on the network interface since we would not be able to synchronize this “double delivery” process. (Note that it is not possible to listen on a loopback interface on Windows.) We have decided to do a little workaround and create fake packet headers around the data that come through a socket. There is a
43
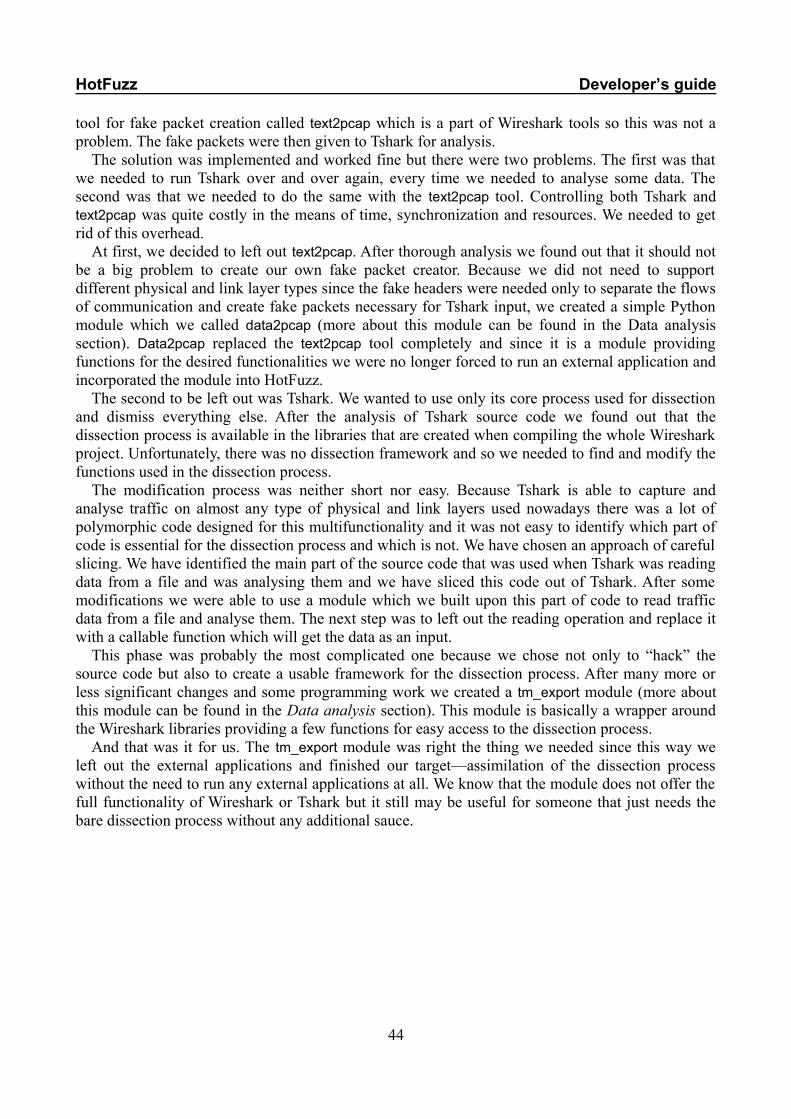
HotFuzz Developer’s guide
tool for fake packet creation called text2pcap which is a part of Wireshark tools so this was not a problem. The fake packets were then given to Tshark for analysis.
The solution was implemented and worked fine but there were two problems. The first was that we needed to run Tshark over and over again, every time we needed to analyse some data. The second was that we needed to do the same with the text2pcap tool. Controlling both Tshark and text2pcap was quite costly in the means of time, synchronization and resources. We needed to get rid of this overhead.
At first, we decided to left out text2pcap. After thorough analysis we found out that it should not be a big problem to create our own fake packet creator. Because we did not need to support different physical and link layer types since the fake headers were needed only to separate the flows of communication and create fake packets necessary for Tshark input, we created a simple Python module which we called data2pcap (more about this module can be found in the Data analysis section). Data2pcap replaced the text2pcap tool completely and since it is a module providing functions for the desired functionalities we were no longer forced to run an external application and incorporated the module into HotFuzz.
The second to be left out was Tshark. We wanted to use only its core process used for dissection and dismiss everything else. After the analysis of Tshark source code we found out that the dissection process is available in the libraries that are created when compiling the whole Wireshark project. Unfortunately, there was no dissection framework and so we needed to find and modify the functions used in the dissection process.
The modification process was neither short nor easy. Because Tshark is able to capture and analyse traffic on almost any type of physical and link layers used nowadays there was a lot of polymorphic code designed for this multifunctionality and it was not easy to identify which part of code is essential for the dissection process and which is not. We have chosen an approach of careful slicing. We have identified the main part of the source code that was used when Tshark was reading data from a file and was analysing them and we have sliced this code out of Tshark. After some modifications we were able to use a module which we built upon this part of code to read traffic data from a file and analyse them. The next step was to left out the reading operation and replace it with a callable function which will get the data as an input.
This phase was probably the most complicated one because we chose not only to “hack” the source code but also to create a usable framework for the dissection process. After many more or less significant changes and some programming work we created a tm_export module (more about this module can be found in the Data analysis section). This module is basically a wrapper around the Wireshark libraries providing a few functions for easy access to the dissection process.
And that was it for us. The tm_export module was right the thing we needed since this way we left out the external applications and finished our target—assimilation of the dissection process without the need to run any external applications at all. We know that the module does not offer the full functionality of Wireshark or Tshark but it still may be useful for someone that just needs the bare dissection process without any additional sauce.
44
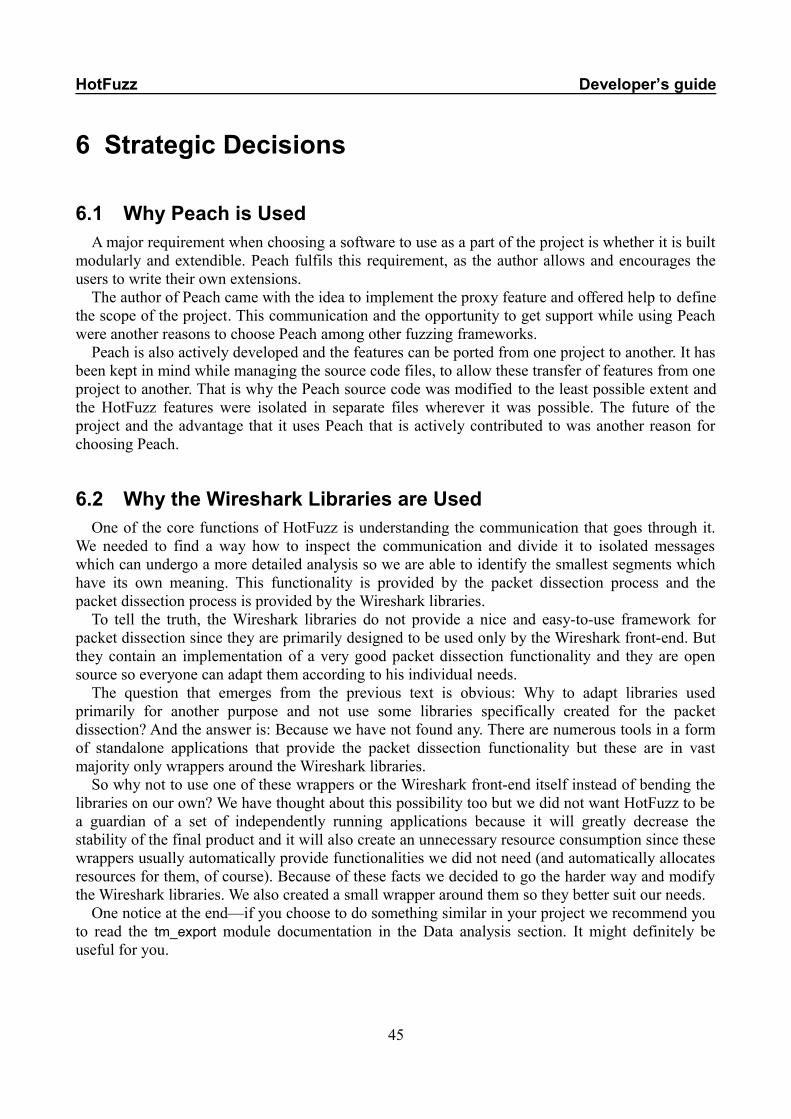
HotFuzz Developer’s guide
6 Strategic Decisions
6.1 Why Peach is UsedA major requirement when choosing a software to use as a part of the project is whether it is built
modularly and extendible. Peach fulfils this requirement, as the author allows and encourages the users to write their own extensions.
The author of Peach came with the idea to implement the proxy feature and offered help to define the scope of the project. This communication and the opportunity to get support while using Peach were another reasons to choose Peach among other fuzzing frameworks.
Peach is also actively developed and the features can be ported from one project to another. It has been kept in mind while managing the source code files, to allow these transfer of features from one project to another. That is why the Peach source code was modified to the least possible extent and the HotFuzz features were isolated in separate files wherever it was possible. The future of the project and the advantage that it uses Peach that is actively contributed to was another reason for choosing Peach.
6.2 Why the Wireshark Libraries are UsedOne of the core functions of HotFuzz is understanding the communication that goes through it.
We needed to find a way how to inspect the communication and divide it to isolated messages which can undergo a more detailed analysis so we are able to identify the smallest segments which have its own meaning. This functionality is provided by the packet dissection process and the packet dissection process is provided by the Wireshark libraries.
To tell the truth, the Wireshark libraries do not provide a nice and easy-to-use framework for packet dissection since they are primarily designed to be used only by the Wireshark front-end. But they contain an implementation of a very good packet dissection functionality and they are open source so everyone can adapt them according to his individual needs.
The question that emerges from the previous text is obvious: Why to adapt libraries used primarily for another purpose and not use some libraries specifically created for the packet dissection? And the answer is: Because we have not found any. There are numerous tools in a form of standalone applications that provide the packet dissection functionality but these are in vast majority only wrappers around the Wireshark libraries.
So why not to use one of these wrappers or the Wireshark front-end itself instead of bending the libraries on our own? We have thought about this possibility too but we did not want HotFuzz to be a guardian of a set of independently running applications because it will greatly decrease the stability of the final product and it will also create an unnecessary resource consumption since these wrappers usually automatically provide functionalities we did not need (and automatically allocates resources for them, of course). Because of these facts we decided to go the harder way and modify the Wireshark libraries. We also created a small wrapper around them so they better suit our needs.
One notice at the end—if you choose to do something similar in your project we recommend you to read the tm_export module documentation in the Data analysis section. It might definitely be useful for you.
45
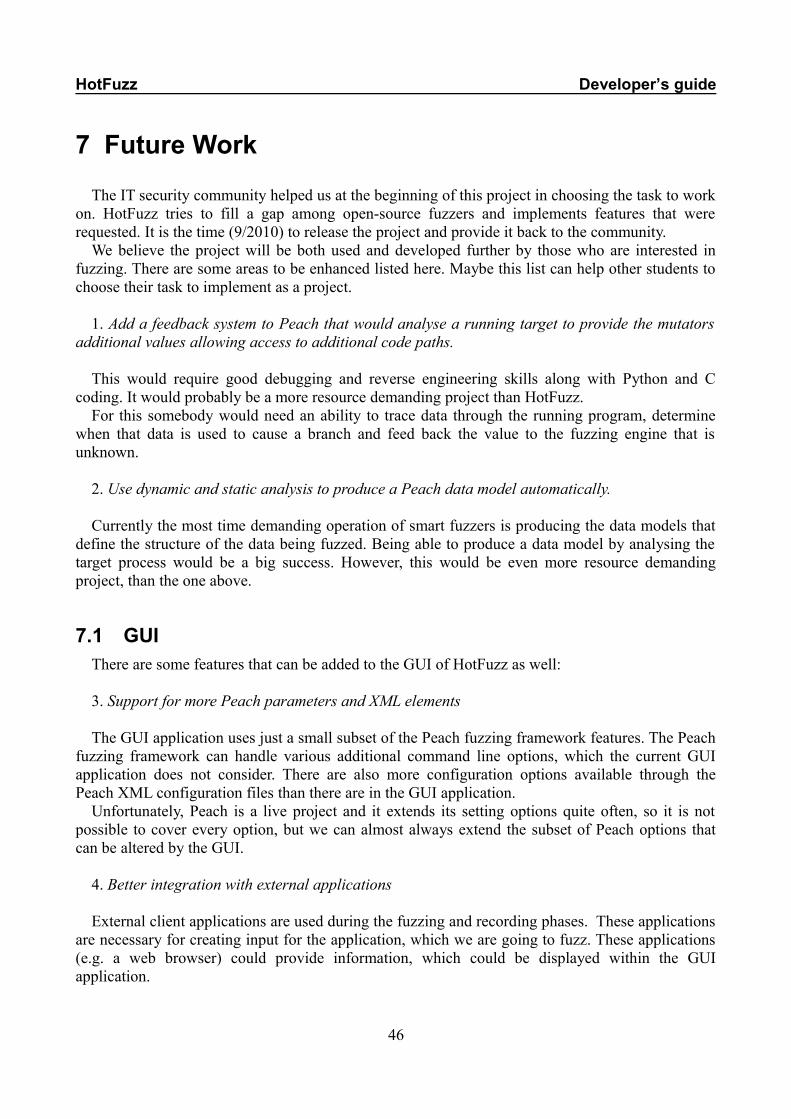
HotFuzz Developer’s guide
7 Future Work
The IT security community helped us at the beginning of this project in choosing the task to work on. HotFuzz tries to fill a gap among open-source fuzzers and implements features that were requested. It is the time (9/2010) to release the project and provide it back to the community.
We believe the project will be both used and developed further by those who are interested in fuzzing. There are some areas to be enhanced listed here. Maybe this list can help other students to choose their task to implement as a project.
1. Add a feedback system to Peach that would analyse a running target to provide the mutators additional values allowing access to additional code paths.
This would require good debugging and reverse engineering skills along with Python and C coding. It would probably be a more resource demanding project than HotFuzz.
For this somebody would need an ability to trace data through the running program, determine when that data is used to cause a branch and feed back the value to the fuzzing engine that is unknown.
2. Use dynamic and static analysis to produce a Peach data model automatically.
Currently the most time demanding operation of smart fuzzers is producing the data models that define the structure of the data being fuzzed. Being able to produce a data model by analysing the target process would be a big success. However, this would be even more resource demanding project, than the one above.
7.1 GUIThere are some features that can be added to the GUI of HotFuzz as well:
3. Support for more Peach parameters and XML elements
The GUI application uses just a small subset of the Peach fuzzing framework features. The Peach fuzzing framework can handle various additional command line options, which the current GUI application does not consider. There are also more configuration options available through the Peach XML configuration files than there are in the GUI application.
Unfortunately, Peach is a live project and it extends its setting options quite often, so it is not possible to cover every option, but we can almost always extend the subset of Peach options that can be altered by the GUI.
4. Better integration with external applications
External client applications are used during the fuzzing and recording phases. These applications are necessary for creating input for the application, which we are going to fuzz. These applications (e.g. a web browser) could provide information, which could be displayed within the GUI application.
46
HotFuzz Developer’s guide
Unfortunately, modification of these applications is usually not easy and some of them aren’t open-source. Thus the possibilities of “bending” these applications are quite limited. The ideal solution would be to design and implement our own applications, which would perfectly fit into our needs.
5. Crash logging extensions
The querying for informations about the crashes obtained in the fuzzing phase is quite clumsy at the moment. It is caused by that the Peach stores the information about crashes in a rather odd directory structure as text and dump files. Informations within these files have often some relations, meaning and are structured.
It would be useful to force Peach to store these informations within a database, so the GUI application could perform more complex queries over the dump info. Moreover, the GUI could also modify and add its own records in the database (e.g. user comments, some record indicators like “reported”, “fixed”, “examined”, …), thus creating a simple bug reporting system.
47
HotFuzz Developer’s guide
Appendix A: Structure of the HotFuzz Configuration File
<?xml version="1.0" encoding="utf-8"?><xs:schema xmlns:xs="http://www.w3.org/2001/XMLSchema">
<xs:element name="Peach"> <xs:annotation><xs:documentation> Root element of a Peach (HotFuzz) configuration file. </xs:documentation></xs:annotation> <xs:complexType> <xs:choice minOccurs="1" maxOccurs="unbounded"> <xs:element ref="PythonPath" /> <xs:element ref="Import" /> <xs:element ref="Mutators"/> <xs:element ref="DataModel" /> <xs:element ref="StateModel" /> <xs:element ref="Agent" /> <xs:element ref="Test" /> <xs:element ref="Run" /> </xs:choice> </xs:complexType> </xs:element>
<xs:element name="PythonPath"> <xs:annotation><xs:documentation> Includes an additional path for module resolution. HotFuzz uses this element to include path to Peach. </xs:documentation></xs:annotation> <xs:complexType> <xs:attribute name="path" use="required"> <xs:annotation><xs:documentation> Include this path when resolving Python modules. </xs:documentation></xs:annotation> </xs:attribute> </xs:complexType> </xs:element> <xs:element name="Import"> <xs:annotation><xs:documentation> Import a Python file into the current context. </xs:documentation></xs:annotation> <xs:complexType> <xs:attribute name="from"> <xs:annotation><xs:documentation> Python module name. </xs:documentation></xs:annotation> </xs:attribute> <xs:attribute name="import" use="required"> <xs:annotation><xs:documentation> Python class name. </xs:documentation></xs:annotation> </xs:attribute> </xs:complexType> </xs:element>
48
HotFuzz Developer’s guide
<xs:element name="Mutators"> <xs:annotation><xs:documentation> Defines mutators to use for testing. </xs:documentation></xs:annotation> <xs:complexType> <xs:sequence> <xs:element ref="Mutator" minOccurs="0" maxOccurs="unbounded"/> </xs:sequence> </xs:complexType> </xs:element>
<xs:element name="Mutator"> <xs:annotation><xs:documentation> Includes a Mutator in this test. </xs:documentation></xs:annotation> <xs:complexType> <xs:attribute name="class" use="required" type="xs:string"> <xs:annotation><xs:documentation> Class name of the Mutator to use </xs:documentation></xs:annotation> </xs:attribute> </xs:complexType> </xs:element>
<xs:element name="DataModel"> <xs:annotation><xs:documentation> DataModels are top level elements that describe the structure of messages that are sent during the process of fuzzing. DataModels behave much like Blocks. </xs:documentation></xs:annotation> <xs:complexType> <xs:sequence minOccurs="0" maxOccurs="unbounded"> <xs:element ref="Block" /> </xs:sequence> <xs:attribute name="name" type="xs:string"> <xs:annotation><xs:documentation> Name of the DataModel. The name is used to reference the DataModel by an action. </xs:documentation></xs:annotation> </xs:attribute> </xs:complexType> <xs:unique name="templateKey1"> <xs:selector xpath="." /> <xs:field xpath="@name" /> </xs:unique> </xs:element>
<xs:group name="dataTypes"> <xs:choice> <xs:element ref="Block" minOccurs="0" /> <xs:element ref="Number" minOccurs="0" /> <xs:element ref="String" minOccurs="0" /> <xs:element ref="Blob" minOccurs="0" /> </xs:choice> </xs:group>
<xs:element name="Block"> <xs:annotation><xs:documentation>
49
HotFuzz Developer’s guide
Blocks are combinations of other data elements combined in sequence to produce a block of data. Blocks can contain other blocks, strings, numbers and blobs. </xs:documentation></xs:annotation> <xs:complexType> <xs:sequence minOccurs="0" maxOccurs="unbounded"> <xs:group ref="dataTypes" /> </xs:sequence> <xs:attribute name="name" type="xs:string"> <xs:annotation><xs:documentation> Name of the Block. </xs:documentation></xs:annotation> </xs:attribute> <xs:attribute name="defaultValue" type="xs:string"> <xs:annotation><xs:documentation> The value is displayed to a user in the HotFuzz GUI in a human readable form. The value is not used in fuzzing process. It is a concatenation of values of the child elements of the block. </xs:documentation></xs:annotation> </xs:attribute> </xs:complexType> <xs:unique name="blockKey1"> <xs:selector xpath="." /> <xs:field xpath="@name" /> </xs:unique> </xs:element>
<xs:complexType name="tSimpleElement"> <xs:attribute name="defaultValue" type="xs:string"> <xs:annotation><xs:documentation> The value of the element that is displayed to a user in the HotFuzz GUI in a human readable form. The value is not used in fuzzing process. The name of the attribute is obsolete and will be changed during the future refactorization. </xs:documentation></xs:annotation> </xs:attribute> <xs:attribute name="name" type="xs:string"> <xs:annotation><xs:documentation> Name of the Element. </xs:documentation></xs:annotation> </xs:attribute> <xs:attribute name="value" type="xs:string"> <xs:annotation><xs:documentation> The real value of the element that is used during the fuzzing process. </xs:documentation></xs:annotation> </xs:attribute> <xs:attribute name="isToken" type="xs:string"> <xs:annotation><xs:documentation> Indicates that the element is a separator. </xs:documentation></xs:annotation> </xs:attribute> <xs:attribute name="valueType"> <xs:annotation><xs:documentation> Indicates how should be the real value of this element interpreted. </xs:documentation></xs:annotation> <xs:simpleType> <xs:restriction base="xs:string"> <xs:enumeration value="string"> <xs:annotation><xs:documentation>
50
HotFuzz Developer’s guide
Regular string. </xs:documentation></xs:annotation> </xs:enumeration> <xs:enumeration value="literal"> <xs:annotation><xs:documentation> Python literal string. </xs:documentation></xs:annotation> </xs:enumeration> <xs:enumeration value="hex"> <xs:annotation><xs:documentation> Hex string. Allows specifying binary data. </xs:documentation></xs:annotation> </xs:enumeration> </xs:restriction> </xs:simpleType> </xs:attribute> <xs:attribute name="mutable" type="xs:string"> <xs:annotation><xs:documentation> Indicates whether this element is allowed to be altered during the fuzzing process. </xs:documentation></xs:annotation> </xs:attribute> </xs:complexType>
<xs:element name="Number" type="tSimpleElement"> <xs:annotation><xs:documentation> Peach Number element. </xs:documentation></xs:annotation> <xs:unique name="numberKey1"> <xs:selector xpath="." /> <xs:field xpath="@name" /> </xs:unique> </xs:element>
<xs:element name="String" type="tSimpleElement"> <xs:annotation><xs:documentation> Peach String element. </xs:documentation></xs:annotation> <xs:unique name="stringKey1"> <xs:selector xpath="." /> <xs:field xpath="@name" /> </xs:unique> </xs:element>
<xs:element name="Blob" type="tSimpleElement"> <xs:annotation><xs:documentation> Peach Blob element. </xs:documentation></xs:annotation> <xs:unique name="blobKey1"> <xs:selector xpath="." /> <xs:field xpath="@name" /> </xs:unique> </xs:element>
<xs:element name="StateModel"> <xs:annotation><xs:documentation> Defines a state machine to use during a fuzzing test. State machine in HotFuzz is used only as a simple package that stores the data recorded during the recording phase.
51
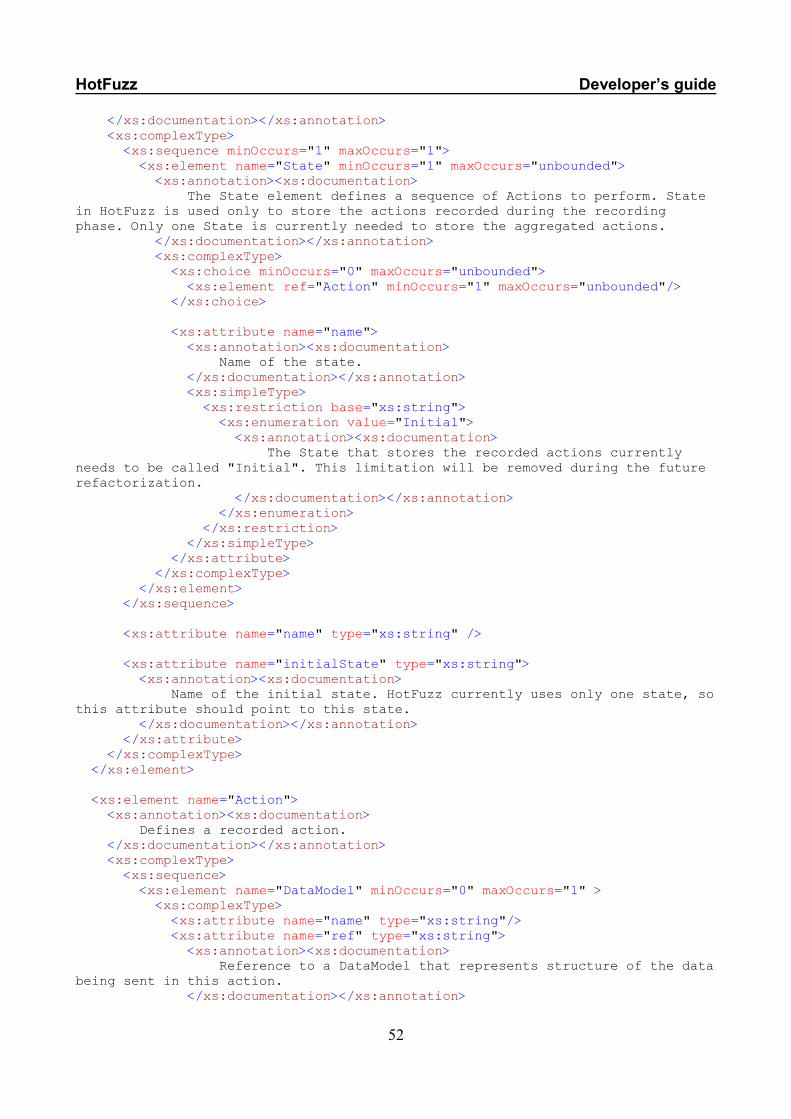
HotFuzz Developer’s guide
</xs:documentation></xs:annotation> <xs:complexType> <xs:sequence minOccurs="1" maxOccurs="1"> <xs:element name="State" minOccurs="1" maxOccurs="unbounded"> <xs:annotation><xs:documentation> The State element defines a sequence of Actions to perform. State in HotFuzz is used only to store the actions recorded during the recording phase. Only one State is currently needed to store the aggregated actions. </xs:documentation></xs:annotation> <xs:complexType> <xs:choice minOccurs="0" maxOccurs="unbounded"> <xs:element ref="Action" minOccurs="1" maxOccurs="unbounded"/> </xs:choice>
<xs:attribute name="name"> <xs:annotation><xs:documentation> Name of the state. </xs:documentation></xs:annotation> <xs:simpleType> <xs:restriction base="xs:string"> <xs:enumeration value="Initial"> <xs:annotation><xs:documentation> The State that stores the recorded actions currently needs to be called "Initial". This limitation will be removed during the future refactorization. </xs:documentation></xs:annotation> </xs:enumeration> </xs:restriction> </xs:simpleType> </xs:attribute> </xs:complexType> </xs:element> </xs:sequence>
<xs:attribute name="name" type="xs:string" />
<xs:attribute name="initialState" type="xs:string"> <xs:annotation><xs:documentation> Name of the initial state. HotFuzz currently uses only one state, so this attribute should point to this state. </xs:documentation></xs:annotation> </xs:attribute> </xs:complexType> </xs:element>
<xs:element name="Action"> <xs:annotation><xs:documentation> Defines a recorded action. </xs:documentation></xs:annotation> <xs:complexType> <xs:sequence> <xs:element name="DataModel" minOccurs="0" maxOccurs="1" > <xs:complexType> <xs:attribute name="name" type="xs:string"/> <xs:attribute name="ref" type="xs:string"> <xs:annotation><xs:documentation> Reference to a DataModel that represents structure of the data being sent in this action. </xs:documentation></xs:annotation>
52
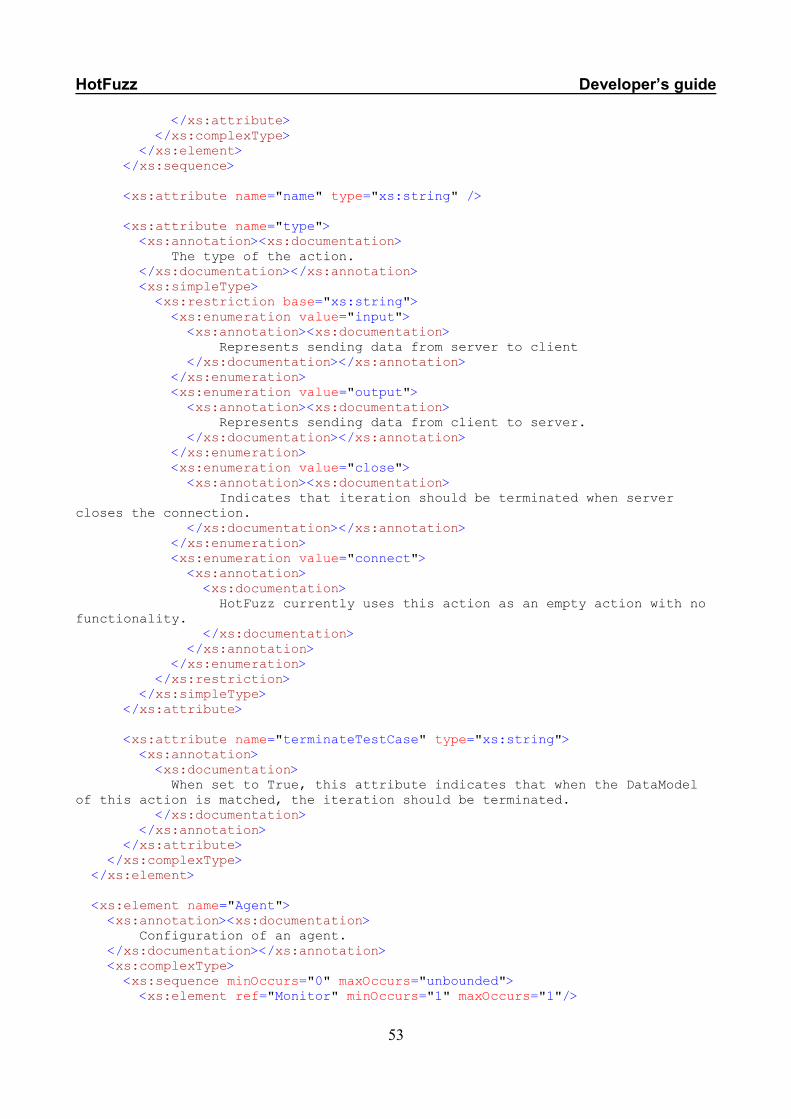
HotFuzz Developer’s guide
</xs:attribute> </xs:complexType> </xs:element> </xs:sequence>
<xs:attribute name="name" type="xs:string" />
<xs:attribute name="type"> <xs:annotation><xs:documentation> The type of the action. </xs:documentation></xs:annotation> <xs:simpleType> <xs:restriction base="xs:string"> <xs:enumeration value="input"> <xs:annotation><xs:documentation> Represents sending data from server to client </xs:documentation></xs:annotation> </xs:enumeration> <xs:enumeration value="output"> <xs:annotation><xs:documentation> Represents sending data from client to server. </xs:documentation></xs:annotation> </xs:enumeration> <xs:enumeration value="close"> <xs:annotation><xs:documentation> Indicates that iteration should be terminated when server closes the connection. </xs:documentation></xs:annotation> </xs:enumeration> <xs:enumeration value="connect"> <xs:annotation> <xs:documentation> HotFuzz currently uses this action as an empty action with no functionality. </xs:documentation> </xs:annotation> </xs:enumeration> </xs:restriction> </xs:simpleType> </xs:attribute>
<xs:attribute name="terminateTestCase" type="xs:string"> <xs:annotation> <xs:documentation> When set to True, this attribute indicates that when the DataModel of this action is matched, the iteration should be terminated. </xs:documentation> </xs:annotation> </xs:attribute> </xs:complexType> </xs:element>
<xs:element name="Agent"> <xs:annotation><xs:documentation> Configuration of an agent. </xs:documentation></xs:annotation> <xs:complexType> <xs:sequence minOccurs="0" maxOccurs="unbounded"> <xs:element ref="Monitor" minOccurs="1" maxOccurs="1"/>
53
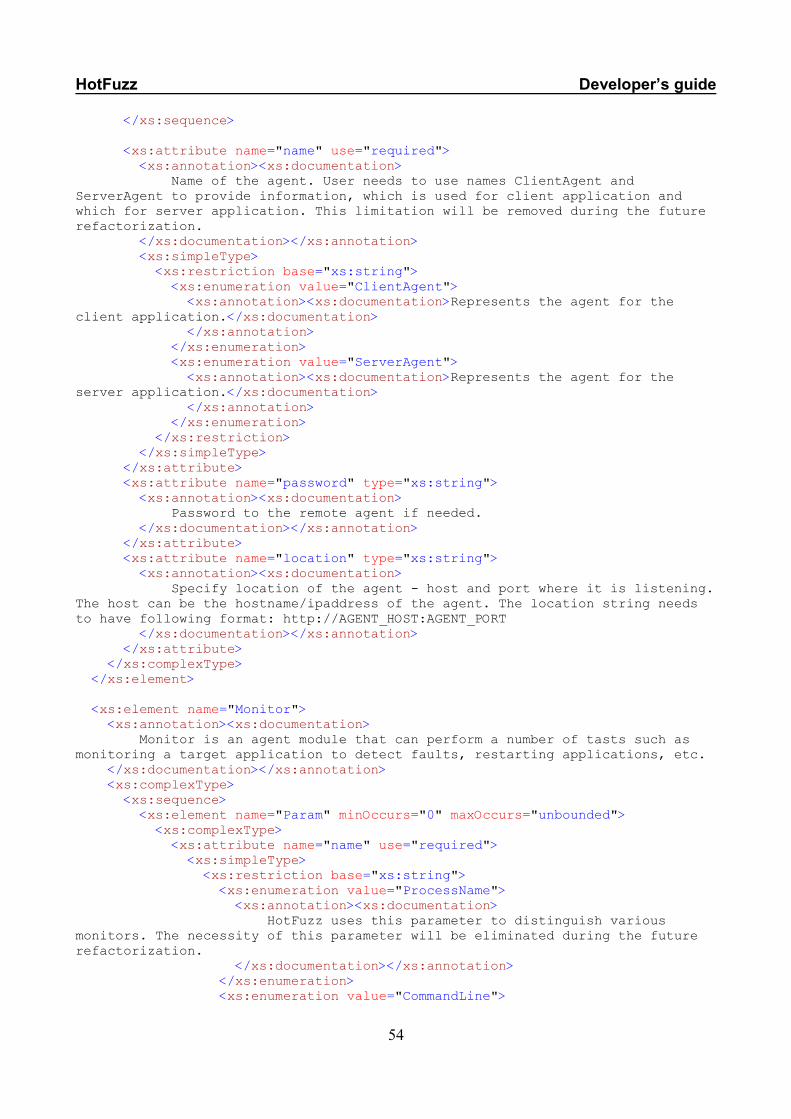
HotFuzz Developer’s guide
</xs:sequence>
<xs:attribute name="name" use="required"> <xs:annotation><xs:documentation> Name of the agent. User needs to use names ClientAgent and ServerAgent to provide information, which is used for client application and which for server application. This limitation will be removed during the future refactorization. </xs:documentation></xs:annotation> <xs:simpleType> <xs:restriction base="xs:string"> <xs:enumeration value="ClientAgent"> <xs:annotation><xs:documentation>Represents the agent for the client application.</xs:documentation> </xs:annotation> </xs:enumeration> <xs:enumeration value="ServerAgent"> <xs:annotation><xs:documentation>Represents the agent for the server application.</xs:documentation> </xs:annotation> </xs:enumeration> </xs:restriction> </xs:simpleType> </xs:attribute> <xs:attribute name="password" type="xs:string"> <xs:annotation><xs:documentation> Password to the remote agent if needed. </xs:documentation></xs:annotation> </xs:attribute> <xs:attribute name="location" type="xs:string"> <xs:annotation><xs:documentation> Specify location of the agent - host and port where it is listening. The host can be the hostname/ipaddress of the agent. The location string needs to have following format: http://AGENT_HOST:AGENT_PORT </xs:documentation></xs:annotation> </xs:attribute> </xs:complexType> </xs:element>
<xs:element name="Monitor"> <xs:annotation><xs:documentation> Monitor is an agent module that can perform a number of tasts such as monitoring a target application to detect faults, restarting applications, etc. </xs:documentation></xs:annotation> <xs:complexType> <xs:sequence> <xs:element name="Param" minOccurs="0" maxOccurs="unbounded"> <xs:complexType> <xs:attribute name="name" use="required"> <xs:simpleType> <xs:restriction base="xs:string"> <xs:enumeration value="ProcessName"> <xs:annotation><xs:documentation> HotFuzz uses this parameter to distinguish various monitors. The necessity of this parameter will be eliminated during the future refactorization. </xs:documentation></xs:annotation> </xs:enumeration> <xs:enumeration value="CommandLine">
54
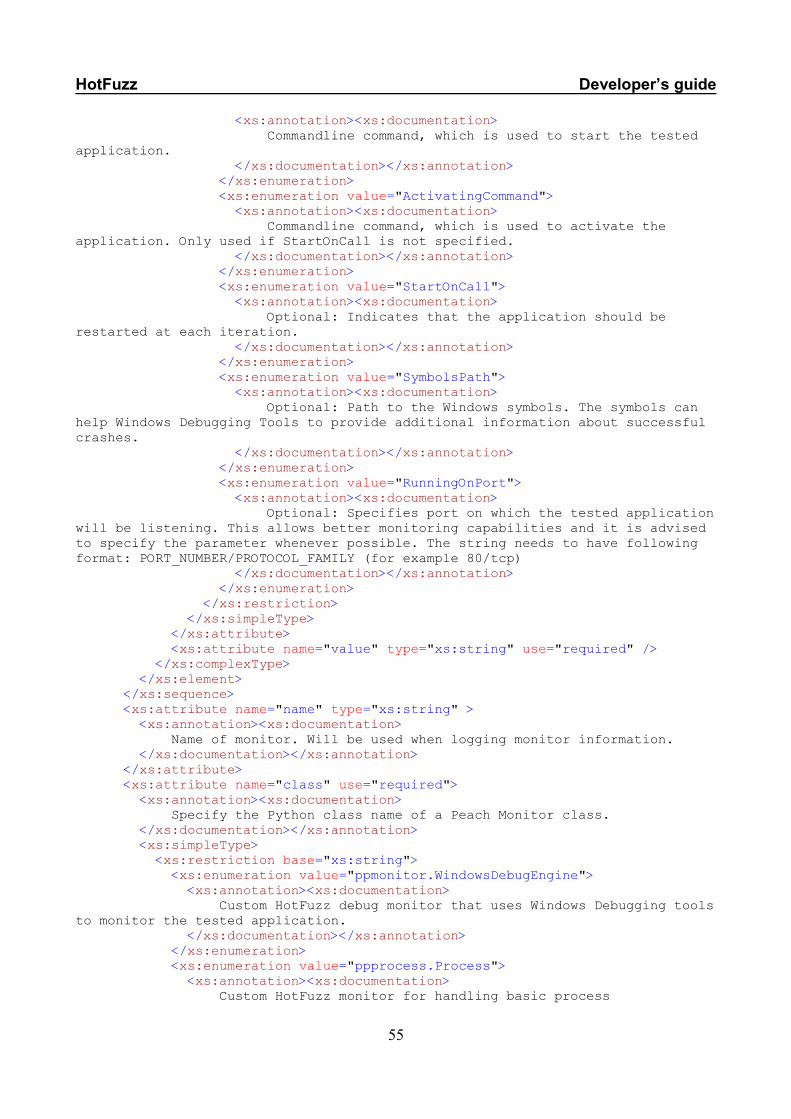
HotFuzz Developer’s guide
<xs:annotation><xs:documentation> Commandline command, which is used to start the tested application. </xs:documentation></xs:annotation> </xs:enumeration> <xs:enumeration value="ActivatingCommand"> <xs:annotation><xs:documentation> Commandline command, which is used to activate the application. Only used if StartOnCall is not specified. </xs:documentation></xs:annotation> </xs:enumeration> <xs:enumeration value="StartOnCall"> <xs:annotation><xs:documentation> Optional: Indicates that the application should be restarted at each iteration. </xs:documentation></xs:annotation> </xs:enumeration> <xs:enumeration value="SymbolsPath"> <xs:annotation><xs:documentation> Optional: Path to the Windows symbols. The symbols can help Windows Debugging Tools to provide additional information about successful crashes. </xs:documentation></xs:annotation> </xs:enumeration> <xs:enumeration value="RunningOnPort"> <xs:annotation><xs:documentation> Optional: Specifies port on which the tested application will be listening. This allows better monitoring capabilities and it is advised to specify the parameter whenever possible. The string needs to have following format: PORT_NUMBER/PROTOCOL_FAMILY (for example 80/tcp) </xs:documentation></xs:annotation> </xs:enumeration> </xs:restriction> </xs:simpleType> </xs:attribute> <xs:attribute name="value" type="xs:string" use="required" /> </xs:complexType> </xs:element> </xs:sequence> <xs:attribute name="name" type="xs:string" > <xs:annotation><xs:documentation> Name of monitor. Will be used when logging monitor information. </xs:documentation></xs:annotation> </xs:attribute> <xs:attribute name="class" use="required"> <xs:annotation><xs:documentation> Specify the Python class name of a Peach Monitor class. </xs:documentation></xs:annotation> <xs:simpleType> <xs:restriction base="xs:string"> <xs:enumeration value="ppmonitor.WindowsDebugEngine"> <xs:annotation><xs:documentation> Custom HotFuzz debug monitor that uses Windows Debugging tools to monitor the tested application. </xs:documentation></xs:annotation> </xs:enumeration> <xs:enumeration value="ppprocess.Process"> <xs:annotation><xs:documentation> Custom HotFuzz monitor for handling basic process
55
HotFuzz Developer’s guide
manipulation. </xs:documentation></xs:annotation> </xs:enumeration> </xs:restriction> </xs:simpleType> </xs:attribute> </xs:complexType> </xs:element>
<xs:element name="Test"> <xs:annotation><xs:documentation> Define a test to run. </xs:documentation></xs:annotation> <xs:complexType> <xs:choice minOccurs="1" maxOccurs="unbounded"> <xs:element name="StateModel" minOccurs="0" maxOccurs="1"> <xs:annotation><xs:documentation> Reference an already declared StateMachine. </xs:documentation></xs:annotation> <xs:complexType> <xs:attribute name="ref" type="xs:string" /> </xs:complexType> </xs:element>
<xs:element name="Agent" minOccurs="2" maxOccurs="2"> <xs:annotation><xs:documentation> Reference a defined agent to use with test. </xs:documentation></xs:annotation> <xs:complexType> <xs:attribute name="ref" type="xs:string" use="required" /> </xs:complexType> </xs:element>
<xs:element ref="Publisher" minOccurs="1" /> </xs:choice>
<xs:attribute name="name" type="xs:string" use="required" /> </xs:complexType> </xs:element>
<xs:element name="Publisher"> <xs:annotation><xs:documentation> Define the publisher to use for this test. HotFuzz currently uses only one publisher - its own custom publisher. The publisher requires following parameters: clientHost, clientPort, serverHost, serverPort, protocolFamily, protocolPort, communicationTimeout. </xs:documentation></xs:annotation> <xs:complexType> <xs:sequence minOccurs="0" maxOccurs="unbounded"> <xs:element name="Param" minOccurs="0" maxOccurs="unbounded"> <xs:complexType> <xs:attribute name="name" use="required"> <xs:simpleType> <xs:restriction base="xs:string"> <xs:enumeration value="clientHost"> <xs:annotation><xs:documentation> The host to which client will be connecting. </xs:documentation></xs:annotation> </xs:enumeration>
56
HotFuzz Developer’s guide
<xs:enumeration value="clientPort"> <xs:annotation><xs:documentation> The port to which client will be connecting. </xs:documentation></xs:annotation> </xs:enumeration> <xs:enumeration value="serverHost"> <xs:annotation><xs:documentation> The host on which the server will be running. </xs:documentation></xs:annotation> </xs:enumeration> <xs:enumeration value="serverPort"> <xs:annotation><xs:documentation> The port on which the server will be listening. </xs:documentation></xs:annotation> </xs:enumeration> <xs:enumeration value="protocolFamily"> <xs:annotation><xs:documentation> The protocol family that will be used for the communication (TCP/UDP). </xs:documentation></xs:annotation> </xs:enumeration> <xs:enumeration value="protocolPort"> <xs:annotation><xs:documentation> The port characterizing the protocol that will be used for the communication. </xs:documentation></xs:annotation> </xs:enumeration> <xs:enumeration value="communicationTimeout"> <xs:annotation><xs:documentation> How many seconds should proxy wait for messages from client and server until it terminates the iteration. </xs:documentation></xs:annotation> </xs:enumeration> </xs:restriction> </xs:simpleType> </xs:attribute>
<xs:attribute name="value" type="xs:string" use="required" /> </xs:complexType> </xs:element> </xs:sequence>
<xs:attribute name="class" use="required"> <xs:annotation><xs:documentation> Specify the Python class name of a Peach publisher class. </xs:documentation></xs:annotation> <xs:simpleType> <xs:restriction base="xs:string"> <xs:enumeration value="pppublisher.ClientServer"> <xs:annotation><xs:documentation> HotFuzz publisher that stores all the information required for client-server communication. </xs:documentation></xs:annotation> </xs:enumeration> </xs:restriction> </xs:simpleType> </xs:attribute> </xs:complexType> </xs:element>
57

HotFuzz Developer’s guide
<xs:element name="Run"> <xs:annotation><xs:documentation> Configuration of the overall fuzzing process. </xs:documentation></xs:annotation> <xs:complexType> <xs:choice minOccurs="0" maxOccurs="unbounded"> <xs:element name="Logger" minOccurs="0" maxOccurs="1"> <xs:annotation><xs:documentation> Specify a a logging mechanism for fuzzing Run. </xs:documentation></xs:annotation> <xs:complexType> <xs:sequence> <xs:element name="Param" minOccurs="0" maxOccurs="unbounded"> <xs:complexType> <xs:attribute name="name" type="xs:string" use="required" /> <xs:attribute name="value" type="xs:string" use="required" /> </xs:complexType> </xs:element> </xs:sequence> <xs:attribute name="class" use="required"> <xs:annotation><xs:documentation> Specify the Python class name of a Peach Logger class. </xs:documentation></xs:annotation> <xs:simpleType> <xs:restriction base="xs:string"> <xs:enumeration value="logger.Filesystem"> <xs:annotation><xs:documentation> Log to a path on the file system. Requires a single parameter named "path" with the fully qualified path place logged information. This will include any data reported by Agents and Monitors along with a text file containing the sent and received data for each logged test. </xs:documentation></xs:annotation> </xs:enumeration> </xs:restriction> </xs:simpleType> </xs:attribute> </xs:complexType> </xs:element> <xs:element name="Test" minOccurs="1" maxOccurs="1"> <xs:annotation><xs:documentation> Reference a test to use for in this run. </xs:documentation></xs:annotation> <xs:complexType> <xs:attribute name="ref" type="xs:string" use="required" /> </xs:complexType> </xs:element> </xs:choice>
<xs:attribute name="name" type="xs:string" /> </xs:complexType> </xs:element>
</xs:schema>
58


