80
Oracle Utilities Analytics Developer’s Guide Release 2.6.0 E70878-01 June 2016

Oracle Utilities Analytics Developer’s Guide
Release 2.6.0
E70878-01
June 2016

Oracle Utilities Analytics Developer’s Guide, Release 2.6.0
E70878-01
Copyright © 2016, Oracle and/or its affiliates. All rights reserved.
This software and related documentation are provided under a license agreement containing restrictions on use and disclosure and are protected by intellectual property laws. Except as expressly permitted in your license agreement or allowed by law, you may not use, copy, reproduce, translate, broadcast, modify, license, transmit, distribute, exhibit, perform, publish, or display any part, in any form, or by any means. Reverse engineering, disassembly, or decompilation of this software, unless required by law for interoperability, is prohibited.
The information contained herein is subject to change without notice and is not warranted to be error-free. If you find any errors, please report them to us in writing.
If this is software or related documentation that is delivered to the U.S. Government or anyone licensing it on behalf of the U.S. Government, then the following notice is applicable:
U.S. GOVERNMENT END USERS: Oracle programs, including any operating system, integrated software, any programs installed on the hardware, and/or documentation, delivered to U.S. Government end users are "commercial computer software" pursuant to the applicable Federal Acquisition Regulation and agency-specific supplemental regulations. As such, use, duplication, disclosure, modification, and adaptation of the programs, including any operating system, integrated software, any programs installed on the hardware, and/or documentation, shall be subject to license terms and license restrictions applicable to the programs. No other rights are granted to the U.S. Government.
This software or hardware is developed for general use in a variety of information management applications. It is not developed or intended for use in any inherently dangerous applications, including applications that may create a risk of personal injury. If you use this software or hardware in dangerous applications, then you shall be responsible to take all appropriate fail-safe, backup, redundancy, and other measures to ensure its safe use. Oracle Corporation and its affiliates disclaim any liability for any damages caused by use of this software or hardware in dangerous applications.
Oracle and Java are registered trademarks of Oracle and/or its affiliates. Other names may be trademarks of their respective owners.
Intel and Intel Xeon are trademarks or registered trademarks of Intel Corporation. All SPARC trademarks are used under license and are trademarks or registered trademarks of SPARC International, Inc. AMD, Opteron, the AMD logo, and the AMD Opteron logo are trademarks or registered trademarks of Advanced Micro Devices. UNIX is a registered trademark of The Open Group.
This software or hardware and documentation may provide access to or information about content, products, and services from third parties. Oracle Corporation and its affiliates are not responsible for and expressly disclaim all warranties of any kind with respect to third-party content, products, and services unless otherwise set forth in an applicable agreement between you and Oracle. Oracle Corporation and its affiliates will not be responsible for any loss, costs, or damages incurred due to your access to or use of third-party content, products, or services, except as set forth in an applicable agreement between you and Oracle.

Contents
Preface................................................................................................................................................................................... iAudience ................................................................................................................................................................................................. iPrerequisite Knowledge........................................................................................................................................................................ iHow This Guide is Organized............................................................................................................................................................ iiRelated Documents .............................................................................................................................................................................. iiConventions.......................................................................................................................................................................................... iiiAcronyms.............................................................................................................................................................................................. iiiDocumentation Accessibility ............................................................................................................................................................. iv
Chapter 1Getting Started ................................................................................................................................................................... 1-1
Naming Conventions ........................................................................................................................................................................ 1-1Project.................................................................................................................................................................................................. 1-1Model Folder ...................................................................................................................................................................................... 1-1CM Metadata User Procedure ......................................................................................................................................................... 1-2
Chapter 2Extending Oracle Utilities Analytics ................................................................................................................................. 2-1
Dimension Patterns........................................................................................................................................................................... 2-1Extending Dimensions ..................................................................................................................................................................... 2-2Fact Patterns....................................................................................................................................................................................... 2-3Extending Facts ................................................................................................................................................................................. 2-4
Using Custom User-Defined Dimensions (UDD) ...................................................................................................... 2-5
Chapter 3Extending Replication....................................................................................................................................................... 3-1
Replicating Custom Tables for Oracle Utilities Application Framework Source Applications ............................................ 3-2Replicating Custom Tables for Oracle Utilities Network Management System Source Applications ................................. 3-4Enabling Replications ....................................................................................................................................................................... 3-6Creating Replicated Tables............................................................................................................................................................... 3-7Executing Initial Sync ..................................................................................................................................................................... 3-10Verifying Model Setup .................................................................................................................................................................... 3-11
Chapter 4Extending Star Schema...................................................................................................................................................... 4-1
User Extensible Columns................................................................................................................................................................. 4-1UDX Processing ................................................................................................................................................................................ 4-2Populating User-Defined Columns................................................................................................................................................. 4-2
Creating a CM Mapping ................................................................................................................................................... 4-3Creating a CM Package..................................................................................................................................................... 4-4Resetting Dimensions....................................................................................................................................................... 4-5Configuring CM Scenarios............................................................................................................................................... 4-6Monitoring the Job Execution ........................................................................................................................................ 4-7Validating the Data Load ................................................................................................................................................. 4-8
Populating User-Defined Foreign Keys......................................................................................................................................... 4-8Creating CM Views ........................................................................................................................................................... 4-9Creating CM Procedures .................................................................................................................................................. 4-9
Contents - i Oracle Utilities Analytics Developer’s Guide
Configuring CM Procedures.......................................................................................................................................... 4-10Star Schema ...................................................................................................................................................................................... 4-10Custom Dimensions........................................................................................................................................................................ 4-11
Creating Dimension Tables ........................................................................................................................................... 4-11Importing Dimensions into Model .............................................................................................................................. 4-13Importing Replicated Tables into Model..................................................................................................................... 4-14Creating Replication Key Views in Model for Dimensions ..................................................................................... 4-15Creating Mapping for Key Views for Dimensions .................................................................................................... 4-15Creating Loading Views in Model for Dimensions ................................................................................................... 4-16Creating Mapping for Loading Views.......................................................................................................................... 4-17Creating Package for Loading Views ........................................................................................................................... 4-20Creating Staging Tables in Model for Dimensions .................................................................................................... 4-20Creating Mapping for Dimensions ............................................................................................................................... 4-21Creating Packages for Dimensions............................................................................................................................... 4-23Configuring Entities........................................................................................................................................................ 4-23Configuring Jobs for Dimensions ................................................................................................................................ 4-24Monitoring Job Executions ........................................................................................................................................... 4-25Validating the Loaded Data ........................................................................................................................................... 4-25
Custom Facts.................................................................................................................................................................................... 4-26Creating Fact Tables ....................................................................................................................................................... 4-27Importing Fact Tables into Model ............................................................................................................................... 4-27Importing Replicated Tables into Model..................................................................................................................... 4-28Creating Key Tables in Model....................................................................................................................................... 4-28Creating Mapping for Key Tables for Facts ............................................................................................................... 4-29Creating Loading Views in Model ................................................................................................................................ 4-31Creating Mapping to Loading Views for Facts........................................................................................................... 4-32Creating Aggregate Tables in Model for Facts ........................................................................................................... 4-34Creating Mapping to Load Aggregate Tables for Facts ............................................................................................ 4-35Creating Staging Tables in Model for Facts ................................................................................................................ 4-36Creating Error Tables in Model for Facts ................................................................................................................... 4-37Creating Mapping to Load Facts .................................................................................................................................. 4-38Creating Packages for Facts........................................................................................................................................... 4-40Configuring Entities for Facts....................................................................................................................................... 4-41Specifying Dependencies for Facts .............................................................................................................................. 4-41Configuring Jobs ............................................................................................................................................................. 4-42Monitoring Job Executions ........................................................................................................................................... 4-43
Custom Materialized Views............................................................................................................................................................ 4-43Creating Mapping for Materialized Views................................................................................................................... 4-43Creating Packages for Materialized Views................................................................................................................... 4-44Configuring Entities for Materialized Views............................................................................................................... 4-44Specifying the Dependencies for Custom Materialized Views ................................................................................ 4-45Configuring Jobs for Materialized Views .................................................................................................................... 4-46Monitoring Job Executions ........................................................................................................................................... 4-46
Chapter 5Extending Analytics........................................................................................................................................................... 5-1
Customizing Existing Analytics....................................................................................................................................................... 5-1Modifying the RPD File ................................................................................................................................................... 5-1Customizing Answers ....................................................................................................................................................... 5-2Customizing the Report Labels....................................................................................................................................... 5-2
Creating New Analytics .................................................................................................................................................................... 5-2Creating New Answers..................................................................................................................................................... 5-2Adding New Labels .......................................................................................................................................................... 5-3
Chapter 6Migrating Environments ................................................................................................................................................... 6-1
Oracle Business Intelligence Enterprise Edition Components .................................................................................................. 6-1Presentation Catalog ......................................................................................................................................................... 6-1
Contents - ii Oracle Utilities Analytics Developer’s Guide

Repository .......................................................................................................................................................................... 6-2Oracle Data Integrator Components.............................................................................................................................................. 6-3
CM Project ......................................................................................................................................................................... 6-3CM Models......................................................................................................................................................................... 6-3CM Metadata...................................................................................................................................................................... 6-3
Contents - iii Oracle Utilities Analytics Developer’s Guide
Preface
This guide provides instructions for configuring and administering Oracle Utilities Analytics (OUA), including:
• Audience
• Prerequisite Knowledge
• How This Guide is Organized
• Related Documents
• Conventions
• Acronyms
• Documentation Accessibility
AudienceThis document is primarily for the developers who would want to extend the functionality of the product based on their custom requirements. This document does not teach Oracle Data Integrator or Oracle Business Intelligence Enterprise Edition fundamentals but expects the users to be familiar with development using Oracle Data Integrator and Oracle Business Intelligence Enterprise Edition.
The developers are expected to be proficient in the following technologies:
• Oracle Data Integrator
• Oracle Business Intelligence Enterprise Edition
• Oracle Golden Gate
• Oracle Database
• Oracle Weblogic
Note: This document assumes that the developer is using a Unix environment for executing the scripts and commands. A Windows machine can also be used for these actions however the "sh" scripts have to be replaced with the corresponding "cmd" scripts.
Prerequisite Knowledge
Oracle Utilities Extractors and Schema and Oracle Utilities Analytics Dashboards use several technologies. You should have knowledge of the following before configuring and administering Oracle Utilities Analytics:
Preface - iOracle Utilities Analytics Developer’s Guide
How This Guide is Organized
• Oracle Data Warehouse:
https://docs.oracle.com/database/121/DWHSG/toc.htm
• Oracle Data Integrator:
http://docs.oracle.com/middleware/1213/odi/index.html
• Oracle GoldenGate:
http://docs.oracle.com/goldengate/1212/gg-winux/index.html
• Oracle WebLogic Server:
https://docs.oracle.com/middleware/1213/wls/index.html
• Oracle Business Intelligence Enterprise Edition:
http://docs.oracle.com/middleware/11119/bisuite/docs.htm
How This Guide is OrganizedThis guide is organized based on the typical flow a user implementing the Oracle Utilities Analytics product goes through.
Related Documents
The following documentation is included with this release:
• Oracle Utilities Analytics Getting Started Guide
• Oracle Utilities Analytics License Information User Manual
• Oracle Utilities Analytics Administration Guide
• Oracle Utilities Analytics Installation Guide
• Oracle Utilities Analytics Quick Install Guide
• Oracle Utilities Analytics Release Notes
• Oracle Utilities Analytics Developer’s Guide
• Oracle Utilities Analytics Dashboards for Oracle Utilities Meter Data Analytics Metric Reference Guide
• Oracle Utilities Analytics Dashboards for Oracle Utilities Customer Analytics, Revenue Analytics and Credit & Collections Analytics Metric Reference Guide
• Oracle Utilities Analytics Dashboards for Oracle Utilities Exception Analytics Metric Reference Guide
• Oracle Utilities Analytics Dashboards for Oracle Utilities Mobile Workforce Analytics Metric Reference Guide
• Oracle Utilities Analytics Dashboards for Oracle Utilities Distribution Analytics and Outage Analytics Metric Reference Guide
• Oracle Utilities Analytics Dashboards for Oracle Utilities Work and Asset Analytics Metric Reference Guide
• Oracle Utilities Analytics Dashboards for Oracle Utilities Operational Device Analytics Metric Reference Guide
• Oracle Utilities Extractors and Schema for Oracle Utilities Customer Care and Billing Data Mapping Guide
• Oracle Utilities Extractors and Schema for Oracle Utilities Meter Data Management Data Mapping Guide
Preface - iiOracle Utilities Analytics Developer’s Guide

Conventions
• Oracle Utilities Extractors and Schema for Oracle Utilities Mobile Workforce Management Data Mapping Guide
• Oracle Utilities Extractors and Schema for Oracle Utilities Network Management System Data Mapping Guide
• Oracle Utilities Extractors and Schema for Oracle Utilities Operational Device Management Data Mapping Guide
• Oracle Utilities Extractors and Schema for Oracle Utilities Work & Asset Management Data Mapping Guide
ConventionsThe following text conventions are used in this document:
AcronymsThe list of acronyms used in this guide is as explained below:
• APEX: Oracle Application Express
• CC&B: Oracle Utilities Customer Care and Billing
• CDC: Changed Data Capture
• ELT: Extraction, Loading and Transformation
• ETL: Extraction, Transformation and Loading
• MDM: Oracle Utilities Meter Data Management
• MWM: Oracle Utilities Mobile Workforce Management
• NMS: Oracle Utilities Network Management System
• OBIEE: Oracle Business Intelligence Enterprise Edition
• ODI: Oracle Data Integrator
• ODM: Oracle Utilities Operational Device Management
• OGG: Oracle GoldenGate
• OUA: Oracle Utilities Analytics
• OWB: Oracle Warehouse Builder
• WAM: Oracle Utilities Work and Asset Management
Convention Meaning
boldface Boldface type indicates graphical user interface elements associated with an action, or terms defined in text or the glossary.
italic Italic type indicates book titles, emphasis, or placeholder variables for which you supply particular values.
monospace Monospace type indicates commands within a paragraph, URLs, code in examples, text that appears on the screen, or text that you enter.
Preface - iiiOracle Utilities Analytics Developer’s Guide

Documentation Accessibility
Documentation AccessibilityFor information about configuring and using accessibility features for Oracle Utilities Analytics, see the documentation at http://docs.oracle.com/cd/E23943_01/bi.1111/e10544/appaccess.htm#BIEUG2756.
For information about Oracle's commitment to accessibility, visit the Oracle Accessibility Program website at http://www.oracle.com/us/corporate/accessibility/index.html.
Access to Oracle Support
Oracle customers have access to electronic support through My Oracle Support. For more information, visit: http://www.oracle.com/pls/topic/lookup?ctx=acc&id=info or http://www.oracle.com/pls/topic/lookup?ctx=acc&id=trs if you are hearing impaired.
Preface - ivOracle Utilities Analytics Developer’s Guide

Chapter 1Getting Started
Before starting any customization, create a custom project so that all customizations are isolated from the product components. Create all the custom objects under the custom project.
This chapter includes the following topics:
• Naming Conventions
• Project
• Model Folder
• CM Metadata User Procedure
Naming ConventionsAll out of the box objects are prefixed with 'B1' and should not be modified. It is recommended that the client also choose a two character code for prefixing their custom objects to avoid any naming conflicts between the product components and the custom components.
The recommendation is to use the CM prefix for all objects created by you, with CM being a reference to Customer Modification.
ProjectCreate a new project for maintaining all custom interfaces, procedures and packages by logging into Oracle Data Integrator Studio. It is recommended that you should use the following folder structure within the project to organize the objects:
• Facts: All the Fact interfaces should be organized under this folder.
• Dimensions: All the Dimension interfaces should be organized under this folder.
• Replication: All the Replication View interfaces should be organized under this folder.
• Materialized Views: All the Materialized View interfaces should be organized under this folder.
The above folders have to be created for the product. Avoid cross references across different folders. For example a mapping under the Dimensions folder should not refer to a mapping in Replication folder.
Model FolderAll custom model objects should reside under a custom model folder. A pattern similar to the folder structures within the project can be followed.
Getting Started 1-1Oracle Utilities Analytics Developer’s Guide
CM Metadata User Procedure
CM Metadata User ProcedureAlways use this user procedure to create new entries into the metadata tables. This will make it easier to migrate the same metadata to different environments. This procedure can be used to populate custom labels for the dashboards.
1. Create a procedure CM_<PROD_FLG>_CREATE_METADATA. Replace the <PROD_FLG> with the appropriate edge product code (For example, CCB/NMS/ MDM/MWM).
2. Add appropriate data population scripts. These should be written as merge statements so that existing rows are skipped and only new rows are added. In case the metadata requires corrections, use the update clause of the merge statement. All tasks within the procedure should have the logical schema set to “Metadata”. The schema names should not be hardcoded.
3. Create a package CM_<PROD_FLG>_CREATE_METADATA.
4. Add the procedure created above as the first step and add the scenario B1_CFG_METADATA as a second step. The B1_CFG_METADATA pulls in the additional metadata from source based on the list of tables to extend the replication.
5. After migrating the CM Project to new environment, execute the custom procedure CM_<PROD_FLG>_CREATE_METADATA mentioned above after the addition of the product instance. This job should be executed in the newly created context for the product.
Getting Started 1-2Oracle Utilities Analytics Developer’s Guide
Chapter 2Extending Oracle Utilities Analytics
The Oracle Utilities Analytics product provides a comprehensive set of star schemas in each of its analytics. However, despite the broad analytics, there are few cases when the star schemas need to be extended to suit business analytic needs that are not supported by the base solution. As part of implementation of utility products, utilities may add customized logic that suits their business needs. For example, utilities may introduce additional fields, via configurable characteristics, to objects that were delivered with minimal fields. Because of the highly configurable nature of the edge applications, it is necessary that the Oracle Utilities Analytics product be customizable and extendable. Keeping this in mind, the star schemas have been created with the following extensible attributes in the facts and dimensions:
• Dimension Patterns
• Extending Dimensions
• Fact Patterns
• Extending Facts
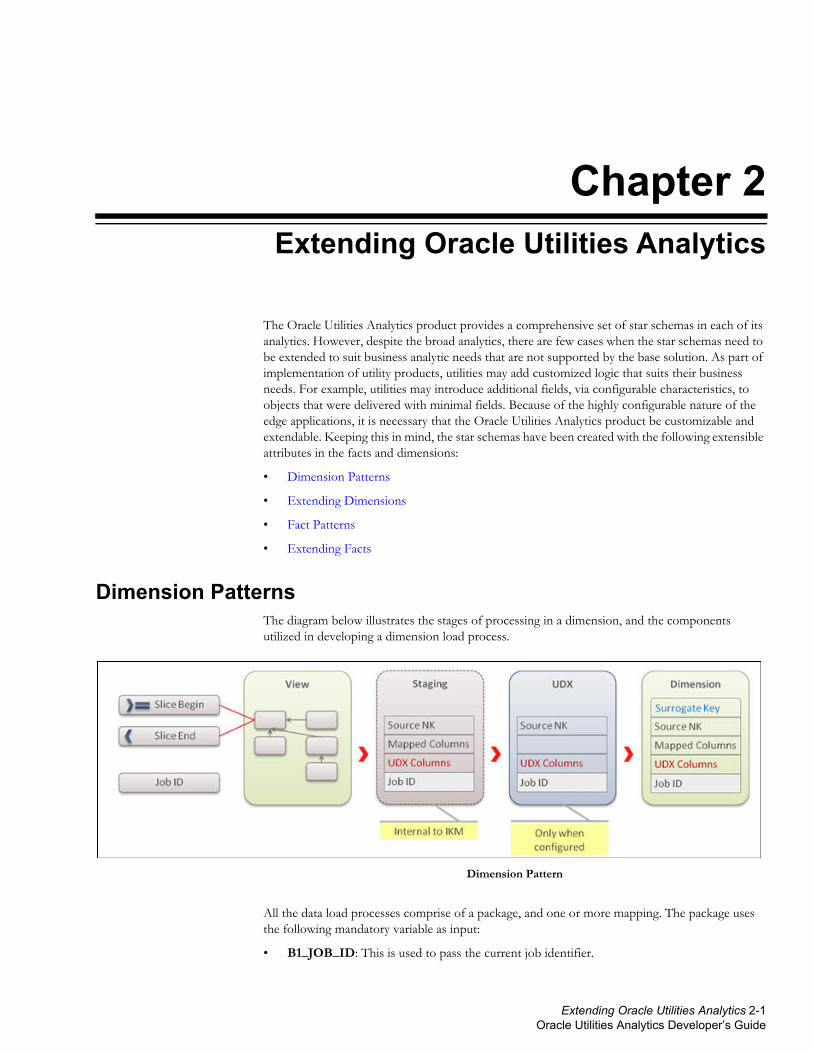
Dimension PatternsThe diagram below illustrates the stages of processing in a dimension, and the components utilized in developing a dimension load process.
Dimension Pattern
All the data load processes comprise of a package, and one or more mapping. The package uses the following mandatory variable as input:
• B1_JOB_ID: This is used to pass the current job identifier.
Extending Oracle Utilities Analytics 2-1Oracle Utilities Analytics Developer’s Guide

Extending Dimensions
The standard Oracle Data Integrator interfaces process an entire table data set in a single execution. This approach is not scalable for large volumes of data. Oracle Utilities Analytics implements a configuration driven data slicing mechanism to subdivide data into smaller evenly distributed slices and processes these slices in parallel. The slice start timestamp and the slice end timestamp are calculated values based on configuration and are passed as parameters to each entity load process. This way the same interface is reused for parallel execution.
The first mapping is usually a view where filters are applied based on the variables to exclude data that does not fall into the specified range. This reduces the data processed in one execution. The data from the view is first inserted into a staging table. The staging table contains the following columns:
• Source natural key columns.
• Columns mapped to target or used for filters.
• Columns marked for user extension (for dimensions these are UDF codes and description columns).
• Job identifier to segregate the data from multiple parallel executions of a data load process.
The UDX table (see the section UDX Processing for the details on the UDX table) is created only if the CM procedure has been configured for the entity. This table contains the following types of columns
• Source natural key columns.
• Columns marked for user extension (for dimensions these are UDF codes and description columns).
• Job identifier to segregate the data from multiple parallel executions of a data load process.
The data is finally loaded into the target dimension.
Extending DimensionsThe diagram below illustrates the steps required to extend a dimension.
Extending Dimension
Extending a dimension is a fairly simple process that requires you to create an Oracle Data Integrator mapping using the UDX table as source and target along with other source tables.
The CM mapping updates the user defined fields (In general, all the dimensions consist of a minimum of ten UDF columns. These columns are utilized to store additional information from the source systems. For example, UDF1_CD, UDF2_CD, UDF1_DESCR, UDF2_DESCR, and so on) columns based on the input parameters and the natural key of the UDX table.
Once the package using the CM mapping has been written, configure it and enable the jobs (Refer to the section UDX Processing in the Chapter 4: Extending Star Schema). If data has already been loaded, then the user defined fields are populated for incremental changes. To load the data
Extending Oracle Utilities Analytics 2-2Oracle Utilities Analytics Developer’s Guide
Fact Patterns
for all rows, the dimension needs to be reset using the reset scenario. Note that resetting a dimension resets the dependent facts also.
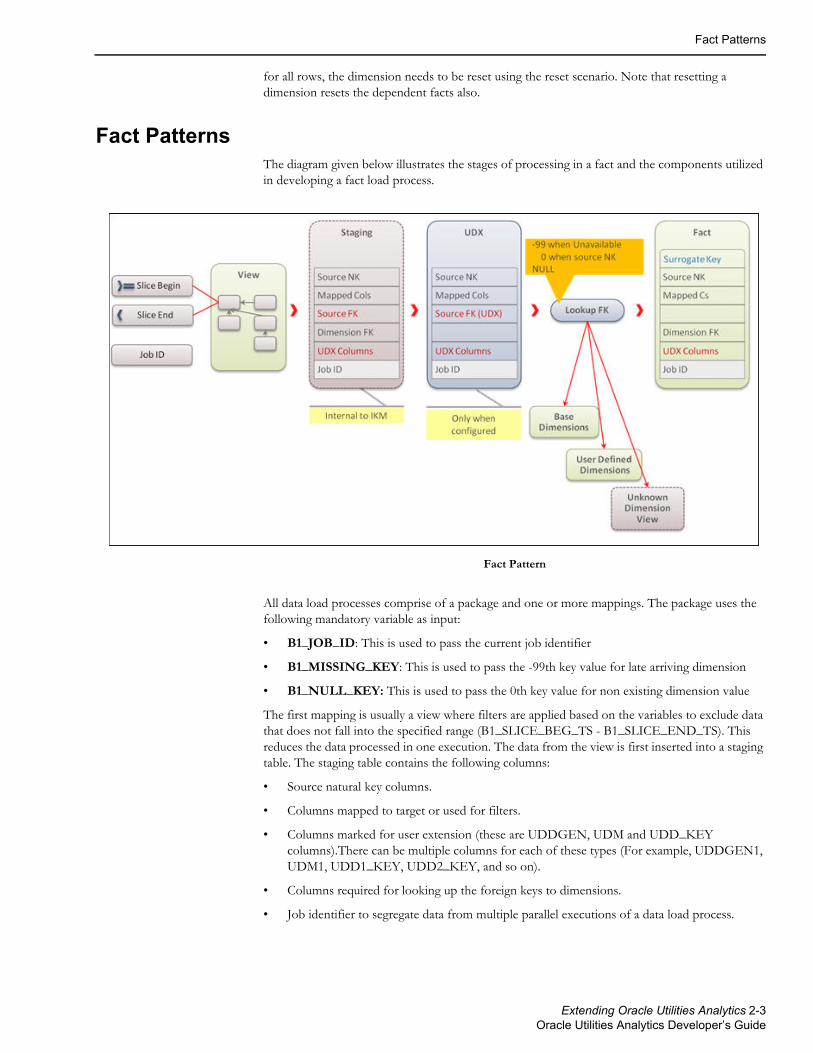
Fact PatternsThe diagram given below illustrates the stages of processing in a fact and the components utilized in developing a fact load process.
Fact Pattern
All data load processes comprise of a package and one or more mappings. The package uses the following mandatory variable as input:
• B1_JOB_ID: This is used to pass the current job identifier
• B1_MISSING_KEY: This is used to pass the -99th key value for late arriving dimension
• B1_NULL_KEY: This is used to pass the 0th key value for non existing dimension value
The first mapping is usually a view where filters are applied based on the variables to exclude data that does not fall into the specified range (B1_SLICE_BEG_TS - B1_SLICE_END_TS). This reduces the data processed in one execution. The data from the view is first inserted into a staging table. The staging table contains the following columns:
• Source natural key columns.
• Columns mapped to target or used for filters.
• Columns marked for user extension (these are UDDGEN, UDM and UDD_KEY columns).There can be multiple columns for each of these types (For example, UDDGEN1, UDM1, UDD1_KEY, UDD2_KEY, and so on).
• Columns required for looking up the foreign keys to dimensions.
• Job identifier to segregate data from multiple parallel executions of a data load process.
Extending Oracle Utilities Analytics 2-3Oracle Utilities Analytics Developer’s Guide

Extending Facts
The UDX table (see the section UDX Processing for the details on the UDX table) is created only if the CM procedure has been configured for the entity. This table contains the following types of columns:
• Source natural key columns.
• Columns marked for user extension (these are UDDGEN, UDM and UDD_KEY columns, for example, UDDGEN1, UDM1, UDD1_KEY, UDD2_KEY, and so on).
• Columns required for looking up the foreign keys to dimensions.
• Job identifier to segregate data from multiple parallel executions of a data load process.
An additional step in the fact processing is the foreign key lookup for dimensions. There are three types of dimensions:
• Base dimensions are the dimensions that are populated out of box.
• User Defined Dimensions (UDDs) are additional dimensions for which a template table is provided in the out of the box product.
• Unknown dimensions are the objects where tables are not provided and you need to create custom dimensions. There is a built in lookup so that custom UDD lookups do not require code change.
The data is finally loaded into the target dimension.
Extending FactsThe diagram below illustrates the steps required to extend a fact.
Extending Fact
Extending a fact is similar to the process for extending a dimension with an additional step required for custom dimension lookup.
Extending Oracle Utilities Analytics 2-4Oracle Utilities Analytics Developer’s Guide
Extending Facts
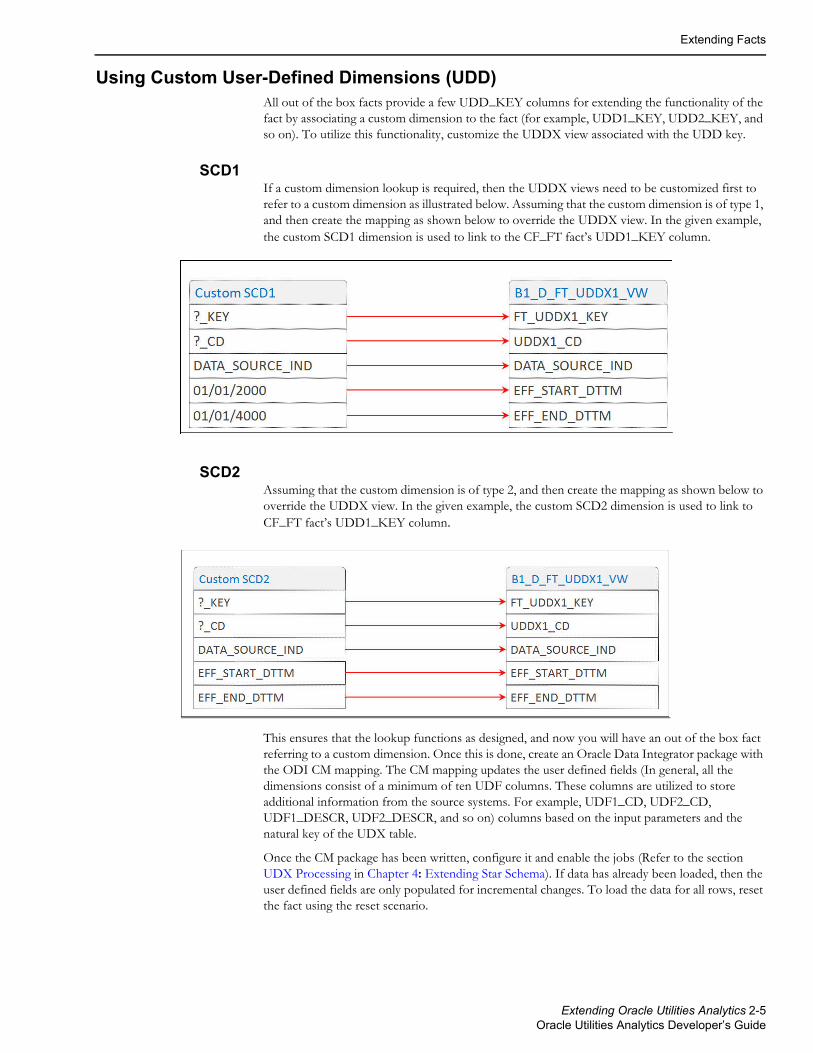
Using Custom User-Defined Dimensions (UDD)All out of the box facts provide a few UDD_KEY columns for extending the functionality of the fact by associating a custom dimension to the fact (for example, UDD1_KEY, UDD2_KEY, and so on). To utilize this functionality, customize the UDDX view associated with the UDD key.
SCD1If a custom dimension lookup is required, then the UDDX views need to be customized first to refer to a custom dimension as illustrated below. Assuming that the custom dimension is of type 1, and then create the mapping as shown below to override the UDDX view. In the given example, the custom SCD1 dimension is used to link to the CF_FT fact’s UDD1_KEY column.
SCD2Assuming that the custom dimension is of type 2, and then create the mapping as shown below to override the UDDX view. In the given example, the custom SCD2 dimension is used to link to CF_FT fact’s UDD1_KEY column.
This ensures that the lookup functions as designed, and now you will have an out of the box fact referring to a custom dimension. Once this is done, create an Oracle Data Integrator package with the ODI CM mapping. The CM mapping updates the user defined fields (In general, all the dimensions consist of a minimum of ten UDF columns. These columns are utilized to store additional information from the source systems. For example, UDF1_CD, UDF2_CD, UDF1_DESCR, UDF2_DESCR, and so on) columns based on the input parameters and the natural key of the UDX table.
Once the CM package has been written, configure it and enable the jobs (Refer to the section UDX Processing in Chapter 4: Extending Star Schema). If data has already been loaded, then the user defined fields are only populated for incremental changes. To load the data for all rows, reset the fact using the reset scenario.
Extending Oracle Utilities Analytics 2-5Oracle Utilities Analytics Developer’s Guide

Chapter 3Extending Replication
The Oracle Utilities Analytics product allows extending the capabilities of the product. The out of the box solution has been set up to enable replication of several tables required for processing and loading data into the data warehouse. Implementer's requirements, however, may vary and they may want to see additional information in their facts and dimensions that are not included in the out of the box solution. Some of these extension requirements may be met by using the tables which are already being replicated out of the box. For others, it may be required to include additional tables in the replication process.
The diagram below illustrates the steps required to include a table for replication that is currently not set up for replication.
Extending Replication
To configure replication, login to the Administration user interface, navigate to Source Table configuration. Identify the table to be replicated. Set the CM Replication flag to “Yes”. Perform the Oracle GoldenGate setup and complete the initial synchronization.
This chapter covers the following topics:
• Replicating Custom Tables for Oracle Utilities Application Framework Source Applications
• Replicating Custom Tables for Oracle Utilities Network Management System Source Applications
• Enabling Replications
• Creating Replicated Tables
• Executing Initial Sync
• Verifying Model Setup
Extending Replication 3-1Oracle Utilities Analytics Developer’s Guide
Replicating Custom Tables for Oracle Utilities Application Framework Source Applications
Replicating Custom Tables for Oracle Utilities Application Frame-work Source Applications
Most of the tables related to the tables used for populating the out of the box star schemas are listed in the metadata configuration “Source Tables”. If the table required for extension is not listed here, perform the following steps:
1. Create a procedure CM_<PROD_FLG>_CREATE_METADATA. Replace the <PROD_FLG> with the appropriate edge product code (For example, CCB/NMS/MDM/MWM).
2. Create a new task for each metadata entry into B1_OBJECT_MAP. All the tasks within the procedure should have the logical schema set to “Metadata”.
B1_OBJECT_MAP requires two entries - one entry mapping the MO to a custom view and the second entry mapping the custom view to the target custom fact or dimension.
Step 3 creates the first entry and step 4 creates the second entry.
3. Add an entry in the B1_OBJECT_MAP setting the SOURCE_OBJECT_NAME as the MO name and the TARGET_OBJECT_NAME as the target fact or dimension, which has some attributes loaded from this table.
These should be written as merge statements so that existing rows are skipped and only new rows are added. In case the metadata requires corrections, use the update clause of the merge statement. The schema names should not be hardcoded.
As an example, the merge statement given below is for setting up the tables under a maintenance object in Oracle Utilities Customer Care and Billing for inclusion in the replication process.
• The Source Product Flag should be the product flag of the source. In this example, it is 'CCB' for Oracle Utilities Customer Care and Billing.
• The Source Object Name should be the source maintenance object. In this example, the tables are included under the Budget Review maintenance object, it is specified as 'BUD REVIEW', which is the maintenance object code for Budget Review in Oracle Utilities Customer Care and Billing.
• The Target Object Name should be the ETL view that uses the tables of this maintenance object. In this example, CM_TEST_VW is specified as dummy value.
• The Object Type Flag is the type of object that is being replicated. In this example, replicating the entire Budget Review MO is specified; hence 'MO' has been specified.
merge into b1_object_map tgt using (select 'CCB' prod_flg , 'BUD REVIEW' source_object_name , 'CM_TEST_VW' target_object_name , 1 seq , 'MO' object_type_flg from dual ) tgt_val on ( tgt.prod_flg = tgt_val.prod_flg and tgt.source_object_name = tgt_val.source_object_name and tgt.target_object_name = tgt_val.target_object_name and tgt.seq = tgt_val.seq) when not matched then insert ( tgt.object_map_id , tgt.prod_flg , tgt.source_object_name
Extending Replication 3-2Oracle Utilities Analytics Developer’s Guide

Replicating Custom Tables for Oracle Utilities Application Framework Source Applications
, tgt.target_object_name , tgt.seq , tgt.object_type_flg , tgt.char_entity_flg , tgt.upd_dttm , tgt.upd_user , tgt.owner_flg ) values ( b1_object_map_seq.nextval , tgt_val.prod_flg , tgt_val.source_object_name , tgt_val.target_object_name , tgt_val.seq , tgt_val.object_type_flg , null , sysdate , sys_context('userenv', 'os_user') ,'B1');
4. The Insert statement mentioned below is to specify that the CM_TEST_VW ETL view is used to populate the target CM_F_FT.
merge into b1_object_map tgt using (select 'CCB' prod_flg , 'CM_TEST_VW' source_object_name , 'CM_F_FT' target_object_name , 1 seq , 'PRVW' object_type_flg from dual ) tgt_val on ( tgt.prod_flg = tgt_val.prod_flg and tgt.source_object_name = tgt_val.source_object_name and tgt.target_object_name = tgt_val.target_object_name and tgt.seq = tgt_val.seq) when not matched then insert ( tgt.object_map_id , tgt.prod_flg , tgt.source_object_name , tgt.target_object_name , tgt.seq , tgt.object_type_flg , tgt.char_entity_flg , tgt.upd_dttm , tgt.upd_user , tgt.owner_flg ) values ( b1_object_map_seq.nextval , tgt_val.prod_flg , tgt_val.source_object_name , tgt_val.target_object_name , tgt_val.seq , tgt_val.object_type_flg , null , sysdate , sys_context('userenv', 'os_user') ,'B1');
Extending Replication 3-3Oracle Utilities Analytics Developer’s Guide

Replicating Custom Tables for Oracle Utilities Network Management System Source Applications
5. Create a package CM_<PROD_FLG>_CREATE_METADATA. Add the procedure created in the first step.Add the scenario B1_CFG_METADATA as a second step. Add the scenario B1_CFG_INSTANCE_JOBS as third step. After migrating the CM Project to new environment, execute the custom procedure CM_<PROD_FLG>_CREATE_METADATA mentioned above after the addition of the product instance. This job should be executed in the newly created context for the product.
Executing the newly created package in the appropriate context ensures that the required tables are now present in the metadata configuration tables and you can follow the instructions under the section Enabling Replications.
The instructions given here are applicable to all the source products except for Oracle Utilities Network Management System, which does not use the Oracle Utilities Application Framework.
Note: Refer to the section Mapped Objects under the Chapter 2: Oracle Utilities Extractors and Schema in Oracle Utilities Analytics Administration Guide.
Replicating Custom Tables for Oracle Utilities Network Manage-ment System Source Applications
Most of the tables related to the tables used for populating the out of the box star schemas are listed in the metadata configuration “Source Tables”. If the table required for extension is not listed here, follow the steps below.
1. Create a procedure CM_NMS_CREATE_METADATA.
2. Create a new task for each metadata entry into B1_OBJECT_MAP. All tasks within the procedure should have the logical schema set to “Metadata”.
3. Add an entry in the B1_OBJECT_MAP setting the SOURCE_OBJECT_NAME as the table name and the TARGET_OBJECT_NAME as the target fact or dimension, which has some attributes loaded from this table.
These should be written as merge statements so that existing rows are skipped and only new rows are added. In case the metadata requires corrections, use the update clause of the merge statement. The schema names should not be hardcoded.
As an example, the merge statement given below is for setting up the tables under a maintenance object in Oracle Utilities Customer Care and Billing for inclusion in the replication process.
• The Source Product Flag should be the product flag of the source. In this example, it is 'NMS' for Oracle Utilities Network Management System.
• The Source Object Name should be the source table. In this example, the table ‘CM_XYZ’ is included.
• The Target Object Name should be the ETL view that uses the tables of this maintenance object. In this example, CM_TEST_VW is specified as dummy value.
• The Object Type Flag is the type of object that is being replicated. In this example, a specific table is replication, hence 'TBL' is been specified.
merge into b1_object_map tgt using (select 'NMS' prod_flg , 'CM_XYZ' source_object_name , 'CM_TEST_VW' target_object_name , 1 seq , 'TBL' object_type_flg
Extending Replication 3-4Oracle Utilities Analytics Developer’s Guide
Replicating Custom Tables for Oracle Utilities Network Management System Source Applications
from dual ) tgt_val on ( tgt.prod_flg = tgt_val.prod_flg and tgt.source_object_name = tgt_val.source_object_name and tgt.target_object_name = tgt_val.target_object_name and tgt.seq = tgt_val.seq) when not matched then insert ( tgt.object_map_id , tgt.prod_flg , tgt.source_object_name , tgt.target_object_name , tgt.seq , tgt.object_type_flg , tgt.char_entity_flg , tgt.upd_dttm , tgt.upd_user , tgt.owner_flg ) values ( b1_object_map_seq.nextval , tgt_val.prod_flg , tgt_val.source_object_name , tgt_val.target_object_name , tgt_val.seq , tgt_val.object_type_flg , null , sysdate , sys_context('userenv', 'os_user') ,'B1');
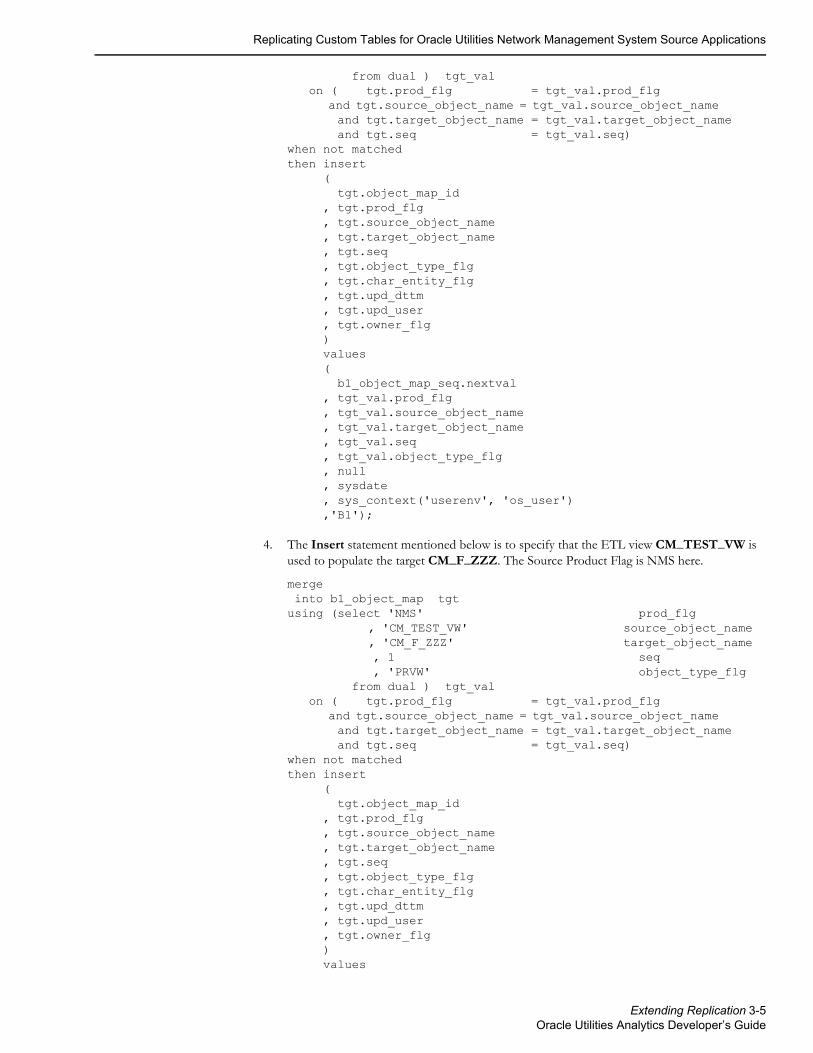
4. The Insert statement mentioned below is to specify that the ETL view CM_TEST_VW is used to populate the target CM_F_ZZZ. The Source Product Flag is NMS here.
merge into b1_object_map tgt using (select 'NMS' prod_flg , 'CM_TEST_VW' source_object_name , 'CM_F_ZZZ' target_object_name , 1 seq , 'PRVW' object_type_flg from dual ) tgt_val on ( tgt.prod_flg = tgt_val.prod_flg and tgt.source_object_name = tgt_val.source_object_name and tgt.target_object_name = tgt_val.target_object_name and tgt.seq = tgt_val.seq) when not matched then insert ( tgt.object_map_id , tgt.prod_flg , tgt.source_object_name , tgt.target_object_name , tgt.seq , tgt.object_type_flg , tgt.char_entity_flg , tgt.upd_dttm , tgt.upd_user , tgt.owner_flg ) values
Extending Replication 3-5Oracle Utilities Analytics Developer’s Guide
Enabling Replications
( b1_object_map_seq.nextval , tgt_val.prod_flg , tgt_val.source_object_name , tgt_val.target_object_name , tgt_val.seq , tgt_val.object_type_flg , null , sysdate , sys_context('userenv', 'os_user') ,'B1');
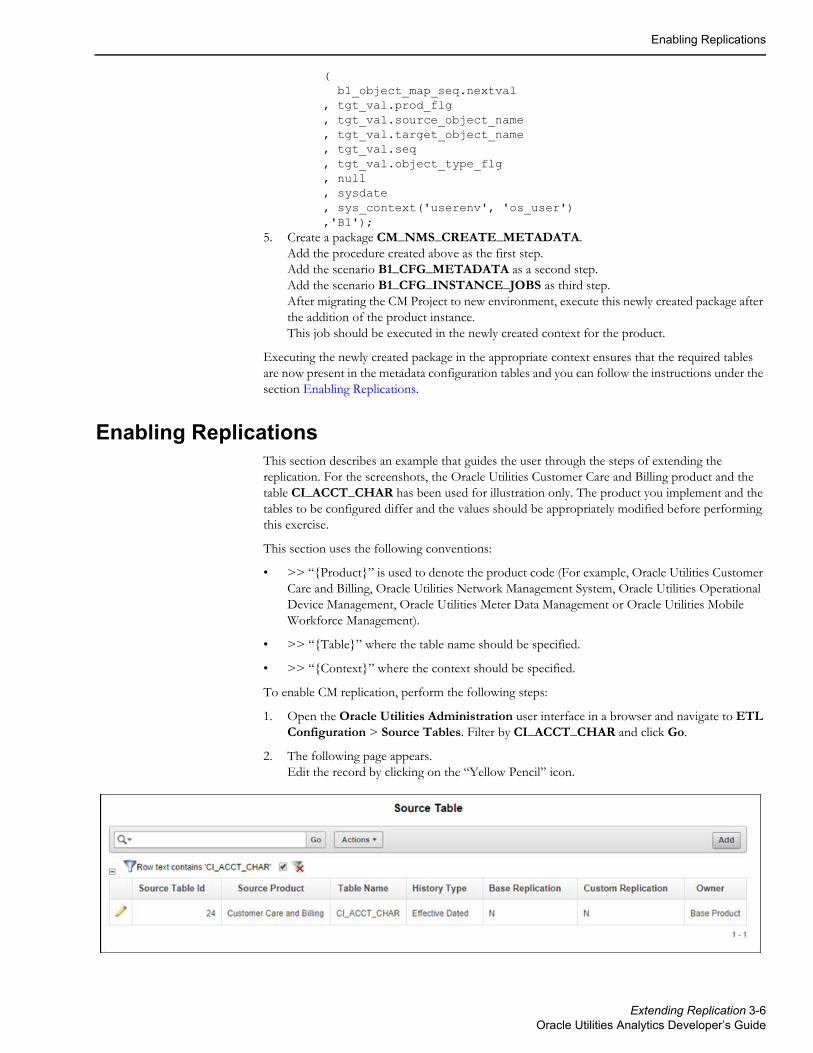
5. Create a package CM_NMS_CREATE_METADATA. Add the procedure created above as the first step. Add the scenario B1_CFG_METADATA as a second step. Add the scenario B1_CFG_INSTANCE_JOBS as third step. After migrating the CM Project to new environment, execute this newly created package after the addition of the product instance. This job should be executed in the newly created context for the product.
Executing the newly created package in the appropriate context ensures that the required tables are now present in the metadata configuration tables and you can follow the instructions under the section Enabling Replications.
Enabling ReplicationsThis section describes an example that guides the user through the steps of extending the replication. For the screenshots, the Oracle Utilities Customer Care and Billing product and the table CI_ACCT_CHAR has been used for illustration only. The product you implement and the tables to be configured differ and the values should be appropriately modified before performing this exercise.
This section uses the following conventions:
• >> “{Product}” is used to denote the product code (For example, Oracle Utilities Customer Care and Billing, Oracle Utilities Network Management System, Oracle Utilities Operational Device Management, Oracle Utilities Meter Data Management or Oracle Utilities Mobile Workforce Management).
• >> “{Table}” where the table name should be specified.
• >> “{Context}” where the context should be specified.
To enable CM replication, perform the following steps:
1. Open the Oracle Utilities Administration user interface in a browser and navigate to ETL Configuration > Source Tables. Filter by CI_ACCT_CHAR and click Go.
2. The following page appears. Edit the record by clicking on the “Yellow Pencil” icon.
Extending Replication 3-6Oracle Utilities Analytics Developer’s Guide

Creating Replicated Tables
3. The Maintain Source Table page appears. In the Maintain Source Table page, select Yes from the Custom Replication drop-down list.
4. Click Save to save the changes.
Creating Replicated TablesThe configuration changes have been done, but the table has not been replicated yet. The next step is to get the table created in the replication schema.
To create a replica table in Replication schema, perform the following steps:
1. Run the following commands at the Command prompt:
cd bin ./config.sh
2. On the Configuration Type page, select Upgrade Source option and click Next.The Source Product page appears. All the source contexts that are already registered will show up in the Source Product page.
3. Select the source product from the Source Product list and click Next.The Source Details page appears. The previously configured values for the selected source are visible in this page.
Extending Replication 3-7Oracle Utilities Analytics Developer’s Guide

Creating Replicated Tables
4. Modify the values in the page where required and click Next. The following is a brief description of the fields in this page:
Note: While upgrading a source that was registered using Oracle Utilities Analytics versions prior to version 2.6.0, values for the database schema name and drillback URL will not appear by default. These parameters must be entered to proceed with the upgrade of the source.
5. The GoldenGate Details page appears. The previously configured values for the selected source are visible in this page.
6. Modify the values where required and click Next. The following is a brief description of the fields in this page:
Field Name Description Value
DB Host This is the source database host name.
DB Port This is the source database port. The default port is 1521
DB Service Name This is the source database service name.
DB Home Path This is the source database home installed location.In case GoldenGate for source is not installed on the source database server, provide the Oracle client home location on the server on which GoldenGate is installed.
Drill Back URL This is the drill back URL for the source database.
DB Schema Name This is the source schema name.
Extract Start Date(YYYYMMDD)
This is the date from which data should be extracted from the source.
Socks Proxy This is the socks proxy host and port separated by a :
Provide the value only if a socks proxy has been setup. Leave the field blank otherwise.
Field Name Description Value
Host This is the source GoldenGate server host.
Home Path This is the Oracle GoldenGate installed location on the source database server.
For example: opt/local/ggs_home
Source Database Home
This is the source database home installed location.
Manager Port The port number on which Oracle GoldenGate Manager is running on the Oracle GoldenGate host.
The default dynamic min port is 7830. The default dynamic max port is 7880.
Extending Replication 3-8Oracle Utilities Analytics Developer’s Guide
Creating Replicated Tables
Note: While upgrading a source that was registered in using Oracle Utilities Analytics versions prior to version 2.6.0, the parameter values for Oracle GoldenGate Owner User and Oracle GoldenGate Owner Password are not populated by default. These parameters must be re-entered to proceed with upgrade of the source.
7. The Source JAgent Details page appears. Enter the following details in the respective fields and click Next.
8. The Configuration Summary page opens showing the log file location. Click Configure.
9. The Configuration Progress page opens showing the status. Click Next.
Encryption Algorithm
This is the algorithm configured in Oracle GoldenGate on the source server.
Provide value AES128.
Encrypt Key This is the Encrypt Key configured in Oracle GoldenGate on the source server.
Provide the encryptkey created while setting up GoldenGate on source database server, as specified in the section Setting up Oracle GoldenGate on the Source Database Server of the Installation Guide.
Shared Secret This is the shared secret key configured in Oracle GoldenGate on the source server.
Refer to the instructions in Generating the Shared Secret Password section of the Installation Guide for getting this value.
GoldenGate Owner User
This is the user name of GoldenGate Owner user.
GoldenGate Owner Password
This is the password of GoldenGate Owner user.
Field Name Description Value
JAgent Host The host of the Oracle GoldenGate JAgent.
JAgent GoldenGate This is the Oracle GoldenGate installed location where GoldenGate JAgent is running.
Example: /opt/local/ggs_12.1.2.1.0
JAgent Port The port number on which Oracle GoldenGate JAgent is running on the GoldenGate host.
JAgent User This is the JAgent user name.
JAgent Wallet Password This is the JAgent Wallet password.
Confirm JAgent Wallet Password
Re enter JAgent Wallet password to confirm.
Field Name Description Value
Extending Replication 3-9Oracle Utilities Analytics Developer’s Guide

Executing Initial Sync
10. The Completion Summary page appears showing the log file location. Click Finish.
11. Upon completion, the status of source registration is shown in a prompt. The detailed logs of the operation are available in the logs/system/deployodi.log file in the Oracle Utilities Analytics home.
12. Log into SQL developer and run the query below to verify that the table has been replicated but there is no data in the table.
select * from ccb1rep.ci_acct_char;
Executing Initial SyncOnce the script is executed successfully the B1_SYNC_CONTEXT scenario has to be run so that the data is moved to replication.
Perform the following steps to execute the B1_SYNC_CONETXT:
1. Login to the ODI console.
2. Go to the “Load plans and Scenario Folder” in Designer tab.
3. Expand the Framework folder.
4. Right click B1_SYNC_CONTEXT Version 001 and click Run.
5. In the dialog that opens, enter the Context and Logical Agent. In the example provided we have to choose context code CCB1 and Logical agent as WLS Agent.
Extending Replication 3-10Oracle Utilities Analytics Developer’s Guide
Verifying Model Setup
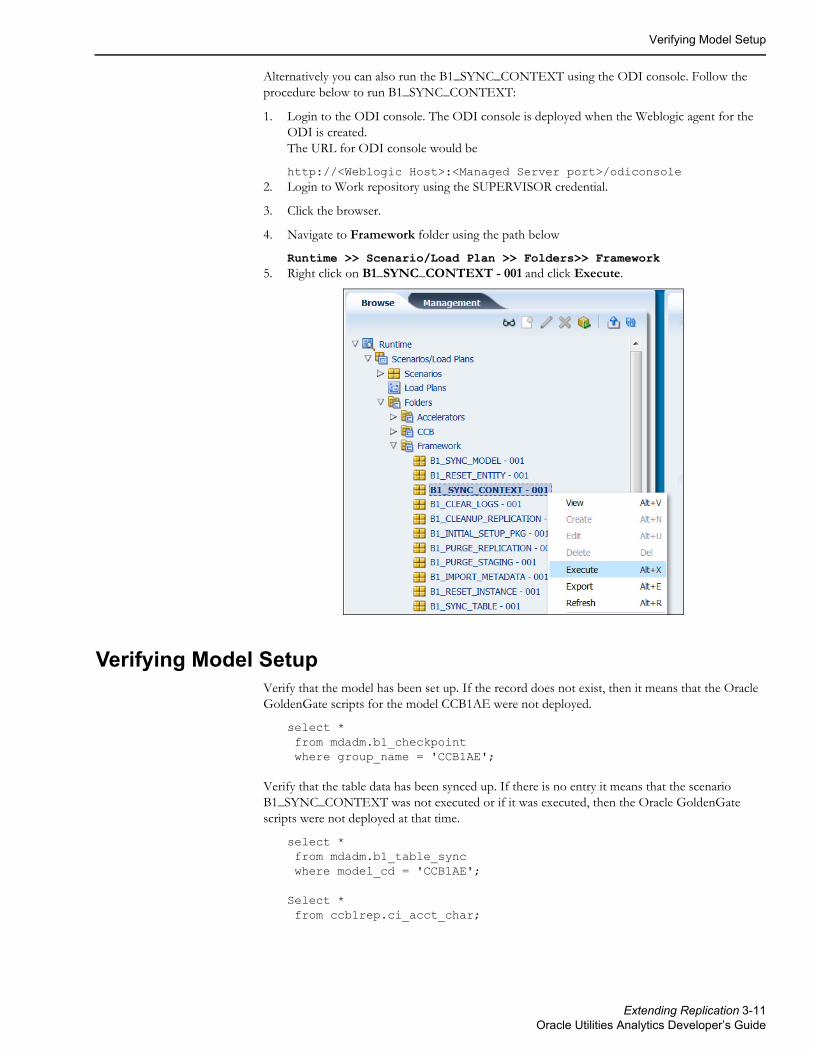
Alternatively you can also run the B1_SYNC_CONTEXT using the ODI console. Follow the procedure below to run B1_SYNC_CONTEXT:
1. Login to the ODI console. The ODI console is deployed when the Weblogic agent for the ODI is created. The URL for ODI console would be
http://<Weblogic Host>:<Managed Server port>/odiconsole2. Login to Work repository using the SUPERVISOR credential.
3. Click the browser.
4. Navigate to Framework folder using the path below
Runtime >> Scenario/Load Plan >> Folders>> Framework5. Right click on B1_SYNC_CONTEXT - 001 and click Execute.
Verifying Model SetupVerify that the model has been set up. If the record does not exist, then it means that the Oracle GoldenGate scripts for the model CCB1AE were not deployed.
select * from mdadm.b1_checkpoint where group_name = 'CCB1AE';
Verify that the table data has been synced up. If there is no entry it means that the scenario B1_SYNC_CONTEXT was not executed or if it was executed, then the Oracle GoldenGate scripts were not deployed at that time.
select * from mdadm.b1_table_sync where model_cd = 'CCB1AE'; Select * from ccb1rep.ci_acct_char;
Extending Replication 3-11Oracle Utilities Analytics Developer’s Guide

Verifying Model Setup
Important Note:
• Enable all the replication tables required for customization, and then follow the steps mentioned in the sections Creating Replicated Tables and Executing Initial Sync.
• Make sure that each model does have more than 100 tables.
Extending Replication 3-12Oracle Utilities Analytics Developer’s Guide
Chapter 4Extending Star Schema
The data warehouse schema in Oracle Utilities Analytics (OUA) covers a wide range of reporting requirements. You often require adding additional data elements to meet site specific requirements. Oracle Utilities Analytics allows such extensions to the schema through the use of user-defined constructs, such as User Defined Fields (UDFs), User Defined Measures (UDMs), User Defined Degenerate Dimensions (UDDGENs), User Defined Foreign Keys (UDDFKs) and User Defined Dimensions (UDDs). Using these constructs, you can extend the star schemas that are delivered along with the product. This chapter includes:
• User Extensible Columns
• UDX Processing
• Populating User-Defined Columns
• Populating User-Defined Foreign Keys
• Star Schema
• Custom Dimensions
• Custom Facts
• Custom Materialized Views
User Extensible ColumnsThe predefined facts and dimensions are provided with a set of user extensible columns, which can be used for extending the existing entities. These columns include:
• User Defined Field: The User Defined Fields (UDFs) reside on the dimension tables in the star schemas. In general, all the dimensions consist of a minimum of ten UDF columns. These columns can be utilized to store additional information from the source systems.
• User Defined Measure: The User Defined Measure (UDM) column is used to support the storage of implementation-specific measures not provided in the out of the box facts.
• User Defined Degenerate Dimension: The User Defined Degenerate Dimension (UDDGEN) columns reside directly on the fact table and can be used to store the dimension attributes, which do not fit into a particular dimension, but is required for analytical purposes.
• User Defined Foreign Key Dimensions: These are empty foreign keys attributes which are not associated with the out of the box dimensions. This allows you to reuse an existing dimension or to create accustom dimension and build a reference in the fact.
• User Defined Dimension: User Defined Dimensions (UDDs) are empty dimensions that are delivered along with the star schemas in Oracle Utilities Analytics.
Extending Star Schema 4-1Oracle Utilities Analytics Developer’s Guide
UDX Processing
In addition to utilizing these extensible columns, you can create custom facts and dimensions to achieve their additional analytic requirements.
UDX ProcessingIn Oracle Utilities Analytics, the process of extending out of the box dimensions and facts is very simple. This relies on a configurable package with a predefined signature. All entities have been set up with a functionality that executes the custom package if configured.
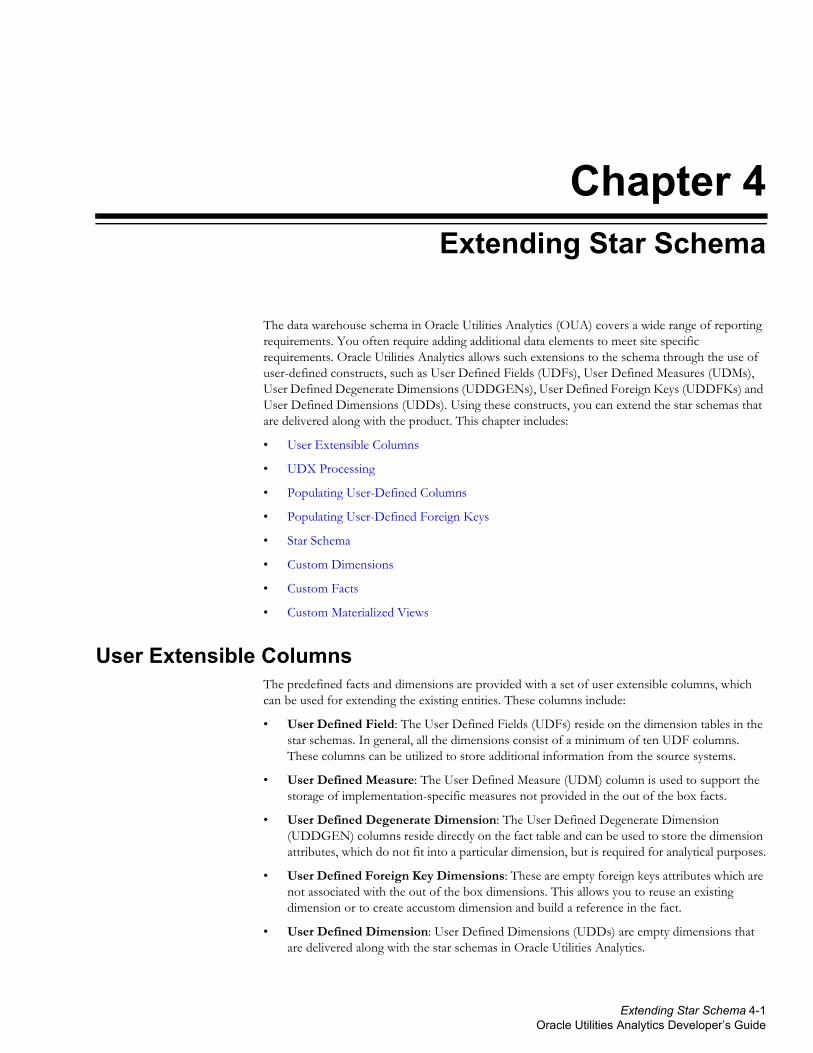
The diagram below illustrates the processing logic when the user exit procedure is executed. All mappings process data using staging tables. The first step is loading a staging table using a source view. Once the staging table is loaded, configurations are looked up and if the CM package has been configured for the job, then a UDX table is created. The UDX table contains a natural key and all user extensible columns. The table acts as a template and you are expected to update the UDX columns based on the natural key columns and the input parameters.
UDX Processing
After the CM package is executed successfully, the data is copied back into the staging table. If the entity being extended is a fact, then user-defined foreign keys are referenced again. After this, the final data is loaded into the target entity.
Your task is reduced to only creating a CM package and configuring it.
Populating User-Defined ColumnsThe Oracle Utilities Analytics product allows you to extend the functionality of the dimensions and facts using user defined columns. Oracle Utilities Analytics allows the creation of ODI based mapping and package to extend the columns. We will be utilizing ODI to define the custom package.
The benefits of utilizing Oracle Data Integrator to create the package are:
• Schema names do not need to be hardcoded.
• Easier to deploy (Execute in the appropriate context).
• Easy to deploy for multiple instances of the same source product.
Extending Star Schema 4-2Oracle Utilities Analytics Developer’s Guide

Populating User-Defined Columns
This section covers the following topics:
• Creating a CM Mapping
• Creating a CM Package
• Resetting Dimensions
• Configuring CM Scenarios
• Monitoring the Job Execution
• Validating the Data Load
Creating a CM MappingThis section walks you through the process of extending the CD_ACCT dimension using a sample data. Again, for purpose of this example, we are assuming that CCB1 is the context defined for the CCB source attached to the Oracle Utilities Analytics product.
To create CM procedure, perform the following steps:
1. Expand the Dimensions folder. The folder contains these object types: “Packages”, “Mapping” and “Procedures”.
2. Select the Mapping node and right-click. Select the New Mapping option in the menu that appears.
3. In the New Mapping window, enter the name of UDX in the Name field (For example, CM_CD_ACCT_UDX). Select “Oracle” from the Target Technology drop-down list.A new mapping will be created with the given name.
4. Click the Logical tab.
5. Drag the UDX and the replication table in the designer window.
6. Join the UDX and the replication table.
Extending Star Schema 4-3Oracle Utilities Analytics Developer’s Guide

Populating User-Defined Columns
7. Drag and drop the target data store UDX_CD_ACCT. The target table should be UDX table and select the appropriate key define in CD_ACCT dimension. The logic to populate the UDX has to done in the mapping accordingly.
8. Go to the Physical tab and select the optimization context.
9. On the Physical tab, select the target table (UDX_CD_ACCT) and select the KM “IKM BI Direct Load”. Set DML_OPERATION option has to be set to UPDATE instead of MERGE.
Creating a CM PackageFollow the instructions below to create a package for the new custom mapping.
1. Navigate to Designer > User Customizations > CCB > Dimension >Package.
2. Right-click on Packages and select New Package.
3. In the Package Editor window, enter the name of UDX in the Name field (For example, B1_PKG_CM_CD_ACCT_UDX). A new package will be created with the given name.
4. Click the Diagram tab at the bottom of the editor.
5. From the Global Objects section, drag the variables B1_JOB_ID into the editor.
6. Change the variables B1_JOB_ID to declare variable.
Extending Star Schema 4-4Oracle Utilities Analytics Developer’s Guide

Populating User-Defined Columns
7. Drag and drop the CM mapping into the editor and connect them all together in sequence.
8. Click Save and close the package editor window.
9. Navigate to the Packages folder and expand it. You will see the new package displayed here.
10. Right- click the package and select Generate Scenario.
11. A dialog opens asking for the scenario name. Click OK.
12. Another popup dialog appears asking you to select the startup variables. Click “OK”.
13. In the Projects section, expand the created package. Under Scenarios, the scenario object that was generated is seen.
Resetting DimensionsSince the dimension has already been loaded, you need to reset to the empty state before you reload with the customization in place by performing the following steps:
1. Navigate to Designer > Load Plans and Scenarios> Framework > B1_RESET_ENTITY.
2. Right-click on the B1_RESET_ENTITY entity and select Execute option in the menu that appears.
3. Select 'CCB1' as the Context and click OK.
Extending Star Schema 4-5Oracle Utilities Analytics Developer’s Guide
Populating User-Defined Columns
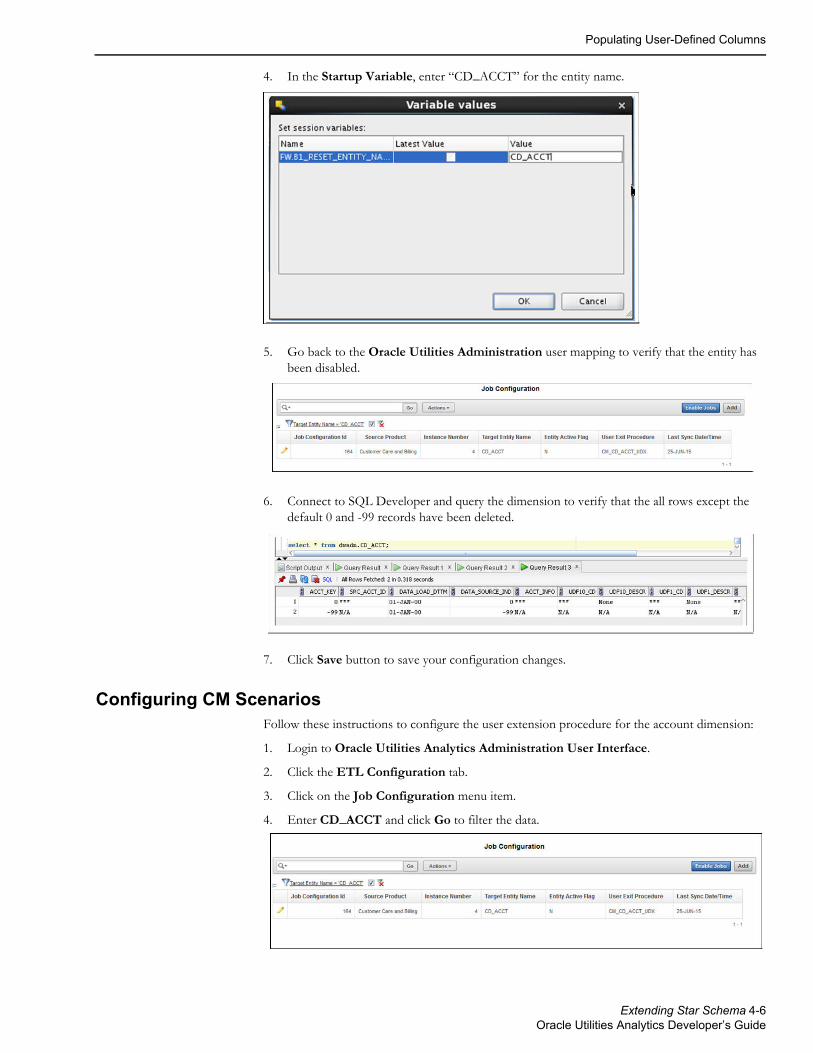
4. In the Startup Variable, enter “CD_ACCT” for the entity name.
5. Go back to the Oracle Utilities Administration user mapping to verify that the entity has been disabled.
6. Connect to SQL Developer and query the dimension to verify that the all rows except the default 0 and -99 records have been deleted.
7. Click Save button to save your configuration changes.
Configuring CM ScenariosFollow these instructions to configure the user extension procedure for the account dimension:
1. Login to Oracle Utilities Analytics Administration User Interface.
2. Click the ETL Configuration tab.
3. Click on the Job Configuration menu item.
4. Enter CD_ACCT and click Go to filter the data.
Extending Star Schema 4-6Oracle Utilities Analytics Developer’s Guide
Populating User-Defined Columns
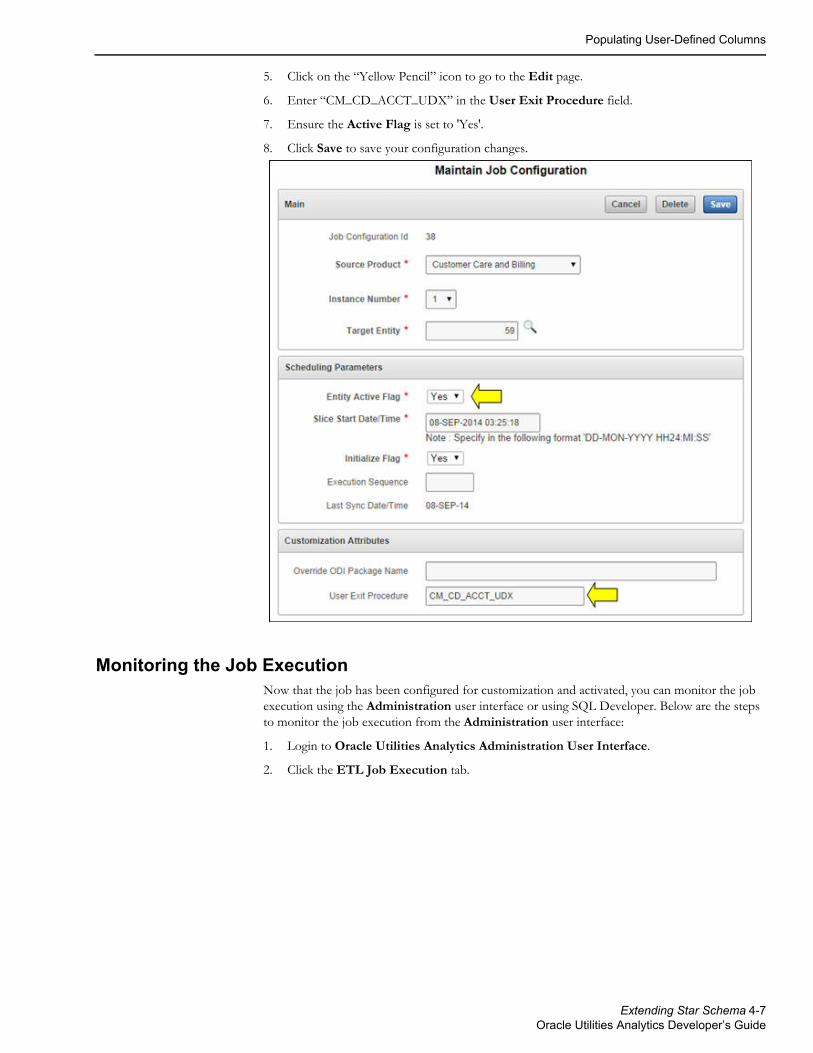
5. Click on the “Yellow Pencil” icon to go to the Edit page.
6. Enter “CM_CD_ACCT_UDX” in the User Exit Procedure field.
7. Ensure the Active Flag is set to 'Yes'.
8. Click Save to save your configuration changes.
Monitoring the Job ExecutionNow that the job has been configured for customization and activated, you can monitor the job execution using the Administration user interface or using SQL Developer. Below are the steps to monitor the job execution from the Administration user interface:
1. Login to Oracle Utilities Analytics Administration User Interface.
2. Click the ETL Job Execution tab.
Extending Star Schema 4-7Oracle Utilities Analytics Developer’s Guide

Populating User-Defined Foreign Keys
3. Enter “CD_ACCT” and click Go to filter the data. To see the latest execution, you can sort by session end date so that the latest execution appears on the top.
Alternatively, perform these instructions to monitor using SQL developer:
1. Connect to the target database using SQL Developer.
2. Monitor the job executions for the account dimension using the query mentioned below:
select * from mdadm.b1_jobs_vw where entity_name = 'CD_ACCT';
Validating the Data LoadFollow the steps below to validate that data has been loaded into the customized columns.
1. Check which rows have the udf10_cd and udf10_descr columns populated using the query mentioned below:
select src_acct_id , udf10_cd , udf10_descr from dwadm.CD_ACCT where acct_key not in (0,-99) and udf10_cd is not null;
2. Compare the data in the dimension with the data in the base table ci_acct_char using the query mentioned below:
select acct_id , char_val , srch_char_val from ccb1rep.ci_acct_char where char_type_cd = 'CI_VATCA' ;
Populating User-Defined Foreign KeysThis section describes the steps to extend the Out of the box facts with the custom dimension. Create the custom dimension first, and then load the custom dimension. Thereafter, customize the fact load to use the custom dimension and populate the custom dimension key.
Before performing these tasks, perform all the tasks described in the section Custom Dimensions. This section covers the following topics:
• Creating CM Views
• Creating CM Procedures
• Configuring CM Procedures
Extending Star Schema 4-8Oracle Utilities Analytics Developer’s Guide

Populating User-Defined Foreign Keys
Creating CM ViewsFollow the instructions below to create a mapping that is used to wrap the custom dimension created in the task given above.
1. Open the Oracle Data Integrator client and navigate to the Customization project.
1. Right-click on the mapping and click on the New Interface option in the menu that appears.
2. Enter the name of the procedure and enter a brief description of the procedure in the Description section.
3. Click the Mapping tab on the bottom of the page to go to the Edit Mapping page.
4. On the left navigation, go to Models > Customizations > UDX Dimension.
5. Select and drag the custom dimension into the Source section.
6. In the Properties Inspector, change the Alias to UDDX1.
7. Click on the title bar of the section Target Datastore and in the Properties Inspector tab, enter the UDDX view name for the name of the target object. The naming convention of the UDDX view is B1_D_<FACT NAME>_UDDX1_VW to populate the UDD1_KEY of the fact. For example, if the fact name is CF_ARREARS, then to populate UDD1_KEY, the view name would be B1_D_ARREARS_UDDX1_VW. To populate UDD2_KEY, the view name would be B1_D_ARREARS_UDDX2_VW.
8. Keeping the CTRL key clicked, select the columns, surrogate key, natural key and effective dated columns.
9. Right-click on any selected column and in the contextual menu that appears click on Add Column to Target Table. This brings all the columns in the target of the mapping.
10. Click on the Flow tab at the bottom. This takes you to the Flow Editor page where the KM selection can be done.
11. In the Properties Inspector, select the “IKM BI View Generation” Global Integration Knowledge Modules (IKM). Leave the properties as the default and click Save.
12. Execute the mapping and go to the Operator to view the status. The job should execute successfully and the view should be created.
13. Verify the view data by executing the following query in SQL Developer. The data from the view and the custom dimension should match.
select * from {Target}.uddx view
Creating CM ProceduresFollow the instructions below to create the CM procedure for a fact:
1. Login to Oracle Data Integrator client.
2. Navigate to the Designer tab.
3. Expand the Customizations project.
4. Create the Facts folder and expand the folder.
5. Right-click Procedures and select the New Procedure option in the menu that appears.
6. Enter the name of the procedure in the Name field and a brief description in the Description field.
7. Click the Details tab on the left hand side navigation section. This opens the Editor window. Click on the green + to add a new step.
Extending Star Schema 4-9Oracle Utilities Analytics Developer’s Guide
Star Schema
8. Enter the name for the step and select “Replication” from the Schema drop-down list.
9. In the Command section, enter the logic to update the UDX table of the fact. The UDD(n)_DSI should be updated.
10. Click Save to save the changes and click on the green triangle to execute. The Execution popup appears. Select the context from the Context drop-down list and click OK.
11. Navigate to the main Operator tab and expand Date > Today to view the status of the execution.
Configuring CM ProceduresFollow the instructions below to configure the user extension procedure for the fact.
1. Open the Oracle Utilities Analytics Administration user interface in a browser and login.
2. Click the ETL Configuration tab.
3. Click the Job Configuration menu item.
4. Enter the procedure name in the User Exit Procedure field and click Go to filter the data.
5. Click on the Pencil icon to bring up the edit page.
6. Set the User Exit Procedure.
7. Click Save.
8. Enable the job by setting the Entity Active Flag to Yes.
9. Monitor the job execution and verify the data is in the final fact.
Star SchemaThe star schema is perhaps the simplest data warehouse schema. It is called a star schema as the entity-relationship diagram of this schema resembles a star with points radiating from a central table. The center of the star consists of a large fact table. The end points of the star are the dimension tables.
A star query is a join between a fact table and a number of dimension tables. Each dimension table is joined to the fact table using a primary key to foreign key join. However, the dimension tables are not joined to each other. The optimizer recognizes star queries and generates efficient execution plans. It is not mandatory to have any foreign keys on the fact table for star transformation to take effect.
A typical fact table contains keys and measures. A star join is a primary key to foreign key join of the dimension tables to a fact table. The main advantages of a star schema are as follows:
• Provides a direct and intuitive mapping between the business entities analyzed by the end users and the schema design.
• Provides highly-optimized performance for the typical star queries.
• Widely supported by a large number of business intelligence tools, which may anticipate or even require that the data warehouse schema contain dimension tables.
The star schemas are used for both simple data marts as well as very large data warehouses. Once the model has been designed, Oracle Data Integrator can used to create the mappings and package to load the data into the star schema.
Note: For the details regarding data modeling, refer to the Chapter 19: Schema Modeling Techniques of the Oracle® Database Data Warehousing Guide 11g Release 2 guide.
Extending Star Schema 4-10Oracle Utilities Analytics Developer’s Guide

Custom Dimensions
Custom DimensionsCreate a table and a sequence in the database. The dimension table has a surrogate primary key and a unique key, which includes the data source indicator and a column from the source.
The below diagram shows the pattern to be used while developing the Oracle Data Integrator components for a custom dimension. This is similar to the out of the box pattern with the user extension component excluded.
This section covers the following steps required to create a custom dimension and load data into it, using an example:
• Creating Dimension Tables
• Importing Dimensions into Model
• Importing Replicated Tables into Model
• Creating Replication Key Views in Model for Dimensions
• Creating Mapping for Key Views for Dimensions
• Creating Loading Views in Model for Dimensions
• Creating Mapping for Loading Views
• Creating Package for Loading Views
• Creating Staging Tables in Model for Dimensions
• Creating Mapping for Dimensions
• Creating Packages for Dimensions
• Configuring Entities
• Configuring Jobs for Dimensions
• Monitoring Job Executions
• Validating the Data Load
Creating Dimension TablesWe will create a Type-II slowly changing dimension. The dimension needs to have a primary key. In our example this will be the surrogate key column and we will use a sequence to generate the values for this key. A Type II dimension needs to have a unique key comprising of a column from source, the data source indicator, effective start timestamp and the effective end timestamp.
Extending Star Schema 4-11Oracle Utilities Analytics Developer’s Guide

Custom Dimensions
Follow the steps below to create a dimension table:
1. Connect to the database using SQL Developer.
2. Run the script below to create the dimension table in the target schema:
create table dwadm.cm_d_arrears_uddx1 ( arrears_uddx1_key number(10) ,uddx1_cd varchar2(30) ,attribute1 varchar2(60) ,attribute2 varchar2(60) ,attribute3 varchar2(60) ,attribute4 varchar2(60) ,attribute5 varchar2(60) ,data_source_ind number(6) ,eff_start_dttm date ,eff_end_dttm date ,job_nbr numeric (15) ,update_dttm date ,primary key (arrears_uddx1_key) );
3. Run the script below to create the unique composite key for the type 2 dimension:
create unique index dwadm.cm_d_arrears_uddx1_uk on dwadm.cm_d_arrears_uddx1(uddx1_cd ,eff_start_dttm ,eff_end_dttm ,data_source_ind);
4. Create the sequence which will be used to generate the surrogate key values.
create sequence dwadm.cm_d_arrears_uddx1_seq start with 1 increment by 1;
5. Insert a row for the default 0 key record to handle nulls in the dimension foreign keys.
insert into dwadm.cm_d_arrears_uddx1 ( arrears_uddx1_key ,uddx1_cd ,attribute1 ,attribute2 ,attribute3 ,attribute4 ,attribute5 ,data_source_ind ,eff_start_dttm ,eff_end_dttm ,job_nbr ,update_dttm ) values (0 ,'***' ,'***' ,'***' ,'***' ,'***' ,'***' ,0 ,to_date('01/01/2000','mm/dd/yyyy') ,to_date('01/01/4000','mm/dd/yyyy') ,0
Extending Star Schema 4-12Oracle Utilities Analytics Developer’s Guide
Custom Dimensions
,sysdate); commit;
6. Insert a row for the default -99 key record for automatic reprocessing of Late Arriving Dimensions:
insert into dwadm.cm_d_arrears_uddx1 ( arrears_uddx1_key ,uddx1_cd ,attribute1 ,attribute2 ,attribute3 ,attribute4 ,attribute5 ,data_source_ind ,eff_start_dttm ,eff_end_dttm ,job_nbr ,update_dttm ) values (-99 ,'N/A' ,'N/A' ,'N/A' ,'N/A' ,'N/A' ,'N/A' ,-99 ,to_date('01/01/2000','mm/dd/yyyy') ,to_date('01/01/4000','mm/dd/yyyy') ,-99 ,sysdate); commit;
Importing Dimensions into ModelAfter the custom dimension is created in the table, import the dimension in the custom model folder created for customization.
1. Login to Oracle Data Integrator client.
2. Navigate to the Models section on the Designer tab in ODI.
3. Navigate to the User Customization folder and then to the folder with the product name for which the customization is done. In this example, it is CCB.
4. Right-click on the product folder and select New Model. The New Model window opens.
5. In the Name field, enter Dimension.
6. Specify the code.
7. Select the Technology as “Oracle” and Logical Schema as “Target”.
8. Click Save to save the model.
9. Right-click and open the dimension model.
10. Navigate to the Reverse Engineer tab.
Extending Star Schema 4-13Oracle Utilities Analytics Developer’s Guide

Custom Dimensions
11. For the Types of Objects to reverse-engineer, select Table.
12. Enter CM_D_ARREARS_UDDX1 in the Mask field.
13. Clear the Characters to Remove from Table Alias field.
14. Click Reverse Engineer.The dimension table is reversed in the model.Once the dimension has been imported into the model, set some properties on the dimension.
15. Expand the Dimension model, double click on the dimension to open the editor window.
16. In the Definition tab, for the OLAP Type, select Slowly Changing Dimension.
17. Save the changes and navigate to the Attributes section of the data store. We will change the SCD behavior for all columns.
18. For each of the attributes, set the SCD Behavior as shown below:
19. The Attributes section will look like this:
Importing Replicated Tables into ModelFollow the steps below to import the replicated table into model:
1. Login to Oracle Data Integrator client.
2. Navigate to the Models section on the Designer tab in ODI.
Attribute SCD Behavior
UDDX1_CD Natural Key
DATA_SOURCE_IND Natural Key
EFF_START_DTTM Starting Timestamp
EFF_END_DTTM Ending Timestamp
ATTRIBUTE1 Add Row on Change
ATTRIBUTE2 Add Row on Change
ATTRIBUTE3 Add Row on Change
ATTRIBUTE4 Add Row on Change
ATTRIBUTE5 Add Row on Change
JOB_NBR Overwrite On Change
UPDATE_DTTM Overwrite On Change
Extending Star Schema 4-14Oracle Utilities Analytics Developer’s Guide
Custom Dimensions
3. Navigate to the User Customization folder and then to the folder with the product name for which the customization is done.
4. Right-click on the product folder and select New Model. The New Model window opens.
5. In the Name field, enter “Replication”.
6. Click on the Reverse Engineer tab on the left side menu.
7. Select “CCB7” for the Context field and enter “%CI_ACCT_CHAR” in the Mask field.
8. Save the model and click Reverse Engineer.
Creating Replication Key Views in Model for DimensionsThe key view is created for the dimension so that the incremental data for the fact can be filtered based on the key view. The key view should comprise the natural key of the dimension and the JRN_SLICING_TS column that stores the JRN_SLICING_TS column values from the driving tables that are used to create the view.
Follow the steps below to create the replication key view in model for the dimension:
1. Login to Oracle Data Integrator client.
2. Navigate to Models > User Customizations.
3. Navigate to the relevant product folder.
4. Right- click the Replication model and select New Datastore in the menu that pops up.
5. In the Definition tab, enter the name of the key view as CM_D_ARREARS_UDDX1_KVW. The naming convention of the view is “CM_” prefixed to Entity name and suffixed by “_KVW”.
6. In the Resource Name field, enter the same name of the key view as in the step above.
7. Navigate to the Attributes tab.
8. Click on + button on right hand corner and add the columns in the datastore. The natural key of the dimension has to be present in the view. In addition to this, the JRN_SLICING_TS column has to be added.
9. Save the datastore.
10. Close the datastore and model tab.
Creating Mapping for Key Views for DimensionsThe key view for the dimension has to be generated in the Replication schema. Follow the instructions below to create a mapping for generating the view for the key columns:
1. Navigate to the User Customizations project.
2. Navigate to the relevant product folder.
3. Create a new folder named Replication and expand it.
4. Right-click on the mapping and select New Mapping from the popup menu.
5. In the New Mapping dialog, enter “CM_D_ARREARS_UDDX1_KVW” as the name and uncheck the Create Empty Dataset option.
6. Navigate to the Logical tab of the mapping editor.
7. Navigate to Models > User Customizations > Replication.
Extending Star Schema 4-15Oracle Utilities Analytics Developer’s Guide
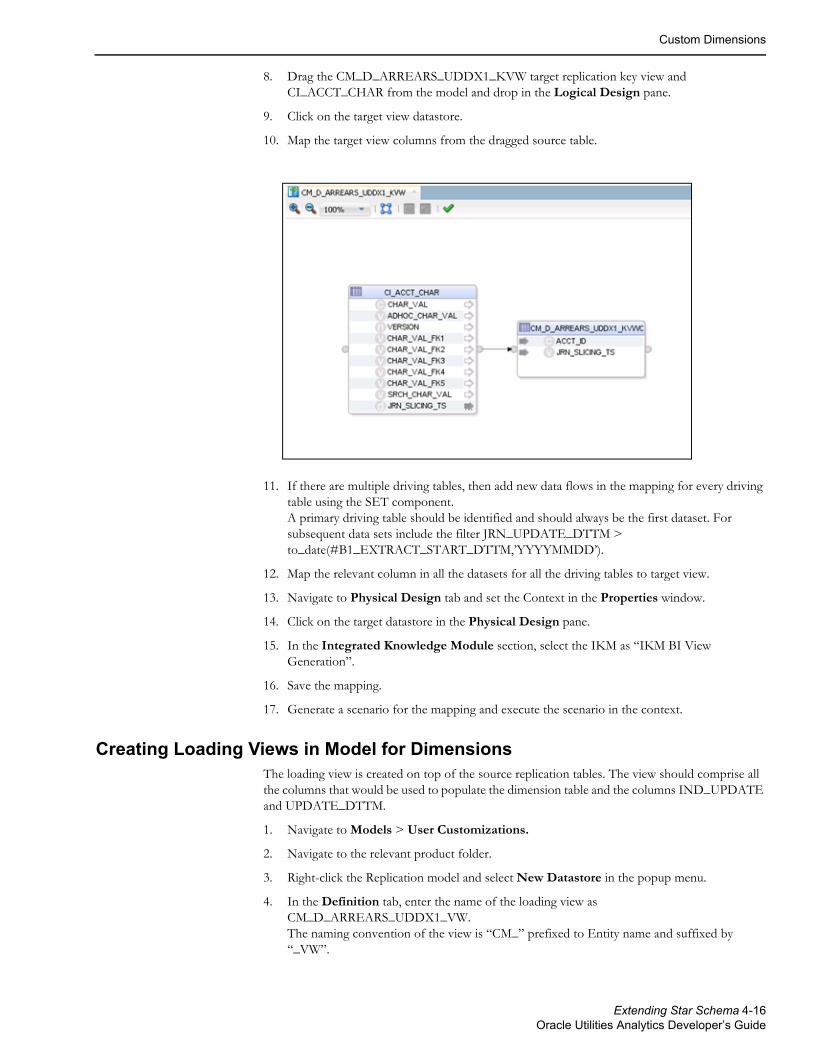
Custom Dimensions
8. Drag the CM_D_ARREARS_UDDX1_KVW target replication key view and CI_ACCT_CHAR from the model and drop in the Logical Design pane.
9. Click on the target view datastore.
10. Map the target view columns from the dragged source table.
11. If there are multiple driving tables, then add new data flows in the mapping for every driving table using the SET component. A primary driving table should be identified and should always be the first dataset. For subsequent data sets include the filter JRN_UPDATE_DTTM > to_date(#B1_EXTRACT_START_DTTM,’YYYYMMDD’).
12. Map the relevant column in all the datasets for all the driving tables to target view.
13. Navigate to Physical Design tab and set the Context in the Properties window.
14. Click on the target datastore in the Physical Design pane.
15. In the Integrated Knowledge Module section, select the IKM as “IKM BI View Generation”.
16. Save the mapping.
17. Generate a scenario for the mapping and execute the scenario in the context.
Creating Loading Views in Model for DimensionsThe loading view is created on top of the source replication tables. The view should comprise all the columns that would be used to populate the dimension table and the columns IND_UPDATE and UPDATE_DTTM.
1. Navigate to Models > User Customizations.
2. Navigate to the relevant product folder.
3. Right-click the Replication model and select New Datastore in the popup menu.
4. In the Definition tab, enter the name of the loading view as CM_D_ARREARS_UDDX1_VW. The naming convention of the view is “CM_” prefixed to Entity name and suffixed by “_VW”.
Extending Star Schema 4-16Oracle Utilities Analytics Developer’s Guide

Custom Dimensions
5. Specify the same view name again in the Resource Name field.
6. Navigate to Attributes tab.
7. Click + on the right corner and add the columns in the datastore. Add all the columns that would be required to populate the dimension table.
8. In addition to the above columns, add “IND_UPDATE” column with datatype as “CHAR(1)”. Add “UPDATE_DTTM” with datatype as “DATE”.
9. Save the datastore.
10. Close the datastore and model tab.
Creating Mapping for Loading ViewsFollow the instructions below to create a mapping for generating the view that will be used as source for the new dimension.
1. Navigate to the User Customizations > CCB> Replication folder.
2. Right-click on the mapping and select New Mapping in the popup menu.
3. In the New Mapping dialog, enter “CM_D_ARREARS_UDDX1_VW” in the Name field and provide a description.
4. Navigate to Model > User Customizations > Replication.
5. Drag the CI_ACCT_CHAR table into the Logical Design pane.
6. In the Property Inspector, change the alias name to PRIM.
7. Similarly, drag the table CI_ACCT_CHAR again into the Logical Design pane. In the property inspector change the alias name to ACDP.
8. From the Component palette, drag the Join component and place it in the Logical Design pane.
9. Join the two source tables to the Join component.
Extending Star Schema 4-17Oracle Utilities Analytics Developer’s Guide
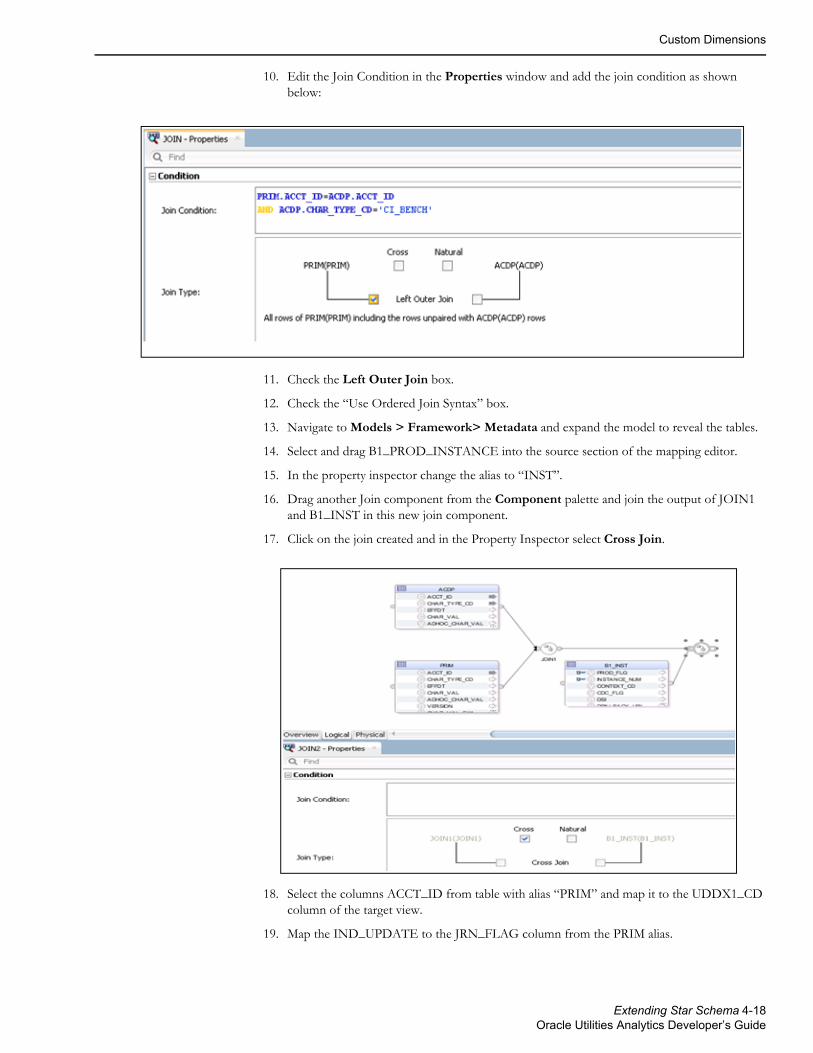
Custom Dimensions
10. Edit the Join Condition in the Properties window and add the join condition as shown below:
11. Check the Left Outer Join box.
12. Check the “Use Ordered Join Syntax” box.
13. Navigate to Models > Framework> Metadata and expand the model to reveal the tables.
14. Select and drag B1_PROD_INSTANCE into the source section of the mapping editor.
15. In the property inspector change the alias to “INST”.
16. Drag another Join component from the Component palette and join the output of JOIN1 and B1_INST in this new join component.
17. Click on the join created and in the Property Inspector select Cross Join.
18. Select the columns ACCT_ID from table with alias “PRIM” and map it to the UDDX1_CD column of the target view.
19. Map the IND_UPDATE to the JRN_FLAG column from the PRIM alias.
Extending Star Schema 4-18Oracle Utilities Analytics Developer’s Guide
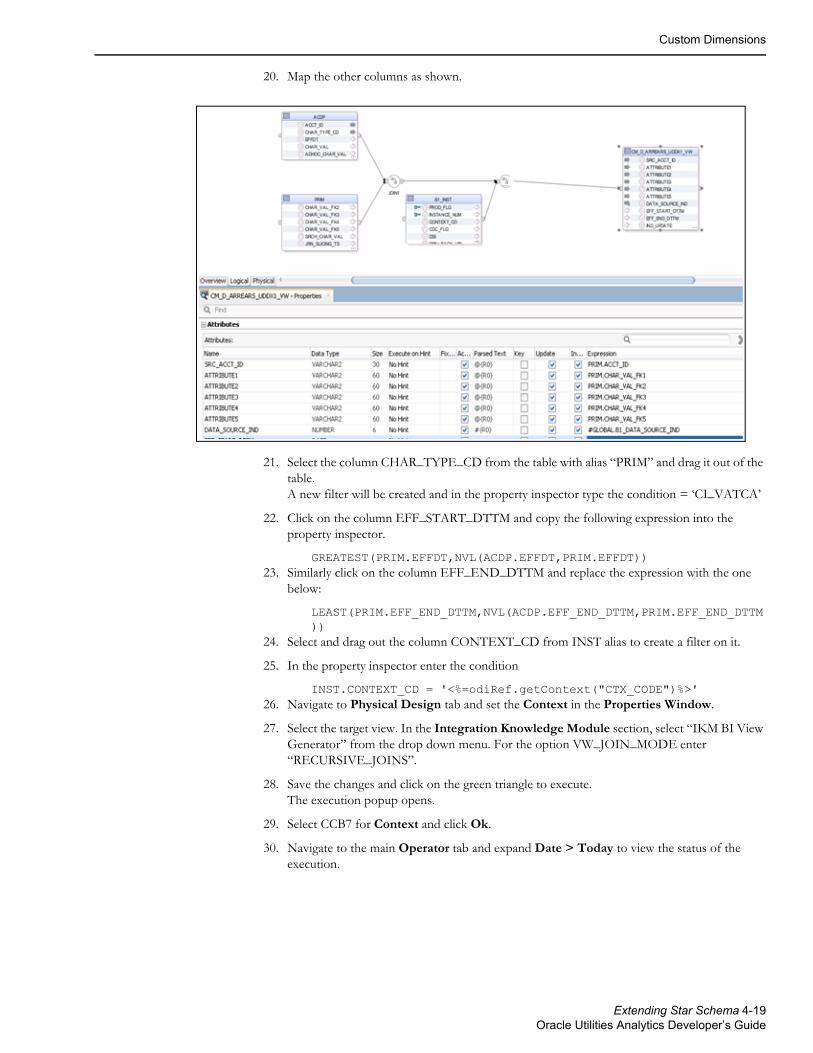
Custom Dimensions
20. Map the other columns as shown.
21. Select the column CHAR_TYPE_CD from the table with alias “PRIM” and drag it out of the table. A new filter will be created and in the property inspector type the condition = ‘CI_VATCA’
22. Click on the column EFF_START_DTTM and copy the following expression into the property inspector.
GREATEST(PRIM.EFFDT,NVL(ACDP.EFFDT,PRIM.EFFDT))23. Similarly click on the column EFF_END_DTTM and replace the expression with the one
below:
LEAST(PRIM.EFF_END_DTTM,NVL(ACDP.EFF_END_DTTM,PRIM.EFF_END_DTTM))
24. Select and drag out the column CONTEXT_CD from INST alias to create a filter on it.
25. In the property inspector enter the condition
INST.CONTEXT_CD = '<%=odiRef.getContext("CTX_CODE")%>' 26. Navigate to Physical Design tab and set the Context in the Properties Window.
27. Select the target view. In the Integration Knowledge Module section, select “IKM BI View Generator” from the drop down menu. For the option VW_JOIN_MODE enter “RECURSIVE_JOINS”.
28. Save the changes and click on the green triangle to execute. The execution popup opens.
29. Select CCB7 for Context and click Ok.
30. Navigate to the main Operator tab and expand Date > Today to view the status of the execution.
Extending Star Schema 4-19Oracle Utilities Analytics Developer’s Guide
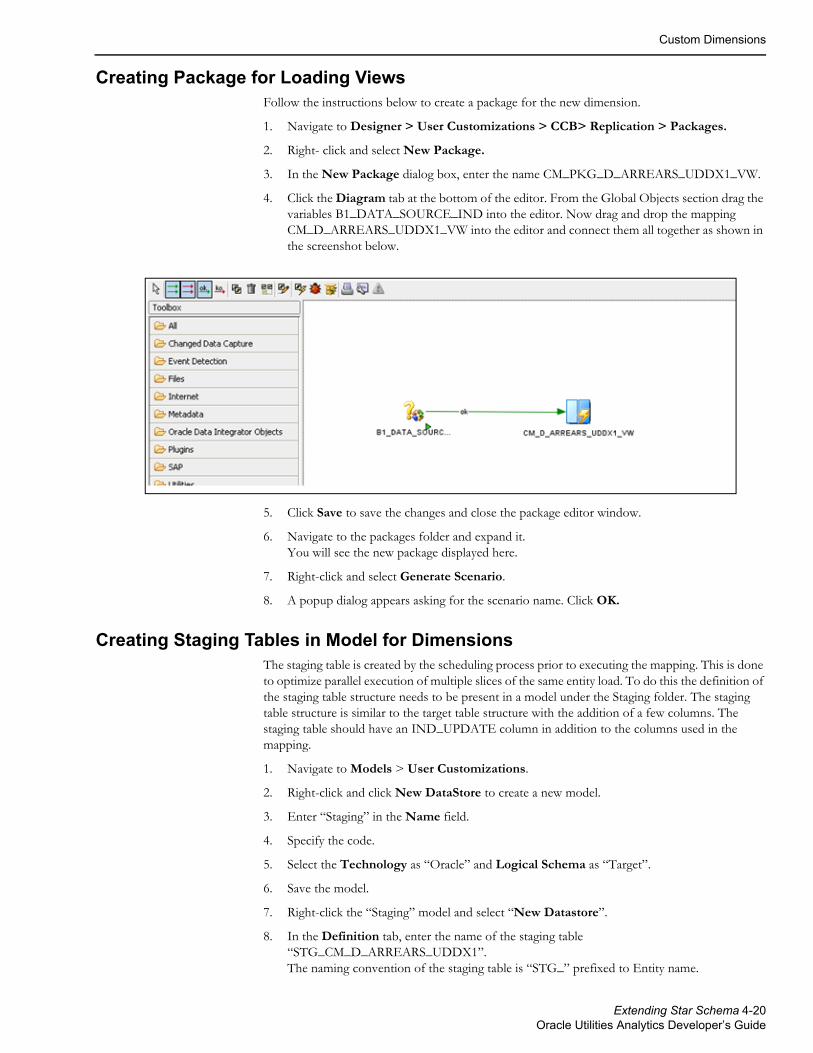
Custom Dimensions
Creating Package for Loading ViewsFollow the instructions below to create a package for the new dimension.
1. Navigate to Designer > User Customizations > CCB> Replication > Packages.
2. Right- click and select New Package.
3. In the New Package dialog box, enter the name CM_PKG_D_ARREARS_UDDX1_VW.
4. Click the Diagram tab at the bottom of the editor. From the Global Objects section drag the variables B1_DATA_SOURCE_IND into the editor. Now drag and drop the mapping CM_D_ARREARS_UDDX1_VW into the editor and connect them all together as shown in the screenshot below.
5. Click Save to save the changes and close the package editor window.
6. Navigate to the packages folder and expand it. You will see the new package displayed here.
7. Right-click and select Generate Scenario.
8. A popup dialog appears asking for the scenario name. Click OK.
Creating Staging Tables in Model for DimensionsThe staging table is created by the scheduling process prior to executing the mapping. This is done to optimize parallel execution of multiple slices of the same entity load. To do this the definition of the staging table structure needs to be present in a model under the Staging folder. The staging table structure is similar to the target table structure with the addition of a few columns. The staging table should have an IND_UPDATE column in addition to the columns used in the mapping.
1. Navigate to Models > User Customizations.
2. Right-click and click New DataStore to create a new model.
3. Enter “Staging” in the Name field.
4. Specify the code.
5. Select the Technology as “Oracle” and Logical Schema as “Target”.
6. Save the model.
7. Right-click the “Staging” model and select “New Datastore”.
8. In the Definition tab, enter the name of the staging table “STG_CM_D_ARREARS_UDDX1”.The naming convention of the staging table is “STG_” prefixed to Entity name.
Extending Star Schema 4-20Oracle Utilities Analytics Developer’s Guide
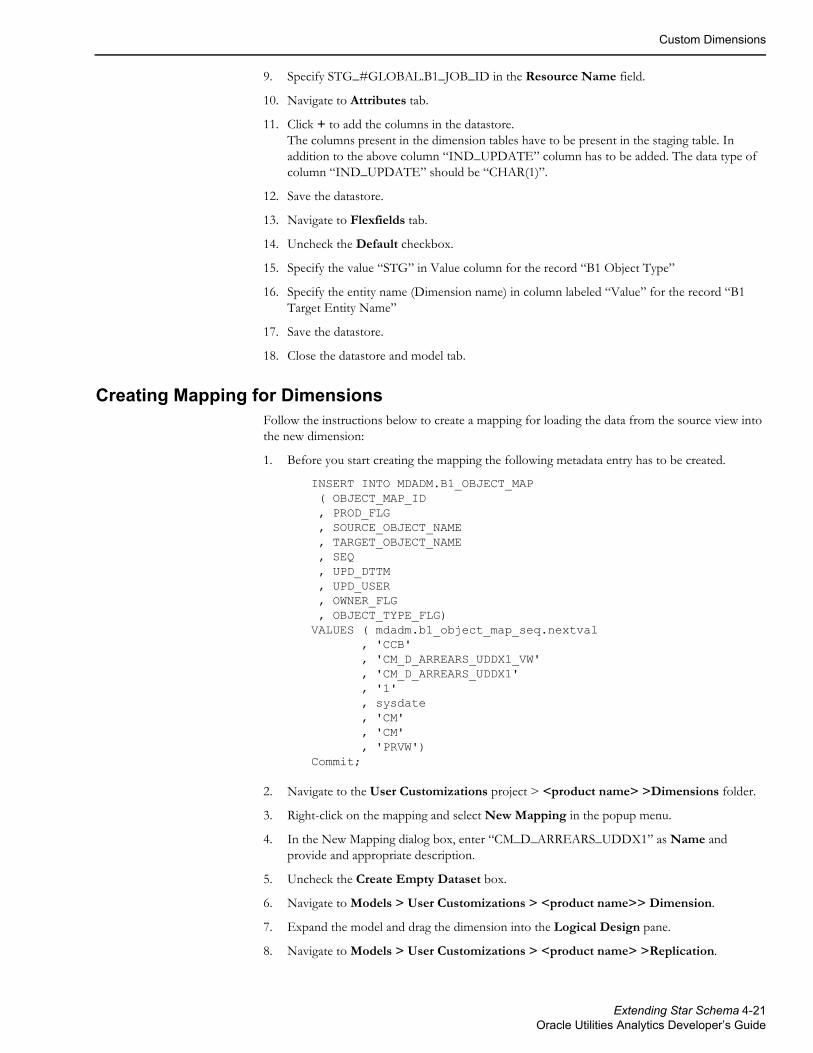
Custom Dimensions
9. Specify STG_#GLOBAL.B1_JOB_ID in the Resource Name field.
10. Navigate to Attributes tab.
11. Click + to add the columns in the datastore. The columns present in the dimension tables have to be present in the staging table. In addition to the above column “IND_UPDATE” column has to be added. The data type of column “IND_UPDATE” should be “CHAR(1)”.
12. Save the datastore.
13. Navigate to Flexfields tab.
14. Uncheck the Default checkbox.
15. Specify the value “STG” in Value column for the record “B1 Object Type”
16. Specify the entity name (Dimension name) in column labeled “Value” for the record “B1 Target Entity Name”
17. Save the datastore.
18. Close the datastore and model tab.
Creating Mapping for DimensionsFollow the instructions below to create a mapping for loading the data from the source view into the new dimension:
1. Before you start creating the mapping the following metadata entry has to be created.
INSERT INTO MDADM.B1_OBJECT_MAP ( OBJECT_MAP_ID , PROD_FLG , SOURCE_OBJECT_NAME , TARGET_OBJECT_NAME , SEQ , UPD_DTTM , UPD_USER , OWNER_FLG , OBJECT_TYPE_FLG) VALUES ( mdadm.b1_object_map_seq.nextval , 'CCB' , 'CM_D_ARREARS_UDDX1_VW' , 'CM_D_ARREARS_UDDX1' , '1' , sysdate , 'CM' , 'CM' , 'PRVW') Commit;
2. Navigate to the User Customizations project > <product name> >Dimensions folder.
3. Right-click on the mapping and select New Mapping in the popup menu.
4. In the New Mapping dialog box, enter “CM_D_ARREARS_UDDX1” as Name and provide and appropriate description.
5. Uncheck the Create Empty Dataset box.
6. Navigate to Models > User Customizations > <product name>> Dimension.
7. Expand the model and drag the dimension into the Logical Design pane.
8. Navigate to Models > User Customizations > <product name> >Replication.
Extending Star Schema 4-21Oracle Utilities Analytics Developer’s Guide
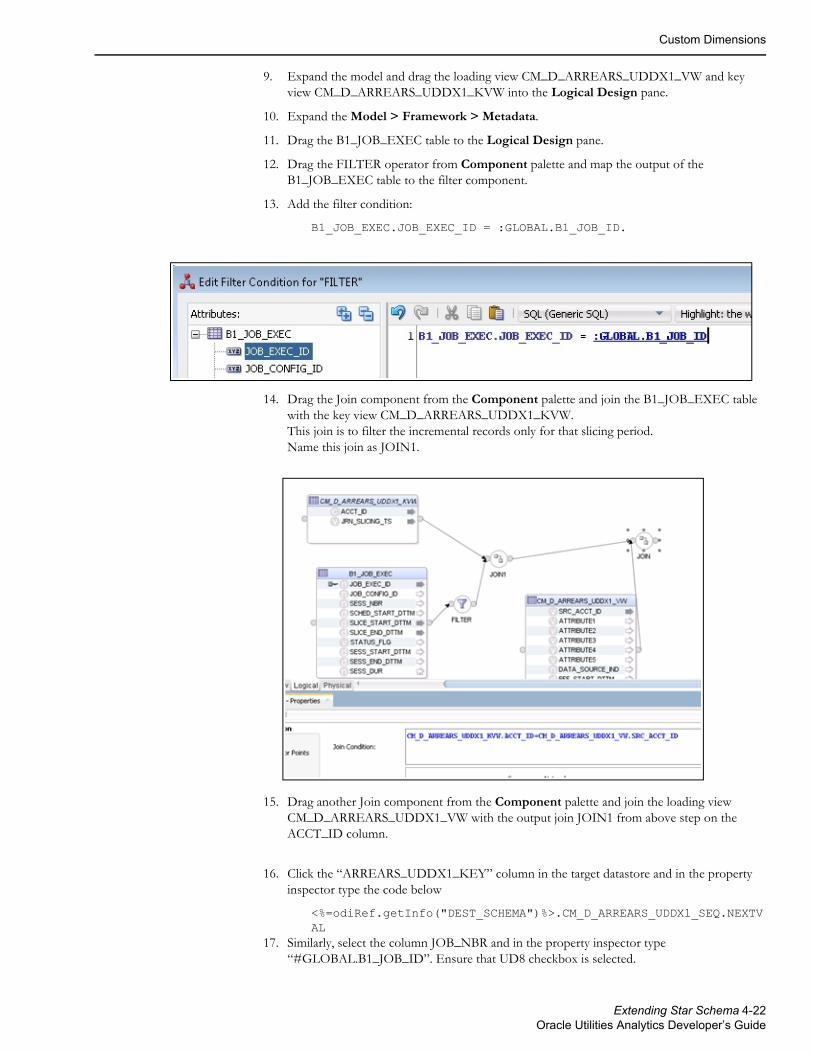
Custom Dimensions
9. Expand the model and drag the loading view CM_D_ARREARS_UDDX1_VW and key view CM_D_ARREARS_UDDX1_KVW into the Logical Design pane.
10. Expand the Model > Framework > Metadata.
11. Drag the B1_JOB_EXEC table to the Logical Design pane.
12. Drag the FILTER operator from Component palette and map the output of the B1_JOB_EXEC table to the filter component.
13. Add the filter condition:
B1_JOB_EXEC.JOB_EXEC_ID = :GLOBAL.B1_JOB_ID.
14. Drag the Join component from the Component palette and join the B1_JOB_EXEC table with the key view CM_D_ARREARS_UDDX1_KVW. This join is to filter the incremental records only for that slicing period. Name this join as JOIN1.
15. Drag another Join component from the Component palette and join the loading view CM_D_ARREARS_UDDX1_VW with the output join JOIN1 from above step on the ACCT_ID column.
16. Click the “ARREARS_UDDX1_KEY” column in the target datastore and in the property inspector type the code below
<%=odiRef.getInfo("DEST_SCHEMA")%>.CM_D_ARREARS_UDDX1_SEQ.NEXTVAL
17. Similarly, select the column JOB_NBR and in the property inspector type “#GLOBAL.B1_JOB_ID”. Ensure that UD8 checkbox is selected.
Extending Star Schema 4-22Oracle Utilities Analytics Developer’s Guide

Custom Dimensions
18. Select the column UPDATE_DTTM and in the property inspector type “SYSDATE”
19. Map the other columns from the loading view as appropriate.
20. Navigate to the Physical Design tab and click on the target dimension table.
21. Set the context as CCB7 in the Properties window.
22. Navigate to the Integration Knowledge Module section and select IKM BI Dimension Load (SCD – II).GLOBAL as the KM for the mapping.
23. Provide the DML_OPTION value as MERGE.
Creating Packages for DimensionsFollow the instructions below to create a package for the new dimension.
1. Navigate to Designer > User Customizations > Dimensions > Packages.
2. Right-click on Packages and select New Package
3. In the New Package dialog box, type the name CM_PKG_CD_ARREARS_UDDX1.
4. Click the Diagram tab at the bottom of the editor.
5. From the Global Objects section drag the variables B1_JOB_ID and B1_HIGH_DATE into the editor. Change the variable B1_JOB_ID to type Declare Variable. Change the variable B1_HIGH_DATE to type Refresh Variable.
6. Now drag and drop the mapping CM_D_ARREARS_UDDX1 into the editor and connect them all together.
7. Click Save to save the changes and close the package editor window.
8. Navigate to the packages folder and expand it. You will see the new package displayed here.
9. Right-click and select Generate scenario.
10. A popup dialog appears asking for the scenario name. Click OK.
11. Another popup dialog appears asking you to select the startup variables. Uncheck B1_HIGH_DATE as this is a refresh variable and click OK.
12. Expand the package and you will notice scenarios and under scenarios you can see the scenario object that was generated.
Configuring EntitiesFollow the instructions below to configure a new entity for the custom dimension.
1. Open the Oracle Utilities Analytics Administration user mapping in a browser and login.
2. Click on the tab ETL Configuration tab.
3. Click on the menu item Target Entity.
Extending Star Schema 4-23Oracle Utilities Analytics Developer’s Guide

Custom Dimensions
4. Click Add.
5. The page appears where the details of the job can be set up.
6. Enter the values for the dimension name as shown in the screen below.
Configuring Jobs for DimensionsFollow the instructions below to configure a job for the custom dimension.
1. Open the Oracle Utilities Analytics Administration user mapping in a browser and login.
2. Click on the tab ETL Configuration tab.
3. Click on the Job Configuration menu item.
4. Click Add.
5. The Maintain Job Configuration page opens for you to enter details of the job.
6. Select the Source Product drop-down and select instance number 1.
7. Click on the Search icon for the Target Entity field. In the popup search window enter “CM_D_ARREARS_UDDX1” and click Go.
8. Click on the id value and it will take you back to the Job Addition screen with the target entity Id populated. Set the Slice Start Date/Time as 01-Jan-2000 or the extract date to which the
Extending Star Schema 4-24Oracle Utilities Analytics Developer’s Guide
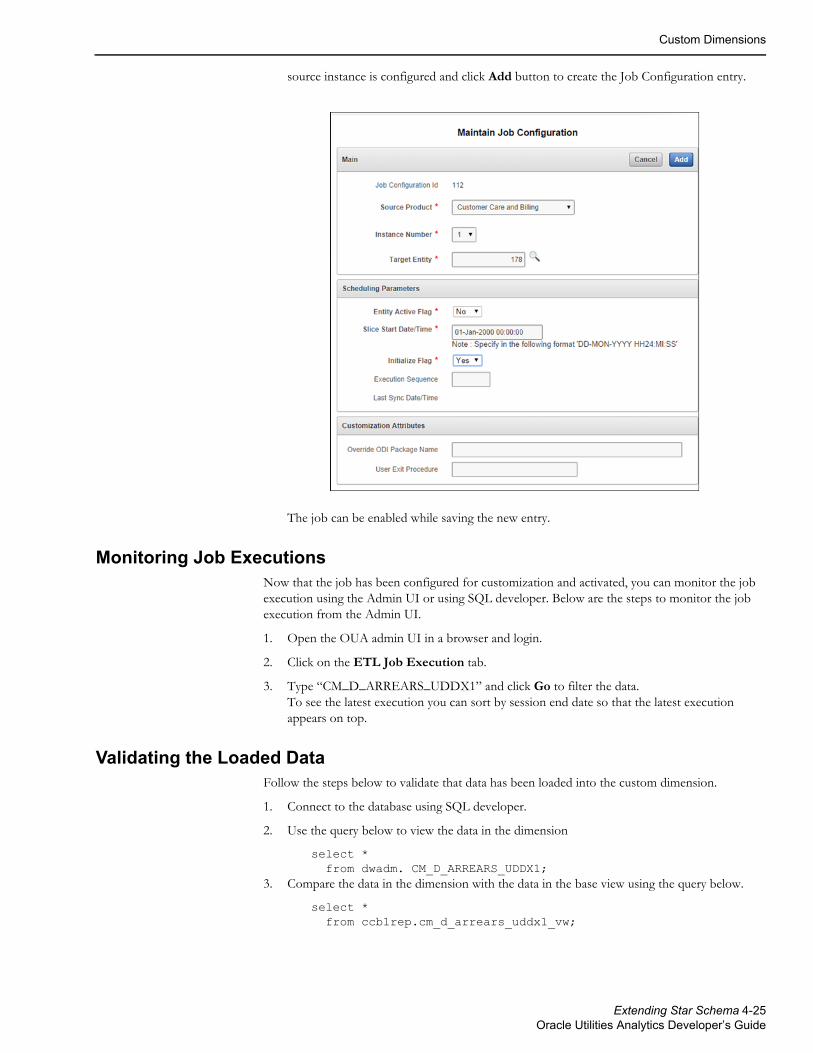
Custom Dimensions
source instance is configured and click Add button to create the Job Configuration entry.
The job can be enabled while saving the new entry.
Monitoring Job ExecutionsNow that the job has been configured for customization and activated, you can monitor the job execution using the Admin UI or using SQL developer. Below are the steps to monitor the job execution from the Admin UI.
1. Open the OUA admin UI in a browser and login.
2. Click on the ETL Job Execution tab.
3. Type “CM_D_ARREARS_UDDX1” and click Go to filter the data. To see the latest execution you can sort by session end date so that the latest execution appears on top.
Validating the Loaded DataFollow the steps below to validate that data has been loaded into the custom dimension.
1. Connect to the database using SQL developer.
2. Use the query below to view the data in the dimension
select * from dwadm. CM_D_ARREARS_UDDX1;
3. Compare the data in the dimension with the data in the base view using the query below.
select * from ccb1rep.cm_d_arrears_uddx1_vw;
Extending Star Schema 4-25Oracle Utilities Analytics Developer’s Guide
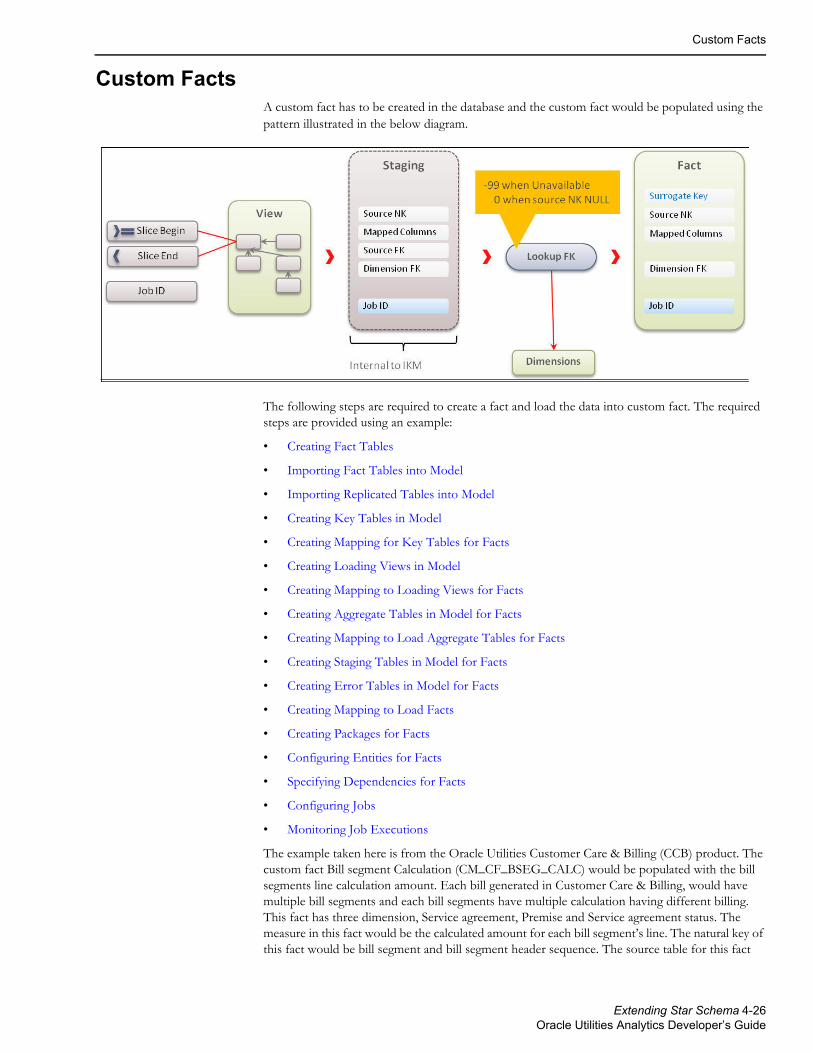
Custom Facts
Custom FactsA custom fact has to be created in the database and the custom fact would be populated using the pattern illustrated in the below diagram.
The following steps are required to create a fact and load the data into custom fact. The required steps are provided using an example:
• Creating Fact Tables
• Importing Fact Tables into Model
• Importing Replicated Tables into Model
• Creating Key Tables in Model
• Creating Mapping for Key Tables for Facts
• Creating Loading Views in Model
• Creating Mapping to Loading Views for Facts
• Creating Aggregate Tables in Model for Facts
• Creating Mapping to Load Aggregate Tables for Facts
• Creating Staging Tables in Model for Facts
• Creating Error Tables in Model for Facts
• Creating Mapping to Load Facts
• Creating Packages for Facts
• Configuring Entities for Facts
• Specifying Dependencies for Facts
• Configuring Jobs
• Monitoring Job Executions
The example taken here is from the Oracle Utilities Customer Care & Billing (CCB) product. The custom fact Bill segment Calculation (CM_CF_BSEG_CALC) would be populated with the bill segments line calculation amount. Each bill generated in Customer Care & Billing, would have multiple bill segments and each bill segments have multiple calculation having different billing. This fact has three dimension, Service agreement, Premise and Service agreement status. The measure in this fact would be the calculated amount for each bill segment’s line. The natural key of this fact would be bill segment and bill segment header sequence. The source table for this fact
Extending Star Schema 4-26Oracle Utilities Analytics Developer’s Guide

Custom Facts
table would be Bill segment (CI_BSEG), bill segment calculation (CI_BSEG_CALC), bill segment calculation line (CI_BSEG_CALC_LN).
Creating Fact TablesFor this example we will create an accumulative fact. The fact needs to have a primary key. In our example this will be the surrogate key column and we will use a sequence to generate the values for this key. The fact needs to have a unique key comprising of a column from source, the data source indicator. In this example we are creating a custom fact to have the bill segment details calculation amount for each header in the bill generated in CC&B.
1. Connect to the OUA database using SQL developer.
2. Run the script below to create the fact table in the target schema:
create table dwadm.cm_cf_bseg_calc( bseg_calc_key number(15),bseg_id number(19),bseg_hdr_seqnumber(5),data_source_ind number(6),bill_nbrnumber(30),bseg_cre_dttmdate,sa_keynumber(15),prem_keynumber(15),bseg_stat_keynumber(15),currency_cdvarchar2(10),distribution_cd varchar2(60),bseg_calc_amtnumber(15,2),job_nbrnumber(19),update_dttmdate,primary key (bseg_calc_key));
3. Run the script below to create the unique composite key for the fact:
create unique index dwadm.cm_f_bseg_calc_uk on dwadm. cm_cf_bseg_calc( bseg_id ,bseg_hdr_seq ,data_source_ind);
4. Create the sequence which will be used to generate the surrogate key values.
create sequence dwadm.cm_cf_bseg_calc_seq start with 1 increment by 1;
Importing Fact Tables into ModelAfter the custom fact is created import the fact in the custom model folder created earlier for customization:
1. Login to Oracle Data Integrator client.
2. Navigate to the Models section on the designer tab in ODI.
3. Navigate to the User Customization Model folder and then to the folder with the product name for which the customization is done.
4. Right-click and select Open Fact Model.
5. Navigate to the Reverse Engineer tab.
6. Select the below options in this tab and Save.
• Type of Object to Reverse-engineer: Table
Extending Star Schema 4-27Oracle Utilities Analytics Developer’s Guide
Custom Facts
• Mask: CM_CF_BSEG_CALC
7. Click on the Reverse Engineer button. The fact table is reversed in the model.
Importing Replicated Tables into Model1. Navigate to the Models section on the Designer tab in ODI.
2. Navigate to the User Customization Model folder and then to the folder with the product name for which the customization is done.
3. Right-click and select Open Replication Model.
4. Navigate to the Reverse Engineer tab.
5. Select the below options in this tab and Save.
• Type of Object to Reverse-engineer: Table
• Mask: CI_BSEG%
6. Navigate to the Selective Reverse-Engineering tab.
7. Select the tables required for the fact load.
• CI_BSEG
• CI_BSEG_CALC
• CI_BSEG_CALC_LN
8. Click on the Reverse Engineer button. The replication tables are reversed in the model.
Creating Key Tables in ModelThe Key table has to be created in the model and the flex field has to be set appropriately. The Resource name of the table has to be changed to “KEY_#GLOBAl.B1_JOB_ID”. The table name can be KEY_<FACT_NAME> but the resource name should the prefix of the type of table followed by the Job number. Since the table would be created during run time, the table name would have the job number suffixed to it so that parallel loading to the data can be done. Follow the instructions to create the key table in model.
1. Navigate to the Customizations Model folder.
2. Navigate to the product folder and then to Staging model.
3. Right-click on the model and select New DataStore.
4. In the Datastore editor page, enter the Table name for the name and Resource Name as “KEY_#GLOBAL.B1_JOB_ID”.
5. Navigate to Flexfields tab.
Extending Star Schema 4-28Oracle Utilities Analytics Developer’s Guide
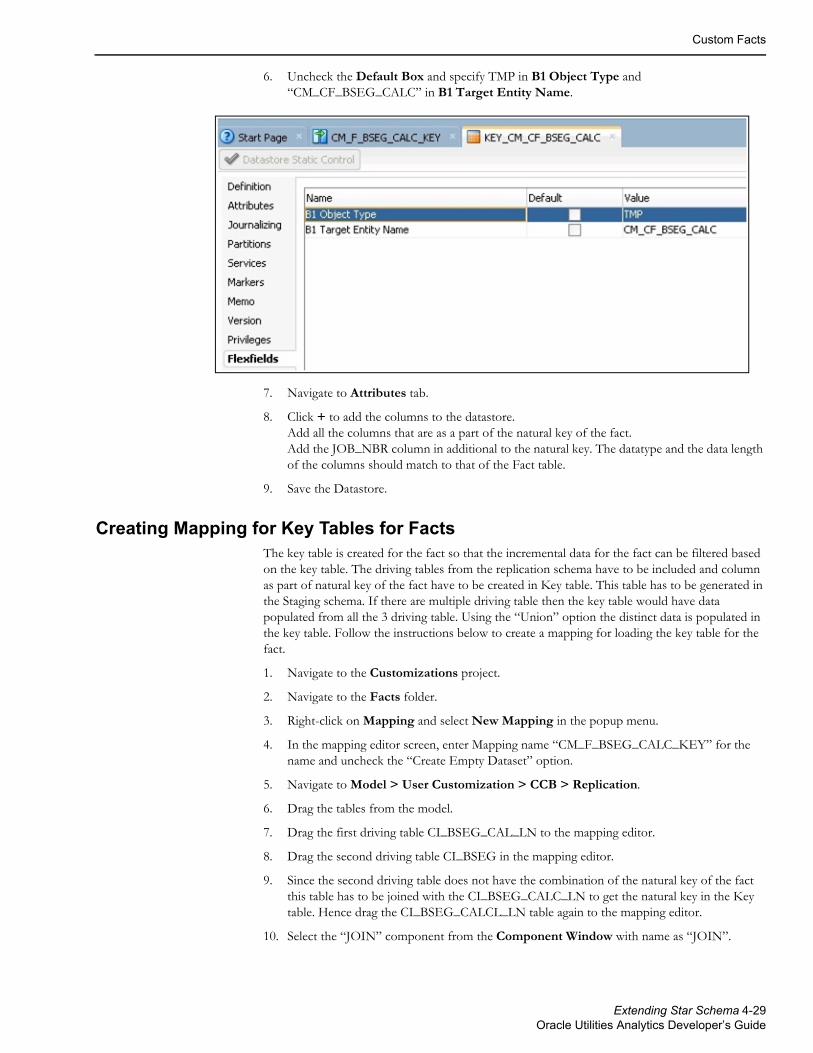
Custom Facts
6. Uncheck the Default Box and specify TMP in B1 Object Type and “CM_CF_BSEG_CALC” in B1 Target Entity Name.
7. Navigate to Attributes tab.
8. Click + to add the columns to the datastore. Add all the columns that are as a part of the natural key of the fact. Add the JOB_NBR column in additional to the natural key. The datatype and the data length of the columns should match to that of the Fact table.
9. Save the Datastore.
Creating Mapping for Key Tables for FactsThe key table is created for the fact so that the incremental data for the fact can be filtered based on the key table. The driving tables from the replication schema have to be included and column as part of natural key of the fact have to be created in Key table. This table has to be generated in the Staging schema. If there are multiple driving table then the key table would have data populated from all the 3 driving table. Using the “Union” option the distinct data is populated in the key table. Follow the instructions below to create a mapping for loading the key table for the fact.
1. Navigate to the Customizations project.
2. Navigate to the Facts folder.
3. Right-click on Mapping and select New Mapping in the popup menu.
4. In the mapping editor screen, enter Mapping name “CM_F_BSEG_CALC_KEY” for the name and uncheck the “Create Empty Dataset” option.
5. Navigate to Model > User Customization > CCB > Replication.
6. Drag the tables from the model.
7. Drag the first driving table CI_BSEG_CAL_LN to the mapping editor.
8. Drag the second driving table CI_BSEG in the mapping editor.
9. Since the second driving table does not have the combination of the natural key of the fact this table has to be joined with the CI_BSEG_CALC_LN to get the natural key in the Key table. Hence drag the CI_BSEG_CALCL_LN table again to the mapping editor.
10. Select the “JOIN” component from the Component Window with name as “JOIN”.
Extending Star Schema 4-29Oracle Utilities Analytics Developer’s Guide
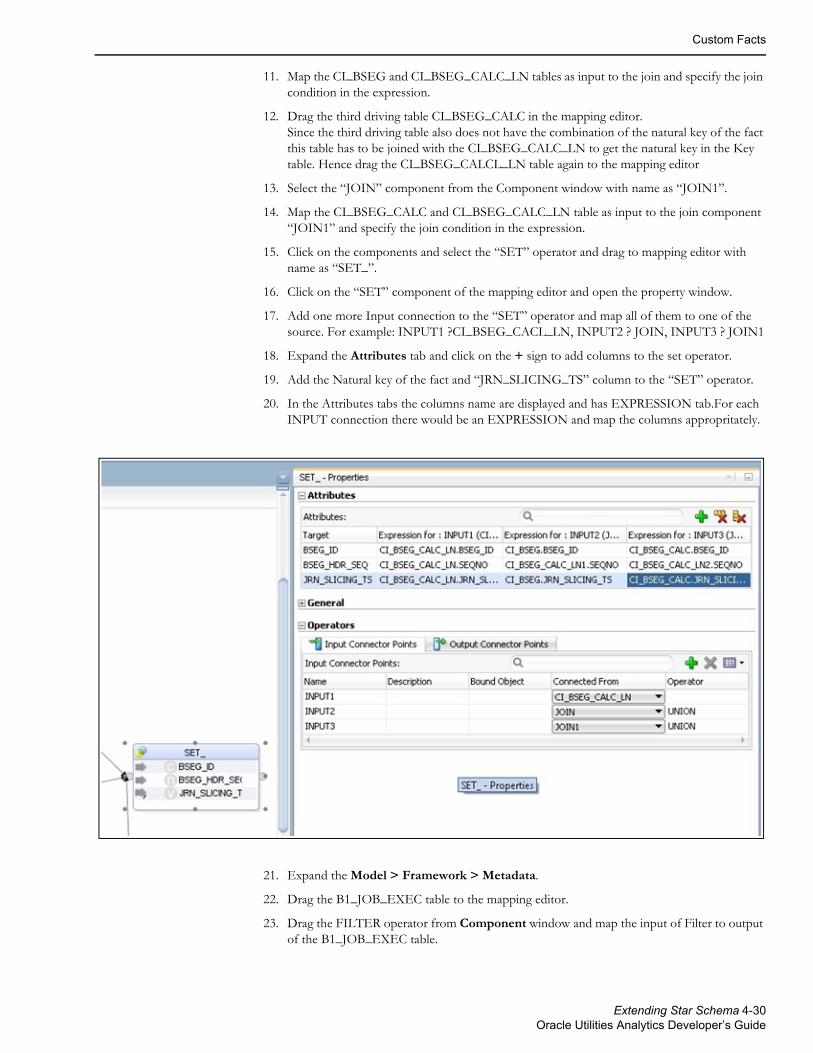
Custom Facts
11. Map the CI_BSEG and CI_BSEG_CALC_LN tables as input to the join and specify the join condition in the expression.
12. Drag the third driving table CI_BSEG_CALC in the mapping editor.Since the third driving table also does not have the combination of the natural key of the fact this table has to be joined with the CI_BSEG_CALC_LN to get the natural key in the Key table. Hence drag the CI_BSEG_CALCL_LN table again to the mapping editor
13. Select the “JOIN” component from the Component window with name as “JOIN1”.
14. Map the CI_BSEG_CALC and CI_BSEG_CALC_LN table as input to the join component “JOIN1” and specify the join condition in the expression.
15. Click on the components and select the “SET” operator and drag to mapping editor with name as “SET_”.
16. Click on the “SET” component of the mapping editor and open the property window.
17. Add one more Input connection to the “SET” operator and map all of them to one of the source. For example: INPUT1 ?CI_BSEG_CACL_LN, INPUT2 ? JOIN, INPUT3 ? JOIN1
18. Expand the Attributes tab and click on the + sign to add columns to the set operator.
19. Add the Natural key of the fact and “JRN_SLICING_TS” column to the “SET” operator.
20. In the Attributes tabs the columns name are displayed and has EXPRESSION tab.For each INPUT connection there would be an EXPRESSION and map the columns appropritately.
21. Expand the Model > Framework > Metadata.
22. Drag the B1_JOB_EXEC table to the mapping editor.
23. Drag the FILTER operator from Component window and map the input of Filter to output of the B1_JOB_EXEC table.
Extending Star Schema 4-30Oracle Utilities Analytics Developer’s Guide

Custom Facts
24. Add the filter condition.
B1_JOB_EXEC.JOB_EXEC_ID = :GLOBAL.B1_JOB_ID25. Join the B1_JOB_EXEC table with the output of the Set operator. This join is to filter the
incremental records only for that slicing period.
26. The output of the Join “JOIN2” is redirected to distinct only on the natural key of the fact so that duplicate keys are loaded in the key table.
27. Drag the Key table from model and map the Natural key from DISTINCT operator to the Target table.
28. Select the Key columns for the Key table in the. Check the KEY check box for the columns which are part of the natural key.
29. The logical mapping is done and the mapping would be as specified in the diagram below.
30. Navigate to the Physical tab and select the context and save the mapping so that the physical mapping diagram is visible. In this case we are selecting “CCB7”.
31. Click on the target table and open the Properties window.
32. Select the IKM “IKM BI Direct load” and the option “DML_OPERATION” to “INSERT”.
33. Save the mapping.
Creating Loading Views in ModelThe loading view for fact has to be created in the model in replication model. Since the table would be created during run time, the table name would have the job number suffixed to it so that parallel loading to the data can be done. Follow the instructions to create the key table in model.
1. Navigate to the Customizations model folder.
2. Navigate to the product folder and then to Replication model.
3. Right-click on the model and select New DataStore.
Extending Star Schema 4-31Oracle Utilities Analytics Developer’s Guide

Custom Facts
4. In the Datastore editor page, enter the view name “CM_CF_BSEG_CALC_VW” for the name.
5. Navigate to Attributes tab.
6. Click + to add the columns to the datastore. Add all the columns that are in fact table except the Dimension keys. For Dimension keys replace the KEY to FK. We require the natural key of the dimension in view so that the Dimension lookup can be done based on the natural key of dimension to populate the Dimension key in fact. If the dimension’s natural key has more than one column then view should have the dimension’s natural key with naming convention as FK1, FK2 etc. The datatype and the data length of the columns should match to that of the Fact table.
7. In addition to the above column “IND_UPDATE” column has to be added. The data type of column “IND_UPDATE” should be “CHAR(1)”.
8. In addition to the above column “UPDATE_DTTM” column has to be added. The data type of column “UPDATE_DTTM” should be “DATE”.
9. Save the Datastore.
Creating Mapping to Loading Views for FactsThe loading view is created for the fact so that the data can be loaded to fact. The loading view is joined with the Key table on natural key so that the data in that slicing period is loaded. This view has to be generated in the Replication schema. Follow the instructions below to create a mapping for generating the loading view.
1. Navigate to the Customizations project.
2. Create a new folder named Replication and expand the folder.
3. Right-click on the Mapping and select New Mapping in the popup menu.
4. In the mapping editor screen enter Mapping name “CM_CF_BSEG_CALC_VW” for the name. Uncheck the “Create Empty Dataset” option.
5. Navigate to Model > User Customization > CCB > Replication.
6. Drag the tables from the model.
7. Drag the replication table is CI_BSEG_CAL_LN to mapping editor.
8. Drag the next replication table CI_BSEG in the mapping editor.
9. Select the “JOIN” component from the Component window with name as “JOIN”.
10. Map the CI_BSEG and CI_BSEG_CALC_LN table as input to the join and specify the join condition in the expression.
11. Drag the table CI_BSEG_CALC in the mapping editor.
12. Select the “JOIN” component from the Component window with name as “JOIN1”.
13. Map the CI_BSEG_CALC and output of JOIN as input to the join component “JOIN1” and specify the join condition in the expression.
Extending Star Schema 4-32Oracle Utilities Analytics Developer’s Guide

Custom Facts
14. Drag the View datastore from model and map the columns from that of the replication tables as per the logic to populate the columns.
15. The UPDATE_DTTM should be populated as Greatest of the JRN_UPDATE_DTTM or JRN_EFF_START_DTTM of the all the replication tables. This is populated so that the latest Dimension key of the SCD2 dimension is populated.
16. The DATA_SOURCE_IND is populated from the Variable B1_DATA_SOURCE_IND from Global objects.
17. The primary Driving table’s JRN_FLAG has to be mapped to IND_UPDATE.
Extending Star Schema 4-33Oracle Utilities Analytics Developer’s Guide
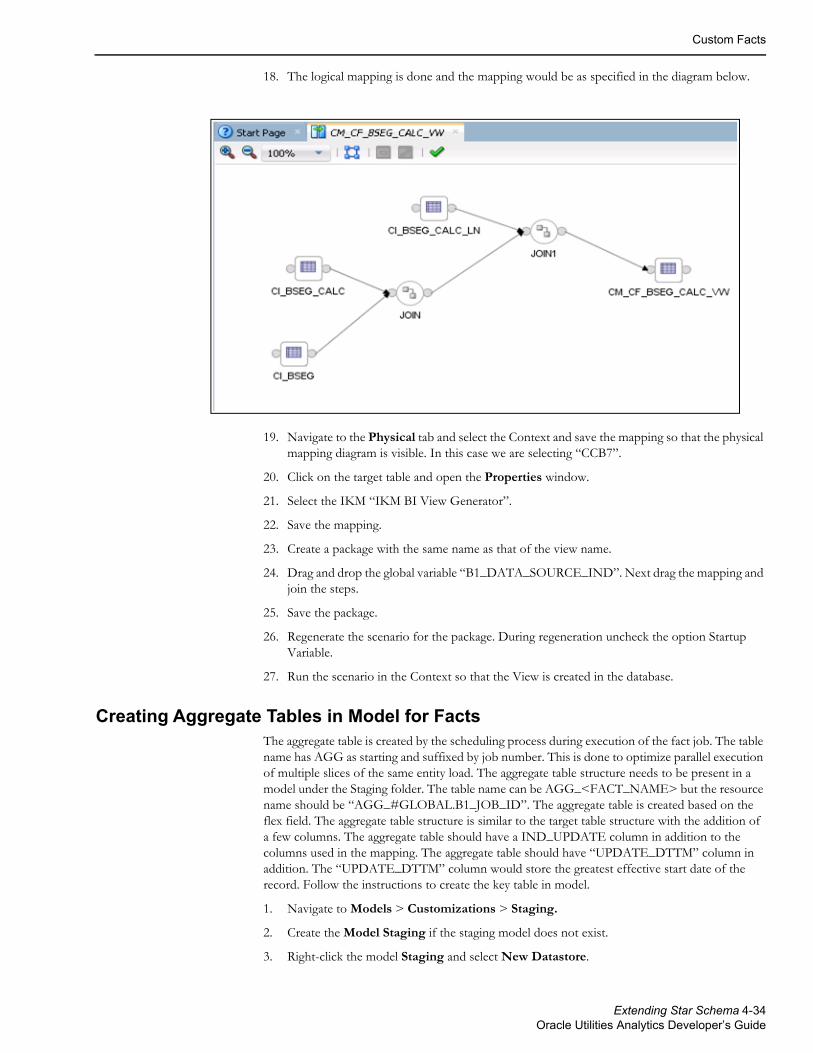
Custom Facts
18. The logical mapping is done and the mapping would be as specified in the diagram below.
19. Navigate to the Physical tab and select the Context and save the mapping so that the physical mapping diagram is visible. In this case we are selecting “CCB7”.
20. Click on the target table and open the Properties window.
21. Select the IKM “IKM BI View Generator”.
22. Save the mapping.
23. Create a package with the same name as that of the view name.
24. Drag and drop the global variable “B1_DATA_SOURCE_IND”. Next drag the mapping and join the steps.
25. Save the package.
26. Regenerate the scenario for the package. During regeneration uncheck the option Startup Variable.
27. Run the scenario in the Context so that the View is created in the database.
Creating Aggregate Tables in Model for FactsThe aggregate table is created by the scheduling process during execution of the fact job. The table name has AGG as starting and suffixed by job number. This is done to optimize parallel execution of multiple slices of the same entity load. The aggregate table structure needs to be present in a model under the Staging folder. The table name can be AGG_<FACT_NAME> but the resource name should be “AGG_#GLOBAL.B1_JOB_ID”. The aggregate table is created based on the flex field. The aggregate table structure is similar to the target table structure with the addition of a few columns. The aggregate table should have a IND_UPDATE column in addition to the columns used in the mapping. The aggregate table should have “UPDATE_DTTM” column in addition. The “UPDATE_DTTM” column would store the greatest effective start date of the record. Follow the instructions to create the key table in model.
1. Navigate to Models > Customizations > Staging.
2. Create the Model Staging if the staging model does not exist.
3. Right-click the model Staging and select New Datastore.
Extending Star Schema 4-34Oracle Utilities Analytics Developer’s Guide
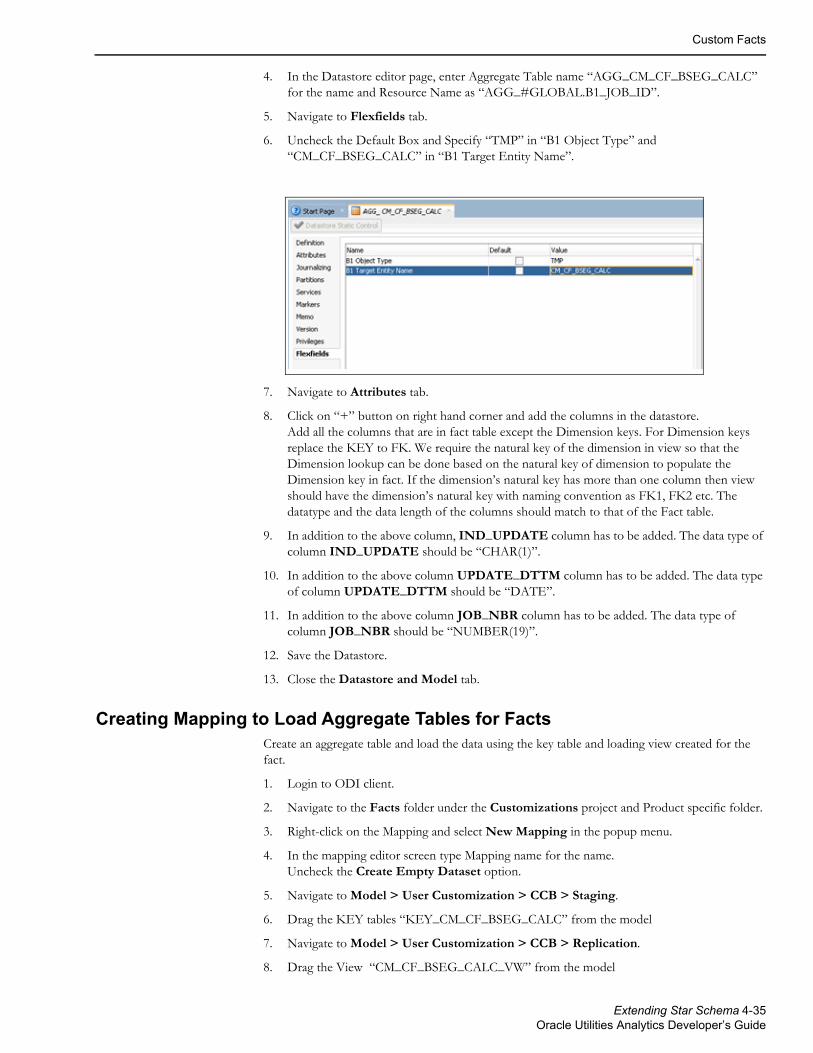
Custom Facts
4. In the Datastore editor page, enter Aggregate Table name “AGG_CM_CF_BSEG_CALC” for the name and Resource Name as “AGG_#GLOBAL.B1_JOB_ID”.
5. Navigate to Flexfields tab.
6. Uncheck the Default Box and Specify “TMP” in “B1 Object Type” and “CM_CF_BSEG_CALC” in “B1 Target Entity Name”.
7. Navigate to Attributes tab.
8. Click on “+” button on right hand corner and add the columns in the datastore. Add all the columns that are in fact table except the Dimension keys. For Dimension keys replace the KEY to FK. We require the natural key of the dimension in view so that the Dimension lookup can be done based on the natural key of dimension to populate the Dimension key in fact. If the dimension’s natural key has more than one column then view should have the dimension’s natural key with naming convention as FK1, FK2 etc. The datatype and the data length of the columns should match to that of the Fact table.
9. In addition to the above column, IND_UPDATE column has to be added. The data type of column IND_UPDATE should be “CHAR(1)”.
10. In addition to the above column UPDATE_DTTM column has to be added. The data type of column UPDATE_DTTM should be “DATE”.
11. In addition to the above column JOB_NBR column has to be added. The data type of column JOB_NBR should be “NUMBER(19)”.
12. Save the Datastore.
13. Close the Datastore and Model tab.
Creating Mapping to Load Aggregate Tables for FactsCreate an aggregate table and load the data using the key table and loading view created for the fact.
1. Login to ODI client.
2. Navigate to the Facts folder under the Customizations project and Product specific folder.
3. Right-click on the Mapping and select New Mapping in the popup menu.
4. In the mapping editor screen type Mapping name for the name. Uncheck the Create Empty Dataset option.
5. Navigate to Model > User Customization > CCB > Staging.
6. Drag the KEY tables “KEY_CM_CF_BSEG_CALC” from the model
7. Navigate to Model > User Customization > CCB > Replication.
8. Drag the View “CM_CF_BSEG_CALC_VW” from the model
Extending Star Schema 4-35Oracle Utilities Analytics Developer’s Guide

Custom Facts
9. Select the “JOIN” component from the Component window with name as “JOIN”.
10. Map the Key table and Loading view as input to the join and specify the join condition in the expression.
11. Drag and drop the Aggregate component from components window.
12. Map the output of the join to Aggregate component.
13. In the Aggregate components Properties window add the column name in the attributes tab. The column names have to be same as that of the Aggregate table.
14. Map all the Columns from the Loading view and Key table as applicable in the expression tab for the column of aggregate component.
15. Navigate to Model > User Customization > CCB > Staging.
16. Drag the Aggregate tables “AGG_CM_CF_BSEG_CALC” from the model
17. Map the output on Aggregate component to the Input of the AGG table.
18. Map all the columns of the Aggregate table.
19. Select the Key columns for the Aggregate table in the. Check the KEY check box for the columns which are part of the natural key.
20. The logical mapping is done and the mapping would be as specified in the diagram below:
21. Navigate to the Physical tab and select the Context and Save the mapping so that the physical mapping diagram is visible. In this case we are selecting “CCB7”.
22. Click on the target table and open the Properties window.
23. Select the IKM “IKM BI Direct load”.
24. Save the mapping.
Creating Staging Tables in Model for FactsThe staging table is created by the scheduling process prior to executing the mapping. This is done to optimize parallel execution of multiple slices of the same entity load. To do this the definition of the staging table structure needs to be present in a model under the Staging folder. The staging table structure is similar to the target table structure with the addition of a few columns. The staging table should have an IND_UPDATE column in addition to the columns used in the mapping.
1. Navigate to the Customizations model folder.
2. Navigate to the product folder and then to Staging model.
Extending Star Schema 4-36Oracle Utilities Analytics Developer’s Guide

Custom Facts
3. Right-click on the model and select New DataStore.
4. In the Datastore editor screen enter Aggregate Table name for the name and Resource Name as “STG_#GLOBAL.B1_JOB_ID”.
5. Navigate to Flexfields tab.
6. Uncheck the Default Box and Specify “STG” in “B1 Object Type” and “CM_CF_BSEG_CALC” in “B1 Target Entity Name”.
7. Navigate to Attributes tab.
8. Click on “+” button on right hand corner to add the columns to the datastore. Add all the columns that are in fact table. In addition add the Dimension’s natural key column. The dimension natural keys as specified in the aggregate table have to present in staging table. The datatype and the data length of the columns should match to that of the Fact table.
9. In addition to the above column “IND_UPDATE” column has to be added. The data type of column “IND_UPDATE” should be “CHAR(1)”.
10. In addition to the above column “UPDATE_DTTM” column has to be added. The data type of column “UPDATE_DTTM” should be “DATE”.
11. In addition to the above column “JOB_NBR” column has to be added. The data type of column “JOB_NBR” should be “NUMBER(19)”.
12. Save the Datastore.
13. Close the datastore and model tab.
Creating Error Tables in Model for FactsThe Error table is created during execution of the fact job. The error table structure should be similar to the staging table. The error table is populated for late arriving dimensions. If the dimension record is not present in the dimension during the load of fact then the dimension key is populated as -99 and the record is populated in the error table. During the next load of the fact the data in error table is looked up in the dimension table to find the records and correct the data in the fact table for the corrected dimension key. Once all the dimension keys are reprocessed for the fact record the same would be deleted from the error table. To do this the definition of the staging table structure needs to be present in a model under the Staging folder. The flex field have o be set appropriately.
1. Navigate to the Customizations model folder.
2. Navigate to the product folder and then to Staging model
3. Right Click on the model and select “New DataStore”.
Extending Star Schema 4-37Oracle Utilities Analytics Developer’s Guide

Custom Facts
4. In the Datastore editor screen type Error Table name “ERR_CM_CF_BSEG_CALC” for the name and Resource Name as same as that of the table name.
5. Navigate to Flexfields tab.
6. Uncheck the Default Box and Specify “ERR” in “B1 Object Type” and “CM_CF_BSEG_CALC” in “B1 Target Entity Name”.
7. Navigate to Attributes tab.
8. Click on “+” button on right hand corner to add the columns to the datastore. Add all the columns that are in fact table. In addition add the Dimension’s natural key column. The dimension natural keys as specified in the aggregate table have to present in staging table. The datatype and the data length of the columns should match to that of the Fact table.
9. In addition to the above column “IND_UPDATE” column has to be added. The data type of column “IND_UPDATE” should be “CHAR(1)”.
10. In addition to the above column “UPDATE_DTTM” column has to be added. The data type of column “UPDATE_DTTM” should be “DATE”.
11. In addition to the above column “JOB_NBR” column has to be added. The data type of column “JOB_NBR” should be “NUMBER(19)”.
12. Save the Datastore.
13. Close the datastore and model tab.
Creating Mapping to Load FactsThe data is loaded to staging table from Aggregate table. The Staging table is update for the dimension key bu looking up the dimension tables. After the dimension keys are updated the Fact table is loaded with the data. Follow the below steps to load the data from Aggregate table to staging and then to fact table.
1. Login to ODI client.
2. Navigate to the Customizations project.
3. Navigate to the Facts folder.
4. Right-click on the Mapping and select New Mapping in the popup menu.
5. In the mapping editor screen type Mapping name “CM_CF_BSEG_CALC” for the name. Uncheck the “Create Empty Dataset” option.
6. Navigate to Model > User Customization > CCB > Staging.
7. Drag the Aggregate (AGG_CM_CF_BSEG_CALC) and staging (STG_CM_CF_BSEG_CALC) tables (and provide the alias name as “SRC”) from the model.
Extending Star Schema 4-38Oracle Utilities Analytics Developer’s Guide

Custom Facts
8. Map the Columns of Aggregate table to staging table.
9. Drag and drop the staging table again.All joins from the staging table (SRC) to the dimension should be an outer join including all rows from staging and any rows that are available from dimension.Drag and drop the dimension and join the staging table with the dimension tables.The join condition with type 2 dimension would be as SRC.DIM_FK = DIM1.SRC_DIM_NK
and SRC.DATA_SOURCE_IND = DIM1.DATA_SOURCE_INDand SRC.UPDATE_DTTM >= DIM1.EFF_START_DTTMand SRC.UPDATE_DTTM < DIM1.EFF_END_DTTM
The join condition with type 1 dimension would be as SRC.DIM_FK = DIM2.SRC_DIM_NK
and SRC.DATA_SOURCE_IND = DIM2.DATA_SOURCE_IND
10. Map the natural key columns of Target table (staging table) columns with that of the staging tables, and mark the KEY check box in properties window.
Select the Dimension key and in the property inspector type the transformation as below by replacing the actual dimension name and the dimension column names
CASE WHEN SRC.DIM_FK IS NULL THEN #GLOBAL.B1_NULL_KEY
WHEN DIM.DIM_KEY IS NULL THEN #GLOBAL.B1_MISSING_KEY ELSE DIM.DIM_KEYEND
11. Repeat the above step for all the dimension keys.
12. Drag and drop the Fact table from the model.
13. Map all the columns of the fact table with that of the staging table which is the target for the Dimension lookup and mark the key columns.
14. The Surrogate key has to be mapped to the Sequence and the Update check box has to be unchecked.
15. Save the mapping.
16. Click on the plain canvas of the mapping and open the property window for the mapping.
17. Specify the target load order as SRC, Staging table, fact table. In this example “SRC,STG_CM_CF_BSEG_CALC,CM_CF_BSEG_CALC”.
Extending Star Schema 4-39Oracle Utilities Analytics Developer’s Guide
Custom Facts
18. The logical mapping is done and the mapping would be as specified in the diagram below.
19. Navigate to the Physical tab and select the Context and Save the mapping so that the physical mapping diagram is visible. In this case we are selecting “CCB7”.
20. Click on the SRC and open the Properties window.
21. Select the IKM “IKM BI Direct load”.
22. Click on the Staging table (STG_CM_CF_BSEG_CALC) and open the Properties window.
23. Select the IKM “IKM BI Fact Key Lookup”. Specify the ERR_TABLE_NAME option as “Staging.ERR_CM_CF_BSEG_CALC” . This option is set to get the error table name.
24. Click on the Fact table CM_CF_BSEG_CALC and open the Properties window.
25. Select the IKM “IKM BI Direct load”.
26. Save the mapping.
Creating Packages for FactsFollow the instructions below to create a package for the new fact.
1. Navigate to Designer > Customizations > Facts > Packages.
2. Right-click on the Package and select New Package option in the popup menu.
3. In the Package Editor page, enter CM_PKG_CM_CF_BSEG_CALC as the name of the package.
4. Click on the Diagram tab at the bottom of the editor. From the Global Objects section, drag the variables B1_JOB_ID, B1_SLICE_BEG_TS, B1_SLICE_END_TS, B1_MISSING_KEY and B1_NULL_KEY into the editor. Change the variables B1_JOB_ID, B1_SLICE_BEG_TS, B1_SLICE_END_TS to declare variable. Change the variables B1_MISSING_KEY and B1_NULL_KEY to refresh variables. Now, drag and drop the mapping to load the aggregate table and then the mapping to load the fact table into the editor and connect them all together in a sequence.
5. Click the Save to save the changes and close the Package Editor window.
Extending Star Schema 4-40Oracle Utilities Analytics Developer’s Guide

Custom Facts
6. Navigate to the Packages folder and expand it. You will see the new package displayed here.
7. Right-click on the Generate Scenario.
8. A popup dialog appears asking for the scenario name. Click OK.
9. Another popup dialog appears asking you to select the startup variables. Uncheck B1_MISSING_KEY and B1_NULL_KEY as these are refresh variables and click OK.
10. Expand the package and you will notice scenarios and under scenarios, you can see the scenario object that was generated.
Configuring Entities for FactsFollow the instructions below to configure a new entity for the custom fact.
1. Open Oracle Utilities Analytics Administration User mapping in a browser and login.
2. Click the ETL Configuration tab.
3. Click the Target Entity menu item.
4. Click Add.
5. Enter the details of the entity in the window.
6. Enter the values appropriate for the fact name.
Specifying Dependencies for FactsThe Dependency for the Type 2 dimension have to be specified for the fact. The dependency is entered in the B1_OBJECT_MAP table for the custom fact. Below is the sample query provided to insert the dependency. Make sure to add this merge query in the CM Procedure created earlier to add the metadata in the OUA.
1. Add a new step to the user procedure CM_<PROD_FLG>_CREATE_MEATADATA.
2. Use the sample mentioned below to create an entry in the entry in the B1_OBJECT_MAP for specifying the type 2 dimension that the fact depends on.
3. As an example, the sample merge statement below specifies the base object name. The given sample statement mentions the source object name as the dimension name. The target object name is the fact name. You can specify the source product flag as appropriate. The object type flag is “DMDP” to identify the materialized dependency on the base objects.
merge into b1_object_map tgtusing (select 'CCB' prod_flg , 'DIM2' source_object_name , 'CM_FACT' target_object_name , 1 seq , 'DMDP' object_type_flg from dual ) tgt_val on ( tgt.prod_flg = tgt_val.prod_flg and tgt.source_object_name = tgt_val.source_object_name and tgt.target_object_name = tgt_val.target_object_name and tgt.seq = tgt_val.seq) when not matched then insert ( tgt.object_map_id , tgt.prod_flg , tgt.source_object_name , tgt.target_object_name , tgt.seq
Extending Star Schema 4-41Oracle Utilities Analytics Developer’s Guide

Custom Facts
, tgt.object_type_flg , tgt.char_entity_flg , tgt.upd_dttm , tgt.upd_user , tgt.owner_flg ) values ( b1_object_map_seq.nextval , tgt_val.prod_flg , tgt_val.source_object_name , tgt_val.target_object_name , tgt_val.seq , tgt_val.object_type_flg , null , sysdate , sys_context('userenv', 'os_user') ,'B1');
4. Execute the user procedure to create the entries.
Configuring JobsFollow the instructions below to configure a job for the custom fact.
1. Login to ODI Client and navigate to “Load Plans and Scenario Folders”
2. Expand Accelerators and then OUA.
3. Right-click on the B1_CFG_INSTANCE scenario and run in the context. This would create the fact job for that context and creates the dependency for the context specific dimensions for this fact job.
Alternately the ODI scenario can be executed from ODI console.
1. Login to the ODI console. The ODI console is deployed when the web logic agent for the ODI is created. The URL for ODI console would be
http://<Weblogic Host>:<Managed Server port>/odiconsole2. Login to Work repository using the SUPERVISOR credential.
3. Click on the browser.
4. Navigate to OUA folder using the path below
Runtime >> Scenario/Load Plan >> Folders>> Accelerators >> OUA5. Right click on B1_CFG_INSTANCE scenario and execute in the context.
After the scenario is executed successfully, the fact job can be enabled from Admin tool.
1. Open the OUA admin UI in a browser and login.
2. Click the ETL Configuration tab.
3. Click the Job Configuration menu item.
4. Search for the custom fact and edit.
5. The job has to be enabled by selecting “Yes” in “Entity Active Flag”.
Extending Star Schema 4-42Oracle Utilities Analytics Developer’s Guide

Custom Materialized Views
Monitoring Job ExecutionsNow that the job has been configured for customization and activated, you can monitor the job execution using the Administration User Interface or using SQL developer. Below are the steps to monitor the job execution from the Administration User Interface.
1. Open Oracle Utilities Analytics Administration User Interface in a browser and login.
2. Click on the ETL Job Execution tab.
3. Enter fact name and click Go to filter the data. To see the latest execution you can sort by session end date so that the latest execution appears on top.
Custom Materialized ViewsThe materialized views are used to store the aggregated data so that the analytics could fetch the data from the materialized views. To create a materialized view on any custom facts, follow the steps mentioned below:
• Creating Mapping for Materialized Views
• Creating Packages for Materialized Views
• Configuring Entities for Materialized Views
• Specifying the Dependencies for Custom Materialized Views
• Configuring Jobs for Materialized Views
• Monitoring Job Executions
Creating Mapping for Materialized ViewsPerform the following steps to create a mapping for materialized view:
1. Login to Oracle Data Integrator client.
2. Navigate to the Materialized Views folder under the Customizations project. Create the Materialized Views folder if the folder does not exist.
3. Right-click on the mapping and select New Mapping in the popup menu.
4. In the Mapping editor enter mapping name in the field labeled “Name”.
5. Navigate to Models > Target. Expand the model and drag the source table (dimension or facts) into the target area of the mapping editor.
6. Setup the appropriate join conditions between the source tables.
7. Navigate to the Models > User Customized > Materialized View and drag and drop the Materialized view to the mapping canvas. The Materialized view datastore has to be created in ODI model before Mapping is created.
8. Map the Target Table (Materialized View) columns with that of the source tables.
9. Navigate to the Flow tab and select the Integration Knowledge Modules (IKM) as “IKM BI Materialized View”.
10. Click Save.
11. Run the mapping so that the Materialized view is created in the database.
12. Reverse the materialized view in ODI so that datatype are same in ODI and Database.
Note: If the Datastore structure are different in Database and ODI then the Materialized view would always be executed in Upgrade mode and would try to change the MV definition instead of refreshing the Materialized view.
Extending Star Schema 4-43Oracle Utilities Analytics Developer’s Guide
Custom Materialized Views
Creating Packages for Materialized ViewsFollow the instructions below to create a package for the new fact.
1. Navigate to Designer > Customizations > Materialized Views > Packages.
2. Right-click on the New Package.
3. In the Package Editor page, enter the name of the package.
4. Click on the Diagram tab at the bottom of the editor. From the global objects section, drag the variables B1_JOB_ID into the editor. Change the variables B1_JOB_ID to declare variable.
5. Drag and drop the mapping into the editor and connect them all together in sequence.
6. Click Save to save the changes and close the Package Editor window.
7. Navigate to the packages folder and expand it. You will see the new package displayed here.
8. Right -click on the Generate Scenario.
9. A popup dialog appears asking for the scenario name. Click OK.
10. Expand the package and you will notice scenarios and under scenarios you can see the scenario object that was generated.
Configuring Entities for Materialized ViewsFollow the instructions below to configure a new entity for the custom materialized view.
1. Open Oracle Utilities Analytics Administration User Interface in a browser and login.
2. Click on the ETL Configuration tab.
3. Click on the Target Entity menu item.
4. Click on Add.
5. Enter the details of the job in the window.
6. Enter the values for the materialized view name.
Specifying the Dependencies for Custom Materialized ViewsFollow the instructions below to specify the dependency for materialized view:
1. Add a new step to the user procedure "CM_<PROD_FLG>_CREATE_MEATADATA".
2. Use the sample below to create an entry in the entry in the B1_OBJECT_MAP for specifying the base objects that the materialized view depends on.
3. As an example, the sample merge statement below specifies the base object name. The given sample statement mentions the source object name as the base object name. The target object name is the materialized view name. You can specify the source product flag as appropriate. The Object Type flag is “MVDP” to identify the materialized dependency on the base objects.
merge into b1_object_map tgt using (select 'CCB' prod_flg , 'DIM1' source_object_name , 'CM_MV' target_object_name , 1 seq , 'MVDP' object_type_flg from dual ) tgt_val on ( tgt.prod_flg = tgt_val.prod_flg
Extending Star Schema 4-44Oracle Utilities Analytics Developer’s Guide

Custom Materialized Views
and tgt.source_object_name = tgt_val.source_object_name and tgt.target_object_name = tgt_val.target_object_name and tgt.seq = tgt_val.seq) when not matched then insert ( tgt.object_map_id , tgt.prod_flg , tgt.source_object_name , tgt.target_object_name , tgt.seq , tgt.object_type_flg , tgt.char_entity_flg , tgt.upd_dttm , tgt.upd_user , tgt.owner_flg ) values ( b1_object_map_seq.nextval , tgt_val.prod_flg , tgt_val.source_object_name , tgt_val.target_object_name , tgt_val.seq , tgt_val.object_type_flg , null , sysdate , sys_context('userenv', 'os_user') ,'B1');
4. Execute the user procedure to create the entries.
Configuring Jobs for Materialized ViewsFollow the instructions below to configure a job for the custom fact.
1. Open Oracle Utilities Analytics Administration User Interface in a browser and login.
2. Click on the ETL Configuration tab.
3. Click on the Job Configuration menu item.
4. Click on the Add button on the right.
5. Add the details of the job in the window.
6. Select a product from the Source Product drop-down list and select the Instance Number.
7. Click on the Search icon for the Target Entity field. In the popup search window, enter the Fact Name and click Go.
8. Click on the ID Value and it will take you back to the Job Addition page with the target entity ID populated. Set the Slice Start Date/Time as 01-Jan-2000 or the extract date to which the source instance is configured and click Add to create the Job Configuration entry.
9. Enable the job while saving the new entry.
Extending Star Schema 4-45Oracle Utilities Analytics Developer’s Guide
Custom Materialized Views
Monitoring Job ExecutionsNow that the job has been configured for customization and activated, you can monitor the job execution using the Administration User Interface or using SQL developer. Below are the steps to monitor the job execution from the Administration User Interface.
1. Open Oracle Utilities Analytics Administration User Interface in a browser and login.
2. Click on the ETL Job Execution tab.
3. Enter the fact name and click Go to filter the data. To see the latest execution, you can sort by session end date so that the latest execution appears on the top.
4. A new package needs to be created for each materialized view mapping. The package should contain the global variable B1_JOB_ID.
Extending Star Schema 4-46Oracle Utilities Analytics Developer’s Guide
Chapter 5Extending Analytics
The Analytic Dashboards in Oracle Utilities Analytics (OUA) cover a wide range of reporting requirements. You often might need to see some additional data on the reports to meet site specific requirements. If the data is not available in the star schemas, they can be extracted using one of the support schema extension methods in Oracle Utilities Analytics. Refer to the Chapter 4: Extending Star Schema in this guide for complete details on how this can be done.
With the data available in the star schemas, the additional report requirements can be met either by customizing any of the existing analytics or by adding brand new answers. The below sections describes how to use Oracle Business Intelligence Enterprise Edition (OBIEE) to extend the analytics in Oracle Utilities Analytics product:
• Customizing Existing Analytics
• Creating New Analytics
Customizing Existing AnalyticsThis section describes how to use Oracle Business Intelligence Enterprise Edition to customize Oracle Utilities Analytics. It includes the following topics:
• Modifying the RPD File
• Customizing Answers
• Customizing the Report Labels
Modifying the RPD FileAll customer modifications must be done in a separate copy of the repository file, which is separate from the product's out-of-the-box repository file. During upgrades to the latest Oracle Utilities Analytics version, any customization done should be merged into the upgraded repository file through the Merge utility of Oracle Business Intelligence Enterprise Edition.
It is recommended that customers use a staging environment for the repository upgrade. However, as long as the customer modifications are done on top of a copy of the base repository file, the Oracle Business Intelligence Enterprise Edition upgrade process should be able to handle most customizations that may be made to the repository file. The simpler the changes, the less complex is the upgrade procedure; hence, it is best to try to limit the changes made to the repository file.
Note: For more information about managing, upgrading and merging repository (.rpd) files, refer to Oracle Business Intelligence Server Administration Guide.
Extending Analytics 5-1Oracle Utilities Analytics Developer’s Guide

Creating New Analytics
Customizing AnswersFor the additional report requirements, if the need is to display additional attributes on an existing report or to include an additional view, then it is recommended to customize the answers delivered with the base product. Create a copy of the base product report and make changes directly to the copy (do not modify the base product report). All user modifications should be saved in a separate custom folder in order to guarantee that any custom modifications are preserved when upgrading to newer versions of Oracle Utilities Analytics later on. The dashboard should be changed to point or refer to the new custom report, or a new custom dashboard can be defined to make use of the customized reports.
Note: The dashboards are overwritten during the upgrade. Any mappings between dashboards and customized answers are lost and must be re-mapped manually. Therefore, you should use a staging environment for upgrade and manually remap dashboards before moving the upgraded customized content into the production environment.
Note: For more details about managing, upgrading, and merging presentation catalogs, refer to Oracle Business Intelligence Presentation Services Administration Guide.
Note: For more details on how to create or edit answers, refer to Oracle Fusion Middleware User's Guide for Oracle Business Intelligence Enterprise Edition.
Customizing the Report LabelsYou can customize labels or captions on an existing report or report columns. You can provide an override description that is used on the reports instead of the base product description. The override descriptions can be provided via the Base Field Maintenance page under the Administration Dashboard in the Oracle Business Intelligence Enterprise Edition Dashboards menu. Once the changes are saved and the cache is cleared, upon the next login, the override descriptions are seen on the report title or the column title.
Note: For more details, refer to the Maintaining the Administration Dashboards section in the Chapter 4: Configuring Oracle Utilities Analytics in Oracle Utilities Analytics Administration Guide.
Creating New AnalyticsYou can choose to build a completely new report from scratch. This section describes how to use Oracle Business Intelligence Enterprise Edition to add new analytics. It includes the following topics:
• Creating New Answers
• Adding New Labels
Creating New AnswersNote: Before creating new reports, it is recommended to have knowledge of Oracle Business Intelligence Enterprise Edition and Data Warehouse concepts. It is also recommended to have some working knowledge in developing reports using Oracle Business Intelligence Enterprise Edition for a smoother implementation.
Oracle Utilities Analytics provides out-of-the-box dashboards with rich and varied set of analytics for Credit and Collection Analytics, Customer Analytics, Distribution Analytics, Meter Data Analytics, Mobile Workforce Analytics, Outage Analytics, Revenue Analytics, Exception Analytics, and Work and Assets Analytics. However, if required, you can create new answers, or dashboards.
Extending Analytics 5-2Oracle Utilities Analytics Developer’s Guide
Creating New Analytics
As noted in the above-mentioned section regarding customization of the existing answers, the new answers should also be saved in a separate custom folder so that they are not overwritten when upgrading to newer versions of Oracle Utilities Analytics later on.
You can create field labels for use in their answers, or the labels can be hard coded directly in the answer if there are no multilingual/localization requirements. If the product labels are used in an answer, they can get modified during upgrade to a newer Oracle Utilities Analytics release. At the best, Oracle tries to limit the changes to the existing labels; however, there can be certain situations, when they are updated. Hence, in rare cases, if you are making use of the base labels, then you can expect to have an impact, when the label value changes in a newer release.
Adding New LabelsTo use the label mechanism for new answers, the Custom Field Maintenance dashboard can be used to add, update, and delete custom labels. These custom labels can then be used in answers as well as in the logical and physical objects in the repository or RPD file.
Note: Only custom field labels, identified by a Customer Modification (CM) owner flag, can be updated or deleted. The new labels are created with a Customer Modification (CM) owner flag. A label that already exists cannot be created, so if a base labels already exists, you can update the override label as described in the preceding section Creating New Answers.
Note: For more details, refer to the Maintaining the Administration Dashboards section in the Chapter 4: Configuring Oracle Utilities Analytics in Oracle Utilities Analytics Administration Guide.
Extending Analytics 5-3Oracle Utilities Analytics Developer’s Guide
Chapter 6Migrating Environments
Most implementations have multiple environments based on the activities that they carry out. The exact number of environments and the purpose for each of them can vary from implementation to implementation. Below are the typical environments expected during an implementation.
• Development: This environment is used to extend the capabilities of the product. This environment is where all custom ELT and custom answers are developed.
• Acceptance: This environment is typically used to perform functional validations based on the source system and the custom code. No development happens in this environment.
• Production: This environment is used to connect to Oracle Business Intelligence Enterprise Edition and view the dashboards and analytics provided.
The lifecycle of the implementation starts in the Development environments and the code is moved to the Acceptance environment and finally into the Production environment. You may choose to have more than three environments.
This chapter covers the following:
• Oracle Business Intelligence Enterprise Edition Components
• Oracle Data Integrator Components
Oracle Business Intelligence Enterprise Edition ComponentsMigration of Oracle Business Intelligence Enterprise Edition components from one environment to another typically involves moving the two main components of the tool - the presentation catalogs and the repository file. The details of how to migrate each of these and whether a migration is actually needed or not is discussed in the following sections.
• Presentation Catalog
• Repository
Presentation CatalogYou are not expected to modify any of the catalogs delivered with the base product. This being the case the catalogs from base product package can directly be deployed across multiple environments. Follow the same steps as mentioned in the Oracle Utilities Analytics Installation Guide in the Dashboard Component section.
It is likely for you to extend the analytics by adding some additional dashboards and reports to cater to some additional business requirements. The details for the same have been provided in the Chapter 5: Extending Analytics The important point here is that all new objects should have been saved in a separate folder/catalog other than the base product catalogs.
Migrating Environments 6-1Oracle Utilities Analytics Developer’s Guide

Oracle Business Intelligence Enterprise Edition Components
Now, with the extra objects in place, you need to move these additional catalogs across their environments. The recommended way from Oracle Business Intelligence Enterprise Edition for this is to archive the catalogs from the source environment, move the files across and unarchive them in the target environment. Oracle Business Intelligence Enterprise Edition provides the Catalog Manager utility for this purpose. The utility is available for both windows and unix machines and is installed along with the Oracle Business Intelligence Enterprise Edition product. Follow the below mentioned steps:
1. Start the catalog manager in the source Oracle Business Intelligence Enterprise Edition environment
2. Login in the Online mode. Pick the custom catalogs created and archive them.
3. Save the archived files (.catalog) on the local server.
4. Move these catalog files to the target server through FTP or other available means.
5. Start the Catalog Manager in the target Oracle Business Intelligence Enterprise Edition environment in the online mode.
6. Choose the Unarchive option and select the catalog files that were moved.
Once the custom catalogs have been successfully deployed, the custom dashboards and reports should start coming up on the target Oracle Business Intelligence Enterprise Edition environment.
Note: For more details on the Catalog Manger, refer to Oracle Fusion Middleware System Administrator's Guide for Oracle Business Intelligence Enterprise Edition.
Repository An implementation can create a custom version of the base product repository file for some additional business requirements. In such cases, the modified repository file needs to be migrated to the other Oracle Business Intelligence Enterprise Edition environments that customers have. The Oracle Utilities Analytics Administration Tool that comes with the Oracle Business Intelligence Enterprise Edition product can be used to save a copy of the repository file.
1. Start the Oracle Utilities Analytics Administration Tool in the source Oracle Business Intelligence Enterprise Edition environment.
2. Open the repository in Online mode.
3. Choose File menu > Copy As > Repository…
4. Enter a custom name for the repository such as 'CM_UtilitiesBusinessAnalytics' and save the copy on the local machine.
5. Log into the Oracle Business Intelligence Enterprise Edition Enterprise Manager console of the target Oracle Business Intelligence Enterprise Edition environment.
6. Navigate to BI Instance > Coreapplication > Deployment.
7. Lock and Edit. The Repository text box will be enabled.
8. Browse to the modified rpd file and submit.
9. Provide the RPD password, and then click Apply.
10. Activate the changes and then restart Oracle Business Intelligence Enterprise Edition services.
Note: If the database connections to be used by the repository in the target environment are different, then you should first update the connection pool details in the repository file before deploying it on the server.
Migrating Environments 6-2Oracle Utilities Analytics Developer’s Guide

Oracle Data Integrator Components
Oracle Data Integrator ComponentsMigrating Oracle Data Integrator components from one environment to another typically involves exporting Oracle Data Integrator objects and importing them in the new environment. The Development environment is the source and all the subsequent environments are the targets where these objects are imported. The export and import are limited to the custom code only.
Each environment should be built or upgraded using the provided installers. After installation or upgrade of individual environments, the custom code can be exported from the Development and imported into the subsequent environments. The following sections provide the instructions that cover the custom code migration from one environment to another.
Note: Before importing the code in an environment, purge the execution log if any. Refer to the bug 22660741.
CM ProjectThe “Developer Guide” provides detailed instruction on how the custom code should be developed. The first step is the creation of a custom project and ensuring that all custom objects are within this newly created project.
The primary benefit of doing this is that all custom code is completely isolated from the out of the box code. The added benefit is that you can now export the entire CM project and import it in the subsequent environment.
CM ModelsIn addition to a custom project, you may need to create a custom model folder to organize your custom facts, dimensions, staging or replication objects. These should also be exported from the Development environment into the subsequent environment.
CM MetadataAll the CM metadata created during the customizations should be applied into the subsequent environments. The approach mentioned below should be followed to simplify the process of migrating these.
1. Create a procedure CM_<PROD_FLG>_CREATE_METADATA.
2. Replace the <PROD_FLG> with the appropriate edge product code (For example, CCB/NMS).
3. Add appropriate data population scripts. These should be written as merge statements so that existing rows are skipped and only new rows are added. In case the metadata requires corrections, use the update clause of the merge statement.
All tasks within the procedure should have the logical schema set to “Metadata”. The schema names should not be hard-coded.
In addition, create a package CM_<PROD_FLG>_CREATE_METADATA. Add the created procedure as the first step and add the scenario B1_CFG_METADATA as a second step. After migration the CM Project to the new environment, execute this step after the addition of the product instance. This job should be executed in the newly created context for the product.
Migrating Environments 6-3Oracle Utilities Analytics Developer’s Guide


![Application Developer’s Guide Release 7 - Oracle · [1]Oracle® Communications WebRTC Session Controller Application Developer’s Guide Release 7.1 E55126-02 April 2015](https://static.documents.pub/doc/80x56/5ed1187b5b230076a5009a4c/application-developeras-guide-release-7-oracle-1oracle-communications-webrtc.jpg)


![Outside In HTML Export Developer’s Guide · [1]Oracle® Outside In HTML Export Developer’s Guide Release 8.5.1 E12884-08 November 2014](https://static.documents.pub/doc/80x56/5fb5e9c9a295ac71ab20c5fb/outside-in-html-export-developeras-guide-1oracle-outside-in-html-export-developeras.jpg)


