Page 1
© 2017 NXP B.V.
Developing a simple UVC device based on
i.MX RT1050
1. Introduction
USB Video Class (UVC) describes the capabilities and
characteristics of video streaming devices. It is widely
used, such as desktop video cameras (or "webcams"),
digital camcorders, still-image cameras, and so forth.
This document describes how to develop a simple UVC
device using the NXP i.MX RT1050 processor.
The i.MX RT1050 is a processor with single ARM
Cortex-M7 core, which operates at speeds up to 600
MHz. The great processing capability, real-time feature,
and reach integration of abundant peripherals make
i.MX RT1050 ideal for lot of high-performance
applications, such as industrial computing, motor
control, power conversion, smart consumer products,
high-end audio systems, home and building automation.
Section 2 of this document introduces the hardware and
software platforms of the demo application. Section 3
describes the procedure to develop a simple UVC
device using i.MX RT1050, based on MCUXpresso
Software Development Kit (SDK).
NXP Semiconductors Document Number: AN12103
Application Note Rev. 0 , 12/2017
Contents
1. Introduction ........................................................................ 1 2. Hardware and software platforms ...................................... 2
i.MX RT1050 processor .......................................... 2 i.MX RT1050 EVK board ....................................... 2 MT9M114 image sensor ......................................... 3 MCUXpresso SDK ................................................. 3
3. Develop a simple UVC device ........................................... 4 System structure analysis ........................................ 4 Create the demo project .......................................... 4 Video capture .......................................................... 7 Customize the UVC drivers .................................... 9 The software structure ........................................... 12 Run the demo application...................................... 12
4. Conclusion ....................................................................... 13 5. References ........................................................................ 13 6. Revision history ............................................................... 13
Page 2
Hardware and software platforms
Developing a simple UVC device based on i.MX RT1050, Application Note, Rev. 0, 12/2017
2 NXP Semiconductors
2. Hardware and software platforms
This section presents short introductions of the hardware and software platforms of the demo
application, including the below items.
• i.MX RT1050 processor
• i.MX RT1050 EVK board
• MT9M114 image sensor
• MCUXpresso SDK
2.1. i.MX RT1050 processor
The i.MX RT1050 offered by NXP with single ARM Cortex-M7 core can operate at speeds up to 600
MHz. It has 512 KB on-chip RAM, which can be flexibly configured as core Tightly-Coupled Memory
(TCM) or general-purpose RAM. It provides various interfaces for connecting various external
memories, and a wide range of serial communication interfaces, such as USB, Ethernet, SDIO, CAN,
UART, I2C, and SPI. It also has rich audio and video features, including LCD display, basic 2D
graphics, camera interface, SPDIF and I2S audio interface. Other notable features including various
modules for security, motor control, analog signal processing, and power management.
The i.MX RT1050 has two independent USB2.0 OTG controllers, which support high-, full-, and low-
speed operations. Each also features embedded DMA controller and low-power mode with local and
remote wake-up capability.
The CMOS Sensor Interface (CSI) module enables the chip to connect directly to external CMOS image
sensors. CSI supports for CCIR656 video interface as well as traditional sensor interface, with 8-bit/ 10-
bit / 16-bit width data port. The embedded DMA controller has the capability to transfer data from
receive FIFO or statistic FIFO through AHB bus to memory buffers.
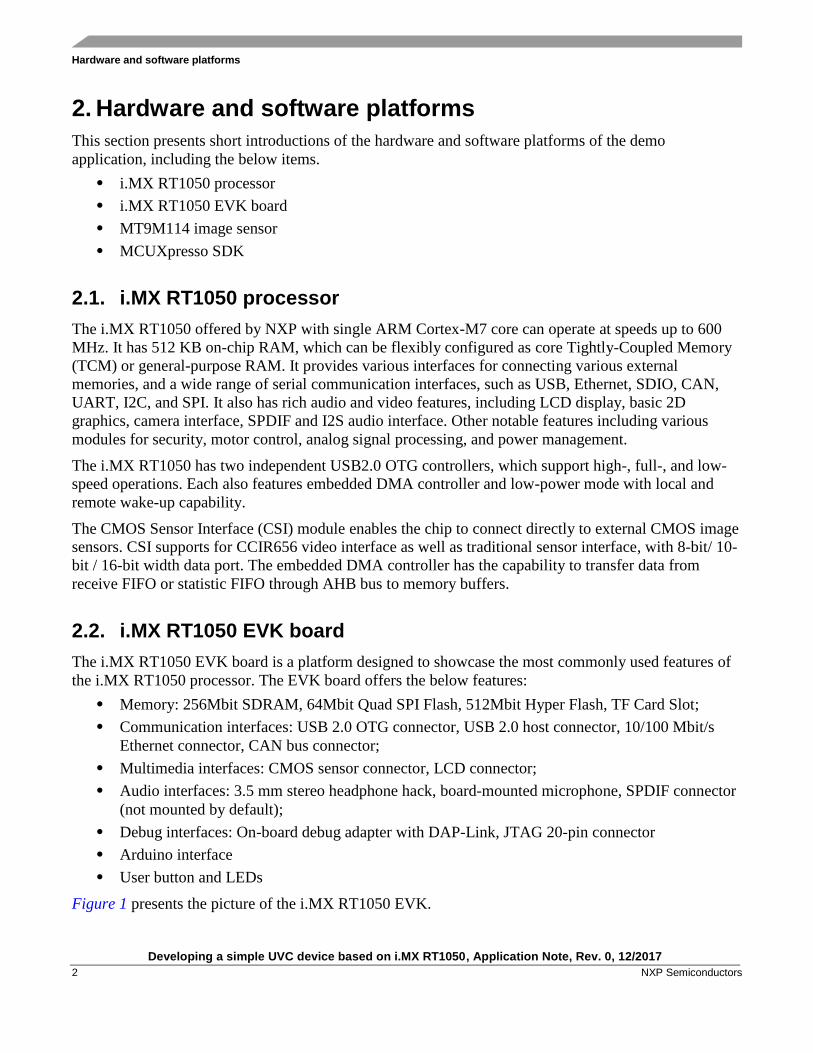
2.2. i.MX RT1050 EVK board
The i.MX RT1050 EVK board is a platform designed to showcase the most commonly used features of
the i.MX RT1050 processor. The EVK board offers the below features:
• Memory: 256Mbit SDRAM, 64Mbit Quad SPI Flash, 512Mbit Hyper Flash, TF Card Slot;
• Communication interfaces: USB 2.0 OTG connector, USB 2.0 host connector, 10/100 Mbit/s
Ethernet connector, CAN bus connector;
• Multimedia interfaces: CMOS sensor connector, LCD connector;
• Audio interfaces: 3.5 mm stereo headphone hack, board-mounted microphone, SPDIF connector
(not mounted by default);
• Debug interfaces: On-board debug adapter with DAP-Link, JTAG 20-pin connector
• Arduino interface
• User button and LEDs
Figure 1 presents the picture of the i.MX RT1050 EVK.
Page 3
Hardware and software platforms
Developing a simple UVC device based on i.MX RT1050, Application Note, Rev. 0, 12/2017
NXP Semiconductors 3
Figure 1. i.MX RT1050 EVK
2.3. MT9M114 image sensor
The MT9M114 from ON Semiconductor (formally Aptina Imaging Corporation) is a 1/6-inch 1.26 Mp
CMOS digital image sensor with an active-pixel array of 1296 × 976. It includes sophisticated camera
functions such as auto exposure control, auto white balance, black level control, flicker avoidance, and
defect correction. The MT9M114 supports a set of UVC controls to simplify the integration of the
MT9M114 with a host’s USB bridge device.
This demo application uses a MT9M1114 camera module. The module expose its signals via a 24-pin
FPC wire which is compatible with the camera connector on the i.MX RT1050 EVK board.
2.4. MCUXpresso SDK
The MCUXpresso SDK provides comprehensive software support for multiple microcontroller families
from NXP. The SDK comprises the blow components:
• A flexible set of peripheral drivers.
• A rich set of example applications.
• Various middleware from NXP or incorporated from a third party, such as FreeRTOS, emWin,
FatFs, LwIP, mbed TLS, USB stack, wolfSSL, and so on.
• The SOC header file, startup files, and linker configuration files for various tool chains.
The USB stack and various USB examples provide a standard implementation of the USB specification
defined by USB Specification Revision 2.0 and the USB classes specifications, including the below
parts:
• Common host driver and host controller driver
• Common device driver and device controller driver
• Device class drivers
• Framework to handle the standard enumeration and request
Camera connector
Page 4
Develop a simple UVC device
Developing a simple UVC device based on i.MX RT1050, Application Note, Rev. 0, 12/2017
4 NXP Semiconductors
3. Develop a simple UVC device
This section describes the procedure to develop a simple UVC device based on the hardware and software
platforms presented in section 2.
3.1. System structure analysis
Firstly, we analyze the system requirements, then figure out the system structure, and draw the system
block diagram. So that we can develop each of the software component, and then build the whole
system. Figure 2 presents the block diagram of this demo application, which shows the primary
components of the system.
Figure 2. System block diagram
• The i.MX RT1050 configures the MT9M114 via an I2C bus, and capture the video frame data
via the CSI interface.
• SDRAM provides data space for frame buffer and/or code space. The i.MX RT1050 connects
with the SDRAM device via the Smart External Memory Controller (SEMC) module.
• QSPI flash or hyper-flash provides code space for non-debugging running configuration. The
i.MX RT1050 connects both with via the FlexSPI controller.
• The Open-Standard Serial Debug Adapter (OpenSDA) provides SWD debug access, debug
UART bridge, and power supply for the board. OpenSDA communicates with the host PC via a
USB port.
• The i.MX RT1050 transfers video frame data to the host PC with one of its own USB
device/OTG port.
3.2. Create the demo project
As we described in section 2, the MCUXpresso SDK provides rich set of peripheral drivers, middleware,
examples applications, and other necessary components for an embedded application. It is recommended
to develop applications based on these components provided by the SDK, in order to speed up and
simplify the development process.
Page 5
Develop a simple UVC device
Developing a simple UVC device based on i.MX RT1050, Application Note, Rev. 0, 12/2017
NXP Semiconductors 5
You can create your application project by porting an SDK example project, then delete, add, and
customize the components; or create an empty project, then add and customize the components. Choose
your own favorite way. In this demo, we start with creating an empty project for the application, using
the IAR Embedded Workbench IDE, version 8.20.
The below subsections summarize the steps of creating the application project based on MCUXpresso
SDK. For detailed information, please refer to the software package along with this application note, and
the IDE help documents.
3.2.1. Download MCUXpresso SDK
Download the SDK package from https://mcuxpresso.nxp.com. Login is required. Register an NXP
account if you do not have one. Download the latest version of the SDK package SDK_2.3.0_EVK-
MIMXRT1050.zip for the EVK board, and extract the archive file to your local disk.
3.2.2. Create an empty IAR project
Follow the below steps to create an empty IAR project.
1. Create new directories user_apps\uvc_demo\iar in the boards \evkmimxrt1050 directory for the
project.
2. Launch the IAR Embedded Workbench, and create a new project “uvc_demo.ewp” in the created
“iar” directory.
3. As SDRAM will be used in the project, so we create a new configuration named “sdram_txt”.
And remove the default “Debug” and “Release” configurations.
This documents mainly describes the SDRAM configuration which is used for debugging session.
Besides this configuration, the software package offers a FlexSPI NOR flash configuration which is
used for offline running purpose. The only difference between the two configurations lies in the memory
space allocation.
3.2.3. Import the needed source files
Follow the below steps to import the needed source files to the project.
1. Import the used driver files from the “devices\MIMXRT1052 \drivers” directory to the project,
including drivers for cache, clock, CSI, GPIO, IOMUX, LPI2C, and LPUART.
2. Import USB stack files from the “middleware\usb” directory, including the ECHI files for high-
speed, OSA, PHY, and so on.
3. Import startup files from the “devices\MIMXRT1052” and “devices\MIMXRT1052/iar”
directories.
4. Import debug UART files from the “devices\MIMXRT1052\utilities” directory and its
subdirectories.
5. From the USB example project “usb_device_video_virtual_camera\bm”, copy board specific
files and USB video device related files to the project directory; and import the files to the
project.
Page 6
Develop a simple UVC device
Developing a simple UVC device based on i.MX RT1050, Application Note, Rev. 0, 12/2017
6 NXP Semiconductors
3.2.4. Project configuration
Open the project option dialog in the IDE, and configure the project.
1. Specify the target device as “NXP MIMXRT1052xxx6A”.
2. Add the various include paths, including header file directories of CMSIS, peripheral drivers,
USB stack, startup files, debug UART utility, and the project header files.
3. Add project symbol definitions for SDK drivers and USB stack configurations.
4. Specify “CISIS DAP” as the debugger driver, and set SWD as the interface.
5. Copy the debugger setup macro file and script files from an example project to the project
directory, which is mainly used for SDRAM initialization. Then import the files to the project.
3.2.5. Memory space allocation
Copy the linker configuration file “MIMXRT1052xxxxx_sdram_txt.icf” from the “devices\
MIMXRT1052\iar” directory to the project directory. Edit this file to allocate the memory spaces (RAM,
SRAM, FlexSPI flash) for text, data, stack, heap, and no-cache regions based on the application
requirements.
For this demo application, we allocate the memory space with the schemes as shown in Figure 3.
(a) SDRAM configuration (b) FlexSPI-NOR configuration
Figure 3. Memory allocation schemes
At last, open the project option dialog, and import the customized linker configuration file to the project.
Page 7
Develop a simple UVC device
Developing a simple UVC device based on i.MX RT1050, Application Note, Rev. 0, 12/2017
NXP Semiconductors 7
3.2.6. Pin mux configuration
Most pins of i.MX RT1050 are multiplexed by multiple peripheral modules. Before a multiplexed pin is
used, the pin’s multiplex must be configured.
For this demo application, we need to configure the pin multiplexes of the debug UART, SDRAM, CSI,
and LPI2C pins.
3.3. Video capture
In this demo application, the MT9M114 camera device is configured to capture VGA (640 x 480) video
frames with RGB565 pixel format, at 20fps frame rate. Both the camera device and the CSI module
need to configure.
3.3.1. The MT9M114 drivers
The MT9M114 drivers offer APIs and parameters for configuring the camera device. It’s remarkable
that MT9M114 has a large number of registers (and the so-called variables) to configure before it works.
It is difficult for users to determine the various parameters. Thus, a configuration tool Register Wizard is
offered by the camera device vendor, which makes it easy to get the basic parameters for a specific set
of video characteristics. Figure 4 shows the Register Wizard tool interface.
Figure 4. The Register-Wizard tool
To archive or update a configuration, the below steps should be made:
1. Prepare the parameters for those registers and variables to written.
2. Write the registers and variables.
3. Issue a change-config process by writing a series commands under prescriptive timing.
Page 8
Develop a simple UVC device
Developing a simple UVC device based on i.MX RT1050, Application Note, Rev. 0, 12/2017
8 NXP Semiconductors
3.3.2. Video capture via CSI
Firstly, CSI module needs to be initialized. The CSI driver refers various video characteristics to
initialize CSI, including pixel format, number of bytes per pixel, frame resolution, frame rate, and so on.
Please refer to the software package to learn further information.
The CSI embedded DMA can write two frame buffer addresses alternately without stop. To improve the
performance in a complicated application, the CSI driver extends the supported buffers to up to four, and
organizes the frame buffers in a ring queue structure. CSI fills the buffers one by one, so that the data
sink, such as LCD interface or USB, can drain the buffers at the same time. Figure 5 illustrates the
frame buffer filling scheme.
Figure 5. Frame buffer filling scheme
The data transfer process is:
a. Set the buffer pointer a pointing to frame buffer 1, buffer pointer b pointing to frame buffer 2.
b. CSI fills frame buffer 1 via buffer pointer a (the data stream 1 in Figure 5).
c. After frame buffer 1 is full, an interrupt is generated. Set buffer pointer a pointing to frame
buffer 3.
d. CSI fills frame buffer 2 via buffer pointer b (the data stream 2 in Figure 5). At the same time,
data sink can drain buffer 1 (the data stream i in Figure 5).
e. After frame buffer 2 is full, an interrupt is generated. Set buffer pointer b pointing to frame
buffer 4.
f. CSI fills frame buffer 3 via buffer pointer a (the data stream 3 in Figure 5). At the same time,
data sink can drain buffer 2 (the data stream ii in Figure 5).
g. After frame buffer 3 is full, an interrupt is generated. Set buffer pointer a pointing to frame
buffer 1.
Page 9
Develop a simple UVC device
Developing a simple UVC device based on i.MX RT1050, Application Note, Rev. 0, 12/2017
NXP Semiconductors 9
h. CSI fills frame buffer 4 via buffer pointer b (the data stream 4 in Figure 5). At the same time,
data sink can drain buffer 3 (the data stream iii in Figure 5).
i. After frame buffer 4 is full, an interrupt is generated. Set buffer pointer b pointing to frame
buffer 2.
j. Repeats from step 2 again. At the same time, data sink can drain buffer 4 (the data stream iv in
Figure 5).
The overall looks like the filling and draining operations on the same set of frame buffers are
simultaneous and independent which makes the system performance to be maximized.
3.4. Customize the UVC drivers
The USB device stack located in the “middleware\usb” directory is composed of the USB controller
driver only, which consists of the common controller driver and the controller (like: xHCI) driver. The
device class driver and the USB framework to handle the standard enumeration and request defined by
USB Specification revision 2.0 locates in various USB examples directories. For more information about
the USB stack, please refer to the reference manual in the SDK “doc\usb” directory.
The SDK usb_device_video_virtual_camera example realizes a simple UVC instance. However, it does
not transfer video frame data from a real camera, but from a small MJPEG format stream stored in the
source code. Based on the example, this CSI camera UVC demo application are greatly simplified. The
device class driver and the framework to handle the standard enumeration and request of the example
can be reused. In section 3.2.3, we have copied these driver files to our demo project directory and
imported to the project. And in this section, we’ll customize these driver files for the application.
3.4.1. Customize the descriptors
USB devices report their attributes using descriptors. A descriptor is a data structure with a defined
format. The descriptors of the USB stack are implemented in usb_device_descriptor.c and
usb_device_descriptor.h.
1. The device descriptor
The device descriptor is defined by USB Specification Revision 2.0, and implemented in the
g_UsbDeviceConfigurationDescriptor[] array. In this example, only the product ID needs to be
modified to distinguish with other UVC devices from NXP. For this demo, we set the product ID
as: 0x9B, 0x00.
2. The configuration, interface, and endpoint descriptors
The configuration descriptor is defined by USB Specification Revision 2.0, and the interface and
endpoint descriptors are defined by the UVC specification. All of the descriptors are
implemented in the g_UsbDeviceConfigurationDescriptor[] array. Several descriptor members
need to be customized for this application.
• Specify the stream packet size HS_STREAM_IN_PACKET_SIZE as 1024.
• Specify the stream interval HS_STREAM_IN_INTERVAL as 1.
Page 10
Develop a simple UVC device
Developing a simple UVC device based on i.MX RT1050, Application Note, Rev. 0, 12/2017
10 NXP Semiconductors
• Set video stream format descriptor subtype as uncompressed -
USB_DESCRIPTOR_SUBTYPE_VIDEO_VS_FORMAT_UNCOMPRESSED.
• Set video stream frame descriptor subtype as uncompressed -
USB_DESCRIPTOR_SUBTYPE_VIDEO_VS_FRAME_UNCOMPRESSED.
• Specify the frame parameters:
width macro USB_VIDEO_CAMERA_UNCOMPRESSED_FRAME_WIDTH as 640;
height macro USB_VIDEO_CAMERA_UNCOMPRESSED_FRAME_HEIGHT as 480;
pixel bytes USB_VIDEO_CAMERA_UNCOMPRESSED_FRAME_DATA_BITS as 2.
• Define the frame interval value for 20fps frame rate:
USB_VIDEO_CAMERA_UNCOMPRESSED_FRAME_INTERVAL_20FPS as
10000000/20;
• Specify the frame default interval
USB_VIDEO_CAMERA_UNCOMPRESSED_FRAME_DEFAULT_INTERVAL as
USB_VIDEO_CAMERA_UNCOMPRESSED_FRAME_INTERVAL_20FPS.
3. String descriptors
There are four string descriptors in total. For this demo, the characters of UsbDeviceString3 is
modified as “CSI Camera Device.”
3.4.2. The device requests
The standard device requests defined by USB Specification Revision 2.0 are implemented in
usb_device_ch9.c.
The UVC specific requests defined by UVC specification are implemented in the device class stack file
usb_device_video.c and application source file (video_camera.c for this demo) via event callback
functions. Adding or modifying the processing code for a request can be done in the application layer
callback function if the application callback framework supports the request, such as most of the Video
Streaming (VS) requests; otherwise, the processing code can only be placed in the callback functions in
the device class stack file usb_device_video.c, such as the Video Control (VC) requests.
One of the most notable request is video data-endpoint Stream In, with which the frame data payload is
transferred. Through a series callback functions, the statements used to drain the frame buffers are
placed in the USB_DeviceVideoPrepareVideoData() function in video_camera.c.
In the demo code, the UVC application makes use of another two buffer pointers FrameBufferPointer1
and FrameBufferPointer2 to drain the four frames buffers. Figure 6 illustrates the frame buffer draining
scheme.
Page 11
Develop a simple UVC device
Developing a simple UVC device based on i.MX RT1050, Application Note, Rev. 0, 12/2017
NXP Semiconductors 11
Figure 6. Frame buffer draining scheme
The driver functions CSI_TransferSubmitEmptyBuffer() and CSI_TransferGetFullBuffer() are used to
handle the four frames buffers.
One point to be noted is that each of the pointer have a chance to points each of the buffers. The
operation flow is shown in Figure 7. FrameBufferPointer1 is always used to point to a full frame buffer,
from which the UVC application drains frame data. FrameBufferPointer2 is always used to submit an
empty buffer which is retrieved from FrameBufferPointer1.
Figure 7. Frame buffer draining flow
Page 12
Develop a simple UVC device
Developing a simple UVC device based on i.MX RT1050, Application Note, Rev. 0, 12/2017
12 NXP Semiconductors
3.5. The software structure
Figure 8 presents the software structure of this demo, which shows
the software and data flow.
Figure 8. Program and data flow
During the initialization session, various components are initialized, like system clock, pin mux, camera,
CSI, and USB. Then the camera and USB start to run.
In the endless working session, CSI captures frames and fills the frames buffers, as described in section
3.3.2. After the enumeration, frame data are transferred to the host if the host requests. At the same time,
various other device requests can be handled.
3.6. Run the demo application
The software package along with this document offers the whole source code and project files of the
demo application. To run the demo:
• Connect a micro USB cable between the host PC and the OpenSDA USB port J28 on the EVK-
MIMXRT1050 board. Connect another micro USB cable between the host PC and the micro
USB port J9 on the board.
• Optionally, open a serial terminal tool with settings 115200 baud rate, 8 data bits, no parity bits,
and 1 stop bit to display debug logs.
• Open the demo project, and build one of the configurations - "sdram_txt" or “flexspi_nor”.
• Start the debug session or download the binary to processor.
Page 13
Revision history
Developing a simple UVC device based on i.MX RT1050, Application Note, Rev. 0, 12/2017
NXP Semiconductors 13
• Launch the debugger in the IDE to begin running the demo if the "sdram_txt" debugging
configuration is used. Or press the reset button SW4 on the EVK to begin running the demo if
the “flexspi_nor” configuration is used.
• A USB device named "CSI Camera Device" starts to be enumerated. After the enumeration is
done, open a webcam program on the host PC. Select and open the demo video device. Then you
can see the video frames on the PC screen.
4. Conclusion
This application note describes the steps of developing a simple UVC device using the i.MX RT1050
processor based on the MCUXpresso SDK, from creating an empty project to completing the
application. The peripheral drivers and the USB stack offered by MCUXpresso SDK make it easy for
the whole development process.
Along with this application note, the source code of the demo application is provided, based on which
you can develop your own customized UVC applications.
5. References
Following documents may offer further reference.
• i.MX RT1050 Processor Reference Manual, Rev. 0
• MCUXpresso SDK USB Stack Device Reference Manual, Rev.0
• MT9M114 Data Sheet, Rev. 12
• MT9M114 Register and Variable Reference, Rev. E
• Universal Serial Bus Specification Revision 2.0
• USB Device Class Definition for Video Devices Revision 1.5
• USB Device Class Definition for Video Devices: Uncompressed Payload Revision 1.5
6. Revision history
Revision number Date Substantive changes
0 12/2017 Initial release
Page 14
Document Number: AN12103 Rev. 0
12/2017
How to Reach Us:
Home Page:
nxp.com
Web Support:
nxp.com/support
Information in this document is provided solely to enable system and software
implementers to use NXP products. There are no express or implied copyright licenses
granted hereunder to design or fabricate any integrated circuits based on the
information in this document. NXP reserves the right to make changes without further
notice to any products herein.
NXP makes no warranty, representation, or guarantee regarding the suitability of its
products for any particular purpose, nor does NXP assume any liability arising out of
the application or use of any product or circuit, and specifically disclaims any and all
liability, including without limitation consequential or incidental damages. “Typical”
parameters that may be provided in NXP data sheets and/or specifications can and do
vary in different applications, and actual performance may vary over time. All operating
parameters, including “typicals,” must be validated for each customer application by
customer’s technical experts. NXP does not convey any license under its patent rights
nor the rights of others. NXP sells products pursuant to standard terms and conditions
of sale, which can be found at the following address: nxp.com/SalesTermsandConditions.
Arm, the Arm logo, are registered trademarks of ARM Limited (or its subsidiaries) in the
EU and/or elsewhere. mbed is a trademark of ARM Limited (or its subsidiaries) in the
EU and/or elsewhere. All rights reserved.
© 2017 NXP B.V.
.