http://www.elfinx.com 1 DigiNet User Manual Server and Client Model#: TX-DSR16 OWNER’S MANUAL CONTENTS: OPERATING INSTRUCTIONS DESCRIPTION OF FUNCTIONS AND FEATURES INSTALLATION GUIDE Before proceeding, please read this manual thoroughly!
Transcript
http://www.elfinx.com 1
DigiNet User Manual Server and Client
Model#: TX-DSR16
OWNER’S MANUAL
CONTENTS:
OPERATING INSTRUCTIONS
DESCRIPTION OF FUNCTIONS AND FEATURES INSTALLATION GUIDE
Before proceeding, please read this manual thoroughly!
http://www.elfinx.com 2
1.0 Installation:
Main Card: Top 16 Pins are positive connection and connect as picture on left (white/red wires). Lower 16 Pins are ground connection (gray wires)
Extend Cards: Lower 4 Pins are positive connection and connect as picture on right (white/red wires). Top 4 Pins are ground connection (gray wires)
http://www.elfinx.com 3
2.0 Main Screen or Default Screen:
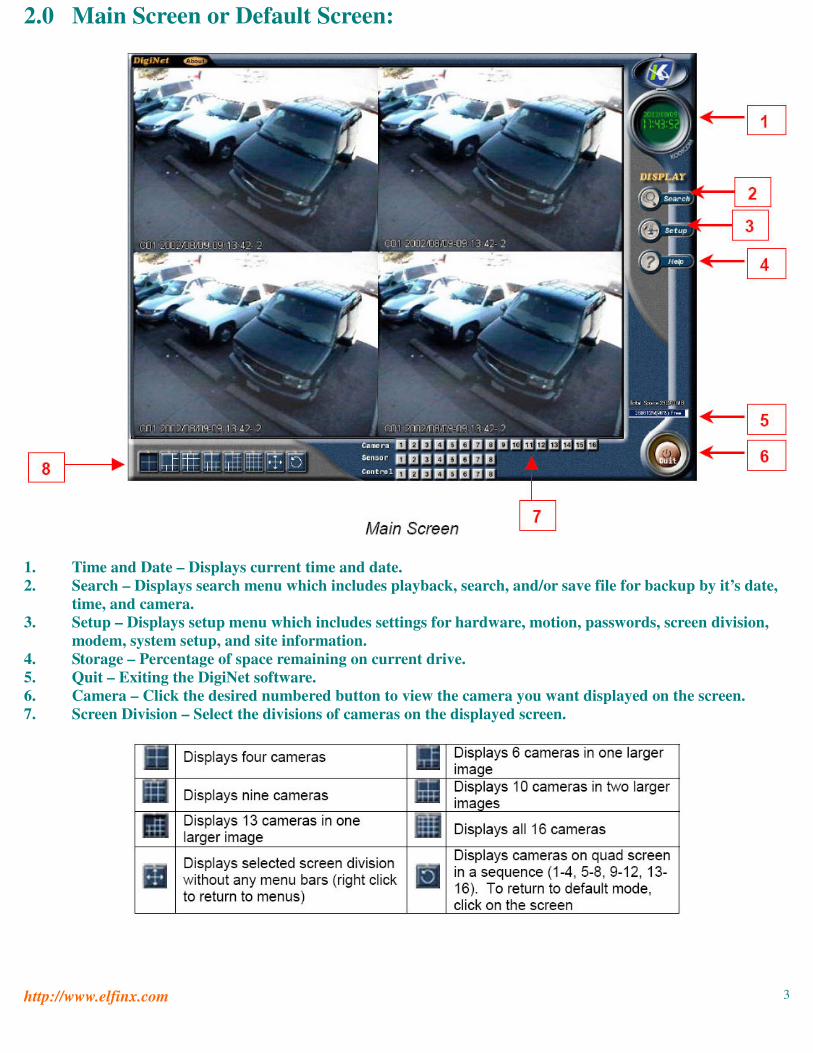
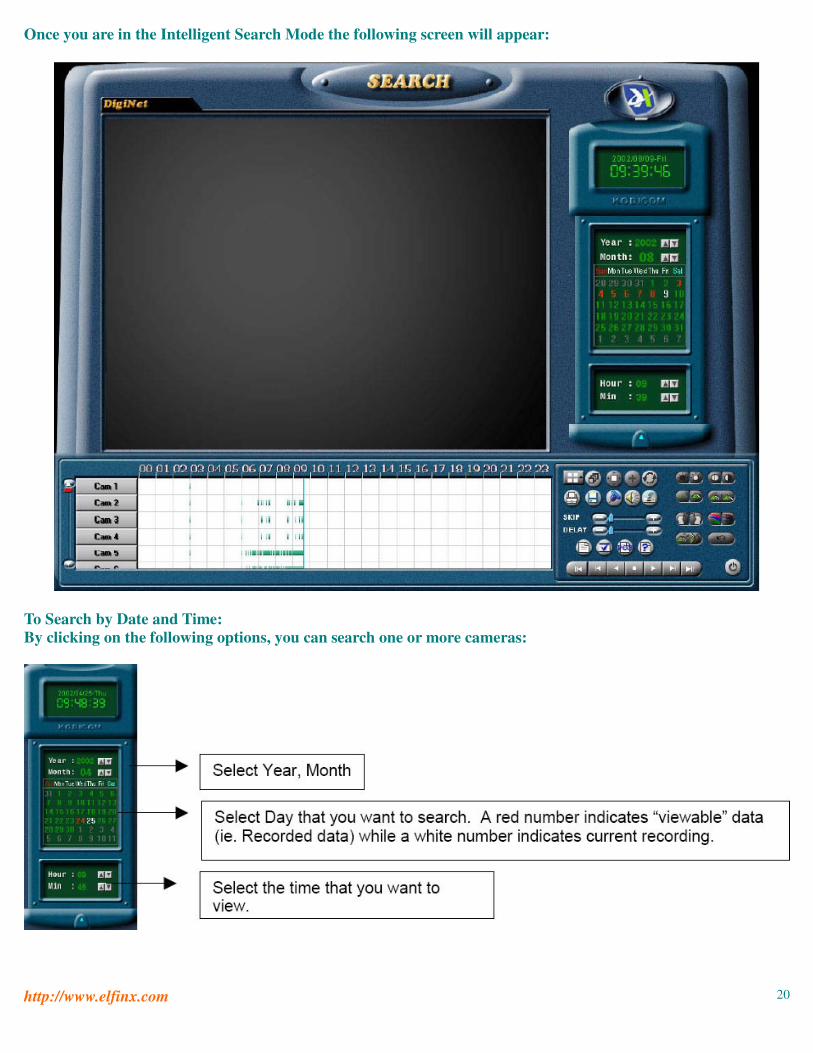
1. Time and Date – Displays current time and date. 2. Search – Displays search menu which includes playback, search, and/or save file for backup by it’s date,
time, and camera. 3. Setup – Displays setup menu which includes settings for hardware, motion, passwords, screen division,
modem, system setup, and site information. 4. Storage – Percentage of space remaining on current drive. 5. Quit – Exiting the DigiNet software. 6. Camera – Click the desired numbered button to view the camera you want displayed on the screen. 7. Screen Division – Select the divisions of cameras on the displayed screen.
http://www.elfinx.com 4
Hardware Setup
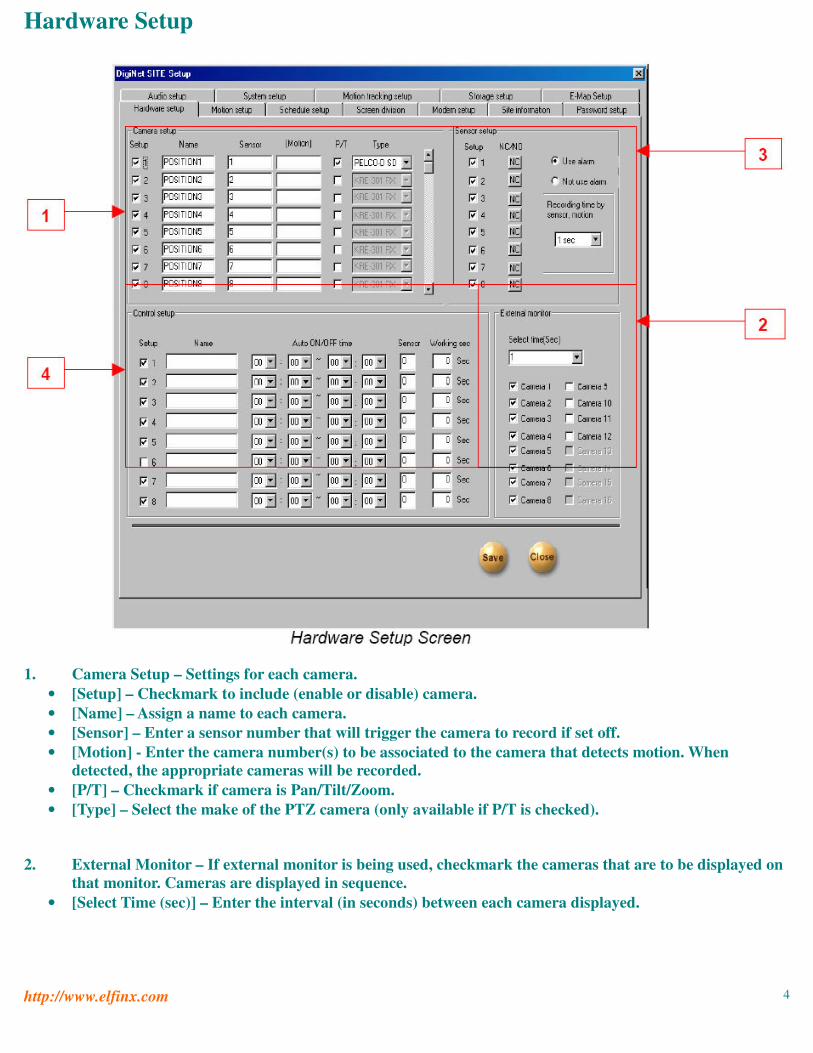
1. Camera Setup – Settings for each camera.
• [Setup] – Checkmark to include (enable or disable) camera. • [Name] – Assign a name to each camera. • [Sensor] – Enter a sensor number that will trigger the camera to record if set off. • [Motion] - Enter the camera number(s) to be associated to the camera that detects motion. When
detected, the appropriate cameras will be recorded. • [P/T] – Checkmark if camera is Pan/Tilt/Zoom. • [Type] – Select the make of the PTZ camera (only available if P/T is checked).
2. External Monitor – If external monitor is being used, checkmark the cameras that are to be displayed on
that monitor. Cameras are displayed in sequence. • [Select Time (sec)] – Enter the interval (in seconds) between each camera displayed.
http://www.elfinx.com 5
3.1 Setting Up Sensors/Controls: 3. Sensor Setup (Applicable only if sensors are available and is being used)
• [Setup] – Check mark to activate sensor. • [NC/NO] – Click button to select type of sensor connection (NC - Normally Closed, NO - Normally
Open). • [Auto ON/OFF Time] – Designated time when the sensor is active (default is continuous 00:00-24:00). If
sensor is triggered outside the specified time, it will be ignored. • [Use Alarm/Do not use alarm] - Select either option to activate an alarm when the sensor is tripped • [Recording time by sensor motion] - The time to begin recording after a sensor detects motion
4. Control Setup (Applicable only if controls are available and is being used) • [Setup] – Checkmark to activate and use specified control. • [Name] – Assign a name to each control. • [Auto ON/OFF Time] – Designated time when the control is active (default is continuous 00:00-24:00). If
sensor is triggered outside the specified time, it will be ignored. • [Sensor] – Specify which sensor is associated with the control (use commas to separate more than one
sensor). • [Working sec] – Enter the length of time (in seconds) that the control is turned on, when activated by
sensor(s) or manually on the display screen mode.
Note: For information on connecting sensors/controls refer to Technician Training Manual (Section 10.83 Connecting Sensors/Controls)
http://www.elfinx.com 6
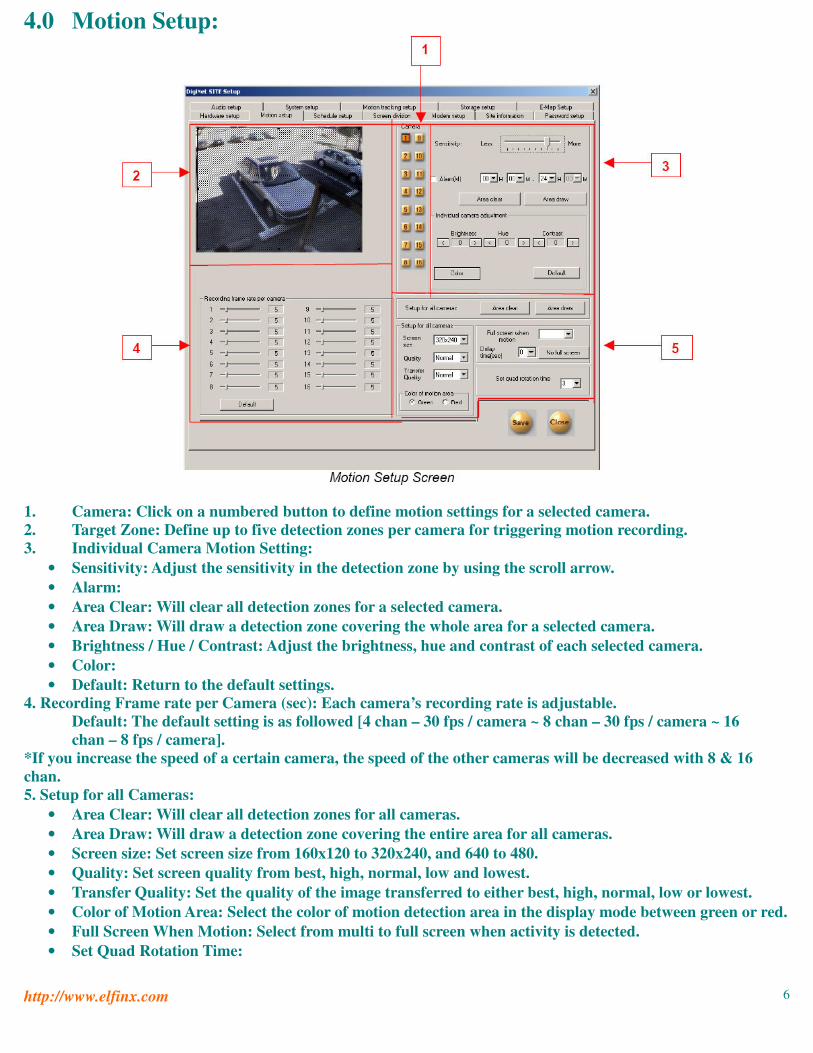
4.0 Motion Setup: 1. Camera: Click on a numbered button to define motion settings for a selected camera. 2. Target Zone: Define up to five detection zones per camera for triggering motion recording. 3. Individual Camera Motion Setting:
• Sensitivity: Adjust the sensitivity in the detection zone by using the scroll arrow. • Alarm: • Area Clear: Will clear all detection zones for a selected camera. • Area Draw: Will draw a detection zone covering the whole area for a selected camera. • Brightness / Hue / Contrast: Adjust the brightness, hue and contrast of each selected camera. • Color: • Default: Return to the default settings.
4. Recording Frame rate per Camera (sec): Each camera’s recording rate is adjustable. Default: The default setting is as followed [4 chan – 30 fps / camera ~ 8 chan – 30 fps / camera ~ 16 chan – 8 fps / camera].
*If you increase the speed of a certain camera, the speed of the other cameras will be decreased with 8 & 16 chan. 5. Setup for all Cameras:
• Area Clear: Will clear all detection zones for all cameras. • Area Draw: Will draw a detection zone covering the entire area for all cameras. • Screen size: Set screen size from 160x120 to 320x240, and 640 to 480. • Quality: Set screen quality from best, high, normal, low and lowest. • Transfer Quality: Set the quality of the image transferred to either best, high, normal, low or lowest. • Color of Motion Area: Select the color of motion detection area in the display mode between green or red. • Full Screen When Motion: Select from multi to full screen when activity is detected. • Set Quad Rotation Time:
http://www.elfinx.com 7
5.0 Schedule Setup:
1. Camera: Click on a numbered button to define motion settings for a selected camera. 2. Calendar: To set the recording settings (in simple mode Weekend, Saturday’s, and Sunday’s/ Holidays;
the time [hours] settings will be the same.) a. Camera: Click on the desired camera to set to recording settings. b. Weekday: Set the recording mode for the weekday (C-continuous, S-sensor, M-motion, P-
Prealarm). c. Saturday: Set the recording mode for Saturday (C-continuous, S-sensor, M-motion, P- Pre-alarm). d. Sunday/Holiday: Set the recording for Sunday and for holiday(s).
3. Advance Mode: Switch to Advance Mode.
4. Record Mode:
• Continuous: Check to continuous recording (note: If this function is selected then all other recording settings will be canceled).
• Sensor: Check to have sensor active recording. • Motion: Check to have motion active recording. • Pre-Alarm:
5. Copy To: Click here to copy recording setting to one or to all of the other cameras.
http://www.elfinx.com 8
6.0 Screen Division Setup:
1. Screen Divisions: Choose the screen / split division (this allows you to hide any camera).
2. Camera Selection: Select camera to be placed on the screen division. 3. Large Screen: You can select the larger screens for magnification among the 6, 10, 13 divisions. 4. Default: Initialize into default
http://www.elfinx.com 9
7.0 Modem Steup:
1. Type of Connection: LAN, PSTN, ISDN, Leased Circuit can be used for remote connection. ISDN or
Leased circuit with router connection is possible and; ISDN or PSTN can be used to connect to a DVR without router directly. If you don’t use remote connection check on “No Connection”
2. Password / Confirm: Enter a 4 number password to log into the site from center the P.C. [password] : enter the 4 number password. [confirm] : re-enter the password to confirm.
3. Emergency Info: a) Sensor for Emergency: If the sensor detects any signal it will send an alarm to the center with the
captured image during the designated time.(You can assign the external sensor numbers.) b) Emergency Phone Number: When you use PSTN for connection you can assign up to 2 phone
numbers for an emergency connection. When the first trial fails to connect, it tries to connect to the second number.
c) Transfer Time: When connection has been made, you can assign the time in seconds to transfer the image to the Center PC. (If any other signal is detected during the transfer, the DVR will transmit the image again.)
d) Emergency IP Address: Enter the IP address on “Emergency IP Address” to connect to a designated site. (Under LAN, Leased Circuit connection)
http://www.elfinx.com 10
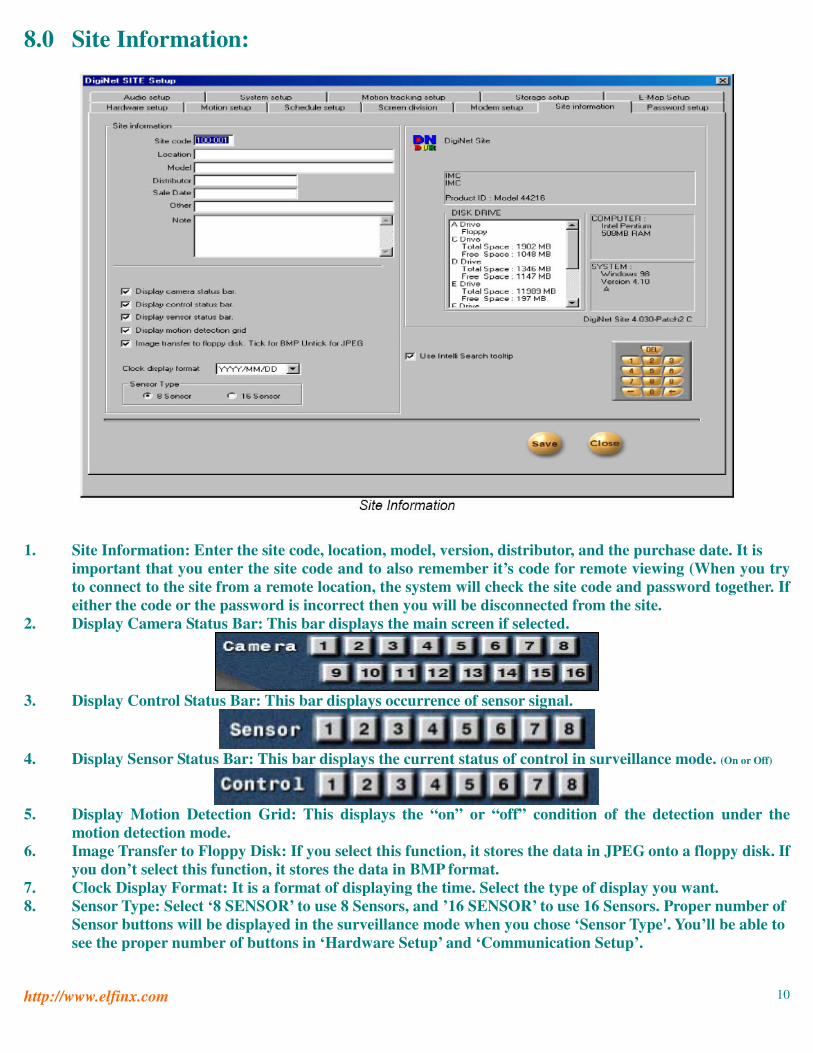
8.0 Site Information:
1. Site Information: Enter the site code, location, model, version, distributor, and the purchase date. It is important that you enter the site code and to also remember it’s code for remote viewing (When you try to connect to the site from a remote location, the system will check the site code and password together. If either the code or the password is incorrect then you will be disconnected from the site.
2. Display Camera Status Bar: This bar displays the main screen if selected.
3. Display Control Status Bar: This bar displays occurrence of sensor signal.
4. Display Sensor Status Bar: This bar displays the current status of control in surveillance mode. (On or Off)
5. Display Motion Detection Grid: This displays the “on” or “off” condition of the detection under the
motion detection mode. 6. Image Transfer to Floppy Disk: If you select this function, it stores the data in JPEG onto a floppy disk. If
you don’t select this function, it stores the data in BMP format. 7. Clock Display Format: It is a format of displaying the time. Select the type of display you want. 8. Sensor Type: Select ‘8 SENSOR’ to use 8 Sensors, and ’16 SENSOR’ to use 16 Sensors. Proper number of
Sensor buttons will be displayed in the surveillance mode when you chose ‘Sensor Type'. You’ll be able to see the proper number of buttons in ‘Hardware Setup’ and ‘Communication Setup’.
http://www.elfinx.com 11
9.0 Password Setup:
1. Setup List: Check the setup that can be modified by operator 2 and operator 3. (Operator 1 has control
over all setup.) 2. Password Change: You can assign a password to three users with different functions. Only user 1 can
modify all the setup. a) Enter the password you are presently using. b) Enter the new password. c) Confirm the new password.
**Password is set with only 4 numbers**
**Password is not set in the initial status** 3. Advanced Security Setup: Allows User 1 to change the cameras that are enabled and whether or not the
search mode is enabled.
After selecting Advanced Security Setup the following dialog will appear:
Input the User1 password and select OK in order to continue.
When the window to the left appears, check the appropriate checkbox according to the desired option.
http://www.elfinx.com 12
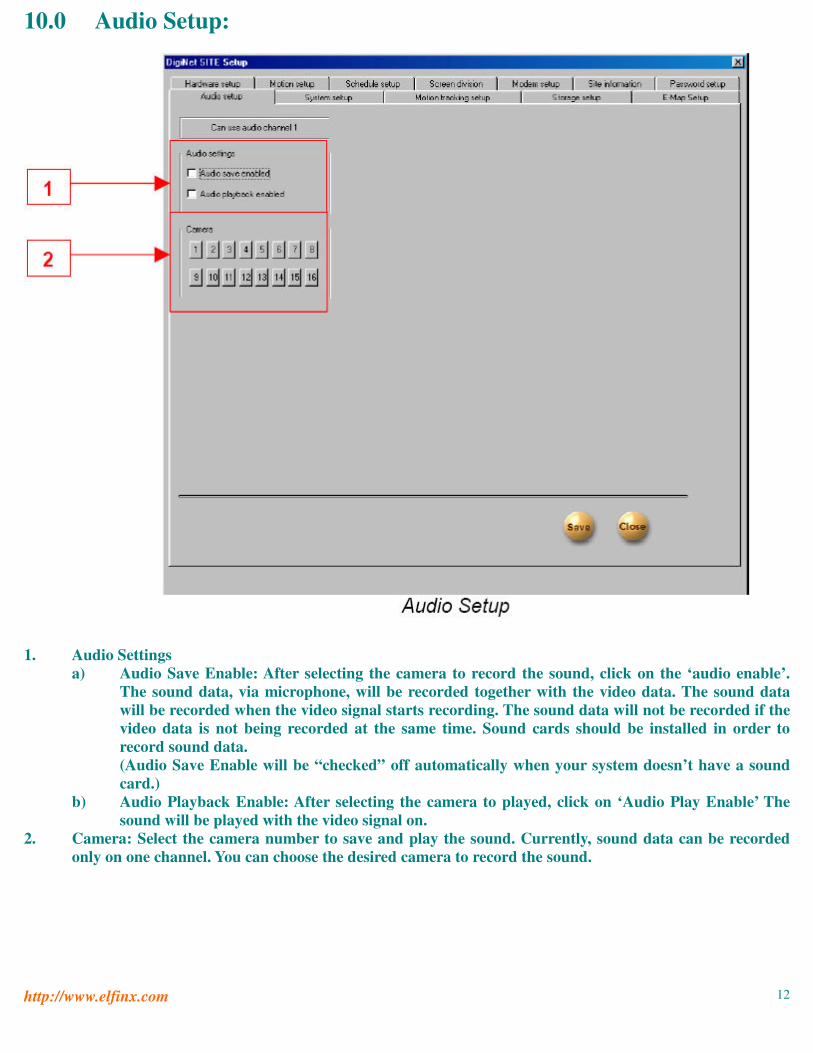
10.0 Audio Setup:
1. Audio Settings
a) Audio Save Enable: After selecting the camera to record the sound, click on the ‘audio enable’. The sound data, via microphone, will be recorded together with the video data. The sound data will be recorded when the video signal starts recording. The sound data will not be recorded if the video data is not being recorded at the same time. Sound cards should be installed in order to record sound data. (Audio Save Enable will be “checked” off automatically when your system doesn’t have a sound card.)
b) Audio Playback Enable: After selecting the camera to played, click on ‘Audio Play Enable’ The sound will be played with the video signal on.
2. Camera: Select the camera number to save and play the sound. Currently, sound data can be recorded only on one channel. You can choose the desired camera to record the sound.
http://www.elfinx.com 13
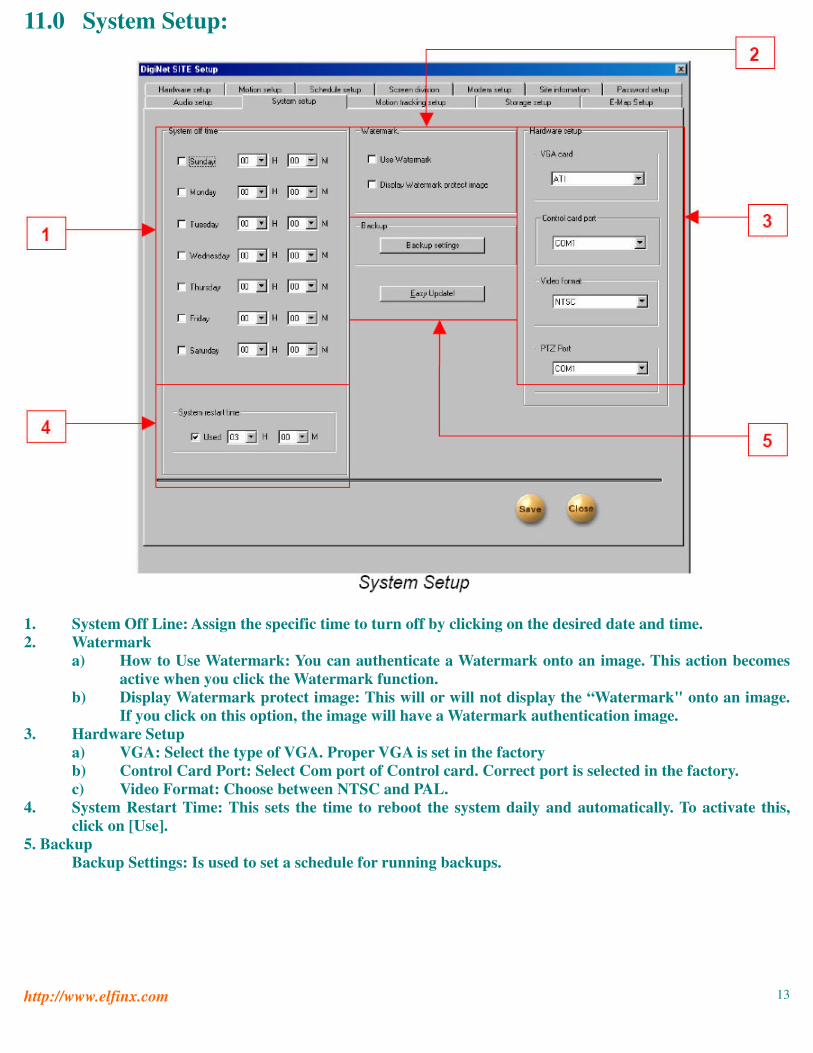
11.0 System Setup:
1. System Off Line: Assign the specific time to turn off by clicking on the desired date and time. 2. Watermark
a) How to Use Watermark: You can authenticate a Watermark onto an image. This action becomes active when you click the Watermark function.
b) Display Watermark protect image: This will or will not display the “Watermark" onto an image. If you click on this option, the image will have a Watermark authentication image.
3. Hardware Setup a) VGA: Select the type of VGA. Proper VGA is set in the factory b) Control Card Port: Select Com port of Control card. Correct port is selected in the factory. c) Video Format: Choose between NTSC and PAL.
4. System Restart Time: This sets the time to reboot the system daily and automatically. To activate this, click on [Use].
5. Backup Backup Settings: Is used to set a schedule for running backups.
http://www.elfinx.com 14
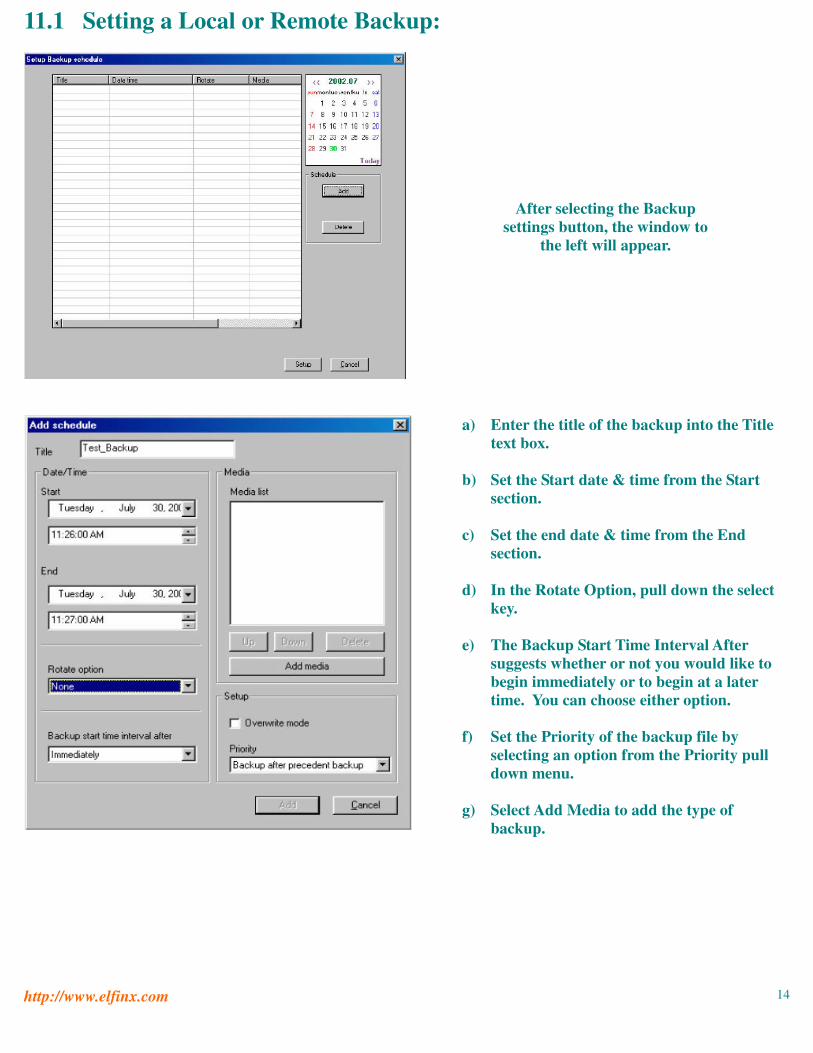
11.1 Setting a Local or Remote Backup:
After selecting the Backup settings button, the window to
the left will appear.
a) b) c) d) e) f) g)
Enter the title of the backup into the Title text box. Set the Start date & time from the Start section. Set the end date & time from the End section. In the Rotate Option, pull down the select key. The Backup Start Time Interval After suggests whether or not you would like to begin immediately or to begin at a later time. You can choose either option. Set the Priority of the backup file by selecting an option from the Priority pull down menu. Select Add Media to add the type of backup.
http://www.elfinx.com 15
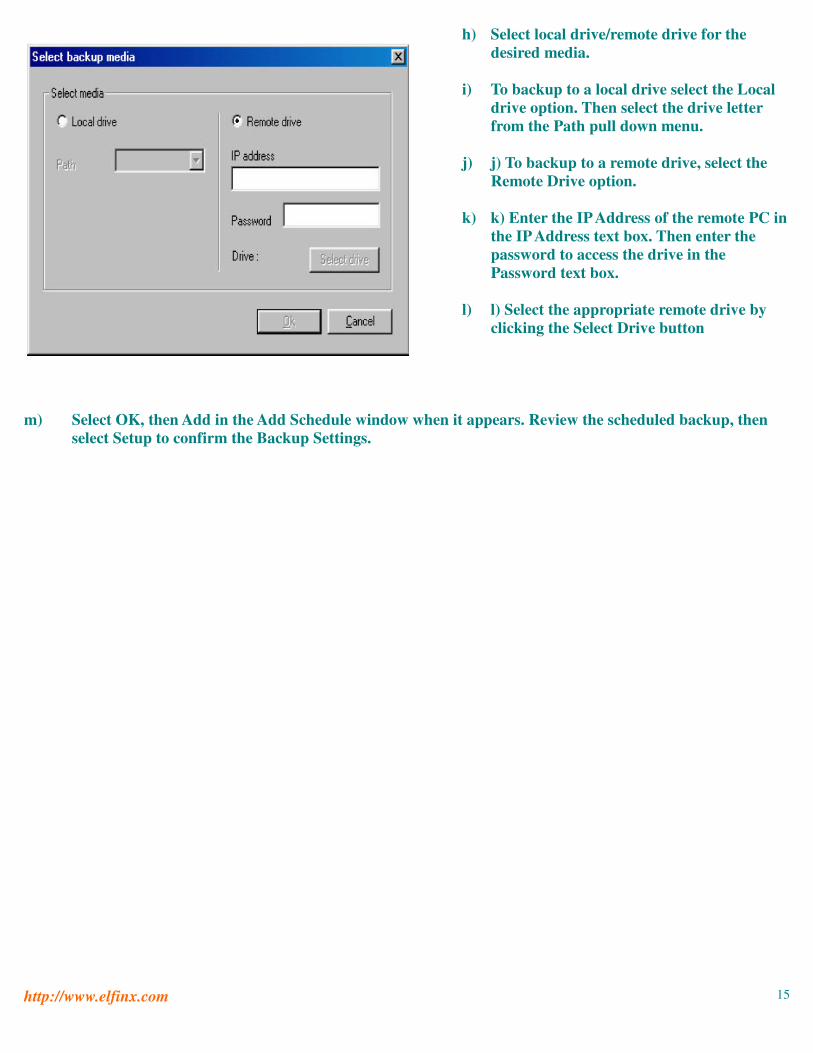
h) i) j) k) l)
Select local drive/remote drive for the desired media. To backup to a local drive select the Local drive option. Then select the drive letter from the Path pull down menu. j) To backup to a remote drive, select the Remote Drive option. k) Enter the IP Address of the remote PC in the IP Address text box. Then enter the password to access the drive in the Password text box. l) Select the appropriate remote drive by clicking the Select Drive button
m) Select OK, then Add in the Add Schedule window when it appears. Review the scheduled backup, then
select Setup to confirm the Backup Settings.
http://www.elfinx.com 16
12.0 Motion Tracking Setup:
1. Enable Camera
a) Current Camera: You can activate the Motion Tracking function when you have a proper speed dome camera. In order to setup in detail, you need to select a specific camera to track the motion.
2. Start Position: This configures the starting point of the camera. Pan and Tilt the position of your camera for the starting point. a) Screen Value: You can get the rectangular value of the current position of the camera by clicking
this button. b) Move Camera: This button moves the camera to the configured position. c) Return Start Position: The dome camera goes back to the starting point in seconds when it stops to
rack a moving object. 3. Range:
a) Pan: You can assign the angle to move left and right. The camera moves from the ‘start position’ that you set in ‘Start Position’. The maximum value to the left and right is 40 degrees. The sum of value to the left and to the right cannot exceed 360 degrees. If the sum of both the values exceeds 360 degrees, then value will be adjusted automatically.
b) Screen Value (Pan): You can get the current camera position by clicking this button. c) Enable (Pan): If you click this box, the camera will move within the value of the angle d) Tilt: You can assign the minimum angle in Tilt based on the value you put in the ‘Start Position’. e) Screen Value (Tilt): You can get the current minimum value of theTtilt by clicking this button f) Enable (Tilt): If you click this box, the camera will move within the value of the angle
4. On/Off Time: You can select the time to activate the Motion Tracking function. The default value is 00:00 ~ 24:00 (continue for 24 hours). The camera works in Pan/Tilt mode outside of the configured time. a) Disable PTZ mode: Disables PTZ mode from the Motion Tracking camera. If you don’t select this
option, both Motion Tracking and PTZ will be used. 5. Set Value:
a) Pan Angle: Adjust this value when the selection box is outside of the position in left and right. b) Tilt Angle: Adjust this value when the selection box is higher or lower than the position chosen. c) Sensitivity: If you increase or decrease this value, the camera movement will be more or less
sensitive. You need to adjust this value properly depending on the location. Also the Motion Tracking may become sensitive to light and may move a little.
d) Camera Flip: Use this function when the dome camera is flipped. When the dome camera is installed in flip position, it will work in reverse. In this case , the dome camera may appear broken. This function therefore should be used to prevent something like this from happening.
http://www.elfinx.com 17
13.0 Storage Setup:
1. Scroll Allocation Menu: Displays the Hard Drive that is allocated. Data regarding possible disk space and
allocation status for each drive will be shown. a) Click on Modify Storage Structure. This will take you to “Storage Structure”. b) Close DigiNet Site Setup.
14.0 Storage Setup (continued):
2. Modifying Storage Structure: Allocation for each drive can be changed.
a) Allocation: Click on the desired drive to be allocated. (Note that Drive C cannot be reformatted since it holds the operating system).
b) Proceed: Click to continue once the proper drives are selected for re-allocation. c) Cancel: Click here to cancel.
http://www.elfinx.com 18
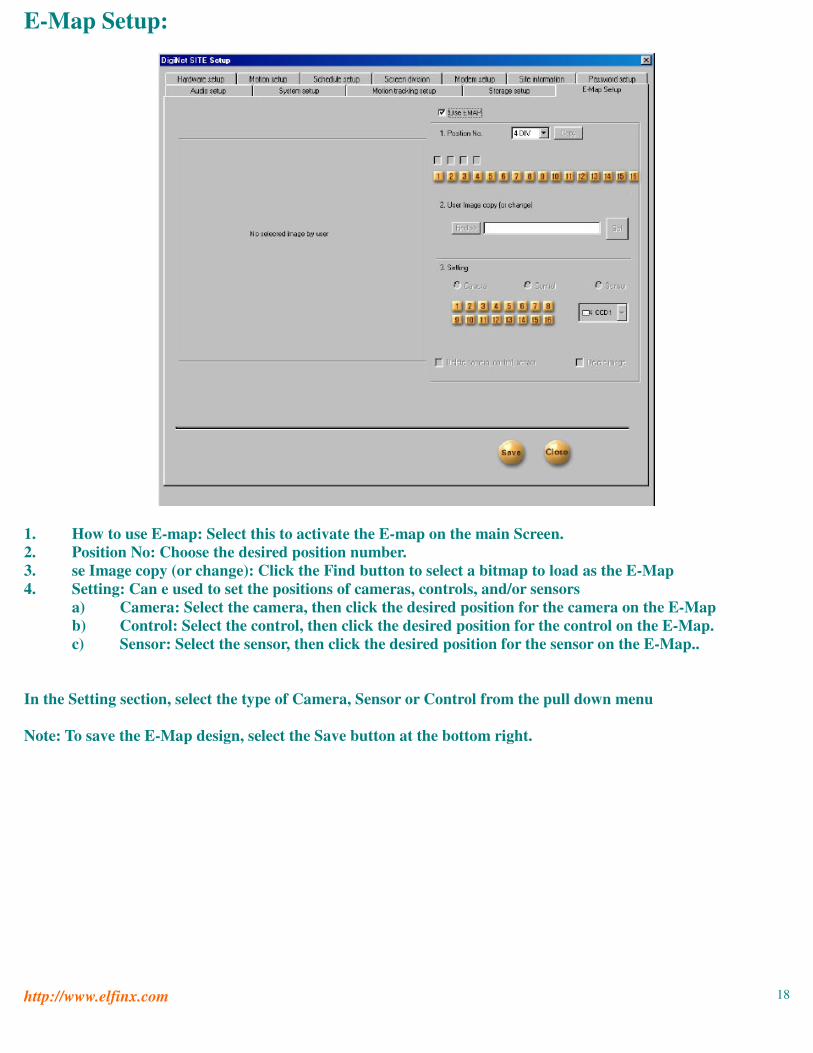
E-Map Setup:
1. How to use E-map: Select this to activate the E-map on the main Screen. 2. Position No: Choose the desired position number. 3. se Image copy (or change): Click the Find button to select a bitmap to load as the E-Map 4. Setting: Can e used to set the positions of cameras, controls, and/or sensors
a) Camera: Select the camera, then click the desired position for the camera on the E-Map b) Control: Select the control, then click the desired position for the control on the E-Map. c) Sensor: Select the sensor, then click the desired position for the sensor on the E-Map..
In the Setting section, select the type of Camera, Sensor or Control from the pull down menu Note: To save the E-Map design, select the Save button at the bottom right.
http://www.elfinx.com 19
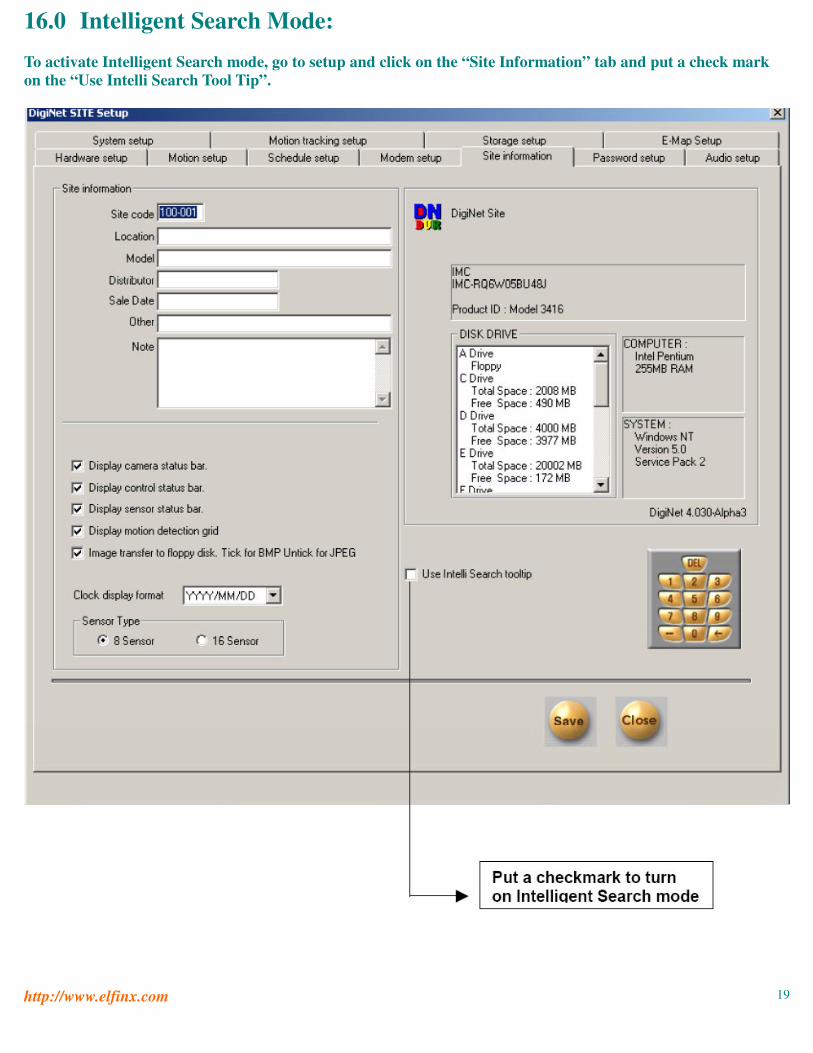
16.0 Intelligent Search Mode: To activate Intelligent Search mode, go to setup and click on the “Site Information” tab and put a check mark on the “Use Intelli Search Tool Tip”.
http://www.elfinx.com 20
Once you are in the Intelligent Search Mode the following screen will appear:
To Search by Date and Time: By clicking on the following options, you can search one or more cameras:
http://www.elfinx.com 21
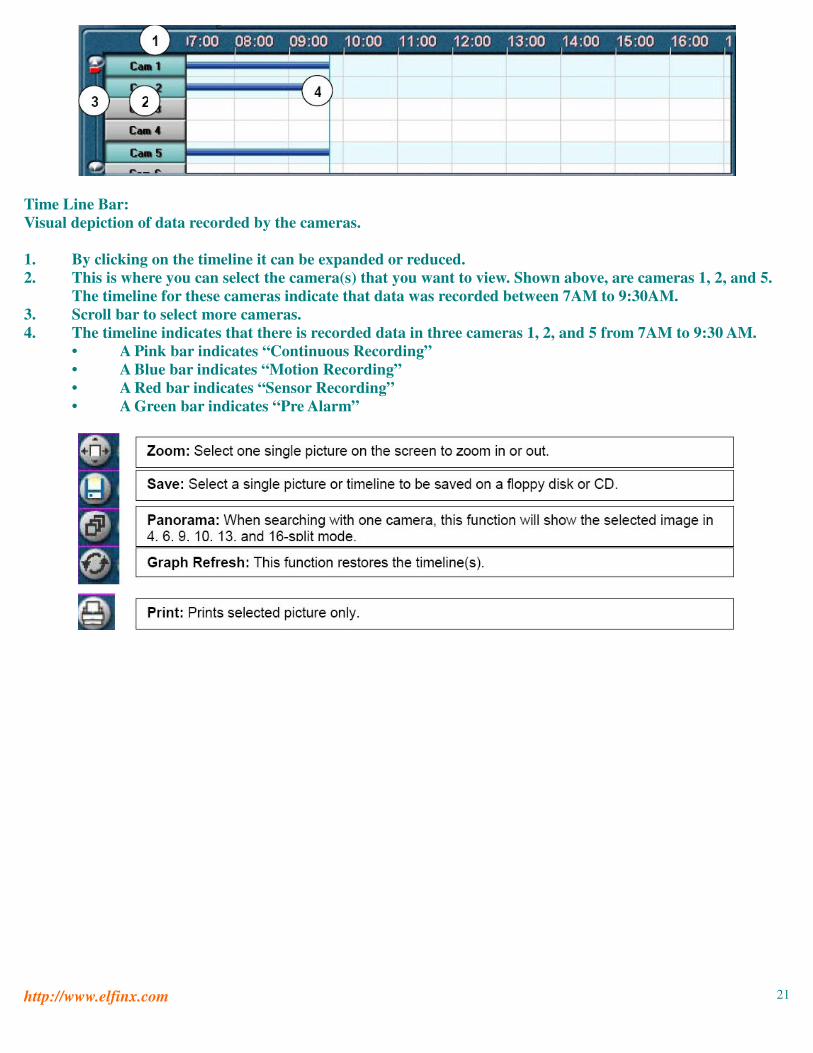
Time Line Bar: Visual depiction of data recorded by the cameras. 1. By clicking on the timeline it can be expanded or reduced. 2. This is where you can select the camera(s) that you want to view. Shown above, are cameras 1, 2, and 5.
The timeline for these cameras indicate that data was recorded between 7AM to 9:30AM. 3. Scroll bar to select more cameras. 4. The timeline indicates that there is recorded data in three cameras 1, 2, and 5 from 7AM to 9:30 AM.
• A Pink bar indicates “Continuous Recording” • A Blue bar indicates “Motion Recording” • A Red bar indicates “Sensor Recording” • A Green bar indicates “Pre Alarm”
http://www.elfinx.com 22
http://www.elfinx.com 23
http://www.elfinx.com 24
16.1 Bookmark:
This function locates bookmarks. When book-marking, the time and date of the image will be registered. Description
• You can add comments/description to the bookmark(s). • If you do not input description, “time information” will be automatically inputted.
Add • This function adds bookmarks.
Delete • This function deletes bookmarks. • In order to delete the registered image location, select the delete time from the bookmark list and then
click [Delete] Delete All
• This function deletes all of the image locations (bookmarks). • Warning: [Delete All] function will delete all the image locations at once.
Goto • This function allows user to search images by date and time. • Select the time of the image you wish to move to, and then click [Goto]
OK • All changes will be inputted. • Selecting [OK] button will close the bookmark function and you will return to the search screen
http://www.elfinx.com 25
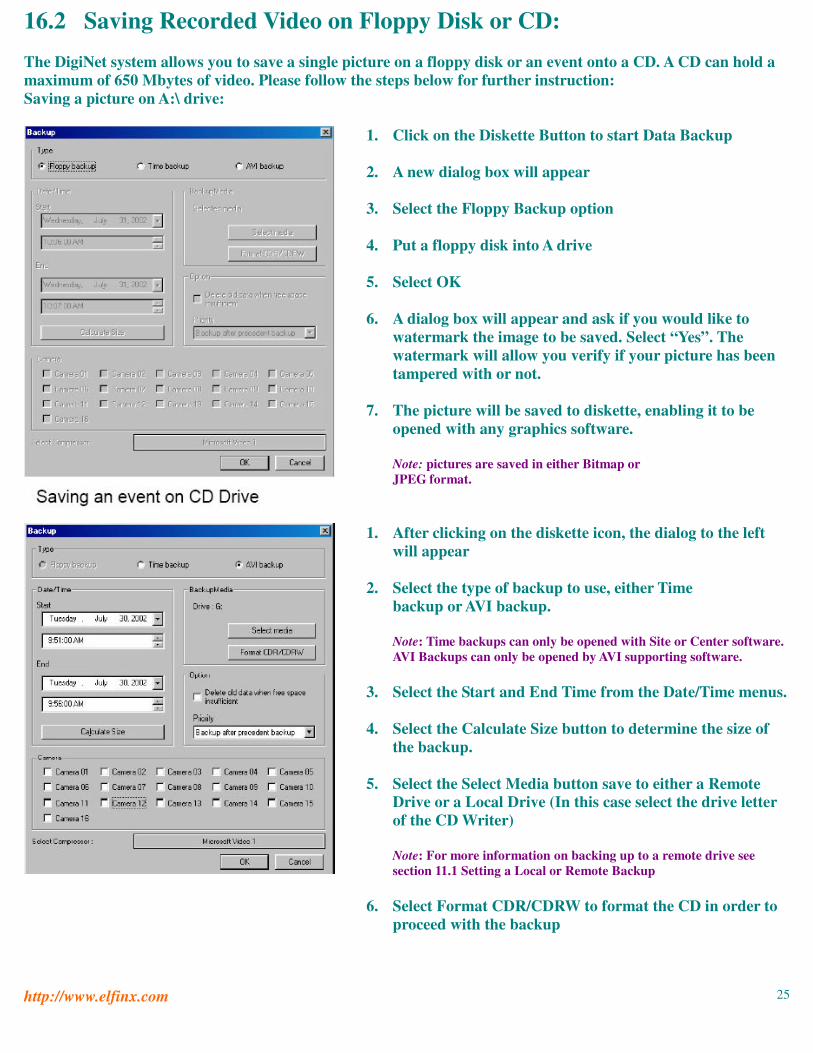
16.2 Saving Recorded Video on Floppy Disk or CD: The DigiNet system allows you to save a single picture on a floppy disk or an event onto a CD. A CD can hold a maximum of 650 Mbytes of video. Please follow the steps below for further instruction: Saving a picture on A:\ drive:
1.
2.
3.
4.
5.
6.
7.
Click on the Diskette Button to start Data Backup A new dialog box will appear Select the Floppy Backup option Put a floppy disk into A drive Select OK A dialog box will appear and ask if you would like to watermark the image to be saved. Select “Yes”. The watermark will allow you verify if your picture has been tampered with or not. The picture will be saved to diskette, enabling it to be opened with any graphics software. Note: pictures are saved in either Bitmap or JPEG format.
1.
2.
3.
4.
5.
6.
After clicking on the diskette icon, the dialog to the left will appear Select the type of backup to use, either Time backup or AVI backup. Note: Time backups can only be opened with Site or Center software. AVI Backups can only be opened by AVI supporting software. Select the Start and End Time from the Date/Time menus. Select the Calculate Size button to determine the size of the backup. Select the Select Media button save to either a Remote Drive or a Local Drive (In this case select the drive letter of the CD Writer) Note: For more information on backing up to a remote drive see section 11.1 Setting a Local or Remote Backup Select Format CDR/CDRW to format the CD in order to proceed with the backup
http://www.elfinx.com 26
7.
Note: The following procedure is for DirectCD 5.10. The procedure for formatting a CD with DirectCD 3.03 can be found in Appendix I After selecting Format (CDR/CDRW) the dialog to the left will appear. Select Format CD to continue.
8.
9.
Enter the desired CD label in the Label text box. Select Start Format to begin formatting the CD
10. The dialog box to the left will appear while formatting the CD, this should take approximately 1 minute (depending on the speed of the CD writer).
11. The window to the left appears after the CD has been formatted. Select OK to continue.
http://www.elfinx.com 27
16.21 Time Backup to CD
1.
2.
3.
Complete the steps in Section 16.3 on Saving an event on CD Drive before proceeding After Formatting the CD, select the Priority of the backup from the Priority pull down Click OK to begin backing up the desired video to CD
16.22 AVI Backup to CD
1.
2.
3.
4.
Complete the steps in Section 16.3 on Saving an event on CD Drive before proceeding Select the priority of the backup from the Priority pull down Place a checkmark next to all the cameras that need to be backed up in the Camera section Select OK to begin backing up the desired video to CD in AVI format
http://www.elfinx.com 28
1. When backup is complete the CD must be ejected, using the Eject option in the window to the left
2.
3.
In the dialog to the left select the Close to Read on Any Computer - Close the CD so it can be read automatically in most standard CD-ROM drives option. This will enable the CD to read in any CD drive. Select OK to complete the ejecting sequence.
1. Double click the setup.exe icon, which is located in the Data1 folder (As pictured to the left)
2.
3.
4.
5.
Select the Next button to continue to the next screen Read the Software License Agreement and check the box next to I Accept This License Agreement, then select Next to continue Select Next to accept the location where the Center Software will be installed The screen to the Left will appear indicating that the DigiNet Center is being installed
6.
7.
When the screen to the left appears, select the Finish button Locate the DigiNet Center icon (as shown below) and double click to run the remote software
http://www.elfinx.com 30
17.1 Introduction: Welcome to DigiNet Center Software. This software allows users to look and search any recorded video from a remote site. There are three methods for media to be viewed remotely: direct phone line, local area network, and high-speed Internet. Depending on the choice of medium, each must be set up according to its technical specification. After you have installed the software, a DigiNet Center icon will automatically be added to your desktop. 17.2 Installing the DigiNet Center onto your computer: If the CD does not automatically begin setup, go to Windows Explorer and double click on the CD drive, then double click on the Data1 folder on the DigiNet Center CD, and finally, double click “setup.exe”. After installing your DigiNet Center software, modify your Display Properties to 1024x768 pixels and True Color (32 bit).
http://www.elfinx.com 31
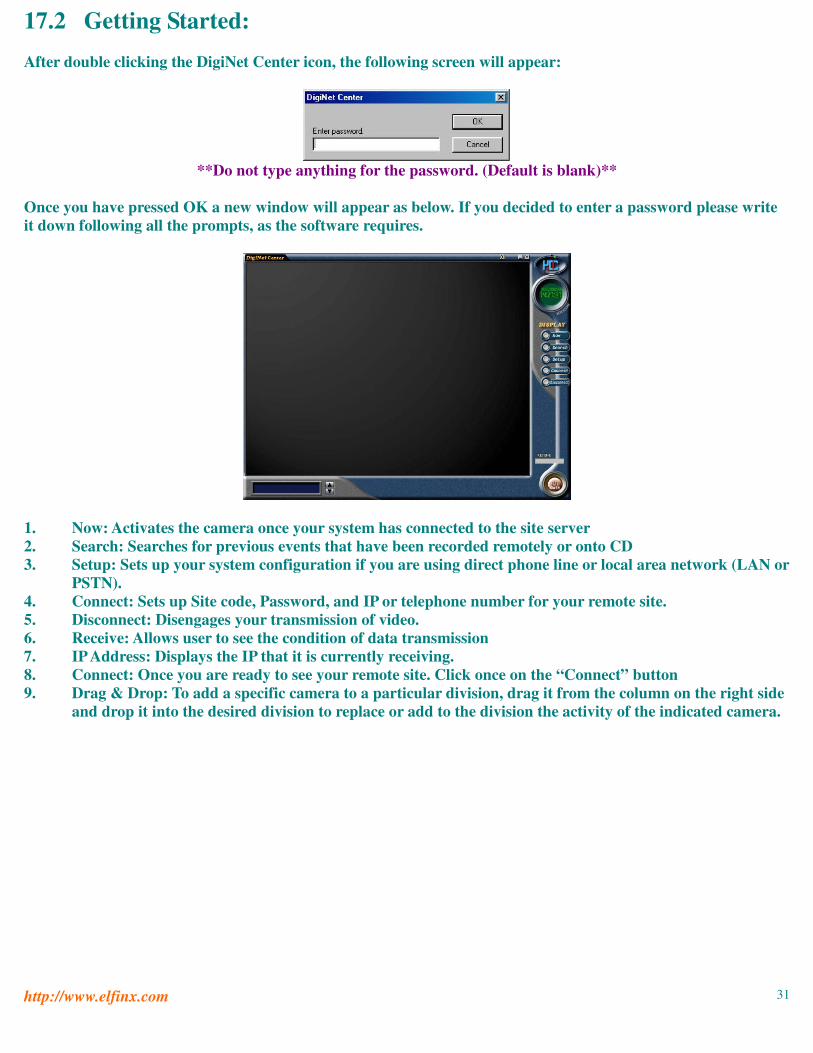
17.2 Getting Started: After double clicking the DigiNet Center icon, the following screen will appear:
**Do not type anything for the password. (Default is blank)**
Once you have pressed OK a new window will appear as below. If you decided to enter a password please write it down following all the prompts, as the software requires.
1. Now: Activates the camera once your system has connected to the site server 2. Search: Searches for previous events that have been recorded remotely or onto CD 3. Setup: Sets up your system configuration if you are using direct phone line or local area network (LAN or
PSTN). 4. Connect: Sets up Site code, Password, and IP or telephone number for your remote site. 5. Disconnect: Disengages your transmission of video. 6. Receive: Allows user to see the condition of data transmission 7. IP Address: Displays the IP that it is currently receiving. 8. Connect: Once you are ready to see your remote site. Click once on the “Connect” button 9. Drag & Drop: To add a specific camera to a particular division, drag it from the column on the right side
and drop it into the desired division to replace or add to the division the activity of the indicated camera.
http://www.elfinx.com 32
The following window will appear:
1.
2.
3.
4.
5.
Add: Selecting this option adds remote LAN locations to the remote site list. Edit: Selecting this option will edit the Remote Site, which is highlighted. Delete: Will delete the selected Remote Site. Connect: Will connect to the selected Remote Site. Cancel: Allows the user to cancel the connection.
To add a new Remote Site select the Add button. And the following window will appear:
1. 2. 3. 4. 5. 6. 7. 8. 9.
Site code: This can fit up to 7 characters. Note: This must match with your “Site code” on the site remote. *Click ‘Group Add’ button. Group: is the group to which user would like to place the connection under. Add Group: Enables the user to add a Group. Note: enter the name of the new Group and select OK to continue. Site name: Choose any name to describe the remote site Password: This can fit up to 5 characters. This password must match with your “Password” on the remote site. IP address: The user can enters the IP address in this area. (Does not work with a domain name) Cancel: Allows user to cancel the connection. Password: Enter the password required to connect to the remote location. Confirm: Enter the password again to confirm. Note: once the user clicks “connect”, the ‘Connecting SITE – LAN’ window will appear, showing the status of the connection.
http://www.elfinx.com 33
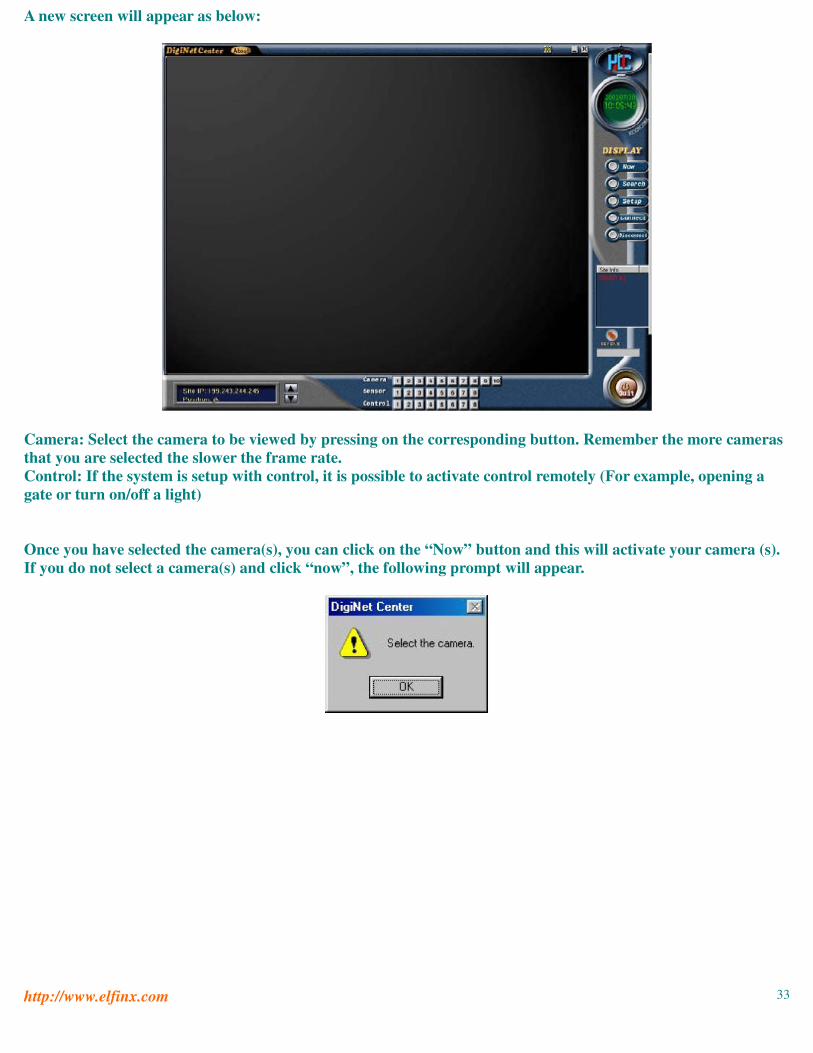
A new screen will appear as below:
Camera: Select the camera to be viewed by pressing on the corresponding button. Remember the more cameras that you are selected the slower the frame rate. Control: If the system is setup with control, it is possible to activate control remotely (For example, opening a gate or turn on/off a light) Once you have selected the camera(s), you can click on the “Now” button and this will activate your camera (s). If you do not select a camera(s) and click “now”, the following prompt will appear.
http://www.elfinx.com 34
17.4 Search Screen: There are two types of searches that can be initiated. One searches the information recorded on a CD. It is not required to be connected to the Internet or a phone line to perform this type of search. The second choice searches search remotely. If you are doing a CD or local search the following screen will appear:
Viewing locally searched video: Click on "Backup Data” and selected the appropriate CD drive. Information will appear regarding the Site Code List. Select the appropriate choice and press OK. If “Removal HDD Drive Data” is selected the same screen will appear, but video data will come from an internal or external hard drive. If “Site NowScreen” is selected, an option to view backed up data stored on the remote PC will become available. If “Site Search Data” is selected there is the option to search data that was backed up on the Remote PC. Once in the search page, select the time, date, and camera and select play. Viewing searched video remotely: Before you can view a camera remotely, turn off camera viewing by selecting “Stop”. The following window will appear:
Camera: First, you must select the camera that you want to view then select the month, date, hour, and minute.
After selecting, your camera(s), date, and time, you can play forward or reverse.
http://www.elfinx.com 35
Backup: You can save and print your picture onto a floppy disk or printer by clicking on this button. Bright/Zoom: Allows user to adjust their picture. This can be done only in stop mode. Display: Allows user to exit to the main screen. Skip: Skip frames Delay: Delays the frames 17.5 Setup Menu: About the DigiNet Center: This function allows users to find out about their system and setup their connection to view their camera remotely.
This window provides information on your current computer and the version of DigiNet Center that you are using.
http://www.elfinx.com 36
17.6 Setup Configuration: Watermark: This enables/disables the watermark (watermark: a function that allows users to see if the picture was tampered with or not). Received data save setup: This allows users to download video either in a search mode or display mode. It also stores the data on your internal hard drive.
Modem: This allows users to choose between regular phone line or LAN/High speed Internet boardband connection.
http://www.elfinx.com 37
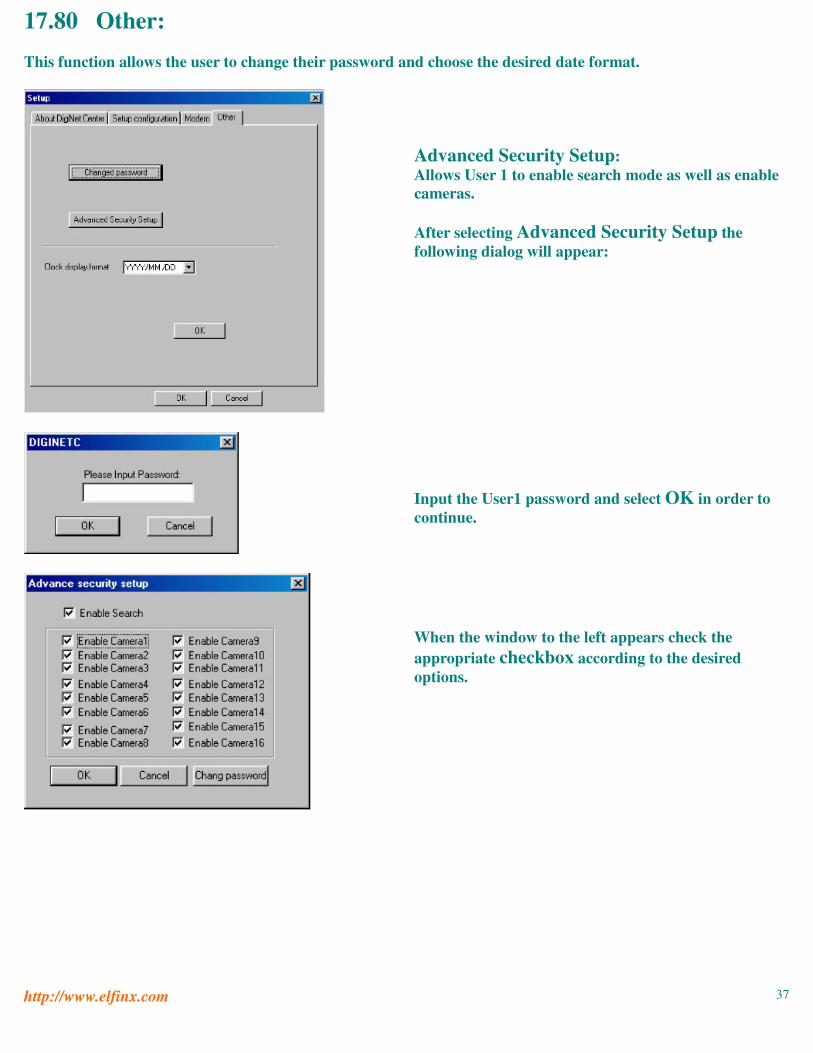
17.80 Other: This function allows the user to change their password and choose the desired date format.
Advanced Security Setup: Allows User 1 to enable search mode as well as enable cameras. After selecting Advanced Security Setup the following dialog will appear:
Input the User1 password and select OK in order to continue.
When the window to the left appears check the appropriate checkbox according to the desired options.
http://www.elfinx.com 38
17.0 DigiNet Web Security Software Before this option is available you must first call us and setup access to your system through Internet Explorer (Must be Internet Explorer 4.00 or higher). 1. Input the address into the address bar. 2. When prompted, click Yes to allow Kodicom Inc to install software on your PC
3.
When prompted with the window pictured to the left, Enter the Password.
4.
A new Internet Explorer window should popup like the one to the left
A) Camera 1 - 4: 4 Divisions are showing cameras 1 through 4. B) Camera 5 - 8: 4 Divisions are showing cameras 5 through 8. C) Camera 9 - 12: 4 Divisions are showing cameras 9 through 12. D) Camera 13 - 16: 4 Divisions are showing cameras 13 through 16. E) 9 Cameras: Shows up to 9 camera divisions. F) 6 Cameras: Shows up to 16 camera divisions. G) About Dialog: Displays copyright information about DigiNet Web Security
http://www.elfinx.com 39
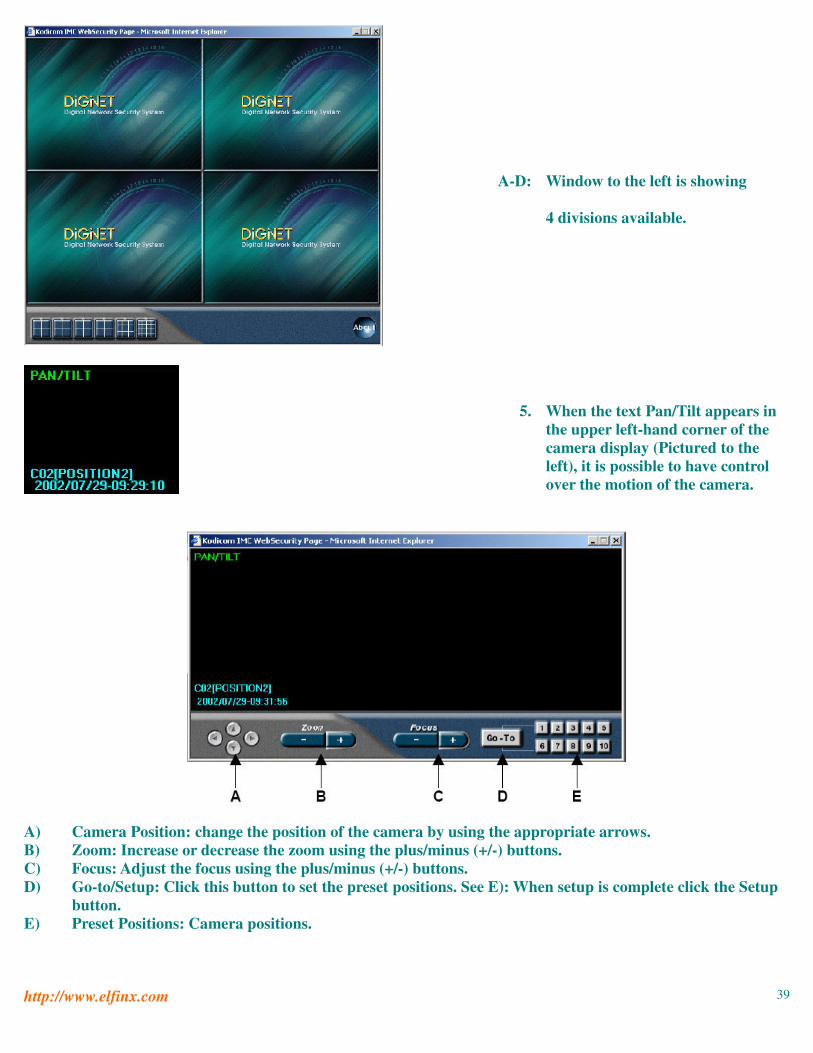
A-D:
Window to the left is showing 4 divisions available.
5.
When the text Pan/Tilt appears in the upper left-hand corner of the camera display (Pictured to the left), it is possible to have control over the motion of the camera.
A) Camera Position: change the position of the camera by using the appropriate arrows. B) Zoom: Increase or decrease the zoom using the plus/minus (+/-) buttons. C) Focus: Adjust the focus using the plus/minus (+/-) buttons. D) Go-to/Setup: Click this button to set the preset positions. See E): When setup is complete click the Setup
button. E) Preset Positions: Camera positions.
http://www.elfinx.com 40
Appendix I: Formatting a CD with DirectCD 3.03
1.
After selecting Format (CDR/CDRW) the dialog to the left will appear. Select Next to continue.
2.
3.
Select the drive letter corresponding with the correct CD Writer. Select Next to continue
4.
5.
Enter the desired name of the backup CD Select Finish to begin formatting the CD.