SUPER HIGH RESOLUTION WDR CAMERA DigiSpider Super High Resolution WDR Camera USER’S MANUAL Please, read this instruction manual carefully before connecting or operating this product. Keep it for future use
Transcript
SUPER HIGH RESOLUTION WDR CAMERA
DigiSpiderSuper High Resolution WDR Camera
USER’S MANUAL
Please, read this instruction manual carefully before connecting or operatingthis product. Keep it for future use
SUPER HIGH RESOLUTION WDR CAMERA
Table Contents
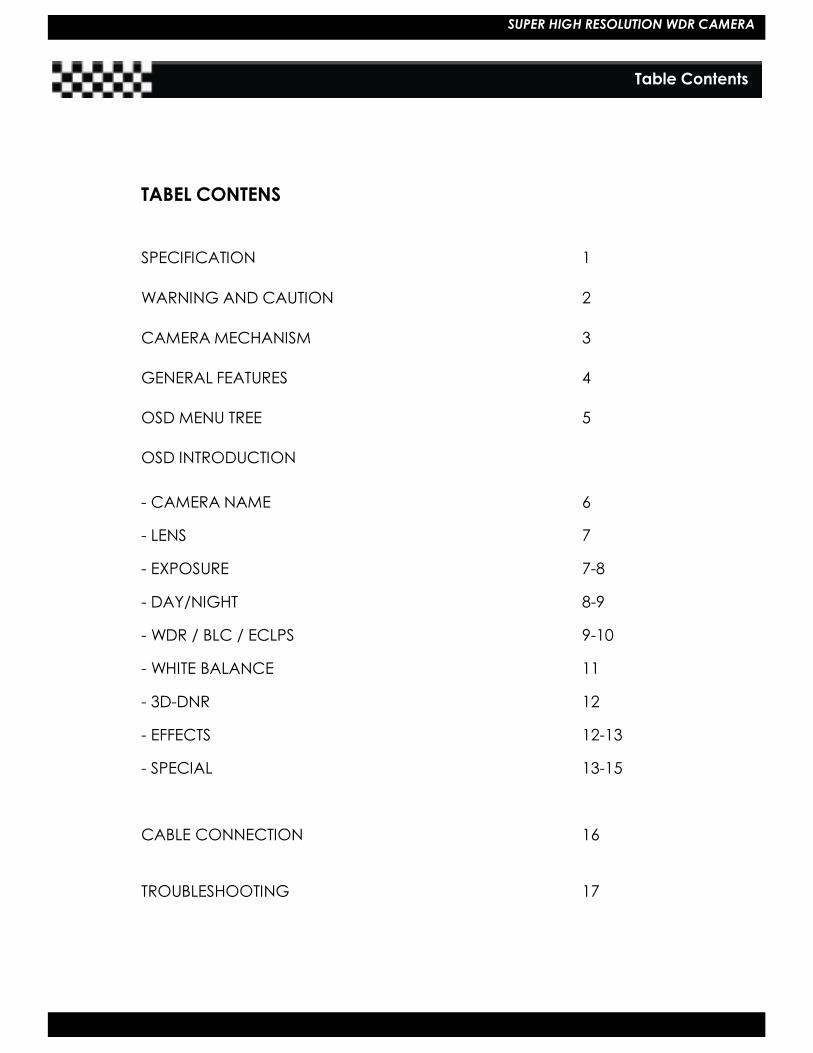
TABEL CONTENS
SPECIFICATION 1
WARNING AND CAUTION 2
CAMERA MECHANISM 3
GENERAL FEATURES 4
OSD MENU TREE 5
OSD INTRODUCTION
- CAMERA NAME 6
- LENS 7
- EXPOSURE 7-8
- DAY/NIGHT 8-9
- WDR / BLC / ECLPS 9-10
- WHITE BALANCE 11
- 3D-DNR 12
- EFFECTS 12-13
- SPECIAL 13-15
CABLE CONNECTION 16
TROUBLESHOOTING 17
SUPER HIGH RESOLUTION WDR CAMERA
1
Total NTSC : 811(H)
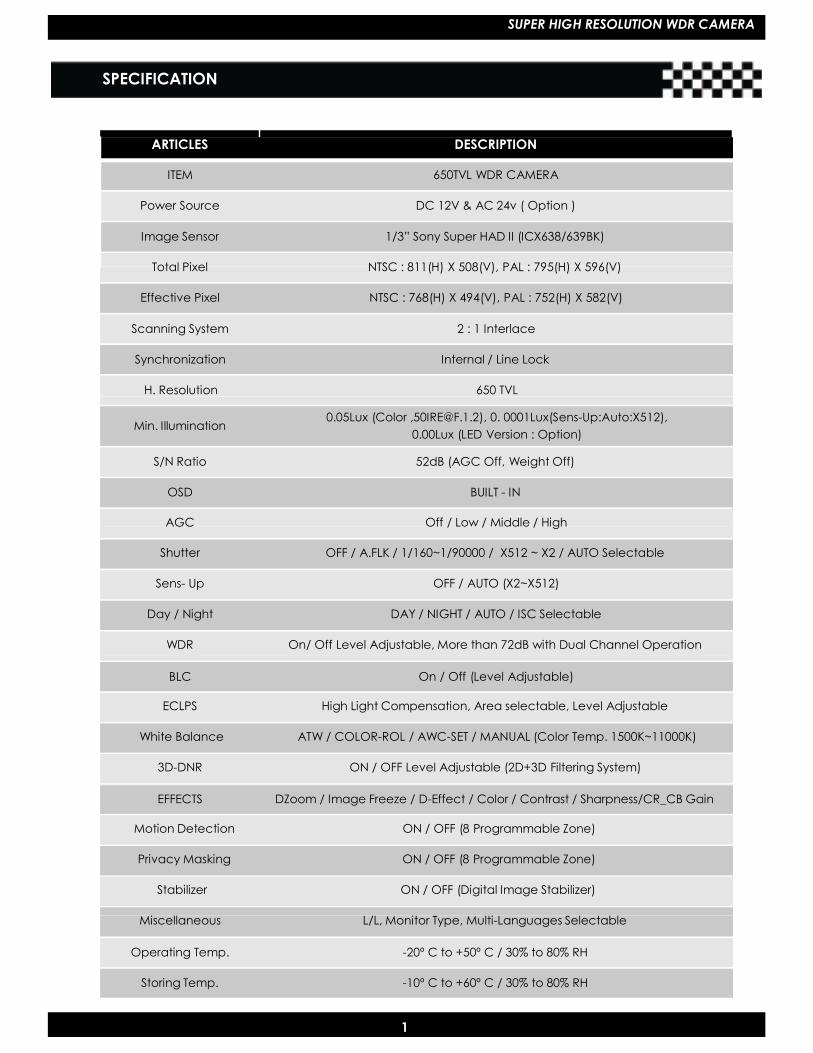
SPECIFICATION
ARTICLES DESCRIPTION
ITEM 650TVL WDR CAMERA
Power Source DC 12V & AC 24v ( Option )
Image Sensor 1/3” Sony Super HAD II (ICX638/639BK)
Total Pixel NTSC : 811(H) X 508(V), PAL : 795(H) X 596(V)
Effective Pixel NTSC : 768(H) X 494(V), PAL : 752(H) X 582(V)
Scanning System 2 : 1 Interlace
Synchronization Internal / Line Lock
H. Resolution 650 TVL
Min. Illumination0.05Lux (Color ,[email protected]), 0. 0001Lux(Sens-Up:Auto:X512),
0.00Lux (LED Version : Option)
S/N Ratio 52dB (AGC Off, Weight Off)
OSD BUILT - IN
AGC Off / Low / Middle / High
Shutter OFF / A.FLK / 1/160~1/90000 / X512 ~ X2 / AUTO Selectable
Sens- Up OFF / AUTO (X2~X512)
Day / Night DAY / NIGHT / AUTO / ISC Selectable
WDR On/ Off Level Adjustable, More than 72dB with Dual Channel Operation
BLC On / Off (Level Adjustable)
ECLPS High Light Compensation, Area selectable, Level Adjustable
*CAUTION : To reduce the risk of Electric Shock, do notremove cover (or Back). No user serviceableparts inside refer servicing to qualified servicepersonnel.
* The lighting flash with an arrowhead symbol in an equilateral triangle,is intended to alert the user to the presence of un-insulated “ DangerousVoltage within the product s enclosure that may be of sufficientmagnitude to constitute a risk of electric shock to persons.
* The exclamation point within an equilateral triangle is intended to alert theuser to the presence of important operating and maintenance (serving)instructions in the literature accompanying the appliance.
* INFORMATION - This equipment has been tested and found to company withlimits for a class a digital device Pursuant to part 15 of the FCC rules.These limits are designed to provide reasonable protectionagainst harmful interference When the equipments operated ina commercial environment. This equipment generates, uses, and canradiate radio frequency energy and if not installed and usedin accordance with the instruction manual, may Cause Harmfulinterference to radio communications. Operation of this equipment ina residential area is likely to cause harmful interference in which casethe user will be required to correct the interference at his own Expense..
* WARNING – Change or modification not expressly approved by the manufacturercould void the user’s authority to operate the equipment
* Caution - To prevent electric shock and risk of fire hazards.Do not use Power Sources other than that specified.Do not expose this appliance to rain or moisture.
This installation should be made by a qualified service person and should confirm to all local codes.
SUPER HIGH RESOLUTION WDR CAMERA
Camera Mechanism
Pls, check which type of OSD Control your camera has. The followings are different types ofOSD Control Board.
A. BULLET TYPE- Open the bottom cap to access OSD
A : Video Test Connector
A C B : Joystick OSD S/W- Press Joystick to enter OSD.
B C: IR LED Level S/W (Only IR LED version)- Adjust IR LED volume
Type A
B. DOME TYPE
A B
Type B A : Video Test Connector
B : Joystick OSD S/W- Press Joystick to enter OSD.
B
Type C
C. BOX TYPE
* JOYSTICK OSD S/W(SET BUTTON)
* POWER IN PORT
* VIDEO OUT PORT
* POWER LED
3
SUPER HIGH RESOLUTION WDR CAMERA
General Features
Super High Resolution
- Sony Super HAD II 410,000K pixelCCD enable camera withthe innovated DSP chip to achieveclear picture quality with a horizontalresolution 650TVL for color
Outstanding Sensitivity
- With highly sensitive Sony CCD andDigital signal processing technology,It can clearly distinguish the outline andcolor of a subject in an extremely lowluminance environment.
- 0.05 Lux (Color)- 0.0001 Lux (Sens-Up Mode)- 0.00Lux (IR LED On)
Mechanical True Day & Night (Option)
- The Camera identifies whether it isday or night and automaticallyswitches to the appropriate mode,depending on its environment.By day, the camera switches to colormode in order to maintain optimalcolor. At night, it switches to B/Wmodes so as to obtain better picturedefinition by removing IR cut filtermechanically.
Stabilizer (Digital Image Stablizer)
- The DIS function compensates for anycamera movement to produce morestable pictures.
3D Digital Noise Reduction (3D-DNR)
- The high performance DSP chipdramatically reduces the gainnoise in digital image processing byusing 2D+3D noise filter, producingclear sharp images in low lightcondition.
On Screen Display (OSD)
- The camera support built – in OSD
WDR (Super Dynamic Range)
- Automatically increase darkphotoelectric signal while retaining brightsignals; dark spots in images becomemore visible for accurate monitoringwith Dual Channel Operation .
ECIPS (High Light Conpensation)
- Automatically mask strong light fromthe designated areas and make otherareas visible.
ISC (Intelligent IR Saturation Control)
- Automatically control IR Saturation ofthe object closing to the camera.
Motion Detection
- The camera can detect motion andgenerates signal without any additionalexternal sensor, which enable to monitoractivity more efficiently by connecting toan alarm device. 8 programmable zonescan be activated.
Privacy Masking
- The camera can mask 8 areas whichcan be programmable to protectprivacy.
Digital Zoom
- The camera can enlarge the picturewith Digital Zoom function in the menu.This will be helpful to cover the limitationof the focal length of the equipped lens.
Miscellaneous Function
- SYNC(INT/LL), Sens-Up, Freeze, Flip(H/V-REV), Sharpness, etc. are provided.
4
SUPER HIGH RESOLUTION WDR CAMERA
WHITE BAL
EFFECTS
O O C S
OSD Menu Tree
MAIN MENU
CAM NAME ON OFF
LENS DC IRIS MANUAL
EXPOSURE AGC SHUTTER SENS-UP INITIAL SET PREVIOUS
DAY / NIGHT DAY NIGHT AUTO ISC
WDR / BLC / ECLPS WDR BLC ECLPS
WHITE BAL ATW COLOR-ROLL AWC-SET MANUAL
3D-DNR ON OFF
EFFECTS DZOOM IMAGE FREEZE D-EFFECT COLOR
CONTRAST SHARPNESS CR_GAIN CB_GAIN
INITIAL SET PREVIOUS
SPECIAL MOTION DET. PRIVACY LANGUAGE STABILIZER
L/L SYNC MONITOR TYPE FACTORY RESET COMM SET
PREVIOUS
EXIT
5
SUPER HIGH RESOLUTION WDR CAMERA
6
di ti
t th M
OSD Instruction
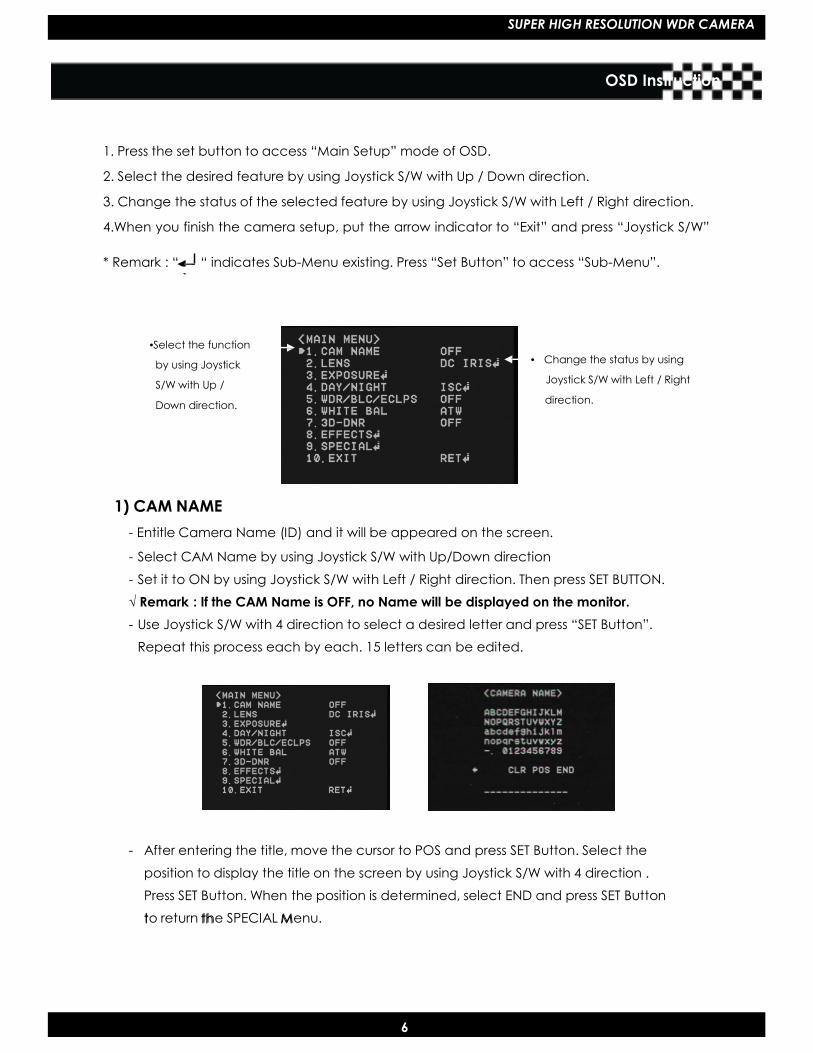
1. Press the set button to access “Main Setup” mode of OSD.
2. Select the desired feature by using Joystick S/W with Up / Down direction.
3. Change the status of the selected feature by using Joystick S/W with Left / Right direction.
4.When you finish the camera setup, put the arrow indicator to “Exit” and press “Joystick S/W”
1) CAM NAME- Entitle Camera Name (ID) and it will be appeared on the screen.
- Select CAM Name by using Joystick S/W with Up/Down direction
- Set it to ON by using Joystick S/W with Left / Right direction. Then press SET BUTTON.√ Remark : If the CAM Name is OFF, no Name will be displayed on the monitor.- Use Joystick S/W with 4 direction to select a desired letter and press “SET Button”.
Repeat this process each by each. 15 letters can be edited.
- After entering the title, move the cursor to POS and press SET Button. Select the
position to display the title on the screen by using Joystick S/W with 4 direction .Press SET Button. When the position is determined, select END and press SET Buttonto return the SPECIAL Menu.
SUPER HIGH RESOLUTION WDR CAMERA
7
OSD Instruction
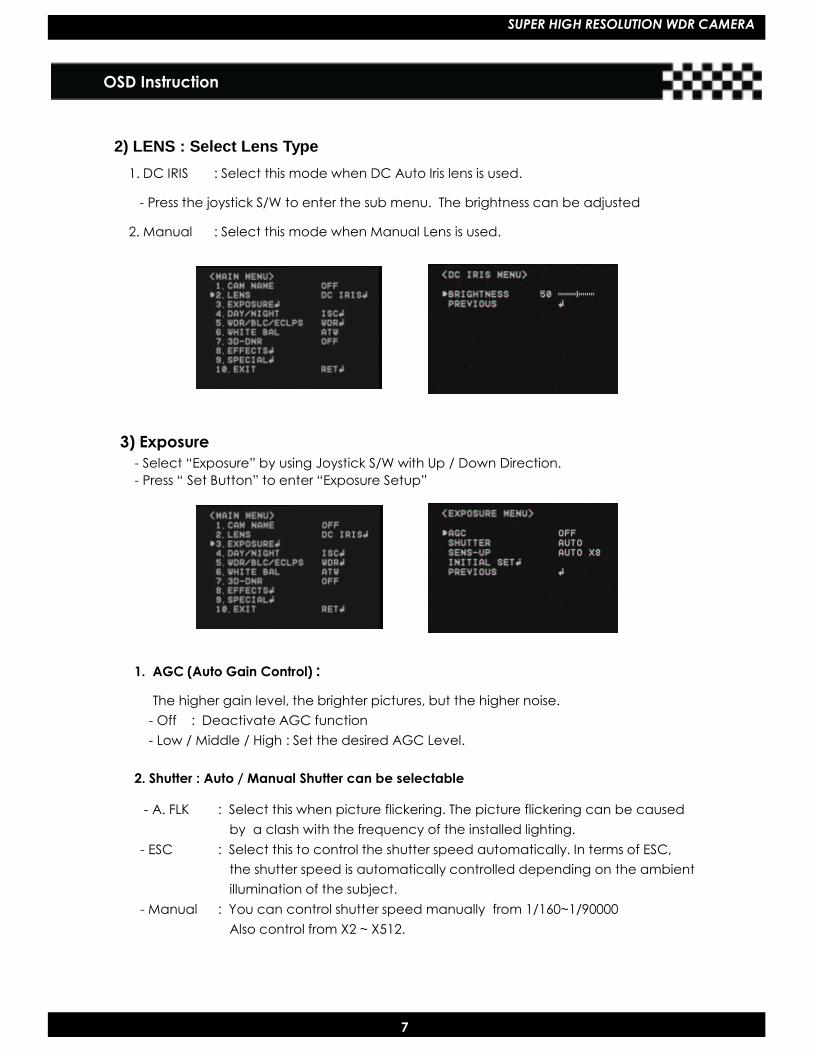
2) LENS : Select Lens Type1. DC IRIS : Select this mode when DC Auto Iris lens is used.
- Press the joystick S/W to enter the sub menu. The brightness can be adjusted
2. Manual : Select this mode when Manual Lens is used.
3) Exposure- Select “Exposure” by using Joystick S/W with Up / Down Direction.- Press “ Set Button” to enter “Exposure Setup”
1. AGC (Auto Gain Control) :
The higher gain level, the brighter pictures, but the higher noise.- Off : Deactivate AGC function- Low / Middle / High : Set the desired AGC Level.
2. Shutter : Auto / Manual Shutter can be selectable
- A. FLK : Select this when picture flickering. The picture flickering can be causedby a clash with the frequency of the installed lighting.
- ESC : Select this to control the shutter speed automatically. In terms of ESC,the shutter speed is automatically controlled depending on the ambientillumination of the subject.
- Manual : You can control shutter speed manually from 1/160~1/90000Also control from X2 ~ X512.
SUPER HIGH RESOLUTION WDR CAMERA
8
OSD Instruction
3) Exposure
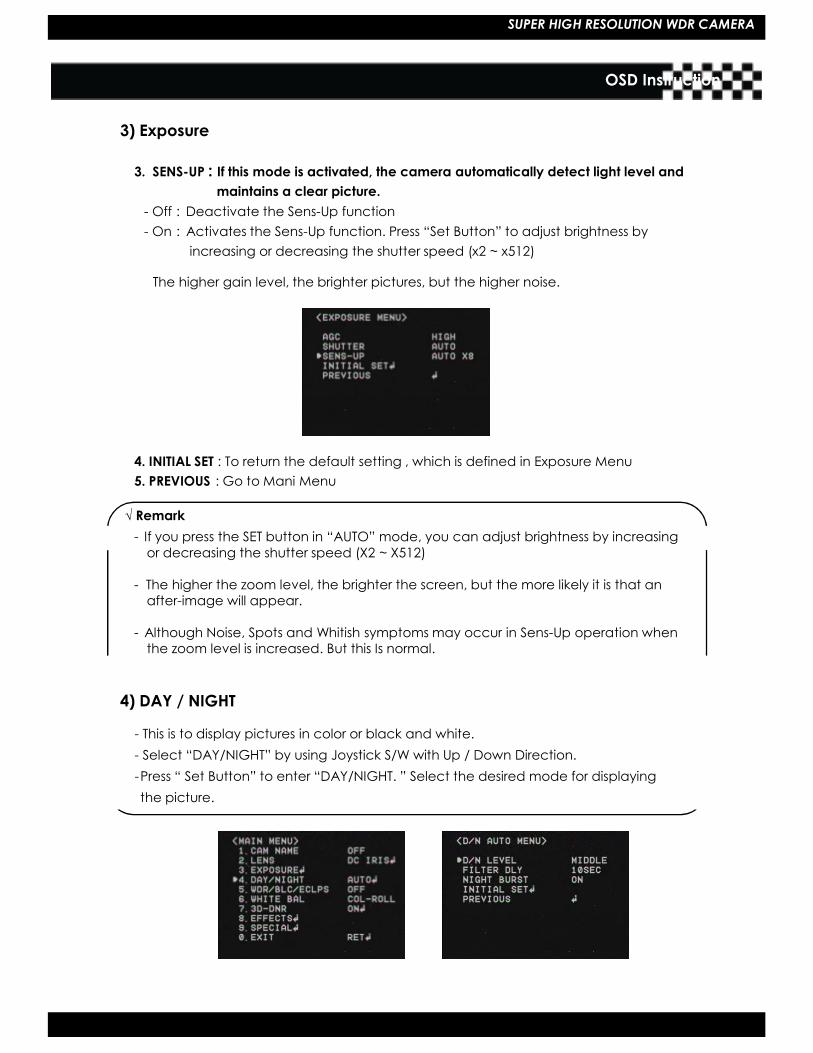
3. SENS-UP : If this mode is activated, the camera automatically detect light level andmaintains a clear picture.
- Off : Deactivate the Sens-Up function- On : Activates the Sens-Up function. Press “Set Button” to adjust brightness by
increasing or decreasing the shutter speed (x2 ~ x512)
The higher gain level, the brighter pictures, but the higher noise.
4. INITIAL SET : To return the default setting , which is defined in Exposure Menu5. PREVIOUS : Go to Mani Menu
√ Remark- If you press the SET button in “AUTO” mode, you can adjust brightness by increasing
or decreasing the shutter speed (X2 ~ X512)
- The higher the zoom level, the brighter the screen, but the more likely it is that anafter-image will appear.
- Although Noise, Spots and Whitish symptoms may occur in Sens-Up operation whenthe zoom level is increased. But this Is normal.
4) DAY / NIGHT
- This is to display pictures in color or black and white.- Select “DAY/NIGHT” by using Joystick S/W with Up / Down Direction.-Press “ Set Button” to enter “DAY/NIGHT. ” Select the desired mode for displayingthe picture.
SUPER HIGH RESOLUTION WDR CAMERA
9
b i ht t ll f ith t t
OSD Instruction
4) DAY / NIGHT
- Color : The picture is always displayed in color.- B/W : The picture is always displayed in Black and White. You can turn on or off
the burst signal on B/W mode.- Auto : The mode is switched to Color in a normal environment, but switched to
B/W mode when ambient illumination is low. To set up the switching time orspeed for Auto mode, press “Set Button”. You can turn on or off the burstsignal on B/W mode. Filter Delay is to dwelling time to convert Color to B/W
- ISC : Intelligent IR Saturation Control (IR LEDs Version Only)
Activate ISC On mode to achieve a clear picture by reducing IR Saturation.
√ Remark : Day / Night will not be activated when AGC in the EXPOSURE menu is OFF.
5) WDR / BLC / ECLPS
1. WDR (Wide Dynamic Range)WDR illuminates darker areas of an image while retaining the same light level forbrighter areas to even out the overall brightness of images with high contrast betweenbright and dark areas.
- Low / Middle / High : Select your desired mode
WDR ON WDR OFF
SUPER HIGH RESOLUTION WDR CAMERA
10
Low Middle High Select desired
Gain : / Select desired
OSD Instruction
5) WDR / BLC / ECLPS
2. BLC (Back Light Compensation)
- It delivers a distinctive subject and background at the same time, even whenthe subject is in backlight, unlike conventional cameras, by adopting a proprietaryDSP chip.
- Low / Middle / High : Select your desired mode
BLC ON BLC OFF
3. ECLPS (ECLIPSE : High Light compensation) :If the scene contains extremely bright light areas such as ; from car headlight, the lightcan mask out much of the on-screen detail. Press “Joystick S/W” in ECLPS mode toenter the sub menu.
ECLPS Masking Area
ECLPS ON ECLPS OFF
- AREA SETTING : Select the desired area where you want to activate this feature
- ALL AREA SET : Enable to set all areas as ON or OFF .
- MASK COLOR/TONE :
Change the color / brightness of the masking area. (Black,, Grey, Dark Grey)
- ECLPS Level : Adjust the level of Eclipse.
- Gain Control : On / Off. Select the desired mode.
* Remark : When Gain Control is “ON”, Eclipse function will be only activated in
low light condition.
- PREVIOUS : Go back to Main Menu.
SUPER HIGH RESOLUTION WDR CAMERA
11
ill i ti d ti ll Whit ti
OSD Instruction
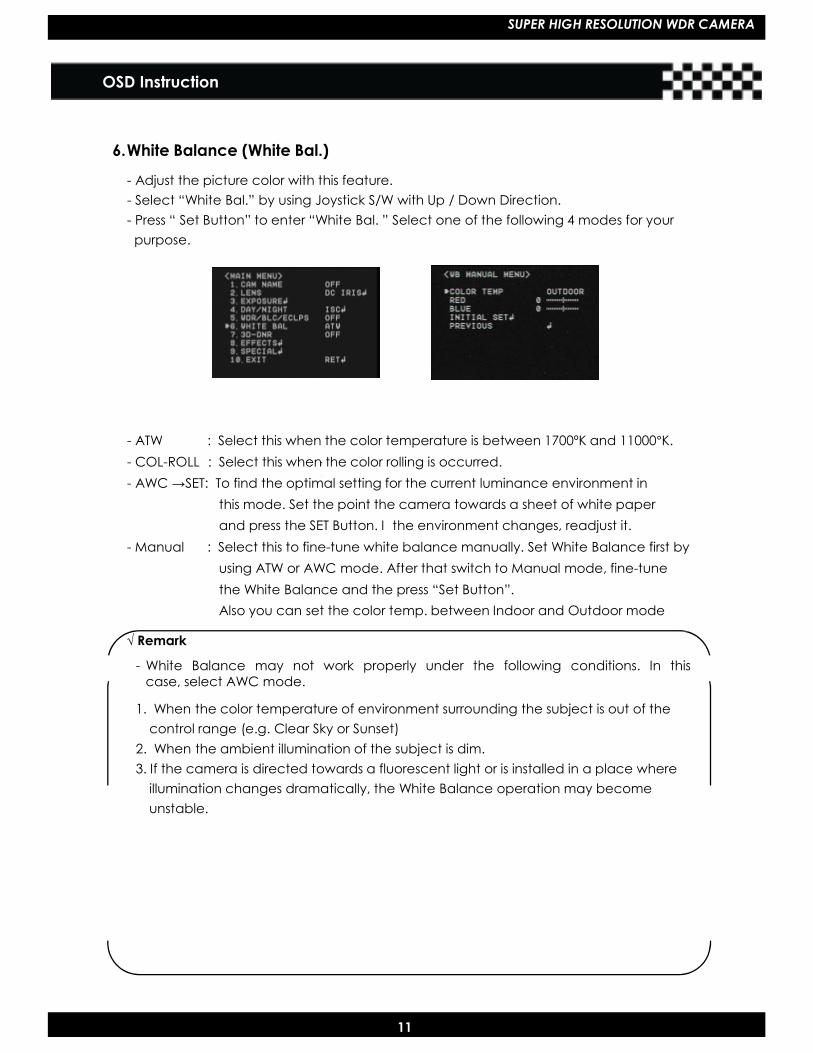
6.White Balance (White Bal.)
- Adjust the picture color with this feature.- Select “White Bal.” by using Joystick S/W with Up / Down Direction.- Press “ Set Button” to enter “White Bal. ” Select one of the following 4 modes for yourpurpose.
- ATW : Select this when the color temperature is between 1700ºK and 11000°K.- COL-ROLL : Select this when the color rolling is occurred.- AWC →SET: To find the optimal setting for the current luminance environment in
this mode. Set the point the camera towards a sheet of white paperand press the SET Button. I the environment changes, readjust it.
- Manual : Select this to fine-tune white balance manually. Set White Balance first byusing ATW or AWC mode. After that switch to Manual mode, fine-tunethe White Balance and the press “Set Button”.Also you can set the color temp. between Indoor and Outdoor mode
√ Remark
- White Balance may not work properly under the following conditions. In thiscase, select AWC mode.
1. When the color temperature of environment surrounding the subject is out of thecontrol range (e.g. Clear Sky or Sunset)
2. When the ambient illumination of the subject is dim.3. If the camera is directed towards a fluorescent light or is installed in a place where
illumination changes dramatically, the White Balance operation may becomeunstable.
SUPER HIGH RESOLUTION WDR CAMERA
12
OSD Instruction
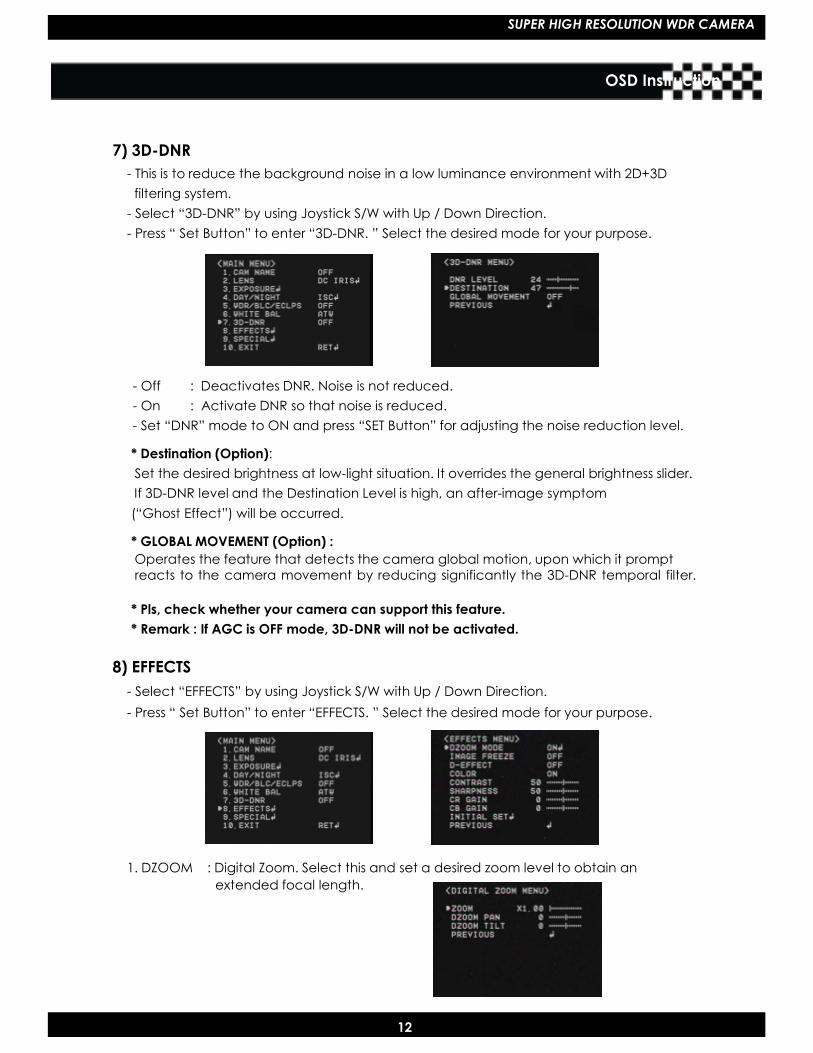
7) 3D-DNR- This is to reduce the background noise in a low luminance environment with 2D+3Dfiltering system.
- Select “3D-DNR” by using Joystick S/W with Up / Down Direction.- Press “ Set Button” to enter “3D-DNR. ” Select the desired mode for your purpose.
- Off : Deactivates DNR. Noise is not reduced.- On : Activate DNR so that noise is reduced.- Set “DNR” mode to ON and press “SET Button” for adjusting the noise reduction level.
* Destination (Option):Set the desired brightness at low-light situation. It overrides the general brightness slider.If 3D-DNR level and the Destination Level is high, an after-image symptom(“Ghost Effect”) will be occurred.
* GLOBAL MOVEMENT (Option) :Operates the feature that detects the camera global motion, upon which it promptreacts to the camera movement by reducing significantly the 3D-DNR temporal filter.
* Pls, check whether your camera can support this feature.* Remark : If AGC is OFF mode, 3D-DNR will not be activated.
8) EFFECTS- Select “EFFECTS” by using Joystick S/W with Up / Down Direction.- Press “ Set Button” to enter “EFFECTS. ” Select the desired mode for your purpose.
1. DZOOM : Digital Zoom. Select this and set a desired zoom level to obtain anextended focal length.
SUPER HIGH RESOLUTION WDR CAMERA
13
Move : the of / Axis MD
OSD Instruction
8) EFFECTS2. Image Freeze : To hold the image to analyze precisely.3. D-Effect : Change the video direction. Vertical Flip, Mirror, Rotate are supported.4. Color : Set the video mode color or B/W.5. Contrast : Adjust Contrast Level that you desired.6. Sharpness : Adjust Sharpness Level. Increasing this value, the picture outline becomes
stronger and clear.7. CR Gain : Adjust “Red Color Portion” in the video8. CB Gain : Adjust “Blue Color Portion” in the Video9. Initial Set : To return the default setting , which is defined in “EFFECT” Menu10. Previous : Go back to “Main Menu”.
√ Remark :The picture may be distorted or noise may appear if SHARPNESS level is increased too high.If the V-FLIP or MIRROR mode is enabled, the text on the screen does not flip.
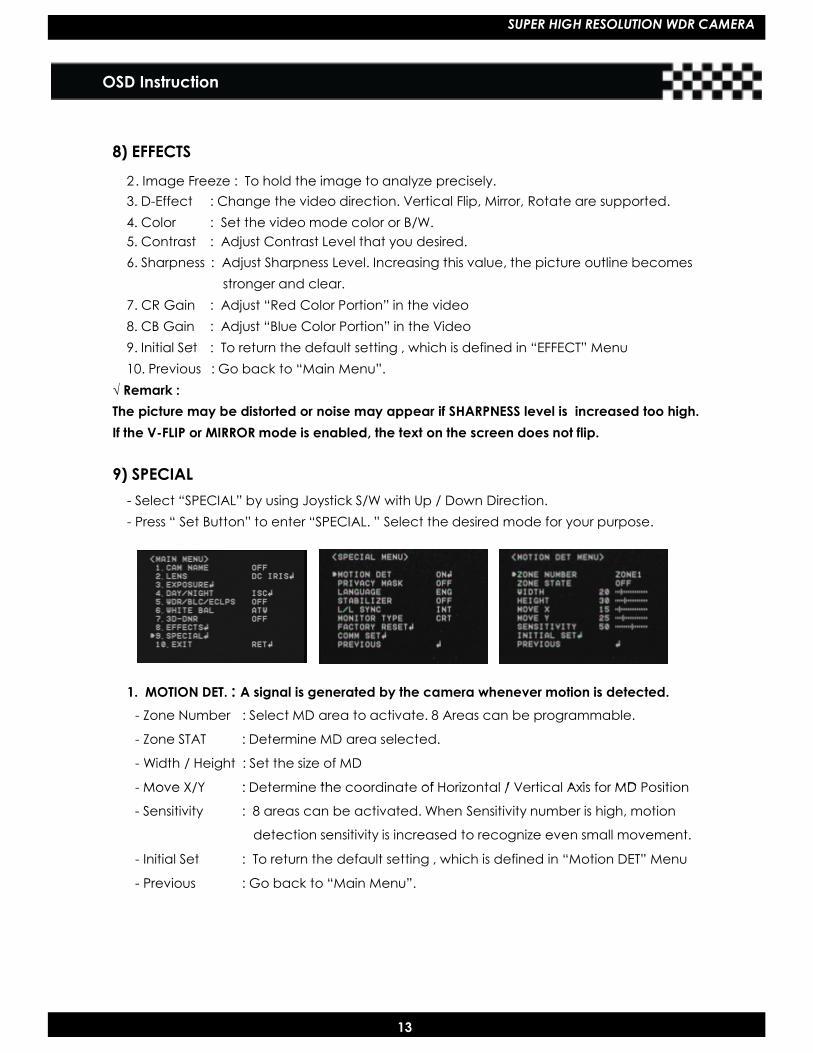
9) SPECIAL- Select “SPECIAL” by using Joystick S/W with Up / Down Direction.- Press “ Set Button” to enter “SPECIAL. ” Select the desired mode for your purpose.
1. MOTION DET. : A signal is generated by the camera whenever motion is detected.- Zone Number : Select MD area to activate. 8 Areas can be programmable.
- Zone STAT : Determine MD area selected.
- Width / Height : Set the size of MD
- Move X/Y : Determine the coordinate of Horizontal / Vertical Axis for MD Position
- Sensitivity : 8 areas can be activated. When Sensitivity number is high, motion
detection sensitivity is increased to recognize even small movement.
- Initial Set : To return the default setting , which is defined in “Motion DET” Menu
- Previous : Go back to “Main Menu”.
SUPER HIGH RESOLUTION WDR CAMERA
14
L/L Power type Lock
OSD Instruction
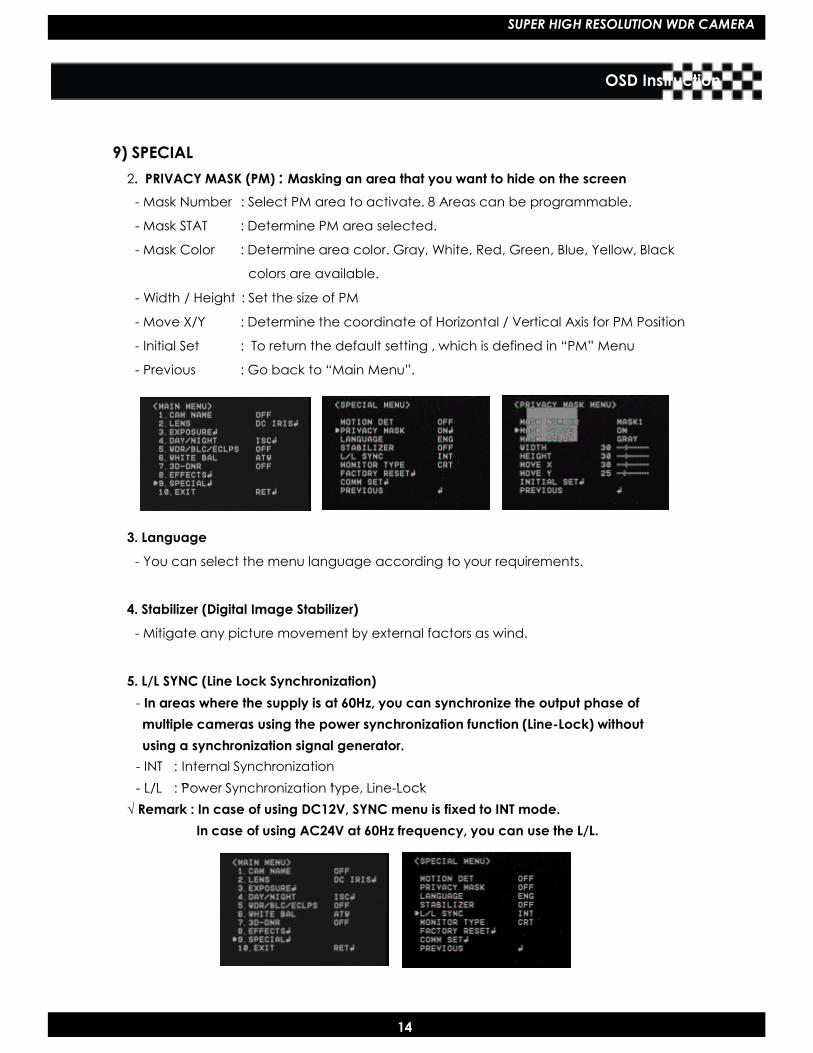
9) SPECIAL2. PRIVACY MASK (PM) : Masking an area that you want to hide on the screen
- Mask Number : Select PM area to activate. 8 Areas can be programmable.
- Mask STAT : Determine PM area selected.
- Mask Color : Determine area color. Gray, White, Red, Green, Blue, Yellow, Black
colors are available.
- Width / Height : Set the size of PM
- Move X/Y : Determine the coordinate of Horizontal / Vertical Axis for PM Position
- Initial Set : To return the default setting , which is defined in “PM” Menu
- Previous : Go back to “Main Menu”.
3. Language
- You can select the menu language according to your requirements.
4. Stabilizer (Digital Image Stabilizer)
- Mitigate any picture movement by external factors as wind.
5. L/L SYNC (Line Lock Synchronization)- In areas where the supply is at 60Hz, you can synchronize the output phase ofmultiple cameras using the power synchronization function (Line-Lock) withoutusing a synchronization signal generator.
- INT : Internal Synchronization- L/L : Power Synchronization type, Line-Lock
√ Remark : In case of using DC12V, SYNC menu is fixed to INT mode.In case of using AC24V at 60Hz frequency, you can use the L/L.
SUPER HIGH RESOLUTION WDR CAMERA
15
OSD Instruction
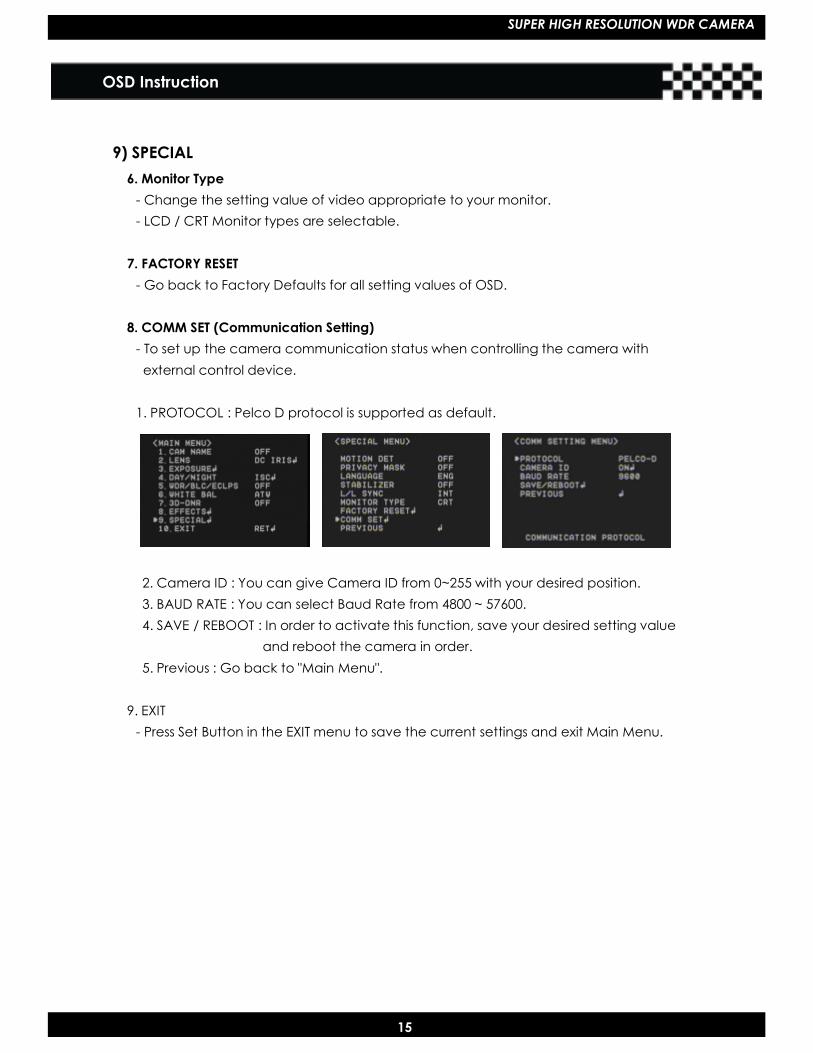
9) SPECIAL6. Monitor Type
- Change the setting value of video appropriate to your monitor.- LCD / CRT Monitor types are selectable.
7. FACTORY RESET- Go back to Factory Defaults for all setting values of OSD.
8. COMM SET (Communication Setting)- To set up the camera communication status when controlling the camera withexternal control device.
1. PROTOCOL : Pelco D protocol is supported as default.
2. Camera ID : You can give Camera ID from 0~255 with your desired position.3. BAUD RATE : You can select Baud Rate from 4800 ~ 57600.4. SAVE / REBOOT : In order to activate this function, save your desired setting value
and reboot the camera in order.5. Previous : Go back to "Main Menu".
9. EXIT- Press Set Button in the EXIT menu to save the current settings and exit Main Menu.
SUPER HIGH RESOLUTION WDR CAMERA
Cable Connection
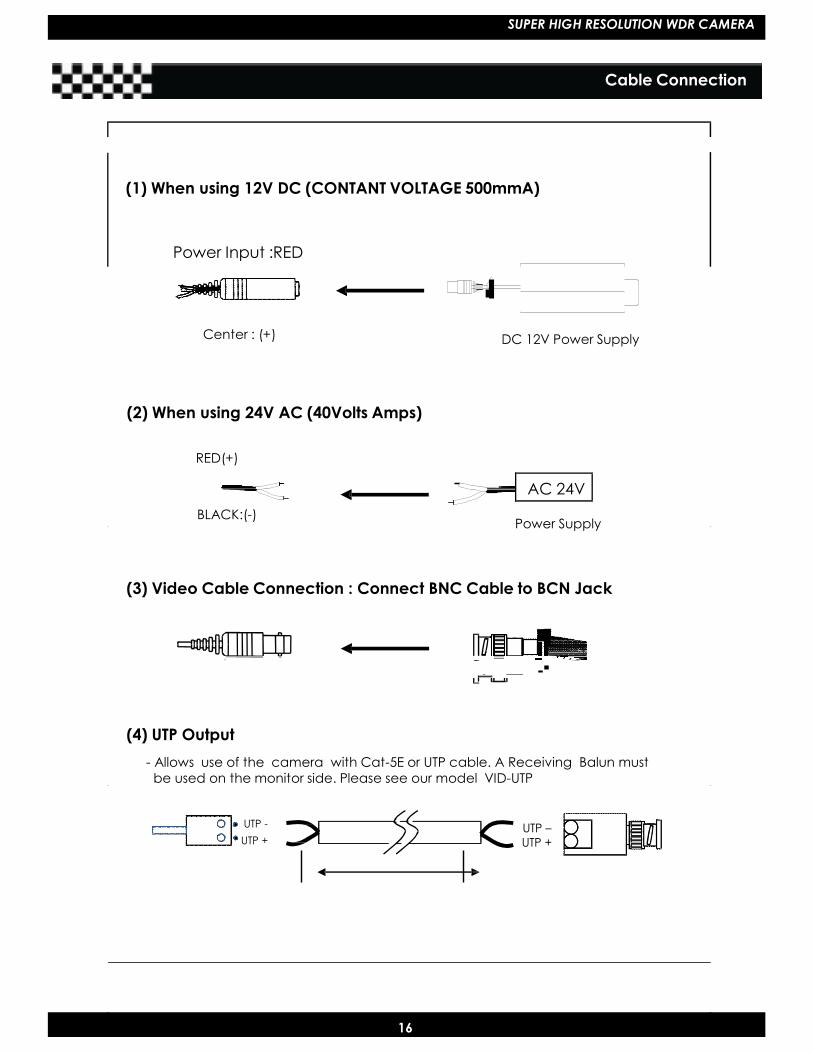
(1) When using 12V DC (CONTANT VOLTAGE 500mmA)
Power Input :RED
Center : (+) DC 12V Power Supply
(2) When using 24V AC (40Volts Amps)
RED(+)
BLACK:(-)
AC 24V
Power Supply
(3) Video Cable Connection : Connect BNC Cable to BCN Jack
(4) UTP Output- Allows use of the camera with Cat-5E or UTP cable. A Receiving Balun mustbe used on the monitor side. Please see our model VID-UTP
UTP -UTP +
UTP –UTP +
16
SUPER HIGH RESOLUTION WDR CAMERA
SENS function does
Troubleshooting
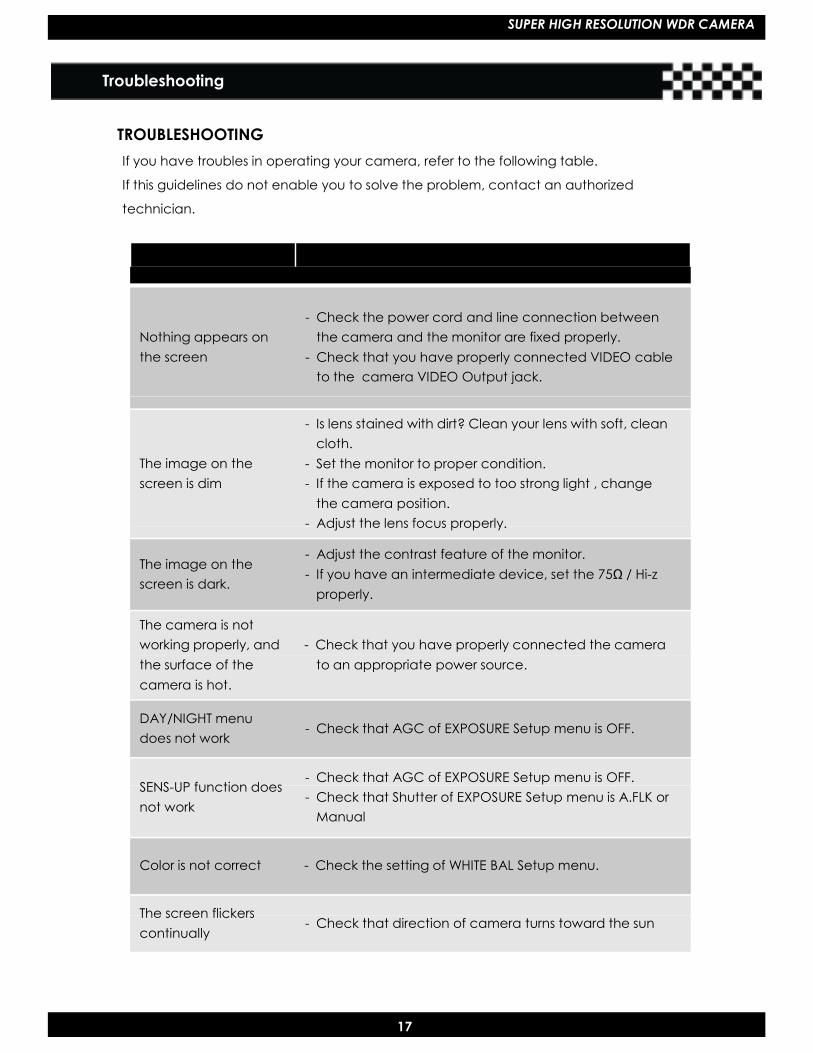
TROUBLESHOOTINGIf you have troubles in operating your camera, refer to the following table.
If this guidelines do not enable you to solve the problem, contact an authorized
technician.
Nothing appears onthe screen
- Check the power cord and line connection betweenthe camera and the monitor are fixed properly.
- Check that you have properly connected VIDEO cableto the camera VIDEO Output jack.
The image on thescreen is dim
- Is lens stained with dirt? Clean your lens with soft, cleancloth.
- Set the monitor to proper condition.- If the camera is exposed to too strong light , change
the camera position.- Adjust the lens focus properly.
The image on thescreen is dark.
- Adjust the contrast feature of the monitor.- If you have an intermediate device, set the 75Ω / Hi-z
properly.
The camera is notworking properly, and - Check that you have properly connected the camerathe surface of thecamera is hot.
to an appropriate power source.
DAY/NIGHT menudoes not work
SENS-UP function doesnot work
- Check that AGC of EXPOSURE Setup menu is OFF.
- Check that AGC of EXPOSURE Setup menu is OFF.- Check that Shutter of EXPOSURE Setup menu is A.FLK or
Manual
Color is not correct - Check the setting of WHITE BAL Setup menu.
The screen flickerscontinually
- Check that direction of camera turns toward the sun