93
Digital Band Processor 7+4 1

Digital Band Processor 7+4
1

Important Warning :
- Never open the equipment unless authorised to do so by a member of the IDT Sound Processing Corporation technical team and please follow the instructions to the letter.
Location of the equipment: - The equipment must be located in an area that is dry and well ventilated. - The equipment should not be subjected to temperatures over 45°C and
should, where possible, be far from heat sources like transmitters or radiators. - The ventilation outlets of the Equipment must, in no case be obstructed. - Every precaution must be taken to make sure that no liquid should enter the
equipment. Should this happen unplug the equipment immediately. Power Supply: - The fuses in the power supply are standard, 2 AT 250 V. In case of use on a
115 Vac. network they should ideally be changed for 4AT 250V. - The equipment needs an AC power supply of 115 Vac or 230 Vac 50/60Hz and
must be properly earthed. There is an earth screw on the equipment for that purpose. Should the equipment not be in use for a certain period it should be unplugged.
- The cables linked to the equipment must not be twisted, pinched, crushed or changed in any way. All standards stipulated must be respected (maximum length, shielded etc.). Please replace, immediately any cable that is damaged.
Never try auto-maintenance or repairs on any machine without the written authorisation of IDT Sound Processing Corporation or a maintenance expert mandated by the company (a list can be supplied by IDT Sound Processing Corporation). Should these conditions not be respected IDT Sound Processing Corporation shall suspend all guarantees. Any damage which results can only be repaired by IDT Sound Processing Corporation and any repairs will be invoiced.
2

SOMETHING TO READ BEFORE SETTING UP ! The aim of this manual is for you to be able to install and start up your processor as efficiently and quickly as possible. Most of the options and functions are described. Should anything be missing call the company. Most of the options and functions are described. By a careful reading of this manual, in particular the part dedicated to installation, will assure a perfect set up of your machine. Test or loan period of the equipment: IDT Sound Processing Corporation has loaned you a processor. This loan is not invoiced but care must, naturally, be taken to make sure that it is returned to IDT Sound Processing Corporation in exactly the same condition it was delivered to you. - The original packaging must be used, including the plastic protector bag. IDT
Sound Processing Corporation could be invoiced. - Avoid damaging any part of the equipment (paint, aluminium etc), clean with
non-corrosive products. Protect the equipment from other elements by, for example, placing polystyrene pads between different boxes.
- The processor will have been delivered with an install CD, this manual, the packaging case, an RS232 cable and a mains cable. Should any of these be missing IDT Sound Processing Corporation could invoice the part that is not returned.
Packaging and return of the equipment. - We prefer you use the original packaging which has been fully tested to
endure extreme conditions. IDT Sound Processing Corporation only sends equipment after repairs or upgrades in this packaging. Should you return the equipment in a different packaging IDT Sound Processing Corporation reserves the right to invoice you.
- If you are only returning a machine for repair or upgrade do not send any of the cables, nor CD nor manual. However, it is essential that you enclose as much information as possible concerning the technical problem.
- Should you decide to return the equipment definitively you must contact the sales department of IDT Sound Processing Corporation to obtain the partial or total refund of the equipment and enclose all parts pertaining to the equipment (cables, CD, manual) along with an explicatory note for the sales department.
3

Maintenance of your Processor. - Use a cloth that is dry or slightly moist to clean all metallic parts. - You can use a special glass cleaning product on the plastic protector of the
display. - To remove the dust from the ventilation system switch off and unplug the
processor then use a compressor to blow through the ventilation ducts at no less than 15cm paying particular attention to the duct where the ventilator is placed (to the left of the processor on 2U racks like the DVP and DBP 7+4, and to the right on IU racks like a DEP, DBP 2 or 4 and VVP).
- Wherever possible protect the equipment from dust or other dangerous
projectiles.
- Should your processor have been exposed to fluids, smoke or dust it must be thoroughly cleaned. However, your processor should not be opened unless you have the authorisation from a technician from IDT Sound Processing Corporation without which your guarantee can be cancelled. Call IDT Sound Processing Corporation in any such case. Depending on the damage we can help you clean the processor or have the equipment returned to the company for a full revision.
Storing your equipment for a long period without use When you don’t use your processor for a long period please store it in its original packaging in a temperate and dry area. We advise you to use the plastic protective bag to avoid any possible corrosion. We advise you to repack the processor exactly as you received it ensuring that you will find it in perfect working condition.
4

EU declaration of Conformity
CE declaration of Conformity EU Declaration EN 61000-6-2 and EN 61000-6-3
Manufacturer IDT Sound Processing Corporation 5, allée Moulin Berger – 69130 Ecully - France
Product application Sound Processor Product Name Digital Band Processor 7+4 (DBP 7+4) European Telecom Standard
ETS 300 384 ETS 300 384 A1
Safety EN 60950 Basic standards EN 61000 6-2 EN 61000 6-3
EN 55103-1 EN 55103-2 EN 55022 IEC 61000-3-2 IEC 61000-3-3 IEC 61000-4-2 IEC 61000-4-4
Registered standards
IEC 61000-4-5 IEC 61000-4-6 IEC 61000-4-11
We, IDT Sound Processing Corporation, declare that products referenced this above, to which refers this declaration relate, satisfy the provisions of Directive(s) of the council,
n° 73/23/EEC of February 19th, 1973 modified by the Directive n° 93/68/EEC of July 22nd, 1993
n° 89/336/EEC of May 3rd 1989
modified by the Directives n° 92/31/EEC of April 28th, 1992 and n° 93/68/EEC of July 22nd, 1993
and are in conformity with the standard(s) referenced this above or other nominative document(s).
Sylviane TESSIER Jean-Marc HERBAUT President Engineering manager
Ecully, on December 15th, 2005
IDT Sound Processing Corporation - Technoparc - 5 Allée Moulin Berger - 69130 Ecully – France Tel. +33/(0) 472 18 19 20 – Fax. +33/(0) 472 18 19 21 – E-mail : [email protected] - Web : www.idt-fr.com
SAS au capital de 37 000 € - RCS LYON 450 741 921 – N° TVA : FR 88 450 741 921 – APE : 221G
5

Digital Band Processor 7+4
Audio Processor
User Manual
6

MENU Important Warning :.................................................................................... 2
Location of the equipment: ...................................................................... 2 Power Supply:........................................................................................... 2
SOMETHING TO READ BEFORE SETTING UP !.............................................. 3
Test or loan period of the equipment: ...................................................... 3 Packaging and return of the equipment. .................................................. 3 Maintenance of your Processor. ............................................................... 4 Storing your equipment for a long period without use............................. 4
EU declaration of Conformity....................................................................... 5 Abbreviations............................................................................................... 9 I - INTRODUCTION .................................................................................... 11
WEEE ................................................................................................ 11
II - INSTALLATION .................................................................................... 12
Physical Installation......................................................................... 12 Electrical Installation : ..................................................................... 13
II-1 - Connections .................................................................................. 14
XLR audio in / Out ............................................................................... 14 XLR AES / EBU In / Out....................................................................... 16 RS 232 - RS 232 Modem...................................................................... 18 Ethernet Port (optional) ...................................................................... 19 Local Switches/GPIO........................................................................... 20 TX1 & TX2............................................................................................ 21 AC Input .............................................................................................. 23
II-2 The Display of the DBP 7+4 ............................................................ 25 II-3 Installation of the software ............................................................ 27 II-4 Connecting the DBP 7+4 to a PC..................................................... 32
Configuration the connections ............................................................ 33
1. Direct connection ........................................................................ 33 2. Connection by Modem ................................................................. 35
7

3. Connection by TCP/IP .................................................................. 36 II-5 – Additional Software...................................................................... 42
1. IP Remote Manager......................................................................... 42 2. Digital Virtual Upgrader................................................................... 42 3. IP Upgrader ..................................................................................... 48
III - SETTINGS........................................................................................... 51
III-1 Quick Start up................................................................................ 51
First launch of the application :........................................................... 51 1. Menu bar ......................................................................................... 53 2. The Vu-metres ................................................................................. 53 3. The central icon bar......................................................................... 54 4. The central Window......................................................................... 55 5. The state bar ................................................................................... 55 6. The « Key Tools » Window .............................................................. 56 7. The other Tags................................................................................. 57
III-2 – The first settings......................................................................... 59
1. Setting the levels............................................................................. 59
Setting the TX level.................................................................... 59 Setting the analogue and digital levels...................................... 60
2. The Presets...................................................................................... 61
The Preset explorer – Use ................................................................ 61 III-3 - Calibration................................................................................... 64
IV – THE PLUG-INS .................................................................................... 69
IV-1 - LE RDS.......................................................................................... 70 IV-2 - THE STEREO BOOST ..................................................................... 77 IV-3 – LE MPX GUARD ............................................................................ 81 IV-4 – THE DORROUGH METER .............................................................. 85
Simplified bloc diagram of the DBP 7+4.................................................... 91 Examples of uses of the DBP 7+4.............................................................. 92 General specifications................................................................................ 93
8

Abbreviations Some of the abbreviations used in this manual may not be familiar to all readers: A/D Analogue to Digital converter AES Audio Engineering Society AF Alternatives Frequencies AGC Automatic Gain Control BNC Type of RF connector CD Compact Disc CE European certification CEM Electro Magnetic Compatibility COM Serial data communication port CT Clock Time D/A Digital to analogue converter DB9 Type of connector SUB-D in 9 points dBfs Decibel Full scale = level concerning the maximum level (digital stream only) dBm Level allowing to deliver 1mW / 600ohm dBr Level concerning a reference DBT Directive Low Voltage dBu Decibel ( unloaded ) = dBm in an impedance of some load DHCP Dynamic Host Control Protocol DI Decoder Information DSP Digital Signal Processor E/S Entrée/Sortie EBU European Broadcasting Union EMI electromagnetic interference FFT Fast Fourier Transform FM Frequency modulation GPI/O General purpose input/output Hz Hertz I/O Input/Output IEC International Electric Standard IP Internet Protocol ITU International Telecommunications Union ITU-R Sector of the ITU dedicated to the Radio kHz Unit of measure expressed in kilo Hertz LCD Liquid Crystal Display LED Light-Emitting Diode MAC Address of the network card MPX Composite MS Music/Speech PC Personal Computer PI Program Identification PPM Pulsation per minute PS Program Service name PTY Program Type RAM Random Access Memory RBDS Radio Broadcasting Data Service RDS Radio Data System RF Radio Frequency
9

ROM Read Only Memory RT Radio Text RTC Real Time Clock RX Receiver SUB-D Type of connector multipoint TA Traffic Announcement TCP/IP Communication Protocol THD Total Harmonic Distortion TP Traffic Program TX Transmitter UECP Universal Encoder Communication Protocol V Volt Vcc Volt Crete Crete Vpp Volt peak to peak Vrms Effective volt XLR Style of 3-conductor audio connector
10
I - INTRODUCTION
The Basics of Signal Processing
At the outset of radio broadcasting the only technical constraint imposed on the audio signal was to ensure that the electrical value of peaks was limited in order to guarantee maximum modulation while respecting legal specifications.
Rapidly the necessity to reduce the dynamics of the signal became necessary if only to increase its reproduction and the audio quality in the diverse areas where radio was listened to.
Today, the increased competition between radio stations has brought the need to resort to more and more sophisticated equipment to process the modulation by rendering the spectre much denser.
The DBP 7+4 that you have just bought is part of the latest generation of audio sound processors. The DBP 7+4 is doted with unique algorithms which process the audio signal, not in the temporal field as other units but in the frequency field by using FFT. The new DBP 7+4 is in a class of its own in all respects;
The heart of the FFT processor has been totally revamped and, as a result, much improved.
New functions have been brought in to enhance precision and to make the settings more flexible.
The architecture of the programme has become far more stable. Modifications have been brought hardware wise thus improving the
exchange of digital audio data.
This manual will help you to rapidly take control of your DBP 7+4 and to master its power to obtain a modulation that is dense yet natural.
WEEE
1. This symbol indicating separate collection for electrical and electronic equipment consists of the crossed-out wheeled bin, mean that the product is covered by the directive 2002/96/EC.
2. The electric and electronic elements must be separately cast in containers foreseen for that purpose by your municipality.
3. The preserve, protect, improve the quality of the environment and the protect of human health.
4. For more information concerning the elimination of your former device, please contact your city hall, the service of the waste of your municipality or still the salesman or the distributor where you bought this product.
11

II - INSTALLATION
Dedicate one hour to the installation. WARNING : IDT declines all liability should the rules of installation below not be respected.
Physical Installation As you will have noticed all IDT products are of a 19 inch format so that it fits into dedicated racks. The following indications must be respected. We advise using a rack-mount; however, the front panel was designed to be sturdy enough to be self-supporting with the four screws firmly implanted. The ventilation of your processor : the ventilation has been studied to make sure that all heat generated is evacuated. Air is sucked in by two ventilators, placed on the right and is expired at the rear and to the left of the unit. These ducts should absolutely not be obstructed. Make sure that your processor is placed where hot air can be evacuated. The ideal location is in an open rack, dry area where, ideally, it is not exposed to high temperatures (behind a window with bright sunshine, a radiator, amplifier etc). IDT processors have been tested to work in environments where the temperatures go from 0°C to 45°C. IDT Sound Processing Corporation cannot guarantee that its processors work perfectly outside these temperatures.
12

Electrical Installation : Good grounding: IDT processors are CEM certified guaranteeing that the equipment can function in an electro-static environment. The key is to make sure that the equipment is properly grounded as results please fix all 4 screws of the front panel to the rack to allow. All IDT processors also have a ground connector at the rear of the unit which allows a connection to the rack. NB : don’t forget to connect the ground link of the rear panel to the rack!
The right fuses : The fuses in the power supply are, standard, 2AT 250V. In case of use on a 115 Vac. network they should ideally be changed for 4AT 250V. The equipment needs an AC power supply of 115 Vac or 230 Vac 50/60Hz and must be properly earthed. There is an earth screw on the equipment for that purpose. Should the equipment not be in use for a certain period it should be unplugged. . The right Cable : IDT are supplied with standard IEC AC cables. The cables are French standard. This cable should be changed to respect the electrical standards of your country. IDT Sound Processing Corporation cannot guarantee any breakdowns should a non-standard cable be used.
13

II-1 - Connections
XLR audio in / Out
The I/Os of the DBP 7+4 are linked by" XLR 3 Pin" connectors The wiring is the following : Pin number 1 = Ground Pin number 2 = Hot Point Pin number 3 = Cold Point
XLR Input
As with any professional audio unit the inputs are female so you need to use a male XLR to bring the audio into the DBP 7+4. The DBP 7+4 has a balanced electronic input. IMPORTANT : the input can receive balanced and imbalanced signals.
XLR Output The audio output connectors are male so you need female XLRs to take the signal out of the DBP 7+4. As for the input the DBP 7+4 has a balanced electronic output. IMPORTANT: the output is protected against unbalancing (cold point to ground), so if need be you can use this type of link.
14

Specifications : Input:
Type Electronically balanced Cabling Ground=1, Hot point=2, Cold point=3 Impedance 10 K Maximum level + 24 dB
Output:
Type Electronically balanced Cabling Ground=1, Hot point=2, Cold point=3 Impedance 600 Ohms Maximum level + 24 dB
15

XLR AES / EBU In / Out
The digital I/Os of the DBP 7+4 are linked by 3 Pin XLRs The wiring is the following : Pin number 1 = Ground Pin number 2 = Cold Point in number 3 = Hot Point P
XLR Input
As with any professional audio unit the inputs are female so you need to use a male XLR to bring the digital audio into the DBP 7+4.
XLR Output The audio output connectors are male so you need female XLRs to take the signal out of the DBP 7+4.
The DBP 7+4 has an advanced synch mode. To ensure a perfect synchronisation, whatever the digital chain, you can configure your DBP 7+4 in the following ways;
• Synch Master • Synch Slave
In the first case the DBP 7+4 will act as transmitter and will deliver the synch frequency to the other units in the digital chain. In the second case the DBP 7+4 will act as a receiver and will be controlled by an external clock.
16

BNC Synchro I/O The DBP 7+4 has a female input socket so you will need a male BNC to link up to the synch.
Specifications :
Input:
Type Balanced on transformer AES type AES 3 Professional Cabling Ground=1, Hot point=2, Cold point=3 Impedance 110 Ohms Maximum Level 0 dBfs
Output:
Type Balanced on transformer AES type AES 3 Professional Cabling Ground=1, Hot point=2, Cold point=3 Impedance 110 Ohms Maximum Level 0 dBfs
17

RS 232 - RS 232 Modem
The DBP 7+4 has 2 types of RS 232 standard serial inputs : RS 232 RS 232 Modem
The possibility of leaving a modem connected permanently: As you can see one of the serial ports is called "RS 232 / Modem". This port allows the use of a modem to facilitate its set up. This port is optimised for use with a modem but can still be used for normal communication use. ATTENTION : The RS 232 connector described above is replaced by the connector situated on the right of the RJ45 connector in devices equipped with TCP/IP Ethernet cards. This connector is thus inactive.
Specifications: Port : RS 232
Connector type Male Cabling 2=RX 3=TX 5=Ground Max Length 10 metres
Port : RS 232 / Modem
Connector type Female Cabling 1=DCD 2=TX 3=RX 4=DTR 5=Ground 7=RTS 9=RING Max Length. 10 metres
18

Ethernet Port (optional)
The DBP 7+4 (optional) has an RJ45 Ethernet port available for an IP link (internet Protocol). LEDs can be viewed next to the connector to show the state of the network.
Connector type RJ45 Cabling 10 Base T LEDs TX=data out RX=data in Col=Collision Max Length. 50 metres
19

Local Switches/GPIO
The "Local Switches" connectors are there to allow the switching of presets via GPI. On the DBP 7+4 the connector is a SUB D 15 pin. The DBP 7+4 allows you to switch presets by linking ground to one of the First 10 pins. The DBP 7+4 can also replace the AF lists of the RDS coder and cross the stereo coder in stereo or mono mode.
Specifications:
Connector type SUB D 25 point female
Cabling
Pin 1 = Preset 1 – Pin 2 = Preset 2 – Pin 3 = Preset 3... up to 10 Pin 11 - Stereo ON Pin 12 - Stereo OFF Pin 13 - AF List 1 Pin 14 - AF List 2 Pin 15 = Ground
Max Length. 10 meters
20

TX1 & TX2
he DBP 7+4 has 2 multiplex outputs "TX1 et TX2" which can be set via the
ctors are female BNCs.
ARNING : as the MPX signal is quite "fragile", we advise you to use the shortest
Specifications for TX1 & TX
Tsoftware. The conne Wcables possible. A standard cable will measure 2 meters. For any length over this use the highest quality cable.
2
Connector type BNC female
Cabling Ground=body of the connector, Hot point= central Pin Impedance 75 Ohms Level delivered inity to + 22 dB From - infLength of cable advised 2 metres
he DBP 7+4 is endowed with two inputs intended for sub-bearers' insertion "SUB1
puts work in Unitarian level, consequently no access in regulation of r
Tand SUB2". These two inlevel is accessible since the control software. These two inputs can beings used fothe insertion of signals RDS, SCA, SWIFT, DARC...
21

Specifications for SUB1 & SUB2
Connector type BNC female Cabling Ground=body of the connector, Hot point= central Pin Impedance > 5k
As any stereo coder, the DBP 7+4 is endowed with a synch 19 kHz output, this one is delivered on a BNC female connector.
Specifications for synch 19 kHz Connector type BNC female Cabling Ground=body of the connector, Hot point= central Pin Impedance 10 metres Delivered Level N.C.
22

AC Input
In order to ensure that the processor is protected from all disturbances the DBP 7+4 is protected by an extremely efficient power supply filter. This filter also has 3 other functions.
• ON/OFF SWITCH • Container of the fuses • IEC standard cable socket
WARNING: as you will have seen there are ventilation outlets just next to the filter. To ensure optimised ventilation never obstruct these outlets. WARNING: to guarantee an optimised protection to respect the Low Power Directives standards we advise you to always use ceramic temporised fuses. The DBP 7+4 has a direct ground link and we advise you, wherever possible, to use this to ensure perfect grounding. The DBP 7+4 has a wide band power supply meaning it can take from 115 or 230 volts in 50 or 60 Hz with no need for any manual change. We advise you to use T2A 250V for use on a 230V network and T4A 250V for 115V.
23

Specifications:
Connector type IEC Fuse Type Pour 115V : 4AT 250V Pour 230V : 2AT 250V
Power From 88 to 132 VAC / 176 to 264 VAC (automatic switch)
Consumption 110V - 240V = 130 VA
24

II-2 The Display of the DBP 7+4
Navigation and enter are centralised on 4 buttons on the front panel:
• The "Tab" button allows you to move from left to right through the various functions or menus on the screen.
• The "Up" button allows you to scroll up or move a selected value up. • The "Down" button allows you to scroll down or reduce a selected value. • "Enter" validates your choice.
Setting the contrast:
1. Press "TAB" and "Enter" at the same time, the display will change and the
«LCD" Led will light up. 2. Press "Up" or "Down" to get the desired setting 3. Click "Enter", you will return to the former screen and the "LCD" will switch off.
25

Setting the phones To set the phones from the front panel of the processor do the following :
o Press "Up" and Down" at the same time and you will access the "PHONE" display.
o Press "Tab" twice to get the setting cursor for the phones level. o Press "Up" or "Down" to increase or decrease the level of the phones. o Press "Enter" when you have the level desired.
You can define a display by default :
• By pressing the 4 tabs of the front panel at the same time the active display at the time will become the default display. This display will reappear on the 7+4 after a “snooze” (this time can be set in the software).
26

II-3 Installation of the software WARNING: The control software for the DBP 7+4 is compatible with the following operating systems:
Windows 95 Windows 98 and 98SE Windows NT 4.0 from SP3 Windows 2000 Windows XP
In any case you must have installed the Internet Navigator Explorer 5.5 minimum for the on-line display. Installation : Insert the CD supplied with the processor in the CD-Rom reader of your computer. The installation programme will start:
Click « Next ».
27

Read the user license attentively, accept then click« Next ».
Chose the type of installation desired depending on the processor you have acquired.
28

You can also install the configuration tool for the Ethernet card if you have this option installed in your processor and place an icon for the application and/or the upgrade tool on your desktop or in the « Quick Launch ®» bar.
Then click« Next ».
29

Choose the folder where the software will be installed (by default; « C:\Program Files\IDT Sound Processing »), and click « Next ».
You can modify the place where you find your shortcuts in the Start menu of Windows. Click « Install ».
30
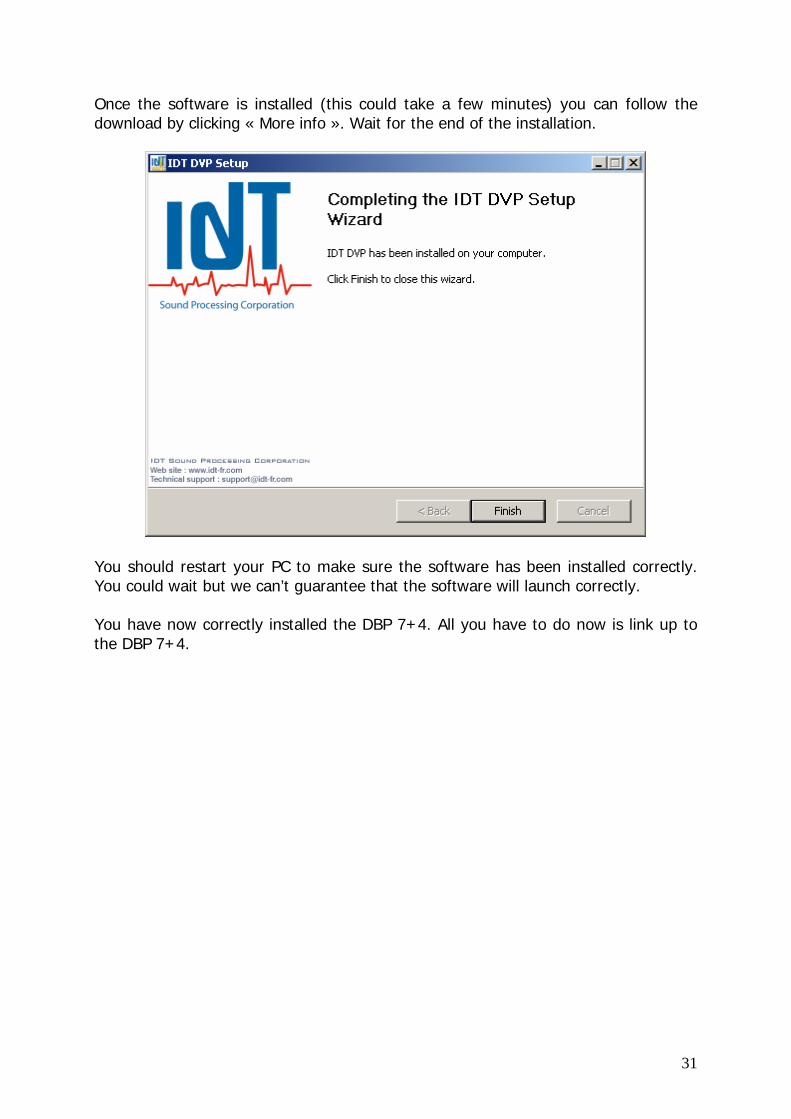
Once the software is installed (this could take a few minutes) you can follow the download by clicking « More info ». Wait for the end of the installation.
You should restart your PC to make sure the software has been installed correctly. You could wait but we can’t guarantee that the software will launch correctly. You have now correctly installed the DBP 7+4. All you have to do now is link up to the DBP 7+4.
31
II-4 Connecting the DBP 7+4 to a PC There are several ways to connect your PC to a DBP 7+4:
Direct connection (Serial port RS232) Connect the serial cable (supplied) to the RS232 serial port of the PC (female connector) and to the male RS232 port of your processor. (front or rear of the unit). Warning: DO NOT MISTAKE THIS PORT FOR THE MODEM PORT! By Modem
Connect the Modem to the « modem » port of the processor. The necessary cable is not supplied by IDT Sound Processing Corporation. IDT Sound Processing Corporation can only guarantee that the modem connection works correctly with modems that are HAYES compatible (US robotics for example). By TCP/IP
If you have taken the Ethernet option with your processor you can connect via TCP/IP. In this case fix an RJ45 class 5 cable to the RJ45 port on the rear of your processor. You can use a straight cable to link to a hub or a Switch or to link directly to the network card of your PC or your router (ADSL for example).
32

Configuration the connections
1. Direct connection Normally there is nothing to configure this connection. During the first launch of the application the software will display the following dialogue box:
Choose the COM Port you want to connect the DBP 7+4 to, and click « OK ». The COM Port selected will be memorised for the next connection. When you are connected to another COM Port or you want to change the type of connection click the same icon and you will be asked which COM Port you wish to use.
Choose « direct » to select another COM Port or change the type of connection as follows or you will find yourself back in the COM Port selection box.
33

If the connection doesn’t work do the following:
To access these parameters go to the peripherals manager, and double-click the COM Port you want to parameterize. Different configurations can work, but IDT Sound Processing Corporation cannot guarantee that everything functions perfectly.
34

2. Connection by Modem To connect by modem, you have to go through the shortcut of the START menu: « programs, IDT Sound Processing, Tools, DBP 7+4 @ FM, DBP 7+4 @ FM Via Modem ». For the first launch the software will ask which port of the PC the modem is connected. The software will then display « phone book », of the DBP 7+4s to which you can link up by modem.
By clicking « New Entry », you can add a DBP 7+4, by entering the name of the programme, the town where the DBP 7+4 is located and above all the phone number to call. NB : The DBP 7+4 automatically answers when a call is placed to a modem that is linked. Make sure of your password protection.
35
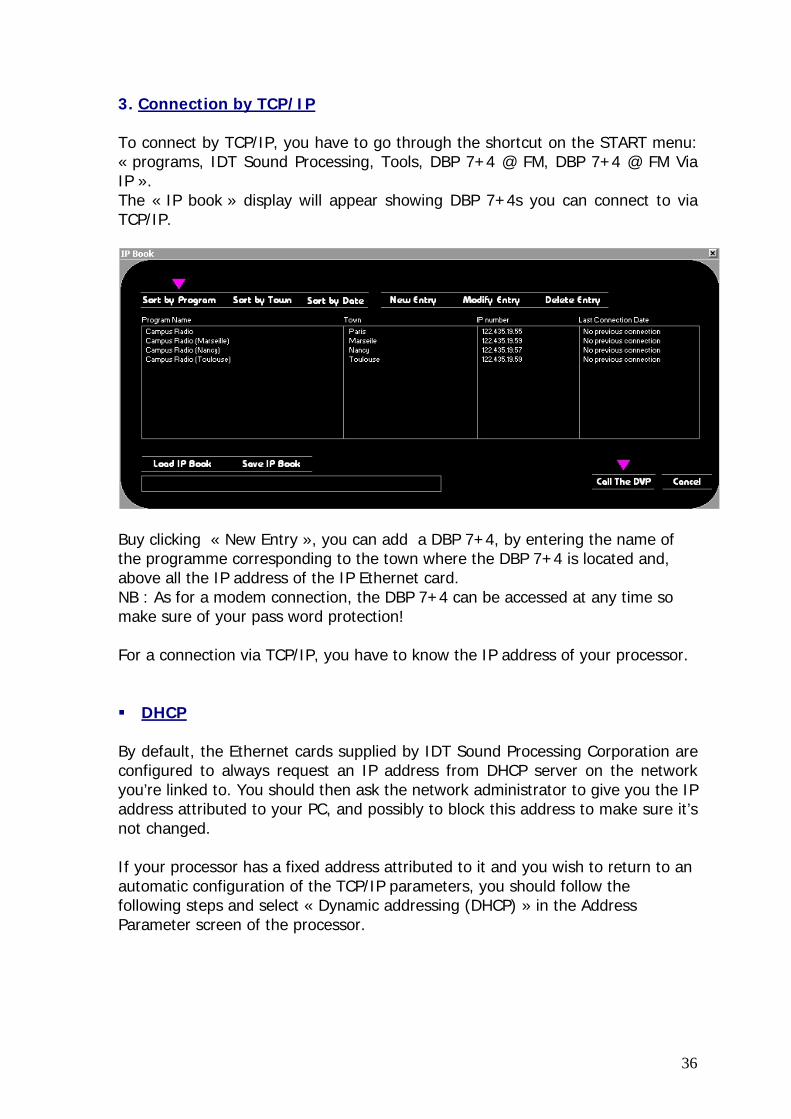
3. Connection by TCP/IP To connect by TCP/IP, you have to go through the shortcut on the START menu: « programs, IDT Sound Processing, Tools, DBP 7+4 @ FM, DBP 7+4 @ FM Via IP ». The « IP book » display will appear showing DBP 7+4s you can connect to via TCP/IP.
Buy clicking « New Entry », you can add a DBP 7+4, by entering the name of the programme corresponding to the town where the DBP 7+4 is located and, above all the IP address of the IP Ethernet card. NB : As for a modem connection, the DBP 7+4 can be accessed at any time so make sure of your pass word protection! For a connection via TCP/IP, you have to know the IP address of your processor.
DHCP
By default, the Ethernet cards supplied by IDT Sound Processing Corporation are configured to always request an IP address from DHCP server on the network you’re linked to. You should then ask the network administrator to give you the IP address attributed to your PC, and possibly to block this address to make sure it’s not changed. If your processor has a fixed address attributed to it and you wish to return to an automatic configuration of the TCP/IP parameters, you should follow the following steps and select « Dynamic addressing (DHCP) » in the Address Parameter screen of the processor.
36

Attribution of a fixed IP address for your processor. If your network does not have a DHCP server and you connect directly (by a crossed RJ45 cable) to the processor, or if this is imposed by your administrator you can attribute a fixed address to your processor. To do so you must have loaded the « IP Remote Manager » software. Connect your PC to the RS232 serial port located next to the RJ45 of your processor. Launch « IP Remote Manager » via the shortcut in the Start menu: « programs, IDT Sound Processing, Tools, IP Remote Manager ».
Click the Serial Port button ». The software will scan all the serial ports of your PC to find the processor. The software will then display the results of the search:
37

The software will display the results of its research:
Select your processor and click « next ». NB : This window can be useful for your network administrator. He can read the MAC addresses of your processors, essential to create DHCP reservations.
38

On this window you have to give your processor a name (NETBIOS) and to give a fixed IP address. Ask your administrator to give you the other parameters (network properties) to ensure that communication can be established between your PC and the processor. This window will also allow you to return to a DHCP. By default, the TCP communication of our processors is 5001. This parameter can be changed. Ask your network administrator before making any modifications. This port can be re-directed via a firewall or a router for remote internet connections. Here again you administrator can help configure the equipment for this type of connection.
39

Firewall / Access control : The IDT Sound Processing Corporation Ethernet cards have a simplified firewall which accepts or refuses connections coming from different IP addresses. These parameters should be set up with the administrator.
To finish click « End ».The programme will then send the configuration to your processor after you have confirmed. The processor can now communicate via TCP/IP by using the fixed address.
40

SNTP synchronization
The Ethernet cards of IDT Sound Processing Corporation processors allows the synchronization SNTP (Simple Network Time Protocol). This function so allows synchronizing the hour of your processor as well as the integrated functions as the RDS.
On this screen, you specify the Time Zone, the IP address of the SNTP server, the interval of synchronization in minutes then the activation or not of the synchronization.
41

II-5 – Additional Software 1. IP Remote Manager Put back you in the section : « Attribution of a fixed IP address for your processor » 2. Digital Virtual Upgrader
Digital Virtual Upgrader.
The software "Digital Virtual Upgrader" has been specially conceived to facilitate the update of processors 2U (DVP and DBP) IDT Sound Processing Corporation. This software is included in the program of standard installation which was delivered to you on the CD accompanying your equipment. An icon has been created in the start menu "programs, IDT Sound Processing, Tools".
Click this icon to begin the process of update of your processor. The following screen displays:
42

Click the drop down menu in the top of the window to select the communication port. The following screen displays:
43

Select the COM port, in the example this above "COM 1". In the central window, is shown the information relative to the Upgrade which you go to make. To select the Upgrade to make two possibilities are offered to you:
1- By the drop down menu as this below :
2 - By clicking "Browse" the following window displays :
Select the file of Upgrade which you want to make. The information concerning this upgrade is shown in the central window. Once the good file selected, click "Run".
44

The software makes then a check of the file of Upgrade and the parameters of your equipment before showing the following screen :
WARNING !!! From this stage, the procedure of update of your processor will be actual. Never make update of your processor when that this is «ON AIR" or in function.
NB: most of the updates include a reprogrammation of the components of the device, this process implies a cut of the audio signal during the update. Thus watch to avoid updating your processor when it is in the antenna.
Also, the updates develop the firmware of the device, and erase all the data of the device. IDT Sound Processing Corporation tries as possible to protect the compatibility of presets between two versions, but it is not still possible, it is thus advised to test presets create with a previous version before putting them "on air".
The program makes then the wanted operations. This process can set up to some minutes (according to the number of operations to be made, of the power of your computer). The screen this below indicates you the state of the Upgrade.
45

During the state of the Upgrade the software will ask you to make a switch off of your processor during some seconds.
At the end of the Upgrade the software shows the following screen :
46

If the software does not show this screen, please switch off and switch on your processor, then begin again the process since the beginning. In case of new failure of the update, please contact immediately IDT Sound Processing Corporation.
47

3. IP Upgrader The « IP Upgrader » software has been specially designed to aid the upgrading of the IP board from the IDT Sound Processing Corporation. This software is included in the standard installation programme which has been delivered with your unit. An icon is created in the start up menu « programs, IDT Sound Processing, Tools ». To make this update, you have to use the connector RS 232 of the IP board. Click this icon to begin the process of update of your IP BOARD. The following Window will appear :
The ended installation the following screen displays.
48
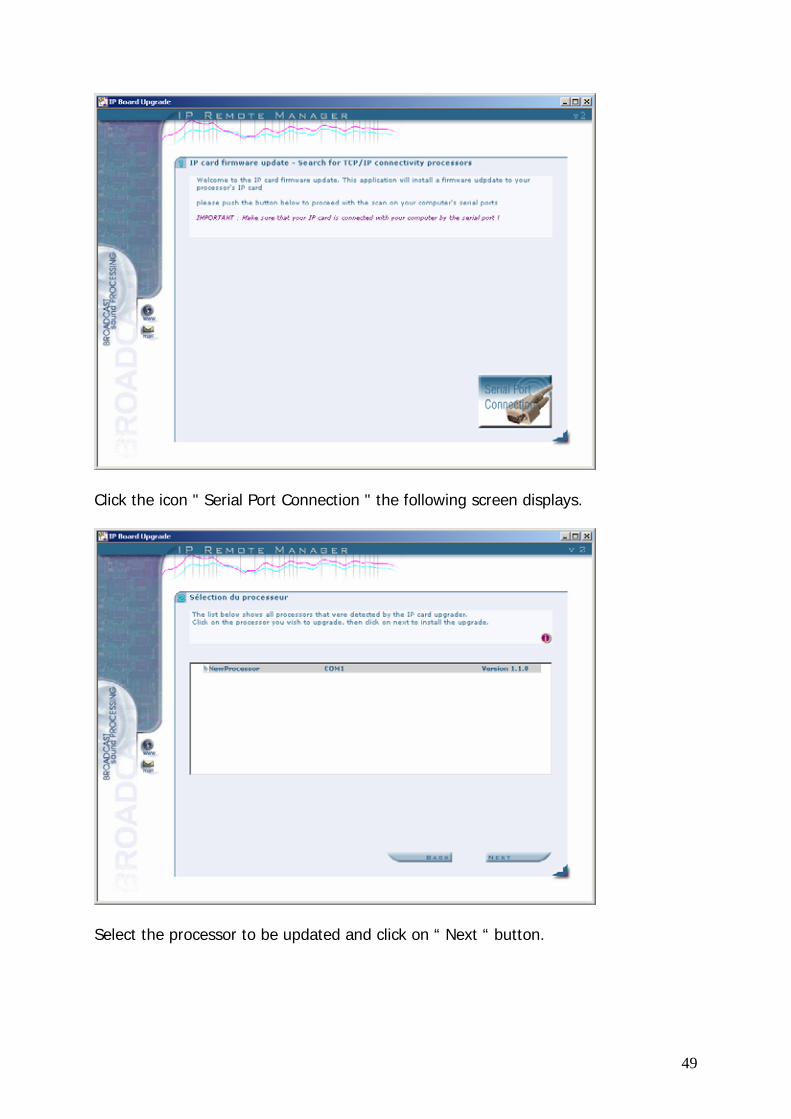
Click the icon " Serial Port Connection " the following screen displays.
Select the processor to be updated and click on “ Next “ button.
49

When the IP board was updated the following screen displays.
Click "Finish" then on "Yes" or "No" according to if you have another card IP to be updated.
50

III - SETTINGS III-1 Quick Start up
First launch of the application :
Control icons have been created for the DBP 7+4. You must now choose where to place them.
Click or double-click one of them depending on the type of connection you have chosen. The software will start by doing an inventory of the equipment and plug-ins contained in the unit.
If the DBP 7+4 is not set to the same time and date as your PC the software will propose to link the two;
Choose to link the 2, or not, and ENTER.
51

The main window of the software will then open. Take a few minutes to familiarize yourself with the Window as it will accompany you throughout your work with the DBP 7+4. To view all the windows at one glance go to the « More Windows » menu and click « All »
Here’s a view of the interface : Menu bar Vu-meters Central bar (icons) Main Window State bar Tags
52

1. Menu bar
To ensure optimised ergonomics all the main accesses have been centralised in the central icon bar. The menu bar regroups secondary accesses which are less frequently required by the user. The main accesses are the following:
File : Save and retrieving presets, the calibration, general parameters and full back-up of the equipment. Leaving the software.
Set Up : Name of the DBP, Calibration, AES/EBU Configuration, Phase Scrambler, Auto Back Up, Internal Clock, Default screens of the DBP and screen savers.
Modem : Configuration, Phone book, IP book. Scheduler : Loading a schedule, saving a schedule. Password : Creating a profile, modifying a profile, loading a profile
Modifier. More Windows : Routing the Measurement, Displaying the Measurement,
MPX Guard, Dorrough meter, phone routing, phone level setting, Quick compare, Key tools, Arrange Windows.
Help : for the DBP 7+4 et choice of language, loading of plug-ins, loading a license, info on the license loaded, About
2. The Vu-metres
The top part of the screen is dedicated to the vu-meters. Everything has been done to guarantee an optimised vision so, from left to right, you can view, instantly the following parameters:
"DBP Input" The action of the "Input AGC" The action of the processing (depending on the function selected). The optimiser of the limiter "Optim. Limiter" "Audio Limiter" "HF Limiter" "DBP Output"
53

3. The central icon bar The central icon bar allows access to the main control screens of the DBP. Located in the centre optimised ergonomics are guaranteed;
• Preset : Access to the "Factory Presets" and "User Presets». • AGC : Access to the parameters of the AGC. • Process : Access to the heart of processing and allows you to sculpt your
sound. • Limiter : Access the audio and MPX limiters, • Key Tools : Access to the automatic processing functions. • St Generator : Access to the parameters of the stereo coder. • Level : Access to all the I/O levels of the DBP. • Plug In : Access to the various plug-ins you have inserted in the DBP • Diagram : Via a diagram, you can visualise, assign and fix the parameters
of the pre-emph, de-emph and the position of the phones. • Result: Access to the advanced measurements of the modulation to
control the efficiency. • Bypass : Access the By-pass of each function of the DBP. • Scheduler; automatic scheduling of presets
To the right of the icons you will note the label "BAND PROCESS" accompanied by an arrow pointing downwards meaning that it is the "BAND PROCESS" Window that is displayed in the central icon bar.
54

4. The central Window
Located just below the main icon bar, the central window displays the various screens accessible and regulated by the icon bar. It’s here that you will take full control of all the parameters of the DBP 7+4. Above the Band Process window of the DBP 7+4. To access the other functions, scroll down the bar located to the left of these functions.
5. The state bar Located just below the main window the state bar displays, permanently, essential information and allows you instant access to commands.
Commands :
• Quick Save : Fully to the right «Quick Save" allow you to save the active parameters of the DBP 7+4 in a new preset.
55

The displays:
• Inputs: The Input to the DBP 7+4 used by the active preset is displayed permanently.
• Stereo encoder mode: The mode of encoding, modifiable in the "St. Generator" window is displayed here for the active preset.
• PC --> DBP 7+4 : This label appears when "Link PC time to DBP 7+4 time" is active. This command can be found in the "Update DBP clock" window accessible from the "Set Up" menu.
• Scheduler : This label indicates that the Scheduler is active. • Bypass : This label is displayed when part of the DBP 7+4 is in by-pass. If
several parts are in by-pass the corresponding labels will be displayed: "AGC Bypass", "Proc. Bypass", "Opti. Bypass", "Limit. Bypass" and "All Bypass".
• Standby : When the DBP 7+4 is in standby. The setting of the standby threshold is accessible from the Key Tools window.
• Overload : If the input is overloaded there can be distortion so this label appears.
NB : A double-click on the display gives you access to the corresponding window.
6. The « Key Tools » Window
If you have a screen and graphic card which allows a resolution of 1024 x 768, you can access the "Key Tools" window. It appears below the state bar and lets you access the following settings;
• StandBy Threshold: Minimal level below which the DBP 7+4 will go into standby.
• HP Filter : High Pass Filter • Stereo Link : Function to link the 2 audio channels. • Fidelity : respects the original sound signal even after processing. • Process order : Here you can choose the order of your processing;
expanding the dynamics before processing or processing before expanding.
56

When you click More, other functions appear :
• HF Limiter : Reduces the unwanted effects of the high end of the spectrum like sibilance.
7. The other Tags
The Result Tag (Henry Curve) Here you can immediately verify the density of your signal. The MPX Guard Tag This tag is only active if the plug-in has been loaded in the DBP 7+4. Refer to the section concerning this plug-in.
The Result Routing Tag Measure the density of the signal before and after processing
Phone Routing Tag Monitor by phones the signal before and after processing
57

Dorrough Meter Tag This tag is only active if the plug-in has been loaded in the DBP 7+4. Visualisation of the average levels and monitors Loudness. Quick Compare Tag Rapid switching between presets to compare and contrast.
58

III-2 – The first settings
The first thing to do is to set the levels to correspond to you transmitter and to the standards applied in your country. 1. Setting the levels WARNING ! ! ! Do not make these modifications while the DBP is linked to a transmitter. Make the settings with the TX1&2 unplugged or you could have over modulation. Setting the TX level
Click the « Level » icon in the central bar. Adjust the reference levels of TX1 and TX2
Then adjust the TX output level depending on the legal modulation levels of your country (generally 75 KHz).
59

You can control the level of deviation with the Henry curve of the DBP 7+4 or with the recording level gauges TX of the screen "Level ":
If these results do not correspond to the levels measured by external equipment consult « Calibration of your processor ». Setting the analogue and digital levels
Still in the « Level » window, adjust the analogue and digital I/O levels to avoid any distortion of the sound before processing.
If your DBP is in a processing chain and that you are using the analogue or digital outputs of your processor don’t forget to set the output levels depending on the equipment your DBP is linked to.
In this way you will avoid any peaks into or out of the DBP.
60

2. The Presets The Digital Band Processor 7+4 @ FM is delivered with a list of Factory Presets. These presets constitute the departure point for your sound settings and correspond to different radio programme categories. You can go, quite simply to the category that corresponds to your programme type but we strongly advise you to go through the different categories of Factory Presets to have a full idea of what is on offer. Processing on the DBP 7+4 @ FM works on an upgradeable algorithmic platform that we call a Layer. Each Layer has a version number and a list of Factory Presets which correspond. WARNING: as the product evolves there are new Factory Presets which will always refer to a version of layer even if we do all we can to ensure compatibility between the various layers. The Preset explorer – Use Just below the display of the vu-meters you will see the icon bar which allows access to each function. To access the Factory Presets click the Preset icon. To the left you will see the explorer for the DBP 7+4 @ FM.
At the top of the tree you will find 2 folders in the Digital Virtual Processor, Factory Presets and User Presets.
The Factory Presets Folder : In this folder you have all the Presets supplied by IDT. Each Preset is part of a family; e.g. AC contains 3 Factory Presets AC Loud, AC Mid and AC Soft. To avoid any confusion : Factory Presets have a blue icon and mauve for the User Presets.
61

The User Presets folder : This folder can contain up to 60 Presets and is located directly in the memory of the DBP 7+4 @ FM.
1. To load a Factory Preset into the User Presets folder:
There are 2 ways. Choose the one you prefer. • Select the Preset you want to load from one of the Factory Presets
folders Drag and drop into User Presets Or:
• Select the Preset you want to load from one of the Factory Presets folders Click it and then Copy Click the User Presets folder Right click PASTE
2. To rename a User Preset : When you load a Factory Preset in the list of User Presets it will keep its original name. Once it is in the list of User Presets you can rename it as you want. To do so proceed as follows: Select the Preset you want to rename: Right click and select RENAME Type the name you want to give to your Preset
3. To delete a User Preset : It is, of course, possible to delete a User Preset from the memory of the DBP 7+4: Select the Preset you want to delete Right click and Delete You will be asked to click OK to Delete or Cancel
4. To put a User Preset ON AIR : To put a User Preset ON AIR do the following: Select the Preset you want to put on air. Double click and the icon of the Preset will become . The Preset is now On Air.
62

5. Basic Settings for a preset:
When you select a preset this window will appear In this screen, you can choose the type of input specific for a preset, the « cross fade » as well as the pin on the local switch to be used to switch the DBP 7+4 to this preset. This window also gives you information on the original preset and the latest modifications made to it.
63
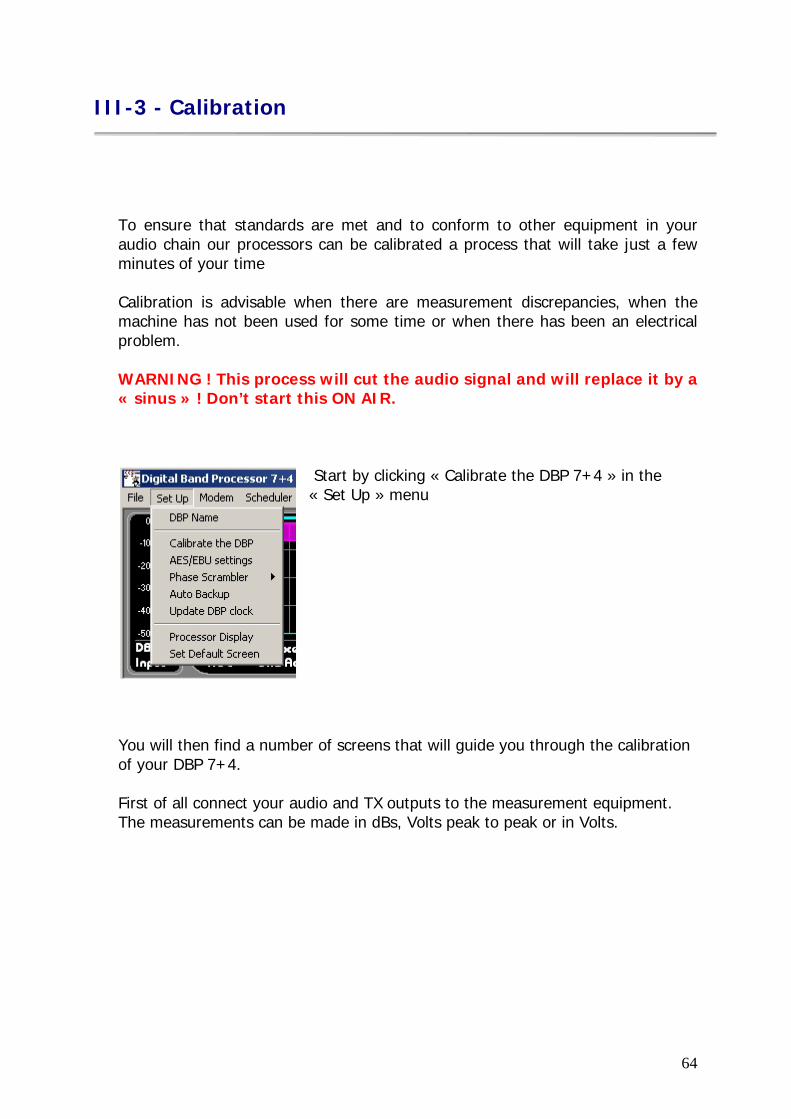
III-3 - Calibration
To ensure that standards are met and to conform to other equipment in your audio chain our processors can be calibrated a process that will take just a few minutes of your time Calibration is advisable when there are measurement discrepancies, when the machine has not been used for some time or when there has been an electrical problem. WARNING ! This process will cut the audio signal and will replace it by a « sinus » ! Don’t start this ON AIR.
Start by clicking « Calibrate the DBP 7+4 » in the « Set Up » menu
You will then find a number of screens that will guide you through the calibration of your DBP 7+4. First of all connect your audio and TX outputs to the measurement equipment. The measurements can be made in dBs, Volts peak to peak or in Volts.
64

With this first window you can see if your processor has lost its configuration, then reload a calibration that you have saved on your hard disk or floppy. When you calibrate your processor this file is automatically saved on the hard disk. To calibrate your processor click « Calibrate » and ENTER.
65

The first stage is the calibration of the TXs. In this example the 2 outputs are calibrated to 4.40Vpp (volts peak to peak). You have to raise or drop the cursor until this value has been attained by your measurement equipment. The second stage is similar except that the DBP 7+4 transmits a sinus signal at instead of 500Hz. These 2 stages are necessary to obtain a frequency response that is as linear as possible.
66

Here again the cursor has to be adjusted to get the correct value on the measurement equipment. Both stages are similar. They concern the analogue outputs of the DBP 7+4.
You will note that our output is parameterised at 6 dB which corresponds to 4.40 Vpp. Here again the aim is to adjust the cursors to obtain the right value on the measurement equipment.
67

Once the levels have been adjusted, click « ok ». The calibration file of the equipment will be saved on your hard disk and you can recall it at any time. Follow the same procedure, in full, even when you reload a file, just to make sure. WARNING :
- A calibration file is dedicated to one processor. You will not be able to transfer file to another processor.
- Moreover the measurements may differ from one machine to another.
- It is, imperative then to do a full calibration on each unit.
NOTA BENE:
Decibels (dB) Volts Peak to Peak (Vcc/Vpp)
Volts RMS (Vrms)
-6 dB 1.10 Vpp ( 0.388 Vrms -4 dB 1.38 Vpp (Vcc) 0.489 Vrms -2 dB 1.74 Vpp (Vcc) 0.615 Vrms 0 dB 1.95 Vpp (Vcc) 0.774 Vrms
+2 dB 2.76 Vpp (Vcc) 0.975 Vrms +4 dB 3.47 Vpp (Vcc) 1.227 Vrms +6 dB 4.37 Vpp (Vcc) 1.545 Vrms +8 dB 5.50 Vpp (Vcc) 1.945 Vrms +10 dB 6.93 Vpp (Vcc) 2.448 Vrms +12 dB 8.72 Vpp (Vcc) 3.082 Vrms
68

IV – THE PLUG-INS IDT processors have an open and modular architecture which is open to receive plug-ins. These plug-ins are available from IDT Sound Processing Corporation and can be activated by a simple software upgrade. There are 4 plug-ins available today. The IDT team regularly develops new plug-ins for your processors and we invite you to visit our web-site regularly or to subscribe to our « newsletter » to be among the first to be aware of new functions for your processors. If you have not ordered a plug-in with your processor, or you want to test one that you don’t have all you have to is contact IDT Sound Processing Corporation for an evaluation which is limited to 30 days.. WARNING: the plug-in from IDT can only be tested once and only once and the 30 day trial period starts from the day it is loaded into the unit. Please make sure, then, to be ready for the test! To install the plug-ins in your processor nothing could be more simple: In the « Help » menu, click « Load Plug in » and select the file of the plug-in that IDT has supplied. Here are the plug-ins available from IDT and their features:
69

IV-1 - THE RDS
The "Basic RDS" Plug-In as displayed in the central window.
Your DVP processor enjoys a modular software architecture. This enables you to add components, called "Plug-Ins", to suit to your specific needs. The "Basic RDS" Plug-In allows you to generate all major RDS data without the need for an external hardware encoder. Installation :
CAUTION :
• The Plug-In that has been sent to you is specific to the serial number of your DVP Processor as well as to the Layers that it uses. It will therefore work only on the machine that you specified when ordering the Plug-In.
To install the "Basic RDS" Plug-In:
1. Follow the instructions received with this Plug-In to install it on your computer.
2. Launch the DVP or DBP Control Software as usual. 3. Click "DVP Load Plug In" or "DBP Load Plug In" in the Help Menu. 4. The window below will be displayed. 5. Select the Plug-In that you want to load (in the example below: "Basic RDS"). 6. Click "Open" at the bottom of the window.
70

The "DVP Load Plug In" window.
To activate / de-activate the RDS coder :
1. Click on the "ON" button located above the RDS On/Off inscription at the top left part of the window:
2. The red triangle is set before your choice indicating that it is implemented. 3. Proceed the same way with the "OFF" icon to de-activate the coder.
To enter the PI code :
1. Click in the "PI" field. 2. Use the <Suppr> and/or <back space.> to delete existing data. 3. Enter the 4 digit PI number that was assigned to you by your regulatory
body.
To enter the PS code :
1. Click in the "PS" field Use the <Suppr> and/or <back space.> to delete existing data.
2. Enter the 8 character PS code that was assigned to you by your regulatory body.
To transmit the date and time within the RDS code :
NB : It is the date and time of the internal clock of the DVP that will be transmitted. See also : Update DVP Clock.
71

1. Click on the "ON" inscription located above Date and Time : 2. The red triangle is set in front of your choice, indicating that it is
implemented. 3. Proceed the same way with the "OFF" button to de-activate the transmission.
To select the program type :
1. Click on the command of the "PTY" scrolling menu. 2. Select the program type nearest to your station programming. 3. The scrolling menu disappears.
To transmit Radio Text :
1. Click on the "ON" button above the Radio Text inscription : 2. The red triangle is set in front of your choice, indicating that it is
implemented. 3. Proceed the same way with the "OFF" button to de-activate the transmission.
To enter or modify the radio text transmitted :
1. click in the "RT" field. 2. Click in the "PS" field Use the <Suppr> and/or <back space.> to delete
existing data. 3. Enter the text you want to transmit.
To add Alternate Frequencies :
1. Make a right click in the square field "AF 1 ". 2. The contextual menu represented below displays :
Contextual menu " Alternative Frequencies".
3. Select "Add..." : The following window of seizure displays :
Seizure window "Add a Frequency".
72

4. In the field "Freq." enter the frequency which you want to add. 5. Click on "OK", The seizure window fades and the added frequency appears in
the field "AF 1".
To modify an Alternative Frequency :
1. Make a simple click on the frequency to modify : this one displays in highlighting.
2. Make a right click in the square field "AF 1". 3. The contextual menu represented below displays :
Contextual menu " Alternative Frequencies".
4. Select "Modify..." : The following window of seizure displays :
"Modify a Frequency" window .
5. In the field "Freq." modify the value of the frequency. 6. Click on "OK", The seizure window fades and the added frequency appears in
the field "AF 1".
73
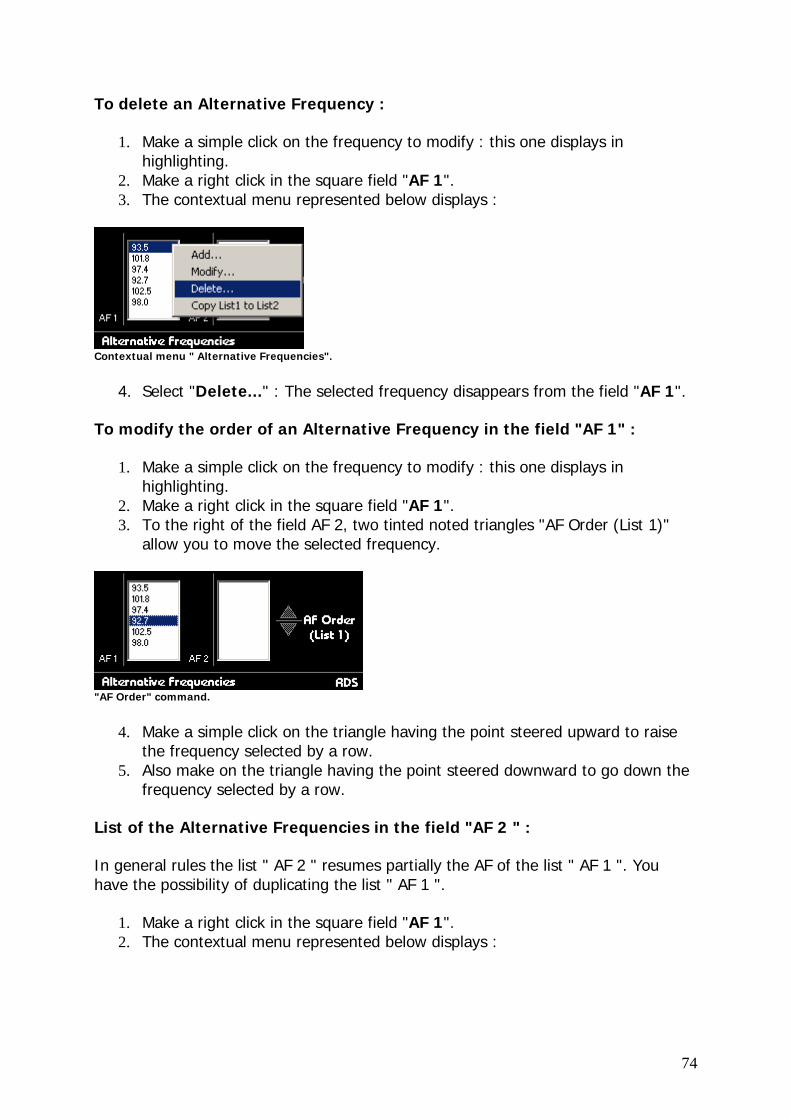
To delete an Alternative Frequency :
1. Make a simple click on the frequency to modify : this one displays in highlighting.
2. Make a right click in the square field "AF 1". 3. The contextual menu represented below displays :
Contextual menu " Alternative Frequencies".
4. Select "Delete..." : The selected frequency disappears from the field "AF 1".
To modify the order of an Alternative Frequency in the field "AF 1" :
1. Make a simple click on the frequency to modify : this one displays in highlighting.
2. Make a right click in the square field "AF 1". 3. To the right of the field AF 2, two tinted noted triangles "AF Order (List 1)"
allow you to move the selected frequency.
"AF Order" command.
4. Make a simple click on the triangle having the point steered upward to raise the frequency selected by a row.
5. Also make on the triangle having the point steered downward to go down the frequency selected by a row.
List of the Alternative Frequencies in the field "AF 2 " :
In general rules the list " AF 2 " resumes partially the AF of the list " AF 1 ". You have the possibility of duplicating the list " AF 1 ".
1. Make a right click in the square field "AF 1". 2. The contextual menu represented below displays :
74

"Copy List 1 to List 2 " command.
3. Select "Copy List1 to List2". 4. The list "AF 2" this below appear.
"Copy List 1 to List 2 " command.
To delete one or several Alternative Frequencies of the list "AF 2" :
1. Click the frequency to be deleted to delete a single frequency, you have the possibility of selecting several frequencies to delete, to do it to use the touch " Ctrl or Shift " of your keyboard.
2. The contextual menu represented below displays :
"Delete" command.
3. Select "Delete". 4. The selected frequencies disappear from the field "AF 2" .
75

To commute from a list to the other one :
1. By the software, click on "List 1" or "List 2".
"List" command.
2. By the "Local Switche", refer you to the section II-1 Connexions and Local Switche.
76

IV-2 - THE STEREO BOOST
The "Stereo Boost" Plug-In as displayed in the central window.
Plug-In " Stereo Boost " allow you to optimize the width of the stereophonic image of your modulation without the addition of stereo enhancer. Installation :
CAUTION :
• The Plug-In that has been sent to you is specific to the serial number of your DVP Processor as well as to the Layers that it uses. It will therefore work only on the machine that you specified when ordering the Plug-In.
To install the "Stereo Boost" Plug-In :
1. Follow the instructions received with this Plug-In to install it on your computer.
2. Launch the DVP or DBP Control Software as usual. 3. Click "DVP Load Plug In" or "DBP Load Plug In" in the Help Menu. 4. The window below will be displayed. 5. Select the Plug-In that you want to load (in the example below: "Stereo
Boost"). 6. Click "Open" at the bottom of the window.
77

The "Load Plug In" window..
It’s an advanced stereo enhancer.
To activate / deactivate the "Stereo Boost" :
1. Click on A or B above Stereo Boost located at the top left of the window : 2. The red triangle is set in front of your choice, indicating that it is
implemented. 3. Proceed the same with "OFF" to deactivate the Stereo Boost
• The A mode amplifies the differences of level between both channels (Left and right).
• The B mode inserts a delay between both channels (Left and right).
Enhance :
This function sets the delay time which will be added between both channels.
NB :
This function can not be used with the A mode as this mode just increases the differences of level.
78

To adjust the enhancement :
1. Set your mouse cursor over the magenta triangle located at the right hand side of "Enhance".
2. Drag the mouse cursor up and down to set the desired value : the value is displayed at the right of the cursor. (In the above example : 20 %)
3. Simply clicking on the red triangle, has the focus activated allowing you to precisely define the value, using the "PgUp" and "PgDn" keys of your keyboard.
Diffusion :
This function sets the levels of the effect that will be inserted.
To adjust the diffusion :
1. Set your mouse cursor over the magenta triangle located at the right hand side of the "Diffusion" scale.
2. Drag the cursor up and down to set the desired value : the value is displayed at the right of the cursor. (in the above example : 31 %)
3. Simply clicking on the red triangle, has the focus activated allowing you to precisely define the value, using the "PgUp" and "PgDn" keys of your keyboard.
Stereo Limiter :
To activate / deactivate the Stereo Limiter :
1. Click on the "ON" sign above the "Stereo Limiter" command located at the top left of the window:
2. The red triangle is set in front of your choice, indicating that it is implemented.
3. Proceed the same way with the "OFF" command to deactivate the Limiter.
79

Efficiency :
To adjust the efficiency of the Stereo Boost :
1. Set your mouse cursor over the magenta triangle located at the right hand side of the "Efficiency" scale.
2. Drag the triangle up and down to set the desired value: the value is displayed at the right of the cursor. (In the above example : 31 %)
3. Simply clicking on the red triangle will have the focus activated, allowing you to precisely adjust the value using the "PgUp" et "PgDn" keys of your keyboard.
Stereo Enhance Effect :
This scale displays in real time the percentage of "enlargement" applied to the signal's stereo image (and thus the efficiency of the enlargement).
Stereo Limitation Effect :
This scale displays in real time the percentage of limitation of image width applied (and thus the efficiency of the limiter).
Final Stereo Image :
This scale displays in real time the true width of the stereo image of the signal at the output of the process.
IMPORTANT :
In Frequency Modulation, the stereo signal is transmitted by a carrier (Left + Right information) and by a sub-carrier modulated by the Left-Right difference. This transmission mode, called Multiplex, is usually considered as robust. Yet, in case of Multiple Reflexions of the HF signal, receptors (i.e. car-radios) can have difficulty to operate a good discrimination (this is usually due to the local geography : mountains, buildings...). If you set the "Stereo Boost" Plug-in on too wide a stereo image (and thus quite not mono compatible), you could alter the quality of reception in areas where reflexions are common.
80

IV-3 – THE MPX GUARD
The "MPX Guard" Plug-In as displayed in the central window.
The "MPX Guard" Plug-In allows you to optimize your frequency excursion and obtain a spectacular modulation density.
Installation :
CAUTION :
• The Plug-In that has been sent to you is specific to the serial number of your DVP Processor as well as to the Layers that it uses. It will therefore work only on the machine that you specified when ordering the Plug-In.
To install the "MPX Guard" Plug-In :
1. Follow the instructions received with this Plug-In to install it on your computer.
2. Launch the DVP or DBP Control Software as usual. 3. Click "DVP Load Plug In" or "DBP Load Plug In" in the Help Menu. 4. The window below will be displayed. 5. Select the Plug-In that you want to load (in the example below: "MPX
Guard"). 6. Click "Open" at the bottom of the window.
81

The "Load Plug In" window..
The MPX Guard settings :
To activate the MPX Guard :
1. Click on the "ON" inscription located above the "MPX Guard" command. 2. The magenta triangle is set in front of the "ON" inscription, indicating that
your command has been implemented. 3. Click on the "OFF" button to deactivate the MPX Guard.
To adjust the targeted MPX level :
1. Set your mouse cursor over the magenta triangle located at the right hand side of "Target of MPX" .
2. Drag the cursor up and down to set the desired value : it is displayed at the right of the cursor. (in the above example: 6 dB)
3. Simply clicking on the red triangle, has the focus activated allowing you to precisely define the value, using the "PgUp" and "PgDn" keys of your keyboard.
To adjust the integration time of the measurement of the deviation :
1. Set your mouse cursor over the magenta triangle located at the right hand side of "Time Integration"
2. Drag the mouse cursor up and down to set the desired value : it is displayed at the right of the cursor. (In the above example: 15 mn)
3. Simply clicking on the red triangle, has the focus activated allowing you to precisely define the value, using the "PgUp" and "PgDn" keys of your keyboard.
82

The MPX Guard display :
The MPX Guard Plug-In displays 3 horizontal scales used to precisely control all the parameters.
MPX Attenuation :
This scale is graduated from right to left. It indicates the instantaneous attenuation rate applied to the power by the MPX Guard. The numerical value is displayed above it. The red bar moves in real time from right to left indicating the applied attenuation rate.
The peak point reached is displayed as a vertical red stroke. You can thus have the MPX Guard in "monitoring" mode and read the maximum attenuation rate applied while you were away.
To reset to zero the red stroke, click on "Reset" at the bottom right of the "MPX Attenuation" scale.
Fast MPX Power :
This scale indicates the instantaneous power at the output of the DVP. The numerical value is displayed above the scale. The blue stroke moves in real time, indicating the current value.
The peak point reached is displayed as a vertical red stroke. You can thus have the MPX Guard in "monitoring" mode and read the maximum value reached while you were away.
To reset to zero the red stroke, click on "Reset" at the bottom right of the "Fast MPX Power" scale.
User Time MPX Power :
This scale indicates the average power according to the integration time defined by the "Time Integration" command. The numerical value is displayed above the scale. The blue stroke also indicates the current value.
The peak point reached is displayed as a vertical red stroke. You can thus have the MPX Guard in "monitoring" mode and read the maximum value reached while you were away.
To reset to zero the red stroke, click on "Reset" at the bottom right of the "User Time MPX Power" scale.
83

Tags :
If your monitor can support a resolution of 1024 by 768, the tags can be constantly displayed at the bottom of the monitor. They give you important informations and a quick access to numerous features of the DVP. See also: MPX Guard Tag.
The "MPX Guard" tag is used to keep information on the MPX Guard plug-in displayed in the overall display of the DVP software. The 3 scales described above are displayed in this tag :
"MPX Guard" tag.
84

IV-4 – THE DORROUGH METER
The "Dorrough" plug-in displayed in the main window.
The famous Dorrough meter is now available in the DVP as a Plug-In. This Dorrough IDT model is the result of an association between IDT and Dorrough constituted so as to offer the best in measurement of the peak and loudness levels in order to get an incredible audio quality!
Digital Dorrough meters are based on unique algorithms to measure the loudness and peak level of the signal, both measures linked on a 40 dB FS scale in one bar graph. Besides, to get more comfort in the visualisation, each led represents one dB!
1. You can control your peak level thanks to the led always located at the right of the others.
2. The last 3 leds on the right are red to warn you that your signal is about to saturate as it will go further than 0dB FS! These 3 leds are from -3 to 0 dB FS.
3. Concerning the loudness, there are 3 other red leds you can use as a reference for your loudness level.
4. Moreover, you can move these 3 leds from -14 to -4dB FS to follow the maximum loudness level you want to reach (only possible on the IDT model).
Special thanks to Mike and Kay Dorrough for letting us use the Dorrough meter.
85

Installation :
CAUTION :
• The Plug-In that has been sent to you is specific to the serial number of your DVP Processor as well as to the Layers that it uses. It will therefore work only on the machine that you specified when ordering the Plug-In.
To install the "Dorrough Loudness Monitor" Plug-In :
1. Follow the instructions received with this Plug-In to install it on your computer.
2. Launch the DVP or DBP Control Software as usual. 3. Click "DVP Load Plug In" or "DBP Load Plug In" in the Help Menu. 4. The window below will be displayed. 5. Select the Plug-In that you want to load (in the example below: " Dorrough
Meter"). 6. Click "Open" at the bottom of the window.
The "Load Plug In" window..
86

To visualise the Dorrough Loudness Monitor on the left and right channels :
1. Click on "Stereo" of the Measure mode option. 2. The switch is now pressed and red showing you that your action has been
taken into account.
The Dorrough meter at the top shows you the modulation of your left channel whereas the one at the bottom shows you the modulation of your right channel.
To visualise the Dorrough Loudness Monitor only on the left channel :
1. Click on "L" of the Measure mode option. 2. The switch is now pressed and red showing you that your action has been
taken into account.
In this case you only visualise the modulation of the left channel on the output of the DBP.
To visualise the Dorrough Loudness Monitor only on the right channel :
1. Click on "R" of the Measure mode option. 2. The switch is now pressed and red showing you that your action has been
taken into account.
In this case you only visualise the modulation of the right channel on the output of the DBP.
87

To visualise the Dorrough Loudness Monitor on left + right and left - right modulations :
1. Click on "L+R/L-R" of the Measure mode option. 2. The switch is now pressed and red showing you that your action has been
taken into account.
In this case you visualise the modulation of the left + right and left - right modulations of the DVP's stereo coder.
Caution :
The loudness level and peak level you visualise are taken on the output of the DBP, that means after all the process. Therefore you can see that as you push up the Efficiency of the final limiter, your loudness level comes closer and closer to the peak level.
88

On this Dorrough IDT model you can relocate the 3 red leds representing the loudness level you want to reach.
To move these 3 leds, please do as follows :
1. Put your cursor on the 3 red leds representing the loudness. 2. Click and move your mouse until you reach the place you wanted.
NB :
These leds can be set on all the visualisation modes from -14dB to -4dB FS.
Furthermore, you have an instant access to the Dorrough Loudness Monitor via a tag window.
To display the Dorrough Loudness Monitor tag window :
1. Click on Dorrough Meter in the More Windows menu of the DVP. 2. A cursor appears showing you that your choice has been taken into account. 3. To remove this window, click again on Dorrough Meter of the More
Windows menu.
This window is showing you what you selected in the Dorrough main window.
89

90
Front Panel display:
The "Dorrough" Plug-in displayed on the DBP front panel.
To visualise the Dorrough Loudness Monitor Plug-in on the front panel of the DBP :
1. From the main screen, point your cursor on PLUGINS thanks to the UP and DOWN keys.
2. The Dorrough Loudness Monitor is now displayed.
You can control your loudness level thanks to the coloured leds and your peak level thanks to the coloured one which is at the right of the others (2 horizontal bars under and above this led enable you to see it easily).

91
Simplified bloc diagram of the DBP 7+4
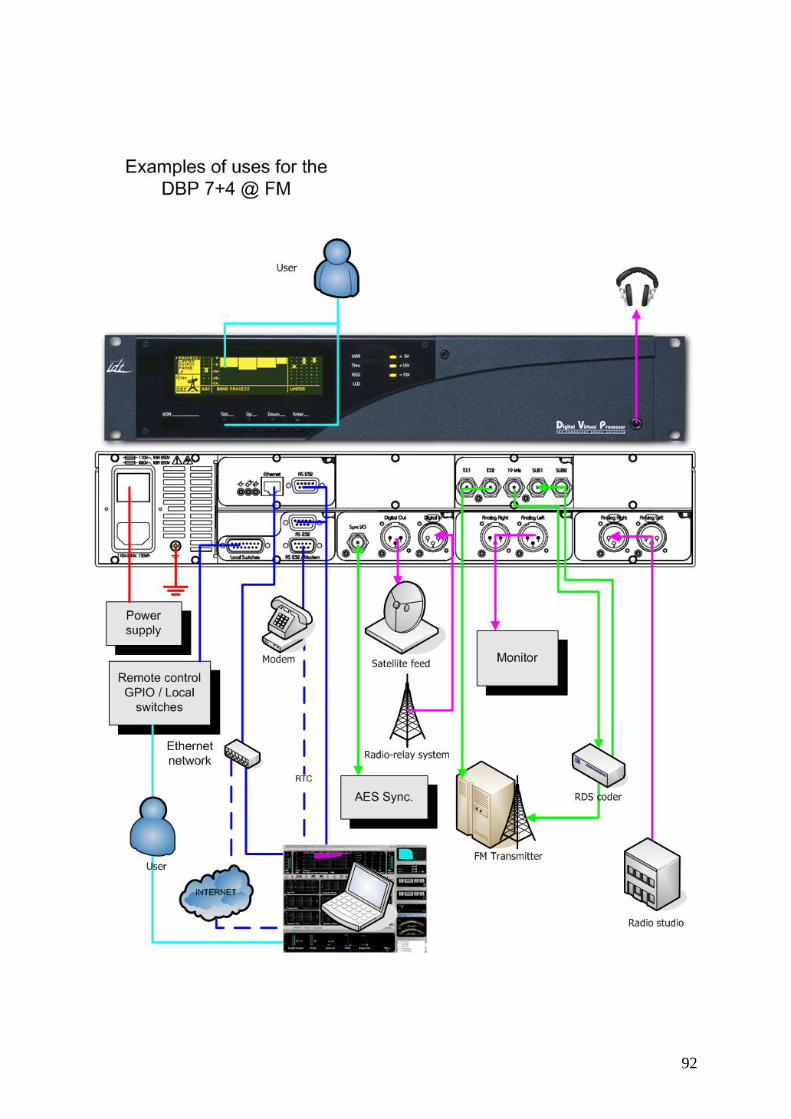
Examples of uses of the DBP 7+4
92

General specifications
General specifications : Frequency response : +0 / - 0.4dB, 10-20000Hz (Bypass mode). System distortion : < 0.01% THD, de-emphasised. Signal to Noise : 92 dB unweighted, 20 Hz - 20 kHz I/O Delay : ~13 milliseconds for the DVP and ~ 6 milliseconds for the DBP Internal sample rate : 96 kHz Internal resolution : 40 bit floating point I/O resolution : 24 bit Maximum Overshoot : 0.1 dB Phase Response : Linear 20 Hz - 20 kHz Process Architecture DVP: FFT (Fast Fourier Transform) Process Architecture DBP: Band process Process structure : 1APP (One Advanced Point Processing) DSP : 10 Sharc 21065, expandable to 66 DSP. Maximum number of Factory Presets : 32 Maximum number of User Presets : 64 Remote contact closure : 14 Presets Analogue Audio Input : Configuration : Stereo Impedance : > 6 kOhms Type : Electronically balanced Maximum Input Level : +25 dBu, for THD + N < 0.01% Equivalent Input Noise : < - 84 dBu Common Mode Rejection Ratio: 90 dB Connector : two XLR female A/D Conversion : 24 bit 128X oversampled Analogue Audio Output : Configuration : Stereo Source impedance : < 1 Ohms Type : Electronically balanced Maximum Output Level : +24 dBu, on 10 kOhms Load for THD + N < 0.01 % +18 dBu on 600 Ohms Load for THD + N < 0.05 % Signal to Noise : > 100 dB unweighted, 20 Hz - 20 kHz Connector : Two XLR male DA Conversion : 24 bit 128X oversampled Digital Audio Input : Configuration : Stereo per AES/EBU (AES3), 16, 18, 20 or 24 bit resolution. Impedance : 110 ohms Sample Rate : 32, 44.1, 48, 96kHz autodetect Status bits : Input channel status is decoded for control. Input user bits are optionally passed trough the output. Connector : XLR female, EMI-suppressed Filtering : RFI filters. BW : 0.5-200MHz Digital Audio Output : Configuration : Stereo per AES/EBU (AES3), 20 or 24 bits resolution. Impedance : 110 ohms Sampling Rate : Software selectable, free running at 32kHz +/- 10 PPM, 44.1kHz +/- 10 PPM, 48kHz +/- 10 PPM, 96kHz +/- 10 PPM. Synchronisation mode : Internal free running or external or delivery mode for 32, 44.1, 48, 96 kHz Word Length : Selectable 18, 20, 24 bits. Jitter : Less than 5 ns rms. Status bits : Output channel status can be generated. Input User bits are optionally passed through the output Connector : XLR male, EMI-suppressed Filtering : RFI filtered. BP : 0.5-200MHz IDT Sound Processing Corporation reserves the right to make changes without previous notification. Illustrations, descriptions and characteristics are not contractually binding and not engage the responsibility of the manufacturer.
Digital Sync Input / Output : Configuration : Two mode, input to provide sync, Output to deliver sync Impedance : 75 ohms Sampling Rate for Input mode : 32, 44.1, 48, 96 kHz Sampling Rate for Output mode : Software selectable, 32 kHz +/- 10 PPM, 44.1 kHz +/- 10 PPM, 48 kHz +/- 10 PPM, 96 kHz +/- 10 PPM. Connector : BNC female. Digital Stereo Generator : Frequency Response : +/- 0.1 dB 20Hz - 15 kHz Configuration : Two independently controlled output Source impedance : 75 ohms Load impedance : 75 ohms or grater Level : Adjustable max 15 Vpp (100% modulation ~ -3 dBfs) Connector : BNC Pre-emphasis : 50 or 75μs Stereo separation : More than 90dB, 20Hz - 15 kHz Main to Sub crosstalk, Sub to Main crosstalk : < -85 dB Audio filtering : 80 dB rejection at 19kHz Pilot stability : +/- 0,2 Hz Pilot Output 19 kHz : 1 BNC Sub-carrier : Two BNC input Remote Computer Interface : Configuration : Two RS 232 Connector : One Sub-D 9 pin female and one Sub-D 9 pin male Baud rate : Auto selectable baud rate 9600 to 115200 bauds Remote Control : Configuration : Fully remote controllable by external modem or TCP/IP (optional). Rate : 9600 to 115200 bauds Remote Control Interface : Configuration : 14 inputs contact closure Control : 14 users presets directly selectable by software Power : Voltage : 80 to 265 VAC, 50 - 60 Hz, 130 VA Connector : IEC, EMI-suppressed Safety Standard : CE / DBT Environmental and Dimensions : Operating Temperature : 0° à 50° C or 32° to 122° F Humidity : 0 to 95% RH, no condensing Size : 19'', Two rack unit high. (W x H x D) : 48,3 x 8.9 x 40 cm - 19 x 3.5 x 15.7'' Weight : 6 Kg - 13.2 lb.
93
IDT – SOUND PROCESSING CORPORATION – TECHNOPARC – 5 Allée Moulin Berger – 69130 ECULLY – France
Tel +33/(0) 472.18.19.20 - Fax +33/(0) 472.18.19.21 - Web www.idt-fr.com – e-mail : [email protected]


