24
Wrist Type Blood Pressure Monitor Model No.: BW-210 INSTRUCTION MANUAL PLEASE READ THIS INSTRUCTION MANUAL COMPLETELY BEFORE OPERATING THIS UNIT.
| Date post: | 15-Apr-2017 |
| Category: |
Healthcare |
| Upload: | gurin-products |
| View: | 169 times |
| Download: | 0 times |

Wrist Type Blood Pressure MonitorModel No.: BW-210
INSTRUCTION MANUAL
PLEASE READ THIS INSTRUCTION MANUAL COMPLETELY BEFORE OPERATING THIS UNIT.

Index
1
2
3
4
5
6
7
8
10
11
13
14
15
15
16
17
1.
Important Information Before Use
Introduction
2.
3.
4. Description of LCD Display
5.
6. Setting the Date and Time
7. Applying Your Cuff
8. Measurement of Pulse Rate and Blood Pressure
9. World Health Organization (WHO)
10.Memory Function
11.Troubleshooting
12.Error Codes
13.Care and Maintenance
14.Applied Standards
15.Technical Specification
16.EMC Tables
Blood Pressure Monitor Features
Battery Installation

1
To achieve the maximum benefit from your blood pressure monitor, we recommend that you first consult with your physician or trained health care professional.Thank you for purchasing an Blood Pressure Monitor. With proper care and use, your monitor will provide you with many years of reliable readings.The method of measurement that your Automatic Monitor uses is called the oscillometric method. The monitor detects your blood’s movement through the artery in your wrist and converts the movements into a digital reading. The oscillometric method does not require a stethoscope, making the monitor easy-to-use. The preformed cuff requires little effort to apply and is comfortable to wear.Clinical research has proven a direct relationship between blood pressure in the wrist and blood pressure in the arm. Because the arteries in the wrist and arm are connected, changes in wrist blood pressure reflect changes in arm blood pressure. Frequent wrist blood pressure measurements will provide you and your physician with an accurate indication of change in your true blood pressure.People with severe hypertension, severe arteriosclerosis, or severe diabetes, should consult their physician about monitoring blood pressure at the arm.Blood pressure readings determined with this device are equivalent to measurements obtained by a trained observer using the cuff/stethoscope auscultation method, within the limits prescribed by the National Standard for Electronic or Automated Sphygmomanometers.
Introduction

2
1. Blood pressure measurements should only be interpreted by a physician or a trained health care professional who is familiar with your medical history. Through regular use of this device and recording of your measurements, you can keep your physician informed of the changes in your blood pressure.
2. Perform your measurement in a quiet place. You should be seated in a relaxed position.3. Avoid smoking, eating, taking medication, alcohol consumption or physical activity 30
minutes prior to taking a reading. If you are exhibiting signs of stress, avoid taking your measurement until the feeling subsides.
4. Rest 15 minutes prior to taking a reading.5. Remove any constrictive clothing or jewelry that may interfere with the cuff placement.6. Keep the monitor stable during measurement to achieve an accurate reading. Remain
still; do not talk during the measurement.7. Record your daily blood pressure and pulse readings on a chart.8. Take your readings at the same time, each day or as recommended by your physician to
get an accurate indication of change in your true blood pressure.9. Wait a minimum of 15 minutes between readings to allow for the blood vessels to return
to normal. The wait time may vary depending on your individual physiological characteristics.
10. Although such cases are rare, for those with an extremely weak pulse or irregular pulse, errors may result which prevent proper measurement. If abnormal variations are noticed, consult with your physician or trained healthcare professional.
11. This device is intended for adult use. While taking a measurement, you can stop the inflation or deflation process of the cuff at any time by pressing the POWER button.
Important Information Before Use

3
Blood Pressure Monitor Features
Storage Case
START/POWERButton (on/off)
MEMORY RecallButton
LCD Display
Wrist Cuff
Date and TimeButton
4
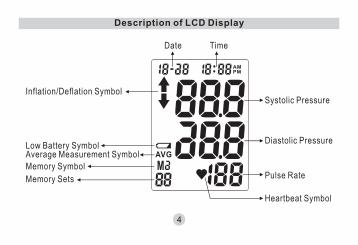
Description of LCD Display
Date Time
Systolic Pressure
Diastolic Pressure
Pulse Rate
Heartbeat Symbol
Inflation/Deflation Symbol
Low Battery SymbolAverage Measurement Symbol
Memory Symbol
Memory Sets
4

5
Low battery warning:It is necessary to replace the batteries when the Low Battery symbol “ ” appears on the display, or when the display does not turn on after the POWER button is pressed.
Battery Installation
Replacing the Battery:1. Press down on latch and lift the cover on the
bottom of the monitor.2. Insert or replace 2 x 1.5 V AAA batteries into the
battery compartment, ensuring to match the indicated polarity symbols. Always use new batteries.
3. Replace the battery cover.
NOTE: Battery-operated1. Please properly dispose of the batteries away from small children and heat.2. It is recommended to remove the batteries if the unit will not be used for an extended
period of time.3. For long durations of non-operation, please remove all batteries from the device.4. Batteries must be disposed of in accordance with local environmental and institutional
policies.5. Dispose of used batteries in accordance with the applicable legal regulations. Never
dispose of batteries in the normal household waste.

Setting the Date and Time
It is necessary to set the date and time for the unit every time batteries are initially installed or replaced.
1. When the unit is off (a blank display screen) or after replacing batteries, press and release the “Date and Time” button; the “Year” will begin to flash on the display.
2. Press the “MEMORY” button to advance the display to the desired “Year”, press “POWER” button to confirm the “Year”.
3. Next, the “Month” will blink. Repeat steps 1 and 2 to set the “Month” and “Date”, then “hour”, then “Minute”.
Year
Press the“Date and Time”
button
Month
Press the“POWER”
button
Date
Press the“POWER”
button
Hour
Press the“POWER”
button
Minute
Press the“POWER”
button
Press the“POWER”
button
4. After setting the minute, the unit will automatically exit out of the date/time setting mode and briefly show the word OFF before shutting down.
6
7
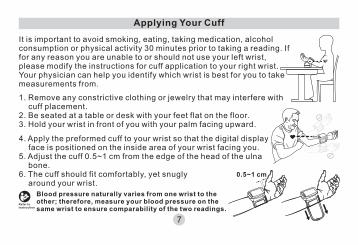
It is important to avoid smoking, eating, taking medication, alcohol consumption or physical activity 30 minutes prior to taking a reading. If for any reason you are unable to or should not use your left wrist, please modify the instructions for cuff application to your right wrist. Your physician can help you identify which wrist is best for you to take measurements from.
Applying Your Cuff
1. Remove any constrictive clothing or jewelry that may interfere with cuff placement.
2. Be seated at a table or desk with your feet flat on the floor.3. Hold your wrist in front of you with your palm facing upward.
4. Apply the preformed cuff to your wrist so that the digital display face is positioned on the inside area of your wrist facing you.
5. Adjust the cuff 0.5~1 cm from the edge of the head of the ulna bone.
6. The cuff should fit comfortably, yet snuglyaround your wrist.
Blood pressure naturally varies from one wrist to the other; therefore, measure your blood pressure on the same wrist to ensure comparability of the two readings.
0.5~1 cm

8
Measurement of Pulse Rate and Blood Pressure
Please read the preceding portions of this manual prior to taking your first reading.
1. Rest your elbow on a solid surface with your palm facing upward. Elevate your wrist so that the cuff is at the same level as your heart. Relax your left hand.
2. Press the POWER button. This will turn the power on.
3. After the self-test, the values for the last reading will appear on the display.
4. The blood pressure monitor start to measure.
5. The cuff will automatically begin to inflate, with the display showing the increasing pressure in the cuff. As the pressure increases, an arrow pointing up will appear on the display.
6. When the inflation has reached optimum level, the display will begin to show the decreasing pressure; the screen will display an arrow pointing down while you feel the pressure of the cuff decrease.
9
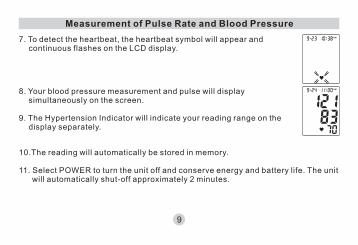
Measurement of Pulse Rate and Blood Pressure
7. To detect the heartbeat, the heartbeat symbol will appear and continuous flashes on the LCD display.
8. Your blood pressure measurement and pulse will display simultaneously on the screen.
9. The Hypertension Indicator will indicate your reading range on the display separately.
10.The reading will automatically be stored in memory.
11. Select POWER to turn the unit off and conserve energy and battery life. The unit will automatically shut-off approximately 2 minutes.

10
The World Health Organization has established globally accepted standards for the assessment of high or low blood pressure readings. The below chart should be considered only as a guideline, always consult with your physician or health care professional to interpret your individual results.
World Health Organization (WHO)
Dia
sto
lic B
loo
d P
res
su
re
85
90
100
110
80
130120
Optimal
Normal
High-Normal
Mild Hypertension (Grade 1)
Moderate Hypertension (Grade 2)
140 160
Severe Hypertension (Grade 3)
180
Systolic Blood PressureHypertension Indicator

11
Memory Function
Press the“MEMORY”
button
You can recall up to 60 total measurements in memory, plus an average of the last 3 stored measurements in memory to share with your physician or trained healthcare professional.
Recalling Measurements in Memory:
1. Press and release the “MEMORY” button. The unit will first display the average of the last 3 stored measurements.
3. All results for a given measurement will display, including measurement results, pulse rate, Hypertension Indicator, and date/time stamp.
4. When the number of readings exceeds 60, the oldest data will be replaced with the new record.
5. Press the Power button to turn the monitor OFF at any time during review of the stored measurements.
2. Continue to press the “MEMORY” button to successively view the next previously stored measurements. Measurements will appear on the display from most current to oldest; the memory number will appear on the lower left corner.
12
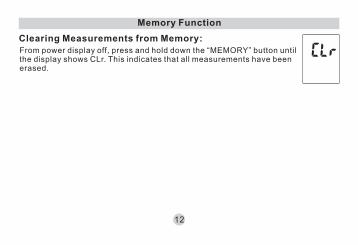
Memory Function
From power display off, press and hold down the “MEMORY” button until the display shows CLr. This indicates that all measurements have been erased.
Clearing Measurements from Memory:

Troubleshooting
Nothing appears in the display even when the power is turned on.
Problem
Low Battery Symbol appears.
Batteries are drained.
Probable Cause
Batteries are drained.
In colder temperatures batteries have weaker electrical charges.
Replace all batteries with new ones.
Recommended Action
Replace all batteries with new ones.
Warm up the batteries, or use the device in a warmer setting.
Device operation time is inconsistent.
No reading after measurement.
Suspicious blood pressure results.
Different battery brands have different life spans.
Batteries are drained.
Perhaps the cuff was improperly positioned.
Blood pressure naturally varies throughout the day.
Use Alkaline batteries and replace all batteries at the same time with same brand batteries.
Replace all batteries with new ones.
Adjust patient and wrist cuff to measure.
Rest a while, relax and measure again.
Suspicious heart rate results.
Bodily movement during device use.
Measurement shortly after exercise or exposure to the outdoors.
Refrain from moving during measurement.
Do not take measurements after exercise or coming back from the outdoors.
Battery are not correctly aligned with terminals. Reinsert batteries in the correct position.
Power switches off automatically.
During measuring, air re-inflates.
System design.
It could be a normal action if the user's blood pressure is higher than the initial pressure value, the device automatically pumps to a higher pressure by 40mmHg each time.
Push the power button again, and then begin measure again.
Relax, and try to take a measure again.
The wrist cuff is not fastened properly. Check that the wrist cuff is fastened properly and retake the measurement.
13

14
Error Codes
Err Meaning Corrective Action
Err 0 No pulse or detect pulses not enough. Take off heavy clothes and retry again.
Err 1 Leakage in Cuff Pressure/Inflation too low.The wrist cuff is not fastened properly. Re-apply the cuff, and take a measurement again.
Err 2 Pressure fault. Rest a while, relax and retry again.
Err 3 Deflation fault.The wrist cuff is not fastened properly. Re-apply the cuff, and take a measurement again.
Err Memory error.Take off batteries to reboot the device, then take another measurement.
Low batteries. Replace all batteries with new ones.

Care and Maintenance
1. Clean the device and wrist cuff carefully only with a slightly moistened cloth.2. Do not immerse the device in water. It may cause damage if water enters.3. Do not use any gas, strong detergent, or solvents to clean the device, including the wrist cuff.4. Disconnect the cuff and tubing from the monitor prior to storing.5. Do not use any liquids on the monitor or cuff.6. Use a soft, dry cloth to clean your monitor.7. Do not store in direct sunlight, dust or excessive humidity.8. Avoid extreme temperatures.9. Do not disassemble the monitor or cuff.10.Remove batteries if the monitor will not be used for an extensive period of time.
This product conforms to the provisions of the EC directive MDD (93/42/EEC). The following standards apply to design and/or manufacture of the products:‧EN 1060-1
Non-invasive sphygmomanometers-Part1 : General requirements‧EN 1060-3
Non-invasive sphygmomanometers-Part 3 : Supplementary requirements for electro-Mechanical blood pressure measuring system
‧EN 1060-4Non-invasive sphygmomanometers - Part 4: Test procedures to determine the overall system accuracy of automated non-invasive sphygmomanometers
‧ANSI/AAMI Sp10Electronic or automated sphygmomanometers
.ISO 14971Medical devices-Application of risk management to medical devices. The Classification according to IEC/EN 60601-1 sub-claues 5:.Internally powered equipment.IPX0.Equipment not suitable for use in the presence of a flammable anaesthetic mixture with air or with oxygen or nitrous
oxide.Continuous operation
Applied Standards
15

16
Technical Specification
10℃
40℃
-20℃
50℃
• Measuring range :
• Calibration Accuracy:
• Operating environment :o o o o10 C~40 C (50 F~104 F)
with relative humidity up to 85% (non condensing)• Storage/ Transportation environment :
o o o o-20 C~+50 C (-4 F~+122 F)with relative humidity up to 85% (non condensing)
• Power Source :• Weight :• Dimensions :• Cuff circumference (M Size) : approx. 12.5~21 cm
2 x 1.5 V AAA batteriesapprox. 109g (exclude batteries)approx. 64mmX74mmX31mm (WXHXD)
Blood Pressure : 30~280 mmHgPulse Rate : 40~199 beats/min
Blood Pressure : ± 3 mmHg
Pulse rate : ± 4% of reading

The BW-210 Wrist Type Blood Pressure Monitor is intended for use in the electromagnetic environment specified below. The customer or the user of the BW-210 Wrist Type Blood Pressure Monitor should assure that it is used in such an environment.
Guidance and manufacturer's declaration-electromagnetic emissions
Emissions test Compliance Electromagnetic environment guidance
RF emissionsCISPR 11
Group 1 The BW-210 Wrist Type Blood Pressure Monitor uses RF energy only for its internal function. Therefore, its RF emissions are very low and are not likely to cause any interference in nearby electronic equipment.
RF emissionsCISPR 11
Class B
The BW-210 Wrist Type Blood Pressure Monitor is suitable for use in all establishments, including domestic establishments and those directly connected to the public low-voltage power supply network that supplies buildings used for domestic purposes.
Harmonic emissionsIEC 61000-3-2
Not applicable
Voltage fluctuations/flicker emissionsIEC 61000-3-3
Not applicable
17
EMC Tables

The BW-210 Wrist Type Blood Pressure Monitor is intended for use in the electromagnetic environment specified below. The customer or the user of the BW-210 Wrist Type Blood Pressure Monitor should assure that it is used in such an environment.
Guidance and manufacturer's declaration-electromagnetic immunity
Immunity test IEC 60601 test level
Compliance level
Electromagneticenvironment-guidance
Electrostaticdischarge (ESD)IEC 61000-4-2
± 6 kV contact± 8 kV air
Floors should be wood, concrete or ceramic tile. If floors are covered with synthetic material, the relative humidity should be at least 30 %.
± 6 kV contact± 8 kV air
Power frequency(50/60 Hz)magnetic fieldIEC 61000-4-8
3 A/m Power frequency magnetic fields should be at levels characteristic of a typical location in a typical commercial or hospital environment.
3 A/m
18
EMC Tables

The BW-210 Wrist Type Blood Pressure Monitor is intended for use in the electromagnetic environment specified below. The customer or the user of the BW-210 Wrist Type Blood Pressure Monitor should assure that it is used in such an environment.
Guidance and manufacturer's declaration-electromagnetic immunity
Immunity test
Radiated RFIEC 61000-4-3
IEC 60601 test level
3 V/m80 MHz to 2,5 GHz
Compliance level
3 V/m
Electromagnetic environment-guidance
Portable and mobile RF communications equipment should be used no closer to any part of the BW-210 Wrist Type Blood Pressure Monitor, including cables, than the recommended separation distance calculated from the equation applicable to the frequency of the transmitter.
Recommended separation distance
d=1.2 √Pd=1.2 √P 80 MHz to 800 MHZd=2.3 √P 800 MHz to 2,5 GHz
where P is the maximum output power rating of the transmitter in watts (W) according to the transmitter manufacturer and d is the recommended separation distance in metres (m).
Field strengths from fixed RF transmitters, as determined by an electromagnetic site surveyª, should be less than the compliance level in each frequency range.
Interference may occur in the vicinity of equipment marked with the following symbol:
b
NOTE 1 At 80 MHz and 800 MHz, the higher frequency range applies.NOTE 2 These guidelines may not apply in all situations. Electromagnetic propagation is affected by absorption and reflection from structures, objects and people.
a. Field strengths from fixed transmitters, such as base stations for radio (cellular/cordless) telephones and land mobile radios, amateur radio, AM and FM radio broadcast and TV broadcast cannot be predicted theoretically with accuracy. To assess the electromagnetic environment due to fixed RF transmitters, an electromagnetic site survey should be considered. If the measuredfield strength in the location in which the BW-210 Wrist Type Blood Pressure Monitor is used exceeds the applicable RF compliance level above, the BW-210 Wrist Type Blood Pressure Monitor should be observed to verify normal operation. If abnormal performance is observed, additional measures may be necessary, such as reorienting or relocating the BW-210 Wrist Type Blood Pressure Monitor.
b. Over the frequency range 150 kHz to 80 MHz, field strengths should be less than 3 V/m.
19
EMC Tables

The BW-210 Wrist Type Blood Pressure Monitor is intended fo use in an electromagnetic environment in which radiated RF disturbances are controlled. The customer or the user of the BW-210 Wrist Type Blood Pressure Monitor can help prevent electromagnetic interference by maintaining a minimum distance between portable and mobile RF communications equipment (transmitters) and the BW-210 Wrist Type Blood Pressure Monitor as recommended below, according to the maximum output power of the communications equipment.
Recommended separation distances between portable and mobile RF communications equipment and the BW-210 Wrist Type Blood Pressure Monitor
Rated maximumoutput powerof transmitter
W
0.01
0.1
1
10
100
Separation distance according to frequency of transmitterm
150 kHz to 80 MHZ
d=1.2 √P
0.12
0.38
1.2
3.8
12
80 MHz to 800 MHZ
d=1.2 √P
0.12
0.38
1.2
3.8
12
800 MHz to 2.5 GHz
d=2.3 √P
0.23
0.73
2.3
7.3
23
For transmitters rated at a maximum output power not listed above, the recommended separation distance d in metres (m) can be estimated using the equation applicable to the frequency of the transmitter, where P is the maximum output power rating of the transmitter in watts (W) according to the transmitter manufacturer.NOTE 1 At 80 MHz and 800 MHz, the separation distance for the higher frequency range applies.NOTE 2 These guidelines may not apply in all situations. Electromagnetic propagation is affected by absorption and reflection from structures, objects and people.
20
EMC Tables


72-B10MN-302
Distributed by:
Gurin Products, LLC
2522 Chambers Road, Suite 100
Tustin, CA-92780


