Digital Control Unit (DCU) Manual Vernier Software & Technology 13979 SW Millikan Way Beaverton, Oregon 97005-2886 (503) 277-2299 FAX (503) 277-2440 www.vernier.com [email protected]Version February 5, 2001 DCU-CBL or DCU-BTD
Transcript
Digital Control Unit (DCU)
Manual
Vernier Software & Technology 13979 SW Millikan Way
First Use of the DCU with a Calculator.......................................................................................................................................... 8
First Use of the DCU with Visual Basic (Windows) .................................................................................................................... 11
First Use of the DCU with REALbasic (Macintosh) .................................................................................................................... 17
Hardware Details of the DCU ...................................................................................................................................................... 23
More about the Sample DCU Programs on the Disks .................................................................................................................. 25
Programming the CBL/LabPro for Data Collection ..................................................................................................................... 27
Programming for the DCU ........................................................................................................................................................... 30
Additional Notes on Calculator Programming ............................................................................................................................. 34
Additional Notes on Visual Basic Programming.......................................................................................................................... 39
Additional Notes on REALbasic Programming ........................................................................................................................... 43
Connecting Devices to the DCU .................................................................................................................................................. 47
A - Sample Programs and Subprograms....................................................................................................................................... 59
B - Selected DCU Calculator Program Lists ................................................................................................................................ 65
C - Using the DCU with a ULI..................................................................................................................................................... 67
D - Sources of Electronic Devices................................................................................................................................................ 69
E - Differences Between the Original CBL and CBL 2/LabPro.................................................................................................. 70
F - Using Visual Basic- Learning Edition With The DCU........................................................................................................... 74
G - Vernier Products .................................................................................................................................................................... 79
How to Use This Manual The Digital Control Unit can be used with the original CBL™ and the CBL 2™ from Texas Instruments, and the Vernier LabPro™. In most cases, the operation of the DCU is similar with all three interfaces. In those cases we will use the generic term “CBL/LabPro” to refer to any of the three. In a few cases, where there are differences between the interfaces, we will use the specific name to refer to the interface.
This manual assumes that you are somewhat familiar with the lab interface you are using, that is, LabPro, CBL 2, or the original CBL, and how it is used. It also assumes that you are somewhat familiar with with the calculator or computer you are using and how it is programmed.
Calculator Users Only: If you are using a calculator for DCU programs, this manual also assumes that you are familiar with the use of TI-GRAPH LINK™ for transferring programs from a computer to the calculator. If you are not, we encourage you to look over other manuals for information on this. If you are using the original CBL, one option is CBL Made Easy, which is available free on our web site (www.vernier.com). If you cannot download this manual, you can purchase a copy on disk (order code CMEP, $12).
• If this is your first time controlling devices with the CBL/LabPro, and you want to get started:
Read the Introduction and one of these three sections:
First Use of the DCU with a Calculator (calculators only) First Use of the DCU with Visual Basic (Windows) First Use of the DCU with REALbasic (Macintosh)
Try some of the other sample programs. Try following the instructions in the section Connecting Devices to the DCU and hooking up some electrical devices to your DCU.
• If you want to start writing calculator programs for controlling the DCU:
In addition to the suggestions above, study these sections.
More About the Sample DCU Programs Included on the Disks Programming the CBL/LabPro for Data Collection Programming for the DCU Additional Notes on Calculator Programming
Also, you will need to refer to the manuals that came with your calculator for programming information. Study the sample programs that we provide for the calculator you are using (see Appendixes A and B). Load our sample programs onto your calculator and experiment with modifying and running them. You may want to refer to the CBL System Guidebook, which is included with every CBL or Getting Started with the CBL 2 which is included with every CBL 2. If you are using LabPro, you may want to refer to the LabPro Technical Reference Manual. The LabPro manual is available free on our web site, www.vernier.com.
• If you want to start writing computer programs for controlling the DCU:
In addition to the suggestions above, study these sections.
More About the Sample DCU Programs Included on the Disks Programming the CBL/LabPro for Data Collection Programming for the DCU Additional Notes on Visual Basic Programming (Windows computers only) or Additional Notes on REALlbasic Programming (Macintosh computers only)
Also, you will need to refer to the manuals that came with your computer programming language. Study the sample programs that we provide for the computer programming language you are using. Open our sample programs with your computer and experiment with running and modifying them. You may also want to refer to the LabPro Technical Reference Manual.
• If you are interested in building electrical devices you can control with the DCU:
Look over the Hardware Details of the DCU, Connecting Devices to the DCU, and DCU Project Ideas sections. After you connect your circuit, use the sample program DCUTOGGL to test your hardware. Later, you will probably want to write your own programs to control your hardware.
Acknowledgements The Digital Control Unit was designed by John Wheeler. John was also involved in every other phase of this project. Dr. Fred J. Thomas of Sinclair Community College, Dayton, Ohio pioneered the use of the digital outputs of the CBL and provided valuable suggestions for this project. Matthew Denton, Jeffery Hellman, Laura Owen, and Adam Higley created and tested most of the sample DCU calculator programs and projects we built. Jeffery Hellman and David Stroud wrote most of the sample DCU computer programs. Thanks to John Gastineau, Scott Holman, Christine Vernier, Erik Schmidt, Jan White, Dan Holmquist, and Ian Honohan of Vernier Software & Technology for their editing and testing. Thanks to Adrian Oldknow for encouraging me on this project. Thanks also to Scott Webb and Eren Koont of Texas Instruments for their ideas and encouragement on this project.
David Vernier
Vernier Software & Technology
7
Introduction The Digital Control Unit (DCU) is designed to make it easy for you to use the Calculator Based Laboratory (CBL) or LabPro digital output lines. Using the DCU and simple programs, you can turn on and off motors, lamps, LEDs, buzzers, stepper motors, and other DC electrical devices. You can even develop more elaborate projects, such as robots that move around the room or automated scientific apparatus. The most exciting projects involve combining the use of sensors connected to the CBL/LabPro with output from the DCU. Examples include alarm systems, temperature-controlled environments, and smart robots.
The Digital Control Unit Hardware
The Digital Control Unit (DCU) is a small box with a short cable. There are two versions: DCU-CBL, for use with the original CBL, and CBL-BTA, for use with CBL 2 or LabPro. The cable from the DCU-CBL plugs into the Digital Out connector on the original CBL. The cable on the CBL-BTD plugs into the Dig/Sonic connector for a CBL 2 or LabPro. The DCU has a socket for a DC power supply (normally a 6-volt CBL or LabPro power supply is used, although others can be substituted). The top of the DCU is transparent. There are six red LEDs and one green LED visible inside the unit. The green LED indicates that power is on and that the DCU is properly connected to the CBL/LabPro. The red LEDs indicate the status of the six output lines of the DCU.
There is a 9-pin D-sub socket on the side of the DCU for connecting electronic devices that you build. There are connections for all six digital lines, plus power and ground. We supply a cable, with bare wire on one end, for you to use in building your first projects. You can use the DCU to control as many as six electrical devices. The output lines can be used in pairs to allow you to switch the polarity applied to an electrical component. For example, you can run a motor in either of two directions. The pinouts and electrical specifications are explained later in this manual.
The Digital Control Unit Software
Sample programs for controlling the DCU are provided on two disks that come with the package. These disks contain programs that allow you to control the DCU using either computers or calculators. One disk is for Windows® users and the other is for Macintosh® users. The Windows disk includes Visual Basic versions of the programs. The Macintosh disk contains REALbasic versions of the programs. Both disks contain DCU programs for all of the following Texas Instruments graphing calculators: TI-73, TI-82, TI-83, TI-83+, TI-85, TI-86, TI-89, TI-92, and TI-92+. You transfer these programs from your computer to your calculator by using the TI-GRAPH LINK cable and software.
The DCU programs we include on the disks are designed to allow you to get started using your DCU right away. More importantly, they are meant to be used as raw material for you in your own programming. You can start with and modify these programs much more quickly than you could write a program from scratch. The programs are broken into subroutines, which are sometimes called subs or methods. These subroutines handle common DCU operations, such as turning on a line for a given period of time, or running a stepper motor. Most of the operations that you will want to do with the DCU are handled in these subroutines. Using the subroutines, you can write useful DCU programs without being an expert programmer. Documentation for all of the sample programs and subroutines is provided in this manual.
Examples of How You May Want to Use the DCU
The DCU is designed to let students and teachers experiment with the CBL/LabPro Digital Out lines. For starters, you can experiment with turning on and off the red LEDs inside the DCU box learning how the lines are controlled in programs. Later you will probably want to build electrical projects that you control. In the process, you will learn a lot about electronics and programming. Listed below are some of the projects we have built at Vernier. You probably have some better ideas of your own.
• Flashing DC lamps and LEDs • Activate electromagnets in sequence to accelerate a magnet • Turn on and off DC motors and operate them in either of two directions • Control stepper motors directly or through stepper motor control ICs • Temperature-controlled environments
User’s Manual Digital Control Unit
8
• Pulse a speaker to generate sound • Add a buzzer to the CBL/LabPro to warn you when an event occurs • Live traps for small animals activated by a sensor detecting the presence of the animal • A CBL/LabPro-controlled car with sensors and feedback • Automatic tea brewer • Moving displays to get people's attention • Alarms that go off when a Motion Detector detects a person • Automated scientific instruments and demonstration equipment
First Use of the DCU with a Calculator This section is intended to introduce you to how the DCU works with a calculator and how it is programmed. It assumes that you are using the DCU and CBL/LabPro connected to a TI graphing calculator. There are sections below which you should skip to if you are using a computer and Visual Basic or REALbasic.
You do not need any extra hardware connected to the DCU, although, if you have a small speaker, you can use it for one part of this section. We try to make things as simple as possible, but introduce you to all of the following:
• Getting the calculator software loaded. • Connecting the DCU to LabPro. • Running the DCUTOGGL (8-character version of “DCU Toggle”) program to control the DCU lines. • Running the simple DCU program DCUCOUNT. • Examining and modifying the DCUCOUNT program.
Follow the steps below to get your DCU operating:
1. Load the appropriate versions of all the DCU programs into the calculator using the TI-GRAPH LINK cable. There are separate folders of DCU sample programs on the disks for TI-73, TI-82, TI-83/83+, TI-85, TI-86, TI-86, TI-92, and TI-92+. If you are not familiar with using TI-GRAPH LINK, refer to the TI manuals or our book CBL Made Easy, which is available free on our web site (www.vernier.com).
2. Connect the DCU to the connector on the top right side of the CBL or LabPro. On an original CBL this connector is labeled DIG OUT. On a CBL 2 or LabPro it is labeled DIG/SONIC. On a LabPro it is labeled DIG/SONIC1. Make sure this connector locks in place.
3. Connect a CBL power supply (TI-9201) or a LabPro power supply (IPS) to the round connector on the DCU.
4. Connect the calculator to the CBL/LabPro. Make sure this connector locks in place
5. If you are using the original CBL, turn it on. CBL 2 and LabPro do not have an on/off switch and they will turn on or off automatically. If you complete all of the steps above correctly, the green LED on the DCU should turn on. (The only exception to this rule is if you are using a LabPro or CBL 2 without an AC Power supply.) If the green LED is not on, double-check all the steps. Note that the electronics in the DCU can sense when it is properly connected to the CBL/LabPro and when the unit has power.
6. Start the DCUTOGGL program.
7. Try pressing the 1 key on the calculator. If everything is working properly, the red LED labeled 1 should go on. Press the 1 key again and it should go off. Try to turn on and off the other LEDs, using the 2 through 6 keys. Note that there are some combinations of LEDs that are not allowed, so that in some cases when you turn on an LED, some others may go off. This DCUTOGGL program is very useful in testing hardware that you connect to the DCU.
8. Quit the DCUTOGGL program by pressing the + key
9. Start the DCUCOUNT program. The red LEDs should go through a series of patterns, with a change every second. There are 17 steps that are the possible output patterns of the DCU. They represent sending the numbers 0, 1, 2, 3, 4, … 15 to the DCU from the calculator, followed by a 0 to turn all the outputs off again. Notice that the first 12 steps
Digital Control Unit User’s Manual
9
correspond to binary counting using the first 4 red LEDs. The numbers 12 to 15 control the status of the last two lines.
10. To give you an introduction to what DCU programs are like, the DCUCOUNT program code is listed below. This is TI-83 code, but the code for other calculators is similar. There are a number of things to notice about this short program:
prgmDCUINIT Calls a subprogram named DCUINIT. This subprogram initializes the CBL/LabPro.
Disp "COUNTING" Displays message on calculator screen {1,31,17,0,1,2,3,4,5,6,7,8,9,10,11,12,13,14,15,0}→L₆ The line above sets up a list starting with a 1, followed by some other numbers.
This command will set up a digital channel. Send(L₆) Sends this list to the CBL/LabPro. {3,1,17,0}→L₆ Sets up a list starting with a 3, followed by some other numbers. This command
will control the output from the CBL/LabPro. Send(L₆) Sends this list to the CBL/LabPro.
11. It’s now time to customize the DCUCOUNT program and make it do something different. Recall that the DCUCOUNT program initially simply outputs the 16 possible outputs, one second at a time, to the DCU, plus a 0 at the end. We are going to modify this program first to make it count slower. Then we will modify it to make it buzz a speaker at 50 hz for 5 seconds before it starts the counting sequence. If you don't have a speaker that you can connect to the DCU, you will be able to visually check the DCU LEDs to see if the buzz code is working.
Examine the program code on the calculator screen. The details of doing this are slightly different on various TI graphing calculators. On TI-73, TI-82, TI-83 and TI-83 Plus calculators you do this by pressing the PRGM key, and then the right arrow to select EDIT and then the ENTER key. Scroll down the list of programs until you come to DCUCOUNT and then press ENTER. Refer to your calculator manual for information on how to do edit the code on other calculators. The program should now be listed on the screen.
We said earlier that we wanted to output all the possible output codes to the DCU. How is that accomplished? Later sections of this manual will explain the commands to control the DCU in some detail, we will just look at this one simple task for now. The 3 command controls the output of the CBL/LabPro. In particular, the numbers following the 3 are used as shown below:
{3,1,17,0}→L₆ {3, number of seconds between steps, number of steps, triggering}
The second number is originally 1, so the steps of the sequence each last 1 second. Try moving the cursor to the 1 and changing it to a 2. Then press 2nd and then QUIT and run the program again. The program should then go through the pattern more slowly.
12. Now we want to make the program do something extra by using a subprogram. We want it to buzz a speaker. If you have a small speaker available, connect the speaker wires between the D1 connection and a Ground connector. If you do not have a speaker, you can just watch the LEDs and see if the buzzing action is taking place. Again display the DCUCOUNT program on the calculator screen. Now, we need to add the following lines to the program, just after the PrgmDCUINIT.
50→F 5→T PrgmDCUBUZZ
These lines will tell the program to execute the subprogram DCUBUZZ using 50 for the frequency (F) and 5 for the number of seconds duration (T). You add this code to the program by going to the start of the line after where you want to add the new code and pressing 2nd INS (for insert). Then type in the lines. You will need to use the ALPHA key to type the
User’s Manual Digital Control Unit
10
letters and the PRGM key, selecting from a list of commands to insert the Prgm character. Refer to your calculator manual if you are not familiar with editing programs.
Now press 2nd and QUIT and run the program again. The program should first buzz the speaker at a low frequency for 5 seconds then go through the pattern. If you do not have a speaker, just look at the #1 LED; it should flicker.
You now have one example of how a calculator program can control the DCU. Programming for the DCU using our provided subprograms is really quite easy. We encourage you to experiment with our other subprograms to develop your own programs. There is a lot more to learn. Later sections of this manual will explain the commands to control the DCU in some detail. Also, remember that more comprehensive manuals are available including the calculator manuals and the CBL and LabPro technical reference manuals. The best advice we have is to experiment. The best way to learn programming is to actually do it.
Digital Control Unit User’s Manual
11
First Use of the DCU with Visual Basic (Windows)
Introduction
This section is intended to be used by people who want to get their DCU up and running as quickly as possible using a Windows computer, Microsoft Visual Basic, and a Vernier LabPro. This is not a comprehensive manual for Visual Basic. We try to make things as simple as possible and allow you to start using the DCU quickly. This manual assumes that you have Visual Basic 6 Enterprise or Standard edition installed on your computer. If instead you have the Learning edition of Visual Basic, refer to Appendix F for information on how to modify the programs so that this version can be used.
Trying out a Visual Basic Program - DCUTOGGL
To see a Visual Basic program in action, controlling the DCU, try the DCUTOGGL program. This is a program to control the DCU lines with button presses. Connect the DCU to the connector on the top right side of the LabPro labeled DIG/SONIC1. Make sure this connector locks in place. Connect a LabPro power supply (IPS) or a CBL power supply (TI-9201) to the round connector on the DCU. Connect LabPro to the Windows computer using the serial port cable. (Note: At this time, Visual Basic does not support using the USB port so that you can control a LabPro interface.).
On the Windows floppy disk that came with your DCU you will see a folder named Visual Basic. Copy this folder to your hard disk. Now, navigate to the location on your hard drive where you put the Visual Basic folder and open it. Inside you will see a number of other folders. One is labeled DCUTOGGL. In this folder you will see a file called DCU.vbp (for “Visual Basic Project”). Double-click on this file. This will start Visual Basic with the DCUTOGGL program open. On the sides of the screen you will see various windows used to write and modify Visual Basic code. The center window usually contains either the code or the user interface of the program.
Initial Visual Basic Screen.
User’s Manual Digital Control Unit
12
From the Run Menu, select Start. You should see the user interface for the TOGGL program which includes a Start and a Stop button and buttons for controlling the six output lines of the DCU. The words LabPro Found should appear in the ListBox at the bottom of the screen if all your hardware is connected properly. If there is a problem with the hardware, you will see an error message. Double-check your connections. If that does not help, try removing the power from the LabPro and then reconnecting it.
The six buttons on the screen correspond to the DCU lines 1-6. This program will allow you to turn these lines on and off. Try clicking the mouse on the “1” button on the screen. The red LED labeled 1 should go on. Press the 1 button again and it should go off. Try to turn on and off the other LEDs, using the 2 through 6 buttons on the screen. Note that there are some combinations of LEDs that are not allowed, so that in some cases when you turn on an LED, some others may go off. The DCUTOGGL program is very useful in testing hardware for your future projects that you connect to the DCU.
Note that the Start button does nothing in this program. It is there to maintain consistency with our other programs. When you are finished experimenting with the DCUTOGGL program, click on the Stop button to terminate communication with LabPro and then quit the program. Visual Basic will still be running.
Opening the DCUCOUNT Program
Choose Open Project from the Visual Basic File menu and navigate to DCU sample programs and within that folder to the folder labeled DCUCOUNT. Within that folder is a file called DCU.vbp. Open this file. Respond No to the question about saving changes to the previous program. On the right side of the screen you will see the Project Window that has an hierarchical menu with an expandable entry labeled “Forms.” Click on this to expand it if it is not already expanded, and then double-click on the entry DCU.frm. If you don’t see the Project window on the top right, go to the View menu and select Project Explorer. We will study this DCUCOUNT program in some detail as an example of how Visual Basic programs are constructed.
Taking a Good Look at a Visual Basic Program
Visual Basic is built around the use of forms. Forms are the windows and dialog boxes that the program uses to display and collect information. These forms contain objects, like buttons and list boxes that allow information to be presented and also allow for user input (buttons). Each of the objects on a form can have Visual Basic code (instructions for what the computer should do) associated with it. For example, pressing a button will result in the code attached to the button being executed. This is why Visual Basic is referred to as an Event Driven language. Pressing a button is considered an event.
Visual Basic applications respond to these events. Much of the code for a Visual Basic DCU program is included in the commands that take effect when these events happen. We have also provided you with subprograms (subs in the Visual Basic jargon) that you can easily attach to an event. So, for example, you can attach a sub that monitors a photogate and reports the status. By doing this you can fairly easily set a program up so that when the user clicks on a button, the program will begin monitoring a photogate. This is much simpler than trying to write your own code to monitor the photogate. The code provided in the subs of our sample programs can do a lot of the work for you.
Now lets take a detailed look at the DCUCOUNT program.
Visual Basic Forms
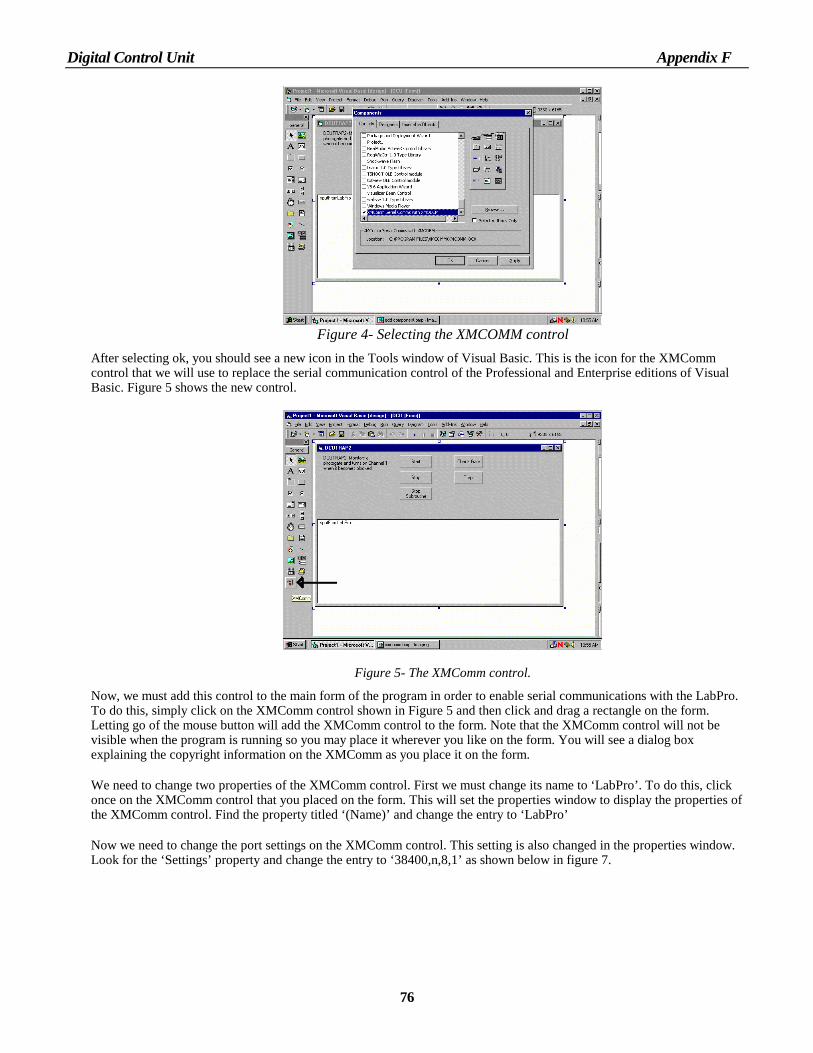
Double-click on the highlighted text in the "Project - Project1" window in the upper right of the Visual Basic window to open the form for editing.
The main form of the DCUCOUNT program opens and you will see the user interface that we have created for the DCU programs.
Digital Control Unit User’s Manual
13
View of the Main DCU Form
This form is the heart of the Visual Basic program. It contains all of the user interface components of a program and also any code that you want the program to execute. Let’s take a closer look at the numbered items on the screen above.
1- This is the main form of the program. When the program is run, this is what you will see. It contains a List Box (the large white section at the bottom of the form), 3 buttons, and a label explaining a bit about this program. It also includes a serial control which will be discussed below as number 4. Later, if you want to add additional elements to this program, you would do it here, on the main form.
2- This is the Project Explorer. All of the forms associated with this program are listed here. Double-clicking on any of them will bring up that particular form. Try this with our program. You will see two other examples of forms, one of for communication error messages and one used in certain subroutines of our sample programs.
3- This is the Properties Window. All items in Visual Basic, buttons, list boxes, and even entire applications have properties associated with them. Some properties define how an object looks or behaves, others control the label that an object is given. Selecting an object on the main form will cause its particular properties to be displayed in the Properties Window.
4- This is the Serial Communications Control. Just as we have buttons that allow user interaction with the program, we have a Serial Communications Control which allows us to communicate with LabPro via the serial port. This control is an important part of the program, but you should not have to change anything about it in our programs. It does not appear in the program window when you run the application. It is only visible in this design view. The Serial Communications Control has a name: LabPro. This control has properties associated with it (like baud rate, number of data bits, etc), clicking on it will bring up those properties in the Properties Window.
Note, this view does not show a running program. By selecting Start from the Run menu you can see what this program looks like when it is running. If you do this, press the Stop button on the program to get back to the design view.
User’s Manual Digital Control Unit
14
Running The DCUCOUNT Program
The DCUCOUNT is a program that we created to count through the 16 possible DCU outputs. Each of the numbers 0-15 represents one of the 16 outputs to the DCU. So a program that goes through each of the 16 outputs on the DCU would be a program that outputs the numbers 0-15 to the LabPro for use by the DCU. It sends out a zero at the end to make sure all the lines are off.
Let's try running this program. Select the Start command from the Run menu at the top of the screen. This will bring up another window. This is the actual running application. You should see the words LabPro Found written in the ListBox at the bottom of the screen. There are no DCU lights on and the program seems to be waiting for some sort of input from the user.
Try pressing the Start button. This button starts sending the output sequence to the LabPro. It sends each of the 16 possible outputs sequentially, holding each output for 1 second. Wait for all 16 outputs to cycle through and press the Start button again. The sequence should start over again. You can continue doing this as many times as you like. When you are done, press the Stop button. This button will cleanly discontinue communication with the LabPro and terminate the execution of the program. It will return you to the Visual Basic design view that we saw earlier.
Examining the Visual Basic Code
Since the act of pressing the Start button started the sequence of LED flashes, there must be some code associated with that button that sends out the correct sequence to the DCU. Let’s take a look at this code.
With the DCU form open on the screen, but not running, double-click on the Start button. This will open the DCU code window. This is where the code is written and edited. By double-clicking on the Start button, the code view has opened with the cursor placed in the section of code that is associated with the clicking of the Start button. See the screen shot below for details.
View of the code that is associated with the Start Button
Digital Control Unit User’s Manual
15
Let’s look at exactly what we have here. The computer screen shows the text displayed in different colors. Everything in green is a comment. These are not instructions to the computer, but rather text comments we have written to explain what is going on. The computer ignores these comments, but you should read them, as they can help you understand how it operates. Blue words are Visual Basic keywords. These are special words that Visual Basic recognizes as commands. Words in black represent Visual Basic code that we have written.
You should see the words “Private Sub DCUStartButton_Click()” in this window. This is the beginning of a “Sub” or subroutine in Visual Basic. Private means that this Sub is local to this program. DCUStartButton is the official name of the Start button of this program. The _Click part of the name of the sub refers to the fact that this code is associated with the Click event of the DCUStartButton
We said earlier that this programs sends out the 16 output codes to the DCU. How is that accomplished? Later sections of this manual will explain the commands to control the DCU in some detail, we will just look at this one simple task. We first set up the sequence of steps that we want to send to the DCU. Then we issue a command for the LabPro to actually start through the sequence of outputs. In this case we are using the following command to set up the sequence:
{1,31,17,0,1,2,3,4,5,6,7,8,9,10,11,12,13,14,15,0}
Here the 1 tells the LabPro we are setting up a channel, the 31 tells the LabPro that we want to setup channel 31 which is Dig/Sonic 1, the 17 tells the LabPro that there are 17 elements in the sequence. The numbers that follow are the actual outputs we would like to send.
This 1 command does not actually initiate the output. The output is started with a 3 command. The exact command we use and the syntax of a LabPro 3 command used this way are:
{3,1,17,0} {3, number of seconds between steps, number of steps, triggering}
So, now we need to see how to send these commands from the computer to LabPro with Visual Basic. We want to send these commands anytime the Start button is pressed, so we put these commands in the code associated with the Start button. Visual Basic code to send commands to the serial port follows this syntax:
LabPro.Output = information to be output
LabPro is the name of the Serial Communications Control, which handles addressing the port to which the LabPro hardware is connected. The “.Output” part of the command tells the computer that you want to output information to the device connected to the serial port. The information on the right side of the equal sign is simply what you want to output.
The syntax of the information that LabPro needs to receive is
“s{command}” + vbCrLf
The quotation marks are required; they make sure that the data you want to send out is in a form readable by LabPro. The + vbCrLf at the end of the line simply adds a termination character to the information being sent out so that the LabPro will know that it has received an entire command.
Now let’s look at the commands we wish to send in detail. We first want to set up the Dig/Sonic port with the 1 command, so the code to do this will look like:
And the code to initiate the outputs to the DCU will look like:
LabPro.Output = “s{3,1,17,0}” + vbCrLf This is the code that we see in the Sub that is executed on a click of the Start button.
User’s Manual Digital Control Unit
16
Modifying the Program
It’s now time to customize the DCUCOUNT program and make it do something different. We are going to make two changes. First we will modify the program to make it go through the counting sequence more slowly. This is a pretty easy change to make to the code. The second number in a 3 command sets the time between steps of an output sequence. This is the code that we see in the Sub. All we have to do is to change the line with the 3 command so that it reads:
LabPro.Output = “s{3,2,17,0}” + vbCrLf A slightly more difficult change is to modify the program to make it buzz a speaker at 50 hz for 5 seconds before the counting sequence starts. The speaker hardware is not really required. If you don't have a speaker that you can connect to the DCU, you will be able to visually check and make sure the program is doing what it should.
All the Visual Basic programs we provide on the disks, including DCUCOUNT, include a number of subroutines, or subs for you to use. One of them is named DCUBUZZ, and it does exactly what we would like. We can have the program use this sub to get this job done. DCUBUZZ takes two parameters, the frequency of the buzz in hz and the length of the buzz in seconds. Here is what the DCUStartButton_Click() Sub will look like after adding in the appropriate DCUBUZZ command:
Private Sub DCUStartButton_Click() DCUBUZZ 50, 5 LabPro.Output = “s{1,31,17,0,1,2,3,4,5,6,7,8,9,10,11,12,13,14,15,0}” + vbCrLf LabPro.Output = “s{3,2,17,0}” + vbCrLf End
Note that in the DCUBUZZ command, the 50 is the frequency that we specified before and the 5 is the length that we want the buzz to last.
Now add the DCUBUZZ line to the program and try running it again. (Select Start from the Run menu.). If you have a speaker handy, connect it between the D1 and Ground lines.
When you click on the Start button on the DCUCOUNT form, you should see the 1st DCU channel flicker for 5 seconds and if you have a speaker, hear a buzz from it. Then the LEDs on the DCU should cycle through the 16 outputs, more slowly than before.
This is an example of how Visual Basic code is used to control the DCU. Visual Basic is an extremely powerful programming tool, but like most programming languages you must become familiar with the commands and syntax of the language. For more information about programming in Visual Basic, read the manuals and help files that came with Visual Basic. Bookstores often have an entire Visual Basic section of books that will help you learn more. Also, you need to learn the commands used to control LabPro and the DCU. For this, read the later sections of this manual, especially, Additional Notes on Visual Basic Programming. Also, refer to the LabPro Technical Reference Manual.
The best advice we have is to experiment. Try things out; see if they work. The best way to learn programming is to actually do it.
Digital Control Unit User’s Manual
17
First Use of the DCU with REALbasic (Macintosh)
Introduction:
This reference guide is intended to be used by people who want to get their DCU up and running as quickly as possible, using a Macintosh computer, RealSoft's REALbasic 2.1.2, and a Vernier LabPro. This is not a comprehensive manual for REALbasic. We try to make things as simple as possible and allow you to start using the DCU quickly. We do assume, however, that you have read the DCU manual. This manual was written for use with REALbasic 2.1.2, other versions of the software may or may not be supported. Preliminary tests with beta versions of version 3 worked well.
Trying out a REALbasic Program - DCUTOGGLE
To see a REALbasic program in action, controlling the DCU, try the DCUTOGGL program. This is a program to control the DCU lines with button presses. Connect the DCU to the connector on the top right side of the LabPro labeled DIG/SONIC1. Make sure this connector locks in place. Connect a LabPro power supply (IPS) or a CBL power supply (TI-9201) to the round connector on the DCU. Connect LabPro to the Macintosh computer using the serial port cable. These programs assume that you are using the Modem port. It is fairly easy to modify a program to work with the Printer port. This is explained in the Additional Notes on REALbasic Programming section. (Note: At this time, REALbasic does not support using the USB port so that you can control a LabPro interface. You can use the REALbasic versions of the DCU programs on a computer with no serial port if you use a Keyspan USB-to-Serial adapter.)
On the Macintosh floppy disk that came with your DCU you will see a folder called “REALbasic.” Copy this folder to your hard disk. Now, navigate to the location on your hard drive where you put the REALbasic folder and open it. Inside you will see a number of other folders. One is labeled DCUTOGGL. In this folder you will see a file called DCUTOGGL. Double-click on this on file. This will start REALbasic with the DCU program open. On the right side of the screen you will see a window labeled Properties. On the left side of the screen you will see a window labeled Tools and another window labeled Colors. For now, we will ignore these windows. In the center of the screen you should see a window labeled DCUTOGGL. This is the important window for now.
Initial REALbasic Screen.
User’s Manual Digital Control Unit
18
Let's try running this program. Select the Run command from the Debug menu at the top of the screen. This will bring up another window. This is the user interface for the DCUTOGGL program. You should see the user interface for the TOGGL program which includes Start and Stop button and buttons for controlling the six output lines of the DCU. The words “LabPro Found” should appear in the ListBox at the bottom of the screen if all your hardware is connected properly. You will get an error message if there is a problem with the hardware. If this happens check the power to the LabPro and the serial connection to the Modem port. If that does not help, try removing the power from the LabPro and then plugging it back in.
The six buttons on the screen correspond to the DCU lines 1-6. This program will allow you to turn these lines on and off. Try clicking the mouse on the “1” button on the screen. The red LED labeled 1 should go on. Press the 1 button again and it should go off. Try to turn the other LEDs on and off using the 2 through 6 buttons on the screen. Note that there are some combinations of LEDs that are not allowed, so that in some cases when you turn on an LED, some others may go off. The DCUTOGGL program is very useful in testing hardware for your future projects that you connect to the DCU.
Note that the Start button does nothing in this program. It is there to maintain consistency with our other programs. When you are finished experimenting with the DCUTOGGL program, click on the Stop button to terminate communication with the LabPro and then quit the program. REALbasic will still be running.
Opening the DCUCOUNT Program
Choose Open from the REALbasic File menu and navigate to DCU sample programs. Within that folder is a file DCUCOUNT. Open this file. Answer no to the question about saving changes to the last program. When the file opens, near the center of the screen you will see a Window that lists the various other windows that make up the program. It has an entry labeled “DCUCOUNT.” Double-click on this entry.
An Overview of REALbasic
REALbasic uses a lot of windows to display information. It has been designed to look a lot like Visual Basic, a version of BASIC for Windows computers. The program is built around a main window to which you add buttons, labels, text boxes, list boxes, and controls. Many of the objects on this window have REALbasic code (instructions for what the computer should do) associated with them. For example, pressing a button will result in the code attached to the button being executed. This is why REALbasic is referred to as an Event Driven language. Pressing a button is considered an Event.
We have provided you with subroutines (Methods in the REALbasic jargon) that you can easily attach to an event. So, for example, you can attach a method that monitors a photogate and reports the status. By doing this you can fairly easily set a program up so that when the user clicks on a button, the program will begin monitoring a photogate. This is much simpler than trying to write your own code to monitor the photogate. The code provided in the methods of our sample programs can do a lot of the work for you.
Now lets take a detailed look at the DCUCOUNT program.
Digital Control Unit User’s Manual
19
REALbasic Windows
View of the Main DCU Window
Key parts of a REALbasic program are labeled with numbers on the figure above. We will try to explain what each of these numbered windows and objects does below:
1- This is the main window of the program with the user interface. It is technically referred to as the Window Editor. It controls what the application that we have developed looks like. Notice how there are several different objects on this window, including two buttons, several labels and a large white listbox at the bottom. This windows is how the program gathers input from the user and also how it displays output to the user as well. One key object on this window will be discussed as 2 below.
2- The object with a Mac modem/printer symbol on it is the Serial Communications Control. This control allows us to communicate with the LabPro via the Serial Port. It is important to the program, but you should not have to change anything about it in your work (unless you need to change from using the Modem port to using the Printer port.). It does not appear in the program window when you run the application. It is only visible in the Design Environment view. The serial communications control has a name: LabPro. It has properties associated with it and clicking on it will display those properties in the Properties window to the right.
3- This is the Properties window. It will become more important as you go on with our development of applications. Many objects in REALbasic have properties associated with them, such as the name, caption, location, etc. This window is where these properties are set and changed.
4 This is the Tools Window. You can drop items from this window onto the main window to add features like buttons, labels, text windows, list boxes and controls.We will not be using these controls now, but as you program your own applications they will become invaluable.
User’s Manual Digital Control Unit
20
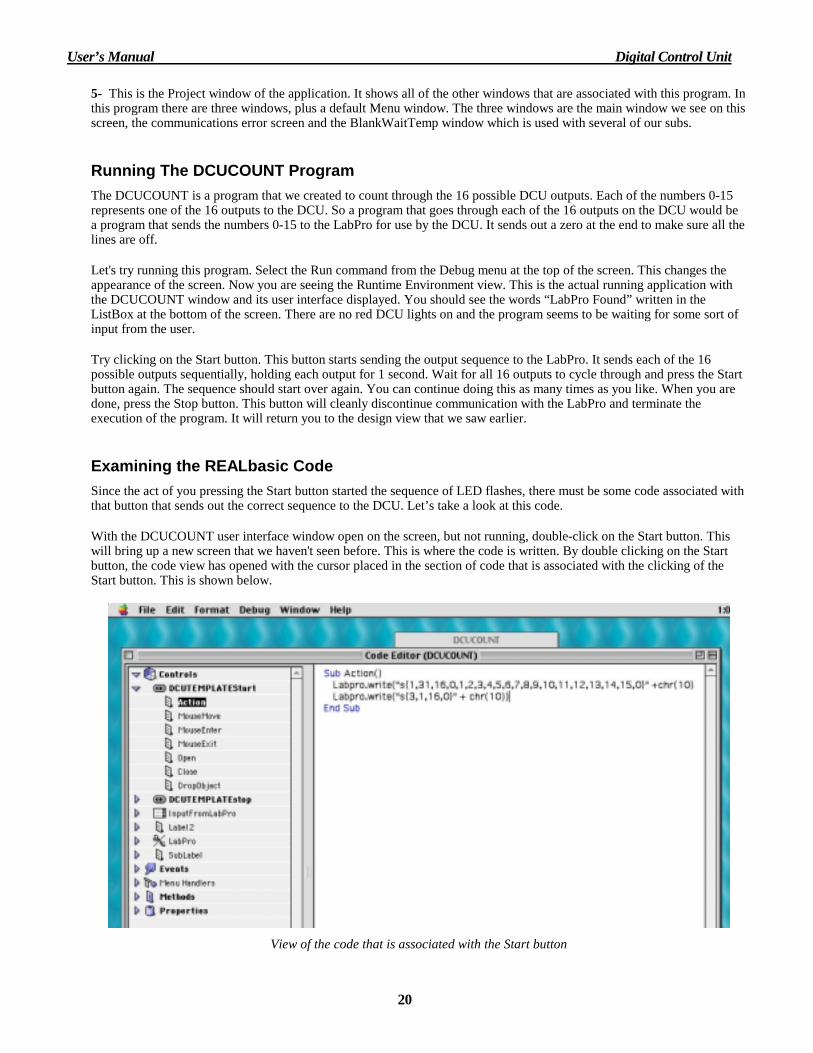
5- This is the Project window of the application. It shows all of the other windows that are associated with this program. In this program there are three windows, plus a default Menu window. The three windows are the main window we see on this screen, the communications error screen and the BlankWaitTemp window which is used with several of our subs.
Running The DCUCOUNT Program
The DCUCOUNT is a program that we created to count through the 16 possible DCU outputs. Each of the numbers 0-15 represents one of the 16 outputs to the DCU. So a program that goes through each of the 16 outputs on the DCU would be a program that sends the numbers 0-15 to the LabPro for use by the DCU. It sends out a zero at the end to make sure all the lines are off.
Let's try running this program. Select the Run command from the Debug menu at the top of the screen. This changes the appearance of the screen. Now you are seeing the Runtime Environment view. This is the actual running application with the DCUCOUNT window and its user interface displayed. You should see the words “LabPro Found” written in the ListBox at the bottom of the screen. There are no red DCU lights on and the program seems to be waiting for some sort of input from the user.
Try clicking on the Start button. This button starts sending the output sequence to the LabPro. It sends each of the 16 possible outputs sequentially, holding each output for 1 second. Wait for all 16 outputs to cycle through and press the Start button again. The sequence should start over again. You can continue doing this as many times as you like. When you are done, press the Stop button. This button will cleanly discontinue communication with the LabPro and terminate the execution of the program. It will return you to the design view that we saw earlier.
Examining the REALbasic Code
Since the act of you pressing the Start button started the sequence of LED flashes, there must be some code associated with that button that sends out the correct sequence to the DCU. Let’s take a look at this code.
With the DCUCOUNT user interface window open on the screen, but not running, double-click on the Start button. This will bring up a new screen that we haven't seen before. This is where the code is written. By double clicking on the Start button, the code view has opened with the cursor placed in the section of code that is associated with the clicking of the Start button. This is shown below.
View of the code that is associated with the Start button
Digital Control Unit User’s Manual
21
Let’s look at exactly what we have here. On the left side of this window you should see a hierarchical listing of entries. The item at the top of this list is Controls. This item is opened in the hierarchical view and we see several sub items in this list, including DCUTEMPLATEStart and DCUTEMPLATEStop. These two enteries correspond to the Start and Stop button that you see on the window. Now notice that the DCUTEMPLATEStart entry is also expanded and we see several Method below it. The one that is selected is labeled Action. This Action entry contains the code that will be executed when the Start button is pressed.
We said earlier that we wanted to sent out all the possible output codes to the DCU. How is that accomplished? Later sections of this manual will explain the commands to control the DCU in some detail, we will just look at this one simple task. We first set up the sequence of steps that we want to send to the DCU. Then we issue a command for the LabPro to actually start through the sequence of outputs. In this case we are using the following command to set up the sequence:
{1,31,17,0,1,2,3,4,5,6,7,8,9,10,11,12,13,14,15,0}
Here the 1 tells the LabPro we are setting up a channel, the 31 tells the LabPro that we want to setup channel 31 which is Dig/Sonic 1, the 17 tells the LabPro that there are 17 elements in the sequence. The numbers that follow are the actual outputs we would like to send.
The 1 command does not actually initiate the output. The output is started with a 3 command. The syntax we use for this 3 command is:
{3,1,17,0} {3, number of seconds between steps, number of steps, triggering} So, now we need to see how to send these commands with REALbasic. We want to send these commands anytime the Start button is pressed, so we put it in the code associated with the Start button. Any code that we put here will be executed when this Start button is clicked. Outputting information to the LabPro consists of only one command.
LabPro.Write(information to be sent out of serial port)
LabPro is the name of the Serial Communications Control, which handles addressing the port to which LabPro is connected. The “Write” part of the command tells the computer that you want to output information to the device connected to the serial port. The information in the parentheses is simply what you want to output.
The syntax of the information that LabPro expects to receive is
“s{command}” + chr(10))
The command is just the string of integers we plan to send to the LabPro. The s and the quotation marks and the curly brackets are required; they make sure that the data you want to send out is in a window readable by the LabPro. The +chr(10)) at the end of the line simply adds a termination character to the information being sent out so that the LabPro will know that it has received an entire command.
Now let’s look at the commands we wish to send in this example. We first want to initialize the Dig/Sonic port with the 1 command is:
{1,31,17,0,1,2,3,4,5,6,7,8,9,10,11,12,13,14,15,0}
The code to initiate the outputs to the DCU is:
{3,1,17,0}
This is the code that we see in the subroutine for clicking the Start button is executed :
It’s now time to customize the DCUCOUNT program and make it do something different. We are going to make two changes. We will modify the program to make it buzz a speaker at 50 hz for 5 seconds before the counting sequence starts and also modify the program to make it go through the counting more slowly. The speaker hardware is not really required. If you don't have a speaker that you can connect to the DCU, you will be able to visually check and make sure the program is doing what it should.
This is the code that we see in Start button code.
The easy change to make to the code is to change the rate of going through the sequence. The second number in the 3 command sets the time between steps of an output sequence. Change the line so it reads:
LabPro.Write(“s{3,2,17,0}” + chr(10)) Now, let's enter the code to make the speaker buzz. The REALbasic programs all include a number of subroutines, stored in methods for you to use. One of them is named DCUBUZZ, and it does exactly what we would like. If you look down this list at the left side of the window you shall see a heading labeled Methods. Click on this entry to expand it. Once it expands, you shall see many entries in the left side of the window. This is a list of the Methods that we have written to aid you in developing your applications.
We can add this method to our code. The DCUBUZZ method requires two parameters, the frequency of the buzz in hz and the length of the buzz in seconds. Here is what the DCU Start button code will look like after adding in the appropriate DCUBUZZ command.
Sub Action() DCUBUZZ 50, 5 LabPro.Write("s{1,31,17,0,1,2,3,4,5,6,7,8,9,10,11,12,13,14,15,0}” + chr(10)) LabPro.Write(“s{3,2,17,0}” + chr(10)) End Sub
Note that the 50 is the frequency that we specified before and the 5 is the length that we want the buzz to last.
Now add this line to your program and try running it again (select Run from the Debug menu). If you have a speaker handy, connect it between the D1 and Ground lines. When you click on the Start button, you should see the 1st DCU channel flicker for 5 seconds and if you have a speaker, hear a buzz from it. Then the LEDs on the DCU should cycle through the 16 outputs, more slowly than before.
Exit REALbasic, or open another DCU sample program if you like. You may or may not want to save the changes you made. You also can save your changed version of the program with a different name.
This is an example of how you can use the raw material we provide in the window of REALbasic code to create your own DCU control programs. REALbasic is an extremely powerful programming tool, but like most programming languages, you must become familiar with the commands and syntax of the system. For more details about what we have done to create this system, read the REALbasic DCU Technical Reference Manual. For more information about programming in REALbasic, read the manuals that came with REALbasic. Also refer the later sections of this manual, especially Additional Notes on REALbasic Programming . The best advice we have is to experiment. Try things out; see if they work. The best way to learn programming is to actually do it.
Digital Control Unit User’s Manual
23
Hardware Details of the DCU The DCU is a small box with a clear plastic top. The short cable plugs into the CBL Digital Out or the Dig/Sonic connector on a CBL 2 or LabPro. On the same side of the DCU is a socket for a DC power supply. Four different power sources can be used:
• a LabPro power supply (6V, regulated) [Vernier order code IPS, $10]
• a CBL power supply (6V, regulated) [Vernier order code TI-9201, $15]
• a ULI power supply (9V, unregulated) [Vernier order code ULI-PS, $9.00]
• a battery power supply (one lantern battery, or a collection of four to eight 1.5-volt cells in series). To make the cable from the batteries to the DCU, you need to use a 5.5 mm x 2.1 mm power connector (Radio Shack part number 274-1569). Connect the leads so that the center of the connector is negative. The voltage supplied can be anything between 5 volts and 12 volts. One easy way to build a battery power supply is to use a holder for four C or D batteries in series, which will provide about 6 volts.
Never apply more than 12 volts DC to the DCU. Never use AC power supplies with the DCU. Note that the center connector on the DCU is negative.
The transparent top of the DCU reveals six red LEDs and a green LED visible inside. The green LED can be helpful to see if these conditions are met:
• The DCU has power.
• The CBL/LabPro has power (and if it is an original CBL, it has been turned on.)
• The DCU is properly connected to the Digital Out port on the CBL or to the Dig/Sonic1 port on the CBL 2 and LabPro.
• On CBL 2 or LabPro only powered by batteries, the green LED will only stay on after a command has been sent to keep the power on. Therefore if your CBL 2 or LabPro is on batteries, the green LED will not come on even if you do have it connected properly.
Learn to check this LED. It can warn you if things are not set up correctly and it will keep you from wasting time when they aren't.
The red LEDs indicate the status of the six output lines. We refer to them as D1, D2, D3, D4, D5, and D6. You can think of the DCU as a set of six remote-controlled switches. Each of the six lines from the DCU is connected to a switch that can have any one of three positions:
The line can be connected to the positive side of the DCU power supply, to the negative side of the power supply, or left unconnected. There are six switches of this type inside the DCU. Actually they are not mechanical switches as shown here but rather electronic switches using transistors. They function like the mechanical switch illustrated. If you connect an electrical device (such as a motor or lamp) between the DCU line and a ground connection, you can control whether it is on or off using this switch. If the switch is in the + position, current will flow, and the device will be on. Either of the other two positions will turn it off.
User’s Manual Digital Control Unit
24
If you have read the specifications in the documentation which came with the CBL, CBL 2 or LabPro, you may be surprised to see that there are six digital output lines on the DCU. There are only four digital output lines on each digital port. We do some digital logic tricks to allow us to control six, instead of four lines. Of course, we had to pay a price for this trickery. We no longer have totally independent control of all six lines. We compromised on a pattern which allows us completely independent control of the first three LEDs and then allows us to use the other three with restrictions. The easiest way to see the restrictions is to examine the 16 possible outputs from the DCU:
Output Binary D1 D2 D3 D4 D5 D6
0 0000 — — — — X X
1 0001 + — — — X X
2 0010 — + — — X X
3 0011 + + — — X X
4 0100 — — + — X X
5 0101 + — + — X X
6 0110 — + + — X X
7 0111 + + + — X X
8 1000 — — — + X X
9 1001 + — — + X X
10 1010 — + — + X X
11 1011 + + — + X X
12 1100 X X X X — —
13 1101 X X X X + —
14 1110 X X X X — +
15 1111 X X X X + +
+ indicates the line is connected to the positive voltage of the DCU power supply, — indicates the line is connected to ground (negative lead of the DCU power supply), and X means the line is disconnected.
The outputs 0 through 11 can be considered as the binary equivalent of the number, with D1 used for the least significant bit, D2 used for the second digit, D3 for the third, and D4 as the most significant bit.
Outputs 0 through 7 give totally independent control of the first three digital lines.
Outputs 12 through 15 are designed for controlling just D5 and D6, but do not allow any use of the first four lines. One reason for this choice is to allow for building robot cars. With such a car, you might want one motor to be controlled by D1 and D2, and another to be controlled by D3 and D4. It would still be useful to have some other lines that could be used for other operations. Lines D5 and D6 do this, but these lines can only be used when lines D1 through D4 are off.
Digital Control Unit User’s Manual
25
Pairs of DCU lines can be used together to allow you to switch the polarity, or direction of current flow in an electrical device. Consider the circuits below. Both circuits show an electrical device wired between the D1 and D2 lines of the DCU. The circuit at the left has the D1 set for + and D2 set for —, so positive current would flow from D1 through the device and to D2. The circuit on the right has D1 set for — and D2 set for +, so positive current would flow from D2 to D1. This idea allows you to have motors run in either of two directions.
Notes:
• If a third simple motor is connected to D5 and D6, the third motor can be run only when the first two are off, but it can be run in either direction.
• Three DC devices can be turned on completely independently and in any combination if they are connected between D1, D2, D3, and ground.
• Six DC devices could be connected between the six output terminals and ground. Four (those connected to D1, D2, D3, and D4) can be used in almost any pattern, except that you could not have D3 and D4 on at the same time. The devices connected to D5 and D6 can be turned on only when all the devices connected to D1 through D4 are off.
More about the Sample DCU Programs on the Disks Sample programs for the Digital Control Unit are included on the Windows and Macintosh disks. These programs can be used in several different ways:
• Use them unchanged for controlling electrical devices you build. The sample program DCUTOGGL is especially good for this. It lets you turn on or off any of the six lines to test your hardware.
• Study them as examples to learn how to write DCU programs.
• Modify them as starting points for your own programs. Usually it is far easier to create a new program from one of our sample programs than to start from scratch.
• Use the subroutines or procedures as “raw material” for building your own programs.
Programs are provided for all of the following TI calculators: TI-73, TI-82, TI-83, TI-83+, TI-85, TI-86, TI-89, TI-92, and TI-92+. The Windows disk also has Visual Basic programs. The Macintosh disk has REALbasic programs. The names of all the programs we have provided start with the letters DCU. Here is a list some of the sample programs, with a short description of what they do.
DCUCOUNT - This simple program sends each of the 16 possible digital outputs to the DCU lines.
DCUTEMPC - This program checks the signal from a TI or a Stainless Steel Temperature probe on CH1 of the CBL/LabPro. If the temperature is greater than a specified level, it turns on the D1 line. If the temperature is less than the specified level, it turns on the D2 line. It is used for a temperature control system, which turns on a light bulb for heating or a fan for cooling, as needed.
User’s Manual Digital Control Unit
26
DCUWARNV – Monitors the voltage input Ch 1 of the CBL/LabPro and turns on the D1 output of the DCU if the voltage exceeds this level.
DCUSTEP - A program to control a stepper motor.
DCUTRAP2 - This program is used to make a live bug trap. It uses a photogate to sense when a bug is inside a box, then turns on a DC motor to knock the lid of the box closed. It is a good example of how subroutines can be used.
Subroutines
We have also included a number of small subroutines. In Visual Basic these are called Subs. In REALbasic they are called Methods. On the TI calculators these are actually separate programs, which we refer to as subprograms. These subroutines are intended to supply sections of code that you can use to write your programs. Major operations that you want your program to handle can be replaced using one of the subroutines. Many programs can be written by linking together these subroutines with a few lines of new code. As an example, consider the program DCUTRAP2. As mentioned earlier, this program is used to make a bug trap. It uses a photogate to sense when a bug is inside a box. It then turns on a motor to knock the lid of the box closed. Here is generic description of this program, with some comments explaining what the program does.
Set up the calculator or computer screen
Display "READY FOR ACTION"
Use the subroutine DCUINIT to initialize the CBL/LabPro.
Use the subroutine DCUCHKP to check to see if the photogate is working.
Clear the calculator or computer screen again.
Use the subroutine DCUWAITP to monitor the status of the photogate and wait until the photogate is blocked.
Set the value of the variable D, used to specify which outputs should be turned on.
Set the value of the variable T, used to control the time the output is turned on.
Use the subroutine DCUPWRON to turn on the motor, connected to D1 (D=1), for 1 second (T=1).
Set D to 2 because the buzzer is connected to the D2 line.
Use the subroutine DCUPULSK to turn on the buzzer, connected to D2 and leave it on until a key is pressed.
Notice that there is not much to the main program. All the tricky stuff is done in the subroutines DCUINIT, DCUCHKP, DCUWAITP, DCUPWRON, and DCUPULSK.
Subroutines are used by jumping to them in the code with the value of certain variables set. For example with the DCUPWRON subroutine, you jump to it with D set for the digital output pattern you want on and T set to the time you want the pattern to stay on.
A complete list of all the DCU programs and subroutines is included in Appendix A of this manual.
How to Get Started with a DCU Programming Project
When you start to write a program to control the DCU, we suggest this approach:
• First, check to see if one of the sample programs we provide does what you need or most of what you need. If so, start with that program and modify it as necessary. Check the list of programs in Appendix A. In some cases, you can just use our program as is. For example, if you just want a quick way of turning on or off certain output lines of the DCU, just use the DCUTOGGL program.
• If none of the programs are close enough, build your program using our subroutines as “raw material.” Start with one of the sample programs. Delete the existing code if it is not needed. Carefully study Appendix A to learn what each subroutine does. Use these subroutines to save yourself work, when you can.
Digital Control Unit User’s Manual
27
Programming the CBL/LabPro for Data Collection The next two sections of the manual are a look at programming for CBL/LabPro. This section will concentrate on reading the status of sensors, since this is the easiest thing to do with a CBL/LabPro. Also, reading sensors will be very useful in writing DCU programs. The next section is about writing programs to control the DCU lines. These sections are not meant to be an in-depth explanation of programming. For that, you should refer to manuals that came with your calculator or computer programming language. However, this section will give you a general overview of how you control LabPro/CBL and the DCU.
These two sections are also not an in-depth explanation of the LabPro/CBL hardware and how it is controlled. For that you should refer to or the LabPro Technical Reference Manual (free at www.vernier.com), Getting Started with the CBL 2, or CBL System Guidebook (for original CBL).
No matter what equipment you are using, the commands you send are similar. This section will concentrate on these commands. These are not affected by the minor differences in programming language or among calculator models.
The CBL/LabPro is controlled by sending lists of numbers to it. We call these commands. Here is a list of the most commonly used commands for programs reading sensors.
0 All Clear
1 Channel Setup
3 Sampling Setup
4 Conversion Equation Setup
There are some other commands that work only with CBL 2 and LabPro, but these commands will not be explained until later in this manual. A command is a list that starts with the command number (usually 1, 3, or 4), followed by other numbers (called parameters in the TI books). The parameters each have special meanings, depending on what command you are using. There is a default value for each of these parameters. If you leave the parameter off the list, the default value will be used. All of this is explained in detail in the CBL System Guidebook, Getting Started with the CBL 2, or the LabPro Technical Reference Manual. In these sections, we will only use parameters that are important for common programs and leave off the others (so they will take their default values).
You control the LabPro/CBL by sending these commands, which are just lists of numbers with commas between them, to it. The lists are enclosed in curly brackets, {}. The details of how these commands are sent out to the LabPro/CBL differ with the programming environment or calculator. On most calculators, you set up the list of numbers with one line, then send it to the CBL/LabPro with a Send command on the next line. On the computer, only one line is needed to send commands. Here are sample code sending out a command of 3,1,2,0. This format will be repeated many times in a program as various commands are sent out.
Using a TI-83: {3,1,2,0}üL† Send(L†) Using Visual Basic: LabPro.Output = "s{3,1,2,0}" + VbCrLf Using REALbasic: LabPro.Write("s{3,1,2,0}"+ chr(10))
For the rest of the next two sections we will concentrate on the commands sent out and not worry about the details of the way the commands are sent. We will list our examples in pseudocode, which explains what the program is doing, but is not the exact characters (not the exact syntax) that the programming language requires.
User’s Manual Digital Control Unit
28
Programs for reading sensors connected to the CBL/LabPro usually follow this basic pattern:
• Use Command 0 to initialize the CBL/LabPro.
• Use a Command 1 to set up the channels to which the sensors are connected.
• (Optional) Use a Command 4 to specify the calibration to be used.
• Use a Command 3 to initiate data collection.
• Get and process the data.
Here is a more specific example of a CBL/LabPro data-collection program that we will explain in some detail. This program takes readings from a Barometer sensor. It will take 50 readings, 0.25 seconds apart. We will go over the program a line at a time below:
Send Out {0} initialize CBL/LabPro
Send Out {1,1,14,0,0,1} set up channel
Send Out {4,1,1,1,8.729,8.271} specify calibration
Send Out {3,.25,50,0,0,0,0,0,1} start data collection
Get Resulting Data get data, measured values first, then times
The first line initializes the CBL/LabPro using a Command 0. (Remember, the first number in the list is the command type). Include this code in your programs, or, even better, use our subroutine DCUINIT to do this job and also do some other preliminary things that are especially important on CBL 2 or LabPro. If this program was to be changed to use the DCUINIT subroutine, you would replace the command 0 line with a call of the subroutine DCUINIT. This is the approach we use in most of our sample programs.
The second line of our pseudocode is used to set up the channel for reading data:
Send Out {1,1,14,0,0,1}
The 1 command, when sent to the CBL/LabPro, specifies a number of things about how data is handled. The syntax for this command, when used with sensors is:
Not all of these are important and you will rarely use some of them. (Use zeros, or leave them out so the default value of zero is used.) Here are the important parameters:
channel = The input channel is specified with the second number in the list. For analog sensors, you can use 1, 2, or 3, or 4 (LabPro only) (for CH1, CH2, CH3, or CH4). For a motion detector you use 11. On a LabPro you can also use 12 for a motion detector connected to Dig/Sonic 2.
operation = The third number in the command should be 1 to read a signal from an Auto ID probe like the standard TI temperature, voltage, or light probe, a Stainless Steel Temperature probe, a motion detector, or any autoID probe. It should be a 14 for other Vernier analog sensors without Auto ID.
postprocessing = not used often, use zero
statistics = not used often, use zero
conversion = The sixth number in the list is either 0 or 1. You should always use a 0 for this parameter if you are using one of the three TI sensors that came with the CBL/CBL 2, a motion detector, or other Vernier Auto ID probe. . Use a 1 if you are using a Vernier analog sensor without Auto ID, such as sensors with the 5 pin DIN plug. If the value is 1, the CBL/LabPro will use a conversion equation (which follows in the program) for converting voltages to readings that correspond to a readings.
Let's take another look at the second line of our sample program:
Send Out {1,1,14,0,0,1}
Digital Control Unit User’s Manual
29
The Command 1 used here sets up channel 1 to use a non-Auto ID sensor and (since the 6th value is 1) to use a conversion equation. The fourth line of our sample program has a Command 4. A Command 4 line is only used to set up the calibration equation for a non-autoID analog sensor, such as one of the Vernier Sensors with a DIN connectors. With the proper Command 4 line, the CBL/LabPro will read correct values (newtons, degrees, etc) on these sensors. If you are using autoID, or you just want to read the raw voltage from a non autoID analog sensor, do not use a Command 4. Skip this line. Another way of saying this is that if the sixth number in your Command 1 line is zero, skip the command 4 line.
If a conversion equation is to be used to convert voltages to meaningful values, Command 4 is used to load the conversion equation to the CBL/LabPro unit. Almost all Vernier probes use linear calibrations (1st order polynomial). The calibration is specified by entering k0 (the y-intercept) and k1 (the slope). For this kind of calibration, the form of the Command 4 line will always be:
Send Out {4,channel number,1,1,k0,k1}
In our sample program, the following line is used to load the conversion equation:
Send Out {4,1,1,1,8.729,8.271}
In this case, channel 1 is being used, with an intercept of 8.729 and a slope of 8.271. This is the proper calibration for a Vernier Barometer, calibrated in atmospheres. Information on the proper Command 4 line values for each Vernier sensor is included in the sensor’s documentation.
The 3 command controls the actual data collection. Here is the 3 command from the sample program we are studying. It specifies taking readings every 0.25 seconds for 50 readings, and specifies that we should record the time of each reading.
Most of these are not important and you should just use zeros for them. Here are the important parameters—the ones we have used in our sample program:
samptime = the time between samples (in seconds). The range is 0.0001 to 16000 seconds. On the original CBL, if the number is greater than 0.25s, it must be a multiple of 0.25 s; that is, an even quarter second. For example, 1.75 s is ok; 1.8 s is not. This limitation does not apply on CBL 2 or LabPro.
Numsamp = the number of readings to be made. For the original CBL, this can be any integer from 1 to 512. (Numsamp = -1 has a special meaning, which will be explained below.) For CBL 2 or LabPro, the number of readings can be any integer up to 12,000.
Trigtype = this specifies if the program should wait for a triggering event before starting the actual data collection. 0 means no. 1 means wait for the Trigger button on the CBL (or the Start/Stop button on CBL 2/Labpro) to be pressed. Other numbers can be used to specify triggering on a certain signal level. The default is 1, which you usually do not want, so you should almost always put a zero here.
rectime = The ninth number in the command 3 list is the “Time recorded Flag.” If 1 is used (the default on CBL 2 and LabPro), the CBL/LabPro will collect the times at which each reading is taken. If 0 is used (the default on the original CBL) times will not be recorded.
The last line of our sample program is used to retrieve data from the CBL/LabPro.
Get Resulting Data get data, measured values followed by times
User’s Manual Digital Control Unit
30
As the first lines of our sample program are executed, the CBL/LabPro will go about its business of collecting the data. Now how do we get it back to the calculator or computer? In the case of calculators, the Get command is the answer. Each Get command will retrieve a complete list of data from the CBL/LabPro. In this case there are two lists, since we asked the CBL/LabPro to record the times. The sensor readings go into list 1 and then the times go into list 2. If we had set rectime to 0, then we would not have had the times recorded, and we would have used only one Get statement. When more than one channel is being monitored, the rule is that the data from the lowest channel number is returned first, followed by other channels (in order), followed by times, if they were recorded.
When using LabPro connected to a computer and you send the 3 command, you sometimes do not need a Get command. The data will automatically appear in the serial buffer of the computer and can be dealt with there. The details are different in Visual Basic and REALbasic, and will be explained in later sections.
Live (Real Time) Data Collection
The discussion above assumes that you want to have a certain number of readings taken at specified intervals for later use by the calculator (e.g., making a graph). There is another variation of data collection that is often used. We call this live data collection. In this type of program, the CBL/LabPro takes one reading, the calculator or computer retrieves the reading (and usually does something with it, such as put a point on a graph), and then the program loops and repeats.
Here is a second sample program, similar to the first, but with live data collection:
Send Out {0} initialize CBL/LabPro Send Out {1,1,14,0,0,1} set up channel Send Out {4,1,1,1,8.729,8.271} specify calibration Send Out {3,1,-1,0} start data collection Label A Label this point in the code Get Resulting Data get data, measured values followed by times Goto A Loop back to A and repeat
This program is the same as the previous sample through the first three lines. After that, the data collection portion is very different. Here is what is going on in the last portion of the program. Notice that the 3 command has a –1 for the third number, as the number of samples. The –1 in the 3 command tells the LabPro/CBL to take one reading and continue on with the program. The program then gets the data and loops back to the point A in the program. This loop continues until the program is interrupted.
This type of data collection works great for many programs where you just want to monitor some reading from a sensor and take action if it exceeds a certain specified value; for example, a program that turns on a fan if a temperature gets too high.
Other Notes on Programming to Read Sensors
As mentioned above, this is a summary of the most important things about writing CBL/LabPro programs for data collection. There is much more you can learn. Even so, this should help you get started. The best ways to learn programming are:
• Study other programs which read sensors including the sample programs on our disks, such as DCUTEMPC and DCUWARNV. Check out programs that your teachers or friends have written, or download some from the internet.
• Jump right in and start changing the programs and notice what happens. • Refer to the CBL System Guidebook, Getting Started with the CBL 2, or LabPro Technical Reference Manual and other
books for reference information.
Programming for the DCU Programming to control the digital out lines is similar to programming for using sensors. The important steps of a program for controlling the digital output lines and the DCU are:
Digital Control Unit User’s Manual
31
1. Initialize the CBL/LabPro. If you are using a CBL 2 or LabPro it is important that you use the DCUINIT program at the start of every program to make sure the power stays on as the program runs.
2. Use a Command 1 to set up the digital output channel (31) for a sequence of digital outputs.
3. Use a Command 3 to initiate the sequence of outputs.
Here is a very simple example. This program flashes on and off the first three lines of the DCU.
Call the subroutine DCUINIT intialize Send Out {1,31,2,7,0} set up sequence Send Out {3,.5,8,0} start through the sequence
The first line uses the DCUINIT subprogram to initialize the CBL/LabPro. This is essential in all CBL 2 and LabPro programs. The Command 1 line is used to set up the digital output channel and specify the sequence of outputs to be used. Command 1 is a little different when used with digital output than it was with sensors. The syntax for Command 1, when used with digital output, is:
{1, channel, # of data elements, data elements}
channel = For digital output, you use a 31 for the channel. If you are using a LabPro, you can also use a DCU connected to DIG/SONIC2 and in this case the channel is 32. All of our sample DCU programs, except DCU2 (for LabPro only) use 31 for the digital output channel.
# of data elements = The third number in the line is used to specify the number of elements in the sequence of patterns to be output. This can range from 1 to 22 (original CBL) or 32 (CBL 2 or LabPro). In our sample program, the number 2 is used. This means there will be two data elements.
data elements = This is a list of numbers (0 to 15) specifying the outputs to be used. In our example, they are 7 and 0. If the # of data elements set in the command was 5, then there would have to be 5 numbers in this list.
The 3 command is used much like it is with sensor programs.
{3, samptime, numsamp, trigtype}
samptime = the time between samples in seconds. The range is 0.0001 to 16000 s. On the original CBL only, if the time is greater than 0.20s it must be a multiple of 0.25 seconds; that is, it must be an even quarter second. For example, 1.75 s is ok, 1.8 s is not.
numsamp = the number of steps to take through the sequence. This can be any integer from 1 to 512 for the original CBL or any integer up to 12,287 for CBL 2 or LabPro (or -1, see below). Note that this number does not have to match the number n used in the Command 1. For example, in the sample program above, n is two (there are two elements in the sequence). The numsamp used in Command 3 is eight. This means that the program will go through eight steps. When it finishes the pattern specified in Command 1, it will start through the list again. Think of the pattern as a loop that will be worked through as many times as needed until all the steps have been executed.
trigtype = trigger type. The default value of this parameter is 1, which is for manual trigger. (You have to press a button on the CBL/LabPro to start the digital output going.) You usually do not want this, so almost always use a zero here. This will have the digital output start as soon as the program executes the step. See the later section for more information about triggering.
So what does the sample program above do? It has the digital output lines go through the following output sequence: 7,0,7,0,7,0,7,0. The sequence 7,0 was specified in the Command 1 line and this pattern is repeated until 8 steps are made (as specified in Command 3). If the DCU was connected when this program runs, the first three red LEDs would flash on and off four times. The status of the LEDs would change every 0.5 seconds.
Setting the DCU to Hold a Steady Output Pattern:
The original CBL was designed for sending sequences of outputs to the Digital output lines. This works great for setting off
User’s Manual Digital Control Unit
32
a sequence of flashing LEDs or sending a pattern of outputs to control a stepper motor through many steps. But, there was no one-step command to tell the original CBL to turn on a certain Digital output line and leave it that way. We had to use a multi-step process to get this job done. Using a CBL 2 or LabPro, there is a single command which allows you to turn on or off each of the digital lines (which will be explained below).
The multi-step method that works for the original CBL and the newer interface is explained here. We use it a lot in our calculator programs. In this case, you specify a one-item “sequence” of outputs to go through, and have it executed. This will seem strange at first, but it works. To do this, you use Commands 1 and 3 in this way:
Send Out {1,31,1,D}
Send Out {3,1,1,0}
In this situation, the output value D is the pattern you want to set and hold. It can be any integer from 0 to 15. You specify this as the only element in the sequence. You will have the CBL/LabPro output a sequence of steps, but in this case, there is only one step. The CBL/LabPro will set the DCU output as you want and leave it that way, until told to make another change.
In the 3 command, the second number is the time, which really does not matter in this case. The next number is 1, indicating just one step. When you execute these steps, you simply set the status of the digital output lines as specified by D.
Setting the DCU Output to a Steady (LabPro and CBL 2 Only)
If you are using a CBL 2 and LabPro, the command 2001 makes it easy to set the output pattern of the DCU. To use it, you simply use:
Send Out {2001,D}
Where D is the output pattern you want to set and hold. It can be any integer from 0 to 15. For example, if you want to turn on the first three digital lines use:
{2001,7}
Having the DCU Output Hold a Setting for a Specific Time
Many times you want to turn on a line for a specific time period. To do this, use Commands 1 and 3 in this way:
Send Out {1,31,2,D,0}
Send Out {3,1,2,0}
In this case, the output pattern has two elements, D (the pattern you want to set and hold) and 0. The CBL/LabPro will set the DCU output as you want and leave it that way for the time you used in the Command 3 line, unless you send another command to the CBL/LabPro before the time is up.
Here is an example. To turn just the first digital output line on and leave it on for exactly 5 seconds, use
Send Out {1,31,2,1,0}
Send Out {3,5,2,0}
Power Control on LabPro and CBL 2 Only:
Command 102 is used for power management with CBL 2 and LabPro. We use this command in the DCUINIT subprogram to set the CBL 2 or LabPro to always stay on. Otherwise the CBL 2 or LabPro would power down when not used for a short while (about a quarter of a second). To set the power to stay on all the time, use 102,-1. To return to normal power control use 102, 0.
This 102 command can also be used with an integer between 1 and 999, as in 102, n. This tells the interface to wait n seconds before taking a first sample. It is intended to allow you to specify a warm up time for a sensor.
Digital Control Unit User’s Manual
33
Controlling Two DCUs at Once( LabPro Only):
If you are using a LabPro, you can actually use any number from 0 to 255 for D in the 2001 command. This will set the status of the four output lines on DIG/SONIC1 and the four lines on DIG/SONIC2 at the same time. The program DCU2 demonstrates this idea.
Programming Challenges:
• Have the DCU red LEDs count in binary from 0 to 11.
• Flash the first three lines on and off every second for one minute.
• Flash the 5th and 6th LEDs on and off every tenth of a second for 10 seconds.
• Turn on each of the six red LEDs, one at a time.
• Have the DCU turn on the D1 red LED if the temperature of a liquid drops below 30 degrees C.
• Have the DCU indicate approximate temperature by turning on the appropriate LED to indicate the Celsius temperature to the nearest 10 degrees (D1 indicates in 10 to 19.9 degrees, D2 indicates 20 to 29.9 degrees, etc.)
• Have the DCU flash the D1 LED until the temperature of a drink drops below 30 degrees C.
User’s Manual Digital Control Unit
34
Additional Notes on Calculator Programming This section offers specific tips for people writing TI calculator programs. For more information, also see the CBL System Guidebook, Getting Started with the CBL 2, or the LabPro Technical Reference Manual and the manuals which came with your calculator. The exact details of programming differ somewhat between calculator models. You should carefully study the manual that came with the calculator you are using. Concentrate on the sections about programming. Also, examine some of the programs that you use with the calculator. No matter what calculator model you are using, the commands you send to the CBL/LabPro are the same. This manual will concentrate on CBL/LabPro commands. These are not affected by the minor differences in programming languages among calculator models. All the sample programs listed in this manual use the syntax of the TI-82 or TI-83 calculators. To see versions of the same programs for other calculators, simply open the appropriate version of the program from the disk, after transferring it using TI-GRAPH LINK.
Our number one tip on programming for TI calculators is that all programming should be done using a computer and typing on a keyboard. Use TI-GRAPH LINK for the editing and then send the program to the calculator. Typing or modifying a program on the calculator keyboard is much harder. Also, most versions of TI-GRAPH LINK (except TI-82 and TI-85) have built-in tools to make writing lines of code for the CBL/LabPro easier. Check the TI-GRAPH LINK manual for information on how to use this feature.
Using -1 in the Command 3 Line of DCU Calculator Program
As with programs for sensors, you can use -1 as the number of readings in the command 3 line. In this type of program, the CBL/LabPro will step through the patterns of outputs each time the Get command is encountered. You must set up a sensor channel, and then use a Get command to step you through the pattern. Here is a sample program, showing how the DCU can be controlled in this way:
prgmDCUINIT Initialize the CBL/LabPro {1,1,14}ü L† Set up CH1 to read a sensor Send(L†) {1,31,6,1,2,4,8,13,14}ü L† Set up digital output to turn on six lines in order, one at a time Send(L†) {3,1,ú1,0}ü L† Set up the CBL/LabPro for one step at a time Send(L†) Lbl A Label for looping Get(I) Get the (meaningless) reading from the CBL/LabPro Goto A Repeat
This program turns on the six lines of the DCU, one at a time, in order. Notice that the timing of the program execution is still controlled by second number in the 3 command. If you are using an original CBL there can be some extra time delay between steps because the original CBL waits for each GET command before moving on to the next step. If you try to go through a pattern too quickly, then the speed will be limited by the looping time of the calculator program, instead of by the sample time set in the 3 command. With the CBL 2 or LabPro the digital output will always be at the rate specified by the sample time in the 3 command.
Setting the DCU Output to Hold a Steady Pattern (Original CBL)
If you are using the original CBL, setting the digital output lines to hold one pattern takes a couple steps. In this case, you specify a one-item “sequence” of outputs to go through, and have it executed. This will seem strange at first, but it works. To do this, you use Commands 1 and 3 in this way:
{1,31,1,D}üL† Send(L†) {3,1,1,0}üL† Send(L†)
In this situation, the output value D is the pattern you want to set and hold. It can be any integer from 0 to 15. You specify this as the only element in the sequence. You will have the CBL/LabPro output a sequence of steps, but in this case, there is only one step. The CBL/LabPro will set the DCU output as you want and leave it, until told to make another change.
Digital Control Unit User’s Manual
35
In the 3 command, the second number is the time, which really does not matter in this case. The next number is 1, indicating just one step. When you execute these steps, you simply set the status of the digital output lines as specified by D. Using this idea, here are some code samples we use a lot:
To turn off all of the digital output lines use
{1,31,1,0}üL† Send(L†) {3,1,1,0}üL† Send(L†)
An even better way to get all the lines turned off is to simply run our sample subprogram DCUOFF, which uses this idea.
Setting the DCU Output to a Steady (LabPro and CBL 2 Only)
If you are using a CBL 2 and LabPro, the command 2001 makes it easy to set the output pattern of the DCU. To use it, you simply use:
{2001,D}üL† Send(L†) Set output pattern to D
Where D is the output pattern you want to set and hold. It can be any integer from 0 to 15.
To turn just the first digital output line on and leave it on until you send another command to turn it off, use
{2001,1}üL† Send(L†)
Having the DCU Output Hold a Setting for a Specific Time
Many times you want to turn on a line for a specific time period. To do this, use Commands 1 and 3 in this way:
{1,31,2,D,0}üL† Send(L†) {3,1,2,0}üL† Send(L†)
In this case, the output pattern has two elements, D (the pattern you want to set and hold) and 0. The CBL/LabPro will set the DCU output as you want and leave it that way for the time you used in the Command 3 line, unless you send another command to the CBL/LabPro before the time is up.
Here is an example. To turn just the first digital output line on and leave it on for exactly 5 seconds, use
{1,31,2,1,0}üL† Send(L†) {3,5,2,0}üL† Send(L†)
User’s Manual Digital Control Unit
36
Reading a Sensor at the Same Time that You Control the DCU
Often you will want to read the status of a sensor and use this to decide what the program should do with the DCU. For example, you may want to check a temperature and turn on a fan motor if the temperature gets too hot. Here is a sample program that shows this idea. This program is for a DCU-controlled alarm system. It monitors an analog sensor on channel 1 and sets off a buzzer, connected to D1 when the voltage goes over one volt.
prgmDCUINIT Initialize the CBL/LabPro {1,1,14}üL† Set up the channel 1 Send(L†) 1üV Set the voltage limit 0üS Initialize reading from the voltage probe {3,1,ú1,0}üL† Take a voltage reading Send(L†) While S<V Get(S) Get the voltage reading End 1üD Set output pattern to be used 10üT Set how long the output pattern will be held prgmDCUPWRON Turn on the buzzer
Notice this program uses live (real time) data collection, with a -1 in the 3 command. When data collection is set up this way, you can loop through a section of code and execute a GET statement many times. Each time through, one reading is taken from the sensor. When the conditions to break out of the loop are met, the DCUPWRON subprogram is used to turn on the buzzer.
Reading a Sensor as a Program Goes through a Sequence of Outputs
Sometimes you will want to read the status of a sensor at the same time you are stepping through a sequence of output patterns. For example, you may want to flash a LED, or operate a stepper motor while you are monitoring a sensor. Here is a sample program that shows how this can be done:
prgmDCUINIT Initialize the CBL/LabPro. {1,31,4,5,9,10,6}üL† Set up digital output lines for running a stepper motor. Send(L†) {1,1,10}üL† Set up CH1 for reading a temperature probe Celsius mode. Send(L†) 0üT Initialize a variable to represent temperature. While T<23 Start a loop that will repeat until 23 degrees is reached.. {3,.2,4,0}üL† Sample sensor and change the digital output. Send(L†) Get(L„) Get the temperatures mean(L„)üT Calculate the mean temperature Disp T Display the mean temperature reading on the calculator. End End of the loop.
This program will operate a stepper motor (or just flash the LEDs on the DCU) as it reads temperatures. It repeats this until the temperature reaches 23 degrees and then it stops.
Digital Control Unit User’s Manual
37
Making Sure the CBL/LabPro Finishes Its Work before Your Calculator Program Moves On
One thing that can cause confusion when programming the DCU is when the calculator goes on with its program before the CBL/LabPro has time to finish what it is doing. This can cause two different types of confusion. For example, consider this program:
prgmDCUINIT Initialize the CBL/LabPro. {1,31,2,0,7}üL† Set up the digital output to turn the first 3 lines on and off . Send(L†) {3,1,100,0}üL† Go through 100 steps, each taking 1 second. Send(L†) Disp "DONE" Display message on calculator when program is finished.
When you execute a program like this, you may be surprised that the calculator indicates that the program is finished, but the CBL/LabPro and DCU are still doing something with the digital output lines. This is because the CBL/LabPro got its command to do the sequence of outputs and they are continuing, even though the calculator went on, executing the rest of the program.
A slightly different situation happens when you send commands to the CBL/LabPro to have the DCU do something else before the first operations sent are completed. Consider this program, for example:
prgmDCUINIT Initialize the CBL/LabPro {1,31,2 0,7}üL† Set up digital output to turn on and then off the first three lines. Send(L†) {3,1,10,0}üL† Go through 10 steps, taking 1 second for each step. Send(L†) {1,31,1,0}üL† Set up digital output lines for turning power off to all lines. {3,1,1,0}üL† Turn power off Send(L†)
If you try this program it will not operate the way you might expect. If the DCU is connected, you might expect to see the first three red LEDs flash on and off for ten seconds and then the power should go off. Instead, the LEDs will briefly flash, but the program quickly ends with the power turned off. Why?
The problem is that the CBL/LabPro starts executing the sequence of 10 steps, but then is sent a new command telling it to turn the power off. It interrupts what it was working on and follows the new instruction.
There is a solution to these problems. The trick is to have the CBL/LabPro do a (probably unnecessary) sensor reading at the same time. Then you can use a GET calculator program statement to retrieve the sensor reading from the CBL/LabPro. In this case the calculator program will know that it cannot go on until the CBL/LabPro has finished its operation and returned readings to the GET instruction. Here is the same program revised so that first sequence of outputs will be completed before the power is turned off:
prgmDCUINIT Initialize the CBL/LabPro {1,1,14}üL† Set up CH1 to read a sensor. Send(L†) {1,31,2 0,7}üL† Set up digital output to turn on and then off the first three lines. Send(L†) {3,1,10,0}üL† Go through 10 steps, each taking 1 second. Send(L†) Get(L†) Get the reading. (The program will wait.) {1,31,1,0}üL† Set up digital output lines for turning power off to all lines. Send(L†) {3,1,1,0}üL† Turn power off. Send(L†)
User’s Manual Digital Control Unit
38
Many times you want to turn on a line for a specific time period and have the calculator wait until this time period is over before proceeding with the program. To do that, use this pattern:
In this case, the output pattern has two elements, D (the pattern you want to set and hold) and 0. The CBL/LabPro will set the DCU output as you want and leave it that way for the time you use in the Command 3 line. The calculator program will wait at the Get statement.
Here is an example. To turn just the first digital output line on and leave it on for exactly 5 seconds, no matter what else the calculator program does later, use
Another good reason for using subprograms in your DCU programming is to avoid confusion of this sort. If you need to turn on a line for a specific time, use the subprogram DCUPWRON. Simply specify the output you want (D), and the time you want the pattern held (T), and all this will be taken care of for you.
Here are some things to remember about the programming trick discussed in this section:
• You do not need to have a sensor connected when you use this trick.
• It makes no difference what value is returned in the GET statement. It is just a way of forcing the calculator program to wait for the CBL/LabPro to finish its work.
• If you happen to want your program to take a sensor reading at the same time it is executing some pattern of digital outputs, then this same idea will work, and produce useful data for you at the same time.
A Trick to Give You More Timing Precision (original CBL only)
When we discussed the sample time earlier, we explained that for the original CBL there was a rule that the sample time can be any number of seconds from 0.0001 to 0.20, but if it is greater than 0.25, it has to be a multiple of 0.25 seconds. This would seem to make it impossible to have a device turn on for a period of exactly 0.385 seconds, for example. Here is a way you can get greater precision. Use the following pattern on your 1 and 3 commands.
{1,31,22,1,1,1,1,1,1,1,1,1,1,1,1,1,1,1,1,1,1,1,1,1,0}üL† Set up digital output pattern with 21 on’s and then an off Send(L†) {3,0.385/21,22,0}üL† Go through 22 steps Send(L†)
The trick here is that you are in effect turning on the device (in this case connected to D1) twenty-one times in a row, and then turning it off. The total “on time” is 0.385 seconds. The advantage is that you can specify the time exactly, getting around the 0.25-second resolution limit. This trick will work for times out to 4.2 seconds (21 times 0.20 seconds). Use this idea only when you need precise timing in the time range between 0.20 seconds and 4.2 seconds. For times greater than 4.2 seconds the resolution is limited to a quarter of a second.
Digital Control Unit User’s Manual
39
Additional Notes on Visual Basic Programming This section offers specific tips for people writing Visual Basic programs. We hope to warn you about some of the things that can cause confusion when you start DCU programming.
How Visual Basic Programs are Saved on Disk
A Visual Basic program is saved as a number of different files. There is a file for each of the forms (.frm), a project file (.vbp), and a few other files. This can be confusing when you first begin your programming efforts. To open a project, open the .vbp file. This will open all of the related files as well, including all the code in that project.
All of the programs that come with the Vernier Software disks are contained in separate folders to keep people from confusing the forms and project files. Each directory contains only one project file, which is all you should ever need to open to access the code.
We suggest that when you start a Visual Basic project of your own that you copy the entire folder of one of our sample projects and give the folder a new name and then make your changes to the files in that folder. This will give you access to all the Subs we have created and set up the simple form with a Start and Stop button and with serial communication set up correctly for LabPro.
Serial Controls
Visual Basic programs that use the serial port work though a serial control. The Enterprise and Standard editions of Visual Basic come with the MSCOMM serial control. The Learning Edition of Visual Basic does not, so we have an alternative control that you may use (see Appendix F). Regardless of the version of Visual Basic you are using, we suggest renaming the serial control to “LabPro” and setting the following properties:
Comm Port default is 1, you need to change this if you use COM2 or another port.
Baud rate 38,400.
Handshaking 0
Rthreshold (size of the serial buffer) 32 bytes
Settings 38400,N,8,1
We have done all this in our sample programs. If you do not start with one of our sample programs, you will have to make these changes to the MSCOMM control. If you ever need to change them, select the serial control icon on the Design View of the user interface, then edit the values in the list of its properties.
Getting Data Back from LabPro
In Visual Basic programs that ask LabPro to return continuous data, there are two ways to handle the data. Normally, whenever data is available on the serial port of the computer, the sub LabPro. OnComm automatically takes over and processes the data. Because of the way data comes back from LabPro, to read data in the LabPro.OnComm sub you need to have the serial control set so that Rthreshold is 32 bytes. It is unnecessary to make this change in the sample programs included on the disk because we have made the change for you, but this change should be done if you want to start a new program completely from scratch.
The other way to process a continuous stream of data from LabPro is to set the Rthreshold value to zero. This effectively turns off the LabPro OnComm sub. If you do this, you still need to deal with the data that comes into the serial port. You can do this in the code that you write, for example the code in the Start button subroutine. You will see both approaches used in our sample programs. Normally the Rthreshold value is set to 32 bytes so that LabPro data can be read properly. Some programmers may want to set the Rthreshold value to zero all the time and deal with data as it comes in. If you are used to simpler versions of BASIC which are not event driven, this approach may be simpler for you.
If you take non-real time data, you need to send a g command after LabPro has collected the data to get the data back.
User’s Manual Digital Control Unit
40
Continuous Data Collection
Often you will want the LabPro to collect data continuously. This is usually done by using command 3 with -1 in the place of the number of samples, causing the LabPro to collect data for an unlimited number of data samples. When you do this, Visual Basic sends back data and it will be processed properly in the LabPro.Oncomm sub if the Rthreshold value of the LabPro control is set to 32 bytes. If you want to deal with this continuous stream of data in another part of the code, set Rthreshold to 0.
The DCUTEMPC program is a good example of this kind of programming. It uses a –1 in the 3 command and monitors a temperature as this loop continues. If the temperature hits certain limits the program branches to other code. Code that does the turning on and off of the lines is in ONCOMM sub.
Format of LabPro Data
LabPro sends data back in a format similar to this:
|{ +n.nnnnnE+nn}|
In order to get this data translated to floating point numbers we use a Mid function in Visual Basic to select only characters 3-17 from the string. This command looks like Mid (string_name, 3, 14) where 3 denotes the starting point in the string (VB is ones based, not 0 like many other programming languages, so the first character in a string is denoted by a 1) and 14 tells Visual Basic how many characters to extract. Next we use a function called Trim() which peels off the leading and trailing whitespace on a string. By using the Trim function after the Mid function we turn our data string into:
+n.nnnnnE+nn
Now we have the data in a standard format rather than an exponential one, so once again the mid function will come in handy. First, to get the mantissa of the number: Mid(string_name, 1, 8) which will give us the +n.nnnnn part of the number. And then to get the exponent: Mid(string_name, 10,3) which will give us the trailing +nn which could also be -nn if the number is greater than 0, but less than one. This method should give correct values for numbers ranging from 10-99 to 1099.
Visual Basic Data Collection Programs for LabPro
We have included some sample programs to demonstrate programming for collecting data using sensors with LabPro without a DCU on the Windows disk. There is a simple real time (live) data collection program, and non real time data collection program and a program that lets you type command strings and send them to LabPro. This program shows the data as it is returned from LabPro. It provides a good way to learn about how LabPro functions.
How commands are sent to LabPro for controlling the DCU
LabPro is controlled by sending strings of integers, called commands, out through the serial port. On a TI calculator, this was accomplished by sending lists out to LabPro. In Visual Basic, we use the following code, which sends data through a MSCOMM control renamed LabPro:
LabPro.Output = "s{integer string}" + vbCrLf
The only part of that line needed to make the LabPro do something is the string of integers itself. The rest of the code tells the computer where to send the data (Output to LabPro), and where the command ends (vbCrLf). Thus, if you wanted to have the LabPro turn on line 1 using the 2001 command, you would use the following line in Visual Basic:
LabPro.Output = "s{2001,1}" + vbCrLf
Likewise, setting up a sequence of outputs to be executed use this line:
LabPro.Output = "s{1,31,5,1,2,3,4,5}" + vbCrLf
and executing the sequence is done with this line:
LabPro.Output = "s{3,1,5,0}" + vbCrLf
Digital Control Unit User’s Manual
41
Making Sure LabPro Finishes Its Work before Your Program Moves On
One thing that can cause confusion when programming the DCU is when the computer program continues on before LabPro has time to finish what it is doing. This can cause two different types of confusion. For example, consider this program:
LabPro.Output = “s{1,31,2,0,7}” + vbCrLf Set up the digital output to turn the first 3 lines on and off .
LabPro.Output = “s{3,1,100,0}” + vbCrLf Go through 100 steps, each taking 1 second. InputFromLabPro.AddItem "DONE" Display “DONE” in the listbox when program is finished.
When you execute a program like this, you may be surprised that the program displays DONE in the list box, while the LEDs are still flashing. Even if you quit the program, or even quit Visual Basic, LabPro and DCU are still doing something with the digital output lines.
A slightly different situation happens when you send new commands to the LabPro to have the DCU do something else before the first operations sent are completed. Consider this program, for example:
LabPro.Output = “s{1,31,2,0,7}” + vbCrLf Set up the digital output to turn the first 3 lines on and off . LabPro.Output = “s{3,1,10,0}” + vbCrLf Go through 10 steps, each taking 1 second. LabPro.Output = “s{2001,0}” + vbCrLf Set up digital output lines for turning power off to all lines
If you try this program, you might expect to see the first three red LEDs flash on and off for ten seconds and then the power should go off. Instead, the LEDs will briefly flash, but the program quickly ends with the power turned off. The problem is that LabPro starts executing the sequence of 10 steps, but then is sent a new command telling it to turn the power off. It interrupts what it was working on and follows the new instruction.
The solution to both these problems is to use the Sleep subroutine which is included in all of our sample programs. It keeps the program from going on, while we wait for LabPro to finish a command. The format of the command is Sleep(X), where X is the number of milliseconds to delay. For example, in the sample program above, you could use
Sleep (10000)
We use this approach frequently in our sample programs.
Another good reason for using subprograms in your DCU programming is to avoid confusion of this sort. If you need to turn on a line for a specific time, use the subprogram DCUPWRON. Simply specify the output you want (D), and the time you want the pattern held (T), and all this will be taken care of for you.
Power Control
Whenever you use LabPro for Digital Output, you probably want to set the LabPro to leave power on at all times. You do this with the following command
LabPro.Output = "s{102,-1}" + vbCrLf
We do this in the DCUINIT sub, so you do not have to do it if you start with one of our sample programs.
Initializing LabPro with DCUINIT
The DCUINIT sub does several things, including checking to see if LabPro is properly attached to the serial port. This is done using a {7} command (system status request) to the LabPro, which typically results in the LabPro sending back a long string of characters to the computer. Since this data cannot be handled in the same way as the analog data, we temporarily turn off the OnComm event before sending this command by setting LabPro.RThreshold to 0. We have the computer sleep for 200 milliseconds and then we examine the data returned. If we verify that the data are proper to indicate a LabPro connected we indicate so in the list box and then set LabPro.RThreshold back to 32. If the proper string of data is not
User’s Manual Digital Control Unit
42
returned, a dialog box is displayed to inform the user of an error in communication. This dialog allows the user to retry the connection until it is successful.
Understanding How Digital Outputs are Controlled with 3 Commands
The exact timing of when digital output lines go on and off when you use a sequence of patterns set up with a 1 command and then a 3 command can be confusing. In the samples below, the graphs represent the voltage out vs time from D1 when only the commands listed at the right are executed. Each set of commands attempts to get the line to go high three times and stay high for one second each time. Only the last one works correctly.
The first attempt fails because LabPro automatically powers down. This is because a (102,-1) command has not been executed. The second attempt fails because the last of the five steps leaves the line on. The third attempt works because it forces the voltage back to low after the third pulse is completed. The best way to think about what is going on here is that the first step happens at time zero on the graphs.
Digital Control Unit User’s Manual
43
Additional Notes on REALbasic Programming This section offers specific tips for people writing REALbasic programs. We hope to warn you about some of the things that can cause confusion when you start DCU programming.
REALbasic Windows
When using REALbasic, you may find it confusing dealing with the various parts of a sample program. Here are some tips. To see the user interface of the program, select Project from the Window menu and then double-click on the name of the file you opened (for example DCUCOUNT). To see the code associated with one of the buttons, double-click on that button. After you have displayed some of the code once, you can also choose Code Editor from the Windows menu to get back to the code.
Sometimes in REALbasic, windows get hidden behind one another strangely. Try moving things around if you loose a window.
REALbasic Methods
In REALbasic, subroutines are called methods and most of our sample code is stored in these methods. To examine or modify these methods, select Code Editor from the Windows menu of REALbasic or double-click anywhere on the user interface window. You will see a hierarchical menu at the left wide of the window. Open the Methods item and you will see each of the subroutines of the program listed as a separate method. Click on any method and the code for that method is displayed to the right.
How commands are sent to LabPro for controlling the DCU
LabPro is controlled by sending a string of integers, called a command, out through the serial port. In REALbasic, we use the following code, which sends data through a serial control renamed LabPro:
LabPro.Write("s{integer string}" + chr(10))
The command is in the parentheses. The rest of the code tells the computer where to send the data (LabPro.Write), and where the command ends (chr(10)). If you wanted to have the LabPro turn on line 1 using the 2001 command, you would use the following line in REALbasic:
LabPro.Write("s{2001,1}" + chr(10))
Likewise, setting up a sequence of outputs to be executed use this line:
LabPro.Write("s{1,31,5,1,2,3,4,5}" + chr(10))
and to executing the sequence is done with this line:
LabPro.Write("s{3,1, 5,0}" + chr(10))
Serial Controls
In REALbasic programs that use the serial port work though a serial control. We suggest renaming the serial control to “LabPro” and changing the baud rate to 38,400 from the default of 57,600.
If you want to change a property of the serial control, follow this procedure. Have the user interface window open, select the serial control icon, and then edit the baud rate value in the list of properties. We have done this in our sample programs and that is one of the reasons we encourage you to start with the sample programs. If you do not start with one of our
User’s Manual Digital Control Unit
44
sample programs, you will have to drag a serial control onto your window and then at least make the change of its baud property.
You also may need to change the Port from 0 – Modem Port to 1 – Printer Port. The other settings of the serial control should be:
Baud 38400
Bits 8
Parity No
Stop Bits 1
All check boxes unchecked
Interrupting the Program
When writing the subroutines such as DCUCHECKP, and DCUWAITP for REALbasic, we were not able to find a way to provide a functional Stop button. Instead we designed these methods to stop on the press of the Space Bar. There is code to check for a press of the Space Bar and break out of the While loops if it is pressed. The relevant code is:
if keyboard.asynckeyDown(&h31) then BlankWaitTemp.Status_Text_Box.Text = "Done" BlankWaitTemp.SpacePressed() refresh End if
This tests the keyboard during the loop to see if the Space Bar (key label &h31) has been depressed. If it has been, we call another method (in this example, BlankWaitTemp) which sets the "ExitButtonClicked" value to true. The While loop is set to check the ExitButtonClicked value to decide whether or not to loop, so it simply quits when you press the Space Bar. This same idea needs to be used in programs similar to DCUTEMPC, which include loops. If you do not handle this properly, you can get into a situation were the REALbasic program is running and there is no way to stop it.
Getting Data Back from LabPro
In REALbasic programs that ask LabPro to return data or other information, there are two ways to handle the data. Normally, whenever data is available on the serial port of the computer, the Data Available subroutine (listed under the serial control (LabPro) would automatically takes over and processes the data. We have written programs to operate that way and it works fine. In the sample programs we provide, we have chosen to handle things differently. We do not allow the Data Available subroutine to take control and instead use code like this in the main part of the program.
Dim Buffer as String 'A string that will be used for reading values from LabPro
We have included some sample programs to demonstrate programming for collecting data using sensors with LabPro without a DCU on the Macintosh disk. There is a simple real time (live) data collection program, and non real time data collection program and a program that lets you type command strings and send them to LabPro. This program shows the data as it is returned from LabPro. It provides a good way to learn about how LabPro functions.
Collecting Data as you Control Outputs
The DCUTEMPC program is a good example of this kind of programming. It uses a –1 command in the 3 command and monitors a temperature as this loop continues. If the temperature hits limits the program branches to other code.
Making Sure LabPro Finishes before the REALbasic Program Moves On
One thing that can cause confusion when programming the DCU is when the calculator goes on with its program before the LabPro has time to finish what it is doing. For example, you may send commands to the LabPro to have the DCU do something else before the first operations sent are completed. Consider this program, for example:
LabPro.Write("s{1,31,2,0,7}" + chr(10)) Set up the digital output to turn the first 3 lines on and off LabPro.Write("s{3,1,10,0}" + chr(10)) Go through 10 steps, each taking 1 second LabPro.Write("s{2001,0}" + chr(10)) Set up digital output lines for turning power off to all lines
If you try this program it will not operate the way you might expect. If the DCU is connected, you might expect to see the first three red LEDs flash on and off for ten seconds and then the power should go off. Instead, the LEDs will briefly flash, but the program quickly ends with the power turned off. Why?
The problem is that LabPro starts executing the sequence of 10 steps, but then is sent a new command telling it to turn the power off. It interrupts what it was working on and follows the new instruction.
There is a solution to this problem. Use the Sleep subroutine (method) which is included in all of our sample programs to keep computer from going on, while you wait for LabPro to finish a command. The format of the command is Sleep(X), where X is the number of milliseconds to delay. For example, in the sample program above, you could use
Sleep (10000)
We use this approach frequently in our sample programs.
Another good reason for using subprograms in your DCU programming is to avoid confusion of this sort. If you need to turn on a line for a specific time, use the subprogram DCUPWRON. Simply specify the output you want (D), and the time you want the pattern held (T), and all this will be taken care of for you.
User’s Manual Digital Control Unit
46
Power Control
Whenever you use LabPro for Digital Output, you probably want to set the LabPro to leave power on at all times. You do this with the following command
LabPro.Write("s{102,-1}" + chr(10))
We do this in the DCUINIT sub, so you do not have to do it if you start with one of our sample programs.
DCUINIT
The DCUINIT sub does several things. First it opens the serial port. It then checks to see if LabPro is properly attached to the serial port and powered up. This is done by sending a {7} command to the LabPro (a system status request). If properly connected and powered, LabPro responds by sending back a long string of characters. We have the computer sleep for 200 milliseconds and then examine the data returned. If we verify that the a LabPro is properly connected, we indicate so in the list box. If the proper string of data is not returned, a Dialog box is displayed to inform the user of an error in communication. This dialog allows the user to retry the connection until it is successful. Finally, the DCUINIT routine sets the LabPro power to be always on.
Understanding How Digital Outputs are Controlled with 3 Commands
The exact timing of when digital output lines go on and off when you use a sequence of patterns set up with a 1 command and then a 3 command can be confusing. In the samples below, the graphs represent the voltage out vs. time from D1 when the commands listed at the right are executed. Each set of commands attempts to get the line to go high three times and stay high for one second each time. Only the last one works correctly.
The first attempt fails because in this case perhaps the command to leave the LabPro power on (102,-1) has not been executed. The second attempt fails because there last of the five steps leaves the line on. The last attempt works because it forces the voltage back to low after the third pulse is completed. The best way to think about what is going on here is that the first step happens at time zero on the graphs.
Digital Control Unit User’s Manual
47
Connecting Devices to the DCU For connecting electrical devices, use the 9-pin, sub-D socket on the side of the DCU. There are connections for all six digital lines, plus power and ground. The pinout is shown below, looking at the holes on the socket on the cable. This is an easy thing to confuse; these are not the pins on the DCU box.
The End of the Cable that Plugs into the DCU, Looking at the Holes
The holes labeled 1, 2, 3, 4, 5, and 6 are the digital output lines. G is for ground and + is for the power from the power supply of the DCU.
We provide one cable to plug into this socket, with the lead wires identified for you to use on your first projects. To build most projects, you will want to make connections to this cable. For testing, twisting the wires together is probably ok, but eventually you will want to solder the leads. Whatever you do, make sure you insulate the leads so that they cannot accidentally touch each other.
As you build devices to connect to the DCU, always keep the power limitations of the DCU in mind. For the entire DCU, it should not exceed the current limit of your power supply. This limit is 300 mA when using the CBL power supply, 600 mA when using the LabPro power supply, and 1000 mA when using the ULI power supply. If you are using a different power supply, check the current rating. In general, you will not damage the DCU by trying to draw too much current, but the circuit will not work properly. It may also be possible that you could damage the power supply. The current draw for any one line should not exceed 600mA, no matter what.
Making Additional Cables to Connect Projects to the DCU
If you need additional cables, you can find the 9-pin, sub-D sockets at most electronic stores; for example, part number 276-1538 from Radio Shack will work. You would have to solder lead wires to each of the connections you use. Even better is to find assembled cables that you can use; for example, Radio Shack #26-152, can be cut in half to produce two useful cables. To identify the lead wires on a cable, use a meter which will indicate conductivity. The meter allows you to determine which wire on your cable connects to each of the holes on the connector. The easiest way to do this is to stick a paper clip in one of the holes on the plug. Connect one probe of the meter to this paper clip inserted in a hole in the end of the cable and then touch each of the bare wires with the other probe until you find one that connects (meter reads near zero resistance). This is even easier if your meter has a setting to make a sound when conductivity is found. As you determine the pattern of wires, either label the leads or make a table indicating a color code of the wires to each hole.
Safety Note: When making your own cables, if you leave the + wire exposed and it touches a ground wire, you could have a direct short of the DCU power supply. If you leave it exposed, it could short out against one of the other bare wires. This could damage the power supply. To avoid this, once you identify the 9 lead wires on the cable, cut the bare wire off of the + connection. This lead is not used very often. We have cut this wire on the prepared cable we include with the DCU.
So, what can you connect to the DCU output lines? The general answer is any electrical device which is meant to run on DC electricity at a voltage that matches the voltage you are using for your power DCU power supply. Most of the time the Labpro or CBL power supply is used with the DCU, and it is a 6-volt power supply. If you are using this power supply, you should use 6-volt devices. Thousands of different motors, stepper motors, lamps, buzzers, solenoids, and other devices are designed to run at 6-volts.
There is another issue that may come up in considering whether a specific device can be used. This is the current that the
User’s Manual Digital Control Unit
48
device will draw. Any power supply you use will have a maximum current that it can supply without overheating, or shutting down. For the CBL power supply, this is 300 mA (=0.3 amperes). For the LabPro power supply, it is 600 mA (=0.6 amperes). If you connect a device (or devices) which will draw more current than this limit, things will not work properly and you could damage the power supply. If you connect something that draws too much current, you will notice the DCU not responding properly, and perhaps the green LED will dim or even go out. Disconnect the device immediately.
Remember that Ohm’s law controls the current that flows through the device:
Current (amperes) = Voltage (volts) / Resistance (ohms)
In some cases you can check the resistance of the device with a meter and calculate how much current it will draw using Ohm’s law.
Connecting One Simple, Non-Polarized Device
To connect a simple, non-polarized, electrical device such as a lamp, DC motor (not a stepper motor), resistor, or electromagnet that you just want to turn on or off, use this wiring pattern:
Wiring a Simple DC Electrical Device
The device is shown in this diagram as a small lamp, but it could be any electrical device that does not have positive and negative leads.
Connecting More Than One Simple device
If you want to wire a number of simple electrical devices, repeat this wiring using additional digital output lines. The wire to hole #8 can also be used for ground connections. These devices will be turned on when the corresponding D line is on (see table in hardware section).
Wiring of Several Simple Electrical Devices
Digital Control Unit User’s Manual
49
Connecting a Speaker
If you connect a small speaker to the DCU, you will probably want to put a resistor in series with it so that the speaker is not too loud. The resistor should be a power resistor, rated at least at 0.5 watts and a fairly low resistance. The larger the resistance, the quieter the speaker will be. When using a speaker, you must use a program that turns the power to an output line on and off at a frequency of a hundred hertz or so. Our sample program DCUBUZZ does this.
Wiring a Speaker
Connecting a Polarized Electrical Device
Some electrical devices are polarized; that is, they have a positive and a negative side. They therefore must be wired in one particular way for use with the DCU. Examples include some buzzers, a few lamps, and complex electronic devices. LEDs are given special treatment below. For devices that have positive and negative sides, make sure you connect the negative side to ground. Devices wired this way will be on any time D1 is high.
Wiring a Polarized Electrical Device with Positive and Negative Leads
You can wire up to six polarized devices in the same way using connections 1–6 for the positive leads and the G connections for the negative leads.
User’s Manual Digital Control Unit
50
Connecting an LED
LEDs have positive and negative sides, so make sure you connect the negative side to ground. Also, most LEDs need to be wired with a resistor in series with them, in order to limit the amount of current that flows. Typically, this resistor has a value of 220 ohms or so. Check the specifications on your specific LED, if possible. On an LED, the flattened side is the negative side.
Wiring a LED with Positive and Negative Leads
You can wire up to six polarized devices in the same way using connections 1–6 for the positive leads and the G connections for the negative leads.
Connecting a Motor for Running in Either Direction
Simple DC motors can be wired as shown above and they will either be off or on, rotating in one particular direction. If you want to have the ability to run the motor either direction, you have to wire it as shown below.
Wiring of a Simple DC Motor to Run Either Direction
For a motor wired this way, you will get one direction of rotation if D1 is high and D2 is low. You will get the opposite rotation if D2 is high and D1 is low. It will be off for all other patterns. You can connect a second motor wired this way to D3 and D4, and even a third motor connected to D5 and D6. The chart below shows the output patterns of the DCU and the direction of rotation of three motors that can be wired using output pairs 1-2, 3-4, and 5-6.
Digital Control Unit User’s Manual
51
Output D1 D2 D3 D4 D5 D6 Motor 1-
2 Motor 3-
4 Motor 5-
6
0 — — — — X X Off Off Off
1 + — — — X X CW Off Off
2 — + — — X X CCW Off Off
3 + + — — X X Off Off Off
4 — — + — X X Off CW Off
5 + — + — X X CW CW Off
6 — + + — X X CCW CW Off
7 + + + — X X Off CW Off
8 — — — + X X Off CCW Off
9 + — — + X X CW CCW Off
10 — + — + X X CCW CCW Off
11 + + — + X X Off CCW Off
12 X X X X — — Off Off Off
13 X X X X + — Off Off CW
14 X X X X — + Off Off CCW
15 X X X X + + Off Off Off
(CW = Clockwise, CCW = Counterclockwise)
Connecting Stepper Motors
Stepper motors are very different from simple “commutator” motors which have two lead wires. Stepper motors are used in cases where you want to have exact control of a motion. Examples include the positioning of the head on a disk drive or the laser in a CD-ROM player.
There are basically two types of stepper motors that you may want to use: unipolar and bipolar. You can identify which type you have with this rule:
• Bipolar stepper motors have 4 lead wires. • Unipolar stepper motors have more than 4 wires, usually 5, 6, or 8. No matter what type of stepper motor you have, remember that it needs to match the voltage you are using on your DCU power supply. If you are using the CBL/LabPro power supply you should use 6-volt stepper motors.
Identifying the leads on a stepper motor can be tricky. It helps if you have a diagram provided by the manufacturer. Unfortunately, you are often using a surplus stepper motor and need to figure it out yourself. First, determine which type of stepper motor it is. Next, look for patterns. Examine the wires carefully. Refer to the diagrams below which symbolically show how the two types of stepper motors are wired inside. Use a meter to measure resistance. Remember that a coil will have a few ohms of resistance. Use a little trial and error and you will be able to get it going.
User’s Manual Digital Control Unit
52
Bipolar Stepper Motors
To connect a bipolar stepper motor directly to the DCU, wire it as shown here:
Direct Connection of a Bipolar Stepper Motor
Wired this way, you can control the bipolar stepper motor using the DCUSTEP1 subprogram. You can also use the DCUSTEP program, which uses DCUSTEP1. The DCUSTEP1 program turns on the two coils in the correct pattern to make the stepper motor move. The DCUSTEP3 program is an improved, more complicated program for controlling stepper motors.
Unipolar Stepper Motors
Unipolar stepper motors are more difficult to figure out for wiring than bipolar ones. Often all the ground wires are the same color or similar colors. Use a meter and trial and error to figure out the wiring pattern. Wire them as shown below.
Direct Connection of a Unipolar Stepper Motor
The programs for unipolar stepper motor are the same as for bipolar. Wired as shown above, you can control the unipolar stepper motor using the DCUSTEP1 subprogram. You can also use the DCUSTEP program which uses DCUSTEP1. The DCUSTEP1 program turns on the four coils in the correct pattern to make the stepper motor move. The DCUSTEP3 program is an improved, more complicated program for controlling stepper motors.
Digital Control Unit User’s Manual
53
Note that the same program works for both unipolar and bipolar stepper motors.
Here is a chart of the output states, showing various ways stepper motors can be used. There are three different methods of driving a stepper motor: Normal, Half-Step, and Wave. The DCUSTEP1 program uses the Normal method. In this case, electromagnets inside the stepper motor are always turned on two at a time as the motor steps. In the Half-Step Method, intermediate steps with only one electromagnet on at a time are included. This gives you more precision in the positioning of the stepper motor. The Wave method of driving a stepper motor has only one electromagnet on at a time. therefore it uses less electricity, but the motor will have less torque. The numbers in the right three columns in the chart also show the outputs used for driving the stepper motor in each of these methods. The program for driving a stepper motor should go through the outputs as numbered for one direction of rotation and in reverse order for the opposite rotation. For example, a Normal stepper program will use the following two patterns for movement in the two directions:
• 5,9,10,6 for clockwise
• 6,10,9,5 for counterclockwise
Stepper Motor
Stepper Motor
Output D1 D2 D3 D4 D5 D6 Normal Half-Step Wave
0 - - - - X X
1 + - - - X X 2 1
2 - + - - X X 6 3
3 + + - - X X
4 - - + - X X 8 4
5 + - + - X X 1 1
6 - + + - X X 4 7
7 + + + - X X
8 - - - + X X 4 2
9 + - - + X X 2 3
10 - + - + X X 3 5
11 + + - + X X
12 X X X X - -
13 X X X X + -
14 X X X X - +
15 X X X X + +
There are other ways to connect stepper motors. If you use a stepper motor control integrated circuit (IC), you will need fewer wires to control the stepper motors. This will allow you to control two stepper motors with the DCU. One type of stepper motor control IC uses just two lines to control the stepper motor. One line is held high or low to indicate the direction the motor should rotate. The other line is toggled on and off one time for each step the motor is to move. This type of stepper motor control IC is assumed for use with our sample program DCUSTEP2. Other stepper motor control ICs may operate differently.
User’s Manual Digital Control Unit
54
DCU Project Ideas The exciting thing about the Digital Control Unit is the projects you can build using it for control. Here are some projects ideas, with a few tips and suggestions.
Flashing Lamps and LEDs
You can use almost any lamp that has a voltage rating to match the DCU power supply you are using. Many different types are available from electronic supply houses, including Radio Shack. Lamps are almost always non-polarized, so they do not have to be oriented in one particular way.
LEDs (Light Emitting Diodes) are very inexpensive and last almost forever. LEDs are polarized, so they must have their positive and negative leads oriented properly. Normally the longer lead of an LED is positive. Also, the negative lead is usually marked with a flattened side on the LED. In most cases, you should connect a current-limiting resistor in series with the LED. This will limit the amount of current that flows through the LED. Without this resistor the LED may quickly burn out.
There are now LEDs of many different colors; there are even two-color LEDs that will produce red if the current flows one way and green if the current flows the other way. If you quickly switch the polarity of a bipolar LED, you get orange.
It is easy to get the lamps and LEDs to flash in any pattern you want. Many of the sample programs included do this.
Moving Displays
Simple DC motors can be used to create rotating or moving displays. Mount a colorful disk on a motor and have it spin to attract attention. Wrap a string around the shaft of a motor and hang a sign from it so that when the motor turns, the sign moves up or down.
Solenoids
Solenoids are electromagnets that can be turned on to make a piece of metal move a short distance. When using solenoids, check the voltage rating and also make sure that the current the solenoid draws is not too large.
Beeps and Buzzers
Almost all computer systems have a “beep” sound that can be made when the computer wants to get the attention of the operator. Most calculators don't make sound, but you can add one, using the DCU. There are several different types of buzzers that you can use. Some buzzers need only to have a steady voltage applied and they will produce a sound. The sound continues until the circuit is turned off. Our program DCUPWRON can be used for this type of buzzer. Other buzzers and simple speakers need to be pulsed; that is, the power to them must be turned on and off at a high frequency. The subprogram DCUBUZZ is an example of this.
Mass Driver
An interesting project to try using electromagnets is to make a device to accelerate magnets. Start with a permanent magnet, such as a cow magnet. Find a clear plastic tube that the magnet will fit through. Wrap wire to make four or six electromagnets spaced along the tube. Connect the electromagnets to the digital out lines. Use a program to turn on the electromagnets in a quick sequence so that the magnet is pulled along. Timing is critical. The subroutine DCUMASS is an example of this kind of program.
You may also want to try using three electromagnets that can switch their polarity. Some commercial mass drivers operate this way.
Digital Control Unit User’s Manual
55
Temperature-Controlled Environment
Combining sensors with control via the DCU allows you to experiment with feedback. Projects of this sort are often educational and interesting. Use any temperature probe connected to the CBL/LabPro. For heating air, you can use a small lamp. For heating a small amount of water, you can use a simple resistor. A fan can be wired to move air in for cooling.
The program DCUTEMPC can be used for this type of control. It turns on a heater connected to D1 until the temperature reaches a specified temperature. If the temperature exceeds another specified temperature, it turns on a fan connected to D2.
Live Traps Activated with a Photogate
A fun project is to try to catch flies, bugs, or mice in a DCU-controlled live trap. The easiest way to do this is by using a photogate as a sensor to detect when the animal is in position to be captured. Photogates have an infrared beam which the animal blocks, sending a signal to the CBL/LabPro. When this happens, you can have the DCU turn on a motor or a stepper motor to move a door to catch the animal. We have used a guillotine-style door, a dropping box, or a motor that hits the lid of a hinged box to knock it in place. Be creative.
The program DCUTRAP2 is an example of a program that uses a DC motor to close a trap. The program DCUTRAP3 does a similar thing using a stepper motor to lower a door.
Alarms Controlled by Motion Detectors
Another fun project is to set up a warning system using a Motion Detector. Motion Detectors have a range up to six meters if oriented carefully. The program DCUALARM is an example. We have used this for sounding a buzzer whenever someone walks in range of the motion detector. We have also used it outside (with the buzzer inside) to detect deer and alert us to look outside so we can see them. Note that it is only possible to use motion detectors in conjunction with the DCU on the original CBL or the LabPro (not CBL 2).
Activating Camera Shutters
Some cameras have connectors so that they can be activated by an electrical signal. To get photos of animals in the wild, you can use this idea to have the DCU trip the camera shutter when an animal is detected by either a photogate or a Motion Detector.
Stepper Motor Projects
Stepper motors are great for projects. You can control the exact position of the rotating part of the motor. There are many surplus stepper motors around, left over from disk drives and similar devices. Some stepper motors have as few as 48 steps in a complete rotation. Many come with built-in gear systems to provide hundreds or even thousands of steps per rotation. This also increases the torque of the motor.
A DCU-Controlled Robot Using DC Motors
One popular project is to build a robot with two wheels controlled by the DCU. A third wheel rotates freely to allow the robot to turn. You can have all of the following motions:
• Forward - Both motors moving forward
• Backward - Both motors moving backward
• Turn Right - Left motor rotating forward, right motor rotating backward
• Turn Left - Right motor rotating forward, left motor rotating backward
User’s Manual Digital Control Unit
56
The DCU was partly designed around this project. There are output patterns for all of these motions using the D1,D2, D3, and D4 lines. This allows you to move the robot anywhere you want. Also, we wanted you to have some other lines (D5 and D6) which could be used for other operations. For example, you could have the robot move around until it reaches a position, and then use D5 and D6 do something like sound a buzzer, raise a flag, pick up something, etc. The program DCUCAR is for this kind of robot.
A DCU-Controlled Robot Using Stepper Motors
Two stepper motors can also be used for the two wheels of the robot. In general, this gives you much better control of the motion of the robot, but it will probably be slower to move. The program DCUCARS is for use with this kind of robot. Note that to control two stepper motors with a single DCU, you must use stepper motor control ICs.
Sensor on a Robot for Feedback
Try combining a robot with sensors to provide added control over its motion. For example:
• Mount a Motion Detector on the robot so that it turns and tries a new direction when it gets within a specified distance of an obstacle.
• Build an edge detector which can tell that the robot has reached the table edge and tell it to stop and back up.
• Mount Magnetic Field Sensors on the robot so it can navigate using the earth's magnetic field.
• Mount two light sensors pointed at the tabletop so that the robot can sense whether the tabletop is white (reflecting a lot of light) or black (not reflecting much light). Program the robot so that it follows a black line drawn on the table, correcting its motion whenever it starts to move off the line.
• Mount a motion detector on the robot and write a program which has the robot move just up to an object and then stop.
Light Seeker
Another interesting project using feedback is to build a light seeker. Mount two light sensors so that they point in slightly different directions on an apparatus that can be rotated. Write a program that compares the light level detected by the two light sensors and then rotate the apparatus toward the one which detects the most light. If this pattern continues, the light seeker should always end up pointed at the brightest light source. This is the basic concept used on some solar panels to track the sun.
Tea Maker
We have made a stepper motor driven automatic tea maker. The device consists of a tea bag, a temperature probe, and a conductivity probe mounted so that the stepper motor can raise or lower them into a tea cup. The program starts by lowering everything into a cup of hot water. The stepper motor gently raises and lowers the tea bag to help with the infusing. At the same time the program is monitoring the conductivity which increases as the tea dissolves. When the conductivity reaches a set limit, the apparatus is raised such that the tea bag is pulled out of the water but the temperature probe is still in the tea. The temperature is then monitored until it drops to a previously specified, perfect drinking temperature. Then the buzzer goes off and the apparatus is raised out of the way.
Monkey Gun Demonstration (original CBL only)
A popular physics demonstration consists of a blow gun used to project a marble or ball bearing toward a metal can target initially suspended by an electromagnet. The gun is aimed directly at the target. A system is set up to cause the electromagnet to be turned off just as the projectile leaves the barrel of the gun. Since both the projectile and the target fall at the same rate vertically, the projectile hits the target. One easy way to set up this demonstration is to use the DCU to supply the current through the electromagnet. Use a photogate placed at the end of the barrel and connected to the original CBL to signal the time to cut the current. The program DCUMONKY is set up to do this task. The photogate should be connected to Channel 1 of the original CBL and the electromagnet should be connected to the D1 line of the DCU. The DCUMONKY program uses the triggering feature of the original CBL to provide the rapid response needed. Unfortunately, triggering on the CBL 2 and LabPro does not work the same way, so this program will not work with them.
Digital Control Unit User’s Manual
57
DCU Music (original CBL only)
We have had a lot of fun using the DCU to play music on the original CBL. Two programs are provided as demonstrations, DCUDAISY and DCUHAPPY. Connect any simple speaker to the D2 line of the DCU and then run one of these programs. The program will click the speaker on and off at a frequency to produce musical tones.
If you want to make the DCU/speaker combination play other songs, you have to modify the two lists, L2‚ and L3. The L2 list determines the duration of each of the notes, in seconds. The L3 list indicates the musical notes, according to the chart below. For example, the first six notes for “Happy Birthday” C C D C F E, would be written as: {1,1,3,1,6,5}-> L3. To insert a rest (pause) in a song, use note 37. The number in the first line of the program must be equal to the number of notes in the song (for example, “Happy Birthday,” has 27 steps, written as 27->N).
Note Number Frequency (Hz) C 1 131.5
C# 2 139.5 D 3 147.5
D# 4 157 E 5 165 F 6 176
F# 7 186.5 G 8 197.5
G# 9 209.5 A 10 221.5
A# 11 235 B 12 248.5
Middle C 13 263 C# 14 279 D 15 295
D# 16 314 E 17 330 F 18 352
F# 19 373 G 20 395
G# 21 419 A 22 443
A# 23 470 B 24 497 C 25 526
C# 26 558 D 27 590
D# 28 628 E 29 660 F 30 704
F# 31 746 G 32 790
G# 33 838 A 34 886
A# 35 940 B 36 994
Pause 37 . 200
The music programs do not work the same on the CBL 2 or LabPro, so we have not included versions for them. Note however, that as an alternative you can program the CBL 2 or LabPro piezo speaker to make music using the 1999 command.
User’s Manual Digital Control Unit
58
Resources for Teachers Interested in Calculator-Controlled Robots
The ACTSAMC (Advanced Competencies for Technical, Scientific, and Mathematical Careers) project is a source for additional curriculum material, technical information, and teacher training on calculator-based control systems, including the construction of calculator-controlled robots.
ACTSAMC c/o Physics Dept Sinclair Community College 444 West Third St. Dayton, OH 45402-1460 www.sinclair.edu/departments/actsamc/
Appendix
A
59
Sample Programs and Subprograms Here is a list of all the complete programs provided on the disks.
Program Name
All Variables Used in
Calculator Programs
Description of Program
For stand-alone programs, a list of
subprograms used. (in calculator
programs)
CBL/CBL 2/LabPro Notes
DCUALARM
V,S,D,T,I,K Waits until Motion Detector detects an object closer than a specified distance. Turns on D1 for 10 seconds. The + key ends this program.
DCUINIT DCUWAITM(V) DCUPWRON(D,T) DCUOFF
CBL and LabPro only. Note the DCUWAITM program is different for the two interfaces. CBL 2 does not have this functionality
DCUCAR
D,K,T Allows you to control a car, driven by two DC motors, using the four arrow keys. T controls the time the motor is on for each keypress. The + key ends this program.
DCUINIT DCUWHEEL(D,T) DCUOFF
All
DCUCARS
D,K,N Allows you to control a car, driven by two stepper motors (and a stepper motor IC), using the four arrow keys. N controls the number of steps taken for each keypress. The + key ends this program.
DCUINIT DCUWHELS(D,N) DCUOFF
All
DCUCOUNT
Counts 0-15 to show the resulting LED displays.
DCUINIT
All
DCUMASS
Program to turn on D1, D2, D3, and D4 in order to accelerate a magnet through a tube (mass driver).
DCUINIT DCUOFF
All
DCUSTEP
T,D,N,I Simple program that allows user to specify direction and number of steps (<=512 for the original CBL or 12,000 for CBL 2 or LabPro) for a directly-connected stepper motor (unipolar or bipolar). Change the value of T in the first
DCUSTEP1 (D,N) DCUINIT DCUOFF
All
Appendix A Digital Control Unit
60
line to control the speed.
DCUSTEP3
T, D,N,I,P, L… Improved program that directly controls a stepper motor. This version is best to use if you plan to use the stepper motor for several different motions, one after the other. It keeps track of the stepper motor position as it moves. (N<=512)
DCUINIT DCUOFF
Use with all three; the 512 point limit only applies to the original CBL.
DCUTEMPC
W, V, S, D Program that monitors temperature. Turns on heater (D1) if temperature is below minimum value (W) and turns on fan (D2) if temperature is above maximum value (V).
DCUINIT DCUOFF
All
DCUTOGGL
L1,L2,L3, I,A,N,B,W,V,K,T,U
Program that allows the user to toggle the digital lines with the keypad. Note that it takes a second or two for this program to respond to a keypress. Also, not all possible combinations of outputs are possible, so sometimes the program will shut off lines before it turns on a line.
DCUINIT DCUOFF
All
DCUTRAP2
D,T Used in a photogate-triggered live trap. Monitors photogate to detect animal, then turns on D1 to take action, then pulses D2.
D,N,I Another live trap program, this one uses stepper motors. Monitors photogate connected to analog channel CH1 to detect animal, then activates a
DCUINIT DCUSTEP1(D,N) DCUWAITP DCUCHKP DCUOFF
All
Digital Control Unit Appendix A
61
directly connected stepper motor to lower a trap door.
DCUWARNV
D,T,V Warns when the signal gets too high by turning on D1. The sensor reading can be read on the original CBL as the program runs.
DCUINIT DCUWAITV(V) DCUPWRON(D,T) DCUOFF
All
DCUMONKY X Monkey gun physics demonstration program. A photogate should be connected to CH1 of the original CBL and an electromagnet should be connected to D2 of the DCU.
DCUINIT DCUOFF
Original CBL only
DCUDAISY Plays the song Bicycle Built For Two on a speaker connected to D1 of the DCU. List L3 contains the note numbers and L2 has the duration of each note.
DCUINIT DCUOFF
Original CBL only. Note that you can make musical tones on CBL 2 and LabPro using the built-in piezo speaker using a 1999 command.
DCUHAPPY Plays the song Happy Birthday To You on a speaker connected to D1 of the DCU. List L3 contains the note numbers and L2 has the duration of each note.
DCUINIT DCUOFF
Original CBL only. Note that you can make musical tones on CBL 2 and LabPro using the built-in piezo speaker using a 1999 command.
DCU2 Turns on D1-D6 in succession on DCU connected to dig/sonic1 and then turns on D1-D6 in succession on dig/sonic2
DCUINIT
LabPro only
Appendix A Digital Control Unit
62
Here is a list of all the subprograms provided on the disks.
Subprogram Name
All Variables Used in
Calculator Programs
Description of Program
Variables that must be set.
CBL/CBL 2/LabPro Notes
DCUBUZZ (subprogram)
F,P,T,N Produces an on/off signal on digital-out line 1 for a specified time and at a specified frequency. For use with speakers and simple buzzers.
F (Frequency) and T (Time) must be predefined. Also, F * T must be <= 512.
Use with all three, the 512 point limit only applies to the original CBL. On CBL 2 or LabPro, the limit is 12,000.
DCUCHKD (subprogram)
S Checks and reports the status of a photogate connected to digital channel 2 (Blocked or Unblocked). The + key ends this program.
LabPro Only
DCUCHKP (subprogram)
S Checks and reports the status of a photogate connected to the CH1 analog input (Blocked or Unblocked). The + key ends this program.
All
DCUINIT (subprogram)
Initialization subprogram for the CBL/LabPro and DCU. It makes sure that the link between the calculator and CBL/LabPro is OK and initializes the unit It also turns off all the DCU lines. This program should be called at the beginning of any main program.
All, this subprogram is essential on all CBL 2 and LabPro programs.
DCUOFF (subprogram)
Turns off all digital power lines. This subprogram should be called at the end of every main program.
All. Note this program sends a 0 command at the end to restore normal power control on CBL 2 or LabPro.
DCUPULSK (subprogram)
K,D, J Turns the output lines specified by D on and off relatively slowly. The program continues until a key is pressed.
D (digital output pattern) must be predefined.
All
DCUPWR2 (subprogram)
I,N,T, D Turns on lines specified by D at half power for a specified
T (Time, less than 5 seconds on original CBL) must be
Use with all three, the 5 second limit only applies to the original CBL.
Digital Control Unit Appendix A
63
time (maximum ~5 seconds).
predefined, D
DCUPWR3 (subprogram)
I,N,T, D Turns on lines specified by D at one-third power for a specified time (maximum ~5 seconds).
T (Time, less than 5 seconds on original CBL) must be predefined, D
Use with all three, the 5 second limit only applies to the original CBL.
DCUPWRON (subprogram)
T,D,I Turns on line D for a time T. Forces calculator to wait for CBL.
T (Time) and D (digital output) must be predefined.
All
DCUSTEP1 (subprogram)
D,N,I Subprogram that directly controls a stepper motor.
D (Direction) and N (Number of Steps) must be predefined.
Use with all three; the 512 point limit only applies to the original CBL.
DCUSTEP2 (subprogram)
D,N,I Controls a stepper motor that uses an IC controller. Line D1 is pulsed to move a step and line D2 is used to set the direction of movement.
D (Direction) and N (Number of Steps) must be predefined.
All
DCUWAITD (subprogram)
S Waits for a photogate connected to digital channel 2 to become blocked.
LabPro Only
DCUWAITM (subprogram)
S,V,K Waits for the motion detector to read an object closer than a specified distance. The + key ends this program.
V (Distance limit) CBL and LabPro have unique programs, CBL 2 does not have this functionality
DCUWAITP (subprogram)
S Waits for a photogate connected to analog channel CH1 to become blocked.
All
DCUWAITV (subprogram)
V,S Waits until the signal level on channel one exceeds a specified value.
V (Minimum Value) must be predefined
All
DCUWHEL (subprogram)
T,D,I DC motor control program. Used to move DC motor-controlled car. Takes direction and steps as an argument and moves accordingly.
T (Time) and D (Direction; 1=forward, 2=backward, 3=left, 4=right ).
All
DCUWHELS (subprogram)
N,D,I, T Stepper Control Program. Used to move a stepper driven car, Takes direction and number of steps as arguments and moves
N (Steps) and D (Direction; 1=forward, 2=backward, 3=left, 4=right)
All
Appendix A Digital Control Unit
64
accordingly. Change the value of T in the first line to control the speed.
Appendix
B
65
Selected DCU Calculator Program Lists Here are some of the DCU programs listed for you to examine. The programs listed here are TI-83 versions, but the versions for other calculators are similar. To see versions of the same programs for other calculators, simply open the appropriate version of the program from the disk, using TI-GRAPH LINK. You can also use TI-GRAPH LINK to modify, print, and move these programs to your calculator.
Program: DCUSTEP
prgmDCUINIT .1üT ClrHome Lbl A If T>0.20 round(4T,0)/4üT Disp "T",T Disp "ENTER DIRECTION" Disp "0 OR 1" Prompt D Disp "NO. OF STEPS?" Prompt N ClrHome prgmDCUSTEP1 Goto A prgmDCUOFF Program: DCUSTEP1
Lbl A If D=1 Then {1,31,4,5,9,10,6}üL† Else {1,31,4,6,10,9,5}üL† End Send(L†) {1,1,14}üL† Send(L†) Disp "DIRECTION",D Disp "STEPS",N {3,T,N,0}üL† Send(L†) Get(I) {1,31,1,0}üL† Send(L†) {3,.1,1,0}üL† Send(L†) Get(I)
Program: DCUMASS prgmDCUINIT {1,1,14}üL† Send(L†) {1,31,5,1,2,4,8,0}üL† Send(L†) Disp "FIRE" {3,.12,5,0}üL† Send(L†) Get(I) prgmDCUOFF Program: DCUWARNV prgmDCUINIT ClrHome Disp "SET LIMIT" Prompt V prgmDCUWAITV Disp "LEVEL" Disp "EXCEEDED" Disp "OUTPUT 1 ON" 1üD 5üT prgmDCUPWRON prgmDCUOFF Program: DCUALARM prgmDCUINIT Disp "ENTER DISTANCE" Disp "LIMIT" Input V ClrHome 10üS Disp "WAITING FOR " Disp "DISTANCE" Disp "TO BE LESS" Disp "THAN" Disp V ClrHome Output(1,1,"PRESS + TO QUIT") prgmDCUWAITM If Sø0 Then 1üD 10üT ClrHome prgmDCUPWRON End ClrHome prgmDCUOFF
Appendix B Digital Control Unit
66
Program: DCUCAR ClrHome 1üT prgmDCUINIT Disp "READY FOR ACTION" Disp "USE ARROWS" Disp "FOR MOTION" Disp "PRESS [+] TO" Disp "QUIT" Lbl A 0üD getKeyüK If K=25 1üD If K=34 2üD If K=24 3üD If K=26 4üD If K=95 Goto Z If D=0 Goto A prgmDCUWHEEL Goto A Lbl Z prgmDCUOFF
Program: DCUWAITM (original CBL version) {change the 11 to a 12 for LabPro}
{1,11,2}üL† Send(L†) 6üS Send(L†) Output(2,1,"WAITING FOR") Output(3,1,"DISTANCE") Output(4,1,"TO BE LESS") Output(5,1,"THAN") Output(5,6,V) {3,1,ú1,0}üL† Send(L†) While S>V Get(S)
Output(7,1,S) getKeyüK If K=95 0üS End
Program: DCUWHEEL
{1,1,14}üL† Send(L†) Disp "DIRECTION" If D=1 Then Disp "FORWARD" {1,31,2,5,0}üL† Goto A End If D=2 Then Disp "BACKWARD" {1,31,2,10,0}üL† Goto A End If D=3 Then Disp "LEFT" {1,31,2,6,0}üL† Goto A End If D=4 Then Disp "RIGHT" {1,31,2,9,0}üL† Lbl A Send(L†) Disp T Disp "SECONDS" {3,T,2,0}üL† Send(L†) Get(I)
Appendix
C
67
Using the DCU with a ULI The Digital Control Unit was designed to make it easy to control motors, lamps, buzzers, and similar devices using the CBL/LabPro. If you are willing to modify the hardware and write your own programs, you can also use the DCU connected to a Universal Lab Interface (ULI) and a computer (Macintosh or Windows).
The Hardware Changes Needed to Use a DCU with a Universal Lab Interface
The control lines on the DCU, as shipped, are designed for connection to a CBL/LabPro. If you are going to use the DCU with a Universal Lab Interface, you need to open the box and solder on new control lines. Remove the original control cable lines (that connect to the CBL/LabPro), or just add the additional lines so that your DCU can be used with either interface. While this may be a little unsightly, leaving both sets of control lines on will give you the most flexibility on the use of the DCU.
The new control lines needed for ULI operation are two 6-pin U.S. telephone connectors (Port 1 and Port 2). Open up the DCU box by removing the four screws. Remove the circuit board. Solder the wires from the 6-pin telephone connectors as shown in the diagram below. If you only want to use the D1 and D2 lines, you do not need to connect the ID INPUT/DIGITAL OUT lines.
The Connection Points for the Cable to the ULI
Software to Use the DCU with a Universal Lab Interface
To write your own programs for the ULI, you should obtain a copy of our ULI Software Developer’s Guide (order code ULI-SDG, $15). This manual explains how to use all the features of the ULI. In particular, it explains how the digital-out lines are controlled. Here is an overview of this process.
You communicate with a ULI by sending ASCII text commands via the serial port of the computer to the ULI. When the ULI is reading sensors, it sends the data back as ASCII text or binary. To control the control lines you simply send the following ASCII commands to the ULI.
Appendix C Digital Control Unit
68
ESC A DG1 on ESC B DG1 off
ESC C DG2 on ESC D DG2 off
ESC E DG3 off ESC F DG3 on
ESC G DG4 off ESC H DG4 on
As mentioned earlier, it is much easier to use the DG1 and DG2 lines than the DG3 and DG4 lines on the ULI. If you do want to use DG3 and DG4, you need to send a ESC J command first to set up the ULI so these lines can be used for digital output. Also, note the on-off pattern is different on the DG3 and DG4 (off-on, instead of on-off).
Also, remember that these commands set the status of the four digital output lines of the ULI. These four lines control the six output lines of the DCU as shown below:
ULI DCU
DG0 DG1 DG2 DG3 D1 D2 D3 D4 D5 D6
low low low low - - - - X X
high low low low + - - - X X
low high low low - + - - X X
high high low low + + - - X X
low low high low - - + - X X
high low high low + - + - X X
low high high low - + + - X X
high high high low + + + - X X
low low low high - - - + X X
high low low high + - - + X X
low high low high - + - + X X
high high low high + + - + X X
low low high high X X X X - -
high low high high X X X X + -
low high high high X X X X - +
high high high high X X X X + +
The best way to experiment and learn about writing programs for the ULI is to use a telecommunications program to communicate with the ULI as if it was another computer connected via the serial port (which it is). This can be done using any computer which has a free serial (COM) port.
Macintosh: The Macintosh ULI Starter Stack, which is included in the ULI Software Developer’s Toolkit (order code ULI-SDK, $15)), can be used to simultaneouly control the first two digital lines D1 and D2 and read signals from sensors connected to the ULI. This Hypercard stack can be edited by anyone who owns Hypercard. Hypercard was distributed free with Macintosh computers for many years. REALbasic can also be used.
Windows: Visual Basic is an easy way to write programs to control the DCU in the Windows environment.
Appendix
D
69
Sources of Electronic Devices
Here are some sources of electronic devices, such as lamps, LEDs, motors, buzzers, solenoids, and stepper motors.
All Electronics 9005 S. Vermont Avenue Los Angeles, CA 90006 800-826-5432 [email protected] http://www.allcorp.com (good for stepper motors, DC motors, and new or surplus items of all kinds) Mouser Electronics 958 N. Main Mansfield, TX 76063-4827 800-346-6873 http://www.mouser.com (new electronic components, but no motors) JameCo Electronic Components 1355 Shoreway Road Belmont, CA 94002-4100 800-831-4242 http://www.jameco.com (new electronic parts of all kinds, including motors) Digi-Key 701 Brooks Ave. South Thief River Falls, MN 56701-0677 800-344-4539 www.digikey.com (new electronic components, but no motors) Radio Shack (stores everywhere) 800-843-7422 www.radioshack.com
Appendix
E
70
Differences Between the Original CBL and CBL 2/LabPro
General
The number of samples that can be taken with CBL 2 and LabPro is 12,287, as compared to 512 for the original CBL.
Two DCUs can be connected to one LabPro and both controlled at the same time.
Since a CBL 2 has only one combined Digital/Sonic port, you cannot use a Motion Detector and a DCU at the same time.
Since a CBL 2 has only one combined Digital/Sonic port, you cannot use a photogate or a radiation monitor connected to the DIG/SONIC port and a DCU at the same time..
New Commands on CBL 2 and LabPro That Effect DCU Operation
{102,n} Power command. Where n = integer (in seconds) between 1 and 999. For n = 0: automatic power control (this is the default upon startup). For n = -1: power always on. Because the interface has no physical power switch, it will go to sleep automatically when it is not receiving instructions from a host. If any value other than –1 is used for n, the interface will go to sleep (thus turning off all port power) in approximately 0.25 seconds. If n is an integer between 1 and 999, the interface will wait for n seconds before taking the first sample. This is intended to give time for sensors to warm up and stabilize prior to sampling. This command needs to be resent after every reset command ({0}). Using this command to always keep the power on (n=-1) can make the digital output commands work more like the original CBL. Be sure to send the {102,0} command when you are finished with the interface. Otherwise you may be draining your batteries unnecessarily. In the absence of communication from a host, the interface will go to sleep in about 10 minutes, regardless of a {102,-1} command.
{2001,n,…} Instant digital output command. Turns on the appropriate lines at any time (during sampling or not). On the CBL 2: n can be an integer from 0-15 (representing the four digital output lines in binary). On the LabPro: n can be an integer from 0-255, and effects all eight digital output lines (four on channel 31 and four on channel 32). For example a {2001, 17} will set the lowest digital line on both ports high and all other lines low. The {0} (reset all) command will not always bring high lines to a low state. Instead, use {2001,0} to force all lines low.
There are also new commands which automatically calculate a heart/respiration rate from collected data; allow for digital data capture using photogates; monitor radiation monitors and rotary motion sensors plugged into the digital ports; allow the user to read and write to a digital-id sensor; and allow the user to interact with the Flash Archive. See the LabPro Technical Reference Manual or Getting Started with the CBL 2 for details.
Changes to original CBL Commands
{0} Reset command. This command will clear data RAM back to the power-up state and clear any error information. It will also set the power control to the normal state. It will not clear the FLASH RAM. If the CBL 2 or LabPro is being powered off AC, it will not bring any high digital output lines to a low state. The {2001,0} command will effectively reset the digital output lines regardless of whether the CBL 2 or LabPro is powered by batteries or AC.
{1,…} Channel setup command. This command is identical to the original CBL. However, there are new side effects as a result of the dual use of the digital output/sonic channel. Often, it is necessary to setup a dummy channel prior to sending digital output. If the auto-ID command is used: {1,Channel #, 1} a current pulse will be sent to all channels, regardless of the channel # in the command. This pulse, which is generated to find a sensor’s auto-ID resistance, will cause D3 to go high. If the CBL 2 or LabPro is powered off internal batteries, this may be just a brief pulse. If the CBL 2 or LabPro is powered off AC, the D3 line will stay high. The LED may light, and D3 will be outputting a constant voltage until further commands are sent. This situation can be avoided by using: {1,Channel #, 14}instead of {1,Channel #, 1}. If however, an actual (auto-id) sensor is being employed and data is needed for feedback, it may be necessary to send the {1, Channel #,
Digital Control Unit Appendix E
71
1}command. In these cases, send a ‘digital outputs off’ command: {2001,0} immediately after the {1,…} command is sent. There will still be a brief time where D3 is high, but the ‘digital outputs off’ command will lower it quickly.
{2,…} Data Type command. This command is not used should not be sent.
{3,…} Trigger setup command. This command is nearly identical to the original CBL. However, there are a number of subtle differences which must be taken into account. The format is almost identical, i.e.…{3, sample interval, number of samples, trigger type, trigger channel, trigger threshold, pre-store, (extclock-ignored), rectime, filter, fastmode} Each of these parameters is discussed below.
-Sample Interval: Any number between 0.0001 seconds and 16000 seconds. If ‘fastmode’ is being used, the sample time can be as small as 0.00002 seconds. See the fastmode discussion below for further restrictions on this parameter.
-Number of Samples: Any integer from 1 to 12,287 for non-real-time mode, or -1 for real-time mode. In non-real-time mode there will be the requested number of samples taken at the requested interval. The first sample will be taken at time=0, the second sample at time = Sample Interval and so on. If a digital output has been commanded, it will be enacted at the time of each sample. In real-time mode there is no limit to the number of samples taken since the interface stores only one sample at a time. When using a CBL 2 or LabPro, if the host does a Get request, the interface will return a value and a time (since the previous Get, or roughly 0 seconds for the first Get). In the same situation, an original CBL would have returned only a single value (and not the time.) Sampling will continue with other Get commands. Even if no Get command is send, the interface will continually sample at the given interval for ten samples or five seconds (whichever is longer). During real-time sampling, the digital pattern will be sent, one element at a time, at the beginning of each Sample Interval, as long as sampling is still active. Therefore, if a Sample Interval of 5 seconds is commanded, any digital output instructed, will be enacted every five seconds, whether or not a new Get request is sent. The final digital output instructed by the final sample will remain until further commands are sent or the power command is anything other than –1. (Note that the digital output pattern will begin being sent at time=0, while the first analog sample is not taken until time = Sample Interval.). With the original CBL the digital output pattern will begin being sent at time = Sample interval, which is at the same time as the first analog sample is taken.
-Trigger type: Identical to original CBL. Any integer from 0 to 6. If a trigger other than Manual (1) is being used, the interface will immediately begin sampling at the requested rate. This is done in order to fill the prestore buffer. If a digital output is commanded, the pattern will be repeated before and after the trigger event occurs until the selected number of samples has been taken. The original CBL would not initiate the digital output pattern until after the trigger event.
-Trigger channel: Identical to original CBL. Any active channel number (1-4, 11,12).
-Trigger Threshold: Any number which falls within the range of the sensor in question. This number will be in the units of the sensor in question. For example, if using a Barometer, measuring in kPa, a possible trigger threshold might be 105 kPa (not the corresponding voltage of 2.95 V, as the original CBL required).
-Pre-store: any integer from 0 to 100 (a percentage). This value will determine the amount of data retained prior to the trigger event.
-(extclock-ignored): a place holder to make the {3…} command compatible with the original CBL.
-Rectime: 0 for none, 1 for absolute (default), 2 for relative.
-Filter: Integer from 0 to 9 (see technical reference manuals for details)
-Fastmode: 0 for off (default), 1 for on. This must be set to 1 if sampling at speeds greater than 10,000 Hz. This mode is only possible with a single, analog sensor at rates of 50, 33, 25, 20, 10, and 5 kHz. No digital outputs can be used if fastmode is enabled.
{5,…} Data Control command. Same as original CBL.
{6,…} System Setup command. Sending a {6,0} will abort sampling but retain the data in the buffer and adjust any system parameters to suit (such as: number of samples, available number of data points,..,etc.). Sending a {6,3} will turn the sound off (default). Sending a {6,4} will turn the sound on.
Appendix E Digital Control Unit
72
{7} Request System Status command. Sending {7} and performing a Get request will return more information than the original CBL. For the new format see the CBL 2/LabPro technical reference manuals.
Programming Tips
With some minor modifications almost all of the programs written for the original CBL and DCU-CBL can be made to work with the new platforms. There are a few universal changes which should be made:
-In almost every case the command {1,1,1} should be changed to {1,1,14}.
-There should be an effort made to distinguish between the old and the new interfaces. The {102,…} command will cause an error if it is sent to the original CBL, but it should always be sent to the new interfaces to ensure the proper power state. Checking the dimension of the list returned from a {7} command (between 7 and 10 for original, always 17 for new) is one way to distinguish between the old and the new. This is done in the DCUINIT program.
-There are some differences in triggering response which can be minimized through careful choice of trigger thresholds and trigger prestore. In general, it is not possible to make triggering work as quickly on a CBL 2 or LabPro as on the original CBL.
-Although the LabPro and CBL 2 were designed to use photogates as digital sensors and you can do this, there are conflicts between digital output and digital data capture, not to mention the physical problem of a single digital port on the CBL 2. To avoid this, use photogates plugged into analog channel 1 via the CBL-P adapter. That is the way photogates are used in this manual.
-There are two music programs written to work with the original CBL/DCU system. These programs use a loop construct to send the song one note at a time. The original CBL would allow the current sample to complete (play the note in full) before allowing the next sampling command (next note) to take effect. This worked as long as the total time of the note was relatively short. The new interfaces will not wait for the current command to complete. The result is that no notes get a chance to finish. The solution is, any looping construct in the program must have a built-in pause or a GET command following to allow the current sampling command to complete. Unfortunately this slows down the program. For this reason we did not include CBL 2 and LabPro versions of these programs.
-In real-time mode a CBL 2 or LabPro will continually sample at the given interval for ten samples or five seconds (whichever is longer), even if no Get command is sent.
-When a -1 is used in a Command 3 for real-time data collection, the timing of the program execution is controlled by the second number in the 3 command as usual. If you are using an original CBL there can be some extra time delay between steps because the original CBL waits for each GET command before moving on to the next step. If you try to go through a pattern too quickly, the speed will be limited by the looping time of the calculator program, instead of by the Sample Interval set in the 3 command. With the CBL 2 or LabPro the digital output will always be at the exact rate specified by the Sample Interval in the 3 command.
Appendix
F
74
Using Visual Basic- Learning Edition With The DCU
Introduction
The Visual Basic software provided with your DCU is intended to be used with either the Enterprise or Professional editions of Visual Basic 6.0. But, because the prices of these versions of the language are quite high, we wanted to see if it would be possible to use the more inexpensive Learning Edition version of Visual Basic with the DCU. Other people have had this same problem, and this appendix will show you how to modify our sample programs so that they will work with the Learning Edition.
Obtaining and Installing the Necessary Software
The use of the Learning Edition of Visual Basic requires downloading one extra piece of software. This software recreates the serial communication functionality of the Professional and Enterprise editions. This software is provided free of charge. It is freeware written by Richard Grier of Mabry Softwware, Inc, Stanwood, WA.
To get this software, open you web browser and go to the address:
You may want to spend a minute reading this webpage, but we will tell you all you need to know to get this software working with our DCU programs. At the top of this web page you will see a link named “Download XMComm”- select this link and wait for the file download to finish. This file is a compressed .zip archive. Once it has finished downloading, expand this file. You should find several files that are extracted from this archive. Select the Setup.exe file as shown below. Double-click this file and follow the installation instructions.
Figure 1- XMComm installation routine
Integration with Visual Basic, Learning Edition
Before proceeding with the integration of XMComm into Visual Basic, we recommend that you make a copy of the sample programs folder make your changes only in that folder.
Open the DCU control program that you want to use with the Learning Edition of Visual Basic. We have selected the DCUTrap2 program as our example program. But the procedures outlined here will work with any of the programs. If you try to run the program without modification, there are two places where you could get an error message. You will see an error either when you open the program or when you try to view the main form of the program (DCU.frm). This error message is shown below in figure 2.
Appendix F Digital Control Unit
75
Figure 2- Load error.
This error occurs because the DCU program is looking for a serial communications routine that the Learning Edition does not provide.
We are going to include XMComm in the program to replace the missing serial communications routines. To do this, select the ‘Components’ menu item from the ‘Project’ menu of Visual Basic.
Figure 3- Adding a component to Visual Basic
This will bring up a new dialog box that has a list of possible components in it. Scroll down to the bottom and select the entry titled ‘XMCOMM Serial Comms with XMODEM’ entry. Make sure that a check mark appears in the box to the left of the entry and select the OK button at the bottom of the dialog.
Digital Control Unit Appendix F
76
Figure 4- Selecting the XMCOMM control
After selecting ok, you should see a new icon in the Tools window of Visual Basic. This is the icon for the XMComm control that we will use to replace the serial communication control of the Professional and Enterprise editions of Visual Basic. Figure 5 shows the new control.
Figure 5- The XMComm control.
Now, we must add this control to the main form of the program in order to enable serial communications with the LabPro. To do this, simply click on the XMComm control shown in Figure 5 and then click and drag a rectangle on the form. Letting go of the mouse button will add the XMComm control to the form. Note that the XMComm control will not be visible when the program is running so you may place it wherever you like on the form. You will see a dialog box explaining the copyright information on the XMComm as you place it on the form.
We need to change two properties of the XMComm control. First we must change its name to ‘LabPro’. To do this, click once on the XMComm control that you placed on the form. This will set the properties window to display the properties of the XMComm control. Find the property titled ‘(Name)’ and change the entry to ‘LabPro’
Now we need to change the port settings on the XMComm control. This setting is also changed in the properties window. Look for the ‘Settings’ property and change the entry to ‘38400,n,8,1’ as shown below in figure 7.
Appendix F Digital Control Unit
77
Figure 6- Changing the port settings for the XMComm Control.
Finally, there is one change that we must make to the code controlling this program. With the Enterprise and Professional versions the command to read data from the LabPro was LabPro.input. With the XMComm control the new command is LabPro.inputdata. To make this change we need to open the code editor. Open the code editor by double-clicking anywhere on the main DCU form. Once this is opened, we will do a find and replace as shown below. Choose Replace from the Edit menu.
Figure 7- Find and Replace dialog for XMComm
Note that the text we are searching for is “LabPro.input” and we wish to replace that text with “LabPro.inputdata”. The Search parameters should be Current Project to search through all the code associated with this project, and the search should include the whole word only to eliminate possible conflicts. Press the ‘Replace All’ button and the necessary changes will be made
After you make all of these changes try running the program. If it all works well, save the changed version. Note that the new version will not work on another computer, unless the XMCOMM control has been installed.
Summary
This is all that you need to do to get our DCU programs working with the Learning Edition of Visual Basic 6. You can now run this program just as we outline in earlier sections of this manual. The bad news is that you have to go through some of these steps for each program. Once you get the changes in mind, they only take a few minutes. Here is a summary of the changes:
Digital Control Unit Appendix F
78
Do one time on your computer:
• Download the software
• Install the software
Repeat for each program:
• Add the XMComm control to the DCU form
• Change the name of the XMComm control to LabPro
• Change the setting of the control to 38400
• Do a global replacement of all instances of “LabPro.input” with “LabPro.inputdata”
Appendix
G
79
Vernier Products Vernier Software and Technology produces many sensors and books that can be used with the CBL or LabPro. Free CBL/LabPro data collection programs are available on our web site (www.vernier.com). There are versions of these data collection programs for all the TI graphing calculators. Also available free on this web site is CBL Made Easy, a guide to getting started using the Original CBL and TI-graphing calculators, and the LabPro Technical Reference Manual.
All TI-graphing calculators, LabPros, CBLs, and CBRs are also available from Vernier. In addition, Vernier has lab interfaces, books, and sensors for collecting data directly with either Windows or Macintosh computers.
Vernier Software and Technology 13979 SW Millikan Way
Vernier sensors with order codes ending in “-BTA” plug directly into the CBL, CBL 2, or LabPro. Other Vernier sensors require adapters, which sell for $5. The sensors with order codes ending in “-DIN” require a DIN-BTA adapter.
Here is a list of Vernier sensors that can be used with CBL, CBL 2, or LabPro directly.
Sensor/Probe Order Code Price 3-Axis Accelerometer 3D-BTA $199 25-g Accelerometer ACC-BTA $91 Low-g Accelerometer LGA-BTA $90 Barometer BAR-BTA $58 CO2 Gas Sensor C02-BTA $261 Colorimeter COL-BTA $99 Conductivity Probe CON-BTA $89 Current & Voltage Probe System CV-BTA $89 Digital Control Unit DCU-BTD $61 Dissolved Oxygen Probe DO-BTA $191 Dual-Range Force Sensor DFS-BTA $99 EKG Sensor EKG-BTA $142 Exercise Heart Rate Monitor EHR-BTA $91 Extra Long Temperature Probe TPL-BTA $70 Gas Pressure Sensor GPS-BTA $71 Heart Rate Monitor HRM-BTA $49 Flow Rate Sensor FLO-BTA $129 Instrumentation Amplifier INA-BTA $51 Ammonium Ion-Selective Electrode NH4-BTA $165 Calcium Ion-Selective Electrode CA-BTA $165 Chloride Ion-Selective Electrode CL-BTA $165 Nitrate Ion-Selective Electrode NO3-BTA $165 Light Sensor LS-BTA $45
Appendix G Digital Control Unit
78
Magnetic Field Sensor MG-BTA $54 Microphone MCA-BTA $35 Motion Detector MD-BTD $64 O2 Gas Sensor O2-BTA $186 pH Sensor PH-BTA $74 Radiation Monitor RM-BTD $205 Relative Humidity Sensor RH-BTA $67 Respiration Monitor Belt (requires GPS-BTA)
There are a number of additional manuals that can help you use LabPro with a computer or calculator.
LabPro Technical Reference – This reference provides detailed information on the LabPro hardware and the software command structure. This manual is available free from our web site, www.vernier.com.
Logger Pro User’s Manual and Logger Pro Tutorials – These manuals are a part of the Logger Pro package and included on the Logger Pro CD. D.
DataMate Guidebook – This guidebook provides a complete look at the DataMate calculator program. This manual can also be downloaded from our web site, www.vernier.com.
Lab Manuals - Lab manuals in physical science, biology, chemistry, physics and water quality enable you and your students to quickly begin using LabPro in the classroom and in the field. Each manual contains
• Ready-to-use student experiments. • Teacher section for each experiment with complete directions, helpful hints, and sample graphs and data. • Word processing files of the student sections on CD, so labs may be edited to your specifications.
Here are the lab manual titles, order codes, and prices: Physical Science with Computers ...................................PSC-LP ......... $35 Physical Science with Calculators ..................................PSCALC ....... $35 Biology with Computers..................................................BWC-LP ....... $35 Biology with Calculators ................................................BWCALC ..... $35 Chemistry with Computers ..............................................CWC-LP ....... $35 Chemistry with Calculators.............................................CWCALC ..... $35 Middle School Science with Computers ..........................MSC-LP........ $35 Middle School Science with Calculators.........................MSCALC...... $35 Physics with Computers ..................................................PWC-LP........ $35 Physics with Calculators.................................................PWCALC...... $35 Water Quality with Computers........................................WQC-LP....... $35 Water Quality with Calculators ......................................WQCALC ..... $35 Nuclear Radiation with Computers and Calculators ......NRCC............ $25