Digital Pressure Indicator DPI I) Software installation 1. Connect your DPI handheld unit to a Windows computer (Windows XP or newer) by using the supplied USB cable. The DPI will automatically turn on and be recognized by the computer, without the need to install any drivers. 2. Open the newly recognized ‘DPI’ drive on your PC by double-clicking it. Locate the file ‘Installer DPI(version no.).exe’ and copy it to any location on your PC, e. g. the desktop. (Fig. 1) NOTICE: Do not attempt to start the installer directly from the DPI drive! 3. Start the software installation on your PC by double-clicking this file. The setup window appears (Fig. 2) 4. Follow the installation instructions. Finally the program group “DPI” will appear in the Windows start menu. 5. Run the software by selecting the application „DPI“ from the start menu (Fig. 3) or via double click on the desktop icon „DPI”. II) Handheld setup via PC Prepare the handheld unit for the first measurement. A) The software is running, but the handheld is not connected to the PC, yet: 1. Open the menu [File] and [Open Database], the empty ‘Enginelist’ in the window ‘Select Dataset’ is shown. (Fig. 4) 2. Click on [Create Ship]. Select the line ‘aNewShip’ in the field ‘Name’, enter the name of the ship, and confirm by clicking [Save]. (Fig. 5) 3. Select the ship name and click on [Create Engine] in order to create an engine for this ship. Enter the required engine parameters under ‘Dataset’ and ‘Handheld’ in the window ‘Create new Engine’ (Fig. 6), and save by clicking [OK]. Repeat this step for other engines as required. Option: Parameters may be changed before transmission to the handheld unit. To do so, open the window ‘Select Dataset’ via the menu commands [File] and [Open Database], select the appropriate engine, and click on [Edit Para.]. 4. Connect your DPI handheld unit to the computer; the import window will pop-up automatically. Click on [Close] to close it. 5. Open the menu [Setup] and [Handheld]. Quick Start Instructions Fig. 1 Fig. 2 Fig. 3 Fig. 4 Fig. 5 Fig. 6
Transcript
Digital Pressure Indicator DPIType50 1
Digital Pressure Indicator DPI
I) Software installation
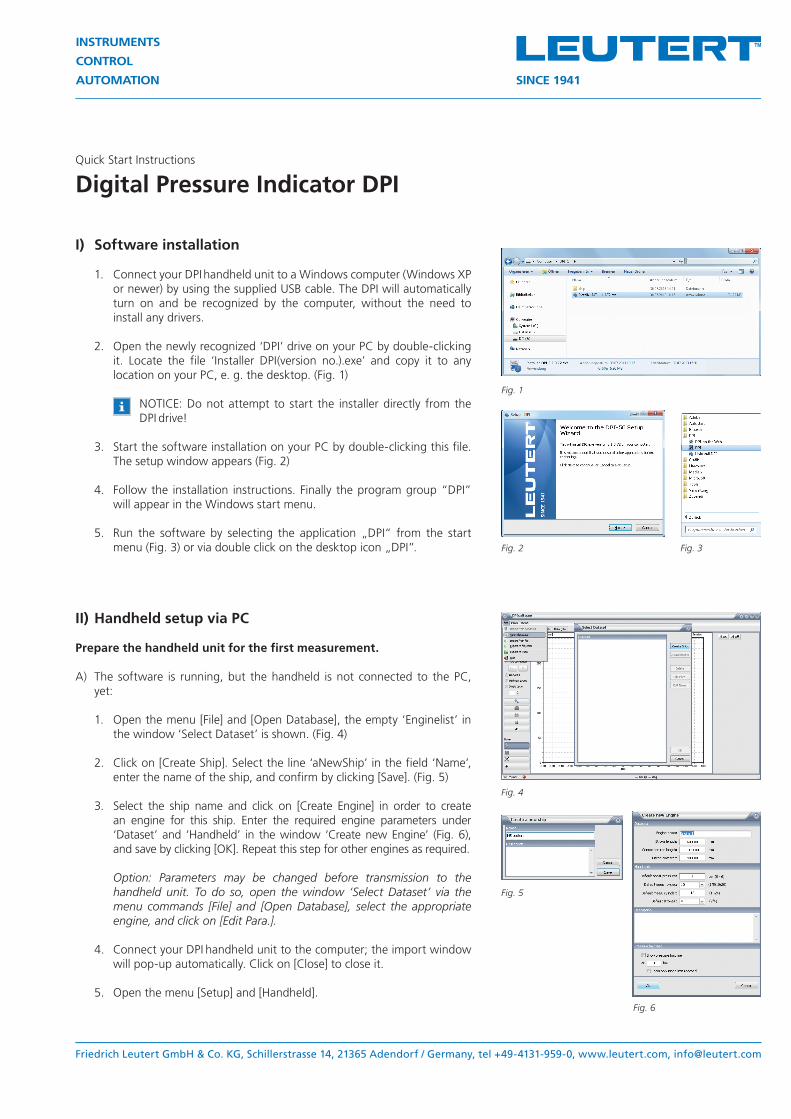
1. Connect your DPI handheld unit to a Windows computer (Windows XP or newer) by using the supplied USB cable. The DPI will automatically turn on and be recognized by the computer, without the need to install any drivers.
2. Open the newly recognized ‘DPI’ drive on your PC by double-clicking it. Locate the file ‘Installer DPI(version no.).exe’ and copy it to any location on your PC, e. g. the desktop. (Fig. 1)
NOTICE: Do not attempt to start the installer directly from the DPI drive!
3. Start the software installation on your PC by double-clicking this file. The setup window appears (Fig. 2)
4. Follow the installation instructions. Finally the program group “DPI” will appear in the Windows start menu.
5. Run the software by selecting the application „DPI“ from the start menu (Fig. 3) or via double click on the desktop icon „DPI”.
II) Handheld setup via PC
Prepare the handheld unit for the first measurement.
A) The software is running, but the handheld is not connected to the PC, yet:
1. Open the menu [File] and [Open Database], the empty ‘Enginelist’ in the window ‘Select Dataset’ is shown. (Fig. 4)
2. Click on [Create Ship]. Select the line ‘aNewShip’ in the field ‘Name’, enter the name of the ship, and confirm by clicking [Save]. (Fig. 5)
3. Select the ship name and click on [Create Engine] in order to create an engine for this ship. Enter the required engine parameters under ‘Dataset’ and ‘Handheld’ in the window ‘Create new Engine’ (Fig. 6), and save by clicking [OK]. Repeat this step for other engines as required.
Option: Parameters may be changed before transmission to the handheld unit. To do so, open the window ‘Select Dataset’ via the menu commands [File] and [Open Database], select the appropriate engine, and click on [Edit Para.].
4. Connect your DPI handheld unit to the computer; the import window will pop-up automatically. Click on [Close] to close it.
5. Open the menu [Setup] and [Handheld].
Quick Start Instructions
Fig. 1
Fig. 2 Fig. 3
Fig. 4
Fig. 5
Fig. 6
2 Digital Pressure Indicator DPI
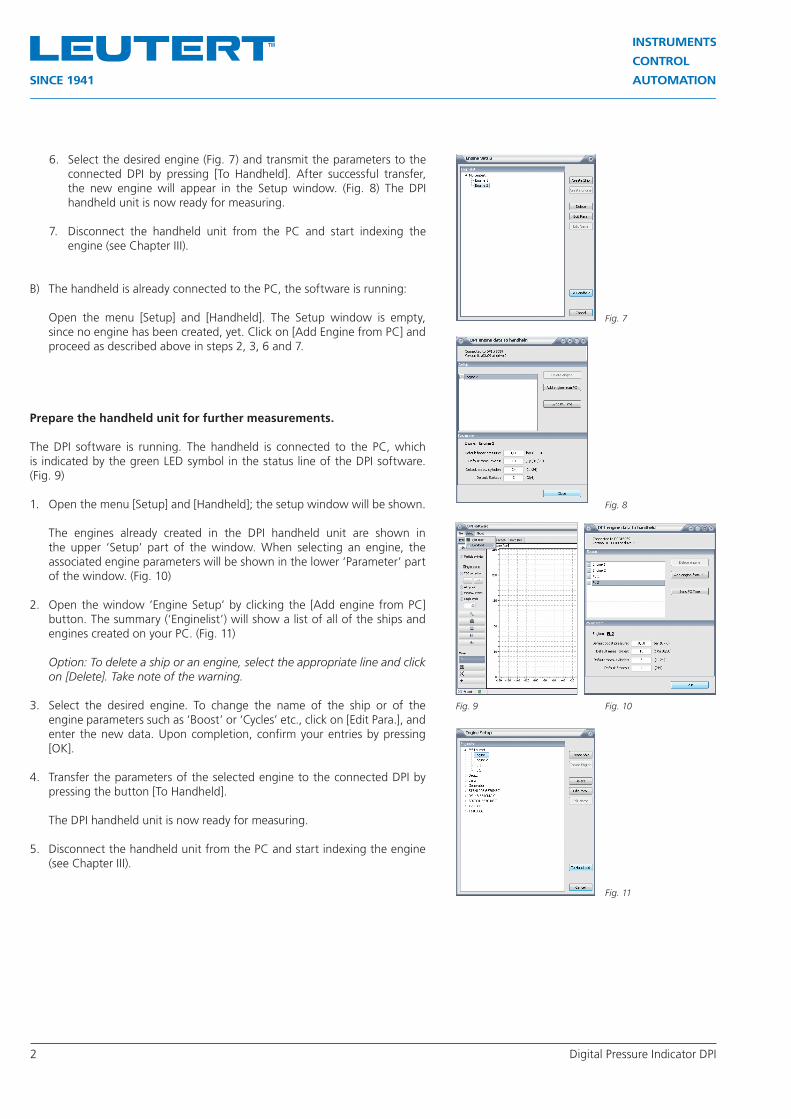
Prepare the handheld unit for further measurements.
The DPI software is running. The handheld is connected to the PC, which is indicated by the green LED symbol in the status line of the DPI software. (Fig. 9)
1. Open the menu [Setup] and [Handheld]; the setup window will be shown.
The engines already created in the DPI handheld unit are shown in the upper ‘Setup’ part of the window. When selecting an engine, the associated engine parameters will be shown in the lower ‘Parameter’ part of the window. (Fig. 10)
2. Open the window ‘Engine Setup’ by clicking the [Add engine from PC] button. The summary (‘Enginelist’) will show a list of all of the ships and engines created on your PC. (Fig. 11)
Option: To delete a ship or an engine, select the appropriate line and click on [Delete]. Take note of the warning.
3. Select the desired engine. To change the name of the ship or of the engine parameters such as ‘Boost’ or ‘Cycles’ etc., click on [Edit Para.], and enter the new data. Upon completion, confirm your entries by pressing [OK].
4. Transfer the parameters of the selected engine to the connected DPI by pressing the button [To Handheld].
The DPI handheld unit is now ready for measuring.
5. Disconnect the handheld unit from the PC and start indexing the engine (see Chapter III).
B) The handheld is already connected to the PC, the software is running:
Open the menu [Setup] and [Handheld]. The Setup window is empty, since no engine has been created, yet. Click on [Add Engine from PC] and proceed as described above in steps 2, 3, 6 and 7.
6. Select the desired engine (Fig. 7) and transmit the parameters to the connected DPI by pressing [To Handheld]. After successful transfer, the new engine will appear in the Setup window. (Fig. 8) The DPI
handheld unit is now ready for measuring.
7. Disconnect the handheld unit from the PC and start indexing the engine (see Chapter III).
Fig. 10Fig. 9
Fig. 11
Fig. 7
Fig. 8
Digital Pressure Indicator DPI 3
III) Indication procedure
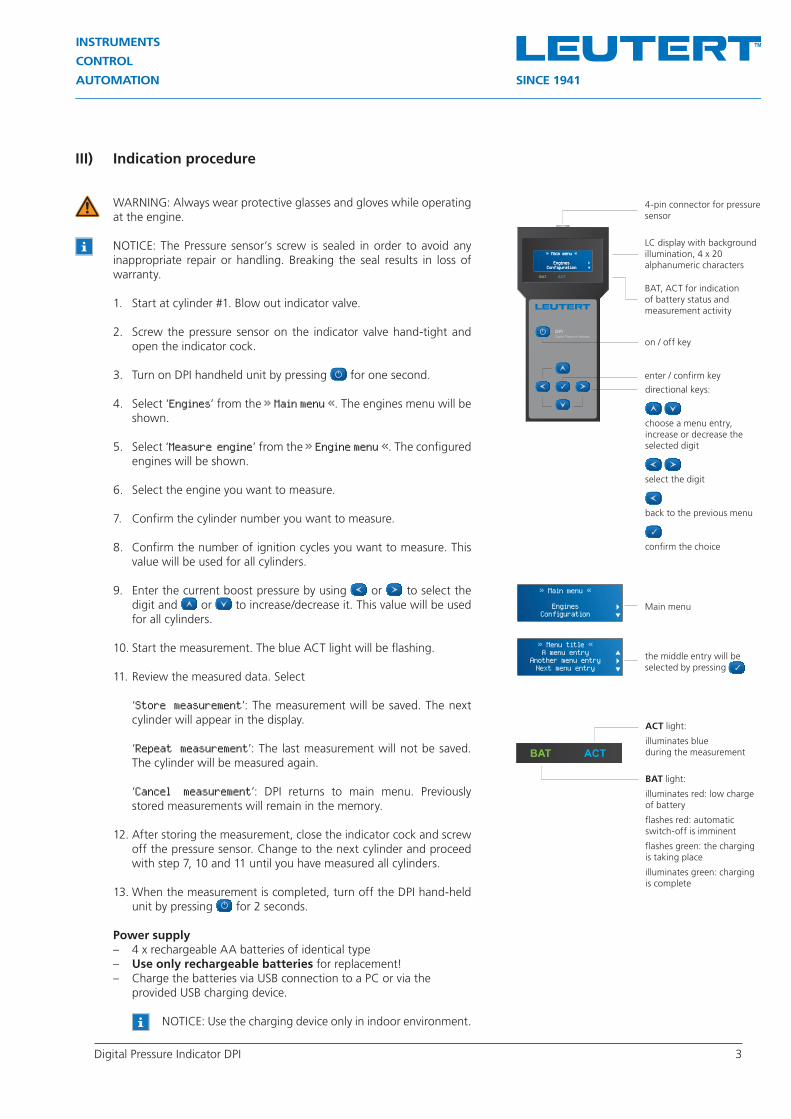
WARNING: Always wear protective glasses and gloves while operating at the engine.
NOTICE: The Pressure sensor’s screw is sealed in order to avoid any inappropriate repair or handling. Breaking the seal results in loss of warranty.
1. Start at cylinder #1. Blow out indicator valve.
2. Screw the pressure sensor on the indicator valve hand-tight and open the indicator cock.
3. Turn on DPI handheld unit by pressing for one second.
4. Select ‘Engines’ from the » Main menu «. The engines menu will be shown.
5. Select ‘Measure engine’ from the » Engine menu «. The configured engines will be shown.
6. Select the engine you want to measure.
7. Confirm the cylinder number you want to measure.
8. Confirm the number of ignition cycles you want to measure. This value will be used for all cylinders.
9. Enter the current boost pressure by using or to select the digit and or to increase/decrease it. This value will be used for all cylinders.
10. Start the measurement. The blue ACT light will be flashing.
11. Review the measured data. Select
‘Store measurement’: The measurement will be saved. The next cylinder will appear in the display.
‘Repeat measurement’: The last measurement will not be saved. The cylinder will be measured again.
‘Cancel measurement’: DPI returns to main menu. Previously stored measurements will remain in the memory.
12. After storing the measurement, close the indicator cock and screw off the pressure sensor. Change to the next cylinder and proceed with step 7, 10 and 11 until you have measured all cylinders.
13. When the measurement is completed, turn off the DPI hand-held unit by pressing for 2 seconds.
Power supply– 4 x rechargeable AA batteries of identical type– Use only rechargeable batteries for replacement!– Charge the batteries via USB connection to a PC or via the
provided USB charging device.
NOTICE: Use the charging device only in indoor environment.
4-pin connector for pressure sensor
on / off key
directional keys:
choose a menu entry,increase or decrease the selected digit
select the digit
back to the previous menu
confirm the choice
enter / confirm key
LC display with background illumination, 4 x 20 alphanumeric characters
BAT, ACT for indication of battery status and measurement activity
BAT light:
illuminates red: low charge of battery
flashes red: automatic switch-off is imminent
flashes green: the charging is taking place
illuminates green: charging is complete
ACT light:
illuminates blueduring the measurement
BAT ACT
BAT ACT
the middle entry will be selected by pressing
Main menu
» Menu title «A menu entry
Another menu entryNext menu entry
�}�
» Main menu «
EnginesConfiguration
}�
4 Digital Pressure Indicator DPI
Subject to change without notice. Issued 11/2016MADE
INGERMANY
IV) Data import procedure
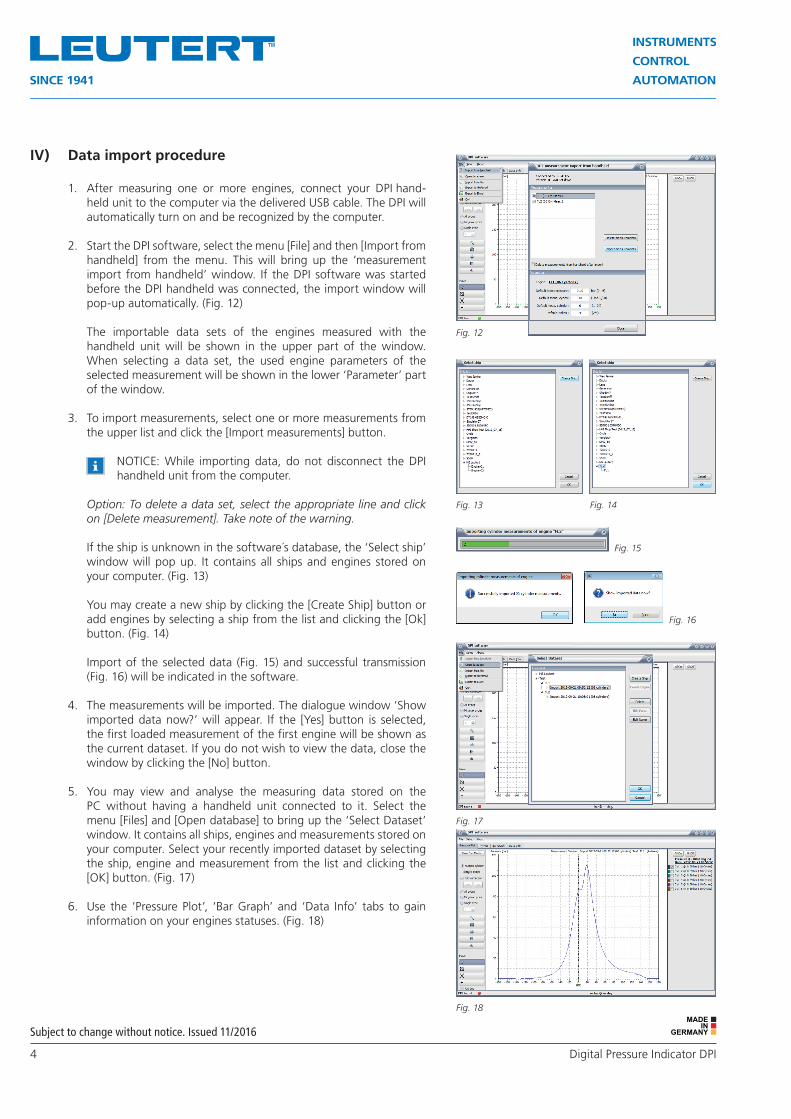
1. After measuring one or more engines, connect your DPI hand-held unit to the computer via the delivered USB cable. The DPI will automatically turn on and be recognized by the computer.
2. Start the DPI software, select the menu [File] and then [Import from handheld] from the menu. This will bring up the ‘measurement import from handheld’ window. If the DPI software was started before the DPI handheld was connected, the import window will pop-up automatically. (Fig. 12)
The importable data sets of the engines measured with the handheld unit will be shown in the upper part of the window. When selecting a data set, the used engine parameters of the selected measurement will be shown in the lower ‘Parameter’ part of the window.
3. To import measurements, select one or more measurements from the upper list and click the [Import measurements] button.
NOTICE: While importing data, do not disconnect the DPI handheld unit from the computer.
Option: To delete a data set, select the appropriate line and click on [Delete measurement]. Take note of the warning.
If the ship is unknown in the software´s database, the ‘Select ship’ window will pop up. It contains all ships and engines stored on your computer. (Fig. 13)
You may create a new ship by clicking the [Create Ship] button or add engines by selecting a ship from the list and clicking the [Ok] button. (Fig. 14)
Import of the selected data (Fig. 15) and successful transmission (Fig. 16) will be indicated in the software.
4. The measurements will be imported. The dialogue window ‘Show imported data now?’ will appear. If the [Yes] button is selected, the first loaded measurement of the first engine will be shown as the current dataset. If you do not wish to view the data, close the window by clicking the [No] button.
5. You may view and analyse the measuring data stored on the PC without having a handheld unit connected to it. Select the menu [Files] and [Open database] to bring up the ‘Select Dataset’ window. It contains all ships, engines and measurements stored on your computer. Select your recently imported dataset by selecting the ship, engine and measurement from the list and clicking the [OK] button. (Fig. 17)
6. Use the ‘Pressure Plot’, ‘Bar Graph’ and ‘Data Info’ tabs to gain information on your engines statuses. (Fig. 18)