Digital Process Controller Series E5K Advanced Process Digital Controllers Field configurable output and option boards 100 ms sampling (for analog input) Advanced PID, or fuzzy self-tuning Conforms to UL, CSA and CE standards IP66/NEMA4X front panel Remote set point (for E5EK and E5AK only) Set point ramp Serial communications (RS-232C, and RS-485; RS-422 for E5AK and E5EK only) and transfer output (4 to 20 mA) Front panel programming Heat/cool or standard operation Auto/manual and ON/OFF selections Ordering Information Order Control Output Boards and Option Boards separately below. Example: for a Relay Control Output, order the E53-R4R4 Output Board in addition to the E5CK-AA1-500 Process Controller. For E5AK or E5EK, order an E53-R output module. Note: You can mount only one Output Board and one Option Board to E5EK or E5CK. Item Description Part number Standard models Base Unit with terminal cover E5AK-AA2-500 E5EK-AA2-500 E5CK-AA1-500 E5CK-AA1-302 Position--proportional Base Unit with terminal cover E5AK-PRR2-500 E5EK-PRR2-500 24 AC/DC models Base Unit with terminal cover E5AK-AA2-500 AC/DC 24V E5AK-PRR2-500 AC/DC 24V E5EK-AA2-500 AC/DC 24V E5EK-PRR2-500 AC/DC 24V E5CK-AA1-500 AC/DC 24V Note: 1. When using the heater burnout alarm function with a standard model, the Linear Output Module cannot be used for the control outputs (heat). The Digital Controller provides transfer outputs at 4 to 20 mA for the PV and other values and control outputs at 4 to 20 mA for the current outputs. 2. Order Output and Option Boards separately. 3. E5EK-PRR2/E5AK-PRR2 controllers are supplied with relay output. The relay output is not compatible with any other module.
Transcript
Digital Process Controller Series E5K
Advanced Process DigitalControllers
Field configurable output and optionboards
100 ms sampling (for analog input)
Advanced PID, or fuzzy self-tuning
Conforms to UL, CSA and CE standards
IP66/NEMA4X front panel
Remote set point (for E5EK and E5AKonly)
Set point ramp
Serial communications (RS-232C, andRS-485; RS-422 for E5AK and E5EKonly) and transfer output (4 to 20 mA)
Front panel programming
Heat/cool or standard operation
Auto/manual and ON/OFF selections
Ordering InformationOrder Control Output Boards and Option Boards separately below. Example: for a Relay Control Output, order the E53-R4R4 OutputBoard in addition to the E5CK-AA1-500 Process Controller. For E5AK or E5EK, order an E53-R output module.
Note: You can mount only one Output Board and one Option Board to E5EK or E5CK.
Item Description Part number
Standard models Base Unit with terminal cover E5AK-AA2-500
E5EK-AA2-500
E5CK-AA1-500
E5CK-AA1-302
Position--proportional Base Unit with terminal cover E5AK-PRR2-500
E5EK-PRR2-500
24 AC/DC models Base Unit with terminal cover E5AK-AA2-500 AC/DC 24V
E5AK-PRR2-500 AC/DC 24V
E5EK-AA2-500 AC/DC 24V
E5EK-PRR2-500 AC/DC 24V
E5CK-AA1-500 AC/DC 24V
Note: 1. When using the heater burnout alarm function with a standard model, the Linear Output Module cannot be used for the controloutputs (heat). The Digital Controller provides transfer outputs at 4 to 20 mA for the PV and other values and control outputs at4 to 20 mA for the current outputs.
2. Order Output and Option Boards separately.3. E5EK-PRR2/E5AK-PRR2 controllers are supplied with relay output. The relay output is not compatible with any other module.
E5K E5K
Ordering Information Table -- continued from previous page
Item Description Part number
Output Module (for E5AK and E5EK only) Relay E53-R( y)
SSR E53-S
Pulse (NPN) 12 VDC E53-Q
Pulse (NPN) 24 VDC E53-Q3
Pulse (PNP) 24 VDC E53-Q4
Linear (4 to 20 mA) E53-C3
Linear (0 to 20 mA) E53-C3D
Linear (0 to 10 V) E53-V34
Linear (0 to 5 V) E53-V35
Note: 1. The Digital Controller uses a dedicated, high-resolution Output Module. The E53-C Current Output Module for the E5X can-not be used with the Digital Controller.
2. If the control period is less than 5 seconds, use solid state relay or pulse voltage.
Item Description Part number
Output Board (for E5CK only) Relay/Relay (See note.) E53-R4R4( y)
Pulse (NPN)/Relay E53-Q4R4
Pulse (PNP)/Relay E53-Q4HR4
Pulse (NPN)/Pulse (NPN) E53-Q4Q4
Pulse (PNP)/Pulse (PNP) E53-Q4HQ4H
Linear (4 to 20 mA)/Relay E53-C4R4
Linear (0 to 20 mA)/Relay E53-C4DR4
Linear (0 to 10 V)/Relay E53-V44R4
Note: If the control period is less than 5 seconds, use solid state relay or pulse voltage.
Item Description Part number
Option Board (for E5AK and E5EK only) Communication (RS-232C) E53-AK01( y)
Communication (RS-422) E53-AK02
Communication (RS-485) E53-AK03
Event input E53-AKB
Transfer output (4 to 20 mA) E53-AKF
Note: 1. The E5AK allows a maximum of three Option Boards to be mounted. Refer to pages 25--26 for mounting combinations.2. The E5EK and E5CK allows only one Option Board to be mounted.
Item Description Part number
Option Board (for E5CK only) Communication (RS-232C) E53-CK01( y)
Communication (RS-485) E53-CK03
Event input E53-CKB
Transfer output (4 to 20 mA) E53-CKF
ACCESSORIES (ORDER SEPARATELY)
Item Hole Diameter Part number
Current Transformer (for E5AK and E5EKl )
5.8 mm E54-CT1(only) 12.0 mm E54-CT3
Note: CT is required when the heater burnout alarm function is used.
Item Connectable Models Part number
Terminal Cover E5AK E53-COV0809
E5EK E53-COV08
E5CK E53-COV07
E5K E5K
INPUT TYPES (SELECTABLE WITH INPUT JUMPER CONNECTOR)
Platinum Resistance Thermometer (RTD’s)
Input (field selectable) JPt100 Pt100
Range °C --199.9 to 650.0 --199.9 to 650.0g
°F --199.9 to 999.9 --199.9 to 999.9
Input setting number 0 1
Thermocouple
Input (fieldselectable)(see note)
K1 K2 J1 J2 T E L1 L2 U N R S B W PL
Range °C --200to1,300
0.0to500.0
--100to850
0.0to400.0
--199.9to400.0
0to600
--100to850
0.0to400.0
--199.9to400.0
--200to1,300
0to1,700
0to1,700
100to1,800
0to2,300
0to1,300
°F --300to2,300
0.0to900.0
--100to1,500
0.0to750.0
--199.9to700.0
0to1,100
--100to1,500
0.0to750.0
--199.9to700.0
--300to2,300
0to3,000
0to3,000
300to3,200
0to4,100
0to2,300
Input settingnumber
2 3 4 5 6 7 8 9 10 11 12 13 14 15 16
Note: 1. Setting number is factory-set to 2 (K1).2. Thermocouple W is W/Re5-26 (tungsten rhenium 5, tungsten rhenium 26).
Current/Voltage
Input (field selectable) Current input Voltage input( )
4 to 20 mA 0 to 20 mA 1 to 5 V2 0 to 5 V 0 to 10 V
Input setting number 17 18 19 20 21
Note: When a current/voltage input is selected, the decimal point is fully adjustable.
E5K E5K
Specifications RATINGS
Model number E5K Standard E5K 24V AC/DC
Supply voltage 100--240VAC, 50/60 Hz 24V AC/DC,50/60Hz
Operating voltage range 85% to 110% of rated supply voltage 85% to 110% of rated supply voltage
Power consumption E5AK 16 VA 9VA, 6W
E5EK 15 VA 9VA, 6W
E5CK 10 VA (at 100 VAC)14 VA (at 240 VAC)
6VA, 3.5W
Input Thermocouple K, J, T, E, L, U, N, R, S, B, W, PL
Platinum resistancethermometer (RTD)
JPt100, Pt100
Current input 4 to 20 mA, 0 to 20 mA
Voltage input 1 to 5 V, 0 to 5 V, 0 to 10 V
Mean Time Between Failure 15.4 years (135,000 hours
Control output (See Note 1.) Relay SPST, 250 VAC, 3 A (resistive load)Mechanical life expectancy: 10,000,000 operations min.Electrical life expectancy: 100,000 operations min.
Voltage(P l )
NPN 20 mA at 12/24 VDC (with short-circuit protection)g(Pulse) PNP 20 mA at 24 VDC (with short-circuit protection)
Linear voltage 0 to 10VDC
Permissible load impedance: 1 kΩ min.Resolution: Approximately 2600 steps
Linear current 4 to 20mA
Permissible load impedance: 500 Ω max.Resolution: Approximately 2600 steps
0 to 20mA
Permissible load impedance: 500 Ω max.Resolution: Approximately 2600 steps
Auxiliary output SPST-NO E5AK 3 A at 250 VAC (resistive load)y
E5EK 3 A at 250 VAC (resistive load)
E5CK 1A at 250 VAC (resistive load)
Control method (See Note 2.) ON/OFF, Advanced PID Control (with auto-tuning) or Self-tuning
Setting method Digital setting using front panel keys or communications features
Indication method -- 7-seg. digital display and LEDs E5AK: PV = 15 mm, SP = 10.5 mmE5EK: PV = 14 mm, SP = 9.5 mmE5CK: PV = 12 mm, SP = 8 mm
Potentiometer (Valve Positioning)(for E5AK and E5EK only)
100 Ω to 2.5 kΩ
Event input Contact input ON 1 kΩ max.
OFF 100 kΩ min.
No-contacti t
ON residual voltage: 1.5 V max.input OFF leakage current: 0.1 mA max.
Transmission output 4 to 20 mA, permissible load impedance: 600 Ω max.,resolution: Approximately 2600 steps
Remote SP input (for E5AK and E5EK only) Currentinput
4 to 20 mA (Input impedance: 150 Ω)
Current Transformer input (for E5AK and E5EK only) Connect only an Omron Current Transformer (E54-CT1 or E54-CT3)
Other functions Standard Manual output, heating/cooling control, SP limiter, loop burnout alarm, SPramp, MV limiter, MV change rate limiter, input digital filter, input shift,run/stop, protect functions
Option Multiple SP, run/stop selection, transfer output functions, auto/manualCommunications (RS-232C, RS-422, or RS-485), Loop Break Alarm, andTransfer Output.
Standards UL File No.: E68481
CSA File No.: LR59623
CE File No.: EN50081-2; EN50082-2; IEC 1010-1
Note: 1. All control outputs are insulated from the input circuit.2. Fuzzy self-tuning is available only when using the Digital Controller in standard control operation with temperature input.
E5K E5K
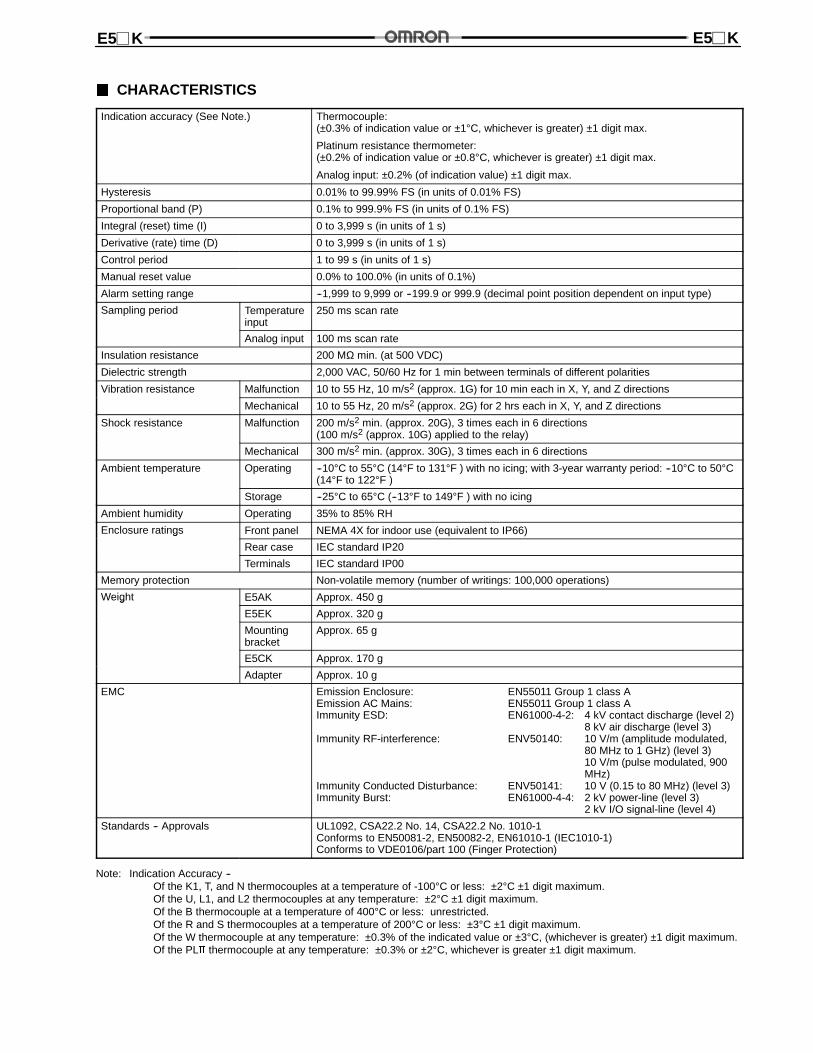
CHARACTERISTICS
Indication accuracy (See Note.) Thermocouple:(±0.3% of indication value or ±1°C, whichever is greater) ±1 digit max.
Platinum resistance thermometer:(±0.2% of indication value or ±0.8°C, whichever is greater) ±1 digit max.
Analog input: ±0.2% (of indication value) ±1 digit max.
Hysteresis 0.01% to 99.99% FS (in units of 0.01% FS)
Proportional band (P) 0.1% to 999.9% FS (in units of 0.1% FS)
Integral (reset) time (I) 0 to 3,999 s (in units of 1 s)
Derivative (rate) time (D) 0 to 3,999 s (in units of 1 s)
Control period 1 to 99 s (in units of 1 s)
Manual reset value 0.0% to 100.0% (in units of 0.1%)
Alarm setting range --1,999 to 9,999 or --199.9 or 999.9 (decimal point position dependent on input type)
Sampling period Temperatureinput
250 ms scan rate
Analog input 100 ms scan rate
Insulation resistance 200 MΩ min. (at 500 VDC)
Dielectric strength 2,000 VAC, 50/60 Hz for 1 min between terminals of different polarities
Vibration resistance Malfunction 10 to 55 Hz, 10 m/s2 (approx. 1G) for 10 min each in X, Y, and Z directions
Mechanical 10 to 55 Hz, 20 m/s2 (approx. 2G) for 2 hrs each in X, Y, and Z directions
Shock resistance Malfunction 200 m/s2 min. (approx. 20G), 3 times each in 6 directions(100 m/s2 (approx. 10G) applied to the relay)
Mechanical 300 m/s2 min. (approx. 30G), 3 times each in 6 directions
Ambient temperature Operating --10°C to 55°C (14°F to 131°F ) with no icing; with 3-year warranty period: --10°C to 50°C(14°F to 122°F )
Storage --25°C to 65°C (--13°F to 149°F ) with no icing
Ambient humidity Operating 35% to 85% RH
Enclosure ratings Front panel NEMA 4X for indoor use (equivalent to IP66)g
Rear case IEC standard IP20
Terminals IEC standard IP00
Memory protection Non-volatile memory (number of writings: 100,000 operations)
Weight E5AK Approx. 450 gg
E5EK Approx. 320 g
Mountingbracket
Approx. 65 g
E5CK Approx. 170 g
Adapter Approx. 10 g
EMC Emission Enclosure: EN55011 Group 1 class AEmission AC Mains: EN55011 Group 1 class AImmunity ESD: EN61000-4-2: 4 kV contact discharge (level 2)
Immunity Conducted Disturbance: ENV50141: 10 V (0.15 to 80 MHz) (level 3)Immunity Burst: EN61000-4-4: 2 kV power-line (level 3)
2 kV I/O signal-line (level 4)
Standards -- Approvals UL1092, CSA22.2 No. 14, CSA22.2 No. 1010-1Conforms to EN50081-2, EN50082-2, EN61010-1 (IEC1010-1)Conforms to VDE0106/part 100 (Finger Protection)
Note: Indication Accuracy --Of the K1, T, and N thermocouples at a temperature of -100°C or less: ±2°C ±1 digit maximum.Of the U, L1, and L2 thermocouples at any temperature: ±2°C ±1 digit maximum.Of the B thermocouple at a temperature of 400°C or less: unrestricted.Of the R and S thermocouples at a temperature of 200°C or less: ±3°C ±1 digit maximum.Of the W thermocouple at any temperature: ±0.3% of the indicated value or ±3°C, (whichever is greater) ±1 digit maximum.Of the PL thermocouple at any temperature: ±0.3% or ±2°C, whichever is greater ±1 digit maximum.
RS-232C Peer-to-peer only; maximum cable length = 15 m (49.2 feet)RS-422 and RS-485 32 controller maximum to host computer; maximum cable length = 500 m(1640 feet)
CURRENT TRANSFORMER RATINGS
Max. continuous heater current 50 Amps
Dielectric strength 1,000 VAC (for 1 min)
Vibration resistance 50 Hz, 98 m/s2 (10G)
Weight E54-CT1: approx. 11.5 g; E54-CT3: approx. 50 g
Accessories (E54-CT3 only) Armature: 2; Plug: 2
HEATER BURNOUT ALARM
Max. heater current Single-phase 50 A VAC (See Note 1.)
Heater current value display accuracy ±5% FS±1 digit max.
Heater burnout alarm setting range 0.1 to 49.9 A (in units of 0.1 A) (See Note 2.)
Min. detection ON time 190 ms (See Note 3.)
Note: 1. Use the K2CU-FA-GS (with gate input terminals) for the detection of three-phase heater burnout.2. The heater burnout alarm is always OFF if the alarm is set to 0.0 A and always ON if the alarm is set to 50.0 A.3. No heater burnout detection or heater current value measurement is possible if the control output (heat) is ON for less than
190 ms.
E5K E5K
Nomenclature E5AK
A/M Key
Display Key
No. 1 display
No. 2 display
Operation Indicators
Up Key/Down Key
OperationIndicators
OperationIndicators
A/M KeyDisplay Key Up Key/Down Key
No. 1 display
No. 2 display
A/M KeyDisplay Key Up Key/Down Key
No. 1 display
No. 2 display
Operation Indicators• OUT1
Lit when control output 1 turns ON.
• OUT2Lit when control output 2 turns ON.
• SUB1Lit when the output function assignedto auxiliary output 1 turns ON.
• SUB2 (for E5AK and E5EK only)Lit when the output function assignedto auxiliary output 2 turns ON.
• MANULit when the manual operation modeis being used.
• STOPLit when control operation has beenstopped.
• RMTLit during remote communicationsoperation.
• ATFlashes during auto-tuning.Auto-tuning is completed when thisLED stops flashing.
• RSP (for E5AK and E5EK only)Lit during remote SP operation.
• Bar Graph (for E5AK only)On a standard model (E5AK-AA2), thisbar graph indicates the manipulatedvariable (heat) in 10% increments persingle segment. On a position-propor-tional model (E5AK-PRR2), this bargraph indicates the valve opening in10% increments per single segment.
A/M KeyPress to select the auto operation or manu-al operation.
No. 2 DisplayDisplays the set point, set point during SPramp, manipulated variable, or parametersettings.
Up Key/Down KeyPress to increase or decrease the value onthe No.2 display.
Display KeyPress quickly (for less than 1 s) to shift thedisplay to the next parameter. When this keyis pressed for 1 s or more, the menu screenwill be displayed in any case.
No. 1 DisplayDisplays the process value or parametersymbols.
E5EK
E5CK
OperationIndicators
AT KeyDisplay Key Up Key/Down Key
No. 1 display
No. 2 display
E5CK-302
• ATPress key for automatic tuning.
• A/MThis feature is located in level one.(Replaced AT feature in level one).
E5K E5K
Operation OPERATING PARAMETERS
Mode Selection
1 second min.
Level 0 mode
Level 1 mode
Level 2 mode
Setup mode
Expansion mode
Option mode
Calibration mode
To switch parameters within a mode, use the Display Key.Press the display key for less than one second to move betweenparameters.
1 second min.
Press the Display Key for 1 sec. min. to switch to modes other thanthe manual or protect mode.
The figure below (Menu Display) shows all modes in the order thatthey aredisplayed. Someparameters arenot displayed, dependingon the protect mode setting and the option boards used.
To Access Protect ModePress and hold the A/M Key and the Display Key for more than1 second.
To Return to the Main PV/SP Display from the Protect ModePress and hold the A/M Key and the Display Key for more than1 second.
Note: 1. In Level 0 mode, Level 1 mode, and Level 2 mode:The controller will maintain control of the process.
2. In Setup mode, Expansion mode, Option mode,and Calibration mode: Control of the process is notmaintained. The outputs are inactive.
3. Option Mode will be accessible only when an optionboard is installed in the controller.
Menu DisplayTo Access Manual ModePress and hold the A/M Key for more than 1 second.
PARAMETERS AND MENUS -- FOR SETTING THE CONTROLLER
Protect Mode Limits use of the menu and A/M Keys.Theprotect functionprevents unwantedmodificationof parameters andcanalsobeused toprevent switching betweenthe auto and manual operation.
Manual Mode Sets the controller to manual operation mode.You can only manually adjust the manipulated variable (MV) in this mode.
Level 0 Mode For normal operation.Change: the set point during operation, and start or stop Controller operation; and, (only in this mode) monitor theprocess value, ramp SP, and manipulated variable.
Level 1 Mode For adjusting primary control parameters.Execute: AT (auto-tuning); set alarm values; set the control period; and, set PID parameters.
Level 2 Mode For adjusting secondary control parameters.Set parameters for: limiting themanipulated variableand set point; switchbetween the remote and local modes; set theloop break alarm (LBA), alarm hysteresis, and the digital filter value of inputs.
Setup Mode For setting the basic specifications.Set parameters for: input type, scaling, output assignments and direct/reverse operation.
Expansion Mode For setting expanded functions.Set: ST (self-tuning), SP setting limiter. Select: advanced PID or ON/OFF control. Specify the standby sequenceresetting method. Initialize parameters; and, set the time for automatic return to the monitoring display.
Option Mode For setting option functions.Set: the communications conditions; transfer: output and event input parameters to match the type of Option Boardinstalled in the Controller. This mode will be accessible only when an option board is installed in the controller.
Calibration Mode For calibrating inputs and transfer output.Calibrate theselected input type. Transferoutput canbe calibratedonly when the Communications Unit (E53-CKF)hasbeen installed in the Controller.
E5K E5K
PARAMETERS DEFINITIONS
Refer to your User’s Manual for each parameter and the calibration mode in detail.
Level 0 Mode for E5AK and E5EK
PV/SVThe process value is displayed on the No.1 display and the set point is displayedon the No.2 display. When the multi-SP function is in use, the value of the currentset point (SP0 or SPD is displayed).
Run/StopPlaces the controller in RUN mode or in STOP mode.
Manipulated Variable (MV) Monitor for CoolWhen the Controller is in heating and cooling control operation, use thisdisplay to monitor the manipulated variable of the cooling output.
Manipulated Variable (MV) Monitor for HeatMonitors the manipulated variable (MV) for the heating output.
Set Point During SP RampMonitors the set point when the SP ramp function is used.
Valve Opening MonitorDisplays the valve position in percentage format.Open = 100%Closed = 0%
For E5K-PRR2
PV/SVThe process value is displayed on the No.1 display and the set point is displayed on the No.2 display.When the multi-SP function is in use, the value of the current set point (SP0 or SP1 is displayed).
Run/StopPlaces the controller in RUN mode or in STOP mode.
Manipulated Variable (MV) Monitor for CoolWhen the Controller is in heating and cooling control operation, use this display to monitor the manipulatedvariable of the cooling output.
Manipulated Variable (MV) Monitor for HeatMonitors the manipulated variable (MV) for the heating output.
Set Point During SP RampMonitors the set point when the SP ramp function is used.
Level 0 Mode for E5CK
E5K E5K
Security
Mode Set value
Using the Security Level Table:
Any mode marked with an X is displayed in the Security Level indicated.
Process value
Manipulatedvariable
MANUindicator
A/M Key ProtectThis invalidates the function of the A/M Key.
When the set value is 5:Only the PV/SP monitor and set point parameter can be used.
When the set value is 6:Only the PV/SP monitor parameter can be used.
⇐ Security Level
Selecting Security Level 2:Displays these modes: Level 0, Level 1 and Level 2 only.Does NOT display these modes: Setup, Expansion, Option, Calibration
Example:
MV Manual
x x x x xx
x
x x x x
x xx
⇑ Highest SecurityLevel (last column)
⇑ LowestSecurity Level(first column)
x x
x x
xx
• To Access Protect ModePress and hold the A/M Key and the Display Key for more than 1 second.
To Return to the Main PV/SP Display from the Protect ModePress and hold the A/M Key and the Display Key for more than 1 second.
• To Access Manual ModePress and hold the A/M Key for more than 1 second.
Range = --105% to 105%
Calibration
Option
Expansion
Setup
Level 2
Level 1
Level 0
0 1 2 3 4 5 6
Note: For E5CK-302 models, this is done the same way, using the AT button.
E5K E5K
Level 1 Mode
Control Period (Cool)Available when the Controller has a relay or voltage output, or is in advanced PID control in heating and coolingcontrol.Range = 1 to 99 s. Default = 20 s.
Control Period (Heat)Available only when the Controller has a relay or voltage output, or is in advanced PID control.Range = 1 to 99 s. Default = 20 s.
Hysteresis (Cool )Available when the Controller is in ON/OFF control in heating and cooling control.Range = 0.01 to 99.99 FS. Default = 0.10.
Hysteresis (Heat)Available when the Controller is in ON/OFF control.If PID control selected, this value will not appear on the menu.Range = 0.01 to 99.99 FS. Default = 0.10.
Manual Reset ValueAvailable ONLY when the integral time parameter of the Controller in standard control is set to 0.The Controller must be in Standard or Advanced PID control and self-tune must be set to off.
Dead BandUsed when the Controller is in heating and cooling control. This setting determines the amount of overlap or deadband present in a heat/cool configuration. Range = -19.99 → 99.99.Negative values = overlap band. Positive values = Dead band.
Cooling CoefficientUsed when the Controller is in heat/cool control. This setting describes the ratio between the heating proportionalband and the cooling proportional band.
Derivative TimeRange = 0 to 3999 secondsSee Note at right.
Integral TimeRange = 0 to 3999 seconds
Proportional BandRange = 0.1% to 999.9%
Alarm Value 2Available only when the alarm output function of the Controller is selected. This setting determines what the Alarm2 set point will be. This alarm can be programmed to work on Control Output 2 or the SUB-1 output (user-select-able). Factory Default = Control Output 2.
Note: Alarm Value 3 is available only when SUB-1 or Control Output No. 1 is selected as AL-3.
Alarm Value 1Available only when Control Output 2 is not used as a control output. This setting determines what the Alarm 1 setpoint will be.
Set Point 1Used only with multi-SP function. This set point is active when the Event input is ON.This parameter is available only if an Event Input Option Board is installed.
Set Point 0Default set point when used with multi-SP function. This set point is active when the Event input is OFF.
AT Execute/CancelStarts the Auto-tune function or cancels an active auto-tune. When an active auto-tune is cancelled, the originalPID constants will be used again.AT-1 = Limited MV change during Autotuning (±40% max.)AT-2 = Full MV change during Autotuning (±100% max.)
Note: This level 1 Mode ends here for the E5CK models only. For all other E5K models in this data sheet,continue with the next page.
Note: For Valve Positioning Models E5K--PRR2, allsubsequent parameters (those after Derivative Time)listed in Level 1 Mode are not available. See Level 1Valve Positioning model (provided on the followingpage).
Note: E5AK and E5EK can have up to 4 set points or 4 alarms
Note: E5AK and E5EK can have up to 4 set points or 4 alarms
E5K E5K
Level 1 Valve Positioning Model (for E5AK and E5EK only)
Position Proportional Dead BandFor valve positioning units only.Used to adjust the dead band for a valve; displayed in percentage format.Range = 0.1--10Default = 2.0
Heater Current MonitorAvailable when the heater burnout alarm is assigned.
Heater Burnout DetectionAvailable when the heater burnout alarm is assigned.Activates the Heater Burnout Alarm when the heater current fallsbelow the set value.Range = 0.0--50.0ADefault = 0.0
E5K E5K
Level 2 Mode
Remote/LocalUsed for the communications function. Only accessible when communication option boards are installed.Determines whether the user will program the unit by the key pads on the face plate (local), by a comput-er, or PLC (remote).Default = local.
SP Ramp Time UnitDetermines what unit of time to use on a set point ramp: minutes or hours. Self-tune must be set to OFFDefault = minutes.
SP Ramp Set ValueDetermines the maximum allowable degrees of change per Time Unit.
Example: SP Ramp Time Unit = minute SP0 = 100FSP Ramp Set Value = 10 SP1 = 150FIt will take 5 minutes to ramp up to 150F from 100F.
Default = 0.
LBA Detection TimeAvailable only when the LBA (loop break alarm) function of the Controller is selected.This parameter is automatically set by Auto--tuning. Determines how long it will take the controller to de-tect a loop break.Range = 0 -- 9999 sec.Default = 0
Manipulated Variable (MV) at StopDetermines what percentage of Manipulated Variable (MV) will be when control has been stopped.Default = 0%Range = -5 to 105% for standard control; -105 to 105% for heat/cool control.
MV at PV ErrorDetermines what percentage of Manipulated Variable (MV) will be when an input error has been detected.Default = 0%Range = -5 to 105% for standard control; -105 to 105% for heat/cool control.
MV Upper LimitStops the MV from going higher than the set value. Default = 105%
MV Lower LimitStops the MV from going lower than the set value.Default (heat only) = --5%Default (heat/cool) = --105%Default (cool only) = --105%
MV Change Rate LimitLimits how fast the MV can change in % of FS per second.Default = 0%Range = 0 -- 100%
Input Digital FilterSets the time constant for the digital filter.Range = 0 to 9999 sec.Default = 0
Alarm 1 HysteresisAvailable only when the Controller has an alarm output.Range = 0 to 9999 sec.Default = 0.2
Alarm 2 HysteresisAvailable only when the Controller has an alarm output.Range = 0 to 9999 sec.Default = 0.2
Alarm 3 Hysteresis (Note: An example of this display is not shown here.)Available only when the Controller has an alarm output.Range = 0 to 9999 sec.Default = 0.2
Input Shift Upper LimitAvailable if the input type connected to the Controller is a thermocouple or platinum RTD.Range = --199.9 to 999.9 °C/°F; default = 0 to 0 °C/°FInput Shift Lower LimitAvailable if the input type connected to the Controller is a thermocouple or platinum resistancethermometer.Range = --199.9 to 999.9 °C/°F; default = 0 to 0 °C/°F
E5K E5K
Setup Mode
Input TypeSets the input type connected to terminals 6 through 8.Note: Set input jumper to current, voltage, or temperature setting before changing input type.Default = 2 (K1 type thermocouple)
Scaling Upper LimitUsed if the input type connected to the Controller is an analog input (voltage or current input).Range = 1 to 9999Default = 100
Scaling Lower LimitUsed if the input type connected to the Controller is an analog input (voltage or current input).Range = --1999 to --1Default = 0
Decimal PointUsed only if the input type connected to the Controller is an analog input (voltage or current input).Range = 0 to 3Default = 0
°C/°F SelectionUsed if the input type connected to the Controller is a temperature input (thermocouple or platinum resistancethermometer).Default = °C
Parameter InitializeReturns the controller to Factory Default Settings.
Control Output 1 AssignmentAssigns the Controller to have one of the following output functions: heating control, cooling control, alarm 1,alarm 2, alarm 3, and LBA (loop break alarm).Default = heat
Control Output 2 AssignmentAssigns the Controller to have one of the following output functions: heating control, cooling control, alarm 1,alarm 2, alarm 3, and LBA (loop break alarm).Default = Alarm 1
Auxiliary Output 1 AssignmentEnables the Controller to have one of the following outputs: alarm 1, alarm 2, alarm 3, LBA (loop break alarm)Default = Alarm 2Note: The following parameters are available only when the controller has an alarm output. (See the table on theExpansion Mode table.
Alarm 1 TypeProvides a choice of 11 different alarm operations.Default = 2 (See Alarm Summary Table for Alarm types available.)
Alarm 1 Open in AlarmSynchronizes the alarm LED with the operation of the alarm. If the alarm is operating as a normally closed relay(open in alarm condition), this parameter should be set to ’Open in Alarm’. If the alarm is operating as a normallyopen relay (close in alarm condition), this parameter should be set to ‘Close in Alarm’.
Alarm 2 TypeProvides a choice of 11 different alarm operations.Default = 2 (See Alarm Summary Table for Alarm types available.)
Alarm 3 Type Note: An example of this display is not shown here.OPEN W/Alarm
Alarm 2 Open in AlarmSynchronizes the alarm LED with the operation of the alarm. If the alarm is operating as a normally closed relay(open in alarm condition), this parameter should be set to ’Open in Alarm’. If the alarm is operating as a normallyopen relay (close in alarm condition), this parameter should be set to ‘Close in Alarm’.
Direct/Reverse OperationChoose between direct (cooling) or reverse (heating) control action.Default = reverse (heating).Direct (cooling) = MV increases with decreasing PV.Reverse (heating) = MV increases with increasing PV.
E5K E5K
Selecting a Control Method
When selecting a control method, refer to the following table for correct parameter setting.
Control method Control output 1 assignment Control output 2 assignment Operation
Heat Control output (heat) --- Reverse
Cool Control output (heat) --- Direct
Heat/Cool Control output (heat) Control output (cool) Reverse
Heat/Cool Control output (cool) Control output (heat) Direct
CLOSE IN ALARM/OPEN IN ALARM
If the alarm is operating as a normally closed relay (open in alarm condition), this parameter should be set to ‘Open in Alarm’. If the alarmis operating as a normally open relay (close in alarm condition), this parameter should be set to ‘Close in Alarm’.
Condition Alarm Output LED
Close in alarm (N.O.) ON Lit( )
OFF Not lit
Open in alarm (N.C.) ON Lit( )
OFF Not lit
Factory setting is “close in alarm” [ ].
E5K E5K
Expansion Mode
SP Setting Upper LimitStops the set point from going higher than the SP setting upper limit.Default = 1300
This setting has no effect on the input scaling values.
SP Setting Lower LimitStops the set point from going any lower than the SP setting lower limitDefault = -200
This setting has no effect on the input scaling values.
PID/ON/OFFSelects the type of control method for the controller to use.Default = PID
Adaptive Tuning (Self Tuning)Only available if the Controller in standard control or advanced PID control has a temperature input.Default = OFF. If ON is selected, the controller will use fuzzy logic to self tune the PID values for optimum control.PID values will not be seen when ST (Self Tune) is on.
ST Stable RangeOnly available if the Controller is in standard control or advanced PID control with the Self Tune (ST) set to ON.
αOnly available if the Controller is in advanced PID control with the ST set to OFF.This setting allows tailoring of the PID algorithm to emphasize control or fast response.Default = 0.65Fast Response = 0.0 → 0.65Stability Emphasis = 0.65→ 1
AT Calculated GainAllows the controller to focus the auto-tune on increased response or more stability.Range = 0.1 (fast response) to 10 (increase stability).Available if the Controller is in advanced PID control with the ST set to OFF.Default = 1.0
Alarm Standby Sequence Reset MethodUsed with alarm settings to have a stand-by sequence applied to the alarm.Default = 0
Automatic Return of Display ModeAutomatically returns the display of the controller to Level 0 PV/SP display after the set amount of time haselapsed if no buttons on the face plate have been used.Applies only in Levels 0 through 2. Default = 0. Range = 0 to 99 sec.
AT HysteresisOnly available if the Controller is in advanced PID control with the ST set to OFF.Default = 0.2% FS; Range = 0.1 to 9.9% FS
LBA Detection WidthOnly available only when the LBA (Loop Break Alarm) function of the Controller is selected.Range 0.0 → 999.9% FSDefault = 0.2
E5K E5K
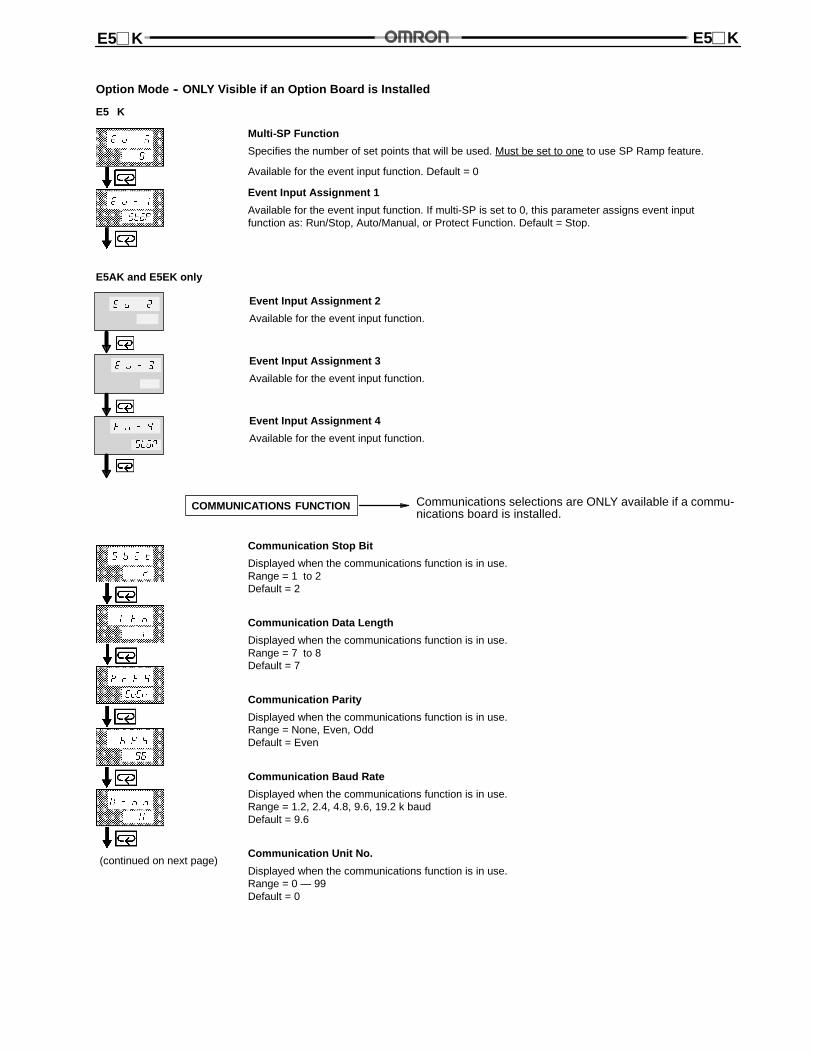
Option Mode -- ONLY Visible if an Option Board is Installed
E5K
Multi-SP Function
Specifies the number of set points that will be used. Must be set to one to use SP Ramp feature.
Available for the event input function. Default = 0
Event Input Assignment 1
Available for the event input function. If multi-SP is set to 0, this parameter assigns event inputfunction as: Run/Stop, Auto/Manual, or Protect Function. Default = Stop.
E5AK and E5EK only
Event Input Assignment 2
Available for the event input function.
Event Input Assignment 3
Available for the event input function.
Event Input Assignment 4
Available for the event input function.
Communications selections are ONLY available if a commu-nications board is installed.
COMMUNICATIONS FUNCTION
Communication Stop Bit
Displayed when the communications function is in use.Range = 1 to 2Default = 2
Communication Data Length
Displayed when the communications function is in use.Range = 7 to 8Default = 7
Communication Parity
Displayed when the communications function is in use.Range = None, Even, OddDefault = Even
Communication Baud Rate
Displayed when the communications function is in use.Range = 1.2, 2.4, 4.8, 9.6, 19.2 k baudDefault = 9.6
Communication Unit No.
Displayed when the communications function is in use.Range = 0 — 99Default = 0
!
(continued on next page)
E5K E5K
Option Mode -- ONLY Visible if an Option Board is Installed, continued
Transfer Output Type
Set when the transfer output function is in use.Determines which function the transfer output will re-transmit as a 4-20mA signal: SP, PV, SPRamp, MV
Transfer Output Upper Limit
Set when the transfer output function is in use.Stops the transfer output from going higher than the Set Value.
Transfer Output Lower Limit
Set when the transfer output function is in use.Stops the transfer output from going lower than the Set Value.
Transfer output selections are ONLY available if a transferboard is installed.
TRANSFER OUTPUT SECTION
Remote set point function is available on all E5AK/E5EKmodels, with or without an option board installed.
REMOTE SET POINT FUNCTION
HBA Latch
Makes the heater burnout alarm remain activated when triggered. It must be resetmanually.
Motor Calibration
Determines how long it takes a fully closed proportional valve to fully open.
Travel time
The amount of time it takes to determine the motor calibration parameter.Range = 1--999 sec.Default = 30 sec.
PV Dead Band
Determines the size of the dead band around the process variable in which the valvewill take no control action.Range = 0--9999Default = 0
Remote SP Enable
Enables the controller to use a remote setpoint.Default = off
Remote SP Upper Limit (Available when the remote SP is enable)
Stops the RSP from going any higher than the set value.Default = 1300
Remote SP Lower Limit (Available when the remote SP is enable)
Stops the RSP from going any lower than the set valve.Default = --200
SP tracking (Available when the remote SP is enable)
Allows a smooth transition between a RSP and a local SP when enabled. When on,the LSP will become the RSP that was being used immediately before switching.
"
"
"
"
E5K E5K
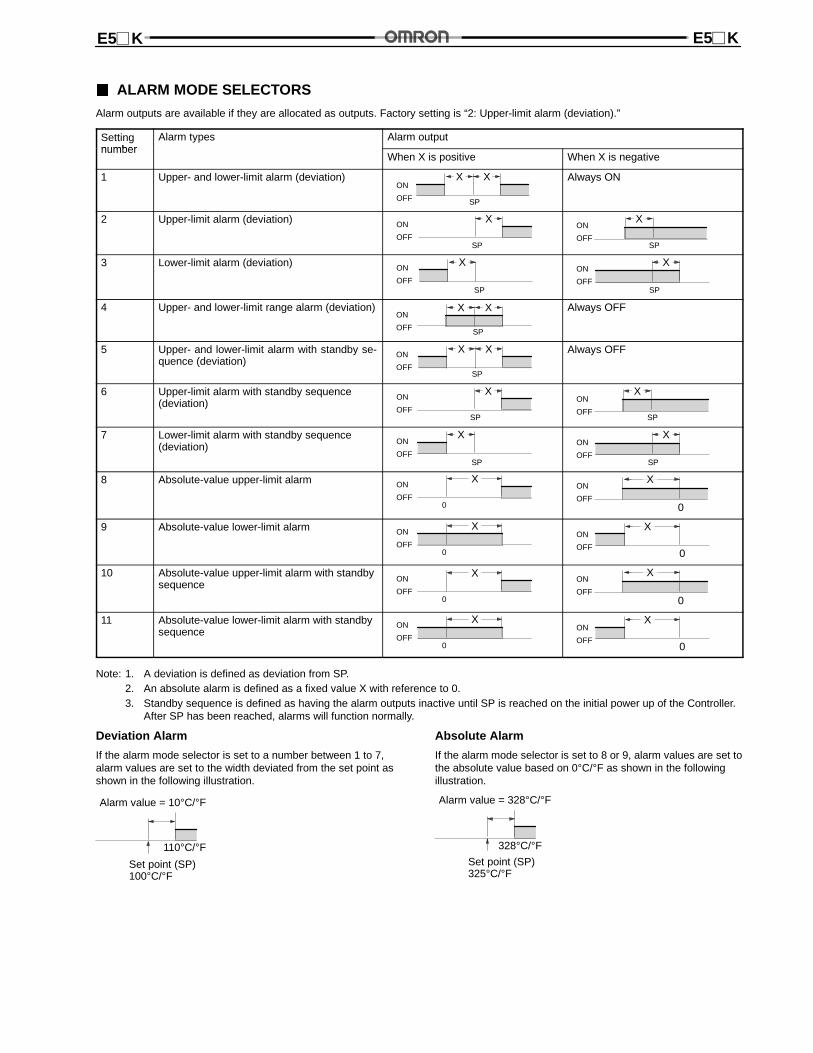
ALARM MODE SELECTORS
Alarm outputs are available if they are allocated as outputs. Factory setting is “2: Upper-limit alarm (deviation).”
Settingnumber
Alarm types Alarm outputnumber
When X is positive When X is negative
1 Upper- and lower-limit alarm (deviation) X XON
OFF SP
Always ON
2 Upper-limit alarm (deviation) X
SP
ON
OFF
X
SP
ON
OFF
3 Lower-limit alarm (deviation) X
SP
ON
OFF
X
SP
ON
OFF
4 Upper- and lower-limit range alarm (deviation) X X
SP
ON
OFF
Always OFF
5 Upper- and lower-limit alarm with standby se-quence (deviation)
X X
SP
ON
OFF
Always OFF
6 Upper-limit alarm with standby sequence(deviation)
X
SP
ON
OFF
X
SP
ON
OFF
7 Lower-limit alarm with standby sequence(deviation)
X
SP
ON
OFF
X
SP
ON
OFF
8 Absolute-value upper-limit alarm X
0
ON
OFF0
ON
OFF
X
9 Absolute-value lower-limit alarm X
0
ON
OFF0
ON
OFF
X
10 Absolute-value upper-limit alarm with standbysequence
X
0
ON
OFF0
ON
OFF
X
11 Absolute-value lower-limit alarm with standbysequence
X
0
ON
OFF0
ON
OFF
X
Note: 1. A deviation is defined as deviation from SP.2. An absolute alarm is defined as a fixed value X with reference to 0.3. Standby sequence is defined as having the alarm outputs inactive until SP is reached on the initial power up of the Controller.
After SP has been reached, alarms will function normally.
Deviation Alarm
If the alarm mode selector is set to a number between 1 to 7,alarm values are set to the width deviated from the set point asshown in the following illustration.
Set point (SP)100°C/°F
Alarm value = 10°C/°F
110°C/°F
Absolute Alarm
If the alarm mode selector is set to 8 or 9, alarm values are set tothe absolute value based on 0°C/°F as shown in the followingillustration.
Set point (SP)325°C/°F
Alarm value = 328°C/°F
328°C/°F
E5K E5K
HOW TO USE THE ERROR DISPLAY
When an error has occurred, the No.1 display alternately indicates error codes together with the current display item.This section describes how to check error codes on the display, and the actions that must be taken to remedy the problem.
Input Error
Meaning Input is in error.
Action Check the wiring of inputs, disconnections, and shorts, and check the input type and the input type jumper connector.
Operation at Error For control output functions, output the manipulated variable matched to the setting of the “MV at PV error” parameter(level 2 mode). Alarm output functions are activated when the upper limit is exceeded.
Memory Error
Meaning Internal memory operation is in error
Action First, turn the power OFF then back ON again. If the display remains the same, the E5AK/E5EK Controller must berepaired. If thedisplay is restored tonormal, theprobablecausemay beexternal noiseaffecting thecontrol system. Checkfor external noise.
Operation at Error Control output functions turn OFF (2 mA max. at 4 to 20 mA output, and output equivalent to 0% in case of other outputs).Alarm output functions turn OFF.
A/D Converter Error
Meaning Internal circuits are in error.
Action First, turn the power OFF then back ON again. If the display remains the same, the E5AK/E5EK Controller must berepaired. If thedisplay is restored tonormal, theprobablecausemay beexternal noiseaffecting thecontrol system. Checkfor external noise.
Operation at Error Control output functions turn OFF (2 mA max. at 4 to 20 mA output, and output equivalent to 0% in case of other outputs).Alarm output functions turn OFF.
Calibration Data Error
This error is output only during temperature input and is displayed for two seconds when the power is turned ON.
Meaning Calibration data is in error.
Action Must repair.
Operation at Error Both control output functions and alarm output functions are active. However, note that the readout accuracy is notassured.
Display Range Over
Meaning Though not an error, this is displayed when the process value exceeds the display range when the control range (settingrange ±10%) is larger than the display range (--1999 to 9999).
• When less than “--1999”
• When greater than “9999”
Operation Control continues, allowing normal operation.
E5K E5K
FUZZY SELF-TUNING
Fuzzy self-tuning is a function that enables the E5K to calculatethe most suitable PID constants for the control output.
Features• The E5K determines by itself when to perform fuzzy self-
tuning.
• During fuzzy self-tuning, the E5K does not output any sig-nal that disturbs the temperature or output value.
Fuzzy Self-tuning FunctionThe fuzzy self-tuning function has three modes.
• In SRT (step response tuning) mode, the PID constants aretuned using a step response method at the time the set pointis changed.
• In DT (disturbance tuning) mode, the PID constants areamended so that the controlled temperature will be within thetarget range set in advance when there is external distur-bance.
• In HT (hunting tuning) mode, when hunting occurs, the PIDconstants are amended to suppress the hunting.
Note: You must turn ON the power supply to the LOADeither before or simultaneously with the start ofTemperature Controller operation.
If an extremely large amount of dead time ismeasured, the control amount will be set to 0% for ashort period of time before being returned to 100%,and the constants will then be retuned. Retuning isperformed only for large amounts of dead time, sobe sure to follow the precaution given above whenstarting operation.
Dead time will be measured from the time theTemperature Controller starts operating. If a load,such as a heater, is turned on after the TemperatureController is turned on, dead time longer than theactual value will be measured, and inappropriate PIDconstants will be obtained.
Startup Conditions of SRTSRT will start if conditions 1 to 5 are satisfied when the set pointis changed, or the E5K is turned on.
1. The new set point is different from the set point used at thetime SRT was last executed.
2. The difference between the new set point and the last setpoint is larger than the value obtained from the calculation:present proportional band value (P) x approximately 1.27+4.
Note: When the E5K is turned on, the difference between theprocess value and set point is regarded as Deviation.
3. The temperature is stable before changing the set point, orthe temperature is balanced while the E5K is turned onbefore any output is obtained.
4. The set point is changed in the direction that the controlledamount increases (i.e., the control amount is in the upperdirection at the time of reverse operation and in the lowerdirection at the time of normal operation).
5. No SRT has been executed with the current set point.
In the following cases, SRT will not be executed accurately.Therefore the E5K must be tuned in DT or HT mode.
1. The maximum temperature slope (R) is not obtained beforethe process value reaches the value obtained from the cal-culation: present proportional band value (P) x approximately1.27 (i.e., the maximum temperature slope (R) is not ob-tained before the SRT is finished). If the proportional band,obtained before SRT is finished, is larger than the previousproportional band, however, the PID constants will be re-newed, so their values will be more accurate.
2. The set point is changed during SRT, and the SRT comple-tion conditions are satisfied; and, no PID constant will berenewed.
Stable Temperature StatusIf the temperature is within the stable range for a specified period,the temperature is considered stable.
TemperatureSlope (R)
Completion of SRT
Stable range
Time
SPP x 1.27
Balanced StatusIf the process value is within the stable range for 60 s when thereis no output, the the temperature is considered balanced.
E5K E5K
Startup Conditions of DT
1. DT will start if the temperature that has been stable variesdue to external disturbance and the deflection of the temper-ature exceeds the stable range, and then the temperaturebecomes stable, provided that the number of maximum tem-perature values is less than four.
2. DT will start if the set point is changed under the conditionthat SRT does not start and the temperature becomes stable,provided that the number of maximum temperature values isless than four.If there are four or more maximum temperature values, HTwill start.
SP
Temperature
Extreme value 2Set point change
Extreme value 1
Balanced Status
If the process value is within the stable range for 60 s when thereis no output, it is deemed that the the temperature is balanced.
Startup Conditions of HT
HT will be ON when there is hunting with four or more maximumtemperature values (extreme values) while SRT is not beingexecuted.
Extreme value 2 Extreme value 4
Extremevalue 1
Extremevalue 3
Temperature
Time
SP
Note: In specific applications where temperature varies periodi-cally due to disturbance, internal parameters need to beadjusted. For details, refer to your User‘s Manual.
E5K E5K
DimensionsUnit: mm (inch)
E5AK
Panel Cutouts
Note: 1. Recommended panel thickness is 1 to 8 mm.2. Maintain the specified vertical and horizontal mounting space between each Unit.
Units must not be closely mounted vertically or horizontally.
96 (3.78) x 96 (3.78)110 min.
120 min.
13.5(0.53) 100 (3.94)
91(3
.58)
x91
(3.5
8)
112
(4.4
1)
E5EK
Panel Cutouts
Note: 1. Recommended panel thickness is 1 to 8 mm.
2. Maintain the specified vertical and horizontal mounting space between each Unit.Units must not be closely mounted vertically or horizontally.
120 min.
60 min.48 (1.89)13.5(0.53)
100 (3.94)
91(3
.58)
112
(4.4
1)
E5CK
Panel Cutouts
Note: 1. Recommended panel thickness is 1 to 5 mm.
2. Maintain thespecifiedvertical andhorizontalmountingspacebetweeneachUnit.Units must not be closely mounted, either vertically or horizontally.
58 (2.28)53 (2.09) x 53 (2.09)
13(0.51)
100 (3.94)
48(1
.89)
65 min.
60 min.45+0.6
0
45+0.60
44.8 (1.76) x 44.8 (1.76)
E5K E5K
E5CK-302
The E5CK-302 model has the same dimension and cutouts as the E5CK.
ACCESSORIES (ORDER SEPARATELY)
E53-COV0809 E53-COV08
Terminal Cover for E5AK Terminal Cover for E5EK
43.2 (1.70)
89(3
.50)
1.5
89(3
.50)
22.05(0.87)
89(3
.50)
43.2 (1.70)
3 33
1.5
3
Terminal Cover for E5CK
44.3(1.74)
44.3(1.74)
E53-COV07
Current Transformer (E5AK and E5EK only)
E54-CT1 E54-CT3
5.8 dia.(0.23)
12 dia.(0.47)
2.36 dia.
Two, M3 (depth: 4)
40 (1.57)x 40 (1.57)
30(1.18)
15
30(1.18)
21 (0.83)
15 (0.59)
25(0.98)
10(0.39)
30 (1.18)
40 (1.57)
2.8(0.11)
7.5 (0.30)
3(0.12)
E5K E5K
Installation
REMOVE CONTROLLER FROM REAR HOUSINGE5AK and E5EK
Hook
To pull out the internal mechanism from the housing, use a Phillips screwdriver matching the screw on the lower part of the front panel.1. Turn the screw counterclockwise while pressing the hook on the upper part of the front panel.
2. Carefully pull out the internal mechanism while holding the left and right sides of the front panel.
E5CK
Input TypeJumper Connector
OptionBoard
Terminals
Housing (case)
OutputBoard
Front Panel
First, while pressing the hooks on the left and right sides of thefront panel, pull the internal mechanism from the housing.
E5K E5K
SETTINGSNote: Always turn off the power supply to the Digital Controller before changing any switch settings.
On a standard model, set up the Output Modules for control outputs 1 and 2 before mounting the Controller.
On a position-proportional model, the Relay Output Module is already set. Do not change that set-up parameter. Do not replace withother Output Modules.
Setting Up and Removing the Output Module
Setting Up the Output Module
When setting up the Output Modules, pull out the internalmechanism from the housing and insert the Output Modulesinto the sockets for control outputs 1 and 2.
Removing the Output Module
To replace the Output Module, use a flat-blade screwdriver topush up the Output Module.
Setting Up the Option/Output Board
E5AK
PowerBoard
OptionBoard
3. Mount the option boards and the power board in theorder shown.
1. Remove the Power Board and Option Boards in the ordershown in the following diagram.
2. Insert the Option Boards into the sockets for options 1 to 3.The following diagram shows the relationship between theOption Boards and mounting positions.
E5K E5K
E5EK
PowerBoard
1. Remove the Power Board in the order shown in the followingdiagram.
2. Insert the Option Board into the socket for option 1. Thefollowing diagram shows the relationship between theOption Board and mounting position.
3. Mount the option boards and the power board in the ordershown.
E5CK
1
2
1. Two rectangular holes are provided on the Power Board(right side of Controller). Fit the two protrusions of theoutput board into these two holes.
2. With the output board fitted into the Power Board, fit theoutput board into the connector on the control board (leftside of Controller).
Set up the Option Board
1
2
1. Place the bottom of the Controller facing up, fit the boardhorizontally into the connector on the power board (rightside of controller).
2. With the Power Board connected, fit the board verticallyinto the connector on the control board (left side ofController).
E5K E5K
MOUNTING CONTROLLER
E5AK and E5EK
1. Insert the controller into the panel’s mounting hole at theposition shown in the figure below.
2. Fit the mounting bracket (accessory) into the mountingslots on the top and bottom of the rear case.
3. Tighten the mounting bracket screws on the upper and lowerparts in small increments alternately and equally until theratchet start to slide.
E5CK
Adapter
Panel
Watertight gasket
1. Insert the E5CK Controller into the cutout on the panel,as shown in the figure here.
2. Push the adapter along the Controller body from the ter-minals up to the panel, and fasten temporarily.
3. Tighten the two mounting screws on the adapter. Whentightening screws, tighten the two screws alternatelykeeping the torque to approximately 0.29 to 0.39 N m,or 3 to 4 kgf cm.
E5K E5K
MOUNTING TERMINAL COVER
E5AK and E5EK
1. Fasten the terminals covers as follows by using the plasticpins. Plastic pins are provided with the terminal covers.
E5CK
E5CK
E53--COV07
1. The E5CK-AA1-500 Controller is provided with a TerminalCover (E53-COV07). Fasten the Terminal Cover as fol-lows by using the plastic pin.
WIRING TERMINALS FOR E5AK
E5AK Terminal Arrangement
TRSF: Transfer outputEV1 to 4: Event inputPTMR: PotentiometerRSP: Remote SP input
AC100--240V
50/60 HzOPTION
2
OPTION3
OPTION1
SENSORINPUT
Wiring
In the following wiring diagrams, the left side of the terminalnumbers indicate the inside of the Controller.
Power Supply
Input power to terminal numbers 9 and 10. Power specificationsare as follows: 100 to 240 VAC, 50/60 Hz, approx. 16 VA
E5K E5K
WIRING TERMINALS FOR E5EK
E5EK Terminal Arrangement
TRSF: Transfer outputEV1/2: Event inputPTMR: PotentiometerRSP: Remote SP input
AC100--240V
50/60 HzOPTION
1
SENSORINPUT
Power supply
Input power to terminal numbers 9 and 10. Power specificationsare as follows: 100 to 240 VAC, 50/60 Hz, approx. 15 VA
WIRING TERMINALS FOR E5CK
E5CK Terminal Arrangement
5
4
3
2
1
10
9
8
7
613 14
11 12
OUT1
OUT2
SUB1
OPTION
INPUT
100--240VAC
Wiring Precautions
• To protect the Controller and its lines from external noise, usethe wire ducts to separate input leads and power lines.
• Use solderless terminals when wiring the Controller.
• Tighten the terminal screws using a torque no greater than0.78 N m, or 8 kgf cm max. DO NOT tighten the terminalscrews too tightly.
Power Supply
Input 100 to 240 VAC to terminal numbers 4 and 5.
3
2
1
10
9
8
7
613 14
11 125
4
E5K E5K
SENSOR INPUT WIRING
E5AK
Connect the sensor input to terminal numbers 11 to 14 and 33 as follows according to the input type.
E5EK
Connect the sensor input to terminal numbers 11 to 14 and 23 as follows according to the input type.
E5CK
Connect the sensor input to terminal numbers 6 to 8 as indicated here, according to the input type.
8
7
6
8
7
6
8
7
6
8
7
6
-
+
-
+
-
+
V mA
TC ⋅ PT V I
Thermocouple Platinum resistancethermometer (RTD)
Voltage input Current inputInput type
Internal jumpersetting
5
4
3
2
1
10
9
13 14
11 12
8
7
6
Match the inputs with the internal jumper settings for each input type. For thermocouple or platinum resistance thermometer inputs, setthe internal jumper to a common position (TC/PT) as the temperature input.
E5K E5K
CONTROL OUTPUT
E5AK Control Output
Terminal numbers 7 and 8 are for control output 1 (OUT1), and terminal numbers 5 and 6 are for control output 2 (OUT2). The followingdiagrams show the available Output Modules and their internal circuits.
E5EK Control Output
Terminal numbers 7 and 8 are for control output 1 (OUT1), and terminal numbers 5 and 6 are for control output 2 (OUT2). The followingdiagrams show the available Output Modules and their internal circuits.
With E53-V Output Modules, approx. 2 V is output for one second after the power is interrupted.
E5AK-PRR2/E5EK-PRR2 Controllers
The E5AK-PRR2 and E5EK-PRR2 Controllers are supplied with relay output. This relay output is not compatible with any other module.
When replacing the Output Module, use the E53-R. The following diagrams show the relationship between terminals and open/close relaysettings.
8
7Open
6
5Close
E5K E5K
E5CK Control Output
Terminal numbers 11 and 12 are for control output 1 (OUT1). The five output types and internal circuits are available according to theOutput Board.
5
4
3
2
1
8
7
613 14
11
12
11
12
L
11
12
L
11
12
L
11
12
L
E53-R4R4 E53-Q4R4E53-Q4Q4
E53-Q4HR4E53-Q4HQ4H
E53-V44R4 E53-C4R4E53-C4DR4
NPN PNP 0 to 10 V 4 to 20mA/0 to 20mA
+v
+
-
+
-
+
-
+
-GND
mA
Relay
V
Output type
Part number
10
9
11 12
Terminal numbers 9 and 10 are for control output 2 (OUT2). The three output types and internal circuits are available according to theOutput Board.
Terminal numbers 3 and 4 are for auxiliary output 1 (SUB1) andterminal numbers 1 and 2 are for auxiliary output 2 (SUB2). Thefollowing diagrams show the internal equalizing circuits for theauxiliary outputs:
1098765
30292827262524232221
20191817161514131211
31 32
33
4321
4
3Auxiliary output 1
2
1
Auxiliary output 2
Output specifications are as follows: SPST-NO, 3 A at 250 VAC
E5CK
Terminal numbers 2 and 3 are for auxiliary output 1 (SUB1). Theinternal equalizing circuit for auxiliary output 1 is as follows:
5
4
1
10
9
8
7
613 14
11 12
3
2
3
2
E5EK
Terminal numbers 3 and 4 are for auxiliary output 1 (SUB1) andterminal numbers 1 and 2 are for auxiliary output 2 (SUB2). Thefollowing diagrams show the internal equalizing circuits for theauxiliary outputs:
1098765
20191817161514131211
21 22
23
4321
4
3Auxiliary output 1
2
1
Auxiliary output 2
Output specifications are as follows: SPST-NO, 3A at 250 VAC
E5K E5K
CT INPUT/POTENTIOMETER (FOR E5AK AND E5EK ONLY)
E5AK CT Input/Potentiometer
When using the HBA function on the E5AK-AA2 Controller,connect CT input (CT) to terminal numbers 15 to 17. Whenmonitoring the valve opening on the E5AK-PRR2 Controller,connect the potentiometer (PTMR) to terminal numbers 15 to 17.Connect each of these inputs as follows:
17
16
15C
W
O
Potentiometer
10987654321
30292827262524232221
20191817161514131211
31 32
33
17
16
15
CT
CT input
For details on CT inputs, refer to Appendix, About CurrentTransformer in your User’s Manual. For details on thepotentiometer, refer to the Instruction Manual for the valveconnected to the Controller. The variable resistance range is 100Ω to 2.5 kΩ.
E5EK CT Input/Potentiometer
When using the HBA function on the E5EK-AA2 Controller,connect CT input (CT) to terminal numbers 15 to 17. Whenmonitoring the valve opening on the E5EK-PRR2 Controller,connect the potentiometer (PTMR) to terminal numbers 15 to 17.Connect each of these inputs as follows:
10987654
321
20191817161514
131211
21 22
23
17
16
15C
W
O
Potentiometer
17
16
15
CT
CT input
For details on CT inputs, refer to Appendix, About CurrentTransformer in your User’s Manual. The potentiometer cannot beused simultaneously with remote SP input. For details on thepotentiometer, refer to the Instruction Manual for the valveconnected to the Controller. The variable resistance range is 100Ω to 2.5 kΩ.
REMOTE SP INPUT (FOR E5AK AND E5EK ONLY)
E5AK Remote SP Input
Connect the input (RSP) to be used as the remote SP to terminalnumbers 21 and 22. Only 4 to 20 mA inputs can be connected.Connect the input as follows:
21
+
--
22
4 to 20 mA
10987654321
30292827262524232221
20191817161514131211
31 32
33
E5EK Remote SP Input
Connect the input (RSP) to be used as the remote SP to terminalnumbers 15 and 16. However, note that the potentiometer cannotbe used simultaneously with remote SP input. Only 4 to 20 mAinputs can be connected. Connect the input as follows:
15
+
--
16
4 to 20 mA
10987654321
20191817161514131211
21 22
23
E5K E5K
OPTION BOARD WIRING
E5AK
Connect event inputs 1 and 2 (EV1/2) to terminal numbers 18 to 20, and event events 3 and 4 (EV3/4) to terminal numbers 24 to 26.However, note that terminal numbers 18 to 20 cannot be used on Controllers with a communications function. Connect the event inputs asfollows:
10987654321
30292827262524232221
20191817161514131211
31 32
33
Terminals 18 and 24 (COM) are connected internally.
13
14
1
32
31
19
SD
RD
SG
E53-AK01
RS-232C
E53-AK02
RS-422Event input 1 and 2(no contact) Transfer outputOption type
Part number
20
18
SDA
SDB
RDA
RDB
SG
E53-AK03
RS-485 Event input 3 and 4(no contact)
30
29
4 to 20mA L
20
19
18
EV1
EV2
COM
+
+
--
26
25
24
EV3
EV4
COM
+
+
--
+
--
32
31
19
20
A
B
A
B
Use event inputs under the following conditions:
Contact input ON: 1 kΩ max.OFF: 100 kΩ min.
No-contact input ON: Residual voltage 1.5 V max.,OFF: Leakage current 0.1 mA max.
Communications
Terminal numbers 18 to 20, 31 and 32 can be used only on Controllers with Communications Units (E53-AK01/02/03). For details on wir-ing, refer to Chapter 6, Using the Communications Function in your User’s Manual.
E5K E5K
E5EK
Connect event inputs 1 and 2 (EV1/2) to terminal numbers 18 to 20. However, note that terminal numbers 18 to 20 cannot be used onControllers with a communications function. Connect the event inputs as follows:
109
87654321
20191817161514131211
21 22
23
E53-AK01
RS-232C
E53-AK02
RS-422 Event input 1 and 2 Transfer outputOption type
Part number E53-AK03
RS-485 Event input 1 and 2(no contact)
21
22
4 to 20mA L
20
19
18
EV1
EV2
COM
+
+
--
+
--
20
19
18
EV1
EV2
COM
+
+
--
20
19
18
SD
RD
SG
22
21
19
20
18
SDA
SDB
RDA
RDB
SG
22
21
19
20
A
B
A
B
Use event inputs under the following conditions:
Contact input ON: 1 kΩ max., OFF: 100 kΩ min.
No-contact input ON: Residual voltage 1.5 V max.,OFF: Leakage current 0.1 mA max.
Communications
Terminal numbers 18 to 20, 31 and 32 can be used only on Controllers with Communications Units (E53-AK01/02/03). For details onwiring, refer to Chapter 6, Using the Communications Function in your User’s Manual.
E5CK
Terminal numbers 1, 13, and 14 are valid only when the Option Board is set in the Controller
The following four connections are possible depending on the model of the Option Board.
5
4
3
2
10
9
8
7
6
11 12 13
14
1
13
14
1
13
14
1
13
14
1
SD
RD
SG
A
B
+
--
4 to 20mA
E53-CK01
RS-232C
E53-CK03
RS-485
E53-CKB E53-CKF
Event input Transfer outputOption type
Part number
+
--
+
--
1 13 14
E5K E5K
CONNECTION EXAMPLE OF DIGITAL CONTROLLER AND SSR
+
--
+
--
Digital Controller
Voltage outputterminal (for driv-ing SSR)
Connectable
Load
HeaterPower supplyfor load
Power SSR
SSR
E5AK/E5EK
Digital Controller withVoltage Output(12 VDC, 40 mA max.)
See the Process and Temperature Controller Catalog GCTC11for further information on External SSR.
E5CK
Digital Controller withVoltage Output(12 VDC, 20 mA max.)
INPUT LOAD
E5K E5K
Precautions
PRECAUTIONS WHEN WIRING
• Use wire ducts to separate input leads and power lines inorder to protect the Controller and its lines from externalnoise.
• Solderless terminals are recommended when wiring the Con-troller.
• Tighten the terminal screws using a torque no greater than0.78 N m, or 8 kgf cm max. Take care not to tighten theterminal screws too tightly.
Power Blocks
The E5AK/E5EK has independent power supplies for each of the terminal blocks shown below.
10987654321
30292827262524232221
20191817161514131211
31 32
33
*
*
10987654321
20191817161514131211
21 22
23
E5AK E5EK
Note: Terminals 21 and 22 of the E5EK belong to the B block when a transfer output is set to option 1 and to the C block for otherOption Boards.
* *
1
2
3
4
5
13 14 6
7
8
9
1011 12
E5CK
*
* Uses same internal power supply
*
OPERATING ENVIRONMENT• Keep within the rated ambient operating temperature, ambi-
ent operating humidity, and storage temperature ranges.
• Use the Unit according to the vibration resistance, shockresistance, and enclosure ratings.
• Do not use the Unit in places with corrosive gas or excessivedust.
• Do not use the Unit near machines generating high-frequen-cy noise.
CORRECT USE
Mounting
• The dimensions of the Digital Controller conform to DIN43700.
• Recommended panel thickness is 1 to 8 mm.
• Mount the Unit horizontally.
Connection
• To reduce inductive noise influence, the lead wires connect-ing the input type to the Digital Controller must be separatedfrom the power lines and load lines.
• Use the specified compensating conductors for thermocou-ples. Use lead wires having a small resistance for platinumresistance thermometers.
Connection Example
• Wire the terminals of the Unit using solderless terminals.
• The tightening torque applied to the terminal screws of theUnit must be approximately 0.78 N m or 8 kgf cm.
Use the following type of solderless terminals for M3.5 screws.
7.2 mm max.
7.2 mm max.
E5K E5K
OPERATION• For models with alarm functions: The alarm outputs of a mod-
el with an alarm function may not turn ON properly when themodel malfunctions. The use of alarm equipment with themodel is recommended.
• The parameters and internal switch are set before shipping sothat the Unit will function normally. Change the settings of theparameters and internal switch according to the application, ifnecessary.
• Several seconds are required until the relay is turned ON afterpower has been supplied to the Digital Controller. you musttake this time delay into consideration when designing se-quenced circuits which incorporate a Digital Controller.
• Do not use excessive force when pulling out the internalmechanism from the housing. Protect the internal connector orelectronic parts of the Unit from shock. Protect against staticdischarge when changing the settings of the internal switch.Changing the settings on a grounded conductive mat is rec-ommended.
• When connecting the Control Output Unit to the TemperatureController or Digital Controller, make sure that the ControlOutput Unit is a suitable type. The use of an improper type ofControl Output Unit may cause the system to malfunction.
• The heater burnout alarm will not be available if the LinearOutput Unit is used.
Cat. No. GCTC12 1/99 Specifications subject to change without notice. Printed in U.S.A.
OMRON ELECTRONICS, INC.One East Commerce DriveSchaumburg, IL 60173


![[E5] Thailand](https://static.documents.pub/doc/80x56/577cc72b1a28aba711a02f6f/e5-thailand.jpg)


