48
Digital Storytelling Manual - State Library of Queensland Digital storytelling Manual State Library of Queensland June 2009
Digital Storytelling Manual - State Library of Queensland
Digital storytelling Manual State Library of Queensland
June 2009
Digital Storytelling Manual - State Library of Queensland
2
DIGITAL STORIES.....................................................................................................................3
TELLING THE STORY...............................................................................................................4
THE ICEBREAKER......................................................................................................................4 THE POSTCARD ........................................................................................................................4 THE STORY CIRCLE ..................................................................................................................4
THE EQUIPMENT (HARDWARE) .............................................................................................5
COMPUTER ..............................................................................................................................5 DIGITAL CAMERA ......................................................................................................................5 FILM CAMERA...........................................................................................................................5 VIDEO CAMERA ........................................................................................................................5 SCANNER .................................................................................................................................6 AUDIO RECORDER ....................................................................................................................6
THE SOFTWARE (COMPUTER PROGRAMS) ........................................................................6
SOUND.....................................................................................................................................6 PICTURES ................................................................................................................................6 DIGITAL VIDEO (PUTTING THE DIGITAL STORY TOGETHER)...........................................................7
PUTTING THE DIGITAL STORY TOGETHER..........................................................................8
FILE MANAGEMENT ...................................................................................................................8 The Hard Disc ....................................................................................................................8
MAKING THE STORY..............................................................................................................11
THE SCRIPT ............................................................................................................................11 THE AUDIO .............................................................................................................................11 GETTING THE PICTURES INTO THE COMPUTER .........................................................................11 THE PICTURES (STILL IMAGES AND MOVING VIDEO) ...................................................................12 EDITING PHOTOGRAPHS IN ADOBE PHOTOSHOP ELEMENTS ......................................................14
CREATING A BLACK SLUG...................................................................................................22
PUTTING THE SOUND AND THE PICTURES TOGETHER................................................................25 CREATING YOUR MOVIE IN ADOBE PREMIERE ELEMENTS 7 .......................................................26 RENDERING TO AVI (FINISHING THE MOVIE)..............................................................................45 RENDERING YOUR ADOBE PREMIERE ELEMENTS MOVIE............................................................45 FINISHING UP..........................................................................................................................47 REQUIREMENTS FOR THE STATE LIBRARY OF QUEENSLAND’S COLLECTION................................47
GLOSSARY (JARGON BUSTER)...........................................................................................48
Digital Storytelling Manual - State Library of Queensland
3
Digital Stories
Digital stories are short videos that generally run for two to four minutes. They can use images, sound, music, narration, animation and video to tell a person’s story. A digital story is a fun and creative way of sharing a story with other people. Digital stories can be shown in several different ways. With the final digital file, the story can be watched on a DVD player, played back locally on a computer, be viewed online or even played on a mobile phone. As well as telling an interesting story, a digital story can give people in the future a way to look at how things were when the story was made. It can become a part of history. The State Library of Queensland is committed to helping people create and share their stories, while also acting as a repository, a safekeeping place where one generation’s story can be discovered by another. A finished digital story is composed of images and sound. The pictures can be still images or moving video, or a mixture of both. The sound is mainly the sound of the story being narrated, but may include background noises, sound effects and even music.
If you use any images, sound or video in your story that does not belong to you, it is essential that you get written permission from the rightsholder. For copyright reasons, you cannot copy music from a popular CD without permission and put it in your story. There are many sites now that offer content under Creative Commons licenses. Under these licenses, creators put their works online and specify how other people can use them. If you interview anybody for a digital story, it is important that you get clearance to use the sound or video recording of them.
Digital Storytelling Manual - State Library of Queensland
4
Telling the Story
Here are some ways of practicing telling a story which you can do with a group of people. You might find these techniques useful when you come to write a script for your digital story.
The Icebreaker
Each person starts by saying ‘My name is …….and on my way here today…..’ They then tell a 2-3 minute story about what happened to them. It doesn’t even have to be true!
The Postcard
Each person brings along a photo. Put the photo face up on the table and then everyone picks someone else’s photo. Write a made-up short story (half a page) about the photo you chose (doesn’t have to be true) and then read it to the group. It can also be good for the real owner of the photo to then tell the real story behind the photo as well.
The Story Circle
This is the beginning of writing the script for your digital story. Think about the pictures and video that you have got with you and write a first version of your story (write it by hand or type it into a computer and print it). Keep the story to one page or less if you can. This should take about an hour. When you’ve finished, sit in a circle and read your stories to each other. Everybody should make comments and suggestions about each story. This will help you to make the story better. The first version is often too long. Half a page, or 200-250 words is usually enough for a 2-3 minute digital story. The story should have a strong focus to make it interesting. This is a single idea about which the story is about. Stories often contain a problem or something to be overcome, such as ‘I wasn’t sure if I’d be able to complete the bushwalk, but I was going to give it my best shot’. This can give the story some drama and interest. There is nothing wrong with the story not containing a problem as long as there is a strong focus on one subject. It is very helpful to write one sentence what your story is about. Share this summary with the group before you read your story and they can help you judge how well you have got the point of the story across.
Digital Storytelling Manual - State Library of Queensland
5
The Equipment (hardware)
Computer
You will need a computer to make a digial story. It can be either Windows or Macintosh. It doesn’t need to be the latest or greatest machine, but should have sufficient memory to store your media files and enough processing power to handle the video files you will be creating. This will make loading files quicker and mean you spend less time staring at a progress bar. The computer must be able to play sound, either through speakers or headphones.
Digital Camera
A digital camera is a great way to get pictures to use in your digital story. It doesn’t matter how many pixels your camera is, the pictures will still look good enough on a computer screen.
Film Camera
If you don’t have a digital camera or prefer to use film, you will need to scan the prints to use them in your digital story. You can do this yourself with a scanner or a commerical photo shop can do this for you and put them on a CD.
Video Camera
Digital video cameras make it fairly easy to get your video onto the computer just as long as the computer is fairly new and powerful. Older (non-digital) video cameras are more difficult because you need to use a capture card to get the video into the computer and the quality won’t be quite as good. Digital cameras can also be used to take videos. The quality is not usually as good as video cameras but can be good enough for a digital story. Even mobile phones can take still and moving images and it may be possible to put these in your story as well! The files from the phone will usually have to be converted using software from the Internet.
Digital Storytelling Manual - State Library of Queensland
6
Scanner
A flat-bed scanner can be used to convert printed pictures into digital pictures for your story. Remember that the you must have permission to use any images that don’t belong to you.
Audio Recorder
There are a few ways of recording sound into a computer. Some computers have a microphone socket that you can plug a small microphone in to. Digital sound recorders are designed specifically to capture audio. Specialised sound recorders (for example high-end oral history recorders) will yield higher sound quality. Many devices, including iPods and MP3 players will record sound which can then be copied to the computer, using a USB cord similar to what you use with a digital camera.
The Software (computer programs)
Sound
Audacity
If you are recording sound directly into the computer you will need some recording software. Macs usually have a program called Garage Band which does the job. If you have a Windows PC you can download a great free program called Audacity from http://audacity.sourceforge.net/ Audacity will allow you to record directly into the computer using a microphone as long as your computer has a microphone socket. If you use a digital sound recorder you probably won’t need any audio software on the computer.
Pictures
GNU Image Manipulation Program (GIMP) Once you have your digital pictures loaded into the computer you may wish to resize, reshape and alter them in other ways. The best free program for doing this is called GIMP, available from www.gimp.org Adobe Photoshop Elements
Digital Storytelling Manual - State Library of Queensland
7
Another program for doing this is Adobe Photoshop Elements. This program comes free on CD sometimes when you buy a scanner or digital camera or to buy it from a shop costs about $100. This is the program used on the laptops in the State Library’s Mobile Multimedia Lab. There are dozens of other programs which can edit digital photos including Corel Photopaint.
Digital Video (Putting the digital story together)
Windows Movie Maker This program comes free with Windows XP and Vista. This program can be used to create the digital story. It is a very simple to use program that enables you to make basic digital stories. For many people, Windows Movie Maker satisfies all their digital storytelling needs. If you want more control of the look and feel of your story and want more options for how it is arranged, a higher-end program such as Adobe Premiere Elements may suit you better. Using Windows Movie Maker, you can put your digital photos, video and sound together and create the final video. Adobe Premiere Elements This program does much the same thing as Windows Movie Maker. It takes a little longer to learn but lets you be more creative with your movie. A license generally costs $100-125. It has far more features and once you get to know it, it is actually just as easy to use as Windows Movie Maker. However, both programs will make a perfectly good digital story! There are dozens of other good digital video programs, for examples include Final Cut and Adobe Premiere Standard.
Digital Storytelling Manual - State Library of Queensland
8
Putting the Digital story together
This information is intended to help you put a digital story together using any equipment and software you choose to use. For specific help on using the software of your choice, don’t forget the help menu which comes with all programs. Also, the internet is an amazing source of help with just about any program. You can find lots of forums on popular video editing programs.
File Management
This first bit is a bit boring, but very important (nearly as important as getting permission to use pictures or sound which belong to someone else in your digital story). If you don’t know where the files are on your computer, you will soon get into a terrible mess and maybe even have to start your digital story again! The following explanations refer to Windows but the same ideas apply to Macs.
The Hard Disc
The hard disc (or hard drive) is where files are stored on your computer. It is usually called the C: Drive but can be any letter. When creating a digital story you will have quite a lot of different files (pictures, sound and others) which make up the story. It is important to create a folder on your hard disc which is just for your digital story. It is a good idea to name the folder with the name of your story. If you share the computer with others perhaps name it like this: My Bushwalking Story by Joe Bloggs DO NOT DELETE ph. 8765 4321 Make a separate folder on the hard disc for every single digital story (don’t put more than one story in the folder). To create folders and subfolders in Windows:
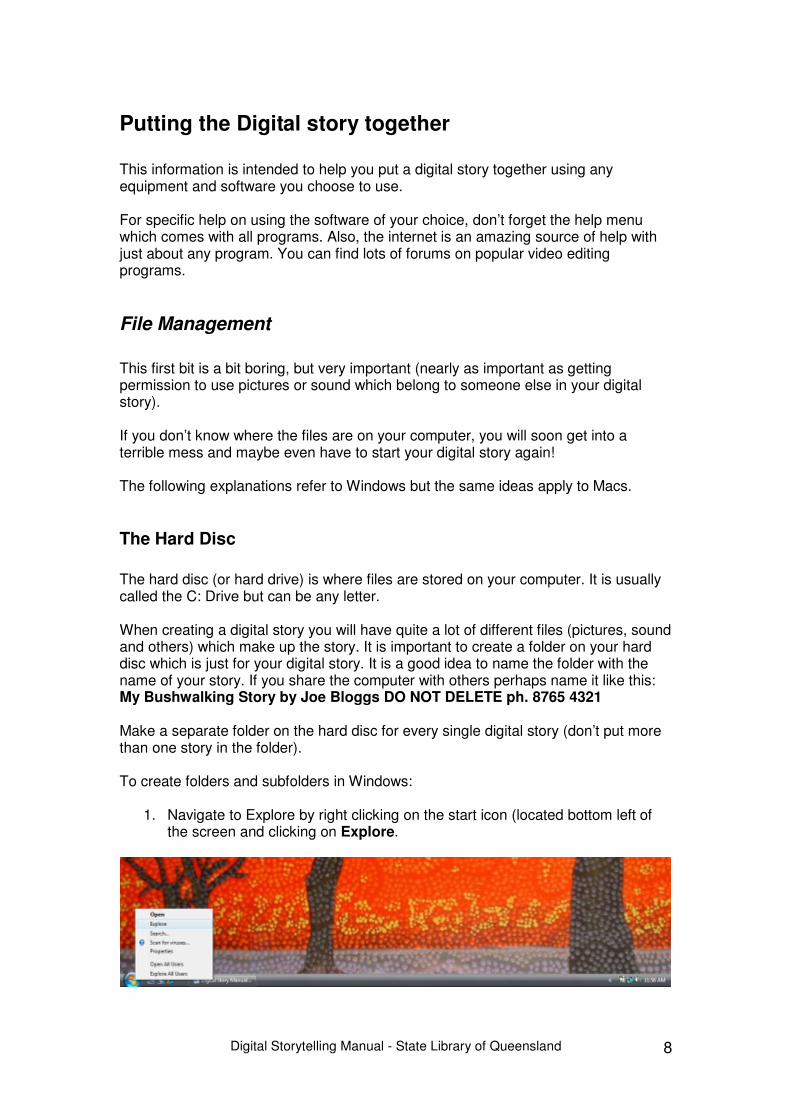
1. Navigate to Explore by right clicking on the start icon (located bottom left of the screen and clicking on Explore.

Digital Storytelling Manual - State Library of Queensland
9
2. Go to the hard drive where you plan to save your folder and subfolders (I am using the C: drive), highlight the drive, right click, and navigate down the menu to select New and then Folder. (The method of creating folders will differ depending on what operating system is running on your computer.)
3. A new folder is now created and can be named.
4. Type in the name you wish to use for the new folder.
Digital Storytelling Manual - State Library of Queensland
10
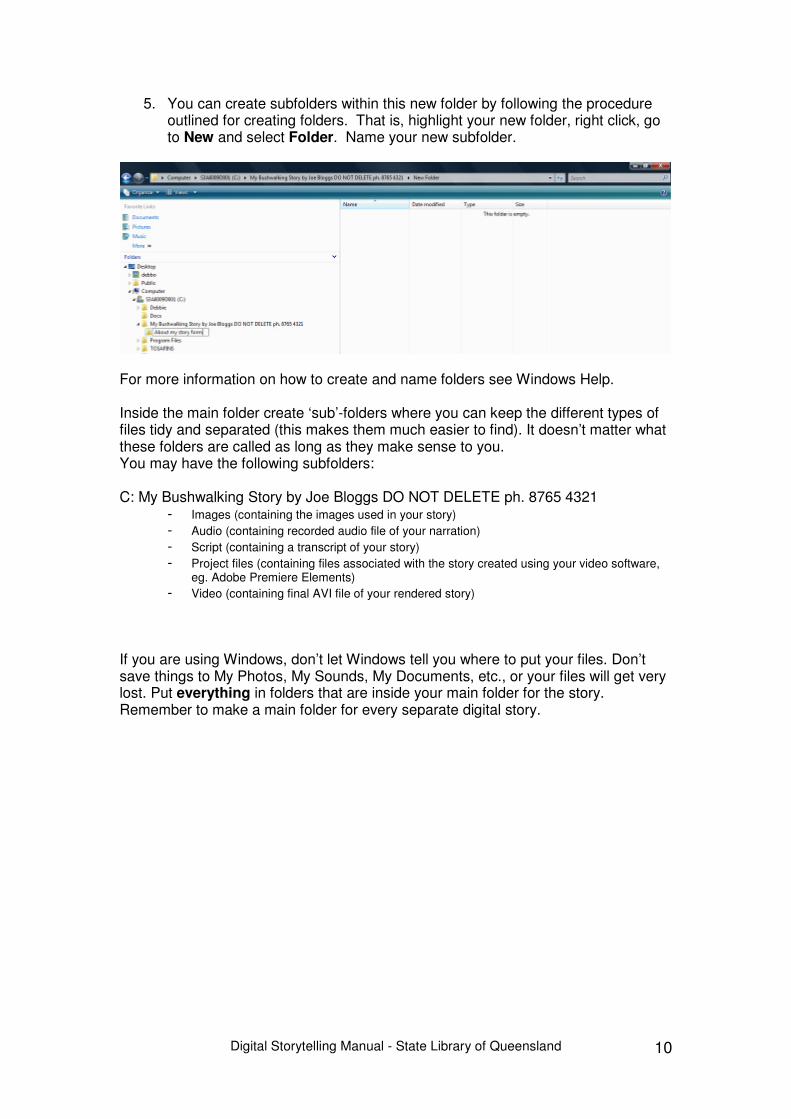
5. You can create subfolders within this new folder by following the procedure outlined for creating folders. That is, highlight your new folder, right click, go to New and select Folder. Name your new subfolder.
For more information on how to create and name folders see Windows Help. Inside the main folder create ‘sub’-folders where you can keep the different types of files tidy and separated (this makes them much easier to find). It doesn’t matter what these folders are called as long as they make sense to you. You may have the following subfolders: C: My Bushwalking Story by Joe Bloggs DO NOT DELETE ph. 8765 4321
- Images (containing the images used in your story)
- Audio (containing recorded audio file of your narration)
- Script (containing a transcript of your story)
- Project files (containing files associated with the story created using your video software, eg. Adobe Premiere Elements)
- Video (containing final AVI file of your rendered story)
If you are using Windows, don’t let Windows tell you where to put your files. Don’t save things to My Photos, My Sounds, My Documents, etc., or your files will get very lost. Put everything in folders that are inside your main folder for the story. Remember to make a main folder for every separate digital story.
Digital Storytelling Manual - State Library of Queensland
11
Making the Story
The script Write a short story that you will later narrate and record. As the movie will be between 2 and 3 minutes long, your story should be about 200 to 250 words. Create an electronic version of your script (using software such as Microsoft Word) and save it to the sub folder called “Script” that you created in your digital story folder on your hard drive.
The Audio Once you are happy with your written story you will need to create an audio file which can be used in the digital story. It is good to save your narration as a .WAV file (some other audio files, such as MP3s and WMVs, may also work depending on your program). You will need to be in a fairly quiet space with your recording device. Be aware that background noise from cars, birds, air conditioners etc may appear in your sound recording. It is a good idea to test the sound recording with headphones before you record your script for real. This will ensure that the audio is actually being recorded and that there are no interfering background noises. You can record the whole script in one track, or you can record it in multiple tracks. Each way is fine. Be aware, though, that if you record a lot of audio, you may have to trawl through the recording to get the part you want. Speak clearly and fairly loudly (don’t be too close to the microphone or you’ll get distortion), and try to put a bit of life into your voice. Listen back to your recording and make sure it is nice and clear and not distorted. If it’s not right adjust the recording levels and maybe even your distance from the microphone. When you are happy with it, save the file or files to you-know-where (see previous section). If you stumble or make a mistake in reading your script, stop, take a breath and start again from the beginning of the sentence. Mistakes can be edited out when you import the audio into your project. It is easier to edit out mistakes that are long and defined than editing out short snippets like “ums”. Any other sounds such as music or other sound effects should also be saved into a subfolder for later use.
Getting the Pictures into the Computer
You can download pictures directly from a digital camera into a subfolder (i.e. the subfolder you created called “Images”) or you can save the files from a scanner to the same place. Any changes you make to the pictures will be permanent so be sure to save a copy elsewhere if you’d like to keep the original, unchanged images (i.e. the subfolder you created called “Master images”). Digital video can be captured
Digital Storytelling Manual - State Library of Queensland
12
directly in to most video-editing programs. Older (non-digital) video cameras will have to be plugged into a capture card (a special video-capturing device) and the video file captured to the hard disc. Your pictures may also be on a CD, DVD or USB memory stick. To download from a digital camera either connect it directly to the computer using a USB cable or take the memory card out of the camera and insert it into a card-reader which is plugged into the computer. Don’t forget to put them all in the right place!
The Pictures (still images and moving video)
Once you have copied your digital photos, video or scanned photos into subfolders on your hard disc you will want to have a look through them and make sure you have enough (about 20-30 is a rough guide for use in a digital story that is between 2 and 3 minutes long). You may wish to edit the pictures to change the shape, the colours, or the brightness. Use one of the photo-editing programs to do this (don’t forget the help file). 4:3 and 16:9 4:3 and 16:9 are the two main shapes used for video these days. 4:3 is like the older style TVs and 16:9 is Widescreen. You can use either for your digital story. If you are including video which is already 4:3 in shape it is much easier to make your digital story in that shape (this is usually the shape of pictures from digital cameras too). If you would prefer the widescreen look you should reshape your pictures in the photo-editing software to be 16:9, and you should only use video which is already 16:9 (some video cameras can take 16:9 shaped video). If that all seems too hard, stick with 4:3 which is pretty standard. Here is some technical detail for making sure your pictures are the right shape using your photo-editing software. 4:3 aspect ratio for Standard TV Width: 768 pixels Height: 576 pixels Resolution 72 dpi 16:9 aspect ratio for Widescreen TV Width: 1024 pixels Height: 576 pixels Resolution 72 dpi 72 dpi is the resolution of a computer screen so anything saved at higher resolution will not look any better. Make sure you do any zooming, cropping, editing, etc., before you resize your images to these sizes.
Digital Storytelling Manual - State Library of Queensland
13
You will find the Cropping tool very useful when it comes to resizing your pictures without distorting the shape. All good photo programs have a Cropping tool. Note: With Adobe Premiere it isn’t really necessary to resize the pictures first as you can do this when you are using the program. But with Windows Movie Maker it is a good idea to have the pictures the right shape to start with. Important Note: Whenever you plan to crop and edit pictures remember that unless you rename these pictures before you change them they will be changed forever if you copy pictures directly from your digital camera into the computer. So it’s always a good idea to be messing around with a copy of your digital files rather than the originals (unless you don’t mind).
Digital Storytelling Manual - State Library of Queensland
14
Editing photographs in Adobe Photoshop Elements Resizing photographs
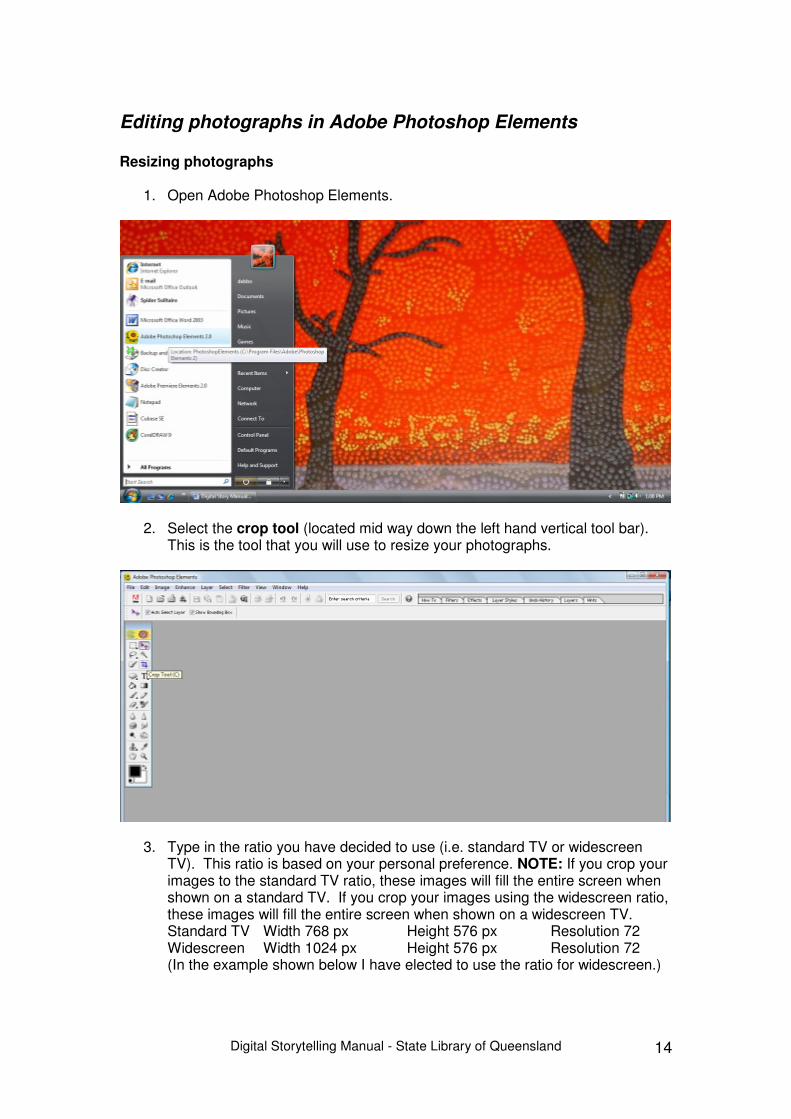
1. Open Adobe Photoshop Elements.
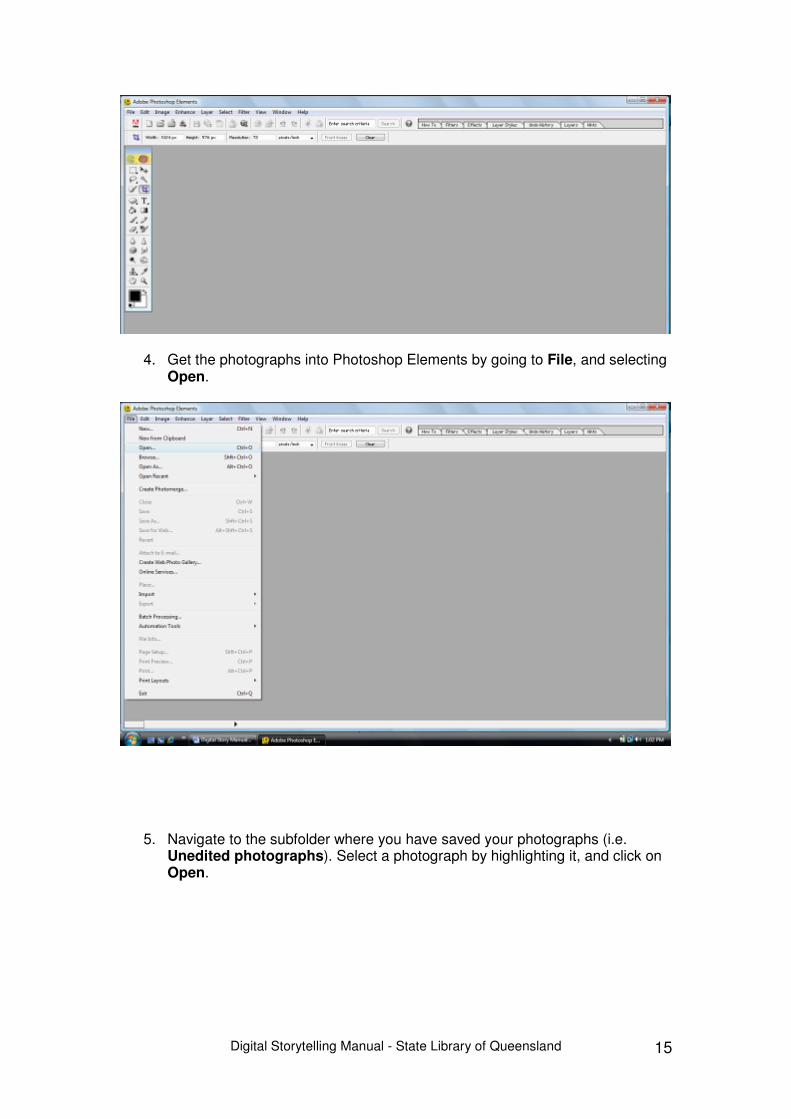
2. Select the crop tool (located mid way down the left hand vertical tool bar). This is the tool that you will use to resize your photographs.
3. Type in the ratio you have decided to use (i.e. standard TV or widescreen TV). This ratio is based on your personal preference. NOTE: If you crop your images to the standard TV ratio, these images will fill the entire screen when shown on a standard TV. If you crop your images using the widescreen ratio, these images will fill the entire screen when shown on a widescreen TV. Standard TV Width 768 px Height 576 px Resolution 72 Widescreen Width 1024 px Height 576 px Resolution 72 (In the example shown below I have elected to use the ratio for widescreen.)
Digital Storytelling Manual - State Library of Queensland
15
4. Get the photographs into Photoshop Elements by going to File, and selecting Open.
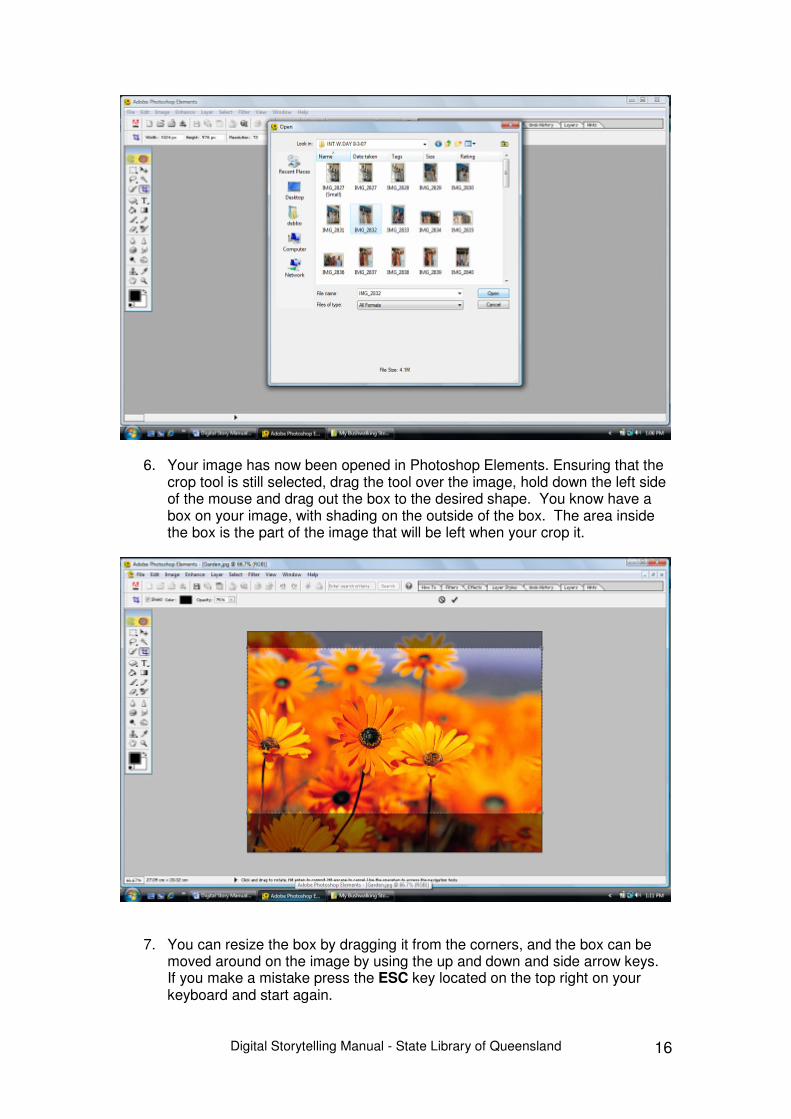
5. Navigate to the subfolder where you have saved your photographs (i.e. Unedited photographs). Select a photograph by highlighting it, and click on Open.
Digital Storytelling Manual - State Library of Queensland
16
6. Your image has now been opened in Photoshop Elements. Ensuring that the crop tool is still selected, drag the tool over the image, hold down the left side of the mouse and drag out the box to the desired shape. You know have a box on your image, with shading on the outside of the box. The area inside the box is the part of the image that will be left when your crop it.
7. You can resize the box by dragging it from the corners, and the box can be moved around on the image by using the up and down and side arrow keys. If you make a mistake press the ESC key located on the top right on your keyboard and start again.
Digital Storytelling Manual - State Library of Queensland
17
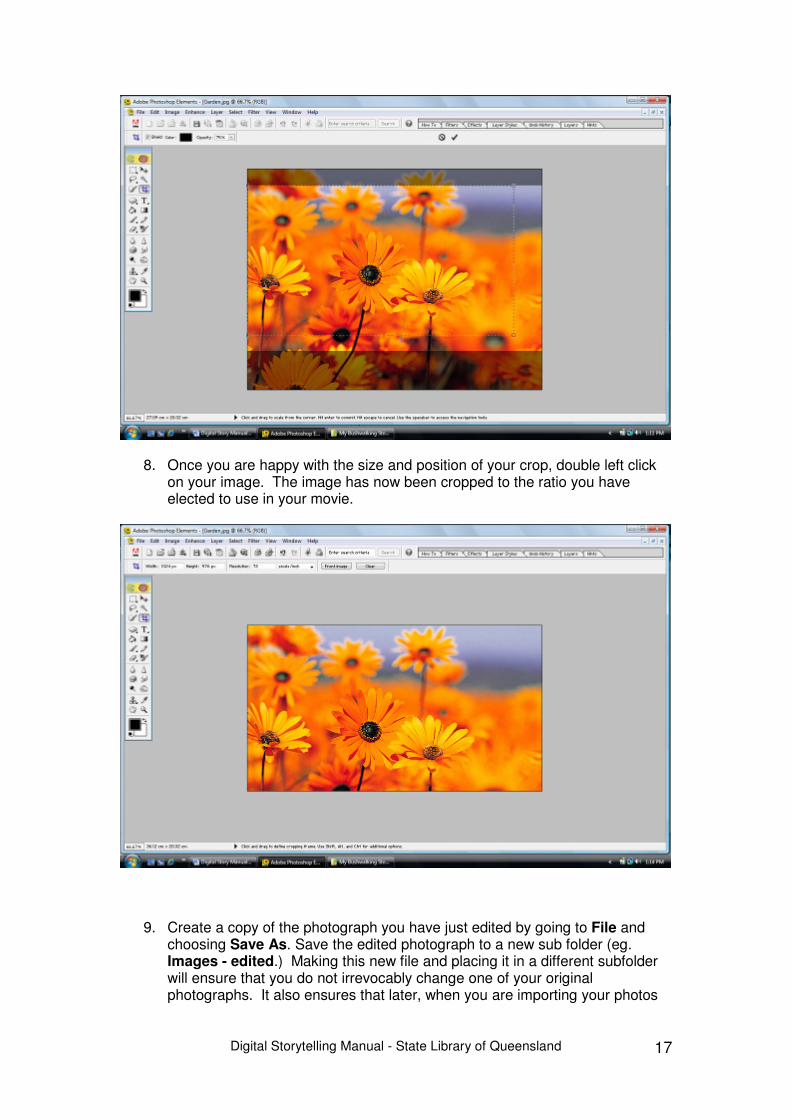
8. Once you are happy with the size and position of your crop, double left click on your image. The image has now been cropped to the ratio you have elected to use in your movie.
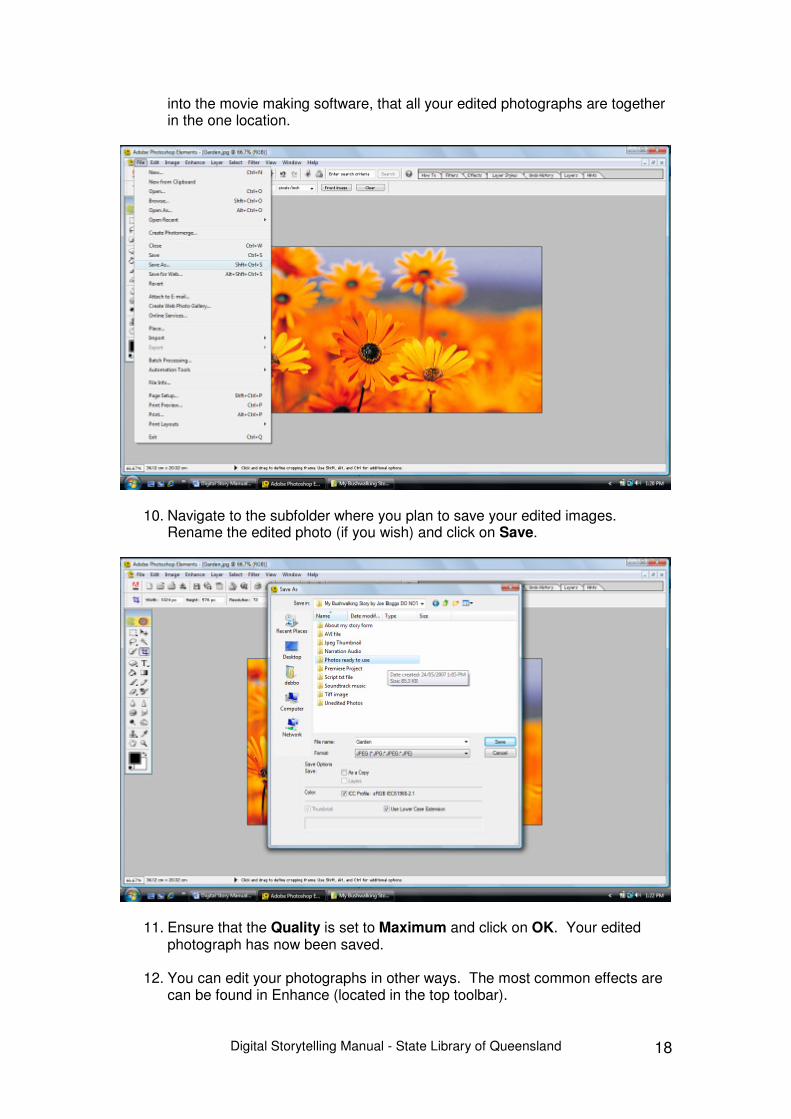
9. Create a copy of the photograph you have just edited by going to File and choosing Save As. Save the edited photograph to a new sub folder (eg. Images - edited.) Making this new file and placing it in a different subfolder will ensure that you do not irrevocably change one of your original photographs. It also ensures that later, when you are importing your photos
Digital Storytelling Manual - State Library of Queensland
18
into the movie making software, that all your edited photographs are together in the one location.
10. Navigate to the subfolder where you plan to save your edited images. Rename the edited photo (if you wish) and click on Save.
11. Ensure that the Quality is set to Maximum and click on OK. Your edited photograph has now been saved.
12. You can edit your photographs in other ways. The most common effects are
can be found in Enhance (located in the top toolbar).
Digital Storytelling Manual - State Library of Queensland
19
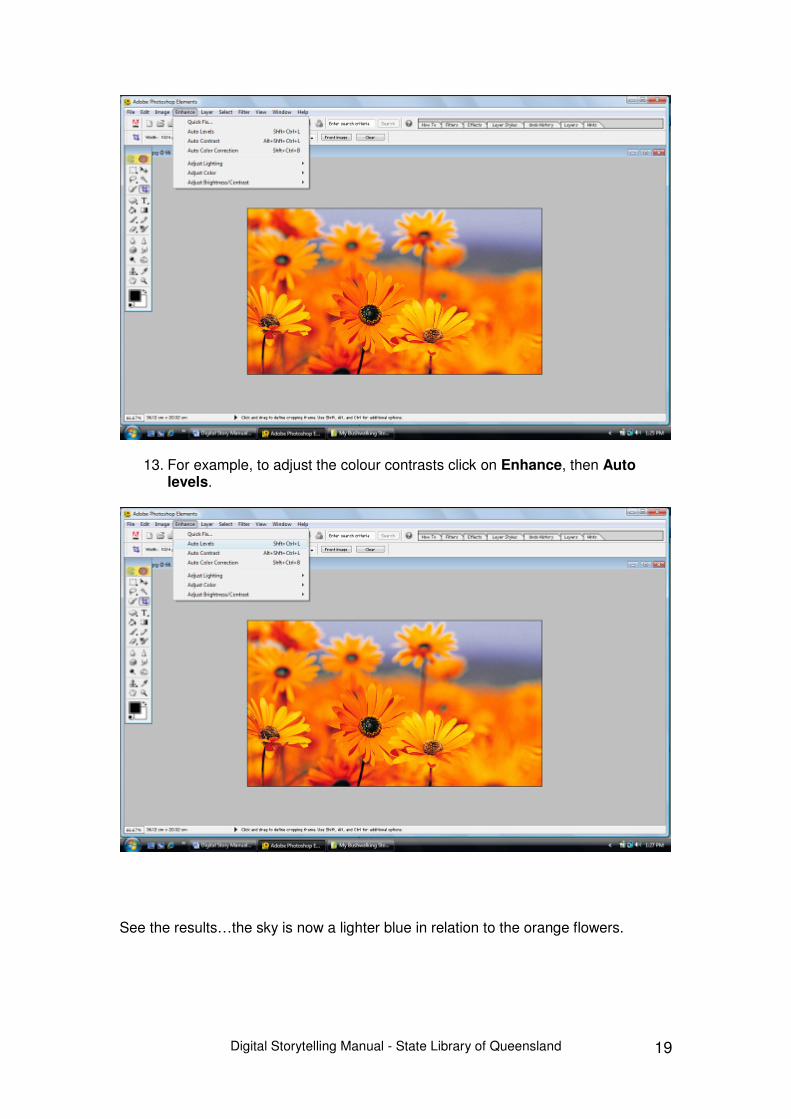
13. For example, to adjust the colour contrasts click on Enhance, then Auto levels.
See the results…the sky is now a lighter blue in relation to the orange flowers.
Digital Storytelling Manual - State Library of Queensland
20
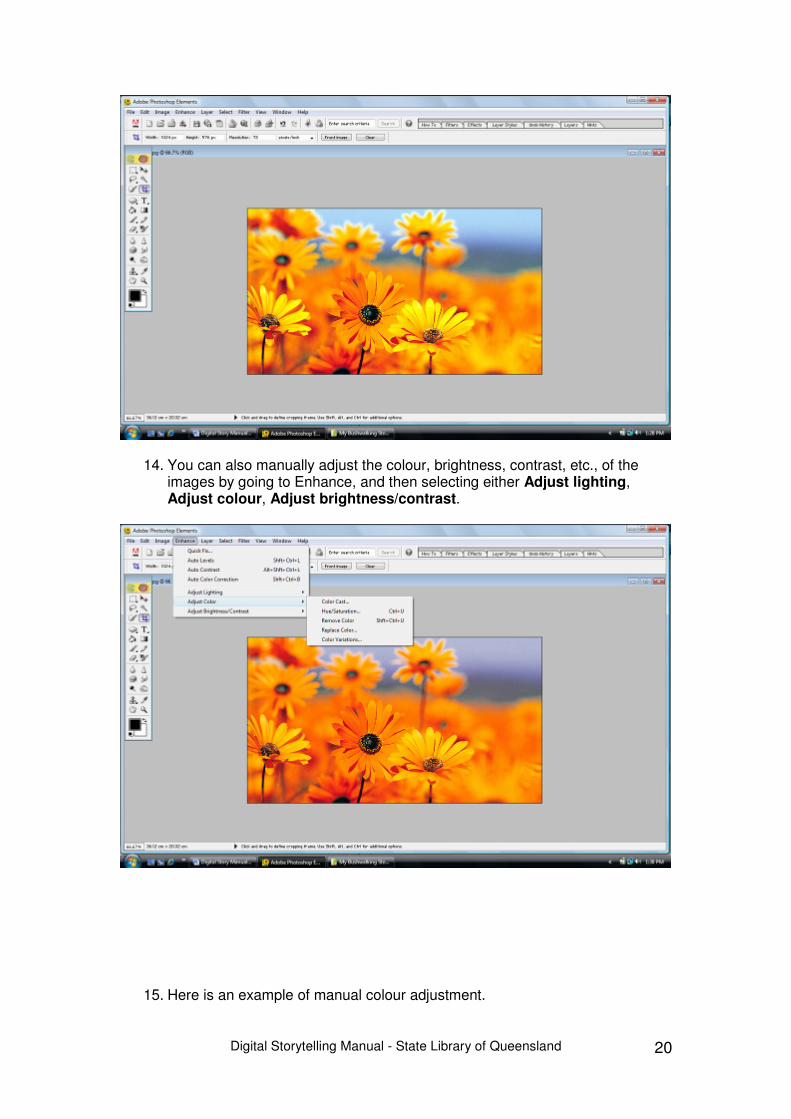
14. You can also manually adjust the colour, brightness, contrast, etc., of the images by going to Enhance, and then selecting either Adjust lighting, Adjust colour, Adjust brightness/contrast.
15. Here is an example of manual colour adjustment.
Digital Storytelling Manual - State Library of Queensland
21
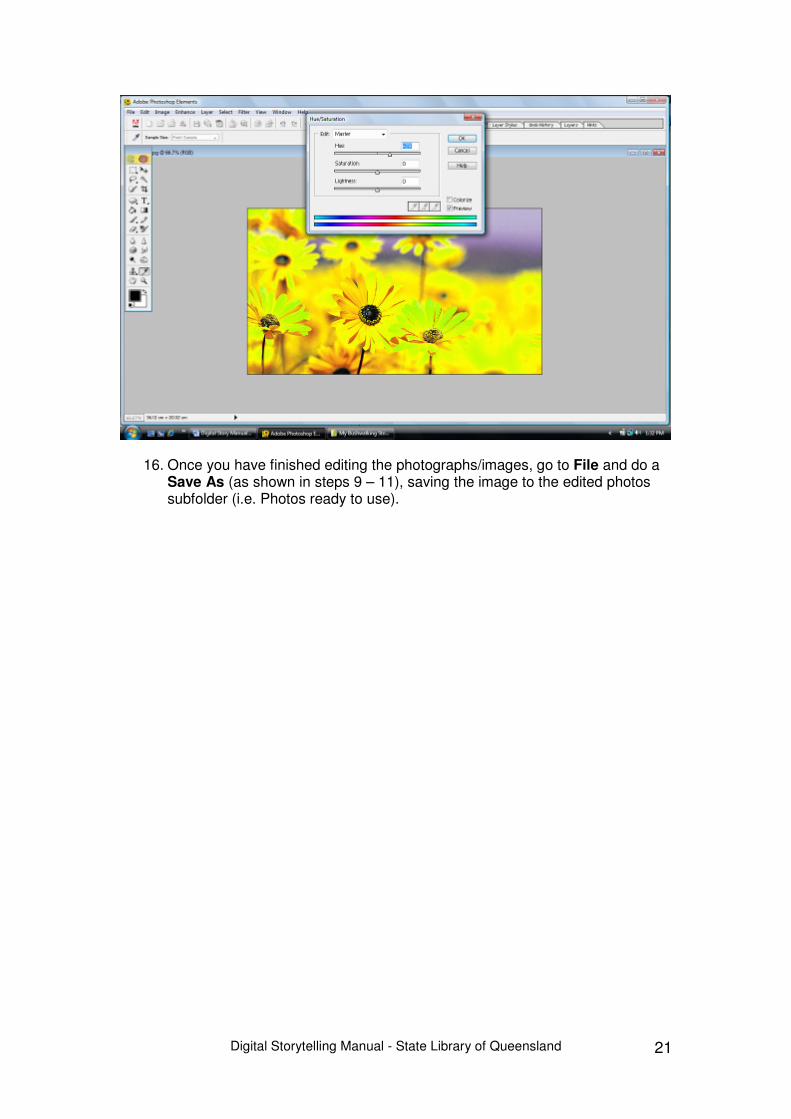
16. Once you have finished editing the photographs/images, go to File and do a Save As (as shown in steps 9 – 11), saving the image to the edited photos subfolder (i.e. Photos ready to use).
Digital Storytelling Manual - State Library of Queensland
22
Creating a black slug A black slug is used to create some black space at the very start and end of your movie (before the opening titles, and after the closing credits). This allows for a couple of seconds of black screen when you first start playing your movie, and after your movie ends. This is very important for stories you make with Windows Movie Maker, because you cannot have unfilled spaces between images. You can have spaces in Premiere Elements, so a black slug is not as necessary.
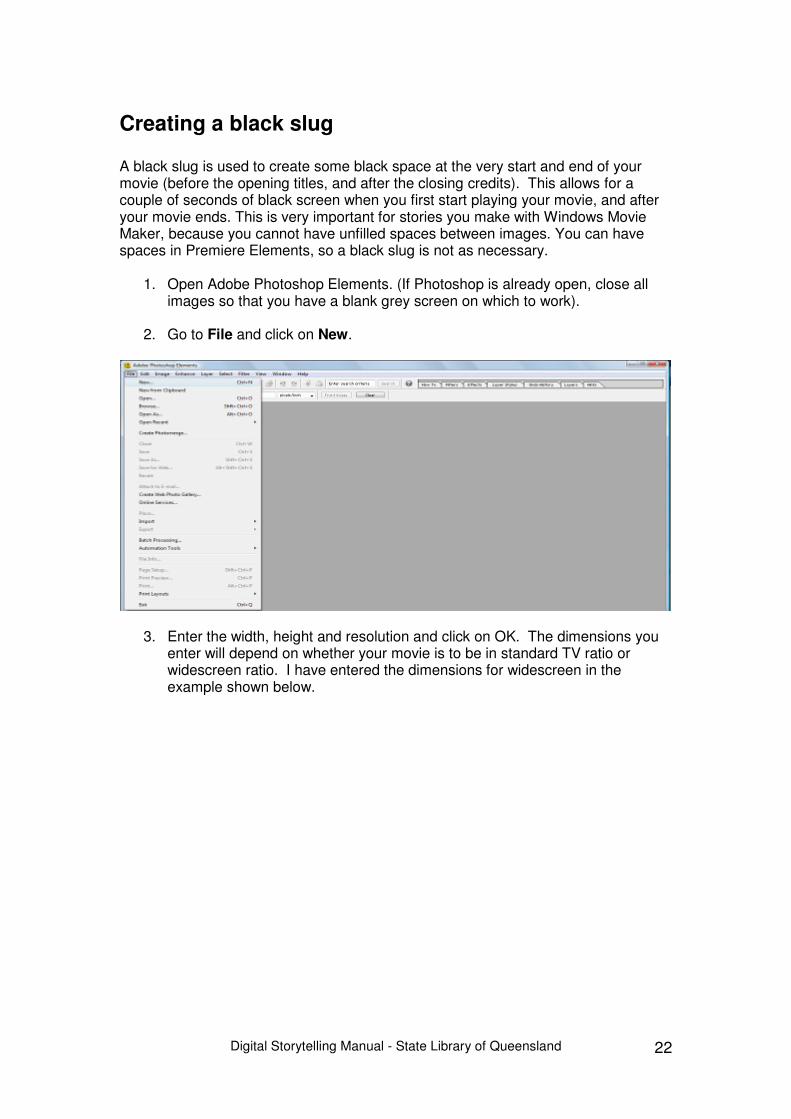
1. Open Adobe Photoshop Elements. (If Photoshop is already open, close all images so that you have a blank grey screen on which to work).
2. Go to File and click on New.
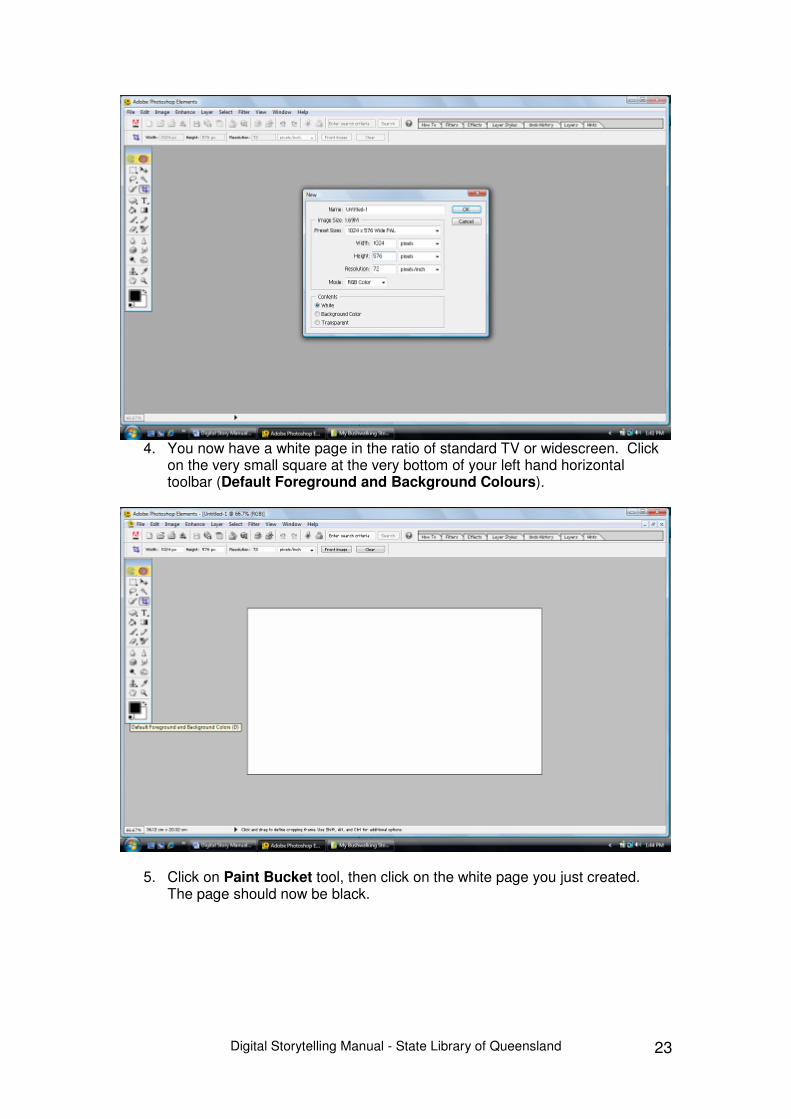
3. Enter the width, height and resolution and click on OK. The dimensions you enter will depend on whether your movie is to be in standard TV ratio or widescreen ratio. I have entered the dimensions for widescreen in the example shown below.
Digital Storytelling Manual - State Library of Queensland
23
4. You now have a white page in the ratio of standard TV or widescreen. Click
on the very small square at the very bottom of your left hand horizontal toolbar (Default Foreground and Background Colours).
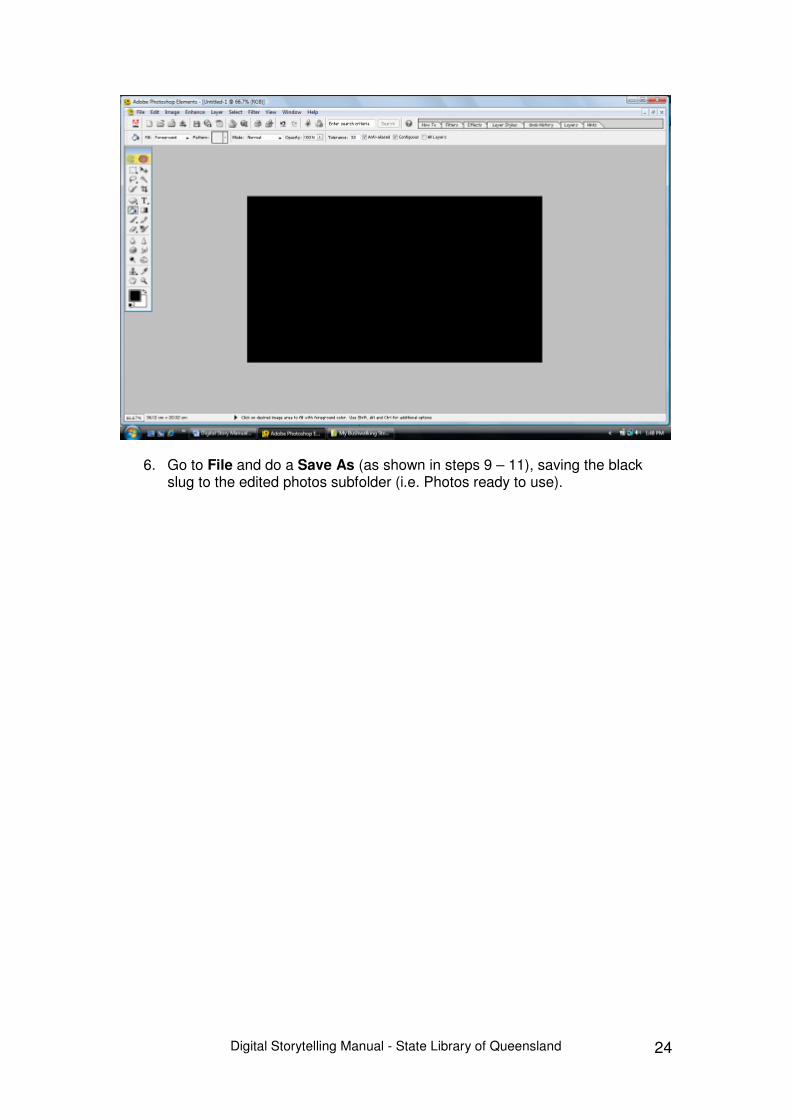
5. Click on Paint Bucket tool, then click on the white page you just created. The page should now be black.
Digital Storytelling Manual - State Library of Queensland
24
6. Go to File and do a Save As (as shown in steps 9 – 11), saving the black slug to the edited photos subfolder (i.e. Photos ready to use).
Digital Storytelling Manual - State Library of Queensland
25
Putting the Sound and the Pictures together
All digital video editing programs work in a similar way. You create a PROJECT file (give it the name of your story), which is simply a file which puts all the sound and pictures together on a TIMELINE which sorts them into a playing order. Important Note: The files are not actually copied into the project as they are too big. The project simply remembers where the files are on the hard disc. This is why it is so important to have your files all tidy and in the correct place, i.e., your folder and subfolders. Once you have imported your sounds and images into the project (see the Program help file), just drag them into the timeline in any order you like and start assembling your movie. Don’t forget to save regularly It is common to put the sound file/s onto the timeline and then match the pictures and video to it, but you can do the images first if you prefer. If using Windows Movie Maker beware that once you have a long timeline worked out, making changes to earlier parts of the project will move all the files around following the change. (Adobe Premiere doesn’t do this). With Windows Movie Maker work from left to right – get the beginning right first. With Adobe Premiere just start wherever you like – you can jump around within the timeline. At this stage you can add effects like dissolves which make pictures blend into one another. Experiment with the effects but be careful that they don’t spoil your movie by becoming a distraction. Dissolves are pretty safe to use but if you use any other effects at all, use them very sparingly. When you think you are happy with the way everything looks, you can add titles at the beginning of the timeline and credits at the end. Now it’s time to render your first draft of the movie.
Digital Storytelling Manual - State Library of Queensland
26
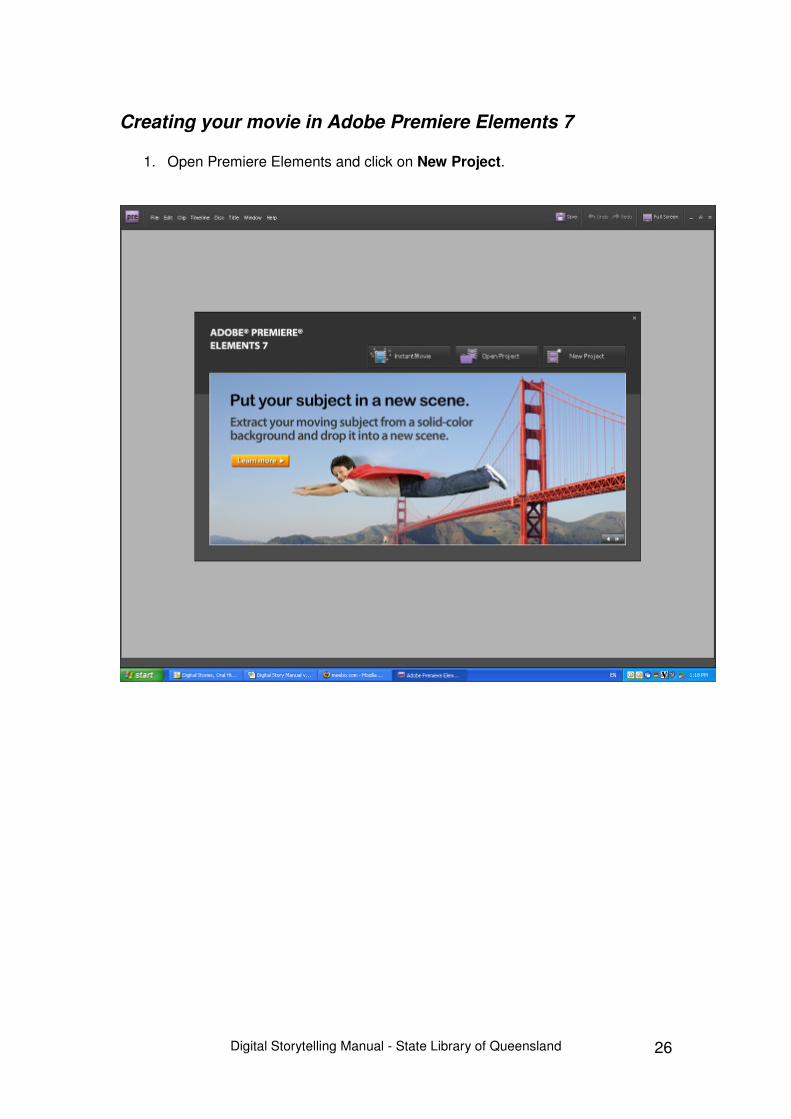
Creating your movie in Adobe Premiere Elements 7
1. Open Premiere Elements and click on New Project.
Digital Storytelling Manual - State Library of Queensland
27
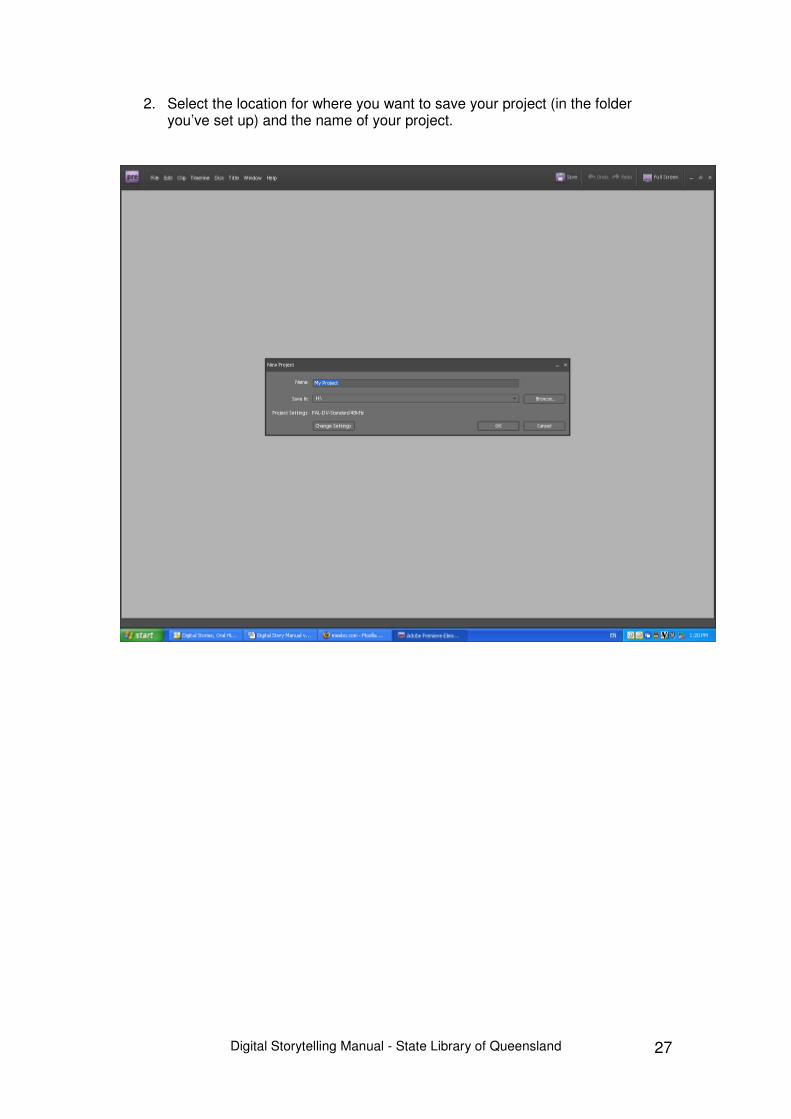
2. Select the location for where you want to save your project (in the folder you’ve set up) and the name of your project.
Digital Storytelling Manual - State Library of Queensland
28
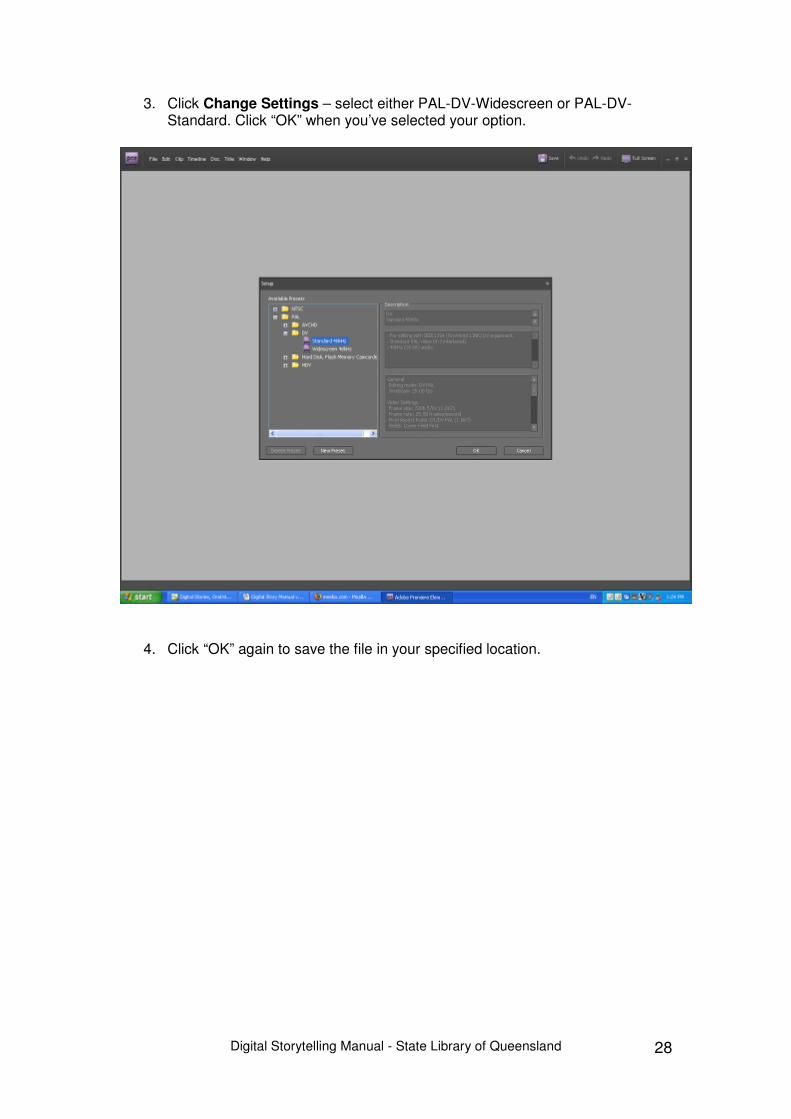
3. Click Change Settings – select either PAL-DV-Widescreen or PAL-DV-Standard. Click “OK” when you’ve selected your option.
4. Click “OK” again to save the file in your specified location.
Digital Storytelling Manual - State Library of Queensland
29
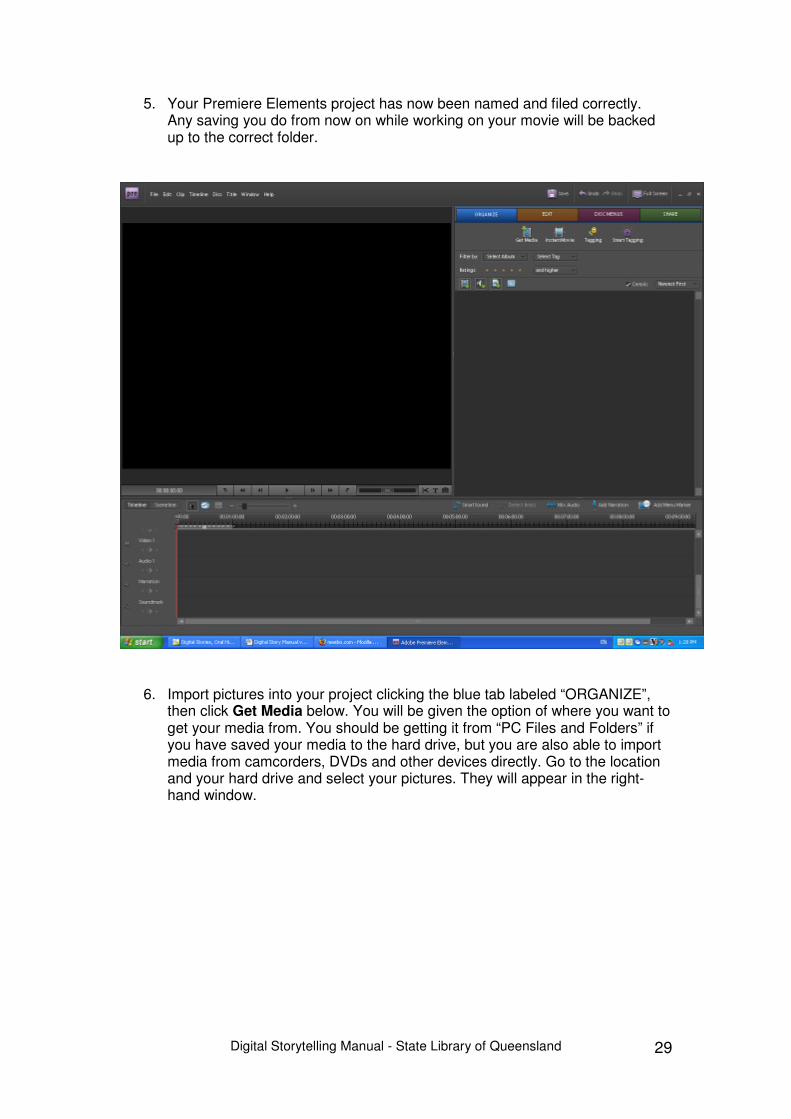
5. Your Premiere Elements project has now been named and filed correctly. Any saving you do from now on while working on your movie will be backed up to the correct folder.
6. Import pictures into your project clicking the blue tab labeled “ORGANIZE”, then click Get Media below. You will be given the option of where you want to get your media from. You should be getting it from “PC Files and Folders” if you have saved your media to the hard drive, but you are also able to import media from camcorders, DVDs and other devices directly. Go to the location and your hard drive and select your pictures. They will appear in the right-hand window.
Digital Storytelling Manual - State Library of Queensland
30
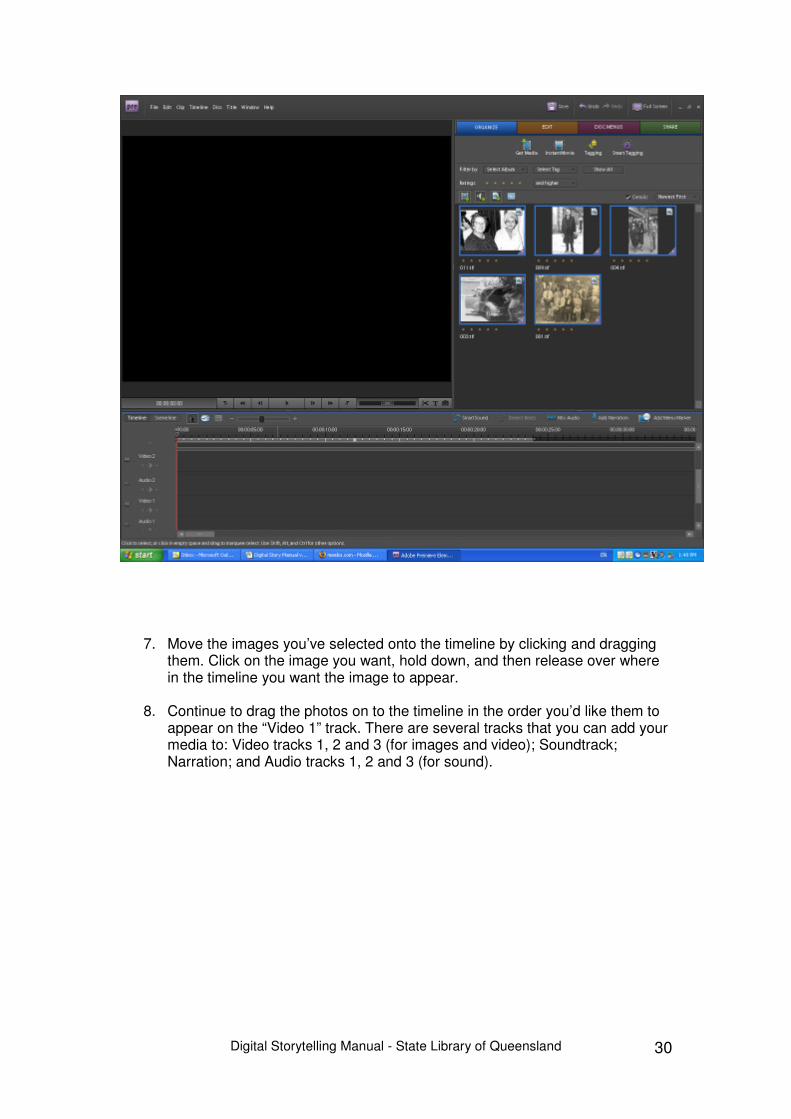
7. Move the images you’ve selected onto the timeline by clicking and dragging them. Click on the image you want, hold down, and then release over where in the timeline you want the image to appear.
8. Continue to drag the photos on to the timeline in the order you’d like them to
appear on the “Video 1” track. There are several tracks that you can add your media to: Video tracks 1, 2 and 3 (for images and video); Soundtrack; Narration; and Audio tracks 1, 2 and 3 (for sound).
Digital Storytelling Manual - State Library of Queensland
31
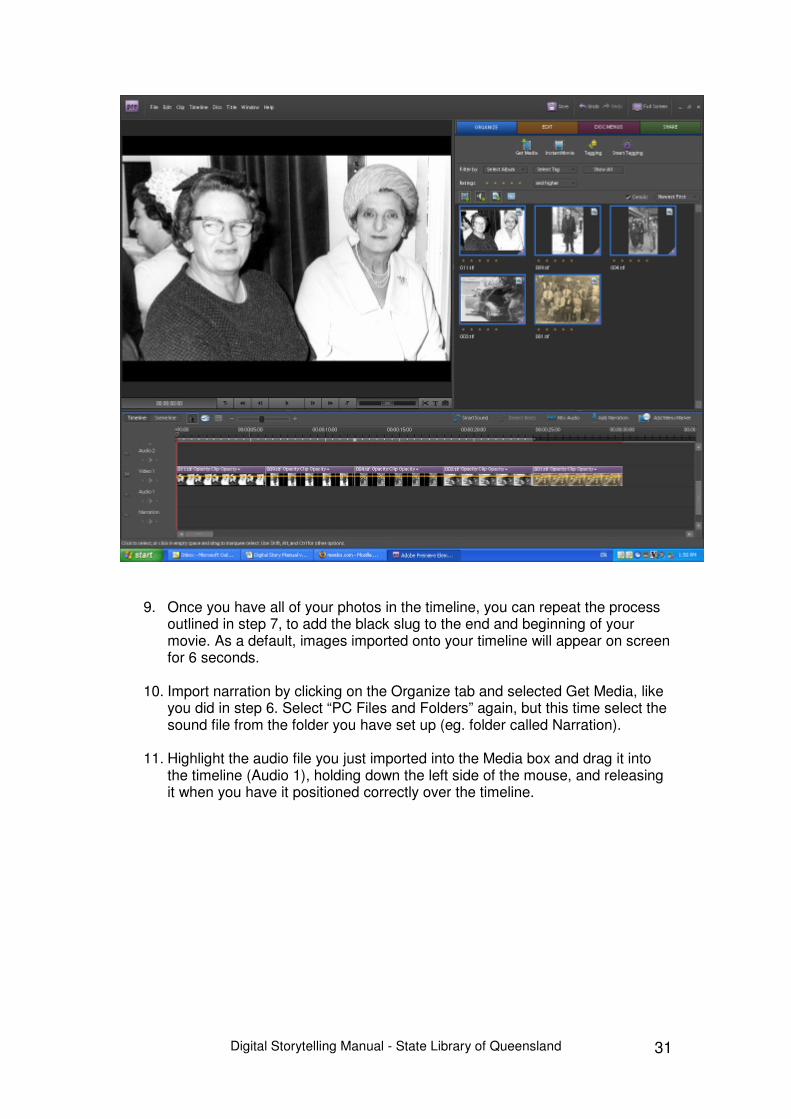
9. Once you have all of your photos in the timeline, you can repeat the process outlined in step 7, to add the black slug to the end and beginning of your movie. As a default, images imported onto your timeline will appear on screen for 6 seconds.
10. Import narration by clicking on the Organize tab and selected Get Media, like
you did in step 6. Select “PC Files and Folders” again, but this time select the sound file from the folder you have set up (eg. folder called Narration).
11. Highlight the audio file you just imported into the Media box and drag it into
the timeline (Audio 1), holding down the left side of the mouse, and releasing it when you have it positioned correctly over the timeline.
Digital Storytelling Manual - State Library of Queensland
32
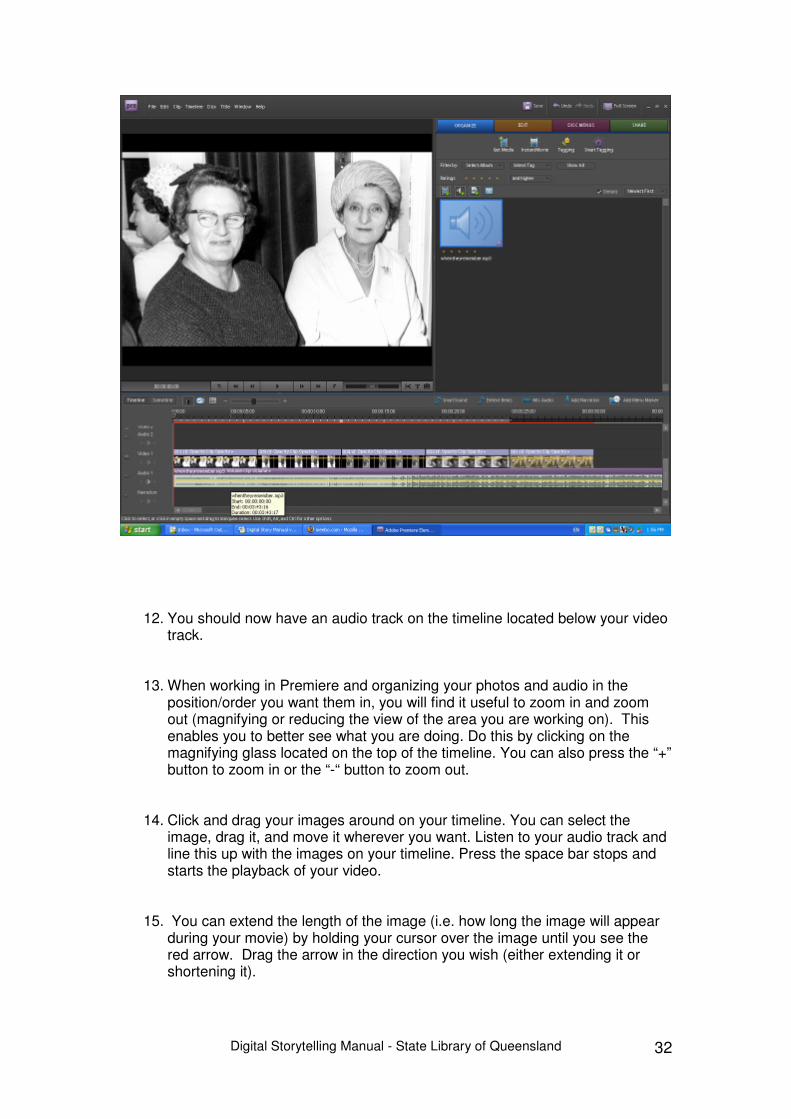
12. You should now have an audio track on the timeline located below your video track.
13. When working in Premiere and organizing your photos and audio in the position/order you want them in, you will find it useful to zoom in and zoom out (magnifying or reducing the view of the area you are working on). This enables you to better see what you are doing. Do this by clicking on the magnifying glass located on the top of the timeline. You can also press the “+” button to zoom in or the “-“ button to zoom out.
14. Click and drag your images around on your timeline. You can select the image, drag it, and move it wherever you want. Listen to your audio track and line this up with the images on your timeline. Press the space bar stops and starts the playback of your video.
15. You can extend the length of the image (i.e. how long the image will appear during your movie) by holding your cursor over the image until you see the red arrow. Drag the arrow in the direction you wish (either extending it or shortening it).
Digital Storytelling Manual - State Library of Queensland
33
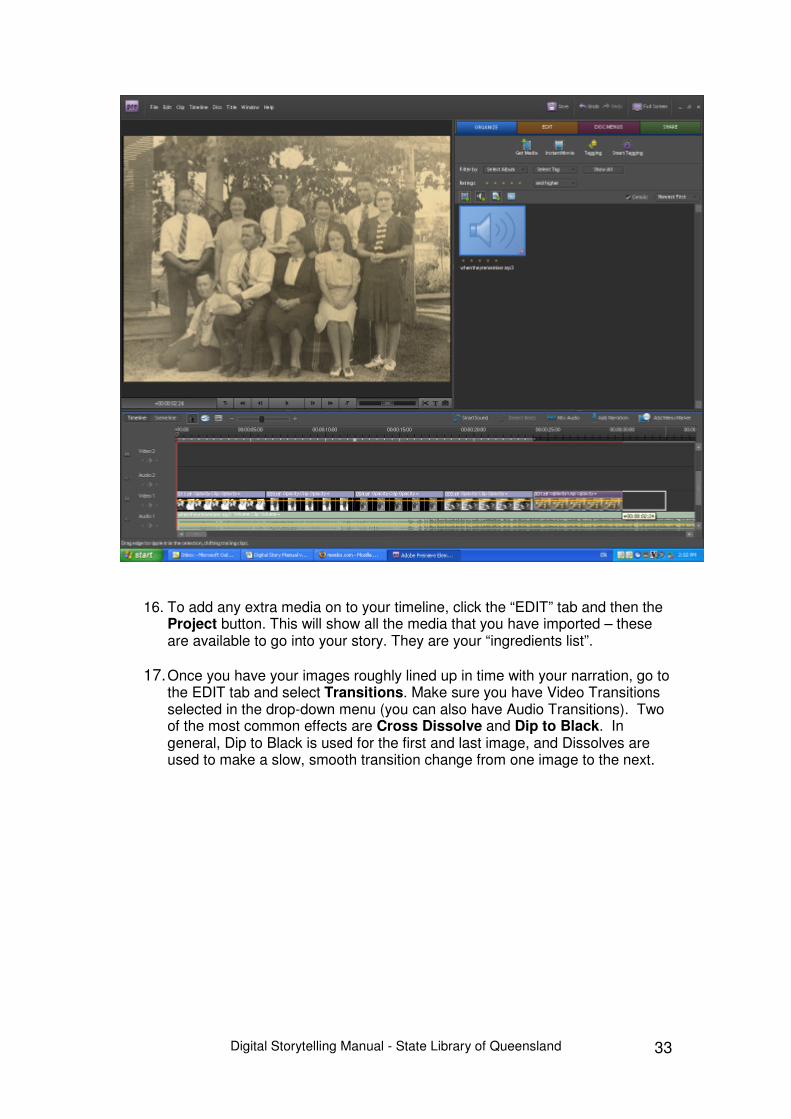
16. To add any extra media on to your timeline, click the “EDIT” tab and then the Project button. This will show all the media that you have imported – these are available to go into your story. They are your “ingredients list”.
17. Once you have your images roughly lined up in time with your narration, go to
the EDIT tab and select Transitions. Make sure you have Video Transitions selected in the drop-down menu (you can also have Audio Transitions). Two of the most common effects are Cross Dissolve and Dip to Black. In general, Dip to Black is used for the first and last image, and Dissolves are used to make a slow, smooth transition change from one image to the next.
Digital Storytelling Manual - State Library of Queensland
34
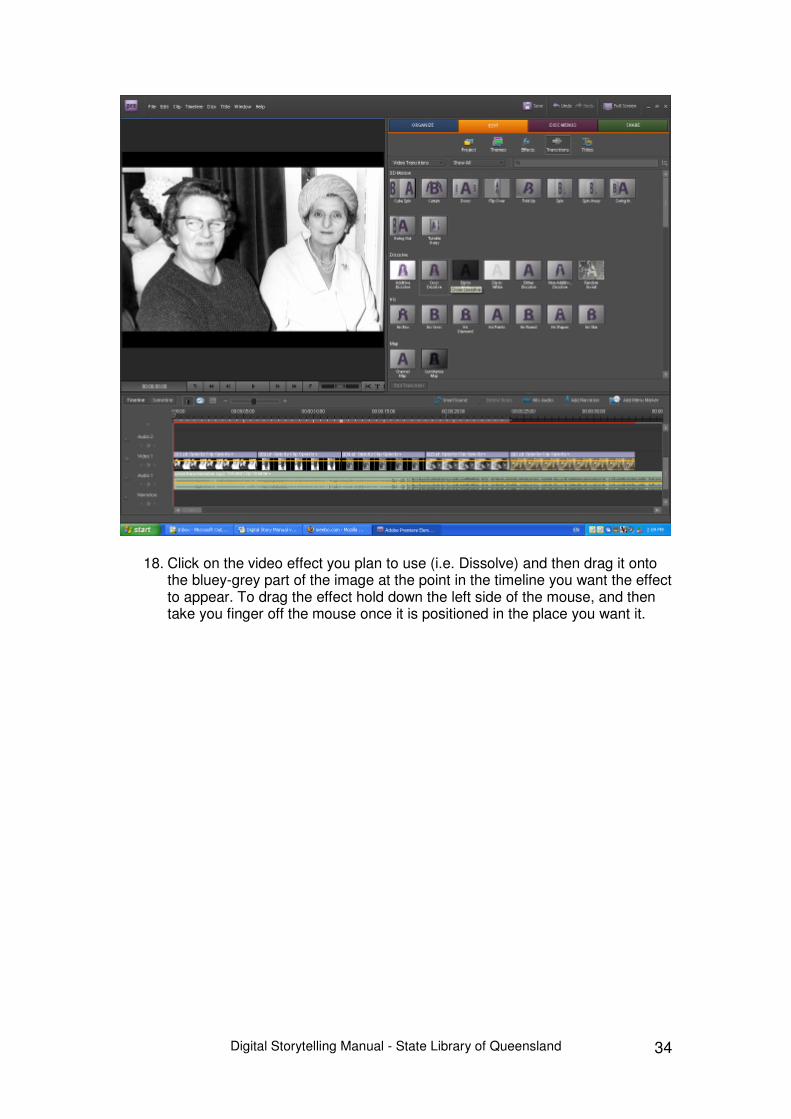
18. Click on the video effect you plan to use (i.e. Dissolve) and then drag it onto the bluey-grey part of the image at the point in the timeline you want the effect to appear. To drag the effect hold down the left side of the mouse, and then take you finger off the mouse once it is positioned in the place you want it.

Digital Storytelling Manual - State Library of Queensland
35
19. These effects can be extended and shortened in the same way as you extended the images (i.e. by positioning your cursor over the effect, and then dragging on the red arrow with your cursor).
20. To add a basic default title to your story go to Title in the top menu bar. Then click New Title then Default Still.
Digital Storytelling Manual - State Library of Queensland
36
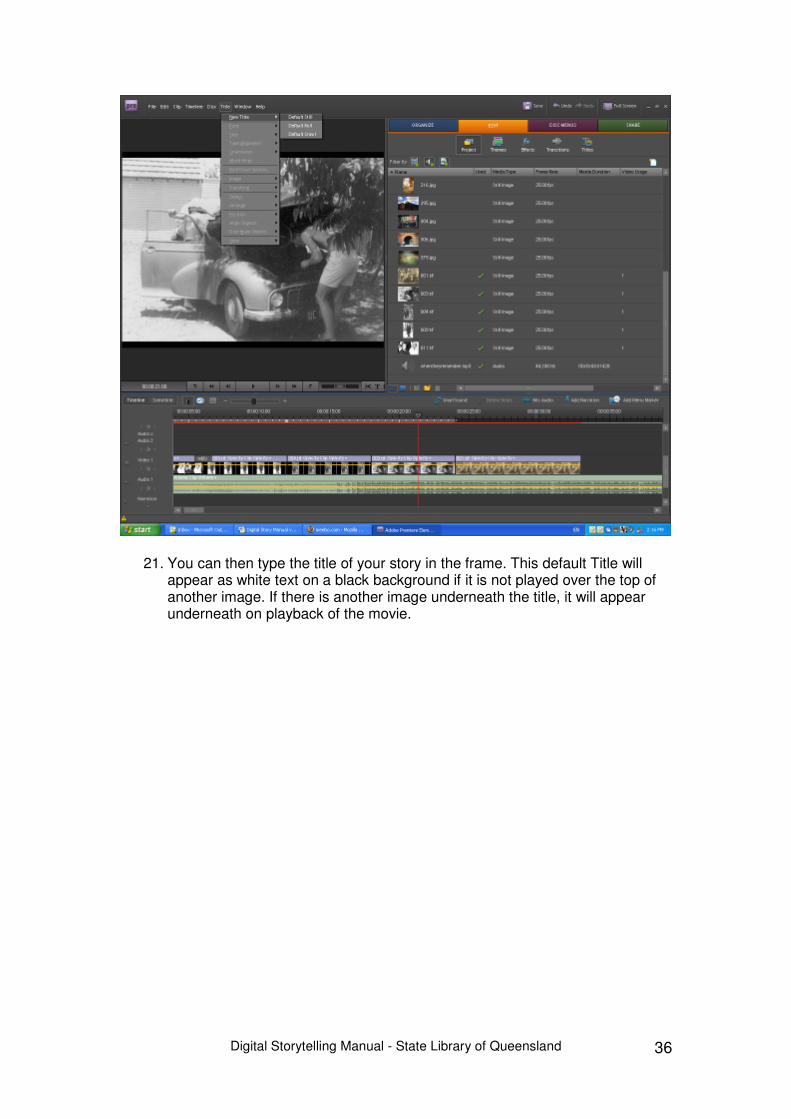
21. You can then type the title of your story in the frame. This default Title will appear as white text on a black background if it is not played over the top of another image. If there is another image underneath the title, it will appear underneath on playback of the movie.
Digital Storytelling Manual - State Library of Queensland
37
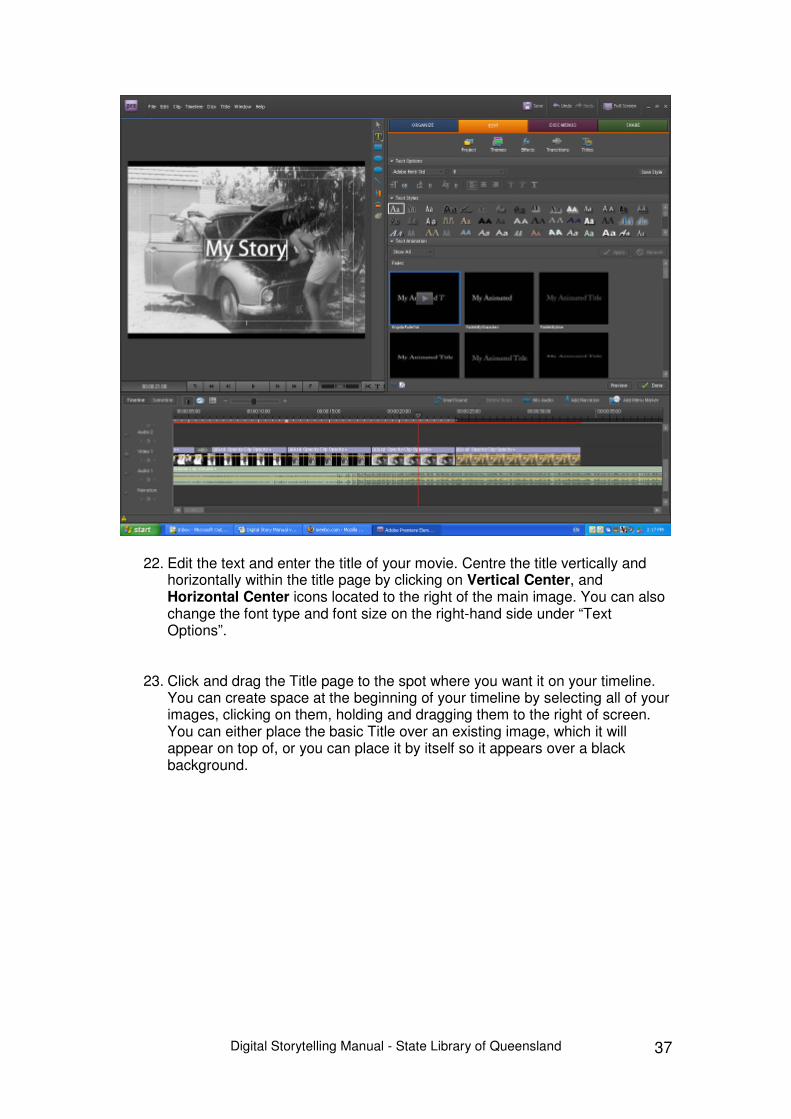
22. Edit the text and enter the title of your movie. Centre the title vertically and horizontally within the title page by clicking on Vertical Center, and Horizontal Center icons located to the right of the main image. You can also change the font type and font size on the right-hand side under “Text Options”.
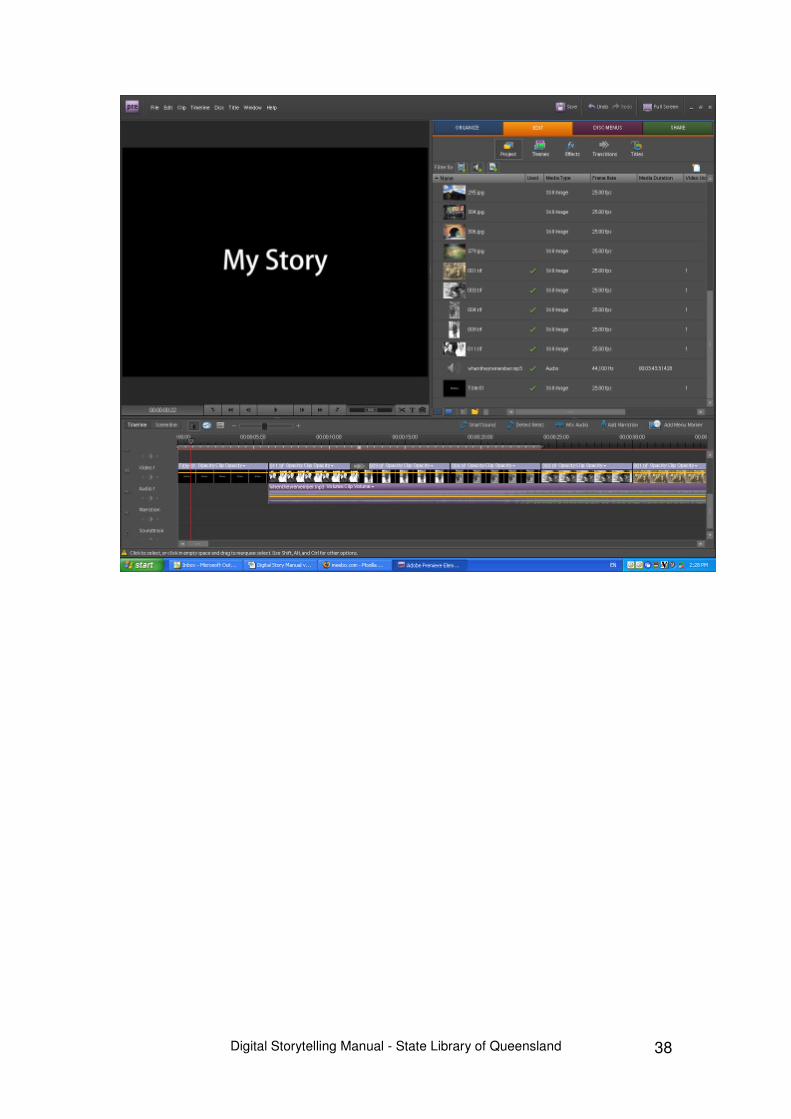
23. Click and drag the Title page to the spot where you want it on your timeline. You can create space at the beginning of your timeline by selecting all of your images, clicking on them, holding and dragging them to the right of screen. You can either place the basic Title over an existing image, which it will appear on top of, or you can place it by itself so it appears over a black background.
Digital Storytelling Manual - State Library of Queensland
38
Digital Storytelling Manual - State Library of Queensland
39
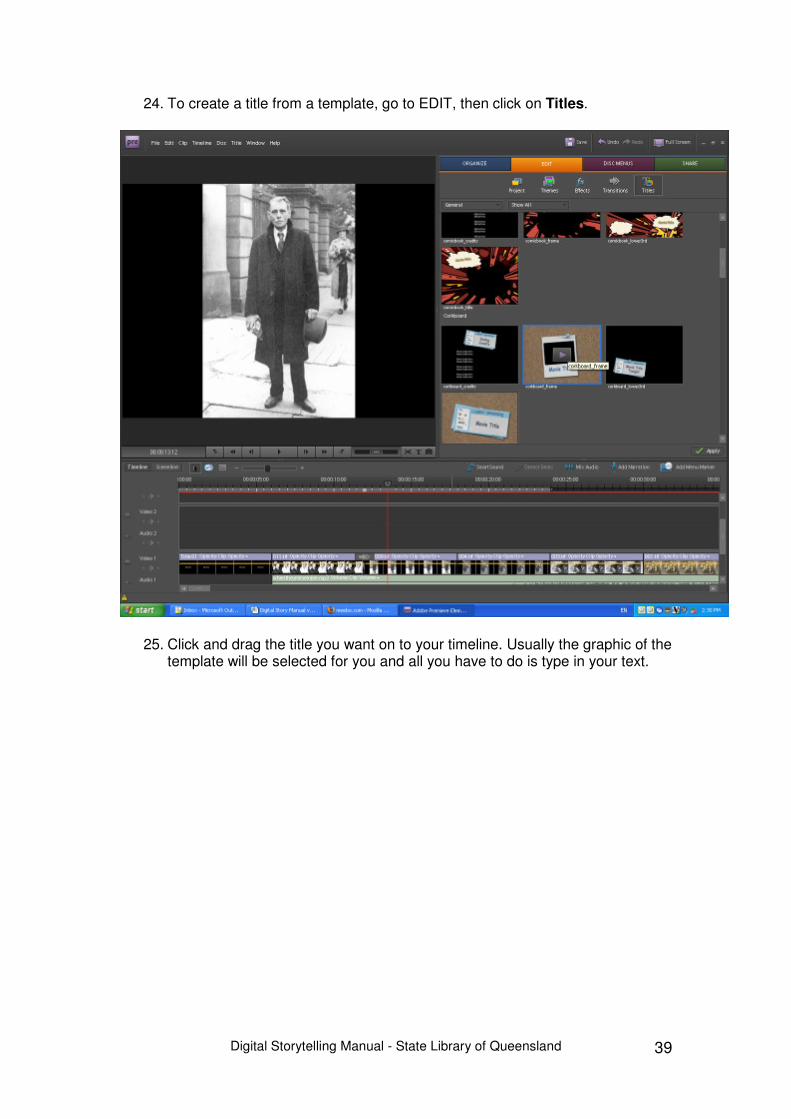
24. To create a title from a template, go to EDIT, then click on Titles.
25. Click and drag the title you want on to your timeline. Usually the graphic of the template will be selected for you and all you have to do is type in your text.
Digital Storytelling Manual - State Library of Queensland
40
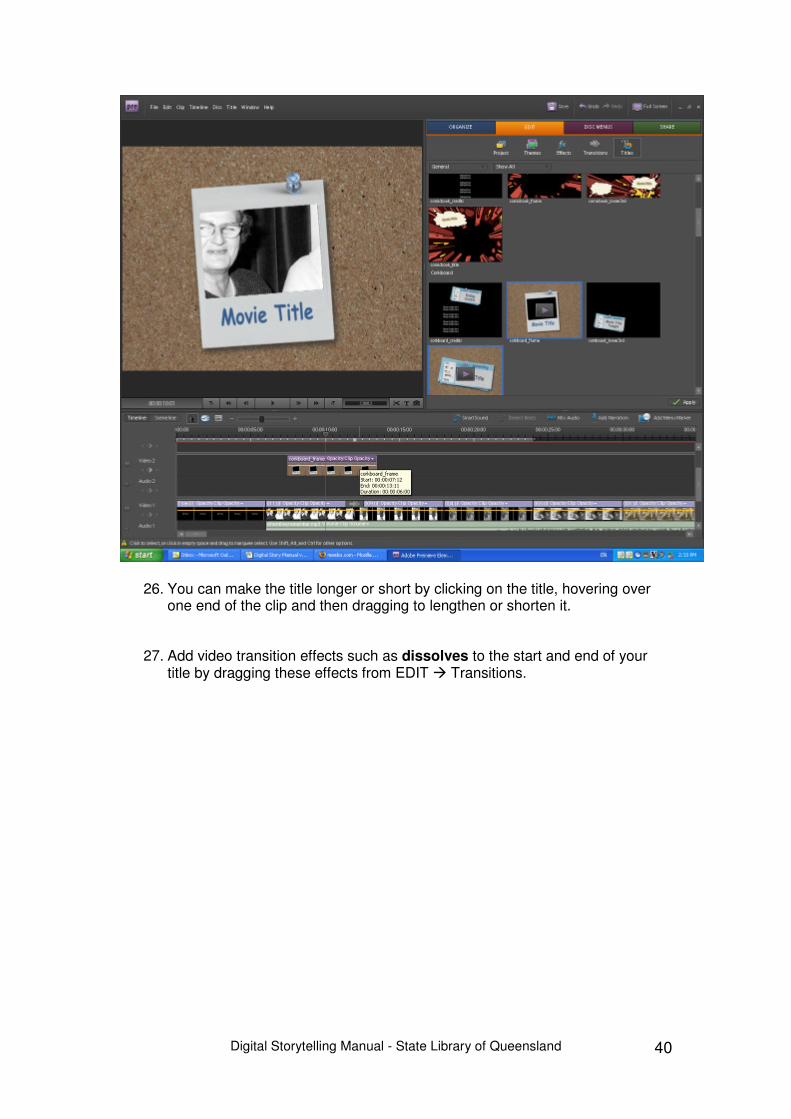
26. You can make the title longer or short by clicking on the title, hovering over one end of the clip and then dragging to lengthen or shorten it.
27. Add video transition effects such as dissolves to the start and end of your title by dragging these effects from EDIT � Transitions.
Digital Storytelling Manual - State Library of Queensland
41
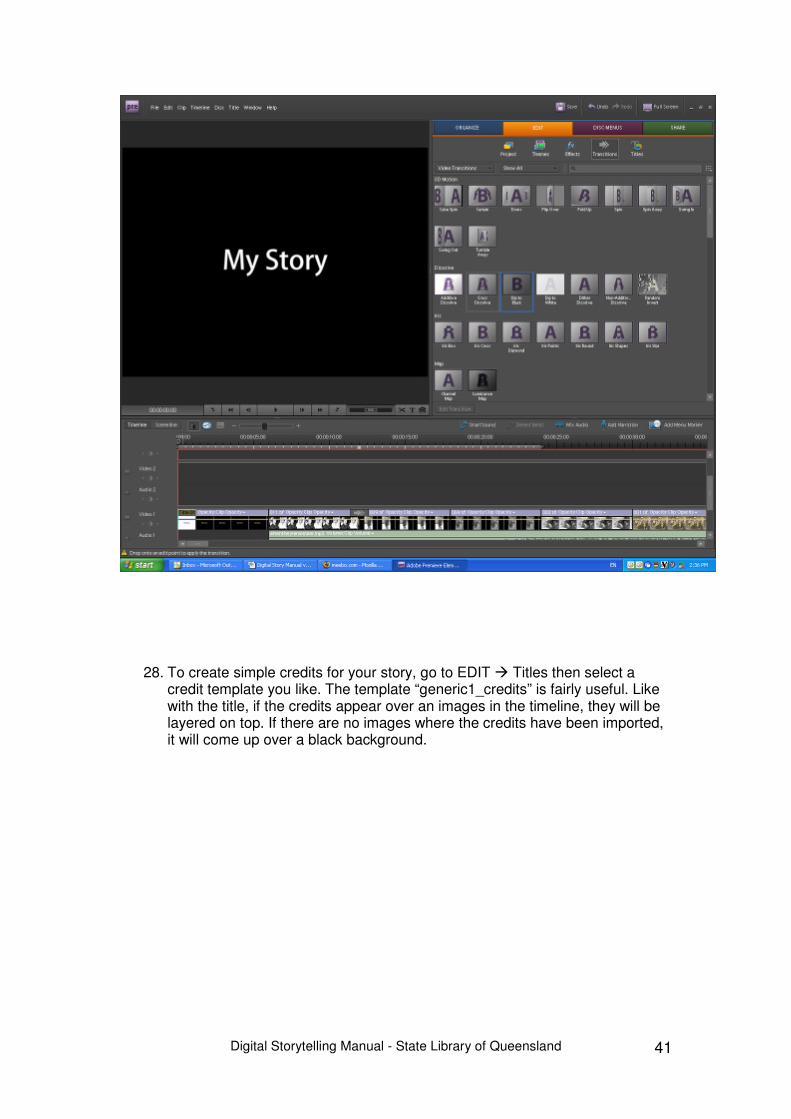
28. To create simple credits for your story, go to EDIT � Titles then select a credit template you like. The template “generic1_credits” is fairly useful. Like with the title, if the credits appear over an images in the timeline, they will be layered on top. If there are no images where the credits have been imported, it will come up over a black background.
Digital Storytelling Manual - State Library of Queensland
42
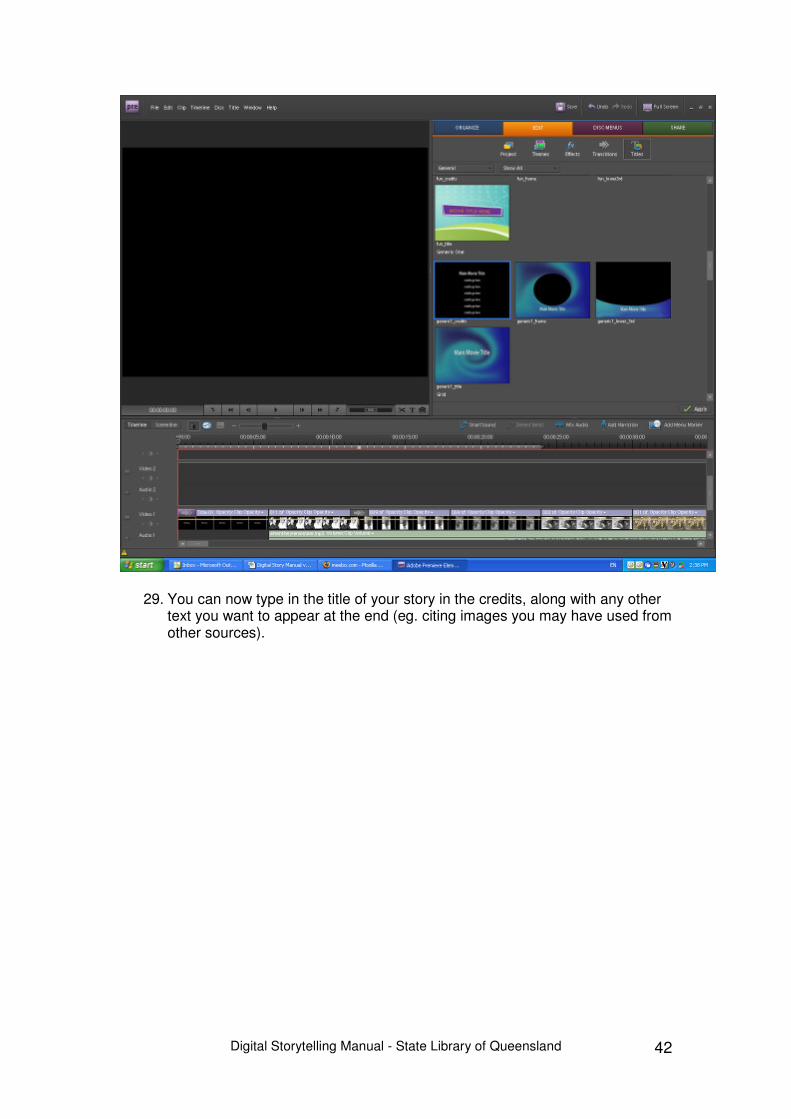
29. You can now type in the title of your story in the credits, along with any other
text you want to appear at the end (eg. citing images you may have used from other sources).
Digital Storytelling Manual - State Library of Queensland
43
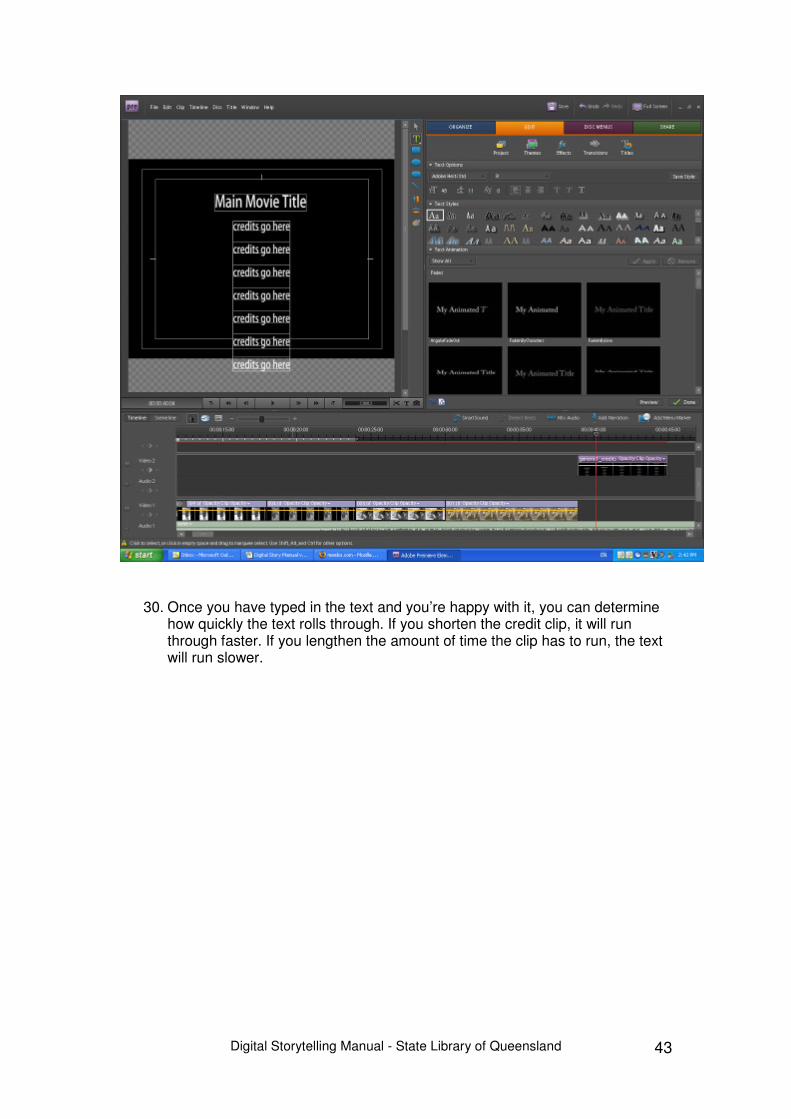
30. Once you have typed in the text and you’re happy with it, you can determine how quickly the text rolls through. If you shorten the credit clip, it will run through faster. If you lengthen the amount of time the clip has to run, the text will run slower.
Digital Storytelling Manual - State Library of Queensland
44
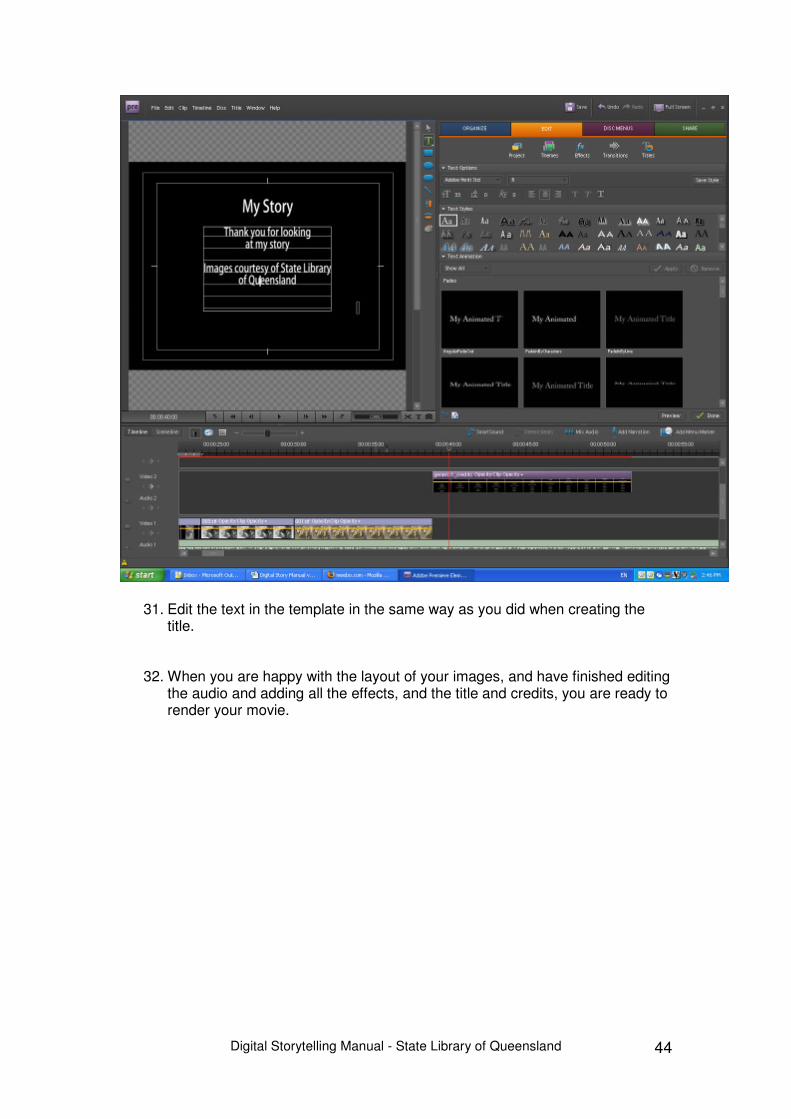
31. Edit the text in the template in the same way as you did when creating the
title.
32. When you are happy with the layout of your images, and have finished editing
the audio and adding all the effects, and the title and credits, you are ready to render your movie.
Digital Storytelling Manual - State Library of Queensland
45
Rendering to AVI (finishing the movie)
The video-editing program will have an option to export as a movie. If given a choice, choose DV-AVI (PAL) uncompressed. What you want to end up with is an AVI file. When the program finishes exporting (which could take 10-15 minutes) the AVI file will probably be about 700-800 MB in size. Watch the AVI using movie viewing software (such as Windows Media Player) and see what you think of it. You will probably notice things you would like to change so it’s back to the project and the timeline to move things around. Remember to save regularly when playing with the timeline. When reviewing the finished AVI file check that the sound is nice and clear. Try checking it with speakers and/or headphones.
Rendering your Adobe Premiere Elements movie
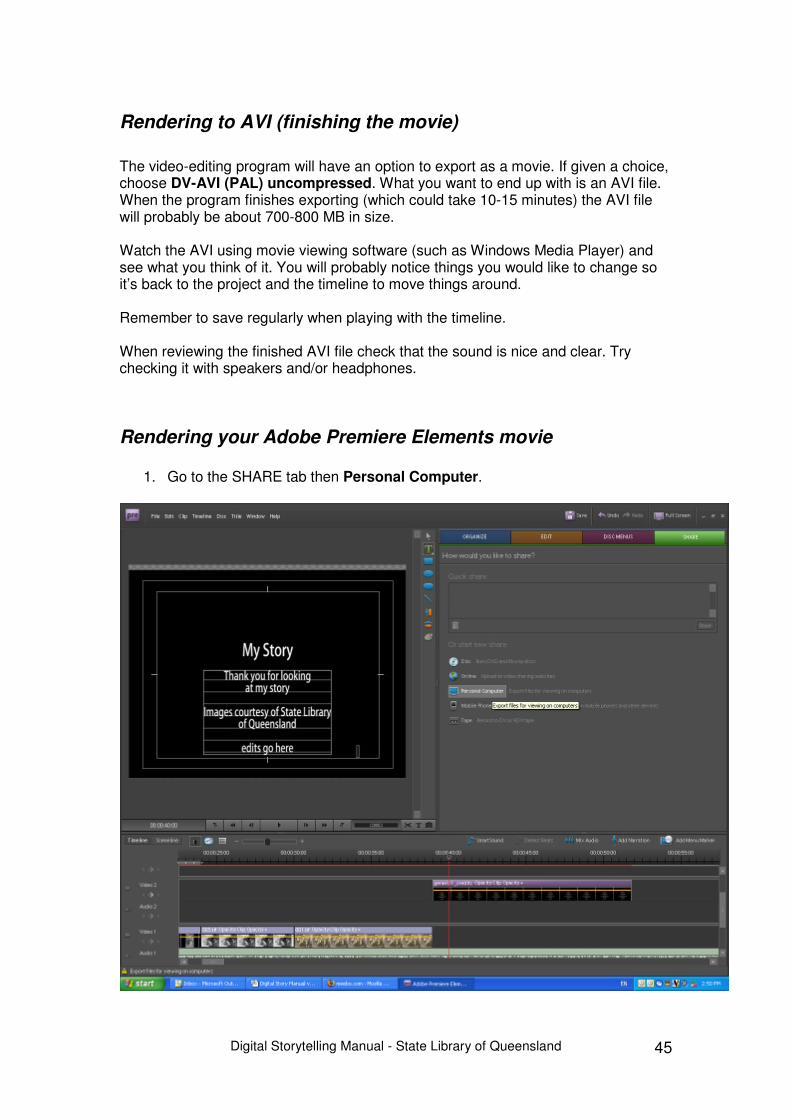
1. Go to the SHARE tab then Personal Computer.
Digital Storytelling Manual - State Library of Queensland
46
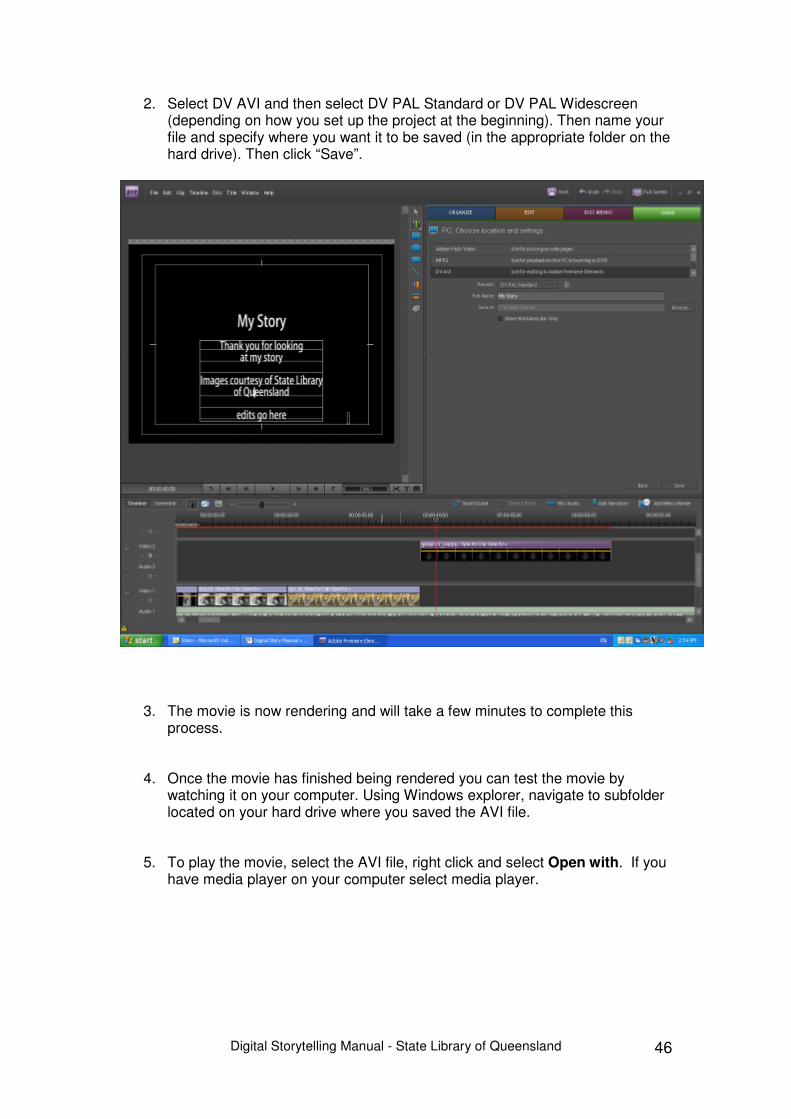
2. Select DV AVI and then select DV PAL Standard or DV PAL Widescreen (depending on how you set up the project at the beginning). Then name your file and specify where you want it to be saved (in the appropriate folder on the hard drive). Then click “Save”.
3. The movie is now rendering and will take a few minutes to complete this process.
4. Once the movie has finished being rendered you can test the movie by watching it on your computer. Using Windows explorer, navigate to subfolder located on your hard drive where you saved the AVI file.
5. To play the movie, select the AVI file, right click and select Open with. If you
have media player on your computer select media player.
Digital Storytelling Manual - State Library of Queensland
47
Finishing up When you are happy with the result then the movie is finished! Almost time to relax and show it off to everyone you know. Firstly though, back up your files. If the size of your main folder is 700mb or less (right-click on the folder and check under properties) you can just save the whole folder to a blank CD with a CD burner. If it is larger than 700mb you will have to use a blank DVD and a DVD burner. If you have an external hard drive or USB stick, you can copy the whole folder to it. The finished AVI file can also be saved onto a DVD and played on a normal DVD player with a TV If it is going to be put on the Internet, a copy of the AVI file will need to be supplied to someone who will alter it into an Internet video.
Requirements for the State Library of Queensland’s collection A copy of the script will need to be supplied to the State Library of Queensland, along with a copy of one of the images from the story and the final AVI.
1. For State Library’s purposes, each participant needs to provide: • Video file (DV.avi format)(.avi)
- embedded audio narration; - PC compatible; - approximate run time of 2-4 minutes (including titles and credits); - PAL standard; - either 4:3 or 16:9 screen ratio.
● A representative still image from your story – 400ppi tiff, 4,000 pixels along the widest dimension. If this is not possible please supply the highest resolution that is available as tiff format. (.tif)
● A filled in copy of the “About my story” form (.xls) that helps us to describe your story and position it on the Queensland Stories website.
• An electronic copy of your story transcript (.txt) or (.doc) format • A completed Deed of Gift form signed by the creator.
Digital Storytelling Manual - State Library of Queensland
48
Glossary (Jargon Buster)
Pixels The screen of your computer and TV, as well as your digital
photos, are made up of hundreds of thousands of tiny pixels. Together they form the digital images that you see.
Megabyte (MB) About a million little bits of computer information. You can fit; 700 MB on a CD 4500 MB on a DVD Gigabyte (GB) One gigabyte roughly equals a thousand megabytes. Hard
discs are usually measured in GBs these days. JPEG An image format which has been compressed (i.e., had some
detail removed), so that it is smaller. They are good for digital stories because they take up less storage space. Most digital cameras take JPEGs by default.
TIFF An uncompressed image format (unlike JPEGs). These files
take up more space but are used for archival purposes because they retain the original integrity of the file.
MP3 A sound file which has been compressed so that it takes up
less storage space. AVI A video file format which hasn’t been compressed. They are
good for use in digital stories, particularly storing the master version.
Photo Editing A program for editing digital still images such as photographs Program scanned material (eg. Adobe Photoshop or Photoshop
Elements) Video Editing A program for joining together still images, video and sound Program on a timeline, then rendering a movie file (eg. Adobe Premiere
Elements or Windows Movie Maker) Audio Program A program (like Audacity) which lets you record sound straight
to a computer if it has a microphone socket. USB Stands for Universal Serial Bus - a standard connection you
can use to connect all sorts of things to a computer through,, eg. digital cameras and sound recorders.


