44
Digital Telephone System Attendant’s Supplement COMDWL ’ Made rigb in the USA

Digital Telephone System
Attendant’s Supplement
COMDWL ’ Made rigb in the USA

This user guide is applicable for the following system and telephone models:
System Models: CO408, C0816, and Cl632 (with software release 10 [SW 101 or later)
Telephone Model: 77OOS-+* Rev. I and later 77143~++ Rev. I and later 7714X-++ Rev. I and later

Table Of Contents LCD Display Abbreviations ......................... iV
Using This Supplement .............................. 1 Programming The Attendant Features ................ .2
Creating The LCD Response Messages .............. .2 Direct Inward Station Dialing ...................... .6 Naming The System Telephones .................... .7 SettingTheMusicOnHoldFeature ................ .lO Setting The Night Transfer Of Ringing Mode ........ .12 Setting The System Clock ........................ .14 Station Message Detail Accounting (SMDA) Printout .. .15 Storing The System Speed Dial Numbers ........... .16 System Alarm Reporting ......................... .20 Transferring Calls To The Voice Mail System ........ .22 Transferring Recalls To A Secondary
AttendantTelephone........................... 4 Understanding The LCD Displays ................... .25 Glossary Of Terms ................................. 33 Index ............................................ 36
. . . 111
LW visplay Abbreviations
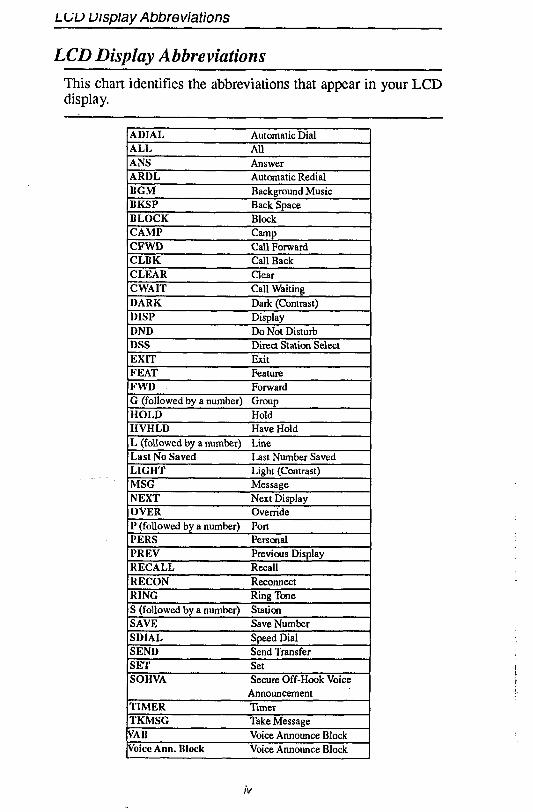
LCD Display Abbreviations This cha display.
ll
-
I identifies the abbreviations that appear in your LCD
ADIAL Automatic Dial 1
ALL All ANS Answer ARDL Automatic Redial BGM Background Music BKSP Back Space BLOCK Block CAMP Camp CFWD Call Forward CLBK Call Back CLEAR clear
DSS EXIT FEAT
Direct Station Select Exit Feature
FWD Forward G (followed by a number) Group HOLD Hold
. . MSG Message NEXT Next Display OVER Override P (followed by a number) Port PERS Personal PREV Previous Display RECALL Recall RECON Reconnect RING Ring Tone S (followed by a number) Staticn SAVE Save Number SDIAL Speed Dial SEND Send Transfer SET SOHVA
TIMER TKMSG VAB Voice Ann. Block
Set Secure Off-Hook Voice
Announcement Timer Take Message Voice Announce Block Voice Announce Block
iV

Using This Supplement
To help you use your attendant’s telephone to its fullest capacity, this supplement to the-DigiTech system user’s guide describes the attendant’s telephone and tells you how to use it. You can program special features on your telephone that are unique to attendant station operation. The instructions for programming these fea- tures are included in the section titled
l Programming The Attendant Features For your convenience, a display summary, a glossary of terms and an index are included in the back of this supplement. The operation sections of the accompanying user’s guide define often- used features and provide instructions for their use. Please refer to the following sections of the user’s guide (publication GCA 70-220 or GCA 70-221, provided separately) for more information about your telephone’s basic functions:
l
b
0
.
b
.
.
.
l
0
.
l
b
Knowing Your Telephone Understanding What The Lights Mean Using Your Telephone To Answer Calls Using Your Telephone To Make Calls Using Your Telephone To Place Calls On Hold Using Your Telephone To Transfer Calls Using Your Telephone For Conference Calls Using The Other Telephone Features Sending And Receiving Non-Verbal Messages Using The Auxiliary Jack Programming Your Telephone Using Your Quick Reference Guide Troubleshooting Your Telephone

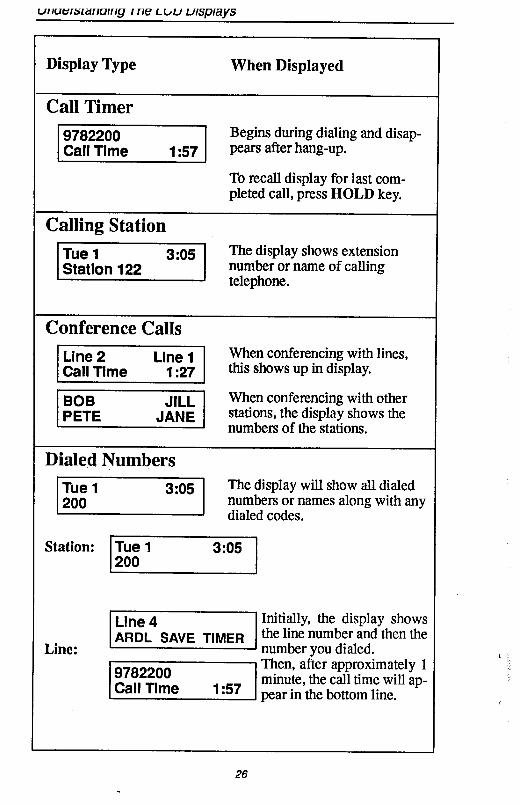
Creating The LCD Response Messages When you are busy or are away from your desk, you can set a message at your telephone that will be received by any LCD speakerphone within your system. Your system provides two default messages: “Back at . . .‘I and “Call . . .” In addition, you can add eight customized messages, or you can create up to ten messages if you choose not to use the two default messages.
Note: If you intend to create a response message to a voice announce, remember that this is also a message, and that it uses one of
your message locations.
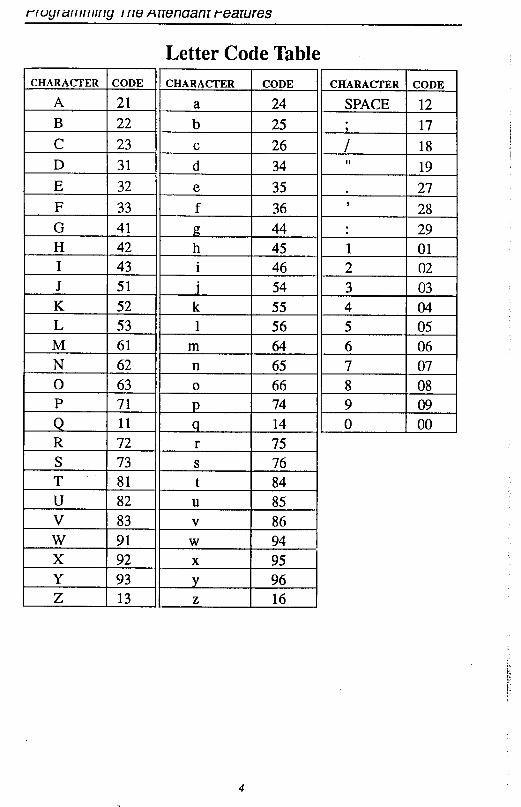
To store the LCD messages, proceed as follows: write your messages on the chart on page 5 (each message can have up to 16 characters), use the letter code table (on page 4) to assign a number to each let- ter, write these numbers on the chart line beside the message letters, press ITCM, dial+##O 5, dial a message location number (l-O), dial # to clear current message, compose your messages by dialing the two-digit codes that relate to the letters, dial +# to save message, dial next location number, #to clear it, two-digit codes for the message, and +# to save, repeat previous step until all messages are stored, press SPKR to end.
Example: Create a message that will read as “TAKE MESSAGE” and program it into message location number 3.
- press ITCM, dial + # 0 5, - dial 3 #, - dial +1,11,22,22 12 61, 32,73, 73;21,41 32
space M E S S A G’E - dial #, and press SPKR to end.
2

rrvgrarrrrnmg I rie fmzrmmr rearures
When you are finished creating and programming messages, fill in the list on page 5 of this guide. Make a list of the stored messages and their location numbers, and give each station user a copy.
00 00 00 00 00 0
00 0
@---pg @@@
0 0 0 0 0 0 000000 I Y 000000 000000 Im muI
,SPKR Button
Antercom Light
-ITCM Button
Continued on the following page .
3
rrvyrarrmmy I ne menaanl tearures
Letter Code Table
4

LCD Message List
5

rrvyra 111,111, ,y IIICirl~1GIIUCIIII rGcJ,“IGa
Direct Inward Station Dialing The direct inward station dialing (DISD) feature allows an external party to call an intercom station directly without assistance from the at- tendant if the call is made over a line programmed for that purpose. As the system attendant, you may instruct callers to make DISD calls when necessary.
For example, if a caller regularly dials a number that rings at the attendant’s station for service, you may give the caller the DISD line number and the extension number associated with the station he is trying to reach. Future calls from the caller to a specific party will not have to be serviced at the attendant’s station, although a ring-no answer or busy condition at the called party’s station will result in the system’s handling the call in another manner (described below).
When a caller makes a DISD call from an outside line, he or she will in- itially hear ringing. The system will answer the call with a DISD con- tinuous dial tone; the caller can then dial an extension number. - If called station is idle, a tone is sounded and called station rings. - If the call is answered by another station user, the caller can ask for
transfer to desired station. - If ringing stops and dial tone sounds again, the caller can dial another
extension number. - If called station has callforward feature set, forward station rings. - If calied’station is busy, call is placed on hold and camped-on at busy
station. If camp-on is not answered within a transfer recall timeout period, busy tone is given, followed by a DISD dial tone. Note: The system will return the caller to DISD dial tone two additional times
and then drop the line.
- If called station is busy but ispartof a huntgroup, DISD call is routed to idle station in hunt group, if available; otherwise, the call is camped- on at dialed station. Hunt group is not followed when caller hears ringing but receives no answer.
- If an invalid extension number is dialed, an error tone is sounded before DISD dial tone is returned (caller can redial). If mistake in dialing is made, caller can dial +K for new DISD dial tone. Note: The system will return the caller to DISD dial tonetwo additional times
and then drop the line.
- If extension number dialing is not completed within the programmed dial time limit, call is routed to DISD assist station if available; otherwise, the line is dropped.
6

Naming The System Telephones If you have an LCD speakerphone, this feature lets you know who is calling you. You can assign either a personal name or a group name to each system telephone. This name can be up to seven letters in length and will show up in the user’s display and/or in the called party’s dis- play. Typical names could be SRVC, MKTG 1, K SMITH.
Name the system telephones as follows: l use letter code table (page 8) to compose names for all telephones
requiring them (up to seven letters per name is allowed), l press ITCM, l dial%#OO, l dial the station number of the telephone to be named (lo-57), l dial # to clear current entry, l dial two-digit codes that correspond to letters in name, l dial +l+ to continue entering station names (repeat above steps
beginning with station selection lo-57), l press SPKR to end, l record names on page 9.
7

I E 132 1
H 1 42
L 53 M 61 N 62 0 63 P 71 Q 11 R 72 S 73
Letter Code Table
8

Station Names (Record telephone names here. Copy this sheet if you need more record space.)
9

rrvyrdrrrrrrrrry I IICZ rl,LlG,I”clll‘ rGa‘“,Ga
Setting The Music On Hold Feature Music that is provided to outside lines while those lines are on hold can be enabled and disabled through the attendant’s station:
TC 3 set the music on hold feature, l press ITCM,
l dial+%#OO, l press A 1 (top, left-hand programmable button) to alternate the
feature on and off, q
l dial 1 to enable, l dial 2 to disable,
Note: Associated light will turn on when music on hold is provided and turn off when the feature is disabled,
l press SPKR to end.
10

rrvyrarrrrr~~r~y I IIG ~~uziiucuit rci’diuiea
000000 0-o--r I 1 000000 0000-0~ tm IlO
-Al
/ * c # 1-O
- SPKR Button
/ ITCM Button
11

rrogrammlng I ne Hrrenaanr Pearures
Setting The Night Transfer Of Ringing Mode The day (or normal) ringing assignments of incoming lines can be trans- ferred to a particular station or stations for off-hour or special purpose answering (such line/station ringing assignments are made through class of service programming). Additionally, stations can be arranged through class of service programming to answer any ringing outside line. The ability to answer a line from any station is also enabled through the night transfer of ringing mode.
To set the night transfer mode, l press ITCM, l dial+#OO, l press Al (top, left-hand programmable button) to alternate the fea-
ture between on and off, q
l dial 1 to enable, l dial 2 to disable,
Note: Associated light will turn on when night tran&er is active and will turn off when the feature is disabled.
l press SPKR to end.
Because Night Transfer is a commonly used feature, you may wish to program a button to serve as the Night Transfer button. To do this,
l press ITCM,
l dialS+l, l press one of the programmable buttons, l press ITCM, l dial+k#OO, l press SPKR to end.
To set the Night Transfer Of Ringing mode, simply press the Night Transfer button you’ve programmed. To return ringing to the attendant’s station, press the Night Transfer button again.
12

.. :
I / / mcmcn
00 00 00 00 00 00 00
-Al
* 4 # 1-o
- SPKR Button
/ ITCM Button
j ._ : : :
73

Setting The System Clock The system clock can be programmed to maintain current date and time information. This information is provided to the LCD speakerphone for display.
To set the system clock from the attendant’s station, l press ITCM, l dial*#Ol, l dial two digits (00-99) for year, l dial two digits (01-12) for month, l dial two digits (01-31) for day, l dial two digits (00-23) for hour, l dial two digits (00-59) for minutes, l press SPKR to end.
r *
14

Station Message Detail Accounting (SMDA) Printout If your system is connected to a printer, you can command the system to print several different types of reports and to delete all stored SMDA records.
To print an SMDA report, ; : j..’ .:
l press ITCM, l dial*#OO, l choose report to be printed:
- dial 1 # for station report - dial 2 # for line report - dial 3 # for SMDA department report - dial 4 # for account code report - dial 5 # for automatic reports - dial 6 #to print all records. - dial 7 #to delete SMDA records - dial 0 # for Departmental Call Distribution (DCD) report - dial 8 to obtain the number of free records remaining in the
system (appears in LCD display) - dial 9 to abort printing
l press SPKR to end.

Storing The System Speed Dial Numbers You can store up to 99 system speed dial numbers at your attendant telephone that every system user can access from his or her telephone. Typically, these are numbers that are frequently called by many dif- ferent users and emergency numbers that you want readily available to everyone. Distribute a list of these stored numbers to the system users for their reference.
To program system speed dial numbers from the attendant’s station, l press ITCM,
l dial%# 02. l dial 01 - 99 to choose storage location, l dial # to clear current entry, a choose line that is to be used:
- dial 90 for no line assignment (system will choose last line used at calling station or prime line if one is assigned to calling station), q
- press buttons Al - Al4 for lines 1-14 or dial 01 - 14, q
- press buttons Bl, B2 for lines 15, 16 or dial 15,16, q
- -,,s;FOLD then press buttons Al - A8 for lines 17 - 24 or dial - 9
q - dial 91- 94 for line groups 1 - 4,
q - press ITCM for intercom line,
l dial the number to be stored (32 digits maximum), - press HOLD to store pause (if required), - press TAP to store flash (if required),
l press TRANS/CONF to save number, l repeat above steps (beginning with choice of storage location) to
store next number, l press SPKR to end.
76

B2-
Bl-
HOLD - Bull-ON
‘c \,L
Il\O\O 0 0 0 0
L I ~000000,
000000’ \ lm ml,
AW41’
-Al-A14
-TAP : Button
/ * E # 1-O
- SPKR Button
/ ITCM Button
17

Programming The Attendant Features
System Speed Dial Numbers
(Record system speed dial here. Copy this sheet if you need more record space.)
18