33


Text University of Bolton.
The screen shots used in this workbook are from copyrighted licensed works and the copyright for them is most likely owned by the publishers of the content. It is believed that the use of a limited number of web-resolution screenshots for training purposes qualifies under educational purposes to: “display, download and print parts of the Licensed Work for the purpose of promotion of the Licensed Work, testing the Licensed Work, or for training Authorised users”. Any other uses of these screenshots may be copyright infringement.

© University of Bolton 2008 1
Your guide to PowerPoint 2007
About this workbook
This workbook is designed to introduce you to PowerPoint 2007, a package that helps you create slides for presentation. The workbook will show you how to produce slides incorporating various objects like pictures and charts and how to package your presentation to give it a professional look. Each section has exercises which help you practise the tasks you are learning. Work through these pages at your own speed and repeat the exercises as necessary. Happy Presenting!
© University of Bolton 2008 2
Contents
What is PowerPoint 2007? ............................................................................... 3
Getting Started – how to log on ........................................................................ 3
Getting into PowerPoint 2007 .......................................................................... 3
The PowerPoint 2007 Screen .......................................................................... 4
Microsoft Office Button ..................................................................................... 5
Quick Access Toolbar ...................................................................................... 6
The Ribbon ...................................................................................................... 7
How do I start a new presentation? .................................................................. 9
How do I save my presentation? .................................................................... 10
How do I change the text on a slide? ............................................................. 11
How do I put bullet points on a slide? ............................................................ 13
How do I put an image on a slide? ................................................................. 15
How do I put a Chart on a slide? .................................................................... 17
How do I get my data into the chart? ............................................................. 19
How do I make changes to the chart? ............................................................ 20
How do I change the background of slides? .................................................. 21
How do I view my slides? ............................................................................... 22
How do I sort my slides? ................................................................................ 22
How do I sort my slides? ................................................................................ 23
How do I delete a slide? ................................................................................. 24
How do I apply transitions to my slides? ........................................................ 25
How do I animate objects on a slide? ............................................................ 26
How do I view my presentation ...................................................................... 28
How do I produce audience handouts? .......................................................... 28
How do I print slides on acetates? ................................................................. 29
How do I create presentation notes? ............................................................. 29
And Finally… .................................................................................................. 31

© University of Bolton 2008 3
What is PowerPoint 2007?
PowerPoint is part of the Microsoft Office 2007 suite. It is a presentation package which enables you to produce slides, incorporating bullet points, pictures, charts and even movie clips, quickly and easily. It can also produce audience handouts and notes to assist with your presentation. All of this gives a professional look to your presentation.
Getting Started – how to log on You can access PowerPoint 2007 from any of the computers in the library. You will need your username and password to log on to the network. To find your username your student ID card should be placed on the card reader at the Information Desk. Your password will be based on your date of birth and six randomly generated digits, but you can change this to something you’ll be able to remember more easily.
Exercise 1
Top Tip See the Introduction to IT workbook for information on how to change your password.
Getting into PowerPoint 2007
Exercise 2
1. Press Control, Alt and Delete simultaneously to log on. A
Windows Dialogue Box will appear.
2. Enter your username in the first space (in lower case letters).
3. Press tab or click in the password box (left hand click).
4. Type in your password.
5. Press return .
1. Click on the Start button in the bottom left hand corner of the
screen.
2. Move the arrow up to All Programs.
3. Next move across to Microsoft Office.
4. Finally move across to Microsoft Office PowerPoint 2007 and
click.

© University of Bolton 2008 4
The sequence to follow is demonstrated below.
The PowerPoint 2007 Screen
Once PowerPoint 2007 loads, it looks like the picture below.
Office Button
Title Slide
The Ribbon
Notes Pane
Title Bar
Status Bar Zoom Slider
Slides View
Click here to close
then here Click here first
Find Microsoft Office Move across and click here

© University of Bolton 2008 5
Microsoft Office Button
In the upper left corner of Microsoft Office 2007 applications Word, Excel, PowerPoint, Access and Outlook you will find the Office Button. It looks like
this a round button with the Microsoft Office logo on it. The Office Button has replaced the File menu found in earlier versions of the Office suite but it retains much the same functionality. Let’s take a look at what you can do when you click the Office Button. Clicking the button brings up a new window containing all the commands currently available to you. These include creating new documents, opening existing documents, saving documents, printing, options and a button to close the application.
(NOTE: This example is taken from Word 2007 but the same sets of commands are common across the MS Office 2007 suite of applications)
Office Button
Click here to exit
the application Click here to set options that control how the application
works for you
List of available
commands
Some commands offer a list of further options for
you to choose from.

© University of Bolton 2008 6
Quick Access Toolbar
Directly to the right of the Office Button you will find the Quick Access Toolbar and as its name implies contains shortcuts to some frequently used functions.
The default shortcuts include a save button and undo / redo commands. You can customise the Quick Access Toolbar by clicking the small arrow at end of the toolbar to include any other commands you may find useful.
Top Tip
You can also use the following keyboard shortcuts to perform the same basic commands found within the Office Button and on the Quick Access Toolbar: Save the current document CTRL+S
Save As F12
Open a saved document CTRL+O
Print the current document CTRL+P
Create a new document CTRL+N
Undo CTRL+Z
Redo CTRL+Y
Quick Access Toolbar
Click here to customise the Quick Access Toolbar. The items with a tick next to them are the ones
currently displayed on the toolbar

© University of Bolton 2008 7
The Ribbon
The Ribbon is a key part of the new user interface found in all Microsoft Office 2007 applications. The Ribbon has replaced the toolbars, menus and task panes that you were familiar with in previous versions of PowerPoint. It is a strip of buttons that run along the top all Microsoft Office applications and is designed to allow you direct access to all the commands the program has to offer. This means you no longer need to hunt through lots of menus to find the command you want! Let’s take look at how the ribbon is organised:
The Ribbon is organised into a series of tabs that group together related commands into task groups. For example, the Home tab contains text formatting commands along with clipboard functions that let you copy and paste text and other objects within PowerPoint 2007. The Ribbon is a contextual menu. This means it will change its appearance to display all the commands that are relevant to the task you are currently performing. In the example below a table has been inserted into a PowerPoint slide. Notice how the Ribbon now displays all the commands that you would need to format a table.
If you feel more comfortable using the more traditional dialogue boxes found in the previous versions of Microsoft Office you can still access them by clicking on the small arrow icon in the bottom right of most task groups. This opens up a more traditional style of dialogue box. For example, if you click the icon on the Font task group the Font dialogue box will open.
Tabs
Task Groups
MS Office PowerPoint 2007
Help

© University of Bolton 2008 8
Since not all commands are directly available on the Ribbon, these dialogue boxes remain a useful way to access more advanced commands.
Clicking here reveals a more
traditional style dialogue box
© University of Bolton 2008 9
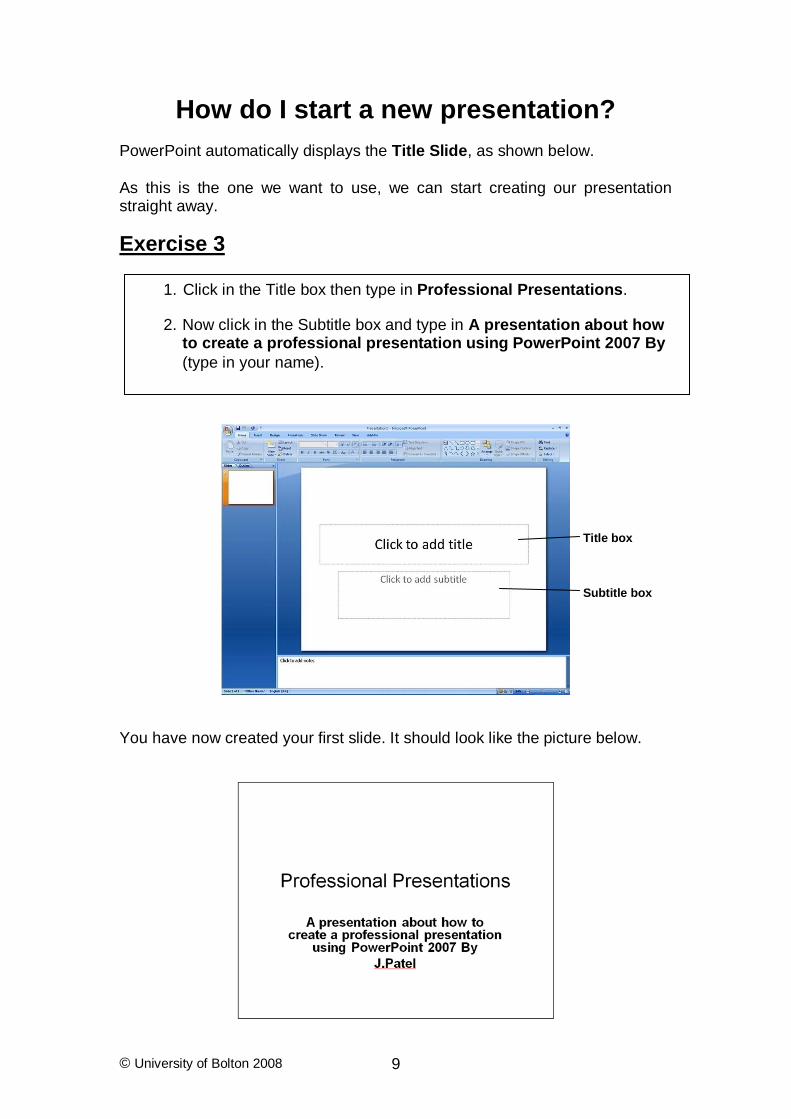
How do I start a new presentation?
PowerPoint automatically displays the Title Slide, as shown below. As this is the one we want to use, we can start creating our presentation straight away.
Exercise 3
You have now created your first slide. It should look like the picture below.
1. Click in the Title box then type in Professional Presentations.
2. Now click in the Subtitle box and type in A presentation about how to create a professional presentation using PowerPoint 2007 By
(type in your name).
Title box Subtitle box
© University of Bolton 2008 10
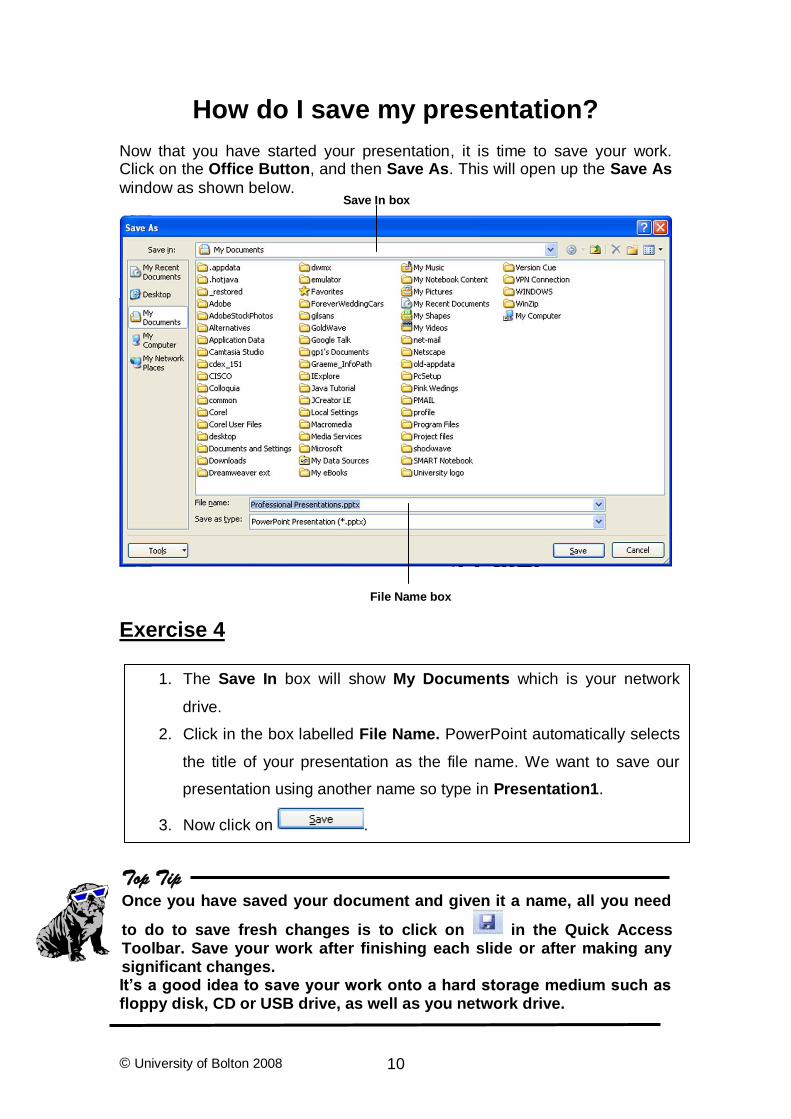
How do I save my presentation?
Now that you have started your presentation, it is time to save your work. Click on the Office Button, and then Save As. This will open up the Save As
window as shown below.
Exercise 4
Top Tip
Once you have saved your document and given it a name, all you need
to do to save fresh changes is to click on in the Quick Access Toolbar. Save your work after finishing each slide or after making any significant changes. It’s a good idea to save your work onto a hard storage medium such as floppy disk, CD or USB drive, as well as you network drive.
File Name box
Save In box
1. The Save In box will show My Documents which is your network
drive.
2. Click in the box labelled File Name. PowerPoint automatically selects
the title of your presentation as the file name. We want to save our
presentation using another name so type in Presentation1.
3. Now click on .

© University of Bolton 2008 11
How do I change the text on a slide?
Text is contained in Text Boxes. Click on the words Professional
Presentation. You will see that the words are surrounded by a box with a dashed line style, as shown below.
Exercise 5 The text will appear against a pale blue background to show the text has been highlighted as demonstrated below. A mini toolbar will also appear at the end of the selected text giving quick access to text formatting commands.
Text box highlighted by dashed line
1. Before you can change any text you have to select it, so click at the
beginning of the word Professional.
2. Hold down the left mouse button and drag the mouse over to the end
of the word Presentations.
Mini Toolbar
© University of Bolton 2008 12
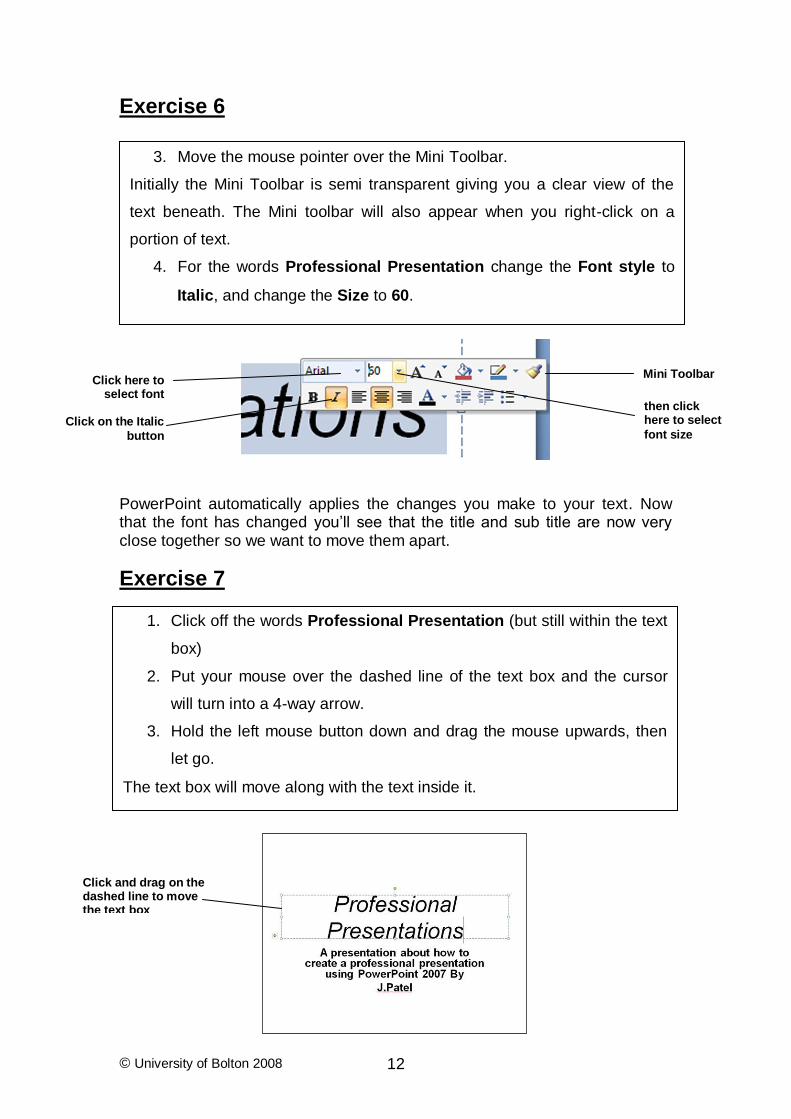
Exercise 6
PowerPoint automatically applies the changes you make to your text. Now that the font has changed you’ll see that the title and sub title are now very close together so we want to move them apart.
Exercise 7
3. Move the mouse pointer over the Mini Toolbar.
Initially the Mini Toolbar is semi transparent giving you a clear view of the
text beneath. The Mini toolbar will also appear when you right-click on a
portion of text.
4. For the words Professional Presentation change the Font style to
Italic, and change the Size to 60.
Click and drag on the dashed line to move the text box
1. Click off the words Professional Presentation (but still within the text
box)
2. Put your mouse over the dashed line of the text box and the cursor
will turn into a 4-way arrow.
3. Hold the left mouse button down and drag the mouse upwards, then
let go.
The text box will move along with the text inside it.
Mini Toolbar
then click here to select
font size
Click here to select font
Click on the Italic
button

© University of Bolton 2008 13
How do I put bullet points on a slide?
Let’s create a new slide which will hold bullet points.
Exercise 8
PowerPoint has now inserted a slide based on the Two Content layout after the title slide. The new slide is shown below.
Top Tip
On this occasion we have selected a slide which incorporates a two column layout. There are many other slide layouts which also can contain bullet lists, combining them with images, charts, movies and other objects. You can view the options in the Office Theme window.
1. Click on New Slide from the Slides task group. Make sure you click
on the lower half of this button to reveal the Office Themes menu.
2. Click on the Two Content slide layout as shown below.
Click here to create a
new slide
then click on the
Two Content layout
Title box
Content box
© University of Bolton 2008 14
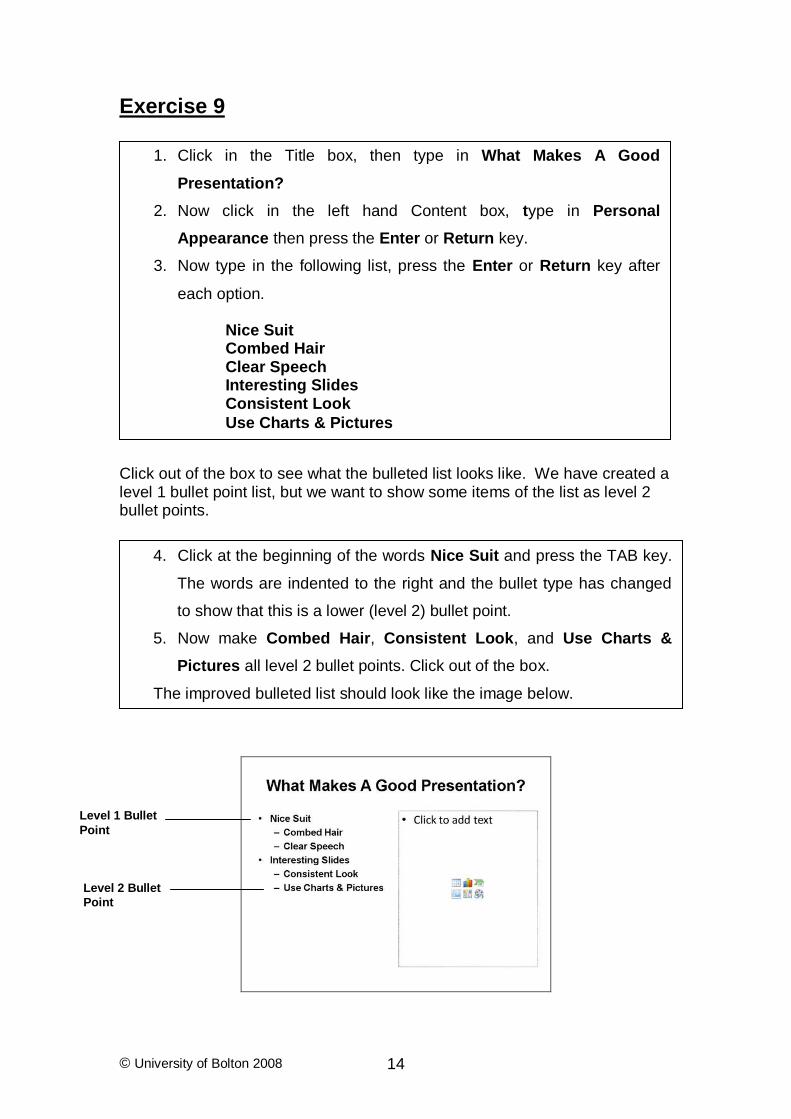
Exercise 9
Click out of the box to see what the bulleted list looks like. We have created a level 1 bullet point list, but we want to show some items of the list as level 2 bullet points.
4. Click at the beginning of the words Nice Suit and press the TAB key.
The words are indented to the right and the bullet type has changed
to show that this is a lower (level 2) bullet point.
5. Now make Combed Hair, Consistent Look, and Use Charts &
Pictures all level 2 bullet points. Click out of the box.
The improved bulleted list should look like the image below.
Level 1 Bullet
Point
Level 2 Bullet
Point
1. Click in the Title box, then type in What Makes A Good
Presentation?
2. Now click in the left hand Content box, type in Personal
Appearance then press the Enter or Return key.
3. Now type in the following list, press the Enter or Return key after
each option.
Nice Suit Combed Hair Clear Speech Interesting Slides Consistent Look
Use Charts & Pictures

© University of Bolton 2008 15
Top Tip
PowerPoint allows you to promote and demote list items to create lists with up to 5 bullet point levels. To promote list items press TAB as above, to demote list items press SHIFT TAB.
How do I put an image on a slide?
Exercise 10
PowerPoint will open up the Microsoft Clip Art pane on right hand edge of the screen as shown on the next page.
A selection of images will load.
1. Click on the Clip Art icon in the other content box.
Click here
2. Click on the dropdown arrow in the Search in box and mark the box
next to Everywhere. (This will display as All collections).
3. Make sure that the Results should be box is set to All media file
types.
4. Click in the box labelled Search for and type in Presentations, then
click on Go.
© University of Bolton 2008 16
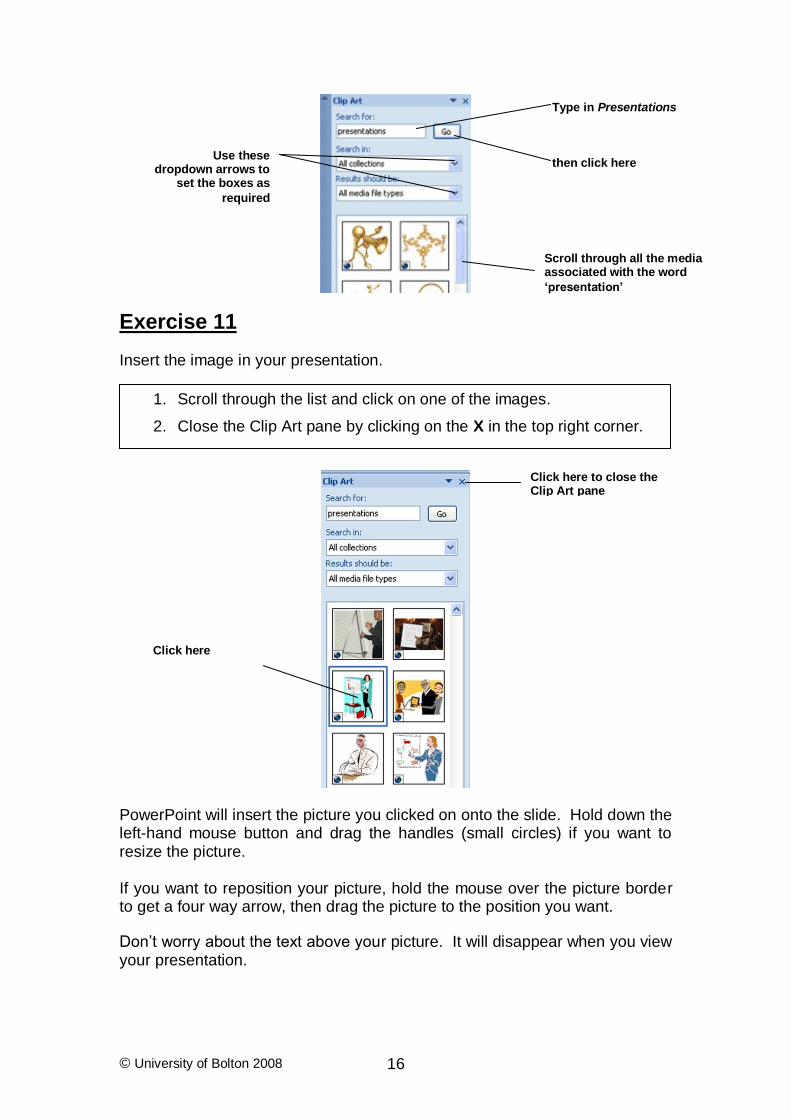
Exercise 11
Insert the image in your presentation.
PowerPoint will insert the picture you clicked on onto the slide. Hold down the left-hand mouse button and drag the handles (small circles) if you want to resize the picture. If you want to reposition your picture, hold the mouse over the picture border to get a four way arrow, then drag the picture to the position you want.
Don’t worry about the text above your picture. It will disappear when you view your presentation.
Type in Presentations
then click here
Click here
1. Scroll through the list and click on one of the images.
2. Close the Clip Art pane by clicking on the X in the top right corner.
Scroll through all the media associated with the word
‘presentation’
Click here
Click here to close the Clip Art pane
Use these dropdown arrows to
set the boxes as
required

© University of Bolton 2008 17
How do I put a Chart on a slide?
Insert a new slide into your presentation as you have done previously. Choose a Title and Content slide layout which should look like the one
below.
Exercise 12
PowerPoint will open the Insert Chart dialogue box.
Your PowerPoint screen should now look like the one shown on the next page.
1. Click in the title box and type in Student & Lecturer Views.
2. Click the Chart icon
then click here
Use handles to resize Click on border and drag and drop to reposition
Type title here

© University of Bolton 2008 18
Your PowerPoint screen should now look like the one shown below.
3. Click the Clustered Column chart form the Insert Chart dialogue box.
4. Click OK.
Insert Chart
dialogue box
Click here
Microsoft Excel Microsoft
PowerPoint
Dummy chart
data
Chart preview
then here
© University of Bolton 2008 19
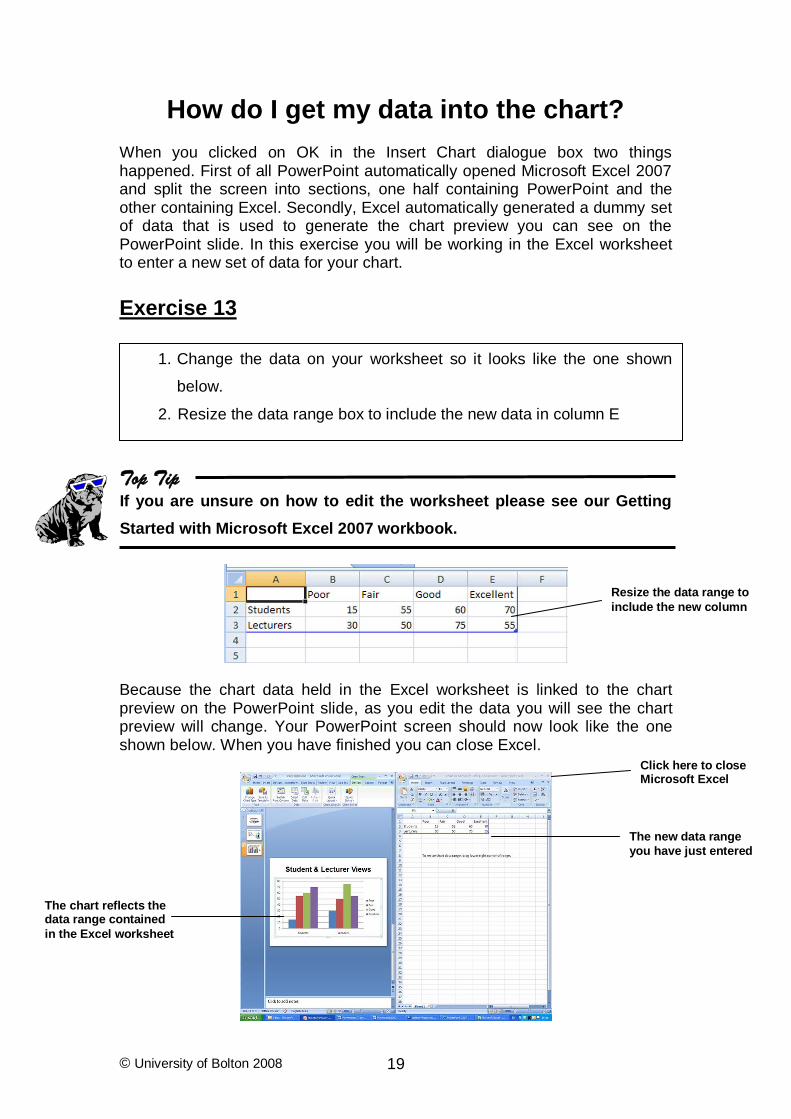
How do I get my data into the chart? When you clicked on OK in the Insert Chart dialogue box two things happened. First of all PowerPoint automatically opened Microsoft Excel 2007 and split the screen into sections, one half containing PowerPoint and the other containing Excel. Secondly, Excel automatically generated a dummy set of data that is used to generate the chart preview you can see on the PowerPoint slide. In this exercise you will be working in the Excel worksheet to enter a new set of data for your chart.
Exercise 13
Top Tip If you are unsure on how to edit the worksheet please see our Getting
Started with Microsoft Excel 2007 workbook.
Because the chart data held in the Excel worksheet is linked to the chart preview on the PowerPoint slide, as you edit the data you will see the chart preview will change. Your PowerPoint screen should now look like the one shown below. When you have finished you can close Excel.
1. Change the data on your worksheet so it looks like the one shown
below.
2. Resize the data range box to include the new data in column E
The new data range
you have just entered
The chart reflects the data range contained
in the Excel worksheet
Click here to close Microsoft Excel
Resize the data range to
include the new column

© University of Bolton 2008 20
How do I make changes to the chart?
Exercise 14
PowerPoint will now open up Excel and display the two applications side by side. The Excel worksheet holds the data that your chart is based upon.
1. Click anywhere on the chart.
The graph should be enclosed by a box as shown below and the Ribbon will
change to display all the commands you will need to edit your chart.
2. Click Edit Data on the Ribbon.
Pale blue box surrounding your
chart
Notice how the Ribbon has changed to display chart formatting
commands
Click here to edit
your chart data
3. Change the 55 in row 3, column E to 80 and then click away from
that cell.
Your chart is automatically updated as you make changes in the
worksheet.
4. Now close the Excel window.
Click in this cell to change contents then click in
another cell

© University of Bolton 2008 21
How do I change the background of slides? To make your presentations more professional PowerPoint allows you to change the background of slides to give them an eye catching consistent look.
Exercise 15
PowerPoint has now applied the Flow theme to each of your slides and adjusted the colourings to fit.
1. Click on the Design tab on the Ribbon.
Ribbon will change to display all the commands you will need to alter the
design of your slides.
2. Click on Flow from the Themes gallery as shown on below.
As you roll over a theme PowerPoint will temporarily apply it to your
presentation, this know as Live Preview. The theme will not be applied to
your slides until you click on it.
Click here to apply Flow theme
Theme Gallery
Click here to scroll through all the
available themes
Click the Design tab

© University of Bolton 2008 22
How do I view my slides?
The screen below shows each slide and a number for each slide which corresponds to its position in the presentation.
Exercise 16
Top Tip
You can also view the previous slide by clicking and the next slide
by clicking .
Exercise 17
How do I sort my slides?
1. Click on Slide 1 in the left hand panel.
The first slide you created, Professional Presentations, will appear.
2. Click on Slide 3, Student & Lecturer Views, and the Chart Slide
will appear.
Click on the Home tab and insert a Blank slide into your presentation. It
will have nothing on it except the previously applied background. Don’t
worry about the content of this slide as we will be using it later to practise
deleting slides.
Previous slide
& next slide buttons
Slide number

© University of Bolton 2008 23
How do I sort my slides?
Slide Sorter allows you to shuffle your slides to change the running order of your presentation.
Exercise 18
Top Tip You can also click on the slide you want to move and drag it to a new position.
Click on the View tab on the Ribbon, and then click on Slide Sorter. The PowerPoint screen will change to show the Slide Sorter view as shown below.
1. Click on slide number 4.
A border will appear around it to show it is highlighted.
2. Right click on slide number 4 then select Cut.
3. Click in the area to the left-hand side of slide number 1.
You’ll notice an insertion point appear.
4. Right click and then click Paste.
The blank slide has now moved to the beginning of your presentation.
5. Click Normal on the Ribbon.
PowerPoint returns you to Normal View.
Slide Number
Click here
Insertion Point
then here

© University of Bolton 2008 24
How do I delete a slide?
Exercise 19
Top Tip You can also delete slides in Slide Sorter view. Click on the slide you wish to remove so that it is highlighted, then press Delete key board.
1. Click on Slide 1, as shown below.
A border will appear around it to show it is highlighted.
2. Press the Delete key on the key board.
The blank slide has been deleted from your presentation.
Click here

© University of Bolton 2008 25
How do I apply transitions to my slides?
Transition is the method by which one slide disappears and another appears during a presentation.
Exercise 20
Top Tip You can vary the transition methods on each slide by clicking on the slide you wish to apply the transition to and then choose a transition method from the Transitions Gallery on the Ribbon.
1. Change your view to Slide Sorter, as you did when you were
sorting your slides, and click on Slide 1.
2. Click on the Animations tab on the Ribbon.
3. Ribbon will change to display all the commands you will need to add
animation to your slides.
4. Click on Dissolve in the Transitions Gallery.
The effect of the Dissolve transition will be previewed on the slide.
5. Now click on
Click here
then here finally click here

© University of Bolton 2008 26
How do I animate objects on a slide?
PowerPoint enables you to animate the objects on a slide so they move or appear gradually.
Exercise 21
The Custom Animation pane will be displayed on the right of your screen, as
shown below.
1. From the Slide Sorter view, double click on slide 1, your title slide.
If you are in Normal view, just click on the slide 1.
2. Click Custom Animation on the Ribbon.
Click here
then click here
Selected object surrounded by
a box
3. Click an object on your slide to which you want to apply an
animation. (An object can be a text box or an image.)
It will now be surrounded by a box.
4. Click the Add Effect button on the Custom Animations pane.
5. From the Entrance category, choose Diamond from the list.
You’ll see a preview of the animation on the slide. The animation is now
set for the selected object on the slide.

© University of Bolton 2008 27
Once you have applied an animation to an object on your slide you can use the Custom Animation pane to modify its timing, speed, direction, set the event that triggers the animation and to remove the animation from the object. By default, animations that you apply to objects on your slide will trigger every time you click the left mouse button during your presentation.
Exercise 22
Try changing some of the settings such as Direction for other objects and
watch the effect on the animation of your slide. You can remove an animation you have just applied by clicking the Remove button on the Custom
Animation pane.
Close the Custom animation pane when you are happy with the effects you have applied.
1. Click on an object to select it.
2. Click the arrow on the Speed drop down box and click Slow from
the list.
You will see the animation previewed at a much slower speed.
3. Change the speed back to fast.
Click here to remove
the animation
Click here to change the speed of the
animation
Click here to change the direction of the
animation
Click here to apply a
different animation
Click here to close
pane
© University of Bolton 2008 28
How do I view my presentation
Exercise 23
Top Tip If you want to get out of your presentation before all the slides have been viewed, you can do so by pressing Esc on the key board.
How do I produce audience handouts?
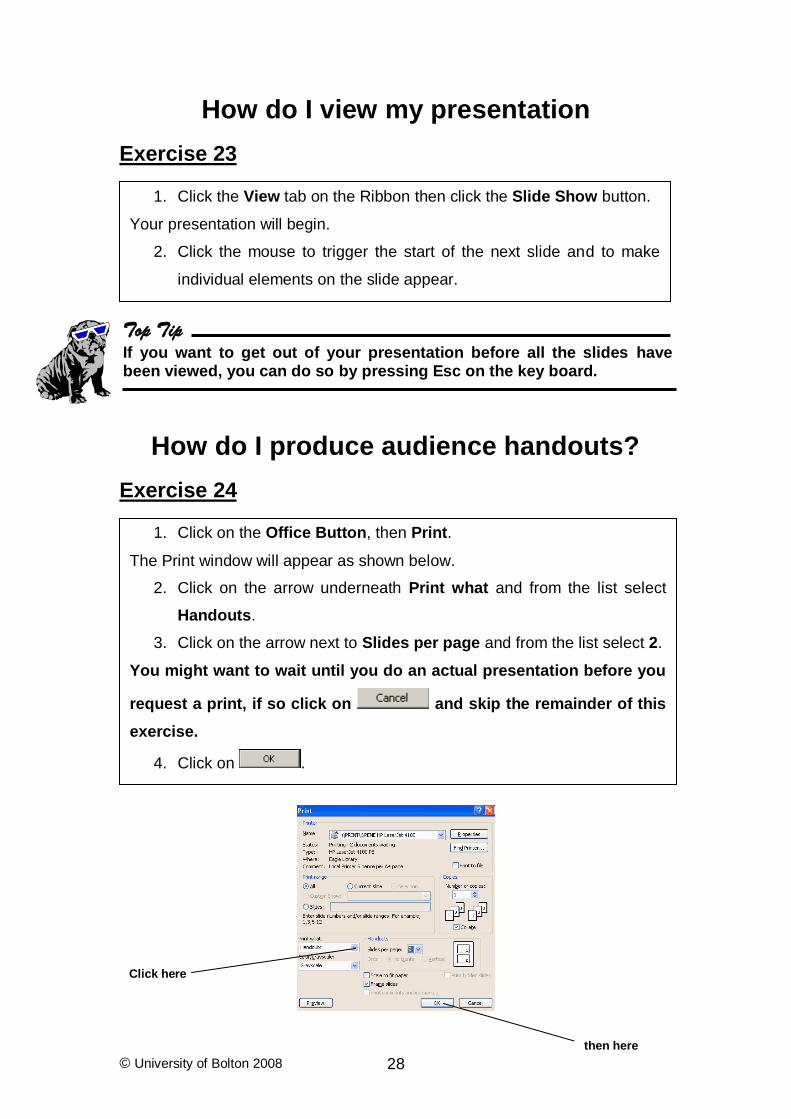
Exercise 24
1. Click the View tab on the Ribbon then click the Slide Show button.
Your presentation will begin.
2. Click the mouse to trigger the start of the next slide and to make
individual elements on the slide appear.
1. Click on the Office Button, then Print.
The Print window will appear as shown below.
2. Click on the arrow underneath Print what and from the list select
Handouts.
3. Click on the arrow next to Slides per page and from the list select 2.
You might want to wait until you do an actual presentation before you
request a print, if so click on and skip the remainder of this
exercise.
4. Click on .
Click here
then here

© University of Bolton 2008 29
How do I print slides on acetates?
Exercise 25
PowerPoint will now send your slides to the printer at the Information Desk. If you require the slides to be printed on acetate, please ask for them to be put in the printer before hand. There is a charge for this.
How do I create presentation notes?
PowerPoint enables you to create notes for each of your slides so you can refer to them whilst giving your presentation.
Exercise 26
1. Click on the Office Button then Print.
The print window will appear as it did in the previous exercise.
2. Click on the arrow next to the Name box, from the list select
Infodesk (Black and White)
(Colour)
3. Click on the arrow underneath Print what, from the list select
Slides.
You might want to wait until you do an actual presentation before you
request a print, if so click on and skip the remainder of this
exercise.
4. Click on
1. Click the View tab on the Ribbon then click the Normal button.
2. Click on slide 3 (the one with your chart)
3. Click where it says click to add notes
4. Type in the following: Poor = 45 Fair = 105 Good = 135 Excellent = 125

© University of Bolton 2008 30
Top Tip If you need to make the notes area bigger, click and drag with the left mouse button using the double arrow, as below.
Top Tip To print your presentation notes, print as you have done previously. However in the Print window under ‘Print what’, select Notes Pages.
You will get a 4-way arrow here when you mouse over the line.
Click here to type notes

© University of Bolton 2008 31
And Finally…
Congratulations on having completed this workbook, you have now created your first PowerPoint presentation. You should now feel more confident using PowerPoint and about creating bulleted lists, pictures, charts and animating your slides. The finished product is your own professional presentation. This workbook is designed as a basic introduction to PowerPoint but we hope it will inspire you to make use of PowerPoint in the future. There is much more you can do to add to your presentations and with practice you’ll be able to produce more detailed and sophisticated presentations. If you need any extra assistance using Microsoft PowerPoint, do not hesitate to ask for help. If you want to explore the more advanced features of PowerPoint or want further information on the topics covered in this workbook then visit the Microsoft Office Online PowerPoint 2007 web pages: http://office.microsoft.com/en-gb/powerpoint/default.aspx Good luck Presenting!


