41
DOB21 Portable Dissolved Oxygen Meter 2.

DOB21Portable Dissolved Oxygen Meter
2.
Instruction ManualDissolved Oxygen Meter
DOB21
Index
Specifications . . . . . . . . . . . . . . . . . . . . . . . . . . . . . . . . . . . . . . . . . . . . . . . . . . . . . . . . . . 3DO Theory . . . . . . . . . . . . . . . . . . . . . . . . . . . . . . . . . . . . . . . . . . . . . . . . . . . . . . . . . . . . 4Panel Description . . . . . . . . . . . . . . . . . . . . . . . . . . . . . . . . . . . . . . . . . . . . . . . . . . . . . . 10Equipment Operation . . . . . . . . . . . . . . . . . . . . . . . . . . . . . . . . . . . . . . . . . . . . . . . . . . . 11Equipment Operation Turning On . . . . . . . . . . . . . . . . . . . . . . . . . . . . . . . . . . . . . . . . . 13Equipment Operation DO - Set Up . . . . . . . . . . . . . . . . . . . . . . . . . . . . . . . . . . . . . . . . . 14Equipment Operation DO - Read . . . . . . . . . . . . . . . . . . . . . . . . . . . . . . . . . . . . . . . . . . 17Equipment Operation DO - Calibration. . . . . . . . . . . . . . . . . . . . . . . . . . . . . . . . . . . . . . 18Equipment Operation DO - Register. . . . . . . . . . . . . . . . . . . . . . . . . . . . . . . . . . . . . . . . 19Equipment Operation O - Set Up. . . . . . . . . . . . . . . . . . . . . . . . . . . . . . . . . . . . . . . . . . 212
Equipment Operation O - Read. . . . . . . . . . . . . . . . . . . . . . . . . . . . . . . . . . . . . . . . . . . 242
Equipment Operation O - Calibration . . . . . . . . . . . . . . . . . . . . . . . . . . . . . . . . . . . . . . 252
Equipment Operation O - Register . . . . . . . . . . . . . . . . . . . . . . . . . . . . . . . . . . . . . . . . 262
Equipment Operation %Sat - Set Up . . . . . . . . . . . . . . . . . . . . . . . . . . . . . . . . . . . . . . . 28Equipment Operation %Sat - Calibration . . . . . . . . . . . . . . . . . . . . . . . . . . . . . . . . . . . . 31Equipment Operation %Sat - Read . . . . . . . . . . . . . . . . . . . . . . . . . . . . . . . . . . . . . . . . 32Equipment Operation %Sat - Register . . . . . . . . . . . . . . . . . . . . . . . . . . . . . . . . . . . . . . 33Equipment Operation Turning Off . . . . . . . . . . . . . . . . . . . . . . . . . . . . . . . . . . . . . . . . . 35Cell Types. . . . . . . . . . . . . . . . . . . . . . . . . . . . . . . . . . . . . . . . . . . . . . . . . . . . . . . . . . . . 36Cell Maintenance . . . . . . . . . . . . . . . . . . . . . . . . . . . . . . . . . . . . . . . . . . . . . . . . . . . . . . 37

&
&
&
&
&
&
&
&
&
&
&
&
&
&
Dissolved Oxygen / O2 / % Saturation / TemperatureSimple 3 key operationAutomatic Resolution SelectionScale exchange in Auto-rangeContinuous or Hold ReadingsNon-Volatile Memory, even when turned off the program set up will be sustainedAutomatic Calibration for all parametersAutomatic Temperature CompensationMaximum and Minimum Sound AlarmBattery charge Auto MonitoringDataloging up to 99 ReadingsSalinity and Barometric Pressure CompensationClark Polarographic CellAutomatic or Manual Zero and SPAN adjustment
2. Specifications
Supplied with equipment
Amperometric Cell DOE-21L
Cell mainutenance Kit DOM-21L
BOD Kit DOM-ADP
Carrying Case
Instruction Manual
Optional
Immersion Probe DOE-21S
AC Adapter CDH-30PW
Dissolved Oxygen
Range 0 to 60 mgO2/l
Resolution 1 / 0.1 / 0.01
Relative Precision 0.02 % (full scale)
O2 Gas
Range 0 to 30% O2
Resolution 1 / 0.1
Relative Precision 0.33 % (full scale)
% Saturation
Range 0 to 100% of saturation
Resoluton 1 / 0.1
Relative Precision 0.1 % (full scale)
General
Enclosure IP-67
Temp. Comp. Manual/Auto 0 to 60 ºC
Display Alphanumeric 2 Lines x 16 Characters
Output RS-232
Power Battery 9 VCC
Battery Life Time Up to 60 hours
Dimensions (LHD) 100 x 75 x 180 mm
Weight 0.45 kg
3

3. DO Theory
Stir Dependence
4
The Oxygen meter has a electrolyte cell, with Platinum Cathode and Silver tubular Anode separated by cast
epoxy. Both are immersed in electrolyte and the set is isolated by a gases permeable PTFE membrane.
In order to determine the dissolved oxygen apply a polarization potential differential between the Anode and the
Cathode. The sample’s oxygen diffuses thru the membrane, reducing at the Cathode and creating the oxidation
product at the Anode. The resulting current is proportional to the oxygen present.
Varying just the membrane’s thickness you can determine the solutions’s oxygen in a range form 0.2 to 60ppm.
Reduced gases interferences will occur, such as halogen and SO2, and H2S will infect the electrode.
The cell’s oxygen consumption will result from the oxygen’s extraction from the solution at membrane’s proximity.
The oxygen is extracted by diffusion, not allowing the real value of the sensibility reading. Therefore, there is a need
to stir the solution so the oxygen can be extracted per diffusion as per convection, allowing a sensibility rate
increase that will allow adequate readings. This way it is evident that in order to perform a correct reading, it is
necessary to maintain the solution under constant stir (10 cm/seg over the cell).
The BOD Kit was developed specifically for Dissolved Oxygen (DO) readings, to determine the Biochemical
Oxygen Demand (BOD), composed by:
1. Stir Cap
Works by magnetic principle. Once submitted to a magnetic field generated by a magnetic stir, makes it rotate
(by attraction / repulsion) the magnet installed at the body cap. Through this effect, the magnet turns at a constant
speed in order to release O2.
BOD Kit
2. Funnel
Use to retain the overflow volume at cell insertion at BOD bottle.
3. Sealing Rubber It is used specifically to seal the BOD. : It is CRUCIAL, to avoid bubbles at BOD bottle, after introducing the cell. In case bubblesoccur, take out the cell and repeat the procedure until bubbles are not present. The lateral opening is exclusively build in order to allow the release of bubbles that possible appear.
ATTENTION

+ 3O2 3O2 + 2H2O + NH3 Orgânisms
Aerobics
H H
H
H NH2
C C CO
OH
ORGANIC
MATERIAL
Free
Oxugen
SIMPLE INORGANIC PRODUCTS
- -+ 3O4
- -6CO2 + 4H2O + 2NH3 + 3SOrganisms
Aerobics
H H
H
H NH2
C C CO
OH
ORGANIC
MATERIAL
ORGANIC
SALT
PRODUCTS PARTIALKYOXIDIZED
%O2 Consumido durante = (ODi - OD5dias) x 100
a incubação ODi
3. DO Theory (cont.)
DO Determination
5
All life organisms depend on oxygen to sustain their metabolism process for growing and reproduction, and we
could classify them as:
Aerobic Organisms: those who depend on free oxygen for organic material mineralization, resulting in most simple
Inorganic final products.
Anaerobic Organisms are those that to for oxidizing the organic material, use oxygen from organic salts, such assulfites, resulting partial oxidized final products .
The pollutant organic material, has a tendance to mineralize naturally by existing aerobic microorganisms, whichconsume dissolved oxygen.When the pollutant is excessive, the free oxygen will finish and from this point on the anaerobic organism willpredominate which partially oxidize.Therefore, it is important to sustain the aerobic conditions, supplying more free oxygen to the organic charge, thisWay the complete mineralization will occur.
The "BOD" (Biochemical Oxygen Demand) is used to determine the pollution levels, evaluate pollutant charge andthe treatment system efficiency (together with "QOD" and "TOC").The "BOD" is the quantity of DO necessary for biological oxidation of oxide substances present at the sample, attest conditions.The used method to determine, is the dilution, incubation and determination, by DO quantity difference consumedduring the incubation.
Therefore the "DO" measurement is the key for water pollution analysis.For "DO" measurements, you will find 2 methods:A. and it’s variations.B. , this is the most common method. The measuring is ease, does not suffer certaininterferences as Winkler’s Method, allowing IN-SITE measurements it eliminates errors caused when collecting Or storing the samples.The oxygen determination is important for:Life conditions for fishes and microorganisms in water; In water treatment station process; Corrosion;Food Packaging Control.
Winkler’s Method Membrane Electrode Method
0.2
0.6
1.2
20
15 20 25 30
º C
Sensibility
mA / mg/L
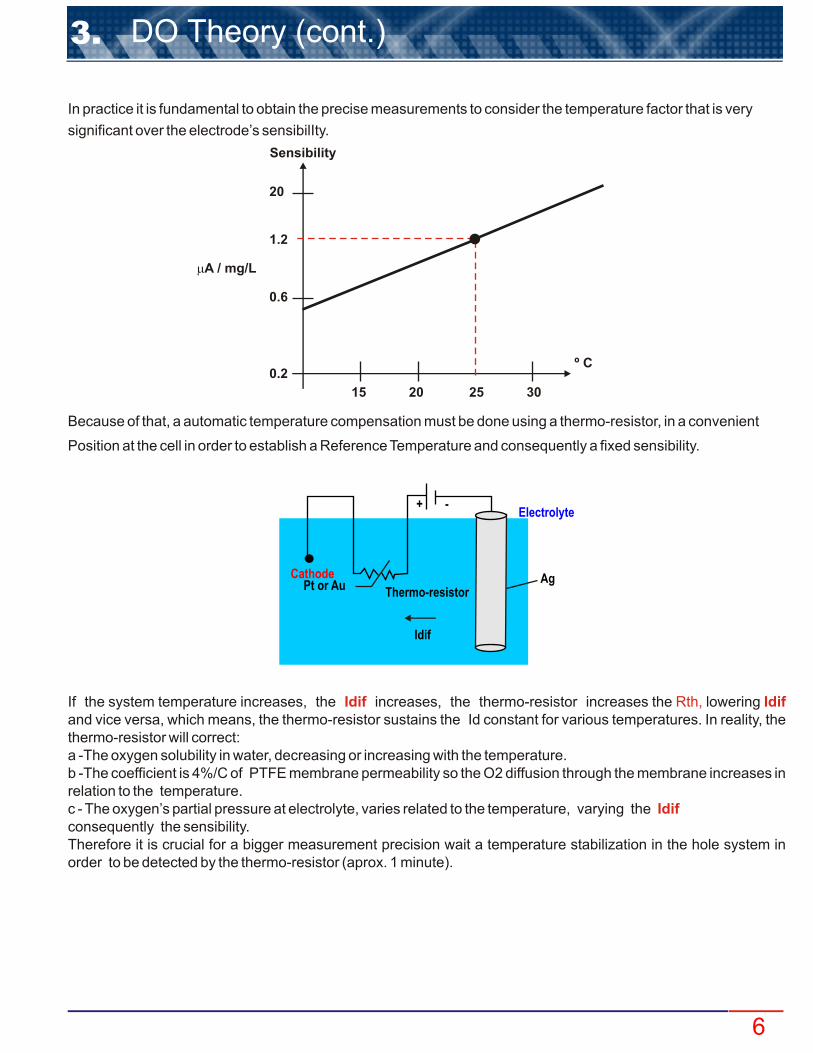
CathodePt or Au
Thermo-resistor
Electrolyte
Ag
Idif
+ -
3. DO Theory (cont.)
6
In practice it is fundamental to obtain the precise measurements to consider the temperature factor that is very
significant over the electrode’s sensibilIty.
Because of that, a automatic temperature compensation must be done using a thermo-resistor, in a convenient
Position at the cell in order to establish a Reference Temperature and consequently a fixed sensibility.
If the system temperature increases, the increases, the thermo-resistor increases the lowering and vice versa, which means, the thermo-resistor sustains the Id constant for various temperatures. In reality, the thermo-resistor will correct:a -The oxygen solubility in water, decreasing or increasing with the temperature.b -The coefficient is 4%/C of PTFE membrane permeability so the O2 diffusion through the membrane increases in relation to the temperature.c - The oxygen’s partial pressure at electrolyte, varies related to the temperature, varying the consequently the sensibility.Therefore it is crucial for a bigger measurement precision wait a temperature stabilization in the hole system in order to be detected by the thermo-resistor (aprox. 1 minute).
Idif Rth, Idif
Idif
3. DO Theory (cont.)
The Membrane Electrode Methode
7
This method is well used, allowing IN-SITE readings, eliminating errors generated by collecting and storage, allow
readings in minutes, economy of solutions used at titlelometric method and the measurement repeat, if necessary
and it is not a destructive method.
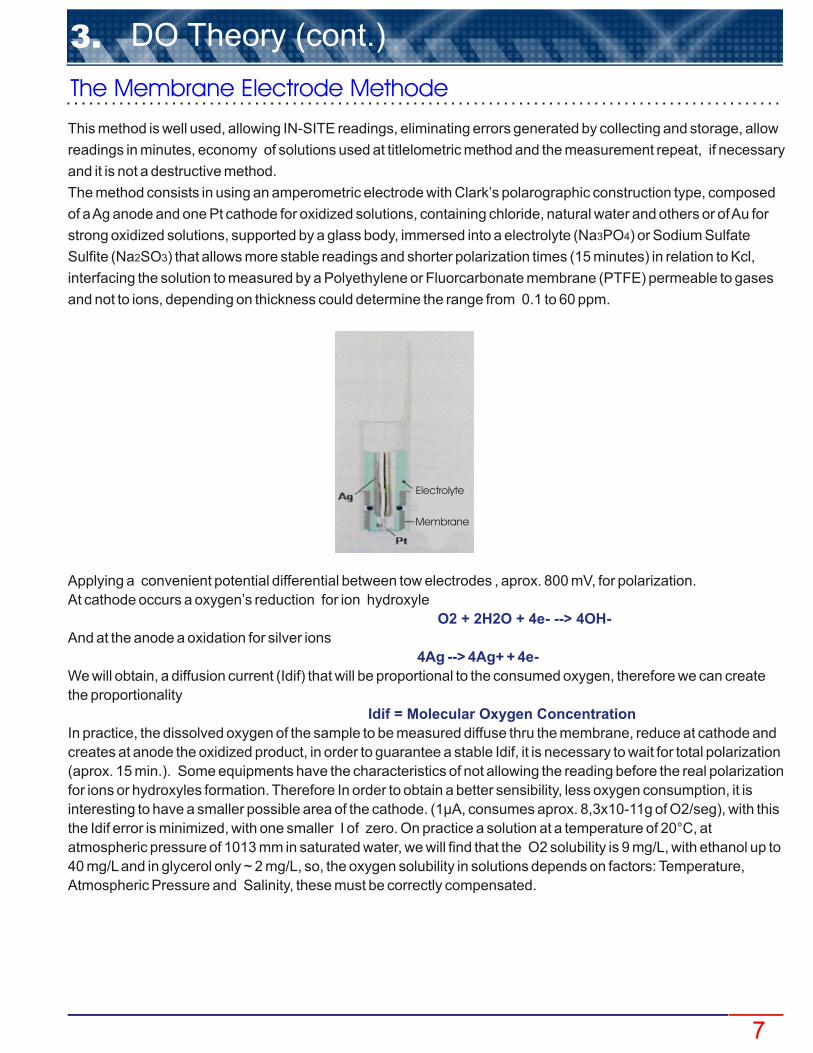
The method consists in using an amperometric electrode with Clark’s polarographic construction type, composed
of a Ag anode and one Pt cathode for oxidized solutions, containing chloride, natural water and others or of Au for
strong oxidized solutions, supported by a glass body, immersed into a electrolyte (Na3PO4) or Sodium Sulfate
Sulfite (Na2SO3) that allows more stable readings and shorter polarization times (15 minutes) in relation to Kcl,
interfacing the solution to measured by a Polyethylene or Fluorcarbonate membrane (PTFE) permeable to gases
and not to ions, depending on thickness could determine the range from 0.1 to 60 ppm.
Electrolyte
Membrane
Applying a convenient potential differential between tow electrodes , aprox. 800 mV, for polarization.
At cathode occurs a oxygen’s reduction for ion hydroxyle
And at the anode a oxidation for silver ions
We will obtain, a diffusion current (Idif) that will be proportional to the consumed oxygen, therefore we can create
the proportionality
In practice, the dissolved oxygen of the sample to be measured diffuse thru the membrane, reduce at cathode and
creates at anode the oxidized product, in order to guarantee a stable Idif, it is necessary to wait for total polarization
(aprox. 15 min.). Some equipments have the characteristics of not allowing the reading before the real polarization
for ions or hydroxyles formation. Therefore In order to obtain a better sensibility, less oxygen consumption, it is
interesting to have a smaller possible area of the cathode. (1µA, consumes aprox. 8,3x10⁻¹¹g of O2/seg), with this
the Idif error is minimized, with one smaller I of zero. On practice a solution at a temperature of 20°C, at
atmospheric pressure of 1013 mm in saturated water, we will find that the O2 solubility is 9 mg/L, with ethanol up to
40 mg/L and in glycerol only ~ 2 mg/L, so, the oxygen solubility in solutions depends on factors: Temperature,
Atmospheric Pressure and Salinity, these must be correctly compensated.
O2 + 2H2O + 4e- --> 4OH-
4Ag --> 4Ag+ + 4e-
Idif = Molecular Oxygen Concentration
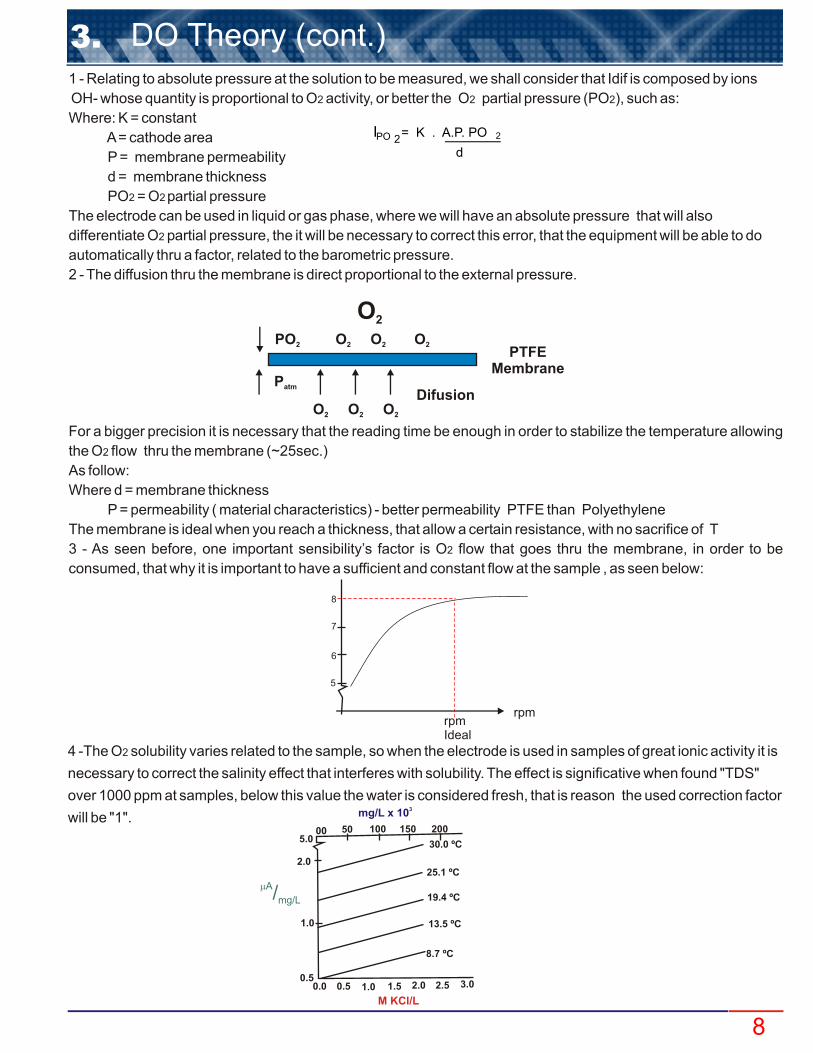
1 - Relating to absolute pressure at the solution to be measured, we shall consider that Idif is composed by ions
OH- whose quantity is proportional to O2 activity, or better the O2 partial pressure (PO2), such as:
Where: K = constant
A = cathode area
P = membrane permeability
d = membrane thickness
PO2 = O2 partial pressure
The electrode can be used in liquid or gas phase, where we will have an absolute pressure that will also
differentiate O2 partial pressure, the it will be necessary to correct this error, that the equipment will be able to do
automatically thru a factor, related to the barometric pressure.
2 - The diffusion thru the membrane is direct proportional to the external pressure.
For a bigger precision it is necessary that the reading time be enough in order to stabilize the temperature allowing
the O2 flow thru the membrane (~25sec.)
As follow:
Where d = membrane thickness
P = permeability ( material characteristics) - better permeability PTFE than Polyethylene
The membrane is ideal when you reach a thickness, that allow a certain resistance, with no sacrifice of T
3 - As seen before, one important sensibility’s factor is O2 flow that goes thru the membrane, in order to be
consumed, that why it is important to have a sufficient and constant flow at the sample , as seen below:
PO2
Patm
O2 O2 O2
O2 O2 O2
O2
Difusion
PTFEMembrane
rpmIdeal
rpm
8
7
6
5
2.0
1.0
0.5
3mg/L x 10
M KCl/L
1.00.5 1.5 2.0 2.5 3.0
mA/mg/L
30.0 ºC
25.1 ºC
19.4 ºC
13.5 ºC
8.7 ºC
0.0
00 50 100 150 2005.0
3. DO Theory (cont.)
8
IPO = K . A.P. PO 2
d2
4 -The O2 solubility varies related to the sample, so when the electrode is used in samples of great ionic activity it is
necessary to correct the salinity effect that interferes with solubility. The effect is significative when found "TDS"
over 1000 ppm at samples, below this value the water is considered fresh, that is reason the used correction factor
will be "1".
3. DO Theory (cont.)
9
Interferences:
Cell Maintenance
Cell Storage
Calibration
SPAN
ZERO
1 - The membranes are permeable to O2 molecules and to various other halogen gases, Cl2, SO2 and others that
can cause measurement errors, by reducing at the cathode.
2 - The long use of electrode in water containing gases such H2S, will cause a loss of sensibility by contamination of
the electrode.
3 - Acid or Basic gases (CO2, NH3) change the solution’s internal pH, generating errors.
4 - Clogging of microorganisms at the membrane, hydrocarbonates, will cover the membrane, diminishing O2 flow,
diminishing response time and requiring calibrations in shorter period of time.
5 - Fats.
It is possible to observe that is fundamental periodical maintenance, because of all interferences already
mentioned it is important to change the membrane, of the electrolyte and cleaning of the cathode / anode.
-For shorter storage time, leave the cell in distilled water.
-For longer storage time, leave the cell dry.
-the electrode can be calibrated at atmosphere or in a known sample (Winkler).
- Electronically, thru a simulation of the equipment of zero or thru the solution with excess of Sodium Sulfate
(Na2SO3).
Preferentially, we should perform a calibration with water sample in test, mostly when we believe that the Winkler’s
method has interferences.

4. Panel Descriptions
4
6
7
5
3
1
2
Items Description
1 - Display: Alphanumeric 2 Lines x 16 characters
2 - Membrane Keyboard
3 - Battery compartnment lid
4 - RS 232 Output
5 - Portection lids for field protection
6 - AC Adapter inlet
7- PA Connector: Oxygen and Temperature cell inlet
10

800m 23.2 ºC
8.7mg/L1 2
34
5. Equipment Operation
11
To turn ON the equipment, press and hold key. Make sure the power cord is plugged correctly!
The menus are self-explanation with it’s respective options, selected by pressing the key.
After making your selection(flashing option), using key, press the key to confirm
Your selection. This manual will represent the Flashing Option always in .
In case of any error or if you decide to change your selection, press the key to move the
screen one step back so you can make the necessary changes, or hold this key for about 5seconds in
order to turn OFF the equipment, until the message “SWITCH OFF? YES / NO” shows off on screen.
This equipment is supplied with a non-volatile memory (E2PROM), to store it’s operational set up
(resolution, reading mode, calibration, etc).
Even if disconnected from it’s power supply, it will not loose the information saved for work!
Before you start to work with this equipment, please review the setup, so you can program the equipment
based on your application!
After powering the equipment on, by pressing and holding key, the equipment will perform an
Auto Check and will then stop at Main Menu(Select Function) with options for the user to Select the desired
Function. pH function will be flashing as a default. Press key to move around until you reach
the desired selection(flashing option) then press key to access the sub-menu were you will find
the SETUP FUNCTION(SET.). Press the key until SET is flashing, then press key
to confirm it. The equipment will prompt for a password, press the following keys in sequence
and follow the instructions on the display.
Always use key to move around the options and press key to confirm this option.
Refer to page 13 for description of Set Up Screens.
The Check Sensor option is very useful, it gives the user the conditions to check the sensibility of the
sensor. The operation is self-explanatory! From main menu press the key to choose the
desired function, then press key to confirm. Select option Check, then press key to
confirm option. The display will guide you thru the process.
Under this operation, you’ll find CALIBRATION and READING options .If you want to calibrate the sensor,
press the key to select the Calibration option(flashing option - CAL), then press key
to confirm. The program will guide you step by step on how to calibrate the sensor. If you need to use the
READING option, press the key to select READ (flashing option), then press key
and the display will show the following format:
1 - The Prompt signal will flick at each reading.
2 - The Measured Value.
3 - Sample Temperature.
4 -Barometric Pressure.
<ENTER>
<ENTER>
<ENTER>
<ENTER>
<ENTER>
<ENTER>
<ENTER>
<ENTER> <ENTER>
<ENTER>
<ENTER>
<SELECT>
<SELECT>
<SELECT>
<SELECT>
<SELECT>
<SELECT>
<SELECT>
<SELECT>
<SELECT>
Blue Color
<ESCAPE>
SETUP OPERATION
<ESCAPE>
CHECK OPERATION
READING OPERATION

Equipment Operation (cont.)
12
IMPORTANT INFORMATION
<ESCAPE>
<ESCAPE>
<ESCAPE> <ESCAPE>
1 - In case you want to quit Reading operation, press and hold key for about 5 seconds in
Order to be recognized by the equipment. This time is necessary to certify the user desires to quit this
mode.
2 - When the equipment is turned on again, the set up will follow initial conditions including the changes
prior to when it was turned off.
To turn off the equipment, press and hold key until the message to Switch Off shows on
screen, then by pressing key, choose YES to turn if off or NO to continue working and press
key to confirm the option c
BASIC OPERATION
The menus are self-explanatory for easy operation. To input new information or change the pre-seted
information, the menu offers flashing options, selected by key and confirmed by .
The key is used to change options or to correct data (every time the user press
The screen will move back one step or one option).
This manual will represent the Flashing Option always in .
CELL POLARIZATION
This instrument is supplied with a Clark Polarographic Cell, so Polarization is necessary before the
reading. Every time you turn on the instrument, Cell Polarization will be performed. This procedure takes
12minutes.
If you turn on your instrument, use it and now you are going to use again in a short period of time, after
performing the Reading, press
<SELECT>
<SELECT>
<ENTER>
<ENTER>
<ENTER>
<ENTER>
BLUE Color
key, so the instrument will be in Stand By, this way the
instrument will not turn himself off.
To return to Reading operation, press key again.
If on the field, make sure to perform the same operation and while in Stand By the battery consumption will
Attention: when replacing the Cell, user must access DO Set Up Mode and perform Themostatization, as described on Page 16.The instrument is supplied with a Cell and this operationis not necessary, as this operation was already performedat the factory. So every time the user is prompted with “NEW CELL?” while at Set Up Mode, answer NO, as the cell is not new to the instrument. Also answer NO if a Cell maintenance is performed, as the Cell is not new!
5.

1 - The software offers self explanatory menus for easy interaction with the user. The menu shows the selected option asFlashing. Use the2 - In case of a mistake, or data modification or to return to a prior menu, press . While at Reading Mode, pressand hold
23 - The equipment stores the configuration on a non volatile memory (E PROM). Even when turned off, the last set upConfiguration will be stored.
1 -Turn on the equipment by pressing . The display will show the following menus until reached the Main Menu.
<SELECT> <ESCAPE>
<ESCAPE>
key to modify the flashing option and select a different one, then press to confirm it.key
key for about 5 seconds in order to exit this mode. This is necessary in order for the instrumentunderstand that the user really desires to exit the Reading Mode.
<ENTER>
Turning On the equipment<ENTER>
Equipment Operation
AUTO CHECK 100%
Go to Sample!Ready?
OMEGADOB21 V1.0
Basic Operations
13
Program performs electronic check
Press key to access the DO sub-menu<ESCAPE>
Press key to turn if on<ENTER>
Return to prior menu for data
modification and to reach the
Turn off screen. Select the menu option.
Turns on the instrument and
Also confirms the selected option,
Every time you see the symbols “ ” or “ ”, that means that the user can adjust the displayed value up or down. To increase the value press key until “ ” flashes, then press to confirm, then press key and at every touch the value will increase by one unit.To decrease the value press key until “ ” flashes, then press to confirm, then press key and at every touch thevalue will decrease by one unit.If a mistake is made, press key to return and correct the value!If user press and holds key, the units will move faster, but be careful when gets closer to the desired number, as you can miss itand if that happens, press key to move back and Correct the mistake.
>>
<
<
<SEL> <SEL>
<SEL> <SEL>
<SEL>
<ENT>
<ENT>
<ESC>
<ESC>
WAIT POLARIZING
10 min : 15segIN POLARIZATION
Every time the instrument is turned on, the Cell Polarization will be preformed. This step is necessary as described under Standard Methods for Examination of Water and Waste Water.This process will take 12minutes to complete!
DO: /CALIBRATE/REG.
READ
Press key to access the Main Menu<ESCAPE>
Go to Top of Page14
A
DO: Read /Set Up
Press key to access the DO sub-menu<ESCAPE>
5.

Equipment Operation - DO - Set Up
DO: Read /Set Up
SELECT FUNCTION O %SAT2DO
PASSWORD___
BATTERY================
LANGUAGE:PORTG./ENGLISH/SPANISH
SELECT: / BODDO
UNIT: / ppm mg/L
RANGE0 to 60 ppm
RESOLUTION1 0.1 0.01
CALIBRATE IN: / WATERAIR
ZEROMANUAL / AUTO
SPAN / MANUAL AUTO
SPAN:7.50ppm <>
SALINIDADE0,1ppm <>
Go to Page15
A
14
Press key until option flashes, then press key to confirm the option chosen.
<SELECT> DO <ENTER>
Press key until option flashes, then press key to confirm the option chosen.
<SELECT> Set Up <ENTER>
A password is required to access the Set Up mode. Press in sequence , , .<SELECT> <ENTER> <ESCAPE>
User has the option to choose the desired language. Press key until the desired option flashes, then press key to confirm the option chosen.
<SELECT><ENTER>
Program will display the battery life left.
This Screen is default and cannot be changed.
Select the Resolution by pressing key. Option chosen will flash. Then press key to confirm option chosen.
<SELECT><ENTER>
User has the option to choose between DO or BOD. Press key until the desired option flashes, then press key to confirm the option chosen.
<SELECT><ENTER>
User has the option to choose between unit desired. Press key until the desired option flashes, then press key to confirm the option chosen.
<SELECT><ENTER>
User has the option to choose the Calibration typedesired. Press key until the desired optionflashes, then press key to confirm the option chosen. If air, calibrate the cell dry at 2cm from watersurface, and if water, dip the cell into Saturated distilled water with Oxygen. See pages 18 &19.
<SELECT><ENTER>
User has the option to choose the Zero calibration typedesired. Press key until the desired optionflashes, then press key to confirm the option chosen. If Zero Auto - Zero is achieved internally by theinstrument. If Zero Manual - also known as Zero Chemical,use solution without Oxygen presence.
<SELECT><ENTER>
Span is the second calibration point and user has the option to choose between Span Manual - when user hasa solution with a known dissolved oxygen value, obtained thru Winkler Method, so read values can be compared to the Winkler values or Span Auto -automatic conditions, with atmospheric air. Press
key until the desired option flashes, then press key to confirm the option chosen.<SELECT>
<ENTER>
User can adjust the Salinity value, so the salinity compensation can be performed. So the saltconcentration of the sample, needs to be known.Remember that at fresh water this value does notexceed 2000µOhms/cm, that corresponds to 1000ppmwhere use can considres the adjust to 0 (zero).Refer to page 13 for instruction on how to adjust this value. The Span Resolution will depend upon the Reading Resolution chosen above.
If chosen Zero Auto calibration,procedure will follow as page18. If chosen Zero manual calibration, will follow as page19.
5.
Equipment Operation - DO - Set Up (cont.)
BAROMETRIC PRES.Altitude 800m <>
TEMP. COEFIC. 4.00% /ºC <>
READING MODE/ /CONT. AVER. HOLD
INFORM WITH:200 READINGS <>
INFORM CALIBR.? / YES NO
TIME BETWEEN READINGS: 1s <>
KEYBOARD BEEP?/ NoYes
MAX. ALARM? / Yes No
CONFIG.DISPLAY? / Yes No
BARGRAPH?/ Yes No
Min: 0ppm Max: 60ppm
<<>>
MAX. VALUE:25.0ppm <>
MIN. ALARM?/ Yes No
MIN. VALUE:5ppm <>
RS-232 OUTPUT?/ Yes No
From Page 14A
Go to Page 16 Go to Page 16
A B
15
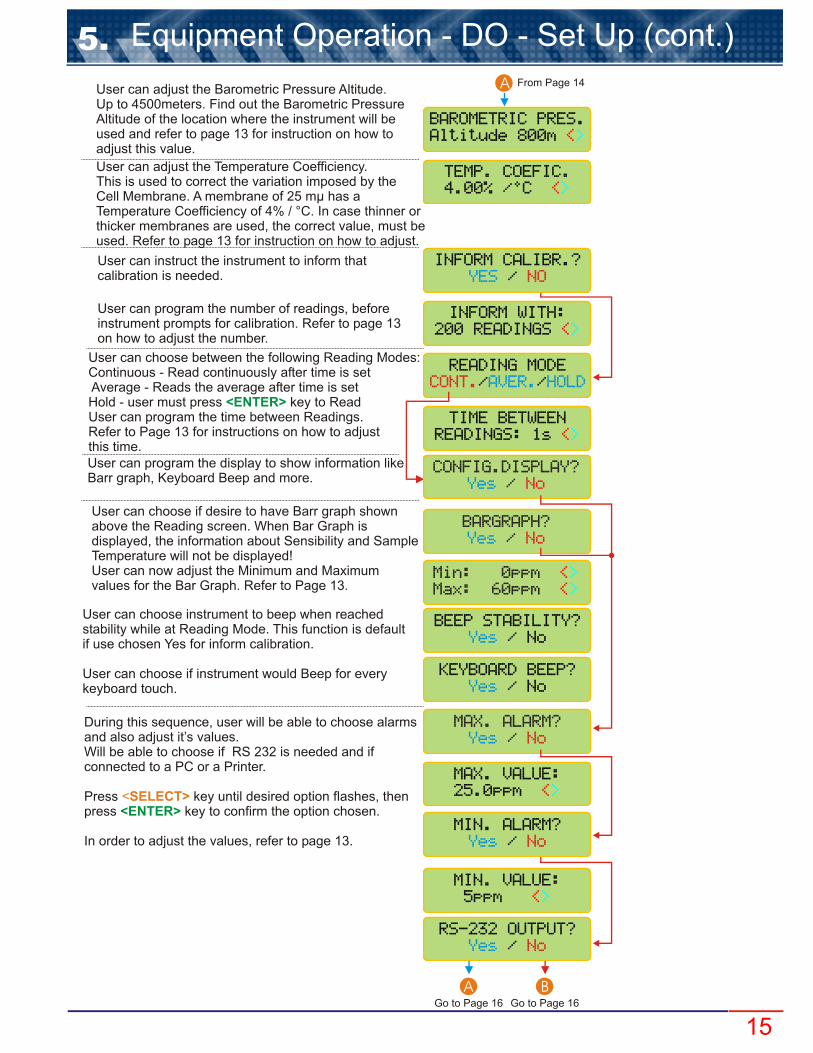
User can adjust the Barometric Pressure Altitude.Up to 4500meters. Find out the Barometric PressureAltitude of the location where the instrument will beused and refer to page 13 for instruction on how to adjust this value.
User can adjust the Temperature Coefficiency.This is used to correct the variation imposed by the Cell Membrane. A membrane of 25 mµ has a Temperature Coefficiency of 4% / °C. In case thinner or thicker membranes are used, the correct value, must be used. Refer to page 13 for instruction on how to adjust.
User can instruct the instrument to inform that calibration is needed.
User can program the number of readings, before instrument prompts for calibration. Refer to page 13 on how to adjust the number.
User can choose between the following Reading Modes: Continuous - Read continuously after time is set Average - Reads the average after time is setHold - user must press key to ReadUser can program the time between Readings. Refer to Page 13 for instructions on how to adjust this time.
<ENTER>
User can program the display to show information like Barr graph, Keyboard Beep and more.
User can choose if desire to have Barr graph shown above the Reading screen. When Bar Graph is displayed, the information about Sensibility and SampleTemperature will not be displayed!User can now adjust the Minimum and Maximum values for the Bar Graph. Refer to Page 13.
User can choose instrument to beep when reachedstability while at Reading Mode. This function is default if use chosen Yes for inform calibration.
User can choose if instrument would Beep for every keyboard touch.
During this sequence, user will be able to choose alarms and also adjust it’s values. Will be able to choose if RS 232 is needed and if connected to a PC or a Printer.
Press key until desired option flashes, thenpress key to confirm the option chosen.
In order to adjust the values, refer to page 13.
<SELECT><ENTER>
BEEP STABILITY?/ NoYes
5.

Equipment Operation - DO - Set Up (cont.)
SPEVD (100bps)12 24 48 96
SPEED (100bps)12 24 48 96
PRINTING MODE/CONT. MAN./STAB
NEW CELL? / YES NO
SAMPLING INTERVAL 2s <>
ZERO CHEMICAL? / YES NO
STATISTICS? / YES NO
PLACE THE CELL @ ZERO CHEMICAL
READY?
WAIT ZERO CHEMICAL
THERMOSTATIZE? / YES NO
THERMOSTATIZE CELL 25ºC <>
THERMOSTATIZE CELL @ 25ºC <E>
================WAIT
STABILIZING
VERIFY SOLUTION TEMPERATURE
VERIFY CELL PERSISTINT ERROR
CONTACT OMEGA CUSTOMER SERVICE
RS 232 OUTPUT / PC PRINTER
From Page 15
From Page 15
A
B
(800)872-9436<ENTER>
Cell with problem
16
Printing ModeCONT.: Print continuously (based on theprinting interval chosen)
Prints the Read value just afterpressing key. But only after theread value is stabilized (an arrow is displayed).
STAB.: Prints only one time, after thereading is stabilized (an arrow is displayed).
MAN.: <ENTER>
If user is changing the cell of the instrument, it is necessary to perform this operation.If changing the cell, choose At this point the user can establish the ZeroChemical for the new cell.
First find out the any sample temperature.Then adjust the temperature at the screen, to match the sample temperature being used. Refer to page 13 for instruction on how to modify this value. Dip the cell into the used sample, then press
Yes, then confirm.
key.
If the cell is new, user MUST choose Yesfor this option, since that the cell Zero waschosen as option Zero Auto (see page 14).
<ENTER>
5.
Zero Chemical is considered a samplethat does not has Oxygen.In order to achieve such solution, use 3grams of Sodium Sulfate (Na3SO4) for every 100ml of water.
Equipment Operation - DO - Read
DO: /CALIBRATE/REG.
READ
SELECT FUNCTION O %SAT2DO
GO TO SAMPPLE!READY?
================-> 8,12 ppm
800m 23.2ºC-> 8,12 ppm
17
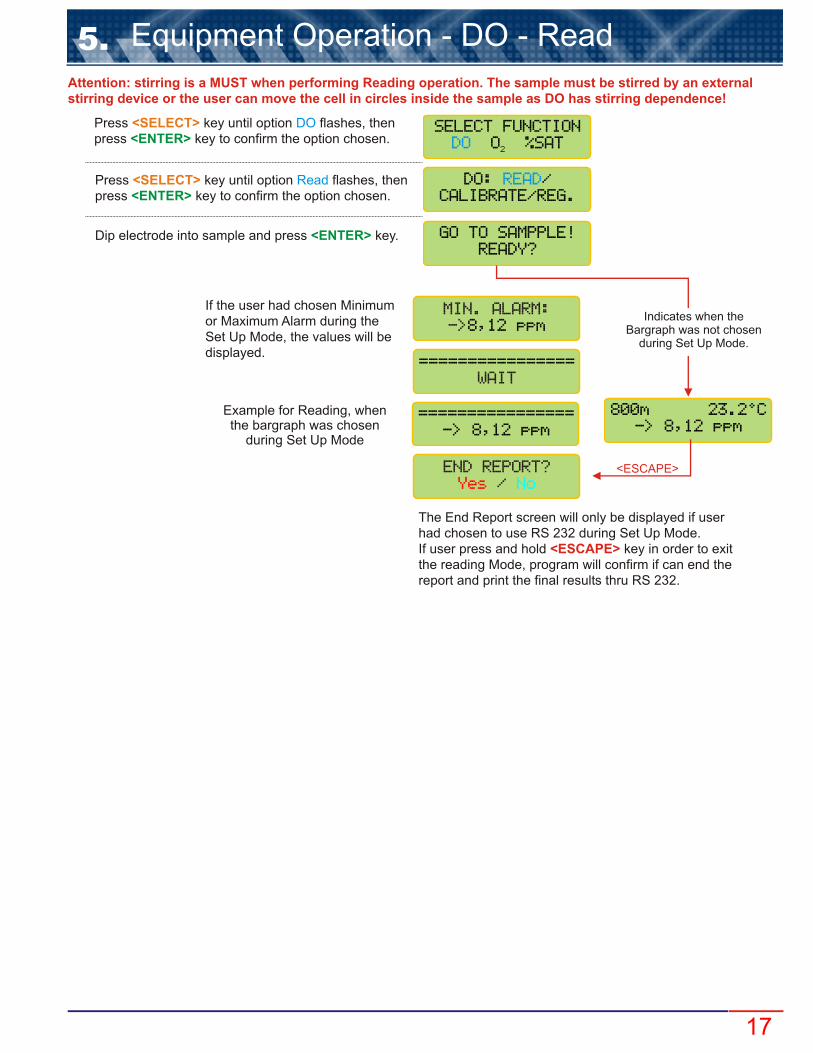
Press key until option flashes, then press key to confirm the option chosen.
<SELECT> DO <ENTER>
Press key until option flashes, then press key to confirm the option chosen.
<SELECT> Read <ENTER>
Dip electrode into sample and press key.<ENTER>
Example for Reading, when the bargraph was chosen
during Set Up Mode
<ESCAPE>
MIN. ALARM:->8,12 ppm
================WAIT
END REPORT? / Yes No
If the user had chosen Minimum or Maximum Alarm during the Set Up Mode, the values will be displayed.
The End Report screen will only be displayed if user had chosen to use RS 232 during Set Up Mode.If user press and hold key in order to exit the reading Mode, program will confirm if can end the report and print the final results thru RS 232.
<ESCAPE>
Indicates when the Bargraph was not chosen
during Set Up Mode.
Attention: stirring is a MUST when performing Reading operation. The sample must be stirred by an external stirring device or the user can move the cell in circles inside the sample as DO has stirring dependence!
5.

END REPORT? / YES NO
Equipment Operation - DO - Calibration
18
Cell
Level
Distilled Water
10mm
Follow this procedure in order to simulate 100% humidity.
<ESCAPE>
The reading will be displayed.
If user press and hold key in order to exit the reading Mode, program will confirm if can end the report and print the final results thru RS 232.
<ESCAPE>
SELECT FUNCTIONO2 DO %SAT
DO: READ / /REG.CALIBRATE
WAITAUTO ZERO
PLACE CELL @ ZERO CHEMICAL
PLACE CELLIN: 7.50 ppm
DIP CELL INTO AIRY WATER
READY?
================WAIT
GO TO SAMPLE!READY?
SIMULATE 100% HUMIDITY
READY?
WAIT ZERO CHEMICAL
ZERO
SPAN
CAL. IN
Manual
Manual
Water
Auto
Auto
Air
Press until flashes then press key. <SEL> DO <ENT>
Press until flashes then press key. <SEL> Calibrate <ENT>
Depending on option chosen during Set Up Mode for Zero: Auto Zero or Manual Zero (on Page 14).
Depending on option chosen during Set Up Mode for Span: Auto Span or Manual Span (on Page 14).
Depending on option chosen during Set Up Mode for Calibration Type: in Air or in Water (on Page 14).
Simulate 100% Humidity as shown on below picture. This option is show if user had chosen to calibrate in Air. Press key when ready. <ENT>
Airy water is water place inside aReservoir and O2 is directly pumped inside this reservoir, mixing with the water.
Dip Cell into sample to be measured. Make sure that you manually stir the cell or use an external Auto Stir. Stirring is crucial for DO measurement and without it the result will not be correct!Then press key when ready.<ENTER>
800m 23.2ºC8.7 ppm
================-> 8,7 ppm
Reading display, when the bargraph function was not
chosen durign Set Up Mode.
5.
Zero Chemical is considered a samplethat does not has Oxygen.In order to achieve such solution, use 3grams of Sodium Sulfate (Na3SO4)
for every 100ml of water.
Equipment Operation - DO - Register
SELECT FUNCTION O %SAT2DO
SELECT FUNCTION O %SAT2DO
DO: /SET UP/CHECK
READ
DO: /SET UP/CHECK
READ
DO: READ /CALIBRATE/REG
DO: READ /CALIBRATE/REG
REG: /CONSULT/ERASE
READ
REG: READ //ERASECONSULT
GO TO SAMPLE!READY?
REG:1 800m 23.2ºC-> 8.12 ppm
REGISTER: 01WAIT
19
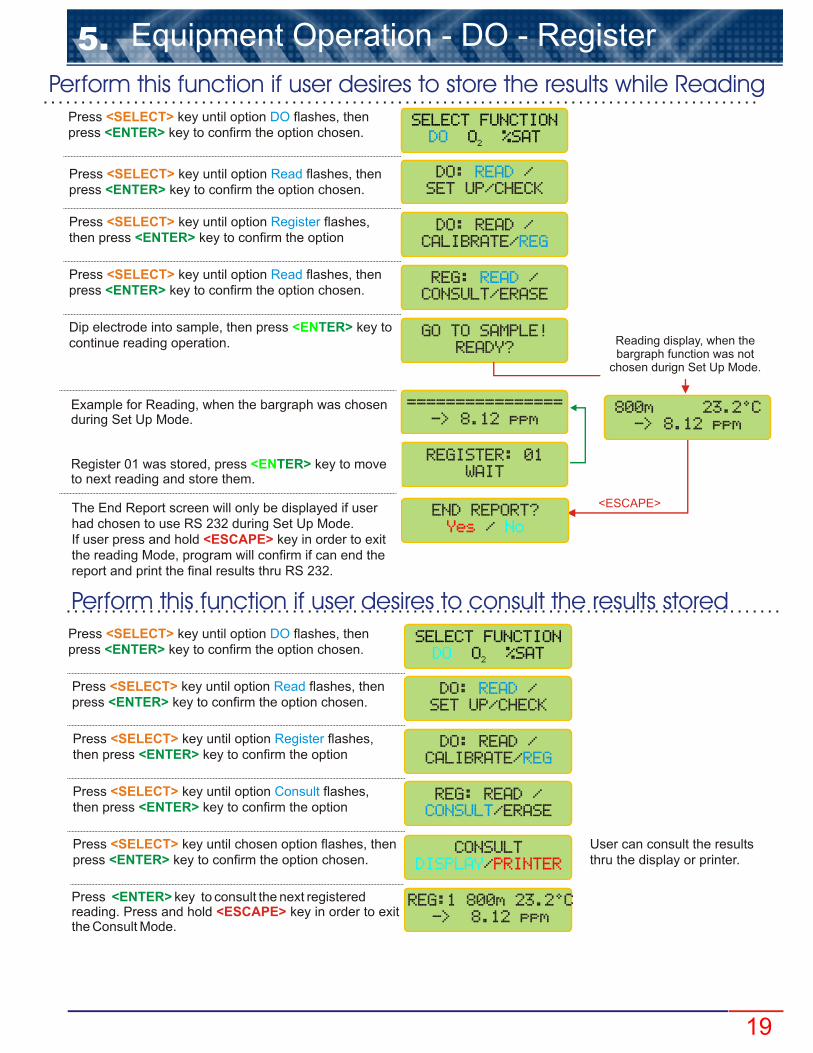
Perform this function if user desires to store the results while Reading
Perform this function if user desires to consult the results stored
Press key until option flashes, then press key to confirm the option chosen.
<SELECT> DO <ENTER>
Press key until option flashes, then press key to confirm the option chosen.
<SELECT> Read <ENTER>
Press key until option flashes, then press key to confirm the option
<SELECT> Register <ENTER>
Press key until option flashes, then press key to confirm the option chosen.
<SELECT> Read <ENTER>
Dip electrode into sample, then press key to continue reading operation.
<ENTER>
Example for Reading, when the bargraph was chosen during Set Up Mode.
Register 01 was stored, press key to move to next reading and store them.
<ENTER>
Press key to consult the next registeredreading. P
<ENTER>ress and hold key in order to exit
the Consult Mode.<ESCAPE>
Press key until option flashes, then press key to confirm the option chosen.
<SELECT> DO <ENTER>
Press key until option flashes, then press key to confirm the option chosen.
<SELECT> Read <ENTER>
Press key until option flashes, then press key to confirm the option
<SELECT> Register <ENTER>
Press key until option flashes, then press key to confirm the option
<SELECT> Consult <ENTER>
Press key until chosen option flashes, then press key to confirm the option chosen.
<SELECT> <ENTER>
CONSULT/DISPLAY PRINTER
User can consult the results thru the display or printer.
800m 23.2ºC-> 8.12 ppm
<ESCAPE>
Reading display, when the bargraph function was not
chosen durign Set Up Mode.
END REPORT? / Yes No
The End Report screen will only be displayed if user had chosen to use RS 232 during Set Up Mode.If user press and hold key in order to exit the reading Mode, program will confirm if can end the report and print the final results thru RS 232.
<ESCAPE>
================-> 8.12 ppm
5.
SELECT FUNCTION O %SAT2DO
DO: /SET UP/CHECK
READ
DO: READ /CALIBRATE/REG
REG: READ /CONSULT/ERASE
CONFIRM? / Yes No
Equipment Operation DO - Register (cont.)
20
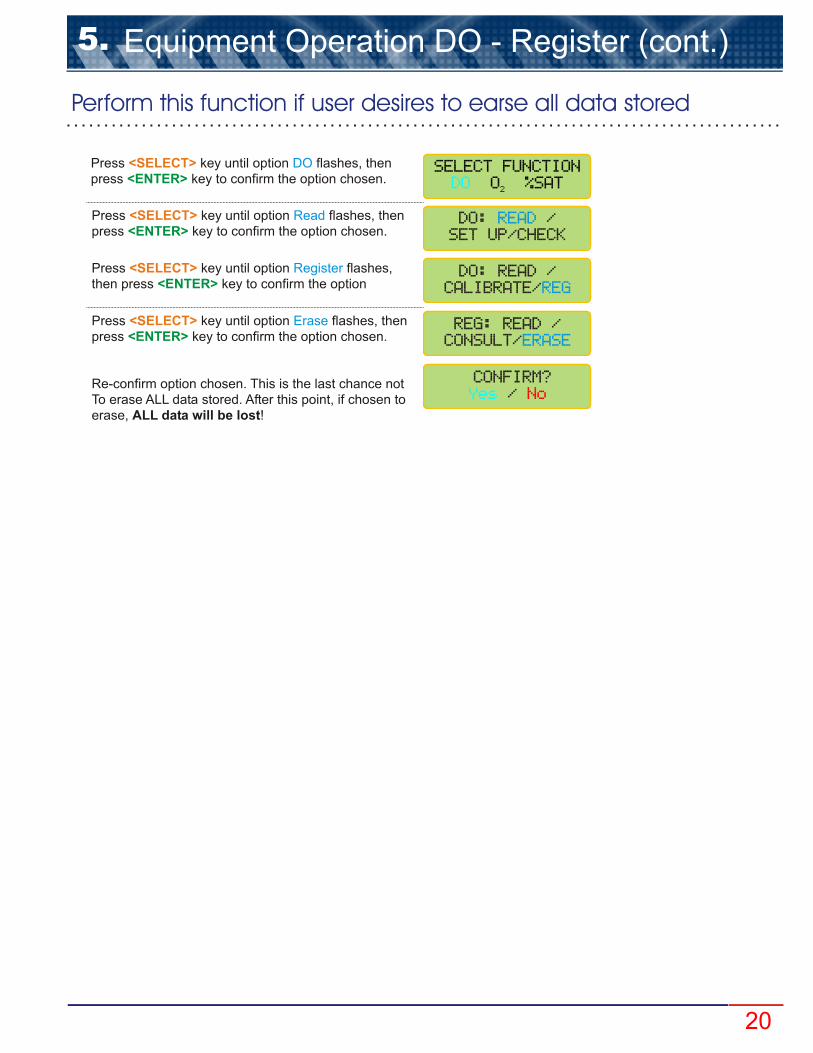
Perform this function if user desires to earse all data stored
Press key until option flashes, then press key to confirm the option chosen.
<SELECT> DO <ENTER>
Press key until option flashes, then press key to confirm the option chosen.
<SELECT> Read <ENTER>
Press key until option flashes, then press key to confirm the option
<SELECT> Register <ENTER>
Press key until option flashes, then press key to confirm the option chosen.
Re-confirm option chosen. This is the last chance not To erase ALL data stored. After this point, if chosen to erase, ALL data will be lost!
<SELECT> Erase <ENTER>
5.

Equipment Operation - O2 - Set Up
O : READ /2
SET UP
SELECT FUNCTIONDO %SATO2
PASSWORD___
BATTERY================
LANGUAGE:PORTG.//SPANISHENGLISH
UNIT:%GAS
RANGE0 to 40%GAS
RESOLUTION1 0.010.1
ZERO/ MANUALAUTO
BAROMETRIC PRES.ALTITUDE 800m<>
TEMP.COEFIC.4.00%/ºC <>
INFORM CAL.?/ YES NO
INFORM WITH?200 READINGS <>
Go to Page 22
A
READING MODE/ /CONT AVER. HOLD
TIME BETWEEN READINGS 5s <>
21
Press key until option flashes, then press key to confirm the option chosen.
<SELECT> O2 <ENTER>
Press key until option flashes, then press key to confirm the option chosen.
<SELECT> Set Up <ENTER>
A password is required to access the Set Up mode. Press in sequence , , .<SELECT> <ENTER> <ESCAPE>
User has the option to choose the desired language. Press key until the desired option flashes, then press key to confirm the option chosen.
<SELECT><ENTER>
Program will display the battery life left.
Unit will be displayed.
This Screen is default and cannot be changed.
Select the Resolution by pressing key. Option chosen will flash. Then press key to confirm option chosen.
<SELECT><ENTER>
At this option only choose Auto! Do not choose Manual.Press key until AUTO flashes, then press
key to confirm the option chosen. Zero Auto - Zero is achieved internally by the instrument.
<SELECT><ENTER>
User can adjust the Barometric Pressure Altitude.Up to 4500meters. Find out the Barometric PressureAltitude of the location where the instrument will beusedand refer to page 13 for instruction on how to adjust this value.
User can adjust the Temperature Coefficiency. This is used to correct the variation imposed by the Cell Membrane. A membrane of 25 mµ has a Temperature Coefficiency of 4% / °C. In case thinner or thicker membranes are used, the correct value, must be used. Refer to page 13 for instruction on how to modify this value.
User can instruct the instrument to inform that calibration is needed.
User can program the number of readings, before instrument prompts for calibration. Refer to page 13 on how to adjust the number.
User can choose between the following Reading Modes: Continuous - Read continuously after time is set Average - Reads the average after time is setHold - user must press key to ReadUser can program the time between Readings. Refer to Page 13 for instructions on how to adjust this time.
<ENTER>
5.
KEYBOARD BEEP? / YES NO
MAX. ALARM? / YES NO
DISPLAY? / YES NO
BARGRAPH?/ YES NO
Min: 0%GAS Max: 40%GAS
<<>>
BEEP ON STABIL.?/ YES NO
MAX. VALUE:25.00% GAS <>
MIN. ALARM?/ YES NO
MIN. VALUE:0.00% GAS <>
RS-232 OUTPUT?/ YES NO
Equipment Operation - O2 - Set Up (cont.)From Page 21A
Go to Page 23 Go to Page 23
A B
22
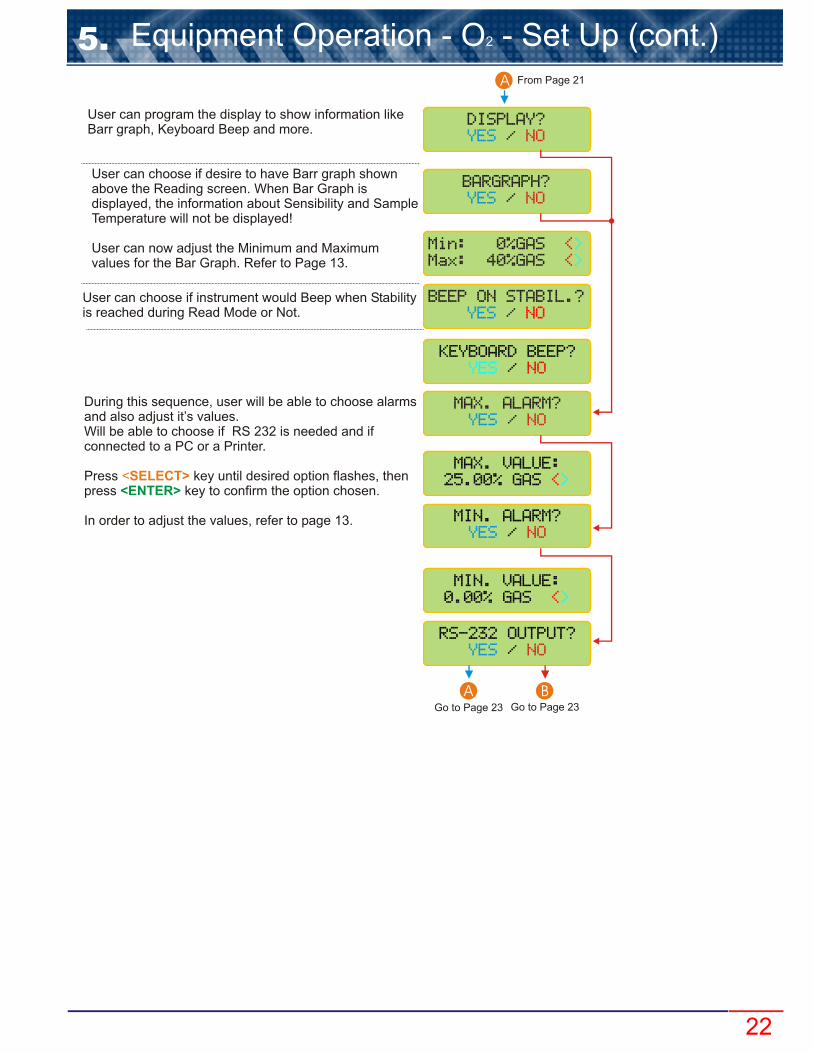
User can program the display to show information like Barr graph, Keyboard Beep and more.
User can choose if desire to have Barr graph shown above the Reading screen. When Bar Graph is displayed, the information about Sensibility and SampleTemperature will not be displayed!
User can now adjust the Minimum and Maximum values for the Bar Graph. Refer to Page 13.
User can choose if instrument would Beep when Stability is reached during Read Mode or Not.
During this sequence, user will be able to choose alarms and also adjust it’s values. Will be able to choose if RS 232 is needed and if connected to a PC or a Printer.
Press key until desired option flashes, thenpress key to confirm the option chosen.
In order to adjust the values, refer to page 13.
<SELECT><ENTER>
5.

Equipment Operation - O2 - Set Up (cont.)
SPEED (100bps)12 24 48 96
SPEED (100bps)12 24 48 96
PRINTING MODE/ LCONTIN. MANUA
NEW CELL? / YES NO
PRINTING INTERVAL 2s <>
ZERO CHEMICAL? / YES NO
STATISTICS? / YES NO
PLACE CELL @ ZERO CHEMICAL
READY?
WAIT ZERO CHEMICAL
THERMOSTATIZE? / YES NO
THERMOSTATIZE CELL 25ºC <>
THERMOSTATIZE CELL @ 25ºC <E>
================WAIT
STABILIZING
VERIFY SOLUTION TEMPERATURE
VERIFY CELL PERSISTING ERROR
CONTACT OMEGA CUSTOMER SERVICE
RS 232 OUTPUT / PC PRINTER
From Page 22
From Page 22
A
B
(800)872-9436<ENTER>
Cell withproblem
23
Printing ModeCONT.: Print continuously (based on theprinting interval chosen)
Prints the Read value just afterpressing key. But only after theread value is stabilized (an arrow is displayed).
STAB.: Prints only one time, after thereading is stabilized (an arrow is displayed).
MAN.: <ENTER>
If user is changing the cell of the instrument, it is necessary.If changing the cell, choose .
First find out the any sample temperature. Then adjust the temperature at the screen, to match the sample temperature being used. Refer to page 13 for instruction on how to modify this value. Dip the cell into the used sample, then press
Yes
<ENTER> key.
5.

Equipment Operation - O2 - Read
SELECT FUNCTIONDO %SATO 2
O : /2
SET UP
READ
O : /2
CALIBRATE/REG
READ
GO TO SAMPLE!READY?
800m 22.7ºC->22.70%GAS
24
Press key until option flashes, then press key to confirm the option chosen.
<SELECT> O2 <ENTER>
Press key until option flashes, then press key to confirm the option chosen.
<SELECT> Read <ENTER>
Dip electrode into sample and press key.<ENTER>
Press key until option flashes, then press key to confirm the option chosen.
<SELECT> Read <ENTER>
================-> 22.70%GAS
Example for Reading, when the bargraph was chosen
during Set Up Mode
<ESCAPE>
MIN. ALARM:->21.00 %GAS
================WAIT
END REPORT? / Yes No
If the user had chosen Minimum or Maximum Alarm during the Set Up Mode, the values will be displayed.
The End Report screen will only be displayed if user had chosen to use RS 232 during Set Up Mode.If user press and hold key in order to exit the reading Mode, program will confirm if can end the report and print the final results thru RS 232.
<ESCAPE>
Indicates when the Bargraph was not chosen
during Set Up Mode.
Attention: stirring is a MUST when performing Reading operation. The sample must be stirred by an external stirring device or the user can move the cell in circles inside the sample as O2 has stirring dependence!
5.
Equipment Operation - O2 - Calibration
O : READ/2
/REGCALIBRATE
O : /2
SET UP
READ
SELECT FUNCTIONDO %SATO2
WAITAUTO ZERO
SIMULATE 100%HUMIDITY
READY?
================WAIT
GO TO SAMPLE!READY?
================-> 8.7 %Gas
END REPORT? / YES NO
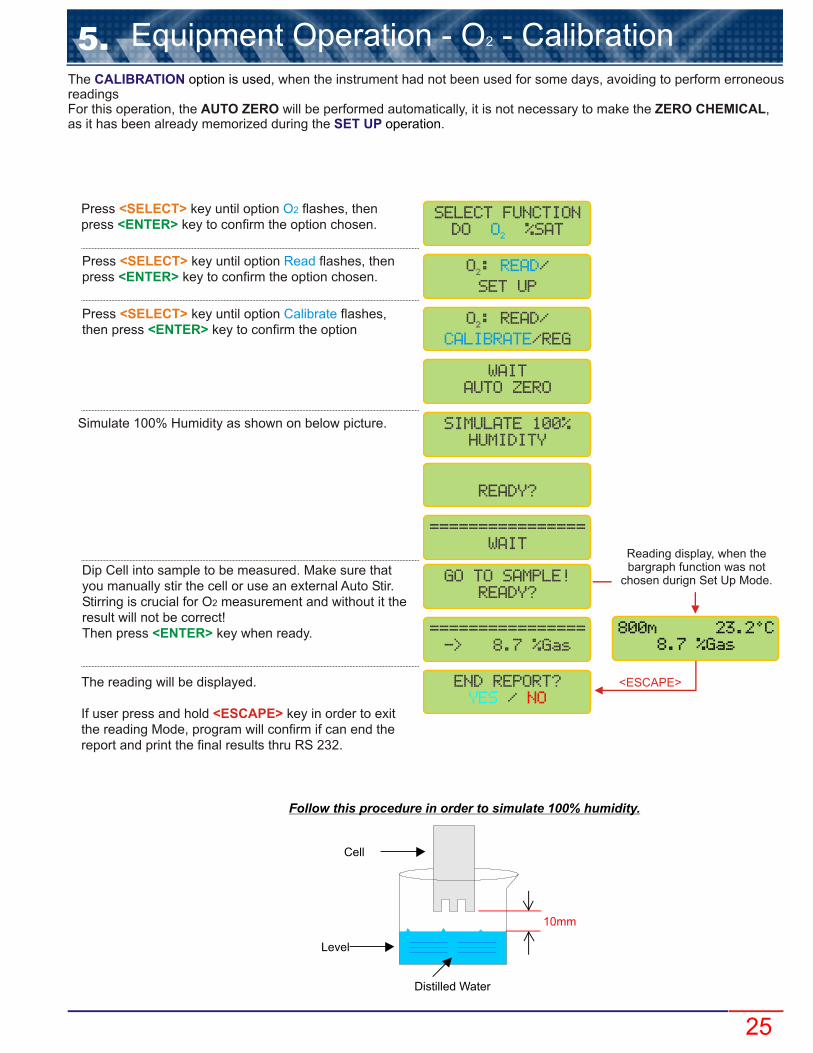
The , when the instrument had not been used for some days, avoiding to perform erroneous readings For this operation, the
CALIBRATION option is used
AUTO ZERO will be performed automatically, it is not necessary to make the ZERO CHEMICAL,as it has been already memorized during the .SET UP operation
25
Cell
Level
Distilled Water
10mm
Follow this procedure in order to simulate 100% humidity.
800m 23.2ºC8.7 %Gas
Reading display, when the bargraph function was not
chosen durign Set Up Mode.
<ESCAPE>
Press key until option flashes, then press key to confirm the option chosen.
<SELECT> O2 <ENTER>
Press key until option flashes, then press key to confirm the option chosen.
<SELECT> Read <ENTER>
Press key until option flashes, then press key to confirm the option
<SELECT> Calibrate <ENTER>
Dip Cell into sample to be measured. Make sure that you manually stir the cell or use an external Auto Stir. Stirring is crucial for O2 measurement and without it the result will not be correct!Then press key when ready.<ENTER>
The reading will be displayed.
If user press and hold key in order to exit the reading Mode, program will confirm if can end the report and print the final results thru RS 232.
<ESCAPE>
Simulate 100% Humidity as shown on below picture.
5.

Equipment Operation - O2 - Register
SELECT FUNCTIONDO %SATO2
SELECT FUNCTIONDO %SATO2
O : /2
SET UP/CHECK
READ
O : /2
SET UP/CHECK
READ
O : READ /2
CALIBRATE/REG
O : READ /2
CALIBRATE/REG
REG: /CONSULT/ERASE
READ
REG: READ //ERASECONSULT
GO TO SAMPLE!READY?
REG:1 800m 23.2ºC-> 20.90 %Gas
================-> 20.90 %Gas
REGISTER: 01WAIT
26
Perform this function if user desires to store the results while Reading
Perform this function if user desires to consult the results stored
Press key until option flashes, then press key to confirm the option chosen.
<SELECT> O2 <ENTER>
Press key until option flashes, then press key to confirm the option chosen.
<SELECT> Read <ENTER>
Press key until option flashes, then press key to confirm the option
<SELECT> Register <ENTER>
Press key until option flashes, then press key to confirm the option chosen.
<SELECT> Read <ENTER>
Dip electrode into sample, then press key to continue reading operation.
<ENTER>
Example for Reading, when the bargraph was chosen during Set Up Mode.
Register 01 was stored, press key to move to next reading and store them.
<ENTER>
Press key until option flashes, then press key to confirm the option chosen.
<SELECT> O2 <ENTER>
Press key until option flashes, then press key to confirm the option chosen.
<SELECT> Read <ENTER>
Press key until option flashes, then press key to confirm the option
<SELECT> Register <ENTER>
Press key until option flashes, then press key to confirm the option
<SELECT> Consult <ENTER>
Press key until chosen option flashes, then press key to confirm the option chosen.
<SELECT> <ENTER>
CONSULT/DISPLAY PRINTER
User can consult the results thru the display or printer.
800m 23,2ºC-> 20.90 %Gas
<ESCAPE>
Reading display, when the bargraph function was not
chosen durign Set Up Mode.
END REPORT? / Yes No
The End Report screen will only be displayed if user had chosen to use RS 232 during Set Up Mode.If user press and hold key in order to exit the reading Mode, program will confirm if can end the report and print the final results thru RS 232.
<ESCAPE>
Press key to consult the next registeredreading. P
<ENTER>ress and hold key in order to exit
the Consult Mode.<ESCAPE>
5.

SELECT FUNCTIONDO %SATO2
O : /2
SET UP/CHECK
READ
O : READ /2
CALIBRATE/REG
REG: READ /CONSULT/ERASE
CONFIRM? / Yes No
Equipment Operation O2 - Register (cont.)
27
Perform this function if user desires to earse all data stored
Press key until option flashes, then press key to confirm the option chosen.
<SELECT> pH <ENTER>
Press key until option flashes, then press key to confirm the option chosen.
<SELECT> Read <ENTER>
Press key until option flashes, then press key to confirm the option
<SELECT> Register <ENTER>
Press key until option flashes, then press key to confirm the option chosen.
Re-confirm option chosen. This is the last chance not To erase ALL data stored. After this point, if chosen to erase, ALL data will be lost!
<SELECT> Erase <ENTER>
5.

Equipment Operation - %Sat - Set Up
SELECT FUNCTIONDO O 2 %SAT
%SAT: READ/SET UP
PASSWORD___
BATTERY================
LANGUAGE:PORTG./ENGLISH/SPANISH
UNIT %
RANGE0 to 100 %
RESOLUTION1 / / 0.010.1
ZEROMANUAL / AUTO
SALINITY0 ppm <>
BAROMETRIC PRES.ALTITUDE 800m <>
TEMP. COEFIC.= 4.0%/ºC <>
Go to Page 29
A
28
Press key until option flashes, then press key to confirm the option chosen.
<SELECT> %Sat <ENTER>
Press key until option flashes, then press key to confirm the option chosen.
<SELECT> Set Up <ENTER>
A password is required to access the Set Up mode. Press in sequence , , .<SELECT> <ENTER> <ESCAPE>
User has the option to choose the desired language. Press key until the desired option flashes, then press key to confirm the option chosen.
<SELECT><ENTER>
Program will display the battery life left.
Unit will be displayed.
This Screen is default and cannot be changed.
Select the Resolution by pressing key. Option chosen will flash. Then press key to confirm option chosen.
<SELECT><ENTER>
User can adjust the Barometric Pressure Altitude.Up to 4500meters. Find out the Barometric PressureAltitude of the location where the instrument will beused and refer to page 13 for instruction on how to adjust this value.
User has the option to choose the Zero calibration typedesired. Press key until the desired optionflashes, then press key to confirm the option chosen. If Zero Auto - Zero is achieved internally by theinstrument. If Zero Manual - also known as Zero Chemical,use solution without Oxygen presence.
<SELECT><ENTER>
User can adjust the Salinity value, so the salinity compensation can be performed. So the salt concentration of the sample, needs to be known. Remember that at fresh water this value does not exceed 2000µOhms/cm, that corresponds to 1000ppm where user can considres the adjust to 0 (zero).Refer to page 13 for instruction on how to adjust this value.
User can adjust the Temperature Coefficiency. This is used to correct the variation imposed by the Cell Membrane. A membrane of 25 mµ has a Temperature Coefficiency of 4% / °C. In case thinner or thicker membranes are used, the correct value, must be used. Refer to page 13 for instruction on how to modify this value.
5.
Equipment Operation - %Sat - Set Up (cont.)
KEYBOARD BEEP? / YES NO
MAX. ALARM? / YES NO
DISPLAY? / YES NO
BARGRAPH?/ YES NO
Min: 0% Max: 100%
< <
>>
BEEP ON STAB.? / YES NO
MAX. VALUE:25.00% GAS <>
MIN. ALARM?/ YES NO
MIN. VALUE:5.00% GAS <>
RS-232 OUTPUT?/ YES NO
From Page 28A
Go to Page 30 Go to Page 30
A B
29
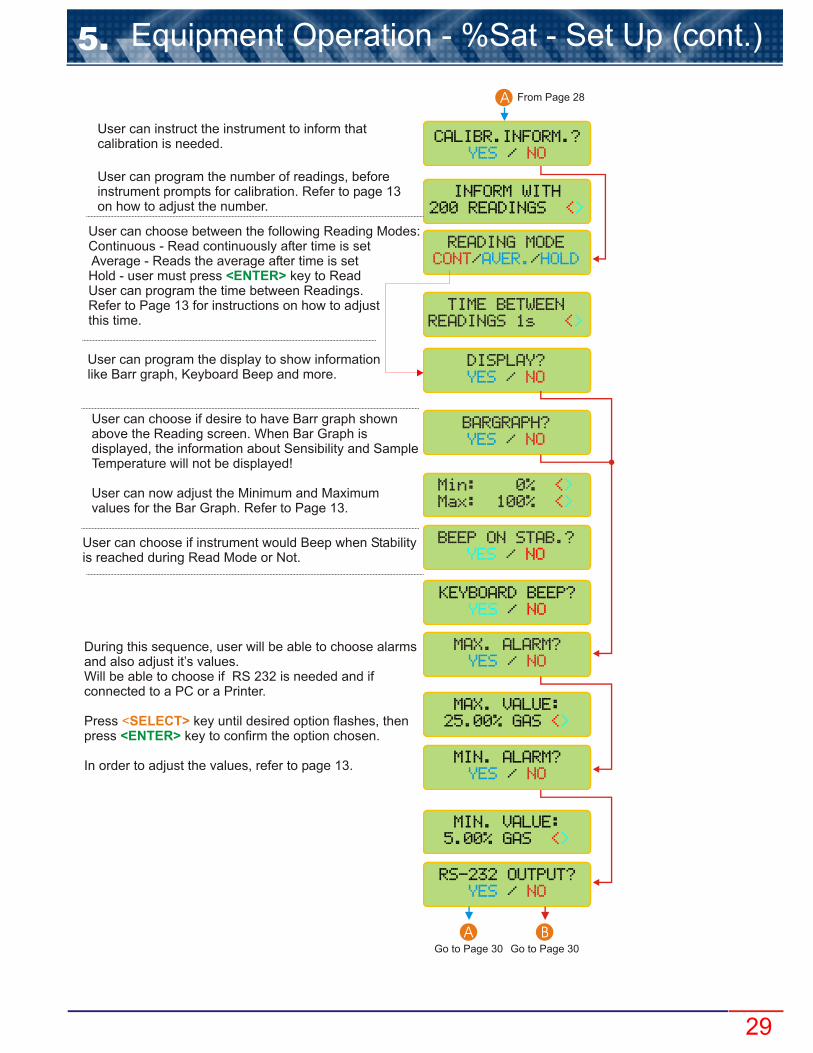
CALIBR.INFORM.?/ YES NO
INFORM WITH200 READINGS <>
READING MODE/ /CONT AVER. HOLD
TIME BETWEENREADINGS 1s <>
User can instruct the instrument to inform that calibration is needed.
User can program the number of readings, before instrument prompts for calibration. Refer to page 13 on how to adjust the number.
User can choose between the following Reading Modes: Continuous - Read continuously after time is set Average - Reads the average after time is setHold - user must press key to ReadUser can program the time between Readings. Refer to Page 13 for instructions on how to adjust this time.
<ENTER>
User can program the display to show information like Barr graph, Keyboard Beep and more.
User can choose if desire to have Barr graph shown above the Reading screen. When Bar Graph is displayed, the information about Sensibility and SampleTemperature will not be displayed!
User can now adjust the Minimum and Maximum values for the Bar Graph. Refer to Page 13.
User can choose if instrument would Beep when Stability is reached during Read Mode or Not.
During this sequence, user will be able to choose alarms and also adjust it’s values. Will be able to choose if RS 232 is needed and if connected to a PC or a Printer.
Press key until desired option flashes, thenpress key to confirm the option chosen.
In order to adjust the values, refer to page 13.
<SELECT><ENTER>
5.
Equipment Operation - %Sat - Set Up (cont.)
SPEED (100bps)12 24 48 96
SPEED (100bps)12 24 48 96
PRINTING MODE/MANUALCONTIN.
NEW CELL? / YES NO
PRINTING INTERVAL 2s <>
ZERO CHEMICAL? / YES NO
STATISTICS? / YES NO
PLACE CELL @ZERO CHEMICAL
READY?
WAIT ZERO CHEMICAL
THERMOSTATIZE? / YES NO
THERMOSTATIZE CELL 25ºC <>
THERMOSTATIZE CEL @ 25ºC <E>
================WAIT
STABILIZING
VERIFY SOLUTIONTEMPERATURE
VERIFY CELL PERSISTING ERROR
CONTACT OMEGACUSTOMER SERVICE
RS 232 OUTPUT / PC PRINTER
From Page 29
From Page 29
A
B
(800)872-9436<ENTER>
Cell withproblem
30
A
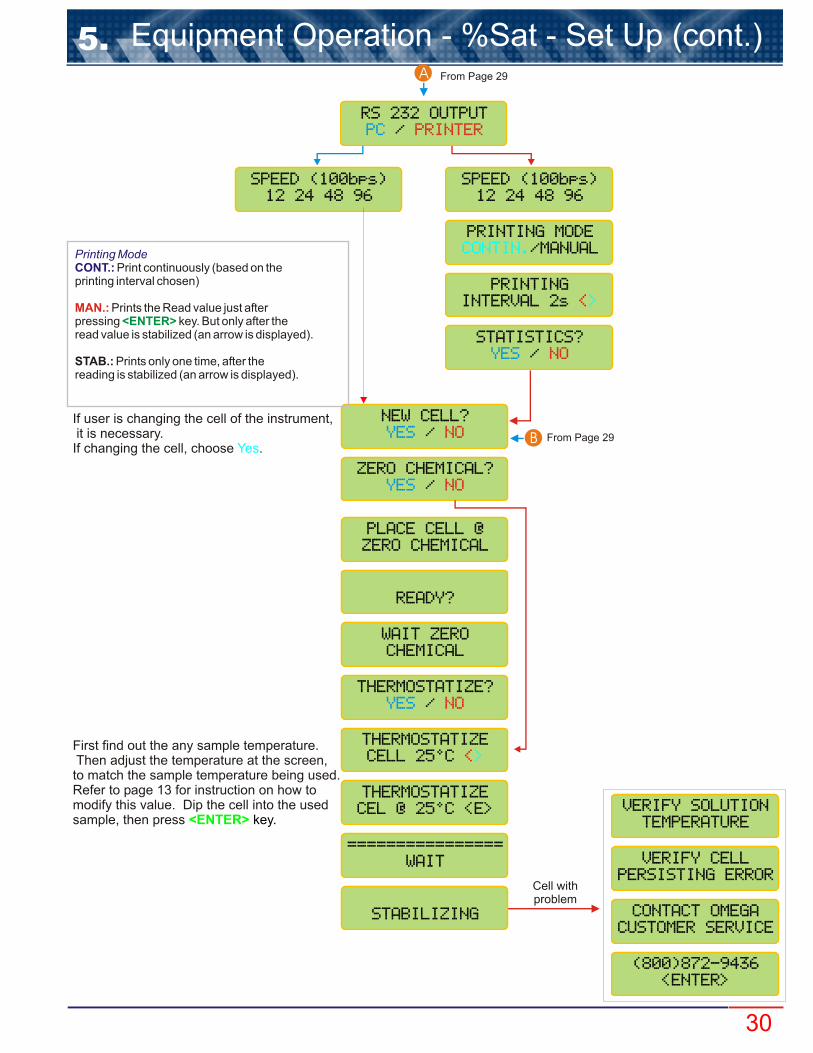
Printing ModeCONT.: Print continuously (based on theprinting interval chosen)
Prints the Read value just afterpressing key. But only after theread value is stabilized (an arrow is displayed).
STAB.: Prints only one time, after thereading is stabilized (an arrow is displayed).
MAN.: <ENTER>
If user is changing the cell of the instrument, it is necessary.If changing the cell, choose .
First find out the any sample temperature. Then adjust the temperature at the screen, to match the sample temperature being used. Refer to page 13 for instruction on how to modify this value. Dip the cell into the used sample, then press
Yes
<ENTER> key.
5.

Equipment Operation - %Sat - Calibration
%SAT: READ//REG.CALIBRATE
SELECT FUNCTIONDO O 2 %SAT
WAITAUTO ZERO
SIMULATE 100%HUMIDITY
READY?
================WAIT
GO TO SAMPLE!READY?
800m 23.2ºC-> 8.7%
<ESCAPE>
===============-> 8.7%
END REPORT? / YES NO
31
Cell
Level
Distilled Water
10mm
Follow this procedure in order to simulate 100% humidity.
The , when the instrument had not been used for some days, avoiding to perform erroneous readings For this operation, the
CALIBRATION option is used
AUTO ZERO will be performed automatically, it is not necessary to make the ZERO CHEMICAL,as it has been already memorized during the .SET UP operation
Reading display, when the bargraph function was not
chosen durign Set Up Mode.
Example for Reading, when the bargraph was chosen
during Set Up Mode
If the user had chosen Minimum or Maximum Alarm during the Set Up Mode, the values will be displayed.
MIN. ALARM:->8.0%
================WAIT
The End Report screen will only be displayed if user had chosen to use RS 232 during Set Up Mode.If user press and hold key in order to exit the reading Mode, program will confirm if can end the report and print the final results thru RS 232.
<ESCAPE>
5.

SELECT FUNCTIONDO O 2 %SAT
%SAT: /SET UP
READ
%SAT: /CALIBRATE/REG
READ
GO TO SAMPLE!READY?
800m 23.2ºC-> 8.7%
<ESCAPE>
================-> 8.7%
END REPORT? / YES NO
Equipment Operation - %Sat - Read
32
Reading display, when the bargraph function was not
chosen durign Set Up Mode.
Press key until option flashes, then press key to confirm the option chosen.
<SELECT> O2 <ENTER>
Press key until option flashes, then press key to confirm the option chosen.
<SELECT> Read <ENTER>
Press key until option flashes, then press key to confirm the option
<SELECT> Register <ENTER>
Dip electrode into sample, then press key to continue reading operation.
<ENTER>
Example for Reading, when the bargraph was chosen during Set Up Mode.
The End Report screen will only be displayed if user had chosen to use RS 232 during Set Up Mode.If user press and hold key in order to exit the reading Mode, program will confirm if can end the report and print the final results thru RS 232.
<ESCAPE>
Attention: stirring is a MUST when performing Reading operation. The sample must be stirred by an external stirring device or the user can move the cell in circles inside the sample as %Saturation has stirring dependence!
5.
Equipment Operation - %Sat - Register
SELECT FUNCTIONDO O 2 %SAT
SELECT FUNCTIONDO O 2 %SAT
%SAT: /SET UP/CHECK
READ
%SAT: /SET UP/CHECK
READ
%SAT: READ /CALIBRATE/REG
%SAT: READ /CALIBRATE/REG
REG: /CONSULT/ERASE
READ
REG: READ //ERASECONSULT
GO TO SAMPLE!READY?
REG:1 800m 23.2ºC-> 8.7%
REGISTER: 01WAIT
33
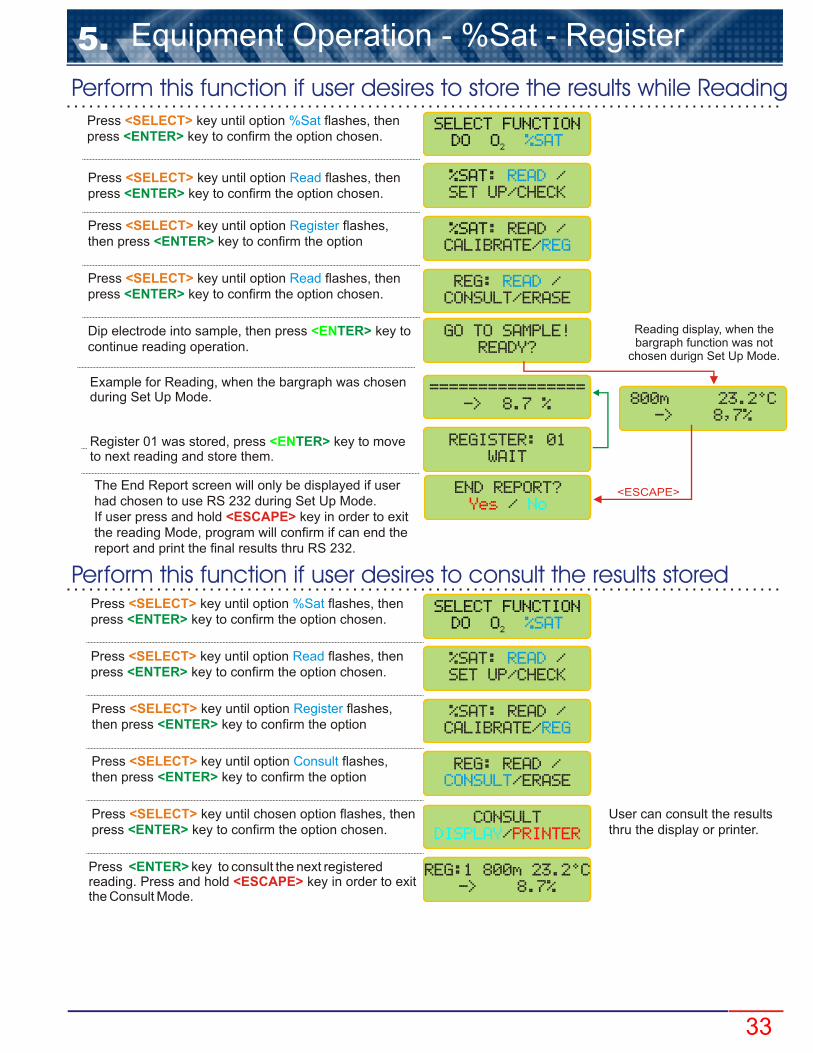
Perform this function if user desires to store the results while Reading
Perform this function if user desires to consult the results stored
Press key until chosen option flashes, then press key to confirm the option chosen.
<SELECT> <ENTER>
CONSULT/DISPLAY PRINTER
User can consult the results thru the display or printer.
END REPORT? / Yes No
The End Report screen will only be displayed if user had chosen to use RS 232 during Set Up Mode.If user press and hold key in order to exit the reading Mode, program will confirm if can end the report and print the final results thru RS 232.
<ESCAPE>
Press key until option flashes, then press key to confirm the option chosen.
<SELECT> %Sat <ENTER>
Press key until option flashes, then press key to confirm the option chosen.
<SELECT> Read <ENTER>
Press key until option flashes, then press key to confirm the option
<SELECT> Register <ENTER>
Press key until option flashes, then press key to confirm the option chosen.
<SELECT> Read <ENTER>
Dip electrode into sample, then press key to continue reading operation.
<ENTER>
Example for Reading, when the bargraph was chosen during Set Up Mode.
Register 01 was stored, press key to move to next reading and store them.
<ENTER>
================-> 8.7 % 800m 23.2ºC
-> 8,7%
Reading display, when the bargraph function was not
chosen durign Set Up Mode.
<ESCAPE>
Press key until option flashes, then press key to confirm the option chosen.
<SELECT> %Sat <ENTER>
Press key until option flashes, then press key to confirm the option chosen.
<SELECT> Read <ENTER>
Press key until option flashes, then press key to confirm the option
<SELECT> Register <ENTER>
Press key until option flashes, then press key to confirm the option
<SELECT> Consult <ENTER>
Press key to consult the next registeredreading. P
<ENTER>ress and hold key in order to exit
the Consult Mode.<ESCAPE>
5.

SELECT FUNCTIONDO O 2 %SAT
O : /2
SET UP/CHECK
READ
O : READ /2
CALIBRATE/REG
REG: READ /CONSULT/ERASE
CONFIRM? / Yes No
Equipm. Oper. %Saturation- Register (cont.)
34
Perform this function if user desires to earse all data stored
Press key until option flashes, then press key to confirm the option chosen.
<SELECT> %Sat <ENTER>
Press key until option flashes, then press key to confirm the option chosen.
<SELECT> Read <ENTER>
Press key until option flashes, then press key to confirm the option
<SELECT> Register <ENTER>
Press key until option flashes, then press key to confirm the option chosen.
Re-confirm option chosen. This is the last chance not To erase ALL data stored. After this point, if chosen to erase, ALL data will be lost!
<SELECT> Erase <ENTER>
5.
SELECT FUNCTION O %SAT2DO
SWITCH OFF?
/ YES NO
GOOD BYE!
Equipment Operation - Turning Off
35
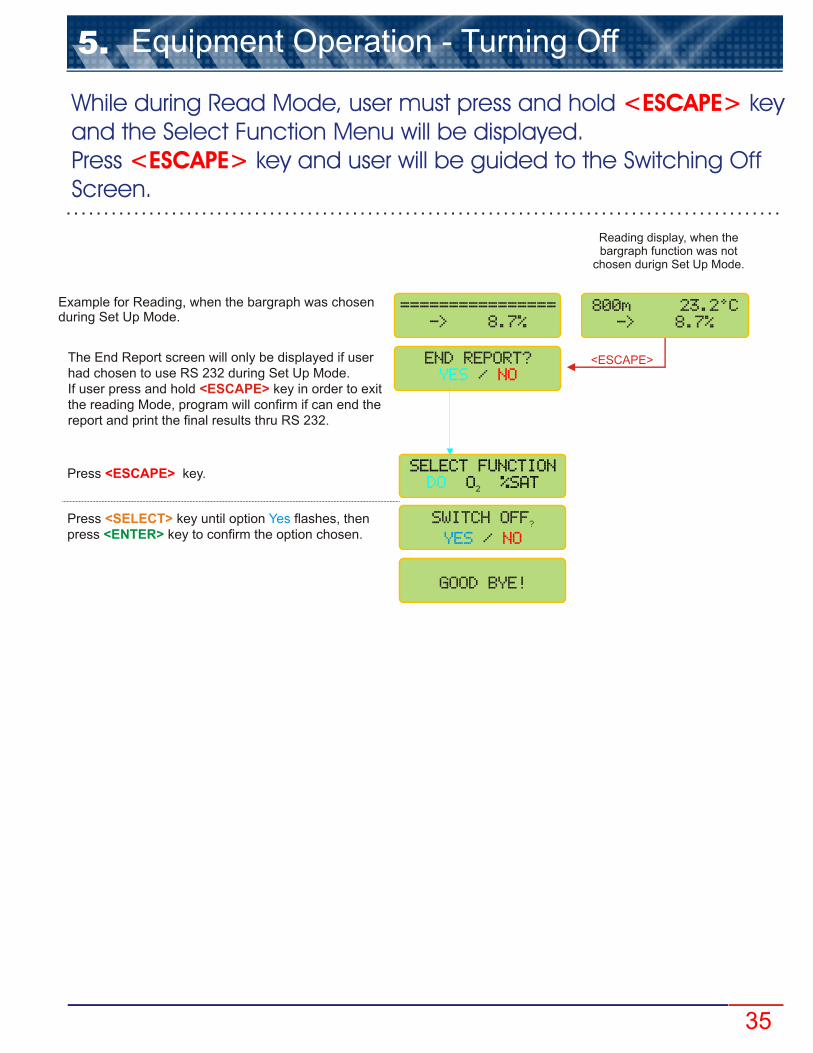
While during Read Mode, user must press and hold keyand the Select Function Menu will be displayed.Press key and user will be guided to the Switching OffScreen.
<ESCAPE>
<ESCAPE>
Press key.<ESCAPE>
Press key until option flashes, then press key to confirm the option chosen.
<SELECT> Yes <ENTER>
5.
800m 23.2ºC-> 8.7%
<ESCAPE>
================-> 8.7%
END REPORT? / YES NO
Reading display, when the bargraph function was not
chosen durign Set Up Mode.
Example for Reading, when the bargraph was chosen during Set Up Mode.
The End Report screen will only be displayed if user had chosen to use RS 232 during Set Up Mode.If user press and hold key in order to exit the reading Mode, program will confirm if can end the report and print the final results thru RS 232.
<ESCAPE>
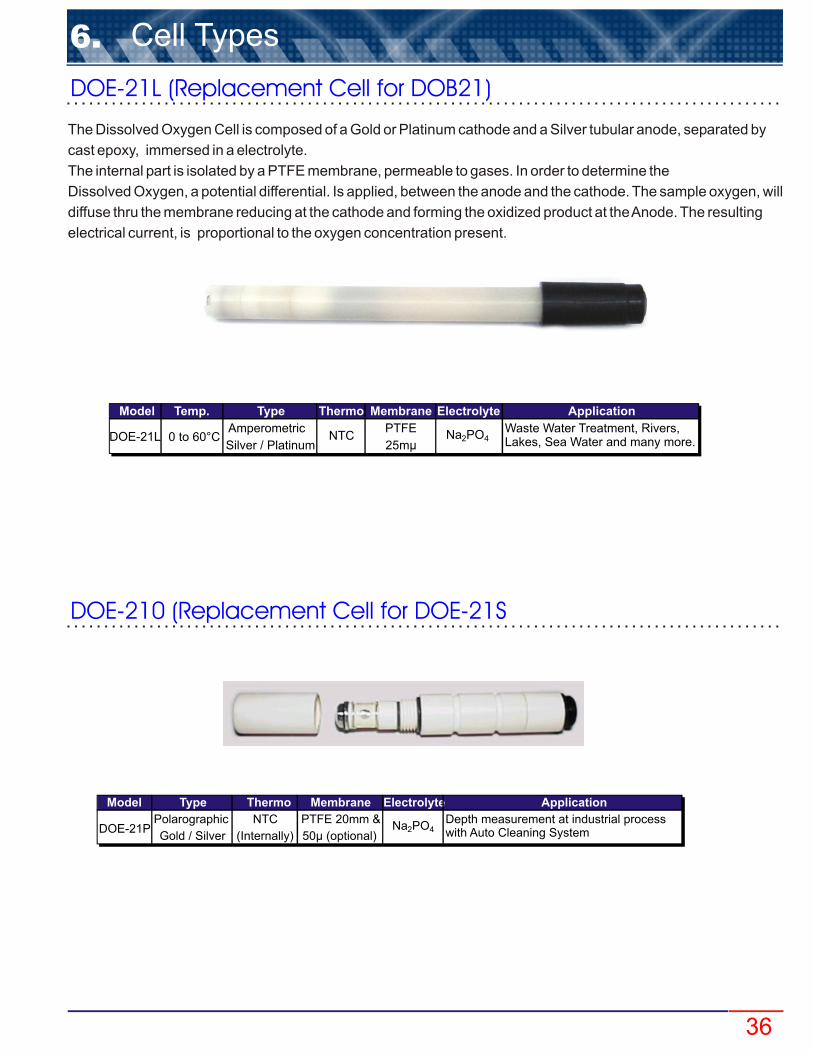
Model Temp. Type Thermo Membrane Electrolyte Application
DOE-21L 0 to 60°CAmperometric
NTCPTFE
Na2PO4Waste Water Treatment, Rivers,Lakes, Sea Water and many more.Silver / Platinum 25mµ
Model Type Thermo Membrane Electrolyte Application
DOE-21PPolarographic NTC PTFE 20mm &
Na2PO4Depth measurement at industrial processwith Auto Cleaning SystemGold / Silver (Internally) 50µ (optional)
6. Cell Types
DOE-21L (Replacement Cell for DOB21)
DOE-210 (Replacement Cell for DOE-21S
36
The Dissolved Oxygen Cell is composed of a Gold or Platinum cathode and a Silver tubular anode, separated by
cast epoxy, immersed in a electrolyte.
The internal part is isolated by a PTFE membrane, permeable to gases. In order to determine the
Dissolved Oxygen, a potential differential. Is applied, between the anode and the cathode. The sample oxygen, will
diffuse thru the membrane reducing at the cathode and forming the oxidized product at the Anode. The resulting
electrical current, is proportional to the oxygen concentration present.

7. Cell Maintenance
Electrolyte Filling
Membrane Replacement
37
The periodical maintenance of the cell consists on replacing the MEMBRANE and cleaning of the Ag/Pt electrodes.The maintenance must be done when calibration sensibility loss occur or deviations of calibration value arefrequent.These factors could occur caused by: accumulation of Silver Phosphate at the Anode, clogging, fat or even mechanical damage at the membrane. Therefore, the user must perform constant verifications and aperiodical maintenance should be performed depending on the application. The user should proceed the maintenance always step by step basis, executing only the necessary. Initiate the operation by changingthe o electrolyte, if necessary proceed with Ag/Pt electrodes cleaning (verify again) and if needed replace the Membrane.
The Electrolyte is composed by Tribasic Sodium Phosphate Solution (Na3PO412H2O) and to replace follow belowSteps:1. Turn the Protection Cap or Stir Cap counter clockwise, being careful in order not to damage the PTFE membrane.2. Wash the Electrolyte Reservoir with distilled or deionized water.3. Rinse with Tribasic Sodium Phosphate Solution, taking it out quickly.4. Fill the Electrolyte Reservoir with Tribasic Sodium Phosphate until it overflows. Observe for any bubbles Formation, if necessary shake the Reservoir until noticed that all bubbles are gone.5.Reinstall the Protection Cap(Stir Cap), being careful in order not to damage the membrane.6. Connect the Cell to the equipment and proceed with calibration.
Reservoir CathodeMain Body
O’ring
STIR Cap
AMPHEROMETRIC CELL
The membrane is composed of a PTFE film of 25µm thickness.1.Turn the Protection Ca or Stir Cap counter clockwise.2. Take out the O-ring and the membrane.3. Be careful when manipulating the new membrane, do not touch it in order to avoid fat and salt clogging. It is recommended the use of gloves or cotton.4. With the Electrolyte Reservoir turned up, install the new membrane over the hole. Place the O-ring at it’s housing, so it will secure the membrane in place. Cut the membrane’s excess over the O-ring. Fill the reservoir with electrolyte until it overflows. Observe for any bubbles formation, if necessary shack the reservoir until noticed that all bubbles are gone .5. Reinstall the reservoir, verifying the membrane is not damaged, then connecting the cell to the equipment and it’s calibration.
PTFE Membrane
O’RING (6 x 1)
Protection Head
(25 µm gros 40 x 50)
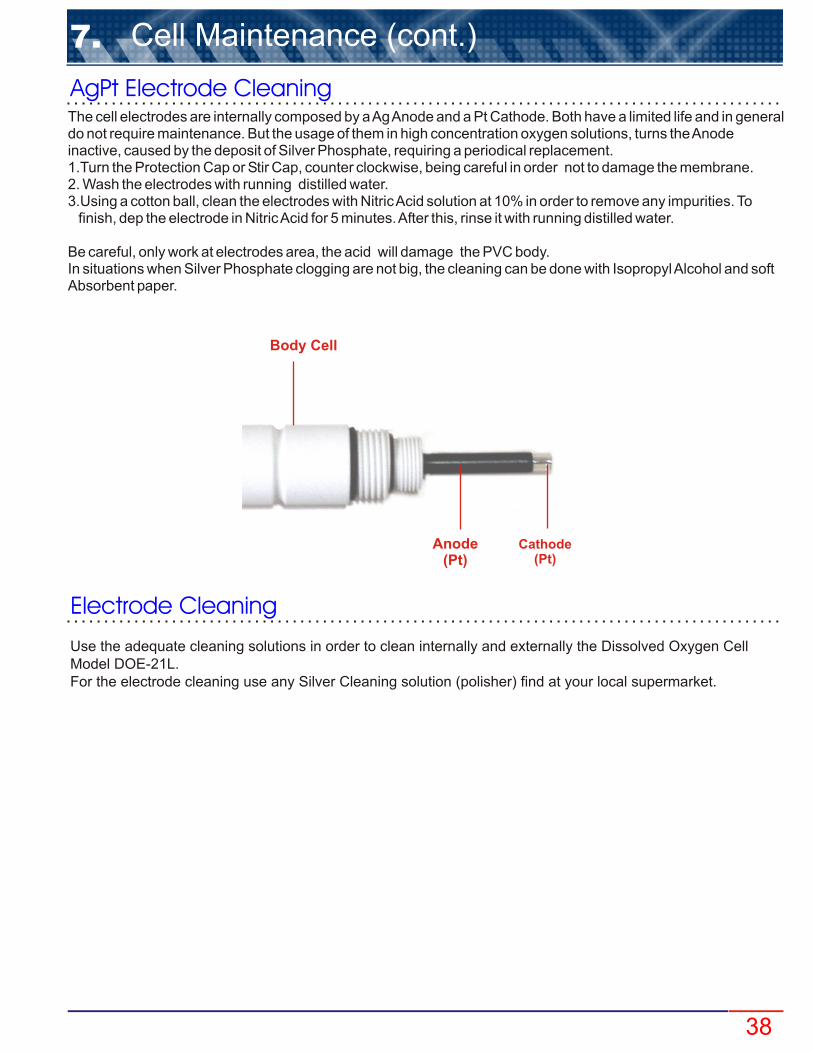
Use the adequate cleaning solutions in order to clean internally and externally the Dissolved Oxygen Cell Model DOE-21L.For the electrode cleaning use any Silver Cleaning solution (polisher) find at your local supermarket.
Cathode(Pt)
Anode(Pt)
Body Cell
7. Cell Maintenance (cont.)
AgPt Electrode Cleaning
Electrode Cleaning
38
The cell electrodes are internally composed by a Ag Anode and a Pt Cathode. Both have a limited life and in generaldo not require maintenance. But the usage of them in high concentration oxygen solutions, turns the Anodeinactive, caused by the deposit of Silver Phosphate, requiring a periodical replacement.1.Turn the Protection Cap or Stir Cap, counter clockwise, being careful in order not to damage the membrane.2. Wash the electrodes with running distilled water.3.Using a cotton ball, clean the electrodes with Nitric Acid solution at 10% in order to remove any impurities. To finish, dep the electrode in Nitric Acid for 5 minutes. After this, rinse it with running distilled water.
Be careful, only work at electrodes area, the acid will damage the PVC body.In situations when Silver Phosphate clogging are not big, the cleaning can be done with Isopropyl Alcohol and softAbsorbent paper.


M-4508/0209


