Intro: DIY 400 Watt Wind TurbineThese plans detail how I built a wind turbine in my garage without any special tools for just over $200. Many of the do-it-yourself designs are either toy projects or unlikelyto hold up in strong winds. This wind turbine will withstand 40+ mile per hour winds and produce electricity with as little as 15 mile per hour winds.
I started out with one of those aforementioned toy projects, but soon realized that this design would not stand up to the high winds in central Iowa. After months of trialand error I finally have a design that is strong and effectively produces usable electricity.
I would just like to note that I am a high school senior with no prior experience with electrical systems; so before you tell yourself that building a wind turbine is out of yourrealm, trust me, it isn't as hard as it sounds and anyone who puts their mind to it can do it.
Step 1: MaterialsNote: I would recommend getting galvanized steel for all parts that will be above ground. Regular black steel will rust within a couple of months unless you paint it often.
The above picture is a spreadsheet of all the parts I used while building the wind turbine itself.
Step 2: The GeneratorThe generator is the heart of your wind turbine project and it is important to get a good one. What you want to look for is an industrial DC permanent magnet motor. I gotmine on eBay for around $65, and it came with a drilled hub meant for attaching wind turbine blades which saved me a bunch of time trying to make one myself.
My motor is rated for 90v DC at 1750 RPM. Using it as a generator, it will do just the opposite, with 80% efficiency. So if I were to spin this motor at 1750 RPM it wouldproduce 72 volts of electricity. Now, I obviously will not be spinning this motor at 1750 RPM, but you get the concept. In order to charge my batteries which are 12 voltdeep cycle marine batteries, the generator needs to be producing at least 12 volts. If you do the math, then I would need to spin the motor at a minimum of 233 RPM tocharge my batteries.
With my PVC blades, a steady 15 MPH wind will easily spin this turbine at 233+ RPM, allowing my batteries to be charged.
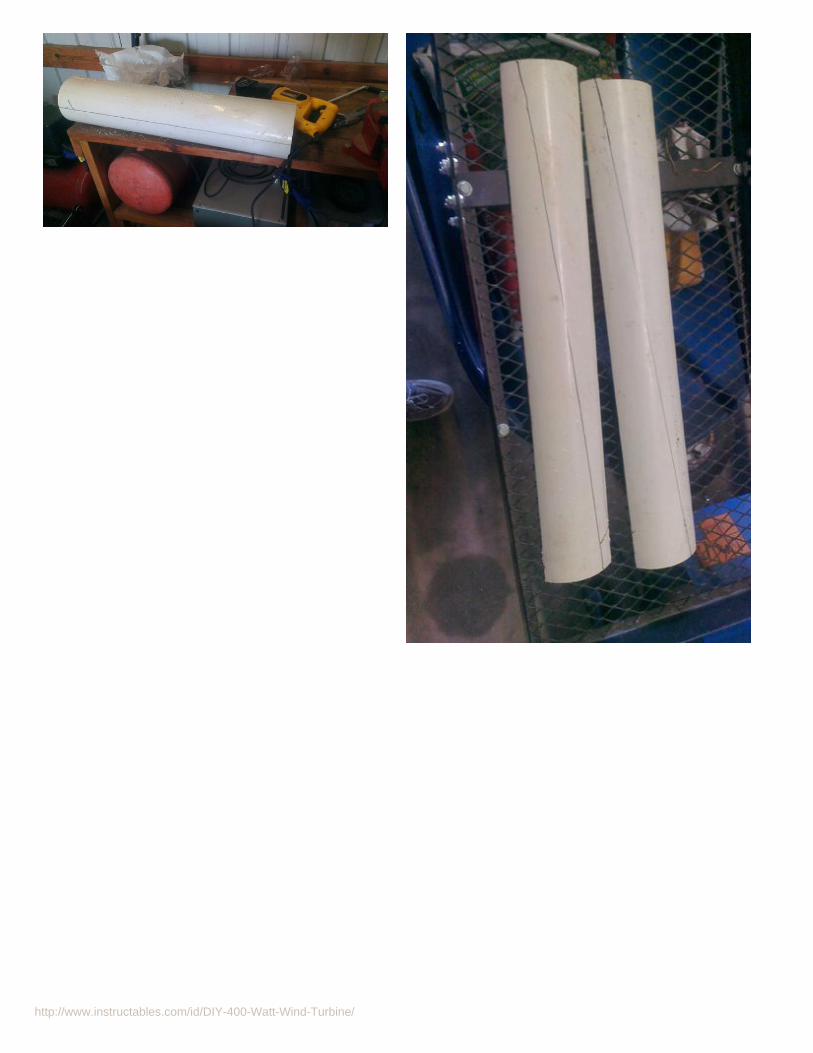
Step 3: The BladesRather than spending hundreds of dollars on blades for my wind turbine, I made my own blades out of scrap PVC I had lying around. Everyone out there tells you to use8" PVC for wind turbine blades, and let me tell you, it works far better than the 6" I was able to get. I had to get creative to make the 6" PVC work (less curvature than 8").
I started by cutting down my PVC pipe. The rectangles I made are 5.5" by 24". I then cut these down to triangles where the short end is 1.25" wide. After that, I cut out atriangle on the end where it will attach to the generator hub. I clamped the blades in a vice when I cut this and drilled the holes so they would all be about the same.
Tips:
Use scrap 90 degree angle iron when marking to cut; you will get a straight line that way.
You can use a hacksaw, but I would recommend a reciprocating saw.
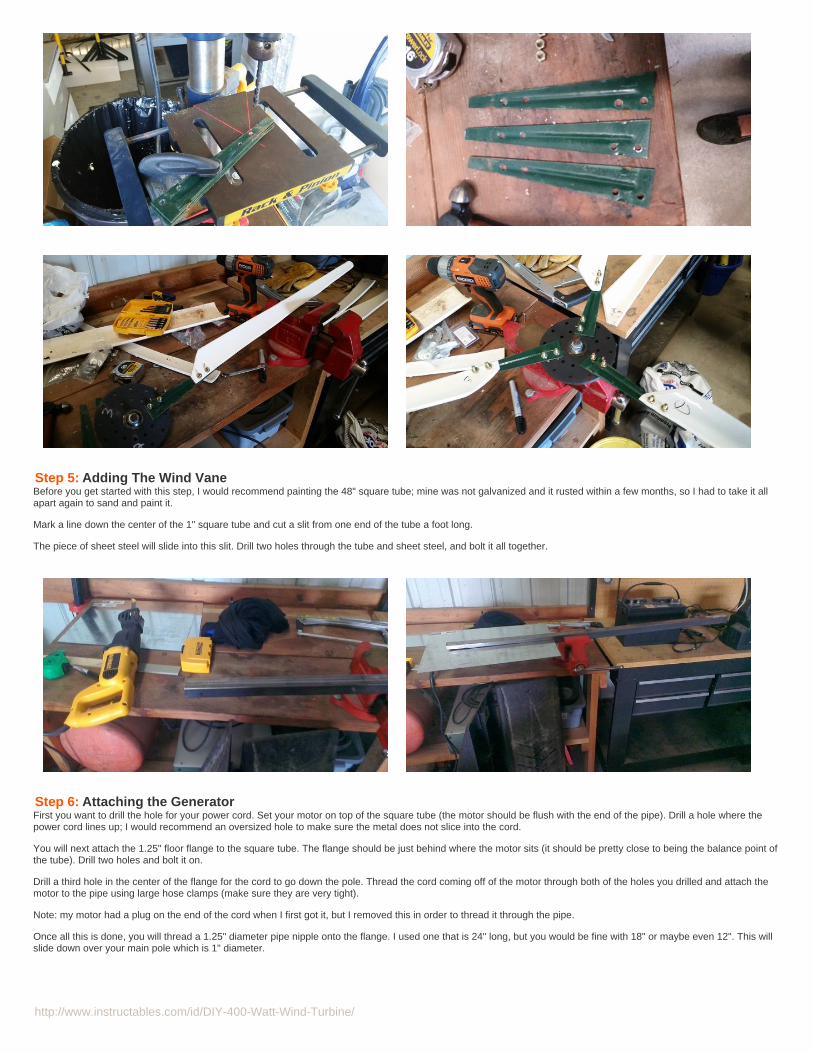
Step 4: Blades, ContinuedIn order to make the 6" PVC work, I added to the design. As illustrated in the pictures, I used steel garden edging stakes with holes drilled in them to add to the length ofmy blades. The most important part of this though, is the fact that I bent the stakes so the blades are sitting at about a 30-45 degree angle to the hub, allowing the wind topush them sideways and around rather than back, putting less strain on the guy wires and foundation, and producing more electricity.
Step 5: Adding The Wind VaneBefore you get started with this step, I would recommend painting the 48" square tube; mine was not galvanized and it rusted within a few months, so I had to take it allapart again to sand and paint it.
Mark a line down the center of the 1" square tube and cut a slit from one end of the tube a foot long.
The piece of sheet steel will slide into this slit. Drill two holes through the tube and sheet steel, and bolt it all together.
Step 6: Attaching the GeneratorFirst you want to drill the hole for your power cord. Set your motor on top of the square tube (the motor should be flush with the end of the pipe). Drill a hole where thepower cord lines up; I would recommend an oversized hole to make sure the metal does not slice into the cord.
You will next attach the 1.25" floor flange to the square tube. The flange should be just behind where the motor sits (it should be pretty close to being the balance point ofthe tube). Drill two holes and bolt it on.
Drill a third hole in the center of the flange for the cord to go down the pole. Thread the cord coming off of the motor through both of the holes you drilled and attach themotor to the pipe using large hose clamps (make sure they are very tight).
Note: my motor had a plug on the end of the cord when I first got it, but I removed this in order to thread it through the pipe.
Once all this is done, you will thread a 1.25" diameter pipe nipple onto the flange. I used one that is 24" long, but you would be fine with 18" or maybe even 12". This willslide down over your main pole which is 1" diameter.
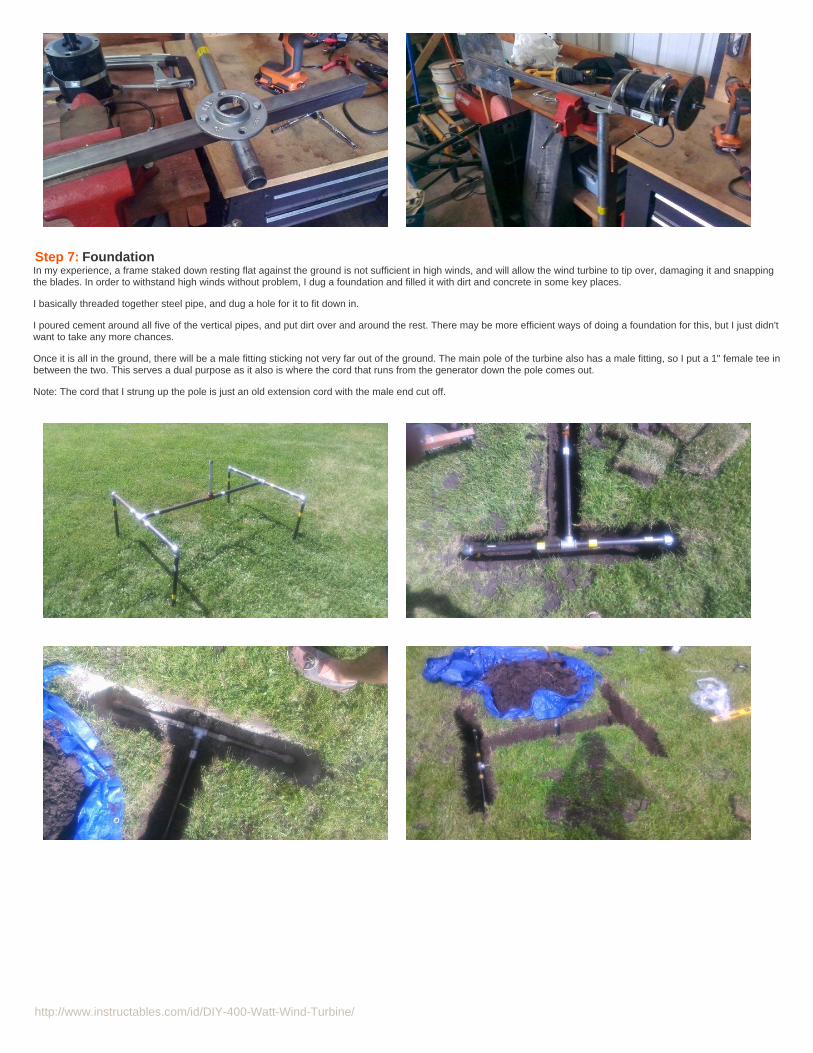
Step 7: FoundationIn my experience, a frame staked down resting flat against the ground is not sufficient in high winds, and will allow the wind turbine to tip over, damaging it and snappingthe blades. In order to withstand high winds without problem, I dug a foundation and filled it with dirt and concrete in some key places.
I basically threaded together steel pipe, and dug a hole for it to fit down in.
I poured cement around all five of the vertical pipes, and put dirt over and around the rest. There may be more efficient ways of doing a foundation for this, but I just didn'twant to take any more chances.
Once it is all in the ground, there will be a male fitting sticking not very far out of the ground. The main pole of the turbine also has a male fitting, so I put a 1" female tee inbetween the two. This serves a dual purpose as it also is where the cord that runs from the generator down the pole comes out.
Note: The cord that I strung up the pole is just an old extension cord with the male end cut off.
Step 8: Guy WiresFor guy wires, I initially used high strength paracord, but they snapped in high winds, so I transitioned to using heavy duty dog leashes made from braided steel cable thatcame with very sturdy screw-in stakes. I attached them to the main pole using two grounding clamps. The clamps came with bolts and I replaced these bolts with I-screwsthat the guy wires could easily clip on to.
Step 9: Charging BatteriesI have two deep cycle marine batteries wired in parallel which I charge using my wind turbine. You could easily just hook the batteries up to the positive and negative ofthe generator with a diode to make sure the electricity does not flow from the batteries to the generator, spinning it like a fan, but I have opted for a charge controller. I gotmine from Missouri Wind and Solar (www.maws.com) , and it was made right here in the USA. This has been a very trouble free solution for my application (I don't haveto check it often since it regulates charging automatically).
When you purchase a charge controller from Missouri Wind, they recommend you purchase a dump load resistor with it. The charge controller will divert the electricityfrom the generator to the resistor when the batteries are full, making sure the wind turbine is always under load, preventing it from spinning out of control. I have neverfound the dump load resistor to be necessary, seeing as I have never completely filled my batteries (they are almost always under load).
If my electrical box looks like a mess of wires to you, don't worry, because if you plan on doing the same sort of setup that I have done, Missouri Wind sends wiringdiagrams when you purchase a charge controller from them.
How I built anelectricityproducing windturbine bymdavis19
HOW TO buildcheap VHS tapeWINDBELTgenerator(Photos) byMladen_solar
7 Foot AxialFlux WindTurbine bybrokengun
HurricaneSurvival With awind turbine bypowertothepeople
My ImprovisedDC GeneratorBuild bymdavis19
DIY WindTurbine by DIYDave
Advertisements
Comments
17 comments Add Comment
spylock says: Oct 19, 2014. 7:32 AM REPLYYou can add more batteries,maybe a 50 watt solar panel,and youll be set.
Liam.great98 says: Oct 19, 2014. 6:51 AM REPLYNice job. Using the pvc tube for the blades is new to me, seems like a good idea
decc1954 says: Oct 19, 2014. 6:03 AM REPLYMust have been a typo?
Missouri Wind and Solar website, charge controllers, is:
http://store.mwands.com/charge-controllers/
Can you update us with the specific charge controller?
We have a solar panel array at our off grid cottage, at the top of a hill.
This would be great for those cloudy weeks.
I am a strong believer in charge controllers, since we have access to our cottage only intermittently.
Thanks so much for a great instructable!
orphed says: Oct 19, 2014. 4:58 AM REPLYNo offense but i think the choice of a DC motor is not the best for such application.
It's clearly easier, but will requier some maintain operation in the futur to change the coal brushes.
A brushless synchronous motor would be more appropriated. Electronic is not so big to transform it into an alternator. (only 6 diodes and a capacitor) .
On the opposite, working with Asynchronous as an hypersynchronous generator would be a real chalenge!
guruji1 says: Oct 19, 2014. 3:38 AM REPLYHi very nice build. I think if the generator was brushless would be much better cause there would be no maintinance. Anyway regards. Thanks.
lr10cent says: Oct 19, 2014. 2:41 AM REPLYNice project! Very enterprising of you. I think using the cable from a dog run for bracing is an excellent idea.
If you make another one of these, you might try a simpler foundation. You could dig a deep hole with a post hole digger, put in some Sonotube, arrange themounting pole for the turbine within the Sonotube, and pour concrete to hold it in place.
If you're going to be using this thing for a while, you might consider carving some wood blades* or making some with hot wired foam cores with fiberglassand epoxy over. In either case using "helical" pitch.A hot wire foam core would have to be twisted for the pitch before doing the composite part. A wood propblade could just have the twist carved in. I bet you'd get much higher performance. Probably wood is the easiest, using a laminated blank and perhaps adrawknife and spoke shave. I'd bet the performance would be MUCH better. Also, a wood or properly made composite blade will take a lot more wind tomake it fail, fly off, and hit something. Relative to wood or composites, PVC is heavy, weak, and floppy. I'm guessing that your motor could handle largerblades, too, which might increase the output. At least if the shaft is strong enough.
I don't remember where I saw it, but there's a simple linkage you can make so that as the wind gets above a certain point, the tail swings closer and closer toparallel with the disc of the blades, thus easing some of the pressure.
Of course, if you're running off to college, it might not make a lot of sense to do something like this.
I wish I had room for something like this, but I'd have to put it very high to get around all these trees, and I'm not sure the neighbors would want to look at it.
*Look for information about carving propellers for homebuilt airplanes or even model airplanes. (Just remember that a model airplane prop meant for rubberpower won't be strong enough unless you use harder wood.). Remember that a turbine blade has the convex side on the back.
jake79 says: Oct 18, 2014. 2:47 PM REPLYSalute to Iowans. Nice turbine
Tinydot says: Oct 18, 2014. 7:35 AM REPLYCool beans, but doesn't the power cord twist up if the wind keeps changing direction? Or does it just spin back whenever there is a break in the wind insteadof eventually getting wound up tight?
suiterelliot says: Oct 18, 2014. 11:11 AM REPLYI have never had a problem with the cord getting wound up, and I think its because the wind primarily comes from one or two main directions everyseason, so the top doesn't spin around and around all the time.
Greasetattoo says: Oct 18, 2014. 4:41 AM REPLYI have a few treadmill motors, that I think will work!
primosanch says: Oct 18, 2014. 4:10 AM REPLYThis is very nice. Thanks for sharing.
AmmarT says: Oct 17, 2014. 10:23 PM REPLYamazing.. i was have the same idea to my graduation project but my team changed to simple pneumatic control system cell. really amazing work ;)
Robibame says: Oct 17, 2014. 8:55 PM REPLYnice.
shark918v says: Oct 17, 2014. 8:42 PM REPLYAmazing project! Kudos!
NamedJohnny says: Oct 17, 2014. 6:05 PM REPLYthis is why I like instructables, so many useful thing
warehouse32 says: Oct 17, 2014. 2:01 PM REPLYHope to build one of these in the future, this will be very helpful! Nice job