No part of this report may be reproduced or transmitted in any form without the written permission of the author, except for the inclusion of brief quotations in a review.
Note: This e-book is optimized for viewing on a computer screen, but it is organized so you can also print it out and assemble it as a book. Since the text is optimized for screen viewing, the type is larger than that in usual printed books.
This report has been written to provide information about creating your own mini miter box up to the publishing date. Every effort has been made to make this guide as complete and accurate as possible. However, there may be occasional mistakes in spelling, grammar, content, production, etc. Therefore, this report should be used as a guide – not as the ultimate source of mini miter box making information.
This guide may contain links and recommendations to relevant and/or related products, services, etc. in which the author may receive affiliate compensation. The affiliated connection should not affect the purchase price or process and earnings will be used to help support the website.
The purpose of this report is to educate. The author and publisher does not warrant that the information contained in this report is fully complete and shall not be responsible for any errors or omissions. The author and publisher shall have neither liability nor responsibility to any person or entity with respect to any loss or damage caused or alleged to be caused directly or indirectly by this report.
If you do not wish to be bound by the above, you may return this report for a full refund.
After I had designed a few projects in my sketch book, I realized I needed a small miter box to cut a few things. I didn't have room for a power saw... plus, it was actually kind of hard to find a small, store-bought miter box. I realized others might have this same problem, so I created this simple mini miter box to help get the job done. And now, I want to share it with you.
Materials & Tools You'll Need
To make the mini miter box, you'll need:
– (2 or 3ft long) 1”x3” board (cut down to a 24” long 'base')– (2 or 3ft long) 1/2” square dowel rod
(cut into two 10” 'fence' pieces & one 3” 'stop-block')– six 1” nails– small C-clamp (1-1/2”) or spring clamp– small, hand-held hacksaw– hammer– ruler (& tape measure)– pencil and/or pen
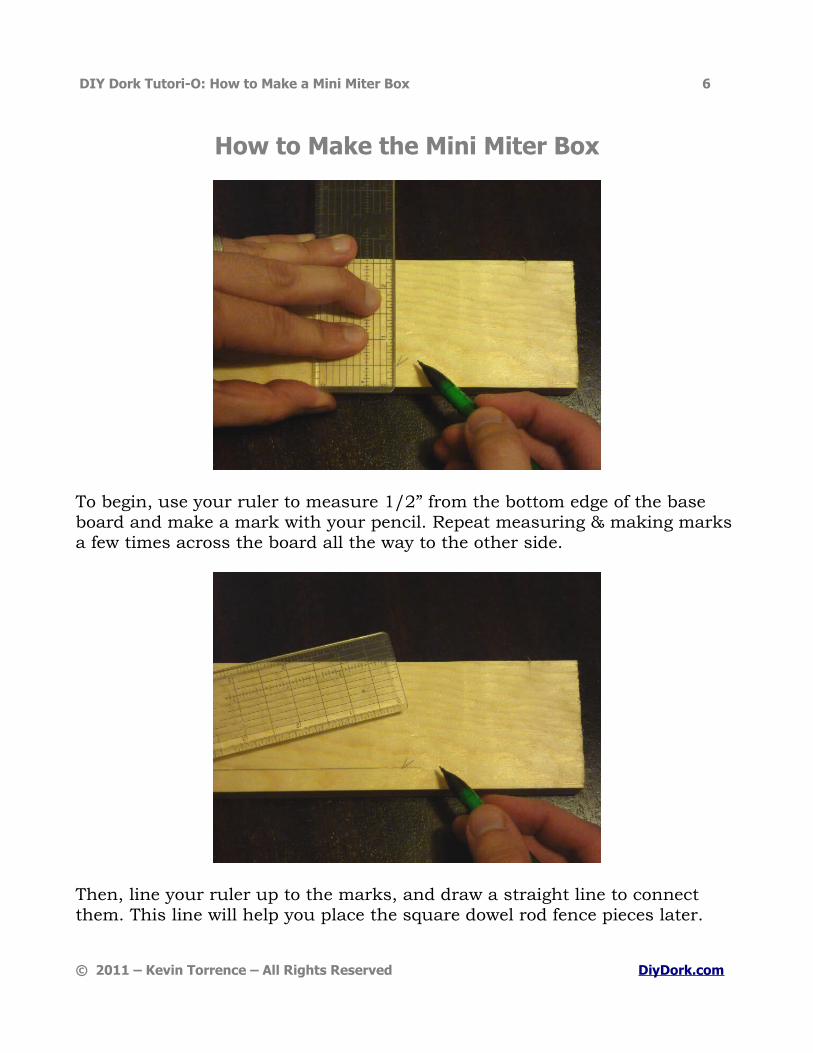
To begin, use your ruler to measure 1/2” from the bottom edge of the base board and make a mark with your pencil. Repeat measuring & making marks a few times across the board all the way to the other side.
Then, line your ruler up to the marks, and draw a straight line to connect them. This line will help you place the square dowel rod fence pieces later.
Next, grab one of your 10” long dowel rods and measure over 1/2” from the corner and make a mark. (I recommend doing this to the raw edge created when you cut the dowel rod down to size... not the straight, factory edge.) Then, use your ruler to draw a line from the mark to the bottom corner.
Use your hack saw to carefully cut the dowel rod straight along the 45* angle line you just drew.
Your cut edge should be nice and straight like this when you're done. Repeat the same measurement & cut on the other 10” dowel rod. You should then have two, 10” long square dowels … each with a straight, factory edge and a 45* angle, raw cut edge.
Grab both dowels and place them on the base board along the guideline you drew earlier. Make sure the angle-cut edges face outwards.
The straight, factory edges should meet in the middle of the base board. (You can measure and mark a line across the middle to help). Leave a small gap just big enough for your hack saw blade to slide inside.
Hammer in 3 nails in each dowel rod fence. Spread them out with two of them about 1” from each edge and one in the center. You can use your C-clamp to hold the dowel “fence” down tight, so it doesn't move on you while you're nailing it in place.
DIY Dork Tutori-O: How to Make a Mini Miter Box 10
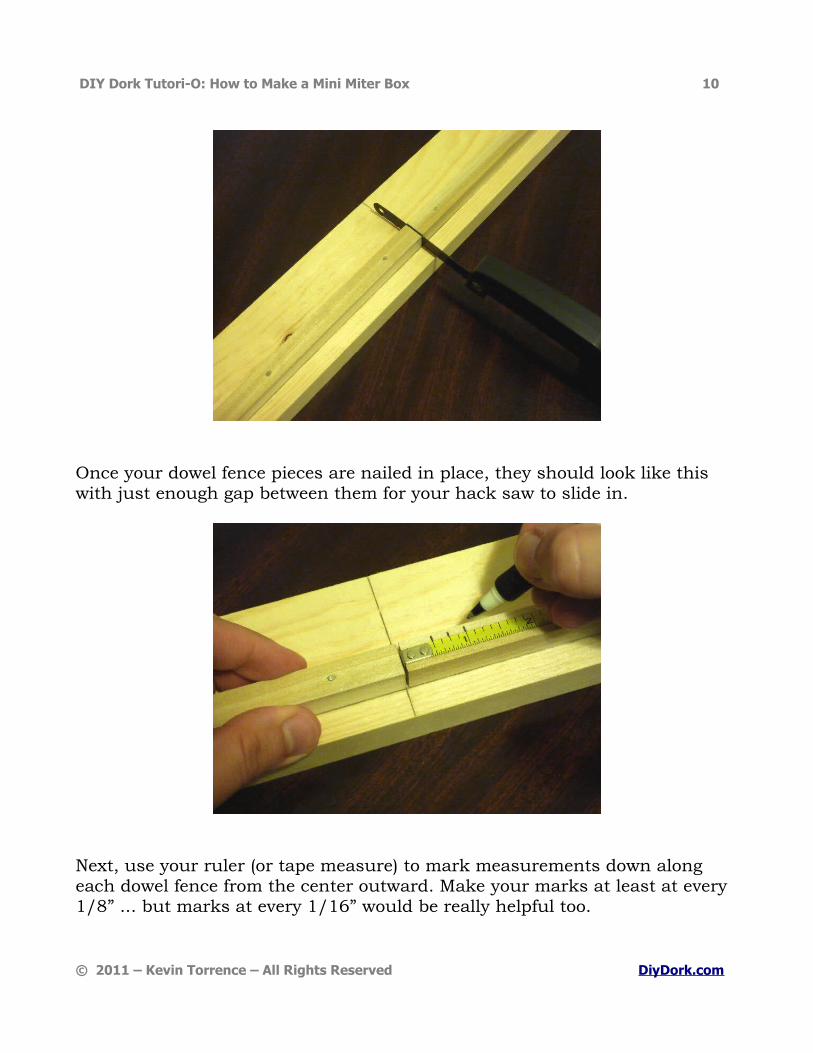
Once your dowel fence pieces are nailed in place, they should look like this with just enough gap between them for your hack saw to slide in.
Next, use your ruler (or tape measure) to mark measurements down along each dowel fence from the center outward. Make your marks at least at every 1/8” ... but marks at every 1/16” would be really helpful too.
DIY Dork Tutori-O: How to Make a Mini Miter Box 11
Once all the measurement marks have been made, your fence pieces should look like this. You'll have measurements along each fence piece on both sides, so you can make cuts whether you're right or left handed (or maybe need to make an awkward cut). Plus you'll have the 45* cut ends on the fence to help make simple, angle cuts when you need them.
And... that's all there is to making the mini miter box.
Just like I said, it's simple & easy, right?
Next, I'll show you how to use your new mini miter box.
DIY Dork Tutori-O: How to Make a Mini Miter Box 12
How to Use the Mini Miter Box
The mini miter box is just as easy to use as it was to make.
Just place your 3” stop-block at the measurement mark you need to cut your piece, and clamp it against the fence, so it doesn't move on you. Then, just hold your pieces tightly against the fence and cut them to size.
DIY Dork Tutori-O: How to Make a Mini Miter Box 13
How to Make 45* Cuts with the Mini Miter Box
To make 45* cuts, place the piece against the fence with the part you need to cut lined up to the angle cutting end. Next, clamp the stop-block against the piece to keep it from moving. Then, use your saw to cut the piece while being careful to keep it as straight against the fence end as you can. You can make straighter, cleaner cuts by taking your time & sawing slowly.
DIY Dork Tutori-O: How to Make a Mini Miter Box 14
Optional “Store Bought” Mini Miter Box
If you just really don't want to make a miter box yourself (or you want really precise cuts or more angle choices), you can buy a mini miter box instead.
I looked in my local big-box hardware stores and didn't see any available (...which is why I made the one in this tutorial in the first place).
You can, however, find them either online, in the modeling section of hobby/craft stores, or sometimes in smaller, well-stocked, hardware stores.
I did eventually find two of them in the model section of my local hobby/craft store. There was a heavier-duty, aluminum one with 3 angle choices (90* 45* & 30*) for about $10 ... but I got the slightly cheaper, plastic one (with more angle choices) for a little less than $10 instead.
If you decide to get one of these, you'll also need to get a small, serrated, razor saw & handle. Each was about $5. This saw makes SUPER precise cuts, but it's slower, because it only cuts when you pull it (so no sawing back & forth).
If you get an aluminum mini miter box, you can also use either a coping saw or a small hack saw like I recommended earlier in the tutorial instead.
DIY Dork Tutori-O: How to Make a Mini Miter Box 15
How to Use the “Store Bought” Mini Miter Box
Before using your store bought miter box, I recommend screwing it to a board, so the whole thing can be clamped to a table to keep it from moving.
To cut your pieces to size, use a measuring tape to measure the correct length from the center slot and clamp the piece in place. (I also clamp a stop-block at the measurement I need as well.) If you're making an angled cut, first, cut the angle on the end of your piece, then measure & cut it to the correct length.
DIY Dork Tutori-O: How to Make a Mini Miter Box 16
The Wrap Up
So now you know how to make one of these simple, mini miter boxes. It's easy to clamp on a table when you need to make small cuts, and it's easy to store away when it's not needed. Plus, it sure beats trying to measure & cut each piece of material separately!
Resources
If you'd rather just buy one of these miter boxes, I found a couple of great deals online for “Deluxe” sets of both the plastic & aluminum versions.
When I bought mine at a local hobby/craft store, I paid about $10 for my miter box, $5 for the saw handle, and $5 for the razor saw blade.
These “Deluxe” sets (which include the miter box and the razor saw & handle) are actually cheaper than buying everything separately like I did.
I also just recently found a mini power miter saw that would make quick work of cutting pencils & dowel rods down to size. It does cost more, but it may be worth it if you plan on making a lot of these frames to sell or give as gifts.