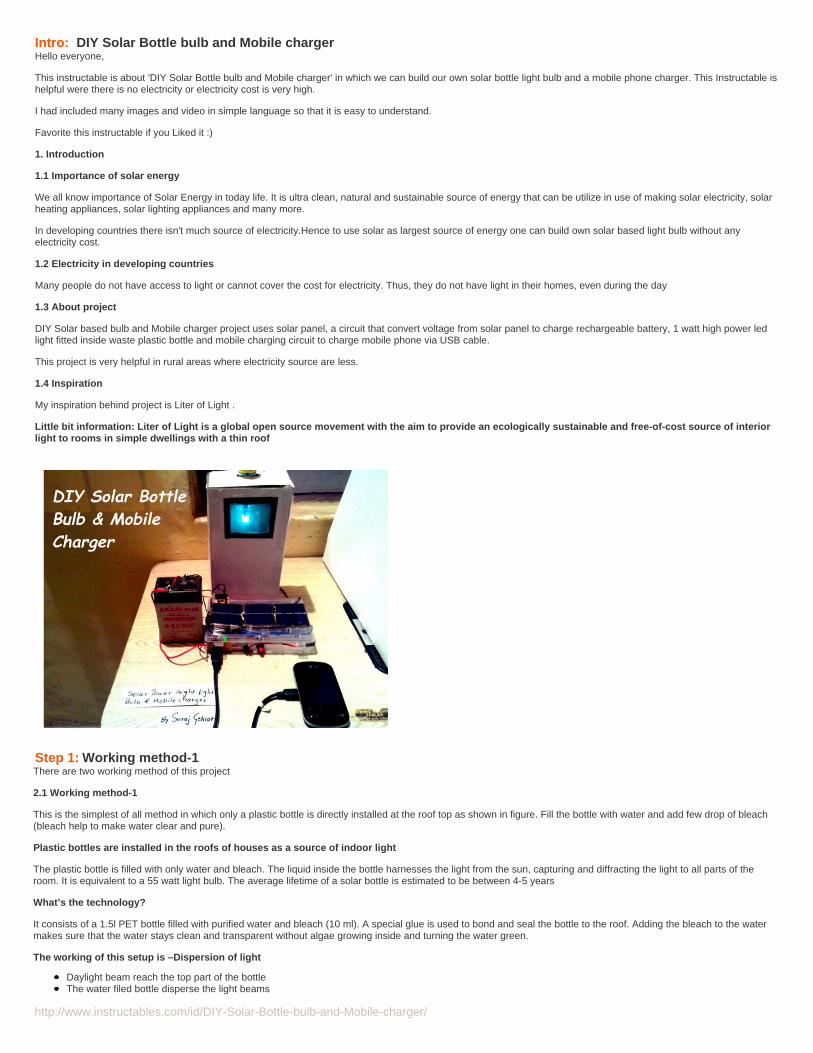
Intro: DIY Solar Bottle bulb and Mobile chargerHello everyone,
This instructable is about 'DIY Solar Bottle bulb and Mobile charger' in which we can build our own solar bottle light bulb and a mobile phone charger. This Instructable ishelpful were there is no electricity or electricity cost is very high.
I had included many images and video in simple language so that it is easy to understand.
Favorite this instructable if you Liked it :)
1. Introduction
1.1 Importance of solar energy
We all know importance of Solar Energy in today life. It is ultra clean, natural and sustainable source of energy that can be utilize in use of making solar electricity, solarheating appliances, solar lighting appliances and many more.
In developing countries there isn't much source of electricity.Hence to use solar as largest source of energy one can build own solar based light bulb without anyelectricity cost.
1.2 Electricity in developing countries
Many people do not have access to light or cannot cover the cost for electricity. Thus, they do not have light in their homes, even during the day
1.3 About project
DIY Solar based bulb and Mobile charger project uses solar panel, a circuit that convert voltage from solar panel to charge rechargeable battery, 1 watt high power ledlight fitted inside waste plastic bottle and mobile charging circuit to charge mobile phone via USB cable.
This project is very helpful in rural areas where electricity source are less.
1.4 Inspiration
My inspiration behind project is Liter of Light .
Little bit information: Liter of Light is a global open source movement with the aim to provide an ecologically sustainable and free-of-cost source of interiorlight to rooms in simple dwellings with a thin roof
Step 1: Working method-1There are two working method of this project
2.1 Working method-1
This is the simplest of all method in which only a plastic bottle is directly installed at the roof top as shown in figure. Fill the bottle with water and add few drop of bleach(bleach help to make water clear and pure).
Plastic bottles are installed in the roofs of houses as a source of indoor light
The plastic bottle is filled with only water and bleach. The liquid inside the bottle harnesses the light from the sun, capturing and diffracting the light to all parts of theroom. It is equivalent to a 55 watt light bulb. The average lifetime of a solar bottle is estimated to be between 4-5 years
What’s the technology?
It consists of a 1.5l PET bottle filled with purified water and bleach (10 ml). A special glue is used to bond and seal the bottle to the roof. Adding the bleach to the watermakes sure that the water stays clean and transparent without algae growing inside and turning the water green.
The working of this setup is –Dispersion of light
Daylight beam reach the top part of the bottleThe water filed bottle disperse the light beams
The dispersed light equals 55 W- even with cloudy skyThe solar bottle improves quality of beneficiaries
Advantage: Simple, No electricity cost, inexpensive
Disadvantage: This method only work during day time
Step 2: Working method-23.1 Working method-2 : This methods uses solar panel to charge a rechargeable battery. Hence during day time solar panel provide power to charge battery and ifrequired light can be turned ON.
The working of this setup is –
The working is simple during day time the rechargeable battery get charge . Whenever we need to turn on the light switch is turned .Additional this project can also be used as mobile charge.Initially LED is connected inside plastic bottles as it reflect more light.Inside bottle sometime water is added with some drop of bleach , bleach help in making water clean for several year and LED is covered with waterproof coating.Even during night time as there will be less voltage from solar panel, battery will provide necessary power to turn ON led light.
Advantage: Can be use both during day and night time, mobile can be charged.
Disadvantages: Little bit expensive then previous one, require maintenance
In the block diagram we see solar panel as source of energy. We can use a single solar panel board or small solar panel connected in series.1.There are many circuit to convert variable voltage from solar panel to constant voltage of 5volts. In this instructable only two circuit are mentioned2.Rechargeable battery charge during day time and provide power to bright light and 5 volt for mobile charging.3.Solar bottle is fixed at roof top with sealed led with water and few drops of bleach.4.
Step 4: Let’s get started : circuit-1To start our own DIY Solar night bulb and Mobile charger section is divided into three parts
1. Circuit diagram
A.Circuit using voltage regulators
There are many circuit that uses solar panel as light bulb and mobile charger, but in this instructable I have included two circuit diagram that are low cost and componentsare easily available.
Image contain all components required for circuit-1
1. Solar panel: We will require 3Volts panel
2. Voltage regulator: 7805, 78015
3. Diode: 1N4001
4. Resistor: 1k, 4.7k, 0.5ohm, 6.8ohm
5. Capacitor: 1000uf, 470uf
6. Rechargeable battery: Either 6volt or 9 volts
7. Bright LED: 1watt
8. Plastic bottle
9. USB connector
10. Connecting wires
Some of other item required are:
PCB board, permanent marker, soldering iron, Lead wire.
REMEMBER: You can make any one circuit as suitable to you. I explained description of both circuit with components and PCB making
Step 5: Let’s get started : circuit-2B. Circuit using IC MC34063A
Circuit 2 Components required are as follows
1. IC MC 34063: It is a monolithic control circuit containing the primary functions required for DC?to?DC converters. It is Step s up/down/ inverting Switching Regulators
2. Resistors- 1k, 39k, 10k, 1ohm
3. LEDS- Two (green and red)
4. Capacitors: 22uf, 330pf, 100uf
5. Inductor: 22uH
6. switch
7. USB port
8. connecting wires,
9. Rechargeable battery
10. Diode: 1N5019, 1N4148, 1N4001
11. Zener diode 4v7
Some of other item required are:PCB board, permanent marker, soldering iron, Lead wire.
NOTE: Since I explained two circuit for this project you can use either circuit-1 or circuit-2 for your project as suitable to you:)
Step 6: PCB making and soldering componentsCreating PCB layout of your circuit
This is usually done by converting your circuit's schematic diagram into a PCB layout using PCB layout software.
There are many open source software packages for PCB layout creation and design.
Some are listed here to give you a head-start:
1. Cadsoft Eagle
2. PCBWizard
Note :In Eagle: File> Export>Image Be sure to set DPIG to 1200 for better quality
I designed my circuit schematic in Cadsoft Eagle for circuit-1 voltage regulator
To show some little bit difference for circuit-2 using IC MC34063A instead oif using PCB copper board I used perf board and soldered components according to circuitdiagram.
Tip: If you want to make your own PCB of circuit at home without any special material, checkout my previous Instructable on :-
How to make PCB at Home
Step 7: Solar panels connectionsSolar panel connection and variable voltage depending on intensity of light
1. We can use either readymade solar panel from electronic store which give 12 to 15 volts or In figure you can see I connected solar panel in series.
2. Figure also demonstrate that according to intensity of light we get variable voltage. Hence we use voltage regulator IC to get constant 5Volt
Step 8: Led inside plastic bottleFollow simply this steps:
Connect long conducting wire to positive and negative terminal of LED.1.We will require plastic tube. Insert this LED to hollow plastic as shown in figure.2.Drill hole on bottle cap & mount cap inside bottle.3.Seal the clear bottom part of the led light with clear epoxy.4.
Note: Make sure to test led light is ON condition before sealing bottom part of plastic tube.
Step 9: Solar bottle & Mobile charging demonstrationAfter all step are performed check working of project. Although even I got more than 15 to 20 attempt to work project
Note to remember:
1. Check proper connection
2. Solder component properly
3. Sometime if seal is not proper LED inside bottle get wet and LED is damaged. If you are making it for hobby purpose you can continue without water inside plasticbottle.
Step 10: ApplicationIn the Indian metropolis of Mumbai 6.5 million people live in slums, which represents 54.1% of the total inhabitants. Mumbai is home to the biggest slum in Asia.Solar night bulb is useful in typhoon hit areas.Solar power street light.Providing access to clean energy to rural community.The electrical power supply in the slums is often tapped and unsafe.Whenever the electric system is overloaded, which happens several times a day, the city administration cuts-off the supply for the area where the slums are.Those circumstances make it hard for people and businesses in the slums to have a constant source of light.Controlling Green house environment.This project is indeed helpful to most of people who live in slum area were there is no electricity.
Step 11: Project Video demonstration & ConclusionI had uploaded DIY Solar bottle & Mobile charger video. Bear with quality and some mistake if found in the video. I tried extremely hard to make thisInstructable as simple as possible with images and videos.
Hope you will find it useful :)
Favourite this instructable if you liked it :)
If you like this Instructable, checkout my previous instructable :-
wobbler says: Feb 22, 2015. 4:58 AM REPLYHi, interesting 'Ible.
Isn't your LED charge indicator the wrong way round? I probably wouldn't bother with it anyway. It is only using a little solar juice, but it doesn't really showanything except that the solar cell is powered up. The sun is usually a good enough indicator for that. It doesn't actually show that the voltage on the cell ishigh enough to charge the battery. You could put an appropriate zener in series with it so it only switches on when the voltage reaches a certain level, but I'mnot sure it is much use even then in practical terms.
I'm not sure you actually need the 78015 regulator. It depends on the maximum current the solar cell provides. Feeding the solar cell directly into the batterymeans you are not wasting any energy in the voltage regulator. The 78xx series are not particularly energy efficient, they effectively act as a dropper resistorto lose the excess voltage and as such waste that proportion of the energy from the solar cell. You shouldn't need to regulate the solar cell voltage as thebattery will effectively soak up all the current the solar panel provides and in this case the solar panel is acting as a current source and the battery as avoltage regulator. Unless the solar cell is capable of providing significantly much more current than the battery needs, it is superfluous. In a large solararray/battery system it is necessary, but in this it probably isn't. You just need a single blocking diode to stop the battery discharging through the solar cell atnight.
On your diagram 1 there also seem to be some other issues as it stands with respect to the list of components:
1) On the diagram the battery is 12v, on the list 6-9v.
2) The solar cell is given as a 3v panel, which isn't enough to charge a 6-9v battery.
Nikaoj says: Feb 20, 2015. 5:18 AM REPLYVery good idea! Perfect explanation!
Engg_suraj says: Feb 20, 2015. 5:28 AM REPLYThanks @Nikaoj :)
diy_bloke says: Feb 19, 2015. 11:43 AM REPLYGreat project. Greenhouse control is certainly possible, but it would be better to do that outside :-) as you wld need fairlu expensive lights and panels tomake decent grow lights :-)
Engg_suraj says: Feb 20, 2015. 5:12 AM REPLYThank you. And yes I will note your tip :)
diy_bloke says: Feb 19, 2015. 11:27 AM REPLYinstead of using discrete components, search at Aliexpress.com. They have buck stabilizers for really low prices, definitely competitive with discretecomponents
diy_bloke says: Feb 19, 2015. 11:24 AM REPLYIntriguing. I have installed many solar bottles and many solarlights.Just wondering why u combine the two. Water and bleach is a bit of a hostile environment for LED lamps and whereas with a solar bottle there are somerestictions on where to put it, The LED lamp doesnt have those, as long as the panel is outside
aahmad30 says: Feb 18, 2015. 6:17 PM REPLYThis is my first Comment ever, thumbs up. Great work. Keep it up.
Engg_suraj says: Feb 19, 2015. 9:09 AM REPLYThanks :)
Engg_suraj says: Feb 18, 2015. 11:30 PM REPLYThanks @dpenjweni :)
AlexanderR1 says: Feb 18, 2015. 10:15 AM REPLYInteresting work here, definitely would recommend for anyone wishing to use circuit 1 that it is not worthwhile to go over 6V with the solar/batterycombination. I'm assuming that the LED runs around 3V, and the USB port needs 5V, so a higher voltage battery like 9 or 12 V is doing no extra work withlinear regulation.
AlexanderR1 says: Feb 18, 2015. 10:15 AM REPLYInteresting work here, definitely would recommend for anyone wishing to use circuit 1 that it is not worthwhile to go over 6V with the solar/batterycombination. I'm assuming that the LED runs around 3V, and the USB port needs 5V, so a higher voltage battery like 9 or 12 V is doing no extra work withlinear regulation.
MPaulHolmes says: Feb 17, 2015. 1:34 PM REPLYThis is spectacular. My favorite instructable ever!
Engg_suraj says: Feb 18, 2015. 6:14 AM REPLYThankyou very much @ MPaulHolmes.I m glad you liked my Instructable :)
Mr AbAk says: Feb 16, 2015. 7:28 PM REPLYNice Ible....
Engg_suraj says: Feb 17, 2015. 12:06 AM REPLYThanks @Mr AbAk