DJ MIXER DJM-850-K DJM-850-S DJM-850-W Operating Instructions http://pioneerdj.com/support/ The Pioneer website shown above offers FAQs, information on software and various other types of information and services to allow you to use your product in greater comfort.
Transcript
DJ MIXER
DJM-850-KDJM-850-SDJM-850-W
Operating Instructions
http://pioneerdj.com/support/The Pioneer website shown above offers FAQs, information on software and various other types of information and services to allow you to use your product in greater comfort.
2 En
Thank you for buying this Pioneer product. Please read through these operating instructions so you will know how to operate your model properly. After you have finished reading the instructions, put them away in a safe place for future reference.In some countries or regions, the shape of the power plug and power outlet may sometimes differ from that shown in the explanatory drawings. However the method of connecting and operating the unit is the same.
The exclamation point within an equilateral triangle is intended to alert the user to the presence of important operating and maintenance (servicing) instructions in the literature accompanying the appliance.
The lightning flash with arrowhead symbol, within an equilateral triangle, is intended to alert the user to the presence of uninsulated “dangerous voltage” within the product’s enclosure that may be of sufficient magnitude to constitute a risk of electric shock to persons.
CAUTION:TO PREVENT THE RISK OF ELECTRIC SHOCK, DO NOT REMOVE COVER (OR BACK). NO USER-SERVICEABLE PARTS INSIDE. REFER SERVICING TO QUALIFIED SERVICE PERSONNEL.
CAUTIONRISK OF ELECTRIC SHOCK
DO NOT OPEN
IMPORTANT
D3-4-2-1-1_A1_En
Read these instructions.Keep these instructions.Heed all warnings.Follow all instructions.Do not use this apparatus near water.Clean only with dry cloth.Do not block any ventilation openings. Install in accordance with the manufacturer’s instructions.Do not install near any heat sources such as radiators, heat registers, stoves, or other apparatus (including amplifiers) that produce heat.Do not defeat the safety purpose of the polarized or grounding-type plug. A polarized plug has two blades with one wider than the other. A grounding type plug has two blades and a third grounding prong. The wide blade or the third prong are provided for your safety. If the provided plug does not fit into your outlet, consult an electrician for replacement of the obsolete outlet.Protect the power cord from being walked on or pinched particularly at plugs, convenience receptacles, and the point where they exit from the apparatus.
1) 2) 3) 4) 5) 6) 7)
8)
9)
10)
Only use attachments/accessories specified by the manufacturer.Use only with the cart, stand, tripod, bracket, or table specified by the manufacturer, or sold with the apparatus. When a cart is used, use caution when moving the cart/apparatus combination to avoid injury from tip-over.
Unplug this apparatus during lightning storms or when unused for long periods of time.Refer all servicing to qualified service personnel. Servicing is required when the apparatus has been damaged in any way, such as power-supply cord or plug is damaged, liquid has been spilled or objects have fallen into the apparatus, the apparatus has been exposed to rain or moisture, does not operate normally, or has been dropped.
D3-7-13-69_En
11)
12)
13)
14)
NOTE:This equipment has been tested and found to comply with the limits for a Class B digital device, pursuant to Part 15 of the FCC Rules. These limits are designed to provide reasonable protection against harmful interference in a residential installation. This equipment generates, uses, and can radiate radio frequency energy and, if not installed and used in accordance with the instructions, may cause harmful interference to radio communications. However, there is no guarantee that interference will not occur in a particular installation. If this equipment does cause harmful interference to radio or television reception, which can be determined by turning the equipment off and on, the user is encouraged to try to correct the interference by one or more of the following measures:— Reorient or relocate the receiving antenna.— Increase the separation between the equipment and receiver.— Connect the equipment into an outlet on a circuit different from that to which the receiver is connected.— Consult the dealer or an experienced radio/TV technician for help.
D8-10-1-2_A1_En
3En
WARNINGThis equipment is not waterproof. To prevent a fire or shock hazard, do not place any container filled with liquid near this equipment (such as a vase or flower pot) or expose it to dripping, splashing, rain or moisture.
D3-4-2-1-3_A1_En
WARNINGBefore plugging in for the first time, read the following section carefully.The voltage of the available power supply differs according to country or region. Be sure that the power supply voltage of the area where this unit will be used meets the required voltage (e.g., 230 V or 120 V) written on the side panel.
D3-4-2-1-4*_A1_En
WARNINGThis product equipped with a three-wire grounding (earthed) plug - a plug that has a third (grounding) pin. This plug only fits a grounding-type power outlet. If you are unable to insert the plug into an outlet, contact a licensed electrician to replace the outlet with a properly grounded one. Do not defeat the safety purpose of the grounding plug.
D3-4-2-1-6_A1_En
WARNINGTo prevent a fire hazard, do not place any naked flame sources (such as a lighted candle) on the equipment.
D3-4-2-1-7a_A1_En
VENTILATION CAUTIONWhen installing this unit, make sure to leave space around the unit for ventilation to improve heat radiation (at least 5 cm at rear, and 3 cm at each side).
WARNINGSlots and openings in the cabinet are provided for ventilation to ensure reliable operation of the product, and to protect it from overheating. To prevent fire hazard, the openings should never be blocked or covered with items (such as newspapers, table-cloths, curtains) or by operating the equipment on thick carpet or a bed.
D3-4-2-1-7b*_A1_En
Operating EnvironmentOperating environment temperature and humidity:+5 °C to +35 °C (+41 °F to +95 °F); less than 85 %RH (cooling vents not blocked)Do not install this unit in a poorly ventilated area, or in locations exposed to high humidity or direct sunlight (or strong artificial light)
D3-4-2-1-7c*_A1_En
If the AC plug of this unit does not match the AC outlet you want to use, the plug must be removed and appropriate one fitted. Replacement and mounting of an AC plug on the power supply cord of this unit should be performed only by qualified service personnel. If connected to an AC outlet, the cut-off plug can cause severe electrical shock. Make sure it is properly disposed of after removal.The equipment should be disconnected by removing the mains plug from the wall socket when left unused for a long period of time (for example, when on vacation).
D3-4-2-2-1a_A1_En
WARNING: Handling the cord on this product or cords associated with accessories sold with the product may expose you to chemicals listed on proposition 65 known to the State of California and other governmental entities to cause cancer and birth defect or other reproductive harm.
D36-P5_B1_En
This product is for general household purposes. Any failure due to use for other than household purposes (such as long-term use for business purposes in a restaurant or use in a car or ship) and which requires repair will be charged for even during the warranty period.
K041_A1_En
CAUTIONThe POWER switch on this unit will not completely shut off all power from the AC outlet. Since the power cord serves as the main disconnect device for the unit, you will need to unplug it from the AC outlet to shut down all power. Therefore, make sure the unit has been installed so that the power cord can be easily unplugged from the AC outlet in case of an accident. To avoid fire hazard, the power cord should also be unplugged from the AC outlet when left unused for a long period of time (for example, when on vacation).
D3-4-2-2-2a*_A1_En
FEDERAL COMMUNICATIONS COMMISSION DECLARATION OF CONFORMITYThis device complies with part 15 of the FCC Rules. Operation is subject to the following two conditions: (1) This device may not cause harmful interference, and (2) this device must accept any interference received, including interference that may cause undesired operation. Product Name: DJ MIXER Model Number: DJM-850-K, DJM-850-S, DJM-850-W Responsible Party Name: PIONEER ELECTRONICS (USA) INC. SERVICE SUPPORT DIVISION Address: 1925 E. DOMINGUEZ ST. LONG BEACH, CA 90810-1003, U.S.A. Phone: 1-800-421-1404 URL: http://www.pioneerelectronics.com
D8-10-4*_C1_En
Information to UserAlterations or modifications carried out without appropriate authorization may invalidate the user’s right to operate the equipment.
D8-10-2_A1_En
4 En
The Safety of Your Ears is in Your HandsGet the most out of your equipment by playing it at a safe level – a level that lets the sound come through clearly without annoying blaring or distortion and, most importantly, without affecting your sensitive hearing. Sound can be deceiving. Over time, your hearing “comfort level” adapts to higher volumes of sound, so what sounds “normal” can actually be loud and harmful to your hearing. Guard against this by setting your equipment at a safe level BEFORE your hearing adapts.
ESTABLISH A SAFE LEVEL:• Set your volume control at a low setting. • Slowly increase the sound until you can hear it
comfortably and clearly, without distortion. • Once you have established a comfortable sound
level, set the dial and leave it there.
BE SURE TO OBSERVE THE FOLLOWING GUIDELINES:• Do not turn up the volume so high that you can’t
hear what’s around you.• Use caution or temporarily discontinue use in
potentially hazardous situations.• Do not use headphones while operating a motorized
vehicle; the use of headphones may create a traffic hazard and is illegal in many areas.
S001a_A1_En
IMPORTANT NOTICETHE MODEL NUMBER AND SERIAL NUMBER OFTHIS EQUIPMENT ARE ON THE REAR OR BOTTOM.RECORD THESE NUMBERS ON PAGE 31 FOR FUTURE REFERENCE. D36-AP9-1_A1_En_PSV
POWER-CORD CAUTIONHandle the power cord by the plug. Do not pull out the plug by tugging the cord and never touch the power cord when your hands are wet as this could cause a short circuit or electric shock. Do not place the unit, a piece of furniture, etc., on the power cord, or pinch the cord. Never make a knot in the cord or tie it with other cords. The power cords should be routed such that they are not likely to be stepped on. A damaged power cord can cause a fire or give you an electrical shock. Check the power cord once in a while. When you find it damaged, ask your nearest PIONEER authorized service center or your dealer for a replacement.
S002*_A1_En
This Class B digital apparatus complies with Canadian ICES-003.
D8-10-1-3_A1_En
CAUTIONThis product satisfies FCC regulations when shielded cables and connectors are used to connect the unit to other equipment. To prevent electromagnetic interference with electric appliances such as radios and televisions, use shielded cables and connectors for connections.
D8-10-3a_A1_En
5En
ContentsHow to read this manualThe names of displays, menus, and buttons in this manual are enclosed in brackets. (e.g. [MASTER] channel, [ON/OFF], [File] menu)
Before startFeatures ....................................................................................................... 6What’s in the box ........................................................................................ 6
ConnectionsRear panel ................................................................................................... 7Connecting input terminals ....................................................................... 8Connecting output terminals .................................................................... 8Connecting to the control panel ................................................................ 9About the driver software and setting utility software ............................. 9
Types of effectsBEAT COLOR FX/SOUND COLOR FX effect types ................................. 19Types of BEAT EFFECT .............................................................................. 19
List of MIDI Messages
Changing the settingsAbout the auto standby function ............................................................. 24About the talk over function..................................................................... 24Setting preferences .................................................................................. 24
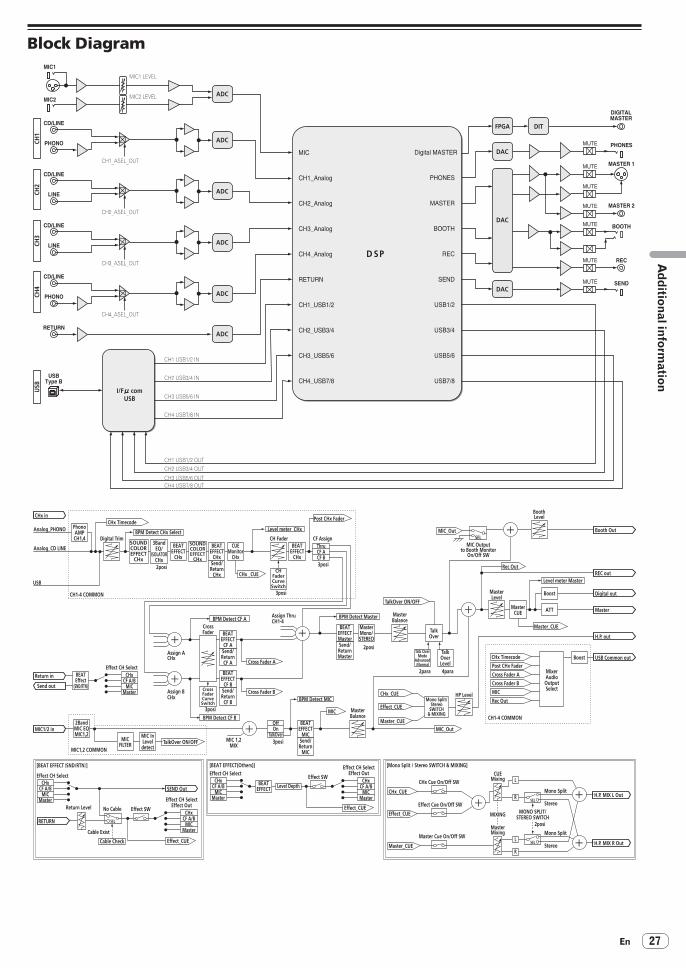
FeaturesThis unit is a 4-channel DJ mixer carrying over the technology of the Pioneer DJM series, the world standard for club sound. It is not only equipped with a variety of functions for DJ performances, including USB sound card, BEAT COLOR FX, SOUND COLOR FX and BEAT EFFECT, it also uses a high sound quality, high reliability design and a panel layout with high operability to provide powerful support for all DJ performances.
24 bit/96 kHz STEREO 4-IN 4-OUT SOUND CARDThis unit is equipped with a 24 bit/96 kHz stereo 4-in 4-out compatible USB sound card.This unit supports ASIO/Core Audio standards, so it can be used not only for DJ performances with DJ software but also with a wide variety of other software applications, including for software for creating music.! Four sets of stereo sound from a single computer can be input to the
respective channels and mixed.! Up to four sets of stereo sound can be output to the computer from
the respective channels (channels 1 to 4, REC OUT, crossfader sides A and B and microphone).
! The sampling rate can be switched between 96 kHz, 48 kHz and 44.1 kHz.
BEAT COLOR FX/SOUND COLOR FXThis unit inherits and further evolves the SOUND COLOR FX feature popular on the DJM series. This feature offers four types of effects, and effects can be achieved simply by turning the [COLOR] control provided for each channel, enabling improvisational performances. The BEAT COLOR FX function that changes the effect in association with the sound of the respective channels makes for even more dynamic perfor-mances than before.
BEAT EFFECTThis unit also inherits the BEAT EFFECT feature popular on the DJM series, equipped with 13 types of effects. The BEAT COLOR FX and SOUND COLOR FX effects can be combined to create some 100 different effects, letting the DJ produce a wide variety of sounds.
HIGH SOUND QUALITYEfforts have been made to improve and enhance sound quality for the digital/analog inputs/outputs. 96 kHz sampling and sound processing with a 24 bit high sound quality A/D converter and a 32 bit high sound quality D/A converter reproduce the source faithfully and provide power-ful, high grade club sound.
BUILD QUALITYThis unit uses the high performance channel faders of the DJM-900nexus and the “P-LOCK Fader Cap” mechanism for locking the fader knobs. Frequently used controls with optimized internal structures using metal shafts and other measures are taken to achieve smooth operation and high endurance.
STANDARD LAYOUTThis unit carries over the control panel layout of the Pioneer DJM series, the world standard in DJ mixers.
The simple, straightforward layout of the control panel not only makes for easy DJ performances, it also allows DJs using it for the first time to operate it without hesitation.
What’s in the box! Driver software CD-ROM! USB cable! Power cord! Operating instructions (this document)
7En
Con
nections
ConnectionsBe sure to turn off the power and unplug the power cord from the power outlet whenever making or changing connections.Refer to the operating instructions for the component to be connected.Connect the power cord after all the connections between devices have been completed.Be sure to use the included power cord.
Rear panel
OFF
RETURNL
1 GND 2 HOT3 COLD
LR
R
L
R
LR L
R
CH 4 CH 3
L
R
PHONOCH 1
CD/ LINEL
R
PHONO CD/ LINEL
RR
LINE CD/ LINEL
LINE CD/ LINE
SIGNAL GND SIGNAL GND
TRS
MASTER1 BOOTHREC OUTMASTER2
MIC2 MIDI OUT
CH1
CH2
CONTROLDIGITAL
MASTER OUT
CH 2
(MONO)
LR (MONO)
SEND
POWER
AC IN
ON
CH3
CH4
1 3 46 46 43 4 55 7 82
de b 9h acg f
1 POWER button (page 15)Turns this unit’s power on and off.
2 RETURN terminals (page 8)Connect to the output terminal of an external effector. When the [L (MONO)] channel only is connected, the [L (MONO)] channel input is simultaneously input to the [R] channel.
3 PHONO terminals (page 8)Connect to a phono level (MM cartridge) output device. Do not input line level signals.To connect a device to the [PHONO] terminals, remove the short-circuit pin plug inserted in the terminals.Insert this short-circuit pin plug into the [PHONO] terminals when nothing is connected to them to cut external noise.
4 CD/LINE terminals (page 8)Connect to a DJ player or a line level output component.
5 SIGNAL GND terminal (page 8)Connects an analog player’s ground wire here. This helps reduce noise when the analog player is connected.
6 LINE terminals (page 8)Connect to a cassette deck or a line level output component.
7 MIC2 terminal (page 8)Connects a microphone here.
8 MIDI OUT terminal (page 8)Connects this to the MIDI IN terminal on an external MIDI sequencer.
9 Kensington security slot
a CONTROL terminal (page 8)This is a Ø 3.5 mm mini phone jack type DJ player control terminal.If you connect a Pioneer DJ player using a control cable (supplied with a DJ player), you can start playback of control other operations of the DJ player with the fader of this unit.
b DIGITAL MASTER OUT terminal (page 8)Outputs the master channel audio signals.
c BOOTH terminals (page 8)Output terminals for a booth monitor, compatible with balanced or unbalanced output for a TRS connector.
d REC OUT terminals (page 8)These are output terminals for recording.
e MASTER2 terminals (page 8)Connect to a power amplifier, etc.
f MASTER1 terminals (page 8)Connect to a power amplifier, etc.
g SEND terminals (page 8)Connect to the input terminal of an external effector. When the [L (MONO)] channel only is connected, a monaural audio signal is output.
h AC INConnects to a power outlet using the included power cord. Wait until all connections between the equipment are completed before con-necting the power cord.Be sure to use the included power cord.
WARNINGThe short-circuit pin plugs out of the reach of children and infants. If accidentally swallowed, contact a doctor immediately.
8 En
Connecting input terminals! When creating a DVS (Digital Vinyl System) combining a computer, audio interface, etc., be careful in connecting the audio interface to this unit’s
input terminals and in the settings of the input selector switches. Also refer to the operating instructions of the DJ software and audio interface.
OFF
RETURNL
1 GND 2 HOT3 COLD
LR
R
L
R
LR L
R
CH 4 CH 3
L
R
PHONOCH 1
CD/ LINEL
R
PHONO CD/ LINEL
RR
LINE CD/ LINEL
LINE CD/ LINE
SIGNAL GND SIGNAL GND
TRS
MASTER1 BOOTHREC OUTMASTER2
MIC2 MIDI OUT
CH1
CH2
CONTROLDIGITAL
MASTER OUT
CH 2
(MONO)
LR (MONO)
SEND
POWER
AC IN
ON
CH3
CH4
L R
L R L RL R L R
L R L RL R
Pioneer DJ playersPioneer DJ playersTo power outlet
MicrophonesAnalog player Cassette deck, CD player, etc.(line level output devices)
Analog player
! To use the fader start function, connect a control cable (page 15).
Connecting output terminals
OFF
RETURNL
1 GND 2 HOT3 COLD
LR
R
L
R
LR L
R
CH 4 CH 3
L
R
PHONOCH 1
CD/ LINEL
R
PHONO CD/ LINEL
RR
LINE CD/ LINEL
LINE CD/ LINE
SIGNAL GND SIGNAL GND
TRS
MASTER1 BOOTHREC OUTMASTER2
MIC2 MIDI OUT
CH1
CH2
CONTROLDIGITAL
MASTER OUT
CH 2
(MONO)
LR (MONO)
SEND
POWER
AC IN
ON
CH3
CH4
L RL R
Power amplifier Power amplifier Digital audio input device
Power amplifier (for booth monitor)
External effector 1MIDI sequencer
Cassette deck, etc. (analog input
recording device)
1 Also connect the external effector to the [RETURN] terminal (input terminal).
9En
Con
nections
Connecting to the control panel
MASTER
0
MIXING
LEVELCUE
PHONES
BA THRU
LEVEL
MIC 1
MIC 2
0
0
MIC USB
MIC1 CD/LINE PHONO
TRIM
9
HI
6-26 /MID
OVER
10
7
4
2
1
1
0
1
2
3
Computers
Microphones
Headphones
Be sure to connect using the included USB cable.
1 MIC1 terminal (page 16)Connects a microphone here.
About the driver software and setting utility softwareThe driver software is required to input and output the sound of a com-puter using this unit’s built-in USB sound card. Prepare a computer on which a Windows or Mac operating system is installed and the pro-prietary driver software provided by Pioneer. When the driver software is installed, the settings utility software is installed at the same time. Change the settings of the settings utility and the computer according to your environment.
Software end user license agreementThis Software End User License Agreement (“Agreement”) is between you (both the individual installing the Program and any single legal entity for which the individual is acting) (“You” or “Your”) and PIONEER CORPORATION (“Pioneer”).TAKING ANY STEP TO SET UP OR INSTALL THE PROGRAM MEANS THAT YOU ACCEPT ALL OF THE TERMS OF THIS LICENSE AGREEMENT. PERMISSION TO DOWNLOAD AND/OR USE THE PROGRAM IS EXPRESSLY CONDITIONED ON YOUR FOLLOWING THESE TERMS. WRITTEN OR ELECTRONIC APPROVAL IS NOT REQUIRED TO MAKE THIS AGREEMENT VALID AND ENFORCEABLE. IF YOU DO NOT AGREE TO ALL OF THE TERMS OF THIS AGREEMENT, YOU ARE NOT AUTHORIZED TO USE THE PROGRAM AND MUST STOP INSTALLING IT OR UNINSTALL IT, AS APPLICABLE.
1 Definitions1 “Documentation” means written documentation, specifications
and help content made generally available by Pioneer to aid in installing and using the Program.
2 “Program” means all or any part of Pioneer’s software licensed to You by Pioneer under this Agreement.
2 Program license1 Limited License. Subject to this Agreement’s restrictions,
Pioneer grants to You a limited, non-exclusive, nontransferable, license (without the right to sublicense):a To install a single copy of the Program on the hard disk
drive of Your computer, to use the Program only for Your personal purpose complying with this Agreement and the Documentation (“Authorized Use”);
b To use the Documentation in support of Your Authorized Use; and
c To make one copy of the Program solely for backup pur-poses, provided that all titles and trademark, copyright and restricted rights notices are reproduced on the copy.
2 Restrictions. You will not copy or use the Program or Documentation except as expressly permitted by this Agreement. You will not transfer, sublicense, rent, lease or lend the Program, or use it for third-party training, commercial time-sharing or service bureau use. You will not Yourself or through any third party modify, reverse engineer, disassemble or decompile the Program, except to the extent expressly permitted by applicable law, and then only after You have notified Pioneer in writing of Your intended activities. You will not use the Program on multiple processors without Pioneer’s prior written consent.
3 Ownership. Pioneer or its licensor retains all right, title and interest in and to all patent, copyright, trademark, trade secret and other intellectual property rights in the Program and Documentation, and any derivative works thereof. You do not acquire any other rights, express or implied, beyond the limited license set forth in this Agreement.
4 No Support. Pioneer has no obligation to provide support, maintenance, upgrades, modifications or new releases for the Program or Documentation under this Agreement.
10 En
3 Warranty disclaimerTHE PROGRAM AND DOCUMENTATION ARE PROVIDED “AS IS” WITHOUT ANY REPRESENTATIONS OR WARRANTIES, AND YOU AGREE TO USE THEM AT YOUR SOLE RISK. TO THE FULLEST EXTENT PERMISSIBLE BY LAW, PIONEER EXPRESSLY DISCLAIMS ALL WARRANTIES OF ANY KIND WITH RESPECT TO THE PROGRAM AND DOCUMENTATION, WHETHER EXPRESS, IMPLIED, STATUTORY, OR ARISING OUT OF COURSE OF PERFORMANCE, COURSE OF DEALING OR USAGE OF TRADE, INCLUDING ANY WARRANTIES OF MERCHANTABILITY, FITNESS FOR A PARTICULAR PURPOSE, SATISFACTORY QUALITY, ACCURACY, TITLE OR NON-INFRINGEMENT.
4 Damages and remedies for breachYou agree that any breach of this Agreement’s restrictions would cause Pioneer irreparable harm for which money damages alone would be inadequate. In addition to damages and any other remedies to which Pioneer may be entitled, You agree that Pioneer may seek injunctive relief to prevent the actual, threatened or continued breach of this Agreement.
5 TerminationPioneer may terminate this Agreement at any time upon Your breach of any provision. If this Agreement is terminated, You will stop using the Program, permanently delete it from the computer where it resides, and destroy all copies of the Program and Documentation in Your posses-sion, confirming to Pioneer in writing that You have done so. Sections 2.2, 2.3, 2.4, 3, 4, 5 and 6 will continue in effect after this Agreement’s termination.
6 General terms1 Limitation of Liability. In no event will Pioneer or its subsidiaries
be liable in connection with this Agreement or its subject matter, under any theory of liability, for any indirect, incidental, special, consequential or punitive damages, or damages for lost profits, revenue, business, savings, data, use, or cost of substitute pro-curement, even if advised of the possibility of such damages or if such damages are foreseeable. In no event will Pioneer’s liability for all damages exceed the amounts actually paid by You to Pioneer or its subsidiaries for the Program. The parties acknowl-edge that the liability limits and risk allocation in this Agreement are reflected in the Program price and are essential elements of the bargain between the parties, without which Pioneer would not have provided the Program or entered into this Agreement.
2 The limitations or exclusions of warranties and liability contained in this Agreement do not affect or prejudice Your statutory rights as consumer and shall apply to You only to the extent such limita-tions or exclusions are permitted under the laws of the jurisdic-tion where You are located.
3 Severability and Waiver. If any provision of this Agreement is held to be illegal, invalid or otherwise unenforceable, that provision will be enforced to the extent possible or, if incapable of enforce-ment, deemed to be severed and deleted from this Agreement, and the remainder will continue in full force and effect. The waiver by either party of any default or breach of this Agreement will not waive any other or subsequent default or breach.
4 No Assignment. You may not assign, sell, transfer, delegate or otherwise dispose of this Agreement or any rights or obligations under it, whether voluntarily or involuntarily, by operation of law or otherwise, without Pioneer’s prior written consent. Any pur-ported assignment, transfer or delegation by You will be null and void. Subject to the foregoing, this Agreement will be binding upon and will inure to the benefit of the parties and their respec-tive successors and assigns.
5 Entire Agreement. This Agreement constitutes the entire agree-ment between the parties and supersedes all prior or contem-poraneous agreements or representations, whether written or oral, concerning its subject matter. This Agreement may not be modified or amended without Pioneer’s prior and express written consent, and no other act, document, usage or custom will be deemed to amend or modify this Agreement.
6 You agree that this Agreement shall be governed and construed by and under the laws of Japan.
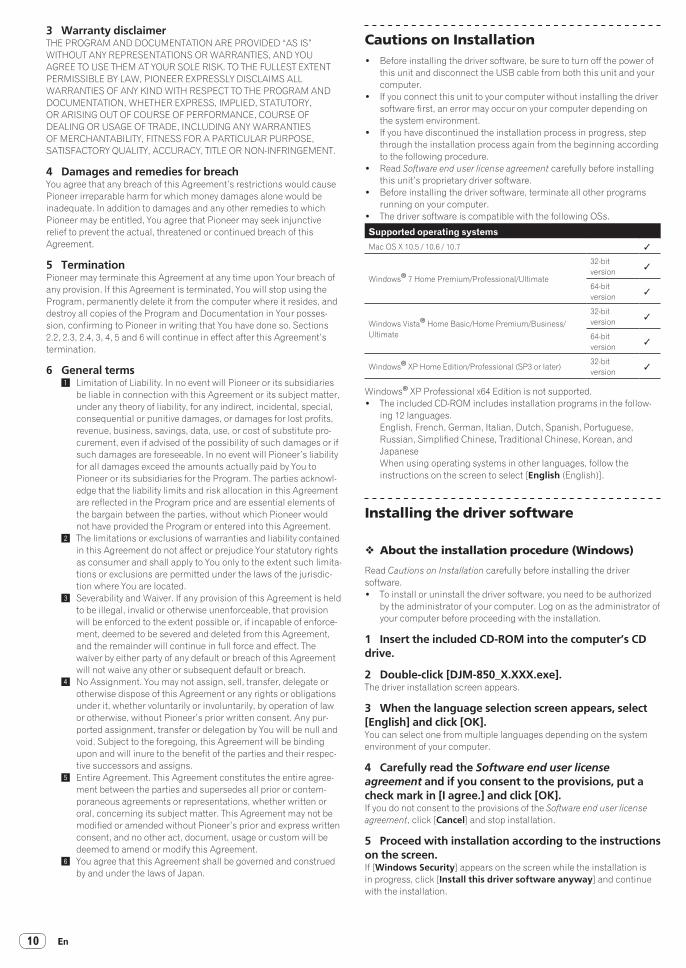
Cautions on Installation! Before installing the driver software, be sure to turn off the power of
this unit and disconnect the USB cable from both this unit and your computer.
! If you connect this unit to your computer without installing the driver software first, an error may occur on your computer depending on the system environment.
! If you have discontinued the installation process in progress, step through the installation process again from the beginning according to the following procedure.
! Read Software end user license agreement carefully before installing this unit’s proprietary driver software.
! Before installing the driver software, terminate all other programs running on your computer.
! The driver software is compatible with the following OSs.
Supported operating systems
Mac OS X 10.5 / 10.6 / 10.7 1
Windows® 7 Home Premium/Professional/Ultimate
32-bit version
1
64-bit version
1
Windows Vista® Home Basic/Home Premium/Business/Ultimate
32-bit version
1
64-bit version
1
Windows® XP Home Edition/Professional (SP3 or later)32-bit version
1
Windows® XP Professional x64 Edition is not supported.! The included CD-ROM includes installation programs in the follow-
ing 12 languages. English, French, German, Italian, Dutch, Spanish, Portuguese,
Russian, Simplified Chinese, Traditional Chinese, Korean, and Japanese
When using operating systems in other languages, follow the instructions on the screen to select [English (English)].
Installing the driver software
� About the installation procedure (Windows)
Read Cautions on Installation carefully before installing the driver software.! To install or uninstall the driver software, you need to be authorized
by the administrator of your computer. Log on as the administrator of your computer before proceeding with the installation.
1 Insert the included CD-ROM into the computer’s CD drive.
3 When the language selection screen appears, select [English] and click [OK].You can select one from multiple languages depending on the system environment of your computer.
4 Carefully read the Software end user license agreement and if you consent to the provisions, put a check mark in [I agree.] and click [OK].If you do not consent to the provisions of the Software end user license agreement, click [Cancel] and stop installation.
5 Proceed with installation according to the instructions on the screen.If [Windows Security] appears on the screen while the installation is in progress, click [Install this driver software anyway] and continue with the installation.
11En
Con
nections
! When installing on Windows XP If [Hardware Installation] appears on the screen while the installa-
tion is in progress, click [Continue Anyway] and continue with the installation.
! When the installation program is completed, a completion message appears.
! When the installation of the driver software is completed, you need to reboot your computer.
� About the installation procedure (Mac OS X)
Read Cautions on Installation carefully before installing the driver software.! To install or uninstall the driver software, you need to be authorized
by the administrator of your computer. Have the name and password of the administrator of your computer ready in advance.
1 Insert the included CD-ROM into the computer’s CD drive.The CD-ROM folder appears.! Double-click the CD icon on the desktop when folders are not dis-
played after a CD-ROM has been loaded.
2 Double-click [CD_menu].
3 Double-click [DJM-850_M_X.X.X.dmg].The [DJM-850AudioDriver] menu screen appears.
5 Check the details on the screen and click [Continue Anyway].
6 When the Software Use Agreement screen appears, select [English], carefully read the Software end user license agreement and click [Continue Anyway].You can select one from multiple languages depending on the system environment of your computer.
7 If you consent to the provisions of the Software end user license agreement, click [Agree].If you do not consent to the provisions of the Software end user license agreement, click [I disagree] and stop installation.
8 Proceed with installation according to the instructions on the screen.! Click [Cancel] to cancel installation after it has started.! When the installation of the driver software is completed, you need to
reboot your computer.
Connecting this unit and computer
1 Connect this unit to your computer via a USB cable.This unit functions as an audio device conforming to the ASIO standards.! This operation does not work with computers that do not support
USB 2.0.! When using ASIO-compatible applications, [USB 1/2], [USB 3/4],
[USB 5/6] and [USB 7/8] can be used as inputs.! When using DirectX-compatible applications, only [USB 1/2] can be
used as the input.! The computer’s recommended operating environment differs
according to the DJ software. Be sure to check the recommended operating environment for the DJ software you are using.
! When another USB audio device is connected to the computer at the same time, it may not operate or be recognized normally.
We recommend only connecting the computer and this unit.! When connecting the computer and this unit, we recommend con-
necting directly to this unit’s USB port.
2 Press [POWER] button.Turn on the power of this unit.
! The message [Installing device driver software] may appear when this unit is first connected to the computer or when it is connected to a different USB port on the computer. Wait a while until the message [Your devices are ready for use] appears.
! When installing on Windows XP— [Can Windows connect to Windows Update to search for
software?] may appear while the installation is in progress. Select [No, not this time], then click [Next] to continue installation.
— [What do you want the wizard to do?] may appear while the installation is in progress. Select [Install the software automatically (Recommended)], then click [Next] to continue installation.
— If [Windows Security] appears on the screen while the installa-tion is in progress, click [Install this driver software anyway] and continue with the installation.
About the setting utility softwareThe setting utility can be used to make the checks and settings described below.— Checking the status of this unit’s [CD/LINE, PHONO, LINE, USB */*]
selector switch— Setting the audio data output from this unit to the computer— Adjusting the buffer size (when using Windows ASIO)— Checking the version of the driver software
� Displaying the setting utility
For WindowsClick [Start] menu > [All Programs] > [Pioneer] > [DJM-850] > [DJM-850 Settings Utility].
For Mac OS XClick [Macintosh HD] icon > [Application] > [Pioneer] > [DJM-850] > [DJM-850 Settings Utility].
� Checking the status of this unit’s [CD/LINE, PHONO, LINE, USB */*] selector switch
Display the setting utility before starting.
Click the [MIXER INPUT] tab.
12 En
� Setting the audio data output from this unit to the computer
Display the setting utility before starting.
1 Click the [MIXER OUTPUT] tab.
2 Click the [Mixer Audio Output] pull-down menu.Select and set the audio data to be output to the computer from the flow of audio signals inside this unit.
CH1 CH2 CH3 CH4
CH1 Timecode PHONO1
CH2 Timecode CD/LINE1
CH3 Timecode CD/LINE1
CH4 Timecode PHONO1
CH1 Timecode CD/LINE1
CH2 Timecode LINE1
CH3 Timecode LINE1
CH4 Timecode CD/LINE1
Post CH1 Fader2 Post CH2 Fader2 Post CH3 Fader2 Post CH4 Fader2
1 The audio data is output with the same volume at which it is input to this unit, regardless of the [USB Output Level] setting.
2 When using for any purposes other than sound recording, pay attention to set the DJ software so that sound loops are not generated. If sound loops are gener-ated, sound with an unintended volume might be input or output.
3 Click the [USB Output Level] pull-down menu.Adjust the volume of the audio data output from this unit.! The [USB Output Level] setting is applied equally to all audio data.
However, when 1 on the table at step 2 is selected, the audio data is output with the same volume at which it is input to this unit.
! If not enough volume can be achieved with the DJ software’s volume adjustment alone, change the [USB Output Level] setting to adjust the volume of the audio data output from this unit. Note that the sound will be distorted if the volume is raised too high.
� Adjusting the buffer size (when using Windows ASIO)
If an application using this unit as the default audio device (DJ software, etc.) is running, quit that application before adjusting the buffer size.Display the setting utility before starting.
Click the [ASIO] tab.
! If the buffer size is made large, drops in audio data (breaks in the sound) occur less easily, but the time lag due to the delay in the transfer of the audio data (latency) increases.
� Checking the version of the driver software
Display the setting utility before starting.
Click the [About] tab.
Checking the latest information on the driver softwareFor the latest information on the driver software for exclusive use with this unit, visit our website shown below.http://pioneerdj.com/support/! Operation cannot be guaranteed when multiple units of this mixer
are connected to a single computer.
13En
Operation
LEVEL
MIC 1
MIC 2
EQ
0
0
POWER
MIC USB
MIC1
AUTO/ TAP
START/ STOP
CH SELECT
PARAMETER
1 2 3 4
MIC A B MST
TIME
MAX
LEVEL / DEPTH
ON/ OFF
MIN
MIDI
BEAT EFFECTS
BEAT
TAP
ON/ OFF SETUP
PHASER
SPIRAL
FLANGER
SLIP ROLL
ROLL
FILTERTRANS
REV ROLL
SND/ RTN
ROBOTREVERB
ECHO
UP ECHO
DELAY
HI
LOW
12 12
12 12
ONTALKOVEROFF
SOUND COLOR FX
NOISE GATE
CRUSH FILTER
1 2 3 4
FADER START
HEAD PHONESSTEREOMONO SPLIT
MASTER
0
MIXING
LEVELCUE
PHONES
CD/LINE PHONO USB1/2
EQ/
TRIM
9
HI
6-26 /MID
6-26 /LOW
6-26 /
ISO
OVER
10
7
4
2
1
- 1
- 2
- 3
- 5
- 7
-10
-15
-24
dB
0
BEAT
COLOR
HILOW
CUE
BA THRU
10
9
8
7
6
5
4
3
2
1
0
CD/LINE LINE USB3/4
EQ/
TRIM
9
HI
6-26 /MID
6-26 /LOW
6-26 /
ISO
OVER
10
7
4
2
1
- 1
- 2
- 3
- 5
- 7
-10
-15
-24
dB
0
BEAT
COLOR
HILOW
CUE
BA THRU
10
9
8
7
6
5
4
3
2
1
0
CD/LINE LINE USB5/6
EQ/
TRIM
9
HI
6-26 /MID
6-26 /LOW
6-26 /
ISO
OVER
10
7
4
2
1
- 1
- 2
- 3
- 5
- 7
-10
-15
-24
dB
0
OVER
10
7
4
2
1
- 1
- 2
- 3
- 5
- 7
-10
-15
-24
RL dB
0
BEAT
COLOR
HILOW
CUE
BA THRU
10
9
8
7
6
5
4
3
2
1
0
CD/LINE PHONO USB7/8
EQ/
TRIM
9
HI
6-26 /MID
6-26 /LOW
6-26 /
ISO
OVER
10
7
4
2
1
- 1
- 2
- 3
- 5
- 7
-10
-15
-24
dB
0
BEAT
COLOR
HILOW
CUE CUE
CUE
BA THRU
STEREO
EQ
MONO
BA
ISOLATOR
WAKE UP
LEVEL
0
BALANCE
RL
MASTER
BOOTH MONITOR
EQ CURVE
CH FADER
CROSS FADER
0
AUTOTAP BPM
%ms
1
2
34 MIC
CF.A
CF.B
MASTER
CROSS FADER ASSIGN
1
2
4
7
8
9
u
g
z
A
B
C
D
y
t
x
s
5
6
3
v
w
j
g
k
m
n
o
p
q
r
g
c
d
e
h
i
a
g
c
d
b
e
h
i
g
c
d
e
h
i
a
g
c
d
e
h
i
aa
l
f
b
f
b
f
b
f
Op
eration
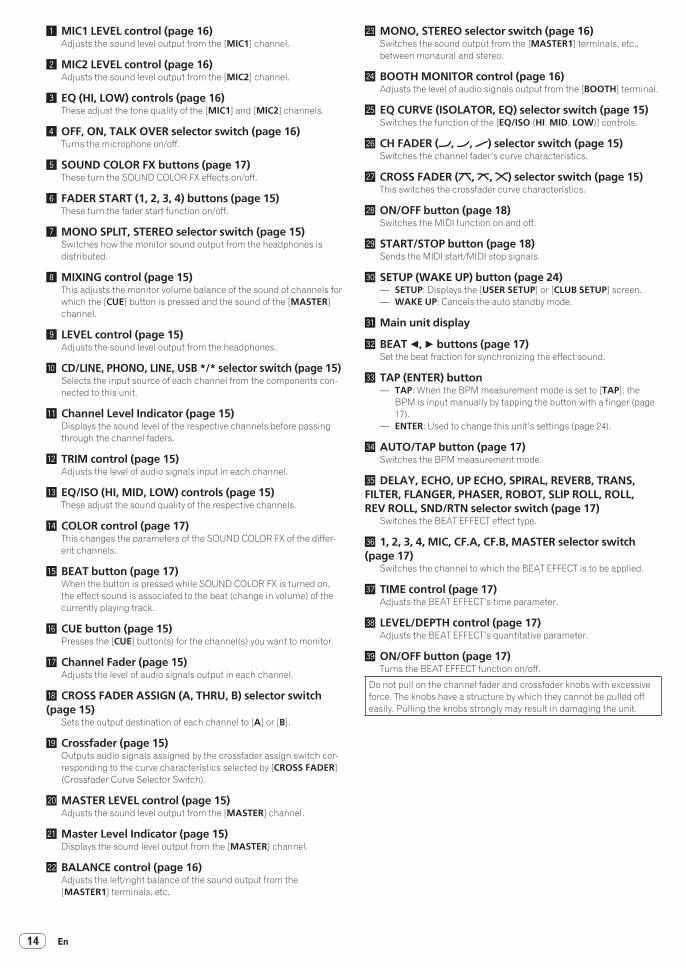
1 MIC1 LEVEL control (page 16)Adjusts the sound level output from the [MIC1] channel.
2 MIC2 LEVEL control (page 16)Adjusts the sound level output from the [MIC2] channel.
3 EQ (HI, LOW) controls (page 16)These adjust the tone quality of the [MIC1] and [MIC2] channels.
4 OFF, ON, TALK OVER selector switch (page 16)Turns the microphone on/off.
5 SOUND COLOR FX buttons (page 17)These turn the SOUND COLOR FX effects on/off.
6 FADER START (1, 2, 3, 4) buttons (page 15)These turn the fader start function on/off.
7 MONO SPLIT, STEREO selector switch (page 15)Switches how the monitor sound output from the headphones is distributed.
8 MIXING control (page 15)This adjusts the monitor volume balance of the sound of channels for which the [CUE] button is pressed and the sound of the [MASTER] channel.
9 LEVEL control (page 15)Adjusts the sound level output from the headphones.
a CD/LINE, PHONO, LINE, USB */* selector switch (page 15)Selects the input source of each channel from the components con-nected to this unit.
b Channel Level Indicator (page 15)Displays the sound level of the respective channels before passing through the channel faders.
c TRIM control (page 15)Adjusts the level of audio signals input in each channel.
d EQ/ISO (HI, MID, LOW) controls (page 15)These adjust the sound quality of the respective channels.
e COLOR control (page 17)This changes the parameters of the SOUND COLOR FX of the differ-ent channels.
f BEAT button (page 17)When the button is pressed while SOUND COLOR FX is turned on, the effect sound is associated to the beat (change in volume) of the currently playing track.
g CUE button (page 15)Presses the [CUE] button(s) for the channel(s) you want to monitor.
h Channel Fader (page 15)Adjusts the level of audio signals output in each channel.
i CROSS FADER ASSIGN (A, THRU, B) selector switch (page 15)
Sets the output destination of each channel to [A] or [B].
j Crossfader (page 15)Outputs audio signals assigned by the crossfader assign switch cor-responding to the curve characteristics selected by [CROSS FADER] (Crossfader Curve Selector Switch).
k MASTER LEVEL control (page 15)Adjusts the sound level output from the [MASTER] channel.
l Master Level Indicator (page 15)Displays the sound level output from the [MASTER] channel.
m BALANCE control (page 16)Adjusts the left/right balance of the sound output from the [MASTER1] terminals, etc.
n MONO, STEREO selector switch (page 16)Switches the sound output from the [MASTER1] terminals, etc., between monaural and stereo.
o BOOTH MONITOR control (page 16)Adjusts the level of audio signals output from the [BOOTH] terminal.
p EQ CURVE (ISOLATOR, EQ) selector switch (page 15)Switches the function of the [EQ/ISO (HI, MID, LOW)] controls.
Switches the channel to which the BEAT EFFECT is to be applied.
B TIME control (page 17)Adjusts the BEAT EFFECT’s time parameter.
C LEVEL/DEPTH control (page 17)Adjusts the BEAT EFFECT’s quantitative parameter.
D ON/OFF button (page 17)Turns the BEAT EFFECT function on/off.
Do not pull on the channel fader and crossfader knobs with excessive force. The knobs have a structure by which they cannot be pulled off easily. Pulling the knobs strongly may result in damaging the unit.
14 En
15En
Op
eration
Basic Operation
Outputting sound
1 Press [POWER] button.Turns on the power of this unit.
2 Switch the [CD/LINE, PHONO, LINE, USB */*] selector switch.Selects the input sources for the different channels from among the devices connected to this unit.
— [PHONO]: Selects the analog player connected to the [PHONO] terminals.
— [CD/LINE], [LINE]: Selects the DJ player or cassette deck con-nected to the [CD/LINE] or [LINE] terminals.
— [USB */*]: Selects the sound of the computer connected to the [USB] port.
3 Turn the [TRIM] control.Adjusts the level of audio signals input in each channel.The corresponding channel level indicator lights when audio signals are being properly input to that channel.
4 Move the channel fader away from you.Adjusts the level of audio signals output in each channel.
5 Switch the [CROSS FADER ASSIGN (A, THRU, B)] selector switch.Switches the output destination of each channel.
— [A]: Assigns to [A] (left) of the crossfader.— [B]: Assigns to [B] (right) of the crossfader.— [THRU]: Selects this when you do not want to use the crossfader.
(The signals do not pass through the crossfader.)
6 Set the crossfader.This operation is not necessary when the [CROSS FADER ASSIGN (A, THRU, B)] selector switch is set to [THRU].
7 Turn the [MASTER LEVEL] control.Audio signals are output from the [MASTER1] and [MASTER2] terminals.The master level indicator lights.
Adjusting the sound quality
Turn the [EQ/ISO (HI, MID, LOW)] controls for the respective channels.Refer to Specifications on page 28 for the range of sound that can be adjusted by each control.
� Switching the function of the [EQ/ISO (HI, MID, LOW)] controls
Switch the [EQ CURVE (ISOLATOR, EQ)] selector switch.— [ISOLATOR]: Functions as an isolator.— [EQ]: The equalizer function is set.
Monitoring sound with headphones
1 Connect headphones to the [PHONES] terminal.
2 Press the [CUE] button(s) for the channel(s) you want to monitor.
3 Switch the [MONO SPLIT, STEREO] selector switch.— [MONO SPLIT]: The sound of the channels for which the [CUE]
button is pressed is output from the headphones output’s left
channel, the [MASTER] channel sound is output from the right channel.
— [STEREO]: The sound of the channels for which the [CUE] button is pressed is output from the headphones in stereo.
4 Turn the [MIXING] control.This adjusts the monitor volume balance of the sound of channels for which the [CUE] button is pressed and the sound of the [MASTER] channel.
5 Turn the [LEVEL] control for [HEADPHONES].The sound of the channels for which the [CUE] button is pressed is output from the headphones.! When the [CUE] button is pressed again, monitoring is canceled.
Switching the fader curve
� Select the channel fader curve characteristics.
Switch the [CH FADER ( , , )] selector switch.— [ ]: The curve rises suddenly at the back side.— [ ]: A curve between the ones above and below is set.— [ ]: The curve rises gradually (the sound gradually increases as
the channel fader is moved away from the front side).
� Select the crossfader curve characteristics.
Switch the [CROSS FADER ( , , )] selector switch.— [ ]: Makes a sharply increasing curve (if the crossfader is
moved away from the [A] side, audio signals are immediately output from the [B] side).
— [ ]: Makes a curve shaped between the two curves above and below.
— [ ]: Makes a gradually increasing curve (if the crossfader is moved away from the [A] side, the sound on the [B] side gradu-ally increases, while the sound on the [A] gradually decreases).
Starting playback on a DJ player using the fader (fader start)If you connect a Pioneer DJ player using a control cable (supplied with a DJ player), you can start playback of control other operations of the DJ player with the fader of this unit.Connect this unit and Pioneer DJ player beforehand. For instructions on connections, see Connecting input terminals on page 8.The fader start function can be switched on and off for all DJ players all at once. For the switching procedure, see Changing the settings on page 24.
� Start playback using the channel fader
1 Set the [CROSS FADER ASSIGN (A, THRU, B)] selector switch to [THRU].
2 Press one of the [FADER START (1, 2, 3, 4)] buttons.Select the channel to be started with the fader start function.
3 Set the channel fader to the nearest position towards you.
4 Set the cue on the DJ player.The DJ player pauses playback at the cue point.
5 Move the channel fader away from you.Playback starts on the DJ player.! If you set the channel fader back to the original position, the player
instantaneously returns to the cue point already set and pauses playback (back cue).
� Start playback using the crossfader
1 Set the [CROSS FADER ASSIGN (A, THRU, B)] selector switch to [A] or [B].
2 Press one of the [FADER START (1, 2, 3, 4)] buttons.Select the channel to be started with the fader start function.
3 Set the crossfader.Set to the edge opposite the side on which the channel you want to use with the fader start function is set.
4 Set the cue on the DJ player.The DJ player pauses playback at the cue point.
5 Set the crossfader.Playback starts on the DJ player.! If you set the crossfader back to the original position, the player
instantaneously returns to the cue point already set and pauses playback (back cue).
Using a microphone
1 Connect a microphone to the [MIC1] or [MIC2] terminal.
2 Set the [OFF, ON, TALK OVER] selector switch to [ON] or [TALK OVER].
— [ON]: The indicator lights.— [TALK OVER]: The indicator flashes.
! When set to [TALK OVER], the sound of channels other than the [MIC] channel is attenuated by 18 dB (default) when a sound of -10 dB or greater is input to the microphone.
! The [TALK OVER] sound attenuation level can be changed at [USER SETUP] screen. For instructions on changing this, see Changing the settings on page 24.
! The talk over mode can be switched to the normal mode or the advanced mode. For instructions on changing it, see Changing the settings on page 24.
3 Turn the [MIC1 LEVEL] or [MIC2 LEVEL] control.Adjust the level of the sound output from the [MIC] channel.! Pay attention that rotating to the extreme right position outputs a
very loud sound.
4 Input audio signals to the microphone.
� Adjusting the sound quality
Turn the [MIC] channels’ [EQ (HI, LOW)] controls.Refer to Specifications on page 28 for the range of sound that can be adjusted by each control.
Switching between monaural and stereo audioThis switches the sound output from the [MASTER1], [MASTER2], [BOOTH], [REC OUT], [PHONES], [DIGITAL MASTER OUT] and [USB] terminals between monaural and stereo.! To adjust the sound output from the [USB] terminals, select [REC
OUT] at [Mixer Audio Output] in the setting utility.
The left/right balance of the sound output from the [MASTER1], [MASTER2], [BOOTH], [REC OUT], [PHONES], [DIGITAL MASTER OUT] and [USB] terminals can be adjusted.
! To adjust the sound output from the [USB] terminals, select [REC OUT] at [Mixer Audio Output] in the setting utility.
1 Set the [MONO, STEREO] selector switch to [STEREO].
2 Turn the [BALANCE] control.The sound’s left/right balance changes according to the direction in which the [BALANCE] control is turned and its position.! Rotating to the rightmost position outputs only the right sound of
stereo audio. Rotating to the leftmost position outputs only the left sound of stereo audio.
Audio is output from the [BOOTH] terminal
Turn the [BOOTH MONITOR] control.Adjusts the level of audio signals output from the [BOOTH] terminal.
16 En
17En
Op
eration
Advanced Operations
SOUND COLOR FXThese effects change in association with the [COLOR] controls for the different channels.
1 Press one of the [SOUND COLOR FX] buttons.This selects the type of effect.The button that was pressed flashes.! For the types of effects, see BEAT COLOR FX/SOUND COLOR FX effect
types on page 19.! The same effect is set for [CH1] to [CH4].
2 Turn the [COLOR] control.The effect is applied to the channel(s) for which the control(s) was (were) pressed.
BEAT COLOR FXThe SOUND COLOR FX effect can be associated to the beat (change in volume) of the track when the [BEAT] buttons for the respective chan-nels are pressed. The beat association function can be set separately for the respective channels.The following describes the operating procedure for when SOUND COLOR FX is turned on.
Press the [BEAT] button.The beat association function is turned on for the channel(s) whose [BEAT] button(s) was (were) pressed.The SOUND COLOR FX effect is associated to the track’s beat.! When the [BEAT] button is pressed again, the beat association func-
tion is turned off.! The beat association function can also be used by turning SOUND
COLOR FX on after pressing the [BEAT] button.
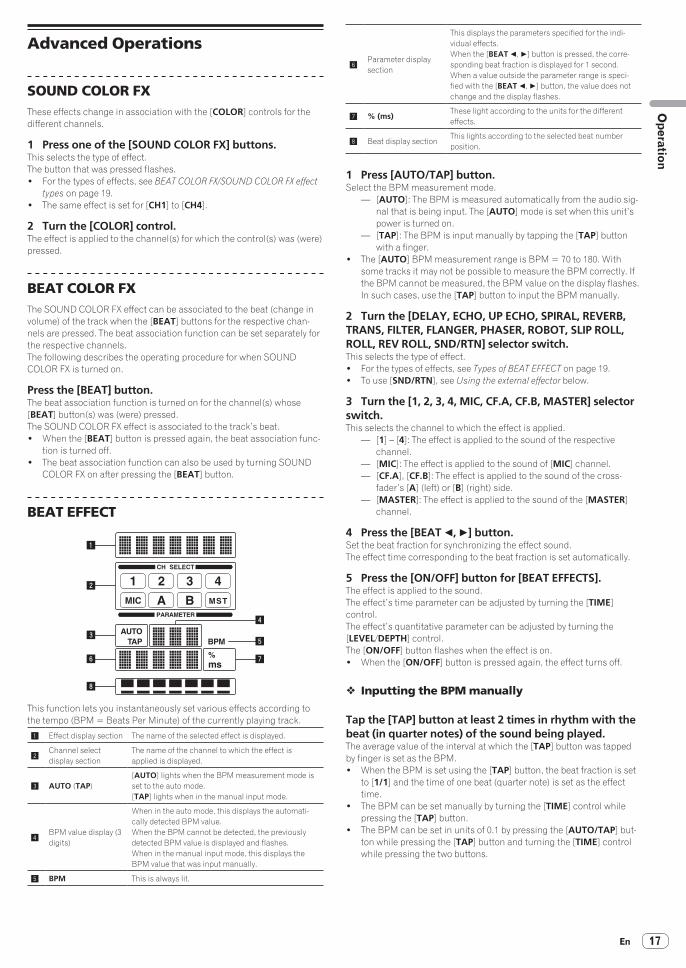
BEAT EFFECT
1
2
3
6
8
4
5
7
AUTOTAP BPM
%ms
CH SELECT
PARAMETER
1 2 3 4MIC MSTA B
This function lets you instantaneously set various effects according to the tempo (BPM = Beats Per Minute) of the currently playing track.
1 Effect display section The name of the selected effect is displayed.
2Channel select display section
The name of the channel to which the effect is applied is displayed.
3 AUTO (TAP)[AUTO] lights when the BPM measurement mode is set to the auto mode.[TAP] lights when in the manual input mode.
4BPM value display (3 digits)
When in the auto mode, this displays the automati-cally detected BPM value.When the BPM cannot be detected, the previously detected BPM value is displayed and flashes.When in the manual input mode, this displays the BPM value that was input manually.
5 BPM This is always lit.
6Parameter display section
This displays the parameters specified for the indi-vidual effects.When the [BEAT c, d] button is pressed, the corre-sponding beat fraction is displayed for 1 second.When a value outside the parameter range is speci-fied with the [BEAT c, d] button, the value does not change and the display flashes.
7 % (ms)These light according to the units for the different effects.
8 Beat display sectionThis lights according to the selected beat number position.
1 Press [AUTO/TAP] button.Select the BPM measurement mode.
— [AUTO]: The BPM is measured automatically from the audio sig-nal that is being input. The [AUTO] mode is set when this unit’s power is turned on.
— [TAP]: The BPM is input manually by tapping the [TAP] button with a finger.
! The [AUTO] BPM measurement range is BPM = 70 to 180. With some tracks it may not be possible to measure the BPM correctly. If the BPM cannot be measured, the BPM value on the display flashes. In such cases, use the [TAP] button to input the BPM manually.
2 Turn the [DELAY, ECHO, UP ECHO, SPIRAL, REVERB, TRANS, FILTER, FLANGER, PHASER, ROBOT, SLIP ROLL, ROLL, REV ROLL, SND/RTN] selector switch.This selects the type of effect.! For the types of effects, see Types of BEAT EFFECT on page 19.! To use [SND/RTN], see Using the external effector below.
3 Turn the [1, 2, 3, 4, MIC, CF.A, CF.B, MASTER] selector switch.This selects the channel to which the effect is applied.
— [1] – [4]: The effect is applied to the sound of the respective channel.
— [MIC]: The effect is applied to the sound of [MIC] channel.— [CF.A], [CF.B]: The effect is applied to the sound of the cross-
fader’s [A] (left) or [B] (right) side.— [MASTER]: The effect is applied to the sound of the [MASTER]
channel.
4 Press the [BEAT c, d] button.Set the beat fraction for synchronizing the effect sound.The effect time corresponding to the beat fraction is set automatically.
5 Press the [ON/OFF] button for [BEAT EFFECTS].The effect is applied to the sound.The effect’s time parameter can be adjusted by turning the [TIME] control.The effect’s quantitative parameter can be adjusted by turning the [LEVEL/DEPTH] control.The [ON/OFF] button flashes when the effect is on.! When the [ON/OFF] button is pressed again, the effect turns off.
� Inputting the BPM manually
Tap the [TAP] button at least 2 times in rhythm with the beat (in quarter notes) of the sound being played.The average value of the interval at which the [TAP] button was tapped by finger is set as the BPM.! When the BPM is set using the [TAP] button, the beat fraction is set
to [1/1] and the time of one beat (quarter note) is set as the effect time.
! The BPM can be set manually by turning the [TIME] control while pressing the [TAP] button.
! The BPM can be set in units of 0.1 by pressing the [AUTO/TAP] but-ton while pressing the [TAP] button and turning the [TIME] control while pressing the two buttons.
� Using the external effector
1 Connect this unit and external effector.For instructions on connections, see Connecting output terminals on page 8.
3 Turn the [1, 2, 3, 4, MIC, CF.A, CF.B, MASTER] selector switch.This selects the channel to which the effect is applied.
4 Press the [ON/OFF] button for [BEAT EFFECTS].The sound that has passed through the external effector is output from the [MASTER] channel.! When the [ON/OFF] button is pressed again, the effect turns off.
Operating DJ software using the MIDI functionThis unit is equipped with a “Full Assignable MIDI” function allowing the operation information of virtually all of the unit’s controls and buttons to be sent to the DJ software as MIDI signals. This unit can be used as a USB MIDI controller when it is connected by USB cable to a computer on which MIDI-compatible DJ software is installed. Furthermore, the tempo (BPM) of the sound being played is sent as MIDI timing clocks, so the tempo on the DJ software can be synchronized with the tempo of the sound output from this unit.To operate DJ software with this unit, first install the MIDI-compatible DJ software on the computer. The MIDI-related settings must also be made on the DJ software.! For the messages output by this unit, see List of MIDI Messages on
page 22.! If you want to change this unit’s MIDI channel, see Changing the
settings on page 24.
1 Connect this unit’s [USB] terminal to the computer.For details about connections, see Connecting to the control panel on page 9.
2 Launch the DJ software.
3 Press the [MIDI] [ON/OFF] button.Turn the MIDI function on.Transmission of the MIDI messages begin.! When a fader or control is moved, a message corresponding to the
position is sent.! When the [START/STOP] button is pressed and held in for more than
2 seconds, a set of MIDI messages corresponding to the button, fader or control positions is sent (Snapshot).
! When the [ON/OFF] button for [MIDI] is pressed again, transmission of MIDI messages stops.
! The MIDI timing clocks (BPM information) are sent regardless of the [MIDI] [ON/OFF] button’s setting.
� Sending the MIDI start and MIDI stop messages
Press the [START/STOP] button for [MIDI].! The MIDI start and MIDI stop messages are sent alternatively each
time the [START/STOP] button is pressed, regardless of whether the MIDI function is on or off.
Operating an external MIDI sequencerThis unit is equipped with a “Full Assignable MIDI” function allowing the operation information of virtually all of the unit’s controls and but-tons to be sent to an external device (effector, etc.) as MIDI signals. This unit can be used as a USB MIDI controller when it is connected by MIDI cable to a MIDI-compatible external device. Furthermore, the tempo (BPM) of the sound being played is sent as MIDI timing clocks, so the tempo on the external device (sequencer, etc.) can be synchronized with the tempo of sound output from this unit.! For the messages output by this unit, see List of MIDI Messages on
be synchronized.! External MIDI sequencers cannot be synchronized for sources for
which the BPM cannot be measured stably.! The MIDI timing clock is output even with BPM values input manu-
ally by tapping the [TAP] button with a finger. The MIDI timing clock output range is 40 BPM to 250 BPM.
1 Connect the [MIDI OUT] terminal to the external MIDI sequencer’s MIDI IN terminal using a commercially available MIDI cable.
2 Set the external MIDI sequencer’s sync mode to Slave.
3 Press the [START/STOP] button for [MIDI].The MIDI start message is sent.
4 Press the [MIDI] [ON/OFF] button.Transmission of the MIDI messages begin.
18 En
19En
Types of effects
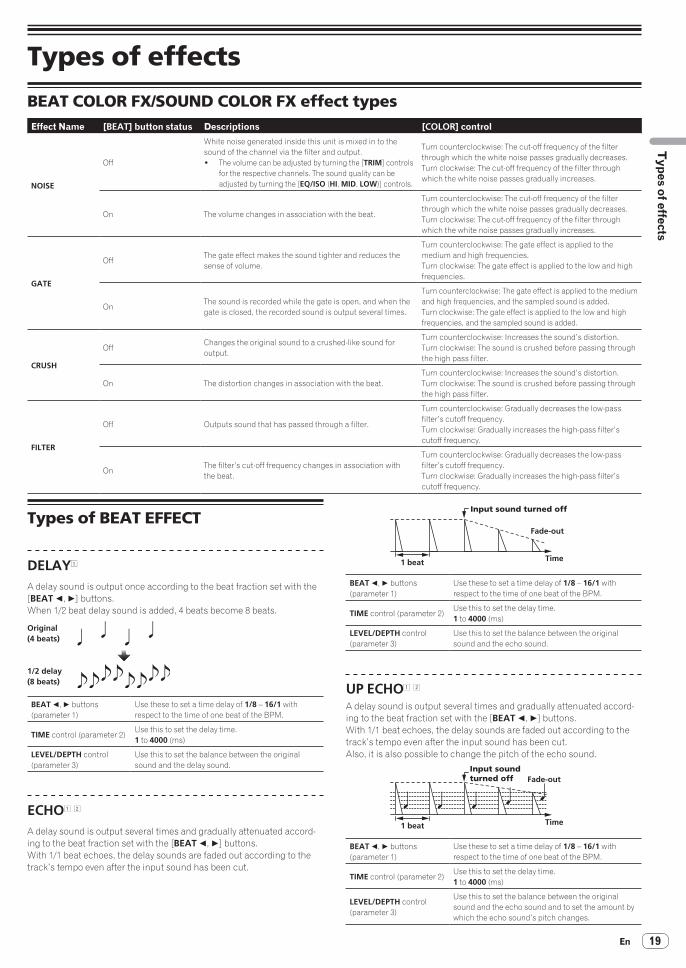
BEAT COLOR FX/SOUND COLOR FX effect typesEffect Name [BEAT] button status Descriptions [COLOR] control
NOISE
Off
White noise generated inside this unit is mixed in to the sound of the channel via the filter and output.! The volume can be adjusted by turning the [TRIM] controls
for the respective channels. The sound quality can be adjusted by turning the [EQ/ISO (HI, MID, LOW)] controls.
Turn counterclockwise: The cut-off frequency of the filter through which the white noise passes gradually decreases.Turn clockwise: The cut-off frequency of the filter through which the white noise passes gradually increases.
On The volume changes in association with the beat.
Turn counterclockwise: The cut-off frequency of the filter through which the white noise passes gradually decreases.Turn clockwise: The cut-off frequency of the filter through which the white noise passes gradually increases.
GATE
OffThe gate effect makes the sound tighter and reduces the sense of volume.
Turn counterclockwise: The gate effect is applied to the medium and high frequencies.Turn clockwise: The gate effect is applied to the low and high frequencies.
OnThe sound is recorded while the gate is open, and when the gate is closed, the recorded sound is output several times.
Turn counterclockwise: The gate effect is applied to the medium and high frequencies, and the sampled sound is added.Turn clockwise: The gate effect is applied to the low and high frequencies, and the sampled sound is added.
CRUSH
OffChanges the original sound to a crushed-like sound for output.
Turn counterclockwise: Increases the sound’s distortion.Turn clockwise: The sound is crushed before passing through the high pass filter.
On The distortion changes in association with the beat.Turn counterclockwise: Increases the sound’s distortion.Turn clockwise: The sound is crushed before passing through the high pass filter.
FILTER
Off Outputs sound that has passed through a filter.
Turn counterclockwise: Gradually decreases the low-pass filter’s cutoff frequency.Turn clockwise: Gradually increases the high-pass filter’s cutoff frequency.
OnThe filter’s cut-off frequency changes in association with the beat.
Turn counterclockwise: Gradually decreases the low-pass filter’s cutoff frequency.Turn clockwise: Gradually increases the high-pass filter’s cutoff frequency.
Types of BEAT EFFECT
DELAY1
A delay sound is output once according to the beat fraction set with the [BEAT c, d] buttons.When 1/2 beat delay sound is added, 4 beats become 8 beats.
Original (4 beats)
1/2 delay (8 beats)
BEAT c, d buttons (parameter 1)
Use these to set a time delay of 1/8 – 16/1 with respect to the time of one beat of the BPM.
TIME control (parameter 2)Use this to set the delay time.1 to 4000 (ms)
LEVEL/DEPTH control (parameter 3)
Use this to set the balance between the original sound and the delay sound.
ECHO1 2
A delay sound is output several times and gradually attenuated accord-ing to the beat fraction set with the [BEAT c, d] buttons.With 1/1 beat echoes, the delay sounds are faded out according to the track’s tempo even after the input sound has been cut.
Input sound turned off
Time
Fade-out
1 beat
BEAT c, d buttons (parameter 1)
Use these to set a time delay of 1/8 – 16/1 with respect to the time of one beat of the BPM.
TIME control (parameter 2)Use this to set the delay time.1 to 4000 (ms)
LEVEL/DEPTH control (parameter 3)
Use this to set the balance between the original sound and the echo sound.
UP ECHO1 2A delay sound is output several times and gradually attenuated accord-ing to the beat fraction set with the [BEAT c, d] buttons.With 1/1 beat echoes, the delay sounds are faded out according to the track’s tempo even after the input sound has been cut.Also, it is also possible to change the pitch of the echo sound.
Input sound turned off
Time
Fade-out
1 beat
BEAT c, d buttons (parameter 1)
Use these to set a time delay of 1/8 – 16/1 with respect to the time of one beat of the BPM.
TIME control (parameter 2)Use this to set the delay time.1 to 4000 (ms)
LEVEL/DEPTH control (parameter 3)
Use this to set the balance between the original sound and the echo sound and to set the amount by which the echo sound’s pitch changes.
Typ
es of effects
SPIRAL1 2
This function adds a reverberation effect to the input sound.When the delay time is changed, the pitch changes simultaneously.
Input sound turned off
Time
Fade-out
1 beat
BEAT c, d buttons (parameter 1)
Use these to set a time delay of 1/8 – 16/1 with respect to the time of one beat of the BPM.
TIME control (parameter 2)Use this to set the delay time.10 to 4000 (ms)
LEVEL/DEPTH control (parameter 3)
Use this to set the balance between the original sound and the effect sound and to set the quantita-tive parameter.
REVERB1 2
This function adds a reverberation effect to the input sound.
Level
Direct soundEarly reflected sound
Reverberations
1%
100%
Time
BEAT c, d buttons (parameter 1)
Use these to set the extent of the reverberation effect, from 1 – 100 %.
TIME control (parameter 2)Use this to set the degree of the reverb effect.1 – 100 (%)
LEVEL/DEPTH control (parameter 3)
Use this to set the balance between the original sound and the effect sound and to set the cut-off frequency of the filter through which the effect sound passes.
TRANS1
The sound is cut according to the beat fraction set with the [BEAT c, d] buttons.
Cut Cut
1/1 beat Time
BEAT c, d buttons (parameter 1)
Use these to set a cut time of 1/16 – 16/1 with respect to the time of one beat of the BPM.
TIME control (parameter 2)Use this to set the effect time.10 to 16000 (ms)
LEVEL/DEPTH control (parameter 3)
Sets the balance between the original sound and the effect sound.
FILTER1
The filter’s cutoff frequency changes according to the beat fraction set with the [BEAT c, d] buttons.
Frequency
BEAT c, d buttons (parameter 1)
Use these to set the cycle for moving the cut-off frequency as a time of 1/4 – 64/1 with respect to the time of one beat of the BPM.
TIME control (parameter 2)Use this to set the cycle at which the cut-off fre-quency is moved.10 to 32000 (ms)
LEVEL/DEPTH control (parameter 3)
The further the control is turned clockwise, the more the effect is stressed.
FLANGER1
A 1-cycle flanger effect is produced according to the beat fraction set with the [BEAT c, d] buttons.
Short delay
Cycle
Time
BEAT c, d buttons (parameter 1)
Use these to set the 1/4 – 64/1 effect time with respect to the time of one beat of the BPM.
TIME control (parameter 2)Use this to set the cycle by which the flanger effect moves.10 to 32000 (ms)
LEVEL/DEPTH control (parameter 3)
The further the control is turned clockwise, the more the effect is stressed.When turned all the way counterclockwise, only the original sound is output.
PHASER1
The phaser effect changes according to the beat fraction set with the [BEAT c, d] buttons.
Cycle
Phase shift
Time
BEAT c, d buttons (parameter 1)
Use these to set the cycle for moving the phaser effect as of time of 1/4 – 64/1 with respect to the time of one beat of the BPM.
TIME control (parameter 2)This sets the cycle by which the phaser effect is moved.10 to 32000 (ms)
LEVEL/DEPTH control (parameter 3)
The further the control is turned clockwise, the more the effect is stressed.When turned all the way counterclockwise, only the original sound is output.
ROBOT1
The original sound is changed to a sound like one produced by a robot.
BEAT c, d buttons (parameter 1)
Use these to set the degree of the effect sound, from -100 – 100 %.
TIME control (parameter 2)Use this to set the degree of the effect sound.-100–100 (%)
LEVEL/DEPTH control (parameter 3)
Sets the balance between the original sound and the effect sound.
20 En
21En
Typ
es of effectsSLIP ROLL1 2
The sound being input at the point when the [ON/OFF] is pressed is recorded, and the recorded sound is output repeatedly according to the beat fraction set with the [BEAT c, d] buttons.When the effect time changes, the input sound is recorded again.
1/1 repeat1/2 repeat
Original
Roll
Changed from 1/2 to 1/1
Effect turned on
BEAT c, d buttons (parameter 1)
Use these to set an effect time of 1/16 – 16/1 with respect to the time of one beat of the BPM.
TIME control (parameter 2)Use this to set the effect time.10 to 4000 (ms)
LEVEL/DEPTH control (parameter 3)
Use this to set the balance between the original sound and ROLL.
ROLL1 2
The sound being input at the point when the [ON/OFF] is pressed is recorded, and the recorded sound is output repeatedly according to the beat fraction set with the [BEAT c, d] buttons.
Effect turned on
Repeated
Original
1/1 roll
BEAT c, d buttons (parameter 1)
Use these to set an effect time of 1/16 – 16/1 with respect to the time of one beat of the BPM.
TIME control (parameter 2)Use this to set the effect time.10 to 4000 (ms)
LEVEL/DEPTH control (parameter 3)
Use this to set the balance between the original sound and ROLL.
REV ROLL1 2
The sound being input at the point when the [ON/OFF] button is pressed is recorded, and the recorded sound is reversed then output repeatedly according to the beat fraction set with the [BEAT c, d] buttons.
Effect turned on
Reversed and repeated
Original
1/1 reverse roll
BEAT c, d buttons (parameter 1)
Use these to set an effect time of 1/16 – 16/1 with respect to the time of one beat of the BPM.
TIME control (parameter 2)Use this to set the effect time.10 to 4000 (ms)
LEVEL/DEPTH control (parameter 3)
Use this to set the balance between the original sound and ROLL.
SND/RTN1
Connect an external effector, etc., here.
DJM-850
SEND
RETURN
Effector
LEVEL
MIC 1
MIC 2
EQ
0
0
POWER
MIC USB
MIC1
AUTO/ TAP
START/ STOP
CH SELECT
PARAMETER
1 2 3 4
MIC A B MST
TIME
MAX
LEVEL / DEPTH
ON/ OFF
MIN
MIDI
BEAT EFFECTS
BEAT
TAP
ON/ OFF SETUP
PHASER
SPIRAL
FLANGER
SLIP ROLL
ROLL
FILTERTRANS
REV ROLL
SND/ RTN
ROBOTREVERB
ECHO
UP ECHO
DELAY
HI
LOW
12 12
12 12
ONTALKOVEROFF
SOUND COLOR FX
NOISE GATE
CRUSH FILTER
1 2 3 4
FADER START
HEAD PHONESSTEREOMONO SPLIT
MASTER
0
MIXING
LEVELCUE
PHONES
CD/LINE PHONO USB1/2
EQ/
TRIM
9
HI
6-26 /MID
6-26 /LOW
6-26 /
ISO
OVER
10
7
4
2
1
- 1
- 2
- 3
- 5
- 7
-10
-15
-24
dB
0
BEAT
COLOR
HILOW
CUE
BA THRU
10
9
8
7
6
5
4
3
2
1
0
CD/LINE LINE USB3/4
EQ/
TRIM
9
HI
6-26 /MID
6-26 /LOW
6-26 /
ISO
OVER
10
7
4
2
1
- 1
- 2
- 3
- 5
- 7
-10
-15
-24
dB
0
BEAT
COLOR
HILOW
CUE
BA THRU
10
9
8
7
6
5
4
3
2
1
0
CD/LINE LINE USB5/6
EQ/
TRIM
9
HI
6-26 /MID
6-26 /LOW
6-26 /
ISO
OVER
10
7
4
2
1
- 1
- 2
- 3
- 5
- 7
-10
-15
-24
dB
0
OVER
10
7
4
2
1
- 1
- 2
- 3
- 5
- 7
-10
-15
-24
RL dB
0
BEAT
COLOR
HILOW
CUE
BA THRU
10
9
8
7
6
5
4
3
2
1
0
CD/LINE PHONO USB7/8
EQ/
TRIM
9
HI
6-26 /MID
6-26 /LOW
6-26 /
ISO
OVER
10
7
4
2
1
- 1
- 2
- 3
- 5
- 7
-10
-15
-24
dB
0
BEAT
COLOR
HILOW
CUE CUE
CUE
BA THRU
STEREO
EQ
MONO
BA
ISOLATOR
WAKE UP
LEVEL
0
BALANCE
RL
MASTER
BOOTH MONITOR
EQ CURVE
CH FADER
CROSS FADER
0
AUTOTAP BPM
%ms
1
2
34 MIC
CF.A
CF.B
MASTER
CROSS FADER ASSIGN
BEAT c, d buttons (parameter 1)
—
TIME control (parameter 2) —
LEVEL/DEPTH control (parameter 3)
This adjusts the sound level input to the [RETURN] terminal.
1 If the sound of the channel you want to monitor is not output from the [MASTER] channel when [CF.A], [CF.B] or [MASTER] is selected with the [1, 2, 3, 4, MIC, CF.A, CF.B, MASTER] selector switch, the effect sound cannot be monitored even by pressing the [CUE] button for [BEAT EFFECTS].
2 If the effect is off, the effect sound cannot be monitored even by pressing the [CUE] button for [BEAT EFFECTS].
List of MIDI Messages! “CC” is the abbreviation of “control change”. A control change is a type of MIDI signal used to transmit various types of control information, such as
timbre, volume, etc. On this unit, values from 0 to 127 are output as CC mainly when controls and faders are operated. CC are also output when certain buttons are
operated.! “Note” is a MIDI term used when pressing or releasing notes on a piano or other keyboard.
Category SW Name SW Type MIDI assignment Trigger/Toggle Transmitted data
CH1
TRIM Control CC 001 — 0-127
HI Control CC 002 — 0-127
MID Control CC 003 — 0-127
LOW Control CC 004 — 0-127
BEAT Button CC 101 Trigger/Toggle OFF=0, ON=127
COLOR Control CC 005 — 0-127
CUE Button CC 070 Trigger/Toggle OFF=0, ON=127
Channel fader Control CC 017 — 0-127
CROSS FADER ASSIGN Switch CC 065 — 0, 64, 127
CH2
TRIM Control CC 006 — 0-127
HI Control CC 007 — 0-127
MID Control CC 008 — 0-127
LOW Control CC 009 — 0-127
BEAT Button CC 102 Trigger/Toggle OFF=0, ON=127
COLOR Control CC 010 — 0-127
CUE Button CC 071 Trigger/Toggle OFF=0, ON=127
Channel fader Control CC 018 — 0-127
CROSS FADER ASSIGN Switch CC 066 — 0, 64, 127
CH3
TRIM Control CC 012 — 0-127
HI Control CC 014 — 0-127
MID Control CC 015 — 0-127
LOW Control CC 021 — 0-127
BEAT Button CC 103 Trigger/Toggle OFF=0, ON=127
COLOR Control CC 022 — 0-127
CUE Button CC 072 Trigger/Toggle OFF=0, ON=127
Channel fader Control CC 019 — 0-127
CROSS FADER ASSIGN Switch CC 067 — 0, 64, 127
CH4
TRIM Control CC 080 — 0-127
HI Control CC 081 — 0-127
MID Control CC 092 — 0-127
LOW Control CC 082 — 0-127
BEAT Button CC 104 Trigger/Toggle OFF=0, ON=127
COLOR Control CC 083 — 0-127
CUE Button CC 073 Trigger/Toggle OFF=0, ON=127
Channel fader Control CC 020 — 0-127
CROSS FADER ASSIGN Switch CC 068 — 0, 64, 127
Crossfader Crossfader Control CC 011 — 0-127
Fader curve
CH FADER ( , , ) Switch CC 094 — 0, 64, 127
CROSS FADER ( , , )
Switch CC 095 — 0, 64, 127
Master
MASTER LEVEL Control CC 024 — 0-127
BALANCE Control CC 023 — 0-127
CUE Button CC 074 Trigger/Toggle OFF=0, ON=127
EQ CURVE (ISOLATOR, EQ)
Switch CC 033 — 0, 127
BOOTH MONITOR BOOTH MONITOR Control CC 025 — 0-127
BEAT EFFECTS
c Button CC 076 Trigger only OFF=0, ON=127
d Button CC 077 Trigger only OFF=0, ON=127
AUTO/TAP Button CC 069 Trigger/Toggle OFF=0, ON=127
TAP Button CC 078 Trigger only OFF=0, ON=127
CUE Button CC 075 Trigger/Toggle OFF=0, ON=127
22 En
23En
List of MID
I Messag
esCategory SW Name SW Type MIDI assignment Trigger/Toggle Transmitted data
BEAT EFFECTS
EFFECT SELECT
DELAY Switch CC 042 2 OFF=0, ON=127
ECHO Switch CC 055 2 OFF=0, ON=127
UP ECHO Switch CC 061 2 OFF=0, ON=127
SPIRAL Switch CC 043 2 OFF=0, ON=127
REVERB Switch CC 054 2 OFF=0, ON=127
TRANS Switch CC 053 2 OFF=0, ON=127
FILTER Switch CC 059 2 OFF=0, ON=127
FLANGER Switch CC 050 2 OFF=0, ON=127
PHASER Switch CC 057 2 OFF=0, ON=127
ROBOT Switch CC 051 2 OFF=0, ON=127
SLIP ROLL Switch CC 058 2 OFF=0, ON=127
ROLL Switch CC 046 2 OFF=0, ON=127
REV ROLL Switch CC 047 2 OFF=0, ON=127
SND/RTN Switch CC 062 2 OFF=0, ON=127
CH SELECT
CH1 Switch CC 034 2 OFF=0, ON=127
CH2 Switch CC 035 2 OFF=0, ON=127
CH3 Switch CC 036 2 OFF=0, ON=127
CH4 Switch CC 037 2 OFF=0, ON=127
MIC Switch CC 038 2 OFF=0, ON=127
CF.A Switch CC 039 2 OFF=0, ON=127
CF.B Switch CC 040 2 OFF=0, ON=127
MASTER Switch CC 041 2 OFF=0, ON=127
TIME
Switch CC 013 — —
Switch CC 045 —
TIME value (When FLANGER, PHASER or FILTER is selected, the value is halved. When a negative value is selected, it is set to a posi-tive value.)
LEVEL/DEPTH Switch CC 091 — 0-127
ON/OFF! When an effect other
than [SND/RTN] is selected at BEAT EFFECT
Button CC 114 — OFF=0, ON=127
ON/OFF! When [SND/RTN]
is selected at BEAT EFFECT
Button CC 064 — OFF=0, ON=127
MICHI Control CC 030 — 0-127
LOW Control CC 031 — 0-127
SOUND COLOR FX
NOISE Button CC 085 Trigger/Toggle1 OFF=0, ON=127
GATE Button CC 105 Trigger/Toggle1 OFF=0, ON=127
CRUSH Button CC 086 Trigger/Toggle1 OFF=0, ON=127
FILTER Button CC 087 Trigger/Toggle1 OFF=0, ON=127
Fader Start
FADER START 1 Button CC 088 Trigger/Toggle OFF=0, ON=127
FADER START 2 Button CC 089 Trigger/Toggle OFF=0, ON=127
FADER START 3 Button CC 090 Trigger/Toggle OFF=0, ON=127
FADER START 4 Button CC 093 Trigger/Toggle OFF=0, ON=127
HEADPHONESMIXING Control CC 027 — 0-127
LEVEL Control CC 026 — 0-127
Timing Clock — Timing Clock — —
Fader Start
FADER START 1 Note 102 — BACK CUE = 0, PLAY = 127
FADER START 2 Note 103 — BACK CUE = 0, PLAY = 127
FADER START 3 Note 104 — BACK CUE = 0, PLAY = 127
FADER START 4 Note 105 — BACK CUE = 0, PLAY = 127
MIDISTART Button START — —
STOP Button STOP — —
1 When turning one button on switches another button from on to off, MIDI on and off messages are sent from the two buttons. When there is no button that switches off, only the MIDI on message is sent from the button that was pressed.2 When switched from one position to another position, the MIDI ON and OFF signals are sent respectively from both positions.! When the [START/STOP] button is pressed for over 1 second, MIDI messages corresponding to the positions of the buttons, faders and controls are sent in a bundle
(Snapshot). The MIDI Snapshot sends all MIDI messages other than MIDI start and MIDI stop.
24 En
Changing the settings1 Press the [MIDI] [SETUP (WAKE UP)] button for at least 1 second.The [USER SETUP] screen is displayed.! To display the [CLUB SETUP] screen, first turn the unit’s power off,
then press the [POWER] button while pressing the [MIDI] [SETUP (WAKE UP)] button.
2 Press the [BEAT c, d] button.Select the setting item.
3 Press the [TAP] button.The screen switches to the setting item’s setting value change screen.
4 Press the [BEAT c, d] button.Change the setting value.
5 Press the [TAP] button.Enter the setting value.The previous screen reappears.! To return to the previous screen without changing the settings, press
the [AUTO/TAP] button.
6 Press the [SETUP (WAKE UP)] button.Close the [USER SETUP] screen.! To close the [CLUB SETUP] screen, press the [POWER] button to turn
this unit’s power off.
About the auto standby functionWhen [Auto Standby] is set to [ON], the standby mode is set automati-cally if 4 hours pass with all of the conditions shown below met.— That none of this unit’s buttons or controls are operated.— That no audio signals of –10 dB or greater are input to this unit’s
input terminals.! When the [SETUP (WAKE UP)] button is pressed, the standby mode
is canceled.! This unit is shipped with the auto standby function turned on. If you
do not want to use the auto standby function, set [Auto Standby] to [OFF].
About the talk over functionThe talk over function has the two modes described below.— [ADV] (advanced talk over): The mid-range only of the sound of chan-
nels other than the [MIC] channel is attenuated according to the [Talk Over LEVEL] setting value and output.
dB
Frequency
— [NOR] (normal talk over): The sound of channels other than the [MIC] channel is attenuated according to the [Talk Over LEVEL] setting value and output.
dB
Frequency
Setting preferences*: Setting upon purchase
ModeOptions settings
Screen display Setting value Descriptions
USER SETUP
Fader Start F.S. ON*, OFFTurns the fader start function on and off for all DJ players connected to the [CONTROL] terminals.
MIDI CH MIDI CH 1* to 16 Sets the MIDI channel.
MIDI Button Type MIDI BT TGL*, TRG Selects the MIDI signal transmission mode, [TGL (TOGGLE)] or [TRG (TRIGGER)].
Talk Over Mode TLK MOD ADV*, NOR Selects the talk over function’s mode, [ADV(ADVANCED)] or [NOR(NORMAL)].
Talk Over LEVEL TLK LVL–6 dB, –12 dB, –18 dB*, –24 dB
Sets the talk over function’s sound attenuation level.
CLUB SETUP
Digital Master Out Level
DOUT LV–19 dB*, –15 dB, –10 dB, –5 dB
Sets the maximum level of the sound output from the [DIGITAL MASTER OUT] terminals. 1
Digital Master Out Sampling Rate
DOUT FS 48 kHz, 96 kHz* Sets the digital signal’s sampling rate.
MASTER ATT. MST ATT–6 dB, –3 dB, 0 dB*
Sets the attenuation level of the sound output from the [MASTER1] and [MASTER2] terminals.
Auto Standby AUTOSTB ON*, OFF Turns the auto standby function on and off.
Mic Output To Booth Monitor
MIC BTH ON*, OFF Sets whether or not to output the microphone’s audio signals from [BOOTH] terminals.
PC UTILITY PC UTLY ON*, OFFSets whether or not to launch the computer’s setting utility software automatically when a USB cable is connected.
Factory Reset INITIAL YES, NO* Restores all the settings to their factory defaults.
1 Note that the output sound may be distorted even if the master level indicator does not light up to the very top.
25En
Additional information
Troubleshooting! Incorrect operation is often mistaken for trouble or malfunction. If you think that there is something wrong with this component, check the points
below. Sometimes the trouble may lie in another component. Inspect the other components and electrical appliances being used. If the trouble cannot be rectified after checking the items below, ask your nearest Pioneer authorized service center or your dealer to carry out repair work.
! The player may not operate properly due to static electricity or other external influences. In such cases, normal operation may be restored by unplugging the power cord then plugging it back in.
Problem Check Remedy
The power is not turned on. Is the power cord properly connected? Plug in the power cord to an AC outlet.
No sound or small sound. Is the [CD/LINE, PHONO, LINE, USB */*] selector switch set to the proper position?
Switch the [CD/LINE, PHONO, LINE, USB */*] selector switch to switch the channel’s input source. (page 15)
Are the connection cables properly connected? Connect the connection cables properly. (page 8)
Are the terminals and plugs dirty? Clean the terminals and plugs before making connections.
Is [MASTER ATT.] set to [–6 dB], etc.? At the [CLUB SETUP] screen, switch [MASTER ATT.]. (page 24)
Digital sound cannot be output. Is the digital audio output’s sampling frequency (fs) suited for the specifications of the connected device?
On the [CLUB SETUP] screen, set [Digital Master Out Sampling Rate] accord-ing to the specifications of the connected equipment. (page 24)
Distorted sound. Is the sound level output from the [MASTER] channel appropriately set?
Adjust the [MASTER LEVEL] control so that the master channel level indicator lights at around [0 dB] at the peak level. (Page 15)
Set [MASTER ATT.] to [–3 dB] or [–6 dB]. (page 24)
Is the level of audio input to each channel properly set?
Adjust the [TRIM] control so that the channel level indicator lights at about [0 dB] at the peak level. (Page 15)
Can’t crossfade. Are the CROSS FADER ASSIGN (A, THRU, B) selector switches properly set?
Set the [CROSS FADER ASSIGN (A, THRU, B)] selector switches for the different channels properly. (Page 15)
Can’t fader start a DJ player. Is [FADER START] set to [OFF]? At the [USER SETUP] screen, set [FADER START] to [ON]. (page 24)
Set the [FADER START] button on the control panel to [ON]. (Page 15)
Is the DJ player properly connected to the [CONTROL] terminal?
Properly connect the [CONTROL] terminal and DJ player using a control cable. (page 8)
Are the audio cables properly connected? Connect this unit’s audio input terminals and the DJ player’s audio output terminals by audio cable. (page 8)
[BEAT EFFECTS] does not work. Is the [1, 2, 3, 4, MIC, CF.A, CF.B, MASTER] selec-tor switch properly set?
Turn the [1, 2, 3, 4, MIC, CF.A, CF.B, MASTER] selector switch to select the channel to which you want to apply the effect. (Page 17)
[SOUND COLOR FX] does not work. Is the [COLOR] control set to an appropriate position?
Turn the [COLOR] control clockwise or counterclockwise. (page 17)
[BEAT COLOR FX] does not work. Is the [SOUND COLOR FX] [BEAT] button set to [ON]?
Set the [SOUND COLOR FX] [BEAT] button to [ON]. (page 17)
Can’t use an external effector. Is the [ON/OFF] button for [BEAT EFFECTS] set to [ON]?
Press the [ON/OFF] button for [BEAT EFFECTS] to set [SND/RTN] to [ON]. (page 17)
Is the external effector properly connected to the [SEND] or [RETURN] terminal?
Connect the external effector to the [SEND] and [RETURN] terminals. (page 8)
Distorted sound from an external effector.
Is the external effector’s audio output level set to an appropriate level?
Adjust the external effector’s audio output level.
Tempo (BPM) cannot be measured or measurement value of tempo (BPM) is implausible.
Is the audio input level too high or too low? Adjust the [TRIM] control so that the channel level indicator lights at about [0 dB] at the peak level. (Page 15)
For some tracks, it may not be possible to measure the tempo (BPM). Use the [TAP] button to input the tempo manually. (page 17)
Measured tempo (BPM) differs from tempo indicated on CD.
— The values may differ slightly due to the different ways in which the BPM is measured. There is no need to make any corrections.
MIDI sequencer does not synchronize. Is the MIDI sequencer’s sync mode set to Slave? Set the MIDI sequencer’s sync mode to Slave.
Does the MIDI sequencer you are using support MIDI timing clocks?
MIDI sequencers not supporting MIDI timing clocks cannot be synchronized.
MIDI control does not work. Is the MIDI channel turned on? Press the [ON/OFF] button for [MIDI]. (Operating DJ software using the MIDI function on page 18)
Are the MIDI settings properly set? To operate DJ software with this unit, this unit’s MIDI messages must be assigned to the DJ software you are using. For instructions on assigning mes-sages, see your DJ software’s operating instructions.
This unit is not recognized after it has been connected to a computer.
Is the driver software properly installed on your computer?
Install the driver software. If it is already installed, reinstall it. (page 9)
Sound of a computer cannot be output from this unit.
Are this unit and computer properly connected? Connect this unit and the computer directly using the included USB cable. (page 9)
Are the audio output device settings properly set? Select this unit with the audio output device settings. For instructions on making settings for your application, see your application’s operating instructions.
Is the [CD/LINE, PHONO, LINE, USB */*] selector switch set to the proper position?
Set the [CD/LINE, PHONO, LINE, USB */*] selector switch to the [USB */*] position. (Page 15)
Ad
ditional inform
ation
Problem Check Remedy
Effect sound cannot be monitored even when the [CUE] button for [BEAT EFFECTS] is pressed.
— The circuit generating the [ECHO], [UP ECHO], [SPIRAL], [REVERB], [ROLL], [SLIP ROLL] and [REV ROLL] echo sounds is positioned after the effect circuit, so the effect sound cannot be monitored. This is not a malfunction.
Sound is distorted when an analog player is connected to this unit’s [PHONO] terminals.Or, lighting of the channel level indicator does not change even when the [TRIM] control is turned.
Have you connected an analog player with a built-in phono equalizer?
For analog players with built-in phono equalizers, connect the player to the [CD/LINE] or [LINE] terminals. (page 8)
If the analog player with built-in phono equalizer has a PHONO/LINE selector switch, switch it to PHONO.
Is an audio interface for computers connected between the analog player and this unit?
If the audio interface for computers has a line level output, connect it to the [CD/LINE] or [LINE] terminal. (page 8)
If the analog player has a PHONO/LINE selector switch, switch it to PHONO.
26 En
27En
Ad
ditional inform
ation
Block Diagram
[BEAT EFFECT (SND/RTN)]
Effect CH Select
Effect CH SelectEffect Out
Cable Check
RETURN
SEND OutCHx
CF A/BMIC
Master
CHxCF A/B
MICMaster
Return Level No Cable Effect SW
Cable Exist
Effect_CUE
Effect_CUE
[Mono Split / Stereo SWITCH & MIXING]
Mono Split
Stereo
2posi
MIXING MONO SPLIT/STEREO SWITCH
[BEAT EFFECT(Others)]Effect CH Select
Effect CH SelectEffect Out
CHxCF A/B
MICMaster
CHxCF A/B
MICMaster
Effect SW
Level DepthCHx Cue On/Off SW
CHx_CUE
Effect Cue On/Off SW
Effect_CUE
CUE Mixing L
RSEL
Mono Split
Stereo
Master Cue On/Off SW
Master_CUE
Master Mixing
L
RH.P. MIX R Out
H.P. MIX L Out
SEL
SEL
3posi
2posi
SOUNDCOLOREFFECT
CHx
3BandEQ/
ISOLATORCHx
BEATEFFECT
CHx
BEATEFFECT
CHx
BEATEFFECT
CHx
BPM Detect CHx Select Level meter CHx
Send/Return
CHx
CUEMonitor
CHx
PhonoAMPCH1,4
Analog_PHONO
Analog_CD LINE
USB
CF Assign
3posi
Assign ACHx
Assign ThruCH1-4
Assign BCHx
CH Fader
3posi
CHFaderCurveSwitch
3posi
2posi
2para 4para
CrossFaderCurveSwitch
ThruCF ACF B
MIC Monitor SW
CHx inCHx Timecode
2BandMIC EQMIC1,2
MIC1/2 in
Post CHx Fader
TalkOver ON/OFF
Rec Out
Master_CUE
MIC_Out
MIC
MIC_Out
Cross Fader B
Cross Fader A
BPM Detect Master
Level meter Master
CH1-4 COMMON
CH1-4 COMMON
MIC1,2 COMMON
Digital Trim
CHx _CUE
BPM Detect CF A
BPM Detect CF B
BPM Detect MIC
Send/ReturnCF A
BEATEFFECT
MICSend/Return
MIC
BEATEFFECT
CF BSend/Return
CF B
CrossFader
BEATEFFECT Master
TalkOver
MasterCUE
TalkOverLevel
Talk Over Mode
Advanced /Normal
MasterMono/STEREO
Send/ReturnMaster
MasterBalance
MasterBalance
MasterLevel
HP Level
BoothLevel
SELMIC Output
to Booth MonitorOn/Off SW
Booth Out
REC out
USB Common out
Digital out
Master
H.P. out
Boost
Boost
ATT
MICFILTER
MIC InLeveldetect
TalkOver ON/OFF MIC 1,2MIX
OffOn
TalkOver
BEATEFFECT
CF A
BEATEFFECT
SOUNDCOLOREFFECT
CHx
BEATEffect
(SND/RTN)
Return in
Send out
CHxCF A/B
MICMaster
Effect CH SelectMixer Audio Output Select
CHx Timecode
Post CHx Fader
Cross Fader A
Cross Fader B
MIC
Rec OutCHx_CUE
Effect_CUE
Master_CUE
Mono Split/Stereo
SWITCH& MIXING
MIC1
MIC2
Digital MASTER
RETURN
CH1_USB1/2
PHONES
MASTER
BOOTH
REC
SEND
USB1/2
USB3/4
USB5/6
USB7/8
D SP
MIC
ADC
I/Fμ comUSB
DAC
PHONES
MASTER 1
REC
DACSENDMUTE
BOOTHMUTE
DAC
MUTE
MASTER 2MUTE
MUTE
MUTE
MUTE
DIGITALMASTER
FPGA DIT
MIC1 LEVEL
MIC2 LEVEL
CH1_Analog
CH2_Analog
CH3_Analog
CH4_Analog
CH2_USB3/4
CH3_USB5/6
CH4_USB7/8
USB
CH1 USB1/2 IN
CH1 USB1/2 OUT
CH2 USB3/4 IN
CH3 USB5/6 IN
CH4 USB7/8 IN
CH2 USB3/4 OUT
CH3 USB5/6 OUTCH4 USB7/8 OUT
USBType B
CH1
CH1_ASEL_OUT
CD/LINE
PHONO ADC
CH2
CH2_ASEL_OUT
CD/LINE
LINE ADC
CH3
CH3_ASEL_OUT
CD/LINE
LINE ADC
CH4
CH4_ASEL_OUT
CD/LINE
PHONO ADC
RETURNADC
About trademarks and registered trademarks! Pioneer and rekordbox are trademarks or registered trademarks of
the PIONEER CORPORATION.! Microsoft®, Windows® 7, Windows Vista®, Windows® XP, and
Windows® are either registered trademarks or trademarks of Microsoft Corporation in the United States and/or other countries.
! Apple, Macintosh and Mac OS are trademarks of Apple Inc., regis-tered in the U.S. and other countries.
! ASIO is a trademark of Steinberg Media Technologies GmbH.
Specifications
GeneralPower requirements .............................................................AC 120 V, 60 HzPower consumption ............................................................................... 30 WPower consumption (standby) ........................................................... 0.45 WMain unit weight ........................................................................7.7 kg (17 lb)Max. dimensions .......................320 mm (W) × 108 mm (H) × 381 mm (D)
(12.6 in. (W) × 4.3 in. (H) × 15 in. (D))Tolerable operating temperature .........+5 °C to +35 °C (+41 °F to +95 °F)Tolerable operating humidity ...................... 5 % to 85 % (no condensation)
Standard output level / Load impedance / Output impedanceMASTER1 ................................................ +6 dBu/10 kW/360 W or lowerMASTER2 ................................................ +2 dBu/10 kW/390 W or lowerREC OUT .....................................................–8 dBu/10 kW/22 W or lowerBOOTH .................................................... +6 dBu/10 kW/360 W or lowerSEND .........................................................–12 dBu/10 kW/1 kW or lowerPHONES ................................................... +8.5 dBu/32 W/10 W or lower
CrosstalkLINE ................................................................................................. 82 dB
Channel equalizer characteristicHI .....................................................................–26 dB to +6 dB (13 kHz)MID ....................................................................–26 dB to +6 dB (1 kHz)LOW ..................................................................–26 dB to +6 dB (70 Hz)
Microphone equalizer characteristicHI ...................................................................–12 dB to +12 dB (10 kHz)LOW ..............................................................–12 dB to +12 dB (100 Hz)
Input / Output terminalsPHONO input terminal
RCA pin jack .................................................................................... 2 setsCD/LINE input terminal
RCA pin jack .................................................................................... 2 setsMIC1 input terminal
XLR connector/phone jack (Ø 6.3 mm) ...........................................1 set
MIC2 input terminalPhone jack (Ø 6.3 mm) .....................................................................1 set
RETURN Input terminalsPhone jack (Ø 6.3 mm) .....................................................................1 set
MASTER output terminalXLR connector...................................................................................1 setRCA pin jacks ....................................................................................1 set
BOOTH output terminalPhone jack (Ø 6.3 mm) .....................................................................1 set
REC OUT output terminalRCA pin jacks ....................................................................................1 set
SEND output terminalPhone jack (Ø 6.3 mm) .....................................................................1 set
DIGITAL MASTER OUT coaxial output terminalRCA pin jacks ....................................................................................1 set
MIDI OUT terminal5P DIN ...............................................................................................1 set
PHONES output terminalStereo phone jack (Ø 6.3 mm) .........................................................1 set
USB terminalB type .................................................................................................1 set
CONTROL terminalMini phone jack (Ø 3.5 mm) ........................................................... 4 sets
— The specifications and design of this product are subject to change without notice.
— Be sure to use the [MASTER1] terminals only for a balanced output. Connection with an unbalanced input (such as RCA) using an XLR to RCA converter cable (or converter adapter), etc., may lower the sound quality and/or result in noise.
For connection with an unbalanced input (such as RCA), use the [MASTER2] terminals.
28 En
Ad
ditional inform
ation
29En
30 En
31En
Ad
ditional inform
ation
UCP0212
PIONEER ELECTRONICS (USA) INC.LIMITED WARRANTY
WARRANTY VALID ONLY IN THE U.S.A. AND CANADA
WARRANTYPioneer Electronics (USA) Inc. (PUSA) warrants that products distributed by PUSA in the U.S.A. and Canada that fail to function properly under normal use due to a manufacturing defect when installed and operated according to the owner ’s manual enclosed with the unit will be repaired or replaced with a unit of comparable value, at the option of PUSA, without charge to you for parts or actual repair work. Parts supplied under this warranty may be new or rebuilt at the option of PUSA.
THIS LIMITED WARRANTY APPLIES TO THE ORIGINAL OR ANY SUBSEQUENT OWNER OF THIS PIONEER PRODUCT DURING THE WARRANTY PERIOD PROVIDED THE PRODUCT WAS PURCHASED FROM AN AUTHORIZED PIONEER DISTRIBUTOR/DEALER IN THE U.S.A. OR CANADA. YOU WILL BE REQUIRED TO PROVIDE A SALES RECEIPT OR OTHER VALID PROOF OF PURCHASE SHOWING THE DATE OF ORIGINAL PURCHASE OR, IF RENTED, YOUR RENTAL CONTRACT SHOWING THE PLACE AND DATE OF FIRST RENTAL. IN THE EVENT SERVICE IS REQUIRED, THE PRODUCT MUST BE DELIVERED WITHIN THE WARRANTY PERIOD, TRANSPORTATION PREPAID, ONLY FROM WITHIN THE U.S.A. AS EXPLAINED IN THIS DOCUMENT. YOU WILL BE RESPONSIBLE FOR REMOVAL AND INSTALLATION OF THE PRODUCT .PUSA WILL PAY TO RETURN THE REPAIRED OR REPLACEMENT PRODUCT TO YOU WITHIN THE U.S.A.
PRODUCT WARRANTY PERIOD Parts LaborDJ Audio and Video ................................................................................................................................................................................... 1 Year 1 YearThe warranty period for retail customers who rent the product commences upon the date product is first put into use (a) during the rental period or (b) retail sale, whichever occurs first.
WHAT IS NOT COVEREDIF THIS PRODUCT WAS PURCHASED FROM AN UNAUTHORIZED DISTRIBUTOR, THERE ARE NO WARRANTIES, EXPRESS OR IMPLIED, INCLUDING THE IMPLIED WARRANTY OF MERCHANTABILITY AND THE IMPLIED WARRANTY OF FITNESS FOR A PARTICULAR PURPOSE AND THIS PRODUCT IS SOLD STRICTLY “AS IS” AND “WITH ALL FAULTS".
PIONEER SHALL NOT BE LIABLE FOR ANY CONSEQUENTIAL AND/OR INCIDENTAL DAMAGES.THIS WARRANTY DOES NOT APPLY IF THE PRODUCT HAS BEEN SUBJECTED TO POWER IN EXCESS OF ITS PUBLISHED POWER RATING.
THIS WARRANTY DOES NOT COVER THE CABINET OR ANY APPEARANCE ITEM, USER ATTACHED ANTENNA, ANY DAMAGE TO RECORDS OR RECORDING TAPES OR DISCS, ANY DAMAGE TO THE PRODUCT RESULTING FROM ALTERATIONS, MODIFICATIONS NOT AUTHORIZED IN WRITING BY PIONEER, ACCIDENT, MISUSE OR ABUSE, DAMAGE DUE TO LIGHTNING OR TO POWER SURGES, SUBSEQUENT DAMAGE FROM LEAKING, DAMAGE FROM INOPERATIVE BATTERIES, OR THE USE OF BATTERIES NOT CONFORMING TO THOSE SPECIFIED IN THE OWNER’S MANUAL.THIS WARRANTY DOES NOT COVER THE COST OF PARTS OR LABOR WHICH WOULD BE OTHERWISE PROVIDED WITHOUT CHARGE UNDER THIS WARRANTY OBTAINED FROM ANY SOURCE OTHER THAN A PIONEER AUTHORIZED SERVICE COMPANY OR OTHER DESIGNATED LOCATION. THIS WARRANTY DOES NOT COVER DEFECTS OR DAMAGE CAUSED BY THE USE OF UNAUTHORIZED PARTS OR LABOR OR FROM IMPROPER MAINTENANCE.
ALTERED, DEFACED, OR REMOVED SERIAL NUMBERS VOID THIS ENTIRE WARRANTY
NO OTHER WARRANTIESPIONEER LIMITS ITS OBLIGATIONS UNDER ANY IMPLIED WARRANTIES INCLUDING, BUT NOT LIMITED TO, THE IMPLIED WARRANTIES OF MERCHANTABILITY AND FITNESS FOR A PARTICULAR PURPOSE, TO A PERIOD NOT TO EXCEED THE WARRANTY PERIOD. NO WARRANTIES SHALL APPLY AFTER THE WARRANTY PERIOD. SOME STATES DO NOT ALLOW LIMITATIONS ON HOW LONG AN IMPLIED WARRANTY LASTS AND SOME STATES DO NOT ALLOW THE EXCLUSIONS OR LIMITATIONS OF INCIDENTAL OR CONSEQUENTIAL DAMAGES, SO THE ABOVE LIMITATIONS OR EXCLUSIONS MAY NOT APPLY TO YOU. THIS WARRANTY GIVES YOU SPECIFIC LEGAL RIGHTS AND YOU MAY HAVE OTHER RIGHTS WHICH MAY VARY FROM STATE TO STATE.
TO OBTAIN SERVICEPUSA has appointed a number of Authorized Service Companies throughout the U.S.A. and Canada should your product require service. To receive warranty service you need to present your sales receipt or, if rented, your rental contract showing place and date of original owner’s transaction. If shipping the unit you will need to package it carefully and send it, transportation prepaid by a traceable, insured method, to an Authorized Service Company. Package the product using adequate padding material to prevent damage in transit. The original container is ideal for this purpose. Include your name, address and telephone number where you can be reached during business hours.
On all complaints and concerns in the U.S.A. and Canada call Customer Support at 1-800-872-4159.
For hook-up and operation of your unit or to locate an Authorized Service Company, please call or write:
CUSTOMER SUPPORTPIONEER ELECTRONICS (USA) INC.
P.O. BOX 1720LONG BEACH, CALIFORNIA 90801
1-800-872-4159http://www.pioneerelectronics.com
DISPUTE RESOLUTIONFollowing our response to any initial request to Customer Support, should a dispute arise between you and Pioneer, Pioneer makes available its Complaint Resolution Program to resolve the dispute. The Complaint Resolution Program is available to you without charge. You are required to use the Complaint Resolution Program before you exercise any rights under, or seek any remedies, created by Title I of the Magnuson-Moss Warranty-Federal Trade Commission Improvement Act, 15 U.S.C. 2301 et seq. To use the Complaint Resolution Program call 1-800-872-4159 and explain to the customer service representative the problem you are experiencing, steps you have taken to have the product repaired during the warranty period and the name of the authorized Distributor/Dealer from whom the Pioneer product was purchased. After the complaint has been explained to the representative, a resolution number will be issued. Within 40 days of receiving your complaint, Pioneer will investigate the dispute and will either: (1) respond to your complaint in writing informing you what action Pioneer will take, and in what time period, to resolve the dispute; or (2) respond to your complaint in writing informing you why it will not take any action.
RECORD THE PLACE AND DATE OF PURCHASE FOR FUTURE REFERENCE
Model No. ____________________________________________ Serial No. _________________________________________ Purchase Date ______________________
Purchased From _____________________________________________________________________________________________________________________________
KEEP THIS INFORMATION AND YOUR SALES RECEIPT IN A SAFE PLACE
To register your product, find the nearest authorized service location, to purchase replacement parts, operating instructions, or accessories, please go to one of following URLs :
Pour enregistrer votre produit, trouver le service après-vente agréé le plus proche et pour acheter des pièces de rechange, des modes d’emploi ou des accessoires, reportez-vous aux URL suivantes :
In the USA & Canada/Aux Etats-Unis & Canada http://www.pioneerelectronics.com
S018_B1_EnFr_PSV
PIONEER CORPORATION1-1, Shin-ogura, Saiwai-ku, Kawasaki-shi, Kanagawa 212-0031, JapanPIONEER ELECTRONICS (USA) INC.P.O. BOX 1720, Long Beach, California 90801-1720, U.S.A. TEL: (800) 421-1404K002_PSV_CU