##$K Operating Instructions METTLER TOLEDO Karl Fischer Titrator DL35 Notes and warnings for DL35 in compliance with IEC-348 and FCC A Notes and warnings for DL35 in compliance with IEC-348 and FCC A This instrument of protection class has been constructed and tested in compliance with IEC publication 348, Safety Regulations for Electronic Measuring Instruments, and has left the factory in faultless condition in regard to safety. To maintain this condition and to ensure hazard-free operation, the user must observe the notes and warnings in these operating instructions. The instrument is intended for indoor use. It can be occasionally exposed to temperatures between +50 C and -10 C without any adverse effects on its reliability. Before switching on, ensure that the operating voltage set on the instrument matches the power supply voltage. If this instrument is to be operated using an autotransformer and a power supply of higher voltage, it must be ensured that the base of the transformer is connected to the neutral wire of the power supply. The power connector may be inserted only in a socket with a ground contact. The protective action must not be nullified by an extension lead without an equipment grounding conductor. # DL35Manual # DL35 $ DL35 Operating Instructions K DL35 Operating Instructions
Transcript
##$K
Operating InstructionsMETTLER TOLEDO Karl Fischer Titrator DL35
Notes and warnings for DL35 in compliance with IEC-348 and FCC A
Notes and warnings for DL35 in compliance with IEC-348 and FCC A
This instrument of protection class has been constructed and tested in compliance withIEC publication 348, Safety Regulations for Electronic Measuring Instruments, and hasleft the factory in faultless condition in regard to safety. To maintain this condition andto ensure hazard-free operation, the user must observe the notes and warnings inthese operating instructions.
The instrument is intended for indoor use. It can be occasionally exposed totemperatures between +50 C and -10 C without any adverse effects on its reliability.
Before switching on, ensure that the operating voltage set on the instrument matchesthe power supply voltage.
If this instrument is to be operated using an autotransformer and a power supply ofhigher voltage, it must be ensured that the base of the transformer is connected to theneutral wire of the power supply.
The power connector may be inserted only in a socket with a ground contact. Theprotective action must not be nullified by an extension lead without an equipmentgrounding conductor.
When covers are opened or parts removed, except where this is possible by hand, liveparts may be exposed. Connection points can also be live.
Before adjustment, servicing, corrective maintenance or replacement of parts, theinstruments must be disconnected from all voltage sources if it has to be opened.
It must be ensured that only fuses of the specified type and the specified ratedamperage are used as replacement. The use of repaired fuses or short circuiting of thefuse holder is strictly forbidden.
If it appears that hazard-free operation is no longer possible, the instrument must beshut down and secured against inadvertent usage.
It may be assumed that hazard-free operation is no longer possible
* when the instrument shows signs of visible damage,* when the instrument no longer operates,* after lengthy storage under adverse conditions,* after severe transport stress.
Warning:
This equipment generates, uses, and can radiate radio frequency energy and if notinstalled and used in accordance with the instructions manual, may cause interferenceto radio communications. It has been tested and found to comply with the limits for aClass A computing device pursuant to Subpart J of Part 15 of FCC Rules, which aredesigned to provide reasonable protection against such interference when operated ina commercial environment. Operation of this equipment in a residential area is likely tocause interference in which case the user at his own expense will be required to takewhatever measures may be required to correct the interference.
Contents Page
1. Introduction 3
2. Safety measures 52.1 Measures for your protection 52.2 Measures after accidents 52.3 Measures for operational safety 5
3. Switching on the instrument 63.1 Entry of date and time 63.2 Filling the burette 73.3 Emptying the titration vessel 83.4 Changing the titration vessel 83.5 Dispensing the solvent 9
4. The keypad 104.1 The functions of the individual keys 10
4.2 Key combinations with [RUN] and [MODE] 11
5. Instrument parameters 13
6. Methods 156.1 Parameters of the Karl Fischer methods 156.2 Developing a method 196.3 Storing a method 206.4 Selecting and modifying a method 206.5 Printing methods 216.5.1 Printing the list of methods 226.6 Deleting a method 236.7 METTLER methods 23
7. Titration 257.1 Titration procedure 257.2 Total titrant consumption 287.3 Subsequent evaluation of results 29
9. Titrant concentration CONC 379.1 Automatic determination 379.2 Entering CONC value manually 389.3 CONC determination with statistics 38
10. DRIFT determination 3910.1 Automatic determination 3910.2 Entering DRIFT value manually 3910.3 Continuous calculation of DRIFT during standby titration 4010.4 Switch-off delay 40
11. Blocking and unblocking of critical key functions 41
12. Remote control 42
13. Startup procedure 4513.1 Checking the operating voltage 4513.2 Changing the operating voltage 4513.3 Setting up the instrument 4613.3.1 Suction device 4713.3.2 Dispensing device for the solvent 4713.3.3 Attaching the pump 4813.3.4 Installing the burette 4913.3.5 Titration stand 5213.3.6 Titration vessels 5213.3.7 Magnetic stirrer 5213.4 Peripheral devices 53
14. Sample preparation 55
15. Maintenance 57
16. Technical data 59
17. Accessories 6017.1 Standard equipment 6017.2 Optional accessories 62
18. Malfunctions and their causes 6718.1 Instrument malfunctions 6718.2 Malfunctions in the communication with external devices 6718.3 Operating errors 6718.4 Other error conditions 67
19. Description of the technical data for instruments conforming 68to IEC-348
20. Index 70
1. IntroductionThe titration of water by the Karl Fischer method is one of the most frequently usedmethods for the determination of water. It allows water contents to be determinedreproducibly within 1 to 2 minutes over a wide concentration range (from a few ppm upto 100%).The Karl Fischer titration is based on the following principle:Water reacts with iodine and a reactive component formed from the reaction of sulfurdioxide with an alcohol (usually methanol) in the presence of a suitable base.
The essential requirements for a high titration quality are the rapid stoichiometricreaction of water with the reagent, the free availability of the water being determined,the absence of side reactions as well as due consideration of the ingress of extraneousmoisture into the titration system.The Karl Fischer titration is indicated by a double platinum pin electrode with a constantcurrent applied across the pins. When the last traces of water have been titrated, themeasured potential falls to practically zero.
METTLER DL35 Karl Fischer Titrator
The new, compact METTLER DL35 Karl Fischer Titrator allows you to perform KarlFischer titrations simply, rapidly and reliably.You can store 50 different methods. Ten of these are METTLER methods that arealready stored and can be called up immediately.Pyridine-containing or pyridine-free one- or two-component Karl Fischer reagents canbe used with the DL35. The control algorithm is matched to modern, fast reacting KarlFischer reagents.
The drift due to moisture diffusing into the system can be determined in a simplemanner and is automatically taken into account in the results calculation.The precharged solvent is automatically titrated to an anhydrous condition before thetitration. Between titrations, the system can be kept permanently anhydrous by astandby titration.You can transfer the sample weight before or after the titration directly from a balance.Volumetric entries are converted automatically with the aid of the specified density(specific weight).If stirring has to be performed before the titration, the remaining stir time is continuouslydisplayed.During a titration, you can obtain information on the current titrant consumption andrequest an intermediate result calculated up to that particular time.The potential change can be plotted on an attached analog line recorder.The result printout includes not only the desired unit (mg, ppm, % or % dry weight), butalso other details such as the consumption of titrant in mL, the date and time of thedetermination, the method used, etc.Subsequent result evaluations with changed values of the drift, the concentration of thetitrant and the blank value are also possible.After a titration, the subsequent consumption of titrant can be recorded; this providesinformation on whether the sample is still releasing water.Statistical evaluations are possible over several samples (including elimination ofoutliers).In order to check the supply of your titrant or to avoid exceeding the capacity of thesolvent, you can record the total titrant consumption.This operating instructions apply to software version 1.0
References• K. Fischer, Angew. Chem. 48, 394 (1935)
• J. Mitchell jr. and D.M. Smith"Aquametry" Part III, 2. Auflage 1980Verlag John Wiley & Sons, Inc, New York
• HYDRANAL-Praktikum von Riedel-de Haën5. Auflage 1987Seelze, Deutschland
• G. Wieland"Wasserbestimmung durch Karl-Fischer-Titration"GIT Verlag GmbH, Darmstadt 1985
• E. Scholz"Karl-Fischer-Titration"Springer Verlag Berlin 1984
2. Safety measures2.1 Measures for your protection
Before you start the titrations, please note the following rules:• All Karl Fischer reagents are highly inflammatory solutions. They are toxic. Do not
inhale! Do not swallow! Avoid skin contact!• When installing the burette, ensure that the burette tip is immersed and not in the air.
(Danger of splashing!)• Comply with all safety measures generally applicable in the lab!
2.2 Measures after accidents• After skin contact, immediately wash off with copious amounts of water!• After eye contact, immediately wash out thoroughly with copious amounts of water -
consult a doctor!• Note directions of the reagent manufacturers!
2.3 Measures for operational safetyFor fault-free operation of the DL35, please note the following points:• Do not leave unreacted titrant in the titration vessel for lengthy periods since parts
made of silicon such as the septum and tubing connections of the suction tube canbe attacked.
• If you do not switch on the instrument for more than 3 months, the battery will becompletely discharged and all stored data lost! The instrument must then be switchedon continuously for at least 72 hours to recharge the battery and reach operationalreadiness.
3. Switching on the instrumentInstrument startup is described in section 13.
3.1 Entry of date and time8.8.8.8.8 When you switch on the instrument, all display segments light up
for control purposes for approx. 2 seconds.
SrSt After this, the entire statistics memory is automatically cleared.
d.At You can now confirm the date d.At or change it:
1 7 [RUN] Enter the day, e.g. 17, confirm with [RUN].
dA.t O
8 [RUN] Enter the month, e.g. 8, confirm with [RUN].
dAt.O
9 1 [RUN] Enter the year, e.g. 91, confirm with [RUN].You can enter 2 or 4 digits for the year; however, it will always beoutputted with 4 digits.
c.Lo O You can now confirm the time c.Lo or change it:1 5 [RUN] Enter the hours, e.g. 15 (24-hour mode), confirm with [RUN].
cL.o O
3 1 [RUN] Enter the minutes, e.g. 31, confirm with [RUN].
cLo. O
5 4 [RUN] Enter the seconds, e.g. 54, confirm with [RUN].
The clock built into the instrument adopts your entry.
The DL35 is in the standby mode.Notes
• If you press the [RESET] key during the entry of the date or time, all values enteredup to that point are lost.
• The time entry must always be in the 24-hour mode (hours-minutes-seconds),irrespective of the time format selected (section 5, instrument parameter 2).
• The date entry must always be in the European format (day-month-year), irrespectiveof the date format selected (section 5, instrument parameter 3).
• You can skip the date and time entry with the [RESET] key. The current values willbe automatically adopted when the instrument is switched on.
• You can set the time display with the key sequence 12 [MODE]. Return to thestandby mode is effected with [RESET].
• When in the standby mode you can change the date with 10 [MODE] or the time with11 [MODE] at any time without first switching the instrument off.
• In the case of a malfunction, you can set the date and time to zero with the keysequence 91000 [MODE] and reenter them. You can call up this function only fromthe standby mode.
• Directly after switching on the instrument, you can clear the entire memory (methodsand statistics) with the key sequence 99999 [MODE]. At the same time, the 10METTLER methods (Nos. 41-50) and the standard method (No. 0) are reloaded. Thedate and time are set to 0 (zero), the default values are assigned to CONC andDRIFT.
3.2 Filling the buretteIf you press the [BURET/mL] key, the entire burette contents are discharged and freshtitrant siphoned in. To ensure complete filling of the burette without air bubbles, youshould repeat this operation at least twice more.
3.3 Emptying the titration vessel
Siphoning off solution
• Press the left button at the rear of the titration head with your left hand. This switcheson the pump. Use your right hand to position the suction tube in the solution so thatthis is siphoned off. The suction tube should not quite reach the bottom of thetitration vessel.
• With the pump still running, raise suction tube to the stop then release the button.The pinch mechanism prevents subsequent flowback of liquid into the titrationvessel.
If you wish to stir the solution during siphon-ing off, first switch the stirrer on with 2[RUN].
Warning
Do not leave unreacted titrant in the titration vessel for lengthy periods and always pullup the suction tube to the stop since parts made of silicon such as the septum andtubing connections of the suction tube can be attacked.
3.4 Changing the titration vessel
Remove titration vessel
• Swing out titration head and undo fastener ring.• Attach the emptied or a clean, dry vessel.
3.5 Dispensing the solvent
• Press the right button on the rear of the titration head with your right hand to switchon the pump. When sufficient pressure has built up in the solvent bottle, solventstarts to flow into the titration vessel.
• Do not release the button until the two electrode tips and the burette tip areimmersed (min. 30 mL in a 150 mL beaker).
4. The keypad4.1 The functions of the individual keys[RESET] Aborts all operations. The instrument returns to the standby mode.
The display is set to zero and the burette filled if need be.Use [RESET] to acknowledge an error message.
[CE] Clears a wrongly entered number.
[DRIFT] Displays the stored DRIFT value.Manual entry of the DRIFT value: First enter the new value inµg/min, then press the [DRIFT] key.
[CONC] Displays the stored CONC value.Manual entry of the CONC value: First enter the new value inmg/mL, then press the [CONC] key.
[RUN] Initiates the following functions:• Start of a pretitration• Start of a titration, a CONC or DRIFT determination• Closing of entries• Skipping of displayed values (method parameters, results
memory, etc.)
[MODE] Cyclic switching: From the standby mode (Karl Fischer titrationmode) via the CONC mode (concentration determination of thetitrant) to the DRIFT mode (DRIFT determination) and then back tothe standby mode. In the CONC and DRIFT mode, the lampsabove the corresponding keys light up.
n [SAVE] Stores method n.
[METHOD] Displays the number of the active method.
n [METHOD] Method number n becomes the active method.
[BURET/mL] The burette contents are discharged and the burette refilled. Thisoperation can be aborted by [RESET].
x [BURET/mL] x mL titrant are dispensed.
Note
The volume of the burette used must match the burette volumeentered in the current method (method parameter B) in order forthe burette to dispense correctly.
4.2 Key combinations with [RUN] and [MODE]Titration
1 [RUN] Skip pretitration
2 [RUN] Switch on stirrer4 [RUN] Subsequent result evaluation
Total titrant consumption
5 [RUN] Display total titrant consumption
6 [RUN] Set memory of total titrant consumption to 0 (zero)
DRIFT
7 [RUN] Display current DRIFT during standby titration
8 [RUN] Adopt current DRIFT (in DRIFT mode only)
Methods
0 [MODE] Print out list of methods1 [MODE] Examine and change method parameters2 [MODE] Print out method parameters
Statistics
3 [MODE] Examine or delete individual resultswithin 3 [MODE]:n [RUN]: Display result of sample No. n0 [RUN]: Delete current sample data
4 [MODE] Examine statistics data5 [MODE] Print out statistics6 [MODE] Clear entire statistics memory (results and statistics data)
Instrument parameters
7 [MODE] Examine or change instrument parameters
8 [MODE] Print out instrument parameters9 [MODE] Abort subsequent consumption
Date/time
10 [MODE] Change date
11 [MODE] Change time12 [MODE] Display current time
18 [MODE] Unblock critical functions
19 [MODE] Block critical functions
Special functions
91000 [MODE] Set date and time to zero
99999 [MODE] Clear entire memory (methods and statistics). At the same time, the10 METTLER methods (Nos. 41-50) and the standard method (No.0) are reloaded. The date and time are set to 0 (zero). The defaultvalues are assigned to CONC and DRIFT. You can only executethese functions directly after the instrument has been switched on.
5. Instrument parametersYou enter the input dialog for the instrument parameters by executing the keysequence 7 [MODE]:
Parameter Default value Meaning
1 1 Instrument identification0: No instrument identification.n: Any identifier (max. 4 places), appears in the
header of the record.
2 0 Time format0: European format (= 24-hour mode).1: American format (= 12-hour mode).
3 0 Date format0: European date entry (day-month-year).1: American date entry (month-day-year).
5 0 Total titrant consumption0: The titrant consumption is not tracked.n: Entry of the upper limit of the total titrant
consumption in mL.Largest admissible value: 9999 mL.If this limit is exceeded during operation,tltrLappears on the display when you wish to start thenext titration; at the same time an audio signal issounded. The printer outputs "warning > titrantlimit". However, you can still start the titration with[RUN]. You abort it with [RESET] and at the sametime the counter of the total titrant con-sumption isset to 0 (zero); the display shows trSt and "titrantreset" appears on the printed record.
You close these entries with [RESET].You can print out the instrument parameters with the key sequence 8 [MODE].
6. MethodsA method comprises all information needed to perform and evaluate a titration.Maximum 50 methods can be stored in the DL35 and are identified by method numbers(1-50). You can not delete the standard method (No. 0). But you can modify it and storeit under another number.Methods 41-50 are the METTLER methods with the parameters for different KarlFischer titrations and concentration determinations. However, you can overwrite theseby your own methods.
6.1 Parameters of the Karl Fischer methodsThe parameter numbers and letters have the following meaning:
Parameter Default value Meaning
1 15 Switch-off delay. The titration is at an end when themeasured signal remains constant for 15 seconds, i.e.no dispensing of titrant is needed, the sample solutionis thus anhydrous. See also section 10.4.
2 41 Left digit: Number of places following thedecimal point. Maximum 4 decimalplaces can be selected. No entry isinterpreted as 0 places. The number ofthe outputted decimal places can be lessthan that entered if the size of the displaywould lead to loss of places before thedecimal point.
Right digit: Result unit:
0: mg No request for sample weight.
1: % For high water contents.2: ppm For low water contents.3: %dm Calculation of the dry content in% (dry material): 100%-result% = %dm.
Note
In addition to the result in the desired unit, the titrant consumption in mL is alwaysspecified on the record.
3 2 Reagent type
0: Pyridine-containing Karl Fischer reagent.
1: Pyridine-free one-component Karl Fischer reagent.2: Pyridine-free Karl Fischer reagent and solvent.
4 2 Standard substance
0: Water.
1: Calibration standard with 5 mg water/mL.2: Sodium tartrate • 2H2O (standard substance with
15.66% water of crystallization).
5 1 Automatic standby titration
0: No standby titration. After the titration, the DL35
returns to the standby mode. A pretitrationautomatically precedes the next titration. (Skippingpossible with the key sequence 1 [RUN].)
1: Standby titration. After the titration, the DL35switches to the standby titration. Ingressingmoisture is con-tinuously removed by titration. Thenext titration can be started at any time.
n: Subsequent consumption. After the pretitrationand after the titration, the DL35 switches to thestandby titration and prints out the subsequentconsumption at intervals of 1 minute over a periodof n minutes. During this time, the lamps "READY"and "BUSY" are lit up.When the configured time has elapsed, the DL35remains in the standby titration mode ("READY"lamp lit up). While the subsequent consumption isbeing measured, a titration, a DRIFT or aconcentration determination can be started. Theother functions are blocked during this time. Youcan abort the subsequent consumptionmeasurement prematurely with 9 [MODE]; thestandby titration continues to run.
6 0 Stir time request
0: No stir time.
9999: The DL35 requests the stir time("STIRTIME") before every titration.
n: Fixed stir time in seconds before everytitration.
7 0 Blank value request
0: No blank value.
9999: Before every titration the DL35 requeststhe blank value ("BLANK").
n: Fixed blank value in µg water for everytitration.
8 0 Sample identification request
0: No sample identification.
1: Before every titration, the DL35 requeststhe sample identification ("IDENT"). Defaultvalue is always 0.
2: Before every titration, the DL35 expectsthe sample identification; the previousidentifica-tion number appears as defaultvalue.
9 2 Audio signal
0: No audio signal.
1: Only the end of the titration and thepretitration is signalled audibly.
2: Each keystroke, the end of everypretitration and every titration areacknowledged with an audio signal.
A 50 Maximum titrant consumption in mL per titration.
n: Automatic statistical evaluation after n titrations(n = 2-99).
D 0 Initial weight
0: Weight entry before the titration.
1: Weight entry after the titration, immediately beforecalculation of the result.
E 1 Density
1: g weighing: The density is not needed for the
titration.
x: mL weighing: The DL35 expects a volume entryon request of the sample weight (display voL).With the density inputted here, it automaticallyconverts the volume entry into the correspondingsample weight. The value of the density isrecorded.
n: whole numberx: fraction
6.2 Developing a methodWhen you switch the DL35 on for the first time in order to develop a method, thestandard method is recalled when in the standby mode with the key sequence 1[MODE].When the instrument is switched on the second, third time, etc., the last used method is
always active, even if it was a provisional one.
1 [MODE] Call up of the input dialog.
I l5 The left digit shows the method parameter in question (e.g. 1:Switch-off delay, see section 6.1). The digits on the right representthe current value. You can overwrite or confirm this value.
[RUN] Press [RUN] to confirm the entry or the old value.
2 4l The next parameter appears on the display.The entire parameter set can be run through repeatedly.
[RESET] When you press the [RESET] key, the input dialog is concluded.
If you have changed one or several parameters, you obtain a provisional methodwithout a method number. You can already perform titrations with a provisional methodand it is also preserved when the instrument is switched off. A provisional methodbecomes definitive when it is assigned a number and stored.
Notes
• If you can not enter the input dialog with 1 [MODE] from the standby mode, thecritical functions are blocked. You can unblock these with the key sequence 18[MODE] (see section 11).
• New parameter entries are immediately checked by the DL35 for validity. Invalidentries are rejected with an audio signal and the old value redisplayed.
• CONC and DRIFT are not part of a method. You yourself are responsible for the cor-rectness of these values.
6.3 Storing a methodWhen you have selected the parameters for a method, you can give the method anumber and store it.
n [SAVE] When in the standby mode, you store the method under methodnumber n (n=1-50) with this key sequence.
occ lO Appears on the display when a method is already stored under theselected number, e.g. 10. Methods 41-50 are the METTLERmethods (see section 6.7). They can be overwritten.
[SAVE] If you press the [SAVE] key again, the old method is overwritten. Ifyou do not wish to overwrite the method, abort the operation with[RESET] and store the new method under a different number.
Note
The current time and date are stored together with the method number. This allowslater versions of the same method to be distinguished from one another.
6.4 Selecting and modifying a methodn [METHOD] When in the standby mode you can select the method number n
with this key sequence and use it for a titration. The method cannow also be examined, modified and printed out.
[METHOD] The current method, e.g. 10 is displayed as long as the [METHOD]key
no. lO is pressed.
If you modify one or several parameters of the method, the methodbecomes provisional. When this method is selected, the displayshows:
no.- provisional method.
You can store the provisional method under the same or a differentnumber (see section 6.3).
6.5 Printing methods2 [MODE] With this key sequence you print out the current method when in
the standby mode.
Printout of the standard method
6.5.1 Printing the list of methods0 [MODE] When in the standby mode, this key sequence shows you a list of
the stored methods. Each method is accompanied by the methodnumber, the reagent type and the date and time of the lastmodification.With an Epson-compatible dot matrix printer (instrument parameter4 has the value 2), you also obtain a printout of the followingmethod parameters: Switch-off delay; unit and number of decimalplaces in the result; automatic standby titration; stir time; blankvalue; burette volume; statistics.
6.6 Deleting a methodA method is deleted by overwriting it with method 0 (standard method).
Example: Method 25 should be deleted:
0 [METHOD] Method 0 is activated.
25 [SAVE] The activated method No. 0 should be stored as method 25.
occ 25 Method 25 is shown to be occupied.
[SAVE] By pressing the [SAVE] key again, method 25 is overwritten bymethod 0 and thus deleted.
Note
With 99999 [MODE] you have the possibility to clear the entire memory (methods andstatistics). At the same time, the 10 METTLER methods (Nos. 41-50) and the standardmethod (No. 0) are reloaded. The date and time are set to 0 (zero). The default valuesare assigned to CONC and DRIFT. This function can only be executed directly after theinstrument has been switched on.
6.7 METTLER methodsWith the 10 METTLER methods you can perform different types of concentration andwater determinations without having to develop a method of your own. You will finddetailed information on how to perform these titrations in one of the METTLERApplication Bulletins (see section 17).
METTLER methods DL35 Karl Fischer TitratorNo. Designation41 Concentration determination with the one-component reagent
42 Concentration determination with the two-component reagentSample: sodium tartrate • 2H2O.
43 Concentration determination with the one-component reagentSample: water.
44 Concentration determination with the two-component reagentSample: water.
45 Water determination in readily soluble samples, > 1% water contentSample: cognac.
46 Water determination in slightly soluble samples, > 1% water contentSample: butter.
47 Water determination in readily soluble samples, < 1% water contentSample: toluene.
48 Water determination in slightly soluble samples, < 1% water contentSample: edible oil.
49 Water determination in samples with external extraction, > 1% water contentSample: coffee.
50 Water determination in samples with drying oven, < 1% water contentSample: polyethylene granules.
7. Titration7.1 Titration procedureThe DL35 automatically performs a pretitration before every titration. The stirrer speedmust be matched to the volume of the solvent (pronounced vortex formation, but no airbubbles). After the pretitration, the solvent is kept anhydrous (standby titration, possiblywith printout of subsequent consumption, see method parameter 5).
"READY" and "BUSY" The instrument is ready for a titration, a DRIFT or alight up CONC determination. If too much water enters the
vesselor "READY" lights up (more than 6 • DRIFT), "warning drift >" is printed out on
the record and the DL35 automatically starts apretitration again.
[RUN] Start the titration with [RUN].
The DL35 starts to measure the time for the DRIFTcorrection from this [RUN].
Add sample to titration vessel.
Now enter the values that the DL35 still needs for thetitration and the evaluation of the samples:
"WEIGHT" flashes Weight entry: Enter weight in g. If a balance isattached, the weight is automatically transferred.
At this point, the weight is requested only if you haveselected "weight entry before the titration" (methodparameter D), otherwise the weight is requested whenthe titration is at an end.
If you have configured a density in the method(parameter E, density different from 1.0), the DL35expects a volume entry and voLO appears on thedisplay. An attached balance is not addressed.
[RUN] Close weight entry with [RUN]."IDENT" flashes Enter sample identification.
[RUN] Confirm with [RUN].
"STIRTIME" flashes Enter stir time before the titration in seconds.
[RUN] Confirm with [RUN].
"BLANK" flashes Enter blank value in µg.
[RUN] Confirm with [RUN].
These three parameters are requested by the DL35only if they have been defined in the method (methodparameters 6-8).All entries are continuously printed out on the printer.
"BUSY" flashes[RUN] Start actual titration with [RUN].
"BUSY" lights up The remaining stir time in seconds is continuously displayed.
The titration runs.
Result The result is displayed in the desired unit. The recordshows a printout of the titration time, the titrantconsumption and the result.
"READY" and "BUSY" If you have configured an automatic standby titration,light up or the solution is kept anhydrous on completion of the
titration"READY" lights up and if configured (method parameter 5) the subsequent
consumption is printed out during the desired timeperiod.Otherwise, the instrument returns to the standby mode.
Titration record:
Notes
• With the key sequence 1 [RUN] it is possible to skip the pretitration. The solvent isnot titrated to dryness before sample addition, rather the total water in the titrationvessel is determined.
• If you wait a long time before entering the weight after the titration, the subsequentconsumption can be drastically distorted since the instrument no longer exerts controlbetween the end of the titration and entry of the weight.
• If a number is pressed during the titration, the intermediate result is shown for a briefperiod. If the weight is not entered until after the titration, no calculation of theintermediate result is possible. The display shows norES.
• If the decimal point is pressed, the display shows the titrant consumption in mL. Thisdisplay disappears when the decimal point is pressed again.
• The light bars on the display have the following meaning:
- Burette dispenses or is being filled
- - . - . - - Water still present- - . - . . Last traces of water are being titrated- . . Solution anhydrous
• If you have entered a value larger than 0 (zero) in instrument parameter 5, beforeevery titration and before the [BURET/mL] function a check is made to see if theupper limit of the total titrant consumption has been exceeded. If yes, tltrL appears onthe display and the printer outputs "warning > titrant limit" (see section 7.2).
• Fixed values specified in the method for the stir time and the blank value are notshown on the result record. They can be found on the printout of the corresponding
method.
7.2 Total titrant consumptionIn instrument parameter 5, you can set the upper limit of the total titrant consumption.The total consumption of titrant is then continuously calculated over all titrations. Youcan thus very easily ensure that the capacity of the precharged solvent is notinadmissibly exceeded. You yourself define the value of the upper limit that has provedsuitable for your determinations. If this limit is exceeded, the display tltrL appears beforethe start of the next titration and an audio signal sounds. "warning > titrant limit"appears on the printed record. You can still start the titration with [RUN], with [RESET]you abort the procedure and then you can change the solvent. The counter of the totaltitrant consumption is automatically set to 0 (zero) in this case. The display shows trST,and the printer outputs "titrant reset".
Display of the current total titrant consumption
5 [RUN] When in the standby mode or the standby titration, you can displaythe current total titrant consumption. The display disappears after2-3 seconds. If you have selected 0 (zero) under instrumentparameter 5 (no tracking of the total titrant consumption), thisfunction is not active.
Zero setting of the total titrant consumption counter
6 [RUN] You can reset the counter of the total titrant consumption to 0(zero).
Changing the total titrant consumption
If you set a different upper limit in instrument parameter 5, the current value of the totaltitrant consumption remains in force, it is not reset to 0 (zero).If you change instrument parameter 5 from n to 0 (zero), i.e. you no longer wish to keeptrack of the total titrant consumption, the counter is also set to 0 (zero).
Note
Both the pyridine-containing and the pyridine-free Karl Fischer reagents allow severaltitrations to be performed in succession in the same solution. With unproblematicsamples (no interference by the matrix), the capacity (loading limit) is approx. 100 mgH2O per 20 mL solvent. When the capacity limit is reached, the reaction rate slows andthe end of the titration is approached sluggishly.
7.3 Subsequent evaluation of resultsOn completion of a titration, you can perform a subsequent evaluation of the resultswhen in the standby mode by changing one or several of the values CONC, DRIFT andBLANK:
4 [RUN] Call up of the subsequent evaluation
"CONC" CONC lamp lights up and the stored CONC value is displayed as asuggestion. You can overwrite this value or confirm it directly with[RUN].
"DRIFT" DRIFT lamp lights up and the stored DRIFT value is displayed as a
suggestion. You can overwrite this value or confirm it directly with[RUN].
"BLANK" BLANK lamp lights up and the stored BLANK value is displayed asa suggestion. You can overwrite this value or confirm it directly with[RUN].
Result The subsequent evaluation is now performed with the new values.The values of DRIFT, CONC and BLANK are reset to the originalvalues after the calculation.
Notes
• The subsequent evaluation can be performed only if a titration result is available (noCONC or DRIFT determination).
• If a determination of the subsequent consumption follows the titration, this must firstbe allowed to run to completion or aborted with 9 [MODE].
• The reevaluated results are not entered in the statistics!
Record of a subsequent evaluation
8. Statistical evaluationThe DL35 has a statistics memory that comprises a results and a statistics data
memory. It allows the statistical evaluation of water and CONC determinations after aseries of maximum 99 samples with the same method.The result of each sample is stored in the results memory. The sample number, theweight and the result are stored for every sample.The statistics data memory contains the number of samples, the mean value and theabsolute and relative standard deviation.If you have selected 1 under method parameter C, you can generate and print out anintermediate set of statistics after any number of titrations (n = 2-99) with 5 [MODE].With 6 [MODE] you can clear the statistics memory and start a new series. Otherwise,the next titration will continue the old series.If you have entered a number (n = 2-99) under method parameter C, a set of statisticswill be automatically generated and printed out after n titrations. (S out on the display,"end of series" on the printed record.) When the next titration is started, the statisticscounter will be automatically reset to 1 and at the same time the statistics memorycleared.
It is possible to delete the result of a sample from the results memory and to exclude itfrom the statistical evaluation (see section 8.3). However, the storage location remainsoccupied and the sample can thus not be repeated or substituted.
8.1 Printing out statistics memory5 [MODE] With this key sequence you can generate a set of statistics. The
mean value will be transferred if applicable (CONC determinations)and the results recorded.
Printout of a set of statistics
Note
The DL35 calculates all results internally to 7 decimal places and does not round theseoff to 4 places until the end. As a consequence, if you recalculate one of the results itmay deviate in the final decimal place from the result of the DL35.
8.2 Examining statistics data4 [MODE] With 4 [MODE] you can examine the current statistics data. If no
results are available, an audio signal sounds after 4 [MODE] andthe instrument returns to the standby mode.
l A 1 appears on the display for approx. 1 second.
23 The number of samples is then indicated.
[RUN] You obtain further information by pressing the [RUN] key:
2 A 2 appears on the display for approx. 1 second.
24.78 The mean value is then shown. The selected unit lights up at thesame time.
If only 1 result is stored, no standard deviation is calculated. In this case, [RUN] leadsfirst to the display of a 1, the information display then starts again from the beginning.
[RUN] You obtain further information by pressing the [RUN] key:
3 A 3 appears on the display for approx. 1 second.
O.l8 The standard deviation is then shown. The selected unit lights upat the same time.
[RUN] You obtain further information by pressing the [RUN] key:
4 A 4 appears on the display for approx. 1 second.
l.79 The relative standard deviation is then shown in percent (percentlamp lights up).
The statistics data memory can be run through again from the beginning with [RUN].You can return to the standby mode with [RESET].
8.3 Examining results memory, deleting individual results3 [MODE] With the key sequence 3 [MODE] you can examine the results
memory and delete individual results. If the results memory is clear,an audio signal sounds after 3 [MODE] and the instrument returnsto the standby mode.
l The sample number lights up for approx. 1 second.
2.5555 The associated result then appears. The selected result unit (mg,%, ppm or %dm) lights up at the same time.
[RUN] By pressing the [RUN] key you are shown the next result.
2 The sample number lights up for approx. 1 second.
2.6754 The associated result then appears. The selected result unit (mg,%, ppm or %dm) lights up at the same time.
n [RUN] By pressing the key sequence n [RUN], you receive the result ofsample No. n directly.
To delete a result from the results memory, you must first select it then overwrite it with0 [RUN]:
n [RUN] You are shown the desired result directly.
lO The sample number, e.g. 10, lights up for approx. 1 second.
2.4938 The associated result then appears. The selected result unit (mg,%, ppm or %dm) lights up at the same time.
0 [RUN] The result of the selected sample is deleted:
dEL Display: dEL and automatic printout. The deleted sample is nottaken into account in the statistical evaluation.
[RUN] By pressing the [RUN] key, you are shown the next result:
ll Sample number of the next sample, e.g. 11, lights up for approx. 1second.
2.4307 Result of the sample. The selected result unit (mg, %, ppm or%dm) lights up at the same time.
Note
In CONC determinations, the unit mg and the CONC lamp both light up.
The results memory is quit with [RESET]; this has no influence on the statistics counter.
If a results memory contains deleted results, the corresponding statistics record willshow STATISTICS*. Deleted results are marked on the record with del.
Example of a statistics record with deleted results
Notes
• With 6 [MODE] you can clear the entire statistics memory.• By pressing the [RUN] key, you can run through the results memory repeatedly.
8.4 Clearing statistics memory6 [MODE] Clears the entire statistics memory.
The entire statistics memory (all results and statistics data) is also cleared in thefollowing situations:• When the instrument is switched on (SrSt on the display, "statistics reset" on the
printed record).• When you modify at least one method parameter and hence create a provisional
method.
• When the results memory is full (after 99 samples), "buffer full" appears on theprinter. The statistics are printed out and the memory cleared when the next titrationis started.
• When the number of measurements entered for a set of statistics has been executed(method parameter C>1), "end of series" appears on the printer. The statistics areprinted out and the memory cleared when the next titration is started.
• Through a change in the stored CONC value by manual entry.
• Through call up of a different method.
• By switching from the CONC determination to titration or in the opposite direction: Onstart of the measurement with [RUN], "mode changed" appears on the printed record,the statistics are printed out, the mean value transferred if applicable (CONCmeasurement series) and the statistics memory then cleared. If you have changedthe mode accidentally, you can abort with [RESET] while the DL35 is printing out thestatistics. The statistics memory has not yet been cleared and you can continue withthe next titration in the correct mode.
Notes
• If the statistics memory has been cleared and data actually existed, SrSt appears onthe display and "statistics reset" on the printer.
• Before the statistics memory is cleared, there is normally no printout of the statisticsmemory.
9. Titrant concentration CONCThe titrant concentration is stored in the DL35 as parameter CONC in mg water per mL(standard value 5 mg H2O/mL). It should be determined daily with the aid of a standardsubstance. For accurate titration results you should perform at least three concentrationdeterminations and evaluate these statistically. Note that the titrant concentration is notpart of the method.The result of the CONC determination or the mean value of the statistics of a CONCmeasurement series is stored directly in the DL35 for the evaluation of the subsequenttitrations.
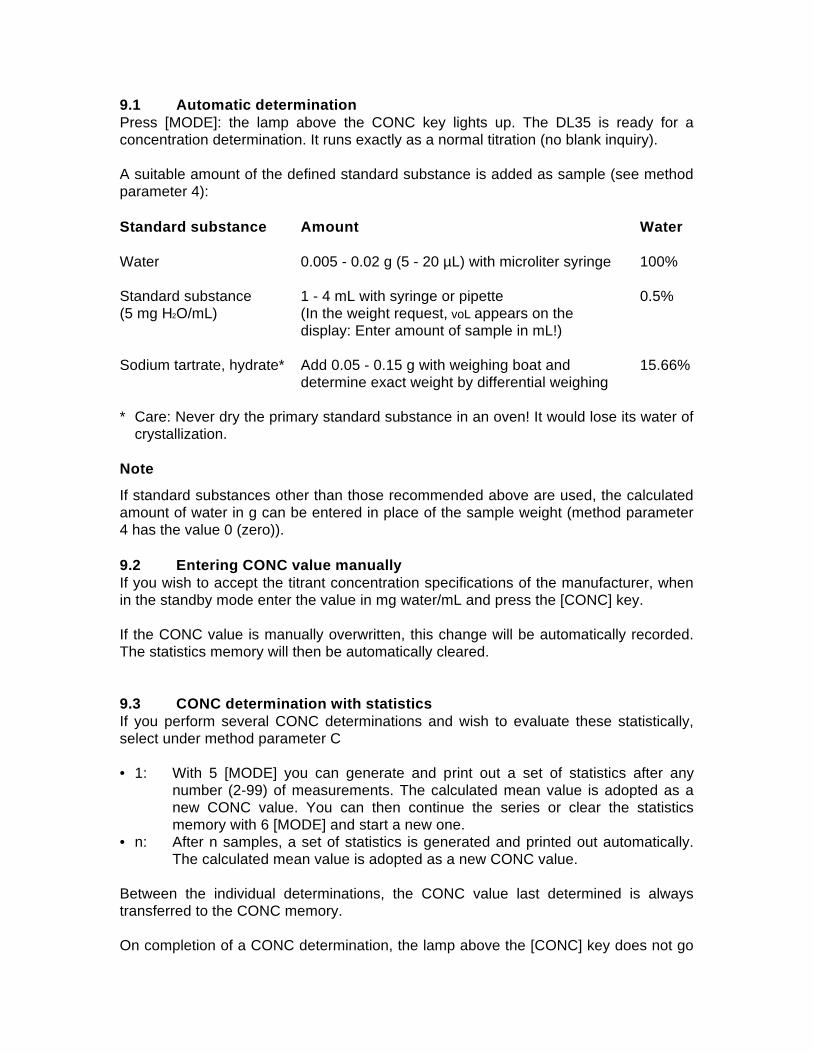
9.1 Automatic determinationPress [MODE]: the lamp above the CONC key lights up. The DL35 is ready for aconcentration determination. It runs exactly as a normal titration (no blank inquiry).
A suitable amount of the defined standard substance is added as sample (see methodparameter 4):
Standard substance Amount Water
Water 0.005 - 0.02 g (5 - 20 µL) with microliter syringe 100%
Standard substance 1 - 4 mL with syringe or pipette 0.5%(5 mg H2O/mL) (In the weight request, voL appears on the
display: Enter amount of sample in mL!)
Sodium tartrate, hydrate* Add 0.05 - 0.15 g with weighing boat and 15.66%determine exact weight by differential weighing
* Care: Never dry the primary standard substance in an oven! It would lose its water ofcrystallization.
Note
If standard substances other than those recommended above are used, the calculatedamount of water in g can be entered in place of the sample weight (method parameter4 has the value 0 (zero)).
9.2 Entering CONC value manuallyIf you wish to accept the titrant concentration specifications of the manufacturer, whenin the standby mode enter the value in mg water/mL and press the [CONC] key.
If the CONC value is manually overwritten, this change will be automatically recorded.The statistics memory will then be automatically cleared.
9.3 CONC determination with statisticsIf you perform several CONC determinations and wish to evaluate these statistically,select under method parameter C
• 1: With 5 [MODE] you can generate and print out a set of statistics after anynumber (2-99) of measurements. The calculated mean value is adopted as anew CONC value. You can then continue the series or clear the statisticsmemory with 6 [MODE] and start a new one.
• n: After n samples, a set of statistics is generated and printed out automatically.The calculated mean value is adopted as a new CONC value.
Between the individual determinations, the CONC value last determined is alwaystransferred to the CONC memory.
On completion of a CONC determination, the lamp above the [CONC] key does not go
out. The instrument remains in the CONC mode and is thus ready for the next CONCdetermination.
Check on the stored CONC value:Press the [CONC] key: The stored value is displayed.
10. DRIFT determinationIn solvent dried by titration a small titrant consumption can always be found and this isprimarily due to the diffusion of moisture into the vessel. This DRIFT is stored in theDL35 as DRIFT value in µg water per minute. The default value is 25 µg/min and isautomatically taken into account in the result calculation. For accurate titrations and forthe determination of small amounts of water (<1 mg), you should determine the DRIFTat regular intervals. Note that the DRIFT is not part of the method.
10.1 Automatic determinationPress [MODE] twice: The lamp above the DRIFT key lights up: The DL35 is ready for aDRIFT determination.If the solution in the vessel has not been dried by titration, a pretitration is firstperformed. Depending on the titrant consumption, this is followed by a measurementover a 3 - 5 minute period which is evaluated to a result with the first minute beingignored. The result is printed out and stored directly in the DL35 for the evaluation ofsubsequent titrations.
Check on the stored DRIFT value
Press the [DRIFT] key twice to display the stored DRIFT value.
10.2 Entering DRIFT value manuallyIn the standby mode, enter the value in µg/min and press the DRIFT key.The new DRIFT value is automatically recorded.
Notes
• The experimentally determined DRIFT should be between 5 and 50 µg/min. If thevalue is too high, possible causes are:- Titration head not closed properly.
- Drying agent on titration head no longer effective.
- Wetted areas are present on the underside of the titration head. Removal of thewater adsorbed at such sites by titration can take a very long time: remove titrationvessel and dry wetted areas.
- Samples that evolve water only slowly.- Residual sample not determined by the titration still adhering to the wall of the
titration vessel.• After the DRIFT determination, you can check the subsequent consumption if you
configure "n" under method parameter 5.
• The DL35 starts to measure the time for the DRIFT correction in a titration after thefirst [RUN].
10.3 Continuous calculation of DRIFT during standby titrationDuring the standby titration, the DRIFT is redetermined after every addition of titrantand the mean value of the last 4 measurements calculated. With 7 [RUN] you candisplay the current DRIFT and with 8 [RUN] transfer it in the DRIFT mode to thememory. Pressing the DRIFT key displays the stored DRIFT value.
Note
The DL35 always uses the stored DRIFT in the result calculation.
10.4 Switch-off delayThe relationship between the switch-off delay, the DRIFT and the smallest increment oftitrant can be seen from the following formula:
The DL35 sets the smallest increment of titrant to be dispensed so that it correspondsto twice the DRIFT during the switch-off delay.The following table shows how large the DRIFT may be at a particular burette volumeand a particular switch-off delay for the DL35 to titrate in the endpoint region withmaximum resolution (CONC = 5 mg/mL).
11. Blocking and unblocking of critical key functionsIf the same titrations have to be performed repeatedly, several functions of the DL35can be blocked so that the methods can not be inadvertently changed. These functionscan be selected only when in the standby mode.
19 [MODE] Blocking
Following functions are now blocked:
1 [MODE] Examination and modification of the method
parameters
7 [MODE] Examination and modification of the instrument
parameters
10 [MODE] Changing the date
11 [MODE] Changing the time
91000 [MODE] Setting the date and time to 0 (zero)
99999 [MODE] Clearing the entire memory
x [CONC], x [DRIFT] Overwriting of CONC and DRIFT
[MODE] Determination of CONC and DRIFT
18 [MODE] Unblocking
The above functions can now be used again.
12. Remote controlThe DL35 Karl Fischer Titrator can be fully remote controlled by a master control unit(computer). All key functions can be controlled via the RS-232-C interface inaccordance with the below table.Each remote control command causes blocking of the entire keypad since no provisionhas been made for parallel operation. However, the keypad can be enabled by aremote control command.
Key Command ASCII hex
0 to 9 0 to 9 30 to 39
. . 2E
CE C 43
RESET G 47
BURET/mL K 4B
RUN H 48
MODE I 49
DRIFT J 4A
CONC E 45
SAVE L 4C
METHOD M 4D
Release key (for DRIFT, Z 5ACONC, RUN)
Unblock keypad Y 59
Simulated power switch-on ! 21
Status inquiry ? 3F
Mode inquiry & 26
Display inquiry # 23
Other characters are ignored.Configuration of the interface: Number data bits: 7
Baud rate: 2400
Parity: even
Stop bit: 1
The remote control commands do not produce an acknowledgment.
Exceptions
• All printer outputs are also outputted simultaneously at the interface. Each printeroutput is closed with the ASCII character CTRL Z (ASCII hex 1A).
• Status, mode and display inquiry. The acknowledgement is an ASCII charactersequence and is closed with the two ASCII characters for carriage return (CR, ASCIIhex OD) and line feed (LF, ASCII hex OA).
Test of the interface
For testing the interface and becoming acquainted with the command set of the DL35remote control, you can use either an ANSI terminal or a terminal program.
Example of a program in BASIC on an IBM-PC:
100 CM$="com1"150 CLS: PRINT "Terminal Emulator"160 OPEN CM$+":2400,e,7,1,cs0,ds0,cd0,pe" AS #1170 T$=INKEY$180 IF T$="" GOTO 210190 IF ASC(T$)=27 THEN PRINT "Good bye": SYSTEM200 PRINT T$;: PRINT #1,T$;205 IF ASC (T$)=13 THEN PRINT CHR$ (10) ;210 IF (256-LOF(1))=0 GOTO 170220 P$=INPUT$ (1, #1)230 IF ASC (P$)<>10 THEN PRINT P$;235 IF ASC (P$)=13 THEN PRINT CHR$ (10) ;240 GOTO 170
Status inquiry (?)
The status message shows the status of the operational guidance lamps on the left ofthe display.
Lamp Status
None 0
READY 1
flashing 65
WEIGHT 2
flashing 66
SAMPLE NO. 4
flashing 68
STIRTIME 8
flashing 72
BLANK 16
flashing 80
BUSY 32
flashing 96
READY and BUSY 33
all 63
Mode inquiry (&)
The mode message shows the status of the CONC and DRIFT lamps.
Lamp Status
None 0
CONC 1DRIFT 2
Display inquiry (#)
The display message shows the contents of the display as a character string. If a resultunit is active, this is appended at the end in clear text, e.g. "16.85 ppm".
13. Startup procedure
13.1 Checking the operating voltageBefore switching on the instrument for the first time, check that the operating voltagespecifications on the yellow sticker (at power supply) match the power supply voltage ofthe local supply.
13.2 Changing the operating voltageWarning
Before you change the operating voltage, disconnect the power connector from thepower supply!
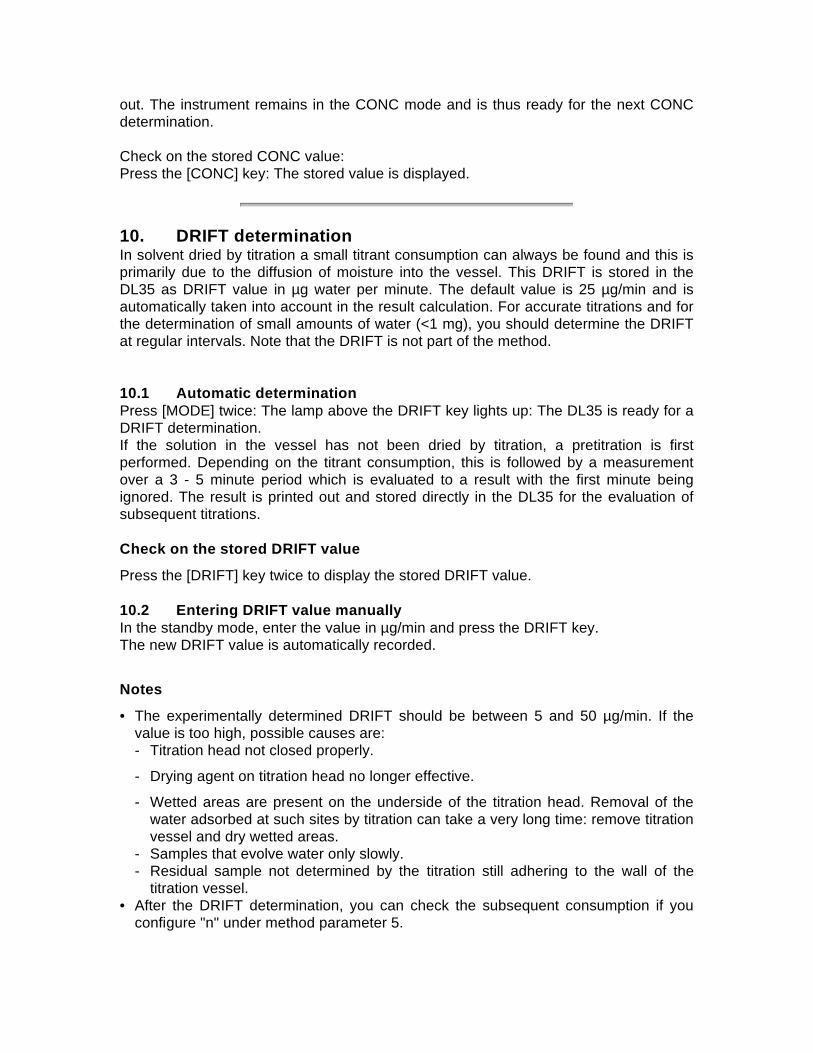
• Place instrument on the bench and undo the seven screws (1) using a Phillipsscrewdriver.
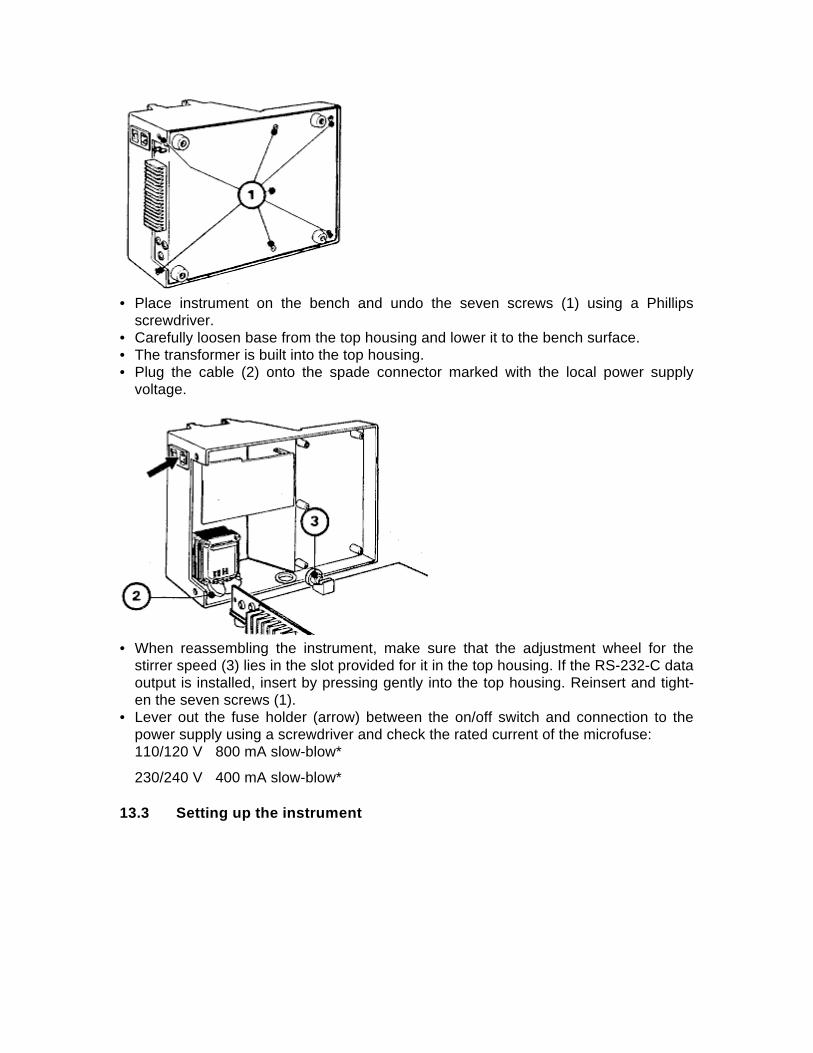
• Carefully loosen base from the top housing and lower it to the bench surface.• The transformer is built into the top housing.• Plug the cable (2) onto the spade connector marked with the local power supply
voltage.
• When reassembling the instrument, make sure that the adjustment wheel for thestirrer speed (3) lies in the slot provided for it in the top housing. If the RS-232-C dataoutput is installed, insert by pressing gently into the top housing. Reinsert and tight-en the seven screws (1).
• Lever out the fuse holder (arrow) between the on/off switch and connection to thepower supply using a screwdriver and check the rated current of the microfuse:110/120 V 800 mA slow-blow*
230/240 V 400 mA slow-blow*
13.3 Setting up the instrument
Note
The accessories include two red and six white tubes:
• 2 double-walled, red tubes for the burette (17, 18)
• 2 single, white tubes for the suction device (7) and for solvent dispensing (10)• 4 white tubes for air lines (19-22)
13.3.1 Suction device
• Insert suction tube (5) in titration head (6) and tighten with union nut (8).• Screw screw cap (4) (see illustration under 13.3) with gasket onto an empty brown
glass bottle and tighten well. Adapters are available for several bottle threads that donot fit.
• Push the free end of suction tube (7) through screw cap (4).• Fill drying tube (9) (see illustration under 13.3) with molecular sieves and mount on
screw cap (4). The molecular sieves protect the pump against acidic vapors of theKarl Fischer solutions.
13.3.2 Dispensing device for the solvent
• Insert solvent dispensing tube (10) in titration head (6) directly next to suction tube.• Screw screw cap (11) (see illustration under 13.3) with gasket onto the solvent bottle
and tighten well.• Push the free end of the solvent dispensing tube through screw cap (11) until it
touches the bottom of the bottle.• Fill drying tube (12) (see illustration under 13.3) with molecular sieves and mount on
screw cap (11).
Warning
Position the solvent bottle at the same height as the titrator; if the solvent bottle ishigher, solvent will run into the titration vessel until the levels are the same.
13.3.3 Attaching the pump
• The pump (23) must be attached with the four white tubes (19-22) to the solvent andsuction bottles via the valve on the titration stand (24).
• Plug in connector (25) of power supply cable below the electrode connectors.
The air vented during suction escapes through fitting (37) on titration stand (24) andif need be can be led away by a tube to a suitable ventilation shaft.
Warning
The pump is attacked by the corrosive vapors of the Karl Fischer solvent and musttherefore be replaced after a certain time. If you change the molecular sievesfrequently, you prolong the service life of the pump.
13.3.4 Installing the buretteAssembly of the piston
a. Piston (1, 2 & 3) and piston rod (4) for a 10 mL or 20 mL burette:Insert O-ring (1) in the groove in the lower part of piston (2) and screw togetherwith piston head (3) and piston rod (4).
b. Piston (1, 2 & 3) and piston rod (4) for a 5 mL burette.Lay O-ring (1) in piston head (3); it does not slot into its final position until youscrew in piston rod (4) and the lower part of piston (2).
Inserting the piston
a. Carefully slide the piston into the burette cylinder so that the wider part of thepiston rod (1) remains visible.
b. Press the burette onto burette holder (2) thus positioning the piston exactly (3).
Fitting the burette
Turn the knurled arrestment wheel on the holder track of the DL35 to the right until itreaches the stop. Move the burette on the holder track to the right until it snaps overthe drive. Turn the knurled arrestment wheel to the left and loosely tighten so that theplay between holder track and burette is taken up.
Equipping the burette
• Lay flat gasket (2) on bottle (1) and screw on burette holder.• Insert drying tube holder (4a) with drying tube (4).
Note
If you do not have a bottle with thread DIN 168-GL 45 x 4 (order number 71296 orRiedel-de Haën bottle), you need an adapter appropriate to the bottle and a flat gasket(see Accessories, section 17).
Warning
Always close the opening with a drying tube during titration. If you close the bottle witha stopper, a partial vacuum forms.
• Push suction tube (5) into the bottle - slide the red PE tube as kink protection overfitting (5a) - and screw to left connection of burette head.
• Screw dispensing tube (6) to right connection and place other end in tip holder (7).(8) is the burette head that you can remove when cleaning the cylinder to avoid
smearing the inscription on sticker (9). (10) is the light protection tube.
If parts of the stopcock (11, 12, 13 & 14) have to be replaced, unscrew threaded ring(11) and remove follower cam (12), rubber washer (13) and valve disk (14).
• Place rubber washer (13) followed by valve disk (14) on follower cam (12). The camof the follower cam must be seated in the larger, oval hole of the valve disk.
• Then lightly grease the surface of the valve disk with silicon grease.
Press the three parts from below onto the ceramic disk of the burette with the cam(15) facing outward and center exactly. Pay particular attention to correct positioningof slot (15), otherwise the burette could be damaged.Invert the burette, mount threaded ring and screw on while holding the follower cam.
13.3.5 Titration stand
• Insert electrode (14) into titration head (6) and attach to rear of instrument.• Fill drying tube (15) with molecular sieves and mount on titration head (6).• Insert burette dispensing tube (17) at titration head (6) to the left of the electrode:
The stirrer must move the titrant away from the electrode!• Insert glass stopper (16), septum or Karl Fischer stopper.• Place magnetic stirrer bar in titration vessel and fasten titration vessel with fastener
ring (38).
13.3.6 Titration vessels
You can install titration vessels of 150 mL or 250 mL or a thermostatable beaker. Forthe 250 mL titration vessel you need a different fastener ring and must change theheight of the titration head:• Lift up titration head and swing to right until the stop.• Lift up titration head again and turn it further to the right until the next stop, raise it
and swing it back again.• Changeover to a 150 mL titration vessel is similar and involves lowering the titration
head in the rearmost position.
13.3.7 Magnetic stirrerThe DL35 has a magnetic stirrer with variable speed. It is located below the titrationstand. If you wish to switch on the stirrer, press 2 [RUN]. On the right of the DL35 is acontrol knob for variable adjustment of the stirrer speed.
13.4 Peripheral devices
Methods and results can be recorded either with a Mettler-Toledo GA42 printer or anEpson-compatible dot matrix printer (CL interface). The cable for the GA42 is enclosed.The conversion cable for the dot matrix printer must be ordered separately (see section17.2).The dot matrix printer must have a serial interface with at least 2 KB buffer and which isconfigured as follows:Baud rate: 2400
Number data bits: 8
Parity: not checked
The DL35 also has an analog output for a line recorder.
If you attach a balance (e.g. Mettler-Toledo AT261), the DL35 automatically accepts thesample weight. Appropriate connection cables are listed in section 17.2.
Warning
The data output of the attached balances must be configured as follows:
Baud rate: 2400
Parity: even
send continuous
These settings must be checked with the aid of the appropriate operating or mountinginstructions of the balance and corrected if necessary.
Attach printer and balance to the same interface.(The connector of the balance cablehas a socket that accepts the connector of the printer.)
An RS-232-C (DCE) data output for attachment of a computer (see section 12) can beeasily retrofitted to the DL35 Karl Fischer Titrator. The appropriate connection cable islisted in section 17.2.
14. Sample preparationAim: The water contained in a sample should be freely available
for the titration.
Liquid samples In general these need no sample preparation. With oils andother samples poorly soluble in methanol, use a solventmixture. e.g. with chloroform.Samples that react with components of the Karl Fischersolutions (iodine, sulfur dioxide, alcohol) can causedifficulties. This applies particularly to aldehydes, ketones,carboxylic acids, thiols, and certain amines. They can usuallystill be titrated if suitable measures are employed, e.g. specialtitrants, buffers, etc.
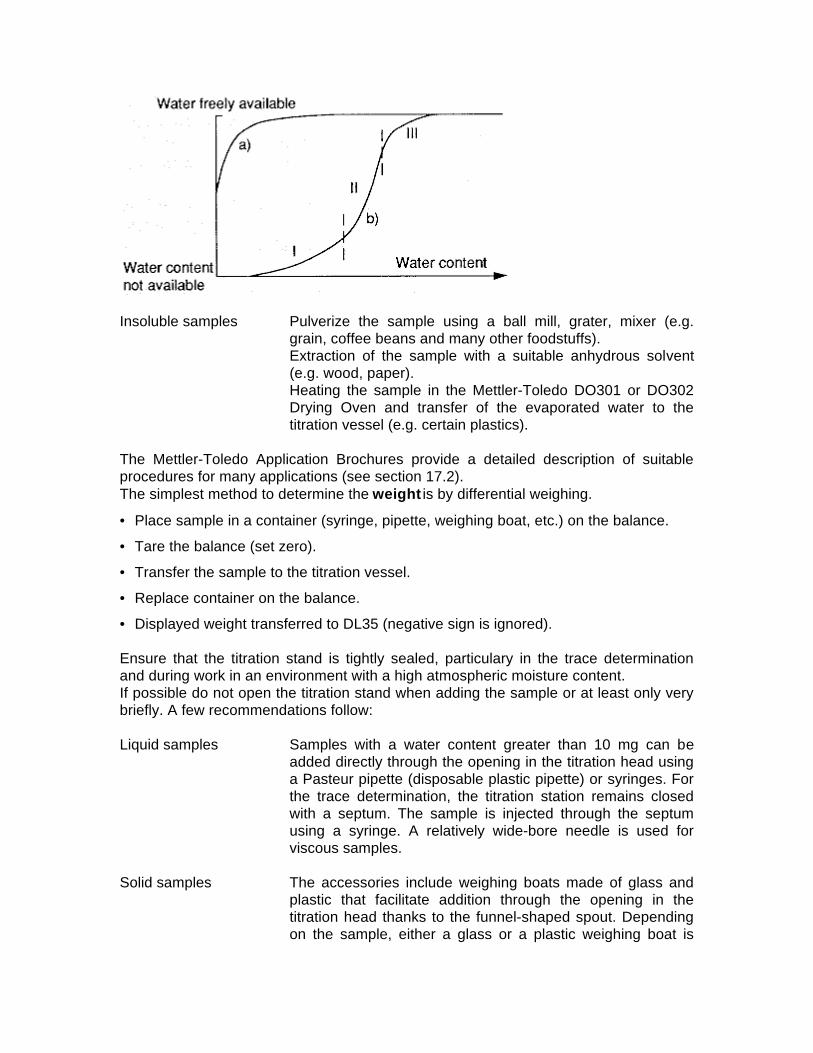
Solid samples The sample preparation depends on the solubility of thesamples in methanol or on the Karl Fischer solvent used andthe type of bonding of the water.The following illustration shows a schematic representation ofhow the total water is freely available in certain products(curve a) and in other substances (curve b) partially free (III),or moderately (II), poorly or not available at all (I).
Insoluble samples Pulverize the sample using a ball mill, grater, mixer (e.g.grain, coffee beans and many other foodstuffs).Extraction of the sample with a suitable anhydrous solvent(e.g. wood, paper).Heating the sample in the Mettler-Toledo DO301 or DO302Drying Oven and transfer of the evaporated water to thetitration vessel (e.g. certain plastics).
The Mettler-Toledo Application Brochures provide a detailed description of suitableprocedures for many applications (see section 17.2).The simplest method to determine the weight is by differential weighing.
• Place sample in a container (syringe, pipette, weighing boat, etc.) on the balance.
• Tare the balance (set zero).
• Transfer the sample to the titration vessel.
• Replace container on the balance.
• Displayed weight transferred to DL35 (negative sign is ignored).
Ensure that the titration stand is tightly sealed, particulary in the trace determinationand during work in an environment with a high atmospheric moisture content.If possible do not open the titration stand when adding the sample or at least only verybriefly. A few recommendations follow:
Liquid samples Samples with a water content greater than 10 mg can beadded directly through the opening in the titration head usinga Pasteur pipette (disposable plastic pipette) or syringes. Forthe trace determination, the titration station remains closedwith a septum. The sample is injected through the septumusing a syringe. A relatively wide-bore needle is used forviscous samples.
Solid samples The accessories include weighing boats made of glass andplastic that facilitate addition through the opening in thetitration head thanks to the funnel-shaped spout. Dependingon the sample, either a glass or a plastic weighing boat is
more suitable. The important point is that the sample flowseasily out of the boat so that the opening can be closed againas quickly as possible.
Pastes, greases Here wide-necked Pasteur pipettes are suitable (disposableplastic pipettes) or syringes without a needle. Slight warmingfacilitates uptake by the pipette.
Normally, several samples can be titrated in succession in the same solvent.
A sluggish end to the titration or a DRIFT that is too high or an excessive subsequentconsumption after the titration can be caused by the following:• Sample dissolves only slowly or poorly: vary solvent, use less sample. Prolong
stirring time. Pulverize sample.• Water is very tightly bound by the sample matrix: vary solvent, titrate at higher
temperature. Predry in the DO301 or DO302 Drying Oven (see applications).• Side reactions also require titrant: titration in cooled solvent, vary solvent or titrant.
• Loading limit is reached: change solvent (see section 7.2).
15. MaintenanceWarning
Never leave unreacted titrant in the titration vessel for a lengthy period as parts madeof silicon such as the septum and tubing connections of the suction tube can beattacked.
Electrode With time, certain Karl Fischer reagents and samples have anadverse effect on the response behavior of the electrode.The end point recognition is then delayed so that the solutionafter the end point is brown and not yellow. Clean theelectrode for a few minutes in an ultrasonic bath withdeionized water or ethanol or place it for 60 seconds inchromic acid and then rinse it with water or ethanol (dry wellbefore use).
Molecular sieves Depending on the moisture content of the ambient air, themolecular sieves in the drying tubes become ineffectivewithin 2 to 12 weeks. They can be dried spread out in adrying oven at 160 - 300 °C for at least 24 hours. Themolecular sieves mounted on the waste bottle contain bothwater and SO2. Rinse these with distilled water beforeregeneration.
Titration stand Ensure that the inside of the titration head together with theinternal fittings (electrode, burette tip, etc.) is as free fromsolvents as possible: When the titration stand is open, wettedareas adsorb water from the air and this then causes arelatively large drift owing to slow back diffusion.
Burette Clean burette cylinder, piston, stopcock and tubingperiodically with ethanol:Never place the parts in a drying oven at a temperaturehigher than 40 °C!Never place O-rings and rubber gaskets in organic solvents!Lightly grease the piston rod with silicon grease as protectionagainst corrosion.Replace the piston if it leaks or its edge is scored.To achieve a better seal, lightly grease the stopcock withsilicon grease (see section 13.3.4).Replace the rubber gasket of the stopcock relatively often; itbecomes hard with time.Remove air bubbles at the piston surface by removing theburette from the guide and tapping it gently. The air bubblesrise to the top. Then rinse the burette.Remove air bubbles in the tubes by tapping them with yourfingers while titrant is being siphoned off or dispensed. If thisdoes not help, undo the suction tube so that the titrant flowsback into the bottle, screw it on again and rinse the burette.In obstinate cases, unscrew bothtubes, rinse with deionizedwater and ethanol and dry with oil-free compressed air or invacuum.
16. Technical dataPrinciple Volumetric water determination by the Karl Fischer method.Endpoint indication Voltametric: voltage measurement at a polarized double
platinum pin electrode.Control Kinetically controlled by microprocessor.Measurement range 10 µg – 500 mg water, a few ppm to 100%.Resolution 1/2000 of a burette. This corresponds to 25 µg water with a
10 mL burette or 12.5 µg water with a 5 mL burette.(Concentration: 5 mg H2O/mL.)
Result Automatic reconciliation of the sample weight in the watercontent calculation in %, %dm, ppm or mg.
Accuracy Better than ±0.3% with sufficient sample and accurateweighing and if the water is freely available.
Reagents All common pyridine-containing and pyridine-free reagentscan be used.
Analysis time Typically 1–2 minutes if the water is freely available.Solvent dispensing/ Addition of solvent and emptying of the titration vesselsuction device By a diaphragm pump.Auxiliary functions Determination of the titrant concentration.
Determination of the DRIFT.Exact dispensing using interchangeable burettes.
Data connections for Serial by bit current loop data interface for all Mettler-Toldeo
balances/scales with data output CL and 03 (e.g. ATbalances) and Mettler-Toldeo GA42 alphanumeric printer oran Epson-compatible dot matrix printer, analog output for linerecorder, Option RS-232-C for a computer.
Self monitoring By microprocessor.Magnetic stirrer Built in, with variable adjustment.Keypad Splash waterproof.Plastic parts Polyester (housing), polypropylene (titration stand, other
parts).Width x depth x height 25 x 35 x 27 cmWeight approx. 5.5 kgAmbient temperature 10...35 °CPower supply 100/120 V 230/240 V (+10%/–15%) 50/60 Hz*Power consumption 600 mA 300 mADate/time Display and alteration of time and date.Methods 50 freely selectable methods.Total titrant Setting of upper limit of total titrant consumption forconsumption several samples.
17. Accessories
17.1 Standard equipmentOrder No.
1 DL35 basic instrument with titration stand incl. –spare fuse
1 Set Operating Instructionsin accordance with your order see opt. accessories
1 Application Brochure METTLER methods 724326DL35 Karl Fischer Titrator
1 Memo card in accordance with your order see opt. accessories
1 Power cable in accordance with your order see opt. accessories
1 Interchangeable burette 5 mL DV905incl. burette piston, piston rod,burette holder, tip holder, dispensing andsuction tube, tube of silicon grease
1 Drying tube holder 23915
1 Diaphragm pump 23920
1 Solvent dispensing tube 23903
1 Suction tube with tubing 23904
1 Tube and O-ring set 23946(spare material: wear parts of suction tube)
4 Tubes for air lines 23975
2 Screw caps (1)* 239372 Gaskets (1)* 23981
4 Drying tubes with cover (1)* 23961
1 Bottle molecular sieves 250 g 71478
1 Double platinum pin electrode DM142
1 Magnetic stirring bar 71479
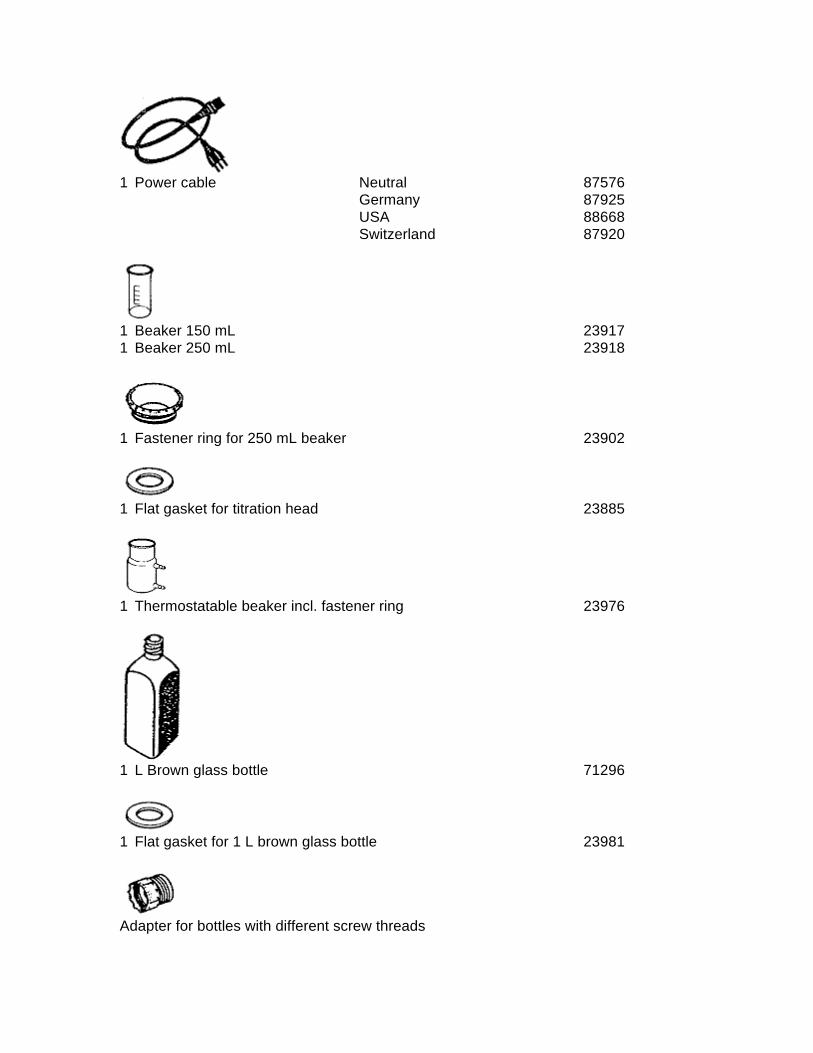
1 Beaker 150 mL 23917
1 Glass stopper 71469
* The order numbers refer to 1 item
1 Septum ST24Set of 10 23950
1 Phillips screwdriver No. 2 73072
17.2 Optional accessories
1 Set operating instructions German 704649English 704724French 704725
1 Memo card German 704743English 704744French 704745Spanish 704749Italian 704750
1 Power cable Neutral 87576Germany 87925USA 88668Switzerland 87920
Weighing boat, glass, Ø 20 x 60, set of 5 23951Weighing boat, glass, Ø 30 x 80, set of 5 23952Weighing boat, PE, Ø 25 x 65, set of 5 23953Weighing boat, PE, Ø 38 x 100, set of 5 23954
Syringe 1 mL, pack of 100 71492Syringe 10 mL, pack of 100 71482
Injection needle 80 x 1.2 mm pack of 12 71483Injection needle 80 x 0.8 mm pack of 100 71484
1 Three-hole adapter with ST10 and ST7.5 and 23982needle hole and the appropriate stoppers
1 Set stoppers for three-hole adapter 25883
comprising: 1 ST10 stopper
1 ST7.5 stopper6 Needle hole stoppers
Microfuses 400 mA*slow-blow for 230/240 V Set of 3 51367
Microfuses 800 mA*slow-blow for 100/120 V Set of 3 20182
1 Connection cable for Mettler-Toledo AE balances 23778
1 Connection cable for Mettler-Toledo PM, AM, AT balances 23618
1 Data output RS-232-C (DCE) 23955
1 Connection cable for RS-232-C interface, 2 mmale – female 59342male – male 59348
1 Interchangeable burette 5 mL DV90510 mL DV91020 mL DV920
1 Piston, packed for DV905 23710DV910 23711DV920 23712
1 Piston rod 23636
1 Burette body 5 mL 25724incl. stopcock 10 mL 25708
20 mL 25725
1 Burette holder 23645
Stopcock parts: Valve disk 101003(1 of each) Rubber gasket 25737
Follower cam 25715Threaded ring 25716
1 Light protection tube 23644
1 Dispensing tube with siphon tip, 70 cm 25687Order No.
1 Suction tube, 83 cm 25688
1 Holder for burette tip 23960
1 Tube silicon grease (stopcock grease) 71300
1 Drying oven 120 V DO301230 V DO302
Application BrochuresWater determination following Karl Fischer German 724349Theoretical and practical fundamentals English 724350
Water determination following Karl Fischer in foods, German 724477beverages and cosmetics English 724478
Water determination following Karl Fischer in chemicals, German 724353solvents, mineral oil products and plastics English 724354
METTLER methods DL35 Karl Fischer Titrator German 724325English 724326
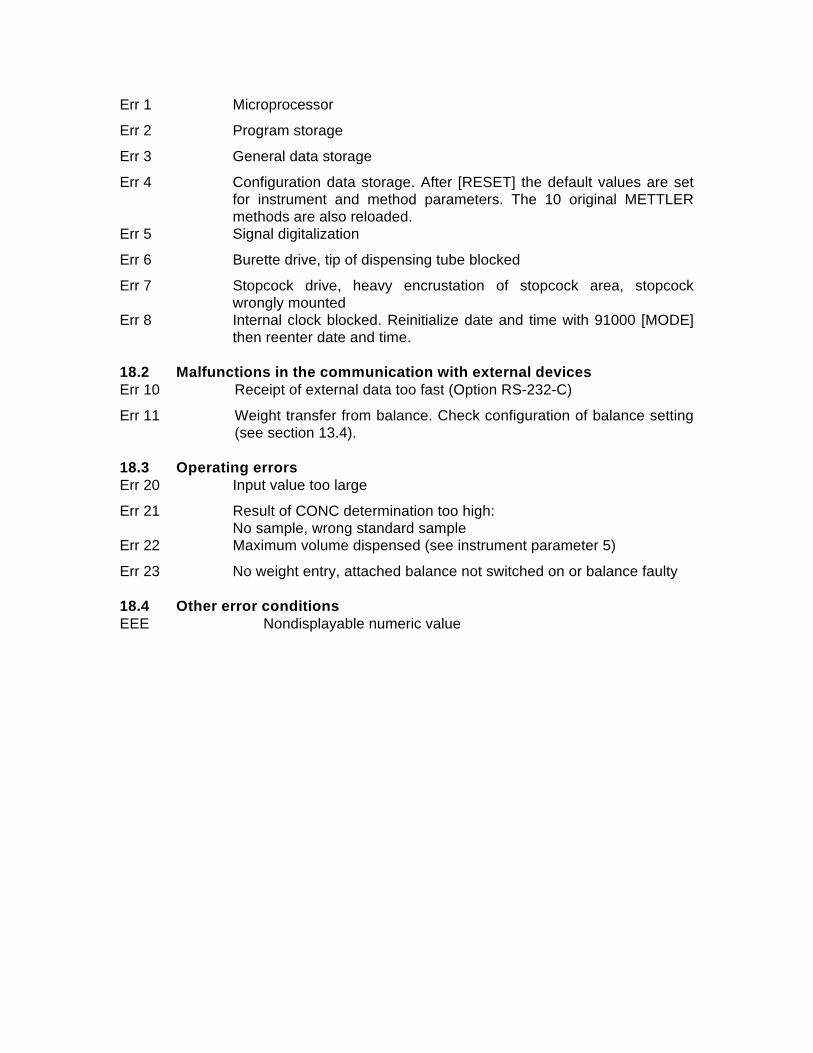
18. Malfunctions and their causes
18.1 Instrument malfunctionsThe error condition is rectified with [RESET]. Please note error code.On reoccurrence, the instrument must be serviced by METTLER service.
Err 1 Microprocessor
Err 2 Program storage
Err 3 General data storage
Err 4 Configuration data storage. After [RESET] the default values are setfor instrument and method parameters. The 10 original METTLERmethods are also reloaded.
Err 5 Signal digitalization
Err 6 Burette drive, tip of dispensing tube blocked
Err 7 Stopcock drive, heavy encrustation of stopcock area, stopcockwrongly mounted
Err 8 Internal clock blocked. Reinitialize date and time with 91000 [MODE]then reenter date and time.
18.2 Malfunctions in the communication with external devicesErr 10 Receipt of external data too fast (Option RS-232-C)
Err 11 Weight transfer from balance. Check configuration of balance setting(see section 13.4).
18.3 Operating errorsErr 20 Input value too large
Err 21 Result of CONC determination too high:No sample, wrong standard sample
Err 22 Maximum volume dispensed (see instrument parameter 5)
Err 23 No weight entry, attached balance not switched on or balance faulty
18.4 Other error conditionsEEE Nondisplayable numeric value